1
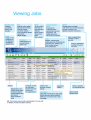
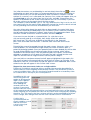
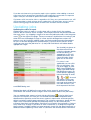
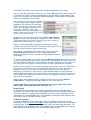
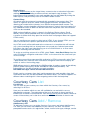
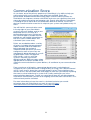
ClaimWatch v2.7.1
User Manual™
Important Notice
Information in this document is subject to change without notice.
No part of this document may be copied or reproduced or transmitted in any form or
by any means (electronic or mechanical) for any purpose without the express written
permission of ClaimWatch Limited.
© 2009 ClaimWatch Limited
Contents
Viewing Jobs page 2
Main Job List Screen page 3
Customer Tracking Page page 4
Entering New Jobs page 5
Updating Jobs page 7
Courtesy Cars List All Cars page 9
Courtesy Cars Add Courtesy Car page 9
Courtesy Cars Edit Courtesy Car page 10
Courtesy Cars Courtesy Car History page 10
Courtesy Cars Courtesy Car Calendar page 10
Edit Edit Colours page 10
Edit Edit Manufacturers page 10
Edit Edit Models page 10
Edit Edit Customer Details page 11
Edit Edit Bodyshop page 11
Edit Edit Operatives page 11
Edit Edit Repair Stages page 11
Providers Add / Edit / Remove page 11
Providers Edit / Remove Providers page 12
Providers New Uplift Jobs page 12
Providers Accepted Uplift Jobs page 12
Providers Declined Uplift Jobs page 12
Providers Cancelled Uplift Jobs page 12
Tools 10 Day Rolling 13
Tools Auto SMS Setup page 13
Tools Auto Email Setup page 14
Tools Import / Export page 14
Tools Reports page 15
Tools News Tickers page 15
Tools Sponsored Links page 15
Tools Main Screen Setup page 15
Jobs Current Jobs page 16
Jobs Pre-booked Jobs page 16
Jobs Finished Jobs page 16
Jobs Delete a Job page 16
Jobs Potential Jobs page 16
Jobs Print Jobs On Screen page 17
Jobs Print Unfinished Jobs page 17
Help User Manual page 17
Help FAQs page 17
Help Tech Support Forum page 17
Help Bodyshop Messages page 17
Help About ClaimWatch page 17
Communication Score page 18
Logout page page 19
Main Job list screen
Tool bar
Refresh the list of repairs
Opens a printer-friendly repair list
Quick link to the reporting suite
Turns the filter on
Quick link to the SMS setup screen
Quick link to the auto email screen
Exports current job list to CSV file.
Log out of ClaimWatch
Customise the main repair list
You can choose which fields to display in the main repairs list and in what order they
appear. Select the Tools menu and then Main Screen Setup to change from the
default order which is described below.
Sort by column heading
You can sort the main repairs list by vehicle name, registration, work provider,
Booked in Date and so on. This is done by clicking the appropriate title in each
column.
Filter repairs list
You can filter the main repairs list by the fields you have selected for filtering in the
Main Screen Setup - by default these are work provider, repair stage and operative.
Select the item you want to filter on from the drop-down box below the title of each
column. You can return to the full list by clicking on Back to Full List at the bottom of
the screen or by selecting ‘All’ from the drop-down boxes. Once the list is filtered,
repairs can still be sorted by clicking the appropriate title in each column. Turn off
filtering by clicking on
Job status
Within the main table, clicking the repair status of a job moves it to the next stage of
repair. This is a shortcut instead of going into the Update Repair Screen and
updating the status from the drop-down list.
A mobile phone symbol will appear in the repair status column for each SMS
message that has been received by the client. Hover over the mobile phone symbol
to read the body of the message.
Work provider
Single click on the work provider name to display contact details and work provider
page hit counts for that work provider. Click on Provider page to see the work
provider view.
Owner names
Single click on the owner’s name to display customer details including their unique
access code and customer tracking page hit count. The access code allows the
customer access to their vehicle’s repair status page within your website. If a
customer’s email address or mobile phone number has been entered, the customer
will be automatically sent their access code. Red stars (*) will appear by the owner’s
name if that customer has not yet been informed of their access code. Once they
have been given their access code, click on the link in the Customer Details screen
to record the fact that they have been informed.
3
From the customer details screen you can also access the customer contact diary
where you can send additional emails and SMS messages and record other
customer contact.
To edit a customer's details click on Edit Details or to view the customer tracking
page click on Tracking Page.
Registration
Single click on the registration number to display vehicle details and the job history
(the date and time that the vehicle moved into each stage of repair). From the
Vehicle Details screen you can click on the link to amend the job history if
necessary.
Operatives (Op)
The initials of the operatives currently working on the repair job.
Courtesy / Hire car (CC)
A car symbol will appears in the courtesy car column if the customer has been
allocated a courtesy car or hire car. Hover over the car symbol to see the courtesy
car registration number if a car has been allocated. Courtesy cars will appear black
and hire cars will appear red.
Notes
The main repair list contains notes about the repair job which are only viewable by
the bodyshop. If the notes are extensive, only the first few words are shown but the
full text can be viewed by hovering over the note.
Search
If the list of current repairs is extensive and you wish to locate a specific job, enter
the registration number in the search box in the top right-hand corner of the screen
and click on
. You can search using a full registration number or any part of a
registration number. Return to the full list by clicking Back to Full List at the bottom
of the screen or turn off the search by clicking
.
Number of jobs contained in any view of the main job list screen appears in brackets
in the green bar.
Customer Tracking Page
Home Page/Logout
Home page and logout links appear in the top right hand corner of the screen. The
home page is the bodyshop's own website where applicable, otherwise the initial
page of the bodyshop's ClaimWatch system.
News Tickers
The scrolling ticker messages can be created, edited, suspended and deleted in the
News Tickers screen. Customise the tickers to carry your latest news or promote
and advertise services at your bodyshop.
Repair stage
The vehicle repair status is shown with a car graphic which fills in as the repair
progresses. The stage names can be edited in the Edit Repair Stages screen. A
more detailed explanation of each repair stage is displayed in a text box when the
repair stage names are rolled over. This text can also be edited in the Edit repair
Stages screen. The car image changes for certain manufacturers and models.
Tailored images are shown for Audi, BMW, Jaguar, Land Rover, Lotus, Mercedes
Benz, Peugeot, Porsche and Vauxhall owners.
Feedback
Upon collecting their vehicle customers who return to the tracking page will be given
a Customer Service Index (CSI) form to complete in the form of a pop up window.
4
This form will invite them to offer their feedback in the areas of quality, cleanliness,
attitude and communication. An additional comments field will also be available.
Results will be stored and available as reports within the reporting area of
ClaimWatch. To increase the percentage of customers who complete this feedback
we recommend utilising ClaimWatch's aftercare SMS facility. (See - Tools Auto SMS
setup).
Contact
Customers can contact the bodyshop using the email contact form. The customer is
required to enter their email address (this is pre-filled where the bodyshop has
recorded the customer's email address already). The email is sent to the bodyshop
and recorded in the Contact Diary. Customers can also complete a feedback form
which is emailed to the bodyshop and recorded in the Contact Diary.
Customers who have not supplied their mobile number can enter it to receive SMS
updates about the repair.
Information
The car make and model, colour, insurance excess amount and whether insurance
approval has been received for the repair are displayed.
Status
Status information includes customer tracking page comments (not bodyshop
notes) and the estimated completion date.
Payment accepted
Methods of payment accepted e.g. Visa, Mastercard, Switch can be recorded in the
Edit Bodyshop screen.
Sponsored Links
Sponsored links can be created, edited, suspended and deleted in the Sponsored
Links screen. Use the links to promote special offers and services, or sell as
advertising space to third parties. If a web address is included, customer clickthroughs are recorded and can be viewed in the Sponsored Links screen.
Sponsored links can be configured to display on all pages or only those for specific
Insurer's repairs.
Please note: sponsored links do not appear on insurer branded tracking pages.
Entering New Jobs
To enter a new job
Enter the new vehicle registration in the box in the top right of the screen next to the
search facility and click
. You will then be prompted to add the customer and
repair details (the mandatory fields are in red).
If a mobile number or email address is entered, this customer will automatically
receive SMS and email updates. If an auto SMS or email would be triggered by
adding the job,
or
will appear at the bottom of the customer details form.
Hover over these icons to read the message and remove the tick from the box if you
wish to prevent the auto email/SMS being sent.
If you need to add an unlisted car model, choose ‘other’. On the next page, you will
be able to type in a new model and select an existing or type a new manufacturer.
This will automatically be saved to the database.
The Booked in Date will be filled with the current date but you can click on
to
select a new date. If possible, add an estimated completion date as this appears in
auto SMS messages and on the customer tracking page.
If you wish to allocate a courtesy car, either tick the Yes (no details supplied) box or
5
Yes (allocate courtesy car and booking in and out dates) then click on
to select
the booking out date and in date. It is recommended that you enter the booking in
date so the courtesy car can be allocated to other customers, however it can be
omitted. If a courtesy car is allocated, the Courtesy Cars screen will appear after you
click Add Job so you can select from the list of cars available. Choose from the
options at the bottom of the screen to record who the car is insured by. If you wish
to assign a hire car to the repair check the hire car box.
The mandatory vehicle on site ‘yes’ or ‘no’ flag. Whenever this flag is set to ‘on-site’
the stage history for the repair will be updated to include the time the vehicle arrived
on site, providing more accurate and detailed cycle time data.
Any extra information about the repair job can be entered in the notes field; these
will only be viewed by the bodyshop. If you use other systems and wish to record
the job and estimate reference numbers, enter them in the appropriate fields. Enter
the claim number and excess amount if known and click Add job.
If you want to save the job as a 'potential job' (i.e. a job that may or
may not actually end up as a live job), then simply check the 'potential
job' check box. This will save all details of the job with in the 'potential
jobs' view accessible from the Jobs - Potential Jobs menu item on the main
screen.
Potential jobs cannot be moved through the repair stages. However, unless you
have disabled it, an auto SMS message will be sent to the customer upon a
potential job being loaded. Once your potential job has been loaded you will be able
to send ad-hoc SMS or email communication to the customer which will be
recorded in the contact diary. From the potential jobs view repairs can be either
deleted or accepted as a live repair. At this point the job is moved into the main
repair list and the normal stage/customer contact process begins.
Your new job has now been entered and will appear highlighted in the repairs list.
The status of repair will automatically be set to the first stage, e.g. Estimate. If the
Booked in Date was a future date, the job will appear in the Prebooked Jobs screen
otherwise the job will appear in the Current Jobs screen.
Support for two concurrent claims on a single vehicle.
Previously ClaimWatch would not allow a second claim record to be added for a
vehicle where a current ongoing record already existed. This limited the system in
cases of multiple claims. You can now load a second record for a secondary claim
on a vehicle that is already in your current jobs list.
In addition to this you
will also be given the
option to ‘Synchronise
repair status updates
with existing claim’
when adding the
second claim to the
system. If you check
this box then the status
of the second record will automatically be synchronised to the status of the primary
record, allowing you to update the status for one claim whilst automatically updating
the other. This also means that the customer will only receive one SMS or email per
status change, even though there are two claim records active in ClaimWatch.
A claim that is
synchronised will be
clearly noted by a small
red star next to its
current status (see
screen shot).
6
If you do not choose to synchronise repair status updates when adding a second
concurrent claim record then ClaimWatch will handle the two records as separate
repairs and you will need to update them both independently.
Customers with two active claims, regardless of if they are synchronised or not, will
still be provided a single unique access code which will give them access to their
online tracking page, where details of both claim numbers will be available.
Updating jobs
Updating the status of repair
Updating the status of repair is usually done with a single click in the updates
column, but for all other status changes, for example to move the job forward more
than one status - by skipping a stage or to move the job backwards, click the green
arrow
to the right of the page. There are numerous implications to moving a job
other than one chronological stage at a time and this dialogue box makes the
process easy, by intuitively adding stages and timing and communication options
for you. In the new dialogue box (shown below), just click the left column at the
stage you now want the job to be at - (in red) and ClaimWatch will add or delete
appropriate stages.
You should just glance at
the date column and
using the calendar button,
revise the date(s) as
appropriate as this will
update job history and
communication which
goes out to the driver.
If a status is not
applicable you can click
the n/a check box. You
can also trigger an auto
SMS, internal SMS (see
'Tools Auto SMS Setup /
Edit SMS messages' for
further details regarding
internal texting) or email,
,
or
for each
will appear. Hover over
these icons to read the
message and remove the
tick from the box if you
wish to prevent the auto
email/SMS being sent.
Moving jobs back will deliver the new earlier status correctly, and of course
Claimwatch still records all the changes which have been made in the job history.
You can update other aspects of each job by clicking on
in the far right-hand
column in the repairs list. Here you can amend the estimated completion date,
deadline date, operative, enter the excess amount, repair notes and overtype the
default customer tracking page comments.The customer comments, along with the
repair status information (except the bodyshop notes) can be viewed by the
customer from their tracking page. Comments are stored in the customer's Contact
Diary when they change. If you wish to send a comment as an SMS message and
the customer's mobile number has been entered, simply tick the Send comment as
SMS box before updating. Please note: if comments are altered, default comments
7
will not be used unless they revert to the standard wording for that stage.
You can also add and remove courtesy cars when updating a job. If the courtesy car
is currently out to the customer, the booking in and out dates can be edited. If the
courtesy car has been returned, the previous booking is shown below and another
courtesy car booking can be made.
You can flag any repair for the attention
of various operatives. Repairs can be
flagged for the attention of workshop
staff, stores (parts), estimators, admin
staff or just for general attention. This
will assign a different colour flag
symbol to your main screen against the
repair as long as you have ‘Flag’ active
in your main screen set-up.
To add ‘Flag’ to your main screen select Tools – Main Screen
Setup from the main ClaimWatch navigation and then add the
‘Flag’ field to the main screen. You can then move it along to
position the column where you want it.
Repairs can be ordered by flag type by clicking on the flag
symbol at the top of the column. To remove a flag simply click on
the flag symbol and then select remove flag.
If a vehicle is uneconomical for repair select ‘write off’ in the
Status of Repair drop-down list. You will be prompted to
confirm this action and the customer tracking page will update
accordingly.
To cancel a repair, select ‘Cancelled’ from the Status of Repair drop down list. This
a specific non-editable repair status called which will automatically move a repair to
your finished jobs and flag it as having been cancelled, allowing you to store it in an
accurate status, but keep any contact records or notes applicable to the repair.
Where you have given access to work providers to view their work via a ClaimWatch
interface or if you receive work via ClaimWatch directly from a work provider it is
important that you can use the system to communicate issues with them as
effectively as possible. As such there is a field labelled ‘Notes for work provider’.
Notes added here will be easily accessible by work providers via their own interface
and should further reduce the need for unnecessary telephone calls from them to
check up on job progress.
When repairs are complete and the vehicle has left the site, tick the Vehicle
collected box. The job will no longer appear in the current jobs list.
If you simply wish to move a job onto the next stage of repair, click on the
repair status of that job within the main jobs list.
Stage History
As a vehicle moves through each stage of the repair cycle the date and time is
recorded. The stage history can be accessed by clicking on the vehicle registration
in the main repairs list and can be amended if necessary. This information can be
viewed by your work providers but can be hidden by ticking the Hide capacity and
job history? box on the Edit Provider screen.
All Status Changes
If a job is rolled back to an earlier repair stage, the original stage history will be
overwritten. Click on All status changes on the stage history screen to view all repair
stage changes and the associated Operatives, both forwards and backwards. This
information can be viewed by your work providers but can be hidden by ticking the
Hide capacity and job history? box on the Edit Provider screen.
8
Repair history
Click on Repair history on the stage history screen to view a calendar of all events
relating to a repair, including customer contact and repair stage changes. This
information can be viewed by your work providers but can be hidden by ticking the
Hide capacity and job history? box on the Edit Provider screen.
Contact Diary
All contact with the customer is automatically recorded in the contact diary. This
shows at a glance all emails, SMS, tracking page comments and phone calls,
allowing you to deal with customers in an efficient and professional manner. The
contact diary can be viewed by clicking on the owner’s name in the main repairs list.
Any additional emails or SMS can be sent from here and phone calls and customer
visits can be recorded.
SMS and email delivery status is shown in the Delivery Status column. Email
delivery status will be updated when the customer opens the email (unless the
customer is offline when they open the email or their mail program does not support
HTML emails)
You can configure your emails as plain text or HTML. If you choose HTML you can
select to include all or specific sponsored links within these emails.
Any HTML emails will be delivered to the customers in a template that will include
any system branding that has already been set-up and your selected sponsored
links down the right hand side allowing you to use ClaimWatch as an even more
powerful marketing tool than before.
To assign an existing auto-email as HTML select Tools – Auto Email Setup from the
main ClaimWatch navigation and selcet ‘HTML’ as the format for the auto-email you
wish to change.
To configure an existing sponsored link to display in HTML auto-emails select Tools
– Sponsored Links from the main ClaimWatch navigation and check to display on
emails as well as the tracking page.
SMS delivery status is updated by the SMS provider at various stages in the delivery
process (SMS tracking may not be available for some SMS providers). This
information can also be viewed by your work providers.
N.B. SMS messages cannot exceed 160 characters.
Emails sent by customers from their tracking page or by work providers from their
ClaimWatch area will also be recorded in the contact diary. This contact appears in a
different colour to distinguish it from outgoing contact from the bodyshop.
Courtesy Cars List
List All Cars
You can view all your courtesy cars from within the Courtesy Cars menu, by
selecting List All Cars.
Here you can monitor which cars are still available for use and which cars are
allocated to customers. The registration of the car in for repair is shown and this is
linked to the customer’s contact details. Click on Print list to print the details shown on
screen. If the courtesy car is due for a service or MOT, the due date is show in red.
Courtesy Cars Add / Remove
Add Courtesy Car
To add new courtesy cars, go to the Courtesy Cars menu and select Add Courtesy
Car. Here you can enter new additions to your courtesy car fleet. You will be
prompted to enter each car’s registration, colour, transmission type, mileage, service
9
due date and MOT due date and then to confirm that each has been entered
correctly.
Removing Courtesy Cars
A courtesy car can only be deleted if it is currently not in use. Deleting
a courtesy car will also delete all the history for that car however. To
avoid this, if a car is no longer available, tick the Out of service? box and it will not
be listed in capacity counts or when allocating cars to customers.
Courtesy Cars Edit
Edit Courtesy Car
If a courtesy car’s details have been input incorrectly or their details have changed,
select Edit Courtesy Car from the Courtesy Car menu. Select a specific courtesy car
by selecting the appropriate registration number from the drop-down menu and
press Update to save any changes. If a car is no longer available, tick the Out of
service? box. The car will not be listed in capacity counts or when allocating
courtesy cars to customers. Click on Courtesy Car List to go to the courtesy cars list
screen.
Courtesy Cars History
Courtesy Car History
From the Courtesy Cars menu select Courtesy Car History to view a full list, so you
can see who was in possession of a courtesy car on a specific date. This table is in
date order. To view a particular courtesy car’s history, use the drop-down menu to
select its registration. Click on the customer’s name to obtain their contact details. If
you wish to save the list to your computer, you can archive the list up to a specific
date by selecting a date from the calendar and pressing Archive. You will be
prompted to save the archived months to your computer.
Courtesy Cars Calendar
Courtesy Car Calendar
Within the Courtesy Cars menu, select Courtesy Car Calendar to view a graphical
representation of Courtesy Car allocation and availability between two dates. You
can amend the dates to show Courtesy Car allocation over a longer or shorter
period. If a booking out and in date has been entered the allocation will be shown by
a dark grey bar between the allocation dates; if a booking in date is not entered the
bar will extend to the end of the calendar. The registration of the customer that the
car is booked out to appears in the grey bar; click on the registration for customer
details. The courtesy car registration on the left of the screen links to the Courtesy
Car History screen.
Edit Colours
Edit Colours
To edit the colours list, select Edit Colours from within the Edit menu. Here you can
overtype colours in the list to amend spelling and add more specific colours. You
can only delete a colour if it has never been allocated to a vehicle.
Edit Manufacturers / Models
Edit Manufacturers
The ClaimWatch database is filled with an extensive list of manufacturers and
models. However, as new manufacturers emerge, it may be necessary to add new
10
details. From within the Edit menu you can add a new manufacturer and the details
will instantly be saved for future use.
Edit Models
From within the Edit menu you can add a new vehicle model and the details will
instantly be saved for future use.
Edit Customer Details / Bodyshop
Edit Customer Details
If a customer’s details have been input incorrectly or their details have changed,
select Edit Customer Details from the Edit menu. Here you can select a specific
customer’s name by clicking the first letter of their name as entered in the customer
details and clicking on the appropriate edit link. Pressing Update will automatically
save any changes. If you wish to contact a customer after repair work on their
vehicle has been completed, you can find them within ClaimWatch’s database using
this menu.
Edit Bodyshop
If you need to amend your bodyshop’s details, change your username and
password or update your vehicle capacity, select Edit Bodyshop from the Edit
menu. You can also fill in the methods of payment accepted by the bodyshop which
is displayed on the customer tracking page. Simply press Update to save changes.
Edit Operatives
Record the initials of the operatives who work on each repair stage in the Edit
Operatives screen. You can add as many operatives to each stage as required. If an
operatives is designated the default for that stage, their initials will automatically
appear on the main repair list when a repair job moves into that stage. You can edit
or delete operatives by selecting a repair stage then updating the initials as
appropriate.
Edit Repair Stages
Amend the name and default comments for each repair stage in the Edit Repair
Stages screen. There are 10 stages in ClaimWatch; the final stage is uneconomical
to repair but this can be reworded and the other stages can be changed to suit your
bodyshop. The repair stage names appear on the car diagram on the customer
tracking page. The default comments also appear on the customer tracking page
unless a custom comment has been added. However if custom comments are
reverted back to the default wording for the stage, default comments will continue to
be used.
Icons show at which stages auto SMS text messages and auto emails are sent.
Providers Add / Edit / Remove
Add Work Provider
To add a new work provider, within the Providers menu, select Add Provider. Enter
the new work provider’s details, allocating a username and password. The
username must be unique to each work provider. They will then be able to use
these secure login details to access the ClaimWatch part of your website and view
all of their insured vehicles currently undergoing repairs at your bodyshop. If you tick
the Capacity Hidden box, the work provider will not be able to view your bodyshop
capacity and courtesy car availability for the next 10 days. When you press Submit,
your new work provider’s details are instantly saved to ClaimWatch’s database.
11
Edit / Remove Provider
If you wish to amend or remove a work provider’s details, within the Providers menu,
select Edit/Remove Provider and select the work provider’s name from the dropdown menu. Here you can delete or update details as necessary. If you tick the
Capacity Hidden box, the work provider will not be able to view your bodyshop
capacity and courtesy car availability for the next 10 days. You can also re-enter
new username and password details if required.
New Uplift Jobs
Work providers can upload details of a repair job directly into ClaimWatch,
preventing double-entry and saving time spent on unnecessary faxes and phone
calls. If a work provider uses this facility you will be notified in the main repairs list
that there are uplift jobs waiting. To move the uploaded job into your current
workload simply click
against the appropriate vehicle. You will then be prompted
to accept it as a live or potential jobs where it will then appear in the appropriate
repair list. To decline the job click
. You can add comments to the uplift for the
work provider to view by clicking on
and then clicking Add Comment. The work
provider will be able to view comments and see that the status of the repair job.
You can enter an email address and a mobile number for any customer before
accepting the job from the work provider. This ensures that, if these details have not
been provided, you can enter them into the system yourself before the job is made
live and ensure the customer receives any first stage auto contact from ClaimWatch,
that they otherwise wouldn’t. Simply open the job details of the uplifted job and
where a mobile or email address does not exist you will be able to add it via the job
details page..
There is a ‘Save as PDF’ option available in the job details window, accessible from
the top right of the page. This will allow you to save or open a PDF copy of the job
details to print or store electronically.
When accepting uplifted repairs as ‘Live’ repair, you are required to enter a booking
in date and specify if a courtesy car or hire car is to be assigned to this customer. If
you do not have this information at this stage you can either wait until you have
contacted the policy holder to accept the repair or you can accept the uplift as a
potential job until such time as you have arranged a booking in date. If the booking
in date is different from the date of uplift this will be put into the pre-booked jobs
section. To find this select Jobs – Pre-booked jobs from the main ClaimWatch
navigation. When the date of the job has arrived the jobs will automatically move to
your current jobs view.
Accepted Uplift Jobs
View details of uplifts previously accepted. You can add comments for the work
provider to view by clicking on
and then clicking Add Comment.
Declined Uplift Jobs
View uplifts which you have previously declined. When the work provider has viewed
a declined job they can delete it from the system.
When declining an uplift job you are required to select a reason from a pre-built list.
This reason is then delivered to the work provider and should hopefully result in
them being able to re-assign the job without the need to contact you for about it.
Cancelled Uplift Jobs
You will be notified by a banner on the main screen about any jobs in your current
repairs that have been cancelled by work providers. You can view uplifts which you
have accepted and the work provider has subsequently cancelled; you will be
prompted to delete the repair from your current jobs.
12
Tools 10 Day Rolling
10 Day Rolling
Select 10 Day Rolling from the Tools menu and a table displaying your capacity and
courtesy cars available over the next ten days will appear. The information here is
based on the total capacity figure entered in the Edit Bodyshop page and the start
and estimated completion dates entered for each job. Work providers can also view
your 10 day rolling capacity unless you have ticked the Hide Capacity? box in the
Edit/Remove Provider screen.
Tools Auto SMS Setup
Automated SMS Messages
By default, six automated SMS messages will be sent to a customer whose mobile
number has been entered, updating them about their vehicle's repair status. Five of
these will be sent during the repair cycle and a final one will be sent 2 days after the
vehicle has been collected as an aftercare SMS. To view, change, delete,
deactivate or add further SMS messages, select Auto SMS Setup from within the
Tools menu.
SMS ‘from’ name is updateable
When you send any SMS message, the name at the top of the message is limited to
11 characters. SMS messages sent from your ClaimWatch system will use the first
11 characters from your bodyshop name as a default. If this is not suitable for you
then you can
select an
alternative
abbreviated na
me by selecting
Tools – Auto
SMS Setup from the main ClaimWatch navigation and updating the SMS label field.
SMS Message Credits
When your SMS messages are running low, you will be prompted at the top of your
jobs list to purchase more. Click on the link provided to go directly to the Auto SMS
Setup page displaying your remaining credits and a field in which to type the
number of blocks (of 1000) you wish to purchase. Payment can be made by debit/
credit card via our secure payment gateway, where you will be credited instantly
with your SMS credits and a payment receipt emailed to you. Alternatively should
you wish to pay by cheque you can print an order form off and send us payment by
mail. However, SMS credits will not be credited to your system until payment has
been received. You can set the level at which the warning message appears; by
default it is set to 50.
Report
A report of the number of SMS for each delivery status is displayed at the bottom of
the screen.
Tools Auto SMS Setup / Edit SMS
messages
Customising the SMS wording
From the SMS setup screen click on the link to edit SMS messages. To amend the
wording of the messages simply over-type the text in the appropriate box on the
right and click Update. You can create any number of new auto SMS messages at
each repair stage by selecting the repair stage to trigger the SMS, entering the
message in the box and clicking Add SMS. You can also create templates to use
when sending ad-hoc SMS messages.
13
Please note: if the repair stage changes, auto SMS messages will always be sent
even if repair is going backwards or that auto SMS has already been sent.
ClaimWatch allows you to create even more personalised SMS messages by
including variables such as the customer's name. The variables are key words inside
<>. When the SMS is sent, the variables are replaced with the appropriate
information. The full list of variables is displayed on this screen including their set
character length.
N.B. SMS messages cannot exceed 160 characters.
Claimwatch also provides you with default SMS text that can be sent to an
internal mobile at the point of a repair being written off. By default this
SMS is deactivated. To activate the internal SMS click on the 'activate'
link in the 'Internal SMS message' box. You will also need to ensure that an
internal mobile is added to your main bodyshop details by going to Edit Edit Bodyshop. When this SMS is activated and an internal mobile number
exists, this SMS message will be sent to the internal mobile number whenever a
repair is moved into the write off stage.
Tools Auto Email Setup
Automated Emails
By default, an automated email will be sent to a customer whose email address has
been entered, informing them about their tracking page. To view, change or add
further auto emails, select Auto Email Setup from the Tools menu. To amend the
wording of the emails simply over-type the text in the appropriate box on the right
and click Update. You can create any number of new auto emails at each repair
stage by selecting the repair stage to trigger the email, entering the message in the
box and clicking Add email. You can also create templates to use when sending adhoc emails.
Please note: if the repair stage changes, auto emails will always be sent even if
repair is going backwards or that auto email has already been sent.
ClaimWatch allows you to create even more personalised emails by including
variables such as the customer's name. The variables are key words inside <>.
When the email is sent, the variables are replaced with the appropriate information.
The full list of variables is displayed on this screen including their set character
length.
Tools Import / Export
Import Data
Data can be imported from Audatex, Glassmatix, Motex and AutoMate to reduce
duplication of data entry. Export the information from the specified program and
save to your computer. Then, within ClaimWatch, select Import/Export from the
Tools menu. You will be prompted to browse your computer for the required file
which you can then upload. ClaimWatch may ask you to match manufacturer and
model names so it can recognise the information, i.e. Audatex’s UK Fiat =
ClaimWatch’s Fiat. This will occur less and less as each time, the matches will be
saved to ClaimWatch’s database. ClaimWatch will then automatically display the
Customer Details page, with data from duplicate fields in the export file pre-entered.
Likewise, details on the Add Repair Job page will be automatically pre-entered.
Export Table to CSV
If you wish to capture the data in the current jobs list, select Import/Export from the
Tools menu then click Export. This will save the jobs list to a .csv file (comma
separated values) which is a basic file format compatible with most software
packages, e.g. Microsoft Excel and Access.
14
Tools Reports
ClaimWatch Reporting Suite
Select Reports from the Tools menu to open up the ClaimWatch Reporting Suite.
This set of reporting tools provides real time visual graphs and pie charts across the
report categories of communication, Customer Service Index (CSI), repair and
vehicle. To select the available reports for a category simply select the category
along the blue navigation. Available reports will then appear down the left side of the
screen. To view a report simply click the report you wish to view and it will generate
in the right pane of the suite, where they then also be printed if required. These
reports are available to any work providers to view that you give access details to,
but only drawing from their specific repairs. If you wish to hide any individual report
from your work providers simply uncheck the box marked 'available to work
providers from the report window.
Tools News Tickers
News Tickers
The ticker messages that appear on the Customer Tracking Page can be
customised to carry special offers, latest news or any other messages specific to
your bodyshop. Go to the Tools menu and choose News Tickers. The screen shows
the ticker messages as they appear on the Customer Tracking Page. You can add
any number of messages: the news tickers will scroll through the messages one at a
time.
Tools Sponsored Links
Sponsored Links
You can create sponsored links on the Customer Tracking Page to promote
bodyshop services or sell as advertising space to third parties. Go to the Tools
menu and choose Sponsored Links. The screen shows the sponsored links as they
appear on the Customer Tracking Page. You can add, update or delete sponsored
links and monitor the click-through rate for each link. Each sponsored link allows
you to specify what Insurer repairs you wish it to appear against. Simply select all
your insurers if you wish it to appear on every customer tracking page, regardless of
the work provider for that policy holder. To stop a sponsored link appearing, untick
the In use? box and click update. You can also change the order that the sponsored
links appear on the screen using the green arrows
.
Tools Main Screen Setup
Main Screen Setup
Select Main Screen Setup from the Tools menu to choose which fields to display in
the main repairs list and in what order they appear. The default appearance is shown
at the top of the screen; to remove a field click
or to move the field left or right
use the green arrows
. If you tick the box in the Allow filter row, filters can be
applied to the field when they are turned on in the main repair list. To add a new field
to the repairs list click
next to the field name in the list of Additional fields below.
Once a field has been added, the name can be changed by over-typing the name in
the box and clicking Submit.
You can set a default order for the repairs by selecting an option in the Default Sort
row. The order must either by ascending (A>Z) or descending (Z>A). The main
screen can be set to automatically reload after a specified number of minutes. Scroll
to the bottom of the Main Screen Setup, enter the automatic refresh rate and click
Update. This feature can be turned off by setting the refresh rate to zero.
15
Jobs Current Jobs
Current Jobs
By default, the main repair list will show current jobs i.e. jobs that started on or
before the current date and are not yet finished. If you are viewing pre-booked or
finished jobs, you can return to the current jobs list by clicking on the link at the top
of the screen or by selecting Current Jobs from the Jobs menu.
Jobs Pre-booked Jobs
Pre-booked Jobs
Jobs are considered pre-booked when their Booked in Date is later than today's
date. If a job is entered with a future Booked in Date, it will automatically appear in
the Pre-booked Jobs screen until the Booked in Date coincides with today's date.
At this point it will appear in the current jobs list. From the Pre-booked Jobs screen
you can return to the Current Jobs screen by clicking the link at the top of the page.
Jobs Finished Jobs
Finished Jobs
When work has been completed and the vehicle collected, the Vehicle collected
box is ticked on the Job Details page, removing it from the Current Jobs screen. If
you wish to re-activate or amend a repair job that has been removed from the
Current Jobs screen, this can be done by selecting Finished Jobs from within the
Tools menu. Here you will be able to select that job from the list of finished jobs
dating back two months. Simply press
for the appropriate repair and the job
details box will appear. Remove the tick from the Vehicle collected box and update
the details as required. The job will then re-appear in the Current Jobs screen. From
the Finished Jobs screen you can return to the Current Jobs screen by clicking the
link at the top of the page.
Jobs Delete a Job
Delete a Job
If you wish to delete repair information, select Delete a Job from the Jobs menu. The
full list of current jobs and jobs completed within the last two months will appear
with the option to delete each. When you select Delete Job you will be prompted to
confirm.
Jobs Potential Jobs
Potential Jobs
If a job is entered into the system as a potential jobs by clicking the
'potential job' checkbox in the 'add new job' screen it will be viewable
within this view. Details of the job can be viewed and customer details
updated, however the status or repair stages of the job cannot be. You will
be able to send ad-hoc SMS messages or emails to the customer, however no
automatic SMS messages will be sent. You can delete this job if it does not turn into
a real love job by clicking the delete job icon on the far right, or you can accept the
job by clicking the accept job icon. When a potential job is accepted you will be
asked to reconfirm the details (edits to the job can be made at this stage) after
which the job will become a live job and added to main repair list.
16
Jobs Print Jobs on Screen/Print
Unfinished Jobs
Print Jobs On Screen
If you wish to have a hard copy of your repair work select Print Jobs on Screen from
the Jobs menu. This opens a printer-friendly version of the repair list in a new
window. The printer version displays exactly the same jobs as those you are viewing
on screen, whether they are pre-booked, current or finished or have been sorted
and/or filtered. Click on File and Print in your browser to print the list out.
Print Unfinished Screen
To print a list of all current and pre-booked jobs, select Print Unfinished Jobs from
the Jobs menu. This opens a printer-friendly version of current and pre-booked
repairs in a new window with any sorts and/or filters that have been applied. Click
on File and Print in your browser to print the list out.
Help User Manual
User Manual
Select User Manual from the Help menu to access this document from the
ClaimWatch website. The online manual is updated with every new release, so it is
recommended that you use this version instead of saving a copy locally.
Help FAQs
FAQs
If you have a question, the answer may be in the FAQ section of the ClaimWatch
website. Select Help, FAQs to open the FAQ section in a new window.
Help Tech Support Forum
Tech Support Forum
If you have a problem, log it in the technical support forum. We will send you a
response via email and if it could help other users, post the problem and response in
the forum.
Help Bodyshop Messages
Bodyshop Messages
If we have a new important message for you about the system, a banner will appear
at the top of the main screen. Click on the link to view the message and then tick
the box to mark it as read. You can select Bodyshop Messages from the Help menu
to view all read and unread messages. If there are several ClaimWatch users at your
bodyshop, it is recommended that important messages are not marked as read until
everyone has seen them.
Help About ClaimWatch
About ClaimWatch
Select About ClaimWatch from the Help menu to open this section of the website in
a new window.
17
Communication Score
As you know, one of the primary purposes of ClaimWatch is its ability to help you
communicate with your customers more effectively via SMS, Email and
personalised, branded web based tracking pages. Effective communication via
ClaimWatch can improve customer satisfaction and saves you significant time and
money by reducing incoming and outgoing calls. Exactly how effective ClaimWatch
is working for you in these terms has often been difficult to monitor, so we have
devised a communication score that is unique to your system and updates every 24
hours.
You will find this communication score
in the top right of your ClaimWatch
system in the main toolbar, next to your
bodyshop name, in the form of a
percentage-based score. Clicking on
this score will open a window that will
provide you with helpful information on
how this score is broken down and
calculated. (see screen shot)
Points are awarded based on a variety
of factors, including the percentage of
mobile number and email addresses
being captured, the number of
automatic SMS and emails you have
configured as well as how many are
subsequently being delivered as a result
of good repair status management.
Other factors, such as using the
system's aftercare service and
delivering ad hoc SMS messages where
appropriate to customers outside of the
automatic communication the system delivers, all contribute to your communication
score.
From a maximum of 40 points, a percentage based score is calculated and
assigned to your system based on a rolling 30 days of usage. Don’t be too alarmed
at first if your score is lower than you might expect it to be. There might be many
reasons for this and we will be more than happy to work with you towards improving
the score to a level reflective of a system that is really working for you in the
communication department. To give you some idea of how you are doing however,
ClaimWatch recommends you aim for an ongoing communication score of 65% as a
minimum best practice standard.
For more information on how the score is calculated and what you can do
to improve how well ClaimWatch can work for you visit http://
www.claimwatch.co.uk/communication_score_help.asp
18
Logout
Logout
When you wish to logout from ClaimWatch select Logout from the tool bar. You will
be provided with a link back to the login page.
ClaimWatch v2.7.1
Holland Road
Hove
East Sussex
BN3 1JL
T: 01273 2440901273 244088
F: 01273 2440899
E: [email protected]
19