1
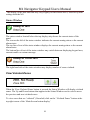
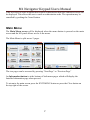
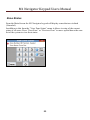
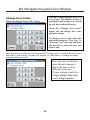
Ness M1 Navigator Touchscreen Keypad USERS MANUAL Ness Document No. 890-421 Ness Corporation Pty Ltd ABN 28 069 984 372 Private Bag 23 Seven Hills NSW 1730 Australia Ph +61 2 8825 9222 Fax +61 2 9838 8508 Email: [email protected] SYDNEY Ph 02 8825 9222 Fax 02 9674 2520 [email protected] www.ness.com.au MELBOURNE Ph 03 9875 6400 Fax 03 9875 6422 [email protected] BRISBANE Ph 07 3399 4910 Fax 07 3217 9711 [email protected] “Australia’s largest designer and manufacturer of high quality security products” PERTH Ph 08 9328 2511 Fax 08 9227 7073 [email protected] Adelaide Ph 08 8152 0000 Fax 08 8152 0100 [email protected] M1 Navigator User Manual Rev1 Document Part Number: 890-421 WARNING ADSL NOTICE Installation and maintenance to be performed by qualified service personnel only. ADSL broadband data can interfere with the operation of your alarm dialler. CAUTION It is recommended that a quality ADSL filter be installed as per the filter manufacturer's guidelines in all premises with an alarm dialler installed. Risk of explosion if battery is replaced by an incorrect type. Dispose of used batteries according to the instructions on the battery. Copyright Notice All rights reserved. No part of this publication may be reproduced, transmitted or stored in a retrieval system in any form or by any means, electronic, mechanical, photocopying, recording, or otherwise, without the prior written permission of Ness. Ness reserves the right to make changes to features and specifications at any time without prior notification in the interest of ongoing product development and improvement. © 2011 Ness Security Products Pty Ltd ABN 28 069 984 372 M1 Navigator Keypad Users Manual Introduction Congratulations on purchasing a Navigator Keypad as part of your featured packed M1 Security and automation controller. The Ness M1 Navigator is a revolutionary Touch Screen interface for use with the Ness M1 Gold and M1 EZ8 / EZ16 series Cross Platform Controllers. The Navigator is the latest world class user interface which leads the industry in providing a fully featured powerful and simple to use interface. The large touch sensitive 3.5” colour LCD with easy-to-navigate menus makes it easy to use and operate your Ness M1 Security and Automation system. This manual aims to show you the many features within the Navigator Touchscreen keypad and how to navigate and use menus within this keypad. Full operation of your M1 Security and Automation control panel should be viewed in conjunction with your User Guide that is supplied with the Ness M1 Control Panel. Main Screen The top strip of the main screen displays the current time and date as programmed in the M1 Controller. 2 3 M1 Navigator Keypad Users Manual The display of the date and time may vary slightly to that shown above, based on system settings with the M1. Status Window The status window located below the top display strip shows the current status of the panel. The icon on the left of the status window indicates the current arming status or the current alarm status. The top line of text of the status window displays the current arming status or the current alarm status. The bottom line of text of the status window may switch between displaying keypad area, current trouble or custom message. The right hand side of the status window may display number of zones violated. View Violated Zones When the View Violated Zones button is pressed the Status Window will display violated zones. The Up and Down buttons that appear in the Status Window can be used to move the previous and next violated zones. To view zones that are “violated” (Unsealed) click on the “Violated Zones” button at the top right corner of the ‘Main Screen button display’ 3 4 M1 Navigator Keypad Users Manual Main Screen Button On the main screen is a numeric keypad along with several other buttons. Along with the “Exit”, “Stay”, “Chime” buttons that function as detailed in the M1 User Guide, is the following buttons unique to the Navigator Keypad. “Violated Zones” – When pressed will display (one at a time) any violated (Unsealed) zones on the M1 Security controller. “F Keys” - There is 6 “F Keys (shortcut Function Keys) that allows your installer to setup to operation “quick” function operations of your system. F1 and F2 are displayed on the main screen. The show F-Keys button is used to display all function key buttons (F1 to F6) which temporarily replace the other buttons on the right and left side. “Menu” – The Menu buttons temporarily takes you from the ‘Main Screen’ to alternative system Menu functions as detailed below. 4 5 M1 Navigator Keypad Users Manual Keypad Locked If a wrong code is entered and the “Wrong Code Lock Out number” of Keystrokes is reached, as set by (Global 12 option), then the Keypad Locked screen will be displayed and the beeper will beep for 60 seconds before returning to the main screen. Authorise 5 6 M1 Navigator Keypad Users Manual If the user tries to enter an option that requires authorisation then the Authorise screen will be displayed. This allows the user to enter an authorisation code. The operation may be cancelled by pushing the Cancel button. Main Menu The Main Menu screen will be displayed when the menu button is pressed on the main screen and the M1 panel allows access to the menu. The Main Menu is split across 2 pages. The two pages can be accessed by pressing “Next Page” or “Previous Page” An Information button is at the bottom of both menu pages which will display the Installer Information page when pressed. To return to the main screen press the EXIT MENU button or press the Close button on the top right of the screen. 6 7 M1 Navigator Keypad Users Manual Select Area (Requires User Code) If your system is programmed into multiple areas (e.g. Office, warehouse, showroom, House, Garage etc) where part of the system can be Armed while other areas (sections) of the system are disarmed, the “Change Keypad Area” can allow full control of your system from the one Navigator Keypad. A Ness M1 key Pad is programmed to control one Area only. However with this option it allows the Navigator Keypad to control any of the 8 Areas the M1 controls. The control of multiple areas can be performed in a couple of different ways. 1. When “Change Keypad Area” option is selected the keypad can be temporally changed (or mapped) to a different Area to allow you to fully control an alternative Area. For example if your Navigator Keypad is programmed to control Area 1, and you select this option it can change the keypad and make it a Area 2 keypad. Therefore all functions of an Area 2 keypad . This includes full arming and disarming as well as all other keypad buttons such as F-Keys. To change the keypad to an alternative area, select the “change Keypad Area” option, select the Area you wish to change the keypad to and then select “Change Area” Once the keypad is mapped to alternative area it will now display the status, including LEDs and the LCD screen of the mapped area for the next 1 minute it will be possible to arm, disarm, bypass, etc. the mapped area from this keypad. The 1 minute will be extended with each key press. The keypad will return to its primary assigned area after 1 minute of no key press activity. 7 8 2. M1 Navigator Keypad Users Manual The second option this feature allows is the control of ALL areas from this one screen. To allow for the control of ALL areas (based on the Access level of the user code used to access this option) Press the “Control All Areas” button at the bottom of the screen. Once selected the screen will change slightly to show the status of all areas the user has access to control. To change the status of any Area while in this mode, simply click on the Area from this screen and the Area will change its state from Arm / Disarm or visa versa. This also allows for multiple Areas to be selected to be changed from the one screen. Once completed press the “Exit” button to exit this screen and go back to the Main screen. 8 9 M1 Navigator Keypad Users Manual Installer Information The Installer Information screen is displayed when the Installer Information button is pressed on the Main Menu. Once pressed information on the keypad and the Manufacturer can also be viewed by pressing the “Keypad Information”, or “Manufacturer Information” button. The screen displays the following installer information: Name Company Address Phone Email To return to the Main Menu screen press the MENU button. To return to the main screen press the “MENU” button or press the Close button on the top right of the screen. 9 10 M1 Navigator Keypad Users Manual Automation Control The Automation Control screen is displayed when the “Automation button” is selected in the Main Menu. This screen provides access to the 6 Automation options: Tasks Lighting Outputs Temperature Sensor Keypad Temperature Thermostat Temperature An Automation Custom Settings button has also been added to this page for access to Automation Custom Settings. To step back to the Main Menu, press the Menu button at the bottom left corner of the keypad. To exit the menu and go back to the main screen, press the red close button on the top right of the screen. 10 11 M1 Navigator Keypad Users Manual Automation Custom Settings (Requires Master Level User Code) The Automation Custom Settings page is accessed from the Automation page. It allows programming of the 20 Automation Custom Settings. Task Activation The Task Activation screen will be displayed when Tasks is selected from the Automation Menu 11 12 Tasks M1 Navigator Keypad Users Manual 8 task buttons are displayed on the screen at once. Each task button displays the task number and task name. To activate the task, press the required task button. Some tasks maybe programmed by the installer to do internal task activations that may not be intended to be activated by the keypad. These tasks will be greyed out to prevent them from being accidentally activated. The scroll bar at the right side of the screen can be used to scroll to other tasks. The Previous and Next buttons can also be used to display the previous or next group of 8 tasks. Display Screen – Task Activation Single View If an advanced user wishes to activate internally activated tasks, these can still be activated by using the “Single View button”. Advanced users who understand the consequences from activating “Internally activated tasks may do so by pressing the Single View button to display the Single View Tasks screen where all tasks can be selected and then activated. The task number can be selected with the numeric buttons. Next Task and Previous Task buttons will move through task items that programmed with show enabled. Test selected task is activated by pressing the Activate Task button. Pressing the MENU button will step back to the Automation Menu. 12 13 M1 Navigator Keypad Users Manual Lighting Control The Lighting Control screen will be displayed when Lighting Control is selected from the Automation window. 4 Lighting control options are displayed at one time. These items may take a little longer to be displayed than Tasks or Outputs as the M1 panel has to be polled for each item to ensure their status are 100 live. Each Lighting button will display the lighting number and lighting name. If the ‘Light’ is Dimmable then a Dim button will also be displayed. Some lights maybe programmed by the installer not to be controllable by the keypad, or if you don’t have a lighting system integrated with your M1 system. If so these lights will be greyed out to prevent them from being accidentally activated. Lights programmed by your installed not to be controlled by the keypad can still be controlled by advanced users using the “Single View Mode” A status icon is displayed for each lighting - either on, off or dimmed. The current status of each lighting is also shown by text – ON, OFF or a percentage if dimmed. If the lighting is on or dimmed then the lighting button will also be highlighted. The Previous and Next buttons can be used to navigate to other lighting. The scroll bar on the right side can also be used to navigate to other lighting. 13 14 M1 Navigator Keypad Users Manual Lighting Control Single View The Lighting Control Single View screen will be display when the Single View button is pressed on the Lighting Control screen. In “Single View” mode, the lighting number can be selected with the numeric buttons. Next Lighting and Previous Lighting buttons will move through lighting items that programmed with show enabled. The Lighting state can be toggled with the Change State button. ie Turn lighting ON or OFF. If the Light is dimmable then a Dim button will be displayed. Press the Dim button will display the Lighting Control Dim screen. Pressing the Menu button will display the Automation Menu screen. Pressing the Multi view button with display the Light Control screen with four lighting items at once. 14 15 M1 Navigator Keypad Users Manual Lighting Dim The Lighting Dim screen is displayed when Dim is pressed on one of the Lighting control screen. The lighting number, lighting name and current dim level is displayed at the top of the screen. The lighting dim level is changed by pressing one of the lighting dim value buttons. The button corresponding to the current dim value will be highlighted. To return to the lighting control screen press the Back button. To exit back to the main screen, press the red close button on the top right of the screen. 15 16 M1 Navigator Keypad Users Manual Output Control The Output Control screen will be displayed when Output Control is selected from the Automation window. 8 output buttons are displayed on the screen at once with each output button displaying the output number and output name. The scroll bar at the right side of the screen can be used to scroll to other outputs. The Previous and Next buttons can also be used to display the previous or next group of 8 outputs. Pressing an output button will toggle the output state. The output button will be highlighted if the output is on. Outputs not connected to the system, or programmed by the installer not to be programmed to be controlled by the Navigator keypad will be greyed out, these outputs will also not display a name Activation outputs from single View If an advanced user wishes to activate internally activated outputs, these can still be activated by using the “Single View button”. Advanced users who understand the consequences from activating “Internally activated outputs may do so by pressing the Single View button to display the Single View output screen where all outputs can be selected and then activated. 16 17 M1 Navigator Keypad Users Manual To toggle outputs set to not be shown, press the Single View button to display the Single View Output Control screen where all outputs can be selected and toggled. Pressing the MENU button will step back to the Automation Menu. To exit the menu and go back to the main screen, press the red close button on the top right of the screen. Temperature Sensors Your M1 system will support up to 16 temperature sensors. If your M1 system includes a temperature sensor your M1 Navigator can easily view the temperature. To view the temperature sensors temperature press the “Temperature Sensor” option from the main menu screen. Then select the Sensor which will in return display the temperature 17 18 M1 Navigator Keypad Users Manual Keypad Temperature If your M1 system includes KP1 Model keypads, which includes a Temperature Sensor, the temperature of these keypads can be displayed on the Navigator keypad. To view the keypad temperatures press the “Keypad Temperature” option from the main menu screen. Then select the keypad address which will in return display the temperature Note: The Navigator keypad does not include a temperature sensor. Thermostat Temperature If your M1 system includes communicating thermostats to control your HVAC system the temperature of these thermostats can be viewed on your Navigator keypad. To view the Thermostat temperatures press the “Thermostat Temperature” option from the main menu screen. Then select the Thermostat address which will in return display the temperature 18 19 M1 Navigator Keypad Users Manual Reset Smoke Detectors If your M1 System has smoke detector connected then depending on what type and model detector the installed has fitted, it may need resetting if it detects smoke and goes into alarm. The main purpose of these could be multiple detectors can be connected together to cause a common smoke detector alarm. In this configuration the detector that caused the alarm would latch on to provide you a visual indication of what detector activated the alarm. Once you have determined what detector it was you can then reset it using this keypad option. If you need to reset it this option will reset the detector if required. Your installer will advise you if your smoke detectors are the type that requires a manual reset. 19 20 M1 Navigator Keypad Users Manual Walk Test Area ALL security system should be tested at regular periods. We recommend testing your system once a week. If your system does not have advance features your M1 has then you can not be guaranteed your system is working to a level you, your family and property are protected by a fully working system. The M1 Navigator has a full zone testing feature that makes it simple to test your system without annoying family of neighbours as you test. Simple select “Walk test Area”. Once in the test more, you simply just need to activate all your detection devices e.g. activate door sensor, motion detectors etc) and then return to your Navigator screen which will display how many zones were successfully test. Any zones that failed to detect or were not tested can be viewed by pressing the “View Zones Not tested”. If you missed the listed zones during your walk test then you can retest it to confirm it is working. This is a simple easy testing process that doesn’t require sirens blasting during your tests and you are confident all your detection devices are doing as expected. 20 21 M1 Navigator Keypad Users Manual History Log Your Ness M1 system will store the last 512 events. At anytime you wish to view history events as logged in your systems memory select “View History Log” which will then display the last event that was logged into your systems memory. To view events one at a time (from most recent backwards) select the “Next” to view the next event logged in time or “Previous” to go back to up the list towards the most recent event. 21 22 M1 Navigator Keypad Users Manual Zone Status From the Main Screen the M1 Navigator keypad will display zones that are violated (Unsealed). In addition to this from the “View Zone Status” menu it allows viewing of the current status of all zones. Press “Next Zone” or “Previous Zone” to move up and down the zone list of the system to view their status. 22 23 M1 Navigator Keypad Users Manual Your M1 system supports up to 199 User Codes. The installer at time of installation and setting your system up will have enabled the users. Change User Codes (Requires Master Level User Code) From this “Change User Codes” option you can change user codes and users names. To change a user’s code, select this option and using the “Next User” or “Previous User” move up and down the user list to select the user you wish to edit. Once the user to be edited is selected press the “Change code” to change the user’s code that will be used to Arm / Disarm your System, or “Edit Name” to change the name assigned to the user code. Once the user is selected enter the new unique 4 digit code you wish to allocate to the user. If your system is set for a 6 digit number then enter a new 6 digit number. 23 24 M1 Navigator Keypad Users Manual To change the users name allocated with the user code select “Edit Name” and enter the users name and then press “Save Name”. 24 25 M1 Navigator Keypad Users Manual System Settings The Systems settings are normally set by the Installer and not covered in this manual. System Tests The Systems Tests and Diagnostics are tools for the installation and trained service company technicians and not covered in this manual. Custom Voice Message Record The Custom Voice message recordings and functions used by the installer at time of installation and not covered in this manual. Clean Screen Select this option before cleaning the screen (with a soft dry cloth or one slightly moistened), which will disable the screen for 10 seconds to allow it to be cleaned without multiple buttons being pressed. 25 26 Notes M1 Navigator Keypad Users Manual 26 27