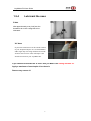
1
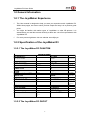
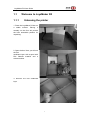
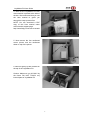
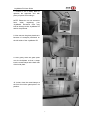
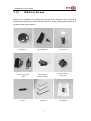
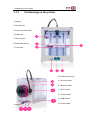
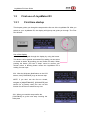
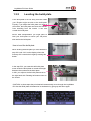
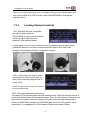
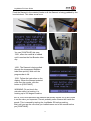
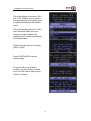
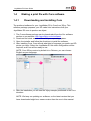
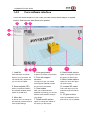
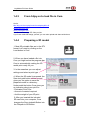
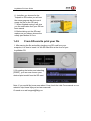
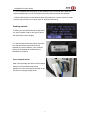
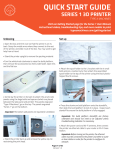
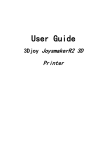
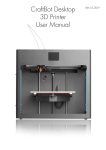
JoysMaker R3 User Manual JoysMaker R3 User Guide Version Date 2014-10-31 Main Content Initial version 2 JoysMaker R3 User Guide 1.0 General Information ............................................................................................................ 4 1.0.1 The JoysMaker Experience................................................................................. 4 1.0.2 Specification of the JoysMaker R3 ..................................................................... 4 1.0.2.1 The JoysMaker R3 PHANTOM ....................................................................... 4 1.0.2.2 The JoysMaker R3 GHOST ............................................................................. 4 1.0.3 Cautions ................................................................................................................. 5 1.1 Welcome to JoysMaker R3............................................................................................ 1 1.1.1 Unboxing the printer ....................................................................................... 1 1.1.2 What’s in the box ............................................................................................ 4 1.1.3 Terminology on the printer ............................................................................. 5 1.2 Install Parts on Your JoysMaker R3 .............................................................................. 6 1.2.1 Installing power supply................................................................................... 6 1.2.2 Spool holder and filament guide ................................................................... 7 1.2.3 Switch on/off the JoysMaker R3 ................................................................... 8 1.3 First use of JoysMaker R3 ............................................................................................. 9 1.3.1 First time startup ............................................................................................. 9 1.3.2 Leveling the build plate ................................................................................ 10 1.3.3 Loading filament material ............................................................................ 12 1.3.4 Make your first 3D print................................................................................ 15 1.3.5 3D printing and print removal...................................................................... 16 1.4 Making a print file with Cura software ......................................................................... 1 1.4.1 Downloading and installing Cura .................................................................. 1 1.4.2 Cura software interface.................................................................................. 2 1.4.3 From 3djoy.cn to load file in Cura ................................................................. 4 1.4.4 Preparing a 3D model .................................................................................... 4 1.4.5 From SD-card to print your file ..................................................................... 5 1.5 Maintenance for your JoysMaker R3 ............................................................................ 6 1.5.1 In General ........................................................................................................ 6 1.5.2 The glass plate ................................................................................................ 6 1.5.3 Change filament and material feeder .......................................................... 7 1.5.4 Lubricant the axes .......................................................................................... 9 1.6 Trouble shooting and support for the JoysMaker R3 .................................................. 10 1.6.1 Simple Troubleshooting tips ........................................................................ 10 1.6.2 Contact support ............................................................................................. 12 1.6.3 Terminology ................................................................................................... 13 1.6.4 Safety and Compliance................................................................................ 14 1.6.5 TERMS OF SERVICE .................................................................................. 14 3 JoysMaker R3 User Guide 1.0 General Information 1.0.1 The JoysMaker Experience This User manual is designed to help you start your experience with JoysMaker R3. Within these pages, we want to show you how simple and easy it is to produce great prints. You might be familiar with earlier types of JoysMaker or other 3D-printers. It is essential that you read this manual carefully as there are a lot of new procedures with JoysMaker R3. For more personal guidance visit our website: www.3djoy.cn 1.0.2 Specification of the JoysMaker R3 1.0.2.1 The JoysMaker R3 PHANTOM J oy s mak er R 3 Par ameter s Bui l d env el ope( 打 印 尺 寸 ) 260 x 260 x 280mm LC D di s pl ay er Y Bui l d v ol ume( 打 印 体 积 ) 20 liters M ater i al s PLA/ABS/PVA/HIPS /PETG/POM/Laywo od M i n Lay er thi c k nes s ( 层 厚 ) 0.02mm Gr os s W ei ght 23KG Stoc k noz z l e di ameter ( 喷 头 ) 0.4 mm Sl i c i ng Softw ar e Cura Speed( 正 常 打 印 速 度 ) 30~300 mm/s Pr i nt F or mat STL,OBJ, DAE, s tep motor ( 步 进 电 机 ) 1/16th OS Pos i ti oni ng pr ec i s i on Z ax i s 0.005 mm Language English/Chinese Pos i ti oni ng pr ec i s i on XY ax i s ( XY精 度 ) 0.0125 mm Pac k age s i z e 450*450*550mm C ontr ol l er ( 控 制 器 ) ATmega2560 Pak c agi ng shockproof N or mal Speed( 正 常 打 印 速 度 ) 68~135cc/H LC D di s pl ay er L* W * H integrated into body M ax i mun Speed( 最 快 打 印 速 度 ) 135cc/H LC D di s pl ay er W ei ght NA M ater i al s R equi r ement 3mm C onnec ti v i ty Stand-alone printing AMF Windows, Linux, Mac (Z 轴精度) materials infilled from SD-card USB (firmware) Pr i nt head 1 Sound 49 dBA. Pr i nt head W or k i ng temp. 180~260C D IY( 是 否 支 持 D IY) Y H eated Bed Y R etai l pr i c e( 售 价 ) ¥9200 H eated Bed W or k i ng temp. 50~100 C Open Sour c e( 是 否 开 源 ) ultimaker2 oriented Pow er 100 - 240 V, ~4 A 50 - 60 HZ 221 W 1.0.2.2 The JoysMaker R3 GHOST 4 JoysMaker R3 User Guide 1.0.3 Cautions 1).Security Do not use other power supply other than the one provided by 3Djoy. JoysMaker 3D printer power supply is designed with strict current control and defense mechanism. The JoysMaker R3 generates high temperatures and has hot moving parts that can cause injury. Never reach inside of the JoysMaker R3 while it is in operation. Always control the R3 from the push wheel on the front or with the power-switch on the back. Allow the machine to cool down for 5 minutes before reaching inside, the temperature is as high as more than 200℃. Unplug the wires, when moving the 3D printer; ensure the cord is disconnected from the wall socket. Check the connection of the wires is in good status before printing. 2).Protection Waterproof rain, water. Do not hit the frame to cause deformation. Do not disassemble the machine, so as not to break the machine. Long time not using the machine, seal the machine and store it. Next time you use it you need to daub grease. Do not press the printing head, or else the 6mm rod may bend, hence the printing quality may be affected. Unplug the wires during thunderstorm weather. To replace the nozzle, you need to heat the nozzle firstly till the filament is melted. 5 JoysMaker R3 User Guide 1.1 1.1.1 Welcome to JoysMaker R3 Unboxing the printer 1. Place the JoysMaker R3 box on a stable surface. Placing it centrally on the floor will provide the best accessible position for unpacking. 2. Open the box. Here you will see the first cardboard layer with a spool with PLA filament material and a welcome sheet. 3. Remove the first cardboard layer. 1 JoysMaker R3 User Guide 4. Take out the JoysMaker R3 User manual which is placed at the side of the box. We recommend that you use the User manual to guide you through the setup process first. NOTE: You can download a PDF copy of this User manual under manual at the support page: http://www.3djoy.cn/en/user-manuals/ 5. Now remove the four cardboard corner pieces and the cardboard sheet on top of the printer. 6. Now lift it gently up with 2 hands on the top of the JoysMaker R3 Caution: Make sure you lift ONLY by the frame DO NOT TOUCH any internal parts of JoysMaker R3 2 JoysMaker R3 User Guide 7. Position it on a sturdy table to optimize the approach and with plenty of space surrounding it. NOTE: Please do not use excessive force when unpacking your JoysMaker. Excessive force may lead to damage to the JoysMaker R3 and its components. 8. Now remove the glass plate that is because of transport positioned on the left inside of the JoysMaker R3. 9. Now gently slide the glass plate over the buildplate so that it snaps into the metal clamps at the back side of the build plate. 10. At last, close the metal clamps at the front to lock the glass plate in its position. 3 JoysMaker R3 User Guide 1.1.2 What’s in the box Besides your JoysMaker R3 supplied with SD card in the 3D printer, there are a lot of essential accessories that comes with this 3D printer. All the following parts should be in the box, please check contents. Filament x1 Power supply and cable Grease Spool Holder x1 USB cable(for firmware update) Hex driver 4 Glue stick x1 Test print done by this printer User Manual JoysMaker R3 User Guide 1.1.3 Terminology on the printer 1. Display 2. SD-card slot 3. Push and rotate button 4. Build plate 7 5. Glass clamps 6. Build plate screws 4 7. Print head 6 5 2 1 3 8. Filament guide tube 8 9. Print head cable 9 10. Material feeder 10 11. Spool holder 12. Power Socket 13. USB Socket 14 14. Power switch 11 12 13 5 JoysMaker R3 User Guide 1.2 1.2.1 Install Parts on Your JoysMaker R3 Installing power supply Attach power supply to give the JoysMaker R3 power. 1. First make sure the power switch is in the OFF position, this is when the button at the back is pressed to “O” 2. The corresponding power cable (for your country) has to be inserted in the power brick of the power supply. 3. The connector has to be inserted at the back of the JoysMaker R3, in the round hole next to the on/off switch and USB slot. The flat side of the power plug has to face towards the top of the JoysMaker R3. 4. Now plug the external power supply into the wall socket. Detaching the power supply 5. If the power supply has to be detached, the first step is to make sure the JoysMaker R3 turned off. This is done by pressing the power switch to 0. 6. Next take the power plug out of the wall socket. 7. The plug has a sliding collar. When removing the plug from the machine, gently slide the collar outwards which will release the plug and allow it to come out with ease. CAUTION: Please make sure not to pull the cable. Excessive force may result in breaking this component. 8. The main cable in the power brick can be detached by pulling it out gently. 6 JoysMaker R3 User Guide 1.2.2 Spool holder and filament guide Attaching the spool holder 1. The spool holder attaches to the back of the JoysMaker R3. 2. Take the spool holder and insert the top through the hole [1] in the middle of the back. Detaching the spool holder [1] 3. Now press it further down [2] until it snaps into place. The filament can now be added. When facing towards the back of the JoysMaker R3 the filament has to turn counterclockwise around the spool. The filament spool can now be pushed over the spool holder until it “clicks”. This means that the filament spool is fitted. To detaching the spool holder the filament has to be removed Detaching the spool holder [2] 4. Take the spool holder and squeeze it at both sides [2], now reverse steps [2] and [1] The top side of the spool holder is the pivot point. The spool holder should detach easily. Now it can be taken away completely. 7 JoysMaker R3 User Guide 1.2.3 Switch on/off the JoysMaker R3 Switch on the JoysMaker R3 The on/off button of the JoysMaker R3 is located at the back. The “—” represents off and the “O” represents on. When it’s switched to the “—” the JoysMaker R3 is turned on and should start up. After the JoysMaker R3 has been turned on, the front LED display should light up and the sides should glow. Switch off the JoysMaker R3 The JoysMaker R3 can be turned off by pressing the power switch to “O” at any time, it is recommended to only turn off the JoysMaker R3 when it is NOT in use. When the JoysMaker R3 is switched off, the display and lights will automatically turn themselves off. 8 JoysMaker R3 User Guide 1.3 1.3.1 First use of JoysMaker R3 First time startup This chapter guides you through the steps and the first run of the JoysMaker R3. After you switch on your JoysMaker R3, the display will light up and guide you through “The First Run Wizard”. Use of the display 1/21. You can navigate through the display by using the button. This button can be pushed and rotated. By rotating you can select or control an action. By pushing you can confirm an action. When pushing the button you hear a “beep” sound to confirm your chosen action. A blinking button means the JoysMaker R3 is waiting for user input. 2/21. After the Welcome Notification on the LCD screen, click [CONTINUE] to go to the next step. NOTE: If you don’t see the first run wizard, navigate to [MAINTENANCE], [ADVANCED] and confirm for a [Factory reset] You can use this function for the first run wizard at any time. 3/21. When you read this step confirm the [CONTINUE] to go the next step: Leveling the build plate 9 JoysMaker R3 User Guide 1.3.2 Leveling the build plate If the build plate is too far away from the nozzle your 3D-print might not stick to the build plate. Equally, if you adjust the build plate too close to the nozzle, the build plate can block the filament from extruding from the nozzle. It can also scratch the build plate. NOTE: After transportation you might want to level your build plate to ensure your 3D prints stick well to the build plate. How to level the build plate When leveling the build plate you must follow the step 4/21 until 10/21 on the display where the first step 4/21 controls the height by rotating this button. In the step 5/21 you rotate this left build plate screw under the build plate to control the height between the nozzle and the build plate. In 6/21 you adjust a similar build plate screw on the right hand side. Rotating left means closer to the nozzle. CAUTION: In these steps the print head will automatically move through the JoysMaker R3. Also the Build plate will determine its destination by going up and down again. 10 JoysMaker R3 User Guide Continued: Leveling the build plate Follow the display instruction 6/21 and 7/21, [CONTINUE] when finished. We are going to do this again to fine tune the build plate. Please, make sure you have a piece of paper within reach and press [CONTINUE] to go to the next step. Make sure you turn the build plate screw to finetune this step if necessary. 8/21. Follow display instruction as demonstrated in the supporting image and press [CONTINUE] when finished. 9/21. Follow display instruction as demonstrated in the supporting image and press [CONTINUE] when finished. 10/21. Follow display instruction as demonstrated in the supporting image and press [CONTINUE] when finished. 11 JoysMaker R3 User Guide NOTE: If you have problems, or if you need to level your build plate again, you can use the [BUILD PLATE] function under [MAINTENANCE] through the standard menu. 1.3.3 Loading filament material 11/21. Now that we have completed the initial leveling tasks we [CONTINUE] and go to the step where we are going to insert filament material in the material feeder. Please make sure you have a filament spool positioned over the spool holder, guided the filament in counter clockwise direction.(Bellow PIC need to be changed, the filaments will have a separated hanger) 12/21. In this step, you need to wait a minute while the print head heats up. Wait for the onscreen progress bar to reach 100% NOTE: The print head will now move itself to the front automatically. 13/21. This step needs some extra focus. The wheel in the material feeder will start rotating slowly. Take the material and put it in the hole at the bottom of the material feeder. There is a hole where it should go into right above the sticker. Follow the display instruction with the supporting images below but WAIT! Before pushing [CONTINUE] and check the next page for more instructions. It is suggested to cut the head of filament and make it sharp. 12 JoysMaker R3 User Guide Push the filament in the material feeder until the filament is being grabbed by the knurled wheel. This takes some force. You can [CONTINUE] this step, 13/21, when the material is loaded until it reaches the first Bowden tube clip. 14/21. The filament is being pulled through the transparent Bowden tube more quickly. Wait until the progress bar is full. 15/21. Follow the instruction on the display. When the filament material exits from the nozzle, click the button to [CONTINUE]. WARNING: Do not touch the extruder while it is heating, it is heating up to 220 degrees celsius. NOTE: Don’t be surprised if the material that initially comes out of the nozzle is not the color you expected. There’s probably some filament left inside the nozzle. This is caused by testing the JoysMaker R3 before packing. Wait until you see the color that you loaded comes out of the nozzle before you [CONTINUE]. 13 JoysMaker R3 User Guide Follow the display instruction 16/21 and 17/21. Make sure you choose the right material; this material type is usually indicated on the filament spool. Follow the display instruction 16/21 and next steps. Make sure you choose the right material, this material type is usually indicated on the filament spool. Confirm the selection by choosing [YES] or [NO] Press [CONTINUE] to get the printing stage. Till now the first run wizard is finished, you can choose a model from your SD card to start printing. Press to continue. 14 JoysMaker R3 User Guide 1.3.4 Make your first 3D print It is important to tell your JoysMaker R3 which type of material it will be using. JoysMaker R3 will adjust its settings to match with specific Materials. IMPORTANT. Before you continue onto the next step, make sure that you add a thin layer of glue on the middle of the glass print plate. Use the provided gluestick that came with your JoysMaker. Now that the JoysMaker R3 has leveled its build plate and has material filament loaded, it can now begin to 3D print. [LET’S PRINT] to go to the next step! 21/21. Make sure you have the SD-card inserted that came with your printer, If not, the SD-card can be inserted at the front of the printer on the right side of the display in the SD-card slot. [LET’S PRINT] to start 3D printing! Your SD-card comes with the file [3djoy_example] click the button if you would like to print this file. 15 JoysMaker R3 User Guide 1.3.5 3D printing and print removal After you have chosen your [3djoy_example] to print your JoysMaker R3 will prepare itself and heat its print head nozzle and build plate. (This can take up to 5 minutes). WARNING: Do not touch the extruder while it is heating and in use. Temperatures can vary between 220 and 260 degrees celsius. While printing, the LCD display will indicate the progress of your print and the remaining time to completion. There is also on screen, the options [TUNE] and [ABORT]. When your 3D print is finished, the display will indicate that the JoysMaker R3 is cooling down. The progress bar indicates when it is safe to take out your print. WARNING: Do not touch the print inside the JoysMaker R3 while it is still cooling down. Wait until the display tells you “Print Finished. You can remove the print”. Some parts are cooling down from a temperature of max. 260 degrees celcius and might be still very hot. Now your print and your JoysMaker R3 is at a safe temperature. You can remove the print. Select the [BACK TO MENU] to start the next print. Also on this screen, you have the options to [CHANGE MATERIAL] and [MAINTENANCE]. Because you have completed the “First run wizard” this is now your home menu every time you start up your JoysMaker R3. Under [MAINTENANCE] and the [ADVANCED] you can choose [Factory reset] if you want to do the “First run 16 wizard” again. JoysMaker R3 User Guide 1.4 1.4.1 Making a print file with Cura software Downloading and installing Cura The preferred software for your JoysMaker R3 is Cura from 3Djoy. This software package prepares your 3D model into instructions that your JoysMaker R3 uses to produce an object. 1. The Cura software package can be downloaded from the Our software section on our website: http://www.3djoy.cn/en/software/ 2. Download the latest version of Cura for your operating system. 3. Open the installer and follow the directions to install the software. 4. After installing Cura, Cura will ask what kind of language you prefer and 3D printer you have. Select the JoysMaker R3 No other configuration will be required, and Cura will be ready to use. NOTE: Cura 3DJoy version by default is in Chinese, you can choose English as your language: 2 1 5. After the installation you will see the 3djoy-example positioned in the Cura interface. NOTE: We keep on updating our software, so the latest version that you have downloaded might be a newer version than the one in this manual. 1 JoysMaker R3 User Guide 1.4.2 Cura software interface This is the main screen of Cura. Here you can choose which object or objects to print. And how you want them to be printed. 3 1 2 4 5 6 6 7 8 11 10 9 1. Load file 4. Print type profiles 8. Scale model options Click this button to load an 3 options to choose a print profile. Option to change the scale of object to your print area. You the object you like to print. can add as many objects as 5. Print with support structure you can fit on the plate. The option to give your model Options to mirror the object some support material to make you’d like to print. 2. Save toolpath (SD) the print more successful. 10. Loaded 3D model When you press this button 6. View modes This is the object you have the prepared toolpath will be After your model has been loaded through the load file saved on the SD card. prepared for printing, you can use button. different view modes to analyze 11. 3D print volume 3. Menu bar your design. This is a visualization of the In this bar you can change to 7. Rotate model options print area of your JoysMaker. Full settings, preferences and Option to change the rotation of more expert settings. the object you like to print. 2 9. Mirror model options JoysMaker R3 User Guide Continued: Cura software interface The following mouse actions are used to work, navigate and view the 3D model: Left mouse button Scroll wheel button Select objects. Hold and move the mouse to drag object on the 3D print area. Use the scroll wheel to zoom in or out. Right mouse button Right mouse button Hold and move the mouse to rotate the viewpoint around the 3D model. + Shift Hold and move the mouse to pan the 3D view. Right and left mouse button Hold and move the mouse to zoom. 3 JoysMaker R3 User Guide 1.4.3 From 3djoy.cn to load file in Cura Surf to bbs.3djoy.cn/forum.php?mod=forumdisplay&fid=42 www.thingiverse.com www.youmagine.com You can download any STL files you like. If you have made 3D design yourself, you can also upload and share with others. 1.4.4 Preparing a 3D model 1. Most 3D printable files are in the STL format. Let’s start by clicking on the Load button in Cura. 2. When you have loaded a file into Cura you might notice the progress bar. Cura is automatically making the 3D model print ready for you. 3. In the meantime you can adjust settings and select a print type. 4. When the 3D model is prepared, the Save tool path button shows up and gives you the option to save the prepared model in a directory. Underneath the button Cura gives you an indication about your print on - Estimated Print Time - Amount of material required - And the weight of your 3D print 5. After you inserted the included SD-card into your computer, Cura changes the Save toolpath Button into the Toolpath to SD Button. 4 JoysMaker R3 User Guide 6. Just after you choose for the Toolpath to SD button you will see the same progress bar but now it saves the file on the SD card. 7. When finished saving It will give you the notification that your file has been saved. 8. Before taking out the SD-card make sure you always choose the safely eject button in Cura. 1.4.5 From SD-card to print your file 1. After saving the file and safely ejecting your SD-card from your computer, it is time to insert it in the SD-card Slot at the front of your JoysMaker R3. 2. By rotating the button and selecting [PRINT], you can now choose your desired print model from the SD-card. Note. If you would like know more about Cura check the total Cura manual on our website: http://www.3djoy.cn/en/user-manuals/ Or send us a mail [email protected] 5 JoysMaker R3 User Guide 1.5 1.5.1 Maintenance for your JoysMaker R3 In General To achieve the best possible results from your JoysMaker R3, some basic annual maintenance is recommended. This chapter contains tips which helps you to keep the JoysMaker R3 running at its best. Before you make a print a quick check is advised. A visual check is recommended to see if there is not any: - old prints/objects on the build plate. - make sure no one can possibly walk over, damage or pull out the power supply cable. Updating firmware with USB cable Very often Cura will give you a mention that new firmware available. New firmware means that we have optimized the control of the electronics which will gives better print results and user experience. If you see this mention, don’t update your JoysMaker R3 by yourself, send us a mail, we will help you to upgrade as the JoysMaker is different with Ultimaker machines in the setting of the parameters. 1.5.2 The glass plate Cleaning the glass plate After a lot of printing, there sometimes can be a little excess glue stuck to the glass build plate. This can cause an uneven print surface and it is recommended to clean it once in a while. 1. Make sure JoysMaker R3 power is powered off. 2. Carefully slide the front glass clamps and click them off carefully. 6 JoysMaker R3 User Guide WARNING. Use a screwdriver for this step because the clamps can be sharp. WARNING. Make sure you only take out the glass plate when it is cooled down. Cleaning the glass plate 3. Make sure the building plate is at the bottom of your JoysMaker R3, this is to prevent you not damage you printhead or Z- axis. 4. Now you continue to slide the glass plate of the build plate to the front and take it out. 5. To dissolve and clean off the excess glue, place the glass plate carefully under normal tap water and brush off the material. WARNING. The glass plate is positioned on an electrical heating area so make sure it really is dry. 6. Put it back in and slide the glass clamps back in the original position. Note. To be sure that your next print will be successful you might want to level your build plate. You can do this under [maintenance]. 1.5.3 Change filament and material feeder Removing filament In the JoysMaker R3 the filament material can be changed. As you have learned in previous steps there is no need to do this all by yourself because the JoysMaker R3 helps you with that. 1. Go to the [MATERIAL] tab on the main menu of the display. Press the button: next go to [CHANGE], this can be done by turning the wheel next to the screen. Press the button. Note: firmware updates in the future may use a different terminology. 7 JoysMaker R3 User Guide 2. Your JoysMaker R3 will heat up so the material can be removed later. When the required temperature is met, the feeder will turn by itself and retract the filament. 3. Rewind the filament on the filament spool and make sure it cannot uncoil at a later moment (secure with hole in spool, tape or anything that works). Feeding material 4. When you took the filament from the spool, you (can) replace it with a new spool, follow the instructions on the display. 5. In the last step of the instructions we make sure that the printer knows what kind of material you have inserted in your machine. Select on the display the material that is identified on the spool. Clean material feeder After a lot of printing, the wheel in the material feeder can accumulate small plastic particles.You can clean this by blowing air on the wheel or using a simple brush. 8 JoysMaker R3 User Guide 1.5.4 Lubricant the axes Z-Axis After approximately every half year the threaded rod on the z-stage has to be lubricated. . X-Y-Axes If you notice small wavers in the outside surfaces of your 3D printed objects. It is recommended to add a single drop of sewing machine oil onto the X and Y steel axes bars. This will improve the smooth movement of your JoysMaker R3. If you choose to lubricate the X- and Y-axis you MUST use sewing machine oil. Apply a maximum of one droplet oil on the axis. Remove any excess oil. 9 JoysMaker R3 User Guide 1.6 Trouble shooting and support for the JoysMaker R3 1.6.1 Simple Troubleshooting tips In case something goes wrong with your JoysMaker R3, the following chapter will help you. From diagnosing and fixing the problem yourself to contacting support. Print detaches during printing or print does not stick at all. Cause Build plate is not properly leveled. Solution Follow the instructions under [MAINTENANCE] and then [BUILD-PLATE] Second cause Material is not adhering to the build plate. Solution Using a thin layer of the supplied glue-stick as discussed in chapter D4. Print is stuck on the build plate. Cause Object is stuck on the build plate, even after soaking in water. PLA or ABS has bonded with the glass. Solution Use a spatula or another thin object such as a wedge between the glass and the object. Slowly push the wedge under the object from different directions. If the object will not release from the build plate try slightly tapping the wedge. 10 JoysMaker R3 User Guide Material feeder ticks when loading new material. Cause Material has reached the nozzle and is exiting the nozzle, the feeder cannot keep up with the flow Solution While loading new material it is normal for the feeder to tick, the feeder is designed to tick backwards instead of grinding the material. Not enough material is released from the nozzle Cause Material feeder on the back of the JoysMaker R3 is ticking while printing. Nozzle is blocked or partially blocked by dirt or burned material. Solution Increasing the print temperature to 260C while printing in an attempt to clear the blockage. If the blockage is removed keep printing at 260C for at least 10 minutes to clean out any residue. Second cause Printing at 260C does not solve the blockage. Solution Something larger than 0.4mm could be blocking the nozzle. Cleaning the nozzle or replacing it is recommended. Contact support: [email protected] who will assist in fixing your JoysMaker R3. Material flow stops and material is ground down by the feeder. Cause Nozzle could be blocked or partially blocked. Solution See not enough material is released from the nozzle. Second cause Too much pressure is put on the material by the feeder. Solution Release the pressure on the feeder a bit by adjusting the build plate screw clockwise. Third cause Too little pressure is put on the material by the feeder, causing the material to slip. Solution Put more pressure on the feeder a bit by adjusting the pressure screw counter clockwise. 11 JoysMaker R3 User Guide JoysMaker R3 display only shows: ERROR - STOPPED, Temp Sensor Cause A problem with the temperature measurement has been detected, the printer has been switched off for safety reasons. Solution It indicates an electronics problem. Contact support: [email protected] who will assist in fixing your machine. 1.6.2 Contact support In case you run into difficulty not addressed in this manual, please feel free to contact our support staff through email, phone and of course our support ticket system. See www.3djoy.cn for details. There is also a wealth of information, tips and amazing JoysMaker printed objects on our busy online forum community. These forums can be reached online at bbs.3djoy.cn Drop by and say hello ! If you need any help resolving an issue you can always email our support department at: [email protected] 12 JoysMaker R3 User Guide 1.6.3 Terminology ABS filament: This is a well-known plastic known for its strength and industrial properties. Active cooling fan: The fan that cools the print head as it is printing. Build plate: The frame that supports the glass print plate. Cura: Open Source Software that allows you to turn your 3D model into a printable file. Display: The OLED display provides the menu for controlling the JoysMaker R3. Filament guide tube: The plastic tube that guides the filament from the material feeder to the print head. Firmware: The software that runs on the electronic board. Gantry: The construction of metal rods that allow movements on the x- y- and z-axis. G-code: The code that comes out of the slicing process of a 3D model in Cura. It describes the movements of your print head. Glue: The glue can be used as an adhesive between your build plate and your model. Knurled wheel: Gives grip to push the filament in the filament guide tube. LED strip: It is a strip which contains several small lights (Light Emitting Diodes) to light the JoysMaker R3. Material feeder: The feeder that drives the filament through the filament guide tube into the heater. Material feeder tensioner: The tension with which the filament is pushed through material feeder can be adjusted by tuning this tensioner. Nozzle: The opening at the end of the print head. The filament is being pushed through the opening and will put down on your build plate. PLA filament: This is a hard bioplastic that has a low environmental impact. It is derived from renewable, starch-based resources. It has a very low shrinkage which is helpful for great prints. Build plate screws: These screws can adjust the leveling of the build plate. Power supply: The A/C power supply. It consists of a block and a power cable. The cable 13 JoysMaker R3 User Guide can have different power plugs (US, EU,AU,UK). It depends on what kind of electric outlet is used in a country. Power switch: Turns the JoysMaker on or off. Print head: The assembly that melts the filament and pushes it through the nozzle onto the build plate. Print head fans: The fans which cool the filament as soon as it is put onto the build plate. Push button: By rotating and pushing the button in front of the JoysMaker R3, you can access the control panel. SD-card: Secure Digital memory card that can store digital data. The card that can be used with the JoysMaker R3 has to be an SD-card and not an SDHC card. It has to be formatted with FAT16 or FAT32 with a maximum capacity of 2GB. Slicing: The process that turns a 3D model into code that can be used with 3D printers. Slider blocks: The slider blocks maintain the connection between the gantry axes. Spool holder: The plastic piece attached to the back of the JoysMaker R3. It can hold different kinds of filament spools. .stl: A widely used file format for 3D models. Threaded rod: The long rod behind the build plate which is threaded. This rod makes the build move up and down. USB cable: The cable that allows direct communication between the JoysMaker R3 and a computer, using the USB interface on the computer. 1.6.4 Safety and Compliance Warning This is a class A product. In a domestic environment this product may cause radio interference in which case the user may be required to take adequate measures. 1.6.5 TERMS OF SERVICE Returning Purchased Items. ** LIMITED ** 3DJoy accepts returns on a very limited basis: for any electronic items, the Company accepts returns only on unaffected devices within 14 calendar days from the date of receipt 14 JoysMaker R3 User Guide of merchandise. “Unaffected” means a device has never been assembled, powered up, programmed, or otherwise changed. Similarly, for non-electronic items, the Company accepts returns only on unopened items within 14 calendar days from the date of receipt of merchandise. After 14 days, all sales are considered final. Warranty**LIMITED** JoysMaker products are warranted only to the original purchaser for a period of three months from the original purchase date, under normal use and service, against defective workmanship and material. This warranty is void if the product has been damaged by accident or unreasonable use, immersion in water, neglect, abuse, battery leakage or improper installation, improper service, or other causes not arising out of defects in workmanship or materials of the product. All warranty claims are subject to: JoysMaker being notified of the warranty claim within the warranty period JoysMaker verifying the existence of a defect in the productReceipt of valid proof of your purchase date. Note: Please make sure that you have a valid proof of purchase (Receipt) before contacting Customer Service. Note: Please make sure to retain your original packaging in case of warranty service. In the event that you experience any problems with your JoysMaker product and before returning a product for any reason, it is necessary to contact the JoysMaker Support team to determine and diagnose the issues you are experiencing prior to taking any other course of action. To communicate with JoysMaker Support, send a mail to [email protected] If the service representative is unable to solve the problem, you will be provided with instructions as to how to go about having the unit repaired or replaced if it is under warranty. Return of a product under warranty is governed by the following rules -- you must return your product, shipping prepaid and with proof of purchase date, as instructed by a JoysMaker service representative. In the event that a product under warranty is repaired or replaced, the replacement will be covered under the original warranty or for 30 days, whichever is longer. Repair or replacement is your exclusive remedy, and JoysMaker ‘s exclusive liability, under this warranty. Replacement may consist of replacing the product with the same product or with a different product of the same value. JoysMaker shall not be liable for any incidental or consequential damages for the breach of any warranty on this product. Any implied warranty of merchantability or fitness for a particular purpose on this product is limited to the duration of this warranty. 15