1
Excelling MultiTerm
User Manual
Version: 5.3
16/11/2015
Table of Contents
Table of Contents
2
1
Introduction
4
2
Installation
6
2.1
System Requirements
6
2.2
Installation
6
2.3
Registration and Activation
7
2.3.1
Registration as a Desktop License
8
2.3.2
Registration as a Network License
11
2.3.3
License Transfer
15
2.3.4
Offline Activation
15
2.4
Settings
16
3
Export
18
3.1
Connect to a Data Source
19
3.2
Specify Export Source and Filter
20
3.3
Using External Sources as Filters
21
3.4
Defining Fields and Sort Order
23
3.5
Save and Run
25
4
Import
27
4.1
Connect to a Data Source
29
4.2
Specify Fields
31
4.3
Save and Run
31
4.4
Log File
32
4.5
Details on Import
33
5
Excel File
37
5.1
Data Structure
37
Excelling MultiTerm - User Manual
Table of Contents
5.2
Editing Existing Entries
39
5.3
Creating New Terms
40
5.4
Creating New Entries
41
6
Additional Features
43
6.1
Check for Duplicates
43
6.2
Clean out wrong data from entries
47
6.3
Sort terms
51
6.4
Deleting specific Termbase Content
53
6.5
Command-line Operation
58
7
Free Express Version
60
7.1
Prepare the Excel File
60
7.2
Create the Termbase
61
7.3
Import the Data
63
7.4
Additional Features of the Free Express Version
66
Excelling MultiTerm - User Manual
3
1
Introduction
1 Introduction
Purpose
Excelling MultiTerm provides a bidirectional interface between SDL
MultiTerm (Desktop or Server) and Microsoft Excel. The purpose of this tool
is to export entries from MultiTerm to Excel, then edit these entries off-line
and finally import them back again into MultiTerm. In Excel you can edit
existing terms, fields and entries, and you can add new ones. If you want to
delete a term, then you can for instance change it to "deleted" and after
import use the batch delete function to delete all terms called "deleted".
You can also use Excelling to batch-import entries or terms into an existing
or a new termbase.
Possible Applications
For the individual user Excelling MultiTerm can be useful if the content of
one field needs to simultaneously be changed in many entries. Or if a larger
quantity of data needs to be exported for easy editing across multiple data
records and subsequently imported again. Excelling MultiTerm is also wellsuited for easily importing Excel files to MultiTerm.
At companies Excelling MultiTerm decentrally supports two fundamental
processes:
▪ The release or editing of entries by persons who do not have MultiTerm,
including, for example, project heads or product managers. A MultiTerm
database can simply be filtered and exported to Excel, edited in Excel,
and then directly imported from Excel back to MultiTerm.
▪ The multilingual development of a termbase by external employees who
do not have MultiTerm. For this application, a specific filter for
"untranslated" entries can be combined with any other MultiTerm filter to
export the desired parts of the termbase to Excel, where they can be
translated by a translator directly in Excel. Then the file is directly
imported from Excel back to MultiTerm.
Functional Principle
For export Excelling MultiTerm directly accesses the Excel and MultiTerm
application programming interfaces (APIs), so it does not perform a "normal"
export using MultiTerm's export function, but adds the contents field by field
to an Excel table or imports it field by field from Excel back to MultiTerm.
4
Excelling MultiTerm - User Manual
Introduction
1
That is how Excelling MultiTerm solves problems that emerge when directly
exporting from MultiTerm e.g., to a tab-delimited file. So Excelling can do the
following:
▪ Manage empty field contents, which can lead to problems in normal tabdelimited export.
▪ Create structured tables, even if MultiTerm contains e.g., synonyms or
several definitions or something like that (In fact this cannot be achieved
using the "normal" MultiTerm export).
▪ Synchronize the correct entries when importing homonyms. Excelling
does this by exporting the concept ID.
Additional Features
Excelling MultiTerm contains several additional features that can be useful
for maintaining and cleaning termbases:
▪ Termbases can be checked for duplicates in all languages
simultaneously.
▪ Termbases can be checked for duplicate synonyms within one entry
▪ Wrong or inconsistent termbase content can be fixed, such as wrong
languages, wrong field names or wrong pick list values
▪ Terms within an entry can be rearranged according to certain descriptive
fields (for instance, all "standard" terms can be moved to the top of the
entry), or all fields in the entire termbase can be sorted in a specific way.
▪ Termbase content can be selectively deleted, for instance by deleting a
certain language or by deleting all terms for a certain MultiTerm filter
Batch Mode
In order to automate processes, Excelling MultiTerm can be executed in
Batch Mode. With Windows task planner you can, for instance, run a certain
set of exports or imports routinely on a certain weekday at a set time.
Excelling MultiTerm - User Manual
5
2
Installation
System Requirements
2 Installation
2.1 System Requirements
▪ Local installation of MultiTerm client starting from version 7. Local and
server-based termbases are supported The hotfix of KB-article http://
talisma.sdl.com/article.aspx?article=1536&p=1 must be installed for
MultiTerm 2007
▪ Windows XP or higher, both 32 or 64 bit versions are supported
▪ Microsoft .net Framework 3.5 SP1
▪ An internet connection for product activation
2.2 Installation
The installation of Excelling MultiTerm is done with the aid of a Windows
installer. The only parameter that must be entered is the path where the
export and import definitions are to be saved. By default this is the subdirectory "Settings" within the Excelling MultiTerm installation directory.
Deinstallation is done using the control panel. Any existing task definitions
are intentionally not deleted so that they are available for a potential
reinstallation or upgrade.
Windows security settings for license and configuration files
Due to Windows security policies, particularly with Windows Vista and
Windows 7, only the base configuration file is stored in the program
directory. The license file and all client-specific configuration files will be
stored in the user´s profile.
For Windows XP this is c:\documents and settings\all users\application files
\Kaleidoscope\. For Windows Vista and Windows 7 this is c:\programdata
\Kaleidoscope\.
Users need write access to this directory, because the license file is
touched at each program start and configuration changes are written to the
configuration file.
6
Excelling MultiTerm - User Manual
Installation
Registration and Activation
2
Trial version
After the initial installation, you can test the software with a full feature set for
3 days. After this time period, the software will be deactivated and has to be
registered. If you have already purchased the software before installation,
you can immediately register it.
It is not possible to circumvent the time limitation by changing the system
date. The license will detect this manipulation and will automatically expire.
You then have to immediately register the software.
Installing Updates
You can simply install an update by installing it on top of the older version.
All settings will be maintained.
However, you will be asked whether you want to also overwrite the license
file. Please answer this question with "No" so your original license will also
be maintained and you will not have to re-register the software.
2.3 Registration and Activation
License Versions
Excelling MultiTerm is available in four versions:
▪ As single desktop license: In this case, activation is done directly at the
workplace where the license will be used.
▪ As a freelance license: The freelance version only works with local
termbases and only with up to 5 languages. Apart from that, the
registration works just like for the single desktop license.
▪ As a network license: (Also called concurrent or floating license) with
parallel access from several PCs In this case the license file is stored on
a network share which is accessible by all client PCs.
▪ As demo version. After installation, Excelling MultiTerm will run for 3
days as a fully functional application with all features available. After this,
the trial expires, which can also be seen in the title bar of the application.
Once it has expired, Excelling MultiTerm must be registered and
activated.
Excelling MultiTerm - User Manual
7
2
Installation
Registration and Activation
Administration Rights
In order to activate Excelling MultiTerm, the application has to be started
with administrative rights. Otherwise windows cannot access the
configuration file.
See also
2 Registration as a Desktop License [➙ 8]
2 Registration as a Network License [➙ 11]
2 Settings [➙ 16]
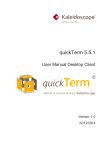
2.3.1 Registration as a Desktop License
Registration is done on the Settings page:
Settings Area
In this dialog you see several options which are explained in detail in the
section Settings [➙ 16]. Registration is done with the last item in the
window. Here you see a list of available license files, typically one license
file. By default a demo license is available.
Select the license and click on Activate. The question pops up: Which type
of license are you activating?:
8
Excelling MultiTerm - User Manual
Installation
Registration and Activation
2
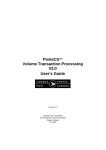
Activation: Type of license
Please select:
▪ Single Desktop or
▪ Freelance License:
The product activation screen pops up:
Activation: Serial Number or Demo
Select the first option and click on OK.
The screen pops up to enter the user data:
Excelling MultiTerm - User Manual
9
2
Installation
Registration and Activation
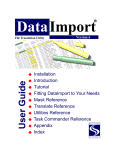
Activation: User Data
In the first field, enter the serial number you received when you purchased
Excelling MultiTerm. Enter your company name and optionally a user name.
In the last field, please enter your e-mail address.
Activation
The next step is the online activation of the license. In the next dialog field,
please confirm the activation by selecting "Activate now":
Activation: Establish a Connection
If activation was successful, the activation server first confirms this:
Activation: Confirmation
Then Excelling MultiTerm also confirms activation:
10
Excelling MultiTerm - User Manual
Installation
Registration and Activation
2
Activation Finished
To complete the activation of your copy of Excelling MultiTerm, you need to
restart the program.
See also
2 Settings [➙ 16]
2.3.2 Registration as a Network License
Step 1: Activate the license file on a shared network folder
In order to use Excelling MultiTerm as a network (also called concurrent or
floating) license, copy the license file to a shared network folder where all
clients have access BEFORE ACTIVATING IT.
To do this, proceed as follows:
a) By default, the license is stored in the folder ProgramData\Kaleidoscope
\ExcellingMultiTerm or on older Windows systems Documents and
Settings\All Users\ApplicationData\Kaleidoscope_GesmbH
\ExcellingMultiterm. The filename is excelling.lic.
b) Copy this file to a network share.
Excelling MultiTerm - User Manual
11
2
Installation
Registration and Activation
c) Then, start Excelling MultiTerm and switch to the Settings screen.
d) Click on the icon next to the license file and choose the file FROM THE
NETWORK SHARE.
e) Now click on Activate...
⇨ You will be prompted to select which license you want to activate.
f) Select Network License.
⇨ The product activation screen pops up:
g) Select the first option ("Serial Number") and then click on Next.
12
Excelling MultiTerm - User Manual
Installation
Registration and Activation
2
⇨ The screen pops up to enter the user data:
h) In the first field, enter the serial number you received when you
purchased Excelling MultiTerm. Enter your company name and
optionally a user name. In the last field, please enter your e-mail
address. Then click on Next.
⇨ The license will now be activated from our license server.
NOTE: If your network uses a proxy server and you have not set this
proxy up in the Internet Explorer settings by default, click on "Proxy
Settings" and then enter the respective data. Otherwise click
"Activate now". The application will now contact our license server
via Internet and verify the license key.
NOTE: If your network infrastructure does not allow online
activations, then you can activate via e-mail. For this you will need
an e-mail client installed on the machine. Click on the respective link
and follow the instructions given by the wizard.
i) Click on "Activate now".
Excelling MultiTerm - User Manual
13
2
Installation
Registration and Activation
⇨ The activation will now be confirmed:
j) Restart Excelling MultiTerm to conclude the activation.
Step 2: Activating the Concurrent Option
After activating the license file on the network share, it has to be set into
"concurrent" mode so that clients can access it simultaneously. To do this,
proceed as follows:
a) Switch to the Settings screen again.
b) Click on "Details".
⇨ You will see the License Viewer displaying the license details:
You can see that the Concurrent option is not active yet. This is what
we are doing in step 2.
c) Click on "Activation Key".
d) Enter the activation code you received from Kaleidoscope (Module
Concurrent).
e) Click on OK.
14
Excelling MultiTerm - User Manual
Installation
Registration and Activation
2
⇨ The network option will now be activated. The number of concurrent
access users will be increased depending on the license you
purchased.
Step 3: Using this License on other Clients
You can now activate other clients by replacing their local license file and
pointing to the activated license file on the network share.
2.3.3 License Transfer
It is not possible to transfer a license to another computer. If you want to use
several instances of Excelling MultiTerm in parallel, please upgrade to a
concurrent network license.
If you need a new license because you changed computer, please contact
us so we can send you a new license key.
2.3.4 Offline Activation
If you can not activate the software online on your machine via Internet, then
you can activate offline via email. Please proceed as follows:
➢ You must already have a valid serial number for your software from
Kaleidoscope.
a) In the start screen of the registration wizard, click on Activate this
Product by e-mail at the bottom of the screen.
b) Enter the serial number, your name and your e-mail-address.
c) Click on „Request Unlock Key by E-Mail“.
Excelling MultiTerm - User Manual
15
2
Installation
Settings
⇨ The registration assistant now generates an e-mail to Kaleidoscope
containing the required information. Kaleidoscope will then generate
an "unlock key" and mail it back to you.
d) Restart Excelling and then click on Activate again.
⇨ A dialog box will appear asking for your activation code.
e) Enter the unlock key you have received and click through the remaining
steps of the wizard with Next.
⇨ Excelling MultiTerm has now been activated.
2.4 Settings
Several base settings can be defined, depending on how you will want to
use Excelling MultiTerm. These settings can be done on the Settings page:
Settings Page
Depending on the security configuration of your system, it might be
necessary to start Excelling MultiTerm with administrative rights in order to
set up these settings.
The possible configuration includes the following settings:
▪ Directory for task definitions: Lets you specify a directory where exportand import task definitions are stored. By default this is the subdirectory
"settings". However, if you work in a network, it might be useful to set up
a shared folder and store your settings there. This way all users can
access all task definitions.
▪ Directory for backup copies: Several tasks provide an optional backup of
the database before changing termbase content. This backup copy will
be stored in the directory specified here. The default setting is the
subdirectory "backup", but you can select any other path, as well.
16
Excelling MultiTerm - User Manual
Installation
Settings
2
▪ E-Mail Settings: When using Excelling MultiTerm in Batch Mode (see
Command-line Operation [➙ 58]), then you can receive automatic
mails when these tasks are processed. You can use this setting to define
your mail server access. You can test your settings immediately by using
the "Send Test mail" feature.
Excelling MultiTerm - User Manual
17
3
Export
3 Export
Excelling MultiTerm automatically creates an Excel-file during export.
In Excelling MultiTerm, exports are processed using so-called "export tasks."
These tasks specify which data will be exported from which termbase. Using
these tasks, you can repeatedly carry out an export. For your first export,
you must create a new task.
To do so, first click on "Perform a database export task". The main screen of
this module pops up:
Export: Main Screen
In this screen, you see all export tasks that already exist and can perform
the following functions:
▪ To create your first task or a new task, check "Create export task from
scratch" and click on "Next."
▪ To delete an existing task, click on the red "X" next to the task. This only
deletes the definition of the export but not the exported files. You can still
import these.
▪ To perform an existing task, select the task and click on "Next“.
▪ To modify an existing task or create a new one based on it, check
"Modify the selected task or create a new one based on it" and click
"Next."
18
Excelling MultiTerm - User Manual
Export
Connect to a Data Source
3
3.1 Connect to a Data Source
The first step will establish a connection to the data source. You will have to
specify whether you are connecting to a local termbase (i.e., existing on your
computer), a LAN termbase (i.e., existing on a MultiTerm server in the
company network) or an Internet termbase (i.e., accessible on the Web via
MultiTerm Anywhere on an Internet server).
Defining a Termbase Connection
▪ For local termbases simply leave all text fields blank (or, if you want to
highlight matters for your own use, enter “local host” in the address field )
and click on "Next."
▪ For LAN server connections enter the server name and the MultiTerm
username and password. Then click on "Next" As an option, select
"Remember password". Excelling always remembers the last termbase
server plus the username. However, the password is only remembered if
you chose to do so.
▪ For MultiTerm 2007 remote server connections via the Internet, enter the
server address (including http(s):// and including "/mtanywhere" at the
end) as well as the MultiTerm username and password. Then click on
"Next". As an option, select "Remember password". Excelling always
remembers the last termbase server plus the username. However, the
password is only remembered if you chose to do so.
▪ "Specify Entry IDs"
By activating this option, you can define a precise list of entry IDs which
should be processed with this task.
Excelling MultiTerm - User Manual
19
3
Export
Specify Export Source and Filter
Database Backup checkbox
For all import and maintenance features the dialog termbase connection
also offers a checkbox "Backup target database". Select this option if you
want Excelling to execute a complete termbase export before running the
import or maintenance operation. The export will be done using the default
export definition of MultiTerm.
3.2 Specify Export Source and Filter
With a successful server connection, the available termbases and different
filter criteria are listed in the next dialog box.
Export: Source and Filter
Here you can now set the following options:
a) With "Source termbase for export" you can select the termbase from
which you would like to export.
b) With "Apply filter" you can select a MultiTerm filter to apply to your data.
This filter gets applied during export. You can also define a Secondary
Filter from MultiTerm. This secondary filter will be applied together with
the main filter during export. Both filter criteria must be met in order for
the entry to be exported, the main AND the secondary filter.
c) Below the MultiTerm filters you can also define term filters which will
work on the term-level. These filters are not from MultiTerm, because
MultiTerm only supports filters on entry level. These filters are added by
Excelling MultiTerm and allow you to filter individual terms within an
entry. For example: If you set the term filter on field Usage equals
Standard, then only those terms will be exported that contain the value
Standard in the Usage field. If none of the terms in an entry match this
setting, then the entry is skipped altogether.
20
Excelling MultiTerm - User Manual
Export
Using External Sources as Filters
3
d) With "Source language" you can select a language as source language.
This language is used for the definition of the "untranslated entries," as
well as for the choice of language used for sorting if in the next dialog
box the option "Sort entries before export" is selected. Also, some
MultiTerm filters are based on a switchable "source" language, so in
order for these filters to work you also need to supply the respective
source language. Filters which refer to a "target" language are not
supported in Excelling.
e) With "Export all entries" all entries are exported which apply to any filter
selected.
f) With "Export incomplete entries only" only those entries are exported
that are "incomplete" for Excelling MultiTerm:
Unlike MultiTerm, Excelling MultiTerm dynamically defines what
"incomplete" means. This is done together with the field selection in the
next dialog, where you can set the fields to be exported. In Excelling
MultiTerm, incomplete means that at least one of the fields selected in
this dialog box is empty in the entry. Therefore, each export can define a
different set of "incomplete" entries.
By contrast, in the MultiTerm filter the definition "incomplete" only
includes those entry, where an obligatory field according to the termbase
definition is missing.
The check for completeness can be done in the source language, the
target language(s) or in all languages.
g) “Export untranslated entries only" can be used to define that only those
entries are exported, which do not yet have a term in the target
language(s), in other words are untranslated. The selection of
untranslated entries can be done in one or several languages at a time.
In the next dialog in this wizard, you will be able to define the languages
to be exported. The "target" languages are all languages which are NOT
the source language set in this dialog.
h) “Export only translated entries” can be used to define that only those
entries are exported, which DO have a term in the target language.
After these specifications, click on "Next."
3.3 Using External Sources as Filters
This step allows you to integrate external files and databases to filter those
entries that should be exported. These sources include:
Excelling MultiTerm - User Manual
21
3
Export
Using External Sources as Filters
External Filters
▪ Text files which contain the entry IDs to be exported
▪ XML-files from which you can read the entry IDs by means of XPath
statements. This, of course, includes MultiTerm XML files. By using
XPatch on exported MultiTerm termbases, you can practically achieve
any kind of filtering, even based on dates, nesting information etc.
▪ SQL queries which return a list of entry IDs to be exported. One typical
use case of this option is the integration with quickTerm to export, for
instance, all entries that are currently being approved in a certain
language.
This is how you can define an external filter source:
a) Select the type of source.
b) Text file: Also define the file which should be read and the separator
which separates the individual IDs from one another.
c) XML file: Also define the file which should be read and the XPatch
statement that returns the entry IDs from the file.
d) Database: Also define the database connection and the SQL statement
which returns the entry IDs.
e) In either case you can klick on Test in order to test the query you have
setup up. The test returns the list of entry IDs which would be filtered.
f) At the end, you can also select the checkbox telling Excelling MultiTerm
to use the defined filter as an EXCLUSION filter. This means that it
would export all entry that do NOT match the filter.
Once you are done, click on Next.
22
Excelling MultiTerm - User Manual
Export
Defining Fields and Sort Order
3
3.4 Defining Fields and Sort Order
In this step you can select which fields from the termbase will be exported.
Export: Specify Fields
▪ Option "Only export terms".
If this option is selected, you can only export terms and you will only be
able to select which languages to export.
Choosing Fields for Export
In the tree structure you can activate and deactivate any field.
▪ The tree "Historical Data" includes the processing information (creation
date, etc.) from MultiTerm. If you select these fields, this data will be
exported for all fields with history.
▪ Click on Entry Class if you also want to export the entry class, in case
you are using this MultiTerm feature.
▪ The tree "Fields" contains the fields on the entry level.
▪ When a field is activated or deactivated on the top level, the entire
substructure will be activated or deactivated automatically. By clicking on
"Deselect all" you can set all fields to not be exported.
Special Features for Field Selection
▪ By clicking on "Select field" you can select all fields in a tree, meaning for
instance all language-level fields, or all term-level fields.
Excelling MultiTerm - User Manual
23
3
Export
Defining Fields and Sort Order
▪ By clicking on Optimize column width you can choose to automatically
scale the column in excel to the longest field value exported in this
column. This can make sense for certain values such as a status value.
However, it makes no sense to optimize for instance a "definition"
column, since it might be extremely wide in Excel.
Sorting Entries and Terms
By default, all entries are sorted in the chronological order of their entry
number. Languages are sorted alphabetically depending on their ISO code.
Terms are sorted exactly in the order in which they appear in the MultiTerm
entry itself.
You can change this sort oder in various ways:
▪ You can sort all entries alphabetically by clicking on "Sort entires
alphabetically by first term". This sort oder uses the "first term" of each
entry to determine the alphabetical sequence of the entries. By default,
the "first term" is the one that is all the way to the top of each language in
MultiTerm. However, you can change this sort order to move certain
terms to the top of each language (see below).
▪ You can sort the order of the languages in the Excel file by selecting a
language and moving it up and down with the arrows at the right side.
This can be useful if you are translating from a specific language and
want this language to be all the way to the left in Excel (thus on top in the
tree).
▪ You can use three approaches to sort the terms within each language:
– Do not sort terms means that the terms appear exactly in the order in
which they are created in the MultiTerm entry.
– Sort terms alphabetically means that the terms within a language are
sorted alphabetically.
– Sort terms be field allows you to define a "preferred" term based on a
certain field and value. To do this, click on "Sort terms by field",
choose the field and then enter the required value. Several values
can be entered by separating them with a a semicolon.
For example: Suppose you have 4 terms in the language German.
Only one of them has the Usage field set to Standard. You can make
sure that this term is exported as the top term. You do this by
selecting "Sort terms by field", then choosing the field Usage and
24
Excelling MultiTerm - User Manual
Export
Save and Run
3
selecting the value Standard. You simply choose the relevant field
and enter the relevant values, separated by a semicolon if there is
more than one value
After these specifications, click on "Next."
Counter for sorting Excel file
Experienced users can click on "Export concept ID and running number for
each line" in order to generate an additional column in the Excel file
containing a sequential numbering. These exported counters are just an
aid for users to restore the original order of lines if it has been changed
manually. Typically, please use the export without counters.
3.5 Save and Run
In the last step, you can now save your selected settings as a task to be rerun at a later time or to run it only once and not save it:
Export: Save and Run
a) Click on "Save task" to save your settings and enter a name and a
description. Your saved export settings will be stored in the subdirectory
“Settings.” This subdirectory can be modified during installation or in the
file config.ini.
b) To perform your export task, click on "Perform export." Then click on
"Next".
c) A dialog box opens where you can specify the storage location and the
file name of the Excel file to be created. Information about structure and
use of the Excel file is found under Excel file.
Excelling MultiTerm - User Manual
25
3
Export
Save and Run
⇨ The export will now run. Depending on the size of the export, this can
take several minutes. At the end of the wizard, you will receive a notice if
the export was successful.
26
Excelling MultiTerm - User Manual
Import
4
4 Import
With this module, you can import an exported and edited / translated Excel
file back to the original MultiTerm database.
Export termbase is also the import termbase
You can only import into the same termbase from which you exported. By
importing into another termbase, it may happen that entries are falsely
synchronized, since during import the entry number is used as a
synchronization feature. Therefore the target-termbase is hard-wired into the
Excel file and you are not prompted to choose one during import.
If you have changed the termbase name or do want to import into a different
termbase, you can change this information in the file properties of the excel
file. But ATTENTION: The target termbase structure must be 100%
compatible with the data structure of the source termbase.
This is how it works:
a) Right click on the Excel file and select Properties.
b) Change to the tab User defined.
⇨ Here you can see all custom properties of the file.
c) In the list of fields, click on "Excelling Termbase".
⇨ The name and value of the field are now displayed in the editor
above.
d) Change the name and click “Apply.”
⇨ You can now import the Excel file into the new termbase.
Excelling MultiTerm - User Manual
27
4
Import
File Properties
Perform Import
To do so, first click on "Perform a database import task." The first step is to
select the file you would like to import. Then the main screen of this module
pops up:
Import: Start screen
28
Excelling MultiTerm - User Manual
Import
Connect to a Data Source
4
In this screen, you see a list of all available import tasks which match the
selected Excel file, and you can carry out the following functions:
▪ To create your first task or a new task, check "Create export task from
scratch" and click on "Next."
▪ To delete an existing task, click on the red "X" next to the task. This only
deletes the definition of the import but not the exported files. You can still
import these.
▪ If you would like to see all tasks, including those that do not apply to the
selected file, click on "Show all import tasks." That can, for example, be
helpful if you would like to use an existing task as the basis for a new
one.
▪ To perform an existing task, select the task and click on "Next“.
▪ To modify an existing task or create a new one based on it, check
"Modify the selected task or create a new one based on it" and click
"Next."
Perform Database Backup
Since some of these features change a lot of entries, it makes sense to
perform a backup before running the command. You do this by selecting
the checkbox "Database Backup" in the termbase connection wizard. This
will carry out a complete default xml export before running the command
that follows.
4.1 Connect to a Data Source
In the next dialog box please define first which user will be entered as
“change user” in the MultiTerm history of modified entries.
Also, you can select the "Backup database" option for certain operations, if
you want to back up the existing termbase before running an import or a
maintenance operation. The backup consists of a complete termbase export
using the default export definition into a directory which you can define in the
settings dialog.
The connection to the termbase will then be established. You will have to
specify whether you are connecting to a local termbase (i.e., existing on your
computer), a LAN termbase (i.e., existing on a MultiTerm server in the
company network) or an Internet termbase (i.e., accessible on the Web via
MultiTerm Anywhere on an Internet server).
Excelling MultiTerm - User Manual
29
4
Import
Connect to a Data Source
Defining a Termbase Connection
▪ For local termbases simply leave all text fields blank (or, if you want to
highlight matters for your own use, enter “local host” in the address field )
and click on "Next."
▪ For LAN server connections enter the server name and the MultiTerm
username and password. Then click on "Next" As an option, select
"Remember password". Excelling always remembers the last termbase
server plus the username. However, the password is only remembered if
you chose to do so.
▪ For MultiTerm 2007 remote server connections via the Internet, enter the
server address (including http(s):// and including "/mtanywhere" at the
end) as well as the MultiTerm username and password. Then click on
"Next". As an option, select "Remember password". Excelling always
remembers the last termbase server plus the username. However, the
password is only remembered if you chose to do so.
▪ “Change user”
Please define which user will be entered as “change user” in the
MultiTerm history of modified entries.
▪ "Specify Entry IDs"
By activating this option, you can define a precise list of entry IDs which
should be processed with this task.
Database Backup checkbox
For all import and maintenance features the dialog termbase connection
also offers a checkbox "Backup target database". Select this option if you
want Excelling to execute a complete termbase export before running the
import or maintenance operation. The export will be done using the default
export definition of MultiTerm.
30
Excelling MultiTerm - User Manual
Import
Specify Fields
4
4.2 Specify Fields
Excelling MultiTerm now reads the fields contained in the Excel file and
offers these fields for selection in a dialog box.
Import: Specify Fields
Now you can specify which fields from the Excel file you want to import into
MultiTerm and which fields you want to exclude. You can do so by simply
activating or deactivating a field in the tree structure. When a field is
activated or deactivated on the lowest level, the entire substructure will be
activated or deactivated automatically. For example, if you are dealing with a
translation project, you will probably de-select the source language from the
list.
If your termbase is server-based, you can also specify the entry class of any
new entries to be created.
Then click on "Next".
4.3 Save and Run
This step allows you to save your settings as a task to be re-run at a later
time or to run it only once and not save it.
Excelling MultiTerm - User Manual
31
4
Import
Log File
Import: Save and Run
a) Click on "Save task" to save your settings and enter a name and a
description. Your saved import settings will be stored in the subdirectory
“Settings.” This subdirectory can be modified during installation or in the
file config.ini.
b) To perform your import task, click on "Perform import." Then click on
"Next".
4.4 Log File
This step tells you how to create and maintain a log file. As a general rule,
this is useful if you want to trace what happened during import or where
there is an error in the Excel data.
Import: Log File
32
Excelling MultiTerm - User Manual
Import
Details on Import
4
The log file contains the following information per entry:
▪ Which entries were modified.
▪ Which entries were not modified.
▪ Which entries required a user intervention and what sort of intervention it
was.
▪ The end of the log file contains a statistic on imported entries so you can
verify whether it is complete.
Then the import starts.
Entry cannot be saved. It contains duplicate terms.
If you find this error message in the log file, it is a result of the MultiTerm
API error that occurs when several identical terms exist in the same entry.
To fix this error, use the Excelling MultiTerm feature “Check Termbase for
duplicate terms.” For further details, please consult the relevant section.
4.5 Details on Import
Checking field values
During import, Excelling verifies that the values in the Excel file are valid in
MultiTerm. This prevents importing invalid data. The checking process
involves the following checks:
▪ Only allowed values are imported for boolean and pick list fields.
▪ Text fields can only be imported more than once if the termbase
definition allows for multiple fields.
▪ Boolean and pick list fields may not be used twice. Instead, several
values can be separated by using the pipe symbol (|) within the
respective column in Excel.
▪ When errors occur, these are written to the log file. The import then
continues with the next line in Excel.
▪ Nested fields can only be filled if the parent field also contains a valid
value.
XML Tags in the Import Data File
If the Excel file contains forbidden XML characters (<, >, & etc.), then these
will be encoded automatically by Excelling (< etc.). Otherwise MultiTerm
will report an error upon import. The only instance where these special
Excelling MultiTerm - User Manual
33
4
Import
Details on Import
characters are not encoded are <XREF> Tags, since these are used for
links in MultiTerm. If Excelling runs into a problem during encoding, then an
error will be shown and the respective characters can be deleted.
Error message caused by XML tags in Excel
The import file is also XML-validated before the import, to avoid messy XML
code from entering the termbase.
Blank Lines in Excel
If blank lines are present in the Excel data file, Excelling MultiTerm supposes
this to be the end of the data file and issues a corresponding notice:
Message: End of file
If you select “Yes,” Excelling searches downward for another 10 lines to see
whether further entries may be present. If Excelling MultiTerm finds no
further lines or if you select “No,” the import will be completed and the log file
created.
Simultaneous Modifications
When entries are modified in MultiTerm directly while an export file is being
changed as well, and if these entries are now to be imported again via
Excelling, we call this a “simultaneous modification.” In this case, the dialog
box Simultaneous modification of fields pops up:
34
Excelling MultiTerm - User Manual
Import
Details on Import
4
Simultaneous Modifications
In this dialog box, the entry in the Excel data file appears on the left while the
entry from MultiTerm is on the right. This simultaneous modification can
have occurred on the entry level or on the term level. Accordingly, the dialog
box looks slightly different: If the simultaneous modification occurred on the
term level, you can select one of several terms of the existing MultiTerm
entry on the right. After that, you have several options:
▪ By choosing Skip, you can skip the import of this term or the entry-level
fields and thus leave the entry in MultiTerm as is.
▪ By choosing Merge, you can add the additional fields from the Excel data
file to the MultiTerm entry or, alternatively, overwrite the data in
MultiTerm with the data modified in the Excel data file. When modifying
on the term level, you can first select the respective term on the right and
then add these modifications to your term via Merge.
▪ By choosing New, you can create an entirely new term or entry.
▪ By clicking on the "Apply this action on the remaining imported entries"
you can make Excelling MultiTerm use your conflict resolution option
(Merge, Skip, New) for all remaining conflicts during the import. Please
only use this option if you are absolutely sure that this applies to all
conflicts in the Excel file.
Technical Information about the Import
Excelling MultiTerm - User Manual
35
4
Import
Details on Import
Modified Terms - Hash Codes
In order to distinguish during import, whether a term not yet present in an
entry was newly added or rather modified, Excelling MultiTerm generates
so-called “hash codes” during export, although this code stays hidden. A
new hash code will be generated during import and compared with the one
in Excel. If it is different, it means that the term was modified. In this case,
Excelling MultiTerm can also change the actual term in MultiTerm.
a) Absolutely never modify the column containing the hash codes!
Color-coding not relevant for import
Excel lines are color-coded only to help the user navigate more easily.
Color-coding is utterly irrelevant to the process of data import.
Deleting Terms
If you want to delete an individual term from an entry, then do not simply
delete the line from the Excel file. During import, this data is not read
(because it does not exist) and thus nothing happens. If you do want to
delete a term, proceed as follows:
a) Change the term to a specific, unique value, for instance "deleted".
b) Import the Excel file:
⇨ In MultiTerm the term is now changed to "deleted".
c) Now switch to the screen "Batch deletion" in Excelling MultiTerm. Here
you can tell Excelling MultiTerm to delete all terms that equal "deleted".
Phantom Terms in the MultiTerm Browse Pane
After import, depending on your MultiTerm version, you can sometimes see
the old term still listed in the alphabetical list. This is caused by the Fuzzy
Index not having been rebuilt during import. To rebuild it, the termbase first
needs to be reorganized. Afterwards, the updated terms will appear in the
MultiTerm list as well.
36
Excelling MultiTerm - User Manual
Excel File
Data Structure
5
5 Excel File
5.1 Data Structure
The Excel data file, where you can process termbase entries, consists of a
simple, logical structure to be described as follows.
Excel File
Header and Definition of Structure
At the top, the Excel file differentiates between the concept ID (=entry
number) and fields at the entry level, as well as the individual languages.
The example provides the concept ID and entry level as well as German and
English as languages.
In the next line, the entry level and the individual languages are parsed
further across the available fields. In the example, no field was exported at
entry level. For the German language, not only the term but also its definition
with its source as well as the source of the term and the status were
exported. The English language option includes an additional “regional
usage.”
In the case of so-called “nested fields,” e.g., the field “Definition” with its
subordinate field “Source,” the script is represented as follows: Source
[Definition]. This means that this column contains the source of the
definition.
For all fields that only allow one exactly value, Excel offers a drop-down list
in order to prevent invalid data. This is not possible, however, for pick list
fields that allow more than just one value. In these cases, the data is
checked only during import.
Entries and Terms
Starting at line 6, we get to the actual data. There we have to distinguish
between “Entries” and “Terms”:
Excelling MultiTerm - User Manual
37
5
Excel File
Data Structure
▪ An entry corresponds to an entry in MultiTerm; it is thus equivalent to a
concept (or “idea”). It can contain several terms.
So that it can synchronize with the correct entry on import, the entry
number is exported along with the remaining data. As additional optical
help, every entry alternates between being colored yellow and white. A
“color” thus always also corresponds to an entry or concept.
▪ A single entry can then contain several terms. These are synonyms,
alternative usages, spelling variants, or anti-terminology, that were all
captured in MultiTerm. In the example, the third entry, Number 428, has
5 variant spellings and therefore 5 lines in Excel.
This does not mean that this entry has to take up 5 lines in English. It
can very well be that an entry has 5 German terms but only a single
English term. It is just as well possible, however, that it only has one
German but 5 English terms.
You can add new synonyms in Excel without any difficulty by simply
adding new lines and by entering new terms under the respective entry
number.
Information about version, export date and termbase name
The information about the source termbase, Excelling version number and
export date is written directly to the file properties of the Excel file.
You can only import into the same termbase from which you exported. By
importing into another termbase, it may happen that entries are falsely
synchronized, since during import the entry number is used as a
synchronization feature. Therefore the target-termbase is hard-wired into the
Excel file and you are not prompted to choose one during import.
If you have changed the termbase name or do want to import into a different
termbase, you can change this information in the file properties of the excel
file. But ATTENTION: The target termbase structure must be 100%
compatible with the data structure of the source termbase.
This is how it works:
a) Right click on the Excel file and select Properties.
b) Change to the tab User defined.
⇨ Here you can see all custom properties of the file.
c) In the list of fields, click on "Excelling Termbase".
⇨ The name and value of the field are now displayed in the editor
above.
38
Excelling MultiTerm - User Manual
Excel File
Editing Existing Entries
5
d) Change the name and click “Apply.”
⇨ You can now import the Excel file into the new termbase.
File Properties
5.2 Editing Existing Entries
You may edit all existing cells in the Excel data file starting at line 6,
excluding the concept ID on the far left. To do so, you simply overwrite the
old field with the new value.
Concerning terms, please note that if you modify a term, the old term in
MultiTerm will be overwritten with the new term. It may be more useful to
switch the existing term to “rejected” and to insert a new term. Please
consult with your terminologist on this issue.
Excelling MultiTerm - User Manual
39
5
Excel File
Creating New Terms
Modified Terms - Hash Codes
In order to distinguish during import, whether a term not yet present in an
entry was newly added or rather modified, Excelling MultiTerm generates
so-called “hash codes” during export, although this code stays hidden. A
new hash code will be generated during import and compared with the one
in Excel. If it is different, it means that the term was modified. In this case,
Excelling MultiTerm can also change the actual term in MultiTerm.
a) Absolutely never modify the column containing the hash codes!
Color-coding not relevant for import
Excel lines are color-coded only to help the user navigate more easily.
Color-coding is utterly irrelevant to the process of data import.
Deleting Terms
If you want to delete an individual term from an entry, then do not simply
delete the line from the Excel file. During import, this data is not read
(because it does not exist) and thus nothing happens. If you do want to
delete a term, proceed as follows:
a) Change the term to a specific, unique value, for instance "deleted".
b) Import the Excel file:
⇨ In MultiTerm the term is now changed to "deleted".
c) Now switch to the screen "Batch deletion" in Excelling MultiTerm. Here
you can tell Excelling MultiTerm to delete all terms that equal "deleted".
5.3 Creating New Terms
You can also create new terms for an entry in Excel by simply inserting a
new line at the end of an entry (and thus before the next concept ID):
Excel: Creating a New Term
40
Excelling MultiTerm - User Manual
Excel File
Creating New Entries
5
In this example, a new Line 14 was inserted after Line 13 (at the entry
identified by concept ID 10). This is where you can add new terms, fields,
etc. During import, these new fields along with the term itself will be added
as a new term (synonym) to Entry 10.
5.4 Creating New Entries
If you want to add entirely new entries with one or more terms, you can
insert a complete line and then enter an asterisk (*) in the first column at the
point where a concept ID would be:
Excel: Creating a New Entry
The example shows that a new entry with 2 synonyms (New Term 1 and
New Term 2) has been added in line 19 and 20. In line 21, a second new
entry with a single term (New Term 3) has been added.
During import, an entirely new entry with a new concept ID will be added for
this line. New entries, too, can take up several lines, of course.
If you want to create several new entries, then simply insert an asterisk in
the concept ID column for every line in which a new entry begins. During
import, Excelling MultiTerm will then always add a new entry for any asterisk
it finds in the concept ID column. The lines following this new entry will be
added to it until a new asterisk or concept ID is found.
Excelling MultiTerm - User Manual
41
5
Excel File
Creating New Entries
Using Excelling MultiTerm for an initial data import
Of course you can use Excelling MultiTerm also to do an initial data import
or a batch data import. This is how it works:
➢ You have created a termbase in MultiTerm.
a) Define a MultiTerm filter which does not select a single entry (for
instance entry number = 0).
b) Now export the termbase with Excelling MultiTerm using this filter.
⇨ You will get an empty Excel file which you can use as a template to fill
with data.
42
Excelling MultiTerm - User Manual
Additional Features
Check for Duplicates
6
6 Additional Features
Certain maintenance tasks are handy in order to ensure consistency of the
data in MultiTerm, particularly before or after running batch exports and
imports. Excelling therefore provides the following set of additional features:
▪ Check for Duplicates: You can either check for duplicates in all
languages at once, or you can check duplicate synonyms withing a
single entry and language.
▪ Clean out wrong data from entries: Sometimes invalid data enters a
termbase, for instance during an invalid import. This includes for
instance invalid field names or field values. Or a language is imported as
DE-AT, but should be DE-DE according to the termbase definition.
These "errors" go unnoticed, until you want to edit that entry. Strange
things will then occur in the application.
▪ Sorting terms: For logical reasons, but also for technical reasons during
filtering, it makes sense to have the preferential terms on top of each
entry. In addition, you might sometimes want to change the sequence of
fields within an entry. Both can be done automatically in an entire
termbase with the Sort Terms feature.
▪ Deleting specific content with a batch command: Particularly during
mass data import, things can go wrong. And then you sometimes want to
delete all entries that match a certain filter, or delete entire languages or
individual terms or fields.
▪ Command-line operation: Once export and import tasks have been set
up, you can use Excelling MultiTerm via the command line, thus enabling
you to fully automate exports and imports. Using the Windows task
planner you can for instance run automatic exports every Sunday at
22:00.
6.1 Check for Duplicates
Duplicate synonyms in a single entry
It is possible in MultiTerm (before 2011) to insert two identical terms in one
entry within a single language. This does not make sense, but it goes
unnoticed during normal termbase use, until you want to edit one of the two
terms. In MultiTerm itself, this does not become a show stopper.
Excelling MultiTerm - User Manual
43
6
Additional Features
Check for Duplicates
During automated processing via the MultiTerm API, however, such an entry
causes a crash of the MultiTerm API. For this reason, MultiTerm contains a
special tool by means of which it can check for duplicate terms in a single
language per entry.
Run check prior to export!
The check for duplicate synonyms should always be run PRIOR to export.
If the file has already been exported, it is possible that an entry will not be
imported because duplicate synonyms are present. Of course, this is only
the case if the exact same language will be re-imported that contains the
duplicate synonyms.
Duplicates in all languages
Additionally, it is possible with this tool to check for duplicates in all
languages simultaneously. This is especially useful after imports of
translations since, sometimes, different terms in the source language can be
translated by a single term in one of the target languages. This often goes
unnoticed for a while and then is difficult to resolve.
Use
Click on “Check termbase for duplicate terms." At first, the dialog box on how
to connect to the server pops up:
Defining a Termbase Connection
▪ For local termbases simply leave all text fields blank (or, if you want to
highlight matters for your own use, enter “local host” in the address field )
and click on "Next."
44
Excelling MultiTerm - User Manual
Additional Features
Check for Duplicates
6
▪ For LAN server connections enter the server name and the MultiTerm
username and password. Then click on "Next" As an option, select
"Remember password". Excelling always remembers the last termbase
server plus the username. However, the password is only remembered if
you chose to do so.
▪ For MultiTerm 2007 remote server connections via the Internet, enter the
server address (including http(s):// and including "/mtanywhere" at the
end) as well as the MultiTerm username and password. Then click on
"Next". As an option, select "Remember password". Excelling always
remembers the last termbase server plus the username. However, the
password is only remembered if you chose to do so.
▪ "Specify Entry IDs"
By activating this option, you can define a precise list of entry IDs which
should be processed with this task.
Database Backup checkbox
For all import and maintenance features the dialog termbase connection
also offers a checkbox "Backup target database". Select this option if you
want Excelling to execute a complete termbase export before running the
import or maintenance operation. The export will be done using the default
export definition of MultiTerm.
In the next step, you can select which check you want to run for which
termbase:
Check for Duplicates: Select Termbase
Excelling MultiTerm - User Manual
45
6
Additional Features
Check for Duplicates
Select the termbase you want to check. Then specify whether you wish to
check for duplicate synonyms only (a good choice prior to your first export)
or whether you wish to check for duplicates in all languages (a good choice
after a translation import). Then click on "Next."
Excelling MultiTerm now searches the termbase for duplicate terms and
produces a summary:
Check for Duplicates: Results
You can export this list and then process the relevant entries in MultiTerm.
Or you can click on Next and then export the respective term to an Excel file
just as you would during a normal Excelling export.
Deleting Duplicate Synonyms
As you will see, it is not so easy to delete a duplicate synonym in MultiTerm
within a single language. It may be necessary to first rename one of the
two duplicates, for example, by adding a “2,” then save the entry and check
if MultiTerm has correctly kept all the fields. After that, enter the edit mode
again and delete the duplicate that does NOT contain the fields. The
handling of these duplicates in MultiTerm does not work well, and this trick
allows you to turn the duplicates in MultiTerm into autonomous terms which
can be deleted.
Skipping certain Entries
If you do not want to process certain entries with Excelling MultiTerm, you
could also create a field in MultiTerm to store the information that this entry
is not valid for Excelling (e.g., “ExcludeExcelling” and value “Yes”). You can
then exclude these entries via a filter.
46
Excelling MultiTerm - User Manual
Additional Features
Clean out wrong data from entries
6
Excluding Homonyms from the Duplicate Search
You might want to exclude certain duplicates (homonyms) from being found
as duplicates again and again. Therefore you can exclude these once:
➢ You have performed a duplicate search and have a list of homonyms.
a) Click on the homonym you do not want to be found as duplicate any
more.
b) Underneath the list click on "Exclude selected duplicates".
⇨ These duplicates are removed from the list and will no longer be found
as duplicates in subsequent searches.
Resetting excluded Duplicates
All excluded duplicates are written to a file called TERMBASENAME.excl in
the settings-directory of Excelling MultiTerm. You can edit this list and
delete individual lines, or simply delete the whole list. Then these
duplicates will be found again.
6.2 Clean out wrong data from entries
Sometimes invalid data enters a termbase, for instance during an invalid
import or a flawed migration. This includes for instance invalid field names or
field values. Or a language is imported as DE-AT, but should be DE-DE
according to the termbase definition. These "errors" go unnoticed, until you
want to edit that entry. Strange things will then occur in the application.
In order to batch delete records from MultiTerm, select "Manage Termbase
Inconsistencies". At first, the dialog box on how to connect to the server
pops up:
Defining a Termbase Connection
Excelling MultiTerm - User Manual
47
6
Additional Features
Clean out wrong data from entries
▪ For local termbases simply leave all text fields blank (or, if you want to
highlight matters for your own use, enter “local host” in the address field )
and click on "Next."
▪ For LAN server connections enter the server name and the MultiTerm
username and password. Then click on "Next" As an option, select
"Remember password". Excelling always remembers the last termbase
server plus the username. However, the password is only remembered if
you chose to do so.
▪ For MultiTerm 2007 remote server connections via the Internet, enter the
server address (including http(s):// and including "/mtanywhere" at the
end) as well as the MultiTerm username and password. Then click on
"Next". As an option, select "Remember password". Excelling always
remembers the last termbase server plus the username. However, the
password is only remembered if you chose to do so.
▪ "Specify Entry IDs"
By activating this option, you can define a precise list of entry IDs which
should be processed with this task.
Database Backup checkbox
For all import and maintenance features the dialog termbase connection
also offers a checkbox "Backup target database". Select this option if you
want Excelling to execute a complete termbase export before running the
import or maintenance operation. The export will be done using the default
export definition of MultiTerm.
Now you can select in which termbase the consistency check should occur.
Excelling MultiTerm now searches invalid entries in the termbase. These are
then displayed in a list:
48
Excelling MultiTerm - User Manual
Additional Features
Clean out wrong data from entries
6
List of invalid entries
You can now export this list as a text file and then edit the entires directly in
MultiTerm.
Or you can click on Next and fix the respective entries using Excelling
MultiTerm. You will receive a listing of all conflicts and can then choose how
you want to fix each of them individually.
List of conflicts
This is how it works:
Invalid Languages
For invalid languages you have several possible solutions:
Excelling MultiTerm - User Manual
49
6
Additional Features
Clean out wrong data from entries
a) You can skip the problem, then Excelling MultiTerm will ignore it and fix
the remaining issues.
b) You can completely delete all of these "wrong" language groups. This
only deletes all terms and fields on the language level, not the remaining
entry.
c) You can map the language to another language. To do so, simply select
the correct language from the drop-down list.
When mapping to another language, you can also add an extra field with
a specified value so that you can identify these terms again in the
termbase later on. For instance, you might want to add a Note with the
content "Mapped from DE-AT". Or you can map the language DE-AT to
DE-DE and include a regional usage field with the content AT.
Invalid Fields
For invalid fields you have several possible solutions:
a) You can skip the problem, then Excelling MultiTerm will ignore it and fix
the remaining issues.
b) You can completely delete all of these "wrong" fields.
c) You can map a "wrong" field to its corresponding "right" field.
Invalid Pick list Values
For invalid pick list values you have several possible solutions:
a) You can skip the problem, then Excelling MultiTerm will ignore it and fix
the remaining issues.
b) You can completely delete all of these "wrong" fields.
c) You can map a "wrong" field value to its corresponding "right" field value.
Then click on "Next". You can now select a log file and then Excelling
MultiTerm will start fixing the defined problems.
Afterwards, check the log file for possible errors, such as errors caused by
duplicate synonyms in the termbase.
50
Excelling MultiTerm - User Manual
Additional Features
Sort terms
6
6.3 Sort terms
How MultiTerm sorts Terms
The order in which MultiTerm displays several terms within a language
depends on the MultiTerm version number. In newer versions, the search
term is always the top term. This does not always make sense. For instance,
it might be better to display the preferred term on the top of the list. Starting
with MultiTerm 2009 you can change this behavior with an option.
In some versions of MultiTerm, the order of the terms within an entry is also
important for the filter function in MultiTerm itself. For instance, you might
have a filter set to "Usage = Standard", but this filter might only work if the
top term in an entry contains the specified field value.
With the Sort Terms feature, Excelling can automatically sort all terms in all
entries of a termbase by defining which field and which value determine a
preferred term.
How MultiTerm sorts Fields
The sequence of the fields in an entry is not really relevant to MultiTerm
itself, but it can be annoying for the user to have a different sequence in
each entry. If you use entry models, then most likely all your entries have the
same field sequence anyhow. Also, it is possible to influence the sequence
in which fields are displayed via the layout. However, it can still happen that
you want the fields in an entry to all follow the same sequence.
The "real" sequence of the fields is only visible in the editor when you have
selected the default full layout.
Perform Database Backup
Since some of these features change a lot of entries, it makes sense to
perform a backup before running the command. You do this by selecting
the checkbox "Database Backup" in the termbase connection wizard. This
will carry out a complete default xml export before running the command
that follows.
Use
Click on "Sort terms". At first, the dialog box on how to connect to the server
pops up:
Excelling MultiTerm - User Manual
51
6
Additional Features
Sort terms
Defining a Termbase Connection
▪ For local termbases simply leave all text fields blank (or, if you want to
highlight matters for your own use, enter “local host” in the address field )
and click on "Next."
▪ For LAN server connections enter the server name and the MultiTerm
username and password. Then click on "Next" As an option, select
"Remember password". Excelling always remembers the last termbase
server plus the username. However, the password is only remembered if
you chose to do so.
▪ For MultiTerm 2007 remote server connections via the Internet, enter the
server address (including http(s):// and including "/mtanywhere" at the
end) as well as the MultiTerm username and password. Then click on
"Next". As an option, select "Remember password". Excelling always
remembers the last termbase server plus the username. However, the
password is only remembered if you chose to do so.
▪ "Specify Entry IDs"
By activating this option, you can define a precise list of entry IDs which
should be processed with this task.
Database Backup checkbox
For all import and maintenance features the dialog termbase connection
also offers a checkbox "Backup target database". Select this option if you
want Excelling to execute a complete termbase export before running the
import or maintenance operation. The export will be done using the default
export definition of MultiTerm.
In the following dialog you can now define, whether you want to change the
sequence of terms, or fields, or both.
52
Excelling MultiTerm - User Manual
Additional Features
Deleting specific Termbase Content
6
Sort terms
Here you can define what you want to sort.
This is how you can sort terms within all entries:
a) Click on "Sort terms according to field values".
b) Select the field you want to use as an indicator.
c) Then enter the value which makes it a preferred term. For instance, this
could be the field "Usage" with the content "Standard".
d) Then click on "Next".
⇨ Excelling will now re-sort all terms in all entries according to this
specification.
This is how you can sort all fields in an entire termbase:
a) Click on "Reorder the fields of all entries".
b) In the field list underneath, sort the terms using the arrow buttons next to
them.
c) Then click on "Next".
⇨ Excelling will now re-sort all fields in all entries according to this
specification.
6.4 Deleting specific Termbase Content
Challenges during mass import
Particularly when editing large amounts of terms, it sometimes happens that
you also want to delete large amounts of terms or entries in a single step.
Excelling MultiTerm - User Manual
53
6
Additional Features
Deleting specific Termbase Content
To avoid invalid data altogether, Excelling always allows you to create a
backup copy of the termbase before each import or maintenance operation.
In addition, Excelling offers the feature to batch delete all terms matching a
particular filter, or a complete language.
Perform Database Backup
Since some of these features change a lot of entries, it makes sense to
perform a backup before running the command. You do this by selecting
the checkbox "Database Backup" in the termbase connection wizard. This
will carry out a complete default xml export before running the command
that follows.
Use
Click on "Batch Deletion". At first, the dialog box on how to connect to the
server pops up:
Defining a Termbase Connection
▪ For local termbases simply leave all text fields blank (or, if you want to
highlight matters for your own use, enter “local host” in the address field )
and click on "Next."
▪ For LAN server connections enter the server name and the MultiTerm
username and password. Then click on "Next" As an option, select
"Remember password". Excelling always remembers the last termbase
server plus the username. However, the password is only remembered if
you chose to do so.
▪ For MultiTerm 2007 remote server connections via the Internet, enter the
server address (including http(s):// and including "/mtanywhere" at the
end) as well as the MultiTerm username and password. Then click on
54
Excelling MultiTerm - User Manual
Additional Features
Deleting specific Termbase Content
6
"Next". As an option, select "Remember password". Excelling always
remembers the last termbase server plus the username. However, the
password is only remembered if you chose to do so.
▪ "Specify Entry IDs"
By activating this option, you can define a precise list of entry IDs which
should be processed with this task.
Database Backup checkbox
For all import and maintenance features the dialog termbase connection
also offers a checkbox "Backup target database". Select this option if you
want Excelling to execute a complete termbase export before running the
import or maintenance operation. The export will be done using the default
export definition of MultiTerm.
In the next step you can select which data from the termbase you want to
delete:
Deleting Filtered Entries
Deleting an entire language
First, select the termbase you want to delete from.
Then click on "Delete an entire language group". Excelling will then show
you all languages in the termbase.
You can choose the language you want to delete.
Excelling MultiTerm - User Manual
55
6
Additional Features
Deleting specific Termbase Content
As an option, you can also choose to completely delete all entries in which
the selected language actually is the only language. If you do not choose
this, then empty entries are left in the termbase, which MultiTerm will not be
able to display or edit any more.
Then click on "Next". Excelling will now delete this language group from the
termbase.
Deleted language
Deleting a language group only means that you delete the content of the
termbase for this language. It will not delete the language from the
termbase definition. Therefore you can then create entries for that
language again or repeat the import with Excelling.
Deleting filtered entries
First, select the termbase you want to delete from.
Then click on "Delete entries by filter". Excelling will then show you all the
filters in the termbase.
First, choose the desired filter you want to delete matching entries for. Since
some filters are built to match a specific source and target language, you
can also select these here.
Then click on "Next". Excelling will now delete all entries that match the
chosen filter from the termbase.
Delete Entries without Language Groups
It can happen that an entry in MultiTerm does not contain any language
group any more. These entries are "dead entries", because MultiTerm
cannot access or display them any more.
Therefore, you can delete them using this feature.
To do so, select "Delete Entries without Language Groups" and then click on
Next. Excelling will now delete all entries that no longer have any language
group.
Delete a Field
Sometimes you might want to delete a complete field from the termbase.
Since you may not change the termbase structure, you need to do this by
exporting the termbase, creating a new structure without this field, and then
importing the data again. Normally, the field content then gets deleted in the
exported xml file. However, this is a cumbersome and error-prone process.
56
Excelling MultiTerm - User Manual
Additional Features
Deleting specific Termbase Content
6
Using the field deletion command in Excelling, you can delete specified
fields from the termbase data before exporting it. Of course you can also use
this feature to "only" delete the values of a particular field wherever it occurs
and leave the field in the termbase structure.
To do so, select "Delete field", then select the field you want to delete (on the
correct level!), and then click on Next. Excelling will now delete this field from
all entries in the termbase.
Deleted Field
Deleting a field only means that you delete the content of the field from the
termbase. It will not delete the field from the termbase definition. Therefore
you can then create new entries using that field. If you want to completely
eradicate the field from the termbase definition, you need to delete it first,
then export the termbase, create a new one without that field, and re-import
the export data.
Delete a Term
You can also delete specific terms from the termbase using Excelling
MultiTerm. To do so, you first set up the filter which defines the terms to be
deleted. This can be done using the content of the term itself or a particular
field on the term level.
To do so, select Delete term.
Then chose the field you want to base the filter on.
If you want to filter according to the content of the term itself, choose "Term".
Then, next to the field, select "Contains", "Does not contain", "Equals" or
"Does not equal" plus the value. For instance, you can delete all terms that
you have marked for deletion in an Excel file by changing the term to
"Deleted". To do so, select "TERM equals Deleted"
If you want to filter according to a field on term level, choose the field you
need. Then, next to the field, select "Contains", "Does not contain", "Equals"
or "Does not equal" plus the value. For instance, you might want to delete all
outdated terms by selecting "Usage contains Outdated".
In addition, you can define the following options before running the
command:
▪ You can delete the complete language group, if the term you delete was
the last one in that language. For instance, if you delete the laster term
of the German language, then it makes sense to completely delete
German from that entry.
Excelling MultiTerm - User Manual
57
6
Additional Features
Command-line Operation
▪ You can delete the complete entry, if the term you delete was the last
language group of that entry. For instance, if you have an entry that only
has one German term, and you delete that term, then it makes sense to
delete the entry altogether.
Then click on "Next". Excelling will now delete the specified terms from the
termbase.
6.5 Command-line Operation
In order to automate processes, Excelling MultiTerm can be executed in
Batch Mode. With Windows task planner you can, for instance, run a certain
set of exports or imports routinely on a certain weekday at a set time.
Syntax for Automatic Exports
Excelling.exe –tasks=“task1;task2“ –output=“targetdirectory“ –
[email protected]
The parameters are:
▪ "Tasks" defines the export or import tasks to be run. You can also define
several tasks separated by semicolon. These will then be executed one
after the other.
▪ "Output" defines the target directory for the export and log files.
▪ "Email" defines an eMail-address to send error messages to. If you do
not supply an eMail-address in the call, then the default address from the
settings dialog will be used.
Syntax for Automatic Imports
Excelling.exe –import –input="File or path" –tasks="Taskfiles" ––
[email protected]
The parameters are:
▪ – import is required to tell the batch command to run an import. Without
this parameter, Excelling will run an export. Automatic exports are rather
unusual, as a matter of fact. If you do want to set up automatic imports,
then you need to include the -import parameter.
▪ – input defines the Excel file to be imported, or an entire folder in which
the Excel files to be imported are stored.
58
Excelling MultiTerm - User Manual
Additional Features
Command-line Operation
6
▪ – tasks defines which import tasks to use. If no import tasks are defined,
then Excelling will pick that one which matches the target termbase and
import all languages. If more than one import tasks are found, or no
import task is found at all, then Excelling MultiTerm writes an error
message into the log file.
▪ "Email" defines an eMail-address to send error messages to. If you do
not supply an eMail-address in the call, then the default address from the
settings dialog will be used.
Excelling MultiTerm will create a log file for each import. It is stored in the
source folder of the Excel file with the same name plus the extension ".log".
Excelling MultiTerm also creates a file "autoimport.lts" in the settings path of
the installation folder to avoid redundant imports.
Excelling MultiTerm - User Manual
59
7
Free Express Version
Prepare the Excel File
7 Free Express Version
In the free Express Version, targeted particularly towards Freelancers,
Excelling MultiTerm offers an express import and export of Excel files
containing only terms, no descriptive fields.
If you import an Excel file without a column for the entry number, then each
line in Excel will become one entry in MultiTerm, containing all the terms in
the separate columns.
You can also use the free express import to import a "real" Excelling file
containing an entry ID in the first column, as long as there are only term
columns in the remaining file. That way you can run the complete export ->
edit -> import workflow with the Express Version of Excelling MultiTerm. You
can also synchronize terms with an existing termbase, or you can create
new entries with synonyms by using the asterisk in the first column. For
more information see Excel File [➙ 37]
These are the steps you need to create a termbase from a simple Excel file
using the Express Version:
a) Prepare the Excel file
b) Create a termbase in MultiTerm
c) Import the data using Excelling MultiTerm
See also
2 Excel File [➙ 37]
7.1 Prepare the Excel File
This is how you prepare the excel file with only terms for an express import
into MultiTerm:
▪ The first line has to contain the name of the languages, one per column.
▪ Starting with line two, each column contains a term in the respective
language The file may include blank cells and even blank lines.
▪ However, it may not include other data than terms. If you want to import
Excel files with descriptive fields, you will need to license your copy of
Excelling MultiTerm.
An example:
60
Excelling MultiTerm - User Manual
Free Express Version
Create the Termbase
7
Example File for an Express Import
7.2 Create the Termbase
If you do not alread have a termbase, this is how you can create a simple
termbase with only terms. Of course you can use your existing or a more
complex termbase, as long as at least one language of the Excel file is
included in the termbase.
a) Start SDL MultiTerm.
b) In MultiTerm, select Termbase -> Create termbase.
c) Select a location and a filename for your termbase. We recommend you
store all databases in one central location, for instance c:\Trados Data.
You can choose any filename for your termbase, for instance My
termbase.
d) Click on Save.
⇨ The start page of the Termbase Wizard will appear.
e) Click on Next.
f) Select create a new termbase definition from scratch and click on Next.
Excelling MultiTerm - User Manual
61
7
Free Express Version
Create the Termbase
g) Enter a Friendly Name and, if you want, a description / copyright for your
termbase. This "friendly" name is how you will see your termbase listed
in MultiTerm and Studio. It can be different from the filename from the
previous step, but of course it can also be the same. Click on Next:
h) Select the languages you want to include in your termbase on the left
side and copy them into your termbase by clicking on Add.
i) Click on Next until you get to the last step in the wizard.
j) Then click on Finish.
⇨ You have now created a new termbase. You can change the definition of
your termbase (languages, fields...) later on. However, you can not
rename existing fields or languages any more.
62
Excelling MultiTerm - User Manual
Free Express Version
Import the Data
7
7.3 Import the Data
This is how you import your Excel file into your new termbase:
a) Start Excelling MultiTerm.
b) Select Perform a database import taks.
c) Select the excel file you have prepared and click on OK.
d) Excelling MultiTerm will automatically see that this is an express file,
because it only contains terms. If you want to import Excel files with
descriptive fields, you will need to license your copy of Excelling
MultiTerm.
e) Since this is your first import, there are no import tasks available yet.
Click on Create import task from scratch and click on Next.
Excelling MultiTerm - User Manual
63
7
Free Express Version
Import the Data
f) In the Modifier user field, enter your name. This name will be stored in
MultiTerm as the creator of the new entries. Leave the remaining fields
blank. Then click on "Next".
g) Select the termbase you just created as the Target termbase. Then
select all languages you want to import. The list of languages contains
those languages which are available both in your termbase and in your
Excel file. If you are missing a language, then either your termbase or
your Excel file is not prepared correctly. Then click on "Next".
Note: If you receive the message that no termbases can be found, then
please restart MultiTerm, open your termbase once, and then close
MultiTerm again. This problem ocurs when the MultiTerm user interface
language changes.
64
Excelling MultiTerm - User Manual
Free Express Version
Import the Data
7
h) Enter a Name and a Description for the import task.
Excelling MultiTerm stores the information you have just entered as a
task which you can then repeat for any identical Excel file.
Click on Perform import and on Next.
i) Enter the location and filename for a log file. This log file contains an
exact description of what was imported and what errors might have
ocurred. Then click on "Next".
⇨ The import will now start.
Excelling MultiTerm - User Manual
65
7
Free Express Version
Additional Features of the Free Express Version
j) If Excelling finds an empty line, then it assumes that this is the end of the
Excel file. If you want Excelling MultiTerm to continue searching through
the remaining file, click on Yes. If you are sure there are not empty lines,
then you can end the import by clicking on No.
⇨ The data has been imported into MultiTerm. You can check the result by
pressing F5 (Refresh) in MultiTerm, or by checking the content of the log
file.
7.4 Additional Features of the Free Express
Version
The free Express version of Excelling MultiTerm can also run an express
export. This export works just like any normal Excelling export, but it only
contains terms.
You can also re-import this file after editing it in Excel. See Export [➙ 18]
and Import [➙ 27] for further information on the normal export and import
features.
See also
2 Export [➙ 18]
2 Import [➙ 27]
66
Excelling MultiTerm - User Manual