1
Liberty Artist’s Manual
Liberty Paint
Liberty 32/64
Artists Manual
Liberty Paint
Liberty 32/64
Artists Manual
An Infinite Freedom Component
An Infinite Freedom Component
Pub. No. 2A01906 October, 1997
Revision A
© 1997 CHYRON Corporation
All Rights Reserved
CHYRON Corporation
5 Hub Drive
Melville, NY 11747
516-845-1000
Pub. No. 2A01906 October, 1997
Revision A
© 1997 CHYRON Corporation
All Rights Reserved
CHYRON Corporation
5 Hub Drive
Melville, NY 11747
516-845-1000
CHYRON Corporation
CHYRON Corporation
FCC Rules and Regulations
FCC Rules and Regulations
WARNING
WARNING
THIS EQUIPMENT GENERATES, USES AND CAN RADIATE RADIO FREQUENCY ENERGY AND IF NOT INSTALLED AND USED IN ACCORDANCE WITH THE INSTRUCTION MANUAL, MAY CAUSE INTERFERENCE
TO RADIO COMMUNICATIONS. IT HAS BEEN TESTED AND FOUND TO
COMPLY WITH THE LIMITS FOR A CLASS A COMPUTING DEVICE PURSUANT TO SUBPART B OF PART 15 OF FCC RULES, WHICH ARE
DESIGNED TO PROVIDE REASONABLE PROTECTION AGAINST SUCH
INTERFERENCE WHEN OPERATED IN A COMMERCIAL ENVIRONMENT.
OPERATION OF THIS EQUIPMENT IN A RESIDENTIAL AREA IS LIKELY
TO CAUSE INTERFERENCE IN WHICH CASE THE USER, AT HIS OWN
EXPENSE, WILL BE REQUIRED TO TAKE WHATEVER MEASURES MAY
BE REQUIRED TO CORRECT THE INTERFERENCE.
Canadian RFI Requirement
Canadian RFI Requirement
THIS DIGITAL APPARATUS DOES NOT EXCEED THE CLASS A LIMITS
FOR RADIO NOISE EMISSIONS FROM DIGITAL APPARATUS SET OUT IN
THE RADIO INTERFERENCE REGULATIONS OF THE CANADIAN DEPARTMENT OF COMMUNICATIONS
THIS DIGITAL APPARATUS DOES NOT EXCEED THE CLASS A LIMITS
FOR RADIO NOISE EMISSIONS FROM DIGITAL APPARATUS SET OUT IN
THE RADIO INTERFERENCE REGULATIONS OF THE CANADIAN DEPARTMENT OF COMMUNICATIONS
LE PRESENT APPAREIL NUMERIQUE N'EMET PAS DE BRUITS RADIOELECTRIQUES DEPASSANT LES LIMITES APPLICABLES AUX APPAREILS NUMERIQUES DE LA CLASSE A PRESCRITES DENS LE
REGLEMENT SUR LE BROUILLAGE RADIOELECTRIQUE EDICTE PAR LE
MINISTERE DES COMMUNICATIONS DU CANADA.
LE PRESENT APPAREIL NUMERIQUE N'EMET PAS DE BRUITS RADIOELECTRIQUES DEPASSANT LES LIMITES APPLICABLES AUX APPAREILS NUMERIQUES DE LA CLASSE A PRESCRITES DENS LE
REGLEMENT SUR LE BROUILLAGE RADIOELECTRIQUE EDICTE PAR LE
MINISTERE DES COMMUNICATIONS DU CANADA.
Trademark/Copyright Notices
Trademark/Copyright Notices
SGI™ is a Registered Trademark of Silicon Graphics, Inc. Liberty™, Liberty Paint™, Liberty 32™, and Liberty 64™ are Registered Trademarks of
Chyron Corporation.
SGI™ is a Registered Trademark of Silicon Graphics, Inc. Liberty™, Liberty Paint™, Liberty 32™, and Liberty 64™ are Registered Trademarks of
Chyron Corporation.
Liberty uses patented LZW compression for import and export TIFF™LZW and/or GIF graphics files. Use of each Liberty product is restricted
for use on a single workstation. Copying, modifying, or distributing Liberty is prohibited except that the software can be transferred to a single
hard disk with the original media maintained for backup or archival purposes. Purchase and/or use of Liberty does not authorize or permit the
use of any other product, method, or activity involving use of LZW
unless separately licensed in writing by Unisys, Inc. This technology is
licensed under U.S. Patent No. 4,558,302 and foreign counterparts.
All other listed trademarks are the respective property of their owners.
All other listed trademarks are the respective property of their owners.
WARNING
ii
WARNING
ii
Table of Contents
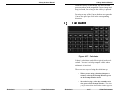
1 - Introduction
1.1
INTRODUCTION ...................................................... 1-1
1.1.1
About this Manual .......................................................... 1-1
1.1.2
Hardware Platform ......................................................... 1-2
1.1.3
Custom Menu Colors ..................................................... 1-2
1.2
A NOTE ON LIBERTY ENVIRONMENTS ............... 1-2
1.3
NAVIGATING THE ENVIRONMENTS..................... 1-3
1.3.1
Arrangement of Functions ............................................ 1-3
1.3.2
Menu Buttons and the Tablet ........................................ 1-3
1.3.3
Slider Scales ................................................................... 1-4
1.3.4
Calculator ........................................................................ 1-5
1.3.5
Number Windows/Text Windows .................................. 1-5
1.3.6
Keyboard ......................................................................... 1-5
1.3.7
Help! ................................................................................ 1-6
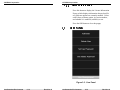
2 - Login Environment
2.1
THE LOGIN ENVIRONMENT .................................. 2-1
User Login Accounts ........................................................ 2-1
A Note for Beginners........................................................ 2-1
3 - Configuration Environment
3.1
Configuration Environment................................... 3-1
3.1.1
Configuration Environment
Functions 3-1
3.1.2
Customizing Menus ....................................................... 3-5
3.1.3
Color Scheme Palette .................................................... 3-5
Menu Color Scheme Palette Elevator .............................. 3-5
Revision A
iii
Table of Contents
Revision A
iii
Table of Contents
CHYRON Corporation
CHYRON Corporation
3.1.4
Changing the Colors of the Menu ................................. 3-6
Default Scheme(s) Button................................................ 3-6
Get Scheme Button.......................................................... 3-7
Set Scheme Button .......................................................... 3-7
3.1.5
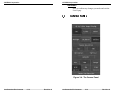
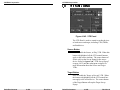
System Info Button ......................................................... 3-7
3.1.6
License Info Button ........................................................ 3-9
3.2
USER PANEL .........................................................3-10
User Login Accounts...................................................... 3-10
Add User Button............................................................. 3-11
Delete User Button......................................................... 3-12
Set User Password Button............................................. 3-12
Set Administration Password Button.............................. 3-13
Delete Button ................................................................. 3-14
3.2.1
User Popup ................................................................... 3-14
User Number Text Window............................................ 3-14
User Name Text Window ............................................... 3-14
User Password Text Window......................................... 3-14
Next Button .................................................................... 3-15
Prev Button .................................................................... 3-15
Cancel Button ................................................................ 3-15
OK Button ...................................................................... 3-15
3.3
CANVAS PANEL....................................................3-16
64-bit Color Range Display (Liberty 64 Only) ................ 3-16
Messages Functions (Liberty 64)................................... 3-21
Resolution Functions ..................................................... 3-21
Dots Per Inch Button (DPI) ............................................ 3-25
Dropframe Button........................................................... 3-25
Frame-rate Buttons ........................................................ 3-27
3.4
MENU PANEL ........................................................3-27
Temp Number Button..................................................... 3-28
Fast Temps Button......................................................... 3-28
Mask Number Button ..................................................... 3-29
Fast Masks Button ......................................................... 3-29
Fast Exit Button.............................................................. 3-29
Info Buttons.................................................................... 3-30
Button Configuration Buttons ......................................... 3-31
3.5
DIRECTORY PANEL..............................................3-32
Create Directory Button ................................................. 3-33
Delete Directory Button.................................................. 3-33
Rename Directory Button............................................... 3-34
User Setup Button.......................................................... 3-34
Re-label ImageStor! Button............................................ 3-35
3.6
Table of Contents
iv
Revision A
VIDEO PANEL........................................................3-36
Table of Contents
iv
Revision A
Liberty Artist’s Manual
Liberty Artist’s Manual
Video Recording and Video Boards............................... 3-37
3.7
CONFIGURING VTRS ........................................... 3-37
Define VTR Button (Defining VTR As:) .......................... 3-37
Model List....................................................................... 3-38
Control Button ................................................................ 3-39
Video Button .................................................................. 3-41
Type Window ................................................................. 3-41
Address Window ............................................................ 3-43
Source Button (SRC) ..................................................... 3-43
Target Button (Tar) ........................................................ 3-44
Comm Button ................................................................. 3-44
V Adj Button ................................................................... 3-45
Config (OK) Button......................................................... 3-45
3.8
VIDEO FRAMER® PANEL .................................... 3-46
3.9
OPTION PANEL .................................................... 3-48
3.9.1
Hardware Options ........................................................ 3-49
3.9.2
Software Options .......................................................... 3-50
Expanded Resolution..................................................... 3-50
Motion Tracking ............................................................. 3-50
Cinefusion ...................................................................... 3-51
License options for GIF/TIFF LZW Compression .......... 3-51
3.9.3
Active Server ................................................................ 3-51
Installing Software Options ............................................ 3-52
3.10
CURSOR PANEL................................................... 3-52
3.11
TABLET PANEL .................................................... 3-54
Tablet Click Pressure..................................................... 3-55
Tablet Top Margin.......................................................... 3-55
Tablet Bottom Margin..................................................... 3-55
Tablet Left Margin .......................................................... 3-55
Tablet Right Margin........................................................ 3-55
Reset Button .................................................................. 3-56
Cancel Button ................................................................ 3-56
OK Button ...................................................................... 3-56
3.12
UNDO PANEL........................................................ 3-57
4 - Paint Environment
4.1
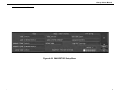
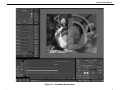
PAINT ENVIRONMENT DESCRIPTION ................. 4-1
Environment Buttons........................................................ 4-5
Revision A
v
Table of Contents
Revision A
v
Table of Contents
CHYRON Corporation
CHYRON Corporation
Canvas............................................................................. 4-5
Undo Functions................................................................ 4-7
Undo Button ..................................................................... 4-8
Redo Button ..................................................................... 4-8
Undo Popup ..................................................................... 4-9
Undo/Redo Buttons on The Buffers Panel..................... 4-12
Prompt Window.............................................................. 4-13
Canvas Button ............................................................... 4-13
Erase Button .................................................................. 4-14
All Button........................................................................ 4-14
Prefix Buttons................................................................. 4-14
Popup Menus................................................................. 4-15
Green OK and Yellow Cancel Buttons........................... 4-15
Transparency ................................................................. 4-15
Transparent Background ............................................... 4-16
Filtering and Anti-aliasing............................................... 4-16
Elevators ........................................................................ 4-16
Panel Menus .................................................................. 4-19
Panel Call Buttons ......................................................... 4-19
4.2
PAINT BRUSHES...................................................4-20
4.2.1
Current Brush Display ................................................. 4-20
Color of Displayed Brush ............................................... 4-21
Color of Brush Background............................................ 4-21
Brush Size Slider Scale ................................................. 4-22
Transparency Slider Scale............................................. 4-23
Cursor Button................................................................. 4-24
4.2.2
Brush Mode Buttons .................................................... 4-25
Solid Brush Button ......................................................... 4-25
Air Brush Button............................................................. 4-26
Programmed Brush Button ............................................ 4-26
User Brush Button.......................................................... 4-29
4.3
COLOR PALETTE..................................................4-33
4.3.1
Palette and Buffers Panels .......................................... 4-33
About the Palette ........................................................... 4-34
Color Palette Elevator .................................................... 4-34
Color Palette Functions.................................................. 4-35
Pick Colors Popup ......................................................... 4-40
Color Space Button (HSV) ............................................. 4-42
4.3.2
Color Modes .................................................................. 4-43
Color Checking .............................................................. 4-43
HSL Button..................................................................... 4-45
Color Mixer..................................................................... 4-45
4.3.3
Color Slider Scales ....................................................... 4-46
Copying Colors in the Palette ........................................ 4-52
Current Color Button ...................................................... 4-52
Table of Contents
vi
Revision A
Table of Contents
vi
Revision A
Liberty Artist’s Manual
Liberty Artist’s Manual
Background Color Button............................................... 4-53
4.4
GRID AND DIRECTION FUNCTIONS ................... 4-53
4.4.1
Grid Functions .............................................................. 4-54
Grid Button..................................................................... 4-54
Grid Popup..................................................................... 4-55
Mask Grid Button ........................................................... 4-58
4.4.2
Direction Functions ...................................................... 4-58
Direction Button ............................................................. 4-58
Horizontal / Vertical Mode Buttons (X and Y) ................ 4-59
4.5
PREFIX BUTTONS ................................................ 4-60
Repeat Prefix Button ...................................................... 4-60
Under Prefix Button........................................................ 4-61
Add Prefix Button ........................................................... 4-61
Copy Prefix Button ......................................................... 4-62
Invert Prefix Button ........................................................ 4-63
4.6
MAGNIFY FUNCTIONS ......................................... 4-63
Canvas Button ............................................................... 4-64
Magnify Mode Button ..................................................... 4-64
Full Button...................................................................... 4-64
Set Magnify Button......................................................... 4-65
Zoom In Button .............................................................. 4-66
Zoom Out Button............................................................ 4-66
CanvDrag Button ........................................................... 4-66
Panning with the Alt Key ................................................ 4-66
4.7
CALCULATOR ...................................................... 4-67
4.8
BUFFERS PANEL ................................................. 4-73
Mask Elevator ................................................................ 4-75
Mask Browse Popup ...................................................... 4-77
Fast Masks..................................................................... 4-80
Mask Display Buttons .................................................... 4-81
Mix Popup ...................................................................... 4-82
Temp Elevator................................................................ 4-84
Global Temp Elevator .................................................... 4-84
Save to Temp Button (the < button)............................... 4-85
Swap with Temp Button (the < > button) ....................... 4-85
Recall from Temp Button (the > button)......................... 4-85
Layers Button................................................................. 4-85
Layers Popup................................................................. 4-88
Individual Layer Controls ............................................... 4-91
Using Paint, Image Tools, and Mask Tools with Layers 4-94
Layers Function Buttons ................................................ 4-96
Temp Layers Color Codes ............................................. 4-98
Loading Layers Graphically ........................................... 4-99
Saving Layers in the Layers File Format ..................... 4-103
Revision A
vii
Table of Contents
Revision A
vii
Table of Contents
CHYRON Corporation
CHYRON Corporation
Canvas Buffer .............................................................. 4-104
Mag Window ................................................................ 4-105
X and Y Windows......................................................... 4-105
Alpha (A) Slider............................................................ 4-105
4.9
TRANSFER PANEL .............................................4-106
Cut & Paste Functions ................................................. 4-107
4.9.1
Cut Button ................................................................... 4-107
4.9.2
Move Button ................................................................ 4-108
4.9.3
Paste Button ............................................................... 4-109
4.9.4
Paste Modes Popup ................................................... 4-112
4.9.5
Paste Normal Mode .................................................... 4-112
4.9.6
Paste Color Mode ....................................................... 4-115
Paste Popups............................................................... 4-111
Paste Normal Popup.................................................... 4-113
Paste Color Popup....................................................... 4-116
4.9.7
Paste Shadow Mode ................................................... 4-118
Paste Shadow Popup .................................................. 4-118
4.9.8
Paste Extrude Mode ................................................... 4-121
Paste Extrude Popup ................................................... 4-121
4.9.9
Paste Emboss Mode ................................................... 4-125
Paste Emboss Popup .................................................. 4-126
4.9.10 Paste Distort Mode ..................................................... 4-129
Paste Distort Popup ..................................................... 4-129
Perspective Transform................................................. 4-131
About Filters................................................................. 4-137
Realtime Paste/Distort Preview on Some Platforms.... 4-141
4.9.11 Tile Button ................................................................... 4-142
Tile Set Popup Corner Button ...................................... 4-142
FTP Button................................................................... 4-144
FTP Popup................................................................... 4-145
4.10
Grab and Show Functions..................................4-149
4.10.1 Grab Button ................................................................. 4-149
Grab Popup.................................................................. 4-149
Grabbing Video to a Disk Array ................................... 4-150
4.10.2 Show Button ............................................................... 4-155
Show Popup................................................................. 4-155
Showing Video from a Disk Array ................................ 4-156
4.11
RECALL/SAVE FILE FUNCTIONS ......................4-158
4.11.1 Recall File Button ....................................................... 4-158
Table of Contents
viii
Revision A
Table of Contents
viii
Revision A
Liberty Artist’s Manual
Liberty Artist’s Manual
File Path Elevator......................................................... 4-159
4.11.2 Recall Corner Button ................................................. 4-159
Recall File Popup......................................................... 4-160
Rescale and Orientation On Buttons ........................... 4-160
Rescale Popup............................................................. 4-162
Recalling Using Wildcards ........................................... 4-166
4.11.3 Save Button ................................................................ 4-167
File Path Elevator......................................................... 4-167
Save Corner Button ..................................................... 4-168
4.11.4 Save File As Button .................................................... 4-169
Save File As Popup ..................................................... 4-170
GIF File Format............................................................ 4-175
GIF Setup Menu........................................................... 4-175
IMAGESTOR! File Format ........................................... 4-177
IMAGESTOR! Setup Menu .......................................... 4-179
FTP set-up controls...................................................... 4-182
IMAGESTOR! Save As Popup..................................... 4-184
Re-label IMAGESTOR! ................................................ 4-188
4.11.5 iNFiNiT! Setup Functions .......................................... 4-189
INFINIT! Setup Menu ................................................... 4-189
FTP set-up controls...................................................... 4-190
FTP Button................................................................... 4-190
Save Local Button........................................................ 4-191
NTSC and PAL Buttons ............................................... 4-191
13.5 MHZ button .......................................................... 4-191
Elevator of Pre-sets ..................................................... 4-191
Saving INFINIT! Files................................................... 4-192
Check for Overwrite ..................................................... 4-193
TIFF File Format .......................................................... 4-193
TIFF Setup Menu ......................................................... 4-194
JPEG File Format ........................................................ 4-196
JPEG Setup Menu ....................................................... 4-197
Re-scale On Save........................................................ 4-198
Setup Button ................................................................ 4-199
Shrink-wrap Mode Button ............................................ 4-199
Compress Button ......................................................... 4-199
Rescale Button............................................................. 4-199
Save-As Orientation Button ......................................... 4-199
FTP Save As Button .................................................... 4-200
FTP Save As Popup .................................................... 4-201
4.12
File Popup ........................................................... 4-205
Host Button .................................................................. 4-206
Disk Button................................................................... 4-206
Directory Button (dir).................................................... 4-206
File Button.................................................................... 4-206
Plus Button (^).............................................................. 4-207
Revision A
ix
Table of Contents
Revision A
ix
Table of Contents
CHYRON Corporation
CHYRON Corporation
Minus Button (v)........................................................... 4-207
Filename list in the File Popup..................................... 4-207
File Mode Button.......................................................... 4-207
File Mode Popup.......................................................... 4-209
Full-screen Button (Full)............................................... 4-213
Path Button .................................................................. 4-214
Full-screen File Menu .................................................. 4-217
4.12.1 File Manager Button ................................................... 4-219
Scroll to Top Button (T)................................................ 4-219
Scroll Up Button( ^ ) ..................................................... 4-220
Scroll Down Button ( V )............................................... 4-220
Scroll to Bottom Button ( B ) ........................................ 4-220
Action Button................................................................ 4-220
File Path Elevator......................................................... 4-225
Select Button................................................................ 4-226
Select All Button........................................................... 4-226
Clear Button ................................................................. 4-226
Complement Select Button .......................................... 4-226
Page Select Button ...................................................... 4-226
Browse Mode ............................................................... 4-226
Browse Button.............................................................. 4-227
Browse-Off Listings...................................................... 4-227
Browse-Off Popup........................................................ 4-228
Alpha Button ................................................................ 4-229
Make Browse Button.................................................... 4-230
Sort Button ................................................................... 4-230
Sort Popup ................................................................... 4-231
Free Space Display...................................................... 4-235
Total Selected Display ................................................. 4-235
Prefix Buttons............................................................... 4-235
OK Button .................................................................... 4-235
Cancel Button .............................................................. 4-236
Loading Layers Graphically ......................................... 4-237
4.13
PAINT PANEL ......................................................4-240
4.13.1 Painting Functions ..................................................... 4-242
Paint Button ................................................................. 4-242
Line Button................................................................... 4-242
Curve Button ................................................................ 4-242
Shape Button ............................................................... 4-242
Paint Gap Popup.......................................................... 4-243
Curve and Shape Gap Popup...................................... 4-245
4.13.2 Curve Popup ............................................................... 4-247
Curve Points ................................................................ 4-248
Curve Tangents ........................................................... 4-249
Curve Elevator ............................................................. 4-249
Select Points Functions .............................................. 4-249
Select Points Button..................................................... 4-250
Table of Contents
x
Revision A
Table of Contents
x
Revision A
Liberty Artist’s Manual
Liberty Artist’s Manual
Clear Select Points Button ........................................... 4-250
Complement Select Points Button ............................... 4-250
Previous Select Points Button...................................... 4-250
Shift Select Points Button ............................................ 4-250
Add Points Button ........................................................ 4-251
Move Points Button...................................................... 4-251
Delete Points Button .................................................... 4-251
Insert Point Button ....................................................... 4-252
Duplicate Points Button................................................ 4-252
Close Curve Button ...................................................... 4-253
Break Button ................................................................ 4-253
Join Button ................................................................... 4-254
Recall Points Button..................................................... 4-254
Save Points Button ...................................................... 4-255
Erase Points Button ..................................................... 4-255
Curve OK and Cancel Buttons..................................... 4-255
Curve Palette Button .................................................... 4-255
Gravity Button .............................................................. 4-255
Transform Points Functions ......................................... 4-256
Transform Axis Button (xform) ..................................... 4-256
Scale Points Button...................................................... 4-257
Center Points Button .................................................... 4-257
Polygon Button............................................................. 4-257
X Rotate Points Button................................................. 4-257
Y Rotate Points Button................................................. 4-258
Z Rotate Points Button................................................. 4-258
Bias Button................................................................... 4-258
Tension Button............................................................. 4-259
Resolution Button......................................................... 4-260
Reverse Points Button ................................................. 4-260
Point List Button........................................................... 4-260
Corner List Button ........................................................ 4-261
4.13.3 Shape Popup .............................................................. 4-262
Circle Button ................................................................ 4-262
Ellipse Button ............................................................... 4-263
Square Button .............................................................. 4-263
Rectangle Button ......................................................... 4-264
Triangle Button............................................................. 4-264
Star Button ................................................................... 4-265
Polygon Button............................................................. 4-265
Erase Button ................................................................ 4-266
Center Button............................................................... 4-266
Move Button................................................................. 4-266
Transform Shape Button (Trans) ................................. 4-267
Shape Gradation Button .............................................. 4-267
Shape Fill Button.......................................................... 4-267
Shape Outline Button................................................... 4-268
Shapes Popup Cancel Button...................................... 4-268
Shape Palette Button ................................................... 4-268
Revision A
xi
Table of Contents
Revision A
xi
Table of Contents
CHYRON Corporation
CHYRON Corporation
Recall Shape and Save Shape Buttons....................... 4-268
Shapes Inbetweening Timeline.................................... 4-269
4.13.4 Paint Mode Button ...................................................... 4-274
Paint Modes Window & Popup .................................... 4-275
Normal Paint ................................................................ 4-276
Smear Paint ................................................................. 4-277
Warp Paint ................................................................... 4-277
Blur Paint ..................................................................... 4-277
Sharpen Paint .............................................................. 4-277
Emboss Paint............................................................... 4-277
Burn Paint .................................................................... 4-277
Dodge Paint ................................................................. 4-278
Saturate Paint .............................................................. 4-278
De-saturate Paint ......................................................... 4-278
Clone Paint .................................................................. 4-278
Duplicate Paint............................................................. 4-279
Reveal Paint................................................................. 4-279
Reveal Paint with Color................................................ 4-279
Reveal Paint with Hue.................................................. 4-279
Reveal Paint with Luminance....................................... 4-280
Reveal Paint with Tint .................................................. 4-280
Reveal Paint with Hue/Tint........................................... 4-280
Pick Paint ..................................................................... 4-280
Paste Paint................................................................... 4-280
Clone Temp Paint ........................................................ 4-281
Duplicate Temp Paint................................................... 4-281
4.13.5 Paint On Button .......................................................... 4-281
Fractal Paint Button ..................................................... 4-282
Fractal Popup............................................................... 4-282
4.13.6 Fold Button ................................................................. 4-283
4.13.7 Noise Button ............................................................... 4-284
Noise Popup ................................................................ 4-285
4.13.8 Jitter Button ................................................................ 4-285
Jitter Popup.................................................................. 4-286
4.13.9 Pressure Button .......................................................... 4-286
Pressure Popup ........................................................... 4-287
4.14
IMAGE TOOLS PANELS .....................................4-291
Preview Buttons ........................................................... 4-291
Image Tools Popup OK and Cancel Buttons ............... 4-292
4.15
Image Tools 1 Panel............................................4-293
4.15.1 Image Tools 1 Adjust Button ..................................... 4-293
Adjust Popup................................................................ 4-293
4.15.2 Color Correct Button .................................................. 4-299
Table of Contents
xii
Revision A
Table of Contents
xii
Revision A
Liberty Artist’s Manual
Liberty Artist’s Manual
Color Correct Popup .................................................... 4-299
4.15.3 Noise Button ............................................................... 4-303
Noise Popup ................................................................ 4-305
4.15.4 Apply Button ............................................................... 4-309
Apply Popup................................................................. 4-309
Circular Apply Button ................................................... 4-310
Radial Apply Button ..................................................... 4-311
4.15.5 Color Clip Button ........................................................ 4-313
4.15.6 Posterize Button ......................................................... 4-314
4.15.7 Map Button .................................................................. 4-315
Map Popup................................................................... 4-316
4.15.8 Reveal Button ............................................................. 4-317
4.15.9 Tint Button .................................................................. 4-318
Tint Popup.................................................................... 4-319
4.15.10 MultiTint Button .......................................................... 4-320
4.15.11 Sharpen Button .......................................................... 4-320
Sharpen Popup ............................................................ 4-321
4.15.12 Blur Button .................................................................. 4-322
Blur Popup ................................................................... 4-324
4.15.13 Filter Button ................................................................ 4-325
Filter Popup.................................................................. 4-326
4.15.14 Ripple Button .............................................................. 4-333
Ripple Popup ............................................................... 4-334
4.15.15 Bump Map Button ...................................................... 4-335
Bump Map Popup ........................................................ 4-335
4.15.16 Mosaic Button ............................................................. 4-337
Mosaic Popup .............................................................. 4-338
4.16
Image Tools 2 Panel ........................................... 4-339
4.16.1 Edge Button ................................................................ 4-339
Edge Popup ................................................................. 4-339
4.16.2 Edge Detection Button ............................................... 4-341
4.16.3 Tri-Morph Button ........................................................ 4-341
4.16.4 Line Morph Button ..................................................... 4-341
4.16.5 Even Field Button ....................................................... 4-341
4.16.6 Odd Field Button ........................................................ 4-341
4.16.7 Wrap Button ................................................................ 4-342
Wrap Mode Popup ....................................................... 4-342
4.16.8 Motion Tracking Button ............................................. 4-343
Revision A
xiii
Table of Contents
Revision A
xiii
Table of Contents
CHYRON Corporation
CHYRON Corporation
4.16.9 Color Matrix Button .................................................... 4-343
Dither Button ................................................................ 4-344
Color Matrix Popup ...................................................... 4-345
Dither Popup ................................................................ 4-345
Hints About Dithering ................................................... 4-348
Chroma Key Button...................................................... 4-349
Chroma Key Popup...................................................... 4-351
Chroma Key Preview Buttons ...................................... 4-353
Key Adjust Buttons....................................................... 4-354
Dominant Color Buttons............................................... 4-355
Picked Color Display.................................................... 4-356
Chroma Key Settings Elevator..................................... 4-356
Chroma Key Control Sliders ........................................ 4-356
Clip Colors Sliders ....................................................... 4-357
Keep Colors Sliders ..................................................... 4-358
Ultimatte Plug-in........................................................... 4-359
Plug-in Button .............................................................. 4-359
Plug-in Popup .............................................................. 4-361
4.17
MASK TOOL FUNCTIONS...................................4-363
Mask Buffer in the Buffers Panel ................................. 4-363
Mask Panels Description ............................................. 4-365
4.18
Mask Tools 1 Panel .............................................4-366
4.18.1 Use Mask Button ........................................................ 4-366
4.18.2 Mask All Button .......................................................... 4-367
4.18.3 Invert Mask Button ..................................................... 4-367
4.18.4 Erase Mask Button ..................................................... 4-367
4.18.5 Rectangle Mask Button .............................................. 4-367
Rectangle Mask Modes ............................................... 4-368
4.18.6 Circle Mask Button ..................................................... 4-369
4.18.7 Alpha Mask Button ..................................................... 4-370
Alpha Mask Popup....................................................... 4-371
4.18.8 Adjust Mask Button .................................................... 4-372
Adjust Mask Popup ...................................................... 4-374
Mask Channels Button................................................. 4-375
Mask Channels Popup................................................. 4-376
S Limits & V Limits Sliders ........................................... 4-376
Channels Clamp Button ............................................... 4-377
Clamp Tolerance Slider ............................................... 4-382
Preview Button............................................................. 4-382
Active Button................................................................ 4-382
OK Button .................................................................... 4-382
Cancel Button .............................................................. 4-382
4.18.9 Fill Mask Button .......................................................... 4-383
Table of Contents
xiv
Revision A
Table of Contents
xiv
Revision A
Liberty Artist’s Manual
Liberty Artist’s Manual
Fill Mask Popup ........................................................... 4-384
4.18.10 Match Mask Button .................................................... 4-386
Match Mask Popup ...................................................... 4-387
Match RGB and Hue Buttons....................................... 4-388
4.19
Mask Tools 2 Panel ............................................ 4-389
4.19.1 Safe Title Button ......................................................... 4-389
Safe Title Popup .......................................................... 4-390
4.19.2 Mask Grid Button ....................................................... 4-391
4.19.3 Clamp Mask Button .................................................... 4-391
Snap & Ramp Modes................................................... 4-392
Clamp Mask Popup...................................................... 4-393
4.19.4 Difference Mask Button ............................................. 4-393
Difference Mask Modes ............................................... 4-394
Difference Mask Popup................................................ 4-395
4.19.5 Field Mask Button ...................................................... 4-399
4.19.6 Paste Mask Button ..................................................... 4-399
4.20
TEXT PANEL MENUS ......................................... 4-400
4.20.1 Text Panel ................................................................... 4-401
Text Edit Button ........................................................... 4-401
Font Elevator................................................................ 4-402
Move Button................................................................. 4-402
Refresh Text Button ..................................................... 4-403
Text Size Button........................................................... 4-403
Center Text Button....................................................... 4-404
Leading Button............................................................. 4-404
Align Text Button.......................................................... 4-405
Kerning Button ............................................................. 4-406
Erase Text Button ........................................................ 4-407
Erase All Button ........................................................... 4-407
Transform Text Button ................................................. 4-407
Render Text Button...................................................... 4-408
Text Save and Recall ................................................... 4-410
4.20.2 International Character Panel ................................... 4-410
4.20.3 Accent Panel ............................................................... 4-411
Accent Position Button................................................. 4-412
4.21
MACRO PANEL MENU ....................................... 4-412
4.21.1 Recording and Playing Macros ................................. 4-413
Record Macro Button ................................................... 4-413
Play Macro Button........................................................ 4-414
Pause Macro Button .................................................... 4-415
Stop Macro Button ....................................................... 4-415
Revision A
xv
Table of Contents
Revision A
xv
Table of Contents
CHYRON Corporation
CHYRON Corporation
Delay Macro Button ..................................................... 4-415
Delete Macro Button .................................................... 4-415
Save and Recall State Buttons .................................... 4-415
4.21.2 Defining Keyboard Keys ............................................ 4-416
Bind Macro Button ....................................................... 4-416
Define Key Button ........................................................ 4-416
4.21.3 Editing Macros (New Format) .................................... 4-419
Edit Macro Button ........................................................ 4-419
4.21.4 Editing Macros (Old Format) ..................................... 4-422
Edit Macro Popup ........................................................ 4-422
Current Step Button ..................................................... 4-422
First Step (I<) Button.................................................... 4-422
Previous Step (<) Button.............................................. 4-422
Next Step (>) Button .................................................... 4-422
Last Step (>I) Button .................................................... 4-423
Insert Step Button ........................................................ 4-423
Change Step Button..................................................... 4-423
Delete Step Button....................................................... 4-423
Delete Rest Button....................................................... 4-425
Step Key Button ........................................................... 4-425
Cancel Edit Button ....................................................... 4-425
Accept Edit Button ....................................................... 4-425
4.22
VTR PANEL MENU ..............................................4-425
Source Button .............................................................. 4-426
Target Button ............................................................... 4-426
Timecode Windows...................................................... 4-426
Timecode Elevator ....................................................... 4-427
Shuttle and Jog Sliders ................................................ 4-427
Cue Button ................................................................... 4-427
Increment Cue Button (Right Arrow) ............................ 4-428
Decrement Cue Button (Left Arrow)............................. 4-428
Stop VTR Button .......................................................... 4-428
Play VTR Button .......................................................... 4-428
Grab Button.................................................................. 4-428
Grab Popup.................................................................. 4-429
Record Button .............................................................. 4-430
VTR Set-up Popup....................................................... 4-432
Source (Target) Set-up Popup..................................... 4-437
Layers Auto-compositing ............................................. 4-439
Target Set-up Popup.................................................... 4-441
Saving Output as Layers Files ..................................... 4-445
Layers Undo in Rotoscoping........................................ 4-446
Chyron Motion File Set-up Popup................................ 4-448
RAW YUV Files for Disk Arrays ................................... 4-451
Target Re-scale Button ................................................ 4-452
Dropframe Button......................................................... 4-453
Preroll Button ............................................................... 4-453
Table of Contents
xvi
Revision A
Table of Contents
xvi
Revision A
Liberty Artist’s Manual
Liberty Artist’s Manual
Rotoscope Button (Roto) ............................................. 4-453
4.23
DISK PANEL MENU ............................................ 4-453
4.23.1 Delete File Button ....................................................... 4-454
4.23.2 Move File Button ........................................................ 4-454
4.23.3 Copy File Button ......................................................... 4-455
4.23.4 Browse Button ............................................................ 4-455
Vidjet Button................................................................. 4-455
Artstar Button Popup.................................................... 4-456
4.24
H-P Vidjet Pro™ .................................................. 4-456
Hardware ..................................................................... 4-457
Color Adjust Menu ....................................................... 4-461
4.25
MORPH FEATURES............................................ 4-467
4.25.1 General Procedure for
Line Morph & Triangle Morph ................................... 4-468
4.25.2 Line Morph .................................................................. 4-468
Line Morph Add Button ................................................ 4-470
Line Morph Delete Button ............................................ 4-470
Line Morph Move Button.............................................. 4-471
Line Morph Color Button .............................................. 4-471
Line Morph Tune Button .............................................. 4-472
Line Morph Select Button............................................. 4-473
Line Morph Keyframe Timeline Slider .......................... 4-473
Line Morph Add Keyframe Button ................................ 4-474
Line Morph Copy Keyframe Button .............................. 4-474
Line Morph Delete Keyframe Button............................ 4-475
Line Morph Reset Button ............................................. 4-475
Line Morph Lock Button ............................................... 4-475
Line Morph Test Button................................................ 4-476
Line Morph Recall and Save buttons ........................... 4-476
Line Morph Cancel Button ........................................... 4-476
Line Morph OK Button ................................................. 4-476
Line Morph Erase Button ............................................. 4-477
4.25.3 Triangle Morph ........................................................... 4-477
Triangle Morph Add Points Button ............................... 4-478
Triangle Morph Delete Points Button ........................... 4-479
Triangle Morph Move Points Button............................. 4-479
Triangle Morph Add Keyframe Button.......................... 4-479
Triangle Morph Copy Keyframe Button........................ 4-480
Triangle Morph Delete Keyframe Button...................... 4-481
Triangle Morph Reset Button ....................................... 4-481
Triangle Morph Lock Button......................................... 4-482
Triangle Morph Recall and Save buttons..................... 4-482
Triangle Morph Cancel Button ..................................... 4-482
Revision A
xvii
Table of Contents
Revision A
xvii
Table of Contents
CHYRON Corporation
CHYRON Corporation
Triangle Morph OK Button ........................................... 4-483
4.26
Importing Jaleo Clips..........................................4-483
5 - Animation Environment
5.1
5.2
Animation Environment Introduction....................5-1
5.1.1
Number Windows in the Animation Environment ....... 5-2
5.1.2
Creating Curve Paths and Keyframes .......................... 5-5
ANIMATION TIMELINE ............................................5-5
Layer Number Buttons ..................................................... 5-6
Scroll Up Button ( ^ ) ........................................................ 5-9
Scroll Down Button ( v ) ................................................... 5-9
Home Button .................................................................... 5-9
5.3
ANIMATION CONTROL MENU .............................5-10
Source Button (src) ........................................................ 5-12
Target Button (tar).......................................................... 5-12
Timecode Window ......................................................... 5-12
Shuttle Button ( S )......................................................... 5-13
Jog Button ( J )............................................................... 5-13
Timecode Elevator ......................................................... 5-13
Cue Button ..................................................................... 5-13
Stop Button .................................................................... 5-13
Play Button..................................................................... 5-13
Replay Button ................................................................ 5-14
VTR Setup Popups ........................................................ 5-15
Source Setup Popup...................................................... 5-19
Target Setup Popup....................................................... 5-22
File Type Popup............................................................. 5-25
Chyron Motion File Setup Popup ................................... 5-28
RAW YUV Files for Disk Arrays ..................................... 5-31
The Target Rescale Button ............................................ 5-33
Dropframe Button........................................................... 5-33
Preroll Button ................................................................. 5-33
OK Button ...................................................................... 5-33
Recall Animation Button................................................. 5-34
Animation Save Button .................................................. 5-35
Check Animation Button ................................................ 5-36
Timecode Button (labeled Tmcode)............................... 5-36
Dropframe Button (labeled Dropfr)................................. 5-36
Duration Button (Dur)..................................................... 5-37
Loops Button.................................................................. 5-39
In Button......................................................................... 5-39
Out Button...................................................................... 5-40
Holdin Button ................................................................. 5-40
Table of Contents
xviii
Revision A
Table of Contents
xviii
Revision A
Liberty Artist’s Manual
Liberty Artist’s Manual
Holdout Button ............................................................... 5-40
Skipin Button .................................................................. 5-41
Skipout Button................................................................ 5-41
Preview Animation Button (In Brief) ............................... 5-43
Animation Storyboard Button (In Brief) .......................... 5-43
Animation Environment Record
Animation Button (In Brief).......................................... 5-43
Run Animation Button (In Brief) ..................................... 5-43
5.4
Animation Actor Menus ....................................... 5-44
5.4.1
Animation Actors (in brief) .......................................... 5-44
Actor Type Popup .......................................................... 5-45
Cel Actor ........................................................................ 5-45
Cycle Actor..................................................................... 5-46
Filmstrip Actor ................................................................ 5-46
Text Actor....................................................................... 5-46
Write-on Actor ................................................................ 5-46
Morph Actor ................................................................... 5-47
Macro Actor.................................................................... 5-47
Plug-in Actor .................................................................. 5-47
Switcher Actor................................................................ 5-47
Color-table Actor (labeled Colortab) .............................. 5-47
Mask Actor ..................................................................... 5-48
Reference Actor (labeled Refer) .................................... 5-48
Troupe Actor .................................................................. 5-48
Cinefusion Actor (Optional)............................................ 5-49
Shapes Actor ................................................................. 5-49
5.4.2
Actor Edit Functions .................................................... 5-50
Main Actor Edit Button ................................................... 5-50
Add Actor Button............................................................ 5-51
Delete Actor Button........................................................ 5-52
Off Button ....................................................................... 5-53
Move Actor Button ......................................................... 5-53
Copy Actor Button.......................................................... 5-54
Stretch Actor Button....................................................... 5-55
Show Troupe Button ...................................................... 5-56
Compress Button ........................................................... 5-56
5.4.3
Actor Popups ................................................................ 5-57
Actor Name Window ...................................................... 5-58
Actor Loops Window ...................................................... 5-58
Actor Begin and End Windows ...................................... 5-59
Edit Keyframe Button ..................................................... 5-60
Edit Path Button ............................................................. 5-60
Curve Functions in Animation ........................................ 5-61
Insert Point Button ......................................................... 5-61
Duplicate Points Button.................................................. 5-62
Point List Button............................................................. 5-63
Corners List Button ........................................................ 5-64
Revision A
xix
Table of Contents
Revision A
xix
Table of Contents
CHYRON Corporation
CHYRON Corporation
Recall Cel Button ........................................................... 5-65
Actor Type Button .......................................................... 5-65
5.5
Animation Keyframes ...........................................5-65
Edit Keyframe Button ..................................................... 5-65
5.5.1
Keyframe Timeline ........................................................ 5-65
5.5.2
Adding and Editing Keyframes ................................... 5-70
Keyframe Edit Menu ...................................................... 5-66
Add Keyframe Button..................................................... 5-71
Delete Keyframe Button................................................. 5-71
Move Keyframe Button .................................................. 5-72
Keyframe Elevator ......................................................... 5-72
Keyframe Save Button ................................................... 5-72
Keyframe All Button ....................................................... 5-73
Keyframe Recall Button ................................................. 5-73
Keyframe Edit OK Button............................................... 5-73
SubPixel Button ............................................................. 5-73
5.5.3
Copying Keyframes ...................................................... 5-74
Copying Keyframes to Another Actor............................. 5-74
5.5.4
Keyframe Positioning ................................................... 5-75
Keyframes without Curve Points.................................... 5-78
5.5.5
Keyframe Distort Popup .............................................. 5-79
Keyframe Attribute Buttons ............................................ 5-80
Keyframe Time Window................................................. 5-81
Auto Smooth Button....................................................... 5-81
Warp Attribute Button..................................................... 5-83
Texture Attribute Button ................................................. 5-83
Keyframe Distort Popup................................................. 5-85
Sub-Pixel Positioning ..................................................... 5-86
Perspective Transform................................................... 5-87
Position Button............................................................... 5-88
Axis Lock Button (Global and Local) .............................. 5-88
Rotation Button .............................................................. 5-89
Slant Button ................................................................... 5-89
Scale Button................................................................... 5-89
Scale Lock Button .......................................................... 5-90
Eye Button ..................................................................... 5-90
Reset Button .................................................................. 5-91
Warp Corners................................................................. 5-91
Distort Filters.................................................................. 5-91
About Filters................................................................... 5-92
Realtime Paste/Distort Preview on Some Platforms...... 5-96
5.6
Speed Curve ..........................................................5-97
Speed Nails.................................................................. 5-101
Speed Curve Elevator.................................................. 5-103
Table of Contents
xx
Revision A
Table of Contents
xx
Revision A
Liberty Artist’s Manual
Liberty Artist’s Manual
Add Speed Nail Button................................................. 5-103
Delete Speed Nail Button............................................. 5-104
Speed Curve Zoom Buttons ( In and Out) ................... 5-104
5.7
THE ACTOR POPUPS ........................................ 5-104
Actor Type Button ........................................................ 5-105
File Button.................................................................... 5-105
Recall Cel Button ......................................................... 5-105
Edit Path Button ........................................................... 5-106
Edit Keyframe Button ................................................... 5-106
Actor Browse Window.................................................. 5-106
5.7.1
Cel Actor Popup ......................................................... 5-106
Single Cel Actor ........................................................... 5-107
Multiple Cel Actor......................................................... 5-108
Inserting a Sequence into the Multiple Cel Actor ......... 5-108
Multiple Cel File Button ................................................ 5-116
Multiple Cel In and Out Number Windows ................... 5-116
Multiple Cel Num Button .............................................. 5-117
Multiple Cel Insert Button............................................. 5-117
Multiple Cel Delete Button ........................................... 5-117
Multiple Cel Duplicate Button (Dup) ............................. 5-117
Multiple Cel Swing Button ............................................ 5-118
Multiple Cel Once Button ............................................. 5-118
5.7.2
Motion Stabilization ................................................... 5-118
5.7.3
Cycle Actor Popup ..................................................... 5-119
5.7.4
Filmstrip Actor Popup ................................................ 5-120
Stabilize Button ............................................................ 5-119
Filmstrip Source Buttons.............................................. 5-122
Filmstrip Hdisk Button .................................................. 5-122
Filmstrip Src VTR Button ............................................. 5-122
Filmstrip Tar VTR Button ............................................. 5-122
Extract Button - De-interlacing ..................................... 5-122
De-interlacing Popup ................................................... 5-123
Hints About Field Order ............................................... 5-124
Filmstrip File Button ..................................................... 5-124
Filmstrip In Button ........................................................ 5-124
Filmstrip Out Button ..................................................... 5-125
Filmstrip Speed Slider.................................................. 5-126
Dynamic Speed Control - Speed Keyframe Button...... 5-127
Motion Blur and Trail Off .............................................. 5-128
5.7.5
Text Actor Popup ....................................................... 5-129
Text Color Button ......................................................... 5-130
5.7.6
Write-On Actor Popup ................................................ 5-131
Write-on Color Button .................................................. 5-132
Brush Mode Button ...................................................... 5-133
Write-on Paint Mode Button......................................... 5-133
Revision A
xxi
Table of Contents
Revision A
xxi
Table of Contents
CHYRON Corporation
CHYRON Corporation
File Button.................................................................... 5-134
5.7.7
Morph Actor Popup .................................................... 5-137
Morph Between Button ................................................ 5-138
Morph Reverse Button ................................................. 5-138
Morph Recall Canvas Button ....................................... 5-138
Morph Swap Temp/Canv Button.................................. 5-138
Triangle Morph Add Points Button ............................... 5-139
Triangle Morph Delete Points Button ........................... 5-140
Triangle Morph Move Points Button............................. 5-140
Triangle Morph Color Button (corner of Move) ............ 5-140
Triangle Morph Add Keyframe Button.......................... 5-140
Triangle Morph Copy Keyframe Button........................ 5-141
Triangle Morph Delete Keyframe Button...................... 5-142
Triangle Morph Reset Button ....................................... 5-142
Triangle Morph Lock Button......................................... 5-142
Triangle Morph OK Button ........................................... 5-143
Triangle Morph Keyframe Slider .................................. 5-143
Line Morph Add Button ................................................ 5-144
Line Morph Delete Button ............................................ 5-145
Line Morph Move Button.............................................. 5-145
Line Morph Color Button .............................................. 5-145
Line Morph Tune Button .............................................. 5-146
Line Morph Select Button............................................. 5-146
Line Morph Add Keyframe Button................................ 5-147
Line Morph Copy Keyframe Button.............................. 5-147
Line Morph Delete Keyframe Button............................ 5-148
Line Morph Reset Button ............................................. 5-148
Line Morph Lock Button ............................................... 5-148
Line Morph Test Button................................................ 5-149
Line Morph OK Button ................................................. 5-149
Line Morph Keyframe Slider ........................................ 5-149
5.7.8
Macro Actor Popup .................................................... 5-150
5.7.9
Switcher Actor Popup ................................................ 5-154
Macro Actor Keyframe - First & Last Line Numbers .... 5-152
File-controlled Reveal Button....................................... 5-155
Switcher Composite Button.......................................... 5-156
Switcher Dissolve Button ............................................. 5-158
Switcher Fade Button................................................... 5-158
Switcher Reverse Button ............................................. 5-158
Switcher Fairing Button................................................ 5-158
Switcher Softness Slider .............................................. 5-159
5.7.10 Color-Table Actor Popup ........................................... 5-159
Color-table File Button ................................................. 5-161
Color-table Duplicate Button (Dups) ............................ 5-161
Color-table Cycle Button .............................................. 5-161
Color-table Reveal Button............................................ 5-162
Color-table Ncols Button .............................................. 5-162
Table of Contents
xxii
Revision A
Table of Contents
xxii
Revision A
Liberty Artist’s Manual
Liberty Artist’s Manual
Color-table Edit Col Button .......................................... 5-162
Color-table Smooth Button........................................... 5-162
5.7.11 Mask Actor Popup ...................................................... 5-162
Mask Mode Popups ..................................................... 5-163
Mask Mode .................................................................. 5-165
Chroma Key Mode ....................................................... 5-165
Brightness Mode .......................................................... 5-166
Contrast Mode ............................................................. 5-167
Tint Mode ..................................................................... 5-167
Ripple Mode................................................................. 5-168
Filter Mode ................................................................... 5-169
Posterize Mode ............................................................ 5-170
Mosaic Mode................................................................ 5-171
Sharpen Mode ............................................................. 5-171
Blur Mode..................................................................... 5-171
HSV and RGB Modes .................................................. 5-171
Color Correct Mode...................................................... 5-172
Adjust Mode ................................................................. 5-172
Noise Mode.................................................................. 5-173
Bump Map Mode.......................................................... 5-173
Gamma Mode .............................................................. 5-174
Chroma Key Mode ....................................................... 5-174
Ultimatte Plug-in........................................................... 5-178
Mask File Button .......................................................... 5-178
Mask Invert Button ....................................................... 5-179
Mask Inplace Button .................................................... 5-179
5.7.12 Reference & Troupe Actor Popups ........................... 5-182
Show Troupe Button .................................................... 5-182
5.7.13 Shapes Actor Popup .................................................. 5-184
Shapes Actor Popup .................................................... 5-186
Inbetweening Timeline ................................................. 5-186
Shapes 3D Paste Popup.............................................. 5-190
Shapes Actor Rendering Modes .................................. 5-191
Canvas Mode............................................................... 5-192
Other Canvas Mode variations: ................................... 5-192
Mask Mode .................................................................. 5-193
Plug-in Actor ................................................................ 5-193
5.8
MORPHING.......................................................... 5-194
5.8.1
Triangle Morph: Step by Step ................................... 5-196
5.8.2
Line Morph: Step-by-Step ......................................... 5-200
5.9
Motion Tracking.................................................. 5-204
5.9.1
Motion Tracking .......................................................... 5-205
Motion Tracking Popup ................................................ 5-209
Lock Frame Button....................................................... 5-209
Size Buttons (X and Y)................................................. 5-211
Revision A
xxiii
Table of Contents
Revision A
xxiii
Table of Contents
CHYRON Corporation
CHYRON Corporation
Move Buttons ............................................................... 5-211
Separating Points from Image with Warp Corners....... 5-213
5.9.2
5.10
Motion Stabilization .................................................... 5-220
Animation Playback Functions..........................5-222
Animation Preview Button............................................ 5-223
Animation Preview Popup............................................ 5-223
Animation Preview Handle........................................... 5-227
Animation Storyboard Button ....................................... 5-231
5.10.1 Record Control Popup ............................................... 5-233
Record Modes.............................................................. 5-233
Erase Functions ........................................................... 5-234
Record Rate Window ................................................... 5-235
Storyboard Resolution Modes...................................... 5-235
Storyboard Elevator and Path Window ........................ 5-237
File Data Button ........................................................... 5-237
Browse Button.............................................................. 5-238
5.10.2 Playback Control Popup ............................................ 5-239
Play Once Button (Play 1)............................................ 5-240
Play Button................................................................... 5-240
Fast Forward Button (FF)............................................. 5-240
Reverse Button (Rev) .................................................. 5-240
Fast Reverse Button (FR) ............................................ 5-240
Stop Button .................................................................. 5-240
Frame Window............................................................. 5-241
Start and End Windows ............................................... 5-241
Playback Frame Slider................................................. 5-241
Playback Modes........................................................... 5-241
Speed Slider ................................................................ 5-242
Rate Selection Modes.................................................. 5-243
Resolution Windows .................................................... 5-244
Magnifying Storyboards ............................................... 5-244
Displaying Full-Screen Storyboards............................. 5-244
Storyboard Elevator and Path Window ........................ 5-245
File Data Button ........................................................... 5-245
Browse Button.............................................................. 5-245
File Control Popup ....................................................... 5-246
Compression Schemes................................................ 5-247
Permanent Storyboard Buttons.................................... 5-251
Record Animation Button (Final Render Mode) ........... 5-255
Background Render ..................................................... 5-255
Run Animation Button .................................................. 5-256
Run Popup ................................................................... 5-256
Index
Table of Contents
xxiv
Revision A
Table of Contents
xxiv
Revision A
1 - Introduction
1.1
INTRODUCTION
The Liberty software package is designed to be used
by artists with no specialized computer or computer
graphics experience. The basic functions are simple
and straightforward. This manual is intended to provide, first, information for the basic use of the Liberty software, and, second, the explanation of the
more complicated variations on the basic functions.
Some functions, such as certain uses of the Diagram
Popup to modify Masks or the use of the scientific
calculator, can become complicated, but the user
must seek out such complexity.
1.1.1
About this Manual
Use this manual to learn the operation of the Liberty
software by starting at the beginning and going
through it step-by-step. After you have some experience with Liberty, use the manual as a reference
book to get more details about functions. For your
convenience, this manual is divided into sections as
follows:
Revision A
1-1
Introduction
Revision A
•
Table of Contents/List of Figures
•
This Introduction
•
Section 2: Login Environment
•
Section 3: Configuration Environment
•
Section 4: Paint Environment
•
Section 5: Animation Environment
•
Index
1-1
Introduction
CHYRON Corporation
CHYRON Corporation
1.1.2
Hardware Platform
Liberty software runs on a number of SGI hardware
platforms. For hardware startup and shutdown routines please consult the documentation for the particular hardware platform that your copy of Liberty
is running on.
NOTE
Installation of Liberty software and a
digitizing tablet is covered in the
appropriate
Liberty
Technical
Reference document and is not
covered in this manual.
1.1.3
Custom Menu Colors
Liberty allows you to customize the colors of your
menus. In this manual all references to the color of
menu buttons refer to the standard default menu colors.
1.2
A NOTE ON LIBERTY
ENVIRONMENTS
The full Liberty software package consists of four
Environments in which you do your work: The
Login Environment, The Paint Environment, The
Animation Environment, and the Configure Environment. If you have Liberty Paint software, the
Animation Environment is not activated.
Introduction
1-2
Revision A
Introduction
1-2
Revision A
Liberty Artist’s Manual
Liberty Artist’s Manual
1.3
1.3.1
NAVIGATING THE ENVIRONMENTS
Arrangement of Functions
In the Paint and Animation Environments, Liberty
provides a Canvas, or picture screen, for the creation and display of pictures. In the Paint Environment, areas of the Canvas can be masked for
operations. These areas are Masks.
Temps are additional frame buffers, or picture storage areas, where you store pictures for quick recall
during active work on a project.
Menus are all the buttons, slider scales, and displays
which you will use to operate on the Canvas.
The Prompt Window is a wide, narrow window at
the bottom of the screen that displays help information about functions you are using.
Elevators are a series of storage registers found in
various menus that allow you to quick-store a number of temps, masks, and other elements, rather than
having to save them on disk. They are represented
by a series of small boxes grouped in a horizontal or
vertical line (6, 8, or 10 boxes).
1.3.2
Menu Buttons and the Tablet
All menu buttons are activated by pressing the pen
down on the tablet (you can configure Liberty for
the mouse if no tablet is installed: see the Liberty
Technical Reference Manual). No button requires
the use of the Shift, Control, or Alt keys to modify
its behavior. If a button is disabled, then the text on
the button fades slightly. In this way you can see at
Revision A
1-3
Introduction
Revision A
1-3
Introduction
CHYRON Corporation
CHYRON Corporation
a glance which buttons are or are not enabled for
use. You can assign menu buttons to keys on the
keyboard, as well as entire macros. (Refer to “PreDefined Macro Functions” on page 4-419 for a listing of pre-defined keys.)
1.3.3
Slider Scales
Many functions in Liberty are controlled by slider
scales. Pressing down on the scale and dragging the
slider changes the value of the slider scale and thus
changes the function controlled by that slider scale.
Pressing the arrow button at either end of a slider
scale causes the slider scale to increment or decrement one unit. Whenever you change a slider scale
value, its name is displayed in the Prompt Window
at the bottom of the screen. Directly underneath or
above each slider scale is a number window that displays the value of that slider. Pressing on the number window enables you to type in a new value from
the keyboard and change the slider in that way. Typing "p" (plus) before a number adds the number to
the value; typing "m" (minus) before a number subtracts that number from the value. For example, if
the value is 7 and you type “m2” the new value will
be 5.
NOTE
You must press Enter after any
Keyboard input.
When you press on a menu button that takes numerical input, such as the Direction Button, it shows its
name and current numerical value in the Prompt
Window. Typing a number on the keyboard, followed by Enter, changes the current value. Typing
"p" (plus) before a number adds the number to the
Introduction
1-4
Revision A
Introduction
1-4
Revision A
Liberty Artist’s Manual
Liberty Artist’s Manual
value; typing "m" (minus) before a number subtracts
that number from the value, just the same as with
number windows.
1.3.4
Calculator
Pressing in the input area on the right end of the
Prompt Window calls up the calculator with the
input value showing in the calculator display. The
calculator is used for more complicated calculations.
Pressing the OFF button on the calculator causes it
to disappear.
1.3.5
Number Windows/Text Windows
There are other number windows in Liberty besides
the ones underneath the slider scales (especially in
the Animation Environment). Pressing on a number
window enables you to type in a new value, and you
can use “p” and “m” the same way you would with a
slider scale.
Text windows are the same as number windows, but
you type text into them (usually one or two words).
These are almost exclusively found in the optional
Animation Environment.
1.3.6
Keyboard
While using Liberty, artists can create images, and
adjust the great variety of parameters, using the system’s mouse and/or tablet pen as well as slider and
diagram controls found in various menu pop-ups.
The SGI keyboard is used to input specific numeric
values, text editing, binding menu functions (and
Revision A
1-5
Introduction
Revision A
1-5
Introduction
CHYRON Corporation
CHYRON Corporation
macros) to keys, and adjustment of paste positioning. All text and numeric input from the keyboard
must end with the Enter key.
1.3.7
Help!
Liberty provides a green Help Button at the upper
left corner of the Paint Environment near the brush
Display. In the Animation and Configure Environments, the green Help Button is at the lower right
corner of the screen. Press the Help Button, then
press the button that you need help with. The name
of the pressed button and a short description appears
in the Prompt Window.
Introduction
1-6
Revision A
Introduction
1-6
Revision A
2 - Login Environment
2.1
THE LOGIN ENVIRONMENT
Liberty automatically logs on as “art,” but you can
create 99 user-defined login accounts in Liberty. To
login using a different account, press on the name or
number of the account you want to use. If prompted,
type the appropriate password.
Once you are logged in to the account of your
choice, you can press on one of the environment buttons at the bottom of the screen. To exit Liberty,
press the Exit button.
User Login Accounts
When you logout of a Login Account, many of the
settings in Liberty are remembered and will be re-set
for you when you log back into the same account at
a later time. To create a User Login Account, refer
to the Configure Environment description.
A Note for Beginners
In this manual the Configuration Environment is
discussed next. You'll use the Configuration Environment to customize your menus, set your resolution, set up your VTRs, and do many other
functions. However, the default settings are usually
adequate and you can proceed directly to the Paint
or Animation Environment. If you're just beginning
to learn the Liberty software, start by going to the
Paint Environment.
Revision A
2-1
Login Environment
Revision A
2-1
Login Environment
CHYRON Corporation
Login Environment
CHYRON Corporation
2-2
Revision A
Login Environment
2-2
Revision A
Liberty Artist’s Manual
Figure 2-1. The Login Environment
Revision A
2-3
Login Environment
3 - Configuration Environment
3.1
Configuration Environment
Use the Configuration Environment (Figure 3-1) to
configure Liberty's variable settings. Many of the
configurations are stored when you exit Liberty and
are automatically reset when you login again to the
same User Login Account.
3.1.1
Configuration Environment
Functions
The functions of the Configuration Environment
include:
Revision A
3-1
Configuration Environment
Revision A
•
Customizing menu colors.
•
Configuring screen resolution and animation
frame-rate.
•
Setting Fast (RAM) Temporary Picture and
Mask Buffers.
•
Creating, renaming, and deleting directories.
•
Configuring video recording devices.
•
Adding or deleting user accounts from the
login list.
•
Installing software options.
•
Displaying information about your version of
Liberty.
•
Choosing a cursor style.
•
Modifying settings for the pen and tablet.
3-1
Configuration Environment
CHYRON Corporation
CHYRON Corporation
The top part of the Configuration Environment consists of the color palette, for customizing the colors
of the menu. The bottom two-thirds of the screen
contains four panel menus which can be replaced
by other panel menus as needed.
At the bottom of the screen is a horizontal row of ten
buttons called the panel call buttons. Press one of
these buttons and then press anywhere in a current
panel menu to replace it with the new one. From left
to right, the Panel Call Buttons of the Configuration
Environment call up:
Configuration Environment
3-2
Revision A
•
The User Management Panel
•
The Canvas Configuration Panel
•
The Menu Configuration Panel
•
The Directory Configuration Panel
•
The Video Configuration Panel
•
The Video Framer Panel
•
The Undo Panel
•
The Option Management Panel
•
The Cursor Configuration Panel
•
The Tablet Configuration Panel
Configuration Environment
3-2
Revision A
Liberty Artist’s Manual
Figure 3-1. Configuration Environment
Revision A
3-3
Configuration Environment
Liberty Artist’s Manual
Liberty Artist’s Manual
3.1.2
Customizing Menus
In the Configuration Environment, you can change
the colors of the menu to fit your personal preferences. Liberty remembers these settings in your
login account, and they will be the same the next
time you login to the same account.
The default menu settings are optimized for general
use. Get acquainted with the use of the Liberty software before deciding on your personal menu color
configurations.
3.1.3
Color Scheme Palette
This palette (Figure 3-2) is the same as the standard
palette in the Paint Environment, except that when
you press on a color to choose it, the name of its
menu parameter appears in the Prompt Window,
rather than its Red, Green, Blue, and Transparency
values.
The menu color controlled by each box is shown on
page 3-7.
Menu Color Scheme Palette Elevator
You can store eight different palettes in the Menu
Colors Palette Elevator at the left of the main palette. There are several default color schemes stored
in the levels of the elevator. Use the Default scheme
button (described in section 3.1.4) to change the
menus to the default color scheme for the current
elevator level. Use the Get scheme button (also in
section 3.1.4) to put the default scheme’s colors into
the current palette elevator level.
Revision A
3-5
Configuration Environment
Revision A
3-5
Configuration Environment
CHYRON Corporation
CHYRON Corporation
Pressing on an elevator box displays its palette. This
elevator works identically to the Color Palette Elevator in the Paint Environment. You can copy the
top elevator level into other levels and save seven
alternate color schemes in one login account.
3.1.4
Changing the Colors of the Menu
To change a menu color, press on the corresponding
palette box. It is underlined and the name of the
menu parameter appears in the Prompt Window.
Change the color with the slider scales at the right.
Repeat for as many menu parameters as you like;
then press the Set Scheme Button. The menu
changes to the new colors. The menus of other environments will also be changed when you go to them.
Default Scheme(s) Button
Press to restore the default standard menu colors.
This does not change the Menu Configuration Palette, only the menu colors. There is several default
color schemes that you can choose between stored in
the palette elevator (see below).
Configuration Environment
3-6
Revision A
Configuration Environment
3-6
Revision A
Liberty Artist’s Manual
Table 3-1: Palette Customizing Buttons
Top Row
Second
Row
Third Row
Fourth
Row
"Desk" Background
Button Surface
Inset Button
Surface
Popup Menu
Surface
Text
Activated Button
Mode Button
Active Elevator Box
Inactive Elevator Box
Up/Down
Slider Arrows
Slider Pointer
Top/Bottom
Slider Pointers
Marker Bars in
Sliders
Moving Slider
Underlined Palette Pot
Keyboard
Input Highlight
Edited Diagram Curve
Final Diagram
Curve
Light Button
Bevel (alt)
Dark Button
Bevel (alt)
Animation
Timeline Raster
Underlined Palette Hot Color
Wireframes
Handles on
Wirefames
Grids, Shapes
& Field Guides
Bad or broken
Wireframes
Multi-points
on corner
inbetweening
Extra wireframe color
Extra wireframe color
Canvas scratch
space
Dimmed Text
Color
Unassigned
.
Figure 3-2. Color Scheme Palette
Revision A
3-7
Configuration Environment
Liberty Artist’s Manual
Liberty Artist’s Manual
Get Scheme Button
Press to copy the current menu colors to the palette.
When you are changing the colors on the palette, use
to restore the palette back to the current menu colors.
Set Scheme Button
Press to display the Menu Configuration Palette colors in the menu.
3.1.5
System Info Button
Press this button to call up the System Info Popup,
which displays information about the current version of Liberty software you are running, as well as
information about your hardware platform. It lists
the following:
•
Current Liberty version number
•
Date compiled
•
Current date and time
•
Host name
•
Internet ID setting
•
Physical RAM
•
User RAM
•
Free RAM
•
Free virtual memory
•
Size of Liberty software
•
Free SYS disk space (%)
Press the OK Button to close the popup.
Revision A
3-9
Configuration Environment
Revision A
3-9
Configuration Environment
CHYRON Corporation
CHYRON Corporation
3.1.6
License Info Button
Press this button to display the License Information
Popup, which displays information about what Liberty software options are currently enabled. It lists
each Liberty software option, its version number,
and whether it is enabled (available) or not.
Press the OK Button to close the popup.
3.2
USER PANEL
Figure 3-3. User Panel
Configuration Environment
3-10
Revision A
Configuration Environment
3-10
Revision A
Liberty Artist’s Manual
Liberty Artist’s Manual
Use these functions to add or delete User Login
Accounts from the Login Environment.
User Login Accounts
You create a User Login Account to remember various Liberty settings. If several artists use the same
Liberty installation, each artist might have a User
Login Account. Different projects might each have
its own User Login Account. You might create a
User Login Account for each different screen resolution you commonly use. The User Login
Accounts are displayed in a list in the Login Environment. Liberty can have up to 99 different User
Login Accounts.
Add User Button
The Add User Button allows you to create a new
User Login Account. A new User Login Account
will contain Liberty’s current settings. Once you
have created a new User Login Account, you can
login to the new account and customize the settings
(such as resolution, menu colors, etc.) that you want
to be part of the new User Login Account.
To add a new User Login Account:
Revision A
3-11
Configuration Environment
Revision A
[ ] 1.
Press the Add User Button. The User Popup
appears. It should show the lowest-numbered
unused login entry.
[ ] 2.
Press in the User Name Text Window, and
type in the User Login Account Name. It
must be less than 20 characters. Avoid spaces
and punctuation marks.
[ ] 3.
Press Enter. The cursor moves down into the
User Password Text Window.
3-11
Configuration Environment
CHYRON Corporation
CHYRON Corporation
[ ] 4.
Type in the User Login Password. If you do
not want a password, skip to step 5.
[ ] 5.
Press Enter. If you want to create another
User Login Account, press the Next button,
and go back to step 2.
[ ] 6.
Press the OK Button to confirm the new User
Login Account(s) you’ve created. The User
Login Popup disappears. To exit the popup
and cancel all changes, press the Cancel
Button.
NOTE
After adding a user's name you
cannot edit it; instead, delete it and
re-add, if necessary.
Delete User Button
The Delete User Button allows you to remove an
existing User Login Account. When a User Login
Account has been deleted, its name disappears from
the list of User Login Accounts in the Login Environment, leaving an empty space for that number.
You can then add a new User Login Account where
the deleted account was.
To delete a User Login Account:
Configuration Environment
3-12
Revision A
[ ] 1.
Press the Delete User Button.
Popup appears.
[ ] 2.
Press on the Next and Previous Buttons to
cycle through the existing Login Accounts.
Find the one you want to delete.
[ ] 3.
Press the OK Button. The User Login
Account is deleted, and the User Login Popup
disappears.
To exit without deleting an
account, press the Cancel Button.
Configuration Environment
3-12
The User
Revision A
Liberty Artist’s Manual
Liberty Artist’s Manual
Set User Password Button
The Set User Password Button allows you to create
a password for a User Login Account that doesn’t
have one, or to change an existing password.
To change a User Login Account Password:
Revision A
3-13
Configuration Environment
Revision A
[ ] 1.
Press the Set User Password Button. The
User Popup appears.
[ ] 2.
Press on the Next and Previous Buttons to
cycle through the existing Login Accounts.
Find the one for which you want to create a
password or whose password you want to
change.
[ ] 3.
Press on the User Password Text Window.
[ ] 4.
Type in the new password and press Enter.
If you want to change another password, go
back to step 2.
[ ] 5.
Press OK to confirm the new password(s).
The User Login Popup disappears. To exit the
popup without making any changes, press the
Cancel Button.
3-13
Configuration Environment
CHYRON Corporation
CHYRON Corporation
Set Administration Password Button
Figure 3-1. Administration Password Popup
The Set Administration Password Button allows you
to create a password for access to the Configuration
Environment.
To change an Administration Password:
•
Press the Set Administration Password Button. The Administration Password Popup
appears.
•
Type a password into the Password Field. (The
characters, when typed, appear as asterisks for
security reasons.)
•
Press OK.
After exiting the Configuration Environment, any
attempt to re-enter Configuration from another environment requires the password.
Configuration Environment
3-14
Revision A
Configuration Environment
3-14
Revision A
Liberty Artist’s Manual
Liberty Artist’s Manual
Delete Button
The Delete button will delete the password from the
system so that it is not activated when entering the
Configuration Environment.
3.2.1
User Popup
Press any of the top three buttons in the User Panel
to call up this popup menu.
User Number Text Window
Press to enter a User Login Account number, 1
through 99. The default is the lowest unused number.
User Name Text Window
Press to enter the User Login Account name, up to
20 characters.
User Password Text Window
Press to enter the User Login Account password, if
any, up to 20 characters.
Next Button
Press to display the name of the next User Login
Account.
Prev Button
Press to display the name of the previous User
Login Account.
Cancel Button
Press to cancel any changes you made to the User
Login Accounts and exit the User Popup.
Revision A
3-15
Configuration Environment
Revision A
3-15
Configuration Environment
CHYRON Corporation
CHYRON Corporation
OK Button
Press to confirm any changes you made and exit the
User Popup.
3.3
CANVAS PANEL
Figure 3-4. The Canvas Panel
Configuration Environment
3-16
Revision A
Configuration Environment
3-16
Revision A
Liberty Artist’s Manual
Liberty Artist’s Manual
64-bit Color Range Display (Liberty 64 Only)
When using Liberty 64, the monitor of your computer can’t display the full range of colors in the 64bit canvas. To display the canvas image, Liberty
normally does a linear conversion to display the 64bit colors on the screen. The 64-bit Color Range
Display functions allow this conversion to be
altered. The following options exist:
Off
When this button is on, Liberty does a linear conversion to display the 64-bit canvas colors on the
screen. In other words, the software does not perform any contrast adjustments or other color corrections when displaying the canvas on the screen. The
lower bits of each pixel are merely discarded to convert the pixel from 64-bit to 32-bit for screen display. This is the default mode.
Linear
This allows the user to turn on a linear contrast correction, so that canvas pixels are contrast corrected
before being displayed on the screen. Pressing on
the Linear button brings up a slider with two markers (shown below). The upper marker represents the
white point. Lowering this marker brightens the
bright colors of the canvas when displayed on the
screen. The lower marker represents a black point.
Increasing this marker darkens the dark colors of the
canvas when displayed on the screen. The Reset button resets the markers to the bottom and top of the
slider, which essentially turns the contrast correction
off.
Revision A
3-17
Configuration Environment
Revision A
3-17
Configuration Environment
CHYRON Corporation
CHYRON Corporation
Note that this function only affects the range of colors displayed on the screen. The actual contents of
the canvas image is not modified.
Figure 3-5. Linear Contrast Slider
Cineon
This function, when enabled, performs a log to linear conversion when the 64-bit canvas colors are
displayed on the screen. This function is normally
used when using images read from Cineon (or DPX)
files, which are often in log format. Pressing on the
Cineon button brings up a popup menu with five
sliders, a Convert Off button, and a Reset button
(refer to the figure shown below). The sliders represent black points for Red, Green, and Blue, an overall white point, and a gamma value. Increasing the
black points makes the dark colors darker, while
decreasing the white point makes the bright colors
brighter. The gamma slider adjusts the middle
ranges in the image. The Reset button sets the menu
to the default log to linear conversion values for
Cineon files, and will almost always be used when
Configuration Environment
3-18
Revision A
Configuration Environment
3-18
Revision A
Liberty Artist’s Manual
Liberty Artist’s Manual
this function is on. The Convert Off button sets the
values so that no conversion is done (black points at
0, white point at 1023, and gamma at 1.0). This is
equivalent to turning the function off.
Once the settings in the popup are complete, the OK
button brings down the popup and makes the settings active.
Note that this function only affects the range of colors displayed on the screen. The actual contents of
the canvas image is not modified.
This function is utilized in conjunction with the Cineon and DPX set-up controls in the Save As popup
in the Paint environment (see page 4-198). There are
two modes of working with log Cineon or DPX
files:
Log:
The user works with log data within Liberty. In
other words, Cineon files are NOT converted to
linear format when read into Liberty (likewise,
images are NOT converted back to log format
when saved from Liberty, since they already
are in log format). The user works in log
format, but turns on Cineon log to linear
conversion for display of the image on the
screen. This way, the canvas looks good when
displayed on the screen, but the pixels are kept
in log format internally, preventing any
conversion artifacts from being introduced.
To run in this mode, the user would set the
Cineon and DPX set-up controls in the Save As
popup in the Paint environment (see page 4198) to “Convert Off”, turning off conversion
when the files are saved and recalled. They
would also turn on log to linear conversion for
screen display of the image, by using the
Cineon function described above. They would
Revision A
3-19
Configuration Environment
Revision A
3-19
Configuration Environment
CHYRON Corporation
CHYRON Corporation
enable this function by pressing on the Cineon
button in the 64-bit Color Range Display
section of the Canvas Configuration panel to
bring up the Cineon popup, and pressing the
reset button in the popup to activate the default
conversion values. The sliders in the popup
could also be fine tuned as needed.
Linear:
The user works with linear data within Liberty.
In other words, Cineon files ARE converted to
linear format when read into Liberty (and back
to log format when saved back out). The user
works in linear format, and turns off Cineon
log to linear conversion for display of the
image on the screen (since the images are
already in linear format within Liberty). This
mode is preferable for some imaging functions
in Liberty (such as Chroma keying), as these
functions work better when using linear image
data.
To run in this mode, the user would set the
Cineon and DPX set-up controls in the Save As
popup in the Paint environment (see page 4198) to do conversion, by pressing the red
Reset button in the Cineon or DPX set-up
menu, and fine tuning the sliders if needed.
This turns on conversion when the files are
Configuration Environment
3-20
Revision A
Configuration Environment
3-20
Revision A
Liberty Artist’s Manual
Liberty Artist’s Manual
saved and recalled. They would also turn off
log to linear conversion for screen display of
the image, by selecting the “Off” button
described above for 64-bit color range display
(in the Canvas Configuration panel).
Figure 3-6. Cineon Setup Control
Messages Functions (Liberty 64)
When using Liberty 64, there are two Modes available in the Messages Buttons: 0 to 65535 and 0 to
255. Press on one of them to activate it. When you
are in 65535 Mode, all colors in Liberty are displayed in a range of 0 to 65535. If you want to display these same colors, but using the more familiar 0
to 255 range, press on the 0 to 255 Button. Again,
these settings will have no effect on the picture
itself, but only on the numbers used to manipulate
the colors.
Resolution Functions
Liberty is capable of resolutions of up to 8000 pixels
by 8000 lines. The resolution you can actually use
depends on which Liberty software package you are
using and on how much RAM (Random Access
Memory) your hardware configuration has. If you
try to enter a resolution that is too high for the
Revision A
3-21
Configuration Environment
Revision A
3-21
Configuration Environment
CHYRON Corporation
CHYRON Corporation
amount RAM your system has, Liberty displays a
warning. You can bypass the warning and continue
to operate Liberty, but performance may be more or
less slowed down.
Liberty 32 and Liberty Paint are limited to 1000 pixels by 1000 lines. The optional Expanded Resolution Option offers 8000 pixels by 8000 lines of
image resolution. Liberty 64 is fully capable of up to
8000 pixels by 8000 lines.
Horizontal Resolution Button
Press to enter a new horiz. resolution (16 to 8000).
Vertical Resolution Button
Press to enter a new vertical resolution (16 to 8000).
Defaults Resolution Button
Press the Defaults button to call up the Defaults Resolution Popup (page 3-25) which has preset resolutions.
Each button represents a preset resolution. If you are
working in video, choose a video resolution by
pressing the appropriate button; then press OK. In
video when transferring the image from the Canvas
to the video board, you can choose to have no
change in pixels (1:1 Pixel Aspect) or to maintain
the 3:4 video aspect ratio (4:3 Pixel Aspect) so that
circles stay circular instead of becoming flattened.
If you are working in film, choose the appropriate
film resolution (Full, Half, and Quarter) while maintaining the correct film aspect ratio.
The Interpolate Button determines whether the
image is filtered or not when it is transferred from
the Canvas to/from the video board. Interpolate On
causes the image to be filtered when it is resized
Configuration Environment
3-22
Revision A
Configuration Environment
3-22
Revision A
Liberty Artist’s Manual
Liberty Artist’s Manual
from the Canvas to the video board (in video 1:1
there is no re-sizing, so interpolation is not
needed). Interpolation On may make the image
slightly softer. When Interpolate is Off, the image is
not filtered. No interpolation results in some aliasing.
NOTE
It is usually important to configure the
Canvas resolution to match your
image resolution when recalling
large files from disk. Images are
recalled to the canvas beginning in
the lower left corner. An image file
that is larger than the canvas will be
truncated and the extra image data
not recalled. If the image is saved
again, only the picture information on
the active canvas will be saved, and
the rest of the data from the large
image will be lost.
To remove the Default Resolution Popup without
choosing a new resolution, press OK.
Revision A
3-23
Configuration Environment
Revision A
3-23
Configuration Environment
Liberty Artist’s Manual
Figure 3-7. Defaults Resolution Popup
Revision A
3-25
Configuration Environment
Liberty Artist’s Manual
Liberty Artist’s Manual
Dots Per Inch Button (DPI)
Press to reset the Dots-Per-Inch setting. Liberty
uses this setting for Paint functions, such as Grid and
Pick Color to measure distances on the screen for
pre-press applications. 100 is the default for SGI
monitors.
Dropframe Button
Press to turn on and enable video recording in Dropframe Mode.
Frame-rate Buttons
Press on one of the three Frame-rate Buttons to set
the frame-rate to 30 frames per second (NTSC), 25
frames per second (PAL), or 24 frames per second
(film). When on, the chosen button is high-lighted
blue.
Revision A
3-27
Configuration Environment
Revision A
3-27
Configuration Environment
CHYRON Corporation
CHYRON Corporation
3.4
MENU PANEL
Figure 3-8. Menu Panel
This panel allows you to configure how many of
Liberty’s temporary picture buffers (temps) and
mask buffers you want to have and how many are
saved in RAM instead of on disk. You can also configure Liberty for fast exits, and customize the look
of your menu buttons.
Configuration Environment
3-28
Revision A
Configuration Environment
3-28
Revision A
Liberty Artist’s Manual
Liberty Artist’s Manual
Temp Number Button
Liberty's Paint Environment provides by default six
temporary work pages, or picture storage buffers,
called temps. You can configure as many temps as
you want by pressing in the Temp Number Button
and entering the number of temps you want. When
you go back to the Paint or Animation Environment
you’ll be prompted for a re-start of Liberty before
the new temps are configured.
Fast Temps Button
Depending on the amount of RAM (Random Access
Memory) on your system, you can assign some or all
of the temps to RAM for fast access. The other
temps are stored on disk and are accessed more
slowly. The minimum (and default) number of fast
temps is 1, the maximum depends on how much
RAM you have and how big your temps are. Only
Fast Temps can be used as Layers in the Paint Environment.
Press inside the Fast Temps Button to type the number of fast temps.
When you go back to the Paint or Animation Environment you’ll be prompted for a re-start of Liberty
before the new fast Temps are configured.
Mask Number Button
Liberty's Paint Environment provides by default six
mask buffers. You can configure as many masks as
you want by pressing in the Mask Number Button
and entering the number of masks you want. When
you go back to the Paint Environment you’ll be
prompted for a re-start of Liberty before the new
masks are configured.
Revision A
3-29
Configuration Environment
Revision A
3-29
Configuration Environment
CHYRON Corporation
CHYRON Corporation
Fast Masks Button
Depending on the amount of RAM on your system,
you can assign some or all of the masks to RAM for
fast access. The minimum number of fast masks is 1,
the maximum depends on how much RAM you
have, how many fast temps you’ve configured, etc.
Press inside the Fast Masks Button to type the number of fast masks.
When you go back to the Paint or Animation Environment you’ll be prompted for a re-start of Liberty
before the new fast masks are configured.
Fast Exit Button
Press this button to turn on Fast Exit Mode. When
on, Fast Exit Mode causes fast temps (RAM Temps)
and fast masks NOT to be saved when you exit Liberty. This speeds up the process when you exit Liberty.
The Fast Exit button is off by default, so fast temps
and fast masks are saved when you exit Liberty.
Note however that this is not permanent storage; the
next use of the fast temps overwrites the saved
temps.
Info Buttons
These buttons provide information about Liberty’s
various buffers.
Cels Info
Press the Cels Info Button for a text list containing
data about the various image buffers in Liberty
(including the Canvas, each RAM temp, and each
RAM mask). For each image buffer, the following
information is provided:
Configuration Environment
3-30
Revision A
Configuration Environment
3-30
Revision A
Liberty Artist’s Manual
Liberty Artist’s Manual
Name of the image buffer (for example "Temp 4").
For temps and masks, a small arrow (>) next to the
name indicates that this is the current temp or mask.
(x, y)
For layers, this shows the current x and y
position of the layer.
(xs, ys)
The total x and y size in pixels of the
buffer (for layers, this is the size of the
image the layer contains; for the canvas
and masks, it is the canvas resolution).
Size
The size in bytes of the image buffer.
Bound
For the Canvas and masks, this shows
lower left (x,y) position and size in pixels (xs,ys) of the image in the buffer.
This is useful since the Canvas and
masks are NOT sized to the image they
contain, and this tells where the image is
in the buffer (assuming the image is a
cutout). For layers, you can ignore this
section (since layers are always sized to
the cutout they contain).
Temp Info and Mask Info
The Temp Info Button is similar to the Cels Info
Button, except that it only provides information on
the temp buffers (layers). Likewise, the Mask Info
Button only provides information on the mask buffers. These menus may be useful when there are too
many temps and masks to fit on the Cels Info menu
(which is not scrollable).
Revision A
3-31
Configuration Environment
Revision A
3-31
Configuration Environment
CHYRON Corporation
CHYRON Corporation
Button Configuration Buttons
Button, button, who’s got the button? Here, you can
set the visual style for all the buttons in Liberty’s
menus. Please note that the Surface and Bevel buttons are mutually exclusive; turning on one turns the
other off.
The Surface Button
Press the Surface button to turn Surface Mode on/
off. When Surface Mode is on, Liberty displays
turned-on buttons by highlighting the surface of the
button.
The Bevel Button
Press the Bevel button to turn Bevel Mode on/off.
When Bevel Mode is on, Liberty displays turned-on
menu buttons with colored bevels that push IN
(become debossed). In Alt mode (see below) you
can set the highlight color and the bevel colors in the
menu configuration palette.
The Black Border Button
Press the Black Border button to turn Black Border
Mode on/off.
When the Black Border Mode is on, Liberty draws
thin black borders around all menu buttons. This
makes buttons look sharper and crisper on a high-res
screen.
The Alt Style Button
Press the Alt Style Button to turn Alternate Style
Mode on/off. When the Alt Style Mode is on, Liberty sets beveling colors to be user-defined (in palette row 3, columns 3 and 4) instead of systemdefined.
Configuration Environment
3-32
Revision A
Configuration Environment
3-32
Revision A
Liberty Artist’s Manual
Liberty Artist’s Manual
3.5
DIRECTORY PANEL
Figure 3-9. The Directory Panel
Liberty provides for the creation, naming, re-naming, and deleting of directories on the hard disk(s).
Use directories to organize your work in ways that
make sense to you. Keep in mind that others may
need to access your directories, so simple, commonsense naming conventions may be in order. A directory name like “PCD421aFINAL2” may be too
obscure at a later time, no matter how logical it
seems now.
Revision A
3-33
Configuration Environment
Revision A
3-33
Configuration Environment
CHYRON Corporation
CHYRON Corporation
NOTE
Avoid punctuation marks and spaces
in directory names (This is also true
for filenames of any type).
Create Directory Button
Press to create a new directory. The file popup
appears with the directory line high-lighted.
Type in the desired directory name and hit Enter.
When you go back to the Paint or Animation Environment you can save files into the new directory.
Delete Directory Button
Press to delete an existing, empty directory. The file
popup appears with the directory line high-lighted.
Type in the name of the directory you want to delete
and press Enter, or you can press on the directory
name in the file list. The indicated directory is
deleted, if it is empty. If the directory has any files
in it, a message appears: "Sorry, no permission." In
this case, go back into the Paint Environment and
delete all the files in the directory before trying to
delete the directory.
Rename Directory Button
Press to rename a directory. The file popup appears
with the directory line high-lighted.
Type in the name of the directory to be renamed and
press Enter, or press on the directory name in the file
list. Type the new name for the directory and press
Enter. The directory is re-named.
Configuration Environment
3-34
Revision A
Configuration Environment
3-34
Revision A
Liberty Artist’s Manual
Liberty Artist’s Manual
User Setup Button
Liberty has a file in its home directory (for example,
/usr/people/liberty) that maintains the path to certain
directories constantly being accessed by the program. These directories are:
Cels
The disk copies of the canvas, temp buffers, and mask buffers are located here.
Image
Images, animations, and other files created by the user are located here.
Plug-ins
Plug-in filters are stored here.
Project
Liberty saves the state of its menus and
elevators here.
Undo
Files for Undo are saved here.
The file liberty_paths is a text file that tells Liberty
the location of these files. This file is a text file that
can be edited by a number of text editors to make
changes (e.g. JOT). By editing this file, the user can
change the locations of these directories. For example, the user could create a directory on an external
hard drive to store images, then change the path for
the Image directory in the liberty_paths file to match
this new location. This would tell Liberty to always
look for images on the external hard drive.
However, instead of using a text editor, Liberty provides a menu pop-up for editing the paths to the
directories. By selecting the User Setup button, a
pop-up menu appears with file windows for Cels,
Image, Plug-ins, Projects, and Undo plus the OK
and Cancel buttons. Clicking in one of the five windows brings up the File Recall Popup, allowing the
Revision A
3-35
Configuration Environment
Revision A
3-35
Configuration Environment
CHYRON Corporation
CHYRON Corporation
user to select a new directory path. Liberty then
automatically updates the liberty_paths file with the
new path information.
Re-label ImageStor! Button
This button allows you to re-label fields in the ImageStor! Pop-up.
3.6
VIDEO PANEL
Figure 3-10. The Video Panel
Configuration Environment
3-36
Revision A
Configuration Environment
3-36
Revision A
Liberty Artist’s Manual
Liberty Artist’s Manual
Use the Video Configuration Panel to define as
many as six physical video recorders (or digital disk
recorders), depending on how many ports your hardware supports. When you are in the Paint or Animation Environments, you can use the VTR Menu there
to set up any defined recording device as Source or
Target, or both simultaneously. You can then control the recording device(s) directly from the Liberty
menu for playback, cueing, shuttle, etc.
Video Recording and Video Boards
To record video from Liberty you must have a video
board installed (or have a digital disk recorder
[DDR]) to convert the RGB output of Liberty to a
video format. Liberty includes software for use of
various video boards and DDRs that are available
for different models of SGI platforms. Consult your
Chyron or SGI salesperson if you need information
about video board/DDR options for your Liberty
workstation.
3.7
CONFIGURING VTRS
To be able to control a recording device (other than
a DDR) from Liberty, install the option for the video
board you are using. (Centaur, Video Framer, etc.)
See page 3-47 for more information.
CAUTION
You must have only one video board
option installed at any time, or VTR
control will not work.
Configure your video board option. See the configuration instruction document of the video board you
have installed.
Revision A
3-37
Configuration Environment
Revision A
3-37
Configuration Environment
CHYRON Corporation
CHYRON Corporation
The buttons on the VTR configuration panel configure Liberty to match your recording device.
Define VTR Button (Defining VTR As:)
Pressing on the number window (at the top of the
Video panel, labeled “Defining VTR as”) cycles
through the video recorders. The number displayed
is the number of the video recorder you are defining.
Cycles from 1 to 6.
Model List
The Model List is the list of models of video recorders that Liberty controls directly and currently supports. The model list is the list of devices just below
the “Defining VTR as” button in the Video panel.
Any models not on this list are controlled by a
VLAN device, which is one of the choices in the list.
For instance, you could define VTR 1 as VLAN and
VTR 2 as Abekas A60. VTR 3, 4, 5, and 6 could be
defined as "none." Any unused VTR numbers (1
through 6) should be set to "none," because logging
in will be faster if Liberty doesn't have to take time
to configure VTRs unnecessarily.
Scroll through the list until you see the model you
want to define; then press it.
^ (up) scrolls the model list up.
v (down) scrolls the model list down.
Configuration Environment
3-38
Revision A
Configuration Environment
3-38
Revision A
Liberty Artist’s Manual
Liberty Artist’s Manual
The Model List includes the following choices:
•
none
•
VLAN
•
generic SMPTE
•
Abekas A60
•
Abekas A65, A66
•
Abekas Diskus
•
AMT 7422
•
Accom RTD 4224
•
Accom WSD
•
RCI
•
SDL QuickFrame/Diskcovery
•
MMS ProntoVideo
•
RCI
Control Button
Press the Control Button to set up the communication path for transmission of control data to the
video device. When pressed, the Control button will
highlight. Use the Type window and Address window to configure the control path. (Refer to Table 32 for correct device control types).
Revision A
3-39
Configuration Environment
Revision A
3-39
Configuration Environment
Liberty Artist’s Manual
Table 3-2: Device Control Type/Address Listing
Control
Video
Device
Type
Address
Type
VLAN
Serial A/1, Serial B/2
Address
AVION, Centaur, Galileo, Framer,
VideoLab
generic SMPTE
Serial A/1, Serial B/2
Address
AVION, Centaur, Galileo, Framer,
VideoLab
Abekas A60
Serial A/1, Serial B/2
Address
Ethernet
hostname
Serial A/1, Serial B/2
Address
Ethernet
hostname
Serial A/1, Serial B/2
Address
Ethernet
AMT 7422
Accom RTD 4224
Abekas A65, A66
Abekas Diskus
Address
Ethernet
hostname
Ethernet
hostname
hostname
Ethernet
hostname
SCSI
SCSI dev
Serial A/1, Serial B/2
Address
AVION, Centaur, Galileo, Framer,
VideoLab
Ethernet
hostname
Ethernet
hostname
AVION, Centaur, Galileo, Framer,
VideoLab
Accom WSD
Ethernet
hostname
SCSI
SCSI dev
Ethernet
hostname
SCSI
SCSI dev
AVION, Centaur, Galileo, Framer,
VideoLab
RCI
Ethernet
hostname
Ethernet
hostname
AVION, Centaur, Galileo, Framer
VideoLab
SDL QuickFrame/Diskcovery
Ethernet
hostname
Ethernet
hostname
SCSI
SCSI dev
SCSI
SCSI dev
AVION, Centaur, Galileo, Framer,
VideoLab
MMS ProntoVideo
Ethernet
hostname
Ethernet
hostname
SCSI
SCSI dev
SCSI
SCSI dev
AVION, Centaur, Galileo, Framer,
VideoLab
Revision A
3-41
Configuration Environment
Liberty Artist’s Manual
Liberty Artist’s Manual
Video Button
Press the Video Button to set the video path for the
video device. When selected, the Video button will
highlight. Use the Type window and Address window to configure the video path.
Type Window
The type window is used to set the type of communication for device control (when the Control button
is selected) and video I/O (when the Video button is
selected). The available types of communication are:
Ethernet, SCSI, Serial A/1 (serial port 1) and Serial
B/2 (serial port 2). Not all type of communication
are available on all devices (see table 3-2). Ethernet
and SCSI are utilized for DDR devices, while Serial
is usually utilized with a VLAN device in conjunction with a VTR. If no DDR or VTR is hooked up,
or a camera is attached to your video board, select
“none”.
Address Window
The address window is used to set the specific
address for device control (when the Control button
is selected) and video I/O (when the Video button is
selected). The Address window is used in conjunction with the Type window, and sets the specific
communications address for the selected type of
communication. For a DDR in Ethernet mode, enter
the network host name of the DDR. For a DDR in
SCSI mode, enter the path of the SCSI or disk
device under IRIX (refer to the Liberty 6.0 Technical Reference Manual for details). For VLAN control, select the VLAN slave number. For SMPTE
control, select the SMPTE address.
Revision A
3-43
Configuration Environment
Revision A
3-43
Configuration Environment
CHYRON Corporation
CHYRON Corporation
Source Button (SRC)
Use this button to configure a VTR as the source
VTR. One VTR can be the source VTR while
another VTR can be the target VTR. Or the same
VTR can be defined as both source and target for
grabbing from and recording to the same device.
(You can also select a source VTR in the Paint and
Animation Environments. Refer to “VTR Set-up
Popup” on page 4-435 for details.)
To configure a VTR as the source VTR:
[ ] 1.
Press to call up the Source VTR Popup. The
popup appears.
[ ] 2.
Press on one of the 6 VTRs to select it as
Source.
[ ] 3.
Press the OK button. The popup disappears.
The Source VTR popup also contains a pre-roll button (for setting the number of seconds of pre-roll for
a VTR connected to a VLAN), and a Dropframe button (for turning drop-frame mode on and off for
timecodes). In addition, the Source VTR popup also
contains buttons for setting up 6 Disk paths, and for
re-scaling files grabbed/recorded from/to those disk
paths. Disk paths are normally set up in the Paint
and/or Animation environment, but the controls are
available here and work in a similar manner. Refer
to the section starting on page 4-428 for details.
Target Button (Tar)
Use this button to configure a VTR as the target
(record) VTR. It works the same as the Source Button.
Configuration Environment
3-44
Revision A
Configuration Environment
3-44
Revision A
Liberty Artist’s Manual
Liberty Artist’s Manual
Comm Button
You shouldn't have to alter the settings in the Comm
Button (in fact, this button’s popup is only active if a
serial control type is selected). If necessary, use this
function to set the communications parameters for
the control protocol. (Note that the AMT 7422 DDR
has its own Comm popup. Contact Chyron Customer
Service for assistance.)
Press the Comm button to call up the Comm popup
with the following functions:
baud
If Control is serial, selects the baud rate. Most common is 9600, except for SMPTE devices which are
always 38400 baud.
data
If Control is serial, selects the number of data bits,
either 7 or 8. Almost every VTR uses 8.
parity
If Control is serial, selects the parity polarity.
"None" is most common, except for SMPTE devices
which expect "even."
stop
If control is serial, 1 or 2 stop bits. Most common is
1, some recorders require 2.
The Comm OK Button
Press to confirm changes to the other buttons on the
Comm Popup. The Comm Popup disappears.
Revision A
3-45
Configuration Environment
Revision A
3-45
Configuration Environment
CHYRON Corporation
CHYRON Corporation
V Adj Button
Use the Video Adjust button when you are not satisfied with the video signal coming out of the video
board. It allows you to adjust the configuration of
the specific video board installed on your platform.
Press the Video Button to start the setup application
for your installed video board.
The corresponding menus will appear on top of the
Liberty menus. If you have questions about the
video board application, consult the documentation
for the video board or contact the vendor of the
video board.
Config (OK) Button
Press the Config Button to confirm all changes you
make in VTR configurations.
None of your VTR configuration changes are permanent until you press the Config Button.
Any VTR number that does not have a device associated with it should be configured as "none;" if not,
it takes longer to complete the configurations when
you press Config and when you login to Liberty. To
abort the configuration process after hitting the Config Button, press the gray End key on the keyboard
(not the white Esc key).
When you exit Liberty after configuring VTRs, your
VTR configurations are remembered in the current
User Login Account. After you log back in to that
User Login Account, Liberty configures the recording devices the first time any of the VTR menus or
controls are accessed. If, while using a certain login
account, you only use one or two of the total VTRs,
configure only those in that login account.
Configuration Environment
3-46
Revision A
Configuration Environment
3-46
Revision A
Liberty Artist’s Manual
Liberty Artist’s Manual
3.8
VIDEO FRAMER
® PANEL
When you are using the Video Framer® as your
video board, Liberty supplies a panel (below) to
choose a video format. Press one of the buttons to
choose among RGB, NTSC, PAL, D1, D2, RY, SVideo, and a custom format. The Video Framer
video board is used only on a SGI Personal IRIS
workstation.
Figure 3-11. Video Framer Panel
Revision A
3-47
Configuration Environment
Revision A
3-47
Configuration Environment
CHYRON Corporation
CHYRON Corporation
3.9
OPTION PANEL
Figure 3-12. The Option Panel
The Options Panel lists the available hardware and
software options for LIBERTY, including different
video boards and several optional software packages. The options that are enabled for your LIBERTY site are highlighted on the panel. Press on an
option to enable (highlight) it. If you press on an
Configuration Environment
3-48
Revision A
Configuration Environment
3-48
Revision A
Liberty Artist’s Manual
Liberty Artist’s Manual
option to highlight it and that option is not licensed,
an error message appears. For licensing procedures,
see the LIBERTY Technical reference Manual.
3.9.1
Hardware Options
This window lists the video hardware accessories
that LIBERTY supports. If one of these video I/O
boards or video accessories is installed in your system, select the hardware option so that it is highlighted.
NOTE
It is important to select one installed
video board in this list as the Type
and Address parameters in the Video
Panel will be changed to match the
selected video board.
The available video I/O boards are:
Video Board
SGI System
Avion
Indigo 2 w/ LIBERTY (NTSC)
Cindy/Centaur
Indy (Cindy) or Indigo (Centaur)
SGI Galileo
Indigo 2 XL, XZ, EX
SGI IMPACT Video
Indigo 2 IMPACT
SGI VideoFramer
Personal Iris
SGI Octane Video
SGI Octane
SGI O2 Video
SGI O2
The supported video accessories are:
HP VidJet Pro
Revision A
3-49
Configuration Environment
Revision A
HP LaserJet/InkJet printing accessory
3-49
Configuration Environment
CHYRON Corporation
CHYRON Corporation
3.9.2
Software Options
This window lists the software options that are
available to Liberty systems. To use an option,
select the option in the list. When selected, the
option will be highlighted. The following software
options are available:
•
Expanded Resolution
•
Motion Tracking
•
Cinefusion
•
GIF
•
TIFF LZW Compression
Expanded Resolution
While all Liberty products are capable of being resolution-independent, some Liberty products are supplied with a basic configuration that permits a
maximum resolution of 1,000 pixels by 1,000 lines.
The Expanded Resolution option is available to
extend image resolution to 8,000 pixels by 8,000
lines. Expanded Resolution is a standard on Liberty
64, and available as an option on Liberty 32 and Liberty Paint.
Motion Tracking
This module provides three software options:
•
Motion Tracking
•
Motion Stabilization
•
Corner Warping
Motion Tracking is a standard feature in Liberty 64,
available optionally on Liberty 32, and not applicable to Liberty Paint.
Configuration Environment
3-50
Revision A
Configuration Environment
3-50
Revision A
Liberty Artist’s Manual
Liberty Artist’s Manual
Cinefusion
This software option provides an interface in Liberty’s Animation Environment to the Ultimatte®
Cinefusion™ blue screen processing software. The
Cinefusion Interface is a standard feature of Liberty
64, available optionally on Liberty 32, and not applicable to Liberty Paint.
License options for GIF/TIFF LZW Compression
Two new licensing options were added for Liberty
version 6.0, for the TIFF LZW and GIF file formats.
These options are necessary since both these file formats utilize LZW compression, on which Unisys
holds a patent and now requires royalties to be paid.
TIFF LZW files are rarely used (also note that Liberty always writes uncompressed TIFF files). GIF
files, however, are common in World Wide Web
graphics, and always use LZW compression.
These two options will automatically be licensed
with all copies of Liberty (in other words, the user
will automatically receive these options, as Customer Service will include these options with all
Liberty licenses).
3.9.3
Active Server
This window lists the name of the workstation that
serves as the licensing server. In a node-locked
installation, this will be the name of the workstation
where Liberty is installed. In an installation with
floating licenses, this will be the workstation designated as the license server.
Revision A
3-51
Configuration Environment
Revision A
3-51
Configuration Environment
CHYRON Corporation
CHYRON Corporation
Installing Software Options
When you install new Liberty software, you must
enable a license from Chyron. Pressing on a software option in the list (or simply using the corresponding feature in the Liberty software) activates
the option. When this occurs, Liberty verifies that
the user has a license for that option. Refer to the
Liberty Technical Reference Manual for instructions
on obtaining and installing Liberty licenses.
Press on the Install Option Button to license Liberty.
3.10
CURSOR PANEL
Figure 3-13. The Cursor Panel
Configuration Environment
3-52
Revision A
Configuration Environment
3-52
Revision A
Liberty Artist’s Manual
Liberty Artist’s Manual
Use the Cursor Panel to choose one of Liberty's cursor styles.
There are four kinds of cursors:
•
The standard active cursor.
•
The “dead’ cursor that is displayed when the
cursor is over a menu area that is currently
unusable.
•
The “busy” cursor that is displayed when
Liberty is occupied with a computation or
rendering, temporarily impeding operation.
•
The “pan” cursor that is displayed when you
pan the magnified Canvas by dragging the
pen on the Canvas with the Alt keyboard key
pressed.
Cursor Selection Buttons
Press one of the arrow buttons on either end of the
Cursor Selection Buttons to cycle through the list of
cursor styles.
As you cycle through, the standard cursor is displayed as the current cursor. The current four cursors are operative throughout all of Liberty’s
functions.
Revision A
3-53
Configuration Environment
Revision A
3-53
Configuration Environment
CHYRON Corporation
CHYRON Corporation
3.11
TABLET PANEL
Figure 3-14. The Tablet Panel
Use the Tablet Configuration Panel to change the
pen pressure settings and the margins of the active
tablet area. You can use the margin sliders to set the
active area of the tablet to be any size or aspect ratio:
operation is automatically adapted to Liberty’s
menu and Canvas areas.
Configuration Environment
3-54
Revision A
Configuration Environment
3-54
Revision A
Liberty Artist’s Manual
Liberty Artist’s Manual
Tablet Click Pressure
This sets the required pressure for a positive click on
the tablet. Its scale extends from 0 on the left to 255
on the right, with a default of 50. Generally, you
want the Click setting to be as low as possible without causing mistaken, unintentional clicks on the
tablet.
Tablet Top Margin
This sets the top margin of the active tablet area. Its
numbers refer to inches on the tablet. After changing the setting, press the OK Button to accept the
change.
Tablet Bottom Margin
This sets the bottom margin of the active tablet area.
Its numbers refer to inches on the tablet. After
changing the setting, press the OK Button to accept
the change.
Tablet Left Margin
This sets the left margin of the active tablet area. Its
numbers refer to inches on the tablet. After changing the setting, press the OK Button to accept the
change.
Tablet Right Margin
This sets the right margin of the active tablet area.
Its numbers refer to inches on the tablet. After
changing the setting, press the OK Button to accept
the change.
Revision A
3-55
Configuration Environment
Revision A
3-55
Configuration Environment
CHYRON Corporation
CHYRON Corporation
NOTE
The tablet configuration settings may
not be changed when using a mouse
as a pointing device.
Reset Button
Press the Reset Button to return the tablet settings to
their original default values.
Cancel Button
Press the Cancel Button to cancel any changes
you’ve just made to the slider settings and return
them to their previous settings.
OK Button
Press the OK Button to confirm the changes you’ve
made to the slider settings.
Configuration Environment
3-56
Revision A
Configuration Environment
3-56
Revision A
Liberty Artist’s Manual
Liberty Artist’s Manual
3.12
UNDO PANEL
Figure 3-15. Undo Configuration Panel Illustration
Use the Undo Panel to set the number of levels of
Undo that Liberty will provide.
There are separate controls for Canvas, Temp, Layers, and Mask, each with a user configurable number
of levels, and an On/Off button. Thus, the number of
levels of Undo, and whether undo is on or off, is
separately controllable for Canvas, Temp, Mask,
and Layers.
Revision A
3-57
Configuration Environment
Revision A
3-57
Configuration Environment
CHYRON Corporation
Configuration Environment
CHYRON Corporation
3-58
Revision A
Configuration Environment
3-58
Revision A
4 - Paint Environment
4.1
PAINT ENVIRONMENT
DESCRIPTION
The Paint Environment is one of Liberty's two main
working environments. Image creation is performed
in the Paint Environment. Paint includes several
Panel Menus that appear in the four Panel Menu
positions below the main picture display (Canvas).
Revision A
4-1
Paint Environment
Revision A
4-1
Paint Environment
CHYRON Corporation
CHYRON Corporation
Liberty Paint Environment
The initial display of the Liberty Paint Environment
appears as shown in Figure 4-1:
Paint Environment
4-2
Revision A
Paint Environment
4-2
Revision A
Liberty Artist’s Manual
Figure 4-1. Paint Environment
Revision A
4-3
Paint Environment
Liberty Artist’s Manual
Liberty Artist’s Manual
Here are some of the main features of the Paint
Environment:
Environment Buttons
Figure 4-2. Environment Buttons
These four buttons are in the lower left corner of the
screen. They are from left to right:
P ...... The Paint Environment Button
A ...... The Animation Environment Button
C ...... The Configure Environment Button
L....... The Login Environment Button
Pressing any Environment Button calls up that environment. These environment buttons appear in
every environment except Login (which has similar
but larger buttons for choosing environments). The
Animation Environment is not available to Liberty
Paint users.
Canvas
The Canvas is the primary working image area. Pictures can also be held and manipulated in Temporary Buffers (Temps), but you do most of your work
on the Canvas. When you recall a picture from the
disk, normally it appears on the Canvas. When you
recall a picture larger than the maximum displayable
area on the Canvas, it is partially displayed and you
Revision A
4-5
Paint Environment
Revision A
4-5
Paint Environment
CHYRON Corporation
CHYRON Corporation
can scroll around on it. Pressing the Full Button at
the bottom right of the screen displays the entire picture on the Canvas, regardless of its size.
NOTE
To be able to display the whole image
file, the canvas resolution must be
configured to be the same as, or
larger than, the image resolution. An
image file recalled into a smaller
canvas size will be displayed in the
available canvas resolution starting at
the lower left corner. See page 3-21
for more information on canvas
resolutions.
Figure 4-3. Brush Panel Illustration
Paint Environment
4-6
Revision A
Paint Environment
4-6
Revision A
Liberty Artist’s Manual
Liberty Artist’s Manual
Undo Functions
Figure 4-4. Undo/Redo Buttons
Liberty provides a user-configurable number of levels of Undo for Canvas, Temp, Roto Layers, and
Mask, controlled through the Undo Panel in the
Configuration Environment. The default number of
Undo is 7 each for Canvas, Temp, Roto Layers, and
Mask. The number of levels is limited only by disk
space. Once the number of levels has been set, a
level is saved each time the Canvas or Mask is
changed. Pressing the main Undo Button (near the
Brush Display) one or more times undoes the last
one or more operations to either the Canvas, temp or
the Mask, depending on which was changed last.
Redo functions in a similar manner. Roto Layers
Undo is off by default and is used only while
rotoscoping with layers.
There are individual Canvas, Temp and Mask Undo
Buttons in the Buffers Panel, allowing you to specifically undo the last Canvas operation, the last Temp
operation or the last Mask operation.
The Browse Undo Button brings up the Undo
Popup, which displays browse images of all the
Canvas, Temp, Roto Layers and Mask images currently saved.
See page 3-57 for details about setting the number of
Undo levels in the Configuration Environment.
Revision A
4-7
Paint Environment
Revision A
4-7
Paint Environment
CHYRON Corporation
CHYRON Corporation
Undo Button
Press this button to undo the last operation, whether
it was Canvas, Temp, or Mask. Pressing the Undo
Button repeatedly undoes the last series of operations, up to the number of levels set.
Redo Button
Press this button to redo the last undo, whether it
was Canvas, Temp, or Mask. Pressing the Redo Button repeatedly redoes the last series of undone operations.
Paint Environment
4-8
Revision A
Paint Environment
4-8
Revision A
Liberty Artist’s Manual
Undo Popup
Figure 4-5. Undo Popup
Revision A
4-9
Paint Environment
Liberty Artist’s Manual
Liberty Artist’s Manual
Press the Browse Undo Button to call up the Undo
Popup. It displays browse images of all the levels of
Undo. Six browse images fit on the normal screen,
but if you have more levels of Undo you can scroll
the popup left and right to see all the browse images.
Controls are provided for scrolling and for deleting
the Undo levels.
One set of Undo images can be browsed at a time
(Canvas, Temp, Mask, or Roto Layers). A colored
mode button selects the current mode to browse.
Browsers for each Undo image are displayed (six
images at a time). Each image is numbered (the
number is at the upper left of the browse image). A
slider at the bottom of the Undo Popup is used to
scroll through the available Undo images (assuming
there are more than six levels configured). When the
slider is all the way to the left, the first six images
are displayed. When it is all the way to the right, the
last six images are displayed. Moving the slider
from left to right scrolls through the images. In addition to the slider, there are these six control buttons:
Top
Displays the first six levels.
<<
Scroll left by one level.
|<
Scroll left by six levels.
>|
Scroll right by six levels.
>>
Scroll right by one level.
Bot
Displays the last six levels.
Erase All erases all levels of undo for the current
mode (Canvas, Temp, Mask, or Roto Layers).
Revision A
4-11
Paint Environment
Revision A
4-11
Paint Environment
CHYRON Corporation
CHYRON Corporation
Undo/Redo Buttons on The Buffers Panel
Figure 4-6. Canvas and Mask Buffers
On the Buffers Panel, just to the left of the Canvas
Temp, and Mask browse images, are small Undo
and Redo Buttons, labeled “U” and “R” respectively. Press the U and R Buttons next to the Canvas
browse image to undo or redo, respectively, only the
last Canvas operation (or series of operations). The
Temp and Mask U and R buttons work in the same
way.
Paint Environment
4-12
Revision A
Paint Environment
4-12
Revision A
Liberty Artist’s Manual
Liberty Artist’s Manual
Prompt Window
Figure 4-7. Prompt Window and the Canvas Button
The wide text window running across the middle
bottom of the screen, where alphanumeric information about the current function is displayed. The left
80% of the window displays system messages, the
name of the current function, help information, etc.
The right 20% displays the numeric value of the current function and allows numeric entry to modify the
value of the current function.
Pressing in the right end of the prompt window calls
up the calculator (see page 4-67.)
Canvas Button
The Canvas Button is at the bottom of the Paint
Environment screen near the right side. Pressing
this button causes the canvas to fill the entire SGI
screen, replacing the menus. The “Canvas” button
then changes to read “Menus” to allow restoring the
menus to the screen. The F8 key on the keyboard
performs the same function as the Canvas Button.
Revision A
4-13
Paint Environment
Revision A
4-13
Paint Environment
CHYRON Corporation
CHYRON Corporation
NOTE
When you press the Canvas Button, it
automatically zooms the Canvas
image so that it fills the screen. The
exceptions to this are (1) If you’ve
already zoomed when you press
Canvas, your current magnification
is preserved, and (2) If the image is
too big to fit into the standard Canvas
screen no zoom is performed.
Erase Button
The red buttons at the top of the screen next to the
Brush Display are the Erase Buttons. Pressing the
main Erase button once erases the masked area in
the picture (see the section on Masks.)
NOTE
When erasing a masked area - on
some hardware platforms after you
press Erase once, there is a pause
before the masked area is erased.
All Button
The smaller red button below the Erase button is the
Erase All button. Pressing the All Button twice
quickly erases the entire Canvas, regardless of any
masked areas.
Prefix Buttons
Figure 4-8. Prefix Buttons
Paint Environment
4-14
Revision A
Paint Environment
4-14
Revision A
Liberty Artist’s Manual
Liberty Artist’s Manual
Prefix buttons are used to modify functions. After
they are pressed, the next function pressed will perform differently than normal, depending on the prefix. Prefix Buttons are Repeat, Under, Add, Copy,
and Invert. For example, pressing the Under Prefix
Button, then the Paint Button, causes painting to
happen under, instead of over, what's on the Canvas.
The Prefix Buttons are located about two-thirds of
the way down the left side of the Paint Environment.
See “Repeat Prefix Button” on page 4-60 for more
information.
Popup Menus
Many functions can call up their own popup menus
for more options or detailed control of the function.
Any button with a small square corner button in the
button’s upper right corner has a popup. Pressing
the corner button displays the popup. For instance,
pressing the corner button in the Paint Button displays the Paint Gap Popup, where you can set the
distance of the space between “pen-downs” when
painting.
Green OK and Yellow Cancel Buttons
You confirm an operation in a popup by pressing a
green OK button (all OK buttons are green), at
which time the operation is performed and the
popup disappears. Or you can cancel the operation
(and remove the popup) by pressing the yellow Cancel Button.
Transparency
All of Liberty's functions and pictures operate with
full-color and full-transparency. In the 32-bit version of Liberty, color goes on the screen at any of
256 levels of transparency. In the 64-bit version of
Liberty, color goes on the screen in from zero to
Revision A
4-15
Paint Environment
Revision A
4-15
Paint Environment
CHYRON Corporation
CHYRON Corporation
65,535 levels of transparency. Transparency is controlled by the Transparency Slider Scale (see page 423.)
Transparent Background
The transparent background is what remains when
you erase the entire picture screen. This background
has its own color called the Background Color,
which can be set to any color in the Palette Display.
Filtering and Anti-aliasing
All Liberty functions are fully anti-aliased, meaning
that everything is filtered to create smooth but crisp
edges. This filtering can be turned off or modified,
if desired with Clamp Mask, for example. The Solid
Brush mode has a popup that lets you modify the
softness of the brush’s edge, all the way down to no
anti-aliasing at all. Likewise, Paste Distort, Liberty’s perspective transform function, allows several
different rendering filters.
Elevators
User-defined elements can be stored in "elevators"
so that many elements are on-line. For instance,
above the color palette is a horizontal row of eight
little squares, each of which, when pressed, calls up
another palette. Thus eight palettes are instantly
accessible. Many functions have elevators, including palettes, temps, masks, user-defined brushes,
and text fonts. See “Color Slider Scales” on page 446 for an example.
Paint Environment
4-16
Revision A
Paint Environment
4-16
Revision A
Liberty Artist’s Manual
Figure 4-9. Four Panel Positions
Revision A
4-17
Paint Environment
Liberty Artist’s Manual
Liberty Artist’s Manual
Panel Menus
The Paint Environment has space for four panels of
buttons across the bottom half of the screen. These
are the movable Panel Menus. From left to right, the
default Panel Menus are the Transfer Panel, the
Paint Panel, the Image Tools Panel, and the Mask
Tools Panel. These are the most frequently used
Panel Menus.
The Panel Menus are interchangeable; that is, any
Panel Menu can be in any of the four positions. Use
the row of colored Panel Call Buttons below the
panels to put any Panel Menu into one of the four
positions. Generally, it's good to keep the Transfer
Panel in the leftmost position and the Mask Tools
Panel in the rightmost position, because these two
panels are constantly in use. Using Liberty is easier
and more efficient when these panels are kept in
familiar positions. Use the middle two positions to
call up other panels as desired. Several of the panel
menus have multiple layers, indicated by small right
and left arrows in the panel’s title bar. These
include the Image Tools, Mask Tools, and Text Panels. Press on either end of the title bar to display
another layer of panel functions.
Panel Call Buttons
Figure 4-10. Panel Call Buttons
The row of colored buttons across the bottom of the
screen (above the Prompt Window) are the Panel
Call Buttons. Press one of the Panel Call Buttons,
then press in one of the four panel positions, and a
Revision A
4-19
Paint Environment
Revision A
4-19
Paint Environment
CHYRON Corporation
CHYRON Corporation
Panel Menu will appear in that position. The Panel
Call Buttons are, from left to right, Transfer, Paint,
Tools, Mask, Text, Macro, VTR, and Disk.
4.2
PAINT BRUSHES
Painting is accomplished in Liberty by using one of
the four basic types of paint brushes - Solid Brush,
Air Brush, Programmed Brush, and User-defined
Brush. You can vary the size of all brushes in real
time. The currently chosen palette color determines
the color of the brush and the setting of the Transparency Slider Scale determines the transparency of
the brush.
4.2.1
Current Brush Display
Figure 4-11. Brush Display
The Current Brush Display is a large box at the
upper left corner of the Paint Environment. It shows
the current size, color, and transparency of the curPaint Environment
4-20
Revision A
Paint Environment
4-20
Revision A
Liberty Artist’s Manual
Liberty Artist’s Manual
rent brush. The background of the brush display can
be a single color or diagonally divided between two
colors, which better displays the transparency of the
brush. Press anywhere in the Current Brush Display
background to toggle between these two modes.
Color of Displayed Brush
To make the displayed brush remain a constant,
fixed color, choose (underline) the palette color you
want the brush to be, then press the Copy Prefix Button and press the center of the displayed brush.
To make the displayed brush show the currently
chosen color again, turn off all palette colors, press
the Copy Prefix Button and press in the center of the
displayed brush. This is the default.
Color of Brush Background
To change the colors in the Current Brush Display
(if necessary, see page 4-33 for more detail on the
use of the palette):
•
When the Brush Display background is two
colors, press the Copy Prefix Button.
•
Press in the top left of the Brush Display background. The top left part of the Brush background becomes the currently chosen (underlined) palette color. If no color is chosen in the
palette, the top left part of the Brush background
becomes the background color of the Canvas.
This works the same for the bottom right part of
the Brush background.
Or:
•
Revision A
4-21
Paint Environment
Revision A
When the Current Brush Display background
is a solid color, press the Copy Prefix Button.
4-21
Paint Environment
CHYRON Corporation
CHYRON Corporation
•
Press anywhere in the Brush background.
The entire Brush background becomes the currently chosen palette color. If no color is chosen
in the palette, the entire Brush background
becomes the background color of the Canvas.
Brush Size Slider Scale
Change the brush size using the vertical slider scale
at the right of the Current Brush Display. Press and
drag to move the slider up and down to change the
size of the current brush in real time. All four brush
modes are sizable in real time.
The number window below the Brush Size Slider
Scale displays the current size of the brush in pixels.
Press in the number window to enter the brush size
via keyboard. Press on the arrow buttons at the top
and bottom of the slider scale to change the value by
one unit at a time. The scale goes from 1 at the bottom to 127 at the top.
Paint Environment
4-22
Revision A
Paint Environment
4-22
Revision A
Liberty Artist’s Manual
Liberty Artist’s Manual
Transparency Slider Scale
Figure 4-12. Transparency Slider
(in the Palette Panel)
The setting of the Transparency Slider Scale determines the transparency of the brush. The Transparency Slider is the rightmost of the four sliders in the
Palette Display. To see the Transparency Slider, the
Palette Display must be showing - if it is not, press
the Palette Button.
Press on the slider and drag it up and down to
change the current transparency value. 100%
opaque is at the top, 100% transparent at the bottom.
This slider scale controls the transparency of painting, as well as most functions that put color or image
into the picture, such as Paste, Text Render, Apply
Color, etc.)
Revision A
4-23
Paint Environment
Revision A
4-23
Paint Environment
CHYRON Corporation
CHYRON Corporation
Press on the arrow buttons at the top and bottom of
the slider scale to change the value by one unit at a
time. In the 32-bit version of Liberty, the scale goes
from 0 at the bottom to 255 at the top. See page 433, the Color Palette.
NOTE
The Transparency Slider stays at its
current setting until you change it.
Since it controls most ways of putting
color on the Canvas, it's important
that it is set where you want it. Make
it a habit to check frequently to see
that its setting is where you expect
it. If the setting is nearly at the top,
but not quite, you'll get images that
are not quite opaque which, though
perhaps unnoticeable now, may
cause problems later when you reuse the element in different ways.
Cursor Button
Press the Cursor Button to display the Cursor Popup,
which gives you a choice of what to display while
you are painting.
The Cursor Popup
Figure 4-13. Cursor Popup
Paint Environment
4-24
Revision A
Paint Environment
4-24
Revision A
Liberty Artist’s Manual
Liberty Artist’s Manual
The Cursor Popup allows you to choose from three
modes: Brush Only, Cursor Only, and Both (the
default is Both). When Brush Only is on, as you
paint only the brush is displayed. When Cursor
Only is on, as you paint only the cursor is displayed
in place of the brush. When Both is on, you see both
the brush and the cursor displayed while you paint.
A displayed cursor is useful for painting with hardto-see brushes, such as very small or very transparent brushes, or when painting in a color that is hard
to see. Cursor display works in all brush functions.
4.2.2
Brush Mode Buttons
The four brush modes are: Solid Brush, Air Brush,
Programmed Brush, and User Brush. They are
accessed by the four buttons below the Current
Brush Display. Press any one of these buttons to
activate it; only one can be active at a time. You can
size all brushes in real time with the Brush Size
Slider Scale.
Solid Brush Button
Figure 4-14. Solid Brush Popup
Revision A
4-25
Paint Environment
Revision A
4-25
Paint Environment
CHYRON Corporation
CHYRON Corporation
Press the Solid Brush Button to choose a round
brush with crisp edges.
To vary Solid Brush edge softness:
•
1.
Press the corner button of the Solid Brush
Button. The Solid Brush Popup appears.
•
2.
Move the slider scale up and down to the
desired value. The top of the slider scale
produces an edge with maximum softness; the
bottom produces an edge with maximum
sharpness (at the bottom the edge has no antialiasing at all). You can press the number
window under the slider to enter a value via the
keyboard. You can press the Reset Button to
set the brush edge back to its default value.
•
3.
Press the OK button to confirm the new
value and remove the Popup Menu. The
Solid Brush appears in the Brush Display with
its new edge setting.
Air Brush Button
Press the Air Brush Button to choose a round
brush with soft edges. The air brush has no popup
menu; you can create custom air brushes with different kinds of edges using the Programmed Brush.
Programmed Brush Button
Press the Programmed Brush Button to choose
the current Programmed Brush.
The Programmed Brush allows you to create custom
air brushes with an infinite variety of edge profiles,
as well as many other customized round brushes.
Paint Environment
4-26
Revision A
Paint Environment
4-26
Revision A
Liberty Artist’s Manual
Liberty Artist’s Manual
The Programmed Brush Diagram Popup
Figure 4-15. Programmed Brush Popup
The Programmed Brush Diagram Popup is basically
the same Diagram Popup that is used to modify
other Liberty functions, such as the distribution of
ramped colors in an Apply or the clipping of a Mask.
Here the Diagram represents the profile of the current Programmed Brush. Modifying the Diagram
Curve modifies the shape of the current Programmed Brush (see page 4-371).
The Diagram Curve allows you to graphically and
interactively modify the Programmed Brush starting
with a basic air brush. The Diagram Curve shows
one half of the current brush. The top of the curve is
maximum opacity; the bottom of the curve is maximum transparency. The left of the curve is the brush
edge; the right of the curve is the center of the brush.
To create a programmed brush:
•
Revision A
4-27
Paint Environment
Revision A
1.
Press the corner of the Programmed Brush
Button to display the Diagram Popup Menu.
4-27
Paint Environment
CHYRON Corporation
CHYRON Corporation
•
2.
Modify the Diagram Curve. Each time you
lift the pen after modifying the curve, the
changes are displayed in the Current Brush
Display. The Sine button creates Liberty’s
standard Air Brush.
•
3.
Press the green OK Button.
The brush
defined by the new diagram curve is confirmed
in the Brush Display and can be scaled.
Use the Programmed Brush like any other brush.
One way to permanently store your custom-created
Programmed Brushes is to save the Diagram Curve
on disk, using the Save Button in the Diagram
Popup. Or you can make a copy of it on the Canvas
and make a User-defined Brush out of it. Userdefined Brushes can also be stored on disk (see page
4-32.)
NOTE
Changing the amount of fall-off
(steepness of the curve) strongly
affects some Paint Mode functions,
such as Touchup Paint.
Paint Environment
4-28
Revision A
Paint Environment
4-28
Revision A
Liberty Artist’s Manual
Liberty Artist’s Manual
User Brush Button
Figure 4-16. User Brush Popup
The User Brush allows you to create a brush from
any image on the Canvas, up to 120 pixels square.
Regardless of its original on-screen color, after it has
been defined, the User Brush paints using the current color in the Palette, like the other three brush
modes.
Press the User Brush Button to choose the current
user-defined brush.
Revision A
4-29
Paint Environment
Revision A
4-29
Paint Environment
CHYRON Corporation
CHYRON Corporation
NOTE
If you have just booted up the system,
there is no current user-defined brush
loaded. Pressing on the User Brush
Button automatically calls up the
User Brush Popup Menu so you can
choose a user-defined brush from the
popup.
To change the current User Brush:
[ ] 1.
Press the corner button of the User Brush
Button. The User Brush Popup appears,
displaying ten of the existing User-defined
Brushes.
[ ] 2.
Press on one of the brushes to choose it.
The chosen brush is underlined and the chosen
brush appears in the Current Brush Display.
[ ] 3.
Press the OK Button. The popup disappears.
To create a User Brush:
Paint Environment
4-30
Revision A
[ ] 1.
Create a small image on the Canvas for
your User Brush. You can use Paint, or
Curve Draw, or any other function to create the
source image for the User Brush. If desired,
first make it large, then scale it down with
Paste Distort (see index) to fit into a 120 pixel
square.
[ ] 2.
Mask the image on the Canvas. The image
for the User brush must be the only thing
masked on the Canvas. If the brush is the only
thing on the Canvas, you don't have to mask it.
[ ] 3.
Press the corner button of the User Brush
Button. The User Brush Popup Menu appears.
[ ] 4.
Press one of the boxes in the User Brush
Elevator. The box becomes underlined.
Paint Environment
4-30
Revision A
Liberty Artist’s Manual
Liberty Artist’s Manual
[ ] 5.
Press the Define (Def) Button. The masked
image on the Canvas appears in the chosen box
in the User Brush Elevator.
[ ] 6.
Press the green OK Button. The User Brush
Popup disappears and the new User Brush
appears in the Current Brush Display.
The User Brush Popup
The User Brush Popup Menu displays the on-line
User-defined Brushes created in Liberty, as well as
tools for the creation and modification of Userdefined Brushes. You can have as many as 80 Userdefined Brushes on-line in the User Brush Elevator.
The User Brush Elevator
Press on one of the 8 levels to choose it and display
its 10 brushes.
The User Brush OK Button
When you press the OK Button to confirm your
choice of User Brush, the underlined User Brush is
installed into the Current Brush Display and the
User Brush Popup disappears.
The User Brush Hard-edge Button (Hard)
Clamps all transparency in the current user brush to
full opacity (255). The result is a hard-edged
(aliased) brush. Like Normalize, this affects only
the display of the brush in the Current Brush Display, not the original user brush in the popup.
The User Brush Normalize Button (Norm)
Normalizes the current brush. If the brush does not
contain all alphas (transparency levels) from 0 to
255, the range is stretched before it is displayed in
Revision A
4-31
Paint Environment
Revision A
4-31
Paint Environment
CHYRON Corporation
CHYRON Corporation
the Current Brush Display. Normalize affects only
the display of the brush in the Current Brush Display, not the original user brush in the popup.
The User Brush Save Button (Save)
Saves the current elevator level of brushes to disk.
Saves all ten brushes.
The User Brush Recall Button (Recall)
Recalls a previously saved set of ten brushes into the
current elevator level. Replaces all ten brushes in
the current level.
The User Brush Define Button (Def)
Press the Define Button when you have masked the
on-Canvas area you want to turn into a User-defined
brush. See page 4-30 for a step-by-step description
of using Define to create a new User-defined Brush.
Paint Environment
4-32
Revision A
Paint Environment
4-32
Revision A
Liberty Artist’s Manual
Liberty Artist’s Manual
4.3
4.3.1
COLOR PALETTE
Palette and Buffers Panels
Figure 4-17. Palette Panel
The Color Palette Panel alternates with the Buffers
Panel, using the same menu space at the left of the
screen below the Brush Display. If the Buffers
Panel is displayed (you’ll see a stack of three small
Revision A
4-33
Paint Environment
Revision A
4-33
Paint Environment
CHYRON Corporation
CHYRON Corporation
representations of the Canvas, Temp Buffer, and
Mask Buffer) you press the button labeled Palette to
call up the Palette Panel in its place. Likewise, if the
Palette is displayed, press the button below labeled
Buffers, and the palette will be replaced by the Buffers Panel. While working in the Paint Environment,
you will frequently change back and forth between
these two panels.
About the Palette
Liberty's Color Palette offers a choice of over 16
million colors (32-bit mode) displayed in 8 sets of
palette boxes in the Color Palette Elevator. You can
modify each color box individually by adjusting the
color slider scales below the palette, or by picking a
color from the Canvas. You can modify colors singly or in groups. Each time you save a picture on
disk, all the current palette colors are saved at the
same time. When you recall a picture, all its palette
colors are recalled with it. However, you can recall
palettes or pictures independently of one another.
To recall a picture without its stored palette, use the
“Ignore Palette” button in the Transfer Panel’s
Recall Popup.
Press on a color palette box to choose it as the current color (it becomes underlined). The current
color is displayed in the Current Color Box. If no
color palette box is chosen (underlined), then Paint
functions act as Erase-Paint; that is, they paint with
the transparent background color of the Canvas.
Color Palette Elevator
The Color Palette Elevator is the row of 8 small
boxes (levels) above the Color Palette. The default
palette is the leftmost box, but you can press on any
level to activate it and display its palette. Each level
Paint Environment
4-34
Revision A
Paint Environment
4-34
Revision A
Liberty Artist’s Manual
Liberty Artist’s Manual
contains a palette of 32 colors. You can copy one
level to another level and link some or all of the levels to one another, if you want to work with large
numbers of colors at one time.
To copy one palette level to another:
•
Press the elevator level you want to copy.
•
Press the Copy Prefix Button.
•
Press the elevator box you want to copy to.
The source palette appears in the target palette.
Color Palette Functions
The Color Palette Functions allow you to work with
groups of colors and to modify them in a variety of
ways. This is useful when, for instance, creating a
multicolored ramp. Located below the color palette,
the Color Palette Functions include:
Multiple
Clear
Swap
Pick
Global
Inverse
Shift
Blend
The Multiple Colors Button (multi)
When Multiple Colors Mode is on, more than one
color can be chosen (underlined) simultaneously.
Multiple Colors Mode is used mainly to blend colors
and to create color ramps (gradations) with the
Apply Color Button in the Image Tools 1 Panel.
When Multiple Colors Mode is on, pressing on a
palette box underlines it, and pressing on an underlined palette box removes the underline (becomes
unselected). You can underline palette boxes in several palettes at the same time on the Palette Elevator
when Global Mode is on (see below).
Revision A
4-35
Paint Environment
Revision A
4-35
Paint Environment
CHYRON Corporation
CHYRON Corporation
When Multiple Color Mode is on, the topmost, leftmost underlined palette box is displayed in the Current Color Box and is used for functions that use a
single color, like Paint.
When you turn off the Multiple Color Mode, Liberty
remembers the underlined colors so that when you
turn Multiple Colors back on, the same color boxes
are underlined as before.
For information on how to manipulate multiple colors using the Color Slider Scales, see page 4-42.
The Global Palette Button
When The Global Button is turned on, all 8 palettes
in the Palette Elevator are active. If the Multiple
Color Button is also turned on, any number of colors
up to 256 can be chosen (underlined) simultaneously.
Pressing the Clear Color Button while Global Palette Mode is turned on un-chooses (removes the
underlines from) all underlined palette boxes in all
palette levels.
If you turn off Global while Multiple Color Mode is
still on, Liberty re-underlines the palette boxes that
were last underlined before you turned Global on.
Generally, you should keep Global Mode turned off
unless you are using it for a specific purpose, lest
you forget it and think you're operating in the displayed palette only.
Paint Environment
4-36
Revision A
Paint Environment
4-36
Revision A
Liberty Artist’s Manual
Liberty Artist’s Manual
The Clear Color Button
Press the Clear button to turn off (remove underlines
from) all palette colors in the current palette. If Global is turned on and more than one palette is active,
all underlined colors in all palettes are turned off.
The Blend Colors Button
The Blend Colors Button requires Multiple Colors
Mode to be on and three or more colors to be underlined. When you press Blend, all underlined colors
are ramped, or blended, between the first and last
underlined colors, starting with the topmost, leftmost palette box. Blended colors need not be adjacent on the palette. You can underline several
colors, skipping colors between, and only the underlined colors will be blended. When Global Mode is
on, you can make a “ramp” with up to 256 colors.
To make a blended color ramp between two
colors in the Palette:
•
Turn on Multiple Colors Mode.
•
Underline three or more colors in the palette.
•
Press the Blend Button. A ramp is created in
the palette from the first to the last underlined
color, in equal steps of Hue, Saturation and
Brightness.
The Inverse Colors Button
With Multiple Colors Mode on, press Inverse to turn
on all colors except those currently underlined. In
Global Mode, Inverse works with all palettes simultaneously. To quickly turn on all colors in the palette, press the Clear Button, then the Inverse Button.
Revision A
4-37
Paint Environment
Revision A
4-37
Paint Environment
CHYRON Corporation
CHYRON Corporation
The Swap Colors Button (<->)
With Multiple Colors Mode on, press Swap to
reverse the order of the chosen colors. With Global
Mode on, Swap affects all palettes simultaneously.
The Shift Colors Button (< >)
With Multiple Colors Mode on, press the right half
of the Shift Button to cycle the underlined colors
one to the right, or press the left half of the Shift
Button to cycle the underlined colors one to the left.
With Global Mode on, Shift affects underlined colors in all palettes simultaneously.
The Pick Color Button
Other than the Color Slider Scales, Pick Color is the
main way to set colors in the palette. You can use
Pick any time to pick a color from the picture in the
Canvas. The Pick Popup gives you more options for
control over the Pick Functions. You also can use
Pick functions in conjunction with Channel Mask
for modifying masks.
To Pick colors from the Canvas to the palette.
•
Press the Pick Color Button. Single Color
Mode should be on.
•
Press on the color in the Canvas you want to
pick up. The "picked" color appears in the currently chosen (underlined) palette box and in the
Current Color Box. The Prompt Window displays the XY screen position that you pressed,
the numeric values of the color, and the XY distance from the last Picked position (You can use
Pick Color just to measure pixel distances in the
picture).
Here is a sample reading of Picked values in the
Prompt Window:
Paint Environment
4-38
Revision A
Paint Environment
4-38
Revision A
Liberty Artist’s Manual
Liberty Artist’s Manual
X, Y: 101, 233 (HSVA: 0-0-144-144) dx, dy: -5.27, 2.06.
X and Y values are read from the lower left corner
of the Canvas. The color values for Hue, Saturation,
Value, and Alpha are expressed on a 0 to 255 scale.
The distance (dx, dy) from the last Picked position
are expressed in plus and minus values. A minus dx
is a distance to the left, a plus dx is a distance to the
right. A minus dy distance is a distance toward the
bottom, a plus dy is a distance toward the top.
To Pick a series of colors:
•
Press the Repeat (Rept) Prefix Button.
•
Press the Pick Color button.
•
Press repeatedly on various colored areas in
the Canvas.
If no color is chosen (underlined) in the palette,
RGB and XY data is printed in the Prompt Window
for each position picked, but no colors are actually
copied into the palette. If one color is chosen in the
palette, colors picked repeatedly in the picture are
copied into the next palette box in the palette, and
the next, and the next, until you press the Pick Button again to turn it off (Don’t forget to turn off the
Repeat prefix as well).
This is a fast way to create a multicolored palette
from the picture. If Multiple Color Mode is on, the
colors you pick on the Canvas are copied into the
underlined colors until all underlined colors have
been changed.
Revision A
4-39
Paint Environment
Revision A
4-39
Paint Environment
CHYRON Corporation
CHYRON Corporation
Pick Colors Popup
Figure 4-18. Pick Colors Popup
The Pick Colors Popup (Figure 4-18) has more
options for Pick Color functions. Press the corner
button in the Pick Button to call up the Pick Popup.
The Strip Background Color Button
Press the StripBG Button to turn it on/off. When on,
Pick Color ignores the transparent Background
Color in the picture, so that the pixel being Picked is
treated as if it is 100% opaque, regardless of the
background color or opacity level.
Paint Environment
4-40
Revision A
Paint Environment
4-40
Revision A
Liberty Artist’s Manual
Liberty Artist’s Manual
The Real-time Mode Button
Press the Real-time Mode Button to turn it on/off.
When on, Pick operates continuously in real-time
while the pen is pressed down. Each pixel crossed
by the pen is Picked, so that the currently underlined
color changes in real-time. The Color Sliders adjust
continuously as well.
The Distance Settings
Press one of the Distance Setting Buttons - pixels,
inches, or millimeters - to turn it on. The distance
from the previous Pick displayed in the prompt Window is displayed in pixels, inches, or millimeters.
Only one can be on at a time. The inches and millimeters settings are determined by the Dots Per Inch
(DPI) setting in the Configure Environment. For
SGI monitors, the DPI default is 100.
The Display Settings
The Display Settings allow you to choose whether to
show the color values of the Picked color in a percentage or on a scale from 0 to 255.
Press the %age Button to turn it on. The color values of the Picked color are shown as a percentage (0
to 100).
Press the 255 Button to turn it on. The color values
of the Picked color are shown on a scale of 0 to 255.
The Averaging Functions
Depending on which Averaging Setting is active, the
Pick function averages neighboring pixels into the
Picked color.
Revision A
4-41
Paint Environment
Revision A
4-41
Paint Environment
CHYRON Corporation
CHYRON Corporation
Press on one of the Averaging Settings to turn it on.
The Pick function averages a number of surrounding
pixels to arrive at the resultant Picked color. The
Off Setting uses only the single pixel pressed on.
The other settings range from 2 x 2 to 9 x 9. 2 x 2
averages a 2 x 2 square group of pixels, with the
Picked pixel at the lower left. 3 x 3 averages a 3 x 3
square group of pixels with the Picked pixel near the
center. The larger settings operate the same way
with the Picked pixel in the center of the square of
averaged pixels.
Color Space Button (HSV)
Displays the current color space (RGB, HSV,
CMYK, HSL etc.). Press this button to call up the
Color Space Popup for choosing which color space
to use or to call up the Color Mixer.
Paint Environment
4-42
Revision A
Paint Environment
4-42
Revision A
Liberty Artist’s Manual
Liberty Artist’s Manual
4.3.2
Color Modes
When the green Color Space button is pressed, the
Color Mode Popup appears. The button will be
labeled HSV, RGB, CMYK, or HSL depending on
the currently selected Color Mode.
Figure 4-19. Color Space Popup
Color Checking
This tool when activated will provide an indication
of whether the currently selected color(s) are within
legal NTSC or PAL color space.
NOTE
This tool will not affect the colors of
the canvas pixels. It only identifies
illegal palette colors. See The Color
Clip Button description on for more
information on clipping the Palette
colors.
Revision A
4-43
Paint Environment
Revision A
4-43
Paint Environment
CHYRON Corporation
CHYRON Corporation
NTSC Button
Press the NTSC button to enable (highlight) NTSC
Color Checking. When active, if a selected color is
legal, there will be a white select line under the color
chip. If the color is illegal (e.g. not in legal NTSC
color space) the white select bar beneath the color
chip will turn red. Adjust the color sliders to make
the color legal.
PAL Button
Press the PAL button to enable (highlight) PAL
color checking for the selected palette color(s).
Gamma Window
The value in this window is used by Liberty in the
algorithm that converts from RGB color space to
NTSC or PAL color space. The default value is
1.600. Increasing the number raises the gamma
curve, and using a smaller number lowers the
gamma curve.
HSV Button
Configures the Color Sliders for Hue, Saturation,
Value, and Alpha palette color control.
RGB Button
Configures the Color Sliders for Red, Green, Blue,
and Alpha palette color control.
CMYK Button
Configures the Color Sliders to Cyan, Magenta, Yellow, and Black palette color control.
Paint Environment
4-44
Revision A
Paint Environment
4-44
Revision A
Liberty Artist’s Manual
Liberty Artist’s Manual
HSL Button
Configures the Color Sliders to Hue, Saturation,
Luminance, and Alpha palette color control.
Color Mixer
Brings up the Color Mixer popup instead of the
Color Sliders for palette color control.
Revision A
4-45
Paint Environment
Revision A
4-45
Paint Environment
CHYRON Corporation
CHYRON Corporation
4.3.3
Color Slider Scales
Figure 4-20. Color Slider Scales in the Palette Panel
The more than 16.7 million colors available to Liberty’s 32-bit version are set using these three slider
scales. There are four different color spaces you can
use to modify colors in. The default is Hue, Saturation, and Value (HSV).
Paint Environment
4-46
Revision A
Paint Environment
4-46
Revision A
Liberty Artist’s Manual
Liberty Artist’s Manual
Color Sliders Space Control
To change the Color Slider Scales to operate in Hue,
Saturation, and Value (HSV); Red, Green, Blue
(RGB); Cyan, Magenta, Yellow, Black (CMYK); or
Hue Saturation, Luminance (HSL) Color Space,
press on the green Color Space Button at the bottom
of the Current Color Button. When the Color Space
Popup appears, press on the Color Space you want
to work in.
HSV Color Space
The Hue slider scale, at the left, controls the hue of
the current color(s).
The Saturation slider scale, the middle of the three,
controls the saturation, or intensity, of the current
color(s) The top of the scale is 100% saturation and
the bottom is 0% saturation. The closer to the bottom the more pastel the color is. The Saturation
scale overrides Hue and is overridden by Value.
The Value scale, the rightmost of the three, controls
the brightness of the current color(s). The top of the
scale is 100% brightness and the bottom is 0 brightness or black. Value overrides both Hue and Saturation.
RGB Color Space Control
RGB represents color in terms of the three additive
primaries of color television. Black is created by
setting all three sliders to the bottom, and white is
created by setting them all to the top.
CMYK Color Space Control
CMYK is the Color Space for pre-press applications
like desktop publishing and represents the three primary ink colors: Cyan, Magenta, and Yellow, plus
Revision A
4-47
Paint Environment
Revision A
4-47
Paint Environment
CHYRON Corporation
CHYRON Corporation
black (K). Cyan, Magenta, and Yellow are subtractive, since when they all equal 255 they give black,
and when they are all at 0 they give white. Liberty
provides other tools for pre-press, such as file conversion to and from Scitex file formats in the Save
and Recall Popups. The four sliders represent C, Y,
M, and K from left to right.
HSL Color Space Control
This color space is similar to HSV but has a Luminance (L) parameter that is proportional to brightness levels measured on an NTSC monitor. The top
of the luminance scale is white; the middle is color;
and the bottom is black. Luminance also takes into
account the brightness of different colors, i.e. red is
darker than yellow. HSV treats pure hues as having
equal weight and so may be used for color paint
applications. HSL gives different weight to different hues and would be used when different hues
must be distinguished by their brightness, as in
choosing colors that must be distinguishable even on
a black and white TV monitor.
Paint Environment
4-48
Revision A
Paint Environment
4-48
Revision A
Liberty Artist’s Manual
Liberty Artist’s Manual
Color Mixer Mode
Figure 4-21. Color Mixer Popup
The Color Mixer provides an area for mixing colors
separate from the Canvas. The Color Mixer consists
of a rectangular area for mixing colors and four buttons: “Real,” “Adjust,” “Edit,” and “Clear.”
Revision A
4-49
Paint Environment
Revision A
•
To display the Color Mixer: Press the Color
Space button. When the Color Space Popup
comes up, press on the Color Mixer Button, followed by the OK button.
•
To put color into the Color Mixer: Press the
Edit Button to enable painting directly into the
Mixer area. After you’ve painted some colors
into the Mixer, use Smear Paint to smear the colors around, creating a range of colors to choose
from. Most paint modes, such as Reveal, ErasePaint, and pressure-sensitivity, work with the
Mixer. Clone Paint and Paste Paint do not work
with the Mixer.
4-49
Paint Environment
CHYRON Corporation
CHYRON Corporation
•
To put color from the Color Mixer into the
Palette: When the Edit Button is turned off,
pressing in the Color Mixer area picks the
pressed-on color into the currently underlined
color box in the Palette.
Edit Button
A mode button that enables you to paint directly into
the mixer.
Clear Button
Clears the Color Mixer of color.
The Real Button
Real time color pick. When this mode button is on,
as you press down and drag the cursor over the
Mixer area the current color box is continuously
updated with the corresponding color.
Repeat Prefix with the Color Mixer
With the Real Mode off and the Repeat Prefix on,
pressing continuously on the Mixer area fills all the
palette boxes in the Palette with colors from the
mixer.
Adjust Button
This allows you to modify the entire Mixer area
using HSV sliders.
Single-Color & Multi-Color Modes
The Color Slider Scales work both in Single- and
Multi-color Modes. In Single-color Mode, they
show the values for the single current color. In
Multi-color Mode they show the values for the range
of underlined colors.
Paint Environment
4-50
Revision A
Paint Environment
4-50
Revision A
Liberty Artist’s Manual
Liberty Artist’s Manual
In Single-color Mode each slider scale has one
pointer indicating its setting. In Multi-color Mode
each slider scale has as many pointers as there are
colors chosen in the Palette.
Press on the arrow buttons at the top and bottom of
the slider scales to change the value by one unit at a
time.
The number windows at the bottom of each Slider
Scales display the numerical setting of that Slider
Scale. Press on the window and type in a new number, followed by the Enter key, to change the setting
of that slider. In Multi-color mode, the number windows show whichever color has most recently been
changed on that slider. So in Multicolor Mode, each
number window can display the value for a different
color.
To use the Color Sliders to change one color
(Single-color Mode):
•
Turn off Multi-color, if not already off, and
choose the color on the palette to be changed.
•
Press on a slider scale and drag it to a new
position. The current color changes accordingly,
in real time.
Or:
Press anywhere on the slider scale (without
dragging). The pointer jumps to the new position and the current color changes accordingly.
With Multi-color mode on, you can change the Hue,
Saturation, or Brightness of all the underlined colors
simultaneously. Individual colors are indicated by
pointers at the right of each slider and can be moved
individually.
Revision A
4-51
Paint Environment
Revision A
4-51
Paint Environment
CHYRON Corporation
CHYRON Corporation
You can change all the colors simultaneously by
dragging one of the blue end-pointers up or down
the scale. This stretches or squeezes the entire range
of chosen colors and they all change accordingly in
the Palette. Or, you can change all the underlined
colors simultaneously by pressing and dragging the
yellow mid-point pointer. All the pointers move up
and down together, without stretching or squeezing
If you drag one of the blue end-pointers till it
touches the other one (collapsing the range of values) and then pull it away again (stretching the range
of values), all the pointers between become equally
spaced. Thus you can reset whole ranges of colors,
manually creating blends.
Copying Colors in the Palette
To copy a color from one position on the palette to another:
•
In single color mode, press on the palette box
you want to copy.
•
Press the Copy Prefix Button.
•
Press the palette box you want to copy the
color to. The source color is copied into the target palette box. The source palette box remains
underlined.
This copy colors procedure works the same for a
group of colors in Multiple Color Mode as for a single color.
Current Color Button
The large box above the green Color Mode button
displays the color of the currently selected palette
color. If the palette is in Multi Mode, the upper-leftmost palette color will be displayed.
Paint Environment
4-52
Revision A
Paint Environment
4-52
Revision A
Liberty Artist’s Manual
Liberty Artist’s Manual
Background Color Button
The box above the Current Color Display is the
Background Color Button. It displays the color of
the transparent background in the Canvas.
To change the color of the transparent background:
4.4
•
If Multiple Colors is on, turn it off.
•
Press the box in the palette that you want to
copy into the Background Color Button.
•
Press the Background Color Button. The
underlined palette color is copied into the Background Color Button. After a momentary pause,
the transparent background color in the Canvas
changes to match the Background Color Button.
GRID AND DIRECTION FUNCTIONS
Figure 4-22. Grid Buttons in the Brush Display
Revision A
4-53
Paint Environment
Revision A
4-53
Paint Environment
CHYRON Corporation
CHYRON Corporation
The Grid and Direction Buttons are below the red
Erase Buttons. They allow you to constrain various
Canvas operations to grid points or to specific directions.
4.4.1
Grid Functions
Grid Button
The Grid function, when turned on, constrains many
of Liberty's Paint functions to user-definable, invisible, evenly-spaced grid points. The positioning of
all the Paint functions, including Line and Curve,
Paint Mask, Rectangle Mask and the Paste functions
are constrained by Grid.
Press the Grid Button to turn Grid Mode on. When
turned on, Grid is set to the previous Grid values and
the Grid Button is highlighted. If no previous Grid
values have been set, the default is a full-screen grid;
i.e., the entire screen is one big grid rectangle.
The grid may or may not be visible when on,
depending on whether or not the “Show Grid” button is on.
Paint Environment
4-54
Revision A
Paint Environment
4-54
Revision A
Liberty Artist’s Manual
Liberty Artist’s Manual
Grid Popup
Figure 4-23. Grid Popup
Press the corner button of the Grid Button to call up
the Grid Popup. You can enter numbers for the x
and y dimensions of a grid, and for the x and y grid
offsets. The offsets of the grid define where the grid
starts on the screen. The offset numbers measure the
distance from the lower left corner of the Canvas to
the xy starting position of the grid. Or you can press
the From Mask Button at the top of the Grid Popup
and a grid will be created using the bounding box of
the current masked area on the Canvas.
The From Mask Button
Press the From Mask Button to set a grid defined by
the size of the bounding box of the current masked
area on the Canvas.
Revision A
4-55
Paint Environment
Revision A
4-55
Paint Environment
CHYRON Corporation
CHYRON Corporation
The Pixels Button
When highlighted, the values in the four grid size
and offset windows represent numbers of pixels.
The Inches Button
When highlighted, the numeric windows represent
size and offset values in inches.
The Millimeter Button
When highlighted, the numeric windows represent
size and offset values in millimeters (mm).
X-Size Window
The value in this window is the horizontal distance
between grid lines
Y-Size Window
The value in this window is the vertical distance
between grid lines.
X Offset Window
This value represents the horizontal offset or positioning of the first vertical line from the left edge of
the canvas.
Y Offset Window
This value represents the vertical offset or position
of the first horizontal line from the bottom edge of
the canvas.
Paint Environment
4-56
Revision A
Paint Environment
4-56
Revision A
Liberty Artist’s Manual
Liberty Artist’s Manual
The Show Grid Button
Press the Show Grid Button on the Grid Popup to
display grid intersection as white dots. These dots
are not part of the picture and will not be saved to
disk with the picture nor sent out to a video board
for recording. Press the Show Grid Button again to
turn it off (to make the grid invisible).
The Grid Division Buttons (div2 and div4)
Press one of these buttons to subdivide the current
grid. The Div2 Button subdivides the grid by a factor of two, the Div4 Button by a factor of four. All
functions constrained by Grid will now operate on
the sub-grid intersections. Press the button again to
turn it off.
The Grid Elevator
A four-level elevator is at the right side of the Grid
Popup for storage of grid set-ups.
To create a grid from the current masked area
on the Canvas:
Revision A
4-57
Paint Environment
Revision A
•
Mask a rectangle on the Canvas the size and
shape of a single grid rectangle. Use the Rectangle Mask Button on the Mask Panel Menu, see
page 4-57 for details.
•
Press the corner button of the Grid Button.
The Grid Popup appears.
•
Press the From Mask Button. A grid is created
based on the masked area. By default, the grid is
invisible, but with the Show Grid Button you can
make it visible.
4-57
Paint Environment
CHYRON Corporation
CHYRON Corporation
When Grid is on, press the Grid Button again to turn
Grid off. The next time you press the Grid Button to
turn it on, the previous values are remembered and
reset.
Mask Grid Button
On the Mask Tools 2 Panel is a button labeled Grid
that, when pressed, creates a mask of one (1) pixel
line width using the grid. The Mask Grid Button
works (using the current Grid) whether the Grid
Button is actually turned on or not.
To make the current grid a permanent part of
the picture:
4.4.2
•
Set the desired grid using the Grid functions.
•
Press the Mask Grid Button in the Mask
Tools 2 Panel. The current grid appears as onepixel-wide masked lines.
•
Press the Apply Color Button (in the Image
Tools 1 panel). The current color (or colors) is
applied into the masked grid lines. Then you can
edge the one-pixel grid to make it thicker, work
on it with the various functions of the Paint Environment, and/or save it to the disk.
Direction Functions
Direction Button
Figure 4-24. Direction Button
Paint Environment
4-58
Revision A
Paint Environment
4-58
Revision A
Liberty Artist’s Manual
Liberty Artist’s Manual
Located a bit below the Grid Button, the Direction
Button looks like a clock with a white dot in the center to turn it on and off. A circle of smaller dots represents the numbers of the clock where the "hand" of
the clock moves around, defining an angle, or direction. When the "hand" dot is at 3 o'clock, the direction is 0 degrees (or 360 degrees). When the hand is
at 12 o'clock, the direction is 90 degrees. With
Direction Mode on, many functions, listed below,
are constrained to the current direction. The setting
of the Direction Button is used for the linear Apply
Color Button for creating multi-colored ramps,
regardless of whether Direction is turned on or not.
To set a new Direction:
•
Press and drag the large white dot on the
outer circle of dots, moving it around to set
the direction. The large dot moves in 15 degree
increments. Or, when the cursor is over the
Direction Button, you can type a number on the
keyboard to set the direction to any number of
degrees from 0 to 360. The Direction Button
does not have to be on to change its direction.
When the Direction Button is on, you can turn it off
by pressing the center dot again.
Horizontal / Vertical Mode Buttons (X and Y)
The two buttons above the Direction Button are the
Horizontal and Vertical Mode Buttons. Turning on
one of these restricts the functions listed below to
horizontal or vertical operation.
Functions that are constrained by the Grid, Direction, Horizontal, and Vertical Modes:
Revision A
4-59
Paint Environment
Revision A
•
Paint
•
Line
4-59
Paint Environment
CHYRON Corporation
CHYRON Corporation
4.5
•
Paint Mask
•
Rectangle Mask, Square Mask, Gradated
Rectangle Mask,Gradated Square Mask
•
Add, Move Curve Points
•
Paste, Paste Mask
•
Tile
•
Text positioning functions
PREFIX BUTTONS
Figure 4-25. Prefix Buttons
The Prefix Buttons are located under the Palette/
Buffers Panels halfway down the Paint Environment. A Prefix Button modifies functions pressed
immediately after it. The Prefix Buttons include
Repeat, Under, Add, Copy, and Invert.
The Prefix Buttons turn off automatically when the
function is completed. You can turn them off manually by pressing them a second time.
Depending on the prefix, it is possible to have multiple prefix buttons activated simultaneously.
Repeat Prefix Button
Most Liberty functions automatically terminate after
a single use. The Repeat Prefix keeps a function
active for multiple uses. To use the Repeat Prefix,
press on the Repeat Button, then press the function
button you want to use in Repeat Mode. Press the
Paint Environment
4-60
Revision A
Paint Environment
4-60
Revision A
Liberty Artist’s Manual
Liberty Artist’s Manual
function’s Cancel or OK Button to terminate the
function. You can press the active (high-lighted)
Repeat Button to turn it off while using the function.
For example, for repeated recalls from the disk,
press the Repeat Prefix, then the Recall Button (for
information on recalling files see page 4-21). The
File Popup stays up during as many recalls as you
like. Press the Cancel Button on the File Popup to
terminate, or just before the last Recall, press the
Repeat Prefix again to turn it off. After you recall
another file, the File Popup disappears and the function terminates because the Repeat Prefix is no
longer on. Another way to terminate a function that
you are using with Repeat is to press the highlighted
function button a second time to turn it off. Then
don’t forget to also press the highlighted Repeat
Button to turn it off.
Under Prefix Button
The Under Prefix causes functions that put color or
image into the picture to put the color or image
under what is currently in the picture. A picture must
have some transparency so that what is put “under”
it can be seen. To use the Under Prefix, press the
Under Button and then press the function you want
to operate in Under Mode. Use the function. You
can press the active Under Prefix to turn it off while
using the function.
Add Prefix Button
The Add Prefix causes a function to add its result to
another. Mostly used with elevator levels - for
example, one temporary buffer can be added to
another.
Revision A
4-61
Paint Environment
Revision A
4-61
Paint Environment
CHYRON Corporation
CHYRON Corporation
To add an elevator level (or other item) to
another:
•
Press the source elevator box (or other item)
to be added.
•
Press the Add Prefix Button.
•
Press the elevator box (or other item) to be
added to. The Add takes place. For instance,
one Temp elevator level is pasted on top of
another.
You can also press Add, then Recall, to recall a picture from disk on top of the current Canvas picture,
rather than the screen being automatically erased
first.
Copy Prefix Button
The Copy Prefix copies one item to another. It is
often used to copy one elevator level to another, or
one palette color box to another. Its second function
is In-place; for instance, pressing the Copy Prefix,
then pressing the Paste Button pastes the element
into its original position on-screen rather than
requiring manual placement. See §4.9.5 for more
details on the Paste function.
To copy one item to another:
Paint Environment
4-62
Revision A
Paint Environment
•
Press the source item to be copied (elevator
box, palette box, etc.).
•
Press the Copy Prefix Button.
•
Press the target item to be copied to. The
source is copied to the target.
4-62
Revision A
Liberty Artist’s Manual
Liberty Artist’s Manual
Invert Prefix Button
The Invert Prefix Button inverts an operation. The
following is a list of the functions it modifies with
descriptions of how it affects them.
4.6
•
Invert Prefix plus Paint - paints under.
•
Invert Prefix plus any masks - de-masks
instead of masking.
•
Invert Prefix plus Line/Curve Draw with multiple colors - inverts the order of the colors used.
•
Invert Prefix plus Reveal Color, Luminance,
or Hue (Image Tools 1 Panel) - Reveals from
Canvas into Temp, instead of the other way
around.
MAGNIFY FUNCTIONS
Figure 4-26. Magnify Buttons
The Magnify functions allow you to zoom into the
Canvas for close-up work. You can pan around the
screen with the cursor or use the Canvas Buffer in
the Buffers Panel to pan more quickly. The Full
Button does the opposite of Magnify - it shows the
entire Canvas, no matter what the resolution is. The
six Magnify Buttons are at the bottom right of the
Paint Environment Menu, below the Panel Menus.
They are, from left to right:
Canvas - Magnify - Full - Set - In - Out
Revision A
4-63
Paint Environment
Revision A
4-63
Paint Environment
CHYRON Corporation
CHYRON Corporation
Canvas Button
Press the Canvas Button to cause the Canvas to fill
the entire screen, replacing the menus. Press the
“Menus” button to restore the Canvas and the menus
to their normal display. If the Canvas is magnified
when you press the Canvas Button, the magnified
picture will fill the entire screen, replacing the
menus. (The F8 keyboard key serves the same purpose as the Canvas/Menus button.)
NOTE
When you press the Canvas Button, it
automatically zooms the Canvas
image so that it fills the screen. The
exceptions to this are (1) If you’ve
already zoomed when you press
Canvas, your current magnification
is preserved, and (2) If the image is
too big to fit into the standard Canvas
screen no zoom is performed.
Magnify Mode Button
Press to turn on or turn off Magnification Mode. If
you press it when the Canvas is not magnified, the
previous level of magnification is restored, centered
on the center of the screen. If you press it when the
Canvas is magnified, the magnification is turned off.
When Magnification is off, the Magnify Button is a
quick way to return to the previous magnification.
When Magnification is on, the Magnify Button is a
quick way to turn it off.
Full Button
Press the Full Button to turn it on/off. The Canvas
display scales to fit inside the Canvas window,
regardless of resolution.
Paint Environment
4-64
Revision A
Paint Environment
4-64
Revision A
Liberty Artist’s Manual
Liberty Artist’s Manual
Use Full-page Mode for resolutions that are larger
than the available picture area. All Paint functions
work in this mode.
NOTE
If the resolution of a stored image
recalled into the Canvas is larger than
the Canvas resolution, pressing the
Full button will only display the
maximum canvas resolution, not the
larger image resolution. The recalled
image is truncated to the configured
canvas resolution.
Set Magnify Button
The Set Button is the easiest way to magnify the
Canvas. Press it to turn it on/off. While it is on,
each time you press on the Canvas the magnification
increases one level.
To use the Set Magnify Button:
Revision A
4-65
Paint Environment
Revision A
•
Press to turn on.
•
Press on the position on the Canvas where you
want to center the magnified image. Each time
you press, the Canvas is magnified by a factor of
2 (2X, 4X, 8X, etc.) up to 32X (16X on some
platforms), centering where you press. When
you have magnified the picture, you can pan
around it by turning on the CanvDrag button and
pressing/dragging the Canvas. You can also use
the Canvas Buffer in the Buffers Panel at the left
of the Canvas to pan around in a magnified picture. Thus you can quickly pan around a magnified picture while, for instance, simultaneously
painting on it.
•
Press Set Magnify again to turn it off.
4-65
Paint Environment
CHYRON Corporation
CHYRON Corporation
Zoom In Button
The Zoom In Button is a quick way to magnify, but
without much control of where the magnified picture centers.
Press to increase the current magnification by 2X.
The center of the displayed picture remains constant.
If bound to a keyboard key (see the Macro Panel
Menu, page 4-68), pressing the key centers the displayed picture around the current pen position on the
Canvas. If the picture is not magnified when you
press the Zoom In Button, magnification centers on
the center of the screen. If in Full-page Mode, when
normal magnification is reached Full-page Mode is
automatically turned off.
Zoom Out Button
The Zoom Out Button is a quick way to de-magnify
one level.
Press to decrease the current magnification by 2X.
The center of the displayed picture remains constant,
unless the center is too close to the edge of the picture, in which case the center moves so as to not display an area outside the Canvas.
CanvDrag Button
Press the CanvDrag Button to turn it on and enable
panning on the Canvas image. When the canvas is
magnified and CanvDrag is on, you can press anywhere in the Canvas image and drag it around.
Panning with the Alt Key
Pressing the Alt key on the keyboard has the same
effect as turning CanvDrag on and can be much
more convenient. The CanvDrag Button highlights
Paint Environment
4-66
Revision A
Paint Environment
4-66
Revision A
Liberty Artist’s Manual
Liberty Artist’s Manual
when the Alt key is held down. The user can then
press anywhere in the magnified Canvas image and
drag it around, for as long as the Alt key is pressed.
Pressing on any of the Canvas borders now pans the
Canvas one pixel per click in the corresponding
direction.
4.7
CALCULATOR
Figure 4-27. Calculator
Liberty's calculator works like a typical pocket calculator. You use it to help compute values where
arithmetic is involved.
There are two ways to bring the calculator up:
Revision A
4-67
Paint Environment
Revision A
•
When you are using a function that puts a
numeric value in the Prompt Window, press
on the Prompt Window itself.
•
Just after keying a value into a number window, press on the Prompt Window. The value
you just entered into the number window appears
4-67
Paint Environment
CHYRON Corporation
CHYRON Corporation
in the Calculator. Perform your calculation, and
when you press the Off Button the value in the
calculator is entered into the number window.
In each of these cases, the calculator begins with the
number from the corresponding input button. You
can then use the calculator to compute a new value.
Remove the calculator by pressing the Off Button.
The number in the Prompt Window takes the number from the numeric display window of the calculator, updating the current function if a change has
been made.
If you press the "Off" Button before changing the
value, the calculator disappears and puts its value
back in the corresponding input button.
The calculator has two panels, one of which is hidden by default. To enable/disable the second panel,
press on the calculator above the numeric display
window. Functions of the second panel are
described below.
The main panel has a numeric display window, and
buttons for Off, Clear, Memory Clear, Save,
Restore, Numeric Entry, Basic Arithmetic (+, -, *, /),
Equals (=), and Timecode Mode (time).
The numeric display window displays the current
number being entered, or the current cumulative
result of an operation.
Just like a pocket calculator, Liberty's calculator has
precedence rules. Divide and Multiply have higher
precedence than Add and Subtract. This means that
the evaluation of Adds and Subtracts is delayed until
another Add or Subtract is specified, or until you
press the "=" Button.
Paint Environment
4-68
Revision A
Paint Environment
4-68
Revision A
Liberty Artist’s Manual
Liberty Artist’s Manual
There are parentheses buttons in the second calculator panel to override the above precedence rules.
Multiple levels of nested parentheses are allowed.
The left Paren Button is highlighted as long as a left
parentheses is active (until all left parens have corresponding right ones).
The Clear (clr) Button clears the calculator so that
you can start a fresh computation, setting the
numeric display window to 0. Neither the calculator's memory nor constants are cleared.
The Memory Buttons allow you to save a value in
the calculator's memory for later use. The "MC"
Button zeros the memory; the "MS" Button stores
the current number from the numeric display window; and the "MR" Button recalls the last saved
value for use (equivalent to entering the number
using the Numeric Menu Buttons, but faster).
Numeric Entry Buttons include the digits 0 - 9, a
decimal point (".") for entering fractions and a
Timecode Separator (":") for working with timecode. The ":" Button shifts the timecode in the display window left 2 digits.
The Time Button turns Timecode Mode on and off.
In Timecode Mode numbers are displayed in hours,
minutes, seconds, and frames (thirtieths of seconds.
If you make an illegal operation, like taking the
square root of a negative number, "Error" appears in
the display window. Clear by pressing the Clear
Button or entering another number.
The second calculator panel contains a number of
more complex functions, including:
Revision A
4-69
Paint Environment
Revision A
4-69
Paint Environment
CHYRON Corporation
CHYRON Corporation
inv - modifies the next sin, cos, tan, log, or ln operation to invert it, resulting in arc-sin, arc-cos, arc-tan,
power of 10, or power of 'e', respectively. It highlights until the operation is performed, then turns
off.
rad - mode button - interpret the number as radians
when on, otherwise interpret it as degrees (used by
sin, cos, and tan). The button is highlighted when in
Radians Mode.
pi - enters the trigonometric constant pi
(3.1415962...)
sin - takes the trigonometric sine of the number in
the display window.
cos - takes the trigonometric cosine of the number in
the display window.
tan - takes the trigonometric tangent of the number
in the display window.
KS, KR, KC - store, recall, clear one of the 10
numeric constants. These are similar to MS, MR,
MC in the first panel, but allows you to save and
recall multiple values.
KC - zeros all 10 constants
KS - pressing KS followed by a digit, i (0-9), stores
the number from the display window as constant
number i.
Pressing KS followed by an operation (+, -, *, /) followed by a digit, i (0-9), takes constant number i and
the current number from the display window, performs the specified operation, and replace constant
number i with the result.
KR - pressing KR followed by a digit, i (0-9),
recalls constant number i.
Paint Environment
4-70
Revision A
Paint Environment
4-70
Revision A
Liberty Artist’s Manual
Liberty Artist’s Manual
log - takes the logarithm (base 10) of the number.
ln - takes the natural logarithm (base e) of the number.
*360 - multiplies the number by 360.
rand - generates a random number between 0 and
2**31 - 1.
sqr - takes the square root of the number.
x^2 - squares the number.
l/x - inverts the number
int - truncates the fraction of a decimal number.
The calculator has numeric entry keys as well, so
you can use the keyboard. When the calculator is
up, use the following keys for:
0 - 9 - enters the corresponding digit
. - enters a decimal point
m - recall number from memory
M - store number in memory
: - same as : button on calculator menu
$ - enable/disable timecode mode
! - clear
C - clear memory
( - enter left paren
) - enter right paren
= - same as = on calculator
enter - same as = on calculator
space - same as = on calculator
Revision A
4-71
Paint Environment
Revision A
4-71
Paint Environment
CHYRON Corporation
CHYRON Corporation
NOTE
When entering timecode in the
Animation Environment, this is equal
to a : . This is not true of the
calculator.
| - change sign of number in display window
+, -, *, / - enter arithmetic operator
% - same as "int" Button on calculator
^ - square
# - square root
i - inv
s - sin
c - cos
t - tan
l - log 10
r - rand
@ - clear constants
k - recall constants
K - store constant
R - int
Paint Environment
4-72
Revision A
Paint Environment
4-72
Revision A
Liberty Artist’s Manual
Liberty Artist’s Manual
4.8
BUFFERS PANEL
Figure 4-28. Buffers Panel
Revision A
4-73
Paint Environment
Revision A
4-73
Paint Environment
CHYRON Corporation
CHYRON Corporation
The Buffers Panel alternates with the Palette Panel,
taking up most of the left side of the Paint Environment. It contains three Buffers - one at the top displaying a thumbnail view of the current Mask Buffer
- one in the middle displaying a thumbnail view of
the current “Temp,” or Temporary Buffer, which is
used for cutting, pasting, and distorting - and one at
the bottom of the Panel displaying a thumbnail view
of the current Canvas with a wireframe “handle” for
panning around the magnified Canvas.
The Mask Buffer
Figure 4-29. The Mask Buffer
The Mask Buffers are places where you can store
Liberty’s masks. In Liberty you isolate an area of
the picture to perform an operation on it by creating
a mask of the area. You can paint a mask, create a
mask from the luminance of the picture, make rectangle masks - there are many, many ways to make
masks. The panel menu at the far right of the screen
below the Canvas is the Mask Panel, where all the
masking tools are found. These tools are described
in detail in the chapter on the Mask Tools panel
(page 4-363).
The Mask Buffer has its own blue Undo (U) and
Redo (R) Buttons.
Paint Environment
4-74
Revision A
Paint Environment
4-74
Revision A
Liberty Artist’s Manual
Liberty Artist’s Manual
Mask Elevator
The Mask Elevator is the vertical slider scale at the
right of the Mask Buffer marked by a stack of tickmarks that show how many Masks are configured
(the default is six). Each tick represents a buffer that
stores a mask without needing a filename assigned
to it, as it would if it was being stored on disk. You
can configure as many masks as you want in the elevator. Press on an elevator tick to display its contents in the Mask Buffer, making it the current
elevator level. Up to 24 tick-marks can appear in the
slider. If more than 24 masks are configured, no
tick-marks appear in the slider.
The ticks are color-coded to indicate which are disk
masks, which are RAM masks (see below), and
which is the current mask (the one displayed in the
Mask Buffer).
To copy a mask from one level to another:
•
1.
Press on the level of the Mask Elevator you
want to copy from. The mask in that level
becomes active on the Canvas.
•
2.
Press the Copy Prefix Button.
•
3.
Press the level of the Mask Elevator you
want to copy to. The mask from the source
level is copied to the target level.
To add a mask from one level to a mask in another,
repeat the above procedure, substituting the Add
Prefix for the Copy Prefix. Only works with RAM
masks.
If you use the Invert prefix with the Copy or Add
prefixes, the source level values will be inverted
before they are copied or added.
Revision A
4-75
Paint Environment
Revision A
4-75
Paint Environment
Liberty Artist’s Manual
Mask Browse Popup
Figure 4-30. The Mask Browse Popup
Revision A
4-77
Paint Environment
Liberty Artist’s Manual
Liberty Artist’s Manual
Pressing directly on the Mask Buffer (the mask
thumbnail) recalls this popup. It allows you to
browse all six (or more) masks and manipulate
them. Colored borders around the browse images
show which mask is current, which masks are in
RAM, and which are on disk. There is a color key on
the left side of the popup identifying the border colors. You can change these colors by underlining a
color in the palette and then pressing on the border
color box you want to change.
Mask Browse Slider
The Mask Browse Popup displays six mask browse
images at a time. Each mask browse image is numbered at the upper left of the browse image. Use the
slider at the bottom of the popup to scroll through
the available mask browse images, assuming that
more than six masks are configured. When the slider
is all way to the left, the first six masks are displayed. Moving the slider to the right scrolls through
the rest of the masks.
Top Button
Press to display the first six masks.
Scroll Left Button (<<)
Press to scroll the masks left by six levels.
Jump Left Button ( |< )
Press to jump the masks left by one level.
Jump Right Button ( >| )
Press to jump the masks right by one level.
Scroll Right Button ( >> )
Press to scroll the masks right by six levels.
Revision A
4-79
Paint Environment
Revision A
4-79
Paint Environment
CHYRON Corporation
CHYRON Corporation
Bottom Button (Bot)
Press to display the last six masks.
As with all Liberty elevators, you can copy the
Masks in this popup from one browse image to
another by pressing one browse image, then the
Copy Prefix Button, and then the browse image you
want to copy to.
Note that when browsing masks in the Mask Browse
popup, some of the browse images may appear as all
red. This represents a Mask buffer on disk which is
currently empty.
Fast Masks
Depending on how much memory you have on your
hardware platform, you can configure some of the
levels of the Mask Elevator as Fast Masks to be
stored in RAM for almost instantaneous save/recall.
There must always be at least one Fast Temp. To
change the number of Fast Masks, see page 3-30 in
the Configuration Environment section.
To Compute How Much RAM You Need for
Fast Masks
The number of bytes of RAM required for each Fast
Mask is easily computed, using the following formula (divide by 1024 to convert to KB; divide by
1024 again to convert to MB):
Paint Environment
4-80
Revision A
bytes =
4 times Canvas x resolution times
Canvas y resolution for Liberty 32
bytes =
8 times Canvas x resolution times
Canvas y resolution for Liberty 64
Paint Environment
4-80
Revision A
Liberty Artist’s Manual
Liberty Artist’s Manual
Mask Display Buttons
Use Mask Button
The top button next to the mask thumbnail (labeled
“Mask”) is highlighted when a mask is active on the
Canvas. When it’s not highlighted, press it to make
the current mask active.
A masked area is normally displayed on the Canvas
by a transparent color superimposed over the Canvas; the default mask color is transparent red. The
buttons at the right of the Mask Elevator provide
choices about the masks are displayed. The top button, labeled “Mask,” is highlighted when a mask is
active on the Canvas.
Mask Only Mode (Only)
Press the Mask Only Button to display the mask as
white on black. White indicates the presence of
mask; black indicates no mask. No other picture
elements are displayed, so you see the mask alone.
This mode is useful for previewing luminance or
chrominance masks while adjusting them
Transparent Mask Mode (Tran)
Press the Transparent Mask Button to display the
background color through the masked area of the
Canvas. Thus the masked area is displayed as transparency, not as a separate color.
Opaque Mask Mode (Opaq)
Press the Opaque Mask Button to display the
masked area opaquely in the current display color.
Revision A
4-81
Paint Environment
Revision A
4-81
Paint Environment
CHYRON Corporation
CHYRON Corporation
Mixed Transparency Mask Mode (Mix)
Press the main part of the Mix Button (not the window) to transparently display the masked area in the
current display color.
Mix Popup
Figure 4-31. Mix Popup
Press the color window of the Mix Button to call up
the Mix Popup. There must be an active mask on
the Canvas (the Use Mask Button must be highlighted). The color window also shows the current
color used to display masks. The Mix Popup contains a slider scale for setting the level of transparency of the mask display (0 - 255) - about 128
(equivalent to about 50% transparency) is a good
setting. You can set the mask color by pressing the
color box in the Mix Popup.
To change the mask color:
•
Paint Environment
4-82
Revision A
1.
Paint Environment
Press the color window in the Mix Button.
The Mix Popup and the Palette appear.
4-82
Revision A
Liberty Artist’s Manual
Liberty Artist’s Manual
•
2.
Underline the palette box of the color you want
to use for displaying masks.
•
3.
Press the color window in the Mix Popup.
The color widow changes color, and all the
masks will be displayed in the new color.
•
4.
Press the OK Button. The popup disappears.
The color window in the Mix Button now
displays the new mask display color.
Transfer Buffer
Figure 4-32. The Transfer Buffer
The Transfer Buffer is a temporary storage buffer
(Temp) used for holding images that are to be pasted
back into the Canvas in various ways, or just as a
convenient place to store an image temporarily
(without saving it more permanently to disk). There
are six default levels of Temps in the Temp Elevator
at the right of the Transfer Buffer, and you can configure as many Temps as you want. You can “cut”
the Canvas into a Temp or recall a picture directly
from the disk into a Temp. All Cut and Paste functions happen to and from a Temp. The Transfer
Buffer shows a thumbnail image of the contents of
the currently active Temp.
The Transfer Buffer has its own blue Undo (U) and
Redo (R) Buttons.
Revision A
4-83
Paint Environment
Revision A
4-83
Paint Environment
CHYRON Corporation
CHYRON Corporation
Temp Elevator
The Temp Elevator is the vertical slider scale at the
right of the Transfer Buffer marked by a stack of
tick-marks that show how many Temps are configured (the default is six). Each tick represents a Temp
that can store or recall a picture without needing a
filename assigned to it, as it would if it was being
stored on disk. Press on an elevator tick to display its
contents in the Transfer Buffer, making it the active
elevator level. Up to 24 tick-marks can appear in the
slider. If more than 24 Temps are configured, no
tick-marks appear in the slider (but the slider functions the same as if the tick marks were visible.)
The ticks are color-coded to indicate which are disk
Temps, which are RAM Temps (see below), which
is the current Temp (the one displayed in the Transfer Buffer window), and which Temps are active as
layers (turned on in the Layers Popup - see below.
Note that the current Temp, plus any active layers,
are always in RAM).
Global Temp Elevator
Figure 4-33. The Global Temp Elevator
There is also a Global Temp Elevator in the lower
right part of the Paint Environment, just above the
Magnification Buttons. It is horizontal rather than
vertical and the ticks are not color-coded. Pressing
on a tick in the Global Temp Elevator turns that
Temp on or off. It’s useful when the Buffers Panel is
not visible because the Palette has replaced it.
Paint Environment
4-84
Revision A
Paint Environment
4-84
Revision A
Liberty Artist’s Manual
Liberty Artist’s Manual
The Global Temp Elevator has two modes. Press on
the word “Layers” to toggle between them. One
shows only RAM Temps; the other shows all configured Temps.
Save to Temp Button (the < button)
Press to save the contents of the Canvas into the current Temp. Saves the entire Canvas whether or not a
mask is active. To save only the masked area to a
Temp, use the Cut Button in the Transfer Panel
Menu below.
Swap with Temp Button (the < > button)
Press to swap the contents of the Canvas with the
contents of the current Temp. The Canvas picture
appears in the Temp Window and the contents of the
Temp appear in the Canvas. Swaps the entire Canvas whether or not a mask is active.
Recall from Temp Button (the > button)
Press to recall the contents of the Temp into the
Canvas. The current contents of the Canvas are first
erased.
Layers Button
The Layers Button is a mode button that allows you
to turn on/off Layers Mode, which displays one or
more of the Temps as layers over the Canvas.
Press the Layers Button to turn it on. The button is
highlighted and the contents of the active Temp layers are displayed over the Canvas. When you press
the Layers Button again to turn it off, the layered
Temp images disappear from the Canvas.
Revision A
4-85
Paint Environment
Revision A
4-85
Paint Environment
CHYRON Corporation
CHYRON Corporation
Layers
In this document the terms “Temps,” “Temp Buffers,” and “layers” are used more or less interchangeably. There is a subtle difference between Temps
and layers, however, in that only Fast Temps
(Temps stored in RAM) can be active layers. Provided you have enough RAM on your hardware
platform, it may be convenient for you to put all of
your Temps into RAM.
Liberty allows you to configure a number of Temps
as active layers, which can be simultaneously overlaid over (or under) the Canvas. Pressing and dragging a layers image on the Canvas moves the image
to a new position. Then, when all the layers are positioned to your satisfaction, you call up the Layers
Popup and press the Composite Button to paste the
layers onto the Canvas for a final composited image.
In the Layers Popup you can change the transparency of the layers, change their relative priority in
the stack, perform Paint and Tools operations on
them, and distort them using Paste Distort - all while
the layers are being temporarily displayed on the
Canvas. These modifications become permanent
only when you give the Composite command, at
which time the layers are composited onto the Canvas.
Fast Temps
Depending on how much memory is on your hardware platform, you can configure some of your
Temps as Fast Temps to be stored in RAM. The
default is one Fast Temp. Only Fast Temps (RAM
Temps) can be accessed as active layers as described
above. There must always be at least one Fast
Temp. To change the number of Fast Temps, see
page 3-29 in the Configuration Environment section.
Paint Environment
4-86
Revision A
Paint Environment
4-86
Revision A
Liberty Artist’s Manual
Liberty Artist’s Manual
The current Temp is always stored in RAM. Thus,
when you click on a disk Temp (one not in RAM),
making it the current Temp, it becomes a RAM
Temp, and the previous current Temp becomes a
disk Temp, preserving the same number of Temps in
RAM.
Unlimited Number of Layers
The default number of Temps is six, but you can
configure as many Temps as you want, depending
on available space, and any number of them can be
Fast Temps, depending on available RAM.
Temp Layers Resolution
Liberty’s Temp Buffers have variable resolution,
based on the size of the image that is in the Temp.
Thus, in RAM Temps small images consume less
RAM than large images. If you use your layers primarily for small cutouts, you may be able to configure many more Temps in RAM.
Temp Buffers can also be larger than the Canvas.
Thus you can load an image that is larger than the
Canvas into a Temp, then modify it with, for example, Paste Distort, without having to go into a larger
Canvas resolution.
Revision A
4-87
Paint Environment
Revision A
4-87
Paint Environment
CHYRON Corporation
CHYRON Corporation
Layers Popup
Figure 4-34. The Layers Popup
Press directly on the Transfer Buffer (thumbnail) in
the Buffers Panel to display the Layers Popup.
Paint Environment
4-88
Revision A
Paint Environment
4-88
Revision A
Liberty Artist’s Manual
Liberty Artist’s Manual
The Layers Popup displays the Temp layers as small
browse images and provides many controls to modify the layers, including positioning, transparency,
Paste Distort, and the relative position of layers in
the stack.
The Layers Popup displays six browse images at a
time and, if more than six layers are configured,
allows you to scroll up and down the stack of layers.
At the upper left of each browse image is its number,
starting with 1 as the top layer.
Layer Priority
Prioritization of the layers is from top to bottom,
with Temp 1 having the highest priority (top layer)
and the lowest Temp in the stack having the lowest
priority (bottom layer).
Canvas Position Relative to Layers Stack
At the left of the Temp browse images is a vertical
bar that controls the position of the Canvas relative
to the layers. A white marker on the bar denotes the
position of the Canvas relative to the stack. Pressing
on the bar moves the Canvas up or down the stack.
For example, pressing on the bar between the first
and second layers displays the Canvas under the first
(top) layer but above all the other layers.
Layers Browse Slider
When more than six layers are configured, use the
vertical slider at the right of the browse images to
scroll through the available layers. When the slider
is all way at the top, the first six layers are displayed.
Moving the slider down scrolls through the rest of
the layers. When the slider is all way at the bottom,
the last six layers are displayed.
Revision A
4-89
Paint Environment
Revision A
4-89
Paint Environment
CHYRON Corporation
CHYRON Corporation
Top Button
Press to display the first six layers.
Scroll Up Button
Press to scroll the layers up by six levels.
Jump Up Button
Press to jump the layers up by one level.
Jump Down Button
Press to jump the layers down by one level.
Scroll Down Button
Press to scroll the layers down by six levels.
Bottom Button
Press to display the last six layers.
As with all Liberty elevators, you can copy the layers in this popup from one level to another by pressing a thumbnail, then the Copy Prefix Button, and
then the thumbnail you want to copy to.
Paint Environment
4-90
Revision A
Paint Environment
4-90
Revision A
Liberty Artist’s Manual
Liberty Artist’s Manual
Note that when browsing temps in the Layers popup,
some of the browse images may appear as all red.
This represents a Temp buffer on disk which is currently empty
Individual Layer Controls
You can modify each layer individually using buttons near each layer’s browse image, including On/
Off, X and Y position, 2D and 3D Paste tools, a
Lock Button, and an alpha slider. The layer must be
active (in RAM) for these tools to be used.
On Button
Press a layer’s On Button to make that layer actively
overlaid on the Canvas. The On Button becomes
highlighted and the contents of the layer appears
overlaid on the Canvas.
Transparency Slider
Controls the individual layer’s transparency. As you
move the slider, the preview of the layer’s transparency changes on the Canvas. You can press in the
numeric window to type in a transparency value.
X and Y Position Windows
These windows display the numeric X and Y values
for each layer. You can press in the numeric windows to type in a new X or Y value. Also, when the
layer is active, you can click above or below the X
or Y labels to move the image one pixel at a time for
incremental adjustments.
Revision A
4-91
Paint Environment
Revision A
4-91
Paint Environment
CHYRON Corporation
CHYRON Corporation
Lock Button
Press to turn it on (it becomes highlighted) to lock
the layer in its current position in order to prevent
accidental movement. Press again to unlock it. Note
that when Lock is on, you can still change the layer's
position using the layer’s X and Y windows.
2D/3D Button
This button is labeled “2D” by default. (When the
layer is in 3D Paste mode, described below, the button is labeled “3D”).
2D Paste Popup
Figure 4-35. Paste Normal Popup
Press on the 2D Button to display the 2D Paste
Popup for that individual layer. The 2D Paste Popup
increases your control of XY positioning by making
the Adjust tools available, as well as the keys in the
numeric keypad on the keyboard for incremental
Paint Environment
4-92
Revision A
Paint Environment
4-92
Revision A
Liberty Artist’s Manual
Liberty Artist’s Manual
adjustments. Also available are the Center and Inplace Buttons. Press the OK Button to exit the 2D
Paste Popup.
NOTE
The X, Y settings in the 2D popup
refer to the center of the image, not
the lower left corner.
3D Paste Popup (Paste Distort)
Figure 4-36. The 3D Paste Popup
To go into 3D mode from the 2D Popup, press on
either end of the Paste Modes Button in the 2D Paste
Popup. The 2D Paste Popup is replaced by the Paste
Distort Popup. You can now use all of the distort
and warp tools on the popup, and the result is
updated in the Canvas overlay of the individual
layer.
Press the OK Button to exit the Paste Distort Popup.
When you exit Paste Distort in this way, the layer
remains in 3D mode (the 2D Button now is labeled
“3D”) and the layer is displayed on the Canvas in its
Revision A
4-93
Paint Environment
Revision A
4-93
Paint Environment
CHYRON Corporation
CHYRON Corporation
“distorted” form and can be dragged around in X
and Y (when re-positioning a 3D layer, its wireframe appears momentarily). You can display the
Paste Distort Popup at any time by pressing on the
3D Button.
To return from the Paste Distort Popup to the 2D
Paste Popup, do not press the OK Button, but rather
press the Paste Modes toggle button, and the 2D
Paste Popup reappears.
A Note on Hardware Platforms
There is no limit to how many layers can be 3D. On
newer hardware platforms with texture mapping,
previews of the 3D layers are performed in highly
interactive real-time. If there are too many 3D layers
to fit in texture memory, or if the user is running on
an older system, 3D layers will be displayed in software. In this case, the preview will not refresh while
the layer's position and/or 3D attributes are being
changed. In this case the preview will refresh as
soon as the user releases the pen/mouse.
Using Paint, Image Tools, and
Mask Tools with Layers
You can paint and apply Image Tools to individual
layers (when the layer is in 2D Mode only). Also,
you can use individual layers as source images for a
number of Mask Tools (such as Channel Luminance).
Painting to Layers
At the top of the Paint Panel is a bar where you can
chose different Paint Modes - On Canvas for normal
painting on the Canvas, On Temp for painting to the
current layer, and On Mask for painting into masks.
Paint Environment
4-94
Revision A
Paint Environment
4-94
Revision A
Liberty Artist’s Manual
Liberty Artist’s Manual
When Paint On Temp Mode is active, all paint functions apply to the current Temp layer, and only
works if the current Temp is an active layer (that is,
if it is displayed as a layer on the Canvas). Paint
functions that need the current Temp as a source
image, such as Reveal Paint, are disabled.
When Paint is off, pressing on a layer on the Canvas
makes that layer the current layer. This is a quick
way to select a layer for Painting or for applying
Image Tools.
Applying Image Tools to Layers
The Image Tools Panels have a Canvas/Temp Mode
bar on the top, similar to the Paint Panel. In Canvas
Mode, the Image Tools apply to the Canvas. In
Temp Mode, they apply to the current Temp (the
Temp must be an active layer). Thus, you can apply
Image Tools and their previews to various individual layers on the Canvas by selecting a layer as the
current layer, then applying the function as desired.
Note that several Image Tools are not implemented
for Temp Mode. This is generally because such tools
require both the current Temp and the Canvas. The
following Image Tools are not implemented in
Temp Mode: Reveal, both Morph functions, Motion
Tracking, Dither, and Chroma Keying. These buttons are grayed out when Temp Mode is active.
Layers as Source for Mask Tools
The Mask Panel also has a Canvas/Temp Mode bar
at the top. Mask Tools that in Canvas Mode use the
Canvas as their source (such as Alpha, Channel, Fill,
and Match) use the current Temp as their source
when Temp Mode is active. For example, if you toggle to Temp Mode, you can use Channels/Luminance Mask to generate a mask from the luminance
of the current Temp.
Revision A
4-95
Paint Environment
Revision A
4-95
Paint Environment
CHYRON Corporation
CHYRON Corporation
When the current Temp is not enabled as a layer, the
mask is generated from the in-place position of the
current Temp. When the current Temp is an active
layer, the layer offset is used to generate the mask.
This is true for Alpha, Channel, Match, Diff and
Paste Mask (Fill Mask requires that the layer be
active).
Layers Function Buttons
Composite Button
Press to paste all active layers onto the Canvas, in
their currently previewed form.
Add Button
The Add Button allows you to add the contents of
one Temp over another.
To add one layer over another:
•
1.
Press the Temp to be added. Its border is
highlighted.
•
2.
Press the Add Button.
•
3.
Press the Temp to be added over. The image
in the first Temp is added over the second
Temp.
Swap Button
The Swap Button allows you to exchange the priorities of two layers.
To Swap two layers:
Paint Environment
4-96
Revision A
•
1.
Press the first Temp browse image to be
swapped. Its border is highlighted.
•
2.
Press the Swap Button.
Paint Environment
4-96
Revision A
Liberty Artist’s Manual
Liberty Artist’s Manual
•
3.
Press the second Temp to be swapped. The
images in the two Temps are exchanged.
Copy Button
The Copy Button allows you to copy the contents of
one Temp into another.
To copy one layer into another:
•
1.
Press the Temp to be copied. Its border is
highlighted.
•
2.
Press the Copy Button.
•
3.
Press the Temp to be copied into. The image
in the first Temp is copied into the second
Temp.
Move Button
The Move Button allows you to move the contents
of one Temp into another.
To move one layer into another:
•
1.
Press the Temp to be moved. Its border is
highlighted.
•
2.
Press the Move Button.
•
3.
Press the Temp to be moved into. The image
is moved into the target Temp. The image
already in the target Temp is moved up or
down one level, so that the effect is that the
moved Temp image is inserted into the stack
just below the target Temp. The previewed
layers on the Canvas are updated
appropriately.
All Off Button
Press to turn all layers off. This changes nothing
other than making all layers non-active.
Revision A
4-97
Paint Environment
Revision A
4-97
Paint Environment
CHYRON Corporation
CHYRON Corporation
Reset All Button
Press to reset the attributes of all layers to default
settings. All Temps are set to 100% opacity and their
original XY positions.
Erase Current Temp Button (Erase Curr)
Press to delete the contents of the current Temp
layer only (you are first prompted).
Erase All Button
Press to delete the contents of all layers (you are first
prompted).
Erase Canvas Button
Press to delete the contents of the Canvas (you are
first prompted).
Temp Layers Color Codes
Each Temp browse image has a colored border
denoting what state it’s in: Current, RAM, or Disk.
Three windows display the color codes for these
states and allow you to change the assigned colors.
The “Current” window (default yellow) shows the
border color used to denote the current Temp layer.
The “In RAM” window (default light blue) shows
the border color used to denote which Temps are
stored in RAM (active layers).
The “On Disk” window (default dark blue) shows
the border color used to denote which Temps are
stored on Disk (inactive layers).
Paint Environment
4-98
Revision A
Paint Environment
4-98
Revision A
Liberty Artist’s Manual
Liberty Artist’s Manual
To change the coded colors:
•
1.
Press the window of the color to be changed.
The color palette appears.
•
2.
Choose and modify a palette color.
•
3.
Press the OK Button beneath the palette.
The palette disappears and the color window is
changed to the new color, updating the
appropriate layer borders.
Loading Layers Graphically
The most convenient way to load a number of Temp
Buffers with images from the disk is to graphically
load them from the Full-Screen File Menu.
Revision A
4-99
Paint Environment
Revision A
4-99
Paint Environment
CHYRON Corporation
CHYRON Corporation
To load layers graphically:
•
1.
Press the File Manager Button on the
Transfer Panel. The Full-Screen File Menu
appears.
•
2.
Press the right end of the pink Canvas File
Mode Button to change it to Temp. The
Temp Loader appears across the bottom of the
screen.
•
3.
Press on the browse image you want to load
into a Temp. It becomes highlighted.
•
4.
Press on the Temp browse window you want
to load into. The chosen browse image
appears in the indicated Temp browse window.
•
5.
Repeat for as many pictures as you want.
•
6.
Press Cancel to remove the Full-Screen File
Menu. Pressing OK also loads the last browse
image into the current Temp.
Loading masks graphically works in a similar fashion except that in Step 2 you switch the colored File
Type Button to "Mask".
Paint Environment
4-100
Revision A
Paint Environment
4-100
Revision A
Liberty Artist’s Manual
Figure 4-37. Full-Screen File Manager (w/ Temp Loader)
Revision A
4-101
Paint Environment
Liberty Artist’s Manual
Liberty Artist’s Manual
Saving Layers in the Layers File Format
You can save all layers as part of a single disk file.
When you recall the file, each individual layer is
recalled into its corresponding position in the stack
along with all its attributes in their saved state.
The Layers File Format saves the images in all
active layers as well as their individual layer settings
(including position, alpha, etc.) in one file on disk.
The Canvas is saved in the file as well. Thus you can
save the composition you are working on and come
back to it later without finalizing the settings of the
layers. When the Layers File is recalled, the Canvas
and all layers and settings are restored from the disk.
Also, when layers are recalled from disk the levels
into which they are loaded are turned on even if they
were off prior to the recall. Note that if there are currently fewer RAM Temps than there are layers in the
recalled file, only the layers loading into current
RAM Temps are recalled. (This only happens if
you’ve reduced the number of RAM Temps since
saving the Layers File.)
The Layers Mode Button is a cyan-colored button
in the File Mode Popup. You call up the File Mode
Popup by pressing on the colored File Mode Button
(pink “Canvas” by default) directly above the file
path elevator in the Recall and Save Popups. You
can also toggle through the file modes by pressing
on the left or right edges of the File Mode Button.
There are similar controls in the Full-Screen File
Manager Menu as well.
Once you’ve selected the Layers mode as described
above, using the Save Button saves the Canvas and
any active layers to a Layers File. Using the Recall
File Button while in Layers Mode displays any Layers Files in the directory, while you can browse LayRevision A
4-103
Paint Environment
Revision A
4-103
Paint Environment
CHYRON Corporation
CHYRON Corporation
ers Files in the Full-Screen File Manager Menu.
Pressing on a Layers File in the Recall Popup or
Full-Screen File Manager Menu recalls the Canvas
and layers from the disk.
Save Inactive Layers Button
By default only active layers in RAM are saved in a
Layers File. As an option, you can save the inactive
layers (in addition to those turned on) in a Layers
File. You control this with the Save Inactive Layers
Button in the Save Pop-up (accessed through the
corner button of Save in the Transfer Panel). Press
on this button to turn it on (it becomes highlighted).
As long as it is on, inactive layers will be saved
when you save a Layers File.
Canvas Buffer
Figure 4-38. The Canvas Buffer
The Canvas Buffer is the bottom buffer in the Buffers Panel. It allows quick panning on the Canvas
image, if the Canvas is magnified. The Canvas
Buffer displays a thumbnail of the full Canvas with
a wireframe box representing the magnified area in
relation to the whole picture. The wireframe rectangle follows the position of the magnified screen in
Paint Environment
4-104
Revision A
Paint Environment
4-104
Revision A
Liberty Artist’s Manual
Liberty Artist’s Manual
real time. When the Canvas is magnified (see page
4-64, press in the wireframe and drag it to pan the
image in the Canvas.
The Canvas Buffer has its own blue Undo (U) and
Redo (R) Buttons.
Mag Window
The Mag Button next to the Canvas Button displays
the current level of magnification of the Canvas (1 =
no magnification, 2 = two times magnification, etc.).
X and Y Windows
The X and Y windows display the x,y location of the
lower left corner of the magnified wireframe. You
can re-position the wireframe (pan the Canvas) by
pressing in one of the X, Y Windows and entering a
new number. The wireframe (and magnified Canvas
display) jumps to the new position.
Alpha (A) Slider
This is the same alpha slider that appears in the color
palette. It is used to set the opacity (alpha) of many
of Liberty’s imaging functions, such as Painting.
Revision A
4-105
Paint Environment
Revision A
4-105
Paint Environment
CHYRON Corporation
CHYRON Corporation
4.9
TRANSFER PANEL
Figure 4-39. Transfer Panel
The Transfer Panel is where you do all saving and
recalling of files, as well as cutting and pasting. It
gets its name from the fact that its functions all
transfer a picture or part of a picture from one place
to another. The Transfer Panel usually appears in
the leftmost panel position at startup. It's a good
idea to leave it in that position, though you can put it
in any of the four panel positions. It's easier to use if
it's always in the same, familiar place.
Disk Recall and Save - A Quick Look
The Save File and Recall File Buttons are treated in
detail on page 4-158.
For simple save or recall of Canvas pictures:
Paint Environment
4-106
Revision A
Paint Environment
•
Press either the Save File or Recall File Button. The File Popup appears.
•
Type the filename you want to save or recall,
then press the Enter key. Or, instead of typing the filename you can press directly on the
filename in the file list displayed in the File
Popup. If you are saving, the contents of the
Canvas picture is saved on disk under the file
4-106
Revision A
Liberty Artist’s Manual
Liberty Artist’s Manual
name you type. If recalling, the file whose name
you type is recalled onto the Canvas, after erasing the previous picture. Afterwards, the File
Popup automatically disappears.
Cut & Paste Functions
For all cutting and pasting Liberty uses the currently
selected Temp Buffer in the Buffers Panel and Cut
and Paste functions in the Transfer Panel. The Cut
Button cuts the whole Canvas (the default) or the
masked area of the Canvas (when a mask is active)
and puts it in the Temp Buffer. The various Paste
Modes paste the contents of the Temp Buffer into
the Canvas.
4.9.1
Cut Button
Press the Cut Button with no mask active on the
Canvas and the entire Canvas picture is cut into the
Temp Buffer. The previous contents of the Temp
Buffer is erased and the new element appears in the
selected Temp Buffer in the Buffers Panel. If the
Palette panel is displayed rather than the Buffers
Panel, the cut is still accomplished. If a mask is
active on the Canvas, then only the masked area is
cut into the Temp Buffer.
Using Prefix Modes
Use the Add Prefix Button with Cut to add the Canvas picture to the picture in the Temp Buffer. The
cut element appears on top of the contents of the
Temp Buffer, which is not erased.
Use the Under Prefix and Add Prefix Buttons with
Cut to cut under the Temp Buffer. The cut element
appears under the contents of the Temp Buffer,
which is not erased.
Revision A
4-107
Paint Environment
Revision A
4-107
Paint Environment
CHYRON Corporation
CHYRON Corporation
4.9.2
Move Button
The Move Button performs just like the Cut Button,
except that the Canvas or the masked area of the
Canvas is erased, cut into the Temp Buffer, and
given to you at the end of your pen for manual positioning and pasting back onto the Canvas in a new
place.
To Move an element on the Canvas:
•
Mask the element on the Canvas. See the section on masking, page 4-363.
•
Press the Move Button. The masked element is
erased from its original position, cut to the Temp
Buffer, and its preview appears at the end of your
pen (or mouse) for positioning on the Canvas.
The type of preview displayed (wireframe,
coarse, final, final + alpha, etc.) is determined by
the current setting in the Paste Popup.
•
Press down to paste the element into its new
position on the Canvas.
Move with the Repeat Prefix
Stays in Paste Mode so you can repeatedly paste the
image until you press Move again to turn it off.
Move with the Add Prefix
When the image is cut from the canvas, it is added
on top of the contents of the Temp Buffer. Then you
can manually position and paste the composited
contents of the Temp Buffer into the Canvas.
Paint Environment
4-108
Revision A
Paint Environment
4-108
Revision A
Liberty Artist’s Manual
Liberty Artist’s Manual
Move with the Add and Copy Prefixes
Same as Move with Add but without manual positioning. Erases the masked area, adds it on top of
the Temp Buffer, then pastes the composited contents of the Temp Buffer onto the Canvas with all
elements in their original positions. This has the
effect of pasting the masked element back down into
its original position with the contents of the Temp
Buffer under it.
4.9.3
Paste Button
Paste takes the contents of the selected Temp Buffer
and pastes it onto the Canvas. This function is the
counterpart to Cut.
Figure 4-40. Paste Modes
Liberty has six paste modes. These are:
Revision A
4-109
Paint Environment
Revision A
•
Normal
•
Color
•
Shadow
•
Extrude
4-109
Paint Environment
CHYRON Corporation
CHYRON Corporation
•
Emboss
•
Distort (3D Perspective)
The small window inside the Paste Button shows the
current paste mode. Pressing on the sides of the window cycles through the paste modes (see “Paste
Modes Popup” on page 4-112). Pressing directly on
the center of the mode name brings up a list of all
the paste modes. Press on one of the mode buttons to
choose that mode.
To paste an element into the Canvas:
•
Press the Paste Button. (There must be an
image in the selected Temp Buffer.)
•
Move the cursor onto the Canvas. A preview
of the image to be pasted appears on the Canvas.
You control its position by moving the pen (or
mouse). The preview of the element to be pasted
depends on the current preview setting in the
Paste Popup.
•
Press down when the previewed image is
where you want it. The image is pasted permanently into the Canvas at full resolution using the
current paste mode (Normal, Shadow, Emboss,
etc.).
The setting of the Transparency Slider in the Palette
Panel determines the transparency of the pasted element.
In the Mask Tools Panel, Paste Mask pastes the
alpha of the contents of the Temp Buffer into the
Mask.
Paint Environment
4-110
Revision A
Paint Environment
4-110
Revision A
Liberty Artist’s Manual
Liberty Artist’s Manual
Paste Popups
There are two ways to use the Paste functions. One
is just to press in the main part of the Paste Button
and paste the image manually into the Canvas, as
described above. The paste will be performed using
the current settings of the Paste Popup, though the
Paste Popup is not displayed in manual mode. The
second way is to press in the corner popup button of
Paste, which brings up the Paste Popup which
allows you to adjust settings for pasting the image
into the Canvas. Using the Paste Popup, the paste is
performed by pressing the OK Button when the
image is in the desired position, which can be far
more precise than manual positioning. The mode
displayed in the Paste window (Normal, Shadow,
etc.) determines what popup appears.
Paste with Prefix Buttons
Use the Under Prefix Button with Paste to paste the
image under the picture on the Canvas, showing
through where the Canvas picture is transparent.
Press the Repeat Prefix Button, then the Paste Button to paste the image repeatedly until pressing the
Paste Button again to turn it off.
Press the Copy Prefix Button, then the Paste Button
to paste the image exactly in its original position (as
it is in the Temp Buffer).
Press the Copy and the Repeat Prefix Buttons, then
the Paste Button to paste the image in its last-pasted
position.
Revision A
4-111
Paint Environment
Revision A
4-111
Paint Environment
CHYRON Corporation
CHYRON Corporation
4.9.4
Paste Modes Popup
Each Paste Mode has its own Popup Menu with
extensive tools for controlling the settings of that
mode.
To call up the popup for a paste mode, press the corner button of the Paste Button with the desired paste
mode displayed in the mode window.
Paste Mode Selection
Once the Paste Popup is on the screen, the bottom
right corner of the popup will identify the Paste
Mode selected (Normal, Color, Shadow, Extrude,
Emboss, or Distort.)
To change the Paste Mode, press on the arrows on
either side of the Paste Mode name to cycle through
the six modes, stopping at the desired mode.
4.9.5
Paste Normal Mode
Paste Normal is the only paste mode with no effects.
It pastes the contents of the Transfer Panel into the
Canvas without altering them (although you can
vary the transparency of the pasted image depending
on the setting of the Transparency Slider Scale in the
Palette Panel).
To access the Paste Normal Popup, press the corner
button of the Paste Button, when “Normal” is displayed in the mode window of the Paste Button.
The Paste Normal Popup appears, and a preview of
the pasted image appears on the Canvas.
Paint Environment
4-112
Revision A
Paint Environment
4-112
Revision A
Liberty Artist’s Manual
Liberty Artist’s Manual
Paste Normal Popup
Figure 4-41. Paste Normal Popup
The Paste Normal Popup contains commands for
precise placement of the pasted image. These standard placement functions appear on the popups for
all the other paste modes.
The Preview Button
This button changes preview modes for the pasted
image on the Canvas. Press on the Mode window to
cycle through the preview modes. These are (from
fastest to slowest):
Revision A
4-113
Paint Environment
Revision A
•
Wireframe
•
Coarse
•
Final - full resolution, transparency displays
as opaque black
4-113
Paint Environment
CHYRON Corporation
CHYRON Corporation
•
Final plus alpha - full resolution and full
transparency
The preview modes are the same for all the paste
modes, except Paste Distort, which also has five filters designed for perspective rendering. Note that on
the newer SGI systems, Final+Alpha preview is very
fast. On such systems, the Coarse and Final previews are not required.
Positioning
To manually position an object on the Canvas, press
down on the preview of the object and drag it, positioning the object as desired. You can repeat this
operation as often as you want. You can constrain
the direction of movement horizontally or vertically
by turning off (and on) the X and Y modes under the
Pen Position Button. You can constrain the direction of movement to any angle by turning off both
the X and Y modes and turning on the Direction
Button (the little “clock” at the right of the Brush
Display).
The Center Button
Press the Center Button to center the image on the
Canvas.
The Inplace Button
Press the Inplace Button to position the image at its
original position (as it is in the Temp Buffer).
The Adjust Button
Use the Adjust Button for precise, pixel-by-pixel
positioning.
Paint Environment
4-114
Revision A
Paint Environment
4-114
Revision A
Liberty Artist’s Manual
Liberty Artist’s Manual
Press the Plus or Minus Adjust Buttons to move the
object by the number of pixels shown in the window
of the Adjust Button, along whatever axis is turned
on, X or Y, or both (diagonal). Press the Plus (+)
Button to move in a positive direction. Press the
Minus (-) Button to move in a negative direction.
Each time you press, the object moves incrementally
the number of pixels in the Adjust window. You can
tap repeatedly on the Plus or Minus Buttons, or hold
them down for continuous movement. To change
the number of pixels moved, press in the window of
the Adjust Button and type in a new number.
The OK, Erase, and Cancel Buttons
Perform the final paste by pressing the OK Button.
Press the Erase Button to perform the final paste
after erasing the Canvas. Press the Cancel Button to
remove the popup without performing the paste.
The Paste Elevator
The current settings of the popup are saved in the
current Paste Elevator level. When you press on
another elevator level, the settings in the popup
change to those saved in the new level. You can
save six different paste set-ups in the elevator, giving each of the set-ups a name with the Name Button, if you want to. Press in the Name Button and
type in a name; then that name will be displayed
whenever you press on that elevator level.
4.9.6
Paste Color Mode
Use Paste Color Mode to paste a blurred copy of the
object or to paste a silhouette of the object in a single color.
Revision A
4-115
Paint Environment
Revision A
4-115
Paint Environment
CHYRON Corporation
CHYRON Corporation
Paste Color Popup
Figure 4-42. Paste Color Popup
The Paste Color Popup is the same as the Paste Normal Popup with the addition of the Blur functions
and a mode button for choosing the source of the
color in the pasted image. The source for the color of
the pasted image can be one of three modes: (1) Palette (the current color box), (2) Image (the object
itself), or (3) Light (the image on the Canvas plus
the setting of the Light Slider).
The Paste Color Blur Functions
The Blur Sliders work the same as the Blur Popup in
the Image Tools Panel Menu, see page 4-324. They
range from 0 to 15, where anything less than 1 is no
blur and 15 is maximum blur. When Blur is greater
than 0, the object “grows” by the number used.
Paint Environment
4-116
Revision A
Paint Environment
4-116
Revision A
Liberty Artist’s Manual
Liberty Artist’s Manual
Source Color for the Paste
At the top of the Blur Sliders is a Color Source Button controlling the source of the color for the paste.
Pressing this button cycles among three modes: Palette, Image, and Light.
In Palette Mode, the object is pasted in the current
color.
In Image Mode, the object is pasted using the original colors of the original image, but blurred according to the Blur Sliders.
In Light Mode, the object is pasted as a lighter or
darker silhouette over the Canvas. However, there
must be some picture information on the Canvas for
this mode to brighten or darken. (If the Canvas is
empty, this mode will do nothing and you should use
Palette Mode.) When you have chosen Light Mode,
a slider scale is displayed, the Light Slider. As in
other paste modes, use the Light Slider to set the
brightness or darkness of the pasted image. The
slider has a range from -100 to 200. Anything below
zero darkens the Canvas; anything above zero
brightens.
The OK, Erase, and Cancel Buttons
Perform the final paste by pressing the OK Button.
Press the Erase Button to perform the final paste
after erasing the Canvas. Press the Cancel Button to
remove the popup without performing the paste.
The Paste Color Elevator
You can save settings of the popup in the six levels
of the elevator, giving each level a name with the
Name Button.
Revision A
4-117
Paint Environment
Revision A
4-117
Paint Environment
CHYRON Corporation
CHYRON Corporation
4.9.7
Paste Shadow Mode
Paste Shadow Mode works like Paste Normal but
also creates and pastes an automatic drop shadow
for the pasted contents of the Temp Buffer.
Paste Shadow Popup
The Paste Shadow commands are similar to Paste
Color commands with the addition of controls for
transparency and the shadow angle and offset.
In Paste Shadow, moving the pen on the canvas controls either the image position or the position of the
shadow, based on whether the “Pen Position,” “Offset”, and “Angle of Shadow” buttons are highlighted
(on). If all buttons are highlighted, the pen moves
the image and shadow together. If the offset and
angle buttons are highlighted, moving the pen only
controls the shadow position. If just the Angle button is on, moving the pen only changes the shadow
angle, and so on.
The Pen Position Buttons work the same as in all
other paste modes, controlling the position of the
original image to be pasted.
The Adjust functions allow fine positioning for the
original image to be pasted, as in other paste modes.
The Blur Sliders work the same as Paste Color and
control the blur of the drop shadow.
The Transparency Slider on the Paste Shadow
Popup controls the transparency of the drop shadow
(not the image itself).
Paint Environment
4-118
Revision A
Paint Environment
4-118
Revision A
Liberty Artist’s Manual
Liberty Artist’s Manual
Figure 4-43. Paste Shadow Popup
Shadow Angle Button
The clock-like button is the Shadow Angle Button
and controls the angle of the shadow. The preview
of the drop shadow is always a wireframe box,
regardless of what preview mode is active for the
image to be pasted.
To move the angle manually, ensure that the “Angle
of Shadow” button is highlighted, then press on the
canvas near the shadow wireframe box and drag it.
The Angle Button changes to reflect the changes
you’re making manually on-screen. The offset distance of the shadow from the original image also
changes when you drag the shadow wireframe box,
if the “Offset” button is highlighted.
Revision A
4-119
Paint Environment
Revision A
4-119
Paint Environment
CHYRON Corporation
CHYRON Corporation
You can also press on the Angle Button and drag the
dot around the outside of the “clock.” The angle of
the wireframe box on the Canvas is updated to
reflect the changes you’re making on the Angle Button. The distance does not change. The window at
the bottom of the Angle Button shows the angle in
degrees. You can change this value by pressing
directly on the window and typing in a new number,
followed by the Enter key.
The window at the top right of the Angle Button
shows the offset distance in pixels. You can change
this value by pressing directly on the offset window
and typing in a new number, followed by the Enter
key.
Source Color for the Drop Shadow
At the top of the Angle Button is a Color Source
Button controlling the source of the color for the
drop shadow. The label of this button cycles among
three modes: Palette, Image, and Light.
In Palette Mode, the drop shadow is pasted in the
current color. Normally you would choose black in
the Color Palette.
In Image Mode, the drop “shadow” is pasted using
the original colors of the original image to be shadowed, but blurred according to the Blur Sliders.
This is useful if you want an effect that resembles a
blurred reflection of the object, rather than a
shadow.
In Light Mode, the shadow is pasted as a lighter or
darker silhouette over the Canvas. However, there
must be some picture information on the Canvas for
this mode to lighten or darken. If the Canvas is
Paint Environment
4-120
Revision A
Paint Environment
4-120
Revision A
Liberty Artist’s Manual
Liberty Artist’s Manual
empty, this mode will do nothing, and you should
use Palette Mode. As in Paste Color, use the Light
Slider to set the lightness or darkness of the shadow.
OK, Erase, and Cancel Buttons
Perform the final paste by pressing the OK Button.
Press the Erase Button to perform the final paste
after erasing the Canvas. Press the Cancel Button to
remove the popup without performing the paste.
Paste Shadow Elevator
You can save settings of the popup in the elevator,
giving each setting a name with the Name Button.
4.9.8
Paste Extrude Mode
Paste Extrude creates a “3D” extrusion of the image
to be pasted. Essentially, this looks like a solid 3D
edge of variable thickness and color gradated over
the depth of the extrusion.
Paste Extrude Popup
The commands on the Paste Extrude popup (Figure
4-44) are the same as for Paste Shadow, but more
control is given for defining a range of colors, blur
factors, and alpha values across the entire extrusion.
The Pen Position Buttons work the same as in all
other paste modes, controlling the position of the
original image to be pasted.
The Adjust functions allow fine positioning for the
main image to be pasted, as in the other paste
modes. The Center and Inplace Buttons also work
the same as in the other paste modes.
Revision A
4-121
Paint Environment
Revision A
4-121
Paint Environment
CHYRON Corporation
CHYRON Corporation
Above the Center and Inplace Position Buttons is a
Color Source Button for the original image to be
pasted (labeled “Paste”). Its three modes are Image,
Clear and Light.
In Image Mode, the original image is first pasted,
prior to being extruded. In Clear Mode, the original
image is pasted transparently so that only the
extruded edge appears. In Light Mode, the original
image is pasted as a lighter or darker silhouette on
top of the extrusion. As in Paste Color, use the Light
Slider to set the lightness or darkness of the silhouette of the original image.
The Blur Sliders work the same as in other paste
modes, but have Near and Far settings, allowing you
to set one blur factor for the part of the extrusion
nearest the object and a different blur factor for the
part of the extrusion farthest from the object.
The Alpha slider also has Near and Far settings so
you can vary the transparency of the extrusion
between its near and far edges.
Depending on which number windows are turned
on, the Adjust Button affects X and Y position, X
and Y blur (Near and Far), alpha % (Near and Far),
Extrusion Angle, and Extrusion Length.
Also, depending on which windows are turned on,
pen position can affect image position, extrusion,
angle offset, or all three.
Paint Environment
4-122
Revision A
Paint Environment
4-122
Revision A
Liberty Artist’s Manual
Liberty Artist’s Manual
Figure 4-44. Paste Extrude Popup
Extrusion Angle Button
The clock-like button is the Extrusion Angle Button
(similar to the Shadow Angle Button) and controls
the angle of the extrusion relative to the original
object to be pasted. The preview of the extrusion is
always a wireframe box, regardless of what preview
mode is on for the main part of the image to be
pasted.
To adjust the extrusion angle manually, ensure that
the Angle button is on (highlighted), then press on
the canvas near the extrusion wireframe box, and
drag it. The Angle Button changes to reflect the
changes you’re making manually on-screen. If the
Length button is also on (highlighted), the length of
the extrusion changes as well.
You can also press on the Angle Button and drag the
dot around the outside of the “clock.” The angle of
the wireframe box on the Canvas is updated to
reflect the changes you’re making on the Angle Button.
Revision A
4-123
Paint Environment
Revision A
4-123
Paint Environment
CHYRON Corporation
CHYRON Corporation
The window at the bottom of the Angle Button
shows the angle in degrees. The window at the top
right of the Angle Button shows the length of the
extrusion in pixels. You can change either of these
values by pressing directly on the window and typing in a new number, followed by the Enter key.
Source Color for the Extrusion
At the top of the Blur Sliders is a Color Source Button controlling the source of the color(s) for the
extrusion. Press this button to cycle between two
modes: Palette and Image.
In Palette Mode, the extrusion is created in the current color, or, if Multiple Colors are on in the Palette, it is extruded along a gradation of the chosen
colors. Palette is the most common mode.
In Image Mode, the extrusion is made using the
original image, so that the extruded edge looks like
it has “grown” out of the image itself.
Extrude Preview
Above the Color Source Button is an Extrude Preview box that displays the colors and length of the
extrusion. When the source color is in “Palette”
mode, the horizontal width of the box is determined
by the current length of the extrusion. If you make
changes in the Palette colors to be used in the extrusion, press on the Extrude Preview Box to update its
display of the new colors.
OK, Erase, and Cancel Buttons
Perform the final paste by pressing the OK Button.
Press the Erase Button to perform the final paste
after erasing the Canvas. Press the Cancel Button to
remove the popup without performing the paste.
Paint Environment
4-124
Revision A
Paint Environment
4-124
Revision A
Liberty Artist’s Manual
Liberty Artist’s Manual
Paste Extrude Elevator
You can save settings of the popup in the elevator,
giving each setting a name with the Name Button.
4.9.9
Paste Emboss Mode
Paste Emboss is used to automatically emboss the
pasted image.
Figure 4-45. Paste Emboss Popup
Revision A
4-125
Paint Environment
Revision A
4-125
Paint Environment
CHYRON Corporation
CHYRON Corporation
Paste Emboss Popup
The Paste Emboss tools (Figure 4-45) are similar to
the other paste modes, with additional controls for
determining the colors and sizes of two opposite
directional edges.
Emboss Angle Button
The clock-like button is the Emboss Angle Button
(similar to the Extrusion Angle Button) which controls the angle of the embossed edges. The red dot is
the active angle (the one displayed in the Angle window below) and the blue dot is always 180 degrees
away from it. The function buttons (alpha, color
source & length, etc.) at the left of the Angle Button
are linked to the red dot; the ones at the right are
linked to the blue dot. To set the emboss angle, press
the pen down on the Angle Button and drag the dot
around the outside of the “clock.” The embossed
image has no preview, since the emboss distance is
too small to preview. The Angle Window at the bottom of the Angle Button shows the emboss angle in
degrees. The Length Windows at either side of the
Angle Window display the length of the two emboss
edges, in pixels. You can change any one of these
numeric values by pressing directly on its window
and typing in a new number, followed by the Enter
key. You can set the Direction Button (below the
Emboss Angle Button) to “Out” for an outward
embossed edge, or “In” for an inward embossed
edge. “In” is useful if you want to emboss something, yet retain its original shape. “Out” grows the
edges outward so that the original image is not
affected.
Use the dual controls for alpha and color source, as
well as length, to define independently the two
opposite embossed edges. As mentioned above, the
left buttons are linked to the red dot on the “clock;”
the right buttons are linked to the blue dot.
Paint Environment
4-126
Revision A
Paint Environment
4-126
Revision A
Liberty Artist’s Manual
Liberty Artist’s Manual
Source Colors for the Emboss
At the top of the Angle Button are two Color Source
Buttons controlling the source(s) of the color for the
emboss. These buttons cycle among the same three
labels as most of the other paste modes: Palette,
Image, and Light.
In Palette Mode, the embossed edge is created using
colors from the Palette. If both Color Source Buttons are set to Palette, the maximum number of colors that can be used is four. If both Color Source
buttons are set to Palette and two colors are used, the
first chosen color in the Palette goes to the edge represented by the red dot on the Angle Button, the second color goes to the edge represented by the blue
dot. Each edge is one color. If three colors are chosen on the Palette, the edge represented by the red
dot is gradated from the first color chosen on the
Palette to the middle color, and the edge represented
by the blue dot is gradated from the middle color to
the last color chosen on the Palette. If both Color
Source Buttons are set to Palette and four colors are
chosen on the Palette, the edge represented by the
red dot is gradated from the first to the second color,
and the edge represented by the blue dot is gradated
from the third color to the fourth color.
Note that when selecting source colors for the
Emboss, there can be more than four colors selected
in the color palette. In this case, the first two colors
selected in the color palette apply to the edge represented by the Red dot, and the last two colors
selected in the color palette apply to the edge represented by the Blue dot.
In Image Mode each embossed edge uses the original colors of the original image, similar to Paste
Extrude.
Revision A
4-127
Paint Environment
Revision A
4-127
Paint Environment
CHYRON Corporation
CHYRON Corporation
In Light Mode, the embossed edge is pasted as a
lighter or darker silhouette over the Canvas. However, there must be some picture information on the
Canvas for this mode to lighten or darken. If the
Canvas is empty, this mode will do nothing and you
should use Palette Mode. As in Paste Color, use the
Light Slider to set the lightness or darkness of the
shadow.
Since each of the two embossed edges has its own
independent controls, you can mix and match these
Color Source Modes for a wide variety of effects.
The buttons controlling the pasting of the original
image are the same as in Paste Extrude. The Pen
Position Buttons work the same as in all other paste
modes, controlling only the position of the original
image to be pasted.
The Adjust functions allow fine positioning for the
main image to be pasted, as in the other paste
modes. The Center and Inplace Buttons also work
in the same manner as the other paste modes.
Above the Center and Inplace Position Buttons is a
Color Source Button for the original image to be
pasted (labeled “Paste”). Its three modes are Image,
Clear and Light.
In Image Mode, the original image is pasted in the
current color.
In Clear Mode, the original image is pasted transparently so that only the embossed edges appear. This
is useful for “blind” embossing.
In Light Mode, the original image is pasted as a
lighter or darker silhouette on top of the extrusion.
Paint Environment
4-128
Revision A
Paint Environment
4-128
Revision A
Liberty Artist’s Manual
Liberty Artist’s Manual
OK, Erase, and Cancel Buttons
Perform the final paste by pressing the OK Button.
Press the Erase Button to perform the final paste
after erasing the Canvas. Press the Cancel Button to
remove the popup without performing the paste.
Paste Emboss Elevator
You can save settings of the popup in the elevator,
giving each of the settings a name with the Name
Button.
4.9.10
Paste Distort Mode
You perform all sizing and perspective transformations in Paste Distort, as well as slanting, mirroring,
and corner warping. Paste Distort supports subpixel positioning.
Paste Distort Popup
Figure 4-46. Paste Distort Popup
Revision A
4-129
Paint Environment
Revision A
4-129
Paint Environment
CHYRON Corporation
CHYRON Corporation
The Distort Popup has the same look and feel as the
other paste modes. The only difference is that it has
tools for manipulating the image in a three-dimensional world. In addition to the standard paste functions, the Paste Distort Popup has tools for rotation
in X, Y, and Z; scaling in X and Y; mirroring in X
and Y; and slanting in X and Y.
Sub-pixel Positioning
Paste Distort allows extra-precise positioning of elements being distorted and pasted. An image being
pasted does not have to be deposited pixel-for-pixel
on the image below it, but with a slight offset or
overlap of the edges of the pixels it’s being pasted
on. Certain filter options (Adaptive) allow user-definition of how fine a “grid” to use to position the element. You can also use this feature, if you have
Liberty’s Animation Option, for very slow-moving
elements.
NOTE
For sub-pixel positioning to occur,
the keyframe must have either a nonzero rotation, slant or three-position
set, or scale value(s) other than one
set (if only positional movement is
desired, set the X and Y scale to 0.99
to invoke sub-pixel positioning). In
addition, use either the bilinear or
adaptive filter to achieve subpixel
positioning. See “About Filters” on
page 4-137 for more information.
Perspective Transform and Warp Corners
The Distort Paste Popup has two distinct modes that
you interact with differently. Perspective Transform
allows you to set up a full three-dimensional world
in which to manipulate images. Warp Corners
allows you to perform arbitrary perspective mapping
Paint Environment
4-130
Revision A
Paint Environment
4-130
Revision A
Liberty Artist’s Manual
Liberty Artist’s Manual
between the original image and a user-definable
quadrilateral. In the middle of the left panel of the
Distort Popup is a button labeled either Transform
or Warp Corners. Press this button to toggle back
and forth between the two modes. The wireframe
preview on the Canvas displays an XYZ axis when
Perspective Transform is active and displays a cross
when Warp Corners mode is active.
Perspective Transform
Perspective Transform displays a panel in the middle of the Distort Popup. This panel has five main
modes - five different ways to manipulate the image
to be pasted. These modes are Position, Rotation,
Slant, Mirror and Scale. Each mode displays coordinate “handles” to press and drag the wireframe.
Dragging each handle manipulates the image in a
particular way. For instance, when Scale Mode is
highlighted in the Distort Popup, dragging on a handle causes scaling. When Rotation Mode is highlighted in the Distort Popup, dragging on a handle
causes rotation.
Position Button
You can always re-position the image or axis,
regardless of what other mode is active. To move
the image manually, press on its axis (the XYZ icon)
and drag it in the desired direction. If another mode
(such as rotation) is active, it becomes temporarily
disabled until you are finished dragging the image.
Press the Position button to enter Position mode.
Dragging the on-screen handles on the wireframe
causes it to move in X or Y. Dragging the axis
moves the wireframe in any direction.
Revision A
4-131
Paint Environment
Revision A
4-131
Paint Environment
CHYRON Corporation
CHYRON Corporation
The Position X and Y windows display the current
coordinates of the image to be pasted. When the
toggle button above the y window displays the label
“Image,” the coordinates indicate the center of the
image to be pasted. When that button displays the
label “Axis,” the coordinates indicate the XY position of the rotational axis of the image. It is possible to separate the axis from the image center using
the Lock button (see below).
Axis Lock Button (Global and Local)
Above the Z window is a Lock Button, which, when
turned on, locks the axis to the image. This is Global Mode, because the locked axis and image move
around together inside a “world” defined by the
Canvas. When the Lock Button is turned off, the
axis is free of the image and can be moved completely away from it. This is Local Mode because
the axis now defines local coordinates that the image
refers to. It is generally better to perform Global
moves first, then Local ones.
Image/Axis Button
Above the Y window is an Image/Axis button.
When the Lock button is off, and the Image Axis
button is in “Image” mode, dragging the on-screen
handles moves the image independent of the axis.
When the Image Axis button is in the “Axis” mode,
dragging the on-screen handles moves the axis independent of the image. When the Lock button is on,
dragging the on-screen handles positions both the
image and the axis together.
Rotation Button
Press on the word “Rotation” to enable Rotation
Mode. Press and drag on the wireframe’s handles to
rotate the image in X, Y, or Z. The image always
Paint Environment
4-132
Revision A
Paint Environment
4-132
Revision A
Liberty Artist’s Manual
Liberty Artist’s Manual
rotates around the axis position (as opposed to the
center of the image). For example, the axis can be
placed at the corner of the image, so that rotation
occurs around that point. Refer to the previous sections for information on how to position the axis.
Slant Button
Press on the word “Slant” to enable Slant Mode.
Press and drag on the wireframe’s handles to slant
the image in X or y.
Scale Button
Press on the word “Scale” to enable Scale Mode.
Press and drag on the wireframe’s handles to scale
the image in X and/or Y. Dragging on a corner handle scales the image in both X and Y. Dragging on a
handle in the center of a side scales the image only
in X or Y.
The scale of the image can be represented as a ratio
(1.0 = 100%) or as a size in pixels. Tap on the small
arrow to the right of the word “Scale” to toggle back
and forth between the two modes.
Scale Lock Button
The Lock Button just above the Mirror Buttons is
the Scale Lock Button. Press it to turn it on or off.
When on, one edge of the image is held stationary
while you drag the opposite edge and scale the
image. If the image has already been rotated, you
may have to unlock global positioning (the Axis
Lock Button) to truly hold an edge in three-dimensional space.
Revision A
4-133
Paint Environment
Revision A
4-133
Paint Environment
CHYRON Corporation
CHYRON Corporation
Mirror Buttons
Press the X Mirror Button or Y Mirror Button to
“reflect” the image across the X or Y axis. The Mirror Buttons are mode buttons; when one or both of
them is “on,” mirroring takes place.
Eye Button
The magenta Eye Button is used to customize the
look of the perspective transformation. This is done
by defining where the center of projection of the
image is located.
Eye Popup
Figure 4-47. Eye Popup
Press the Eye Button to call up the Eye Popup,
which has three buttons: Image, Axis, and Fixed. In
Image Mode the center of projection is centered on
the middle of the image, regardless of where the axis
may be. In Axis Mode, the center of projection is
centered on the axis. In Fixed Mode, you can
choose any point in space to be the center of projection.
Paint Environment
4-134
Revision A
Paint Environment
4-134
Revision A
Liberty Artist’s Manual
Liberty Artist’s Manual
Any center of projection has by default a depth distance from the Canvas equal to the height of the
Canvas. You can adjust this depth in Z in all three
Eye modes to create unique distortions. You can use
a large negative depth (“in front of” the Canvas) to
achieve a parallel projection.
Reset Button
Press the red Reset Button to zero out the current
settings. Reset has a “soft” and a “hard” mode. If a
distort effect (Rotation, Scale, etc.) is active, pressing the Reset Button resets only the active setting of
that effect (soft reset). If no distort effects are
active, pressing Reset resets all the settings in the
Distort Popup, including any changes made to the
Eye settings.
Warp Corners
When the Transform/Warp Button label says Transform, press it to change to Warp Corners mode (the
Transform/Warp Button is above the Center and
Inplace buttons). The current Perspective Transform wireframe is mapped to a Warp Corners wireframe. This allows you to do touch-up work on the
three-dimensional distortion.
NOTE
For Warp Corners to work, the
wireframe must form a convex
polygon. If the wireframe becomes
concave, any active paste preview
stops updating and the wireframe
changes colors. To correct this, move
the corner outward
until
the
wireframe becomes convex.
Revision A
4-135
Paint Environment
Revision A
4-135
Paint Environment
CHYRON Corporation
CHYRON Corporation
Warp Popup
Figure 4-48. Warp Popup
The Warp Corners Popup is much simpler than the
Perspective Transform Popup. Warp generates the
entire three-dimensional world simply by interpreting how you deform the wireframe. Dragging a corner of the wireframe allows you to position one
corner at a time to distort (or warp) the wireframe.
Dragging on the center cross allows you to move the
entire wireframe.
The Image/Texture Button
This button is your access to Texture Mode which
lets you detach the corner points from the image
being warped. This has application for Motion
Tracking in the Animation Environment (see page
5-207).
Press the Image Button to toggle it to “Texture”
mode. This displays a green wireframe representing
the image. You can then detach the green wireframe,
along with the image, from the (yellow) corner
Paint Environment
4-136
Revision A
Paint Environment
4-136
Revision A
Liberty Artist’s Manual
Liberty Artist’s Manual
points by moving its center point. You can also
adjust its corners to rescale the image relative to the
original (yellow) corner points. During these operations, the image stays in the same perspective as the
corner points.
Distort Filters
Distort Paste has its own rendering filters, three preset and two user-definable. You should experiment
to determine which ones are best for your applications. The Point Filter corresponds roughly to
Coarse filtering; the Bilinear Filter to Medium filtering; and the Adaptive Filter to Fine filtering. Point
Filter is the default filter--- fast but a bit coarse.
About Filters
Two stages are required to properly reconstruct an
image in 3-D perspective. The first stage is an interpolation (or reconstruction) stage, and the second is
an anti-aliasing stage. If you want to understand filters better, the following will give you a quick
explanation of how filters work. This will also help
you understand the User-defined filters.
Interpolation
There are two methods used to interpolate (or reconstruct) the image from two-dimensional space into
the specified three-dimensional space. The two
methods are (1) nearest neighbor, and (2) linear.
Nearest neighbor chooses pixels based on the nearest sample pixel. This maintains sharpness when the
image is enlarged and reduced. However, when you
scale an element up from small to very large this
method produces blocky results.
Revision A
4-137
Paint Environment
Revision A
4-137
Paint Environment
CHYRON Corporation
CHYRON Corporation
Linear interpolation chooses pixels based on the
nearest four neighboring pixels. This offers better
quality than nearest neighbor, with slightly greater
cost in rendering time. However, smoothing is
introduced into the image, meaning that the image
gets a bit soft.
Anti-aliasing
Any interpolation method introduces artifacts,
which must be countered with anti-aliasing techniques. Liberty has two methods: point sampling
and adaptive supersampling.
Point sampling is the simplest and quickest of the
two. It takes the pixels straight from the interpolation stage with no extra calculations. For objects
that are smoothly-varying (that is, continuous-tone,
like a photo image) this may be acceptable. But for
high-contrast images, this may not do the job.
Adaptive supersampling is more complex. It always
produces the highest-quality render. This method
looks at the image and finds all areas where there are
high-contrast changes. When it finds them, it drops
a subpixel grid on the image and approximates the
pixel based on an average.
The point filter is the only filter that doesn’t do subpixel positioning. The adaptive supersampling filter is very sophisticated. Both user-definable filters
are adaptive supersampling filters.
Paint Environment
4-138
Revision A
Paint Environment
4-138
Revision A
Liberty Artist’s Manual
Liberty Artist’s Manual
User-defined Distort Filters
Figure 4-49. User-defined Filter Popup
Press the corner button of the Filter Button to bring
up the Adaptive Filter Popup, which allows you to
define thresholds for the different channels (RGBA)
in the image, as well as the resolution for each subpixel grid to be used. The thresholds use defaults
that take into account the human eye’s sensitivity to
the green color channel, as well as stair-stepping of
the image. Press the Matte Button to display a white
edge trace where the filter finds high-contrast
changes. Press the Level button to specify the number of subpixels to be used in the render. A level of
six means thirty-six subpixels will be used for each
pixel in the original image. More is not necessarily
better here, but more is definitely slower.
The Paste Distort Preview Modes
Paste Distort has three Preview Modes: Wireframe,
Final, and Final Plus Alpha. Paste Distort always
displays a wireframe bounding box, whatever the
preview mode. In Final mode, a full resolution preview of the image is displayed on the bounding box.
In Final + Alpha mode, preview takes alpha (transparency) of the image into account. You manipulate
the wireframe box in real time on the Canvas. Note
Revision A
4-139
Paint Environment
Revision A
4-139
Paint Environment
CHYRON Corporation
CHYRON Corporation
that on the newer SGI systems, Final+Alpha preview is very fast. On such systems, the Coarse and
Final previews are not required.
Keypad Controls for Paste Functions
You can use the keypad at the right of the keyboard
to manipulation the paste functions. The functions
of the keypad keys are dependent on which mode
the menu is in (position, rotation, scale, or slant.)
NOTE
The Num Lock must be off for Keypad
Control to work.
Num
Lock
/
*
7
Home
8
9
Pg Up
4
5
6
1
End
2
3
Pg Dn
Figure 4-50. Numeric Keypad
Table 4-1: Numeric Keypad Keys/Functions
Key
/
Turns off final preview of image
*
Turns on final preview of image
7/Home
é
8/
Paint Environment
4-140
Revision A
Function
Decreases Z position, increases Z rotation, decreases X, Y
scale
Increases Y position, increases X rotation, increases Y slant,
increases Y scale
Paint Environment
4-140
Revision A
Liberty Artist’s Manual
Liberty Artist’s Manual
Table 4-1: Numeric Keypad Keys/Functions
Key
9/page up
ç
4/
5
è
6/
1/END
ê
2/
3/page dn
Function
Increases Z position, decreases Z rotation, increases X, Y
scale
Decreases X position, increases Y rotation, decreases X
slant, decreases X scale
Reset
Increases X position, decreases Y rotation, increases X slant,
increases X scale
In place
Decreases Y position, decreases X rotation, decreases Y
slant, decreases Y scale.
Center
Realtime Paste/Distort Preview on Some Platforms
On platforms that support realtime performance,
previews of Paste Distort/Warp update smoothly
and continuously as the Paste bounding box is
changed (using the Paste Popup, the pen/mouse controls on the Canvas, or keyboard controls). On
slower platforms Final+alpha previews are done in
software, with the previews only being updated
when the controls are released (for example, when
the pen is released from the Canvas controls).
In some cases, even on platforms capable of realtime
performance, in cases of large images or when multiple images are being distorted/warped in Layers,
some previews will be done in software (with the
same interactivity as on slower hardware platforms).
Revision A
4-141
Paint Environment
Revision A
4-141
Paint Environment
CHYRON Corporation
CHYRON Corporation
Paste Mode Button
The Paste Mode Button toggles through the modes
of the current paste operation. The Paste Mode button cycles between Normal, Color, Shadow,
Extrude, Emboss, or Distort.
Figure 4-51. Transfer Panel
4.9.11
Tile Button
This button tiles the Canvas by repeatedly pasting
the contents of the selected Temp Buffer according
to the pattern created by the Tile Set function (the
corner popup of the Tile button). Use the Tile Set
popup to set the horizontal and vertical offsets of the
tile pattern, then press the Tile Button to render a
full-screen tiled pattern.
Tile Set Popup Corner Button
(In the upper right corner of the Tile Button.) This
button sets the horizontal and vertical offset of the
tile pattern. You paste the image three times on the
Canvas - the first time to begin the pattern, the second time to set the horizontal offset, and the third
time to set the vertical offset.
Paint Environment
4-142
Revision A
Paint Environment
4-142
Revision A
Liberty Artist’s Manual
Liberty Artist’s Manual
To create a tiled pattern:
•
1.
Cut the element to be tiled into the Temp
Buffer.
•
2.
Press the Tile Set Popup Button. The
element to be tiled appears on the Canvas
attached to the cursor.
•
3.
Press down once to set the first tile
position. The element is pasted where you
press.
•
4.
Press down a second time to set the
horizontal tile offset. The element is again
pasted where you press.
•
5.
Press down a third time to set the vertical
tile offset. The element is again pasted where
you press.
•
6.
Double-click the Erase All Button to clear
the Canvas.
•
7.
Press the main Tile Button. The tile fills the
Canvas, row by row, according to the offsets
you set.
NOTE
Once the offsets have been set, you
need only press the main part of the
Tile Button to automatically tile the
whole screen with the image, using
those offsets.
Tile Set Corner Button with the Copy Prefix
Sets the tiling positions to a rectangular grid with no
gaps.
Revision A
4-143
Paint Environment
Revision A
4-143
Paint Environment
CHYRON Corporation
CHYRON Corporation
To automatically create a tiled pattern with no
spaces between tiles:
•
Cut the element to be tiled into the Temp
Buffer.
•
Press the Copy Prefix, then the Tile Set Corner Button.
•
Press the main Tile Button. The element is
tiled with no gaps.
For information about creating rectangles for seamless tiles, see Fold Paint on page 4-283.
FTP Button
Liberty’s FTP function allows you to display, navigate, and browse directories on remote systems as
well as recall files from them, using Liberty’s File
Manager tools. Using FTP allows you to access any
remote system on your local network. You can also
access remote FTP sites over the Internet.
Press the FTP Button to display the File Manager in
the currently selected remote directory. The FullScreen File Manager comes up by default, with
Browse Mode on.
During FTP operation, you can use only Recall
functions (not functions such as Copy, Delete, nor
any of the Select functions, such as All, Clear, etc.).
The File Path elevator is also disabled during FTP
operation.
To specify the remote host name, directory, and
other settings, press the corner button of the FTP
Button, which calls up the FTP Popup.
Paint Environment
4-144
Revision A
Paint Environment
4-144
Revision A
Liberty Artist’s Manual
Liberty Artist’s Manual
FTP Popup
Figure 4-52. The FTP Popup
The FTP Popup has windows for entering set-up
information to log on to a remote system.
Node
Enter the node name of the remote system (such as
“infinit”).
Path
Enter the path of the directory on the remote system
you wish to access (such as C/logos/message)
NOTE: For iNFiNiT! and Imagestor! systems, the
path name should be in all upper case characters!
ImageStor! Database Server Node (Optional)
If ImageStor! thumbnails are stored in a directory
other than the ImageStor! files themselves, entering
the host node here will cause Liberty to query the
database to find the thumbnails so they can be
browsed. You don’t need to set this field if ImageStor! files and their thumbnails are always stored in
the same directory, or if the files you wish to
browse/recall are not Imagestor! files.
Revision A
4-145
Paint Environment
Revision A
4-145
Paint Environment
CHYRON Corporation
CHYRON Corporation
User Name
Enter the user name used to log on to the remote system (such as “guest”). This user name must correspond to a user account on the remote system.
Password
Enter the password used to log on to the remote system. This password must correspond to the password for the user account on the remote system.
Temp Directory
Enter a temporary directory on the local hard drive
where temporary files can be stored. Normally this
is set to “usr/tmp,” but you can specify a different
location if space is tight on the “usr” drive. All files
browsed or recalled via FTP pass through this temporary directory, so it needs at least a few megabytes
of free space.
FTP Settings Elevator
Use the six levels of the elevator to save settings for
different remote hosts/directories.
Note on Browse Images
Any ImageStor! files or other browsable file formats
in the remote directory display as thumbnails when
the File Manager is in browse mode. Images with
browse thumbnails embedded in their images are not
displayed, because the entire image would have to
be recalled in order to display the thumbnail, which
would be too slow.
Paint Environment
4-146
Revision A
Paint Environment
4-146
Revision A
Liberty Artist’s Manual
Liberty Artist’s Manual
To access a remote host via FTP:
•
1.
Press the main FTP Button. The File
Manager comes up, displaying the specified
directory on the specified remote host.
•
2.
Press on a filename or browse image. The
file is recalled to the Canvas as in normal nonFTP operation from the hard drive. (As in
normal operation, you can recall to Temp,
Mask, and Layers by changing recall modes
with the colored File Mode Button.)
Remote Navigation
Once you are browsing a remote directory in the File
Manager, you can navigate to different directories
by selecting them in the directory listing at the top of
the popup, in the same way as you normally would
when browsing images on your hard drive. When
using FTP, the File Manager is always in Path
Mode. The current directory is displayed in the Path
Window and you can enter directory or file names in
the highlighted File Window. Also, you can use the
Back Button to go to the parent directory (the next
level up in the directory hierarchy).
If Browse Mode is Off
Browse Mode may be off when you are logged into
a remote directory. The Browse Button has a corner
button that calls up a popup that allows you to set
what file data should be displayed when Browse
Mode is off. Press one of the popup’s buttons to
enable a mode.
If the “List Size and Date” mode is on, sizes and
dates of the files are displayed, if possible (some
types of remote systems don’t provide such information). If the “List Dimensions” mode is on, the
dimensions are not shown, since such information
can’t be provided from remote systems. If the “DisRevision A
4-147
Paint Environment
Revision A
4-147
Paint Environment
CHYRON Corporation
CHYRON Corporation
play File Format” mode is on, the format for each
file is displayed. If the “ImageStor! data” mode is
on, the file format is listed if it is an ImageStor! file
(that is, if it has an ImageStor! thumbnail file in the
same directory or an entry is in the ImageStor! database). Information identifying other image file formats is not remotely accessible.
Listing ImageStor! Database Fields in FullScreen File Manager
When in FTP mode, press the Full Button to call up
the Full-Screen File Manager. In the Full-Screen
File Manager, the corner button of the Browse Button brings up a popup with options for what to display when Browse Mode is off. One of these options
is “ImageStor! data.” When this mode is on, it displays five ImageStor! database fields for every
ImageStor! file it finds. See page 4-177 for details.
Sorting and Filtering By ImageStor! Fields
The Sort Button in the Full-Screen File Manager
calls up a Sort Popup that has five sort modes based
on ImageStor! database fields.
The Sort Popup also has text entry windows
whereby files are filtered on the basis of up to five
ImageStor! database fields.
Paint Environment
4-148
Revision A
Paint Environment
4-148
Revision A
Liberty Artist’s Manual
Liberty Artist’s Manual
4.10
Grab and Show Functions
4.10.1
Grab Button
Press the Grab Button to digitize the input to the
installed video board and to display that digitized
image on the Canvas. The Grab Popup allows you to
grab video to an optional disk array instead of the
Canvas.
Grab Popup
Figure 4-53. The Grab Popup
Press the corner button of Grab to call up the Grab
Popup. By default video is grabbed to the Canvas. If
the Video to Disk Button is enabled, video is
grabbed to a disk array. See your Liberty Technical
Manual for details about the particular disk array
installed on your system.
Revision A
4-149
Paint Environment
Revision A
4-149
Paint Environment
CHYRON Corporation
CHYRON Corporation
Grabbing Video to a Disk Array
Press the Video to Disk Button to enable grabbing
video frames to a disk array (instead of to the Canvas).
To record a clip of video to the disk array, bring up
the Grab Popup, click on the Video To Disk Button,
enter the file path you want to save the clip as, and
enter the number of frames you want to record.
Then exit the popup and hit the Grab Button. Liberty will tell you to:
"Left Click, Spacebar or Return to grab; Right Click
or Esc to abort"
The incoming video will be written to disk once you
left click, for as many frames as you specified.
There is some delay before the actual transfer starts,
however, so be sure to click a little before the video
you want. There are no provisions for triggering the
start of the grab from an external source.
Once the video is grabbed to disk, you can recall it
into Liberty using the disk paths in the Source VTR
Set-up Popup. You can use the Source VTR Set-up
Popup to assign this clip to a disk path, and the clip
can be grabbed from a particular timecode location
(the time-code is the frame number within the clip,
which starts at zero).
Paint Environment
4-150
Revision A
Paint Environment
4-150
Revision A
Liberty Artist’s Manual
Liberty Artist’s Manual
You can also create a clip file through the VTR
interface. Set up a target disk path in the Target VTR
Set-up Popup, and change the file type in the Target
VTR Set-up Popup to "RAW .yuv". Rendering to
this disk path (in the VTR Panel in the Paint Environment or when rendering an Animation), then
generates a video clip. The saved clip can be displayed through the video, as described in the section
on Showing below.
Revision A
4-151
Paint Environment
Revision A
4-151
Paint Environment
Liberty Artist’s Manual
Figure 4-54. Disk Path File Type Popup
Revision A
4-153
Paint Environment
Liberty Artist’s Manual
Liberty Artist’s Manual
Note that file type for a target disk path is selected
by clicking on the File Type Window for the disk
path in the Target VTR Set-up Popup. This brings
up the Disk Path File Type Popup. The popup has a
section for "Clip file formats" (corresponding to
files which contain multiple frames). Select the
"Raw YUV" button under "Clip file formats" to
specify a clip file format.
4.10.2
Show Button
The Show Button transfers the contents of the Canvas to the installed video board frame buffer. Usually you press Show when you want to see the
Canvas on the monitor output of the video board to
see how it looks in NTSC or PAL. Show works at
any Canvas resolution and for all video boards that
can be installed with Liberty. It corrects aspect ratio
at the time of the transfer. You must press the Show
Button each time you want to update the video
board.
Show Popup
Figure 4-55. Show Popup
Pressing the corner button of Show calls up a small
popup with two options: Real-time Show and NonReal-time Show.
Revision A
4-155
Paint Environment
Revision A
4-155
Paint Environment
CHYRON Corporation
CHYRON Corporation
Non-Real-time Show
Non-Real-time Show is the default. When this
mode is active, a Show is performed each time you
press the Show Button.
Real-time Show
Pressing the Real-time Show Button turns on Realtime Show Mode. The time required for Real-time
Show slows some functions on certain platforms.
On some platforms Real-time Show only works if
the configured resolution is the same as the installed
frame buffer's native resolution.
Showing Video from a Disk Array
Press the Disk to Video Button to enable showing
video frames from a disk array.
To output a clip, bring up the Show Popup and make
sure you are in "Realtime Show" mode. Then click
on the Disk To Video Button and enter the filename
of the clip you want to output to video. The Frames
Window is automatically updated to the number of
frames in the clip, based on the size of the file. Then
exit the popup and hit the Show Button. The entire
clip will be played through the video device.
The clip can also be played through the File Manager interface. When bringing up the File Manager
and browsing any saved clips, you can see that they
have the VTR-type controls available (H < <| |> >
T). You can use these controls to play and step
through the clip interactively through the video
board directly from the disk array. Thus you can
play and examine the clip in full resolution on the
video monitor.
Paint Environment
4-156
Revision A
Paint Environment
4-156
Revision A
Liberty Artist’s Manual
Liberty Artist’s Manual
Set-up for Grab and Show
You set up Grab and Show using the Video Panel in
the Configuration Environment. Consult the Liberty
Technical Reference Manual for details.
The Grab function uses the Source recording device
(on the Paint Environment’s VTR Panel and the
Configure Environment’s Video Panel).
The Show function uses the Target channel (Target
on the Paint Environment’s VTR Panel and Tar on
the Configure Environment’s Video Panel).
Revision A
4-157
Paint Environment
Revision A
4-157
Paint Environment
CHYRON Corporation
CHYRON Corporation
4.11
RECALL/SAVE FILE FUNCTIONS
These buttons are used for saving files to disk or
recalling images or files from disk storage.
4.11.1
Recall File Button
Figure 4-56. File Popup
The Recall Button allows you to recall images and
other types of files from the disk.
To recall a picture file from disk to the Canvas:
•
Press the Recall Button. The File Popup
appears.
•
Press on a filename in the list of filenames, or
type the filename you want to recall, followed
by the Enter key. The Canvas picture is erased
and the indicated picture appears on the Canvas.
The File Popup disappears.
Recall with the Add Prefix
Recalls on top of (adds to) the Canvas, Temp Buffer,
or mask.
Paint Environment
4-158
Revision A
Paint Environment
4-158
Revision A
Liberty Artist’s Manual
Liberty Artist’s Manual
Recall into Masked Area
If there is an active mask on the Canvas, the recalled
picture only appears in the masked area.
Recalling non-Liberty File Formats
Recalling a non-Liberty file format is performed just
like a normal recall (see the previous page). You
don't have to specify the extension when you recall a
file in a non-Liberty format. However, if there is
more than one file format for one file (for example,
both .tga and .rla), you should specify which format
to recall by typing the proper extension with the file
name. For information about saving in different file
formats, see “The File Save-As Popup” on page
page 4-171.
File Path Elevator
6 elevator boxes are provided, each of which can
hold a file path. The current elevator box keeps the
current path until you change it. With the Copy Prefix you can copy a path into a different elevator box,
saving it for later quick access.
4.11.2
Recall Corner Button
Press the corner button of Recall when you want to
use special settings to modify how pictures are
recalled. The Recall File Popup appears.
When you change a recall setting to other than normal default, the Recall Corner Button is high-lighted
purple to indicate that a special recall setting is
active. When you change a recall setting, it stays
changed until you go back and reset it or change it
again.
Revision A
4-159
Paint Environment
Revision A
4-159
Paint Environment
CHYRON Corporation
CHYRON Corporation
Recall File Popup
Figure 4-57. Recall File Popup
The Ignore Palette Button
Press the Ignore Palette Button to turn it on/off.
When on (the default), it causes pictures to be
recalled to the Canvas without changing the current
palette colors. When off, it causes pictures to be
recalled along with the colors with which they were
saved.
Rescale and Orientation On Buttons
Press one of these On Buttons to activate either Rescaling or Orientation (includes Mirror) during the
recall operation. Only one function can be on at a
time. Pressing the Rescale On Button high-lights the
Rescale Button. Pressing the Orientation On Button
high-lights the Orientation/Mirror Button.
Re-scale Button
Press to display the Re-scale Popup
Paint Environment
4-160
Revision A
Paint Environment
4-160
Revision A
Liberty Artist’s Manual
Liberty Artist’s Manual
With the Rescale function you can automatically
change the aspect ratio and/or size of pictures during
recalls or saves (there is a Re-scale Button in the
Save File Popup also). This is especially useful for
images larger than the current Canvas size, or for
images generated on systems with different pixel
aspect ratios. Rescale calls up a popup that allows
you to set the special scaling parameters. The
default mode for both Recall and Save is "No Scaling."
When a file is rescaled during Recall or Save, Liberty displays a message in the Prompt Window displaying both the original and the rescaled xy
dimensions of the image.
Revision A
4-161
Paint Environment
Revision A
4-161
Paint Environment
CHYRON Corporation
CHYRON Corporation
Rescale Popup
Figure 4-58. Rescale Popup
Paint Environment
4-162
Revision A
Paint Environment
4-162
Revision A
Liberty Artist’s Manual
Liberty Artist’s Manual
The No Scaling Button
When this mode is on (the default), Liberty disables
all file rescaling for subsequent Recalls (or Saves).
Images are recalled in the current Canvas resolution.
Images larger than the current Canvas resolution are
clipped when recalled.
The Automatic Button
When this mode is on, Liberty automatically rescales the file being recalled from whatever size/
aspect ratio it has on the disk to the current resolution.
The Scaling by xy Panel
When this mode is on, images are rescaled when
recalled (or saved). You can set xy resolution of the
source file (to be recalled) resolution and the target
Canvas resolution using the four windows in the
Scaling by XY Panel.
For example, if you are recalling files from the disk
that are 720 x 486 to the Canvas that is 720 x 540,
you enter the following:
•
File X
720
•
File Y
486
•
Canvas X
720
•
Canvas Y
540
As long as the Scaling by XY Button is active, Liberty uses these settings to rescale the recalled file,
correcting for the difference in pixel aspect ratio.
These four settings default to the current Canvas resolution.
Revision A
4-163
Paint Environment
Revision A
4-163
Paint Environment
CHYRON Corporation
CHYRON Corporation
The Scaling by Percent Panel
When this mode is on, images are rescaled when
recalled (or saved). You can set the percentage of
rescaling using the two windows in the Scaling by
Percentage Panel.
For example, if you want to automatically rescale
images to half their size, you would enter the following:
•
X
50
•
Y
50
Interpolation On Button
The Interpolation On button enables filtering of the
image during re-scale. When this button is on, the
image is filtered during re-scaling, which eliminates
aliasing artifacts, but also blurs the image slightly.
When this button is off, the image is not smoothed
during re-scaling. In this case, the image will not
blur, but may have aliasing artifacts.
Reset Button
Press to set all numeric settings to defaults.
The OK Button
Press to confirm changes in settings. The popup disappears. Note that when you turn on a rescaling
mode, it stays on after you leave the popup and
remains on until you go back into the Rescale Popup
and press the No Scaling Button, or the Reset Button.
Paint Environment
4-164
Revision A
Paint Environment
4-164
Revision A
Liberty Artist’s Manual
Liberty Artist’s Manual
Recall Orientation Button
Press one of the four orientation modes to enable it.
The 90 Button causes the recalled file to appear
rotated 90 degrees on the Canvas. The 180 Button
causes the recalled file to appear rotated 180 degrees
on the Canvas. The 270 Button causes the recalled
file to appear rotated 270 degrees on the Canvas.
The default is 0, or no rotation. This feature is very
useful for recalling Cineon image files which have
rotated images.
Recall Mirror Button
Press one (or both) of the two mirror modes to
enable it. The X Button causes the recalled file to be
reflected horizontally. The Y Button causes the
recalled file to be reflected vertically. When both
the X and Y Buttons are enabled, the recalled file is
flipped both horizontally and vertically. The default
is both buttons off.
Recall Alpha Button
Press one of the three alpha recall modes to enable
it. The default is the Use Alpha Button, which
recalls the file along with its alpha channel. The
Ignore Alpha Button causes the file to recalled without any alpha (transparency) - it is opaque. The
Invert Alpha Button causes the file to be recalled
with its alpha inverted - the file is opaque everywhere except where it has alpha. A solid object on a
transparent background would be recalled as a transparent hole in the shape of the object on an opaque
background.
Revision A
4-165
Paint Environment
Revision A
4-165
Paint Environment
CHYRON Corporation
CHYRON Corporation
Recall Brightness Slider
This slider is used when you are recalling images
without the full brightness range available, 32 bits
for Liberty 32, and 64 bits for Liberty 64. This
slider’s setting denotes the maximum brightness of
the recalled file. Setting the slider at the top, or 255,
indicates that the recalled file has 100% or normal
brightness. If the recalled file has a low brightness,
you set the slider correspondingly lower. The file is
recalled with increased brightness. At 0 the file is
recalled at maximum brightness. To use the Recall
Brightness Scale in Liberty 64, you should set the
“messages” button in the Canvas Panel of the Configuration Environment to 0-65535. This allows the
slider to be moved throughout the full 64-bit brightness range.
OK Button
Press to confirm changes and to remove the popup.
Reset Button
Press to reset all settings to their defaults.
Cancel Button
Press to remove the popup with no changes.
Recalling Using Wildcards
When entering a file or directory name in the Recall
File or File Manager Popups, you can use the * and ?
wildcards anywhere in the file/directory name being
entered. In such a case, the directory listing will be
filtered out based on the specified wildcards. The
wildcards have the following meanings: * matches 0
or more characters, while ? matches exactly one
character. For example, entering "lib*.im" will list
all files whose names start with "lib" with extension
Paint Environment
4-166
Revision A
Paint Environment
4-166
Revision A
Liberty Artist’s Manual
Liberty Artist’s Manual
".im". Entering "lib???.im" will list all files with 6
character names starting with "lib" and extension
".im". You can use wildcards in multiple places in a
file/directory name for more exotic pattern matching. For example, "test*red*.???" would list all files
with names starting with "test," with the string "red"
in their name, and with 3 character extensions.
4.11.3
Save Button
The Save Button allows you to save images and
other types of files to the disk. In the 32-bit version
of Liberty, pictures are saved as 32-bit files. In the
64-bit version, pictures are saved as 64-bit files.
Both versions can recall either 32-bit or 64-bit files.
To save a picture file from Canvas to the disk:
•
Press the Save Button. The File Popup appears.
•
Type the file name you want to save the picture under, followed by the Enter key, or
press on a filename in the list of filenames.
The Canvas picture is saved under the indicated
file name. if you press on an existing filename
you will be asked whether to overwrite it.
NOTE
If there is an active mask, only the
masked area of the canvas is saved.
File Path Elevator
6 elevator boxes are provided, each of which can
hold a file path. The current elevator box keeps the
current path until you change it. With the Copy Prefix you can copy a path into a different elevator box,
saving it for later quick access.
Revision A
4-167
Paint Environment
Revision A
4-167
Paint Environment
CHYRON Corporation
CHYRON Corporation
Save Corner Button
Press the corner button of Save when you want to
use special settings to modify how pictures are
saved. The Save File Popup appears (below).
When you change a save setting, it stays changed
until you go back and reset it or change it again.
Save File Popup
Figure 4-59. Save File Popup
Re-scale Button
The Save Popup contains the same rescaling functions as the Recall File Popup, applied to saved files
rather than recalled ones. For details on the rescale
functions, see “Rescale Popup” on page 4-162.
When you activate Re-scale in the Save File Popup,
the Save Corner Button in the Transfer panel is highlighted to indicate that Re-scale is active.
The Shrinkwrap Button
When on, the file is saved with only its bounding
box, ignoring any transparent areas of the Canvas
outside it.
Paint Environment
4-168
Revision A
Paint Environment
4-168
Revision A
Liberty Artist’s Manual
Liberty Artist’s Manual
Save Inactive Layers Button
By default only active layers in RAM are saved in a
Layers File. As an option, you can save the inactive
layers (in addition to those turned on) in a Layers
File. You control this with the Save Inactive Layers
Button in the Save Pop-up (accessed through the
corner button of Save in the Transfer Panel). Press
on this button to turn it on (it becomes highlighted).
As long as it is on, inactive layers will be saved
when you save a Layers File.
4.11.4
Save File As Button
The Save As function allows you to save the Canvas
as different file formats. Press the main part of this
button to save the current Canvas as a file in the current non-Liberty file format (the one displayed in the
text window). Press the corner button in the Save
File As Button to call up a popup that offers you a
choice of foreign file formats in which to save the
picture. Pressing on the center of the word in the
text window also calls up the popup. Pressing on
either side of the word in the text window toggles
through the available file types, one by one.
To save a picture in a non-Liberty format:
Revision A
4-169
Paint Environment
Revision A
•
Press the corner button of the Save File As
Button. The Save As Popup appears.
•
Press one of the file format buttons..
•
Press the OK Button. The Save File Popup disappears.
•
Press the Save File As button. The file saving
menu appears.
4-169
Paint Environment
CHYRON Corporation
CHYRON Corporation
•
Type a filename for the file to be saved under,
followed by the Enter key. Liberty saves the
Canvas picture as usual, but converts it into the
desired format and gives it an appropriate suffix.
NOTE
Some formats don't support alpha
(transparency), which means that
transparent areas of the Canvas are
saved as opaque pixels of the current
background color. Other formats can
be saved either with or without alpha,
depending on settings in their set-up
menu in the Save File As Popup. Also,
in the Save File As Popup, buttons for
formats which currently have saving
of alpha enabled have a small alpha
symbol drawn next to the format
name. This helps provide an
additional cue as to which formats are
being saved with alpha.
Save File As Popup
The Save As File Popup contains buttons for all of
the available non-Liberty file formats, and also contains buttons to enable/disable compression, enable/
disable shrinkwrap, enable/disable rescaling, to set
up file format-specific parameters, and to specify
parameters to transfer the file to a remote host via
FTP.
Paint Environment
4-170
Revision A
Paint Environment
4-170
Revision A
Liberty Artist’s Manual
Figure 4-60. Save File As Popup
Revision A
4-171
Paint Environment
Liberty Artist’s Manual
Liberty Artist’s Manual
In this table 8-bit refers to 8-bits per component, or 32-bits total (8-bits each for
R, G, B, A). 16-bit refers to 16-bits per component or 64-bits total (16-bits each
for R, G, B, A). The File Buttons include:
Table 4-2: Available non-Liberty File Formats
Format
Recall
Save
Alias
8-bit RGB or 8 bit matte
8-bit RGB
.sim
8-bit RGBA
8-bit RGBA
Aurora 280
8-bit RGBA
8-bit RGBA
BMP/DIB
1, 4, 8, 16, and 24 bit
24 bit uncompressed
uncompressed
Cineon
10-bit RGB or RGBA
10-bit RGB or RGBA
DPX (SMPTE)
8, 10, 12, 16-bit RGB
8, 10, 12, 16-bit RGB/RGBA (10, 12, & 16-bit
and RGBA
RGB/RGBA DPX only in Liberty 64)
GIF
from 1 to 8 bits
from 1 to 8 bits
IMAGESTOR
8-BIT RGBA
8-bit RGBA
iNFiNiT!
8-bit RGBA
8-bit RGBA
JPEG
various
variable compression
PDI
8-bit RGBA block,
8-bit RGBA interleave
RGBA interleave, or
alpha only
PICT
8-bit RGB or RGBA
8-bit RGB or RGBA
Pixar
8-bit RGBA
8-bit RGBA
Prisms
8-bit RGBA
8-bit RGBA
8- & 16-bit RGB, RGBA
8 and 16-bit RGBA (16-bit only in Liberty 64)
Wavefront
(RLA)
Scitex
SGI rgb
-
CMY, CMYK, K (no alpha)
8, 10, 12, & 16-bit RGB
8, 10, 12, & 16-bit RGB or RGBA (10, 12, and
or RGBA
16-bit RGB and RGBA in Liberty 64 only)
Softimage
8-bit RGB or RGBA
8-bit RGBA
Targa (tga)
8-bit B&W, 4 or 8-bit RGB,
8-bit RGBA
8-bit RGBA
Revision A
4-173
Paint Environment
Revision A
4-173
Paint Environment
CHYRON Corporation
CHYRON Corporation
Table 4-2: Available non-Liberty File Formats
Format
TDI
Recall
Save
8- and 16-bit RGB,
8 and 16-bit RGBA (16-bit only in Liberty 64)
RGBA, or alpha
TIFF
1,4,8,10,12,16-bit RGB,
1, 4, 8, and 16 bit grayscale; 4 and 8 bit color
RGBA, CMYK, color
mapped; 8, 10, 12, and 16 bit RGB/RGBA;
mapped & grayscale.
and 8, 10, 12, and 16 bit CMYK (10, 12, and
16 bit formats only available in Liberty 64).
Vertigo
8-bit RGBA
8-bit RGBA
YUV
YUV (no alpha)
YUV (no alpha)
Where multiple save options exist (like TIFF), the popup has a Set-up Button. Pressing
this button brings up a Set-up Popup with different save options. The following options
exist:
Table 4-3: Save Options by Format Type
Format
Save Options (from Set-up Pop-Up)
Cineon
Matte (alpha) enable/disable; color correction sliders
DPX
Matte (alpha) enable/disable; choose 8, 10, 12, or 16 bits;
color correction sliders
Paint Environment
4-174
Revision A
IMAGESTOR
Specific type of iNFiNiT! system, and FTP transfer parameters
iNFiNiT!
Specific type of iNFiNiT! and FTP transfer parameters
RLA
Choose 8-bits or 16-bits
Scitex
Various options
SGI
Matte (alpha) enable/disable; 8, 10, 12, 16-bits
TDI
Choose 8-bits or 16-bits
TIFF
Various options
GIF
Select number of bits, dithering controls, interlace on/off, transparency
JPEG
Select compression rate
PICT
Select RGB or RGBA
Paint Environment
4-174
Revision A
Liberty Artist’s Manual
Liberty Artist’s Manual
As stated in the table above, a number of the file formats have Set-up menus, which are accessed by
pressing the Setup button in the Save File As Popup.
The Set-up menus for PICT, RLA, SGI rgb, and TDI
are fairly simple, as they merely allow the user to
enable/disable the saving of alpha (matte) information, and/or select the number of bits per component
(8, 10, 12, or 16). The set-up menus for the other
formats are more complicated. These are described
in the following sections.
GIF File Format
You can save and transfer GIF images to HTML
editors for inclusion on Web Pages at various levels
of compression. You can set the GIF file background to transparent so that it appears as a “cutout” when displayed by a Web browser that supports
transparent GIFs.
NOTE: You may need a separate license for the
GIF functions to work in Liberty. Contact your Chyron/Liberty sales representative or customer service
representative.
GIF Setup Menu
Figure 4-61. Setup Menu
Revision A
4-175
Paint Environment
Revision A
4-175
Paint Environment
CHYRON Corporation
CHYRON Corporation
With the GIF Button high-lighted on the Save-As
Popup, press the Setup Button to bring up the GIF
Setup Menu.
Number of Bits/Pixel & Greyscale On/Off
When the greyscale button is on, the GIF file saves
as a black and white image (actually, in shades of
gray). In this case, the user can choose between 1, 2,
3, 4, 5, 6, 7, and 8 bits of resolution, using the corresponding buttons in the set-up menu. When the
greyscale button is off, the GIF file saves as a colormapped image (a color image that uses a color
table). In this case, the user can choose between 3, 4,
5, 6, 7, and 8 bits of resolution.
Interlacing On/Off
When on, the GIF is stored with the scan lines in an
order such that a World Wide Web browser can
incrementally refresh the image, starting with a
lower resolution version of the image and progressing to the full-resolution display.
Transparency On/Off and the Transparency
Slider
When on, any pixels with an alpha of less than a certain value are flagged as transparent in the GIF file.
You set the cutoff value with the Transparency
Slider on the GIF Setup Menu. The higher the slider
setting, the higher the opacity of the area that will
appear transparent.
Uniform and Optimal Quantization
Uniform quantization splits the color space into
equal partitions, while optimal quantization computes the best color table for the specific image you
are saving. Optimal quantization performs very well
on most images, even with very few bits per pixel.
Paint Environment
4-176
Revision A
Paint Environment
4-176
Revision A
Liberty Artist’s Manual
Liberty Artist’s Manual
The Dither Button
When the Dither Button is high-lighted, the quantized image is also dithered. This is the technique
used in newspaper photos, where the appearance of
higher color resolution is achieved by varying the
density of colored dots. Dither only works with Uniform Mode.
The Noise Button
When the Noise Button is high-lighted, some noise
is added to the quantized image.
This tends to smooth out color-banding artifacts that
may appear at lower levels (bits-per-pixel).
Preview Button
Press the Preview Button to see how the saved GIF
file will look, based on the current settings. The preview turns off when you press OK to confirm the
settings, or when you press reset.
IMAGESTOR! File Format
The IMAGESTOR! functions allow you to transfer
images from Liberty to the Chyron Still Store. When
you enable the IMAGESTOR! Button on the Save
As Popup, you can save files in IMAGESTOR! format, and optionally transfer files over the network
(via FTP) to the IMAGESTOR!. When saving an
IMAGESTOR file, a popup appears on which you
can enter descriptive text for the file’s 5 database
entry fields. There is a menu in the Configuration
Environment that allows you to relabel the 5 text
fields when saving an IMAGESTOR! file.
Revision A
4-177
Paint Environment
Revision A
4-177
Paint Environment
Liberty Artist’s Manual
IMAGESTOR! Setup Menu
Figure 4-62. IMAGESTOR! Setup Menu
Revision A
4-179
Paint Environment
Liberty Artist’s Manual
Liberty Artist’s Manual
With the IMAGESTOR! button high-lighted, on the
Save-As popup, press the Setup Button to call up the
IMAGESTOR! Setup Menu.
The IMAGESTOR! Set-up menu has three sets of
text fields for user input. These are in columns,
labeled “image”, “image 2 (dual record)”, and “FTP
set-up” along the top of the menu. The text fields in
each column are described in the following sections:
Image controls
These set-up transfer of the image, the thumbnail,
and the update to the still store database.
•
node
Network host name of the system
that will receive the full resolution still store
file (e.g.: infinit1)
•
path
Disk/directory path on the system
where the full resolution still store file will be
stored (e.g.: C/INFINIT/STILLS)
•
Thumbnail node network host name of the
system that will receive the thumbnail file
(e.g.: infinit1)
•
Thumbnail path disk/directory path on the
system where the thumbnail file will be
stored (e.g.: C/INFINIT/TN)
•
Server node Network host name of the system that will be the database server (e.g.:
infinit1). This is where the database fields
(descriptive text) is sent. If this field is left
blank, the database will not be updated; only
the image and thumbnail will be transferred.
Image 2 (dual record) controls
These controls allow the image to optionally be
transferred to a second remote host. The image may
be stored in a different directory than on the first
Revision A
4-181
Paint Environment
Revision A
4-181
Paint Environment
CHYRON Corporation
CHYRON Corporation
remote host. In addition, its address (numeric filename) will contain an offset from the address on the
first host (for example, the first remote host may
have files in the range 0-500, while the second
remote host may have files in the range 600-1100;
the offset in this case would be 600).
In the ImageStore set-up menu, there are fields for
the second remote host (labeled "image 2 (dual
record)"). The fields include text windows for node
name, path, and numeric offset. As in the “image”
section of the menu, enter the network host name of
the target system in the “node” field. Enter the disk/
directory path on the target system in the “path
field”, and the numeric offset in the “offset” field.
Note that if the node field of this section is left
blank, a dual record will not occur (the fields in the
image 2 (dual record) section of the menu will be
ignored).
Note that both the first and second (dual) copies of
the still will be added to the ImageStore database
(for example, if the still is written as .100 to host1
and .700 to host2 (for dual record), then database
entries are made for both .100 and .700). In addition,
thumbnails saved for both the first and second (dual)
copies of the still. Both thumbnails are transferred to
the thumbnail node and path specified in the Imagestor set-up menu.
FTP set-up controls
This section of the set-up menu contains the following fields:
Paint Environment
4-182
Revision A
Paint Environment
4-182
Revision A
Liberty Artist’s Manual
Liberty Artist’s Manual
•
user name
The name of a user account on the remote
system (for infinit systems, this is often
“guest”).
•
password
The password of the user account on the
remote system (for infinit systems, this is
often “anonymous”).
•
temp dir
This is the path of a temporary directory to
store files on the local system. This is most
often set to “/usr/tmp”.
The FTP Button
Turn the 'FTP' button 'ON' if you want to automatically transfer the files and update the database over
the network (from the Liberty workstation to the
specified remote system(s) on the network) after
saving the files to the local SGI hard disk.
Save Local Button
When you turn this button OFF, the saved image is
not archived in the current directory on the local SGI
hard disk after the FTP process is finished. The
image is saved only in the selected directory on the
selected remote system(s) on the network.
NTSC and PAL Buttons
Press one of these buttons to select either 'NTSC' or
'PAL' TV standards.
Elevator of Pre-sets
To allow the user to configure set-ups for multiple
ImageStore's and Infinits, the ImageStor set-up
menu has a 6-level elevator. This allows the user to
set-up and save up to 6 different configurations for
Revision A
4-183
Paint Environment
Revision A
4-183
Paint Environment
CHYRON Corporation
CHYRON Corporation
ImageStore network transfer. A name is provided
for each elevator level as well (immediately above
the elevator itself).
When the user exits Liberty, the settings are saved
and will be restored next time Liberty is started up.
If the copy prefix is on when switching elevator levels, the contents of the current elevator are copied to
the new one before switching.
After filling in the fields and highlighting the appropriate buttons, confirm the IMAGESTOR! Setup
menu by pressing the 'OK' button.
IMAGESTOR! Save As Popup
Figure 4-63. IMAGESTOR! Save As Popup
When IMAGESTOR! is the current File Save As
Mode, first press the Save As Button, then save the
file to a directory/filename path, and press Enter. At
this point the IMAGESTOR! Save As Popup
Paint Environment
4-184
Revision A
Paint Environment
4-184
Revision A
Liberty Artist’s Manual
Liberty Artist’s Manual
appears, which provides 5 editable text fields for
entering descriptive information and or/keyword
parameters for the IMAGESTOR! database.
The test labels can be changed from the default
labels. See “Re-label IMAGESTOR!” on page 4188, which is a setup function found in the Directory
Panel in the Configuration Environment.
Select a field to enter text into and then type the new
text information. Press the Enter key to advance to
the next field.
NOTE
When entering filenames to save
IMAGESTOR! or iNFiNiT! images, use
a four-digit numeric file name with the
first number preceded by a period
(e.g.: “.0032”). IMAGESTOR! and
iNFiNiT! images can be saved using
up to 12 alphanumeric characters (but
can not start with a number - hence
the leading period in numeric
filenames). However, for quick on-air
access, IMAGESTOR! and iNFiNiT!
files are usually saved using a fourdigit number as described above,
because alphanumeric information
requires
that
additional
popup
menus appear, thus slowing the onair performance slightly. Note also
that
you
can
configure
the
IMAGESTOR! to utilize eight digit
numeric file names (rather than four)
if more than 10,000 stills will be
utilized.
The Cancel button in the IMAGESTOR! SaveAs
popup exits the pop-up menu and terminates the current Save-as operation (preventing the file from
being saved/transferred). The Esc keyboard key will
Revision A
4-185
Paint Environment
Revision A
4-185
Paint Environment
CHYRON Corporation
CHYRON Corporation
also cancel the pop-up. The OK button exits the
popup and saves the image (pressing the enter key in
any of the text entry fields without typing new text
does the same). At this point, Liberty saves the current Canvas to the specified directory on the local
hard disk. A thumbnail file, with the same name as
the still store file, but with the added extension .TN,
will be saved to the same directory. In addition, if
the set-up menu's 'FTP' button is on, the still store
image, thumbnail image and database information
files are transferred over the network to the selected
remote system(s) on the network as indicated in the
Setup Menu at this time. If the “local” button is off,
the image and thumbnail files are deleted from the
local hard disk once the transfer to the IMAGESTOR! is complete.
As stated, Liberty transfers the still store image,
thumbnail and database information using FTP. For
each file type, it uses the appropriate node name
(entered in the Setup Menu) as the network host. It
generates the target path on the host using the directory path (entered in the Setup Menu) and the file
name (entered in the directory listing menu when the
file was saved). The database server (i.e.: any infinit,
Max, or Maxine connected to the network or file
server) automatically and regularly 'polls' for new
database files and when the database file is sent via
FTP from Liberty to the database server, it automatically updates the still store database with the new
information.
For the above procedure to work, both the local SGI
system and the still store (host) system(s) need to
have a user account named 'guest', with the password 'anonymous'. In addition, the SGI system's '/
etc/hosts' file needs to contain an entry for the still
store (host) system (this can also be set up using the
System Manager menu in the SGI desktop
Paint Environment
4-186
Revision A
Paint Environment
4-186
Revision A
Liberty Artist’s Manual
Liberty Artist’s Manual
toolchest). Also, networking needs to be set up on
the Still Store system itself (refer to the User Manual
or Chyron Customer Support for instructions).
The Liberty software generates an FTP script to do
the transfer. The script is equivalent to the following
commands:
> ftp -in <still store host name>
> user guest anonymous
> binary
> put <local file path> <file path on still store>
> close
> quit
The above commands are run for the still store
(image) file, the thumbnail (.TN) file and the database information file.
ImageStore Check for Overwrite
When a file is being written to the ImageStore, Liberty queries the ImageStore database to see if the file
already exists. If it does, a confirmation pop-up
appears, allowing the user to either overwrite the file
or cancel the operation. If the user confirms over
write of the file, it will be written to the ImageStore,
and the ImageStore database will be updated accordingly. This write will overwrite the old copy of the
file, unless the old copy of the file was in a different
location on the ImageStore (or on another ImageStore). In this case, the old copy will be deleted
from that location.
The over write feature also works for dual record
(transfer of the still to a second location). If dual
record is enabled, and the dual still already exists on
the ImageStore, the user will be prompted to overwrite or cancel.
Revision A
4-187
Paint Environment
Revision A
4-187
Paint Environment
CHYRON Corporation
CHYRON Corporation
Re-label IMAGESTOR!
Figure 4-64. Config Directory Management Illustration
In the Configuration Environment on the Directory
Panel, you’ll find the Re-label IMAGESTOR! Button. Press it to call up the Re-label IMAGESTOR!
Popup. Press in the 5 field labels on the popup to
change the labels on the IMAGESTOR! Save As
popup to more meaningful names.
Paint Environment
4-188
Revision A
Paint Environment
4-188
Revision A
Liberty Artist’s Manual
Liberty Artist’s Manual
4.11.5
iNFiNiT! Setup Functions
The INFINIT! functions allow you to transfer
images from Liberty to the Chyron iNFiNiT!, Max!,
and Maxine! character generator systems. We will
refer to all these systems as “infinit” in the following
sections. When you enable the INFINIT! Button on
the Save As Popup, you can save files in the
INFINIT’s RGBA message format, and optionally
transfer files over the network (via FTP) to the
INFINIT!.
INFINIT! Setup Menu
Figure 4-65. iNFiNiT! Setup Menu
With the INFINIT! button high-lighted, on the SaveAs popup, press the Setup Button to call up the
INFINIT! Setup Menu.
The INFINIT! Set-up menu has two sets of text
fields for user input. These are in columns, labeled
“remote system” and “FTP set-up” along the top of
the menu. The text fields in each column are
described in the following sections:
Revision A
4-189
Paint Environment
Revision A
4-189
Paint Environment
CHYRON Corporation
CHYRON Corporation
Remote system
These set-up transfer of the image to the infinit.
•node Network host name of the system that will
receive the full resolution still store file (e.g.:
infinit1)
•pathDisk/directory path on the system where image
file will be stored (e.g.: C/INFINIT/STILLS)
FTP set-up controls
This section of the set-up menu contains the following fields:
•user name
The name of a user account on the remote system
(for infinit systems, this is often “guest”).
•password
The password of the user account on the remote system (for infinit systems, this is often “anonymous”).
•temp dir
This is the path of a temporary directory to store
files on the local system. This is most often set to “/
usr/tmp”.
FTP Button
Turn the 'FTP' button 'ON' if you want to automatically transfer the files over the network (from the
Liberty workstation to the infinit) after saving the
files to the local hard disk.
Paint Environment
4-190
Revision A
Paint Environment
4-190
Revision A
Liberty Artist’s Manual
Liberty Artist’s Manual
Save Local Button
When you turn this button OFF, the saved image is
not saved on the local hard disk after the FTP process is finished. The image is saved only in the
selected directory on the selected infinit system.
NTSC and PAL Buttons
Press one of these buttons to select either 'NTSC' or
'PAL' TV standards.
13.5 MHZ button
This button will be on in most cases. Turn it off if
you are transferring files to an old (non 13.5 MHZ
infinit system).
After filling in the fields and highlighting the appropriate buttons, confirm the INFINIT! Setup menu
by pressing the 'OK' button.
Elevator of Pre-sets
To allow the user to configure set-ups for multiple
Infinits, the Infinit set-up menu has a 6-level elevator. This allows the user to set-up and save up to 6
different configurations for network transfer. A
name is provided for each elevator level as well
(immediately above the elevator itself).
When the user exits Liberty, the settings are saved
and will be restored next time Liberty is started up.
If the copy prefix is on when switching elevator levels, the contents of the current elevator are copied to
the new one before switching.
Revision A
4-191
Paint Environment
Revision A
4-191
Paint Environment
CHYRON Corporation
CHYRON Corporation
Saving INFINIT! Files
When INFINIT! is the current File Save As Mode,
first press the Save As Button, then save the file to a
directory/filename path
NOTE
When entering filenames to save
iNFiNiT! images, use a four-digit
numeric file name with the first
number preceded by a period (e.g.:
“.0032”). iNFiNiT! images can be
saved using up to 12 alphanumeric
characters (but can not start with a
number - hence the leading period in
numeric filenames). However, for
quick on-air access, iNFiNiT! files are
usually saved using a four-digit
number as described above, because
alphanumeric information requires
that additional popup menus appear,
thus slowing the on-air performance
slightly. Note also that you can
configure the INFINIT! to utilize eight
digit numeric file names (rather than
four) if more than 10,000 images will
be utilized.
At this point, Liberty saves the current Canvas to the
specified local SGI directory. In addition, if the setup menu's 'FTP' button is on, the image, is transferred over the network to the remote infinit system
as indicated in the Setup Menu. If the “local” button
is off, the image is deleted from the local hard disk
once the transfer to the INFINIT! is complete.
As stated, Liberty transfers the image using FTP. It
uses the node name (entered in the Setup Menu) as
the network host. It generates the target path on the
host using the directory path (entered in the Setup
Menu) and the file name (entered in the directory
listing menu when the file was saved).
Paint Environment
4-192
Revision A
Paint Environment
4-192
Revision A
Liberty Artist’s Manual
Liberty Artist’s Manual
For the above procedure to work, both the local SGI
system and the infinit (host) system(s) need to have
a user account named 'guest', with the password
'anonymous'. In addition, the SGI system's '/etc/
hosts' file needs to contain an entry for the infinit
(host) system (this can also be set up using the System Manager menu in the SGI desktop toolchest).
Also, networking needs to be set up on the infinit
system itself (refer to the User Manual or Chyron
Customer Support for instructions).
The Liberty software generates an FTP script to do
the transfer. The script is equivalent to the following
commands:
> ftp -in <still store host name>
> user guest anonymous
> binary
> put <local file path> <file path on still store>
> close
> quit
Check for Overwrite
When a file is being transferred to the iNFiNiT!,
Liberty checks the target directory to see if the file
already exists. If it does, a confirmation pop-up
appears, allowing the user to either overwrite the file
or cancel the operation. If the user confirms over
write of the file, it will be written to the iNFiNiT!.
This write will overwrite the old copy of the file.
TIFF File Format
Liberty allows the user to save RGB, RGBA,
CMYK, color-mapped, and greyscale TIFF files.
This is selected via the TIFF setup menu (accessed
Revision A
4-193
Paint Environment
Revision A
4-193
Paint Environment
CHYRON Corporation
CHYRON Corporation
via the Setup button in the Save-As popup). This
menu also allows the user to save TIFF files with
inverted Y.
Note that 8-bit RGB and RGBA files are the most
commonly used and widely supported formats.
NOTE: You may need a separate license for the
TIFF LZW format to work in Liberty. All other
TIFF formats do not require special licenses. If you
need to use the TIFF LZW format, contact your
Chyron/Liberty sales representative or customer service representative.
TIFF Setup Menu
Figure 4-66. TIFF Setup Menu Illustration
Save Greyscale
When activated, images are saved as 1, 4, 8, or 16bit greyscale. 16 bit is film resolution.
Save Color-map
When activated, images are saved as 4, or 8-bit
color-mapped.
The uniform, optimal, dither and noise buttons are
used in color space reduction for saving greyscale
and color-mapped files. These determine how the
Paint Environment
4-194
Revision A
Paint Environment
4-194
Revision A
Liberty Artist’s Manual
Liberty Artist’s Manual
32-bit image being saved is converted to an image
with reduced color resolution. To assist in this process, the TIFF set-up menu has a Preview button.
When in color-mapped or gray-scale mode, set the
number of bits, and the uniform, optimal, dither, and
noise buttons as desired. The Preview button then
previews how this color space reduction will look,
as applied to the current canvas image. The preview
turns off when the TIFF set-up menu is exited. The
uniform, optimal, dither, and noise buttons are further described below:
Uniform/Optimal Quantization (greyscale
and color-mapped files only)
Uniform quantization splits the color space into
equal partitions, while optimal quantization computes the best color table for the specific image you
are saving. Optimal quantization performs very well
on most images, even with very few bits per pixel.
Dither Button (greyscale and color-mapped
files only)
When the Dither Button is high-lighted, the quantized image is also dithered. This is the technique
used in newspaper photos, where the appearance of
higher color resolution is achieved by varying the
density of colored dots. Dither only works with Uniform Mode.
Noise Button (greyscale & color-mapped
files only)
When the Noise Button is high-lighted, some noise
is added to the quantized image.
This tends to smooth out color-banding artifacts that
may appear at lower levels (bits-per-pixel).
Revision A
4-195
Paint Environment
Revision A
4-195
Paint Environment
CHYRON Corporation
CHYRON Corporation
Flip Y
When activated, saves the file from top to bottom,
rather than the default bottom to top. Some applications only read TIFF files stored from top to bottom.
Try this button if another application reads your
TIFF files upside-down.
Other Modes
You can also save 8-bit RGB, RGBA, and CMYK
TIFF files, using the appropriate buttons. Liberty 64
also allows 10, 12, and 16 bits per component. 8-bit
RGB or RGBA are the most common formats for
video work, whereas 16-bit RGB or RGBA would
be used for film work.
To save RGB TIFF files, turn on the “Save RGB”
button and turn on the “Inhibit Matte” button. To
save RGBA TIFF files, turn on the “Save RGB” button and turn on the “Save Matte” button. To save
CMYK TIFF files, turn on the “Save CMYK” button (the Matte buttons are ignored in this case).
When saving files in CMYK, 4 sliders are provided.
These allow the user to adjust the C, M, Y, and K
values after conversion from RGB when CMYK
TIFF files are written, and prior to conversion to
RGB when CMYK TIFF files are read. The sliders
work in terms of percentages (from 0 to 200%).
JPEG File Format
The JPEG Setup Menu allows you to vary the compression or “quality” of the saved JPEG file.
Paint Environment
4-196
Revision A
Paint Environment
4-196
Revision A
Liberty Artist’s Manual
Liberty Artist’s Manual
JPEG Setup Menu
Figure 4-67. JPEG Setup Menu
The Quality Slider
The slider setting controls the amount of compression of the JPEG file on a scale of 0 - 100. The Reset
Button resets the quality variable to a default of 75.
The Quality Slider allows you to trade off compressed file size for image quality: the higher the
setting, the larger the JPEG file and the closer the
output image will be to the original file. Normally,
you use the lowest setting for the smallest file that
will decompress into an image that looks the same
as the original. Try settings between 50 and 95. If
you see defects at a setting (say, 75), go up 5 or 10 at
a time until the result is satisfactory. The optimal
setting varies from image to image.
Settings below 50 produce very small files of low
image quality. For example, you could use settings
of about 5 or 10 to make an index of a large image
library. A setting of 2 gives Cubist effects.
Revision A
4-197
Paint Environment
Revision A
4-197
Paint Environment
CHYRON Corporation
CHYRON Corporation
NOTE
Values below about 25 generate 2byte quantization tables, which are
considered optional in the JPEG
standard. Some commercial JPEG
programs may not read the resulting
file.
Cineon and DPX Set-up
The Cineon and DPX Set-up Popups allow you to
enable/disable saving of Matte (alpha) information.
They also provide sliders for adjustment of the RGB
and M black points of the image, the white point of
the image, and the gamma. Increasing the sliders for
the black points increases the contrast of the dark
areas in the image (for red, green, blue, and matte
respectively), while decreasing the white point slider
value increases the contrast of the bright areas of the
image. The gamma slider adjusts the mid-ranges of
the image. You can adjust them depending on your
particular film application. There is also a reset button to reset the sliders to defaults. The defaults convert Cineon log data to linear format during recall,
and linear data back to log format during save. A
Convert Off Button disables the effect of the sliders
so that image data is read/written exactly as is.
This concludes the section on the Set-up menus for
individual file formats. We now resume the discussion of the buttons in the File Save As popup.
Re-scale On Save
This function calls up the Re-scale Popup to allow
you to re-scale the file when saving it. See page 4162.
Paint Environment
4-198
Revision A
Paint Environment
4-198
Revision A
Liberty Artist’s Manual
Liberty Artist’s Manual
Press the Rescale On Button to activate it; then
press the in the inset window to call up the Rescale Popup.
Setup Button
Each file format has its own setup controls. When a
file format is high-lighted on the Save As Popup,
press the Setup Button to see its Setup Popup.
(Some file formats require no setup controls (for
example, Prisms files are always saved as RGBA
(32-bits per pixel). For such file formats, the setup
button is grayed out.)
Shrink-wrap Mode Button
When on, saves only the image within its bounding
box, not the transparent background. (When shrink
wrap is off, the size of the saved image will be the
same as the current canvas size.)
Compress Button
When on, compresses Softimage, Targa, and PDI
files.
Rescale Button
This button brings up the File Rescale Popup
(described on page 4-162), allowing non-Liberty
files to be rescaled on output. Once the re-scale button has been set up with the desired re-scale values,
use the “On” button to enable/disable re-scaling.
Save-As Orientation Button
Press one of the four orientation modes to enable it.
The 90 Button causes the saved file to appear rotated
90 degrees on the Canvas. The 180 Button causes
Revision A
4-199
Paint Environment
Revision A
4-199
Paint Environment
CHYRON Corporation
CHYRON Corporation
the saved file to appear rotated 180 degrees on the
Canvas. The 270 Button causes the saved file to
appear rotated 270 degrees on the Canvas. The
default is 0, or no rotation. This feature is very useful for saving Cineon image files which have rotated
images.
Save-As Mirror Button
Press one (or both) of the two mirror modes to
enable it. The X Button causes the saved file to be
reflected horizontally. The Y Button causes the
saved file to be reflected vertically. When both the
X and Y Buttons are enabled, the saved file is
flipped both horizontally and vertically. The default
is both buttons off.
FTP Save As Button
When the FTP Button is enabled in the Save As
Popup, the saved file is transferred to a remote directory in the current file format. For example, you
could FTP Targa files to a networked PC or Mac.
All file formats in the Save As Popup, except for
iNFiNiT! and ImageStor!, use the same FTP settings. If the file is a type other than iNFiNiT! or
ImageStor!, pressing the FTP Button in the Save As
Popup brings up the common FTP Popup.
Paint Environment
4-200
Revision A
Paint Environment
4-200
Revision A
Liberty Artist’s Manual
Liberty Artist’s Manual
FTP Save As Popup
Figure 4-68. The FTP Save As Popup
The FTP Save As Popup allows you to enter set-up
information to log on to a remote system. If you
enable FTP in the popup, the FTP Button on the
Save As Popup is highlighted. Thus, you can tell if
FTP is on for the current file type just by looking at
the Save As Popup.
Node
Enter the node name of the remote system.
Path
Enter the path of the directory on the remote system
you wish to access.
User Name
Enter the user name used to log on to the remote system. This user name must correspond to a user
account on the remote system.
Password
Enter the password used to log on to the remote system. This password must correspond to the password for the user account on the remote system.
Revision A
4-201
Paint Environment
Revision A
4-201
Paint Environment
CHYRON Corporation
CHYRON Corporation
Temp Directory
Enter a temporary directory on the local hard drive
where temporary files can be stored. Normally this
is set to “usr/tmp,” but you can specify a different
location if space is tight on the “usr” drive. All files
browsed or recalled via FTP pass through this temporary directory, so it needs at least a few megabytes
of free space.
FTP Settings Elevator
Use the six levels of the elevator to save settings for
different remote hosts/directories.
FTP/Local
If the FTP Button is on, the file is transferred via
FTP to the specified remote host and directory. If the
Local Button is also on, the file is saved to the local
hard drive as well.
If only the FTP Button is on, the file will be deleted
from the local hard disk after the FTP is completed.
Save Browse Button
When this button is on, a browse file is FTP’d along
with the image, so that Liberty can later browse the
file remotely.
iNFiNiT! and ImageStor! each have their own FTP
settings, which are brought up by pressing either the
Set-up Button or the FTP Button when iNFiNiT! or
ImageStor! is the current file format. When the current file format is iNFiNiT! or Imagestor!, the FTP
button highlights depending on whether FTP is
turned on in the FTP settings for that file format.
Paint Environment
4-202
Revision A
Paint Environment
4-202
Revision A
Liberty Artist’s Manual
Liberty Artist’s Manual
Note that the enabled FTP Button on the Save As
Popup causes animation files being rendered to disk
in non-Liberty image file formats (as they appear in
the SaveAs Popup), to be saved to a remote directory.
To prepare to save via FTP with Save As:
•
1.
Bring up the Save As Popup, chose the
desired file format, and press the FTP
Button. The FTP Popup appears.
•
2.
Enter the desired settings in the FTP Popup
and press on the FTP Enable Button. The
FTP Enable Button is highlighted.
•
3.
Press OK. The FTP Popup disappears.
•
4.
Press OK on the Save As Popup. The Save
As Popup disappears.
To save via FTP with Save As:
Revision A
4-203
Paint Environment
Revision A
•
1.
When the file is ready to be saved, press the
main Save As Button. The Save File Popup
appears.
•
2.
Enter the file name to be saved and press
<Enter.> Liberty checks to see if the file
already exists in the remote directory. If it
does, you are prompted to overwrite it. When
the transfer is complete, you are prompted:
“FTP Transfer Complete.” If the transfer fails,
a red error message appears in the Prompt
Window (for example if the user name or
password is incorrect).
4-203
Paint Environment
CHYRON Corporation
Paint Environment
CHYRON Corporation
4-204
Revision A
Paint Environment
4-204
Revision A
tn
ia
Liberty Artist’s Manual
P
Liberty Artist’s Manual
4.12
-
File Popup
4
Figure 4-69. File Popup
When you press Save or Recall, this popup
appears. At the top it lists the current host, disk,
directory, and the last file that was saved or recalled.
Below that is a list of the files in the current directory.
To initially set up the host, disk, and directory:
Revision A
4-205
Paint Environment
Revision A
•
Press Save File or Recall File. The File Popup
appears. The word “Host” at the top is highlighted and the available hosts are displayed.
(The host, disk, and directory must be set for
both Save and Recall, and they can be set to different locations.)
•
Press on the host name you want to change to
(or type in the host name and press Enter).
By convention, “local” is the default local host.
After you press on the host name, the word
“Disk” becomes highlighted. The available disks
are displayed.
4-205
Paint Environment
CHYRON Corporation
CHYRON Corporation
•
Press on the disk name you want to change to
(or type in the disk name and press the Enter
key). After you press on the disk name (for
instance, “hd0”, or hard disk zero), the word
“Dir” becomes highlighted. The available directories are displayed.
•
Press on the directory name you want to
change to (or type in the directory name and
press the Enter key). After you press on the
directory name, the word “File” becomes highlighted. The available filenames are displayed.
•
Press on the filename to save or recall, or type
in the filename and press the Enter key.
Host Button
Press on the word “Host” to choose a new host.
Disk Button
Press on the word “Disk” to choose a new disk.
Directory Button (dir)
Press on the word “Dir” to choose a new directory.
File Button
Displays the file name to operate on (usually the
previous file name operated on). To change the file
name you want to operate on, press on the desired
file name in the file list area, or type in the filename
and press the Enter key. The File Popup disappears
and the operation is performed.
Paint Environment
4-206
Revision A
Paint Environment
4-206
Revision A
Liberty Artist’s Manual
Liberty Artist’s Manual
Plus Button (^)
When you press the Plus Button it looks for a number in the current filename, adds 1 to it, and performs the operation.
Minus Button (v)
When you press the Minus Button it looks for a
number in the current filename, subtracts 1 from it,
and starts the operation as if the Enter key had been
pressed. When the number reaches zero, it will not
go lower. The Plus and Minus buttons do not recognize negative numbers.
Use the Plus and Minus Buttons to increment and
decrement filenames when saving or recalling a
series of consecutively numbered files, especially
when using Macros. For more information about
Macros see page 4-413.
Filename list in the File Popup
The standard File Popup lists up to 10 or 14 filenames and has buttons to scroll the list up and down.
Each line of the file list consists of a filename, in
upper and lower case, preceded by a color "bullet"
describing the type of the file. The colors of the bullets are coded to match the colored bars in the File
Mode Button. (The colors also match the colored
bars of the Panel Menus.)
File Mode Button
The File Mode Button is a colored bar in the File
Popup labeled "Canvas" by default. It allows you to
choose different options when you use Save, Recall,
or another file operation. For instance, if Canvas,
Temp, or Mask Mode is displayed in the colored
Revision A
4-207
Paint Environment
Revision A
4-207
Paint Environment
CHYRON Corporation
CHYRON Corporation
bar, filenames of pictures are displayed in the file
list. If Font Mode is displayed in the colored bar,
only filenames of fonts are displayed in the file list.
The File Mode Button controls how a file is saved/
recalled, or what kind of file is saved/recalled.
Pressing repeatedly on either end of the File Mode
Button steps through the modes. Kinds of files that
you can save/recall include Canvas, Temp, Mask,
Palette, Layers, Brushes, Text, Macro, Shapes,
Curves, Animation (if the Animation option for Liberty is enabled), Morph, Movie, Menu State, Diagram, Filter, Point, Font, and Corner. Pressing
directly on the mode name itself calls up a the File
Mode Popup that lists all the modes in their colorcoded buttons.
Note that some file modes can only be accessed
from certain menus. For example, Text files can
only be recalled and saved from the Text Panel (section 4.20). When not recalling and saving from the
Text panel, the Text mode button will normally be
disabled (grayed out).
Paint Environment
4-208
Revision A
Paint Environment
4-208
Revision A
Liberty Artist’s Manual
Liberty Artist’s Manual
File Mode Popup
Figure 4-70. File Mode Popup
To change the File Mode when the File Popup
is displayed:
•
1.
Press the middle of the File Mode Button to
display the File Mode Popup.
•
2.
Press one of the File Modes to choose it as
the current mode. The File Mode Popup
disappears and the desired mode is displayed
in the File Mode Button.
If the Mode Button displays "CANVAS" the Canvas
picture will be saved, or the indicated picture file
will be recalled into the Canvas.
If "TEMP" is displayed, the current Temp (the one
displayed in the Transfer Buffer) will be saved, or
the indicated picture file will be recalled into the
Revision A
4-209
Paint Environment
Revision A
4-209
Paint Environment
CHYRON Corporation
CHYRON Corporation
current Temp and is displayed in the Transfer
Buffer. A horizontal slider is provided to change the
current temp.
If "MASK" is displayed, the current mask on the
Canvas will be saved, or the indicated file will be
recalled onto the Canvas as a mask. See page 4-364
for step-by-step instructions about saving and recalling masks. A horizontal slider is provided to change
the current mask.
If "PALETTE" is displayed, the current palette will
be saved without the picture, or the palette of the
indicated file will be recalled (without the picture, if
any) into the Palette in the Paint Environment.
If "LAYERS" is displayed, all currently active layers and the Canvas will be saved. When you recall
the file, each individual layer is recalled into its corresponding position in the stack along with all its
attributes in their saved state.
Saving in Layers Mode
The Layers File Format saves the images in all
active layers as well as their individual layer settings
(including position, alpha, etc.) in one file on disk.
The Canvas is saved in the file as well. Thus you can
save the composition you are working on and come
back to it later without finalizing the settings of the
layers. When the Layers File is recalled, the Canvas
and all layers and settings are restored from the disk.
Also, when layers are recalled from disk the levels
into which they are loaded are turned on even if they
were off prior to the recall. Note that if there are currently fewer RAM Temps than there are layers in the
recalled file, only the layers loading into current
Paint Environment
4-210
Revision A
Paint Environment
4-210
Revision A
Liberty Artist’s Manual
Liberty Artist’s Manual
RAM Temps are recalled. (This only happens if
you’ve reduced the number of RAM Temps since
saving the Layers File.)
Once you’ve selected the Layers mode as described
above, using the Save Button saves the Canvas and
any active layers to a Layers File. Using the Recall
File Button while in Layers Mode displays any Layers Files in the directory, while you can browse Layers Files in the Full-Screen File Manager Menu.
Pressing on a Layers File in the Recall Popup or
Full-Screen File Manager Menu recalls the Canvas
and layers from the disk.
Revision A
4-211
Paint Environment
Revision A
4-211
Paint Environment
CHYRON Corporation
CHYRON Corporation
The File Modes and their color codes are:
Table 4-4: File Modes
Item
File Mode
Canvas (magenta bar)
Save Canvas/recall to Canvas (image file)
Temp (green bar)
Save Temp/recall to Temp (image file)
Mask (yellow Bar)
Save/recall mask (image file)
Palette (light purple bar)
Save/recall palette (image file)
Layers
(light blue bar)
Save/recall Layers (active layers and
Canvas)
Brushes (violet bar)
Save/recall User Brush File (10 brushes)
Text (light blue bar)
save/recall text for Text Panel Menu
Macro (red bar)
Save/recall Macro in Macro Panel Menu
Shapes (teal bar)
Save/recall shape files
Curves (peach bar)
Save/recall Curve (spline data) File
Animation (purple bar)
save/recall Animation File in Animation Environment (if Liberty animation option is enabled)
Morph (magenta bar)
save/recall Morph Keyframe File
Movie (dark purple bar)
Save/recall animated preview storyboard movies
Menu State (lt. rust bar)
Save/recall menu state (with Macros)
Font (tan bar)
Save/recall Bit-stream font
Diagram (red bar)
Save/recall Diagram files
Filter (green bar)
Save/recall custom Image Filter settings
Point (dk. purple bar)
Save/recall single point motion tracking files
Corner (lt. purple bar)
Save/recall 4-corner point motion tracking files.
The Temp Elevator on the File Mode Popup
You can recall pictures into all levels of the Temp
Elevator without ever leaving the File Popup.
Paint Environment
4-212
Revision A
Paint Environment
4-212
Revision A
Liberty Artist’s Manual
Liberty Artist’s Manual
To recall files into several levels of the Temp
Elevator:
•
1.
Press the Repeat Prefix Button to turn it on.
•
2.
Press Recall to display the File Popup.
•
3.
Press the middle of the File Mode Button
(where it says "Canvas") to display the File
Mode Popup.
•
4.
Press on a level of the Temp Elevator on the
File Mode Popup. It becomes the active
elevator level.
•
5.
Press the green Temp Button to activate it.
The File Mode Popup disappears with the File
Popup remaining.
•
6.
Press the filename you want to recall into
the Temp. The file is recalled into the active
of the Temp Elevator. (Since the Repeat Prefix
is on, the File Popup does not disappear.)
•
7.
Now, repeat steps 3 through 6 to recall files
to each additional level of the Temp
Elevator that you wish to recall to.
In this way you can load up all the Temps
without ever leaving the File Popup. (This also
works in the Full Screen File menu.) When
finished, press Cancel to remove the File
Popup.
Full-screen Button (Full)
Press to display the Full-screen File Menu. Use
this button to pictorially Browse the files. Refer to
the “File Manager Button” on page 4-219 for details
on the full-screen File Manager menus used for
browsing files.
Revision A
4-213
Paint Environment
Revision A
4-213
Paint Environment
CHYRON Corporation
CHYRON Corporation
Path Button
Figure 4-71. File Popup with Path Activated
Use the Path Button to access other paths besides
Liberty's standard Host/Disk/Dir/File path.
To change into Path, press the button marked “path”
on the File Popup. The File Popup changes to Path
mode. To switch back to the standard path (Host/
Disk/Dir/File), just press the Path Button again to
turn it off.
When you switch from the standard path to Path, the
standard path you are in changes to Path notation
(for example, usr/people/aurora/image/local/hd0/
demos/pic1) If no host was selected, "/" is displayed.
When you turn off Path, the source "image" directory is displayed.
To Use Path
When the Path first comes up, if you press on a
directory name in the list of directories, the directory
is added to the current path. Each time a new directory list is displayed you press on a directory to add
Paint Environment
4-214
Revision A
Paint Environment
4-214
Revision A
Liberty Artist’s Manual
Liberty Artist’s Manual
it to the path until you come to a filename list the
end of the directory path, where you can press on a
filename. The file is then recalled or saved.
In Path any time you press on a filename, the file is
immediately recalled or saved.
You can use the keyboard to enter directory names
and filenames instead of pressing directly on names
in the list. If the File Name Button is not highlighted, press somewhere in the file list area and it
will be highlighted. Then type the desired filename.
The name you type appears in the File Name Button.
When you press the Enter key the file is recalled or
saved.
The Back Button
Press the Back Button to go back up the path one
directory level. This is the equivalent of a "cd .."
in Unix.
When you exit the File Popup, the path that was last
used is remembered. When you bring up the File
Popup again, the same path is displayed.
If the maximum path length of 80 characters is ever
exceeded, an error message appears, and you can
choose another directory.
Revision A
4-215
Paint Environment
Revision A
4-215
Paint Environment
Liberty Artist’s Manual
Full-screen File Menu
Figure 4-72. Full-screen File Menu
Revision A
4-217
Paint Environment
Liberty Artist’s Manual
Liberty Artist’s Manual
4.12.1
File Manager Button
Press the File Manager for a short cut to the Fullscreen File Menu where you can see the files as
browsed images. This is the same as pressing the
Recall Button, then the Full Button. Comes up in
Recall Mode by default. For more details on the
Full-screen File Menu, see page 4-213.
There are two methods for recalling the Full Screen
File Menu.
•
Press Save File or Recall File, then press the Full
button, or...
•
Press the File Manager button.
Pressing Save File or Recall File brings up the standard, panel-sized File Popup. In this popup you can
call up the Full-screen File Menu, which has much
more detail and options, including the ability to pictorially Browse the files on disk.
On the File Popup, press the Full Screen Button
(labeled “Full”) to call up the Full Screen File Menu.
Files may be displayed as text, like the smaller file
menus, along with the size of the file (in KB) and the
date/time the file was stored. Or, if the browse Button is active, files may be displayed as small
“thumb-nail” or Browse pictures. The Full Screen
File Menu has buttons for sorting, multiple-file
selections, as well as all of Liberty's file management functions.
Scroll to Top Button (T)
Jumps the file list to the beginning of the filename
list.
Revision A
4-219
Paint Environment
Revision A
4-219
Paint Environment
CHYRON Corporation
CHYRON Corporation
Scroll Up Button( ^ )
Scrolls the filename list up one page.
Scroll Down Button ( V )
Scrolls the filename list down one page.
Scroll to Bottom Button ( B )
Jumps the filename list to the end of the list.
Action Button
At the top left of the Full Screen File Menu is the
Action Button, which displays the current operation
you’re performing: Recall, Save, Delete, etc. It
allows you to choose what file management action
to perform. Press on either end of the Action Button
to cycle through the available actions: Recall, Save,
Delete, Rename, Move, Copy, and Save As.
The Action Popup
When you press in the middle of the Action Button
(right on the name of the current operation), the
Action Popup appears, displaying buttons for all the
action options, as well as the Save As functions.
Pressing on an action button chooses that action and
removes the Action Popup. Details on the Save As
functions are below and on page 4-169.
Recall
When the Action Button displays RECALL, press
on a Browse picture or filename in the file list, or
type in a file name. The Full-screen File Menu disappears and the indicated file is recalled. As in the
smaller File Popup, how the file is recalled depends
on the colored File Mode Button: to the Canvas, to
the Temp Buffer, as a mask, etc.
Paint Environment
4-220
Revision A
Paint Environment
4-220
Revision A
Liberty Artist’s Manual
Liberty Artist’s Manual
Save
When the Action Button displays SAVE, press on a
Browse picture or filename in the list, or type in a
new file name. The Full-screen Popup disappears
and the indicated file is saved. If saving over an
existing file, you are prompted to confirm the overwrite. The colored File Mode Button determines
how the file is saved: as a picture, as a mask, etc.
Delete
When the Action Button displays DELETE, press on
a Browse picture or filename in the list. A popup
appears asking you to confirm the deletion. Press
yes to confirm the deletion. The Full-screen Popup
disappears and the indicated file is deleted.
Revision A
4-221
Paint Environment
Revision A
4-221
Paint Environment
Liberty Artist’s Manual
Figure 4-73. Action Popup
Revision A
4-223
Paint Environment
Liberty Artist’s Manual
Liberty Artist’s Manual
Rename
When the Action Button displays RENAME, press
on a Browse picture or a filename in the list. The
indicated filename appears in the Prompt Window.
Type in the new name for the file and press the OK
Button to confirm. The old filename is replaced by
the new one and the Full-screen Popup disappears.
Move
When the Action Button displays MOVE, press on a
Browse picture or filename in the list. You are
prompted: “Now select a target directory.” Type a
directory name (or designate a path to another host/
disk/directory) for the file to be moved to.
Copy
When the Action Button displays COPY, press on a
filename in the list. You are prompted: "Now select
a target directory." Type in a directory name (you
can also designate a path to another host/disk/directory) for the file to be copied to.
Save As
When the Action Button displays SAVE AS, the file
is saved like a normal Save, but you can use the
Save As functions to choose what format the file
will be saved as, and what other Save As functions
will be used, such as Shrink-wrap and Compress.
File Path Elevator
6 elevator boxes are provided, each of which can
hold a file path. The current elevator box keeps the
current path until you change it. With the Copy Prefix you can copy a path into a different elevator box,
saving it for later quick access.
Revision A
4-225
Paint Environment
Revision A
4-225
Paint Environment
CHYRON Corporation
CHYRON Corporation
Select Button
The Select functions allow you to select multiple
files in the file list. Press the Select Button to turn it
on; then press on a filename to select it. The filename is highlighted until you perform an action on it
or cancel the selection. You can select as many files
as you wish, then press OK to perform the action
currently displayed in the Action Button on all
selected files. Press on a selected file to de-select it.
Select All Button
Press the All Button to select all the files in the current directory.
Clear Button
Press the Clear Button to de-select all the files in the
current directory.
Complement Select Button
Press the Compl Button to select all files not currently selected and to de-select all files currently
selected.
Page Select Button
Press the Page Button to turn it on/off. When on, the
select functions work only on files on the currently
displayed page.
Browse Mode
In Browse Mode picture files are displayed as small
pictures. The small “thumb-nail” pictures are automatically created when pictures are saved. If pictures are imported from outside Liberty, they will
usually not have Browse files associated with them
and thus cannot be Browsed until the browse images
Paint Environment
4-226
Revision A
Paint Environment
4-226
Revision A
Liberty Artist’s Manual
Liberty Artist’s Manual
are created. The Make Browse Button is used for
this. The Alpha Button activates a Browse Mode in
which only the Alpha, or transparency, of each picture is displayed in white on black.
Browse Button
Press the Browse Button to turn it on/off. When on,
Liberty displays “thumb-nail” pictures of the files,
along with their color bullets and filenames. Pressing on a Browse picture causes its file to be selected,
recalled, saved, etc. just like pressing on its filename.
Often the reason for displaying the Full Screen File
Menu is to Browse pictures. If you leave the
Browse Button on, it will be on the next time you
call up the Full Screen File Menu.
Browse-Off Listings
When the Browse Button is turned off, Liberty displays the contents of the current directory as text
descriptions of the files. There are four modes of
text display, which you can access by pressing the
corner button of the Browse Button, bringing up the
Browse-Off Popup.
Revision A
4-227
Paint Environment
Revision A
4-227
Paint Environment
CHYRON Corporation
CHYRON Corporation
Browse-Off Popup
Figure 4-74. Browse-Off Popup
Press the corner button of the Browse Button to display the Browse Off Popup, which allows you to
choose what file data display when Browse Mode is
off.
List Size and Date (in Kbytes)
If the “List Size and Date” mode is on, sizes and
dates of the files are displayed if possible (when
accessing a remote system via FTP, the size and date
information may or may not be displayed, depending on the type of remote system).
List Dimensions
If in “List Dimensions” mode, the dimensions are
shown (when accessing a remote system via FTP,
the file dimensions are not normally displayed).
Paint Environment
4-228
Revision A
Paint Environment
4-228
Revision A
Liberty Artist’s Manual
Liberty Artist’s Manual
List Image File Format
If in “List Image File Format” mode, the file format
for each file is displayed (when accessing a remote
system via FTP, the file format is not normally
listed; it will be listed for Imagestor! files with
thumbnail files in the same directory, or with entries
in the Imagestor! database.)
ImageStor! Data
Once ImageStor! Data mode is enabled (when
Browse is off) a row of text appears for the file
name, followed by the five database fields. For nonImageStor! files, these fields are blank. For ImageStor! files, the fields contain the database information entered when the file was saved in Liberty (or
when it was entered on the ImageStor! itself). The
display of the ImageStor! fields works for files on
local and NFS mounted file systems, accessed
through the File Manager Button. It also works for
files in directories remotely displayed through the
new FTP Button in the Transfer Panel (page WA4144), assuming that the thumbnail files are in the
same directory as the ImageStor! files, or if the
name of the database server has been entered into
the FTP Popup.
Alpha Button
The Alpha Button is a mode button similar to
Browse. When on, it displays the files as small pictures, except that it displays their masks (their alpha
values) as white silhouettes on black backgrounds.
For example, a background filling up the entire
screen would appear as a solid white rectangle,
while an element on a transparent background
would display as white on black.
Revision A
4-229
Paint Environment
Revision A
4-229
Paint Environment
CHYRON Corporation
CHYRON Corporation
Make Browse Button
The Make Browse Button is a mode button that creates browse images for foreign file formats that have
been imported into Liberty. When this mode is on,
Browse images for foreign files are created every
time one is encountered. Creating these Browse
images for large directories of foreign files can be
slow (each file must be decoded and rescaled) but
once the Browse image has been created it will be
saved to disk and need not be recreated. A foreign
file will stay with its Browse image and they will be
moved, deleted, copied, and renamed together,
unless you are copying from the UNIX shell, in
which case both files must be dealt with explicitly.
In fact, the UNIX command “ls” will not list Browse
files unless the “-a” extension is used. (because the
Browse filenames begin with a “.”)
Sort Button
The Sort Button allows you to list files in the current
directory in a variety of ways. Press the Sort Button
to display a popup with a choice of sort modes.
Press on one of the modes to choose it.
Paint Environment
4-230
Revision A
Paint Environment
4-230
Revision A
Liberty Artist’s Manual
Sort Popup
Figure 4-75. Sort Popup
Revision A
4-231
Paint Environment
Liberty Artist’s Manual
Liberty Artist’s Manual
The Sort Popup provides the following options for
sorting the file list:
All Files
By Date
List files in the order that they were created, with the newest file first.
By Name
List files alphabetically. Numbers are
listed correctly: X2Y comes before
X11Y.
By Size
List files in order of size, with the smallest file first.
ImageStor! Files
In addition to being able to display ImageStor! database fields, you can sort directory listings based on
them. Five ImageStor! sort modes, labeled "description" and "field 1" through "field 4," cause the files
to be sorted based on the corresponding ImageStor!
database field.
Note that non-ImageStor! files are grouped together
and sorted by name when one of these sort modes is
active.
Other Sort Criteria
Filmstrip
Revision A
4-233
Paint Environment
Revision A
Lists under one Browse image all files
which have identical names except for a
number, (pic1, pic2, pic3, pic4...).
Selecting that Browse image selects all
the files of the filmstrip. Above the
Browse image are six filmstrip functions. Head (H) displays the first Browse
picture (i.e. pic1); Tail (T) displays the
last Browse picture; the arrows “play”
the filmstrip forwards and backwards
smoothly or frame by frame. Note that
4-233
Paint Environment
CHYRON Corporation
CHYRON Corporation
Raw YUV files always sort as a filmstrip, since they are each one large file,
playable by the filmstrip mode.
By Type
Group files by type (Canvas, Select, etc.)
before date, name or size.
Reverse
Reverse the current sort order.
Hide . Files
Causes files beginning with . (dot) to not
be displayed.
Filter by ImageStor! Field
Allows you to filter the current directory listing
based on the ImageStor! database fields of its files
by the use of the five text entry windows, one for
each database field, in which you can enter text and
wildcards.
When a window is blank, filtering is not done based
on the corresponding database field. When a window contains text, only the ImageStor! files whose
database fields match the text in the window are
listed in the directory listing. For example, if the
field 1 window contains the word "people," only
ImageStor! files with “people” as database field 1
are listed.
You can also use wildcards in the five filter fields.
The wildcards have the following meanings: *
matches any number of characters, while ? matches
exactly one character. For example, entering "lib*"
lists all files whose corresponding database field
starts with the characters "lib" ("liberty," "liberation", etc.). Entering "lib????" lists all files whose
corresponding database field entries start with the
characters "lib" and contain 7 characters exactly.
Paint Environment
4-234
Revision A
Paint Environment
4-234
Revision A
Liberty Artist’s Manual
Liberty Artist’s Manual
You can use wildcards in multiple places in a text
window for more exotic pattern matching. For
example, entering "test*red*???" would list all files
whose corresponding database field starts with "test"
and contains the word "red" followed by at least 3
more characters.OK Button
Press the OK Button to remove the Sort Popup.
Free Space Display
Shows the total free space on the disk in KB. The
value could be 0 for some remote hosts that do not
report disk capacity.
Total Selected Display
If a number of files are selected, shows the number
of selected files and the total size in KB. Very useful when you need to delete files to free up a specific
amount of space on the disk.
Prefix Buttons
The following standard prefix buttons are included
in the Full-screen File Menu: Rep, Und, Add, and
Inv. These work the same here as on the standard
Paint Environment menu.
OK Button
Press the green OK button to start the current action
on the selected files. If there is no selection, do not
press OK; just hit the Enter key after typing in the
filename, or press directly on a filename in the list.
If there is a selection, OK must be used. Also OK
must be used when choosing a directory while in
Path mode (for example, when choosing a directory
to copy a file to.)
Revision A
4-235
Paint Environment
Revision A
4-235
Paint Environment
CHYRON Corporation
CHYRON Corporation
Cancel Button
Press the yellow Cancel button to remove the Fullscreen File Menu without performing any action.
Paint Environment
4-236
Revision A
Paint Environment
4-236
Revision A
Liberty Artist’s Manual
Loading Layers Graphically
Figure 4-76. Full-Screen File Manager (with Temp Loader)
Revision A
4-237
Paint Environment
Liberty Artist’s Manual
Liberty Artist’s Manual
The most convenient way to load up a number of
Temp Buffers with images from the disk is to graphically load them from the Full-Screen File Menu.
To load layers graphically:
•
1.
Press the File Manager Button on the
Transfer Panel. The Full-Screen File Menu
appears.
•
2.
Press the right end of the pink Canvas File
Mode Button to change it to Temp. The
Temp Browse Menu appears across the bottom
of the screen.
•
3.
Press on the browse image you want to load
into a Temp. It becomes highlighted.
•
4.
Press on the Temp browse window you want
to load into. The chosen browse image
appears in the indicated Temp browse window.
•
5.
Repeat for as many pictures as you want.
•
6.
Press Cancel to remove the Full-Screen File
Menu. Pressing OK also loads the last browse
image to the current Temp.
Loading masks graphically works in a similar fashion except that in Step 2 you switch the colored File
Type Button to "Mask".
Revision A
4-239
Paint Environment
Revision A
4-239
Paint Environment
CHYRON Corporation
CHYRON Corporation
4.13
PAINT PANEL
Figure 4-77. Paint Panel
All Liberty's painting functions are on the Paint
Panel. The top line of buttons on the Paint Panel
(Paint, Line, Curve, and Shape) all start a painting
operation. The other buttons on the Paint Panel
Menu are mode buttons that modify how painting,
line drawing, curve or shape drawing is performed.
Painting to Temps and Masks
At the top of the Paint Panel is a bar where you can
chose different Paint Modes - On Canvas for normal
painting on the Canvas, On Temp for painting to the
current layer, and On Mask for painting into masks.
When Paint On Temp Mode is active, all paint functions apply to the current Temp layer, and only
works if the current Temp is an active layer (that is,
if it is displayed as a layer on the Canvas). Paint
functions that need the current Temp as a source
image, such as Reveal Paint, are disabled.
Paint Environment
4-240
Revision A
Paint Environment
4-240
Revision A
Liberty Artist’s Manual
Liberty Artist’s Manual
When Paint is off, pressing on a layer on the Canvas
makes that layer the current layer. This is a quick
way to select a layer for Painting or for applying
Image Tools.
You can change brush, color, transparency, and
paint mode during painting. The Grid and Direction
functions (the Direction Button, the Horizontal Button, and the Vertical Button) constrain painting and
line/curve drawing. If a mask is active on the Canvas, painting or line/curve drawing only affects the
masked area.
When painting to the Canvas, the under prefix button when used with Paint, Line, Curve, and Shape
causes these functions to paint under the picture on
the Canvas. While painting or line/curve/shape
drawing, the Under Prefix can be turned on or off at
any time.
When painting to Canvas, you can erase from the
Canvas by painting with no palette color selected.
When painting to Mask, the Invert Prefix button
causes the paint functions to erase from the current
mask (rather than adding to it.)
NOTE
If the Mask is active and you turn on
Paint (while in Paint on Mask mode),
the mask becomes visible and you
can add to it or erase from it with the
brush. If the mask is not active and
you turn on Paint (while in Paint on
Mask mode) the mask is erased
before it becomes visible and
painting can begin.
Revision A
4-241
Paint Environment
Revision A
4-241
Paint Environment
CHYRON Corporation
CHYRON Corporation
4.13.1
Painting Functions
Paint Button
Press the Paint Button to paint using the current
brush, color, transparency, and paint mode. The
brush appears on the Canvas controlled by the
mouse or the pen. Press down to paint. Pressuresensitive painting is supported if you are using a
pressure-sensitive tablet; see Pressure-sensitive
Mode below. Press the Paint Button again to turn it
off.
Line Button
Press the Line Button to draw straight lines using the
current brush, color, transparency, and paint mode.
Press down once to start the line and press a second
time to complete the line. To “break” the line, press
the button on the barrel of the pen, or use the middle
or right mouse button. Press the Line Draw Button
again to turn it off.
Curve Button
Press the Curve Button to call up the Curve Popup.
It allows you to draw curves using the current brush,
color, transparency, and paint mode. For a detailed
description of the Curve Popup functions, see
“Curve Popup” on page 4-248.
Shape Button
Press the Shape Button to call up the Shape Popup.
It allows you to create shapes and render them, or
outline them using the current brush, color, transparency, and paint mode. For a detailed description of
the Shape Popup functions, see page 4-262.
Paint Environment
4-242
Revision A
Paint Environment
4-242
Revision A
Liberty Artist’s Manual
Liberty Artist’s Manual
Paint Gap Popup
Figure 4-78. Paint Gap Popup
Use this popup to adjust the gap between “pendowns” as you paint, so that you can paint, for
instance, with dotted lines. Press the corner button
of Paint to call up the Paint Gap Popup. When you
drag your pen across the tablet, the tablet cannot get
new coordinates constantly; there is a gap between
tablet coordinates which increases with the speed of
the moving pen. By default, Liberty fills in the gaps
while you paint. The Paint Gap Popup controls
how, or whether, the spaces between tablet coordinates are filled while painting.
The Gap Slider
This slider on the Paint Gap Popup controls the paint
gap expressed in percentage of the diameter of the
brush. Works in either Max or Exact Mode (see
below). The scale is from 1 to 300. At 100 the
brushes are placed edge-to-edge. At settings of
more than 100 there is a gap between brushes. At
less than 100 the brushes overlap. The Gap Slider is
also on the Line Gap and Curve Gap Popups.
Revision A
4-243
Paint Environment
Revision A
4-243
Paint Environment
CHYRON Corporation
CHYRON Corporation
To change the Paint Gap:
•
Press the corner button of the Paint Button.
The Paint Gap Popup appears.
•
Press and drag the Gap Slider on the Paint
Gap Popup.
•
Press the OK Button. Proceed with painting.
The Paint Gap Modes
There are three mode buttons on the Paint Gap
Popup: Max, Exact, and Nofill. Press on one of
them to turn on the corresponding Paint Gap Mode.
The Paint Gap Modes control the way Liberty interprets your moving pen when painting. The Exact
paint gap mode is the most commonly used one. It is
the default, and results in the fastest brush speeds.
Max Mode
In Max Mode, there is no filling between tablet
coordinates as long as the gap between them does
not exceed the value on the Paint Gap Slider. If the
gap between the tablet coordinates exceeds the value
on the Gap Slider, a straight line is drawn between
the tablet coordinates, using the value on the Gap
Slider. Thus, the maximum gap between the brush
“pen-downs” will be whatever the value on the Paint
Gap Slider is set to.
Exact Mode
In Exact Mode, Liberty places brushes exactly at
equal distances according to the setting of the slider.
Liberty will not allow brushes to be placed any
closer without lifting the pen and pressing again.
The Line and Curve Gap Popup always use Exact
mode and thus do not have the Max, Exact, and
Nofill Buttons.
Paint Environment
4-244
Revision A
Paint Environment
4-244
Revision A
Liberty Artist’s Manual
Liberty Artist’s Manual
Nofill Mode
In Nofill Mode, Liberty places the brush without
filling and ignores the slider value. The density of
the "dotted" line varies with painting speed.
OK Button
Press to confirm the gap setting and remove the Gap
Popup.
The Reset Button
Press to reset the Gap Slider to the default 26% and
turn on Exact Mode.
Curve and Shape Gap Popup
Figure 4-79. Curve and Shape Gap Popup
These popups are identical to the Paint Gap Popup,
except they do not have the Max, Exact, and Nofill
mode buttons. Curve and Shape have no tablet coordinates to interpret, and they always operate in Exact
mode. The default on the Line/Curve Gap Slider is
15%.
Revision A
4-245
Paint Environment
Revision A
4-245
Paint Environment
CHYRON Corporation
CHYRON Corporation
Line Gap Modes
Figure 4-80. Line Gap Popup
The Line Gap Popup contains a slider for setting the
line gap (the gap between brushes painted along a
line). In addition, the Line Gap popup contains three
mode buttons: Single, Multiple, and Radiate. In
Multiple Mode, as you repeatedly press on the Canvas, the corresponding points are connected with
lines using the current brush.
In Single Mode, one press starts a line and the second press terminates it. The next time you press a
new line is started.
In Radiate Mode, the first press defines a center
point. Subsequent presses cause lines to be painted
from the center point to the points pressed (in other
words, the lines radiate out from the center point).
You can use the button on the barrel of the pen (or
the middle mouse button) to reset line painting (for
example, to start a new sequence of lines while in
Multiple Mode).
Paint Environment
4-246
Revision A
Paint Environment
4-246
Revision A
Liberty Artist’s Manual
Liberty Artist’s Manual
4.13.2
Curve Popup
Curve Paint gives you a popup that allows you to
create and edit curves (splines) by adding curve
points to the Canvas. When you press OK, a curve
is drawn through the points, using the current brush,
color, and transparency setting.
To create a simple curve drawing:
Revision A
4-247
Paint Environment
Revision A
•
Press the Curve Button. The Curve Popup
appears. If a curve appears on the Canvas, press
the Erase button on the Curve Popup to clear it.
•
Press the Add Points Button on the Curve
Popup.
•
Press on various places in the Canvas to add
curve points. Liberty displays a spline curve
through the points as you put them down.
•
Press the green OK Button on the Curve
Popup. The current brush in the current color
and transparency is dragged along your curve to
create a curve drawing.
4-247
Paint Environment
CHYRON Corporation
CHYRON Corporation
Figure 4-81. Curve Popup
The Curve Popup contains a large array of functions
for creating and editing curves. The Curve functions are also used in Liberty’s optional animation
software to create and edit motion paths. Press the
Curve Button to call up the Curve Popup.
Curve Points
You create a curve by putting curve points on the
Canvas with the Add Points Button. One curve is
active at any time. You can store curves in the
Curve Elevator or Save them to the disk. Curve
Paint Environment
4-248
Revision A
Paint Environment
4-248
Revision A
Liberty Artist’s Manual
Liberty Artist’s Manual
points are represented on the Canvas by little white
dots. The Curve is represented by a red line. The
Curve Popup has the same functions as the Path
Popup for creating curve paths for animation actors
in Liberty’s Animation Option.
Curve Tangents
Each curve point (except the first and last points in
the curve) has two tangents, which define how the
curve approaches and leaves the curve point. Tangents are represented by a yellow line. You can use
the Move Points Button (see page 4-251) to drag the
end points of the tangents, thereby changing how the
curve approaches or leaves a point. Normally the
two tangents for each point are locked together in a
straight line; so that moving the end point of a tangent affects the other end. You can use the Break
Button (see page 4-253) to separate the tangents of a
point and modify each tangent independently of the
other.
Curve Elevator
Press one of the Curve Elevator buttons to display
the points of the curve in that elevator level for editing. You can store a curve on each of the 8 levels
of the Curve Elevator. Use the Copy Prefix to copy
a curve from one level to another.
Select Points Functions
Most of the functions on the Curve Popup act on
selected points. The Select Points functions are in
the vertical row of buttons at the right of the Curve
Elevator. They provide tools to select multiple
points so you can edit points as a group.
Revision A
4-249
Paint Environment
Revision A
4-249
Paint Environment
CHYRON Corporation
CHYRON Corporation
Select Points Button
To select curve points:
•
Press the Select button (labeled Selct) to turn
Select Points Mode on.
•
Press on or near each curve point on the Canvas you want to select. Each selected point
turns red. Pressing on an already selected point
de-selects it.
Clear Select Points Button
Press the Clear button to deselect all points.
Complement Select Points Button
Press the Compl button to select all unselected
points and deselect all selected points. When no
points are selected, press it to select all points.
Previous Select Points Button
When a selection of points has been turned off, press
the Prev button to re-select the last selection.
Shift Select Points Button
This button shifts the selected points. Press the left
side of the button to shift backwards, or press the
right side of the button to shift forwards.
NOTE
The Xform Button below the Shift
Select Points Button is used to move
the rotational axis of the points and is
discussed below.
Paint Environment
4-250
Revision A
Paint Environment
4-250
Revision A
Liberty Artist’s Manual
Liberty Artist’s Manual
Add Points Button
To add curve points on the Canvas:
•
Press the Add Button. The cursor appears.
•
Press on the Canvas at each position where
you want to deposit a point. A spline is displayed through the points as you put them down.
If there are already curve points on the Canvas,
the line changes to reflect each added point.
Move Points Button
To move one at a time:
•
With no points selected, press the Move Button. Tangents of the points appear on the Canvas represented by white lines.
•
Position the cursor over a point or over a tangent end-point.
•
Press and drag the point or tangent end point
to its desired position. The curve changes as
you move the point. Move as many points as
you like.
To move groups of selected points:
•
Select some curve points.
•
Press the Move Button. Tangents are not displayed when points are selected. Tangents cannot be moved as a group.
•
Press and drag the selected points as a group.
Delete Points Button
To delete points one at a time:
•
Revision A
4-251
Paint Environment
Revision A
With no points selected, press the Del button.
4-251
Paint Environment
CHYRON Corporation
CHYRON Corporation
•
Position the cursor over a point, and press
down. The point is deleted. The curved line
changes to reflect the deletion. You may delete
as many points as you like.
To delete groups of points:
•
Select the points to be deleted.
•
Press the Del button. The selected points disappear.
Paint Points Button
To “paint” with points:
•
Press the Paint Button.
•
On the Canvas press and drag the cursor to
"paint" the desired curve on the Canvas.
Points are laid down following the curve you
draw manually. Then use the Add, Move, and
Delete buttons to refine the curve, if necessary.
Insert Point Button
The Insert Points (Insrt) button allows you to insert
points along the curve.
To insert points in an existing curve:
•
Press the Ins button.
•
Press on the curve where you want the new
point to appear. The point is added and the
curve is modified.
Duplicate Points Button
The Dup button allows you to exactly duplicate a
point at a particular position on the curve. This is
most useful when creating paths in the Animation
Environment (see below).
Paint Environment
4-252
Revision A
Paint Environment
4-252
Revision A
Liberty Artist’s Manual
Liberty Artist’s Manual
To duplicate a point using the Duplicate Points
Button:
•
Press the Dup button in the Curve Popup. It
becomes highlighted.
•
On the Canvas, press on a point in the curve.
Another point is added exactly on top of the
point you pressed. You can now move the new
point to a new location on the curve.
Duplicated points are colored the same color as the
tangent lines (default is yellow) to distinguish them
from single points.
When the Duplicate Points Button is enabled and
you move the cursor near a point, the point you are
nearest to will flash, as a preview of which point will
be duplicated when you press down. Duplicate
points can be used to make animation holds in Liberty’s Animation Option.
Close Curve Button
Press to turn on or off. When on, the first and last
points in the curve are connected so that the curve is
closed.
Break Button
Each point in the curve has two tangents, represented on the screen by straight yellow lines through
the point. Normally the two tangents for each point
are locked together in a single line. The Break Button breaks the two tangents apart so each can be
changed independently of the other. This allows the
curve to take a sharp angle as it goes through the
point.
Revision A
4-253
Paint Environment
Revision A
4-253
Paint Environment
CHYRON Corporation
CHYRON Corporation
To break tangents:
•
Select a point, or points, whose tangents you
want to break.
•
Press the Break Button. The tangents change
from a solid white line to one solid and one broken line.
•
Clear the Select.
•
Use the Move Button to move the tangents
independently of each other.
Join Button
After you have broken a point’s tangents, use Join to
re-join them. It works the same as Break Points,
though it performs the opposite operation.
To join tangents that have been separated:
•
Press the Select Points Button and select the
point(s) you want to join.
•
Press the Join Button. The tangents of the
selected points are joined again.
Recall Points Button
Press the Recall button to display the File Popup and
recall curves that have been saved on the disk.
Type in the filename of the curve you want to recall,
or find the filename in the list and press on it. The
recalled curve replaces the current curve.
Paint Environment
4-254
Revision A
Paint Environment
4-254
Revision A
Liberty Artist’s Manual
Liberty Artist’s Manual
Save Points Button
Press the Save button to display the File Popup and
save the current curve to disk. You are prompted to
enter a filename for the curve you are saving. The
actual points and tangents of the curve are saved, not
the image that is created when you press OK.
Erase Points Button
Press the Erase button to delete all points on the
Canvas. It doesn't matter if the points are selected or
not.
Curve OK and Cancel Buttons
Press the OK button to draw the current curve, using
the current brush, color, and transparency. Unless
the Repeat Prefix is on, the Curve Popup disappears.
Press Cancel to remove the popup without drawing
the curve.
Curve Palette Button
Press the Palette button to call up the color palette
and color slider scales without exiting the Curve
Popup. Press OK to return to the Curve Popup.
Gravity Button
Press the Grav button to turn on Gravity, which
allows you to add a point exactly on top of another
point. This is useful when creating curves which
cross themselves (such as bows, etc.) The Grav button is grayed out unless you are in the Add or Move
Points mode.
Revision A
4-255
Paint Environment
Revision A
4-255
Paint Environment
CHYRON Corporation
CHYRON Corporation
To add a point exactly on top of an existing
point:
•
Press the Add Button.
•
Press the Gravity Button to turn it on.
•
Move the cursor near a point on the Canvas.
It lights up. The lighted point is the one over
which the added point will go.
•
Press down. Gravity causes the added point to
go exactly on top of the lighted (nearest) point.
The Move Gravity Function
Move Gravity combines the Gravity Button and the
Move Points Button. When the Gravity Button is
on, the Move Button will snap the point being
moved to any point it gets close to. This allows you
to lock curve points together after the points have
been added. Thus two existing points can be made
into duplicates.
Transform Points Functions
The upper part of the Curve Popup Menu contains
buttons for 3D rotation, scaling, and other transformations of curve points.
Transform Axis Button (xform)
This button works in conjunction with the Move
Points button. Turn on the Transform button, then
turn on Move. The center of rotation is displayed as
a small cross. Press on the Canvas to move the cross.
All subsequent rotations will use this point as their
center.
Paint Environment
4-256
Revision A
Paint Environment
4-256
Revision A
Liberty Artist’s Manual
Liberty Artist’s Manual
Scale Points Button
To scale curve points:
•
Select some points in the curve.
•
Press the Scale button.
•
Press and drag the pen up and down the Canvas. This causes the selected points to be scaled
up or down. The curve changes as the points are
scaled.
Center Points Button
Press the Cent button to center the selected points
around the transform axis.
Polygon Button
Press the Poly button to cause the selected points to
form a regular polygon. Three selected points
become an equilateral triangle; four selected points
become a square. Five selected points become a regular pentagon; and so on. At the same time, the tension of the curve is reduced to zero, making straight
lines between points. The curve changes as the
points take on the new arrangement.
X Rotate Points Button
To rotate curve points around the x axis:
Revision A
4-257
Paint Environment
Revision A
•
Select some points in the curve.
•
Press the Rot X button.
•
Press and drag up and down on the Canvas.
The curve changes as the points are rotated.
4-257
Paint Environment
CHYRON Corporation
CHYRON Corporation
Y Rotate Points Button
To rotate curve points around the y axis:
•
Select some points in the curve.
•
Press the Rot Y button.
•
Press and drag up and down on the Canvas.
The curve changes as the points are rotated.
Z Rotate Points Button
To rotate curve points around the z axis:
•
Select some points in the curve.
•
Press the Rot Z button.
•
Press and drag up and down on the Canvas.
The curve changes as the points are rotated.
Bias Button
To change the bias:
•
Select some points in the curve.
•
Press the Bias Button.
•
Press and drag up and down on the Canvas.
The curve changes as the bias of the points
changes.
About Bias
Like tension, Bias acts on each selected point in the
curve. When moving the cursor upward, bias
increases the length of a selected point's out-going
tangent. At the same time, it proportionately
decreases the length of the next point's tangent. This
Paint Environment
4-258
Revision A
Paint Environment
4-258
Revision A
Liberty Artist’s Manual
Liberty Artist’s Manual
has the effect of making the curve joining the two
points 'curvier' at the beginning and straighter at the
end.
Likewise, moving the cursor down has the effect of
making the curve straighter at the beginning and
'curvier' at the end. As with Tension, however, the
angles of the tangents matter also. If the tangents
point at each other, the curve will not get very
'curvy' (no matter how long the tangents become).
Tension Button
To change the tension:
•
Select some points in the curve.
•
Press the Tens button.
•
Press and drag up and down on the Canvas.
The curve changes as the tension of the points
changes.
About Tension
For each selected point, Tension uniformly increases
or decreases both tangents of the point. This change
is based on the Y movement of your cursor (moving
up makes the tangents longer, while moving down
makes the tangents shorter).
The idea is that making the tangents longer should
have the effect of making the curve 'curvier', while
shrinking them should have the effect of making the
curve straighter (more 'Tense'). Whether or not Tension actually does this, however, also depends on the
angles of the tangents. If the tangents of two adjacent curve points, for example, point straight at each
other directionally, then increasing their length
Revision A
4-259
Paint Environment
Revision A
4-259
Paint Environment
CHYRON Corporation
CHYRON Corporation
doesn't make the curve 'curvier' at all. The tangents
have to be angled somewhat away from each other
for the curve to get 'curvier'.
Resolution Button
Press the Resol button to display the current resolution of the curve. Default is 35 line segments
between points. Type in a new number to change
the resolution. Typing "1" gives straight lines
between the points.
Reverse Points Button
The Rev button reverses the order of two selected
points.
To reverse the order of two points:
•
Select the points to be swapped. Select just the
two points to be swapped.
•
Press the Rev Button to swap the order of the
two selected points. The curve display adjusts
to follow the new order.
Point List Button
The Point List Button is only enabled if you have
Liberty’s Animation Option. When editing an Animation actor's path (using the Edit Path button in the
actor edit menu), press the Point List button to recall
a Point File.
Point Files are created with the Motion Tracking
function in the Image Tools2 panel, when the tracking function is in Point mode (tracking a single point
in the image). The Point File is read in as a curve to
be used as a path in the animation actor. For exam-
Paint Environment
4-260
Revision A
Paint Environment
4-260
Revision A
Liberty Artist’s Manual
Liberty Artist’s Manual
ple, recalling a Point File while editing a Cel Actor's
path makes the actor's image follow the path defined
in the Point File, as defined for each frame.
Corner List Button
The Corner List Button is only enabled if you have
Liberty's Animation Option. When editing an Animation actor's path (using the Edit Path button in the
actor edit menu), press the Corner List button to
recall a Corner File. Corner Files are created with
the Motion Tracking function in the Image Tools2
panel, when the tracking function is in Corner mode
(tracking four corner points).
The Corner File is utilized to apply corner warping
to an animation actor. For example, recalling a Corner File while editing a Cel Actor's path puts the cel
actor's keyframes in Distort/Warp mode, and warps
the cel actor's image using the four corner points
defined in the Corner File for each frame.
Revision A
4-261
Paint Environment
Revision A
4-261
Paint Environment
CHYRON Corporation
CHYRON Corporation
4.13.3
Shape Popup
Figure 4-82. Shape Popup
The Shape Button calls up the Shape Popup, which
is used to create simple wireframe shapes to be rendered as a solid in the current color or as an outline
with the current brush.
Circle Button
To create a circle:
Paint Environment
4-262
Revision A
Paint Environment
•
Press the Circle Button.
•
Press on the Canvas. The place you press
becomes the center of the circle.
4-262
Revision A
Liberty Artist’s Manual
Liberty Artist’s Manual
•
Move the pen outwards, without losing contact with the tablet. The circle grows as you
drag away from the center.
•
Lift the pen when the circle is the right size.
•
Press the Fill Button or the Outline Button to
render the shape.
Ellipse Button
To create an ellipse:
•
Press the Ellipse Button.
•
Press on the Canvas. The place you press
becomes the center of the ellipse.
•
Move the pen outwards, without losing contact with the tablet. The ellipse grows as you
drag away from the center. The more you move
the pen horizontally, the more the ellipse grows
horizontally; the more you move the pen vertically, the more the ellipse grows vertically.
•
Lift the pen when the ellipse is the right size
and shape.
•
Press the Fill Button or the Outline Button to
render the shape.
Square Button
To create a square:
Revision A
4-263
Paint Environment
Revision A
•
Press the Square Button.
•
Press on the Canvas. The place you press
becomes the corner of the square.
•
Move the pen outwards, without losing contact with the tablet. The square grows as you
drag away from the corner.
4-263
Paint Environment
CHYRON Corporation
CHYRON Corporation
•
Lift the pen when the square is the right size.
•
Press the Fill Button or the Outline Button to
render the shape.
Rectangle Button
To create a rectangle:
•
Press the Rectangle Button.
•
Press on the Canvas. The place you press
becomes the corner of the rectangle.
•
Move the pen outwards, without losing contact with the tablet. You are dragging the opposite corner of the rectangle.
•
Lift the pen when the rectangle is the right
size and shape.
•
Press the Fill Button or the Outline Button to
render the shape.
Triangle Button
To create an equilateral triangle:
Paint Environment
4-264
Revision A
Paint Environment
•
Press the Triangle button.
•
Press on the Canvas. The place you press
becomes the center of the triangle.
•
Move the pen outwards, without losing contact with the tablet. The triangle grows as you
pull away from the center.
•
Lift the pen when the triangle is the right size.
•
Press the Fill Button or the Outline Button to
render the shape.
4-264
Revision A
Liberty Artist’s Manual
Liberty Artist’s Manual
Star Button
To create a star:
•
Press the Star button.
•
Press on the Canvas. The place you press
becomes the center of the star.
•
Move the pen outwards, without losing contact with the tablet. The star grows as you pull
away from the center.
•
Lift the pen when the star is the right size.
•
Press the Fill Button or the Outline Button to
render the shape.
Polygon Button
To create an irregular polygon:
Revision A
4-265
Paint Environment
Revision A
•
Press the Poly Button. It lights up.
•
Press the Polygon Window until it displays
“Add.”
•
Press repeatedly on the Canvas to add
points. Each point is connected to the previous
point by a straight line, forming a closed polygon.
By pressing repeatedly on the Poly Button, you
can cycle through the four different Poly Functions: Draw, Add, Delete, and Move. Draw
allows you to add points to the polygon. New
points are always added at the end of the polygon
(i.e. after the last point in the polygon). Add
allows you to add points to the polygon; however
it differs from Draw in that new points are added
between the two Polygon points closest to the
cursor. Move allows you to move the existing
points by pressing and dragging on them. Delete
allows you to delete points by pressing on or near
them.
4-265
Paint Environment
CHYRON Corporation
CHYRON Corporation
•
Press the Fill Button or the Outline Button to
render the shape.
The Polygon Button stays on as long as you are editing the polygon. Creating another shape erases the
existing polygon. To create another shape without
erasing the existing shape, use a different elevator
level.
Erase Button
Deletes the current shape.
Center Button
The Center Button positions the center of the current
shape at the center of the Canvas.
Move Button
To move the current shape:
Paint Environment
4-266
Revision A
Paint Environment
•
Press the Move button.
•
Press on the shape and drag it to its new position.
4-266
Revision A
Liberty Artist’s Manual
Liberty Artist’s Manual
Transform Shape Button (Trans)
Press the Trans button to call up the Transform
Popup which is used for rotating, scaling, slanting,
and mirroring the current shape. All functions work
similarly to those on the Paste Distort Popup.
Figure 4-83. Transform Shape Popup
Shape Gradation Button
Fills the current shape with a gradated mask, similar
to Gradated Rectangle Mask (see page 4-367). The
Direction Button controls the direction of the Gradation (see page 4-59). The corner button calls up the
Diagram, which you can use to distribute the gradation in non-linear ways. Note that the Gradation button only works when using shapes to create masks
(i.e. when the Paint panel is set to paint on Mask).
Shape Fill Button
Renders the current shape as a solid in the current
color, transparency, and size.
Revision A
4-267
Paint Environment
Revision A
4-267
Paint Environment
CHYRON Corporation
CHYRON Corporation
Shape Outline Button
Draws an outline of the current shape using the current brush, in the current color and transparency.
Shapes Popup Cancel Button
Closes the Shapes Popup Menu.
Shape Palette Button
Brings up the Color Palette and enables you to
change the palette colors, underlining the one you
want the current shape to render in. Press the OK
Button to return to the Shapes Popup.
Recall Shape and Save Shape Buttons
Used to recall and save shape files. This does not
save or recall the rendered picture of the shape, but
the wireframe only, as well as any settings that have
been changed from the defaults.
Shape Elevator
Creating a new shape erases whatever current shape
is displayed on the Canvas. To create a new shape
without erasing the current one, you must use a different elevator level. There are seven elevator levels, each of which can hold one shape. Press on the
level you want to edit. It becomes the active elevator level, and the shape contained in it is displayed
for editing or rendering. Use the Copy Button to
copy a shape to a different elevator level.
Paint Environment
4-268
Revision A
Paint Environment
4-268
Revision A
Liberty Artist’s Manual
Liberty Artist’s Manual
Shapes Inbetweening
Figure 4-84. Shapes Inbetweening Area
The Shapes Inbetweening section at the top of the
Shapes Popup is used to create intermediate “keyframes” of shapes between shapes that you create
using the standard Shapes tools. Thus, for instance,
you could create a triangle and a star at two different
keyframes and, using in-betweening, create a shape
that is between a triangle and a star.
To activate Shapes Inbetweening, press on the
Shapes Inbetweening Button at the top of the Shapes
Popup.
Shapes Inbetweening Timeline
This timeline is similar to the Morph Timeline. You
can add, delete, and copy keyframes or shapes along
the length of the Timeline. Controls are also provided to manipulate the points in a shape, so you can
adjust how one shape changes into another.
Press and drag the slider pointer at the bottom of the
Timeline to move it along the Timeline.
Revision A
4-269
Paint Environment
Revision A
4-269
Paint Environment
CHYRON Corporation
CHYRON Corporation
The Next/Previous Buttons (< >)
Press either of these buttons to move to the next or
previous keyframe on the Timeline.
The Add Keyframe Button (Add Kf)
To add a keyframe/shape to the Timeline:
•
Move the Timeline slider to the place where
you want to add the keyframe.
•
Create a shape on the Canvas, using the normal Shape tools.
•
Press the Add Kf Button. A keyframe of the
current shape is added. A keyframe marker
appears at that place on the Timeline.
Once you’ve added the keyframe, you can change
the shape on the Canvas, but the contents of the keyframe will not change. Use the Replace Kf Button to
update the shape in an existing keyframe. To display
the shape in an existing keyframe on the Canvas,
just move the Timeline marker to the desired keyframe and its shape appears on the Canvas. (Note
that if the Timeline marker is right on a keyframe,
the shape is drawn in white. If the marker is between
keyframes, the shape is drawn in red.)
You can press right on a keyframe’s marker on the
timeline to go directly to it.
The Delete Keyframe Button (Del Kf)
To delete an existing keyframe, move the marker to
the keyframe you want to delete and press the Del
Kf Button.
Paint Environment
4-270
Revision A
Paint Environment
4-270
Revision A
Liberty Artist’s Manual
Liberty Artist’s Manual
Copy Keyframe Button (Copy Kf)
To copy a keyframe to a new place on the Timeline,
move the marker to the keyframe you want to copy,
press the Copy Kf Button, and then click on the
Timeline at the desired location of the copied keyframe. This is useful when you have created an inbetween keyframe and want to put it somewhere
else on the Timeline.
About Shape Points - The Link Keyframe
Button (Link Kf)
The Link Keyframe Button allows you to control
how a shape’s points change between keyframes.
For example, when creating a keyframe between
two shapes with the same number of points, Liberty
makes its best guess as to how the points should correspond in the new keyframe. The Link Keyframe
Button allows you to adjust which points in the first
shape correspond to which points in the second
shape.
Internally each shape’s points have a certain order,
and each shape has a start point. When you choose a
keyframe (using the slider or the </> Buttons on the
Inbetween Timeline), the start point is red. The rest
of the points in the shape are ordered in either a
clockwise or counter-clockwise direction. The second point (one point either clockwise or counterclockwise from the start point) is yellow, which
helps you visualize how the points are ordered.
When a shape in-betweens to another shape, the
points are interpolated based on their order. The start
point of the first shape in-betweens to the start point
of the second shape, while the second point of the
first shape in-betweens to the second point of the
second shape, and so on for all the points. Press the
arrow buttons (</>) on either end of the Link KeyRevision A
4-271
Paint Environment
Revision A
4-271
Paint Environment
CHYRON Corporation
CHYRON Corporation
frame Button to cycle the order of the points in the
current shape. You can tell which way they’re
cycling by watching how the red (start) point moves.
You can also change the order to either clockwise or
counter clock-wise by pressing the labeled Link
Window Button till it displays the desired direction,
then pressing on the main part of the Link Keyframe
Button.
To get the best in-betweening results with the least
amount of folding and cross-over, place the start
points of the two neighboring keyframes in the same
relative position (for example, at the bottom of the
shapes) and make the direction of the order the same
(clockwise or counter-clockwise), and then press on
the main part of Link Keyframe Button.
Move Keyframe Points Buttons (Move Prev
Kf pt/Move Next Kf pt)
Use these buttons when the two shapes to be inbetweened have a different number of points. For
example, if the first shape has three points and the
second shape has five points, the second shape’s two
extra points have to originate somewhere in the first
shape. Often the second shape’s extra points originate from the same point on the first shape. You can
change how these points originate in the following
way:
To change the origin position of extra points
(from a triangle to a star):
Paint Environment
4-272
Revision A
Paint Environment
•
Use the Triangle Button to create a triangle
shape.
•
Move the Timeline marker to the beginning of
the Timeline.
4-272
Revision A
Liberty Artist’s Manual
Liberty Artist’s Manual
•
Press Add Kf. A new keyframe appears (the triangle) at the beginning of the Timeline.
•
Move the Timeline marker to the end of the
Timeline.
•
Use the Star Button to create a star shape.
•
Press Add Kf. A new keyframe appears (the
star) at the end of the Timeline.
•
Move the marker back to the first keyframe.
This selects the first keyframe (the triangle).
•
Press the Move Next Kf pt Button. The point
on the triangle where multiple points originate
turns blue. In this case, it’s the lower-left point of
the triangle.
•
Press and drag the seven multiple points out
of the blue point. As long as multiple points
remain, the point stays blue. You can drag the
points (one at a time) past other points in the
shape to distribute them evenly, two points to a
side. Note that the points turn green as you move
them.
•
Move the Timeline marker back and forth
between the two keyframes to see the inbetweening.
When the second shape has fewer points than the
first shape, the procedure is the same, except that
you choose the second keyframe and use the Move
Prev Kf pt Button.
See the Shapes Actor section in the Animation Environment, page 4-186, for details about how to animate shapes in-betweening.
Revision A
4-273
Paint Environment
Revision A
4-273
Paint Environment
CHYRON Corporation
CHYRON Corporation
4.13.4
Paint Mode Button
Figure 4-85. Paint Panel
The Paint Mode Button allows you to choose the
Paint Modes, which work in conjunction with the
three buttons in the top row, Paint, Line Draw,
Curve Draw, and Shape Draw. The paint Modes
are: Normal Paint, Blur Paint, Clone Paint, Paste
Paint, Pick Paint, Smear Paint, Reveal Paint, Reveal
Paint with Color, Reveal Paint with Hue, Reveal
Paint with Luminance, Reveal Paint with Tint,
Reveal Paint with Hue/Tint, Warp, Sharpen,
Emboss, Burn, Dodge, Saturate, De-saturate, and
Duplicate.
Some of the Paint Modes can be used in conjunction
with each other.
Paint Environment
4-274
Revision A
Paint Environment
4-274
Revision A
Liberty Artist’s Manual
Liberty Artist’s Manual
Paint Modes Window & Popup
Figure 4-86. Paint Modes Popup
The Paint Modes popup (Figure 4-86) contains buttons to choose the current Paint Mode. These modes
are described in the paragraphs below. If Paint is on
when you bring the popup up, you can select and try
the various paint modes while the popup is up. You
can then accept the selected paint mode with the OK
button, or cancel your selection with the Cancel button. Note that if Paint is not on when you bring up
the popup, it will be turned on after you press OK.
The modes on the right half of the Paint Modes
popup (starting with “Reveal”) use the current Temp
buffer as a source image. For example, the user can
use Reveal mode to paint the current temp onto the
canvas. The modes on the left half of the popup
(starting with “Normal”) do not use the current
Temp buffer as a source image. They either paint
with the current palette color (“Normal”), or apply
imaging effects (such as Blur) to the target image.
Revision A
4-275
Paint Environment
Revision A
4-275
Paint Environment
CHYRON Corporation
CHYRON Corporation
The paint mode popup also contains a “Temp Position” control, with “Inplace” and “Offset” buttons.
These buttons determine how the current Temp
buffer image is positioned during modes such as
Reveal. These buttons apply to all paint modes in the
right half of the Modes popup. They are grayed out
when the modes in the left half of the popup are in
use.
When the “Inplace” button is on, paint modes such
as Reveal utilize the in-place (or original) position
of the current temp. This is the default. When the
“Offset” button is on, paint modes such as Reveal
utilize the temp’s layer position (which is set by
activating the Temp as a Layer and positioning it).
For example, suppose the user recalls a cutout image
to the current temp, then turns the temp on as a layer
and moves the layer to the upper right corner of the
canvas. When the “Offset” button is on, Reveal
paint will reveal from the temp at its layer position
(in the upper right corner of the canvas). When the
“Inplace” button is on, Reveal paint will reveal the
image at its original position.
The Paint Modes are further described in the following paragraphs:
Normal Paint
Normal Paint Mode is the default. You paint with
the current brush in the current palette color at the
current transparency level.
If no color is selected in the Palette, painting erases
the current image on the Canvas.
Paint Environment
4-276
Revision A
Paint Environment
4-276
Revision A
Liberty Artist’s Manual
Liberty Artist’s Manual
Smear Paint
In Smear Paint Mode, the existing color on the Canvas is “smeared” or pushed around as you paint. A
solid brush drags a piece of the Canvas; an airbrush
smears; randomized custom brushes can simulate
smoke or dithering. Good for removing or smoothing details in captured frames of video, or for giving
painterly effects to captured video. Normally, you
would use Smear Paint with a fairly low transparency level, a low Brush Gap, and Exact Mode.
Warp Paint
In Warp Paint Mode, the image on the Canvas is
“warped” in the direction that you paint. With a
solid brush, the image is offset and slightly blurred.
An airbrush offsets and greatly blurs the image.
Blur Paint
In Blur Paint Mode, the image on the Canvas is
blurred wherever you paint.
Sharpen Paint
In Sharpen Paint Mode, the image has a sharpen filter applied to it wherever you paint.
Emboss Paint
In Emboss Paint Mode, the image is embossed in the
direction you paint. For best results, use a low opacity setting and a light touch on the stylus.
Burn Paint
In Burn Paint Mode, the image on the Canvas is
darkened as you paint over it.
Revision A
4-277
Paint Environment
Revision A
4-277
Paint Environment
CHYRON Corporation
CHYRON Corporation
Dodge Paint
In Dodge Paint Mode, the image on the Canvas is
lightened as you paint over it.
Saturate Paint
In Saturate Paint Mode, the image on the Canvas
becomes more saturated as you paint over it.
De-saturate Paint
In De-saturate Paint Mode, the image on the Canvas
becomes less saturated as you paint over it.
Clone Paint
Clone Paint picks up one part of the screen and
paints it over another part.
To use Clone Paint Mode:
Paint Environment
4-278
Revision A
Paint Environment
•
Press the Clone Paint Button in the Paint
Mode Popup to turn it on.
•
Position the cursor where you want to paint
from and press down.
•
Holding the pen down, drag to where you
want to paint to. A white line stretches out
from the place where you pressed down, which is
marked by a white crosshair.
•
Release the pen. The offset is set to be the distance and angle from the point of first pressdown to the point of release. The white line is
now attached to your cursor.
•
Paint on the Canvas. Liberty picks up image
from the crosshair and paints with it at the cursor. If you want to reset the offset, use either the
4-278
Revision A
Liberty Artist’s Manual
Liberty Artist’s Manual
button on the barrel of the pen (available on all
but the older model Wacom tablets), or the middle mouse button.
Duplicate Paint
Duplicate Paint Mode works exactly like Clone
Paint, except that the offset origin returns to the
same place each time you lift the pen/mouse. This is
useful for repeatedly copying the same object to different places on the Canvas (for example, replicating
trees). This tool is sometimes called “non-aligned
Clone.”
Reveal Paint
Reveal Paint uses the contents of the Temp Buffer as
a source instead of the current color. It reveals the
contents of the Temp Buffer into the Canvas while
you paint. The lower the setting of the Transparency
Slider, the more gradually reveal-painting takes
place.
Reveal Paint with Color
Paints the color of the contents of the Temp Buffer
into the Canvas, while preserving the luminance of
the Canvas image. Only paints into image areas of
the canvas.
Reveal Paint with Hue
Paints the hue of the contents of the Temp Buffer
into the Canvas, while preserving the saturation of
the Canvas image. Maintains highlights. Only
paints into image areas of the canvas.
Revision A
4-279
Paint Environment
Revision A
4-279
Paint Environment
CHYRON Corporation
CHYRON Corporation
Reveal Paint with Luminance
Paints the luminance of the contents of the Temp
Buffer into the Canvas, while preserving the color of
the Canvas image. Only paints into image areas of
the canvas.
Reveal Paint with Tint
In Reveal Paint with Tint Mode, the contents of the
Temp Buffer is reveal-painted into the Canvas while
tinting it with the current color. Is not constrained to
painting into image areas of the Canvas.
Reveal Paint with Hue/Tint
Reveal Paint with Hue has the same effect as Reveal
Paint with Tint, but preserves white high-lights
which Tint would have filled with color. Is not constrained to painting into image areas of the Canvas.
Pick Paint
When Pick-Paint Mode is on, Liberty “picks” the
color in the Temp Buffer at the current brush coordinates and then paints with that color on the Canvas
in the same place. It is similar to Reveal Paint, but it
creates a blurred or “painterly” effect. You can get a
very large range of effects with Pick Paint using
Programmed and User Brushes. By making a Pick
Paint Macro you can automate the process and perform it automatically on a number of pictures or
frames of captured video (see Macros, page 4-413).
Paste Paint
Paste Paint uses the contents of the Temp Buffer as a
brush. Paste Paint allows you to use a brush element
that is not limited in size or color like a normal paint
brush. It does not use the palette color, but the colors from the image in the Temp Buffer.
Paint Environment
4-280
Revision A
Paint Environment
4-280
Revision A
Liberty Artist’s Manual
Liberty Artist’s Manual
NOTE
The Paint Gap Popup (see page 4-257)
uses the size of the current brush to
calculate where to put down brush
images, not the size of the element in
the Temp Buffer. It is recommended,
if you are not using NoFill Mode, to
make the current brush about the
same size as whatever element you
are Paste-Painting with. Experiment
with different brush sizes and Paint
Gap Modes.
Clone Temp Paint
Clone Temp Mode works just like Clone Paint
except that it uses the image in the current Temp
(rather than the Canvas) as a source for painting.
Duplicate Temp Paint
Duplicate Temp Mode works just like Duplicate
Paint except that it uses the image in the current
Temp (rather than the Canvas) as a source for painting.
4.13.5
Paint On Button
The Paint On Button allows you to choose between
Paint On Canvas Mode (which is the default for
painting color onto the Canvas) or Paint On Mask
Mode, which uses the current brush and transparency to paint on the mask layer. All of the other
mask functions are located on the Mask Panel, the
rightmost of the four Panel Menu positions by
default. For more detail about masks and masking,
see page 4-363, the Mask Panels.
Revision A
4-281
Paint Environment
Revision A
4-281
Paint Environment
CHYRON Corporation
CHYRON Corporation
Fractal Paint Button
Fractal painting moves the brush along a jagged path
(for painting rough, natural-looking strokes). Fractal
painting can also branch out into multiple paths,
which is useful for effects such as lightning. The
main Fractal Button turns Fractal Mode on and off.
You can use Fractal mode with any of the painting
tools (Paint, Line, Curve, and Shape), and any of the
other painting effects (for example, Jitter).
Fractal Popup
Figure 4-87. The Fractal Popup
The Fractal corner button brings up the Fractal
Popup with a Roughness Slider and a Radiate On/off
Button. The slider controls the jaggedness (randomness) of the fractal strokes, while Radiate Mode,
when on, causes multiple strokes to branch out as
you paint. The red Reset Button resets the slider to
default and the Radiate Button to off. The OK Button confirms the settings and brings down the
popup, while the Cancel Button brings down the
popup while reverting to the previous settings.
Paint Environment
4-282
Revision A
Paint Environment
4-282
Revision A
Liberty Artist’s Manual
Liberty Artist’s Manual
Try using Radiate Mode with Smear Paint on a Canvas image for some nice water color and broken
glass effects. Also, try using Fractal Paint in a
Macro. Since the random numbers used by Fractal
Paint change each time the Macro is run, the fractal
lines will appear to dance from frame to frame as the
Macro renders.
Cancel Button
The Cancel Button reverts to the prior randomness
value, but doesn't reset the Radiate Button setting.
4.13.6
Fold Button
NOTE
The Fold, Noise, Jitter, and Pressure
buttons can be active simultaneously,
or in any combination, along with the
current Paint Mode.
When Fold Paint Mode is on, painting "wraps
around" - that is, when you paint off one edge of the
Canvas, it spills over on the opposite edge. Painting
off the right edge spills over onto the left edge and
vice-versa. Top/bottom painting works the same.
This results in a Canvas whose edges can be joined
together seamlessly when, for instance, it is texturemapped in a 3D program.
To paint a seamless rectangle for tiling:
Revision A
4-283
Paint Environment
Revision A
•
Use Rectangle Mask (see page 4-368) to mask
a rectangle on the Canvas.
•
Press Fold Paint to turn it on.
•
Paint into the rectangle, painting across edges.
4-283
Paint Environment
CHYRON Corporation
CHYRON Corporation
•
4.13.7
Cut the painted rectangle into the Temp
Buffer and use Copy/Tile to tile it without
gaps. See page 4-143 for details about Copy/
Tile.
Noise Button
When noise is enabled, colors on the brush are randomized as they are painted, introducing textures
and grains to the painted strokes. This feature can be
used to achieve more natural-looking paint effects,
or to re-introduce grain into a touched-up area of
film/video.
Noise can be used with all Canvas paint modes (normal, reveal, clone, etc.) except for Paste. Noise can
also be used with erase paint and painting to mask.
To use Noise Paint Mode:
Paint Environment
4-284
Revision A
[ ] 1.
Set the Transparency Slider Scale near the
bottom. This allows the grain or noise to build
up slowly.
[ ] 2.
Press the corner button of the Noise Paint
Button. The Noise Paint Popup appears.
[ ] 3.
Use the sliders to choose the amount of noise
for Hue, Saturation and Value, and for each
color component. Gauss mode with the Red,
Green, and Blue sliders at the top is usually
appropriate for most uses, but you will want to
experiment with each individually to choose
your favorite.
[ ] 4.
Press OK.
[ ] 5.
Paint on the Canvas.
As you paint,
graininess, or noise, is introduced as the brush
is moved along.
Paint Environment
4-284
Revision A
Liberty Artist’s Manual
Liberty Artist’s Manual
Noise Popup
Figure 4-88. Noise Popup
The Noise Popup contains sliders scales to control
how much noise is painted into the six channels:
Hue, Saturation, Value, Red, Green, and Blue. It
also has two noise modes, Uniform and Gauss,
which give slightly different effects. You can simultaneously paint and adjust the sliders while the
popup is up, to test out different combinations of
effects.
NOTE
The red slider is also used for Mask
Paint and Erase Paint.
4.13.8
Jitter Button
Jitter Paint adds a random positional jitter to painting. The paint brush bounces around randomly to
give a scatter-paint effect. You can control the
amount of jitter with a slider on the Jitter Popup.
Revision A
4-285
Paint Environment
Revision A
4-285
Paint Environment
CHYRON Corporation
CHYRON Corporation
Jitter Popup
Figure 4-89. Jitter Popup
To vary the amount of jitter in Jitter Paint:
•
Press the corner button of Jitter Paint. The
Jitter Popup appears.
•
Press and drag the Jitter Slider. The scale
goes from 0 to 300.
•
Press OK to set the value and remove the
popup.
Jitter Paint can be used with all other Paint Modes
including Paint On Mask, as well as with Line,
Curve, and Shape Draw.
4.13.9
Pressure Button
Pressure Paint is a mode which, when enabled,
invokes the pressure-sensitive features of the tablet.
With the Pressure Popup, pen pressure can control
brush size, jitter, rotation, and color, as well as transparency. If you are using a mouse, or if the current
Paint Environment
4-286
Revision A
Paint Environment
4-286
Revision A
Liberty Artist’s Manual
Liberty Artist’s Manual
tablet is not pressure-sensitive, the Pressure Button
does nothing. Pressure Mode works with all Paint
Modes (including Paint On Mask.)
Press the Pressure Button to turn on/off pressuresensitive mode.
Pressure Popup
Figure 4-90. Pressure Popup
Press the corner button of the Pressure Button to call
up the Pressure Popup. Use the Pressure Popup to
assign different painting functions to pressure-sensitivity. They include Angle, Size, Alpha (transparency), Jitter, and Color. You can use any
combination of these modes at one time.
NOTE
Angle only works with user brushes,
since the other brush types (Air,
Solid, and Programmed) are rou7nd.
Revision A
4-287
Paint Environment
Revision A
4-287
Paint Environment
CHYRON Corporation
CHYRON Corporation
To access the Pressure Popup:
•
Press the corner button of the Pressure Button. The Pressure Popup appears.
•
Press the modes you want to turn on or off.
You can use any combination of the modes:
angle, size, alpha, jitter, and color.
•
Press the OK Button. The Pressure Popup disappears. The Pressure Button stays on.
•
Proceed to paint on the Canvas.
Pressure Angle Button
With the Pressure Angle mode on, the brush rotates
clockwise in Z the harder you press. Zero pressure
equals zero rotation (12 o’clock). Pressure Angle
mode only works with User-Defined brushes,
because all other brushes are round and do not vary
when rotated in Z.
Angle Slider
Press and drag the Angle Slider Scale to set the maximum rotation when Pressure Angle mode is on. If
the Angle Slider is set at 180, then pressing down
half-way will turn the brush 90 degrees, and using
full pressure will turn it 180 degrees.
Pressure Size Button
When Pressure Size mode is on, brush size varies
dynamically with pressure. The harder you press,
the bigger the brush gets. With minimum pressure,
the brush size is the value defined in the Brush Size
Slider. With maximum pressure, the brush size
equals the size defined in the Brush Size Slider plus
the setting of the Size Increase Slider.
Paint Environment
4-288
Revision A
Paint Environment
4-288
Revision A
Liberty Artist’s Manual
Liberty Artist’s Manual
Size Increase Slider
Press and drag the Size Increase Slider to set the difference between the brush sizes at minimum and
maximum pressure. If the Brush Size Slider is at
10% and the Size Increase Slider is at 40, then the
brush size at minimum pressure is 10 and at maximum pressure, 50.
Pressure Alpha Button
When Pressure Alpha mode is on, brush opacity varies with pressure. The harder you press, the more
opaque the brush is. With minimum pressure, the
brush is transparent. With maximum pressure, the
brush opacity is defined by the current setting of the
Transparency Slider.
Pressure Jitter Button
When Pressure Jitter mode is on, the amount of jitter
of brush placement varies with pressure. At minimum pressure, there is no jitter. At maximum pressure, jitter is defined by the current setting of the
Jitter Slider in the Jitter Popup. Pressure Jitter only
works if you turn on the Jitter Button and it is set to
a value greater than 0 (see the Jitter Button, below).
Pressure Color Button
When Pressure Color mode is on, brush color varies
with pressure. At minimum pressure, the brush uses
the first color selected in the palette (when Multicolor Mode is activated.) At maximum pressure, the
brush uses the last color selected in the palette. At
pressures between minimum and maximum, the
brush uses the selected colors between the first and
the last selected colors, with smooth interpolation
between colors. This works in normal paint mode,
and also with Reveal-Tint and Reveal-Tint-Hue
modes.
Revision A
4-289
Paint Environment
Revision A
4-289
Paint Environment
CHYRON Corporation
CHYRON Corporation
To paint, varying brush color with pressure:
[ ] 1.
Turn on Multi-color Mode in the palette.
[ ] 2.
Choose a range of colors by underlining
them.
[ ] 3.
Press the corner button of the Pressure
Paint Button. The Pressure Popup appears.
[ ] 4.
Press the Pressure Color Button to turn it
on.
[ ] 5.
Press the OK Button.
[ ] 6.
Paint with varying pressure.
Pressure OK Button
Press to confirm the settings in the Pressure
Popup and remove the popup. If all the Pressure
Mode Buttons are off, the Pressure Paint Button will
be off when the popup disappears. If any of the
Pressure Mode Buttons are on, the Pressure Paint
Button will be on when the popup disappears.
Pressure Diagram
Allows you to re-map pressure values coming from
the tablet, thereby modifying how pressures affect
painting.
For instance, you could invert the Diagram Curve,
causing pressure values to be inverted. Pressing
harder would have the opposite of the usual effect.
In Size Mode, pressing harder would result in a
smaller brush size.
Pressure Cancel Button
Press to cancel changes you’ve made in the popup
and remove the popup.
Paint Environment
4-290
Revision A
Paint Environment
4-290
Revision A
Liberty Artist’s Manual
Liberty Artist’s Manual
Pressure Save Button
Press to save the current Pressure Diagram.
Pressure Recall Button
Press to recall a Pressure Diagram from the disk.
4.14
IMAGE TOOLS PANELS
The Image Tools Panels contain functions which
operate on the masked area of the Canvas, altering it
in some way. Many of the tools have popup menus
which allow you to change settings and preview
them.
If no mask is active on the Canvas, the functions
operates on the entire Canvas.
Most Image Tools buttons have a popup, invoked by
pressing on the corresponding corner button. The
popup allows settings for the tool to be adjusted.
Once the settings have been chosen, pressing on the
tool’s main button performs the function, using the
last settings chosen in the pop-up.
Preview Buttons
Most Image Tools popup menus have two preview
buttons: Preview and Active. Press the Preview
Button to preview the results of the current settings.
Press the Active Button to turn on Active Mode,
which will preview the results of the settings every
time you make a change in them. Active Mode
works well when you have a small area masked in
which to preview the changes (or a very fast computer).
Revision A
4-291
Paint Environment
Revision A
4-291
Paint Environment
CHYRON Corporation
CHYRON Corporation
Image Tools Popup OK and Cancel Buttons
Most Image Tools popup menus have an OK and a
Cancel button. Pressing the OK Button performs the
function and removes the popup. Cancel removes
the popup with no change to the Canvas.
Applying Image Tools to Temps and Masks
The Image Tools Panels have a Canvas/Temp Mode
bar on the top, similar to the Paint Panel. In Canvas
Mode, the Image Tools apply to the Canvas. In
Temp Mode, they apply to the current Temp (the
Temp must be an active layer). Thus, you can apply
Image Tools and their previews to various individual layers on the Canvas by selecting a layer as the
current layer, then applying the function as desired.
Note that several Image Tools are not implemented
for Temp Mode. This is generally because such tools
require both the current Temp and the Canvas. The
following Image Tools are not implemented in
Temp Mode: Reveal, both Morph functions, Motion
Tracking, and Dither. These buttons are grayed out
when Temp Mode is active.
In Mask Mode, Image Tools are applied to the current mask.
Paint Environment
4-292
Revision A
Paint Environment
4-292
Revision A
Liberty Artist’s Manual
Liberty Artist’s Manual
4.15
Image Tools 1 Panel
Figure 4-91. Image Tools 1 Panel
4.15.1
Image Tools 1 Adjust Button
Press the Adjust Button to adjust contrast, brightness, and gamma in the masked area of the Canvas,
according to the settings of the Adjust Popup. Press
the corner button of Adjust to call up the Adjust
Popup.
Adjust Popup
This popup allows you to adjust brightness, contrast,
and gamma all at once, using one Diagram Curve.
You can adjust these values in two ways: (1) With
the Diagram and (2) With the Sliders. Altering the
Sliders also alters the Diagram.
Sliders
There are three sliders, each with a mode button
beneath. If the mode button is on, then the slider’s
setting is reflected on the Diagram Curve. If the
mode button is off, the slider has no effect.
Revision A
4-293
Paint Environment
Revision A
4-293
Paint Environment
CHYRON Corporation
CHYRON Corporation
Contrast Slider
Press and drag the Contrast Slider to increase and
decrease contrast. The Contrast Slider ranges from
-63 at the bottom to +63 at the top.
Brightness Slider
Press and drag the Brightness Slider to increase and
decrease brightness. The Brightness Slider ranges
from -100 at the bottom to +200 at the top.
Gamma Slider
The Gamma Slider ranges from +50% to -50%. A
positive percentage darkens the dark values; a negative percentage brightens the light values.
Experiment with the Adjust Popup to understand
what its effects are.
High Contrast Mode
High Contrast Mode has the same effect as Contrast
Mode with the slider at the top.
Normalize Mode
Adjusts the contrast of the image so that the full
range of brightness values are utilized. (When this
mode is selected, a momentary pause may occur
while the software scans the image to determine its
brightness range.) Normalize mode stretches the
lightest and darkest values in the selected area to
true white and true black; a low-contrast picture will
look as if a gray film has been lifted from it when it
is Normalized.
NOTE
Contrast, High Contrast, and
Normalize are mutually exclusive.
Paint Environment
4-294
Revision A
Paint Environment
4-294
Revision A
Liberty Artist’s Manual
Liberty Artist’s Manual
Adjust Diagram
The Diagram used with Adjust changes the distribution of contrast, brightness, and gamma correction.
A straight diagonal ramp gives a one-to-one for no
adjustment. If you alter the curve, the masked areas
of the Canvas are adjusted according to the curve.
You can drag the sliders to see how they affect the
curve; then you can further adjust the curve in three
ways: (1) Drag the Diagram Sliders (the arrow buttons adjacent to the Diagram), or (2) Press and drag
directly on the curve to modify it graphically, or (3)
Use the Curve Functions to smooth the curve, posterize the curve, or invert the curve. You can use
any or all of these methods at the same time. When
you have created a useful curve you can save it on
disk for later recall back into the Diagram. Press the
Red Reset Button to restore the diagonal straight
default Diagram. Press the small gray Reset Button
to reset only the sliders. The best way to learn to use
the Diagram Curve with Adjust is to experiment.
Preview and the Active Preview Button
Press Preview to see a preview of the adjustment.
When the Active Button is on, every change you
make on the Diagram or Sliders will update the preview.
OK Button and the Cancel Button
Press OK to perform the adjustment; press the Cancel Button to remove the popup with no adjustment.
Revision A
4-295
Paint Environment
Revision A
4-295
Paint Environment
Liberty Artist’s Manual
Figure 4-92. Adjust Popup
Revision A
4-297
Paint Environment
Liberty Artist’s Manual
Liberty Artist’s Manual
4.15.2
Color Correct Button
The Color Correct Button gives you a popup that
allows you to correct the Hue, Saturation, Value, or
Alpha (HSVA) of the masked area of the Canvas.
You can also correct in the color spaces of RGBA,
CMYK, or RGBB. If nothing is masked, the entire
Canvas is affected.
Press the corner button of the Color Correct Button
to call up the Color Correct Popup.
Color Correct Popup
The Color Correct Popup (Figure 4-93) contains a
set of four sliders and diagrams, one for each component. You manipulate these sliders and diagrams
to alter the way the component is applied to the
masked area of the Canvas.
Changing the sliders performs a global adjustment
on the given color component, while the diagrams
allow more localized adjustments to be made (note
that adjusting the diagrams always overrides the corresponding slider adjustments.) The sliders come up
straight above the leftmost diagram. Each slider is
labeled with the corresponding color component
(e.g. H, S, V, A). The diagrams, although not
labeled, appear in this same order, left to right.
Color Correct Diagrams
The Diagrams used with Color Correct change the
distribution of the components in the masked area of
the Canvas. A straight diagonal ramp gives a oneto-one correlation for no correction. If you alter the
Diagram Curves, the masked areas of the Canvas are
corrected accordingly. You can adjust the Diagram
in three ways: (1) Drag the Diagram Sliders (the
Revision A
4-299
Paint Environment
Revision A
4-299
Paint Environment
CHYRON Corporation
CHYRON Corporation
arrow buttons adjacent to the Diagram), or (2) Press
and drag directly on the curve to modify it graphically, or (3) Use the Curve Functions to smooth the
curve, posterize the curve, or invert the curve. You
can use any or all of these methods at the same time.
When you have created a useful set of curves you
can save it on disk for later recall back into the Diagrams. Press the Red Reset Button to restore all the
Diagrams to the diagonal straight default ramp.
Press the small gray Reset Buttons to reset only each
set of sliders. The best way to learn to use the Diagram Curves with Color Correct is to experiment.
Simple Adding or Subtracting of a
Component
By dragging the left vertical slider down, you reduce
the amount of any given component. By dragging it
up you increase the amount of that component.
Paint Environment
4-300
Revision A
Paint Environment
4-300
Revision A
Liberty Artist’s Manual
Figure 4-93. Color Correct Popup
Revision A
4-301
Paint Environment
Liberty Artist’s Manual
Liberty Artist’s Manual
HSVA
Assigns Hue, Saturation, Value, and Alpha components to the four Diagrams.
RGBA
Assigns Red, Green, Blue, and Alpha components to
the four Diagrams.
RGBB
Assigns Red, Green, Blue and Brightness controls to
the four Diagrams. This allows the user to adjust the
individual image components (Red, Green, and
Blue), at the same time as adjusting the overall
image brightness (with the rightmost diagram, or the
rightmost slider labeled “Br”).
CMYK
Assigns Cyan, Magenta, Yellow, and Black components to the four Diagrams.
Preview , Active Preview Button s
Press Preview to see a preview of the adjustment.
When the Active Button is on, every change you
make on the Diagram or Sliders will update the preview.
OK , Cancel Buttons
Press OK to perform the adjustment; press the Cancel Button to remove the popup with no adjustment.
4.15.3
Noise Button
The Noise Button allows you to apply grain and
noise effects to the masked area of the Canvas. It can
also be used to generate a variety of interesting texRevision A
4-303
Paint Environment
Revision A
4-303
Paint Environment
CHYRON Corporation
CHYRON Corporation
ture patterns. Noise effects can also be animated
using the Mask Actor in the Animation Environment.
To apply noise into an area:
Paint Environment
4-304
Revision A
Paint Environment
•
Mask the desired area on the Canvas. If there
is no mask active on the Canvas, the entire Canvas will have noise applied.
•
Press the corner button of the Noise Button to
call up the Noise Popup. The Noise Popup
appears. If you press the main part of the Noise
Button, noise is applied according to the current
settings.
•
Press some of the Color Controls to high-light
them. This designates the channels on the Canvas where the noise will appear.
•
Choose one of the Noise Modes (Uniform,
Gauss, etc.).
•
Press OK. The noise is applied into the masked
area.
4-304
Revision A
Liberty Artist’s Manual
Noise Popup
Figure 4-94. Noise Popup
Revision A
4-305
Paint Environment
Liberty Artist’s Manual
Liberty Artist’s Manual
The Noise Popup contains a host of tools for controlling the application of different kinds of noise to
the Canvas.
Palette Button
When the Palette Button is high-lighted, noise is
applied using the Palette colors that are currently
selected in the Palette (instead of the image on the
Canvas). There must be at least two colors selected
(in the Palette’s Multiple Colors Mode). Pressing on
the Color Chip Button above the Palette Button displays the currently selected Palette colors that will
be used to generate the noise.
To turn the Palette Button off, just press on one of
the Color Control Buttons (Hue, Saturation, Brightness, etc.) and noise will be applied to that channel
of the image on the Canvas (instead of to the Palette
colors).
Noise Modes
Press on one of the Noise Modes to highlight it. You
can control how the Uniform and Gaussian Modes
are applied to the Canvas by adjusting the HSV and
RGB sliders at the left.
You can further control the Clouds, Fibers, Marble,
and Fabric Modes by also adjusting the X Scale, Y
Scale, Levels, and Time sliders on the left. Marble
and Fabric Modes can be given additional control by
adjusting the Warp Slider.
X Scale Slider
Provides control of the width of the noise for
Clouds, Fibers, Marble, and Fabric Modes.
Revision A
4-307
Paint Environment
Revision A
4-307
Paint Environment
CHYRON Corporation
CHYRON Corporation
Y Scale Slider
Provides control of the height of the noise for
Clouds, Fibers, Marble, and Fabric Modes.
Levels Slider
Provides control of the amount of “granularity” of
the noise for Clouds, Fibers, Marble and Fabric
Modes. The higher the setting the more grainy the
noise.
Warp Slider
Provides control of the warp distortion of the noise
for Marble and Fabric Modes. Marble Mode is
directional, controlled by the setting of the Direction
“Clock” near the Brush Display at the top left of the
Paint Environment. To see how Warp interacts with
Marble Mode, try Marble Mode with the Warp setting at one (1), then again with Warp set at a higher
number.
Time Slider
Primarily used for controlling noise applied over
time in the Mask Actor in the Animation Environment. Changing the setting of the Time Slider alters
the distribution of the noise. Making small, incremental changes in the Time settings makes small,
incremental variations in the distribution of the
noise.
Elevator Presets
The popup has twelve presets for saving different
configurations of the settings for Noise.
Paint Environment
4-308
Revision A
Paint Environment
4-308
Revision A
Liberty Artist’s Manual
Liberty Artist’s Manual
The Preview and the Active Preview Button
Press Preview to see a preview of the noise. When
the Active Button is on, every change you make on
the popup updates the previewed image. Pressing
Cancel restores the original Canvas image
unchanged. Pressing OK performs the noise on the
masked area.
4.15.4
Apply Button
The Apply Button applies a color, or colors, to the
masked area. When a single palette color is chosen,
that color is applied uniformly to the masked area.
If multiple palette colors are chosen, a gradated
wash is applied from the palette.
Apply Popup
Figure 4-95. Apply Popup
Press the corner button of Apply to call up the Apply
Popup. The Apply Popup has three basic options:
Apply, which gives a straight-line gradation of color
to the masked area; Circular Apply, which gives a
concentric gradation of color to the masked area;
and Radial Apply, which gives a radial (sweeping)
gradation of color to the masked area.
Revision A
4-309
Paint Environment
Revision A
4-309
Paint Environment
CHYRON Corporation
CHYRON Corporation
The OK button in the apply popup applies a gradation to the canvas, based on the settings in the
popup. It also brings down the popup. The Cancel
button brings down the popup (without applying a
gradation).
Once the user has adjusted settings in the Apply
Popup, the main “Apply Color” button in the (Image
Tools 1 Panel) applies a gradation to the canvas
(based on the settings in the popup, but without
bringing up the popup).
Linear Apply Button (on the Apply Popup)
When the Linear Apply Button is highlighted, you
are in Linear Apply Mode. In this mode (which is
the default) multiple colors chosen on the palette are
applied to the masked area in a linear gradation. The
direction of the gradation depends on the Direction
Button, see page 4-59. The gradation always starts
with the upper, left-most color selected in the palette
and proceeds to the lower, right-most color selected
in the palette.
Circular Apply Button
When the Circular Apply Button is highlighted, you
are in Circular Apply Mode. In this mode multiple
colors chosen on the palette are applied to the
masked area in a circular gradation. The upper leftmost color in the palette starts at the center and
moves outward, ending with the lower right-most
color in the palette. Circular Apply has several
modes that control how color is distributed,
described below.
Paint Environment
4-310
Revision A
Paint Environment
4-310
Revision A
Liberty Artist’s Manual
Liberty Artist’s Manual
Radial Apply Button
When the Radial Apply Button is highlighted, you
are in Radial Apply Mode. In this mode multiple
colors chosen on the palette are applied to the
masked area in a radial gradation. The colors are
gradated as if they were swept by a rotating arm.
The starting angle of the gradation is set using the
Direction Button (page 4-59). Only the Centered and
Pick Points modes below affect Radial Apply.
Near Edge Mode
When Near Edge Mode is enabled, the Circular Gradation starts at the center of the bounding box of the
masked area and ends at the nearest edge of the
bounding box of the masked area. Does not apply to
Radial Gradation.
Far Edge Mode
When Far Edge Mode is enabled, the Circular Gradation starts at the center of the bounding box of the
masked area and ends at the farthest edge of the
bounding box. This makes for a more diffuse gradation than Near Edge, since it is over a longer distance. Does not apply to Radial Gradation.
Corner Mode
When Corner Mode is enabled, the Circular Gradation starts at the center of the bounding box of the
masked area and ends at the farthest corner of the
bounding box. This makes for the most diffuse gradation of all, since the farthest corner is a greater
distance than the farthest edge. Does not apply to
Radial Gradation.
Revision A
4-311
Paint Environment
Revision A
4-311
Paint Environment
CHYRON Corporation
CHYRON Corporation
Pick Point Mode
Pick Point allows you to choose where the Circular
or Radial Gradation starts within the bounding box
of the masked area. To select a new origin for either
the Circular or Radial Gradation, click on the Pick
Point Button (at which time all the menu buttons
will be grayed out), then click on the Canvas to set
the new origin.
Centered Mode
Centered Mode is the default; it starts the Circular or
Radial Gradation at the center of the bounding box
of the masked area.
Apply Diagram
The Diagram used with Apply changes the distribution of colors in a multiple-color apply. The vertical
axis represents the colors of the apply, while the horizontal axis represents the space the apply fills. A
straight diagonal ramp gives a one-to-one correlation between colors and space, for a normal, linear,
default apply. If you alter the curve, the colors are
given a different distribution. You can alter the
curve in three ways: (1) Drag the sliders, or (2) Press
and drag directly on the curve to modify it graphically, or (3) Use the Curve Functions to smooth the
curve, posterize the curve, or invert the curve. You
can use any or all of these methods at the same time.
When you have created a useful curve you can save
it on disk for later recall back into the Diagram.
Press the Red Reset Button to restore the diagonal
straight default Diagram. Press the small gray Reset
Button to reset only the sliders. The best way to
learn to use the Diagram Curve with Apply is to
experiment.
Paint Environment
4-312
Revision A
Paint Environment
4-312
Revision A
Liberty Artist’s Manual
Liberty Artist’s Manual
4.15.5
Color Clip Button
Figure 4-96. Color Clip Popup
Press the Color Clip Button to clip the colors in the
masked area of the Canvas to legal NTSC or PAL
colors. Press the corner button of Color Clip to call
up the Color Clip Popup.
NTSC Mode
Press to enable NTSC Mode, which causes Color
Clip to clip colors to NTSC legal values.
PAL Mode
Press to enable PAL Mode, which causes Color Clip
to clip colors to PAL legal values.
Gamma Correct Window
Press in the window to type in a gamma correction
value, which is utilized in conversion to/from
NTSC/PAL Color Space. A value of “1” means that
no gamma is applied in this conversion.
NOTE
Ths Color Clip button is inactive in
Liberty 64, since it does not pertain to
film or the 64-bit color space.
Revision A
4-313
Paint Environment
Revision A
4-313
Paint Environment
CHYRON Corporation
CHYRON Corporation
4.15.6
Posterize Button
Figure 4-97. Posterize Popup
Press to posterize the selected area. The corner button calls up a popup with a slider with 30 levels for
posterization.
The lower the slider values; the heavier the posterization effect (as the slider represents the number of
colors the canvas is being reduced to).
Preview and the Active Preview Button
Press Preview to see a preview of the posterization.
When the Active Button is on, every change you
make on the slider updates the previewed image.
Pressing Cancel restores the original Canvas image
unchanged. Pressing OK performs the posterization
on the masked area.
Paint Environment
4-314
Revision A
Paint Environment
4-314
Revision A
Liberty Artist’s Manual
Liberty Artist’s Manual
4.15.7
Map Button
Press to map selected palette colors onto the Canvas
using the active mask.
Map takes the chosen (underlined) colors in the palette and uses the active mask to map them to the
Canvas. For example, with red as the first and blue
as the second color chosen in the palette, unmasked
pixels become pure red, completely masked pixels
become pure blue, and any in-between mask values
become some shade of purple. Of course, you can
use as many colors as you like, and they are interpolated across the whole range of mask values.
The Map Window
Figure 4-98. Map Modes Popup
The Map Window displays the current Map Mode.
Pressing on the mode label calls up a popup with 7
mode buttons. Press on one to activate it. If Color
Mode is on, the colors map onto the RGB of each
pixel as described above. The Red, Green, and Blue
Revision A
4-315
Paint Environment
Revision A
4-315
Paint Environment
CHYRON Corporation
CHYRON Corporation
Buttons map only onto R, G, and B respectively.
The Hue, Saturation and Value Buttons map onto H,
S, and V.
Map Popup
Figure 4-99. Map Popup
Press the corner button of the Map Button to call up
the Map Popup. The Map Popup has buttons for the
same modes as the Map Modes Popup, but also has
the Obey Mask Button and preview tools.
Obey Mask
When Obey Mask is on, Map does nothing for pixels
where the mask is zero.
For example, if you do a gradated rectangle mask in
the middle of the Canvas, and choose red and green
in the Palette, Map will make the gradated mask a
color gradation from red to green. If Obey Mask is
off, areas where the mask is zero (the area outside
the rectangle, for example) will become red. If Obey
Mask is on, nothing happens to these areas, since
zero values are not mapped.
Paint Environment
4-316
Revision A
Paint Environment
4-316
Revision A
Liberty Artist’s Manual
Liberty Artist’s Manual
Preview and the Active Preview Button
Press Preview to see a preview of the map. When
the Active Button is on, every change you make on
the popup updates the previewed image. Pressing
Cancel restores the original Canvas image
unchanged. Pressing OK performs the map on the
masked area.
4.15.8
Reveal Button
Figure 4-100. Reveal Modes Popup
The Reveal Button allows you to bring color or
luminance information from the current Temp
Buffer onto the Canvas in preset ways. Includes
Reveal Color, Reveal Luminance, and Reveal Hue.
Press the Reveal Button to apply the Temp Buffer to
the Canvas using whatever mode is displayed in the
text window. Press on the word in the window to
call up the modes popup.
Reveal Color
Reveal Color reveals the color of the image in the
current Temp Buffer into the masked area of the
Canvas with the luminance of the Canvas image preserved. It is an interesting and dynamic way to combine pictures. One use is to apply a texture (e.g.,
wood, marble) from the Temp Buffer to the image in
the Canvas, while preserving the shadows and highlights in the Canvas, making it look as if it were
made of wood or marble.
Revision A
4-317
Paint Environment
Revision A
4-317
Paint Environment
CHYRON Corporation
CHYRON Corporation
Reveal Luminance
Reveal Luminance reveals the luminance of the
image in the Temp Buffer into the masked area of
the Canvas, with the hue and saturation of the Canvas preserved.
Reveal Luminance is the reverse of Reveal Color in
this way: Reveal Color reveals the color (hue and
saturation) from the image in the Temp Buffer into
the Canvas, with only the luminance of the Canvas
preserved; Reveal Luminance reveals only the luminance from the image in the Temp Buffer into the
Canvas, with the color (hue and saturation) of the
Canvas preserved; thus, revealing luminance from
element A into element B is identical to revealing
color from element B into element A.)
Reveal Hue
Reveal Hue reveals only hue, leaving saturation
unchanged. Use to put a color texture on an object
with white highlights, because white remains
white. Reveal Hue really does the same thing as
Tint-Hue, but can reveal the hues from an entire picture instead of just tinting with one color.
4.15.9
Tint Button
Press to tint the masked area on the Canvas using the
slider settings in the corresponding popup. There
are two modes on the popup; Hue, which changes
hue only, and Hue & Sat, which changes both Hue
and Saturation.
Paint Environment
4-318
Revision A
Paint Environment
4-318
Revision A
Liberty Artist’s Manual
Liberty Artist’s Manual
Tint Popup
Figure 4-101. Tint Popup
Press the corner button of Tint to call up the Tint
Popup.
Hue Mode
Press to tint the masked area on the Canvas with the
hue slider value, ignoring saturation.
If no mask is active on the Canvas, the entire Canvas
is tinted.
Saturation Mode
Press to tint the masked area on the Canvas using the
hue and saturation slider values. The current color
must not be white, black or gray.
If no mask is active on the Canvas, the entire Canvas
is tinted.
Revision A
4-319
Paint Environment
Revision A
4-319
Paint Environment
CHYRON Corporation
CHYRON Corporation
4.15.10
MultiTint Button
This function allows you to tint using two or more
colors on the palette. It’s a combination of Tint and
Apply, allowing you to create tinted gradations.
Only linear gradations are supported, not radial gradations. Press to tint the masked area on the Canvas
using the current palette colors. There are two
modes in the text window: Hue, which tints only
into Canvas areas with some chroma, ignoring areas
with no color but only gray-scale, and H&S, which
tints into both hue and saturation, so that gray-scale
areas are tinted as well as areas with chroma.
As with Apply, the Direction button (See “Direction
Button” on page 4-58) determines the direction of
the gradation.
To Multitint an area:
4.15.11
•
Mask an area on the Canvas.
•
Choose two or more colors on the palette by
underlining them.
•
Press in the text window of Multitint to choose
Hue or H&S Mode.
•
Press the main part of the Multitint Button.
The masked area is tinted with a gradation.
Sharpen Button
Applies a sharpening filter to the masked area. Press
the corner button to display the Sharpen Popup.
Paint Environment
4-320
Revision A
Paint Environment
4-320
Revision A
Liberty Artist’s Manual
Liberty Artist’s Manual
Sharpen Popup
Figure 4-102. Sharpen Popup
The Sharpen Popup has three slider scales that control how the sharpen filter is applied to the Canvas.
The % slider controls the amount of sharpen. The X
slider controls the horizontal range of the sharpen (0
to 30). The Y slider controls the vertical range of the
sharpen (0 to 30).
Preview and the Active Preview Button
Press Preview to see a preview of the sharpen.
When the Active Button is on, every change you
make on the Sliders updates the previewed image.
Pressing Cancel restores the original Canvas image
unchanged. Pressing OK performs the sharpen on
the masked area.
Revision A
4-321
Paint Environment
Revision A
4-321
Paint Environment
CHYRON Corporation
CHYRON Corporation
NOTE
Sharpen previews skip the areas
around the edge of the canvas (to
preview faster). The higher the
sharpen X and Y sliders, the more
pixels around the edge are skipped.
These pixels will be processed,
however, during the actual sharpen
operation (started with “OK” or the
main sharpen button).
4.15.12
Blur Button
The Blur Tool blurs the masked area of the canvas
(or the entire canvas if no mask is active). There are
six different Blur modes to choose from, including
Fast, Gaussian, Min, Max, Median, and Despeckle.
In addition, the amount of blur in the X and Y directions can be controlled using slider settings.
The main Blur button contains an inset window (to
view and set the Blur mode) and a corner button to
bring up a Blur popup (which allows the user to set
the sliders, choose the blur mode, preview the effect,
and apply the effect to the canvas). Pressing the
main blur button applies the blur effect to the canvas
with the current settings.
Blur Mode Inset Button
Press in the inset window in the Blur Button to toggle between the six blur modes (Fast, Gaussian,
Min, Max, Median, and Despeckle.)
Fast Blur: This mode applies a heavy, uniform blur
to the canvas. The effect is fast to process, but can
introduce some slight artifacts (especially on corners
of objects).
Paint Environment
4-322
Revision A
Paint Environment
4-322
Revision A
Liberty Artist’s Manual
Liberty Artist’s Manual
Gaussian Blur: This mode applies a softer,
weighted blur to the canvas. This effect is slower to
process than Fast Blur, but produces a cleaner effect.
Min Filter: The Min Filter works by taking the minimum value of each pixel and its neighbors (within
the area whose size is defined by the X and Y sliders). This tends to make dark areas of the image
spread out, and tends to give the image a handpainted, impressionist, or cubist look. Its effects are
especially pleasing when applied to background
images. Using large X and small Y values (or visa
versa) tends to provide the appearance of a wood
carving.
Max Filter: The Max Filter works by taking the
maximum value of each pixel and its neighbors
(within the area whose size is defined by the X and
Y sliders). This tends to make bright areas of the
image spread out, and tends to give the image a
hand-painted, impressionist, or cubist look. Its
effects are especially pleasing when applied to background images. Using large X and small Y values
(or visa versa) tends to provide the appearance of a
wood carving.
Median Filter: The Median filter is commonly used
to remove noise from images. It is especially good at
removing random spots or specks of noise in an
image (for example, freckles on a person’s skin). Of
course, the higher the value of the X and Y sliders,
the more noise is removed. The Median filter can
also be utilized as a special effect, as it tends to give
images a very smooth, watery look.
Despeckle Filter: The Despeckle Filter is similar to
the Median filter, in that it removes noise (especially
random spots or specks of noise) from images. It has
the additional benefit of preserving detail and edges
Revision A
4-323
Paint Environment
Revision A
4-323
Paint Environment
CHYRON Corporation
CHYRON Corporation
in the image, however. While the median filter tends
to blur out such details, the despeckle filter preserves them, while at the same time removing noise.
This filter is noticeably slower than the Median filter, since it does more computation for each pixel.
NOTE
The six Blur modes can also be set
within the Blur popup (accessed
through the corner button).
Blur Popup
Figure 4-103. Blur Popup
Press the corner button of Blur to call up the Blur
Popup.
Blur Sliders
There are two slider scales: one for the amount of
horizontal blur, the other for the amount of vertical
blur. Moving the x slider causes both the x and y
sliders to move together. To set separate x and y
values, move the x slider first, then the y slider,
Paint Environment
4-324
Revision A
Paint Environment
4-324
Revision A
Liberty Artist’s Manual
Liberty Artist’s Manual
which operates separately from the x slider. The
slider settings represent the pixel width of the blur.
The sliders range on a scale from 0 to 30.
Blur Mode Buttons
These select between the six blur modes (Fast,
Gaussian, Min, Max, Median, and Despeckle.)
Preview and the Active Preview Button
Press Preview to see a preview of the blur. When
the Active Button is on, every change you make on
the popup updates the previewed image. Pressing
Cancel restores the original Canvas image
unchanged. Pressing OK performs the blur on the
masked area.
NOTE
Blur previews skip the areas around
the edge of the canvas (to preview
faster). The higher the Blur X and Y
sliders, the more pixels around the
edge are skipped.
These pixels will be processed,
however, during the actual Blur
operation (started with “OK” or the
main Blur button).
4.15.13
Filter Button
Press the Filter Button to apply the current filter to
the masked area of the Canvas, using the settings of
the Filter Popup.
Revision A
4-325
Paint Environment
Revision A
4-325
Paint Environment
CHYRON Corporation
CHYRON Corporation
Filter Popup
Press the corner of the Filter Button to call up the
Filter Popup (page 4-327). In other Image Tools,
Liberty uses standard filters to perform operations
like blurring, sharpening, edge enhancement, etc.
The Filter Popup allows you to customize existing
filters and create filters of your own from scratch in
an infinite variety. The Filter Popup is extraordinarily powerful, but requires experimentation to
explore the possibilities. The main part of the Filter
Popup is a 5 x 5 array of boxes, the Filter Array.
Filter Array
The Filter Function changes each pixel in a masked
area (or the entire Canvas) based on its neighboring
pixels. The Filter Array determines how each neighbor contributes to the result. The Filter Array is a 5
x 5 array of boxes, each representing one pixel. The
center pixel is surrounded by two ranks of neighboring pixels. You assign numerical values to each
box, thereby controlling how each pixel affects its
neighbor. For example, if the center value is 1 and
all its neighbors (adjacent pixels) are 0, the filter
leaves all pixels unchanged. Setting all values to 1
makes all neighbors contribute equally, blurring the
image. Negative values subtract. Values are in the
range of minus (-) 9999 to plus (+) 9999.
NOTE
Zero values in this array are displayed
as blank boxes on the menu. This
helps make the menu easier to read.
Paint Environment
4-326
Revision A
Paint Environment
4-326
Revision A
Liberty Artist’s Manual
Figure 4-104. Filter Popup
Revision A
4-327
Paint Environment
Liberty Artist’s Manual
Liberty Artist’s Manual
To change a value in the Filter array:
•
Press a box in the Filter array.
•
Type a number, followed by the Enter key.
Prefix Buttons with the Filter Array
The Prefix Buttons provide a quick way to repeatedly enter the same values into the Filter boxes.
You can press the Copy Prefix (page 4-62), then one
of the Filter Array Boxes, to put the last entered
value into the box. Pressing the Add Prefix, then
pressing a Filter Array Box, adds the last entered
value to the number in the box. Pressing the Add
and the Inverse Prefixes, then a Filter Array Button
subtracts the last entered value from the number in
the box.
Filter Slider
Press and drag the slider to proportionately adjust all
the values in the Filter Array. Often you'll get the
best results by incrementing the Filter Slider one
unit at a time by pressing the arrow buttons at the
top or bottom of the slider. If some values in the Filter Array don't change enough with the slider, you
can always enter values numerically by pressing in
the Array Box you want to change and typing the
number on the keyboard, followed by the keyboard's
enter key.
Filter Elevator
The Filter Elevator has 20 levels, the first 7 of which
are pre-set and can’t be modified. The last 13 are
empty for you to put your own filters into. You can
copy an existing filter to an empty level using the
Copy Prefix Button. You can add an entire filter to
another with the Add Prefix Button.
Revision A
4-329
Paint Environment
Revision A
4-329
Paint Environment
CHYRON Corporation
CHYRON Corporation
The first 7 Filter Elevator levels are, from the left:
Sharpen, Edge Enhance, Edge Detect, Relief, Rattle,
Invert, and Blur.
Filter Divisor
The number in the Divisor is used to re-scale the
result of the Filter Array so that it doesn't "overflow." If you run a filter and its result is a mostly
white or all white screen, increase the Divisor and
try the filter again. (Normally, if the sum of the values in the filter array is greater than one, the divisor
should be set to that sum, to normalize the result of
the computation (the sum of the values is displayed
in the prompt window, at the bottom of the screen,
when a filter elevator level is selected.)
Filter Delta
Press on the Delta Button to enter a number from the
keyboard to change the brightness of the Filter
result. Plus values brighten the result; minus values
darken the result.
Filter Modes
The mode buttons determine what components of
the image are acted on by the Filter. Only one Mode
Button can be on at a time.
Paint Environment
4-330
Revision A
all
All components
R
Red only
G
Green only
B
Blue only
Paint Environment
4-330
Revision A
Liberty Artist’s Manual
Liberty Artist’s Manual
Filter Name Button
Displays the name of the current Filter. Press and
type in a name to name a custom filter.
Filter Save Button
When you save a filter to disk the Filter Array, the
divisor, the Delta, and the filter name are all also
saved. Saves to a special type of file for filters.
Filter Recall Button
When you recall a filter from disk the Filter Array,
the divisor, the Delta, and the filter name are all
recalled. Press on a Filter Elevator level and then
press Recall Filter to recall the filter into it.
Filter Clear Button
Press the Clear Button to zero all the boxes in the
Filter Array.
Filter Symmetry Buttons
These buttons create symmetric filters if you enter
values in just one quadrant of the filter. For example, if your filter values are:
4
-
3
1
-
-
-
-
Press the 4-way Sym Button to copy the quadrant to
the other quadrants:
Revision A
4-331
Paint Environment
Revision A
2
4
2
3
1
3
2
4
2
4-331
Paint Environment
CHYRON Corporation
CHYRON Corporation
The Horizontal and Vertical Sym Buttons work the
same way, but only horizontally or vertically.
Rotate Filter Buttons
The Rotate <- and Rotate -> Buttons rotate the filter
left and right respectively. This is very useful for
directional edge filters. For example, take a horizontal line segment enhancement filter:
-1
-1
-1
2
3
2
-1
-1
-1
Rotating this right once gives you a diagonal line
segment enhancer:
2
-1
-1
-1
3
-1
-1
-1
2
Rotating once more provides a vertical line
enhancer.
The Mirror Filter Buttons
The X Mirror and Y Mirror Buttons simply flip the
Filter Array about its horizontal or vertical axis. For
example, given this filter:
Paint Environment
4-332
Revision A
Paint Environment
1
2
3
4
5
6
7
8
9
4-332
Revision A
Liberty Artist’s Manual
Liberty Artist’s Manual
Using X Mirror results in:
3
2
1
6
5
4
9
8
7
Preview , Active Preview Button s
Press Preview to see a preview of the filter. When
the Active Button is on, every change you make on
the popup updates the previewed image. Pressing
Cancel restores the original Canvas image
unchanged. Pressing OK performs the filter on the
masked area.
4.15.14
Ripple Button
Ripple gives an refracting effect that looks like distorting glass or water. There must be some image in
the Canvas to distort, and Ripple requires a mask.
There must be some transparency in the mask,
because Ripple works from the variation in the
transparency of the mask. Ripple can give
extremely interesting results, but it requires some
experimentation. Its effects are completely dependent on what kind of a mask you use.
Revision A
4-333
Paint Environment
Revision A
4-333
Paint Environment
CHYRON Corporation
CHYRON Corporation
Ripple Popup
Figure 4-105. Ripple Popup
Press the corner button of Ripple to call up the Ripple Popup. The Ripple Slider controls the “refraction index,” or intensity, of the ripple effect. It’s
most powerful at the top.
To ripple an area of the Canvas:
•
Mask the area you want to ripple.
•
Press the corner button of Ripple. The popup
appears.
•
Move the slider to a high value.
•
Press OK. The ripple is performed.
Try using Paint-Mask with an air brush to create a
mask with varied transparency to see what Ripple
does. Try some different custom-brushes, always
with a change in transparency. Programmed brushes
give interesting results.
Paint Environment
4-334
Revision A
Paint Environment
4-334
Revision A
Liberty Artist’s Manual
Liberty Artist’s Manual
The Preview and the Active Preview Button
Press Preview to see a preview of the ripple. When
the Active Button is on, every change you make on
the slider updates the previewed image. Pressing
Cancel restores the original Canvas image
unchanged. Pressing OK performs the ripple on the
masked area.
4.15.15
Bump Map Button
This button uses a mask to map out three-dimensional “bumps” with the alpha value of the mask
controlling the height. The Direction Button (page
4-59) controls the apparent direction of the light
source. There must be some picture information in
the Canvas; Bump Map does not have any effect on
transparent background. To see the effect of Bump
Map, make a mask using Paint Mask using an air
brush.
Bump Map Popup
Figure 4-106. Bump Map Popup
Press the corner button of Bump to call up the
popup. The popup contains four sliders to control
the bump map.
Revision A
4-335
Paint Environment
Revision A
4-335
Paint Environment
CHYRON Corporation
CHYRON Corporation
To Bump Map the current mask:
•
Create a Mask with varied intensity. For
example, doing a Luminance Channel Mask on a
picture of a cloudy sky gives a mask of varied
intensity.
•
Set the direction button to indicate which
direction the light source will come from.
•
Press the corner button of the Bump Map
Button. The Bump Map Popup appears. (You
can press the main part of the Bump Map Button
to make a bump map without changing the bump
map settings.)
•
Press the Reset Button to set the slider scales
to their default.
•
Press OK to render the Bump Map.
NOTE
A Bump Map often looks best when
performed
on
a
solid
color
background. There must be picture
information on the Canvas for the
Bump Map to map onto; transparent
background won’t work.
Dark Range Slider
Sets two markers to define the range of the darker
areas of the rendered bumps.
Bright Range Slider
Sets two markers to define the range of the lighter
areas of the rendered bumps.
Bump Height Slider
Sets the height of the rendered bumps on a scale of 1
to 100.
Paint Environment
4-336
Revision A
Paint Environment
4-336
Revision A
Liberty Artist’s Manual
Liberty Artist’s Manual
Light Elevation Slider
Sets the vertical angle of the light hitting the rendered bumps on a scale of 0 - 90 degrees (coming
out of the screen directly at the viewer). The direction clock determines horizontal direction of the
light source (in the plane of the canvas image).
Preview and the Active Preview Button
Press Preview to see a preview of the bump map.
When the Active Button is on, every change you
make on the popup updates the previewed image.
Pressing Cancel restores the original Canvas image
unchanged. Pressing OK performs the bump map on
the masked area.
Elevator Presets
The Bump Map popup has six presets for saving different configurations of bump map settings.
4.15.16
Mosaic Button
The Mosaic Button renders the masked area of the
Canvas into blocks for a “digitized” look. You can
control the coarseness and fineness of the blocks
with two sliders on the Mosaic Popup.
Revision A
4-337
Paint Environment
Revision A
4-337
Paint Environment
CHYRON Corporation
CHYRON Corporation
Mosaic Popup
Figure 4-107. Mosaic Popup
Press the corner button of Mosaic to call up the
popup. The x slider controls the width of the mosaic
blocks; the y slider controls the height. Moving the
x slider causes both the x and y sliders to move
together. To set separate x and y values, move the x
slider first, then the y slider, which operates separately from the x slider. The slider numbers represent the pixel dimensions of the mosaic blocks.
Preview and the Active Preview Button
Press Preview to see a preview of the mosaic. When
the Active Button is on, every change you make on
the sliders updates the previewed image. Pressing
Cancel restores the original Canvas image
unchanged. Pressing OK performs the mosaic on the
masked area.
Random Button
When highlighted, the mosaic effect is randomized,
by varying the horizontal start position of each
mosaic block (for example, try an x value of 15 and
a y value of 2 with random on for an interesting,
impressionist effect).
Paint Environment
4-338
Revision A
Paint Environment
4-338
Revision A
Liberty Artist’s Manual
Liberty Artist’s Manual
4.16
Image Tools 2 Panel
Figure 4-108. Image Tools 2 Panel
4.16.1
Edge Button
The Edge function allows you to generate an edge
around the masked area in one of 8 directions or in
all directions at once. Only elements with some
opacity will be edged. Transparent background is
ignored by the Edge function. The transparency of
the edge is set by the Transparency Slider.
Edge Popup
Figure 4-109. Edge Popup
Revision A
4-339
Paint Environment
Revision A
4-339
Paint Environment
CHYRON Corporation
CHYRON Corporation
Press the corner button of the Edge Button to bring
up the Edge Popup.
Edge Direction Buttons
The Edge Popup has nine direction buttons. The
eight outside direction buttons generate the edge in
one direction, and the center button edges out in all
directions. If multiple colors are chosen on the palette, they are interpolated through the width of the
edge, with the first color on the inside and the last
color on the outside of the edge.
Edge Slider Scale
Press and drag to change the length of the edge.
Default is a one-pixel edge. The scale goes from 1
to 50.
Style Button
Press the Style Button to turn on/off Style Mode.
Normally the center Edge Direction Button edges
out in four directions. When Style Mode is enabled,
diagonal edging occurs. This results in a more
rounded edge.
Edge Reset Button
Press to reset the length of the edge to 1 pixel.
NOTE
The Edge button increases the size of
the mask. The mask gets larger by the
width of the edge, each time the Edge
button is used.
Paint Environment
4-340
Revision A
Paint Environment
4-340
Revision A
Liberty Artist’s Manual
Liberty Artist’s Manual
4.16.2
Edge Detection Button
Press to Run Edge Detection on the masked area.
The result is rendered to look somewhat like an
architectural blueprint by applying white lines to the
high-contrast edges it finds in the picture.
You can use Luminance Mask to mask the lines created by the Edge Detection function and put other
colors into them or produce varying effects. Once
you have used Luminance Mask, use Clamp Mask
or Adjust Mask to get rid of noise in the resulting
mask.
4.16.3
Tri-Morph Button
Press to display the Triangle Morph Menu, to the
left of the Canvas. For more information, see “Line
Morph” on page 4-473.
4.16.4
Line Morph Button
When pressed, the Line Morph Menu appears, to the
left of the canvas. For information, see page 4-473.
4.16.5
Even Field Button
Press to copy every even field line to every odd field
line in the masked area. Reduces vertical resolution
by half.
4.16.6
Odd Field Button
Copies odd field lines to every even field line in the
masked area. Reduces vertical resolution by half.
Revision A
4-341
Paint Environment
Revision A
4-341
Paint Environment
CHYRON Corporation
CHYRON Corporation
4.16.7
Wrap Button
When you press the Wrap Button, the full-screen
Canvas image is divided into halves or fourths and is
mirrored in X and Y so that the outside edges of the
Canvas meet in the center of the screen. This allows
you to create continuous backgrounds by painting
across the edges, and then un-Wrapping the Canvas,
so that the Canvas creates seamless patterns when
tiled. Another way to do this is with Fold paint in
the Paint Panel.
•
Press the main Wrap Button to perform the current Wrap Mode.
Wrap Mode Popup
Figure 4-110. Wrap Mode Popup
Pressing in the inset window in the Wrap Button displays the Wrap Modes Popup which provides horizontal, vertical and 4-way wrapping of the Canvas.
To Wrap and then un-Wrap the Canvas:
Paint Environment
4-342
Revision A
Paint Environment
•
Press on the inset window in the Wrap Button. The Wrap Modes Popup appears.
•
Press on the Horizontal Wrap Button to highlight it. That mode becomes active. The Canvas
wraps horizontally.
4-342
Revision A
Liberty Artist’s Manual
Liberty Artist’s Manual
4.16.8
•
Press on the Horizontal Wrap Button a second time. The Canvas returns to its un-wrapped
form.
•
Repeat with Vertical and 4-way Wrap.
Motion Tracking Button
When pressed, the Motion Tracking popup appears.
For more detailed information, refer to the Motion
Tracking section. (See “Motion Tracking” on page
5-206.)
4.16.9
Color Matrix Button
The Color Matrix Button allows you to remap the
input RGBA channels to the output RGBA channels.
Thus, for example, you can remap the red channel
into the green channel.
Press the corner button in the Color Matrix Button to
call up the Color Matrix Popup (Figure 4-111). It
contains the 16-button Color Matrix. If you press,
for example, the button for R in/G out, and enter the
number 1.0, the input red channel will be mapped
into the output green channel. Values of less than
1.0 provide fractional mapping. Sliders are provided to adjust Bias and Gain, allowing contrast
brightness adjustments.
Elevator Presets
The Color Matrix Popup has six presets for saving
different configurations of the Color Matrix settings.
Revision A
4-343
Paint Environment
Revision A
4-343
Paint Environment
CHYRON Corporation
CHYRON Corporation
Preview and the Active Preview Button
Press Preview to see a preview of the color mapping.
When the Active Button is on, every change you
make on the popup updates the previewed image.
Pressing Cancel restores the original Canvas image
unchanged. Pressing OK performs the color mapping on the masked area.
Dither Button
Dither allows you to quantize (reduce or compress)
the colors of an image on the Canvas. The effect is
similar to how a newspaper photo uses a dot screen
of a few colors to give the impression of a much
higher color resolution. The Dither tool is similar to
the Posterize tool in that it reduces the number of
colors on the Canvas image, but Dither provides a
greater variety of effects. Its controls are similar to
the controls provided for saving color-mapped GIF
and TIFF files in the Save As function; see “Save
File As Button” on page 169 .
To Quantize an area:
Paint Environment
4-344
Revision A
Paint Environment
•
Mask the desired area on the Canvas. If there
is no mask active on the Canvas, the entire Canvas will be quantized.
•
Press the corner button of the Dither Button
to call up the Dither Popup. The Dither Popup
appears. If you press the main part of the Dither
Button, the quantizing is applied according to the
current settings.
•
Choose Uniform Mode.
•
Choose both Dither and Noise Modes. Be sure
Greyscale Mode is turned OFF.
•
Press OK. The quantization is applied into
the masked area.
4-344
Revision A
Liberty Artist’s Manual
Color Matrix Popup
Figure 4-111. Color Matrix Popup
Dither Popup
Figure 4-112. Dither Popup
Revision A
4-345
Paint Environment
Liberty Artist’s Manual
Liberty Artist’s Manual
The Dither Popup (Figure 4-112) contains a host of
tools for controlling the application of different
kinds of quantization to the Canvas. The two basic
modes of quantization are Uniform and Optimal.
The Noise and Greyscale Buttons can be on or off
for either Uniform or Optimal Mode, but the Dither
Mode can't be used with Optimal Mode.
Uniform Mode
Press to activate. Uniform quantization splits the
color space into equal partitions.
Optimal Mode
Press to activate. Optimal quantization computes
the best color table for the specific image that you're
quantizing. Optimal quantization performs very
well on most images, even at low levels (few bits per
pixel).
Dither Button
When the Dither Button is high-lighted, the quantized image is also dithered. This is the technique
used in newspaper photos, where the appearance of
higher color resolution is achieved by varying the
density of colored dots. Dither only works with
Uniform Mode.
The Noise Button
When the Noise Button is high-lighted, some noise
is added to the quantized image. This tends to
smooth out color-banding artifacts that may appear
at lower levels (bits-per-pixel).
Greyscale Mode and the Greyscale Slider
Reduces the quantization to levels of grey. When
activated, you can set how many levels of grey using
the Greyscale Slider.
Revision A
4-347
Paint Environment
Revision A
4-347
Paint Environment
CHYRON Corporation
CHYRON Corporation
RGB Level Sliders
Moving the RGB Level Sliders allows you to set
levels of quantization independently for each of the
color channels. When the Greyscale Button is on,
the RGB sliders are disabled.
Elevator Presets
The popup has six presets for saving different configurations of the settings for quantization.
Preview and the Active Preview Button
Press Preview to see a preview of the quantization.
When the Active Button is on, every change you
make on the popup updates the previewed image.
Pressing Cancel restores the original Canvas image
unchanged. Pressing OK performs the quantization
on the masked area.
Hints About Dithering
As an example, make a multi-colored gradation on
the Canvas. Bring up the Dither Popup, and set the
RGB sliders to 2. If Uniform is on, but Dither and
Noise are off, the gradation looks banded, since it's
being represented with only 8 colors (2 levels of R, 2
levels of G, and 2 levels of B).
If you turn Noise on, however, it breaks up some of
the banding, since the values get randomized a bit.
If you turn Dither on, the image looks good with no
magnification. If you zoom in you'll see that the
image's original colors are being simulated by
proper distribution of the 8 colors around the image.
You can use Dither and Noise at the same time. If
you use the Optimal Button in this same case, Liberty does a better job of choosing the specific 8 colPaint Environment
4-348
Revision A
Paint Environment
4-348
Revision A
Liberty Artist’s Manual
Liberty Artist’s Manual
ors to use, based on the given image. Uniform uses
the same 8 colors for any image. You can't use
Dither while using Optimal, however.
Chroma Key Button
The Chroma Key tool provides quick blue screen or
green screen chroma keys. It uses the Canvas as a
foreground image, from which areas of blue or green
screen are keyed out. It uses the image in the current
Temp as a background image, which is composited
under the keyed-out areas of the canvas (thus replacing the keyed-out blue or green screen areas of the
Canvas.)
Using the Chroma Key Popup, you can do previews,
pick colors from the blue/green screen, and adjust a
variety of controls. Also you can choose a mask as a
"garbage matte," to exclude selected areas from the
key.
Pressing the main Chroma Key Button performs a
chroma key on the Canvas image (foreground)
based on the current settings in the Chroma Key
Popup.
Revision A
4-349
Paint Environment
Revision A
4-349
Paint Environment
Liberty Artist’s Manual
Chroma Key Popup
Figure 4-113. The Chroma Key Popup
Revision A
4-351
Paint Environment
Liberty Artist’s Manual
Liberty Artist’s Manual
Press the corner button of the main Chroma Key
Button to call up the Chroma Key Popup.
Pressing the OK Button performs a chroma key
using the current settings and brings down the
popup. The Cancel Button just brings down the
popup, and the Reset Button resets most of the settings to default values.
Chroma Key Preview Buttons
The Chroma Key Popup provides three active preview modes, along with a "Preview off" setting.
When a preview mode is on, the preview is updated
on the screen each time you change settings in the
popup. When adjusting the Chroma Key settings,
you will often flip between the preview modes.
When previews are off, the unaltered Canvas is
shown on the screen and, for example, you can Pick
samples of the blue or green screen colors (see
below, the Picked Color Display).
The Preview Button
The Preview Button previews the image in the Temp
(background) composited (keyed) into the blue or
green areas of the Canvas (foreground).
The Preview Alpha Button
The Preview Alpha Button previews the alpha
(matte) generated by the Canvas chroma key as a
gray scale image. A 100% key shows as black; a
100% non-key shows as white. Use Preview Alpha
to make fine adjustments in the matte.
Revision A
4-353
Paint Environment
Revision A
4-353
Paint Environment
CHYRON Corporation
CHYRON Corporation
Preview BG Button
Preview BG simply shows the contents of the Temp
(the image to be used as the background in the key)
by itself. Use it to compare the original Temp with
the composited result.
Key Adjust Buttons
At the left of the OK button is a stack of buttons to
adjust the key signal (matte or alpha) generated by
the Chroma Key tool. The Blur, Median, and Shrink
buttons are mutually exclusive. Only one can be on
at a time.
3x3 Blur Button
Press the 3x3 Blur Button to blur the key signal with
a 3x3 pixel filter.
5x5 Blur Button
Press the 5x5 Blur Button to blur the key signal with
a 5x5 pixel filter.
3x3 Median Button
Press the 3x3 Median Button to run a 3x3 pixel
median filter on the key signal. This is good for
removing spots of noise from the key.
5x5 Median Button
Press the 5x5 Median Button to run a 5x5 median
filter on the key signal. This is good for removing
slightly larger spots of noise from the key.
Shrink Button
The Shrink Button shrinks the key signal at the
edges by 1 pixel.
Paint Environment
4-354
Revision A
Paint Environment
4-354
Revision A
Liberty Artist’s Manual
Liberty Artist’s Manual
BG On Button
When previewing or performing an actual chroma
key, press the BG On Button to turn on/off the compositing of the Temp image with the keyed Canvas.
When the BG On Button is on, the Temp is composited with the Canvas. When the BG On Button is off,
the background color of the Canvas is keyed in. This
is useful for viewing the keyed Canvas against various background colors to see if the blues or greens
are still visible. You can change the canvas background color using Liberty's Color Palette (at the left
of the Canvas) while the Chroma Key Popup is up,
causing the preview to update (if the Preview Button
is on) with a different background color displayed in
place of the keyed blue or green colors.
Use Mask Button
Sometimes you will want to key out certain parts of
the Canvas image other than the blue or green screen
areas (for example, booms or rigging). This can be
done by masking those areas using Liberty's Mask
tools (for example, Rectangle Mask). Then press the
button on the popup labeled “Use Mask” to turn it
on, which causes any mask currently active on the
Canvas to be keyed out. The mask functions as a
"garbage matte" in this case. The mask can have
transparent areas also (for example, areas with 50%
transparency will key out by 50%).
Dominant Color Buttons
Dominant Foreground Color
This selects the color component on the Canvas that
you are NOT using for the key. For a blue screen
key you would choose "R" (red) or "G" (green).
Revision A
4-355
Paint Environment
Revision A
4-355
Paint Environment
CHYRON Corporation
CHYRON Corporation
Thus, you would set the Dominant Foreground
Color to red for a blue screen of a person, since the
reds in the person’s skin tones will contrast with the
blue being keyed out.
Key On Button
This selects the color component on the Canvas to
be used for the key. For example for a blue screen
key you would choose "B" (blue).
Picked Color Display
The Picked Color Display is always active when the
Chroma Key Popup is up - at any time you can
“pick” a key color by pressing in the blue or green
areas of the Canvas. This fine tunes how much blue
or green keys out from the Canvas. When you pick
blue or green colors from the Canvas, the colors are
added to the color swatch labeled "picked cols,"
which displays the range of colors being keyed out.
The "clr" button clears the picked colors and resets
the swatch to a default color sample.
Chroma Key Settings Elevator
The Chroma Key Popup contains a 6-level elevator
that allows you to set up and save 6 sets of parameters. You can name each level using the text window
above the elevator.
Chroma Key Control Sliders
Strength Slider
The Key Control Sliders include the main chroma
key control tool, the Strength Slider, near the middle
of the popup. The Strength Slider controls how
much blue or green is keyed out. The higher the
slider, the more blue or green is keyed out.
Paint Environment
4-356
Revision A
Paint Environment
4-356
Revision A
Liberty Artist’s Manual
Liberty Artist’s Manual
Tune Slider
The Tune Slider provides a secondary strength control. Although you will often leave it at a value of
one, a higher value causes more blue/green to be
keyed out, while a lower value causes less blue/
green to be keyed out. Its effects are slightly different from the Strength Slider and allows more fine
tuning of the key.
Clip Colors Sliders
The Clip Colors Sliders provide additional ways to
adjust the chroma key.
Alpha Slider
Use the Alpha Slider, with two slider markers, to
clip the key signal at the upper and lower ends. Lowering the upper marker increases the opacity of the
most opaque areas of the key (matte). This will
make semi-transparent areas of the Canvas more
opaque (less keyed). This is useful when you want to
keep those areas in the picture. Conversely, increasing the lower marker of the slider makes the most
transparent parts of the key totally transparent. Use
this to clip out undesired parts of the Canvas which
are still visible but have high transparency.
Smooth Slider
The Smooth Slider, next to the Alpha Slider, makes
the Alpha clipping effect smoother. In other words,
increasing its value makes the edges of the matte
softer when you’re using the Alpha Slider (actually,
it only applies to the lower marker of the Alpha
Slider).
Revision A
4-357
Paint Environment
Revision A
4-357
Paint Environment
CHYRON Corporation
CHYRON Corporation
Color Slider
Use the Color Slider to neutralize or adjust out the
keyed color (blue or green) if it still appears in the
composited picture. For example, if blue still
appears on the composited result of a blue screen,
increasing the Color Slider reduces the blue color
component in those areas.
Edge Button
The Edge Button, below the Color Slider, limits the
Color Slider's effect to transparent areas of the key.
Thus, when the Edge Button is on, the Color Slider
has no effect on opaque areas of the key. In practice
this removes blue or green at the edges of the key.
Keep Colors Sliders
Use the three Keep Colors Sliders to preserve certain colors in the Canvas image that would otherwise be keyed out. Each slider has two markers.
Keep H (Hue) Slider
Use the Keep H Slider to keep certain hues in the
Canvas from keying out. For example, in a blue
screen Canvas, you may want to keep certain areas
of cyan from keying out. Adjusting the Keep H
Slider so that the bottom marker is at the beginning
of the cyan's range and the top marker is at the end
of the cyan's range will preserve that range of colors
in the Canvas. The Keep H Slider defaults to 0 for
the bottom marker and 255 for the top marker; i.e.,
the slider has no effect.
Keep S (Saturation) Slider
The Keep S Slider is similar to the Keep H Slider,
except that the bottom and top markers work independently. For example, if you want to keep the
Paint Environment
4-358
Revision A
Paint Environment
4-358
Revision A
Liberty Artist’s Manual
Liberty Artist’s Manual
least saturated colors in the Canvas from being
keyed out, you can raise the bottom marker of the
Keep S Slider, to 20 for example. This will keep all
pixels whose saturation is less than 20. Likewise, the
top marker allows the user to preserve very saturated
colors. For example, moving the top marker of the
Keep S Slider down to 100 will keep all pixels
whose saturation is more than 100.
Keep V (Value) Slider
The Keep V Slider works in a similar fashion for
value. Raise the bottom marker to keep dark colors
from keying, and lower the top marker to keep
bright colors from keying.
Ultimatte Plug-in
Note that Liberty supports an Ultimatte Cinefusion
plug-in as part of the Animation Environment. This
plug-in provides a far more advanced set of controls
for blue and green screening than the Chroma Keying tool described here. Thus, the user may prefer to
purchase and use the plug-in for the more difficult or
intensive chroma keying jobs.
Plug-in Button
Liberty’s Plug-in function allows you to use filters
created by third-party software developers. These
filters may need to be licensed separately by contacting your Chyron Liberty sales representative.
Pressing either end of the Plug-in Window toggles
through the list of available plug-ins. Pressing the
corner button brings up the Plug-in Popup.
Revision A
4-359
Paint Environment
Revision A
4-359
Paint Environment
CHYRON Corporation
CHYRON Corporation
At the right end of the Plug-in Popup is a toggle button (< >) that allows you to go through a list of
available filters. The name of the current filter
appears in the bottom window of the stack just at the
left. The upper windows in that stack display available options, if any, for that specific filter. Some of
the sliders at the left of the popup may be activated
for a filter, allowing you to modify the filter’s output. A slider that is active for any given filter displays a label for the function you can change.
Press the OK Button to render the filter on the Canvas (or masked area of the Canvas).
Paint Environment
4-360
Revision A
Paint Environment
4-360
Revision A
Liberty Artist’s Manual
Plug-in Popup
Figure 4-114. Plug-in Popup
Revision A
4-361
Paint Environment
tn
ia
Liberty Artist’s Manual
P
Liberty Artist’s Manual
4.17
-
MASK TOOL FUNCTIONS
4
The current mask tells the system what part of the
Canvas you want to work on. The mask tool functions allow you to create and adjust masks. You can
mask the entire Canvas, or an area as small as one
pixel. You can create masks of variable transparency. You can combine different Mask functions at
once. With the Invert Prefix Button and a Mask
function you can un-mask areas. The transparency
of masks are controlled by the setting of the Transparency Slider when the mask is created.
After a mask is created using a mask tool, the mask
becomes active (on). All currently masked areas are
acted on by the next Canvas operation (painting or
pasting an image to canvas, for example.) When the
Canvas operation is complete, the mask becomes
inactive (off).
Mask Buffer in the Buffers Panel
Figure 4-115. Mask Buffer in the Buffers Panel
At any time there can be one mask on the Canvas
which includes all the masked areas. The current
mask is displayed in a small thumb-nail black-andwhite picture in the Mask Buffer in the Buffers
Revision A
4-363
Paint Environment
Revision A
4-363
Paint Environment
CHYRON Corporation
CHYRON Corporation
Panel at the left of the Canvas. The Buffers Panel
contains a Mask Elevator which contains six different masks (including the current one.) You can also
store masks on the disk using the Save Button. The
Mask Buffers Panel also contains the Mask Display
functions, with which you can change the color/
transparency/mode in which masks are displayed on
the Canvas when active. For more details on the
Mask functions in the Buffers Panel, see the section
on the Buffers Panel, page 4-74.
Saving and Recalling Masks
To save a Mask to disk:
•
Use a Mask Button to mask an area of the
Canvas.
•
Press the Save Button (in the Transfer panel).
The File Popup appears.
•
Press either end of the File Mode Button until
it displays the word "Mask" (the file button is
the pink button labeled “Canvas” when the
file popup first comes up.)
•
Type a file name for the Mask to be saved
under, followed by the keyboard's Enter key.
The Mask is saved with a yellow color-coded dot
next to its file name in the file list. When browsing files in the Full-Screen File Menu, masks
appear as white silhouettes on a black background.
To recall a Mask:
Paint Environment
4-364
Revision A
Paint Environment
•
Press the Recall Button. The File Popup
appears.
•
Press either end of the File Mode Button until it
displays the word "Mask."
4-364
Revision A
Liberty Artist’s Manual
Liberty Artist’s Manual
•
Press on a file name in the file list, or type the
file name to be recalled, followed by the keyboard's Enter key. The file is recalled to the
Canvas as an active mask.
NOTE
It doesn't matter whether the file you
recall was saved as a Mask file or not.
A normal picture file, when recalled in
Mask mode, displays as a Mask rather
than as an RGB picture.
When the Invert Prefix is on, the Mask function will
remove mask from the areas it would normally add
mask to.
Mask Panels Description
There are two Mask Panel menus, Mask Tools 1 and
Mask Tools 2. Press the small arrows at either end
of the yellow title bar at the top of the panel to bring
up the other panel. Normally the Mask Panel
appears in the rightmost of the four Panel menu
positions under the Canvas. The top row of four
buttons - Use mask, Mask All, Invert Mask, and
Erase Mask - stay visible when both the Mask1 and
the Mask2 Panels are displayed.
Temp Layers as Source for Mask Tools
The Mask Panel has a Canvas/Temp Mode bar at the
top. Mask Tools that in Canvas Mode use the Canvas as their source (such as Alpha, Channel, Fill, and
Match) use the current Temp as their source when
Temp Mode is active. For example, if you toggle to
Temp Mode, you can use Channels/Luminance
Mask to generate a mask from the luminance of the
current Temp.
Revision A
4-365
Paint Environment
Revision A
4-365
Paint Environment
CHYRON Corporation
CHYRON Corporation
When the current Temp is not enabled as a layer, the
mask is generated from the in-place position of the
current Temp. When the current Temp is an active
layer, the layer offset is used to generate the mask.
This is true for Alpha, Channel, Match, Diff and
Paste Mask (Fill Mask requires that the layer be
active).
4.18
Mask Tools 1 Panel
Figure 4-116. Mask Tools 1 Panel
4.18.1
Use Mask Button
The Use Mask Button lights up when a Mask is
active to show the presence of an active Mask.
Always check the Use Mask Button if you want to
see if a mask is active. When the Use Mask Button
is high-lighted (a mask is active), you can de-activate the current mask by pressing the Use Mask Button to turn it off. The current mask will be
remembered until replaced by a new mask. When
no Mask is active, you can press the Use Mask Button to turn on the last, or previous, mask.
Paint Environment
4-366
Revision A
Paint Environment
4-366
Revision A
Liberty Artist’s Manual
Liberty Artist’s Manual
4.18.2
Mask All Button
Press this button to mask the entire Canvas with a
100% mask.
4.18.3
Invert Mask Button
Press the Invert Mask Button to invert the mask currently displayed on the Canvas. Areas that are 100%
masked become 0% masked, and vice-versa. If
nothing is masked, it then masks all areas.
4.18.4
Erase Mask Button
Clears or erases the active Mask.
4.18.5
Rectangle Mask Button
Use the Rectangle Mask Button to create a rectangular masked area on the Canvas. This is often the
quickest way to mask part of the picture. Rectangle
Mask has four modes that you access through the
text window in the Rectangle Button: Rectangle,
Square, Gradated Rectangle, and Gradated Square.
To mask a rectangle:
Revision A
4-367
Paint Environment
Revision A
•
Press the Rectangle Mask Button.
•
Press down once on the Canvas to set the first
corner of the rectangle.
•
Move the pen and press down again to set the
opposite diagonal corner of the masked rectangle. The rectangle is masked and high-lighted.
As you drag the pen, the rectangle is displayed
by a moving, elastic wireframe rectangle. Pressing the button on the pen’s barrel (if present), or
4-367
Paint Environment
CHYRON Corporation
CHYRON Corporation
pressing the middle mouse button, breaks contact
with the wireframe rectangle and lets you start a
new rectangle. Mask as many rectangles as you
like.
When there is an active mask on the Canvas, turning
on Rectangle Mask allows you to add rectangles to
the existing mask.
NOTE
When the mask is not active, turning
on rectangles erases the mask before
allowing you to add rectangles.
Use the Invert Prefix with Rectangle Mask to unmask rectangles in the current mask.
Rectangle Mask Modes
Figure 4-117. Rectangle Mask Popup
Paint Environment
4-368
Revision A
Paint Environment
4-368
Revision A
Liberty Artist’s Manual
Liberty Artist’s Manual
Press the middle of the window in the Rectangle
Mask Button to call up a popup of the four Rectangle Mask Modes. Press on the mode you want to
use.
Rectangle Mask
Press to mask a rectangle.
Square Mask
Press to mask a square. Otherwise the same as Rectangle Mask.
Gradated Rectangle Mask
Creates a rectangular mask with gradated alpha
(transparency). The masked rectangle gradates from
the current value of the Transparency Slider to 0
alpha, with the direction of the gradation depending
on the Direction Button (see page 4-59).
NOTE
Rectangular and square masks can
also be created in the Shape Popup;
see page 4-262.
Gradated Square Mask
Creates a square mask with gradated alpha (transparency). The masked square gradates from the current value of Transparency Slider to 0 Alpha, with
the direction of the gradation depending on the
Direction button (see page 4-59.)
4.18.6
Circle Mask Button
The Circle Mask Button replaces the current mask
with an ellipse-mask that is determined by the current mask's bounding box. Creates an exact circle if
Revision A
4-369
Paint Environment
Revision A
4-369
Paint Environment
CHYRON Corporation
CHYRON Corporation
the current mask is a square (see Square Mask,
above). If there is no mask currently active, Liberty
uses the edges of the screen as boundaries.
NOTE
Circular masks can also be created in
the Shape Popup, see page 4-262.
4.18.7
Alpha Mask Button
The Alpha Mask Tool creates a mask from the Canvas’s alpha information (how opaque the areas are).
If a pixel is 100% opaque, it is 100% masked. If a
pixel is 50% opaque, it is 50% masked.
NOTE
When a pixel that is 50% opaque is
alpha-masked, it is masked 50%.
Thus if that pixel is Cut into a Temp,
the pixel that goes into the Temp is
25% opaque. Alpha Mask is a good
way to eliminate low-opacity noise
that may appear in the background of
an image masked from a videocaptured picture.
Press the Alpha Mask Button to create a mask from
the alpha (transparency) of the image on the Canvas.
Background color is not masked. If no mask is on,
then all elements on-screen are alpha-masked. If
there is a mask on-screen, only elements within the
mask are Alpha-masked.
Press the Invert Prefix Button, then the Alpha Mask
Button to invert the alpha data before making the
mask (though background color is still not masked).
Paint Environment
4-370
Revision A
Paint Environment
4-370
Revision A
Liberty Artist’s Manual
Liberty Artist’s Manual
Alpha Mask Popup
Figure 4-118. Alpha Mask Popup
Press the corner button of the Alpha Mask Button to
call up the Alpha Mask Popup. The Alpha Mask
Popup contains the Diagram Curve. The Diagram
Curve re-maps the current mask values according to
its shape. For example, increasing the slope of the
curve makes the mask more opaque.
For information on how to modify the Diagram
Curve, or on how the Diagram Curve operates with
masks, see page 4-371.
Revision A
4-371
Paint Environment
Revision A
4-371
Paint Environment
CHYRON Corporation
CHYRON Corporation
4.18.8
Adjust Mask Button
Figure 4-119. Adjust Mask Modes
The Adjust Mask modes adjust the current active
mask by a user-defined number of pixels.
Press in the text window in the Adjust Mask Button
to see all seven modes. Press on one of the modes to
make it active.
The seven Adjust Mask modes are:
Blur Mask Mode
Blurs the active mask by the designated number of
pixels on all edges. This mode is useful in antialiasing edges on a mask.
Gaussian Blur Mask Mode
Gaussian Blur provides a smoother and cleaner
curve-weighted blur effect than the standard, faster
Blur Mode.
Median Mode
Averages masked pixels with their neighbors. Has
the effect of eliminating “grainy” noise in a mask.
Paint Environment
4-372
Revision A
Paint Environment
4-372
Revision A
Liberty Artist’s Manual
Liberty Artist’s Manual
Grow Mode
Make the active mask grow by the designated number of pixels on all edges.
Shrink Mode
Make the active mask shrink by the designated number of pixels on all edges.
Contour Mask Mode
Traces the outside contour of the active mask using
a width of the designated number of pixels. This
mode has the effect of making a “ring” around the
active mask on all edges. “Grows” the mask when
making the ring.
Inside Contour Mode
Same as Contour Mode, but traces the inside contour
of the mask using the designated number of pixel.
“Shrinks” the mask when making the ring.
To adjust the current mask:
Revision A
4-373
Paint Environment
Revision A
•
Press the corner button of the Adjust Mask
Button to bring up the popup.
•
Press on one of the mode buttons to make it
active and set the number of pixels with the
slider.
•
Press the Preview button to preview the effect
of the Adjust before it becomes permanent.
•
Press the OK Button. The adjustment to the
mask is completed.
4-373
Paint Environment
CHYRON Corporation
CHYRON Corporation
Adjust Mask Popup
Figure 4-120. Adjust Mask Popup
The Adjust Mask Popup has seven mode buttons
and a vertical slider that controls the number of pixels used for the adjustment. The Preview Button
allows you to see the mask adjustment before it is
made permanent. The Active button leaves the preview mode activated continuously. The Mask Only
Button displays the mask as an opaque white-onblack silhouette. The Reset button resets the slider to
a default value of 4.
Paint Environment
4-374
Revision A
Paint Environment
4-374
Revision A
Liberty Artist’s Manual
Liberty Artist’s Manual
Mask Channels Button
Figure 4-121. Mask Channel Modes
The Mask Channels Button uses the Diagram Curve
to crease a mask from one of the following channels
of the Canvas:
Lum
Create Diagram from luma component only.
R
Create Diagram from the red component only.
G
Create Diagram from the green component only.
B
Create Diagram from the blue component only.
H
Create Diagram from the hue only.
S
Create Diagram from the saturation only.
V
Create Diagram from the value (brightness) only.
The current channel selected is displayed in the
mask channels text window (on the Mask Channel
button.) Pressing on this window brings up a popup, allowing the user to switch channels.
Press the Mask Channels Button to create a mask
from the selected channel of the Canvas (printed in
the Mask Channels window.) If a mask is already
Revision A
4-375
Paint Environment
Revision A
4-375
Paint Environment
CHYRON Corporation
CHYRON Corporation
active when the channel mask is created, the channel
mask is affected by the active mask (the channel
mask is attenuated by the active mask’s transparency.).
Mask Channels can also be used in conjunction with
the Add and Invert Prefix Buttons. When the Add
Prefix button is on, and a mask is active when the
channel mask is created, the channel mask will be
added to the existing mask (rather than be attenuated
by it.) Pressing the Invert Prefix first masks the
opposite pixels of the current Channel.
Mask Channels Popup
Press the corner button of Mask Channels to call up
the Mask Channels Popup (Figure 4-122). The Mask
Channels Popup contains the Diagram functions and
buttons for choosing among the different channel
options. When a channel is highlighted, the Diagram Curve is displayed in the appropriate colors:
for instance, Luminance shows a Diagram Curve
ramped from black to white and Hue shows a Diagram Curve ramped through the primary colors.
S Limits & V Limits Sliders
The "S limits" and "V limits" sliders are utilized
when the Mask Channels tool is in Hue ("H") mode
(creating a mask based on the Hue of the source
image). The sliders are disabled when the Mask
Channels tool is not in Hue mode. The V slider
allows the user to further tune the mask, by preventing pixels with very light or very dark colors from
being masked. Increasing the lower marker on the V
slider (which defaults to 0) prevents all pixels with
brightness lower than the marker from being
masked. This is especially useful since dark pixels
don't have a well-defined hue, and are often masked
Paint Environment
4-376
Revision A
Paint Environment
4-376
Revision A
Liberty Artist’s Manual
Liberty Artist’s Manual
when you don't want them to be. Raising the lower
marker of the V slider prevents this. Lowering the
upper V slider (which defaults to 255), prevents all
pixels with brightness higher than the marker from
being masked. Thus, the upper and lower markers
on the V slider work independently.
The S slider works in a similar manner to the V
slider, but using Saturation rather than Brightness.
Channels Clamp Button
Clamping allows you to precisely control what values of the channel you apply mask to. For instance,
if you want to separate a camera-grabbed black logo
from its white background, you use the luminance
channel and clamp all the white and light gray values found in the background to 100% and create the
mask only from those values. Once the mask is created, Erase will remove all of these lighter areas,
leaving only the darker grays and black. (See page
4-14 for more information about the Erase button.)
Revision A
4-377
Paint Environment
Revision A
4-377
Paint Environment
Liberty Artist’s Manual
Figure 4-122. Mask Channels Popup
Revision A
4-379
Paint Environment
Liberty Artist’s Manual
Liberty Artist’s Manual
The Clamp Button is used to clamp the chosen values in the Diagram Curve to 100% or zero, leaving
nothing in between. Press on values in the Canvas
to choose them (the Pick Colors Button is automatically activated by the Mask Channels Popup), then
clamp them to 0 or 100% on the Diagram Curve.
To clamp chosen values from the Canvas:
Revision A
4-381
Paint Environment
Revision A
[ ] 1.
Press the corner button of the Mask
Channels Button. The Mask Channels Popup
appears.
[ ] 2.
Press on the channel button you want to use.
(Luminance, Red, Green, etc.)
[ ] 3.
Press the Ramp Button on the Diagram
Curve to reset the curve, if necessary.
[ ] 4.
Press on the areas of the Canvas that you
want to mask. The corresponding areas of the
Diagram Curve are marked.
[ ] 5.
Press the Clamp Button. The marked areas
on the Diagram Curve are clamped to 100%
and the rest of the values are clamped to 0.
[ ] 6.
Press the Preview Button to see a preview of
the masked areas. It may help to use the
Mask Only button (below the Preview button).
This displays the mask in opaque white-onblack, making it easy to evaluate the mask as
you adjust and preview it.
[ ] 7.
Press the OK Button to confirm the mask.
The Mask Channels Popup disappears. Now
you perform the desired operation on the
masked area; for instance, Erase, or Apply
Color, etc.
4-381
Paint Environment
CHYRON Corporation
CHYRON Corporation
Clamp Tolerance Slider
Determines how much of the marked diagram curve
is clamped. If the slider is at minimum value (all the
way to the bottom), only the exact marked parts of
the curve are clamped to 100%. If the slider is at
maximum value (all the way to the top), all parts of
the curve between the lowest and highest picked
parts are clamped to 100%. At values between minimum and maximum, more or less of the curve is
clamped. The Reset Button resets the slider to minimum.
Preview Button
Press the Preview Button to see a preview on the
Canvas of the result of the current re-mapped Diagram Curve. Use the Mask Only button which
shows the mask in white on black, making it very
clear what your mask consists of.
Active Button
Press the Active Button to turn it on/off. When
Active is on, the preview of the result is updated
continuously (every time you change the Diagram
Curve).
OK Button
Press the OK button to bring down the popup and
make the change to the current mask.
Cancel Button
Press the Cancel button to close the popup and not
make any change to the current mask.
Paint Environment
4-382
Revision A
Paint Environment
4-382
Revision A
Liberty Artist’s Manual
Liberty Artist’s Manual
4.18.9
Fill Mask Button
Figure 4-123. Fill Mask Modes
The Fill Mask Button allows you to create a mask by
mask-filling an area of the Canvas based on transparency, color, or an existing mask. You can transparency-fill an object on the screen if it is
surrounded by transparent background. The different fill modes use slider scales to set the thresholds
at which the fill will stop.
Press in the text window in the Fill Mask Button to
display a list of all three modes. Press on one of the
modes to make it active.
Press the corner button in the Fill Mask Button to
call up the Fill Mask Popup.
Revision A
4-383
Paint Environment
Revision A
4-383
Paint Environment
CHYRON Corporation
CHYRON Corporation
Fill Mask Popup
Figure 4-124. Fill Mask Popup
The Fill Mask Popup has four slider scales: one for
filling to alpha, two for filling to color, and one for
filling to mask.
Fill to Alpha
To fill-mask to transparency, press on the Fill to
Alpha Slider and set it, then press the OK Button.
Press on the Canvas. If the place that you pressed
has a lower alpha value than the slider, the mask fills
outward from the pixel, stopping at pixels with an
alpha equal to or greater than the slider setting. If the
place that you pressed has a higher alpha value than
the slider, mask fills outward from the pixel, stopping at pixels with an alpha equal to or less than the
slider setting. To fill to empty background color
(zero alpha) set the Fill to Alpha Slider to the bottom, or 1 (one). The default slider setting for Fill to
Alpha is 1 (one).
Paint Environment
4-384
Revision A
Paint Environment
4-384
Revision A
Liberty Artist’s Manual
Liberty Artist’s Manual
Fill to Color
To fill-mask to a color, press on one of the Fill to
Color Sliders and set it, then press the OK Button.
Press on a Pixel on the Canvas. Mask fills outward
from the pixel, stopping at pixels whose color differs
from the start pixel.
The left Color Slider is the Greed Slider, which
determines how much of a color difference the fill
stops at. The higher the setting of the Greed Slider,
the greater the difference of colors that are included
in the fill.
The right Color Slider is the Smoothness Slider,
which determines the softness of the edges of the
fill. If the Smoothness setting is 0, the edges are
hard without anti-aliasing (all filled values are
255). If the Smoothness setting is at the maximum
(same as Greed setting), the fill has a smooth edge.
Fill to Mask
To fill-mask to a mask value, use Paint On Mask (or
other mask tool) to make a closed mask on the Canvas (for example, Paint-masking a boundary around
an image you want to cut out from its background).
Press on the Fill to Mask Slider and set it, then press
the OK Button. Press on a pixel on the Canvas
inside the boundary of the closed mask. Mask fills
out to the masked boundary. The mask fills with the
value chosen on the slider.
Fill Mask Preview
Press Preview to see the fill before it becomes permanent. Press on Preview, then anywhere on the
Canvas to see a preview of that fill. The Preview
Button will only preview one fill at a time. Press
again on the Canvas to choose a new start point for
the fill and re-preview it. The Mask Only Button disRevision A
4-385
Paint Environment
Revision A
4-385
Paint Environment
CHYRON Corporation
CHYRON Corporation
plays the mask as an opaque white-on-black silhouette. Previewing a Fill Mask is important when
filling to a threshold - you can set a threshold with a
slider, preview the mask, then come back and adjust
the slider and re-preview. Press the OK Button to
make the previewed mask permanent.
Fill Mask Active
Press the Active button to turn it on or off. When
Active is on, the preview of the result is updated
continuously.
4.18.10 Match Mask Button
The Match Mask Button makes a mask based on
matching the Canvas colors to the color chosen on
the palette. Sliders on the popup allow you to adjust
what colors are masked.
The button’s text window shows whether the button
is in Hue or RGB mode. Press on the text window to
bring up a pop-up selecting one of these modes.
Paint Environment
4-386
Revision A
Paint Environment
4-386
Revision A
Liberty Artist’s Manual
Liberty Artist’s Manual
Match Mask Popup
Figure 4-125. Match Mask Popup
Press the corner button of Match to call up the
Match Mask Popup. The popup contains two sliders: the Delta Slider, and the Smoothness Slider.
The Delta Slider sets a “greed” factor for the color
mask. If its setting is low, then only the nearly exact
instances of the current palette color are masked on
the Canvas. If it is set high, then Canvas colors are
masked that are similar to the current color.
The Smoothness Slider sets how hard-edged or softedged the mask is. A high Smoothness setting
results in a softer-edged mask.
To adjust the Delta factor and make a Match
Mask:
Revision A
4-387
Paint Environment
Revision A
[ ] 1.
Choose a color in the palette (or use Pick
Color).
[ ] 2.
Press the corner button of the Match
Button. The popup appears.
4-387
Paint Environment
CHYRON Corporation
CHYRON Corporation
[ ] 3.
Adjust the Delta Slider. The higher the Delta
value, the more is masked.
[ ] 4.
Adjust the Smoothness Slider. The higher
the Smoothness Slider, the smoother the edge
of the masked area. The Smoothness value is
constrained to be no higher than the Delta
value.
[ ] 5.
Press the Preview Button to preview the
effect of Match Mask before it becomes
permanent.
[ ] 6.
Press the OK Button. The mask is made.
Match RGB and Hue Buttons
Press one of these mode buttons to turn it on. RGB
is the default. Hue works the same as RGB, except
that the match is based on hue only; saturation and
brightness are disregarded. This tends to leave highlights and shadows unmasked.
If a mask is already active when Match Mask is
invoked, the result will be limited to the opaque
areas of the active mask.
With the Add Prefix on, Match adds the new Mask
to any existing active mask.
With the Invert Prefix on, Match inverts the mask.
Paint Environment
4-388
Revision A
Paint Environment
4-388
Revision A
Liberty Artist’s Manual
Liberty Artist’s Manual
4.19
Mask Tools 2 Panel
Figure 4-126. Mask Tools 2 Panel
The Mask Tools 2 Panel has the same top row of
buttons as the Mask Tools 1 Panel: Use Mask, Mask
All, Invert (Complement) Mask, and Erase Mask.
4.19.1
Safe Title Button
Safe Title is a way to display a white rectangular
overlay on the picture to indicate the area outside of
which it is not safe to put essential visual information in the picture. The white rectangle is not really
part of the picture and will not appear when Cut,
recorded or saved to disk. Press the Safe Title Button to turn on/off the white rectangle. Press the corner button of the Safe Title Button to call up the Safe
Title Popup.
Revision A
4-389
Paint Environment
Revision A
4-389
Paint Environment
CHYRON Corporation
CHYRON Corporation
Safe Title Popup
Figure 4-127. Safe Title Popup
The Safe Title Popup provides two sets of sliders
that define the Safe Action and Safe Title fields.
You can change the size of the rectangles with the
slider scales; below the sliders, the aspect ratio (ratio
of width to height) of each rectangle is displayed.
(These sliders allow the X and Y size of the rectangle to be set, in terms of percentage of the Canvas
size.) Pressing the Reset button resets the sliders to
SMPTE Safe Title and Safe Action fields, based on
the current canvas resolution. The Safe Title Elevator stores six different settings.
Show Safe Action and Show Safe Title
To turn on the Safe Action or Safe Title rectangle,
press the corresponding Show Button. A white, centered cross-hair appears with either of the rectangles.
Press OK to make the Safe Title Popup disappear.
The Safe Title Button remains highlighted. Press
the Safe Title Button again to turn it off or press the
corner button to bring up the popup again and turn
off the Show Buttons. The white rectangle is not
Paint Environment
4-390
Revision A
Paint Environment
4-390
Revision A
Liberty Artist’s Manual
Liberty Artist’s Manual
permanent, nor is it really a part of the picture. You
can leave it up while you work on the Canvas - when
you save pictures the overlay is not saved.
Mask Safe Action and Mask Safe Title
You can create a rectangle mask corresponding to
Safe Action or Safe Title by turning on Mask Safe
Action or Mask Safe Title. If either or both of the
Mask Buttons is on when you press OK, the solid
rectangle masks are maintained on the Canvas for
the next function.
Cross Hair Button
The Cross Hair Button changes the size of the
crosshair in the center of the screen, when either
Show Safe Action or Show Safe Title is on.
4.19.2
Mask Grid Button
Press the Mask Grid Button to display the current
grid as a mask in one-pixel lines, thus making it visible. You can then Apply color into the grid lines to
make them a permanent part of the picture. The
Mask Grid Button displays the current Grid whether
the Grid Button is actually turned on or not. For
more details about Mask Grid, see page 4-58.
4.19.3
Clamp Mask Button
The Clamp Button allows you to “compress” the
values in a mask. Press the corner button of the
Clamp Button to call up the Clamp Popup. The
Clamp Popup has the standard Diagram tools along
with an extra slider, the Clamp Threshold Slider.
Basically, clamping a mask reduces some of the
mask values to either 0 or 100% (255). Clamp sets
to 0 all current mask values that are lower than the
Revision A
4-391
Paint Environment
Revision A
4-391
Paint Environment
CHYRON Corporation
CHYRON Corporation
Clamp Threshold Slider Scale setting, and sets to
255 all current mask values equal to or greater than
the slider setting. Useful for eliminating anti-aliasing. Press in the Clamp Window to choose between
two different modes of affecting the Diagram: Snap
Mode and Ramp Mode.
Snap & Ramp Modes
Figure 4-128. Snap and Ramp Modes
Snap Mode
In Snap Mode all values less than the slider setting
are set to zero. All values greater than the slider setting are set to 255. With the Invert prefix on, this is
reversed.
Ramp Mode
In Ramp Mode all values less than the slider setting
are set to zero. All values greater than the slider setting are unchanged. With the Invert Prefix on, this
reversed.
Paint Environment
4-392
Revision A
Paint Environment
4-392
Revision A
Liberty Artist’s Manual
Liberty Artist’s Manual
Clamp Mask Popup
Figure 4-129. Clamp Mask Popup
Press the corner button of Clamp to call up the
Clamp Mask popup. The Clamp Mask Popup consists of the Clamp Threshold Slider, a preview, a
Mask Only Button and OK, Cancel, and Reset Buttons, along with a diagram.
Diagram with Clamp Mask
Re-maps the current mask values according to the
diagram, completely ignoring the Clamp Threshold
Slider. For information on how to modify the Diagram Curve, see page 4-290. For information on
how the Diagram Curve operates with masks, see
page 4-371.
4.19.4
Difference Mask Button
Press to make a mask on the Canvas based on the
difference between the picture in the Canvas and the
picture in the Temp Buffer. Differences create a
mask on the Canvas corresponding to the difference.
The difference can be based on various channels;
Revision A
4-393
Paint Environment
Revision A
4-393
Paint Environment
CHYRON Corporation
CHYRON Corporation
i.e., on luminance differences, on red differences,
etc. The channel displayed in the window in the
Difference Button is the active channel. The more
different the pixels, the higher the mask values.
Difference Mask Modes
Figure 4-130. Difference Mask Modes
The window in Difference displays the current
mode. Press directly on the mode label to call up a
popup displaying all the mode buttons. The mode
buttons also appear on the Difference Popup (the
corner button of Difference). You can base a Difference Mask on Luminance, Red, Green, Blue, Hue,
Saturation, Value, or Alpha (transparency). Press on
the desired mode button in the popup and press the
OK Button. You can cycle through the modes by
pressing on either end of the window in the Difference Mask Window.
Paint Environment
4-394
Revision A
Paint Environment
4-394
Revision A
Liberty Artist’s Manual
Liberty Artist’s Manual
Difference Mask Popup
Press the corner button of the Difference Mask Button to call up the Difference Mask Popup (Figure 4131), which contains the Diagram Curve, the Difference Ramp and Clamp functions, and related features. The Diagram Curve re-maps the current mask
values according to the diagram, completely ignoring the Difference Ramp/Clamp functions. For
information on how the Diagram Curve operates
with masks, see page 4-371.
The popup also contains the Difference Mask
Modes.
Revision A
4-395
Paint Environment
Revision A
4-395
Paint Environment
Liberty Artist’s Manual
Figure 4-131. Difference Mask Popup
Revision A
4-397
Paint Environment
Liberty Artist’s Manual
Liberty Artist’s Manual
Difference Ramp and Clamp Functions
These functions allow you to apply ramping and
clamping to the Difference Mask, as defined by the
Diagram Curve. They consist of a slider scale and
two mode buttons, Ramp and Clamp. When Clamp
Mode is on, all values above the slider are clamped
to 255 and all other are clamped to 0. When Ramp
Mode is on, all the values above the slider are
ramped, and all others are clamped to 0.
4.19.5
Field Mask Button
Figure 4-132. Field Mask Modes
Press the Field Mask Button to mask every other
one-pixel line on the Canvas. In Odd Mode it masks
the odd field; in Even Mode it masks the even field.
The text window displays the current mode (even or
odd.) Press on the text window to bring up a popup
for selecting even or odd mode.
Revision A
4-399
Paint Environment
Revision A
4-399
Paint Environment
CHYRON Corporation
CHYRON Corporation
4.19.6
Paste Mask Button
Figure 4-133. Paste Mask Modes
Press to mask an area by pasting the contents of the
Temp Buffer as a mask. An area is masked on the
Canvas determined by the silhouette of the contents
of the Temp Buffer. Any transparency in the image
in the Temp Buffer also appears in its mask. The
two Paste Mask Modes are: In-place and Pick Point.
In-place pastes the mask in its original position; Pick
Point gives it to you on the end of the pen (or
mouse) for manual positioning. In this mode, a fullresolution preview of the mask being pasted is
updated on the canvas as the user moves the pen.
The current mode is displayed in the Paste button’s
text window. Press on the window to bring up a
popup selecting this.
Invert Prefix with Paste Mask
Pressing the Invert Prefix Button, then pressing
Paste Mask uses the temp’s Alpha data to erase from
the existing mask.
Paint Environment
4-400
Revision A
Paint Environment
4-400
Revision A
Liberty Artist’s Manual
Liberty Artist’s Manual
4.20
TEXT PANEL MENUS
The Text Panel Menus provide Liberty's text functions. Liberty uses three Panels for the Text functions: one for the main text editing, another for
Accent Marks, and one for International Characters. Press the small arrow at either end of the light
blue Text title bar (at the top of the Text Panel) to
cycle the Accent Panel and the International Panel.
All Liberty fonts are Bitstream vector fonts. Liberty
comes with 50 standard fonts. Contact your Liberty
salesperson to order additional fonts from the library
of over 1,500 fonts.
4.20.1
Text Panel
Figure 4-134. Text Panel
Text Edit Button
Press the Edit button to begin entering text from the
keyboard, or to edit existing text. As you type, the
text appears on the Canvas in vector outline form. A
Revision A
4-401
Paint Environment
Revision A
4-401
Paint Environment
CHYRON Corporation
CHYRON Corporation
small triangle appears at the base of the characters
that represents the insertion point. Press the Edit
Button a second time to terminate Text Editing.
THE TEXT EDIT BUTTON MUST BE
ON IN ORDER TO USE ANY OF THE
TEXT EDITING FUNCTIONS!
Selecting Text
When the Text Edit Button is on, you can select displayed text by pressing and dragging the pen over
the text outline on the Canvas. The selected text
turns red. Most text functions use selected text
(these turn off the selection when complete.)
To unselect the selected text, press on the Canvas
away from the displayed text.
Font Elevator
In the upper left of the Main Text Panel Menu is the
Font Elevator. It has four levels, each of which can
hold a different font.
To bring a font into a level, or to change the
font in a level:
Paint Environment
4-402
Revision A
Paint Environment
•
Press on the in-arrow at the left of the elevator
level. The File Popup appears. If the font directory is not displayed, press on DIR to see a list of
directories; press the directory named "fonts."
You can browse fonts just like pictures in the
Full Screen File Menu.
•
When the list of available fonts is displayed,
press on a font name in the list. The name of
the font appears in the elevator level and the File
Popup disappears.
4-402
Revision A
Liberty Artist’s Manual
Liberty Artist’s Manual
On the right of each elevator level is a Set button.
Press on the Set button to change the style of the text
currently being edited into the font in that elevator
level. If there is selected text, only the selected text
will change font style, but if there is no selected text
then all text will change font style.
Move Button
Use to move the text outline around on the Canvas.
It works on the selected characters, and if no characters are selected, it works on all the characters. (If
characters are selected, they change color while
being moved.)
To move text:
•
Press Move.
•
Press on the selected text and drag to its new
position.
•
Press Move again to turn it off.
You cannot select new text while Move is on.
Refresh Text Button
Updates the displayed text. The displayed text automatically updates when most functions are used, but
when new text is typed in there can be update problems which will be corrected by pressing this button.
Text Elevator
Under the font elevator are six elevator boxes. Each
box in the Text Elevator can hold a page of unrendered text outline. You edit the contents of the
active elevator box. Press on a different elevator
box to edit a different level.
Revision A
4-403
Paint Environment
Revision A
4-403
Paint Environment
CHYRON Corporation
CHYRON Corporation
When the Copy prefix is on, pressing on an elevator
level copies the text in the current level to the new
one.
Text Size Button
Figure 4-135. Text Size Popup
Use to adjust the size of the text. This button acts on
the selected characters of the text, and if no text is
selected, it acts on all the characters.
To change text size:
•
Press the Text Size Button. The Text Size
Popup appears.
•
Press and drag the slider to resize the active
text. The displayed text changes size.
•
Press the green OK button on the popup when
the text is at the desired size.
You can select different text with the pen while the
Text Size Popup is still up.
Paint Environment
4-404
Revision A
Paint Environment
4-404
Revision A
Liberty Artist’s Manual
Liberty Artist’s Manual
Center Text Button
The Center Button centers the bounding box of the
text. It centers all the displayed text, regardless of
selects.
Leading Button
Figure 4-136. Leading Button
Use to adjust the leading (space between lines) of
the text. It works on selected text, or if no text is
selected, it works on all the text.
To change the leading:
Revision A
4-405
Paint Environment
Revision A
•
Press the Lead Button. The Text Leading
Popup appears.
•
Press and drag the slider to adjust the leading
of the selected text.
•
Press the green OK button on the popup when
the text is at the desired leading.
4-405
Paint Environment
CHYRON Corporation
CHYRON Corporation
Align Text Button
Figure 4-137. Align Popup
Allows left, center, right, and full justification.
Affects all the current text, not just the selected text.
To change the justification of the text:
•
Press the Align Text Button. The Align Popup
appears.
•
Press one of the Align Mode Buttons to make
it active. The Align Popup disappears and the
text display adjusts according to the chosen
mode.
The Align Left Button justifies the text to the left.
The Align Right Button justifies the text to the right.
The Align Center Button centers the text horizontally.
The Align Justify Button justifies the text to left and
right, adjusting the kerning line by line.
Paint Environment
4-406
Revision A
Paint Environment
4-406
Revision A
Liberty Artist’s Manual
Liberty Artist’s Manual
Kerning Button
Figure 4-138. Kerning Popup
Use to adjust the kerning (space between characters)
of the text. This acts on the selected text, and if no
text is selected, it acts on the character before the
insert point. If you want to change all the text, you
must select it.
To kern selected text:
•
Press the Text Kerning Button. The Text
Kerning Popup appears.
•
Press and drag the slider to kern the active
text. The kerning changes on the displayed text.
The text can be kerned negatively or positively.
To change the kerning back to zero, press Reset.
Press the green OK button on the popup when
the text is at the desired kerning.
You can select different text with the pen or arrow
keys while the Kerning Popup is still up.
Erase Text Button
Deletes the selected text, or if there is no selected
text, deletes the character just before the insertion
point.
Revision A
4-407
Paint Environment
Revision A
4-407
Paint Environment
CHYRON Corporation
CHYRON Corporation
Erase All Button
Deletes the entire buffer of text.
Transform Text Button
Figure 4-139. Transform Popup
Transform Text provides a popup similar to Paste
Distort with functions for positioning, rotating, scaling, slanting, and mirroring the text outline, prior to
rendering. Transform works on the entire buffer, the
current line, or a single character. You can change
modes and the active character or line while the
Transform Popup is up. To change modes, press on
the text window inside the Transform button until it
displays the correct mode: Buffer, Line or Character.
To transform text:
•
Paint Environment
4-408
Revision A
Paint Environment
Press the Transform Text Button. The Transform Popup comes up and a wireframe bounding
box appears around the displayed text on the
Canvas. NOTE: You must type in some text
before the Transform Button can be used.
4-408
Revision A
Liberty Artist’s Manual
Liberty Artist’s Manual
•
Use the functions of the Transform Popup to
position, rotate, scale, slant, and mirror the
displayed text. The Text Transform Popup
works similar to Paste Distort. When the Transform Popup is up, to change the active character,
press the right and left arrow keys. To change the
active line, press the up and down arrow keys on
the keyboard. To change what mode Transform
is in, press on the text window in the Transform
Text Button.
•
Press the OK Button. The Transform Popup
disappears.
Render Text Button
Figure 4-140. Render Popup
Press at any time to render text to the Canvas in the
current color at the current transparency. It works
on selected text, or if no text is selected, it works on
all the text. The corner Erase button of the OK button erases the Canvas, Temp, or Mask before rendering. Render Text has a popup that allows you to
render into the Mask, Temp Buffer, or Canvas. You
can render the text as solid color, as an outline, or
as a mask.
Revision A
4-409
Paint Environment
Revision A
4-409
Paint Environment
CHYRON Corporation
CHYRON Corporation
To choose how to render the text:
•
Press the corner button of the Text Render
Button. The Render Popup appears.
•
Press a Render Mode Button to choose how to
render the text. The Button changes between
Canvas, Temp, and Mask Modes, indicating
whether Liberty will render the text to the Canvas, to the Temp, or as a Mask on the Canvas.
•
Press either the Filled Button or the Outline
Button to choose to render the text in outline
or filled (solid) mode. Outline mode drags the
current brush around the vector outline of the
text. In outline mode, the current paint mode
(Normal, Reveal, etc.) is used, along with any
selected Fold, Jitter, and Noise settings. (See
“Paint Modes Popup” on page 4-275 for more
information about these modes.)
•
Press the OK Button. The text is rendered
according to the current settings. The Erase OK
Button erases first, then renders.
An example of an application of outline mode: after
rendering your text solid to the Canvas, choose a
small light-colored airbrush with the Transparency
Slider at a low setting. Then Render in Outline
mode with the Under Prefix on. Liberty draws a soft
glow around the solid text.
Text Save and Recall
Use these buttons to save and recall text files. All
settings and text are saved, including font style. At
any time, you can use no more than four font styles
in one text file (since there are four levels to the Font
Elevator). If you save a text file with four different
font styles in it and recall it later, the original four
font styles are called into the Font Elevator from the
Paint Environment
4-410
Revision A
Paint Environment
4-410
Revision A
Liberty Artist’s Manual
Liberty Artist’s Manual
disk, if they are not already there. If less than four
font styles need to be recalled, they are loaded into
the Font Elevator starting at the top level. If the
Recall Path for the font directory has changed, the
stored fonts will not be found, and they will be
replaced by the current fonts in the Font Elevator.
4.20.2
International Character Panel
Figure 4-141. International Character Panel
While editing text, press the left end of the light blue
Text title bar (at the top of the Text Panel) to call up
the International Character Panel.
To use an international character in your text, press
on the desired character in the International Panel,
just as if you were pressing a key on the keyboard.
The indicated character appears in the wireframe
text display after the triangular cursor. Press on the
right end of the light blue title bar to return to the
main Text Panel.
Revision A
4-411
Paint Environment
Revision A
4-411
Paint Environment
CHYRON Corporation
CHYRON Corporation
4.20.3
Accent Panel
Figure 4-142. Accent Panel
While editing text, press the right end of the light
blue Text title bar (at the top of the Text Panel) to
call up the Accent Panel.
To use an accent mark in your text, press on one of
the accent marks in the Accent Panel. The indicated
accent mark appears in the wireframe text display
above the current character (the one followed by the
triangular cursor). Press on the left end of the light
blue title bar to return to the main Text Panel.
Accent Position Button
Remarkably enough, you use the Accent Position
Button to position accents! The button has 8 directional buttons, similar to the Edge Button. Pressing
each directional button moves the accent mark one
pixel in that direction. The middle button ("A") is a
mode button, which, when on, causes the accent
mark to move continuously as long as you press
down on a directional button.
Paint Environment
4-412
Revision A
Paint Environment
4-412
Revision A
Liberty Artist’s Manual
Liberty Artist’s Manual
If you move a character that has an accent mark, the
accent mark moves with the character.
4.21
MACRO PANEL MENU
Figure 4-143. Macro Panel
The Macro function allows you to create macros that
record your actions on Liberty and play them back.
You can use Macro to perform repetitive tasks that
would be tedious to do by hand. You can, for example, use Macros to process stills and large amounts
of sequentially numbered files or frames. Or you
can use macros to remember complex sequences of
actions or set-ups.
Revision A
4-413
Paint Environment
Revision A
4-413
Paint Environment
CHYRON Corporation
CHYRON Corporation
4.21.1
Recording and Playing Macros
Record Macro Button
NOTES
Use caution when recording macros
with toggle (on/off) or cycling
buttons. Since the result of pressing
such buttons is dependent on the
button’s current value, macros may
work differently if these button values
differ (e.g. if the Paint button gets
turned on while recording the macro,
playing the macro back when the
Paint button is already on will turn the
Paint button off, since it is an on/off
toggle button.)
Macros will not handle double-clicks
(as on the Erase Button for a fullscreen erase) because Macros do not
record time duration and so do not
recognize two clicks in quick
succession. If you want to erase the
whole screen while recording a
Macro, press Mask All, then Erase
(once).
To record a Macro:
Paint Environment
4-414
Revision A
Paint Environment
•
Press the Record Macro Button. The File
Popup appears.
•
Type in or press on the name for the recording to be saved under. The popup disappears.
The Record Button is highlighted, indicating that
you are recording.
•
Perform the operations that you want to
record. All relevant pen presses and keyboard
presses are recorded until you press Stop.
•
Press the Stop Macro Button. Recording stops.
4-414
Revision A
Liberty Artist’s Manual
Liberty Artist’s Manual
Play Macro Button
To play a Macro:
•
Press the Play Macro Button. The File Popup
appears showing recorded Macro filenames.
•
Choose a Macro by typing its filename or
pressing on its name in the list. The Macro
plays back.
To play a Macro repeatedly:
•
Press the Repeat Prefix Button.
•
Press the Play Macro Button. The File Popup
appears showing recorded Macro filenames.
•
Choose a Macro by typing its filename or
pressing on its name in the list. You are
prompted to enter the number of loops (or times
you want the Macro to play).
•
Type the number of times you want the Macro
to play. The Macro plays the appropriate number of times. You can use this technique along
with the Increment Buttons in Save and Recall or
with the Rotoscope Buttons to recall, process,
and save large numbers of sequentially-numbered files.
Pause Macro Button
Press the Pause Button during a Macro recording to
suspend recording until you press Pause again. Neither the two presses of Pause or anything between is
recorded. While Pause mode is active, the Pause
Button is highlighted. This can be useful if you discover during recording that the right menu wasn't
installed, etc.
Revision A
4-415
Paint Environment
Revision A
4-415
Paint Environment
CHYRON Corporation
CHYRON Corporation
Stop Macro Button
Press to terminate recording. Every Macro must
end with Stop.
Delay Macro Button
Press the Delay Button during a Macro recording to
insert a pause in the playback. You are prompted to
enter a number of seconds for the duration of the
pause. This function is often used to slow the pacing of the playback of a Macro when it is being used
for display purposes.
Delete Macro Button
Press to bring up the File Popup with the list of Macros on disk. Press on one of the filenames to delete
it. You are prompted to confirm the deletion.
Save and Recall State Buttons
Save State helps you set up your menus for playing
back a Macro. Often when you play back a Macro
you want certain menu set-ups in order that it runs
correctly, yet these set-ups are not part of the Macro
and can get mistakenly re-set before you play the
Macro. A press on Save State saves all the set-ups.
Then you press on the Recall State Button as the
first step of your Macro, which will automatically
restore the proper settings before playing the Macro.
When you press Save State, the usual File Popup
appears. Choose a directory and a filename. Then,
when creating the Macro, recall the Save State file
as the first step of the Macro.
Save State is also useful when working with Macro
Actor in the Animation Environment, page 5-151.
Paint Environment
4-416
Revision A
Paint Environment
4-416
Revision A
Liberty Artist’s Manual
Liberty Artist’s Manual
4.21.2
Defining Keyboard Keys
Bind Macro Button
Binds a keyboard key to a Macro. The keyboard
keys are already bound to many of Liberty's Menu
Buttons (see the list below). When you bind a
Macro to a key, the previous binding will be
replaced by the new binding.
To bind a Macro to a key:
•
Press the Bind Button. You are prompted to
press a keyboard key for the Macro to be bound
to.
•
Press a keyboard key. The File Popup appears,
displaying recorded Macro filenames.
•
Press on the file name of the Macro you want
to bind. The File Popup disappears. When you
press the keyboard key, the Macro plays back.
Define Key Button
Defines (binds) a keyboard key as a Liberty menu
button. The keys are already defined as many of
Liberty's menu buttons (see the list below). The previous definition is replaced by the new definition.
To define a key as a Liberty Menu Button:
Revision A
4-417
Paint Environment
Revision A
•
Press the Define Button. You are prompted to
press a keyboard key for a menu button to be
defined as.
•
Press a keyboard key. You are prompted to
press a menu button.
•
Press the menu button you want to define to
the key. Now when you press the keyboard key,
the defined menu button is activated.
4-417
Paint Environment
CHYRON Corporation
CHYRON Corporation
The ESC is permanently defined as CANCEL.
The END key terminates the current operation in
progress (e.g. an animation render).
Many keyboard keys are predefined to function buttons. You can undefine them with the Undefine Key
or define another function over the function currently defined.
Undefine Button
Press the Undef button to undefine (or unbind) a
keyboard key. A keyboard key can be redefined as a
new function without being undefined. This button
is used if for some reason you do not want a particular key to perform any function. For example, if you
press the spacebar often by accident, you wouldn’t
want that defined as anything.
The pre-defined keys are shown in the table on the
following page.
Paint Environment
4-418
Revision A
Paint Environment
4-418
Revision A
Liberty Artist’s Manual
Table 4-5: Pre-Defined Macro Functions
Table 4-5: Pre-Defined Macro Functions
Key
Key
Predefined Function
Predefined Function
*
Turn on/off Multiple Color Mode (on palette)
F1
Magnify in one step
‘
Press Pick Color Button
F2
Magnify out one step
Enter
Press Yes Confirmation Button
F3
Turn Magnify on/off (previous level of magnification)
<
Press Recall Button
F4
Turn on Full Page Mode
>
Press Save Button
F5
Turn on/off current grid
{
Temp to Canvas
F6
Undefined
}
Canvas to Temp
F7
Undefined
%
Temp/Canvas Swap
F8
The CANVAS Button (go to full-screen canvas or back)
/
Turn on/off Autopan
h
Turn on/off Horizontal Button
=
Brings up Calculator
v
Turn on/off Vertical Button
i
Turn on/off Invert Prefix Button
c
Turn on/off Copy Prefix Button
a
Turn on/off Add Prefix Button
u
Turn on/off Under Prefix Button
r
Turn on/off Repeat Prefix Button
;
Turn on/off Paint Button
~
Turn on/off Jitter Paint Button
!
Turn on/off Pressure Paint Button
^
Turn on/off Mask in Use Button
l
Press Mask All Button
,
Turn on Paint Mask Button
#
Turn on/off Rectangle Mask Button
t
Press Matte Mask Button
?
Press Help Button
Revision A
4-419
Paint Environment
Liberty Artist’s Manual
Liberty Artist’s Manual
4.21.3
Editing Macros (New Format)
With the release of Liberty v5.0 software, the macro
file structure and macro editing interface was
changed significantly. While Liberty will only
record macros using the new format, it can play
macros under the new or old format. Due to this
capability, the macro editing interface enabled will
be dependent on the record macros’s file format. To
edit new macros follow the procedures below. To
edit macros recorded using the old format, following
the editing interface described on See “Editing Macros (New Format)” on page 4-421.
Edit Macro Button
Press the Edit Button to edit a recorded Macro. The
File Popup appears, displaying the list of filenames
of recorded Macros. Press on or type the filename
of a Macro to edit it. The entire Canvas area is
replaced by a text file of the Macro, putting you into
a text editor called Jot.
The Jot Program
Jot is resident on the SGI platform and is called up
by Liberty. Jot is a very simple text editor for the
purposes of editing line-by-line the text file of the
Macro. It works like most text editors with standard
commands for cutting, pasting, saving files, etc. Jot
has an on-line help feature to answer questions
about its operation.
Liberty Help Codes
When the text file of the Macro appears on the Canvas for editing, each line begins at the left with the
name, in capitals, of the Liberty menu button
invoked at each step of the Macro. These button
names are not always easy to interpret. However,
Revision A
4-421
Paint Environment
Revision A
4-421
Paint Environment
CHYRON Corporation
CHYRON Corporation
you can use the Liberty Help function to determine
the names of buttons. When you press the green
Help button, then press on a button you want help
on, the help message displayed in the prompt window includes the name of the button (this appears at
the end of the message). This can assist in interpreting which button names in the macro pertain to
which buttons.
When you have edited the Macro, save it and close
the Jot program, which returns you to normal operation of Liberty. You can then run the macro again to
test it in its edited form.
Paint Environment
4-422
Revision A
Paint Environment
4-422
Revision A
Liberty Artist’s Manual
Figure 4-144. “Jot” Macro Editing Utility
Revision A
4-423
Paint Environment
Liberty Artist’s Manual
Liberty Artist’s Manual
4.21.4
Editing Macros (Old Format)
Edit Macro Popup
Use the editing functions to correct small mistakes
you make in recording your Macros. The most common mistake is to leave out a step when you record
the Macro. The Edit Popup makes it easy to insert
steps where you want them. The easiest Macros to
edit are those consisting mainly of button presses
and keystrokes. Macros with painting tend to get
very large and complex and hard to edit. The easiest
inserts to make are at the beginning of the Macro
(first step) and at the end of the Macro (last step)
because you can use the First Step Button or the Last
Step Button to get to the insert point.
Current Step Button
This button displays a window that shows the number of the current step of the Macro that you are editing. Press on the window to type in the number of a
step to jump to. Whatever button is being pressed in
the current step is highlighted on the menu.
First Step (I<) Button
Press to jump back to the first step of the Macro you
are editing.
Previous Step (<) Button
Press to go backwards one step the Macro you are
editing.
Next Step (>) Button
Press to go to the next step of the Macro you are
editing.
Revision A
4-425
Paint Environment
Revision A
4-425
Paint Environment
CHYRON Corporation
CHYRON Corporation
Last Step (>I) Button
Press to jump to the last step (Stop Button) of the
Macro you are editing.
Insert Step Button
While Insert Mode is on, all button pushes are
inserted in sequence before the current step until you
press Insert again to turn it off, or press the Accept
Button to end the insertion.
To insert steps into the Macro you are editing:
•
Use the Step Buttons to get to the step before
which you want to insert.
•
Press the Insert Step Button to turn Insert
Mode on.
•
Perform the operation (press the menu buttons) you want to insert into the Macro. The
buttons you press are recorded.
•
Press the Insert Button again to turn off
Insert Mode. The button presses that you
recorded are inserted into the Macro before the
current step. When you play back the Macro, the
new button presses will be executed along with
the rest of the Macro.
Change Step Button
The Change Step Button turns on/off Change Mode.
While Change Mode is on, buttons and keys pressed
replace existing steps (starting at the current step
number) until you press Change again to turn it off.
To replace steps in a Macro with new steps:
•
Paint Environment
4-426
Revision A
Paint Environment
Use the Step Buttons to get to the step where
you want to start replacing.
4-426
Revision A
Liberty Artist’s Manual
Liberty Artist’s Manual
•
Press the Change Step Button to turn Change
Mode on.
•
Press the menu buttons you want to record in
place of the existing steps of the Macro. The
buttons you press are recorded.
•
Press the Change Step Button to turn off
Change Mode. The button presses that you
recorded replace the steps in the Macro following the current step number displayed when you
pressed the Change Button. When you play back
the Macro, the new button presses will be executed along with the rest of the Macro.
Delete Step Button
Press to delete the current step.
Delete Rest Button
Press to delete the current step and all steps following it, except for the terminating Stop which can't be
deleted or changed.
Step Key Button
Normally the button pressed in a step is highlighted
in red, but some buttons, like the Canvas and keyboard keys can't be highlighted. In those cases the
step is printed in the Step Key Button.
Cancel Edit Button
Press to discard all changes and terminate editing.
The edited Macro is preserved in its original form.
Accept Edit Button
Press to confirm the edited Macro and terminate
editing. The edited Macro is saved with its changes.
Revision A
4-427
Paint Environment
Revision A
4-427
Paint Environment
CHYRON Corporation
CHYRON Corporation
4.22
VTR PANEL MENU
Figure 4-145. VTR Panel
The VTR Panel is used to control recording devices
as both source and target, including VTRs, DDRs,
and hard drives.
Source Button
Press to enable the Source, or Play, VTR. When this
button is highlighted, all the VTR control buttons
apply to the source machine. The corner button of
Source calls up the Set-up Popup for the source
device. Refer to Figure 4-148, “VTR Set-up Popup”
on page 4-432 (and the subsequent sections) for
more information about the Source and Target
VTRs.
Target Button
Press to enable the Target, or Record, VTR. When
this button is highlighted, all the VTR control buttons apply to the record device. The corner button
of the Target Button calls up the Target Set-up
Popup.
Paint Environment
4-428
Revision A
Paint Environment
4-428
Revision A
Liberty Artist’s Manual
Liberty Artist’s Manual
Timecode Windows
These two windows display the current timecode
settings for the source and target devices. The timecode windows do not update continuously from the
devices, because VTRs have different pre-roll periods which can cause continuous timecode reference
to get lost. Each of these “global” timecode windows refer only to the single current (highlighted)
device on the Source and Target Set-up Popups,
accessed by pressing the Source or Target corner
buttons.
To update the timecode of the current device, press
the “>” (source) button or the "<" (target) button.
The current timecode appears in the corresponding
timecode window.
Each timecode window has a set of “Bump” buttons
(up and down arrows). Press on these to bump the
timecode setting by one frame up or down.
Press directly in a timecode window to enter a new
number. Separate the hours, minutes, seconds, and
frames with spaces. 1:09:21:15 would be typed 1 9
21 15. Typing just "5" appears as 0:00:00:05.
Timecode Elevator
You can store four timecode positions in the four
levels of the elevator.
To set the timecodes in the timecode elevator:
Revision A
4-429
Paint Environment
Revision A
•
1.
Press on the elevator level you want to store a
timecode setting in.
•
2.
Press in a timecode window and enter a new
timecode.
4-429
Paint Environment
CHYRON Corporation
CHYRON Corporation
•
3.
Press a different elevator level. When you
again press the previous level, the timecode
setting will still be there. You can copy a
timecode setting from one elevator level to
another with the Copy Prefix Button (to do
this, press the copy prefix button, then
select a new elevator level in the VTR
panel. This copies the timecodes in the
current level to the new level).
Shuttle and Jog Sliders
Press and drag these sliders to shuttle or jog the
enabled (highlighted) source or target device.
Cue Button
Cues the enabled device to the current timecode.
Increment Cue Button (Right Arrow)
Press to increment the timecode by one and cue the
current device to that timecode.
Decrement Cue Button (Left Arrow)
Press to decrement the timecode by one and cue the
current device to that timecode.
Stop VTR Button
Press to stop the current device. Puts the device in
standby mode.
Play VTR Button
Press to play the current recording device.
Paint Environment
4-430
Revision A
Paint Environment
4-430
Revision A
Liberty Artist’s Manual
Liberty Artist’s Manual
Grab Button
Press to fetch the currently numbered frame on the
source device. Cues the source recording device and
grabs the frame (actually one field doubled) and
sends it to the buffer (Canvas, Temp or Mask) that’s
set on the Source Set-up Popup. If set to a disk path
it recalls a series of incrementally numbered files.
The Grab Popup allows you to choose different
modes of grabbing.
Grab Popup
Figure 4-146. Grab Popup Illustration
Press the corner button of the Grab Button to call up
the Grab Popup. The Grab Popup has two primary
modes: Still Grab and Grab on the Fly. In addition
you can choose whether to grab a full frame, or only
the even or odd field.
Still Grab
Turn on Still Grab when using recording devices
without dynamic tracking.
Revision A
4-431
Paint Environment
Revision A
4-431
Paint Environment
CHYRON Corporation
CHYRON Corporation
Grab on the Fly
Grab on the Fly requires a recording device with
dynamic tracking. Grab on the Fly is only supported
on video boards with built-in VLAN master (Centaur, Video Framer). When Grab on the Fly is
enabled, the grab is performed on the currently numbered frame (both fields) while the recording device
with dynamic tracking is in motion.
Grab Frame
When on, grabs a full frame with both fields.
Grab Even Field
When on, grabs the even field and doubles it. This,
and Grab Odd Field, is useful if you don’t want an
interlaced image, which may contain undesirable
inter-field jitter or movement). It is also useful when
the Canvas resolution is different from that of the
video source. In such a case, spatial re-scaling is
done which can cause undesirable artifacts in an
interlaced (2-field) image.
Grab Odd Field
When on, grabs the odd field and doubles it.
Record Button
Press the red Record Button to record to the currently numbered frame to the target device.
Rotoscoping
Liberty’s rotoscoping tools allow you to grab frames
from one or a number of simultaneous source
devices, to modify the frames with Liberty’s Paint
and Image Tools, and then to record the frames to
one or a number of target devices. The possible
devices include VTRs, DDRs, disk arrays, and interPaint Environment
4-432
Revision A
Paint Environment
4-432
Revision A
Liberty Artist’s Manual
Liberty Artist’s Manual
nal hard drives. You can rout input frames into the
Canvas, the current mask, and one or more layers
(Temp Buffers).
Liberty provides Source and Target Set-up Menus
which allow you to configure your source devices
and target (record) devices for rotoscoping. For
example, you could composite two video clips from
separate VTRs along with a sequence of images
from the hard drive. One clip could go to the Canvas, another clip to Layer 1, and the image sequence
to Layer 2. Then, each time you press the Roto Button all three sources are updated to their respective
buffers. You could then modify and composite the
frames using Liberty’s many imaging tools before
each composited frame is recorded.
Note that Liberty’s rotoscoping tools are an
enhancement in the Paint Environment of the similar
capability in the Animation Environment, where you
can configure multiple source devices using Filmstrip Actors (and other types of actors) in the Animation Timeline.
NOTE
The Source and Target Set-up
Popups are identical in appearance
except that the Source Popup has a
large blue button at the top, labeled
“Source,” and the Target Set-up
Popup has a large pink button at the
top, labeled “Target.” Each popup
provides for the configuration of six
possible devices (VTRs, DDRs etc.)
and six possible disk paths.
Revision A
4-433
Paint Environment
Revision A
4-433
Paint Environment
Liberty Artist’s Manual
VTR Set-up Popup
Figure 4-147. VTR Set-up Popup
Revision A
4-435
Paint Environment
Liberty Artist’s Manual
Liberty Artist’s Manual
Timecode/Frame Number Controls
Each device and disk path has separate controls for
setting timecode. You can set up for either timecode
or frame mode by toggling the Show Timecode/
Show Frames button in the lower right corner of the
VTR Set-Up popup. Each of the six devices has
these timecode controls:
•
A Timecode Window for entering time code.
•
Timecode “Bump” Buttons that allow you to
bump the timecode in the window up or down
one increment.
•
A Timecode Input Button (>) that takes the
current timecode from the device.
The six disk paths have the same timecode controls,
except for the Timecode Input Button.
Reset All Button
Resets the entire Set-up Popup, including clearing
the disk path windows.
Reset Time Button
Resets all timecode windows in the popup to zero.
Reset Src/Tar Button
Resets all of the Source/Target Selection Buttons
(the buttons to toggle between "Canvas," "Matte,"
and "Off") to "Off."
Re-scale Button
When active automatically re-scales the source or
target images (see below for details in the Source
Set-up Popup and the Target Set-up Popup).
Shrinkwrap
When the Shrinkwrap button is on, files being saved
are “shrink-wrapped” to the size of the corresponding image. When shrinkwrap is off, files are always
Revision A
4-437
Paint Environment
Revision A
4-437
Paint Environment
CHYRON Corporation
CHYRON Corporation
saved the same size as the canvas, regardless of the
size of the image being saved (which may be smaller
than the canvas).
The Shrinkwrap button only applies to the Target
VTR Set-up menu, when a Disk path is selected as
the current output device.
Pre-roll Button
For source and target VLAN-controlled VTRs. The
default pre-roll is 5 seconds. On some VTRs you
may want to set up a shorter pre-roll, but be careful
that you don't create locking problems if you set it
too short. If you are experiencing locking problems,
you may want to set the pre-roll at longer than 5 seconds. The range is 1 to 10 seconds.
To change the pre-roll:
•
1.
Press on one of the source devices (VTR 1,
VTR 2, etc.) to enable it. The button you
press is highlighted.
•
2.
Press the number window in the Pre-roll
Button to enter a new pre-roll duration in
seconds. Only the active recording device is
changed (it must be a VLAN-controlled VTR).
Dropframe Button
Press the Dropframe Button to turn it on/off. When
on, recording/grabbing takes place in Dropframe
Mode. The Dropframe Mode affects both the source
and target recording device (unlike Pre-roll).
Show Timecode/Show Frames Button
Press this button to change between Timecode Mode
and Frame Mode. This affects the display of all
numbers in the VTR Panel.
Paint Environment
4-438
Revision A
Paint Environment
4-438
Revision A
Liberty Artist’s Manual
Source (Target) Set-up Popup
Figure 4-148. Source (Target) Set-up Popup
Revision A
4-439
Paint Environment
Liberty Artist’s Manual
Liberty Artist’s Manual
Source Selection Buttons
At the right of each of the twelve timecode windows
on the Source Set-up Popup is a Source Selection
Button, which you can toggle between Off, Canvas,
Temp, and Mask. When the button is Off, that
device or disk path is not active. Any of the other
three modes causes the device/disk path to be an
active source. Choosing Canvas, Temp, or Mask
causes the input images to be routed to the corresponding buffer in the Paint Environment during
grabs and rotoscoping. Clicking repeatedly on the
window cycles through the choices. For a normal
Canvas render when only one device is highlighted,
you do not need to enable the Source Selection Button. By default the highlighted (current) device is
used as the source. When more than one device button has been configured, you can set all the devices
to Off and only the current (highlighted) device is
used as a source.
When using Temp or Mask as a source mode, use
the number window at the right to set which number
Temp or Mask to use. That source will then be input
to Temp 1, Temp 2, etc. when you press the Grab or
Rotoscope Button on the VTR Panel.
To set up a source device:
Revision A
4-441
Paint Environment
Revision A
•
1.
On the VTR Panel press the corner button
of the Source Button. The Source Set-up
Popup appears.
•
2.
Press on one of the source devices (VTR 1,
VTR 2, etc.) to enable it. The button you
press is highlighted.
•
3.
Choose Off, Canvas, Temp or Mask on the
Source Selection Button. Will default to
Canvas if only one device is set up.
4-441
Paint Environment
CHYRON Corporation
CHYRON Corporation
•
4.
Enter the source timecode in the timecode
window. This should be the start point of the
source sequence.
•
5.
Press OK. The popup disappears. Grabbing or
rotoscoping will now use the indicated
device(s) as source.
To set up a source hard disk path:
•
1.
On the VTR Panel press the corner button
of the Source Button. The Source Set-up
Popup appears.
•
2.
Press on one of the Disk Buttons (Disk 1,
Disk 2, etc. - not the windows) to set it up as
a source. The Disk Button you press becomes
highlighted.
•
3.
Press on the window in the highlighted Disk
Button. The File Popup appears.
•
4.
Type in a filename to begin the source
path. There must be a number in the filename.
Usually it would be the starting number 0 or 1.
•
5.
Enter the source timecode in the timecode
window. This should be the start point of the
source sequence. Use the Timecode/Frame
Button at the right to select which mode you
want (often you will use frame numbers for a
disk path).
•
6.
Press OK. The Set-up Popup disappears.
Grabbing or rotoscoping will now use the
indicated disk path.
Source Re-scale Button
With a device or disk path active, press on the Rescale Button to enable it (it becomes highlighted),
causing the input images to be re-scaled when
grabbed or rotoscoped.
Paint Environment
4-442
Revision A
Paint Environment
4-442
Revision A
Liberty Artist’s Manual
Liberty Artist’s Manual
The Re-scale Button controls only the current (highlighted) device/disk path. When the Re-scale Button
is active, you can use the X and Y windows to enter
new resolutions (in pixels) for the images to be rescaled to.
Layers Auto-compositing
Often, when rotoscoping from multiple VTRs and/or
disk paths to the Canvas and Temp buffers, you will
use Layers to view and position the images. You can
cause layers to be automatically composited (to the
Canvas) prior to being recorded during rotoscoping.
The Auto-composite Popup
Figure 4-149. Auto-composite Popup
Press the corner button in the Roto Button to bring
up a pop-up with an Auto-composite Layers Button
that you can turn on or off.
As an example of this in a rotoscoping project, suppose Temp Layer 1 is on, and you’ve set up a DDR
to input images to the Canvas and a disk path to
input images to Layer 1. You’ve configured the output to record on a VTR. With Auto-composite
enabled, you press the First Button to recall the first
images to the Canvas and Layer 1 respectively. The
two images appear on the Canvas, and you can position Layer 1 using the Layers controls. Pressing on
the Roto Button then composites Layer 1 onto the
Canvas image, records the result to the VTR, inputs
Revision A
4-443
Paint Environment
Revision A
4-443
Paint Environment
CHYRON Corporation
CHYRON Corporation
the next frames to the Canvas and Layer 1, and turns
Layers back on. Thus, you can composite layered
sequences with one press of the Roto Button per
frame.
Target Set-up Popup
NOTE
Refer to Figure 4-149 on page page 4437 for an illustration of this popup.
The Source and Target Set-up
Popups are identical in appearance
except that the Source Popup has a
large blue button at the top, labeled
“Source,” and the Target Set-up
Popup has a large pink button at the
top, labeled “Target.” Each popup
provides for the configuration of six
possible devices (VTRs, DDRs etc.)
and six possible disk paths.
Liberty’s rotoscoping controls allows you to record
to more than one target device at a time, at different
resolutions, if desired. You can record either a fullcolor image or a matte image - a black-and-white
rendering of the image’s alpha channel.
The only difference between setting up source
devices (as outlined above) and setting up target
devices is that when setting up a target device,
whether it is a VTR or DDR or a disk path, you have
only two ways to record - (1) a full-color picture
(Canvas Mode) or (2) the matte of the picture (Matte
Mode).
Paint Environment
4-444
Revision A
Paint Environment
4-444
Revision A
Liberty Artist’s Manual
Liberty Artist’s Manual
Target Selection Buttons
At the right of each of the twelve timecode windows
on the Target Set-up Popup is a Target Selection
Button, which you can toggle between Off, Canvas,
and Matte. When the button is Off, the device or
disk path is not active. Either of the other two
modes, Canvas or Matte, causes the device/disk path
to be an active target.
The number windows at the right of the Target
Selection Buttons are disabled, since they are used
only for source devices.
For a normal Canvas render when only one device is
highlighted, you do not need to enable the Target
Selection Button. By default the highlighted (current) device is used as the target, and Canvas Mode
is used. When more than one device button has been
configured, you can set all the devices to Off and
only the current (highlighted) device is used as a target.
To set up a target device:
Revision A
4-445
Paint Environment
Revision A
•
1.
On the VTR Panel press the corner button
of the Target Button. The Target Set-up
Popup appears.
•
2.
Press on one of the target devices (VTR 1,
VTR 2, etc.) to enable it. The button you
press is highlighted.
•
3.
Choose Off, Canvas, or Matte on the Target
Selection Button. Will default to Canvas if
only one device is set up.
•
4.
Enter the target timecode in the timecode
window. This should be the start point of the
record sequence.
4-445
Paint Environment
CHYRON Corporation
CHYRON Corporation
•
5.
Press OK. The popup disappears. Recording
will now use the indicated device(s) as target.
To set up a target hard disk path:
•
1.
On the VTR Panel press the corner button
of the Target Button. The Target Set-up
Popup appears.
•
2.
Press on one of the Disk Buttons (Disk 1,
Disk 2, etc. - not the windows) to set it up as
a target. The Disk Button you press becomes
highlighted.
•
3.
Press on the window in the highlighted Disk
Button. The File Popup appears.
•
4.
Type in a filename to begin the target path.
There must be a number in the filename.
Usually it would be the starting number 0 or 1.
•
5.
Enter the target timecode in the timecode
window. This should be the start point of the
record sequence. Use the Timecode/Frame
Button at the right to select which mode you
want (often you will use frame numbers for a
disk path).
•
6.
Press OK. The Set-up Popup disappears.
Recording will now use the indicated disk
path.
The Disk Path File Type Buttons
Every target disk path has a File Type Button at the
right of its File Window. Press this button to bring
up a File Type Popup that allows you to choose from
Liberty’s wide range of file formats for the images
to be saved.
Paint Environment
4-446
Revision A
Paint Environment
4-446
Revision A
Liberty Artist’s Manual
File Type Popup
Figure 4-150. File Type Popup
Revision A
4-447
Paint Environment
Liberty Artist’s Manual
Liberty Artist’s Manual
The File Type Popup allows you to choose from
Liberty file formats and External file formats for
still images and Clip file formats for animations.
External Image File Formats
The normal still image file formats from the Save As
Popup, such as TIFF and Targa.
Liberty Image File Formats
Standard Liberty .im and Liberty Layers file format.
Clip File Formats
Raw YUV for use with the RAID Disk Array (see
the Liberty Technical Reference manual) and the
Chyron Motion File Format for realtime playback
on iNFiNiT.
Saving Output as Layers Files
As an alternative to using Auto-composite to composite Layers and Canvas before recording, you may
want to save the rotoscoped frames to a sequence of
Layers files on disk. In this case, you would disable
Auto-composite, and set up a disk path to which
each active Layer (and the Canvas) would be saved
in a Layers file, frame-by-frame.
The advantage of this is that later you can recall the
sequence of Layers files frame by frame, and you
can make further changes to the individual Layers,
because they are still separate.
To save rotoscoped output as Layers files:
•
Revision A
4-449
Paint Environment
Revision A
1.
Set up a disk path in the Target VTR Set-up
Popup.
4-449
Paint Environment
CHYRON Corporation
CHYRON Corporation
•
2.
Press the File Type Button at the right of the
disk path’s File Window. The File Type
Popup appears.
•
3.
Press the Layers Button in the “Liberty File
Formats” section of the popup. The button is
highlighted and the Layers File Type is
assigned to the disk path.
•
4.
Press OK and exit all the popups.
•
5.
Proceed with the rotoscope as usual.
Rendered composited frames are saved to the
specified disk path as Layers Files.
Layers Undo in Rotoscoping
Unlike Undo for Temps, which undoes the last
change made to the current Temp (which is most
likely turned on as a layer), Undo for Layers applies
to rotoscoping of layers (see above). Layers Undo is
available when it is enabled in the Undo Configuration Panel, and when layers are active and being
rotoscoped (for example, if the user has layers 1 and
2 on, and is rotoscoping the layers and the Canvas).
In such a case, each time you press the Roto Button
on the VTR Panel, the current set of layers is saved
to a Layers Undo file prior to being written out to
the current target device. After writing to the target
device, rotoscoping updates the Canvas and the
active layers with the next image from the active
source devices. At this point, you can use Layers
Undo to restore the previous set of images (in the
Canvas and each active layer). You can access Layers Undo through the Undo Browse Popup (press the
Browse Undo Button in the Brush Panel), by toggling the popup’s colored mode button to Layers
Mode, which displays the levels of Layers Undo.
Note that Layers Undo does not reset the time-codes
in the VTR panel. For example, if you use Layers
Paint Environment
4-450
Revision A
Paint Environment
4-450
Revision A
Liberty Artist’s Manual
Liberty Artist’s Manual
Undo to go back two levels, you will need to decrement each active source and target timecode by two.
Then, rotoscoping can proceed from that point.
Chyron Motion File Format
With this file format you can render animations to a
format that contains all the frames under a single file
name. When the render is finished, you can transfer
the file to the iNFiNiT for realtime playback. The
Animation Environment (Section 5) has the same
access to saving in the Chyron Motion File Format.
Note that when saving to a Chyron Motion File, the
disk path’s frame numbers must always start with
zero. For example, when recording to a Chyron
Motion Path in the Animation Environment, the “In”
frame number/timecode must be zero, or the record
will fail. This is because the software uses frame
zero to trigger the start of a Chyron Motion File.
Once you’ve created a Chyron Motion File, however, you can record to different frames within it by
altering the target disk path’s frame number accordingly (for example, for a fix, you could re-render
frames 10 - 20 over the original frames 1- -20).
When rendering to a Chyron Motion File is finished,
you can transfer the file via FTP to a remote directory on an iNFiNiT! or other system. The File Type
Popup contains a Set-up Button which is active only
when the Chyron Motion File Type is selected. This
button brings up the Chyron Motion File Set-up
Popup, which allows you to enter the host and directory path names of the remote system where you
want to store the Chyron Motion File.
Revision A
4-451
Paint Environment
Revision A
4-451
Paint Environment
CHYRON Corporation
CHYRON Corporation
Chyron Motion File Set-up Popup
Figure 4-151. Chyron Motion File Set-up Popup
The Chyron Motion File Set-up Popup (in the File
Type Popup) allows you to enter set-up information
to log on to a remote system.
Node
Enter the node name of the remote system (such as
“iNFiNiT”).
Path
Enter the path of the directory on the remote system
you wish to access (such as C/logos/message)
User Name
Enter the user name used to log on to the remote system (such as “guest”). This user name must correspond to a user account on the remote system.
Password
Enter the password used to log on to the remote system. This password must correspond to the password for the user account on the remote system.
Paint Environment
4-452
Revision A
Paint Environment
4-452
Revision A
Liberty Artist’s Manual
Liberty Artist’s Manual
Temp Directory
Enter a temporary directory on the local hard drive
where temporary files can be stored. Normally this
is set to “usr/tmp,” but you can specify a different
location if space is tight on the “usr” drive. All files
browsed or recalled via FTP pass through this temporary directory, so it needs at least a few megabytes
of free space.
X,Y Offset Position
The Chyron Motion File Set-up Popup contains text
windows for X and Y offset position. Since Chyron
Motion Files are usually small cutouts, you can use
these windows to specify the position of the cutout.
The cutout then will be displayed at this position on
the iNFiNiT!
FTP Settings Elevator
Use the six levels of the elevator to save settings for
different remote hosts/directories.
FTP/Local
If the FTP Button is on, the file is transferred via
FTP to the specified remote host and directory. If the
Local Button is also on, the file is saved to the local
hard drive as well.
If only the FTP Button is on, the file will be deleted
from the local hard disk after the FTP.
As described above, the Chyron Motion File Type
must be enabled on the Target VTR Set-up Popup,
and the Animation rendering must be complete (or
when rotoscoping the “Last” Button must have been
pressed). When the FTP transfer is about to occur,
the software checks to see if the file already exists in
the remote directory. If it does, you are prompted to
Revision A
4-453
Paint Environment
Revision A
4-453
Paint Environment
CHYRON Corporation
CHYRON Corporation
confirm that you want to over-write the file. If you
answer "Yes", the FTP transfer will commence.
When the transfer finished, the message "FTP
Transfer Complete" is displayed in the Prompt Window. If the FTP transfer fails, a red error message
appears in the Prompt Window (for example, if the
user name or password for the remote system is
incorrect).
Re-scaling for Realtime Playback
To achieve realtime playback on the iNFiNiT!, Chyron Motion Files must normally limited in size (for
example, 224 x 200 pixels). You can do this most
easily using the Re-scale Button in the Target VTR
Set-up Popup, where you can enter the target X and
Y resolution for each disk path. For example, turning on Re-scale and setting the X and Y rescale controls to 224 and 200 would cause each rendered
frame to be re-scaled to 224 x 200 before being written to the Chyron Motion File.
Recalling Chyron Motion Files
You can recall Chyron Motion Files using the Recall
and File Manager Tools, just like any other image
file format. This only recalls the first frame in the
clip, however. To recall multiple frames in the clip,
you must select the file as a disk path in the Source
VTR Set-up Popup. The Grab Button (in Paint) will
then grab individual frames from the Chyron Motion
File, based on the disk path’s source timecode/frame
number. Or, the Filmstrip Actor in Animation can be
used to input frames from the file (to do this, put the
Filmstrip Actor in Source VTR mode, and assign the
file as the disk path for Source VTR; see page 5-120
for more details).
Paint Environment
4-454
Revision A
Paint Environment
4-454
Revision A
Liberty Artist’s Manual
Liberty Artist’s Manual
Note also that Chyron Motion Files do not currently
have browse images, nor are they browsable as filmstrips in the Full-Screen File Manager.
RAW YUV Files for Disk Arrays
This format is utilized for rendering animations (or
rotoscoping in Paint) to a format that contains all the
frames under a single file name (a clip file). This
format is normally used to render or rotoscope to a
Disk Array such as the Ciprico, MegaDrive, or
EuroLogic Disk Array.
Note that when first saving to a RAW YUV clip file,
the disk path’s frame numbers must always start
with zero. For example, when first recording to a
RAW YUV clip file in the Animation environment,
the “In” frame number/timecode must be zero, or the
record will fail. This is because the software uses
frame zero to trigger the start of a RAW YUV clip
file. Once you’ve created a RAW YUV clip file,
however, you can record to different frames within it
by altering the target disk path’s frame number
accordingly (for example, for a fix, you could rerender frames 10 – 20 over the original frames 120).
To render to a RAW YUV clip, the RAW YUV clip
file type must be enabled on the Target VTR Set-up
Popup. In addition, when setting up the disk path
(the file pathname) for the clip, an extension of
“.raw” must be added to the filename.
Once you have rendered a RAW YUV clip file, you
can recall frames from the clip, by selecting the clip
as a disk path in the Source VTR Set-up Popup. The
Grab Button (in Paint) will then grab individual
frames from the clip file, based on the disk path’s
source timecode/frame number. Or, the Filmstrip
Revision A
4-455
Paint Environment
Revision A
4-455
Paint Environment
CHYRON Corporation
CHYRON Corporation
Actor in Animation can be used to input frames
from the clip (to do this, put the Filmstrip Actor in
Source VTR mode, and assign the clip as the disk
path for Source VTR; see page 5-120 for more
details).
In addition, if the RAW YUV clip is rendered to a
Disk Array, and if your SGI system has an O2,
Octane, or Impact video board, you can play the clip
in real-time through the video board. See the section
on Showing Video from a Disk Array (see “Show
Button” on page 4-155) for details on how to do this.
Note also that for the above real-time playback
through the video board to work, the video clip has
to be rendered in 601 PAL (720 x 576) or NTSC
(720 x 486) resolution. If the canvas resolution does
not match one of these, you can use the Target Rescale Button (described in the section below) to rescale the clip to the proper resolution as it is rendered.
Target Re-scale Button
With a device or disk path active, press on the Rescale Button to enable it (it becomes highlighted),
causing the rendered images to be re-scaled before
being recorded. The X and Y windows specify the
resolution of the re-scaled image.
The Re-scale Button controls only the current (highlighted) device/disk path. When the Re-scale Button
is active, you can use the X and Y windows to enter
new resolutions (in pixels) for the images to be rescaled to.
Paint Environment
4-456
Revision A
Paint Environment
4-456
Revision A
Liberty Artist’s Manual
Liberty Artist’s Manual
Dropframe Button
Press the Dropframe Button to turn it on/off. When
on, recording takes place in Dropframe Mode.
Preroll Button
The default preroll is 5 seconds. On some VTRs
you may want to set up a shorter preroll, but be careful that you don't create locking problems by giving
it too short a setting. If you are experiencing locking
problems, you may want to set the preroll at longer
than 5 seconds. The range is 1 to 10 seconds.
Rotoscope Button (Roto)
When you have set up the source and target devices,
press Roto to record the current Canvas to the target
device(s) and fetch the next frame from the source
device(s). Use the First Button for the first rotoscope frame - fetch only, no record. Use the Last
Button for the last rotoscope frame - record only, no
fetch.
4.23
DISK PANEL MENU
Figure 4-152. Disk Panel
Revision A
4-457
Paint Environment
Revision A
4-457
Paint Environment
CHYRON Corporation
CHYRON Corporation
Many of the Disk Panel Functions are short cuts to
performing functions that are also found on the Full
Screen File Menu. The Disk Panel Functions perform their operations on one file at a time, while you
can operate on many files at one time in the Full
Screen File Menu (see page 4-217). The Popup for
controlling the Hewlett Packard VidJet Pro printer is
also on the Disk Panel, along with the button for
accessing the Artstar optical disk drive.
4.23.1
Delete File Button
To delete a file:
•
Press the Delete File Button. The File Popup
appears.
•
Press on a file name you want to delete. A
confirmation popup appears.
•
Press Yes to confirm the deletion.
This button may be used with the Repeat prefix to
delete multiple files.
4.23.2
Move File Button
To move a file:
Paint Environment
4-458
Revision A
Paint Environment
•
Press the Move File Button. The File Popup
appears.
•
Press on a file name you want to move. The
File Popup displays all the directories.
•
Press on the target directory. The file is
moved.
4-458
Revision A
Liberty Artist’s Manual
Liberty Artist’s Manual
4.23.3
Copy File Button
To copy a file:
4.23.4
•
Press the Copy File Button. The File Popup
appears.
•
Press on a file name you want to copy. The
File Popup displays all the directories.
•
Press on the target directory. The file is copied.
Browse Button
This Button calls up the Temp/Mask Popup, which
is usually accessed by pressing the Temp Buffer
Window in the Buffers Panel. The Temp/Mask
Popup displays browse images of all six Temps and
all six mask buffers.
Vidjet Button
This button is used in conjunction with the HewlettPackard® Vidjet Pro™ Printer. The Vidjet Pro
interface permits printing of the canvas image to a
H-P InkJet™ or LaserJet™ printer. For more information about the H-P VidJet Pro, see page 4-456.
Revision A
4-459
Paint Environment
Revision A
4-459
Paint Environment
CHYRON Corporation
CHYRON Corporation
Artstar Button Popup
Figure 4-153. Artstar Button
The Artstar Button is a recall button used to recall
files from an Artstar graphics system optical disk.
The corner button allows you to designate the SCSI
port that the optical disk is connected to. With the
main part of the Artstar Button, you call up a file
recall popup to list files, and you can go into the Full
Screen Popup to browse files and recall them. However, no other functions are available, other than
browse and recall.
4.24
H-P Vidjet Pro
™
The Vidjet Pro is installed in the Configuration
Environment of Liberty. One of the video boards
must first be installed. If the video board is deinstalled, so is the Vidjet.
NOTE
YOU SHOULD RESTART LIBERTY
AFTER INSTALLING THE VIDJET!
The Vidjet print manager interface includes three
menus. The Main Menu appears when the Vidjet
Button in the Disk Panel is pressed. The Vidjet must
Paint Environment
4-460
Revision A
Paint Environment
4-460
Revision A
Liberty Artist’s Manual
Liberty Artist’s Manual
first have been installed in the Configuration Environment, otherwise the message "Vidjet not
installed" will print to the Prompt Window and the
button will not bring up the Vidjet Menu. When the
menu first comes up, many parameters of the Vidjet
are being queried, so it takes a few seconds. The
more frequently changing parameters are placed on
the Main Menu. A secondary menu, the Install
Menu, can be brought up by clicking on the Install
Button in the Main Menu. Fields that are not often
changed, such as what printer is hooked up, are
placed here. Most fields in the Install Menu should
be set once and then left alone. Another secondary
menu, the Color Adjust Menu, can be brought up by
clicking on the Color Adjust Button in the Main
Menu. This menu controls the image color when
grabbing frames and printing them.
Hardware
Make sure the RS-232/422 switch on the back of the
Vidjet is set to RS-232.
Make sure the cable from the video board to the
back of the Vidjet is secure and the cable is connected from serial port #2 of the computer to the
Vidjet. Also, connect the cable from the video
board to the monitor, so you can see the video input
and the cable from the Vidjet (Monitor label in the
back of the Vidjet) to the monitor. You'll have to
switch to the line on the monitor that is coming from
the Vidjet in order to view the frames that have been
stored in the Vidjet's memory.
Main Menu
The fields that can be set in the Main Menu include:
•
Revision A
4-461
Paint Environment
Revision A
Resolution ["Res" button]
4-461
Paint Environment
CHYRON Corporation
CHYRON Corporation
•
Fields (1, 2, or both) that will print ["Field"
button]
•
Format of the images (Tile, 1 per page, various Storyboard and Logsheet formats, etc.)
["Format" button]
•
Placement of the image on the page (center,
upper left, etc.) ["Justify" button]
•
Size of the image ["Size" button],
•
Source of the timecode that is optionally
printed under an image
•
Vidjet internal, remote, or LTC ["TC Src" button]
•
Timecode to print under the image ["T-Code"
button]
•
Frame number that is currently being viewed
["Current Frame" button]
•
Number of copies that will print ["Copies"
button]
•
Image source (Video or Vidjet Frame memory) ["Image Source" button]
When the image source is set to "Memory", the
specified images to be printed will come from the
Vidjet's internal Frame Memory. "Grabbing" an
image places it memory. When the image source is
set to "Video", the image to print will come from the
video being sent in and not what has been stored in
memory.
Clicking on the inset buttons for the above will cycle
through the possible values for each parameter.
Some parameters are dependent on others. For
example, the user can not change the "Justify"
parameter if the "Format" has not been set to "1 per
page".
Paint Environment
4-462
Revision A
Paint Environment
4-462
Revision A
Liberty Artist’s Manual
Liberty Artist’s Manual
Also, the "Size" parameter depends upon whether
the user is using the English or Metric system, what
printer is being used, and what type of paper is being
used.
“T-Code" can only be set when "TC Src" has been
set to "REMOTE". The timecode only applies to the
next frame that is grabbed. When any field can not
be changed a row of asterisk will appear to signal
the user.
The five toggle buttons: “Color Out”, “Color In”,
"Time/Date", "Page Num", and “TimeCode” appear
at the bottom of the Menu. Clicking on them will
turn these parameters on (button is lit) and off (button is not lit). "Color Out", if lit, means that you are
printing in color. "Color In", if lit, means that you
are grabbing images into the Vidjet in color. "Time/
Date", if lit, means that the time and date will be
printed on each page. “Page Num”, if lit, means that
pages will be numbered. In order to turn on “Color
Out”, “Color In” must be on, since it doesn't make
sense to print an image in color that was input in
black and white.
The three buttons "Current Frame", "Frames
Grabbed", and "Frames Free" show the current state
of the Vidjet's Frame Memory. The Frame Memory
is the storage area for images that have been grabbed
into the Vidjet.
“Frames Grabbed” shows you how many frames
have been stored in memory. This button can't be
set by the user. “Frames Free” shows how many
frames are left in memory. This button also is not
adjustable by the user.
Revision A
4-463
Paint Environment
Revision A
4-463
Paint Environment
CHYRON Corporation
CHYRON Corporation
“Current Frame” shows the number of the frame
being viewed on the monitor. The arrow buttons can
be used to view the next/previous frame in memory
or a number can be typed in and the image with that
frame number will be shown on the monitor. If the
image source is set to "Video" instead of "Memory",
there will be no current frame and a row of asterisk
will appear in "Current Frame". Various factors can
affect the state of memory. The buttons "Grab 1",
"Clear", and "Clear All" affect memory and will be
described shortly.
Changing the resolution ("Res") or turning color
grabbing on/off ("Color In") will affect the number
of frames that can be stored. For example, in high
resolution color grabbing, 7 images can be stored,
but in low resolution color grabbing, 123 images can
be stored. If either of these fields is reset, frame
memory will be cleared. All frames that were stored
will be lost in anticipation of starting over with different image quality.
Various "command buttons" appear along the right
side of the Main Menu. If the “Print” button is
pressed, 1 image will print (either from memory or
video depending on the image source setting). If the
“Print Seq” button is pressed, a sequence of images
will be printed as the user has specified. In order to
print a sequence of images, the image source must
be set to "Memory" and there should be some frames
that have been "grabbed" and stored in memory previously. If "Grab 1" is pressed, the image that is on
the canvas will be input to the Vidjet's memory (via
the video board). If "Clear All" is pressed, all
frames in memory will be removed. If "Clear" is
pressed, the current frame will be cleared from
memory and the remaining frames will be renum-
Paint Environment
4-464
Revision A
Paint Environment
4-464
Revision A
Liberty Artist’s Manual
Liberty Artist’s Manual
bered. The affects of "Grab 1", "Clear All", and
"Clear" will be seen in the "Current Frame",
"Frames Grabbed", and "Frames Free" fields.
If "Tag" is pressed, the current frame will be tagged.
A tagged frame will get printed when one of the
print buttons is pressed. By default, if no frames are
tagged, they will all get printed. Tagging allows for
editing. If the user decides not to print all frames in
memory, he/she just tags the ones that need to be
printed. The order that frames are tagged in determines the order they will print in. If "Untag" is
pressed, the current frame will be untagged (won't
be printed). If "Stop" is pressed, printing will be
cancelled. If "Save" is pressed, the current configuration for the Vidjet will be saved and can be
recalled any time later by pressing the "Recall" button. If "Status" is pressed, the current state, such as
"READY", "PRINTING CANCELLED", "WAITING FOR PRINTER", etc., of the Vidjet will be
printed to the message area of Liberty.
Printing does take some time and you need to wait
until the state of the Vidjet is "PRINT COMPLETED" before trying to continue.
The EXIT button at the bottom of the Main Menu
simply pops down the Menu. The current configuration is remembered.
Color Adjust Menu
The secondary Menus are less frequently used that
the Main Menu. Pressing "Color Adjust" brings up
a Menu with seven sliders: one each for adjusting
image brightness, contrast, hue, saturation, red gain,
green gain, and blue gain. The defaults are 0
degrees for hue rotation, 100% for contrast, brightness, and saturation, and 0 for the rgb gains.
Revision A
4-465
Paint Environment
Revision A
4-465
Paint Environment
CHYRON Corporation
CHYRON Corporation
Hue, saturation, brightness, and contrast apply more
to an image that is coming in Composite form. The
gains apply more to an image that is coming in RGB
form. The color adjustments apply only to images
before they are grabbed. No adjustments can be
made after grabbing. The OK button sets the color
adjustments the user has made. The EXIT button
removes the Menu.
Install Menu
Pressing the "Install" button in the Main Menu
brings up another secondary Menu.
The fields in this Menu include:
Paint Environment
4-466
Revision A
Paint Environment
•
the type of paper to use (this affects how
much ink will be put down) ["Paper Type"]
•
The header type that will print on each page
(This can be turned off, or the Standard two
lines can be printed, or the user can customize the header ["Header"])
•
The first line of the custom header ["Line 1"]
•
The second line of the custom header [Line 2]
•
The print quality ["Print Mode"],
•
The printer type ["Printer"],
•
The video format input (RGB, Composite,
etc.) ["Video"],
•
The units being used (English or Metric)
["Units"]
•
The video standard (NTSC, PAL, SECAM, or
AUTO (the machine figures it out))
•
Auto can not detect Secam-it will assume 625
lines is PAL ["Lines"]
•
The paper size ["Paper Size"]
4-466
Revision A
Liberty Artist’s Manual
Liberty Artist’s Manual
•
The date ["Month", "Day", "Year"]
•
The time ["Time"].
Time is military time. Hitting the "Set" button will
set the Vidjet's clock to whatever was typed into the
three buttons after the Time label which represent
hour, minutes, and seconds. If nothing is entered,
the current time on the Vidjet will flash in the three
buttons.
The three toggle buttons on the right side of the
Menu are: "Freeze", "Under", and "Ext Sync".
These can be turned on and off. "Freeze", if lit,
means that a freeze frame will take place when grabbing. "Under", if lit, means that print underscan is
on.
"Ext Sync", if lit, means that the user is using an
external as opposed to internal sync.
The EXIT button removes the Menu. Again, some
fields are dependent on others. If a field can not be
set, asterisk will appear in that button and a message
will print in Liberty's message area if the user clicks
on the asterisk.
The "Show" button in Liberty's full screen browser
Menu will place as much of the browser full screen
as will fit (starting at the lower left corner) into the
canvas and on the monitor (via the video board).
This image can then be printed. In order to print the
full screen browser, the canvas size must be set to
the full screen size in the configuration environment
of Liberty.
Example: Printing
In order to print the image in the canvas--•
Revision A
4-467
Paint Environment
Revision A
Set the Size as you like.
4-467
Paint Environment
CHYRON Corporation
CHYRON Corporation
•
Set the Format to "1 per page".
•
Set Justify as desired (center, upper right,
etc.).
•
Set the image source to "Video".
•
Press the "Print 1" button.
In order to save an image (in the canvas) into the
Vidjet's memory--•
Press the "Grab 1" button.
In order to print a sequence of images--•
Grab the images from the canvas into memory using the "Grab 1" button.
•
View the images using the "Current Frame"
button (make sure the monitor is set to the
line that is coming from the Vidjet and not the
video board.)
•
Tag/Untag frames if you don't want to print
them all.
If a frame has been tagged the "Current
Frame" label will light up when that frame is
viewed.
"Current Frame" should be lit if there are no
frames (current frame = 0)
•
Set the image source to "Memory".
•
Press the "Print Seq" button.
Problems
If the custom header is not being set--•
Paint Environment
4-468
Revision A
Paint Environment
Make sure the "Header" field is set to "Custom".
4-468
Revision A
Liberty Artist’s Manual
Liberty Artist’s Manual
•
The characters that you type in must be
enclosed in double quotes.
•
Line 1 can be up to 70 characters and Line 2
up to 20 characters (not including quotes)
If the monitor only displays a color video input in
monochrome--•
Make sure the monitor is not a monochromeonly monitor.
NOTE
If using Secam (and Composite
input), the monitor will display the
color image in monochrome, but print
it in color.
If the image size won't change--•
Make sure one of the predefined layouts (Storyboards and Logsheets) isn't chosen.
If the print-out should be multi-column, but is only a
single column--•
Only the laser jet printers, the Deskjet 1200C,
the PaintJet XL300, and the DesignJet 650C
support multi-column printing.
If there is a long delay between copies--•
If the printer you are using doesn't support
multiple copy printing, the Vidjet must reprocess and send the image data for each copy.
If black bars appear at edges of the printed images--•
Turn the "Under" toggle button in the Install
Menu off.
If the edges look uneven or there are bands throughout the image--Revision A
4-469
Paint Environment
Revision A
4-469
Paint Environment
CHYRON Corporation
CHYRON Corporation
•
Check the setting of the "Printer Mode" button. Banding may occur if it's set to "Fast".
•
Also check the resolution ("Res") and print
fields ("Fields").
If the monitor display is not what you expected--•
Make sure the Image Source is "Video" if you
want to see the video in.
•
Make sure the video standard ("Video" button) is set properly in the Install Menu.
•
Make sure the Image Source is "Memory" if
you want to see what is in frame memory, and
that the monitor is set to the line that is coming from the Vidjet, not the video board.
If you are losing frames from memory or you can't
print or grab--•
Make sure memory is not full
(Free Frames = 0).
Even if you have the image source set to
"Video", if you press the "Print 1" key, and
there are no free frames, you can not print.
This is because the Vidjet will do a temporary
grab for you (it won't be reflected in the
Menu) until the image data has been sent to
the printer.
Paint Environment
4-470
Revision A
Paint Environment
•
Make sure you have not changed Video standards and have the Line field set to "Auto".
•
When the video input signal changes, memory will be cleared.
•
Make sure you have not changes resolution
or the "Color In" toggle button unless you
don't need what is in memory, since doing so
will clear frame memory.
4-470
Revision A
Liberty Artist’s Manual
Liberty Artist’s Manual
Warnings
If the buttons on the Vidjet have been manually
adjusted while you are running the Vidjet software,
the Menu you are seeing may not reflect the actual
state of the print manager. Subsequent commands
may not execute properly. You should restart the
paint environment, so the Menu on screen will
reflect the actual state of the Vidjet. Again, buttons
should not be manually pressed on the Vidjet.
If you are using a tablet through serial port #1 and a
VTR (or VLAN) through serial port #2, the Vidjet
will take over the port being used by the VTR and
communication with the VTR will be lost. In order
to restore communication with the VTR after using
the Vidjet, you should de-install the Vidjet in the
configuration environment and then re-enter Liberty.
4.25
MORPH FEATURES
Liberty provides two complementary morph programs: Triangle Morph and Line Morph. Line
Morph is quite easy to use and gives the best results,
but takes more time to render than Triangle Morph.
In Line Morph you freely position and modify line
segments in a gridless system to create distortions.
Line Morph yields extremely organic and smooth
results and is usually well worth the extra rendering
time.
Revision A
4-471
Paint Environment
Revision A
4-471
Paint Environment
CHYRON Corporation
CHYRON Corporation
Triangle Morph is more complicated to use, but renders more quickly. In Triangle Morph you set and
move control points, creating a triangular grid to
make distortions.
4.25.1
General Procedure for Line Morph
& Triangle Morph
You start a morph by setting up the control points
(Triangle Morph) or the line segments (Line Morph)
that define the beginning, or source, image of the
morph. Then you move or modify the source points
or lines to create a distortion for the final, or target,
image of the morph. You can use morph keyframes
to create interim distortions between the source and
the final distortion. Morphs render from the Temp
Buffer to the Canvas. Always cut your source image
into the Temp Buffer before starting the morph.
4.25.2
Line Morph
Figure 4-154. Line Morph Popup
Paint Environment
4-472
Revision A
Paint Environment
4-472
Revision A
Liberty Artist’s Manual
Liberty Artist’s Manual
After this step-by-step Line Morph procedure is a
button-by-button description of the Line Morph
Popup (Figure 4-155).
To create a morph distortion of an image with
Line Morph:
[ ] 1.
Cut the image you want to morph into the
Temp Buffer.
[ ] 2.
Press the Line Morph Button in the Image
Tools 2 Panel. The Line Morph Popup
appears. If an existing morph appears on the
Canvas, click the Reset Button to reset the
morph.
[ ] 3.
Press the Add Button on the Line Morph
Popup to add line segments on the Canvas
to define the beginning of the morph. Press
once to start a line segment; press a second
time to define the end of the line segment.
[ ] 4.
Press the Lock Button on the Line Morph
Popup. This locks down the line segments
you have added, defining the first morph
keyframe. The pointer on the Morph Slider
jumps to the right end of the slider.
[ ] 5.
Press the Move Button on the Line Morph
Popup and press and drag the line segments
on the Canvas, moving, rotating, and scaling
them to define the final (target) distortion.
To move the line segment, press directly on
a line segment and drag it. To rotate and
scale the line segment, press just beyond
either end and drag. This sets the line
segments defining the final keyframe of the
morph.
In general, slight movements of the line
segments between keyframes cause subtle
effects while larger modifications of the line
segments cause wildly warped and twisted
Revision A
4-473
Paint Environment
Revision A
4-473
Paint Environment
CHYRON Corporation
CHYRON Corporation
distortions. In particular, if any line segments
flip over or intersect in the interim or final
keyframes, the distorted picture will fold over
on itself and may even contain multiple
distorted copies of the source image. Start
with small conservative adjustments and work
your way up to more flamboyant effects.
[ ] 6.
Press the main part of the OK Button to
start the morph. After a pause, the final
distortion of the Temp Buffer image is
rendered on top of the existing Canvas image.
The corner button performs a faster, lowerresolution render. The Erase Button erases the
Canvas before the morph is rendered. The
corner of the Erase button performs a faster,
lower-resolution erase-render.
Line Morph Add Button
Press to add line segments. Press on the Canvas
once to place the beginning of a line segment, then
lift and press a second time to place the end of the
line segment. Add as many line segments as you
want. The "arrowhead" at the front end of the line
segment helps you keep track of the orientation of
the line segment.
While adding line segments you can use the Move
Button (see below) to reposition line segments you
have just added. Unlike Triangle Morph, you can
add or delete line segments after you press the Lock
Button. Press the Add Button a second time or press
another Line Morph button to terminate the Add
function.
Line Morph Delete Button
Press to delete line segments from the Canvas. On
the Canvas press on a line segment to delete it. The
line segment disappears. Delete as many segments
Paint Environment
4-474
Revision A
Paint Environment
4-474
Revision A
Liberty Artist’s Manual
Liberty Artist’s Manual
as you want before terminating the function by
pressing a second time on the Delete Button or any
other Line Morph Popup button.
Line Morph Move Button
Press to move line segments. On the Canvas, press
in the middle of a line segment to drag it to a new
position, or press just beyond an endpoint to drag
just the endpoint (stretching or rotating the line segment). You can move line segments in any keyframe at any time, even after pressing the Lock
Button. Press the Move Button a second time or any
other Line Morph Popup button to terminate the
move function.
Line Morph Color Button
Press to switch the color of the line segments. Use
this when it's difficult to see the line segments on the
Canvas background. The default is red for the line
segments which become yellow when they are
selected. Press the Color Button to reverse this.
Revision A
4-475
Paint Environment
Revision A
4-475
Paint Environment
CHYRON Corporation
CHYRON Corporation
Line Morph Tune Button
Figure 4-155. Line Morph Tune Popup
Press to call up the Tune Popup. In general, the further away a line segment is from a pixel, the less
effect it has on that pixel. Tune allows you to adjust
three slider settings: Blend, Distance, and Length.
The best way to understand these settings is to
experiment (It's sometimes difficult to predict what
the exact effect will be for a combination of settings).
Blend Slider
The Blend Slider controls the smoothness of the
morph, or the amount of blending between line segments.
Distance Slider
The Distance Slider controls how the effect of a line
segment diminishes with distance.
Paint Environment
4-476
Revision A
Paint Environment
4-476
Revision A
Liberty Artist’s Manual
Liberty Artist’s Manual
Length Slider
The Length Slider, if non-zero, makes longer line
segments have a greater effect on the morph.
Press the Cancel Button on the Tune Popup to cancel any changes you've made to the Tune settings.
Press the Reset Button to reset the Tune settings to
their defaults.
Line Morph Select Button
Press to select line segments. Press near a line segment to select it. The selected line segments change
color. Pressing a selected segment un-selects it.
Press the Move Button to move all the selected segments simultaneously. Press the Delete Button to
delete all the selected segments simultaneously.
Line Morph Keyframe Timeline Slider
This slider displays a timeline of the morph from
beginning to end. You can have many different keyframes on the timeline, though when the morph is
rendered, only the information in the two neighboring keyframes to the pointer will be considered.
Keyframes in a morph are mostly used in Liberty’s
animation option; they are not used often when morphing a still image. One good way to use keyframing in a still image is when the final morph is a bit
too extreme. A quick way to render the morph in a
less extreme version is to add a keyframe near the
end of the keyframe timeline and to render the
morph at that point.
You can move any keyframe in the slider by pressing on the keyframe marker and dragging it to a new
position. No keyframes appear in the slider until
Revision A
4-477
Paint Environment
Revision A
4-477
Paint Environment
CHYRON Corporation
CHYRON Corporation
you press the Lock Button. When you press on the
slider, the percent completion of the morph at that
point is displayed in the Prompt Window.
Line Morph Add Keyframe Button
Press to add a keyframe into the keyframe slider. A
keyframe marker appears in the Morph Slider wherever the pointer is when you press Add Keyframe.
Use the Move Button to move line segments on the
Canvas to define the new keyframe. You can move
line segments in any keyframe of the morph at any
time.
The number of keyframes you can have is limited by
the space along the slider. If you try to add a keyframe too close to an existing keyframe, you are
prompted: "Cannot be too close to another keyframe."
Line Morph Copy Keyframe Button
To copy the line segment data from one keyframe to another:
•
•
Position the pointer in the Keyframe Slider
beneath the keyframe you want to copy from.
Press the Copy Button. You are prompted:
"Please specify keyframe to copy to."
Paint Environment
4-478
Revision A
Paint Environment
•
If the pointer is not beneath a keyframe, you
are prompted: "Please specify keyframe to
copy from." Move the pointer under an existing keyframe marker and press the Copy Button again.
•
Press below another keyframe marker on the
Keyframe Slider. The data from the first keyframe is copied into the indicated keyframe.
4-478
Revision A
Liberty Artist’s Manual
Liberty Artist’s Manual
NOTE
Do not press directly on the keyframe
marker itself, but under it on the same
line as the pointer. A successful copy
prompts:
"Keyframe
copied
successfully." If you press directly
on a keyframe marker, you are
prompted:
"Cannot copy to source keyframe."
Line Morph Delete Keyframe Button
To delete a keyframe:
•
In the slider, position the pointer beneath the
keyframe marker you want to delete.
•
Press to delete the keyframe at the current
position of the pointer on the Keyframe
Slider. The keyframe marker disappears from
the slider.
Line Morph Reset Button
Press to delete all line segments and reset the morph.
All keyframes are deleted. You are prompted:
"Restarted LMORPH. Please enter line segments."
Line Morph Lock Button
Initially the morph is unlocked, meaning that you
are editing the first keyframe and no other keyframes exist. Once the first keyframe is complete,
pressing Lock creates the corresponding end keyframe, which you then edit to define the distortion.
After pressing Lock you can still add, delete, or
move line segments. You only have to press Lock
once - when you've set the first keyframe points.
Revision A
4-479
Paint Environment
Revision A
4-479
Paint Environment
CHYRON Corporation
CHYRON Corporation
Line Morph Test Button
Position the slider pointer under the morph keyframe whose distortions you want to check. Press
the Line Morph Test button to go into Test Mode.
When you press on the Canvas, the pixel you press
jumps to its original (source) position and shows as
a dot in the alternate color. The distance of the displayed dot from the pressed pixel shows you the
magnitude and direction of the distortion of that
pixel. Press Done or another Line Morph button to
terminate Test Mode.
Line Morph Recall and Save buttons
The Line Morph Recall button recalls a previously
saved Line Morph from disk. Pressing on it brings
up the file recall menu, allowing the user to browse
directories and select a file to recall.
The Line Morph Save button saves the currently
defined morph in a morph file. Pressing on it brings
up the file save menu, allowing the user to browse
directories and select a file name to save to. The
Save button is grayed out when there is no morph
defined yet (before morph lines have been added or
before the Lock button has been pressed).
Line Morph Cancel Button
The Cancel button exits the popup without performing a morph.
Line Morph OK Button
Press to render the morphed distortion, as determined by the position of the pointer in the Line
Morph Slider. Renders on top of the existing picture
on the Canvas, or under it if the Under Prefix is on.
The corner button renders at one-fourth resolution.
Paint Environment
4-480
Revision A
Paint Environment
4-480
Revision A
Liberty Artist’s Manual
Liberty Artist’s Manual
Line Morph Erase Button
Press the Line Morph Erase Button to erase the Canvas before rendering. The corner button renders at
one-fourth resolution.
4.25.3
Triangle Morph
Figure 4-156. Triangle Morph Popup
The discussion of Triangle Morph begins with a
step-by-step description of how to create a morph
distortion of an image, followed by a button-by-button description of the Triangle Morph Popup.
To morph a distortion of an image with Triangle
Morph:
Revision A
4-481
Paint Environment
Revision A
[ ] 1.
Cut the image to be distorted into the Temp
Buffer.
[ ] 2.
Press the Triangle Morph Button in the
Tools 2 Panel. The Triangle Morph Popup
appears. If an existing morph appears on the
Canvas, press the Reset Button to reset the
morph. The Prompt Window at the bottom of
4-481
Paint Environment
CHYRON Corporation
CHYRON Corporation
the Canvas displays the message: "Press twice
on canvas to specify 2 bounding box corners.”
[ ] 3.
Define a bounding box around the area you
want to morph. Press down and let up
quickly to set the first corner of the bounding
box, then drag and press again to set the
diagonally opposite corner. The bounding box
should cover the area you want to distort.
[ ] 4.
Press the Add Button on the Triangle
Morph Popup to add control points on the
Canvas to define the beginning of the
morph. Generally, add points at the places
that you want to distort.
[ ] 5.
Press the Lock Button on the Triangle
Morph Popup when you've finished adding
points. This locks down the points, defining
the morph source. The pointer jumps to the
right end of the Triangle Morph Slider.
[ ] 6.
Press the Move Button on the Triangle
Morph Popup and press and drag the
control points on the Canvas, moving them
to define the final distortion. This sets the
points defining the target of the morph. The
morph distortion happens between the source
position of the points and the target position of
the points.
[ ] 7.
Press the OK Button to start the morph.
After a pause for rendering, the final distortion
of the image in the Temp Buffer is displayed
on top of the existing Canvas image. The Erase
OK Button erases the existing Canvas before
the morph is rendered.
Triangle Morph Add Points Button
Press to add control points to the Canvas. (You
must specify a bounding box first. Press down and
let up quickly to set the first corner of the bounding
Paint Environment
4-482
Revision A
Paint Environment
4-482
Revision A
Liberty Artist’s Manual
Liberty Artist’s Manual
box, then drag and press again to set the diagonally
opposite corner.) Adding a point connects the new
point to other points (or to corners of the bounding
box), forming triangular segments, creating a grid
that controls the morph. You can use the Move Button while adding points to reposition points you
have just added. Unlike Line Morph, you cannot
add or delete points after you press the Lock Button.
Press Done or another Triangle Morph Popup Button to terminate the Add function.
Triangle Morph Delete Points Button
Press to delete control points from the Canvas. On
the Canvas press on a point to delete it. The point
disappears along with the lines connecting it to other
points. Press the Delete Button a second time or
another Triangle Morph Popup button to terminate
the delete function.
Triangle Morph Move Points Button
Press to move control points on the Canvas. On the
Canvas press on and drag a point. The point moves,
along with the lines connecting it to other points.
You are prevented from moving a point across a
connecting line. You can move points in any keyframe of the morph at any time, even after pressing
the Lock Button. Press the Move Button a second
time or another Triangle Morph Popup button to terminate the Move function.
Triangle Morph Add Keyframe Button
You use morph keyframes mostly in animations, but
they can be useful in still morphs as well to create
interim distortions between the source and the final
distortion.
Revision A
4-483
Paint Environment
Revision A
4-483
Paint Environment
CHYRON Corporation
CHYRON Corporation
To add a keyframe to the Keyframe Slider:
•
Move the pointer to the place on the slider
where you want to add a keyframe.
•
Press the Add Keyframe Button. A keyframe
marker appears in the Keyframe Slider above the
pointer. After adding a keyframe, use the Move
Button to move points on the Canvas to define it.
You can move points in any keyframe of the
morph at any time.
The number of keyframes you can have is limited by
the space along the slider. If you try to add a keyframe too close to an existing keyframe, you are
prompted: "Cannot be too close to another keyframe." Move the pointer and try again.
Triangle Morph Copy Keyframe Button
To copy the control points from one keyframe
to another:
•
•
In the slider, position the pointer beneath the
keyframe marker you want to copy from.
Press the Copy Button. You are prompted:
"Please specify keyframe to copy to." If the
pointer is not beneath a keyframe marker, you
are prompted: "Please specify keyframe to
copy from." In this case, move the pointer under
an existing keyframe marker and press the Copy
Button again.
•
Paint Environment
4-484
Revision A
Paint Environment
Press below another keyframe marker on the
Keyframe Slider. The data from the first keyframe is copied into the indicated keyframe.
4-484
Revision A
Liberty Artist’s Manual
Liberty Artist’s Manual
NOTE
Do not press directly on the keyframe
marker itself, but under it on the same
level as the pointer. A successful
copy prompts: "Keyframe copied
successfully." If you try to press
directly on a keyframe marker, you
are prompted: "Cannot copy to
source keyframe."
Triangle Morph Delete Keyframe Button
To delete a keyframe:
•
Position the pointer beneath the keyframe
marker you want to delete.
•
Press the Delete Keyframe Button. The keyframe marker disappears from the slider.
Rendering a Morph Keyframe
After creating a keyframe, you can render it by
pressing the OK Button when the pointer is under
the keyframe you want to render. If you want to render at a place between keyframes, you need only
place the pointer there instead. Rendering takes
place wherever the pointer is positioned, regardless
of whether it's right under a keyframe or not.
Triangle Morph Reset Button
Press to reset the morph functions. All keyframes,
including points, connecting lines, and the bounding
box are deleted. You are prompted:
"Restarted MORPH. Please specify bounding box."
Revision A
4-485
Paint Environment
Revision A
4-485
Paint Environment
CHYRON Corporation
CHYRON Corporation
Triangle Morph Lock Button
Initially the morph is unlocked, meaning that you
are editing the first keyframe, and no other keyframes exist. Once the first keyframe is complete,
pressing lock creates the corresponding end keyframe, which you then edit to define the distortion.
Press to lock control points after the first keyframe
is set. The beginning and ending keyframe markers
appear on the Keyframe Slider, with the pointer at
the last keyframe. Now you can use the Move Button to modify the points on the Canvas to define the
final keyframe. You can also add more keyframes.
After pressing Lock you can't add or delete points,
only move them. You only have to press Lock once
- after you've finished setting the first keyframe
points.
Triangle Morph Recall and Save buttons
The Triangle Morph Recall button recalls a previously saved Triangle Morph from disk. Pressing on
it brings up the file recall menu, allowing the user to
browse directories and select a file to recall.
The Triangle Morph Save button saves the currently
defined morph in a morph file. Pressing on it brings
up the file save menu, allowing the user to browse
directories and select a file name to save to. The
Save button is grayed out when there is no morph
defined yet (before morph lines have been added or
before the Lock button has been pressed).
Triangle Morph Cancel Button
The Cancel button exits the popup without performing a morph.
Paint Environment
4-486
Revision A
Paint Environment
4-486
Revision A
Liberty Artist’s Manual
Liberty Artist’s Manual
Triangle Morph OK Button
Press to render the morph, as determined by the
position of the pointer in the Keyframe Slider. Renders on top of the existing picture on the Canvas, or
under it, if the Under Prefix is on.
Press the OK Button. The existing Canvas image is
erased before the final distortion of the Temp image
is displayed on the Canvas.
4.26
Importing Jaleo Clips
Liberty provides the ability to import Jaleo clips in
the Paint Environment so that Liberty's comprehensive paint tools can apply various treatments to the
Jaleo images. Liberty gives you the ability to access
the source material pointed to by the Jaleo .nclp
files.
Jaleo Environment Variable
In order for Liberty to recognize the Jaleo clip files
and import the high resolution files from the Jaleo
directory, it is necessary to configure the environment variable in the liberty account to recognize the
location of the Jaleo files automatically.
To set the Environment Variable in the Liberty
account:
Revision A
4-487
Paint Environment
Revision A
•
1.
Login to liberty account.
•
2.
Open UNIX shell window.
•
3.
Set directory to /usr/people/liberty if not set
already.
4-487
Paint Environment
CHYRON Corporation
CHYRON Corporation
•
4.
Type the following shell command:
ls -a
Verify that there is a file called: .cshrc
•
5.
Open the file .cshrc for editing by typing:
jot .cshrc
•
6.
Set the cursor at the end of the file.
•
7.
Type the following line in the shell window.
seten JALEO_WORK /usr/people/jaleo/WORK
Paint Environment
4-488
Revision A
•
8.
Press the Enter key on the keyboard.
•
9.
Save the file.
•
10.
Close the jot file window.
Paint Environment
4-488
Revision A
Liberty Artist’s Manual
Liberty Artist’s Manual
Reading Jaleo Clip Files
Once Liberty has been configured to recognize the
Jaleo file location, the artist uses the VTR setup
panel to define the disk path to the Jaleo clips and
then import them to apply a rotoscoping treatment.
To read the Jaleo clips:
•
1.
Press the Source comer popup button.
•
2.
If the message:
"VTR's have not been configured.
Do it now?"
appears, press the "Yes" button. Press the
Source corner popup button again.
•
3.
Press in the desired Disk file Window. The
Recall File popup appears.
•
4.
Select the Directory path to the Jaleo .nclp
(e.g.:/usr/people/jaleo/WORK)
Revision A
4-489
Paint Environment
Revision A
•
5.
Choose the Jaleo .nclp to be recalled.
•
6.
Press the OK button.
•
7.
Continue
with
procedures.
4-489
normal
rotoscoping
Paint Environment
5 - Animation Environment
5.1
Animation Environment
Introduction
Liberty's Animation Environment (Figure 5-1) is a
separate full-screen menu that you enter by pressing
the "A" Button in the Environment Buttons (PACL)
in the lower left corner of the Paint Environment and
the Configure Environment. You can also press the
Animation Button in the Login Environment.
All of Liberty's animation is created in the Animation Environment using elements created in Paint or
imported from another source, such as a VTR or a
3D software package.
The Animation Environment has four main parts:
Animation Playback Menu: The Animation Playback
Menu controls playback/recording of an animation.
The Animation Timeline contains the actors, or basic elements of the animation.
Actors are represented on the Timeline by colorcoded horizontal bars. There are several different
types of actors, each with a different function or
effect. An actor's type is indicated by the color of
the bar that represents it.
Animation Timeline:
The Actor Edit Menu appears at
the left of the Timeline, and allows you to create,
position and time individual actors in the Timeline.
Actor Edit Menu:
The Actor Popup appears at the right
of the Timeline, and contains the data and specialized functions of the actor selected on the Timeline.
Actor Popup:
Revision A
5-1
Animation Environment
Revision A
5-1
Animation Environment
CHYRON Corporation
CHYRON Corporation
When you select each type of actor, its Actor Popup
appears at the right. For the most part, the menus of
the Animation Environment remain constant. However, the Actor Popup displays different popup
menus for each type of animation Actor.
The Animation Environment contains some familiar
functions from the Paint Environment: the Prompt
Window, Magnify Buttons, Undo, Erase, Erase All,
Grid, Direction buttons, and the Prefix Buttons.
5.1.1
Number Windows in the Animation
Environment
Many windows in the Animation Environment display numbers. You can input to them directly by
pressing on the window and typing a number, followed by the Enter key.
You can add to a number by typing "p" followed by
the amount you want to add. You can subtract from
a number by typing "m" followed by the amount you
want to subtract.
Pressing in the upper half of the label of a button
adds one to the number, pressing in the lower half
subtracts one.
Windows indicating duration or times can use either
timecode or frame numbers.
Animation Environment
5-2
Revision A
Animation Environment
5-2
Revision A
Liberty Artist’s Manual
Figure 5-1. Animation Environment
Revision A
5-3
Animation Environment
Liberty Artist’s Manual
Liberty Artist’s Manual
5.1.2
Creating Curve Paths
and Keyframes
In addition to the menus displayed when you first
come into the Animation Environment, there are
several popups that you often use to provide animation actors with curve paths and keyframes. The
popup for creating curve paths is identical to the
Curve Popup in the Paint Environment. The Keyframe Timeline appears over the main Animation
Timeline and provides a timeline for each individual
actor. When you edit a keyframe, the Keyframe
Distort Popup appears, which is almost identical to
the Paste Distort popup in the Paint environment.
5.2
ANIMATION TIMELINE
The Animation Timeline (Figure 5-2) is the large
horizontal window below the Canvas that displays
the entire current animation with layers containing
color-coded bars representing animation "actors."
What is an animation layer?
An animation layer on the Timeline is like a clear
acetate cel in conventional cel animation. On the
Timeline the highest layer appears on top in the animation, the lowest layer on the bottom. You can use
an unlimited number of layers both above and below
the Zero layer. One layer can hold any number of
actors and any combination of actor types.
What is an animation actor?
Animation actors carry the information about what
happens in an animation. An actor is represented on
the Timeline by a color-coded bar. Each actor can
have its own curve path along which it moves during
the animation. Each actor can have a series of keyRevision A
5-5
Animation Environment
Revision A
5-5
Animation Environment
CHYRON Corporation
CHYRON Corporation
frames for DVE-type perspective transformations,
size changes, and many other modifications. A single animation can contain many different types of
actors, each with a different function or effect.
Actors can be any length and several actors can exist
in sequence on a single layer.
Layer Number Buttons
The stack of small, square buttons running vertically
along the left side of the Timeline are the Layer
Number Buttons. Layers above the Zero layer have
positive numbers, those below have negative numbers.
When a layer is empty (has no actor in it), and all
layers above it are empty, its Layer Number Button
is blank. When an actor is added to an empty layer,
that layer is numbered according to its distance from
the Zero layer.
This is also true (in reverse) of the negative layer
numbers below the Zero layer. For example if layer
-1 is empty of actors, it will be numbered if layer -2
just below it contains an actor.
The Zero layer
The Zero layer is the base layer of any animation,
represented by a thin purple line in the Timeline. No
actors can be assigned to this layer, and it cannot be
edited. You can create any number of layers above
the Zero layer (numbered with positive numbers)
and any number of layers below it (numbered with
negative numbers). More detailed editing functions
using the Layer Number Buttons are discussed in the
section on the Actor Edit Menu, page 5-44.
Animation Environment
5-6
Revision A
Animation Environment
5-6
Revision A
Liberty Artist’s Manual
Figure 5-2. Animation Timeline
Revision A
5-7
Animation Environment
Liberty Artist’s Manual
Liberty Artist’s Manual
Scroll Up Button ( ^ )
Press once to scroll the Timeline up one layer.
Pressing the Scroll Up Button and holding the pen
down causes the layers to scroll up continuously.
Scroll Down Button ( v )
Press once to scroll the Timeline down one layer.
Pressing the Scroll Down Button and holding the
pen down causes the layers to scroll down continuously.
Home Button
Press the Home Button (H) to "home" the Timeline
back to the 0 layer. The Home Button is in the corner of the Actor Edit Button at the left of the Timeline. For more details about the Actor Edit menu,
see page 5-44.
Revision A
5-9
Animation Environment
Revision A
5-9
Animation Environment
CHYRON Corporation
CHYRON Corporation
5.3
ANIMATION CONTROL MENU
Figure 5-3. Animation Control Menu
Animation Environment
5-10
Revision A
Animation Environment
5-10
Revision A
Liberty Artist’s Manual
Liberty Artist’s Manual
The Animation Control Menu occupies the space
along the left side of the Canvas in the Animation
Environment. It controls playing back and recording animations. At the top, you use the VTR Menu
to control the source and target recording devices.
Below the VTR Menu are windows for setting the
timing of the playback of an animation. At the bottom of the Playback Menu are buttons to control
how you playback the animation.
The Animation VTR Menu
Figure 5-4. Animation VTR Menu
The Animation VTR Menu is for controlling source
and target recording devices. If you want to perform
rotoscoping, use the VTR Menu in the Paint Environment. (The Filmstrip Actor can also use a
recording device as a source in an animation - see
below, page 5-46.) The Animation VTR Menu
works the same as the VTR Menu in the Paint
except that the rotoscope functions are missing
Revision A
5-11
Animation Environment
Revision A
5-11
Animation Environment
CHYRON Corporation
CHYRON Corporation
Source Button (src)
Press to enable the Source VTR. When this button
is highlighted, all the VTR control (Play, Stop, etc.)
buttons apply to the source machine. With the
Source Button highlighted, press the Setup Button to
call up the Source VTR Setup Popup.
Target Button (tar)
Press to enable the Target, or Record, VTR. When
this button is highlighted, all the VTR control buttons (Play, Stop, etc.) apply to the record device.
With the Target Button highlighted, press the Setup
Button to call up the Target VTR Setup Popup.
Timecode Window
This window displays the timecode setting for the
current device (source or target). The timecode window does not update continuously, because VTRs
have different pre-roll periods which can cause continuous timecode reference to get lost. This “global”
timecode window refers only to the single current
(highlighted) device on the Source and Target Setup
Popups, accessed by pressing the Setup Button.
Note that this timecode setting does NOT determine
where on a target device to start recording. Only the
In Button below does that. (Or, if you are recording
to multiple target devices, you set the time-codes in
the individual time-code windows for each target
device in the Target VTR Setup Popup. This (global) timecode window is only for grabbing the timecode setting from the current device, or setting a
new timecode to cue the device to.
To update the timecode of the current device, press
the "<" button. The timecode of the current device
appears in the timecode window.
Animation Environment
5-12
Revision A
Animation Environment
5-12
Revision A
Liberty Artist’s Manual
Liberty Artist’s Manual
The timecode window has a set of “Bump” buttons
(up and down arrows). Press on these to bump the
timecode setting by one frame up or down.
Press directly in the timecode window to enter a new
number. Separate the hours, minutes, seconds, and
frames with spaces. 1:09:21:15 would be typed 1 9
21 15. Typing just "5" appears as 0:00:00:05.
Shuttle Button ( S )
Press and drag to shuttle the VTR forward or backward. When you let up, the VTR continues to shuttle at the current rate and direction until you press
and drag again, or press the Stop VTR Button.
Jog Button ( J )
Press and drag to jog the VTR forward or backward.
When you let up on the pen, the VTR stops.
Timecode Elevator
You can store four timecode positions in the four
levels of the elevator.
Cue Button
Press to cue the current device to the setting in the
timecode window.
Stop Button
Press to stop the current device.
Play Button
Press to play the current device.
Revision A
5-13
Animation Environment
Revision A
5-13
Animation Environment
CHYRON Corporation
CHYRON Corporation
Replay Button
Press to replay the current animation on the Timeline just recorded on the current device. (Uses the In
and Out settings below).
Animation Environment
5-14
Revision A
Animation Environment
5-14
Revision A
Liberty Artist’s Manual
VTR Setup Popups
Figure 5-5. Source (Target) Setup Popup
Revision A
5-15
Animation Environment
Liberty Artist’s Manual
Liberty Artist’s Manual
NOTE
The Source and Target Setup Popups
are identical in appearance except
that the Source Popup has a large
blue button at the top, labeled
“Source,” and the Target Setup
Popup has a large pink button at the
top, labeled “Target.” Each popup
provides for the configuration of six
possible devices (VTRs, DDRs etc.)
and six possible disk paths.
Timecode/Frame Number Controls
Each device and disk path has separate controls for
setting timecode. You can set up for either timecode
or frame mode by toggling the Show Timecode/
Show Frame Number Button at the lower right corner of the Popup.
Each of the six devices has the following timecode
controls:
•
A Timecode Window for entering time code.
•
Timecode “Bump” Buttons that allow you to
bump the timecode up or down one increment.
•
A Timecode Input Button (>) that takes the
current timecode from the device.
•
The six disk paths have the same timecode
controls, except for the Timecode Input Button.
Reset All Button
Resets the entire Setup Popup, including clearing the
disk path windows.
Revision A
5-17
Animation Environment
Revision A
5-17
Animation Environment
CHYRON Corporation
CHYRON Corporation
Reset Time Button
Resets all timecode windows in the Setup Popup to
zero.
Reset Src/Tar Button
Resets all of the Source/Target Selection Buttons to
"Off."
Rescale Button
When active automatically re-scales the source or
target images (see below for details in the Source
Setup Popup and the Target Setup Popup).
Preroll Button
For source and target VLAN-controlled VTRs. The
default pre-roll is 5 seconds. On some VTRs you
may want to set up a shorter pre-roll, but be careful
that you don't create locking problems if you set it
too short. If you are experiencing locking problems,
you may want to set the pre-roll at longer than 5 seconds. The range is 1 to 15 seconds.
To change the pre-roll:
•
1.
Press on one of the source/target devices
(VTR 1, VTR 2, etc.) to enable it. The button
you press is highlighted.
•
2.
Press the number window in the Pre-roll
Button to enter a new pre-roll duration in
seconds. Only the active recording device is
changed (it must be a VLAN-controlled VTR).
Dropframe Button
Press the Dropframe Button to turn it on/off. When
on, recording/grabbing takes place in Dropframe
Mode. Dropframe Mode affects both the source and
target recording device (unlike Pre-roll). Note that
Animation Environment
5-18
Revision A
Animation Environment
5-18
Revision A
Liberty Artist’s Manual
Liberty Artist’s Manual
the Dropframe button is only active when a VTR
device is selected. It is not active, nor is it needed,
for disk paths.
Show Timecode/Show Frames Button
Press this button to change between Timecode Mode
and Frame Mode. This affects the display of all
numbers in the VTR Panel.
Source Setup Popup
NOTE
The Source and Target Setup Popups
are identical in appearance except
that the Source Popup has a large
blue button at the top, labeled
“Source,” and the Target Setup
Popup has a large pink button at the
top, labeled “Target.” Each popup
provides for the configuration of six
possible devices (VTRs, DDRs etc.)
and six possible disk paths.
Source Selection Buttons
At the right of each of the twelve timecode windows
on the Source Setup Popup is a Source Selection
Button, which you can toggle between Off, Canvas,
Temp, and Mask. When the button is off, that device
or disk path is not active. Any of the other three
modes causes the device/disk path to be an active
source. Choosing Canvas, Temp, or Mask causes the
input images to be routed to the corresponding
buffer in the Paint Environment during grabs and
rotoscoping. Clicking repeatedly on the window
cycles through the choices. For a normal Canvas
render when only one device is highlighted, you
need not enable the Source Selection Button. By
default the highlighted (current) device is used as
the source. When more than one device button has
Revision A
5-19
Animation Environment
Revision A
5-19
Animation Environment
CHYRON Corporation
CHYRON Corporation
been configured, you can set all the devices to Off
and only the current (highlighted) device is used as a
source.
When using Temp or Mask as a source mode, use
the number window at the right to set which number
Temp or Mask to use. That source will then be input
to Temp 1, Temp 2, etc.
To set up a source device:
•
1.
On the VTR Panel press the Source Button
(src). The button is highlighted.
•
2.
Press the Setup Button. The Source Setup
Popup appears.
•
3.
Press on one of the source devices (VTR 1,
VTR 2, etc.) to enable it. The button you press
is highlighted.
•
4.
Choose Off, Canvas, Temp or Mask on the
Source Selection Button. Will default to
Canvas if only one device is set up.
•
5.
Enter the source timecode in the timecode
window. This should be the start point of the
source sequence.
•
6.
Press OK. The popup disappears. The
indicated device(s) will be used as source.
Note that when the Source VTR set-up button is
accessed, a popup labeled “VTR’s have not been
configured. Do it now?” may appear. This indicates
that a physical device has been previously assigned
to the current VTR using the Video Configuration
Panel (section 3.6). Press yes or no, depending on
whether you want to initialize the interface to that
device.
Animation Environment
5-20
Revision A
Animation Environment
5-20
Revision A
Liberty Artist’s Manual
Liberty Artist’s Manual
To set up a source hard disk path:
•
1.
On the VTR Panel press the Source Button
(src). The button is highlighted.
•
2.
Press the Setup Button. The Source Setup
Popup appears.
•
3.
Press on one of the Disk Buttons (Disk 1,
Disk 2, etc. - not the windows) to set it up as
a source. The Disk Button you press becomes
highlighted.
•
4.
Press on the window in the highlighted Disk
Button. The File Popup appears.
•
5.
Type in a filename to begin the source
path. There must be a number in the filename.
Usually it would be the starting number 0 or 1.
•
6.
Enter the source timecode in the timecode
window. This should be the start point of the
source sequence. Use the Show Timecode/
Show Frames Button at the right to select
which mode you want (often you will use
frame numbers for a disk path).
•
7.
Press OK. The Setup Popup disappears. The
indicated disk path(s) will be used as source.
Source Rescale Button
With a device or disk path active, press on the
Rescale Button to enable it (it becomes highlighted),
causing the input images to be re-scaled.
The Rescale Button controls only the current (highlighted) device/disk path. When the Rescale Button
is active, you can use the X and Y windows to enter
new resolutions (in pixels) for the images to be rescaled to.
Revision A
5-21
Animation Environment
Revision A
5-21
Animation Environment
CHYRON Corporation
CHYRON Corporation
Target Setup Popup
NOTE
The Source and Target Setup Popups
are identical in appearance except
that the Source Popup has a large
blue button at the top, labeled
“Source,” and the Target Setup
Popup has a large pink button at the
top, labeled “Target.” Each popup
provides for the configuration of six
possible devices (VTRs, DDRs etc.)
and six possible disk paths.
Liberty allows you to record to more than one target
device at a time, at different resolutions, if desired.
You can record either a full-color image or a matte
image - a black-and-white rendering of the image’s
alpha channel. Liberty renders each animation frame
once, saving the result in the Canvas. The frame is
then output to each active Target VTR and/or disk
path. The frame is re-scaled if needed for each output device, and either full color or matte information
is recorded to each device.
The only difference between setting up source
devices (as outlined above) and setting up target
devices is that when setting up a target device,
whether it is a VTR or DDR or a disk path, you have
only two ways to record - (1) a full-color picture
(Canvas Mode) or (2) the matte of the picture (Matte
Mode).
Target Selection Buttons
At the right of each of the twelve timecode windows
on the Target Setup Popup is a Target Selection Button, which you can toggle between Off, Canvas, and
Matte. When the button is Off, the device or disk
Animation Environment
5-22
Revision A
Animation Environment
5-22
Revision A
Liberty Artist’s Manual
Liberty Artist’s Manual
path is not active. Either of the other two modes,
Canvas or Matte, causes the device/disk path to be
an active target.
The number windows at the right of the Target
Selection Buttons are disabled, since they are used
only for source devices.
For a normal Canvas render when only one device is
highlighted, you do not need to enable the Target
Selection Button. By default the highlighted (current) device is used as the target, and Canvas Mode
is used. When more than one device button has been
configured, you can set all the devices to Off and
only the highlighted device is used as a target.
To set up a target device:
Revision A
5-23
Animation Environment
Revision A
•
1.
On the VTR Panel press the Target Button
(tar). The button is highlighted.
•
2.
Press the Setup Button. The Target Setup
Popup appears.
•
3.
Press on one of the target devices (VTR 1,
VTR 2, etc.) to enable it. The button you
press is highlighted.
•
4.
Choose Off, Canvas, or Matte on the Target
Selection Button. Will default to Canvas if
only one device is set up.
•
5.
Enter the target timecode in the timecode
window. This should be the start point of the
record sequence.
•
6.
Press OK. The popup disappears. Recording
will now use the indicated device(s) as target.
5-23
Animation Environment
CHYRON Corporation
CHYRON Corporation
To set up a target hard disk path:
•
1.
On the VTR Panel press the Target Button
(tar). The button is highlighted.
•
2.
Press the Setup Button. The Target Setup
Popup appears.
•
3.
Press on one of the Disk Buttons (Disk 1,
Disk 2, etc. - not the windows) to set it up as
a target. The Disk Button you press becomes
highlighted.
•
4.
Press on the window in the highlighted Disk
Button. The File Popup appears.
•
5.
Type in a filename to begin the target path.
There must be a number in the filename.
Usually it would be the starting number 0 or 1.
•
6.
Enter the target timecode in the timecode
window. This should be the start point of the
record sequence. Use the Timecode/Frame
Button at the right to select which mode you
want (often you will use frame numbers for a
disk path).
•
7.
Press OK. The Setup Popup disappears.
Recording will now use the indicated disk
path.
The Disk Path File Type Buttons
Every target disk path has a File Type Button at the
right of its File Window. Press this button to bring
up a File Type Popup that allows you to choose from
Liberty’s wide range of file formats for the images
to be saved.
Animation Environment
5-24
Revision A
Animation Environment
5-24
Revision A
Liberty Artist’s Manual
File Type Popup
Figure 5-6. File Type Popup
Revision A
5-25
Animation Environment
Liberty Artist’s Manual
Liberty Artist’s Manual
The File Type Popup allows you to choose from
Liberty file formats and External file formats for
still images and Clip file formats for animations.
External Image File Formats
The normal still image file formats from the Save As
Popup, such as TIFF and Targa.
Liberty Image File Formats
Standard Liberty .im and Liberty Layers file format.
Note that saving the Layers files is useful in the
Paint environment, when using the Temp Layers
feature (see p4-447). You would not normally render to Layers files in Animation.
Clip File Formats
Raw YUV for use with disk arrays (such as Ciprico,
MegaDrive, or Eurologic; see the Liberty Technical
Reference manual) and the Chyron Motion File Format for realtime playback on iNFiNiT.
Chyron Motion File Format
With this file format you can render animations to a
format that contains all the frames under a single file
name. When the render is finished, you can transfer
the file to the iNFiNiT for realtime playback. The
VTR Panel in the Paint Environment (page 4-409)
has the same access to saving in the Chyron Motion
File Format.
Note that when saving to a Chyron Motion File, the
disk path’s frame numbers must always start with
zero. For example, when recording to a Chyron
Motion Path in the Animation Environment, the “In”
frame number/timecode must be zero, or the record
will fail. This is because the software uses frame
Revision A
5-27
Animation Environment
Revision A
5-27
Animation Environment
CHYRON Corporation
CHYRON Corporation
zero to trigger the start of a Chyron Motion File.
Once you’ve created a Chyron Motion File, however, you can record to different frames within it by
altering the target disk path’s frame number accordingly (for example, for a fix, you could re-render
frames 10 - 20 over the original frames 1- -20).
When rendering to a Chyron Motion File is finished,
you can transfer the file via FTP to a remote directory on an iNFiNiT! or other system. The File Type
Popup contains a Setup Button which is active only
when the Chyron Motion File Type is selected. This
button brings up the Chyron Motion File Setup
Popup, which allows you to enter the host and directory path names of the remote system where you
want to store the Chyron Motion File.
Chyron Motion File Setup Popup
Figure 5-7. Chyron Motion File Setup Popup
The Chyron Motion File Setup Popup allows you to
enter set-up information to log on to a remote system.
Node
Enter the node name of the remote system (such as
“iNFiNiT”).
Animation Environment
5-28
Revision A
Animation Environment
5-28
Revision A
Liberty Artist’s Manual
Liberty Artist’s Manual
Path
Enter the path of the directory on the remote system
you wish to access (such as C/logos/message)
User Name
Enter the user name used to log on to the remote system (such as “guest”). This user name must correspond to a user account on the remote system.
Password
Enter the password used to log on to the remote system. This password must correspond to the password for the user account on the remote system.
Temp Directory
Enter a temporary directory on the local hard drive
where temporary files can be stored. Normally this
is set to “usr/tmp,” but you can specify a different
location if space is tight on the “usr” drive. All files
browsed or recalled via FTP pass through this temporary directory, so it needs at least a few megabytes
of free space.
X,Y Offset Position
The Chyron Motion File Setup Popup contains text
windows for X and Y offset position. Since Chyron
Motion Files are usually small cutouts, you can use
these windows to specify the position of the cutout.
The cutout then will be displayed at this position on
the iNFiNiT!
FTP Settings Elevator
Use the six levels of the elevator to save settings for
different remote hosts/directories.
Revision A
5-29
Animation Environment
Revision A
5-29
Animation Environment
CHYRON Corporation
CHYRON Corporation
FTP/Local
If the FTP Button is on, the file is transferred via
FTP to the specified remote host and directory. If the
Local Button is also on, the file is saved to the local
hard drive as well.
If only the FTP Button is on, the file will be deleted
from the local hard disk after the FTP.
As described above, the Chyron Motion File Type
must be enabled on the Target VTR Setup Popup,
and the Animation rendering must be complete (or
when rotoscoping the “Last” Button must have been
pressed). When the FTP transfer is about to occur,
the software checks to see if the file already exists in
the remote directory. If it does, you are prompted to
confirm that you want to over-write the file. If you
answer "Yes", the FTP transfer will commence.
When the transfer finished, the message "FTP
Transfer Complete" is displayed in the Prompt Window. If the FTP transfer fails, a red error message
appears in the Prompt Window (for example, if the
user name or password for the remote system is
incorrect).
Re-scaling for Realtime Playback
To achieve realtime playback on the iNFiNiT!, Chyron Motion Files must normally be limited in size
(for example, 224 x 200 pixels). You can do this
most easily using the Rescale Button in the Target
VTR Setup Popup (page 5-22), where you can enter
the target X and Y resolution for each disk path. For
example, turning on Rescale and setting the X and Y
rescale controls to 224 and 200 would cause each
rendered frame to be re-scaled to 224 x 200 before
being written to the Chyron Motion File.
Animation Environment
5-30
Revision A
Animation Environment
5-30
Revision A
Liberty Artist’s Manual
Liberty Artist’s Manual
Recalling Chyron Motion Files
You can recall Chyron Motion Files using the Recall
and File Manager Tools, just like any other image
file format. This only recalls the first frame in the
clip, however. To recall multiple frames in the clip,
you must select the file as a disk path in the Source
VTR Setup Popup (page 5-19). The Grab Button (in
Paint) will then grab individual frames from the
Chyron Motion File, based on the disk path’s source
timecode/frame number. Or, the Filmstrip Actor in
Animation can be used to input frames from the file
(to do this, put the Filmstrip Actor in Source VTR
mode, and assign the file as the disk path for Source
VTR; see page 5-120 for more details).
Note also that Chyron Motion Files do not currently
have browse images, nor are they browsable as filmstrips in the Full-Screen File Manager.
RAW YUV Files for Disk Arrays
This format is utilized for rendering animations (or
rotoscoping in Paint) to a format that contains all the
frames under a single file name (a clip file). This
format is normally used to render or rotoscope to a
Disk Array such as the Ciprico, MegaDrive, or
EuroLogic Disk Array.
Note that when first saving to a RAW YUV clip file,
the disk path’s frame numbers must always start
with zero. For example, when first recording to a
RAW YUV clip file in the Animation environment,
the “In” frame number/timecode must be zero, or the
record will fail. This is because the software uses
frame zero to trigger the start of a RAW YUV clip
file. Once you’ve created a RAW YUV clip file,
however, you can record to different frames within it
by altering the target disk path’s frame number
Revision A
5-31
Animation Environment
Revision A
5-31
Animation Environment
CHYRON Corporation
CHYRON Corporation
accordingly (for example, for a fix, you could rerender frames 10 – 20 over the original frames 120).
To render to a RAW YUV clip, the RAW YUV clip
file type must be enabled on the Target VTR Setup
Popup. In addition, when setting up the disk path
(the file pathname) for the clip, an extension of
“.raw” must be added to the filename.
Once you have rendered a RAW YUV clip file, you
can recall frames from the clip, by selecting the clip
as a disk path in the Source VTR Setup Popup. The
Grab Button (in Paint) will then grab individual
frames from the clip file, based on the disk path’s
source timecode/frame number. Or, the Filmstrip
Actor in Animation can be used to input frames
from the clip (to do this, put the Filmstrip Actor in
Source VTR mode, and assign the clip as the disk
path for Source VTR; see page 5-120 for more
details).
In addition, if the RAW YUV clip is rendered to a
Disk Array, and if your SGI system has an O2,
Octane, or Impact video board, you can play the clip
in real-time through the video board. See the section
on Showing Video from a Disk Array (see “Show
Button” on page 4-155) for details on how to do this.
Note also that for the above real-time playback
through the video board to work, the video clip has
to be rendered in 601 PAL (720 x 576) or NTSC
(720 x 486) resolution. If the canvas resolution does
not match one of these, you can use the Target
Rescale Button (described in the section below) to
re-scale the clip to the proper resolution as it is rendered.
Animation Environment
5-32
Revision A
Animation Environment
5-32
Revision A
Liberty Artist’s Manual
Liberty Artist’s Manual
The Target Rescale Button
With a device or disk path active, press on the
Rescale Button to enable it (it becomes highlighted),
causing the rendered images to be re-scaled before
being recorded. The X and Y windows specify the
resolution of the re-scaled image.
The Rescale Button controls only the current (highlighted) device/disk path. When the Rescale Button
is active, you can use the X and Y windows to enter
new resolutions (in pixels) for the images to be rescaled to.
Dropframe Button
Press the Dropframe Button to turn it on/off. When
on, recording takes place in Dropframe Mode.
Preroll Button
The default preroll is 5 seconds. On some VTRs
you may want to set up a shorter preroll, but be careful that you don't create locking problems by giving
it too short a setting. If you are experiencing locking
problems, you may want to set the preroll at longer
than 5 seconds. The range is 1 to 15 seconds.
OK Button
Pressing the OK Button confirms all settings and
removes the Setup Popup.
Revision A
5-33
Animation Environment
Revision A
5-33
Animation Environment
CHYRON Corporation
CHYRON Corporation
Recall Animation Button
Figure 5-8. Animation File Management Buttons
The Recall Button recalls only animations from the
disk. It only displays animation filenames. To
recall a picture from the disk, use the Canvas Button
just below the Save Button.
To recall an animation from the disk:
•
1.
Press the Recall Animation Button. The File
Popup appears, showing the existing animation
disk files.
•
2.
Press on an animation filename or type in a
new filename. The current animation in the
Timeline is replaced by the recalled animation.
An animation is recalled with all its data, including
Timeline data and data in the Playback Menu, such
as duration, in/out-times, skip in/skip out-times, and
hold in/hold out-times.
Animation Environment
5-34
Revision A
Animation Environment
5-34
Revision A
Liberty Artist’s Manual
Liberty Artist’s Manual
CAUTION
Recalling an animation from disk
completely replaces the animation
currently in the Timeline. Be sure you
have saved your current animation to
disk before recalling another one.
Animation Save Button
The Save Button saves only animations. If you want
to save the current picture on the Canvas, you must
go to the Paint Environment and press Save.
To save the current animation to the disk:
•
1.
Press the animation Save Button. The File
Popup appears.
•
2.
Type in a filename for the animation to be
saved under, or press on an existing
filename to save the current animation over
the existing animation file. If you try to save
the animation over an existing file, you'll be
prompted to confirm that you want to
overwrite the existing animation.
An animation is saved with all its data, including
Timeline data and data in the Playback Menu, such
as duration, in/out-times, skip in/skip out-times, and
hold in/hold out-times.
NOTE: Save your animations frequently. Since
they take up almost no disk space you can save several versions of an animation as you work -- good
insurance in case you need to go back to an earlier
version.
Revision A
5-35
Animation Environment
Revision A
5-35
Animation Environment
CHYRON Corporation
CHYRON Corporation
Automatic Animation Save on Exiting
Liberty
When you log out of Liberty, the current animation
is saved and restored to the Timeline the next time
you log in to your User Login Account. This can be
especially handy in the admittedly extremely
unlikely event of a crash.
Check Animation Button
Press to make sure that all files required for the current animation exist. If all the files called for in the
animation exist in the right place, you are prompted:
"Animation is OK." If an error is found in the animation, a pop-up appears asking if you want to continue. You can press “Yes” to continue to the next
error or press “No” or “Cancel” to stop. If you stop,
the actor which caused the error is highlighted.
Timecode Button (labeled Tmcode)
Press to change between Timecode Mode and Frame
Mode. Liberty automatically converts frames to
timecode using the currently configured frame per
second rate. If Liberty is configured for NTSC, one
second is calculated at 30 frames. For PAL, one
second is calculated at 25 frames. For film, one second is calculated at 24 frames.
Dropframe Button (labeled Dropfr)
Press the Dropframe Button to turn it on/off. When
on, recording/grabbing takes place in Dropframe
Mode. Dropframe Mode affects both the source and
target recording device (unlike Pre-roll). Note that
the Dropframe button is only active when a VTR
device is selected. It is not active, nor is it needed,
for disk paths.
Animation Environment
5-36
Revision A
Animation Environment
5-36
Revision A
Liberty Artist’s Manual
Liberty Artist’s Manual
Duration Button (Dur)
Figure 5-9. Duration Window
The number in the Duration Window determines the
overall length of the animation. You can change the
duration at any time to any value. When you change
the duration of an animation, all actors in the animation change their length proportionately. Usually,
you can run an animation at any duration without
seriously altering its content, except at very short
durations, like 15 frames or under (sometimes used
for quick preview purposes).
The duration can be expressed in frames or timecode
(see the Timecode Button above). When you save
an animation to disk, its duration is saved as well.
Revision A
5-37
Animation Environment
Revision A
5-37
Animation Environment
CHYRON Corporation
CHYRON Corporation
To change the duration of an animation:
•
1.
Press in the Duration Window.
•
2.
In Frame Mode, type the number of frames
that you want the animation to last. In
timecode Mode, type the timecode duration
that you want the animation to last. In
timecode Mode, if the animation is to be 3
seconds and 15 frames long, type 3 15,
separating the seconds and frames with a
space. If it is to be an even 3 seconds long,
type 3 0.
•
3.
When finished typing, press the Enter key.
If Liberty is configured for NTSC, one second is calculated at 30 frames. For PAL, one second is calculated at 25 frames. For film, one second is
calculated at 24 frames.
The Duration Button with Add Prefix
Use the Add Prefix to add empty time at the end of
the animation without changing the duration of the
actors in the animation. Press the Add Prefix, then
the Duration Button, then type the total longer duration. An empty space is added at the end of the animation. If there is empty time at the end of an
animation, pressing the Add Prefix and then typing a
smaller duration will cause the actors to keep their
durations, while cutting off empty time at the end.
Timeline Frame Increment Markers
The Animation Timeline displays vertical lines
marking frame increments. Liberty displays the
lines at convenient intervals, changing the intervals
with the duration of the animation. For example, for
a duration of 30 frames there are 15 lines at 2-frame
intervals. Change the duration to 60 frames and
Animation Environment
5-38
Revision A
Animation Environment
5-38
Revision A
Liberty Artist’s Manual
Liberty Artist’s Manual
there are still 15 lines, but at 4-frame intervals. A
duration of 300 frames displays 10 lines at 30-frame
intervals.
Placing the cursor inside the Timeline (without
pressing down) automatically displays the animation
frame number at the current cursor position. The
frame number appears in the Prompt Window at the
bottom of the screen. Note also that a period (“ . “) is
displayed after the frame number if the cursor is on
the second field of the given frame
Loops Button
Press to enter the number of times for the animation
to repeat. This function repeats the entire Timeline. Each animation actor has its own individual
loop button as well.
In Button
Press to set the in-time on the current device. This is
the start time for the animation to be recorded. If the
device’s target destination in the VTR menu is set, it
overrides the setting of the In Button.
In Timecode Mode type the in-time, separating
hours, minutes, seconds, and frames by spaces; for
example: 4 17 3 15 is 4 hours, 17 minutes, 3 seconds and 15 frames.
Entering a new in-time automatically changes the
out-time, while maintaining the current duration.
Revision A
5-39
Animation Environment
Revision A
5-39
Animation Environment
CHYRON Corporation
CHYRON Corporation
Out Button
Press to set the out-time on the record device. This
is the end time for the animation to be recorded.
You don't have to set the out-time, if you've set the
in-time. Liberty automatically sets the out-time by
adding the duration to the in-time.
Entering a new out-time changes the duration, while
maintaining the current in-time.
Holdin Button
Press to set how long to hold the first frame of the
animation. Type the number of frames or the timecode duration of the desired hold at the beginning of
the animation. For VLAN connections the hold is
recorded with a single command to the recording
device, recording in a single, real-time pass.
Holdout Button
Press to set the hold on the last frame of the animation. Type the number of frames or the timecode
duration of the desired hold at the end of the animation. For VLAN connections the hold is recorded
with a single command to the recording device,
recording in a single, real-time pass.
Animation Environment
5-40
Revision A
Animation Environment
5-40
Revision A
Liberty Artist’s Manual
Liberty Artist’s Manual
Skipin Button
Press to set the frame number of the animation at
which you want recording to begin. In this way, you
can skip the beginning of the animation, or if you
had to abort recording earlier, you can pick up
exactly where you left off. Type the frame number
to begin the recording. For example, a skipin of 4
skips frames 0 through 3 and renders at frame 4.
Skipout Button
Press to set the frame number of the animation at
which you want the animation to end. In this way
you can record only the beginning of an animation,
or cut off the end. For example, an animation of 20
frames (0 through 19), with a skipout of 18, stops
after rendering frame 17.
For the following examples, these parameters apply.
•
Animation Duration = 90 frames
•
DDR Record In Time = 450 frames
To record the complete animation:
Render Control
Render Control
Value
Value
Menu Field
Revision A
5-41
Animation Environment
Menu Field
Dur
90
HoldIn
0
Loops
1
Holdout
0
In
450
SkipIn
0
Out
540
SkipOut
0
Revision A
5-41
Animation Environment
CHYRON Corporation
CHYRON Corporation
To continue rendering animation after stopping
midway (frame 50):
Render Control
Render Control
Value
Value
Menu Field
Menu Field
Dur
90
HoldIn
0
Loops
1
Holdout
0
In
450
SkipIn
50
Out
540
SkipOut
0
To render a section of the animation timeline
(frame 30 to frame 60) but start recording on the
DDR at the first new frame (450 on DDR):
Render Control
Render Control
Value
Value
Menu Field
Menu Field
Dur
90
HoldIn
0
Loops
1
Holdout
0
In
420
SkipIn
30
Out
510
SkipOut
61
In order to render the middle section of the timeline
to the beginning of the DDR the SkipIn Time must
be subtracted from the In time. If the In time is left at
450, then the DDR will leave 30 frames of old material (or black) and start recording at frame 480.
To have a 15 frame freeze of the last frame in the
animation:
Animation Environment
5-42
Revision A
Animation Environment
5-42
Revision A
Liberty Artist’s Manual
Liberty Artist’s Manual
Render Control
Render Control
Value
Value
Menu Field
Menu Field
Dur
90
HoldIn
0
Loops
1
Holdout
15
In
450
SkipIn
0
Out
555
SkipOut
0
Preview Animation Button (In Brief)
Allows you to preview the animation in Wireframe
Mode, Outline Mode, and Render Mode.
Animation Storyboard Button (In Brief)
Allows you to render the animation as a preview
movie to be played back through Liberty.
Animation Environment Record Animation Button
(In Brief)
Allows you to render the animation to a recording
device (VTR, DDR, hard disk, etc.)
Run Animation Button (In Brief)
Press to start rendering the animation in Preview,
Storyboard, or Record Mode.
The Run corner button calls up the Run Popup to
choose among various rendering options.
Revision A
5-43
Animation Environment
Revision A
5-43
Animation Environment
CHYRON Corporation
CHYRON Corporation
For more information on the Preview, Storyboard,
Record, and Run buttons briefly described above,
refer to the Animation Playback Functions (§5.10 on
page 5-222).
5.4
5.4.1
Animation Actor Menus
Animation Actors (in brief)
Animation actors are the basic elements of an animation. Each type of actor has a specific function
and is represented by a color-coded bar in the Timeline. When you see a dark green bar, you know that
it represents a Cel Actor. When you see a magenta
bar, you know it represents a Morph Actor. Below
is a quick introduction to the actor types.
Most types of actors call an image file from the disk
and display it as part of the animation. Each actor
can have its own curve path and a series of keyframes for various changes in the display of the
actor's image file - size, rotation, transparency, etc.
Animation actors exist on layers in the Animation
Timeline. Any number of sequential actors and any
combination of actor types can exist on a single
layer.
Animation Environment
5-44
Revision A
Animation Environment
5-44
Revision A
Liberty Artist’s Manual
Liberty Artist’s Manual
Actor Type Popup
Figure 5-10. Actor Type Popup
The Actor Type Popup displays the types of actors
and their color codes. To call it up, press the center
of the colored button in the Add Actor Button in the
Actor Edit Menu (usually the colored button is green
and says "Cel," but it may be other colors/types of
actors). The Actor Type Popup appears on top of
the Actor Edit Menu.
The following are brief descriptions of the actor
types and their functions in an animation. Detailed
descriptions of each type of actor start on page 5106.
Cel Actor
A Cel Actor calls a single image or a group of
images from disk for display in the animation. See
page 5-106 for a full description of this actor type.
Revision A
5-45
Animation Environment
Revision A
5-45
Animation Environment
CHYRON Corporation
CHYRON Corporation
Cycle Actor
A Cycle Actor calls a series of images from disk and
displays the sequence in the animation. The Cycle
Actor takes filenames that are dissimilar and not
sequentially numbered, unlike the Filmstrip Actor.
The Cel Actor in Multiple Mode can perform the
same operation. See page 5-119 for a full description of this actor type.
Filmstrip Actor
A Filmstrip Actor calls a sequence of images with a
common name and incrementing numbers (like
anim1, anim2, anim3, anim4, etc.) from disk, and
displays the sequence in the animation. The Filmstrip sequence can come from another source, such
as a 3D software package or a recording device. The
Cel Actor in Multiple Mode can perform the same
operation. See page 5-120 for a full description of
this actor type.
Text Actor
The Text Actor is similar to a Cel Actor, but calls up
a vector-based text image, rather than a picture file.
The Text actor allows text to be greatly magnified
while keeping full resolution. See page 5-129 for a
full description of this actor type.
Write-on Actor
The Write-on Actor allows you to animate the current paintbrush along a curve path to create signature-type write-on animations. See page 5-131 for a
full description of this actor type.
Animation Environment
5-46
Revision A
Animation Environment
5-46
Revision A
Liberty Artist’s Manual
Liberty Artist’s Manual
Morph Actor
The Morph Actor can use one of two different
morph programs. Each animates a metamorphosistype distortion of a single image or a morph between
two images. Triangle Morph uses a triangular grid
system and is the faster of the two. Line Morph uses
free line segments and is much easier to use, but rendering takes longer. Line Morph gives more pleasing, organic distortions. See page 5-137 for a full
description of this actor type.
Macro Actor
The Macro Actor allows you to animate a Macro as
part of an animation.
Plug-in Actor
The Plug-in Actor applies a plug-in filter to the
actor(s) below it.
Switcher Actor
The Switcher Actor can call an image from disk and
use its alpha data to animate a reveal, or wipe. The
Switcher Actor can also animate simple fades and
dissolves. See page 5-154 for a full description of
this actor type.
Color-table Actor (labeled Colortab)
The Color-table Actor calls up a picture file from
disk and assigns its gray-scale to a set of colors chosen on the palette. Then the assigned colors can be
cycled or revealed for flow effects. See page 5-159
for a full description of this actor type.
Revision A
5-47
Animation Environment
Revision A
5-47
Animation Environment
CHYRON Corporation
CHYRON Corporation
Mask Actor
The Mask Actor calls an image from disk and uses
its alpha, or transparency data, to mask the actor
below it. The Mask Actor has a large variety of
modes for masking, including most of the effects on
the Image Tools in the Paint Environment. For
example, it can make a mask on the basis of brightness, to animate spotlights or shadows. Or, it can
make a mask on the basis of the Ripple function, to
animate liquid or glass refractions.
The Mask Actor can contain a curve path for the
mask to follow during the animation, as well as keyframes for DVE-type rotation in X, Y, and Z. These
keyframes also control attributes such as Transparency, Scale, Slant, Mirror, and Under. See page 5162 for a full description of this actor type.
Reference Actor (labeled Refer)
Reference Actors allow an existing animation saved
on disk to be included in other animations. You can
use the Show Troupe button to expand or compress
Reference (or Troupe) Actors. An expanded actor
shows all the actors contained in it. A compressed
actor “hides” all its actors and displays only on one
layer. Reference Actors can have paths and keyframes, allowing the member actors (possibly having their own relative paths and keyframes) to move
as a group. Reference Actors cannot be edited.
Troupe Actor
Troupe Actors are like Reference Actors in that they
refer to animation files stored on disk, but the contents of Troupe Actors can be edited, while the contents of Reference Actors cannot be edited. The
Show Troupe Button affects Troupe Actors the same
way as Reference Actors.
Animation Environment
5-48
Revision A
Animation Environment
5-48
Revision A
Liberty Artist’s Manual
Liberty Artist’s Manual
NOTE: For more information on Reference and
Troupe actors, refer to page 5-182.
Cinefusion Actor (Optional)
The Cinefusion Actor works with Ultimatte’s Cinefusion software to allow you to create animated
mattes.
Shapes Actor
The Shapes Actor allows you to animate polygons
as part of an animation.
Rotation and Scaling of Actors Larger Than the
Screen
You can pan, rotate, scale, and slant actors created at
a higher resolution than the display screen. This
means that they are larger than the screen in which
you are rendering animation. These larger actors
can be Cel Actors, Mask Actors, or Switcher Actors.
A Temp or Mask Buffer large enough to hold the
larger file is temporarily allocated to do this. You’ll
need sufficient RAM to support this.
Revision A
5-49
Animation Environment
Revision A
5-49
Animation Environment
CHYRON Corporation
CHYRON Corporation
5.4.2
Actor Edit Functions
Figure 5-11. Actor Edit Buttons
To create an animation from scratch you start with
the Actor Edit Functions. You use the Actor Edit
Menu (at the left of the Timeline) to put different
types of actors into the Timeline, to move or copy
them, to change their length, and to delete them.
Each Actor Edit Button turns off after performing an
operation once, except the Main Actor Edit Button.
To perform repeated actor edit operations, press the
Repeat Prefix Button before pressing an Actor Edit
Button.
Only one Actor Edit Button can be active at a time.
Main Actor Edit Button
Press the Main Actor Edit Button to end any Actor
Edit function. The Main Actor Edit Button ("Edit")
is active by default, indicating that no other Actor
Animation Environment
5-50
Revision A
Animation Environment
5-50
Revision A
Liberty Artist’s Manual
Liberty Artist’s Manual
Edit Buttons are active. When any other Actor Edit
Button finishes an operation, the Main Actor Edit
Button becomes active again.
Home Button (Corner of Main Actor Edit)
Press the Home Button in the corner of the Main
Actor Edit Button to "home" the Timeline to the
Zero layer. When you have scrolled away from this
layer on the Timeline, this button resets the Zero
layer to the second line from the bottom.
Add Actor Button
To add an actor to the Timeline:
•
Press the Add Actor Button.
•
Press in a layer of the Timeline at the point
that you want the actor to begin.
•
Press a second time (in the same layer) at the
point that you want the actor to end. The actor
appears between the two indicated points. The
begin and end times of the actor appear in its
Actor Popup at the right of the Timeline.
NOTE
To automatically fill up all the space
in a layer with the added actor,
double-click in the layer.
Actor Type Popup
The type of actor that is added is determined by the
color-coded Actor Type Button in the Add Actor
Button. To change the actor type displayed in the
Actor Mode Button, press on the Actor Type to call
up the Actor Type Popup (see the illustration “Actor
Revision A
5-51
Animation Environment
Revision A
5-51
Animation Environment
CHYRON Corporation
CHYRON Corporation
Type Popup” on page 5-45). You can also cycle
through the actor types by pressing repeatedly on
either end of the color-coded Actor Type Button.
The Add Actor Button can also be used to insert layers in the Timeline. Instead of pressing inside the
Timeline, press on one of the Layer Number Buttons. Pressing on the top half of the Layer Number
Button adds the new layer above the layer you
pressed on. Pressing on the lower half of the Layer
Number Button adds the new layer below the layer
you pressed on.
Delete Actor Button
To delete an actor from the Timeline, press the
Delete Actor Button (labeled Del) and then press on
the actor you want to delete in the Timeline. If you
want to delete several actors, press the Repeat Prefix
Button before pressing the Delete Actor Button.
Don't forget to turn Repeat off when you're finished
(or press the Main Actor Edit Button).
To delete an entire layer from the Timeline, press
the Delete Actor Button and then press on the layer
number button of the layer you want to delete. All
the actors in the layer are deleted, and it is removed
from the Timeline.
Delete Timeline Button
(Corner of Del Button)
To delete all the actors in the Timeline press the corner button in the Delete Actor Button. A popup
appears asking you to confirm the deletion of the
entire animation. Press YES to confirm the deletion.
Press NO to make no modification to the animation.
Press CANCEL to abort the deletion. (NO and
CANCEL have the same effect.)
Animation Environment
5-52
Revision A
Animation Environment
5-52
Revision A
Liberty Artist’s Manual
Liberty Artist’s Manual
Off Button
The Off Button allows you to turn an actor off without deleting it, so it doesn't appear when the animation is played back. This is useful when you want to
preview only certain actors in an animation.
Press the Off Button and then press on the actor in
the Timeline that you want to turn off. A red line
appears along the actor to show that it is turned off.
The procedure to turn the actor back on again is
exactly the same.
To turn off an entire layer (turn off all the actors in a
layer at once) press the Off button and then press on
the layer number button. All the actors are turned
off. Or, if the actors in the layer are already off, they
are turned on again.
Off Timeline Button (Corner of Off Button)
Turns off all actors on the timeline. When used with
the invert prefix, turns on all actors on the timeline.
Move Actor Button
To move an actor to another place on the Timeline:
•
Press the Move Actor Button.
•
Press on an actor and drag it to its new position. You don't have to press down while you
drag.
•
Press again when the actor is in its new position. You can move an actor within the same
layer or to a different layer.
If there is not enough space for the moved actor in
its new position, it can’t be moved there.
Revision A
5-53
Animation Environment
Revision A
5-53
Animation Environment
CHYRON Corporation
CHYRON Corporation
To move an entire layer to another place on the
Timeline:
•
Press the Move Actor Button.
•
Press on the Layer Number Button of the
layer you want to move.
•
Press on another Layer Number Button.
Pressing on the top half of a Layer Number Button puts the moved layer above it; pressing on
the bottom half of a Layer Number Button puts
the moved layer below it.
Copy Actor Button
The Copy Actor Button works the same as the Move
Actor Button, except that the source actor (or layer)
is not removed by the operation. A copied actor has
all the attributes as the original.
To copy an actor on the Timeline:
•
Press the Copy Actor Button.
•
Press on an actor and drag it to the position to
be copied to. You don't have to press down
while you drag.
•
Press again where you want the new copy of
the actor. A copy of the actor appears in the
new position.
You can copy an actor within the same layer or to a
different layer.
If there is not enough space for the copied actor in
its new position, it can’t be copied there.
Animation Environment
5-54
Revision A
Animation Environment
5-54
Revision A
Liberty Artist’s Manual
Liberty Artist’s Manual
To copy an entire layer to another layer on the
Timeline:
•
Press the Copy Actor Button.
•
Press on the Layer Number Button of the
layer you want to copy.
•
Press on the top or bottom half of the Layer
Number Button of the layer where you want
to put the new copy of the layer. A copy of the
layer appears in the new position. Pressing on
the top half of a Layer Number Button puts the
new copy of the layer above that layer; pressing
on the bottom half of a Layer Number Button
puts the new copy of the layer below it.
To copy only an actor's curve path to another actor,
see the Edit Path Button. To copy only an actor's
keyframes to another actor, see Copying Keyframes
to Another Actor.
Stretch Actor Button
Use the Stretch Actor Button to make an actor
longer or shorter.
To change the begin time of an actor:
•
Press the Stretch Actor Button.
•
Press on the first half of the actor to be modified.
•
Press on the new begin point. The actor
stretches or shrinks to the point you press on.
To change the end time of an actor:
Revision A
5-55
Animation Environment
Revision A
•
Press the Stretch Actor button.
•
Press on the last half of the actor to be modified.
5-55
Animation Environment
CHYRON Corporation
CHYRON Corporation
•
Press on the new end point. The actor stretches
or shrinks to the point you press on.
To stretch all actors in a layer to the maximum
available space:
•
Press the Stretch Actor Button.
•
Press on the Layer Number Button of the
layer in which you want to stretch all actors to
the maximum available space. The first actor in
the layer changes its begin-time to 0. The other
actors maintain their original begin-times and
stretch their end points to fill all available space
in the layer.
Stretching with the Begin/End Windows
In the Actor Popup at the right of the Timeline, there
are two number windows which display the begin
and end frames of the actor. Press on these number
windows to type in new begin or end times. Changing the begin-time moves the actor without changing
its length; changing the end time changes the actor’s
length without moving it in the layer.
Show Troupe Button
This button is used with Troupe and Reference
Actors. Pressing the Show Troupe Button, and then
pressing a Troupe or Reference Actor either expands
or compresses the actor. An expanded actor shows
all the actors contained in it. An compressed actor
hides all its actors and displays only on one layer.
Compress Button
Deletes all empty layers in the Timeline.
Animation Environment
5-56
Revision A
Animation Environment
5-56
Revision A
Liberty Artist’s Manual
Liberty Artist’s Manual
5.4.3
Actor Popups
Figure 5-12. Basic Actor Popup (no actor selected)
Each type of animation actor has its own popup
menu with functions specific to that type of actor.
When you select an actor by pressing on it in the
Timeline, the popup menu for that actor appears at
the right of the Timeline. Use the buttons on this
popup to edit the actor. You can select only one
actor for editing at a time.
To edit the functions of an actor, press on the actor
in the Timeline. The actor becomes underlined in
white. Its Actor Popup appears at the right of the
Timeline, containing the data for that actor (beginning and ending frame numbers, filename, etc.).
The two top rows and one bottom row of the Actor
Popups always have the same buttons. The middle
section of the Actor Popup varies with actor type.
Revision A
5-57
Animation Environment
Revision A
5-57
Animation Environment
CHYRON Corporation
CHYRON Corporation
Actor Name Window
You can assign a name to any actor simply as a
reminder of the contents of the actor, but it's not necessary to give an actor a name.
To assign a name to an actor, or change the
current name:
•
Press the Actor Name Window.
•
Type a name for the actor. The name you type
appears in the Actor Name Window. The actor
keeps this name until you change it.
Actor Loops Window
The Actor Loops Window allows you to type in a
number for how many times the actor is to repeat.
Only the individual actor repeats, not the entire animation.
To set the number of times the actor is to
repeat:
•
Press the Actor Loops Window.
•
Type in the number of times you want the
actor to repeat. The new number appears in the
Actor Loops Window. When you play back the
animation, the actor repeats this many times.
An actor loops within its duration. For instance, if
an actor with a duration of 30 frames has 3 loops, it
makes three 10-frame loops.
If the actor is using a curve path, closing the path
makes a smooth loop. See Actor Edit Path, page 544.
Animation Environment
5-58
Revision A
Animation Environment
5-58
Revision A
Liberty Artist’s Manual
Liberty Artist’s Manual
Actor Begin and End Windows
The Actor Begin Window displays the current
actor's beginning frame number (or timecode number). This number (if other than zero) changes automatically if the duration of the animation is changed.
The Actor End Window displays the current actor's
ending frame number or timecode number. This
number changes automatically if the duration of the
animation is changed.
The actor's beginning and ending may be displayed
in either frame mode or timecode, depending on the
Frame Number/Timecode Button (labeled Tmecode)
in the Playback Menu at the upper left of the Animation Environment. An actor's beginning and ending
changes proportionately with changes in the duration of the whole animation.
If you want to change an actor's position or length
on the same layer, you can reset the Begin and/or
End Actor Windows, rather than use the Move or
Stretch Actor Buttons. This gives you frame-accurate precision.
NOTE
Subtracting the beginning frame
number from the end frame number
gives the duration of the actor.
To move an actor within the same layer using
the Actor Begin Window:
Revision A
5-59
Animation Environment
Revision A
•
Press the actor to select it.
•
Press in the Actor Begin Window and type the
new beginning number. The actor moves to its
new beginning point while maintaining its duration.
5-59
Animation Environment
CHYRON Corporation
CHYRON Corporation
To stretch an actor using the Actor End Window:
•
Press on the actor to select it.
•
Press in the Actor End Window and type the
new ending number. The actor stretches to its
new ending number while maintaining its original beginning number.
Edit Keyframe Button
The Edit Keyframe Button allows you to assign
many attributes to an actor on a curve path, including DVE-type rotations, scaling, transparency, mirror and slant settings. It also allows you to modify
the speed and acceleration of the curve path and
other attributes. When you press the Edit Keyframe
Button, the Keyframe Timeline appears over the
Timeline. Details of creating and editing keyframes
begin on page 5-65.
Edit Path Button
The actor's curve path controls the motion of the
actor. The Edit Path Button calls up the Curve
Popup and displays the actor's current path, if any,
on the Canvas. Here you can create a new curve path
or change the current curve path.
NOTE
The top Curve Elevator level is used
for the current actor’s animation
curve path. The other elevator levels
can be used for temporarily storing
curves - for example, for copying to
other actors.
Animation Environment
5-60
Revision A
Animation Environment
5-60
Revision A
Liberty Artist’s Manual
Liberty Artist’s Manual
Curve Functions in Animation
Figure 5-13. Curve Popup
Some functions on the Curve Popup have special
applications to animation keyframes. They are
listed here:
Insert Point Button
This button (labeled Insrt) allows you to insert
points along the curve.
Revision A
5-61
Animation Environment
Revision A
5-61
Animation Environment
CHYRON Corporation
CHYRON Corporation
To insert points in an existing curve:
•
Press the Edit Path Button. The Curve Popup
appears with the existing curve displayed.
•
Press the Insert Button.
•
Press on the curve where you want the new
point to appear. The point is added and the
curve is modified. A corresponding Keyframe
Matchstick is added to the Keyframe Timeline.
Duplicate Points Button
This button (labeled Dup) allows you to exactly
duplicate a point on the curve. You can use this to
make a hold in the middle of an actor, since duplicating a point adds a Keyframe Matchstick with
exactly the same x,y position as the existing one.
You can then adjust the matchsticks on the Keyframe Timeline to set the length of the hold.
To make a hold using the Duplicate Button:
Animation Environment
5-62
Revision A
•
Press the Edit Path Button. The Curve Popup
appears with the existing curve displayed.
•
Press the Dup Button in the Curve Popup. It
becomes highlighted.
•
On the Canvas, press on a point in the middle
of the path. Another point is added exactly on
top of the point you pressed. Though the Keyframe Timeline is not displayed, a corresponding
matchstick is added just after the original matchstick.
•
Press the Edit Keyframe Button. The Curve
Popup disappears and the Keyframe Timeline
appears, displaying the new matchstick next to
its original.
Animation Environment
5-62
Revision A
Liberty Artist’s Manual
Liberty Artist’s Manual
•
Use the Move Matchstick Button to move the
duplicate matchstick, thus setting the duration of the hold.
On the curve, duplicated curve points are colored the
same color as the tangents (default is yellow) to distinguish them from single points.
When the Duplicate Points Button is enabled and
you move the cursor near a point, the point you are
nearest to will flash, as a preview of which point will
be duplicated when you press down.
To separate two duplicate keyframe positions, go
into Edit Path and use the Move function to manually drag one point away from its duplicate. When
editing keyframes in the Keyframe Timeline, duplicated points always move as a unit - thus you must
go into curve editing in order to separate them.
The Move Gravity Function
This function on the Curve Popup combines the
Gravity Button and the Move Points Button. When
the Gravity Button is on, the Move Button will snap
the point being moved to any point it gets close to.
This allows you to lock curve points together after
the points have been added. Thus two existing
points can be made into duplicates in order to create
a animation keyframe hold.
Point List Button
Press this button to recall Point Lists, which are
curves created with the Motion Tracking function in
the Image Tools 2 Panel in the Paint Environment.
If the Motion Tracking option is not installed, the
Point List Button will be grayed out.
Revision A
5-63
Animation Environment
Revision A
5-63
Animation Environment
CHYRON Corporation
CHYRON Corporation
Pressing Point List brings up the file popup, allowing you to select the desired point list file.
The tracked element can be anything that can be distinguished from its surroundings in some way, usually by its luminance value. The Tracking function
will create a series of points, generating a motion
curve path, which is saved on disk as a Point List. Or
it will generate a set of four points defining a warp
rectangle that follows an area in the target sequence,
which is saved on disk as a Corner List, which you
can recall using the Corners List Button.
To recall a Point List you must have first created
one, using the Motion Tracking option in the Image
Tools 2 Panel in the Paint Environment. For this
procedure, see below.
Corners List Button
The Corners List Button is used to recall a Corners
List, which is a special type of file created with the
Motion Tracking functions in the Image Tools2
Panel in the Paint Environment. If the Motion
Tracking option is not installed, the Corners List
Button will be grayed out. The Tracking function
will create a series of points, generating a motion
curve path, which is saved as an animation Curve
Path and can be recalled with the Point List Button.
Or it will generate a set of four points defining a
warp rectangle that follows an area in the target
sequence, which is saved as a Corners List and is
recalled with the Corners List Button.
Pressing the Corners List Button brings up the File
Popup, allowing you to click on the desired Corners
List file.
Animation Environment
5-64
Revision A
Animation Environment
5-64
Revision A
Liberty Artist’s Manual
Liberty Artist’s Manual
Recall Cel Button
Press to recall the actor's image file from the disk to
the Canvas. All actor types use Recall Cel except:
Text, Write-on, Morph, Macro, Reference, Troupe,
and Shapes. These actor types have no image file
associated with them.
Actor Type Button
Displays the type of the selected actor along with its
color code. Actor types can be changed without loss
of information. Pressing on the Actor Type Button
brings up the Actor Type Popup, see page 5-45.
5.5
Animation Keyframes
Edit Keyframe Button
Press the Edit Keyframe Button, and the Keyframe
Timeline (page 5-67) appears on top of the Animation Timeline. With this popup you can create keyframes which determine DVE-type moves and other
attributes of the selected actor. You can vary the
speed and acceleration of the actor's attributes,
including its motion along its curve path.
5.5.1
Keyframe Timeline
The Keyframe Timeline has two parts: the Keyframe Timeline on the right and the Keyframe Edit
Menu on the left.
The Keyframe Timeline shows at the top the actor's
timeline with triangular curve path points and keyframe matchsticks. The rectangle across the bottom
contains the Speed Curve, which you can use to vary
the speed and acceleration of the actor's attributes.
Revision A
5-65
Animation Environment
Revision A
5-65
Animation Environment
CHYRON Corporation
CHYRON Corporation
The Keyframe Edit Menu, at the left of the Keyframe Timeline, contains buttons for interacting
with the Keyframe Timeline - adding and editing
keyframes as well as editing the Speed Curve.
Frame Numbers in Keyframe Timeline
When the cursor is moved over the Keyframe Timeline (without pressing) both the relative and absolute
frame numbers of the cursor’s position on the timeline are displayed in the Prompt window (at the bottom of the screen).
Peek
Peek shows a wireframe preview for the corresponding frame on the timeline. To Peek, press the cursor
down on the green bar on the Keyframe Timeline to
show the corresponding wireframe preview.
Keyframe Edit Menu
The upper part of the Keyframe Edit Menu (above
the green OK button) contains buttons to add, delete,
and move keyframes in the Keyframe timeline.
These buttons, labeled “Add”, “Del”, and “Move”,
are at the top of the Keyframe Edit Menu. This portion of the menu also contains a 5-level elevator,
with buttons for saving and recalling keyframes in
the elevator (labeled “sav”, “all”, and “rec”).
The lower portion of the Keyframe Edit Menu
(below the OK button) contains buttons related to
the Speed curve, including buttons to Add and
Delete Speed Nails, a 5-level elevator, and controls
for recalling/saving speed nails. It also contains in/
out buttons for zooming the speed curve display,
along with a SubPixel button to enable sub-pixel
positioning. See §5.6 for more information on the
Speed Curve.
Animation Environment
5-66
Revision A
Animation Environment
5-66
Revision A
Liberty Artist’s Manual
Figure 5-14. Keyframe Timeline
Revision A
5-67
Animation Environment
Liberty Artist’s Manual
Liberty Artist’s Manual
About Keyframes and Keyframe
Matchsticks
On the Keyframe Timeline, keyframes are displayed
as blue keyframe “matchsticks”. When an actor is
created, Liberty automatically adds start and end
keyframes to it. These keyframes have no attributes,
and thus no effect, until edited. The animation
actor's disk image file is displayed as it exists on the
disk. If the actor has a curve path, the image file
moves along the path with no changes in the way it
is displayed. By editing the start and end keyframes
and adding new keyframes to the Keyframe Timeline you can change attributes of the display of the
actor's image file. The following attributes are controlled by keyframes:
Revision A
5-69
Animation Environment
Revision A
•
X,Y,Z rotation of the image. (Same as Paste
Distort in Paint Environment).
•
X,Y size of the image. (Same as Paste Distort
in Paint Environment)
•
X,Y mirroring of the image. (Same as Paste
Distort in Paint Environment)
•
Slanting of the image. (Same as Paste Distort
in Paint Environment)
•
Position of the Reference Point of the image.
(Same as Paste Distort in Paint Environment)
•
Transparency of the image.
•
Whether the image is displayed under other
actors.
•
Many of the individual attributes of the actor
types
•
Filter Type: point, bilinear, adaptive, or userdefined
5-69
Animation Environment
CHYRON Corporation
CHYRON Corporation
Colored Dots on Matchsticks
On the Keyframe Timeline keyframe matchsticks
display little colored dots depending on which
attributes have been changed for that keyframe. The
following colors are used to denote attribute dots,
starting at the top of the keyframe matchstick and
working down:
•
Light green - transparency
•
Red - rotation
•
Yellow - scaling and mirroring
•
Purple - slant
•
Light blue - under
The lack of a colored dot on a matchstick means that
at this keyframe the display of this attribute is interpolated from other matchsticks. For example, if
there are three keyframes on the timeline, and the
first one is completely transparent, and the last one
is completely opaque, then the middle one does not
need to have a transparency specified. It will have
no light green dot, but it will still be halfway transparent, interpolating its value from the other two
keyframes.
When an animation is saved to disk all its keyframe
data is saved as well.
5.5.2
Adding and Editing Keyframes
Use the Edit Keyframe Menu to add keyframes to
the Keyframe Timeline. You can add as many keyframe matchsticks as you want anywhere on the
Keyframe Timeline.
Animation Environment
5-70
Revision A
Animation Environment
5-70
Revision A
Liberty Artist’s Manual
Liberty Artist’s Manual
NOTE
There can be, at most, one keyframe
per field on the Timeline. A warning
message will be displayed if the user
attempts to add a keyframe to a field
already containing one.
If the actor has no curve path, any added keyframes
take their X, Y positions from the original position
of the image file as saved on the disk. If the actor
has no curve path and you change the X, Y positions
of a keyframe on the screen, Liberty creates and displays a curve path accordingly (see details of editing
keyframes, page 5-70).
Add Keyframe Button
To add a keyframe to the Keyframe Timeline:
•
Press the Add Keyframe Button.
•
Press somewhere in the space above the green
Keyframe Timeline bar. A keyframe matchstick appears above the timeline. The new keyframe matchstick has no data when you add it to
the timeline. You will edit it to change its
attributes (see details of editing keyframes, see
page 5-70).
Delete Keyframe Button
To delete a keyframe from the Keyframe Timeline:
Revision A
5-71
Animation Environment
Revision A
•
Press the Delete Keyframe Button.
•
Press on a keyframe matchstick in the Keyframe Timeline. The matchstick you press on
disappears from the timeline. All its attributes
are deleted as well.
5-71
Animation Environment
CHYRON Corporation
CHYRON Corporation
NOTE
It is impossible to delete or move the
beginning or ending matchstick.
Move Keyframe Button
To move a keyframe on the Keyframe Timeline:
•
Press on the Move Keyframe Button. The
Move Keyframe Button lights blue.
•
Press and drag the keyframe matchstick to
move it to its new position. The Move Button
turns off.
Keyframe Elevator
The five-level Keyframe Elevator is just above the
keyframe OK Button. It does not work like any of
the other elevators in Liberty. Use the Save Keyframe Button to save keyframe matchsticks into the
Keyframe Elevator. Use the Recall Keyframe Button to recall keyframe matchsticks from the Keyframe Elevator.
Keyframe Save Button
To save a keyframe matchstick into the Keyframe Elevator:
Animation Environment
5-72
Revision A
•
Press on the matchstick to be saved. It
becomes highlighted. (This is also the way you
select a matchstick for editing - the wireframe of
the keyframe appears on the Canvas and the
Keyframe Attribute Popup appears.)
•
Press on the Save Keyframe Button (Sav).
The keyframe is saved in the current elevator
level (highlighted light blue).
Animation Environment
5-72
Revision A
Liberty Artist’s Manual
Liberty Artist’s Manual
•
Press the Keyframe OK Button. This removes
the selection from the matchstick and makes the
popup disappear.
Keyframe All Button
The Keyframe All Button is a mode button that,
when on, causes all the keyframe matchsticks in the
Keyframe Timeline to be recalled/saved into the
current elevator level when you press the Keyframe
Recall/Save Button. When off, only the single
selected keyframe matchstick in the Keyframe
Timeline is recalled/saved.
Keyframe Recall Button
To recall a keyframe matchstick from the Keyframe
Elevator, press the Keyframe Recall Button. The
contents of the current Keyframe Elevator level is
recalled into the Keyframe Timeline and becomes
part of the actor. If there is more than one matchstick stored in the elevator level, and the “All” button is on, all matchsticks are recalled into the
timeline.
Keyframe Edit OK Button
Press to remove the Keyframe Edit Menu and Keyframe Timeline.
SubPixel Button
When the SubPixel Button is high-lighted the keyframes are rendered through the “warp code,” so that
even images which are not distorted in any way are
forced to be rendered with filtering.
Revision A
5-73
Animation Environment
Revision A
5-73
Animation Environment
CHYRON Corporation
CHYRON Corporation
5.5.3
Copying Keyframes
Use the Save/Recall Keyframe functions to make
copies of matchsticks on the Keyframe Timeline.
To copy a matchstick:
•
Select the matchstick you want to copy, either
by pressing on one to highlight it, or turning on
the All Button under the Keyframe Elevator.
•
Press the Save Keyframe Button to save the
selected matchstick(s) into the current elevator
level.
•
Move the selected matchstick in the Keyframe
Timeline. This is so when you recall the saved
matchstick it isn't recalled on top of the original.
•
Press the Recall Keyframe Button. The saved
matchstick appears in the Keyframe Timeline,
identical to the original matchstick.
NOTE
You can also copy keyframes by
copying the entire actor containing
the keyframe(s) to be copied.
Another way to copy keyframe data
using the Next and Prev Buttons in
the Keyframe Distort Popup is
discussed on page 5-79.
Copying Keyframes to Another Actor
You can use the Save/Recall Keyframe functions to
copy keyframes to another actor. This is useful
when you have another actor with its own, different
curve path and you want to copy keyframe data only
into that actor without changing its path.
Animation Environment
5-74
Revision A
Animation Environment
5-74
Revision A
Liberty Artist’s Manual
Liberty Artist’s Manual
To copy keyframes to another actor:
5.5.4
•
Select the matchsticks you want to copy, either
by pressing on one to highlight it, or turning on
the All Button under the Keyframe Elevator.
•
Press the Save Keyframe Button to save the
selected matchstick(s) into the current Keyframe
Elevator level.
•
Press OK to exit the Keyframe Timeline.
•
Edit the actor to which you want to copy the
matchsticks. Press the Edit Keyframe Button to
call up the Keyframe Timeline.
•
Press the Recall Keyframe Button at the same
elevator level that you saved the keyframes to.
The saved keyframe(s) are recalled and appear in
the actor's Keyframe Timeline.
Keyframe Positioning
When creating keyframe positions for a new actor,
the best technique is to add the desired number of
Keyframe Matchsticks to the Keyframe Timeline;
then, on the Canvas, drag the keyframes to their
desired positions. As you drag each keyframe, a
smooth, predictable curve appears between it and
the previous keyframe. You can move keyframes
this way at any time.
NOTE
Keyframes can also be positioned by
moving the corresponding path
points in the Edit Path menu (see
page 5-60). If a jagged (non-smooth)
curve is desired, the Edit Path menu
should be used.
Revision A
5-75
Animation Environment
Revision A
5-75
Animation Environment
CHYRON Corporation
CHYRON Corporation
Holds
Basically, in a new actor whose keyframes haven’t
yet been moved, when you drag a keyframe on the
Canvas, the other keyframes will automatically have
the same position, thus creating a hold.
To make an actor move, then stop and hold to
the end of the actor’s duration:
•
Add a new actor to the Timeline.
•
Press the Edit Keyframe Button. The Keyframe Timeline appears with a beginning and
ending Keyframe Matchstick.
•
Add a Keyframe Matchstick in the middle of
the Keyframe Timeline.
•
Select the first matchstick, and on the Canvas
drag the wireframe to the desired starting
position.
•
Select the second matchstick and on the Canvas drag the wireframe to the desired end
(hold) position.
The third and last keyframe will be in exactly the
same position as the second keyframe, thus automatically creating a hold. Other kinds of holds use the
Duplicate Curve Points Button, described above,
page 5-62.
To add a hold at the beginning
and end of an actor:
Animation Environment
5-76
Revision A
•
Add a new actor to the Timeline.
•
Press the Edit Keyframe Button. The Keyframe Timeline appears with a beginning and
ending Keyframe Matchstick.
Animation Environment
5-76
Revision A
Liberty Artist’s Manual
Liberty Artist’s Manual
•
Add two Keyframe Matchsticks in the middle
of the Keyframe Timeline. This gives a total
of four matchsticks.
•
Select the second matchstick and on the Canvas drag the wireframe to the desired starting
position.
•
Select the third matchstick and on the Canvas
drag the wireframe to the desired end (hold)
position.
•
Run a storyboard to look at the animation.
The animation begins with a hold and ends with
a hold
NOTES
The above procedure also applies to a
hold at the beginning of an actor. In
that case you would move the last
keyframe into position first, then the
middle keyframe. The first keyframe
then takes on the position values of
the middle keyframe.
When a pair of keyframes constitute a
hold at the end of an actor, and you
drag the first keyframe of the pair, the
last keyframe moves as a unit with it.
When a pair of keyframes constitute a
hold at the beginning of an actor, and
you drag the second keyframe of the
pair, the first keyframe moves as a
unit with it.
The hold characteristics of keyframes
apply to the Reference Points of
keyframes, as well as to their
positions.
Revision A
5-77
Animation Environment
Revision A
5-77
Animation Environment
CHYRON Corporation
CHYRON Corporation
Keyframes without Curve Points
If a keyframe has not been manually moved on the
Canvas, and no curve path has been added to the
actor, the keyframes have no curve point and no
curve path. This is the default state of a keyframe.
If a keyframe has no curve point, then its position is
interpolated along the curve path from the two nearest keyframes that do have curve points.
If a keyframe has no curve point, and there are no
keyframes after it with curve points, then the keyframe will assume the position of the nearest previous keyframe with curve points.
When you add a curve path to the actor, or manually
move a keyframe on the Canvas by dragging its
wireframe, the keyframes are automatically assigned
positions on the curve path, as described in the following section.
For Each Path Point a Keyframe
When you use the Add Button in the Curve Popup to
add a point to the curve path, a Keyframe Matchstick is automatically added to the Keyframe Timeline. Likewise, if you delete a point from the curve
path, its corresponding matchstick will be deleted
from the Keyframe Timeline, as long as it is set to
its default values. If the corresponding keyframe
has been given non-default values (for instance, if it
has been manually given a rotation) then it will not
be deleted. The curve point will be deleted and the
matchstick will remain on the timeline with its position interpolated between its neighboring keyframes.
Animation Environment
5-78
Revision A
Animation Environment
5-78
Revision A
Liberty Artist’s Manual
Liberty Artist’s Manual
Keyframes and Path Points
When moving keyframes on the Canvas by dragging
their wireframes, the changing path always stays
smooth throughout its entire length. If you want a
non-smooth curve, you can go into Edit Path and
move path points and their tangents to modify the
curve. However, if you then go back to editing keyframes and move keyframes on the canvas, the path
will smooth out again.
5.5.5
Keyframe Distort Popup
Figure 5-15. Keyframe Distort Popup
To edit a keyframe you must have the Keyframe
Timeline called up. Then you press on a keyframe
matchstick and it becomes highlighted and calls up
the Keyframe Distort Popup. When you edit a keyframe, it appears as a wire-frame on the Canvas, as
when using Paste Distort in the Paint Environment.
The Keyframe Distort Popup is called up, which is
almost identical to the Distort Popup in the Paint
Environment, see page 4-136. In addition, a set of
buttons appears at the right end of the Keyframe
Timeline containing the Keyframe Attribute Buttons.
Revision A
5-79
Animation Environment
Revision A
5-79
Animation Environment
CHYRON Corporation
CHYRON Corporation
When you save an animation on disk, the actors and
the actors' keyframes are saved as part of the animation.
To create and edit keyframes:
•
Press on the keyframe matchstick you want to
edit. The matchstick becomes highlighted. The
bounding rectangle of the actor's image file
appears on the Canvas. The Keyframe Distort
Popup appears (similar to the Distort Popup in
the Paint Environment).
•
Use the functions on the Keyframe Distort
Popup to modify the actor's bounding rectangle on the Canvas.
•
Press the OK button in the Keyframe Distort
Popup to remove the popup and confirm the
modifications you've made.
Keyframe Attribute Buttons
Figure 5-16. Keyframe Attribute Buttons
Animation Environment
5-80
Revision A
Animation Environment
5-80
Revision A
Liberty Artist’s Manual
Liberty Artist’s Manual
At the right of the Keyframe Timeline are a group of
functions controlling the keyframe’s attributes. The
Keyframe Time Window and the Auto Smooth Button. are here. This area also contains the Next and
Prev Buttons, used to move from keyframe to keyframe while you are editing. Also here are several
mode buttons which are either on (highlighted) or
off, including Alpha, Warp, Under, Rotate, Scale,
and Slant. A Preview Button is provided to preview
the current keyframe, as well as an Alpha Slider to
set the transparency level of the keyframe.
Keyframe Time Window
The Keyframe Time Window displays the current
keyframe’s time-code or frame number. You can
press in the window to type in a new number, and
the keyframe will move to the new time setting.
Auto Smooth Button
The Auto Smooth Button is on by default, meaning
that Liberty automatically smooths out, or averages,
animation curve points while you are editing the
keyframes. In some cases this is not desirable - you
want to manually move curve points without automatic smoothing being applied. In such a case, press
the Auto Smooth Button to turn it off.
Next Button
In the Keyframe Distort Popup, you can press the
Next Button to move to the next keyframe in the
actor. Press the Copy Prefix first, then the Next Button, to copy all the attributes (excluding X, Y, Z
position) of the current keyframe into the next keyframe.
Revision A
5-81
Animation Environment
Revision A
5-81
Animation Environment
CHYRON Corporation
CHYRON Corporation
Prev Button
In the Keyframe Distort Popup, you can press the
Prev Button to move to the previous keyframe in the
actor. Press the Copy Prefix first, then the Prev Button, to copy all the attributes (excluding X, Y, Z
position) of the current keyframe into the previous
keyframe.
NOTE
When you copy keyframes with the
Copy Prefix Button, all values are
copied except position.
Keyframe Copy All
This is a feature that allows you to copy a keyframe’s settings, including its position, to another
keyframe. With a Keyframe Matchstick highlighted
for editing, press the Add Prefix Button, then the
Copy Prefix Button, then the Next or Prev Keyframe
Button. This only works for two keyframes with
curve points that are adjacent on the timeline. This
is perhaps the easiest way to create a hold on existing keyframes.
Keyframe Alpha Slider Scale
Press and drag to change the transparency of the
keyframe.
Alpha Attribute Button
When the Alpha Button is on, the transparency of
the keyframe is controlled by the setting of the Keyframe Alpha Slider Scale just above the Alpha Button. When the Alpha Button is off, the keyframe’s
alpha is interpolated from the nearest-neighboring
keyframes with the Alpha Button on.
Animation Environment
5-82
Revision A
Animation Environment
5-82
Revision A
Liberty Artist’s Manual
Liberty Artist’s Manual
You can use the Alpha attribute to perform dissolves
between individual actors (unlike a Switcher actor
dissolve, which dissolves between all layers above it
and all layers below it). Set the alpha of the dissolving actors so that one actor starts with 100% opacity
in its beginning keyframe and animates to 0% opacity. The other actor simultaneously animates its
alpha in reverse.
Warp Attribute Button
When you modify the keyframe using Warp Corners
Mode, this button is highlighted. If this button is off,
the keyframe is interpolated from the previous keyframe to the next keyframe.
The Warp Button is highlighted by default for the
first and last keyframes in a new actor, because there
are no other keyframes to interpolate from or to. For
keyframes that you add later, the Warp Button is off,
but is high-lighted if you change the warp parameters.
Under Attribute Button
When the Under Button is on, the keyframe is displayed under all other actors in the animation.
When the Under Button is off, the keyframe is displayed in its normal layer in the animation. If two
actors have the under prefix on, the one in the higher
layer will appear below the other.
Texture Attribute Button
When you modify the keyframe using Warp Corners
Mode, this button is high-lighted. Texture points are
used to separate the image corners from the warped
corners, and are really only used in Motion Tracking.
Revision A
5-83
Animation Environment
Revision A
5-83
Animation Environment
CHYRON Corporation
CHYRON Corporation
If this button is off, the texture corner points of the
keyframe are interpolated from the previous keyframe to the next keyframe, according to the relative
time of the keyframe.
Rotate Attribute Button
When you change the rotation of the keyframe, the
Rotate Attribute Button turns on. When the Rotate
Attribute Button is on, the keyframe's X, Y, Z rotation is controlled by the rotation functions of the
Keyframe Distort Popup. When it is off, the keyframe’s rotation is interpolated from the nearest
neighboring keyframes having the Rotate button on.
Scale Attribute Button
When you change the size of the keyframe, the Scale
Attribute Button turns on. When the Scale Attribute
Button is on, the keyframe's X, Y size is controlled
by the scaling functions of the Keyframe Distort
Popup. When it is off, the keyframe’s scale is interpolated from the nearest neighboring keyframes
having the Scale button on.
Slant Attribute Button
When you change the slant of the keyframe, the
Slant Attribute Button turns on. When the Slant
Attribute Button is on, the keyframe's slant is controlled by the slant functions of the Keyframe Distort Popup. When it is off, the keyframe’s slant is
interpolated from the nearest neighboring keyframes
having the Slant button on.
Animation Environment
5-84
Revision A
Animation Environment
5-84
Revision A
Liberty Artist’s Manual
Liberty Artist’s Manual
Keyframe Distort Popup
Figure 5-17. Keyframe Distort Popup
NOTE
This section similar to the section on
Paste Distort in the Paint Environment, described on page 4-129.
The Keyframe Distort Popup is the same as the
Paste Distort Popup in the Paint Environment. In
addition to the standard paste functions, the Keyframe Distort Popup has tools for rotation in X, Y,
and Z; scaling in X and Y; mirroring in X and Y;
and slanting in X and Y.
Revision A
5-85
Animation Environment
Revision A
5-85
Animation Environment
CHYRON Corporation
CHYRON Corporation
Sub-Pixel Positioning
Figure 5-18. Keyframe Edit Menu
Keyframe Distort allows extra-precise positioning of
elements being distorted and pasted. An image
being pasted does not have to be deposited pixel-forpixel on the image below it, but with a slight offset
or overlap of the edges of the pixels it’s being pasted
on. Certain filter options (Adaptive) allow user-definition of how fine a “grid” to use to position the element. You can use this feature for animating very
slow-moving elements.
Sub-pixel Button
Press the Sub-pixel Button in the Keyframe Edit
Menu at the left of the Keyframe Timeline to turn it
on/off. When turned on, sub-pixel positioning is
enabled. When turned off, sub-pixel positioning is
disabled.
Animation Environment
5-86
Revision A
Animation Environment
5-86
Revision A
Liberty Artist’s Manual
Liberty Artist’s Manual
When sub-pixel positioning is enabled, the image is
pasted using the 3D distort even if the keyframe is
not rotated, scaled or slanted.
Perspective Transform and Warp Corners
The Keyframe Distort Popup has two distinct modes
that you interact with differently. Perspective
Transform allows you to set up a full three-dimensional world in which to manipulate images. Warp
Corners (which is part of the optional Motion Tracking software) allows you to perform arbitrary perspective mapping between the original image and a
user-definable quadrilateral. In the middle of the
left panel of the Distort Popup is a button labeled
either Transform or Warp. Press this button to toggle back and forth between the two modes. The
wireframe preview on the Canvas displays an XYZ
axis when Perspective Transform is active and displays a cross when Warp Mode is active.
Perspective Transform
Perspective Transform displays a panel in the middle of the Distort Popup. This panel has five main
modes - five different ways to manipulate the image
to be pasted. These modes are Position, Rotation,
Slant, Mirror and Scale. Each mode displays coordinate “handles” to press and drag the wireframe.
Dragging each handle manipulates the image in a
particular way. For instance, when Scale Mode is
highlighted in the Distort Popup, dragging on a handle causes scaling. When Rotation Mode is highlighted in the Distort Popup, dragging on a handle
causes rotation.
Revision A
5-87
Animation Environment
Revision A
5-87
Animation Environment
CHYRON Corporation
CHYRON Corporation
Position Button
You can always re-position the image, regardless of
what other mode is active. To move the image manually, press on its axis (the XYZ icon) and drag it in
the desired direction. If another mode (such as rotation) is active, it becomes temporarily disabled until
you are finished dragging the image.
Press the Position button to enter Position Mode.
Dragging the on-screen handles on the wireframe
causes it to move in X or Y. Dragging the axis
moves the wireframe in any direction.
The Position X and Y windows display the current
coordinates of the image to be pasted. When the
toggle button above the Y window displays the label
“Image,” the coordinates indicate the center of the
image to be pasted. When that button displays the
label “Axis,” the coordinates indicate the XY position of the rotational axis of the image. It is possible to separate the axis from the image center using
the Lock Button (see below).
Axis Lock Button (Global and Local)
Above the Z window is a Lock Button, which, when
turned on, locks the axis to the image. This is Global Mode, because the locked axis and image move
around inside a “world” defined by the Canvas.
When the Lock Button is turned off, the axis is free
of the image and can be moved completely away
from it. This is Local Mode because the axis now
defines local coordinates that the image refers to. If
you turn on the Lock Button again, the image can,
for instance, rotate around the new local position of
the axis. It is generally better to perform Global
moves first, then Local ones.
Animation Environment
5-88
Revision A
Animation Environment
5-88
Revision A
Liberty Artist’s Manual
Liberty Artist’s Manual
Image/Axis Button
Above the Y window is an Image/Axis button.
When the “Lock: button is off, and the Image/Axis
button is in “Image” mode, dragging the on-screen
handles moves the axis independent of the axis.
When the Image/Axis button is in “Axis” mode,
dragging the on-screen handles moves the axis independent of the image. When the Lock button is on,
dragging the on-screen handles positions both the
image and axis together.
Rotation Button
Press on the word “Rotation” to enable Rotation
Mode. Press and drag on the wireframe’s handles to
rotate the image in X, Y, or Z.
Slant Button
Press on the word “Slant” to enable Slant Mode.
Press and drag on the wireframe’s handles to slant
the image in X or Y.
Scale Button
Press on the word “Scale” to enable Scale Mode.
Press and drag on the wireframe’s handles to scale
the image in X and/or Y. Dragging on a corner handle scales the image in both X and Y. Dragging on a
handle in the center of a side scales the image only
in X or Y.
The scale of the image can be represented as a ratio
(1.0 = 100%) or as a size in pixels. Tap on the small
arrow to the right of the word “Scale” to toggle back
and forth between the two modes.
Revision A
5-89
Animation Environment
Revision A
5-89
Animation Environment
CHYRON Corporation
CHYRON Corporation
Scale Lock Button
The Lock Button just above the Mirror Buttons is
the Scale Lock Button. Press it to turn it on or off.
When on, one edge of the image is held stationary
while you drag the opposite edge and scale the
image. If the image has already been rotated, you
may have to unlock global positioning (the Axis
Lock Button) to truly hold an edge in three-dimensional space.
Eye Button
The magenta Eye Button is used to customize the
look of the perspective transformation. This is done
by defining where the center of projection of the
image is located. Press the Eye Button to call up the
Eye Popup, which has three buttons: Image, Axis,
and Fixed. In Image Mode the center of projection
is centered on the middle of the image, regardless of
where the axis may be. In Axis Mode, the center of
projection is centered on the axis. In Fixed Mode,
you choose any point to be the center of projection.
Any center of projection has by default a depth distance from the Canvas equal to the height of the
Canvas. You can adjust this depth in z in all three
Eye modes to create unique distortions. You can use
a large negative depth (“behind” the Canvas) to
achieve a parallel projection. You can set the depth
to the height of each image to provide the same look
for both large and small panning objects.
Fixed mode is useful for animations that need to use
the same center of projection for objects on individual paths.
Experiment to see what kind of look you can
achieve.
Animation Environment
5-90
Revision A
Animation Environment
5-90
Revision A
Liberty Artist’s Manual
Liberty Artist’s Manual
Reset Button
Press the red Reset Button to zero out the current
settings. Reset has “soft” and “hard” modes. If a
distort effect (Rotation, Scale, etc.) is active, pressing the Reset Button resets only the setting of that
effect (soft reset). If no distort effects are active,
pressing Reset resets all the settings in the Distort
Popup, including changes made to the Eye settings.
Warp Corners
When the Transform/Warp Button label says
“Transform”, press it to change to Warp Corners
mode. The current Perspective Transform wireframe is mapped to a Warp Corners wireframe. This
allows you to do touch-up work on the three-dimensional distortion.
The Warp Corners Popup is much simpler than the
Perspective Transform Popup. Warp generates the
entire three-dimensional world simply by interpreting how you deform the wireframe. Dragging a corner of the wireframe allows you to position one
corner at a time to distort (or warp) the wireframe.
Dragging on the center cross allows you to move the
entire wireframe.
NOTE
Warp Corners is part of the Motion
Tracking
software
option,
and
requires
that
the
appropriate
licensing be activated.
Distort Filters
Distort has its own rendering filters, three pre-set
and two user-definable. You should experiment to
determine which ones are best for your applications.
The Point Filter corresponds roughly to the coarse
Revision A
5-91
Animation Environment
Revision A
5-91
Animation Environment
CHYRON Corporation
CHYRON Corporation
filtering, the Bilinear Filter corresponds to medium
filtering, and the Adaptive Filter to fine filtering.
Point Filter is the default - fast, but a bit coarse.
About Filters
Two stages are required to properly reconstruct an
image in 3-D perspective. The first stage is an interpolation (or reconstruction) stage, and the second is
an anti-aliasing stage. If you want to understand filters better, the following will give you a quick
explanation of how filters work. This will also help
you understand the User-defined filters.
Interpolation
There are two methods used to interpolate (or reconstruct) the image from two-dimensional space into
the specified three-dimensional space. The two
methods are (1) nearest neighbour, and (2) linear.
Nearest neighbor chooses pixels based on the nearest sample pixel. This maintains sharpness when the
image is enlarged and reduced. However, when you
scale an element up from small to very large this
method produces blocky results.
Linear interpolation chooses pixels based on the
nearest four pixels. This offers better quality than
nearest neighbor, with slightly greater cost in rendering time. However, smoothing is introduced into
the image, so the image gets a bit soft.
Anti-aliasing
Any interpolation method introduces artifacts,
which must be countered with anti-aliasing techniques. Liberty has two methods: point sampling
and adaptive supersampling.
Animation Environment
5-92
Revision A
Animation Environment
5-92
Revision A
Liberty Artist’s Manual
Liberty Artist’s Manual
Point sampling is the simplest and quickest of the
two. It takes the pixels straight from the interpolation stage with no extra calculations. For objects
that are smoothly-varying (that is, continuous-tone,
like a photographic image) this may be acceptable.
For high-contrast images, this may not do the job.
Adaptive supersampling is more complex. It always
produces the highest-quality render. This method
looks at the image and finds all areas where there are
high-contrast changes. When it finds them, it drops
a subpixel grid on the image and approximates the
pixel based on an average.
The point filter is the only filter that doesn’t do subpixel positioning. The adaptive supersampling filter is very sophisticated. Both user-definable filters
are adaptive supersampling filters.
User-defined Distort Filters
Press the corner button of the Filter Button to bring
up the Adaptive Filter Popup, which allows you to
define thresholds for the different channels (RGBA)
in the image, as well as the resolution for each subpixel grid to be used. The thresholds use defaults
that take into account the human eye’s sensitivity to
the green color channel, as well as stair-stepping
artifacts that appear along the edges of the image.
Press the Level button to specify the number of subpixels to be used in the render. A level of six means
thirty-six subpixels will be used for each pixel in the
original image. More is not necessarily better here,
but more is definitely slower.
Revision A
5-93
Animation Environment
Revision A
5-93
Animation Environment
CHYRON Corporation
CHYRON Corporation
Figure 5-19. User-Defined Distort Filter Popup
Keyframe Distort Preview Modes
Keyframe Distort has three Preview Modes: Wireframe, Final, and Final Plus Alpha. Keyframe Distort always displays a wireframe bounding box,
whatever the preview mode. In Final mode, a fullresolution preview of the image is displayed in the
bounding box. In Final plus Alpha mode, the preview takes the alpha (transparency) of the image
into account as well. You manipulate the wireframe
box in real time on the Canvas.
Change Mode Button
The Change Mode Button toggles through the
modes of the current paste operation. The arrow
keys increment and decrement the co-ordinates of
the current paste operation.
Keypad Controls for Paste Functions
You can use the keypad at the right of the keyboard
to manipulate the paste functions, whether in manual
or popup mode. Refer to Table 5-1.
Animation Environment
5-94
Revision A
Animation Environment
5-94
Revision A
Liberty Artist’s Manual
Liberty Artist’s Manual
The Num Lock must be off for Keypad
Control to function.
NOTE:
Num
Lock
/
*
7
Home
8
9
Pg Up
4
5
6
1
End
2
3
Pg Dn
Figure 5-20. Numeric Keypad
Table 5-1: Numeric Keypad Keys/Functions
Key
/
Turns off final preview of image
*
Turns on final preview of image
7/Home
8/
é
9/page up
ç
4/
5
è
6/
1/END
ê
2/
3/page dn
Revision A
5-95
Animation Environment
Function
Revision A
Decreases Z position, increases Z rotation, decreases X, Y
scale
Increases Y position, increases X rotation, increases Y slant,
increases Y scale
Increases Z position, decreases Y rotation, increases X, Y
scale
Decreases X position, increases Y rotation, decreases X
slant, decreases X scale
Reset
Increases X position, decreases Y rotation, increases X slant,
increases X scale
In place
Decreases Y position, decreases X rotation, decreases Y
slant, decreases Y scale.
Center
5-95
Animation Environment
CHYRON Corporation
CHYRON Corporation
Realtime Paste/Distort Preview on Some Platforms
On platforms that support realtime performance,
previews of Paste Distort/Warp update smoothly
and continuously as the Paste bounding box is
changed (using the Paste Popup, the pen/mouse controls on the Canvas, or keyboard controls). On
slower platforms Final+alpha previews are done in
software, with the previews only being updated
when the controls are released (for example, when
the pen is released from the Canvas controls).
In some cases, even on platforms capable of realtime
performance, in cases of large images or when multiple images are being distorted/warped in Layers,
some previews will be done in software (with the
same interactivity as on slower hardware platforms).
Animation Environment
5-96
Revision A
Animation Environment
5-96
Revision A
Liberty Artist’s Manual
Liberty Artist’s Manual
Colored Dots on Matchsticks
When you change an attribute in a keyframe, a colored dot appears on its matchstick in the Keyframe
Timeline. At a glance you can get a rough idea of
what kinds of transformations a series of keyframes
is going through. The color codes for the colored
dots are as follows, starting at the top of the matchstick and moving down:
•
•
•
•
•
5.6
Light green - transparency
Red - rotation
Yellow - size (scaling)
Purple - slant
Light blue - under
Speed Curve
The Speed Curves in the bottom half of the Keyframe Timeline allow you to vary the speed and
acceleration of keyframe attributes as well as
progress of the actor's image file along the curve
path. Each Speed Curve is a graphic interface for
varying speed and acceleration. Each keyframe
attribute, such as rotation or transparency, or a combination of attributes, can be controlled by a separate
Speed Curve.
A Speed Curve can only redistribute the speed
between two keyframes; it cannot actually change
the speed of the actor. The Duration of the Actor
remains the same, and it still must travel through its
path and keyframeable attributes in the given time.
A Speed Curve can be set to control :
Revision A
5-97
Animation Environment
Revision A
•
Path (spatial position)
•
Alpha
•
Rotation
5-97
Animation Environment
CHYRON Corporation
CHYRON Corporation
•
Reference Point (center of rotation)
•
Scale
•
Slant
•
Warp (Warp Corner Points)
•
Effects (Mask and Write-on Actor keyframe
sliders)
You choose what attribute the Speed Curve controls
by pressing on one of the colored buttons along the
bottom of the Keyframe Timeline.
To choose one of the Speed Curve Buttons:
•
Press on the desired Speed Curve Button. It
becomes highlighted.
The default shape of the Speed Curve is a flat line.
This default gives a constant speed with no acceleration. By pressing and dragging the Speed Nails (the
little red points at either end of the Speed Curve)
you can alter acceleration between the keyframes. A
Speed Nail is automatically added for every keyframe. If you add more Speed Nails to the Speed
Curve, you can press and drag them to create ever
more complex acceleration and speed variables.
A downward slope from left to right applies a deceleration. An upward slope from left to right applies
an acceleration.
Animation Environment
5-98
Revision A
Animation Environment
5-98
Revision A
Liberty Artist’s Manual
Figure 5-21. Keyframe Timeline
Revision A
5-99
Animation Environment
Liberty Artist’s Manual
Liberty Artist’s Manual
Speed Nails
Speed Nails are the red control points on the Speed
Curve. You can add as many Speed Nails as you
like to the Speed Curve. You can press and drag the
Speed Nails up and down, changing the slant of the
top of the Speed Curve, thereby changing the relative acceleration/speed of the actor on its curve path.
Boundary Speed Nails
There is a separate speed curve segment for each
neighboring pair of keyframes. Each such speed
curve segment by default has two speed nails, called
Boundary Speed Nails, located at the same timeline
positions as the keyframes themselves. The Boundary Speed Nails cannot be deleted or moved away
from the ends of the corresponding speed curve segment. Boundary Speed Nails can be moved vertically only. The two Boundary Speed Nails define
the beginning and end speed of the Speed Curve
segments path or attributes.
Moving the Speed Nails
To move a Speed Nail, thus changing the speed/
acceleration of the actor at that point, press on the
Speed Nail you want to move and, holding the pen
down, drag the nail to its desired position. The
Speed Curve changes accordingly.
Speed Nail Tangents
Each Speed Nail has two tangents, represented by
tiny green dots on either side of the Speed Nail.
Boundary Speed Nails have only one tangent.
Pressing and dragging a tangent changes the way the
Speed Curve approaches or leaves its Speed Nail
(just like tangents in the Curve Points functions).
Revision A
5-101
Animation Environment
Revision A
5-101
Animation Environment
CHYRON Corporation
CHYRON Corporation
Speed Curve Color Codes
Some of the Speed Curve Buttons have colored bars
along the bottom of the button. These correspond to
the colored tick marks on the blue Keyframe Matchsticks. A colored mark on a matchstick indicates
that a parameter has been set for that matchstick at
other than its default value. For example, a red tick
mark on a matchstick indicates that the keyframe
has a non-default (manually set) rotation. If the red
tick mark is not present, then the rotation values for
that keyframe are interpolated between the two closest keyframes with set rotations.
•
White dot - Path attribute
•
Light green dot - Alpha attribute
•
Red dots - Rotation & Translation attributes
•
Yellow dot - Scale attribute
•
Purple dot - Slant attribute
•
Light blue dot - Under attribute
NOTE
The Under Button has no Speed
Curve (since Under is either on or off
at each keyframe), but has a button to
show the color of its representative
tick mark - turquoise.
The Warp Speed Curve controls the interpolation of
the warped corners when in Warped Corners Mode
in the 3D Distort panel.
The Effects Speed Curve controls the interpolation
of various actor’s effects, such as shadow, emboss,
Cinefusion, Shapes, Plug-ins, keying, brightness,
ripple, and other Mask Actor effects.
Animation Environment
5-102
Revision A
Animation Environment
5-102
Revision A
Liberty Artist’s Manual
Liberty Artist’s Manual
The lower portion of the Keyframe Edit Menu
(below the green OK button) contains buttons
related to the Speed curve, including buttons to Add
and Delete Speed Nails, and a 5-level elevator and
controls for recalling and saving speed nails. It also
contains in/out buttons for zooming the speed curve
display in and out. These buttons are described in
the following sections.
Speed Curve Elevator
The Speed Curve Elevator has 5 levels, each of
which can store a Speed Curve. Beneath the elevator are three buttons: Save, Swap, and Recall. With
one of the elevator levels highlighted, pressing Save,
then pressing a speed curve on the timeline, causes
the selected Speed Curve to be saved in that elevator
level. Pressing Swap, then pressing a speed curve
on the timeline, exchanges the selected Speed Curve
with the Speed Curve in the current elevator level, if
any. Pressing Recall, then pressing a speed curve on
the timeline, recalls a Speed Curve from the highlighted elevator level, replacing the current Speed
Curve in the Keyframe Timeline.
When you press on a Speed Curve Elevator level, a
prompt appears in the Prompt Window. If the
pressed level is empty, the prompts says, for example: “Level 2 is empty.” If there is a Speed Curve in
that level, the prompt might say: “Speed Curve with
2 Nails.”
You can use the Copy Prefix to copy one level of the
Speed Curve Elevator to another.
Add Speed Nail Button
To add a Speed Nail to the Speed Curve:
•
Revision A
5-103
Animation Environment
Revision A
Press the Add Speed Nail Button.
5-103
Animation Environment
CHYRON Corporation
CHYRON Corporation
•
Press on the Speed Curve where you want the
new Speed Nail to go. The new Speed Nail
appears where you press down and the shape of
the Speed Curve changes accordingly.
Delete Speed Nail Button
To delete a Speed Nail from the Speed Curve:
•
Press on the Delete Speed Nail Button.
•
Press on the Speed Nail you want to delete in
the Speed Curve. The Speed Nail you press on
disappears and the Speed Curve changes accordingly.
Speed Curve Zoom Buttons ( In and Out)
To magnify and unmagnify the Speed Curve, press
the In and Out buttons at the bottom of the Keyframe Edit Menu. This gives you more precise control of the Speed Curve when moving the Speed
Nails. 8 levels of magnification are permitted.
5.7
THE ACTOR POPUPS
This section details the functions of the Actor Popups appearing at the right of the Timeline. The type
of Actor Popup depends on the actor type selected in
the Timeline. The Actor Popups contain the tools
for animating the different types of actors in the
Timeline.
To display an Actor Popup, press on an actor in the
Timeline to select it. The Actor Popup appears at
the right of the Timeline, its type corresponding to
the type of the selected actor.
Animation Environment
5-104
Revision A
Animation Environment
5-104
Revision A
Liberty Artist’s Manual
Liberty Artist’s Manual
Actor Type Button
At the bottom right of any Actor Popup is the Actor
Type Button. It displays the name and color of the
type of actor currently selected in the Timeline.
Pressing the center of the colored window calls up
the Actor Type Popup. Pressing either end of the
colored window moves through the actor types.
You can use this button to change the type of the
currently selected actor. This can be extremely useful. For example, if you have decided to use a single
unchanging image instead of a filmstrip, you need
only change the actor type to Cel, change it from
Multiple to Single, and you can still retain all the
keyframe and path information.
To change the type of the selected actor:
•
Press the Actor Type Button. The Actor Type
Popup appears.
•
Press the button for the actor type you want to
change to. The Actor Type Popup disappears
and the selected actor in the Timeline changes
color to its new type.
File Button
Press on the text window labeled “File” to bring up
the File Popup. You can then specify a file for the
actor.
Recall Cel Button
Press to Recall the actor’s image file into the Canvas.
Revision A
5-105
Animation Environment
Revision A
5-105
Animation Environment
CHYRON Corporation
CHYRON Corporation
Edit Path Button
Press to call up the Curve Path Popup. You can use
this popup to create or edit a curve path for the actor.
Edit Keyframe Button
Press to call up the Keyframe Timeline to edit the
actor’s keyframe attributes.
Actor Browse Window
This box shows a thumbnail sketch of the image-file
associated with the currently selected actor.
5.7.1
Cel Actor Popup
The Cel Actor, color-coded green, is the most used
of the actor types. There are two different kinds of
Cel Actors: Single Cel Actors and Multiple Cel
Actors.
The Cel Actor can contain a curve path for the
image to follow during the animation, as well as
keyframes for DVE-type rotation in x, y, and z.
These keyframes also control attributes such as
Transparency, Scale, Slant, and Under.
Animation Environment
5-106
Revision A
Animation Environment
5-106
Revision A
Liberty Artist’s Manual
Liberty Artist’s Manual
Single Cel Actor
Figure 5-22. Cel Actor Popup (Single)
The Single Cel Actor is simple and easy to use. Use
it when you want to animate one picture element
stored as an image file on disk. A Single Cel Actor
calls a single image file from disk and displays it in
the animation.
To create a Single Cel Actor you need only specify
its image file using the File Button. Then, if necessary, you can set up a path or keyframes.
Revision A
5-107
Animation Environment
Revision A
5-107
Animation Environment
CHYRON Corporation
CHYRON Corporation
Multiple Cel Actor
Figure 5-23. Cel Actor Popup (Multiple)
The Multiple Cel Actor is the second kind of Cel
Actor. It looks the same as a Single Cel Actor
except that in the Cel Actor Popup at the right is a
button labeled Multiple (instead of Single, as you
might expect!) . It uses a sequence of images
instead of just one. It can use filmstrips (a sequence
of numbered files; i.e. pic1, pic2, pic3) or unnumbered files, or a combination of the two. You specify the duration that each file is displayed on the
screen, and whether the Actor holds on the last
frame or cycles through the sequence again and
again throughout the animation.
Inserting a Sequence into the Multiple Cel Actor
There are two different ways to create a sequence of
files for the Multiple Cel Actor to follow. You can
use the two different methods in tandem, but these
step-by-step procedures take you all the way
through creating a sequence in each one.
Animation Environment
5-108
Revision A
Animation Environment
5-108
Revision A
Liberty Artist’s Manual
Liberty Artist’s Manual
NOTE
The Multiple Cel Actor accomplishes
the same effects as combining the
Cycle and the Filmstrip actors, which
are discussed next after this section.
In this discussion the term “filmstrip”
refers to a sequence of files with the
same filename and continuous
numbers, like pic1, pic2, pic3, etc.
Using the Filmstrip File Menu
To create a sequence of files in Multiple using
the Filmstrip File Menu (Figure 5-22):
Revision A
5-109
Animation Environment
Revision A
•
Add a Cel Actor into the Timeline.
•
Press on the word Single in the lower right
corner of the Cel Actor Popup. The Multiple
Cel Popup appears.
•
Press on the File Window. The File Popup
appears.
5-109
Animation Environment
Liberty Artist’s Manual
Figure 5-24. Filmstrip File Menu (in the Full-screen File Menu)
Revision A
5-111
Animation Environment
Liberty Artist’s Manual
Revision A
5-113
Animation Environment
Liberty Artist’s Manual
Revision A
•
Press on the button labeled “film” on the File
Popup. It is next to the “full” button used to
access the Full-Screen File Menu. The FullScreen File Menu appears, with a new popup at
the bottom. This is the Filmstrip File Menu. The
Insert Mode Button should be on.
•
Make sure Filmstrip Sort Mode is on. If it
isn’t, you can turn it on by pressing the Sort Button and then turning on the Filmstrip Button.
•
Press on a browse image of a single file or a
filmstrip in the full-screen file menu. The filename turns blue.
•
Press in the empty strip in the Filmstrip File
Menu. A browse image of the file appears in the
Multiple Cel File Popup. The original (in the
Full-Screen File Menu) does not disappear.
•
Repeat Step 6 and 7 until you have several
browse images in the Filmstrip File Menu.
Liberty reads the sequence from left to right.
Use the arrow buttons on the right of the popup
to scroll right, and the arrow buttons on the left
to scroll left. If, instead of pressing on an empty
space in the popup, you press on a browse image
already in the popup, the new image is inserted
in front of the image you press on.
•
Now you may edit the sequence you have created. To Replace files in the sequence, press the
Replace Mode Button to turn it on. When
Replace Mode is on, you must press on a browse
image already in the sequence, and it is replaced
by the new image. To remove files from the
sequence, press on the Delete Mode Button to
turn it on. When Delete Mode is on, pressing on
a file in the sequence removes it from the Filmstrip File Menu.
5-113
Animation Environment
CHYRON Corporation
CHYRON Corporation
•
When you are finished, press the OK Button
at the top of the Full-Screen File Menu. The
Full-Screen File Popup disappears.
The Filmstrip File Menu is also discussed on page 5124 .
Figure 5-25. Cel Actor Popup (Multiple)
As mentioned previously, a multiple cel actor contains one or more elements (steps); each of which is
an image file or numbered sequence of image files
(filmstrip).
In the Multiple popup, at the right of the Timeline,
the File Window displays the filename of one of the
elements in the sequence. The Num Button displays
the number of this element. The second number in
the Num Button window is the number of total elements in the sequence (filmstrips are counted as one
element, though they include many sequentially
numbered files).
Animation Environment
5-114
Revision A
Animation Environment
5-114
Revision A
Liberty Artist’s Manual
Liberty Artist’s Manual
To create a sequence of files in Multiple using
the Num Button and the File Button:
•
11. Add a Cel Actor into the Timeline.
•
12. Press on the word Single in the lower right
corner of the Cel Actor Popup. The Multiple Actor Popup appears.
•
13. Press in the window of the File Button.
The File Popup appears.
•
4.
Select a file from the File Popup by pressing
on or typing its filename. The File Popup
disappears and the filename appears in the File
Button. The chosen image file is assigned to
step 1 of the cycle.
•
14. Press the Insert Button to increase by one
the displayed number in the Number Button, for example, "2 of 2."
•
15. Press the File Button and select from the
File Popup the next image file to be used.
The File Popup disappears and the filename
appears in the File Button. The chosen
image file is assigned to step 2 of the cycle.
Repeat steps 5 and 6 until you have entered all the
desired image files.
Pressing the Recall Cel Button recalls from disk the
image file of the step currently displayed in the Num
Button.
Revision A
5-115
Animation Environment
Revision A
5-115
Animation Environment
CHYRON Corporation
CHYRON Corporation
To change the image file of one of the steps of
the cycle:
•
Repeatedly press the top/bottom half of the
Num label to display the step whose image file
you want to change, for example, 3 of 10. You
can also press directly on the number window
and type in a new number.
•
Press the window in the File Button. The File
Popup appears.
•
Select a picture file from the File Popup by
pressing on or typing its filename. The filename appears in the File Button. This image (or
filmstrip) is now assigned to the current step of
the cycle.
Multiple Cel File Button
Displays the current step (image file or filmstrip) in
the cycle.
Multiple Cel In and Out Number Windows
The In and Out Buttons treat a step in the cycle as a
sequence of numbered files. For the filmstrips
(sequentially numbered files), these designate the
numbers that the filmstrip starts and ends with. The
In number is the number of the first file in the filmstrip, and the Out number is the number after the last
file in the filmstrip. Using these numbers you can
designate a section of the filmstrip, instead of beginning at the very beginning and ending at the very
end (which is the default). If the file has a number in
it, but is only a single file, then the In number should
be the number of the file, and the Out number should
be one more than that.
Animation Environment
5-116
Revision A
Animation Environment
5-116
Revision A
Liberty Artist’s Manual
Liberty Artist’s Manual
Multiple Cel Num Button
Displays the number of the current step in the cycle
and the number of total steps (files or filmstrips) in
the sequence. A filmstrip is displayed as one step in
the sequence, even though it may contain many
files. The current file number designates the current
step (file or filmstrip), which is displayed in the
Actor Popup Browse Window, which will be
recalled when you press Recall Cel, and whose filename is displayed in the File Button.
The current step number can be incremented by
pressing on the top half of the label, or decremented
by pressing in the bottom half of the label.
Multiple Cel Insert Button
Press to insert a step into the sequence, increasing
the total number of steps by one. Inserts after the
current number.
Multiple Cel Delete Button
Press to delete the current step . The total number of
steps decreases by one.
Multiple Cel Duplicate Button (Dup)
This button displays the number of fields to repeat
each step of the sequence. This means that each
image in the cycle is recorded for that number of
consecutive fields (not frames!) before going to the
next image in the sequence. The default is 2 fields
(1 frame) per step. You can use odd or even numbers
of fields.
To change the number of fields recorded for each
step of the sequence, press directly on the Dups
Window and type in a new number.
Revision A
5-117
Animation Environment
Revision A
5-117
Animation Environment
CHYRON Corporation
CHYRON Corporation
Multiple Cel Swing Button
Press to turn on/off. If turned on, the sequence plays
to the end, and then plays in reverse to the beginning. If the Swing Button is on, a Multiple Cel
Actor would take twice as long to complete a cycle,
once forward and once backward.
Multiple Cel Once Button
Press to turn on/off. If turned on, the sequence plays
once through, then holds on the last step, regardless
of the duration of the actor.
If neither the Multiple Cel Swing Button nor the
Multiple Cel Once Button are on, then the sequence
will play as many times as the duration of the actor
allows.
Rotation and Scaling of
Actors Larger Than the Screen
You can include actors created at a higher resolution
than the display screen. This means that they are
larger than the screen you are rendering animation
in. These larger actors include Cel Actors, Mask
Actors, and Switcher Actors. A Temp or Mask
Buffer large enough to hold the larger file is temporarily allocated to do this. You’ll need sufficient
RAM to support this.
5.7.2
Motion Stabilization
Motion Stabilization is part of the Motion Tracking
software option. If this option has not been
installed, the Stabilize Button will be grayed out.
Motion Stabilization allows the user to automatically correct for unwanted positional movement in a
sequence of image frames. Before stabilizing a
Animation Environment
5-118
Revision A
Animation Environment
5-118
Revision A
Liberty Artist’s Manual
Liberty Artist’s Manual
sequence of frames, the user must choose a 'reference frame' from the sequence, along with a small
rectangle of pixels in it that should remain stable
throughout the sequence. Stabilization works by
searching for this rectangle of pixels in each frame
in the sequence. Once the pixels are located, the
frame is pasted so that the pixels' spatial position is
the same as in the reference frame. This corrects for
unwanted positional motion in the sequence.
Stabilize Button
Press the Stabilize Button to turn Motion Stabilization on or off. When the Stabilize Button is turned
on, it activates several buttons associated with it.
The details of Motion Stabilization for a sequence of
frames can be found on page 5-220.
5.7.3
Cycle Actor Popup
The Cycle actor is like a Multiple Cel actor except
that it doesn’t use filmstrips very easily. They can
still be added into a sequence in the Multiple Cel
File Popup, but there are no In and Out Buttons to
control them with. If a sequence of files has no filmstrips in it, then using a Cycle Actor instead of a Cel
Actor is useful, because on the Timeline you can
identify a Cycle Actor by its color, while Single and
Multiple Cel Actors look the same.
Like most other actor types, the Cycle Actor can
contain a curve path for the series of images to follow during the animation, as well as keyframes for
DVE-type rotation in x, y, and z. These keyframes
also control attributes such as Transparency, Scale,
Slant, Mirror, and Under.
Revision A
5-119
Animation Environment
Revision A
5-119
Animation Environment
CHYRON Corporation
CHYRON Corporation
Use the Edit Path Button to create a curve path for
the file to follow (see page 5-60). Use the Edit Keyframe Button to create and edit the actor's keyframes. Use the Preview (page 5-223) or Storyboard
functions to preview the animation you've created.
Figure 5-26. Cycle Actor Popup
5.7.4
Filmstrip Actor Popup
The Filmstrip actor is similar to the Multiple Cel
Actor, except that it must use a sequence of numbered files. The Filmstrip Actor can also grab its
images from a recording device (such as a DDR or
VTR) instead of from the hard disk. The Filmstrip
Actor only goes forward through its files, and there
is no Filmstrip Swing Button.
Animation Environment
5-120
Revision A
Animation Environment
5-120
Revision A
Liberty Artist’s Manual
Liberty Artist’s Manual
The Filmstrip Actor can contain a curve path for the
series of images to follow during the animation, as
well as keyframes for DVE-type rotation in x, y, and
z. These keyframes also control attributes such as
Transparency, Scale, Slant, Mirror, and Under.
Figure 5-27. Filmstrip Actor Popup
To create a Filmstrip actor:
Revision A
5-121
Animation Environment
Revision A
•
Add a Filmstrip actor to the Timeline. The
new actor is selected in the Timeline See adding
actors, page 5-104.
•
Press the File Button. The File Popup appears.
•
Select a picture file from the File Popup by
pressing on or typing its filename. The filename appears in the File Button. The filename
must be one of a series of files with the same
name and sequential numbers, such as pic1, pic2,
pic3, etc. The filename may be any of the files in
the sequence, not necessarily the first.
5-121
Animation Environment
CHYRON Corporation
CHYRON Corporation
The current file displayed in the File Window of the
Filmstrip Actor Popup can be recalled with the
Recall Cel Button.
Filmstrip Source Buttons
Press one of these buttons to specify a source for the
files of the Filmstrip Actor. Only one of these buttons can be on at a time.
Filmstrip Hdisk Button
When turned on, the images come from the hard
disk, using the name entered in the File button.
Filmstrip Src VTR Button
Press to turn on. If turned on, images are grabbed
from the VTR configured as the Src (source) VTR.
Filmstrip Tar VTR Button
Press to turn on. If turned on, images are grabbed
from the VTR configured as the Tar (target) VTR.
Extract Button - De-interlacing
The extract functions allow you to de-interface
video frames as they are input to Liberty in a Filmstrip Actor. Press the Extract Button to display the
de-interlacing controls on the De-interfacing Popup.
Animation Environment
5-122
Revision A
Animation Environment
5-122
Revision A
Liberty Artist’s Manual
Liberty Artist’s Manual
De-interlacing Popup
Figure 5-28. De-interlacing Popup
This popup has two sets of identical controls, one for
field 1 and one for field 2. The field 1 buttons control the render of the first field; the field 2 buttons
control the render of the second field in the same
way.
Use Even
When high-lighted, extracts and uses only the even
field from the input source’s current frame.
Use Odd
When high-lighted, extracts and uses only the odd
field from the input source’s current frame.
Off
When high-lighted, uses the entire current frame, as
is, from the input source.
Reset
Resets both fields to Off.
Thus you can set the Filmstrip Actor to alternately
grab even and odd fields from the input stream. This
is useful when you are using the Filmstrip Actor to
re-position or rotate the incoming video, because
interlaced images often create unwanted artifacts in
such cases. It is also useful when the incoming
Revision A
5-123
Animation Environment
Revision A
5-123
Animation Environment
CHYRON Corporation
CHYRON Corporation
images are of a different resolution than the Canvas,
because the re-scaling that takes place often creates
unwanted artifacts.
Hints About Field Order
Different devices have different field orderings.
Most Digital Disk Recorders are odd field first,
meaning than the even field was rendered roughly 1/
60th of a second (for NTSC) after the odd field in
time. The even field is contained in the even numbered scanlines while the odd field is in the odd
numbered ones (in otherwords, the image is interlaced (not quite in the same meaning as GIF interlacing).
If you’re pulling images off a DDR, you probably
would extract with odd for Field 1 and even for
Field 2. That would preserve the motion in each
field correctly. If you did not, however, want the
resulting images to be interlaced, you could use odd
field for both Fields 1 and 2. That way, each from
that got rendered would contain the corresponding
odd field from the DDR in both rendered fields (the
image would have lower resolution, since each scanline would be replicated twice). The image wouldn’t
be interlaced, however. For some applications, the
interlacing is undesirable.
Filmstrip File Button
If the images come from hard disk, this button's window displays the filename.
Filmstrip In Button
This button displays the number of the first file to be
used in the Filmstrip Actor or the frame number or
timecode of the first image to be grabbed from a
recording device.
Animation Environment
5-124
Revision A
Animation Environment
5-124
Revision A
Liberty Artist’s Manual
Liberty Artist’s Manual
To change the number, press in the window of the
button and type in a new number. Or press the top
part of the "In" label to increase the number by one;
press the lower part of the "In" label to decrease the
number by one.
Filmstrip Out Button
This button displays the number of the last file, plus
one, to be used in the Filmstrip Actor. The Out
number is the In number plus the duration; the duration is the Out number minus the In number.
To use a recording device as a source for the
files of a Filmstrip actor:
•
Turn on the Timecode Button in the Playback
Menu at the upper left of the Animation Environment. You can optionally use Frame Mode
(Timecode Button off) if using a disk recorder as
the source device.
•
Press the Src VTR or Tar VTR Button to
choose a configured device as the source
device.
•
Press in the window of the Filmstrip In Button
and type the timecode number of the first file
to be used. You can separate numbers with
spaces rather than colons. For example, typing 4
2 28 15 yields a timecode of 04:02:28:15.
The number in the window of the Out Button is set
automatically, adding the Filmstrip Actor’s duration
to the In number. Entering a new number in the
window of the Out Button automatically resets the
number in the In Button (Out minus duration).
Revision A
5-125
Animation Environment
Revision A
5-125
Animation Environment
CHYRON Corporation
CHYRON Corporation
You can increment the In/Out numbers by pressing
repeatedly on the top half of the In/Out labels. You
can decrement the In/Out numbers by pressing on
the lower half of the In/Out labels.
Filmstrip Speed Slider
Figure 5-29. Filmstrip Actor Popup
Press and drag the Filmstrip Speed Slider to give a
fixed playback speed to the input stream. It allows
you to specify a fractional number between -10 and
+10 (the number can be, for example, 2.377564).
This number is the number of input source frames
per rendered frame. The default is 1, meaning one
input source frame for every rendered frame. The
entire input stream will be given this fixed playback
speed. You can also press on the numerical window
to type in a speed setting. The following are examples of speed values:
2
Animation Environment
5-126
Revision A
Animation Environment
Renders the Filmstrip Actor twice as fast
as normal (every other source frame is
skipped).
5-126
Revision A
Liberty Artist’s Manual
Liberty Artist’s Manual
0.5
Renders the Filmstrip Actor at half speed
(every source frame is used for two rendered frames).
-1
Renders the Filmstrip Actor backwards
at normal speed. For this to work, the inpoint must be set to a timecode/frame
number towards the middle or end of the
source stream (the actor always starts at
this point).
Dynamic Speed Control - Speed Keyframe Button
Figure 5-30. Filmstrip Keyframe Popup
Press on the Keyframe Button (inset in the Speed
Slider) to high-light it. This turns off the Speed
Slider’s fixed setting and allows you to assign
dynamic, keyframed settings to the playback speed.
Now, when this button is high-lighted, when you
press the Edit Keyframe Button and edit a keyframe,
the popup displays a Speed Slider for each keyframe. Press and drag the slider to set a different
Revision A
5-127
Animation Environment
Revision A
5-127
Animation Environment
CHYRON Corporation
CHYRON Corporation
playback speed at each keyframe. Dynamic speed
changes between keyframes are interpolated fractionally, frame-by-frame.
Motion Blur and Trail Off
As above, when the Speed Slider Keyframe Button
is high-lighted, each keyframe’s popup displays
Motion Blur and Trail Off controls. The default setting is zero, or no motion blur.
Blur Before
Press and drag the Blur Before slider to set how
many frames are to be blurred, or blended, with the
current keyframe before the current keyframe.
Blur After
Press and drag the Blur After slider to set how many
frames are to be blurred, or blended, with the current
keyframe after the current keyframe.
Trail Off
Press either Trail Off Button to high-light it, causing
the blended frames further away from the current
keyframe to be progressively more transparent, giving a gradual “trailing-off” quality to the before or
after motion blur.
Animation Environment
5-128
Revision A
Animation Environment
5-128
Revision A
Liberty Artist’s Manual
Liberty Artist’s Manual
5.7.5
Text Actor Popup
Figure 5-31. Text Actor Popup
The Text Actor is similar to the Cel Actor except
that it animates a vector text file instead of an image
file from the disk. Its main advantage is that the text
file is re-rendered for each field or frame of the animation, so that even when it is scaled up it is displayed at full resolution. The Text Actor also can
animate the color of the rendered text. The Text
Actor can contain a curve path for the text to follow
during the animation, as well as keyframes for DVEtype rotation in x, y, and z. These keyframes also
control attributes such as Transparency, Scale, Slant,
Mirror, and Under.
To create a Text actor:
•
Revision A
5-129
Animation Environment
Revision A
Add a Text actor to the Timeline. The new
actor is selected in the Timeline. See adding
actors, page 5-51.
5-129
Animation Environment
CHYRON Corporation
CHYRON Corporation
•
Press the Edit Button in the Text Actor Popup
at the right of the Timeline. The Text Panel
appears along with a wire-frame of the current
text, if any, on the Canvas. The Text Panel
called up by the Text actor is identical to the Text
Panel in the Paint Environment, except that the
Render Button is replaced by an OK Button.
•
Create or edit a text file using the Text Functions in the Text Panel.
•
Press the OK Button in the Text Panel. The
Text Panel disappears. The text file you created
or edited is now in the Text Actor. You can save
the animation with the Text Actor to disk, and
later when you recall it the data in the actor's text
file is recalled as well.
Text Color Button
The Text Color Button allows you to choose two
colors in which to display the animating text, one
beginning the animation and one ending it, with a
smooth dissolve between the two.
To animate the color of the Text actor:
Animation Environment
5-130
Revision A
•
Press the left color box in the Text Color Button. The Color Palette (identical to the Palette in
the Paint Environment) appears at the upper left
of the Animation Environment.
•
Choose/modify a palette box for the beginning
text color.
•
Press again the left color box in the Text Color
Button. The Color Palette disappears. The
beginning text color is now set.
•
Repeat steps 1 through 3 using the right Color
Box in the Text Color Button. The ending text
color is now set.
Animation Environment
5-130
Revision A
Liberty Artist’s Manual
Liberty Artist’s Manual
5.7.6
Write-On Actor Popup
Figure 5-32. Write-On Actor Popup
The Write-on actor allows you to animate a paint
brush along a curve path to create write-on animations. You can use any of the four Brush Modes, the
same as in the Paint Environment. You can "nest"
Write-on actors to create complex brush effects.
You can create a Cycle actor to run along with a
Write-on actor to create "burn-in" effects.
To create a Write-on Actor:
Revision A
5-131
Animation Environment
Revision A
•
Add a Write-on Actor to the Timeline. The
new actor is selected in the Timeline. See adding
actors, page 5-51.
•
Press the Edit Path Button and create a curve
path for the write-on animation.
•
In the Write-on Actor Popup, press on the
arrows next to the Text Window in the Brush
Mode Button to choose a brush mode (Prog,
Solid, Air, Custom) or press on the Text Win5-131
Animation Environment
CHYRON Corporation
CHYRON Corporation
dow itself to call up a popup with all the brush
modes. The Brush Mode Button you press displays in the Text Window.
•
Press on the arrows next to the Text Window
in the Paint Mode button to choose a paint
mode (see Figure 5-34), or press on the Text
Window itself to call up a popup with all the
brush modes. The Paint Mode Button you press
displays in the Text Window. If you choose
Paste, Tint, Noise, Hue, Pick, or Reveal, you can
give the Write-on a file to use in the File Window - this takes the place of the file in the Temp
Buffer that would be normally used in these
modes in the Paint Environment.
Write-on Color Button
The Write-on Color Button allows you to choose
two colors for display of the write-on, one beginning
the write-on and one ending it, with a smooth gradated ramp between the two.
To set the color of the Write-on actor:
Animation Environment
5-132
Revision A
•
Press the left color box in the Write-on Color
Button. The Color Palette (identical to the Palette in the Paint Environment) appears at the
upper left of the Animation Environment.
•
Choose/modify a palette box for the beginning
write-on color.
•
Press again the left color box in the Write-on
Color Button. The Color Palette disappears.
The beginning write-on color is now set.
•
Repeat steps 1 through 3 using the right Color
Box in the Write-on Color Button. The ending
write-on color is now set.
Animation Environment
5-132
Revision A
Liberty Artist’s Manual
Liberty Artist’s Manual
Brush Mode Button
Figure 5-33. Brush Modes Popup
Allows you to use one of the four Brush Modes to
make the write-on animation. The Brush Mode Button has a text window showing the current Brush
mode. Press on the text window to bring up a popup
with the four Brush modes to choose from. Only one
can be chosen at a time. When one of the modes is
chosen, the write-on animation uses the current
brush in that mode. If you want to change one of the
diagrammed Programmed Brushes, or a userdefined Custom Brush, you must go to the Paint
Environment. You cannot have two different userdefined or programmed brushes in the same animation.
Write-on Paint Mode Button
Figure 5-34. Paint Modes Popup
The Paint Mode Button has a text window showing
the current paint mode. Press on the text window to
bring up a popup with all the available modes to
choose from. Only one can be selected at a time. All
Revision A
5-133
Animation Environment
Revision A
5-133
Animation Environment
CHYRON Corporation
CHYRON Corporation
modes except Normal, Smear, Warp, Blur, Sharpen,
Emboss, Burn, Dodge, Saturate, and De-saturate
require an image in the File Button to work on.
Smear, Warp, Blur, Sharpen, Emboss, Burn, Dodge,
Saturate, and De-saturate modify the rendered result
of the layers below the write-on actor, while Normal
Mode just paints with the selected colors.
Write-on Actors have the following choice of Paint
modes: Normal, Smear, Warp, Blur, Sharpen,
Emboss, Burn, Dodge, Saturate, De-Saturate,
Reveal, Tint, Hue-Tint, Paste, Pick, Noise-luminance, and Noise-color.
File Button
Press on the File Button on the Write-on Actor
Popup to choose a source file for the modes that
require it.
Animation Environment
5-134
Revision A
Animation Environment
5-134
Revision A
Liberty Artist’s Manual
Liberty Artist’s Manual
Write-On Actor Keyframe Popup
When the Write-on Edit Keyframe Button is activated, an additional write-on actor keyframe popup
appears.
Figure 5-35. Write-on Actor Keyframe Popup
The Write-on Size Slider (The left slider)
Press and drag to set the size of the brush. The range
is 1 to 127 pixels, the same as in the Paint Environment.
The Write-on Gap Slider (The right slider)
Press and drag to change the gap between brush
"place-downs." The gap is expressed in percentage
of the diameter of the brush. At 100 the brushes are
placed edge-to-edge. At more than 100 there is a
gap between brushes. At less than 100 the brushes
overlap. Default is the minimum gap, 1.
Revision A
5-135
Animation Environment
Revision A
5-135
Animation Environment
CHYRON Corporation
CHYRON Corporation
Nesting Write-on Actors
After creating a Write-on actor, make copies of it
and change the size and mode of the brushes, putting
the smallest brush in the top-most Write-on actor.
Thus all the curve paths of the actors are identical,
but the different brushes can create "stacked" effects
more complex than a single Write-on actor. You
can create a Write-on shadow by slightly offsetting
the curve of a copied Write-on actor and resetting its
color and transparency appropriately.
"Burning-in" a Write-on Animation
Make a copy of a Write-on actor and change it to a
Cycle actor (page 5-46). Go into the Paint Environment and create a series of image files - with, say,
four or five steps - representing a sparkling or glowing effect. After saving these to disk, go back into
Animation and assign them to the Cycle actor. The
resulting animation will move the sparkle or glow
cycle along the same curve path as the Write-on,
giving the effect that the Write-on is "burning" itself
in.
Animation Environment
5-136
Revision A
Animation Environment
5-136
Revision A
Liberty Artist’s Manual
Liberty Artist’s Manual
5.7.7
Morph Actor Popup
Figure 5-36. Morph Actor Popup
Use the Morph Actor Popup at the right of the Timeline to choose whether to morph a single image or
between two images and to access the Triangle
Morph and Line Morph Popups. Once you've edited
a Morph Actor as Triangle Morph, you can't change
it later to Line Morph (and vice-versa). You must
add a new Morph Actor to the Timeline.
Morph Single Button
Press to turn on. When this mode is on, the morph is
performed only on the image file of the actor below
the Morph Actor. It is distorted instead of being
morphed into something else.
Revision A
5-137
Animation Environment
Revision A
5-137
Animation Environment
CHYRON Corporation
CHYRON Corporation
Morph Between Button
Press to turn on. When this mode is on, the morph is
performed between two images, starting with the
actor below the Morph Actor on the Timeline and
morphing to the actor above the Morph Actor.
Morph Reverse Button
Press to turn on/off. When on, the morph is performed in reverse. If Morph Between is on, the
morph starts with the actor above the Morph Actor
and morphs to the actor below the Morph Actor. If
Morph Single is on, the distortion starts with the last
keyframe and ends with the first one.
Morph Recall Canvas Button
Press to recall a file to the Canvas. The File Popup
appears, and you press on or type a filename. The
image file is recalled to the Canvas. Allows you to
quickly to recall and look at files from the disk for
possible inclusion in a morph.
Morph Swap Temp/Canv Button
Press to swap the Canvas and the Temp. The image
on the Canvas goes to the Temp and the image from
the Temp is recalled to the Canvas. You can use the
Morph Recall Canvas Button (see above) to recall
an image file to Canvas, swap it to the Temp, and
then recall another image file to Canvas. This is a
way to load two image files for a morph and quickly
swap back and forth between them to compare them.
Animation Environment
5-138
Revision A
Animation Environment
5-138
Revision A
Liberty Artist’s Manual
Liberty Artist’s Manual
Morph Edit Triangles Button
Figure 5-37. Triangle Morph
Press to call up the Triangle Morph Popup. The
popup is the same as the Triangle Morph Popup in
the Paint Environment. A button-by-button description of the Triangle Morph Popup follows below.
Triangle Morph Add Points Button
Press to add control points to the Canvas. (You
must specify a bounding box first. Press down once
to set the first corner, and then without dragging,
move the cursor to the diagonally opposite corner
and press again.) Adding a point connects the new
point to other points (or to corners of the bounding
box), forming triangular sections, creating a grid
that controls the morph. You can use the Move Button while adding points to reposition points you
have just added. Unlike Line Morph, you cannot
Revision A
5-139
Animation Environment
Revision A
5-139
Animation Environment
CHYRON Corporation
CHYRON Corporation
add or delete points after you press the Lock Button.
Press the Lock Button again or another Triangle
Morph Popup button to terminate the add function.
Triangle Morph Delete Points Button
Press to delete control points from the Canvas. Then
on the Canvas press on a point to delete it. The point
disappears along with the lines connecting it to other
points. You cannot delete points after Lock is
pressed. Press the Lock Button again or another Triangle Morph Popup button to terminate the delete
function.
Triangle Morph Move Points Button
Press to move control points on the Canvas. On the
Canvas press on and drag a point. The point moves,
along with the lines connecting it to other points.
You are prevented from moving a point across a
connecting line. You can move points in any keyframe of the morph at any time, even after pressing
the Lock Button. Press the Lock Button again or
another Triangle Morph Popup button to terminate
the Move function.
Triangle Morph Color Button (corner of Move)
Press to switch the color of the line segments. Use
this when it's difficult to see the line segments on the
Canvas background. The default is red for the line
segments which become yellow when they are
selected. Press the Color Button to reverse this.
Triangle Morph Add Keyframe Button
To add a keyframe to the Morph Slider:
•
Animation Environment
5-140
Revision A
Move the yellow pointer to the place on the
slider where you want to add a keyframe.
Animation Environment
5-140
Revision A
Liberty Artist’s Manual
Liberty Artist’s Manual
•
Press the Add Keyframe Button. A blue keyframe marker appears in the Morph Slider above
the yellow pointer. After adding a keyframe, use
the Move Button to move points on the Canvas
to define it. You can move points in any keyframe of the morph at any time.
The number of keyframes you can have is limited by
the space along the slider. If you try to add a keyframe too close to an existing keyframe, you are
prompted: "Cannot be too close to another keyframe." Move the yellow pointer and try again.
Triangle Morph Copy Keyframe Button
To copy the control points from one keyframe
to another:
•
In the slider, position the yellow pointer
beneath the blue keyframe marker you want
to copy from.
•
Press the Copy Button. You are prompted:
"Please specify keyframe to copy to."
If the yellow pointer is not beneath a keyframe,
you are prompted: "Please specify keyframe to
copy from." Move the yellow pointer under an
existing blue keyframe marker and press the
Copy Button again.
•
Press below another blue keyframe marker on
the Triangle Morph Slider. The data from the
first keyframe is copied into the indicated keyframe.
NOTE
Do not press directly on the blue
keyframe marker itself, but under it on
the same line as the yellow pointer. A
successful copy prompts: "Keyframe
copied successfully." If you try to
Revision A
5-141
Animation Environment
Revision A
5-141
Animation Environment
CHYRON Corporation
CHYRON Corporation
press directly on a blue keyframe
marker, you are prompted: "Cannot
copy to source keyframe."
Triangle Morph Delete Keyframe Button
To delete a keyframe marker:
•
Position the yellow pointer beneath the blue keyframe marker you want to delete.
•
Press the Delete Keyframe Button. The blue
keyframe marker disappears from the slider.
Triangle Morph Reset Button
Press twice quickly to reset the morph functions.
All keyframes, including points, connecting lines,
and the bounding box are deleted. You are
prompted: "Restarted MORPH. Please specify
bounding box."
To set the bounding box, press once to set the first
corner. Then press again, setting the diagonally
opposite corner (the same as Rectangle Mask). If
the bounding box is set incorrectly, drag the corner
points to new positions.
Triangle Morph Lock Button
Initially the morph is unlocked, meaning that you
are editing the first keyframe, and no other keyframes exist. Once the first keyframe is complete,
pressing lock creates the corresponding end keyframe, which you then edit to define the morph.
Press the Lock Button to lock control points after the
first keyframe is set. The beginning and ending blue
keyframe markers appear on the Triangle Morph
Slider, with the yellow pointer at the last keyframe.
Now you can use the Move Button to modify the
Animation Environment
5-142
Revision A
Animation Environment
5-142
Revision A
Liberty Artist’s Manual
Liberty Artist’s Manual
points on the Canvas to define the final keyframe.
You can also add more keyframes. After pressing
Lock you can't add or delete points, only move
them. You only have to press Lock once - after
you've finished setting the first keyframe points.
Triangle Morph OK Button
Press to render one frame of the morph, as determined by the position of the pointer in the Triangle
Morph Slider. Renders on top of the existing picture
on the Canvas, or under it, if the Under Prefix is on.
Press the Erase OK Button to erase the Canvas
before rendering.
Triangle Morph Keyframe Slider
You can move any keyframe in the slider by pressing on the blue keyframe marker and dragging it to a
new position. This changes the keyframe's place in
the Timeline. No keyframes appear in the slider
until you press the Lock Button. When you press on
the slider, the percent completion of the morph at
that point is displayed in the Prompt Window.
When you press on one of the blue keyframe markers, the number of that keyframe marker is displayed
in the Prompt Window.
Revision A
5-143
Animation Environment
Revision A
5-143
Animation Environment
CHYRON Corporation
CHYRON Corporation
Morph Edit Lines Button
Figure 5-38. Line Morph Popup
Press to call up the Line Morph Popup. The popup is
the same as the Line Morph Popup in the Paint Environment. A button-by-button description of the Line
Morph Popup follows below.
Line Morph Add Button
Press to add line segments. Press on the Canvas
once to place the beginning of a line segment, then
lift and press a second time to place the end of the
line segment. Add as many line segments as you
want. The "arrowhead" at the front end of the line
segment is a reminder later as to whether the direction of the line segment has been changed.
Animation Environment
5-144
Revision A
Animation Environment
5-144
Revision A
Liberty Artist’s Manual
Liberty Artist’s Manual
While adding line segments you can use the Move
Button (see below) to reposition line segments you
have just added. Unlike Triangle Morph, you can
add or delete line segments after you press the Lock
Button. Press the Lock Button again or press
another Line Morph button to terminate the Add
function.
Line Morph Delete Button
Press to delete line segments from the Canvas. On
the Canvas press on a line segment to delete it. The
line segment disappears. Delete as many segments
as you want before terminating the function by
pressing the Delete Button again or any other Line
Morph Popup button.
You can select more than one line segment and press
the Delete Button to delete them all at once. However, it's no faster than deleting them one by one.
Line Morph Move Button
Press to move line segments. On the Canvas, press
in the middle of a line segment to drag it to a new
position, or press just beyond an endpoint to drag
just the endpoint (stretching or rotating the line segment). You can move line segments in any keyframe at any time, even after pressing the Lock
Button. Press the Move Button again or another
Line Morph Popup button to terminate the Move
function.
Line Morph Color Button
Press to switch the color of the line segments. Use
this when it's difficult to see the line segments on the
Canvas background. The default is red for the line
segments which become yellow when they are
selected. Press the Color Button to reverse this.
Revision A
5-145
Animation Environment
Revision A
5-145
Animation Environment
CHYRON Corporation
CHYRON Corporation
Line Morph Tune Button
Press to call up the Tune Popup. In general, the further away a line segment is from a pixel, the less
effect it has on that pixel. Tune allows you to adjust
three settings with sliders: Blend, Distance, and
Length. The best way to understand these settings is
to experiment (It's sometimes difficult to predict
what the exact effect will be for a certain combination of settings).
The Blend Slider
The Blend Slider controls the smoothness of the
morph, or the amount of blending between line segments.
The Distance Slider
The Distance Slider controls how the effect of a line
segment diminishes with distance.
The Length Slider
The Length Slider, if non-zero, makes longer line
segments have a greater effect on the morph.
Press the Cancel Button on the Tune Popup to cancel any changes you've made to the Tune settings.
Press the Reset Button to reset the Tune settings to
their defaults.
Line Morph Select Button
Press to select line segments. Press near a line segment to select it. The selected line segments change
color. Pressing a selected segment un-selects it.
Press the Move Button to move all the segments
simultaneously.
Animation Environment
5-146
Revision A
Animation Environment
5-146
Revision A
Liberty Artist’s Manual
Liberty Artist’s Manual
You can also select more than one line segment and
press the delete Button to delete them all at once.
However, it's really no faster than deleting them one
by one.
Line Morph Add Keyframe Button
Press to add a keyframe into the keyframe slider. A
blue keyframe marker appears in the Morph Slider
wherever the yellow pointer is when you press Add
Keyframe. Use the Move Button to move line segments on the Canvas to define the new keyframe.
You can move line segments in any keyframe of the
morph at any time.
The number of keyframes you can have is limited by
the space along the slider. If you try to add a keyframe too close to an existing keyframe, you are
prompted: "Cannot be too close to another keyframe."
Line Morph Copy Keyframe Button
To copy the line segment data from one keyframe to another:
Revision A
5-147
Animation Environment
Revision A
•
Position the yellow pointer in the Line Morph
Slider beneath the keyframe you want to copy
from.
•
Press the Copy Button. You are prompted:
"Please specify keyframe to copy to." If the yellow pointer is not beneath a keyframe, you are
prompted: "Please specify keyframe to copy
from." Move the yellow pointer under an existing blue keyframe marker and press the Copy
Button again.
•
Press below another blue keyframe marker on
the Line Morph Slider. The data from the first
keyframe is copied into the indicated keyframe.
5-147
Animation Environment
CHYRON Corporation
CHYRON Corporation
NOTE
Do not press directly on the blue
keyframe marker itself, but under it on
the same line as the yellow pointer. A
successful copy prompts: "Keyframe
copied successfully." If you press
directly on a blue keyframe marker,
you are prompted: "Cannot copy to
source keyframe."
Line Morph Delete Keyframe Button
To delete a keyframe:
•
In the slider, position the yellow pointer
beneath the blue keyframe marker you want
to delete.
•
Press to delete the keyframe at the current
position of the yellow pointer on the Line
Morph Slider. The blue keyframe marker disappears from the slider.
Line Morph Reset Button
Press twice quickly to reset the morph functions.
All keyframes, including line segments are deleted.
You are prompted: "Restarted LMORPH. Please
enter line segments."
Line Morph Lock Button
Initially the morph is unlocked, meaning that you
are editing the first keyframe and no other keyframes exist. Once the first keyframe is complete,
pressing Lock creates the corresponding end keyframe, which you then edit to define the morph.
After pressing Lock you can still add, delete, or
move line segments. You only have to press Lock
once - when you've set the first keyframe points.
Animation Environment
5-148
Revision A
Animation Environment
5-148
Revision A
Liberty Artist’s Manual
Liberty Artist’s Manual
Line Morph Test Button
Press the Test button to go into Test Mode. The line
segments appear on the screen, their position determined by the yellow pointer in the slider. When you
press on the Canvas, the pixel you press jumps to its
original source position and shows as a dot in the
alternate color. The distance of the displayed dot
from the pressed pixel shows you the magnitude and
direction of the distortion of that pixel. Press the
Test Button again or another Line Morph button to
terminate Test Mode.
Line Morph OK Button
Press to render the morphed distortion, as determined by the position of the pointer in the Line
Morph Slider. Renders on top of the existing picture
on the Canvas, or under it if the Under Prefix is on.
The corner button renders at one-fourth resolution.
Press the Erase OK Button to erase the Canvas
before rendering. The corner button renders at onefourth resolution.
Line Morph Keyframe Slider
This slider is a timeline of the morph from beginning to end. You can move any keyframe in the
slider by pressing on the blue keyframe marker and
dragging it to a new position. No keyframes appear
in the slider until you press the Lock Button. When
you press on the slider, the percent completion of the
morph at that point is displayed in the Prompt Window. When you press on one of the blue keyframe
markers, the number of that keyframe marker is displayed in the Prompt Window.
Revision A
5-149
Animation Environment
Revision A
5-149
Animation Environment
CHYRON Corporation
CHYRON Corporation
Tracking Features in Line Morph
You can place line segments on features you want to
track through a morph. For instance if you are morphing one face to another face and want the eyes,
nose, and mouth to track through to the second face:
Place a line segment on each feature in your starting
keyframe; then when you set your final keyframe,
move the line segments to follow the corresponding
features in the second face.
NOTE
The Morph Actor need not be the
same length as the actors to be
morphed. The Morph Actor acts on
whatever is above or below it at the
current time. However, it must have
something to act on.
5.7.8
Macro Actor Popup
Figure 5-39. Macro Actor Popup
Animation Environment
5-150
Revision A
Animation Environment
5-150
Revision A
Liberty Artist’s Manual
Liberty Artist’s Manual
The Macro Actor allows a Macro (history file) to be
played back as a layer in an animation. Thus you can
integrate many powerful Paint Environment functions into any animation. A Macro can play back in
its entirety for each frame of the animation (useful
for rotoscope-type processes, including Mask Panel
and Tools Panel functions). Or, a Macro can play
back incrementally; i.e., more and more of it renders
each frame (useful for write-on Macros containing
hand-painted brush strokes, using Pressure Paint, for
example).
When the Macro renders as an animation layer, Liberty switches momentarily to the Paint Environment,
then back to the Animation Environment for the
next frame.
To create a Macro Actor that plays through at
each frame:
•
Create a Macro in the Paint Environment. See
page 4-394.
•
In the Animation Environment, clear the Timeline, if necessary.
•
Add a Macro Actor to the Timeline.
•
Press the File Window at the right of the Timeline and assign the Macro you just made. This
creates a Macro Actor that plays the entire macro
at every frame.
•
Render a Storyboard of the animation and play it
back.
To create a Macro Actor that plays incrementally:
•
Revision A
5-151
Animation Environment
Revision A
Repeat steps 1 through 4 above.
5-151
Animation Environment
CHYRON Corporation
CHYRON Corporation
•
Press the Edit Keyframe Button at the right of the
Timeline. The Keyframe Popup appears.
•
Press on the first Keyframe to edit it. The
Macro Keyframe Popup appears.
•
Press in the End Line Window in the Macro
Keyframe Popup, then type in “1.” The Macro
plays one line of the Macro per frame.
•
Render a Storyboard of the animation and play it
back.
Macro Actor Keyframe - First & Last Line Numbers
These windows set which lines of the Macro are to
be rendered at the keyframe. They are set by default
to the first and last lines of the Macro assigned to the
actor. When left at their default settings, the entire
macro plays at each frame (the first example above).
Changing these numbers allows you to render a keyframable portion of the Macro at each frame. The
most common use of this is to change the Last Line
of the first keyframe to 1. This incrementally renders
more and more of the Macro each frame. This capability is very powerful, but is also easy to misuse.
NOTE
The two examples given above - one,
playing the Macro in its entirety at
each frame, and, two, incrementally
increasing the Macro with each frame
- are the two primary way to use the
Macro
Actor.
However,
other
variations are possible. Experiment
with different settings for the First
and Last Line numbers - they behave
very differently, depending on the
Macro being used. Use the two
Animation Environment
5-152
Revision A
Animation Environment
5-152
Revision A
Liberty Artist’s Manual
Liberty Artist’s Manual
examples given above, and introduce
variations in the numbers to see how
they behave.
The First Line Window
The First Line Window specifies which line in the
Macro file is the first line to be executed at the keyframe. In between keyframes, the First Line number
is interpolated. The First Line and the Last Line
numbers are interpolated independently of each
other.
Last Line Window
The Last Line Window specifies which line in the
Macro file is the last line to be executed at the keyframe. In between keyframes, the Last Line number
is interpolated. The First Line and the Last Line
numbers are interpolated independently of each
other.
Save/Recall Menu State
Use the Save/Recall State function in the Macro
panel in the Paint Environment (page 4-394) when
you record or use a Macro for animation. Before
actually recording the Macro, when you’ve set the
menus for the Macro, press the Save State Button.
Then immediately after pressing Record Macro,
press the Recall State Button and choose the filename that you’ve saved the menu state to. This will
ensure that each time you run the Macro, it will
automatically reset the menu states for the Macro.
NOTE
You can see the text file of the Macro
with numbered lines by pressing the
Edit Macro Button in the Macro Panel
in the Paint Environment. See page 4402.
Revision A
5-153
Animation Environment
Revision A
5-153
Animation Environment
CHYRON Corporation
CHYRON Corporation
5.7.9
Switcher Actor Popup
Figure 5-40. Switcher Actor Popup
The Switcher actor accomplishes fades and dissolves between layers of the animation. It can contain an image file to use as a pattern for wipes or
reveal effects.
To create a Switcher effect:
Animation Environment
5-154
Revision A
•
Add a Switcher Actor to the Timeline.
•
Add one Cel Actor above and one Cel Actor
below the Switcher Actor. The Cel Actors
should have the same begin/end numbers as the
Switcher Actor between them (This is not necessary, but simplifies the result). The bottom Cel
Actor contains the image dissolved from; the top
Cel Actor contains the image dissolved to.
•
Select and edit the Cel Actors and assign
image files to them with the File Button on the
Actor Popup.
Animation Environment
5-154
Revision A
Liberty Artist’s Manual
Liberty Artist’s Manual
•
Press the Switcher Actor to select it.
•
Turn on the Switcher mode you want to use.
If you use File-controlled Reveal, assign it a file.
NOTE
If there are multiple layers in an
animation, a Switcher actor dissolves
from all layers below it to all layers
above it. To dissolve between two
actors only, use keyframes to control
the transparency of the two actors,
see page 5-104.
Switcher Modes
Only one Switcher Mode can be active at a time.
The four Switcher Modes are: File-controlled
Reveal, Dissolve, Fade, and Composite.
File-controlled Reveal Button
Press to turn on. When this Switcher Mode is on,
the dissolve between the two images is controlled by
an image file from the disk. The alpha of the image
file determines the progressive steps of the dissolve.
For instance, if the image file is a luminance mask of
a face, then the image would start dissolving in at
the shadows, and the lightest spots would be the last
to disappear. Because Liberty uses the alpha of the
image, masks are often used for their files. For
example, if you want to make a left-to-right wipe,
you make a white-to-black gradation with Apply.
Then you use Mask Channels to mask its Luminance, and use the File Mode Popup to save the
mask.
Switcher actors, in "File-controlled Reveal" mode,
can perform transitions with multiple files. This
allows the mask for the file-controlled reveal effect
Revision A
5-155
Animation Environment
Revision A
5-155
Animation Environment
CHYRON Corporation
CHYRON Corporation
to change over time. The controls for a multi-file
Switcher Actor work like controls for other multifile actors (such as Cel and Mask). Pressing on the
Single Button in the Actor Edit Menu brings up a
Multiple File Popup. Or, when selecting the filename assigned to the Switcher Actor, press the
"film" button in the Recall Popup, and enter into the
Full-Screen Animation Filmstrip Browse Popup.
You can select multiple files there.
Switcher Composite Button
Figure 5-41. Switcher Composite Popup
The Switcher Composite Button calls up a popup
with six special compositing modes. Each mode
provides a special compositing effect along with a
slider scale to control the brightness of the resulting
effect.
Plus Mode (top+bot)
When this mode is enabled, the pixels of the top and
bottom layers are added together. This causes
brightness to increase, so a slider is provided to offset excessive brightness. The bottom, or zero, slider
setting leaves the resulting brightness unchanged.
Raising the value of the slider decreases brightness.
Plus mode is good for compositing transparent elements such as flame, smoke or ghost-effects.
Animation Environment
5-156
Revision A
Animation Environment
5-156
Revision A
Liberty Artist’s Manual
Liberty Artist’s Manual
Subtract Mode (top-bot)
When this mode is enabled, the pixels of the bottom
layer are subtracted from the pixels of the top layer.
This causes brightness to decrease, so a slider is provided to offset low brightness. The bottom, or zero,
slider setting leaves the resulting brightness
unchanged. Raising the value of the slider increases
brightness.
Subtract Mode works in a similar way to the Difference Matte function. For instance, in a medical
imaging application, an x-ray of an arm with no sensitive fluid in the veins might be subtracted from the
same image with sensitizing fluid in the veins. The
difference - the veins only - would be composited.
Multiply Mode (top*bot)
When this mode is enabled, the pixels of the bottom
layer are multiplies by the pixels of the top layer.
This can cause brightness to greatly increase, so a
slider is provided to offset excessive brightness.
The bottom, or zero, slider setting leaves the resulting brightness unchanged. Raising the value of the
slider decreases brightness.
Divide Mode (top/bot)
When this mode is enabled, the pixels of the top
layer are divided by the pixels of the bottom layer.
This causes brightness to decrease, so a slider is provided to offset low brightness. The bottom, or zero,
slider setting leaves the resulting brightness
unchanged. Raising the value of the slider increases
brightness.
Revision A
5-157
Animation Environment
Revision A
5-157
Animation Environment
CHYRON Corporation
CHYRON Corporation
Greater Than Mode (top>bot)
When this mode is enabled, the composite uses a
pixel of the top layer if it is brighter than the corresponding pixel in the bottom layer. Otherwise the
pixel from the bottom layer is used. The slider does
not affect brightness.
Less Than Mode (top<bot)
When this mode is enabled, the composite uses a
pixel of the top layer if it is less bright than the corresponding pixel in the bottom layer. Otherwise the
pixel from the bottom layer is used. The slider does
not affect brightness.
Switcher Dissolve Button
Press to turn on. When this mode is on, layers above
the Switcher Actor replace the layers below the
Switcher Actor, as rendering proceeds.
Switcher Fade Button
Press to turn on. When this mode is on, the layers
above the Switcher actor fade onto the layers below
it; the bottom layers are not replaced, but can be
seen through transparency in the image fading in.
Fade is used when the incoming image has transparency in it, so you can see the image it is fading onto.
Switcher Reverse Button
Press to turn on/off. Performs the current Switcher
effect backwards.
Switcher Fairing Button
Press to turn on/off. When this mode is on, the
effect happens with ease-in and ease-out.
Animation Environment
5-158
Revision A
Animation Environment
5-158
Revision A
Liberty Artist’s Manual
Liberty Artist’s Manual
Switcher Softness Slider
Press and drag to change the softness of the Filecontrolled Reveal effect. When the slider is at the
bottom, the effect is hard-edged. When the slider is
at the top, the effect has maximum diffusion.
NOTE
Generally in the Animation Environment, you can use any combination of
layers and keyframe attributes. Thus
you can use any combination of Mask
Actors, Switcher Actors, and Morph
Actors.
All keyframes attributes,
including Alpha and Under, will work,
regardless of how you layer the
actors.
5.7.10
Color-Table Actor Popup
Figure 5-42. Color-table Actor Popup
Revision A
5-159
Animation Environment
Revision A
5-159
Animation Environment
CHYRON Corporation
CHYRON Corporation
The Color-table actor allows you to create animated
color cycle effects. You can create cycling effects in
which a series of colors cycle through a gray-scale
ramp in a file created in Paint and saved on disk. Or
you can create color-reveal effects, which, instead of
cycling colors, turns the colors on one-by-one until
they are all revealed.
To create a color-table animation:
•
Add a Color-table actor to the Timeline.
•
Assign a file to it, using the File Button. The
Color-table Actor only uses the gray-scale of
whatever image you assign, but it can be a fullcolor image.
•
Press the Ncols Button and type in the number of colors you want to use in the palette.
For example, you might type 8. The cycle will
be comprised of the 8 topmost, leftmost colors in
the palette.
•
Press the Edit Col Button to bring up the
Color Palette. If you try to call up the palette
when Ncols is at 0, you get an error message:
"No colors, change Ncols." This is a palette for
just this Actor, and has no relation to the palette
in the Paint Environment.
•
Set some of the top color boxes in the palette
to colors that you want to be in your cycle.
•
Press the Edit Col Button a second time to
remove the color palette.
•
Turn on the mode you want the Actor to use.
The selected colors will be applied to the levels of
gray in the file you assigned to the actor. The first
color selected in the palette (top-most, left-most) is
Animation Environment
5-160
Revision A
Animation Environment
5-160
Revision A
Liberty Artist’s Manual
Liberty Artist’s Manual
assigned to the darkest color in the gray-scale image.
The cycle travels from light to dark. To reverse
direction you must invert the values of the original
gradation in the file you save to disk. (See “Color
Correct Popup” on page 4-301 for more information.)
Color-table File Button
Press to call up the File Popup and choose an image
file whose gray-scale the Color-table actor will use
to cycle colors through.
Any image file can be used, not just images with
gray-scale only. The Color-table actor uses the
luminance range it finds in the image file and
applies the selected colors from the palette.
Color-table Duplicate Button (Dups)
To set the number of fields it takes to cycle the
color table one step:
•
Press the Dups window.
•
Type in a new number of fields (press Enter).
You can also increment the Dups number by pressing the top half of the Dups label (the word itself)
and decrement by pressing the bottom half of the
Dups label.
Color-table Cycle Button
Press to turn on/off. When on, this mode causes the
selected colors to cycle through the gray-scale from
light to dark.
Revision A
5-161
Animation Environment
Revision A
5-161
Animation Environment
CHYRON Corporation
CHYRON Corporation
Color-table Reveal Button
Press to turn on/off. When on, initially all colors are
transparent, and thus invisible. Then, one by one
each color is revealed, starting with the one assigned
to the darkest values.
Color-table Ncols Button
Press to set the number of palette colors to be used.
The maximum is 256, in which case the Color-table
Actor would use all 8 palettes of 32 colors each in
the Color Palette Elevator.
The number of colors set in Ncols is the length of a
single cycle. For example, with 30 colors set in
Ncols and the Dups Button at 2 (fields), one cycle
lasts 30 frames (1 second, 60 fields). In this case, if
the Color-table actor has a duration of 3 seconds, the
cycle repeats 3 times.
Color-table Edit Col Button
Press to display the color palette. Set the colors to
be used in the color-table animation. Use the topmost, leftmost colors in the palette.
Color-table Smooth Button
Press to turn on. When on, the color-table animation
proceeds in soft dissolves rather than hard cuts.
5.7.11
Mask Actor Popup
The Mask actor calls up a mask file from disk to
control a masked effect on another actor. The term
"mask" in the Liberty Animation Environment
means to change the way another image displays.
Animation Environment
5-162
Revision A
Animation Environment
5-162
Revision A
Liberty Artist’s Manual
Liberty Artist’s Manual
To create a masked effect:
•
Add a Mask Actor to the Timeline above the
actor which you want to mask. Usually the
Mask Actor should have the same begin and end
times as the actor to be masked below it.
•
Press the File Button to assign a file to the
Mask Actor which is selected on the Timeline.
•
Press on one of the Mask modes to activate it.
The modes are: Mask, Chroma, Brightness, Contrast, Tint, Hue, Ripple, Filter, Poster, Mosaic,
Gamma, HSV, RGB, Diagram Correct, and Blur.
•
Press the Edit Keyframe Button. The Keyframe Timeline appears.
•
Press on a matchstick to edit a keyframe. The
Keyframe Distort Popup appears along with a
popup for the current Mask mode.
•
Edit the keyframes using the Distort Popup
and the Mask Mode Popup.
•
Press the Edit Keyframe Button a second time
to remove the popups.
•
Preview the animation.
Mask Mode Popups
When you press the Edit Keyframe Button to call up
the Keyframe Timeline, a popup also appears for the
current mask mode (at the right of the Timeline).
This popup allows you to set keyframe-able mask
attributes. It contains options for the current mask
mode. For example, if the Mask Actor is in Brightness Mode, then the Mask Mode Popup has a slider
for brightness.
Revision A
5-163
Animation Environment
Revision A
5-163
Animation Environment
CHYRON Corporation
CHYRON Corporation
The values set by sliders and buttons in the Mask
Mode Popup are keyframe-able. For example, in
Brightness Mode you could set the first keyframe to
a brightness of 0 and the last keyframe to a brightness of 200. In the animation, the masked area
would begin with no change to its brightness and
gradually become very bright. A value of -100 will
set the masked area to black. If you want, you can
add keyframes in between to control the brightness
further.
All the Mask Mode Popups have Next and Prev Buttons for moving between keyframe matchsticks (the
same as on the Distort Popup). There is also a large
Preview Button, which you press to see a preview of
the current Mask actor applied to the actor below it.
The only Mask modes that don’t have (or need)
Mask Mode popups are Mask and Tint Modes.
Figure 5-43. Mask Actor Popup (1)
Animation Environment
5-164
Revision A
Animation Environment
5-164
Revision A
Liberty Artist’s Manual
Liberty Artist’s Manual
Mask Modes
Only one of the Mask modes can be on at a time.
Mask Mode
Press to turn on. When turned on, the actor below
the Mask Actor is revealed only through the mask.
For instance, to give the effect of a keyhole through
which you can see the action, you would put a keyhole-shaped Mask Actor over a Filmstrip Actor.
The more opaque the mask, the more the mask
reveals. An area of 100% transparent background
color in the mask file allows nothing to be revealed
through the mask. For example, a fully opaque
piece of text on a fully transparent background used
as a file for a Mask displays only inside the text.
Chroma Key Mode
Press the Key Button on the Mask Actor Popup to
turn on Chroma Key Mode. When on, the actor
below is masked according to the similarities of the
its image to the color set in the Chroma Key Mode
Popup. This works exactly the same as the Mask
Channels Button in the Paint Environment, but
instead of masking all of a particular color, it masks
all but that color.
By using the Invert Button (see page 5-179) you can
mask out the color instead of masking out everything except the color.
To set the color used by the Mask Actor in
Chroma Key Mode:
Revision A
5-165
Animation Environment
Revision A
•
Press the Edit Keyframe Button to call up the
Keyframe Edit Popup.
•
Press on the first keyframe to edit it.
5-165
Animation Environment
CHYRON Corporation
CHYRON Corporation
•
Press on the color swatch in the Chroma Key
Mode Popup (the default is black). The Color
Palette is called up.
•
Select a palette box, and create the color you
want to key off of. A good way to do this is to
recall the full-color image from the actor below,
and use the color pick button to pick the color
you wish to key on into the palette.
•
Press on the color swatch again. It changes to
the new color.
Repeat steps 2 through 5 with all the remaining keyframes. If you want to, you can have the color
change from keyframe to keyframe.
Also on the Chroma Key Mode Popup are the Greed
and Smoothness slider scales, which work identically to the Greed and Smoothness slider scales on
the Match Mask Popup in the Paint environment.
If there is a file assigned to the Mask Actor, it is
used as a garbage matte, and masks the file below
exactly the same as Mask Mode.
Brightness Mode
Press the Brightness Button on the Mask Actor
Popup to turn on Brightness Mode. When turned
on, the brightness of the masked area in the actor
below is changed according to the Brightness Slider
on the Mask Mode Popup. The slider works identically to the Brightness Slider on the Adjust Popup in
the Paint Environment. The default is -100 (black).
Animation Environment
5-166
Revision A
Animation Environment
5-166
Revision A
Liberty Artist’s Manual
Liberty Artist’s Manual
NOTE
The Brightness Actor operates on all
layers below it. To make it just affect
the row directly below it, place a mask
actor in mask mode directly above the
brightness layer (a fully opaque mask
can be used for the mask layer).
Contrast Mode
Press the Contrast Button on the Mask Actor Popup
to turn on Contrast Mode. When turned on, the contrast of the masked area in the actor below is
changed according to the Contrast Slider on the
Mask Mode Popup. The slider works identically to
the Contrast Slider on the Adjust Popup in the Paint
Environment. The default is 0 (no change).
NOTE
The Contrast Actor operates on all
layers below it. To make it just affect
the row directly below it, place a mask
actor in mask mode directly above the
Contrast layer (a fully opaque mask
can be used for the mask layer).
Tint Mode
Press the Tint Button on the Mask Actor Popup to
turn on Tint Mode. When on, a tint is applied into
the masked area in the actor below. Works like the
Tint function in the Image Tools 1 Panel in the Paint
Environment.
Set the beginning tint color by pressing on the left
Tint Color Button. The Color Palette appears. Set
the first selected color to the value you want to start
the tint with. Press the left Tint Color Button a second time to remove the Color Palette and set the
Revision A
5-167
Animation Environment
Revision A
5-167
Animation Environment
CHYRON Corporation
CHYRON Corporation
color. In the same way, set the right Tint Color Button to determine the end Tint color. The Mask Actor
starts with the first color and interpolates to the second. Double-clicking the second color copies the
first color to the second.
The Tint button has a toggle window to select either
“Hue” or “H & S” (Hue & Saturation) modes.
H & S Mode
Press in the window of the Tint button to alternatively change between “Hue” and “H & S” modes.
Set to H & S Mode. The tint is applied to Hue and
Saturation values of the image.
Hue Mode
Press in the window of the Tint button to alternatively change between “Hue” and “H & S” modes.
Set to Hue. It works the same as “H & S” Mode, but
only the hue is affected. This preserves white highlights. It works similarly to Tint-Hue in the Paint
Environment.
NOTE
The Tint Actor operates on all layers
below it. To make it just affect the row
directly below it, place a mask actor
in mask mode directly above the Tint
layer (a fully opaque mask can be
used for the mask layer).
Ripple Mode
Press the Ripple Button on the Mask Actor Popup to
turn on the Ripple Mode. When on, a ripple distortion is performed on the masked area in the actor
below, according to the setting of the Ripple Slider
in the Mask Keyframe Popup. The file assigned to
Animation Environment
5-168
Revision A
Animation Environment
5-168
Revision A
Liberty Artist’s Manual
Liberty Artist’s Manual
the Mask Actor is used as the “mask” the ripple
refracts with. For example, a Mask Actor could use
Ripple to animate a glass or water effect. It works
identically to the Ripple Button in the Image Tools1
Panel in the Paint Environment. Depends on variations in alpha (transparency) in the Mask Actor's
file.
NOTE
The Ripple Actor operates on all
layers below it. To make it just affect
the row directly below it, place a mask
actor in mask mode directly above the
Ripple layer (a fully opaque mask can
be used for the mask layer).
Filter Mode
Press the Filter Button on the Mask Actor Popup to
turn on Filter Mode. When turned on, the masked
area in the actor below is filtered through a userdefined filter. Pressing the Select Filter Button on
the Mask Keyframe Popup calls up the Filter Popup
to allow you to choose a filter. Pressing OK on the
Filter Popup assigns the current filter to the selected
keyframe.
NOTE
The Filter Actor operates on all layers
below it. To make it just affect the row
directly below it, place a mask actor
in mask mode directly above the Filter
layer (a fully opaque mask can be
used for the mask layer).
Revision A
5-169
Animation Environment
Revision A
5-169
Animation Environment
CHYRON Corporation
CHYRON Corporation
Figure 5-44. Mask Actor Popup (2)
Posterize Mode
Press the Poster Button on the Mask Actor Popup to
turn on Posterize Mode. When turned on, the
masked area in the actor below is posterized according to the Posterize Slider on the Mask Mode Popup.
The slider works identically to the Posterize Function on the Tools1 Panel in the Paint Environment.
NOTE
This actor operates on all layers
below it. To make it just affect the row
directly below it, place a mask actor
in mask mode directly above the
Posterize layer (a fully opaque mask
can be used for the mask layer).
Animation Environment
5-170
Revision A
Animation Environment
5-170
Revision A
Liberty Artist’s Manual
Liberty Artist’s Manual
Mosaic Mode
Press the Mosaic Button on the Mask Actor Popup
to turn on Mosaic Mode. When turned on, the
masked area in the actor below is given a mosaic
pattern according to the Mosaic Sliders on the Mask
Mode Popup. The sliders works identically to the
Mosaic function on the Image Tools 1 Panel in the
Paint Environment.
NOTE
This actor operates on all layers
below it. To make it just affect the row
directly below it, place a mask actor
in mask mode directly above the
Mosaic layer (a fully opaque mask can
be used for the mask layer).
Sharpen Mode
Press the Sharpen Button on the Mask Actor Popup
to turn on Sharpen Mode. When turned on, the
masked area in the actor below is sharpened. The
function works identically to the Sharpen function
on the Image Tools 1 Panel in the Paint Environment.
Blur Mode
Press the Blur Button on the Mask Actor Popup to
turn on Blur Mode. When turned on, the masked
area in the actor below is blurred. The function
works identically to the Blur function on the Image
Tools 1 Panel in the Paint Environment.
HSV and RGB Modes
Press the HSV Button on the Mask Actor Popup to
turn on HSV Mode. When turned on, the masked
area in the actor below is adjusted according to the
Revision A
5-171
Animation Environment
Revision A
5-171
Animation Environment
CHYRON Corporation
CHYRON Corporation
sliders on the Mask Keyframe Popup. These sliders
work identically to the Color Correct Popup on the
Image Tools 1 Panel in the Paint Environment.
Press the RGB Button on the Mask Actor Popup to
turn on the RGB Mode. RGB Mode is identical to
HSV Mode, but the sliders adjust the Red, Green,
and Blue of the image instead of the Hue, Saturation, and Value.
NOTE
This actor operates on all layers
below it. To make it just affect the row
directly below it, place a mask Actor
in Mask Mode directly above the
Gamma layer (a fully opaque mask
can be used for the mask layer).
Color Correct Mode
Press the Correct Button on the Mask Actor Popup
to turn on Color Correct Mode. When turned on, the
masked area in the actor below is color-corrected
according to settings on the Color Correct Popup.
The function works identically to the Color Correct
function on the Image Tools1 Panel in the Paint
Environment.
Adjust Mode
Press the Adjust Button on the Mask Actor Popup to
turn on Adjust Mode. When turned on, the masked
area in the actor below is adjusted according to settings on the Adjust Popup. The function works
identically to the Adjust function on the Image
Tools1 Panel in the Paint Environment.
Animation Environment
5-172
Revision A
Animation Environment
5-172
Revision A
Liberty Artist’s Manual
Liberty Artist’s Manual
Figure 5-45. Mask Actor Popup (3)
Noise Mode
Press the Noise Button on the Mask Actor Popup to
turn on Noise Mode. When turned on, the masked
area in the actor below has noise applied to according to the settings on the Noise Popup. The function
works identically to the Noise function on the
Image Tools1 Panel in the Paint Environment.
Bump Map Mode
Press the Bump Map Button on the Mask Actor
Popup to turn on Bump Map Mode. When turned
on, the masked area in the actor below is bumpmapped. The function works identically to the
Bump Map function on the Image Tools 1 Panel in
the Paint Environment.
Revision A
5-173
Animation Environment
Revision A
5-173
Animation Environment
CHYRON Corporation
CHYRON Corporation
Gamma Mode
Press the Gamma Button on the Mask Actor Popup
to turn on Gamma Mode. When turned on, the
gamma of the masked area in the actor below is
changed according to the Gamma Slider on the
Mask Mode Popup. The slider works identically to
the Gamma Slider on the Adjust Popup on the Image
Tools1 in the Paint Environment.
NOTE
This actor operates on all layers
below it. To make it just affect the row
directly below it, place a mask Actor
in Mask Mode directly above the
Gamma layer (a fully opaque mask
can be used for the mask layer).
Chroma Key Mode
Figure 5-46. Mask Actor Popup (3)
Animation Environment
5-174
Revision A
Animation Environment
5-174
Revision A
Liberty Artist’s Manual
Figure 5-47. Chroma Key Popup
Revision A
5-175
Animation Environment
Liberty Artist’s Manual
Liberty Artist’s Manual
A Mask Actor in Chroma Key Mode allows you to
key one Cel Actor into another one.
To use the Chroma Key Mask Actor:
•
1.
Add a Mask Actor to the Timeline.
•
2.
Press the Chroma Button in Mask Panel 3 to
make it a Chroma Key Mask Actor.
•
3.
Below the Mask Actor add a Cel actor
containing one or more blue screen images
to the timeline.
•
4.
Below the blue screen Cel Actor add
another Cel Actor with the image to be
keyed in.
•
5.
Press the Edit Keyframe Button and edit the
keyframes. A large "Edit Key" button appears
to the right of the Paste/Distort Menu.
•
6.
Press the Edit Key Button. This brings up the
Chroma Key Popup, which allows you to set
the chroma key parameters for the current
keyframe.
•
7.
Finish editing the chroma key and exit Edit
Keyframe.
The Mask Actor Chroma Key Popup is similar to the
Chroma Key Popup in the Paint Environment (see
page 4-337). The preview buttons work in a slightly
different manner, and the "BG on" button is grayed
out (since the actors below the key will render as the
background). The preview buttons work slightly differently since previewing in animation really
amounts to rendering the animation at the current
keyframe. In the Mask Actor the Preview Button in
the Chroma Key Popup does that, while the Preview
Alpha Button previews the alpha generated by the
key (as in Paint). The Preview BG button renders all
Revision A
5-177
Animation Environment
Revision A
5-177
Animation Environment
CHYRON Corporation
CHYRON Corporation
the actors below the blue screen cel actor and mask
actor, since these represent the background. Again,
these are rendered at the current keyframe. The
Recall FG Button recalls the current frame of the
blue screen cel actor, so that blue screen colors can
be picked using the Chroma Key Popup (note that
this button is labeled "Preview Off" in the Paint
Environment, since it is simply turning the preview
off and showing the canvas rather than recalling a
file from an actor, as in the Animation Environment).
As in Paint, you can turn on the Use Mask Button in
the Chroma Key Popup to enable a mask to be used
as a garbage matte. Use the Mask Actor’s File Window to assign a mask from disk to be used as a garbage matte. Use the Single/Multiple controls to
specify multiple files. If the Use Mask Button is off,
no file needs to be assigned to the Mask Actor.
You can set individual chroma key parameters for
each keyframe in the Mask Actor, or just set parameters for the first and last keyframe (in which case,
the keyframes in between are interpolated).
Ultimatte Plug-in
Note that Liberty supports an Ultimatte Cinefusion
plug-in. This plug-in provides a far more advanced
set of controls for blue and green screening than the
Chroma Keying tool described here. Thus, you may
prefer to purchase and use the plug-in for the more
difficult or intensive chroma keying jobs.
Mask File Button
Press to call up the File Popup and choose a file
from the disk. This file performs a different service
for the different mask modes. In the modes that
Animation Environment
5-178
Revision A
Animation Environment
5-178
Revision A
Liberty Artist’s Manual
Liberty Artist’s Manual
mimic functions on the Image Tools Panels, the file
works like a Paint Environment Mask. With both
Chroma Key and Mask Mode, the file is used as a
way of only showing part of the image.
The Mask Actor only uses the alpha (transparency)
information in a file, regardless of the RGB (color)
information. Because of this, it is often easier to use
a mask saved on the disk instead of an image,
because a mask is essentially an image made up of
only alpha information.
Mask Invert Button
Press to turn on/off. When on, inverts the mask
before it is used. This means that the mask is
inverted or that the complement of the mask is used.
For instance, if the Mask Actor has a solid circle as
its reference file, like a spotlight, inverting it would
cause the mask to appear everywhere except inside
the circle. This is true of all Mask Actor Modes
except Ripple. There is a difference between a normal Ripple and an inverted Ripple, but it's slight, not
very predictable, and generally not useful.
Using Invert Mode can be especially useful with the
Chroma Key Mode. With Invert Mode on, the
Chroma Key Mode masks out a color, and whatever
file is assigned to the actor can be used to filter out
any garbage that slips by the Chroma Key.
Mask Inplace Button
Press to turn on/off. If Inplace is turned on, the
mask effect is applied to the actor below before the
actor is transformed (rotated, scaled, etc.) and pasted
onto the Canvas. Then the masked result is pasted
onto the Canvas transformed by the keyframe of the
actor below. For example, a perspective view of a
Revision A
5-179
Animation Environment
Revision A
5-179
Animation Environment
CHYRON Corporation
CHYRON Corporation
spotlight shining on a background texture would
appear with both the spotlight and the texture in perspective.
If Inplace is turned off, the mask effect is applied to
the actor below after the actor is pasted onto the
Canvas. A perspective view of the background texture would appear in the non-perspective spotlight.
Experiment with this mode on and off to get a feel
for its effect.
More About Mask Actors
All Mask Actors are controlled by their Keyframe
Alpha Slider. Decreasing alpha on a mask mode
(Brightness Mask, Ripple Mask, etc.) causes the
effect to become more transparent relative to the
original image. Decreasing alpha on a mask (the
Mask Actor’s Mask Button is highlighted) causes a
dissolve between the masked and un-masked image.
At full opacity (100% alpha) the mask actor fully
blocks out the un-masked area. As alpha comes
down, the unmasked area dissolves in.
NOTE
To fade the masked element, apply
the alpha change to the element itself,
not its mask.
You can perform any combination of layers and
keyframe attributes. Thus you can use any combination of Mask Actors, Switcher Actors, and Morph
Actors. All keyframes attributes, including Alpha
and Under, will work, regardless of how you layer
the actors. Also, the Mask In-place function will
work, regardless of how many layers of Mask
Animation Environment
5-180
Revision A
Animation Environment
5-180
Revision A
Liberty Artist’s Manual
Liberty Artist’s Manual
Actors you use. If a Mask Actor has In-place turned
on, all Mask Actors directly below it become Inplace as well.
REMINDER: When a Mask Actor’s In-place Mode
Button is turned on, the mask is applied before the
next lower actor’s rotation, scaling, position, etc. is
calculated.
Multiple layers of Mask Actors are calculated multiplicatively. This allows all combinations of all
kinds of Mask Actors to always work correctly. For
example, two stacked Mask Actors both set at 50%
transparency will yield a result of 25% (50% times
50%).
You can use Liberty and non-Liberty RGB and
RGBA files in Mask Actors. When you use a nonLiberty file as a Mask, the alpha channel is used.
When you use an RGB file as a Mask, the luminance
is used.
Rotation and Scaling of
Actors Larger Than the Screen
You can pan, rotate, scale, and slant actors created at
a higher resolution than the display screen. This
means that they are larger than the screen you are
rendering animation in. These larger actors include
Cel Actors, Mask Actors, and Switcher Actors. A
Temp or Mask Buffer large enough to hold the
larger file is temporarily allocated to do this. You’ll
need sufficient RAM to support this. Masking of
panning backgrounds will work, even if In-place is
on.
Revision A
5-181
Animation Environment
Revision A
5-181
Animation Environment
CHYRON Corporation
CHYRON Corporation
5.7.12
Reference & Troupe
Actor Popups
The Actor Popups for these two Actor Types are
identical, consisting of only a File Button. The Edit
Path and Edit Keyframe Buttons work the same as
with any other actor, but the Recall Cel Button and
the Browse Window do not work with these actors,
as they have no image file assigned to them.
Both types perform the same function. By assigning
either type an animation file that has been stored on
disk, you include that entire animation in your Timeline, which can be moved, stretched and keyframed
like any other actor. It’s an easy way to combine
several animations. The difference between the Reference Actor and the Troupe Actor is that the
Troupe Actor allows you to edit its actors (without
changing them in the original file on disk) and the
Reference Actor does not.
To add an animation into the Timeline, add a Reference or Troupe Actor to the Timeline. Press the File
Window in the actor’s Popup Menu and choose an
animation file from the disk for the actor to refer to.
If there is a Holdin or Holdout in the source animation, it is ignored when a Reference or Troupe Actor
referring to it is rendered. If you need the hold, render the first or last frame of the source animation,
save it, and then use it as a file for a Cel Actor.
Show Troupe Button
This button is at the bottom of Actor Edit Menu to
the left of the Animation Timeline. It is used for
both Reference and Troupe Actors.
Animation Environment
5-182
Revision A
Animation Environment
5-182
Revision A
Liberty Artist’s Manual
Liberty Artist’s Manual
When you first assign an animation to a Troupe or
Reference Actor, all the actors in the animation
appear on the Timeline. If you press on the Show
Troupe Button and then press on the Reference or
Troupe Actor, all the actors of the referenced animation are “hidden,” and only the Reference or Troupe
Actor itself is shown.
If you press the Show Troupe Button, and then press
on a Reference or Troupe Actor whose actors are
hidden, they will be shown again.
Whether the actors of a Reference or Troupe Actor
are hidden or shown, they remain a part of the animation unless turned off by the Off Button (see page
5-123).
Revision A
5-183
Animation Environment
Revision A
5-183
Animation Environment
CHYRON Corporation
CHYRON Corporation
5.7.13
Shapes Actor Popup
Figure 5-48. Shapes Actor Popup
The Shape Actor allows you to animate from one
shape to another, using the same tools as in the
Shapes Popup in the Paint Environment. You can
add a different shape at each keyframe and it will be
smoothly “morphed” to the next keyframe shape.
These can function either like a Write-on Actor,
Animation Environment
5-184
Revision A
Animation Environment
5-184
Revision A
Liberty Artist’s Manual
Liberty Artist’s Manual
painting around or filling the shape with color, or
like a Mask Actor, masking and applying effects to
the layer(s) below.
When animating from one keyframe shape to
another, the two shapes do NOT have the same number of vector points. In such cases you can specify
where the missing points come from as the shapes
animate. Note, however, that circles and ellipses
must animate to or from circles and ellipses.
To create a Shape Actor:
Revision A
5-185
Animation Environment
Revision A
•
In the Animation Environment, clear the Timeline, if necessary.
•
Add a Shape Actor to the Timeline and press on
it to edit it.
•
Press the Edit Keyframe Button. The Keyframe
Edit Popup appears.
•
Press the first Keyframe Matchstick to edit it.
The Shapes 3-D Paste Popup appears.
•
Press the Edit Shape Button at the right of the
Timeline. The Shapes Actor Popup appears. On
the Canvas, the default shape is a square.
•
Press the Rectangle Button and press and drag on
the Canvas to create a rectangle.
•
Press the Replace Keyframe Button (Replace
Kf).
•
Press and drag the indicator on the Shapes Timeline to see a wireframe preview of the animation
between the first and last keyframes.
•
Press the necessary OK Buttons to get back to
the main Timeline.
5-185
Animation Environment
CHYRON Corporation
CHYRON Corporation
•
Be sure the Fill Button at the right of the Timeline is highlighted.
•
Render a Storyboard of the animation and play it
back.
Shapes Actor Popup
Press the Edit Shapes Button to bring up the Edit
Shapes Popup.
The Shapes Actor Popup is identical to the Shapes
Popup in the Paint Environment, except that here the
Shapes Inbetweening section at the top is always
active and has a minimum of two keyframes. Also,
the Inbetweening section’s Add Kf, Delete Kf, and
Copy Kf buttons are grayed out, because when editing a Shapes Actor, you add keyframes to the main
animation Timeline in the normal way, see page 570. For the basic procedure of working with the
Shapes Popup, see page 4-253.
Initially each keyframe contains a simple square
Shape by default.
When you are editing a keyframe in the Shape
Actor, you can use any of the Shapes tools to create
or modify a geometric shape for the current keyframe.
Inbetweening Timeline
At the top of the Shapes Actor Popup, press and drag
the marker in the Inbetweening Timeline to choose
different keyframes to edit. You can also use the
Previous (<) and Next (>) Keyframe Buttons at
either end of the Inbetweening Timeline to move
among keyframes. The current keyframe’s shape is
visible and modifiable on the Canvas. If you try to
Animation Environment
5-186
Revision A
Animation Environment
5-186
Revision A
Liberty Artist’s Manual
Liberty Artist’s Manual
edit without having an existing keyframe chosen, an
error message appears at the bottom of the screen in
the Prompt Window.
Adding Keyframes While Editing Shapes
There is always a one-to-one correspondence
between the actor’s keyframes and the keyframes on
the Inbetweening Timeline. If you want more keyframes in the Actor, press the OK Button twice, and
use the Add Keyframe Button at the left of the main
Timeline to add a keyframe where you want it. Then
press on the keyframe to edit it (and press Edit
Shape).
Replace Keyframe Button (Replace Kf)
After creating or modifying a shape in a keyframe,
always press the Replace Keyframe Button. Until
you do this, the new shape doesn’t “take.”
About Shape Points - The Link Keyframe
Button (Link Kf)
The Link Keyframe Button allows you to control
how a shape’s points animate between keyframes.
For example, when animating between two shapes
with the same number of points, Liberty makes its
best guess as to how the points should correspond.
The Link Keyframe Button allows you to adjust
which points in the first shape correspond to which
points in the second shape.
Internally each shape’s points have a certain order,
and each shape has a start point. When you choose a
keyframe (using the slider or the </> Buttons on the
Inbetween Timeline), the start point is red. The rest
of the points in the shape are ordered in either a
clockwise or counter-clockwise direction. The sec-
Revision A
5-187
Animation Environment
Revision A
5-187
Animation Environment
CHYRON Corporation
CHYRON Corporation
ond point (one point either clockwise or counterclockwise from the start point) is yellow, which
helps you visualize how the points are ordered.
When a shape animates to another shape, the points
are interpolated based on their order. The start point
of the first shape animates to the start point of the
second shape, while the second point of the first
shape animates to the second point of the second
shape, and so on for all the points. Press the arrow
buttons (</>) on either end of the Link Keyframe
Button to cycle the order of the points in the current
shape. You can tell which way they’re cycling by
watching how the red (start) point moves. You can
also change the order to either clockwise or counter
clock-wise by pressing the labeled Link Window
Button till it displays the desired direction, then
pressing on the main part of the Link Keyframe Button.
To get the best in-betweening results with the least
amount of folding and cross-over, place the start
points of the two neighboring keyframes in the same
relative position (for example, at the bottom of the
shapes) and make the direction of the order the same
(clockwise or counter-clockwise), and then press on
the main part of Link Keyframe Button.
Move Keyframe Points Buttons (Move Prev/
Next Kf pt)
Use these buttons when the two shapes to be animated have a different number of points. For example, if the first shape has three points and the second
shape has five points, the second shape’s two extra
points have to originate somewhere in the first
shape. Maybe the second shape’s extra points origi-
Animation Environment
5-188
Revision A
Animation Environment
5-188
Revision A
Liberty Artist’s Manual
Liberty Artist’s Manual
nate from the same point on the first shape. You can
change how these points originate in the following
way:
To change the origin position of extra points
(from a triangle to a star):
Revision A
5-189
Animation Environment
Revision A
•
Add a new Shapes Actor to the Timeline.
•
Press Edit Keyframe Button.
•
Press on the second (last) keyframe on the Keyframe Timeline.
•
Press the Edit Shape Button.
•
Use the Star Button to create a star shape.
•
Press the Replace Kf button.
•
Choose the first keyframe (using the Inbetweening slider or left arrow (<) button).
•
Use the Triangle Button to create a triangle
shape.
•
Press the Replace Kf button.
•
Press the Move Next Kf pt Button. The point
where multiple points originate turns blue. In this
case, it’s the lower-left point of the triangle.
•
Press and drag the seven multiple points out
of the blue point. As long as multiple points
remain, the point stays blue. You can drag the
points (one at a time) past other points in the
shape to distribute them evenly, two points to a
side. Note that the points turn green as you move
them.
•
Press the necessary OK Buttons to return to
the main Animation Timeline.
5-189
Animation Environment
CHYRON Corporation
CHYRON Corporation
•
Render a Storyboard and play it back.
When the second shape has fewer points than the
first shape, the procedure is the same, except that
you choose the second keyframe and use the Move
Prev Kf pt Button.
Shapes 3D Paste Popup
Figure 5-49. 3D Paste Popup
This popup appears when you click on a Keyframe
Matchstick to edit it. It’s the same popup as the one
you use for scaling, rotating and slanting shapes in
the Paint Environment. You can also bring up the
3D Paste Popup after you have pressed the Edit
Shapes Button by pressing the Transform Button on
the Edit Shapes Popup. Either way, the results are
the same.
Animation Environment
5-190
Revision A
Animation Environment
5-190
Revision A
Liberty Artist’s Manual
Liberty Artist’s Manual
Shapes Actor Rendering Modes
Figure 5-50. Shapes Edit Popup
In the Shapes Actor’s Actor Edit Menu (which
appears at the right of the main Animation Timeline
when you’ve high-lighted the Shape Actor), are a
number of rendering modes. Choose these by using
the Canvas Mode and Mask Mode Buttons, which in
turn open up a number of variations.
When in Canvas Mode, the Shapes Actor functions
much like a Write-on Actor. Any of the paint modes
are used to paint along the outline of the shape, or to
fill it solidly. Both brush size and brush gap are keyframable. When in Mask Mode, the Shapes Actor
functions much like a mask Actor. All of the effects
obtainable through the Mask Actor are applied
through the animating shapes onto the layer(s)
below. These include effects such as Posterize, Blur,
Noise, Brightness, etc.
Revision A
5-191
Animation Environment
Revision A
5-191
Animation Environment
CHYRON Corporation
CHYRON Corporation
Canvas Mode
Press to choose Canvas Mode for the Shapes Actor,
so that the shape paints to the Canvas using the
color, brush style, brush mode, and brush parameters
set in the Actor Edit Menu and the Keyframe Popup.
In certain paint modes (Reveal, Smear) it reveals
from the Cel Actor below for its effects.
Choose the Canvas Modes from the bottom three
rows of the Actor Edit Menu. These include the
brush colors, brush mode, and brush type:
Brush
Chooses the type of brush to draw with.
Color
Chooses the start/end colors used to draw the shape
outline (when in Outline Mode). Colors are interpolated between the Start and End Color Buttons as the
Actor renders. Press the Start or End Color Buttons
to display the color palette. Modify the upper left
palette box to the desired color, then press the Start
or End Color Button again to confirm the new color.
Mode
Chooses the paint mode (Paint, reveal, Smear, etc.)
Other Canvas Mode variations:
Outline
Draws only the outline of the shape. By default, the
entire shape is drawn at every field. (See below,
Continuous Modes 1 and 2).
Fill
Fills the shape with the current color.
Animation Environment
5-192
Revision A
Animation Environment
5-192
Revision A
Liberty Artist’s Manual
Liberty Artist’s Manual
Continuous Mode 1
Draws the shape a piece at a time over the entire animation. Brush size and gap can change over the
course of the shape’s render.
Continuous Mode 2
Same as above, but brush size and gap are constant
for any particular field. Brush size and gap do not
change during the render.
Mask Mode
The Mask Modes in the Shapes Actor are similar to
the Modes in the Mask Actor, see page 5-163.
Plug-in Actor
The Plug-in Actor allows you to apply a plug-in filter to the actor(s) below it.
The Plug-in Actor’s File Window
The Plug-in Actor’s File Window allows you to
assign a file from the disk to use as a mask for the
filter. When a file is assigned in the window, the filter is applied to the actor(s) below only inside the
file’s mask. If no file is assigned, the filter is applied
over the entire Canvas.
Editing Keyframes of the Plug-in Actor
When you edit a keyframe of a Plug-in Actor, press
on the large Edit Button at the right of the Timeline.
The Plug-in Popup appears, identical to the Plug-in
Popup in the Paint Environment, allowing you to
choose which plug-in filter will be active, as well as
its modifying functions.
Revision A
5-193
Animation Environment
Revision A
5-193
Animation Environment
CHYRON Corporation
CHYRON Corporation
5.8
MORPHING
Liberty provides two complementary morph programs: Triangle Morph and Line Morph. You can
use both types of morphs in the Paint and Animation
Environments. Triangle Morph is more complicated
to use, but renders more quickly. In Triangle Morph
you set and move control points, creating a triangular grid to make distortions. Line Morph is quite
easy to use, and has a better result, but takes more
time to render. In Line Morph you freely position
and modify line segments in a gridless system to
create distortions. Line Morph yields extremely
organic and smooth results and is usually well worth
the extra rendering time.
Figure 5-51. Morph Actor Popup
Animation Environment
5-194
Revision A
Animation Environment
5-194
Revision A
Liberty Artist’s Manual
Liberty Artist’s Manual
You start a morph animation by setting up the control points (Triangle Morph) or the line segments
(Line Morph) that define the beginning keyframe of
the morph. Then you move or modify the keyframe
to create a distortion in the ending keyframe of the
morph. Then you set a duration for the animation
and render the morph using the Storyboard or
Record functions.
Both Triangle Morph and Line Morph allow morphing of a single image or morphing between two
images.
You can add keyframes between the beginning and
ending of any morph.
The discussion of each type of morph begins with a
step-by-step description of how to animate a morph
between two images. This is followed by a function-by-function description of the morph buttons
for each type of morph. First, Triangle Morph:
Revision A
5-195
Animation Environment
Revision A
5-195
Animation Environment
CHYRON Corporation
CHYRON Corporation
5.8.1
Triangle Morph: Step by Step
Figure 5-52. Triangle Morph Popup
To create a morph animation from one image to
another:
Animation Environment
5-196
Revision A
•
Add a Morph Actor to the Timeline. See adding actors, page 5-51.
•
Add a Cel Actor to the layer below the Morph
Actor. The Cel Actor should have the same
begin and end numbers as the Morph Actor (this
is not necessary, but simplifies the process).
•
Press the File Button in the Cel Actor Popup
at the right of the Timeline and assign an
image file to the Cel Actor you just added.
This will be the image that starts the morph.
•
Add a Cel Actor to the layer above the Morph
Actor. Again, the Cel Actor should have the
same begin and end numbers as the Morph
Actor.
Animation Environment
5-196
Revision A
Liberty Artist’s Manual
Revision A
5-197
Animation Environment
Liberty Artist’s Manual
Revision A
•
Assign a disk image file to this Cel Actor as
you did with the previous one. This will be the
image that ends the morph.
•
Press the lower Cel Actor to select it.
•
Press the Recall Cel Button in the Cel Actor
Popup at the right of the Timeline. The starting image for the morph is recalled to the Canvas
so that you can refer to it while setting the beginning of the morph.
•
On the Timeline press the Morph Actor to
select it.
•
Press the Morph Between Button in the
Morph Actor Popup at the right of the Timeline. This sets the actor to morph between two
images.
•
Press the Edit Triangles Button in the Morph
Actor Popup. The Triangle Morph Popup
appears. If an existing morph appears on the
Canvas, press the Reset Button twice quickly to
reset the morph. The Prompt Window at the top
of the Canvas displays the message: "Please
specify a bounding box on Canvas." For a button-by-button description of the Triangle Morph
Popup, see page 5-139.
•
Define a bounding box around the area you
want to morph. Press down once to set the first
corner of the bounding box. Without dragging,
move the cursor to the diagonally opposite corner, and press down a second time. The bounding
box should cover the area you want to distort. If
you make a mistake you can drag the corners into
better positions, but you must do it before you
add any points.
5-197
Animation Environment
CHYRON Corporation
Animation Environment
CHYRON Corporation
5-198
Revision A
•
Press the Add Button on the Triangle Morph
Popup to add control points on the Canvas to
define the beginning of the morph. For example, if morphing a dog into a snake, add points to
define the outline of the dog.
•
Press the Lock Button on the Triangle Morph
Popup when you've finished adding points. This
locks down the points, defining the first morph
keyframe. The yellow pointer jumps to the right
end of the horizontal Triangle Morph Slider,
automatically adding an ending keyframe to the
morph.
•
Press the Edit Triangles Button to exit the
Triangle Morph Popup. The Triangle Morph
Popup disappears.
•
Press the Swap Temp/Canvas to put the starting image into the Temp. Whatever was in the
Temp will appear on the screen.
•
Press the top Cel Actor to select it. This contains the image you are morphing to.
•
Press the Recall Cel Button in the Cel Actor
Popup. The image you are morphing to is
recalled to the Canvas for you to refer to while
setting the ending of the morph.
•
Press the Morph Actor on the Timeline to
select it and press the Edit Triangles Button.
The Triangle Morph Popup appears again. The
points defining the beginning of the morph are
again displayed on the Canvas.
•
Press the Move Button on the Triangle Morph
Popup, then press and drag the control points
on the Canvas, moving them to outline the
image on the Canvas. This sets the points
defining the final keyframe of the morph. For
Animation Environment
5-198
Revision A
Liberty Artist’s Manual
Liberty Artist’s Manual
example, if morphing a dog to a snake: press and
drag the dog's outline points to new positions
outlining the snake.
•
Press the Erase OK Button to see the morphed version of the starting image. The Triangle Morph Popup morphs whatever is in the
Temp. Earlier, you put the starting image in the
Temp using Swap Temp/Canvas. It will be morphed into its new form. This image will never
actually appear on the screen, but it gives a general idea of what is going to happen. It is usually
a far exaggerated version, though, and you must
storyboard or final record the animation to see it
completely (see page 5-251). When testing
morph animations, set a very low duration (15 to
30 frames, depending on the complexity of the
morph or whether additional keyframes have
been inserted. See “Triangle Morph Add Keyframe Button” on page 5-140.)
•
Press the Edit Triangles Button to exit the
Triangle Morph Popup. The Triangle Morph
Popup disappears.
To morph one image instead of morphing between
two, you must turn on the Morph Single Button in
the Morph Actor Popup. In that case you need only
one Cel Actor below the Morph Actor.
Revision A
5-199
Animation Environment
Revision A
5-199
Animation Environment
CHYRON Corporation
CHYRON Corporation
5.8.2
Line Morph:
Step-by-Step
Figure 5-53. Line Morph Popup
To create a morph animation from one image to
another:
Animation Environment
5-200
Revision A
•
1.
Add a Morph Actor to the Timeline.
•
2.
Add a Cel Actor to the level below the
Morph actor. The Cel Actor should have the
same begin and end numbers as the Morph
actor (this is not strictly necessary, but
simplifies the process).
•
3.
Press the File Button in the Cel Actor Popup
at the right of the Timeline and assign an
image file to the Cel Actor you just added.
This will be the image that starts the morph.
•
4.
Add a Cel actor to the level above the
Morph Actor. Again, the Cel Actor should
Animation Environment
5-200
Revision A
Liberty Artist’s Manual
Liberty Artist’s Manual
have the same begin and end numbers as the
Morph Actor.
Revision A
5-201
Animation Environment
Revision A
•
5.
Assign a disk image file to this Cel Actor as
you did with the previous one. This will be
the image that ends the morph.
•
6.
Press the lower Cel Actor to select it.
•
7.
Press the Recall Cel Button in the Cel Actor
Popup at the right of the Timeline. The
starting image for the morph is recalled to the
Canvas so that you can refer to it while setting
the beginning of the morph.
•
8.
On the Timeline press the Morph Actor to
select it.
•
9.
Press the Morph Between Button in the
Morph Actor Popup at the right of the
Timeline.
This sets the actor to morph
between two images.
•
10.
Press the Edit Lines Button in the Morph
Actor Popup.
The Line Morph Popup
appears. If an existing morph appears on the
Canvas, press the Reset Button twice quickly
to reset the morph.
•
11.
Press the Add Button on the Line Morph
Popup to add line segments on the Canvas
to define the beginning of the morph. Press
once to start a line segment; press a second
time to define the end of the line segment. For
example, if you are morphing one face into
another, you place line segments along each of
the features.
•
12.
Press the Lock Button on the Line Morph
Popup. This locks down the line segments
you have added, defining the first morph
keyframe. The yellow pointer on the Morph
Slider jumps to the right end.
5-201
Animation Environment
CHYRON Corporation
Animation Environment
CHYRON Corporation
5-202
Revision A
•
13.
Press the Edit Lines Button to exit the Line
Morph Popup. The Line Morph Popup
disappears.
•
14.
Press the Swap Temp/Canvas to put the
starting image into the Temp. Whatever was
in the temp will appear on the screen.
•
15.
Press the top Cel actor to select it. This
contains the image you are morphing to.
•
16.
Press the Recall Cel Button in the Cel Actor
Popup. The image you are morphing to is
recalled to the Canvas for you to refer to while
setting the ending of the morph.
•
17.
Press the Morph actor on the Timeline to
edit it and press the Edit Lines Button. The
Line Morph Popup appears again. The line
segments defining the beginning of the morph
are again displayed on the Canvas.
•
18.
Press the Move Button on the Line Morph
Popup and press and drag the line segments
on the Canvas, moving, rotating, and scaling
them to define the ending keyframe relative
to the image on the Canvas. Press on a line
segment and drag it to move the line segment.
Press just beyond either end and drag to rotate
and scale the line segment. This sets the line
segments defining the final keyframe of the
morph. For example, if you were morphing
one face into another, you would move each
segment to match the corresponding features
on the second face. In general, slight
movements of the line segments between
keyframes cause subtle effects while larger
modifications of the line segments cause
wildly warped and twisted distortions. In
particular, if any segments flip over or intersect
in the interim or final keyframes, the distorted
picture will fold over on itself and may even
Animation Environment
5-202
Revision A
Liberty Artist’s Manual
Liberty Artist’s Manual
contain multiple distorted copies of the source
image.
•
19.
Press the Erase OK Button to see the
distorted version of the starting image. The
Line Morph Popup distorts whatever is in the
Temp. Earlier, you put the starting image in
the Temp using Swap Temp/Canvas. It will be
distorted into its new form. This image will
never actually appear on the screen, but it gives
a general idea of what is going to happen. It is
usually a far exaggerated version, though, and
you must storyboard or final record the
animation to see it completely (see “Preview
Animation Button (In Brief)” on page 5-43
for a quick overview.) When testing morph
animations, set a very low duration (15 to 30
frames, depending on the complexity of the
morph).
•
20.
Press the Edit Lines Button to exit the Line
Morph Popup. The Line Morph Popup
disappears.
To morph one image instead of morphing between
two, you must turn on the Morph Single Button in
the Morph Actor Popup. In that case you need only
one Cel Actor below the Morph Actor.
Revision A
5-203
Animation Environment
Revision A
5-203
Animation Environment
CHYRON Corporation
CHYRON Corporation
5.9
Motion Tracking
Motion Tracking is an optional software package for
Liberty 32 (standard on Liberty 64) that incorporates
three features:
•
•
•
Motion Tracking
Motion Stabilization
Warp Corners
Motion Tracking
Motion Tracking is designed to follow a defined
point (point mode) or warped group of points (corner mode) so that another element can be composited over the filmstrip and track the reference points.
An example of this feature would be to track the
license plate on a moving vehicle and replace it.
Motion Stabilization
As a complementary tool to Motion Tracking,
Motion Stabilization is used to remove undesired
movement in a filmstrip to stabilize what should be
a stationary reference position. This feature is often
used to remove film weave from digitized scenes
before compositing elements.
Warp Corners
Warp Corners is part of the 3D Distort Paste Popup
in the Paint Environment, or the 3D Distort Paste
Popup in the Edit Keyframe function of the Animation Environment.
The artist can “pull” on any of the four corners of a
paste image to distort the image to the desired effect.
The Warp Corners feature makes it easier to position
a pasted image to match a background element
Animation Environment
5-204
Revision A
Animation Environment
5-204
Revision A
Liberty Artist’s Manual
Liberty Artist’s Manual
instead of using the normal paste transform controls.
See page 4-129 (Paste Distort Mode) for more information.
5.9.1
Motion Tracking
Motion Tracking is designed to allow you to track
an element (still or animated) along a track in a
series of target frames. If the Motion Tracking
option is not installed, the Motion Tracking Button
will be grayed out. (This button is located on the
Image Tools 2 panel of the Paint Environment.) The
tracked element can be anything that can be distinguished from its surroundings in some way, usually
by its luminance value. The Tracking function will
create a series of points, generating a motion curve
path. Or it will generate a set of four points defining
a warp rectangle that follows an area in the target
sequence.
Point Mode
In Point Mode, you are given one selectable point,
Point1. When this point is tracked, a point list will
be generated which has one point that corresponds
to the location of the tracked area for every frame in
the sequence. In Point Mode only the top row of
Point Buttons are active; the rest are grayed out.
Point Mode is used to track one element over a filmstrip with only positional information with no size or
rotational change to the tracking element.
Corner Mode
Corner mode works the same as Point Mode, except
that you define four tracking paths. You should usually (but not always) define the four points starting
with the lower left corner as Point 1 and move
Revision A
5-205
Animation Environment
Revision A
5-205
Animation Environment
CHYRON Corporation
CHYRON Corporation
counter-clockwise. This simplifies the task of the
Warp Corners functions in the animation actor that
the corner paths will be used in. Corner Mode is
used so that the tracking element will be changed to
match the reference area (size, perspective, rotation).
Animation Environment
5-206
Revision A
Animation Environment
5-206
Revision A
Liberty Artist’s Manual
Figure 5-54. Motion Tracking
Revision A
5-207
Animation Environment
Liberty Artist’s Manual
Liberty Artist’s Manual
Motion Tracking Popup
Press the Motion Tracking Button on the Image
Tools 2 panel in the Paint Environment to call up the
Motion Tracking Popup.
File Button
The File Button specifies the target file sequence to
work with. This is a sequence of files that contains a
moving point or area that can be distinguished by
luminance, or other component. The file sequence
must be continuously numbered somewhere in the
filename. Press on the window within the File Button and the File Popup appears. Press in the file list
on one of the filenames in the sequence and it
appears in the File Window. Press on the File Button itself to recall the current file to the Canvas.
Start Button
This button allows you to define the beginning or
base frame of the target sequence you want to track.
This is the file you will recall to the Canvas to set
your Point values on. Press in the Start Window and
type the starting number of the sequence.
End Button
Press in the End Window and type the ending number of the sequence you want to track.
Lock Frame Button
The Lock Frame Button allows you to set points
manually for any given frame or series of frames in
the animation being tracked. The start frame is
always automatically locked, since you specify its
points manually.
Revision A
5-209
Animation Environment
Revision A
5-209
Animation Environment
CHYRON Corporation
CHYRON Corporation
To lock points on a frame using Lock Frame:
•
Choose the frame you want to lock by pressing the Current Frame Window and typing
the appropriate number.
•
Recall the appropriate image file to help you
choose the points.
•
Use the Point Buttons to input the X and Y
values for the desired points.
•
Press the Lock Frame Button. The points you
entered are locked to this frame.
When a locked frame becomes the current frame, the
Lock Frame Button becomes highlighted.
Current File Button
The window in this button displays the filename of
the file currently being processed after you press the
OK Button and tracking is proceeding. This is a display window only; you cannot input to it.
Point Buttons
The Point Buttons allow you to define the points on
the Canvas that you want to track. There are two
modes of operations for the Point Buttons: one,
called Point Mode, that allows tracking of a single
motion curve, and the second, called Corner Mode,
that allows tracking of a four-sided polygon, or warp
rectangle, which uses four motion paths. At the
lower right of the Motion Tracking Popup is a Point/
Corner Mode Button that toggles between Point
Mode and Corner Mode.
Animation Environment
5-210
Revision A
Animation Environment
5-210
Revision A
Liberty Artist’s Manual
Liberty Artist’s Manual
Size Buttons (X and Y)
The X and Y Size Buttons allow you to define the
size of the area you want to track, in pixels. This is
the area that the tracking function “looks at” to trace
motion on the basis of the luminance (or other component) of the area. The X Button defines the width
of the tracked area and the Y button defines the
height.
The size box of the current point is highlighted in
red.
Move Buttons
The X and Y Move Buttons allow you to define a
rectangle designating the maximum distance you
expect the tracked area to move in a single frame.
This value helps the Tracking function eliminate
other areas outside the expected motion path. The X
Button defines the width of the expected area of
motion and the Y button defines the height.
Also, the procedure for recalling a corner list (generated during 4-Point Motion Tracking) into an animation actor has changed. This is now done using the
Corner List Button in the Edit Path Menu.
NOTE
The larger the Size and/or Move
values are, the longer the processing
time for each frame in the sequence.
Point/Corners Button
When pressed, this button alternates between the
Point Mode and the Corner Mode. When in Point
mode, only one row of Point editing windows (X, Y,
Size, Move) is available. When in Corners mode, all
four rows of Point windows are enabled.
Revision A
5-211
Animation Environment
Revision A
5-211
Animation Environment
CHYRON Corporation
CHYRON Corporation
Output Button
The Output Button defines the name of the file containing the Point List or the Corner List. These are
unique file types with unique suffixes when saved
on the disk. A point file is listed as “filename.pt”
and a corner file is listed as “filename.co.” Press in
the Output Window and the File Popup appears.
Type a filename for the Point List to be saved under
(if you are in Point Mode) or for the Corner List to
be saved under (if you are in Corner Mode). The
files are ASCII files containing the coordinates of
the tracked points, and their Size and Move values.
A point file is recalled into the Curve Popup for the
motion path of an animation actor. A corner file is
recalled into the Keyframe Timeline of an animation
actor.
Luminance, H, S, V, R, G, and B Buttons
The Motion Tracking function uses one of these
components to track an area on the Canvas. Luminance is the most common. Choose the mode to use
that will best isolate the element you want to track.
For example, if tracking a yellow sign, highlight the
R & G buttons.
OK and Cancel Buttons
Press OK to start processing the Motion Tracking
function. All the points are calculated and saved
into the currently designated Output File. The Cancel Button brings down the popup without starting
the tracking, while maintaining the current values.
If the software is unable to track a point in a given
frame, an error message will appear in the prompt
window and tracking will halt. If this occurs, try
Animation Environment
5-212
Revision A
Animation Environment
5-212
Revision A
Liberty Artist’s Manual
Liberty Artist’s Manual
increasing the “size” or “move” dimensions, or try
using a different color component (H, S, V, R, G, B,
etc.)
As tracking proceeds, a red wireframe bounding box
is drawn on the canvas when each point is found in
the current frame. This gives the user a visual cue
that the tracking is proceeding correctly.
Separating Points from Image with Warp Corners
To separate the corner points from the tracked
image, use Warp Corners Mode in the Paste/Distort
Popup in the Paint Environment. For example, if
you’ve read a Motion Tracking corners list into an
actor (using the Corner List Button), the corners list
might define a window on the side of a house. You
might want to move the corners list away from the
window to define a sign somewhere else on the wall.
You access this feature through the Paste Distort
Popup, in Warp Corners mode (see page #). Press on
the window labeled "Image" at the top of the Popup.
This toggles the window to "Texture" mode and displays a green wireframe representing the image.
You can then detach the green wireframe, along
with the image, from the (red) corner points by moving its center point. You can also adjust its corners to
rescale the image relative to the original (red) corner
points. During these operations, the image stays in
the same perspective as the corner points.
The Texture Button
The Paste/Distort Popup in Edit Keyframe Mode has
a Texture Button just below the "prev" Button. The
Texture Button is highlighted when the image for
Warp Corners has been detached from the corner
points for the current keyframe. The Texture Button
is off when the image has not been detached from
Revision A
5-213
Animation Environment
Revision A
5-213
Animation Environment
CHYRON Corporation
CHYRON Corporation
the corner points for the current keyframe (or the
image may have been detached before or after the
current keyframe, in which case the offset values
will be interpolated).
Motion Tracking Procedure - Point Mode
The procedure for Motion Tracking (Point Mode)
consists of two procedures: building the point list in
the Paint Environment, and compositing the tracked
element(s) over a background in the Animation
Environment.
Build Point List (Paint Environment)
Animation Environment
5-214
Revision A
•
1.
Press the Motion Tracking Button on the
Image Tools 2 panel to activate the Motion
Tracking Popup.
•
2.
Click in the File window and select first
filmstrip file to be used to select reference
point. The selected image is recalled to the
Canvas.
•
3.
In the Start window, enter number of base
or beginning cel of filmstrip sequence.
•
4.
Click in the End window; enter number of
last cel of filmstrip sequence plus 1.
•
5.
Click in the Output window to select a
directory, and type a filename that will be
the recorded point list.
•
6.
Click on the Point/Corner button and make
sure it is set to Point.
•
7.
Click on the desired component buttons
(luminance, R, G, B, H, S, V) to narrow or
isolate the tracking of the selected pixel(s).
•
8.
Press the Point 1 Button and move the
cursor over the canvas. (If desired, zoom into
Animation Environment
5-214
Revision A
Liberty Artist’s Manual
Liberty Artist’s Manual
the selected area of the canvas for easier pixel
selection.)
•
9.
Press down on the point/area you want to
track. The X and Y windows display the X
and Y coordinates of the point you picked.
•
10.
Press the Size button. Enter the size (in
pixels) of the area you want to track.
•
11.
Press the Move button. Enter the maximum
movement per frame you expect the area to
move (in pixels).
•
12.
Press the OK button. The system will
automatically recall each cel in the sequence,
analyze the position of the selected area, draw
a bounding box on the canvas of the new
position and then recall the next cel.
NOTE
It is recommend that you watch the
processing of the tracking data to
ensure that the reference wireframe is
corresponding to the selected area. If
not, press the END key on the
keyboard, increase the values in the
SIZE and/or MOVE windows, and
press the OK button again.
Compositing Tracked Element
(Animation Environment)
Revision A
5-215
Animation Environment
Revision A
•
1.
Go to the Animation Environment.
•
2.
Press the red corner box of the Delete
Button to delete all layers currently in the
animation timeline.
•
3.
Press in the Actor Type popup of the Add
Actor button.
•
4.
Select the Filmstrip actor type.
5-215
Animation Environment
CHYRON Corporation
CHYRON Corporation
•
5.
Press the Add Actor button and click twice
quickly on Layer 1 of the timeline to add the
Filmstrip actor to the timeline.
•
6.
Click on the File window and select the
same file sequence (filmstrip) as selected in
step 2 above.
•
7.
Click on the In window and select the
starting cel. This should match the same
number as in Step 3 above.
•
8.
Click on the Out window. This number
should match the number entered in Step 4
above.
•
9.
Add a second actor to the timeline on Layer
2. This can be a cel or filmstrip actor type.
•
10.
Click on the File window and select the
filename of the image(s) to be tracked and
composited over the base actor.
•
11.
Click on the Edit Path button to bring up
the Curve Popup.
•
12.
Click on the Point List button and select the
Point List filename as saved in Step 5 above.
•
13.
You can now preview the tracked animation
or render it to a storyboard, disk, VTR, or
DDR.
Motion Tracking Procedure (Corners Mode)
The procedure for Motion Tracking (Corner Mode)
consists of two main procedures: building the corner
list (very similar to building a point list) and compositing the tracked element(s).
Animation Environment
5-216
Revision A
Animation Environment
5-216
Revision A
Liberty Artist’s Manual
Liberty Artist’s Manual
Build Corner List (Paint Environment)
Revision A
5-217
Animation Environment
Revision A
•
1.
Press the Motion Tracking Button on the
Image Tools 2 panel to activate the Motion
Tracking Popup.
•
2.
Click in the File window and select first
filmstrip file to be used to select reference
point. The selected image is recalled to the
Canvas.
•
3.
In the Start window, enter number of base
or beginning cel of filmstrip sequence.
•
4.
Click in the End window; enter number of
last cel of filmstrip sequence plus 1.
•
5.
Click in the Output window to select a
directory, and type a filename that will be
the recorded corner list.
•
6.
Click on the Point/Corner button and make
sure it is set to Corner.
•
7.
Click on the desired component buttons
(luminance, R, G, B, H, S, V) to narrow or
isolate the tracking of the selected pixel(s).
•
8.
Press the Point 1 Button and move the
cursor over the canvas. (If desired, zoom into
the selected area of the canvas for easier pixel
selection.) Start by selecting the lower left
point of the warped rectangle that will be
defined by the four points.
•
9.
Press down on the point/area you want to
track. The X and Y windows display the X
and Y coordinates of the point you picked.
•
10.
Press on the Point 2 Button and select the
second corner point. Move in a counterclockwise direction from Point 1.
•
11.
Repeat Step 10 for Points 3 and 4,
continuing in a counter-clockwise direction.
5-217
Animation Environment
CHYRON Corporation
CHYRON Corporation
•
12.
Press the Size button. Enter the size (in
pixels) of the area you want to track.
•
13.
Press the Move button. Enter the maximum
movement per frame you expect the area to
move (in pixels).
•
14.
Press the OK button. The system will
automatically recall each cel in the sequence,
analyze the position of the selected area, draw
a bounding box on the canvas of the new
position and then recall the next cel.
NOTE
It is recommend that you watch the
processing of the tracking data to
ensure that the reference wireframe is
corresponding to the selected area. If
not, press the END key on the
keyboard, increase the values in the
SIZE and/or MOVE windows, and
press the OK button again.
Compositing Tracked Element
(Animation Environment)
Animation Environment
5-218
Revision A
•
1.
Go to the Animation Environment.
•
2.
Press the red corner box of the Delete
Button to delete all layers currently in the
animation timeline.
•
3.
Press in the Actor Type popup of the Add
Actor button.
•
4.
Select the Filmstrip actor type.
Animation Environment
5-218
Revision A
Liberty Artist’s Manual
Revision A
5-219
Animation Environment
Liberty Artist’s Manual
Revision A
•
5.
Press the Add Actor button and click twice
quickly on Layer 1 of the timeline to add the
Filmstrip actor to the timeline.
•
6.
Click on the File window and select the
same file sequence (filmstrip) as selected in
step 2 above.
•
7.
Click on the In window and select the
starting cel. This should match the same
number as in Step 3 above.
•
8.
Click on the Out window. This number
should match the number entered in Step 4
above.
•
9.
Add a second actor to the timeline on Layer
2. This can be a cel or filmstrip actor type.
•
10.
Click on the File window and select the
filename of the image(s) to be tracked and
composited over the base actor.
•
11.
Click on the Edit Path button to call up the
Curve Popup. The Curve Popup appears.
•
12.
Click on the Corner List button to bring up a
file popup
•
13.
Click on the desired Corners List file (saved in
Step 5 above.)
•
14.
Click in the Ref window and enter the file
number of the first image tracked, as
entered in Step 3 above.
•
15.
Press the Enabled button to highlight it,
thereby activating the Corners mode.
•
16.
Press the OK button to close the Corners
popup.
•
17.
Press the OK button to close the Keyframe
Timeline popup.
5-219
Animation Environment
CHYRON Corporation
CHYRON Corporation
•
5.9.2
18.
You can now preview the tracked animation
or render it to a storyboard, disk, VTR, or
DDR.
Motion Stabilization
Motion Stabilization is a tool to stabilize a digitized
sequence of images that have undesired movement
such as film weave. The procedure involves defining
the reference area in a selected frame (the “Reference Frame”) of the sequence, saving the reference
area as a mask which is then called up by the multiple cel actor. The following steps illustrate the
Motion Stabilization procedure. Refer to “Motion
Stabilization” on page 5-118 for more information.
Motion Stabilization Procedure
•
1.
Go to the Paint Environment and recall the
“Reference Frame” from the sequence to
the Canvas.
•
2.
Within the reference frame, choose a
rectangle of pixels which you want to
remain stable throughout the sequence of
frames. Select the pixels using the Rectangle
Mask function in the Mask Tools 1 panel, and
save the result to a Mask file.
NOTE
A larger rectangle will achieve better
results, but will also take more
processing time per frame. This is
because more pixels are being
corrected.
Animation Environment
5-220
Revision A
•
3.
Go to the Animation Environment and start
with an empty animation timeline.
•
4.
Create a Cel actor for the sequence you
want to stabilize. As with any Cel actor, enter
Animation Environment
5-220
Revision A
Liberty Artist’s Manual
Liberty Artist’s Manual
the first filename of the image sequence into
the File window of the Actor Edit popup.
Then, press on the “Single” button to bring up
the Cycle/Filmstrip Popup. In this popup, enter
the number of the first file in the sequence into
the “In” window. Enter one beyond the number
of the last file in the sequence into the “Out”
window. Once this is complete, the “Single”
window’s label will change to “Multiple”.
Press on this window to exit the Cycle/
Filmstrip Popup.
Revision A
5-221
Animation Environment
Revision A
•
5.
Press on the Stabilize button to enable
(highlight) Stabilization in the Actor Edit
Popup. Once activated, the Ref, X, Y, and
Mask buttons will also become activated.
•
6.
Set the Ref window to the file number of the
reference frame.
•
7.
Click in the X window and enter a number.
This is the distance that will be searched
horizontally for each frame. Higher values will
correctly handle sequences with greater
movement, but will also take more processing
time. A value between 10 and 30 will work for
most sequences (10 is the default value.)
•
8.
Click in the Y window and enter a number.
This is the same as the X window in Step 7
except for the vertical direction.
•
9.
Click in the Mask window and select the
filename saved in Step 2.
•
10.
You can now preview the animation or
render it to a storyboard, disk, VTR, or
DDR. If the Stabilize button is on, the frames
in the Cel Actor will be stabilized as they are
rendered.
5-221
Animation Environment
CHYRON Corporation
CHYRON Corporation
NOTE
If the Cel Actor fails to render, it is
often due to loss of correlation
between image frames. If this occurs,
try increasing the X and Y distance
values in the Actor Edit popup (steps
7 and 8). If this fails, try increasing the
size of the reference frame’s
correlation mask (step 2).
If the Cel Actor’s files fail to recall,
check the frame number of the
reference frame (step 6). Also, check
the In and Out frame numbers in the
Cycle/Filmstrip Popup of the Cel
Actor (Step 4).
5.10
Animation Playback Functions
Use the playback functions to play animations in
one of three basic modes: Preview, Storyboard, and
Record. These are playback mode buttons, only one
of which can be on at a time. Preview Mode renders
to the screen in various ways, without saving or
recording anything.
Storyboard Mode records the animation (with a
choice of various resolutions) to a disk file, so that it
can be played back as a preview. You can also drag
the Preview Handle at the top of the Timeline to
manually play back the different Preview modes.
Use Record Mode for final rendering to a recording
device or to disk; it is always at full resolution.
After choosing a playback mode by pressing it, you
must press the Run Button to begin the play back.
Animation Environment
5-222
Revision A
Animation Environment
5-222
Revision A
Liberty Artist’s Manual
Liberty Artist’s Manual
Animation Preview Button
Figure 5-55. Playback Buttons
Press the main part of the button to turn on Preview
Mode. Press the corner button to display the Preview
Animation Popup.
Animation Preview Popup
Figure 5-56. Preview Animation Popup
The Animation Preview Popup contains three mode
buttons: Wireframe, Outline, and Render. Press the
OK Button to confirm your choice of mode and
make the popup disappear. The three Preview modes
do not save or record anything, but display on the
screen only.
Revision A
5-223
Animation Environment
Revision A
5-223
Animation Environment
CHYRON Corporation
CHYRON Corporation
Wireframe Preview
When this mode is active, the animation plays representing each actor by a separate rectangular bounding wireframe. This is the fastest playback mode,
since it uses only wireframes with no rendering. It is
useful for getting a quick, general sense of the
motion in an animation. Press the Run Button to
start playback.
You can press and drag the Preview Handle (the cursor at the top of the timeline) to dynamically view
the motion. The Preview Handle is red when the
Render Preview Mode is chosen; otherwise it’s
white.
Outline Preview
When this mode is active, the animation plays representing each actor by an outline based on its alpha
(transparency). For example, a Cel Actor containing
a logo saved on a transparent background displays
the logo’s outline shape. Press the Run Button to
start playback. As another example, Text Actors display as outlines in this mode.
To display its outline, a file must have been saved to
disk in Liberty 5.5 or later. If the file was saved in an
earlier version of Liberty it will display as a rectangle wireframe. To display it as an outline, simply
recall it and re-save it in the Paint Environment.
Render Preview
When this mode is active, the animation renders the
current frame to the screen in full resolution. The
current frame is determined by dragging the Preview
Handle (the red cursor at the top of the Timeline)
along the top of the Timeline to its desired position
and releasing.
Animation Environment
5-224
Revision A
Animation Environment
5-224
Revision A
Liberty Artist’s Manual
Liberty Artist’s Manual
To render a frame with Render Preview Mode:
•
1.
Press the corner button of the Animation
Preview Button. The Preview Animation
Popup appears.
•
2.
Press the Render Mode button to activate it, if
it’s not already high-lighted.
•
3.
Press OK to remove the popup.
•
4.
Press and drag the red Preview Handle cursor
along the top of the Timeline until it is at the
frame you want to render.
•
5.
Lift up on the pen or mouse. The current frame
renders to the screen.
•
6.
Repeat as desired.
Render Preview mode does not use the Run Button
for playback. If you press the Run Button while
Render mode is active, the animation plays back in
Wireframe.
Revision A
5-225
Animation Environment
Revision A
5-225
Animation Environment
Liberty Artist’s Manual
Animation Preview Handle
Figure 5-57. Animation Timeline
Revision A
5-227
Animation Environment
Liberty Artist’s Manual
Liberty Artist’s Manual
The Preview Handle is a cursor at the top of the
Timeline. Its default position is at the left end of the
Timeline. Press and drag it along the top of the
Timeline to manually display the animation in the
current Preview Mode. In Wireframe and Outline
Modes as you drag the Handle, the animation plays
back according to the position of the moving Handle. In Render Mode, one frame is rendered at the
point where you lift the pen or mouse.
The handle changes color to red in Render Mode to
alert you that it will render-over the canvas if
dragged on the timeline.
When selected, an actor with multiple files (Filmstrip, Cycle, or Multiple Cel Actors) in the animation displays its current filename and thumbnail as
you drag the Handle along the Timeline. Thus, you
can watch the multiple files animate in the Browse
image in the Actor Popup. The filename shown in
the File Button Text Window changes as well.
When dragging the Handle in Preview Mode, you
can drop down inside the Timeline where the wireframe of the actor that the pen is over on the Timeline highlights.
The Prompt Window at the bottom of the screen displays the frame number of the cursor's position as it
moves across the Timeline.
The Handle works in the Keyframe Timeline Popup
as well.
In Storyboard Preview, the Preview Handle manually plays back the current Storyboard file (see
below). When thus using the Preview handle in Storyboard Mode, be sure that the animation on the
Timeline matches the animation in the current StoRevision A
5-229
Animation Environment
Revision A
5-229
Animation Environment
CHYRON Corporation
CHYRON Corporation
ryboard elevator. In Storyboard Mode the animation
in the current Storyboard Elevator plays, not the animation currently on the timeline.
Animation Environment
5-230
Revision A
Animation Environment
5-230
Revision A
Liberty Artist’s Manual
Liberty Artist’s Manual
Animation Storyboard Button
Figure 5-58. Record Popup
The Animation Storyboard functions allow you to
record and play back rendered previews of the current animation, using the SGI Movie (extension
Revision A
5-231
Animation Environment
Revision A
5-231
Animation Environment
CHYRON Corporation
CHYRON Corporation
.mv) and the Quicktime Movie (extension .mov)
formats. Four different resolution settings are available for the Storyboard preview, as well as variable
playback speed. The SGI Movie files are readable
by SGI media collaborations such as Moviemaker,
Movieplayer, and ShowCase.
To render a Storyboard preview of an animation:
Animation Environment
5-232
Revision A
•
Create an animation in the Timeline or recall one
from the disk.
•
Set the duration of the animation. Often it's good
to use a short duration for a Storyboard, unless
you need to see a very detailed Storyboard. For
one thing, a long Storyboard can use up a lot of
disk space. However, extremely short durations
(say, 5 to 10 frames) can leave out large parts of
the animation.
•
Press the Storyboard Button to activate Storyboard mode.
•
Press the “R” corner button of the Storyboard
Button. The Record Control Popup appears.
•
Press the Fine Button to set the resolution.
Fine is normally the preferred resolution. If you
are prompted whether to change the resolution,
answer Yes.
•
Press the Path Window to set a path and filename for the Storyboard to be recorded
under. The current elevator level is used.
•
Press the Overwrite Button if it’s not already
high-lighted. This is the default mode for
recording a new Storyboard, or over-writing an
existing one.
Animation Environment
5-232
Revision A
Liberty Artist’s Manual
Liberty Artist’s Manual
•
Press the OK Button to remove the Record
Popup. The popup disappears.
•
Press the Run Button. (The Story Button must
be high-lighted). The animation renders. You can
press the End key on the keyboard to abort Storyboard render.
To play back a Storyboard preview of an animation:
5.10.1
•
Press the “P” corner button of the Storyboard
Button to bring up the Storyboard Popup. The
popup appears.
•
Press the Play 1 Button. The Storyboard cues to
the beginning and plays back once.
Record Control Popup
Press the “R” corner button of the Storyboard Button to call up the Storyboard Popup.
Record Modes
Press one of the three Record Mode Buttons to
choose one. They are Overwrite Mode, Insert Before
Mode, and Append Mode.
Overwrite Mode
Activate Overwrite to record a new Storyboard, or to
overwrite all or part of an existing Storyboard.
The Start and End Windows
The Start and End Windows display the beginning
and ending frames of the file to be overwritten. If
you are recording a new Storyboard file, the Start
and End Windows are by default set at 0. You can
press in the Start/End Windows to type in new valRevision A
5-233
Animation Environment
Revision A
5-233
Animation Environment
CHYRON Corporation
CHYRON Corporation
ues, or change them by using the Frame Slider.
Pressing the main part of the Start or End Windows
displays the specified frame on the canvas, so you
can see which frames will be overwritten.
The Frame Slider
The Frame Slider displays Start and End indicators.
Press and drag the left indicator to change the Start
Window value. Press and drag the right indicator to
change the End Window value. Frames of the current Storyboard file are displayed on the Canvas as
you drag the indicators. You can also display the
start or end frame on the Canvas by pressing directly
on the word “Start” or “End.” You can also change
the Start/End values by pressing the Decrement ( < )
or Increment (>) Frame Buttons at either end of the
Frame Slider.
Insert Before Mode
To insert frames into an existing Storyboard file,
activate the Insert Before Button. Set the Start Window to the frame before which you want to insert the
new frame(s). The insert frame is displayed on the
Canvas.
Append Mode
To append frames to the end of an existing Storyboard file, activate the Append Button. The last
frame is displayed on the Canvas.
Erase Functions
The Erase Functions allow you to selectively delete
frames from a Storyboard file.
Animation Environment
5-234
Revision A
Animation Environment
5-234
Revision A
Liberty Artist’s Manual
Liberty Artist’s Manual
Erase Block
Press to delete the frames between the frames displayed in the Start and End Windows, inclusive.
Erase One
Press to erase the Start frame.
Erase All
Press to erase all the frames in the Storyboard file.
Record Rate Window
Press this window to change the default rate at
which the Storyboard will be played back during
normal play. When you play back the Storyboard,
the Playback Popup allows you to select a different
playback rate than the one recorded in the file.
Storyboard Resolution Modes
Press one of the Storyboard Resolution Modes to
activate it. Choices are Full, Fine, Normal, or
Coarse.
Full Resolution
The resolution of the frame recorded to the Storyboard is the same as the Canvas resolution.
Fine Resolution
The resolution of the frame recorded to the Storyboard is one-half the Canvas resolution.
Normal Resolution
The resolution of the frame recorded to the Storyboard is one-third the Canvas resolution.
Revision A
5-235
Animation Environment
Revision A
5-235
Animation Environment
CHYRON Corporation
CHYRON Corporation
Coarse Resolution
The resolution of the frame recorded to the Storyboard is one-fourth the Canvas resolution.
X Resolution Window
Press in this window to type in a new resolution for
the width of the recorded image. The y resolution is
automatically computed to preserve the current
aspect ratio.
Y Resolution Window
Press in this window to type in a new resolution for
the height of the recorded image. The aspect ratio is
NOT automatically preserved. Thus, if you want to
change the aspect ratio, change x first, then y.
Filter Button
Press the Filter Button to turn it on, thereby enabling
interpolation on the rendered Storyboard frames.
When Filter is off, the frames are not interpolated.
Interpolation filters the frames, giving them a softer
look. It makes rendering take a little longer. Does
not apply to Full Resolution images.
When you try to change the Resolution Mode (or the
X/Y settings) while the current Storyboard elevator
level has a Storyboard in it, you will be prompted:
Resolution changed. Erase Storyboard?
Press Yes to erase the current Storyboard and
change the resolution.
Generally, the Fine Resolution Mode is preferred,
since it gives a fairly high quality renderings, without taking as much time as Full Mode. However
(since Storyboard renders to disk) the finer the resoAnimation Environment
5-236
Revision A
Animation Environment
5-236
Revision A
Liberty Artist’s Manual
Liberty Artist’s Manual
lution, the more disk space is required for storage.
Since there is no limit to how long a Storyboard can
be, it is possible to use quite a bit of disk space for
Storyboards. The coarser resolutions use less disk
space. Coarse render takes 12 KB per frame; Normal takes 48 KB per frame; Fine takes 192 KB per
frame; and Full takes 1555 KB per frame. Use Full
mode only when necessary.
Storyboard renders to the Canvas in full resolution,
then converts the frame to the currently selected resolution and stores the frame to disk. However, you
may notice that as it renders to Canvas some elements look a little compressed. This is because
actors that are rotated or scaled are rendered to the
Canvas at lower resolution to save time during Storyboard rendering. To see a full-resolution frame,
use Full Mode.
Storyboard Elevator and Path Window
Press on one of the six Storyboard elevator levels to
choose it for rendering a Storyboard. The Storyboard renders to the disk path in the current elevator
level. If the current elevator level contains a Storyboard when you press Run, you are prompted as to
whether you want to overwrite it. To change the path
in the current Storyboard elevator level, press in the
Path Window and select a disk/directory/filename
for the Storyboard file.
File Data Button
Press the File Data Button to call up the Storyboard
File Control Popup. Here you can enter title information and comments that will be saved with the
Storyboard when you perform a Record. You can
Revision A
5-237
Animation Environment
Revision A
5-237
Animation Environment
CHYRON Corporation
CHYRON Corporation
also choose recording formats and compression
schemes. For details about these functions, see page
5-246.
Browse Button
Pressing the Browse Button will create a browse
image of the storyboard using the current frame,
similar to normal Liberty browse images.
Animation Environment
5-238
Revision A
Animation Environment
5-238
Revision A
Liberty Artist’s Manual
Liberty Artist’s Manual
5.10.2
Playback Control Popup
Figure 5-59. Playback Popup
Revision A
5-239
Animation Environment
Revision A
5-239
Animation Environment
CHYRON Corporation
CHYRON Corporation
The Playback Control Popup allows you to play
back Storyboard files at various speeds, loop
modes, rates, and resolutions
Press the “R” corner button of the Storyboard Button to call up the Storyboard Popup.
Play Once Button (Play 1)
Press the Play Once Button to play the current Storyboard from its beginning to its end, then stop.
Play Button
Press the Play Button to play the current Storyboard
forward from the current frame.
Fast Forward Button (FF)
Press the FF Button to play the current Storyboard
at double-speed forward from the current frame.
Reverse Button (Rev)
Press the Reverse Button to play the current Storyboard backward from the current frame.
Fast Reverse Button (FR)
Press the FR Button to play the current Storyboard
at double-speed backward from the current frame.
Stop Button
Press to stop playback.
Animation Environment
5-240
Revision A
Animation Environment
5-240
Revision A
Liberty Artist’s Manual
Liberty Artist’s Manual
Frame Window
The Frame Window displays the current frame of
the Storyboard on the Canvas. You can press on the
Frame Window itself and type in a frame number to
go to that frame.
Start and End Windows
The Start and End Windows display the start and
end frames of the current Storyboard file. Press in
either one to change the start/end time of the play
back. For example, if you have a 30-frame Storyboard file, you can set the Start Window to 10 and
the End Window to 20. Pressing Play plays frames
10 through 20.
Pressing above the Start or End Windows (right on
the word) displays the start or end frame on the Canvas.
Playback Frame Slider
This slider allows you to manually control playback
of a Storyboard by pressing and dragging the slider.
The buttons on either end of the slider allow you to
move one frame at a time through the Storyboard,
backwards (<) or forward (>). Press and drag the
small markers above the slider to manually change
the Start and End frames of the Storyboard playback.
Playback Modes
The Playback Once Button
When activated, the Storyboard plays once, then
stops.
Revision A
5-241
Animation Environment
Revision A
5-241
Animation Environment
CHYRON Corporation
CHYRON Corporation
Loop Playback Button
When activated, the Storyboard plays repeatedly,
until you press the Stop Button. Plays the number of
times set in the Num Loops Button. Loop Direction
depends on which play buttons you press to start
playback (forward or reverse).
Swing Playback Button
When activated, the Storyboard plays repeatedly
forward to the end and then in reverse back to the
beginning, repeating until the you press Stop. Plays
the number of times set in the Num Loops Button.
Num Loops Button
Press to set the number of loops to play the Storyboard when you are in Loop or Swing Mode. If set
to 0 (zero), the Storyboard loops indefinitely until
you press the Stop Button.
Loops Counter Button (Loop Ctr)
Show how many loops have been played (no display
if Num Loops is infinite).
Speed Slider
Use this slider to manually vary playback speed
while the Storyboard is playing. Set the playback
mode to Loop or Swing, then press and drag the
slider between the left end (-2, reverse) and the right
end (+2, forward). A speed of 1 plays at the
requested rate, where a speed of 2 plays back at
twice the requested rate. A negative speed plays
back in reverse.
Animation Environment
5-242
Revision A
Animation Environment
5-242
Revision A
Liberty Artist’s Manual
Liberty Artist’s Manual
Rate Selection Modes
Requested Rate Window
This window shows the rate that the Playback Control is attempting to achieve, depending on hardware
platform, size of frames, etc. Press in the window to
type a number, or use one of the six Rate Buttons
just below (Normal, 1 FPS, etc.).
If playback fails to achieve the requested rate, a
message appears in red in the Prompt window at the
bottom of the screen.
Actual Rate Window
This window shows the rate of the actual playback.
When the Actual Button is high-lighted the rate is
displayed for each frame. When it is not highlighted, an average rate is displayed, averaged over
the last full second of playback.
Normal Button
Press to high-light and set the requested rate at the
default rate recorded when the Storyboard file was
created.
1 Frame Per Second Button
Press to high-light and set the requested rate at one
frame per second.
Play Every Frame Button
Press to high-light and play back every frame of the
Storyboard, regardless of the requested or recorded
rate. Every frame is displayed.
Quarter Button
Press to high-light and set the requested rate at one
quarter of the recorded (Normal) rate.
Revision A
5-243
Animation Environment
Revision A
5-243
Animation Environment
CHYRON Corporation
CHYRON Corporation
Half Button
Press to high-light and set the requested rate at one
half of the recorded (Normal) rate.
Double Button
Press to high-light and set the requested rate at twice
the recorded (Normal) rate.
Resolution Windows
These buttons are for information only.
The Storyboard can be played back only in multiples
of its recorded resolution. The “Recorded” Windows
show the X and Y dimensions of the recorded Storyboard file. The “Actual” Windows show the X and
Y dimensions of the images on the Canvas.
Magnifying Storyboards
You can use the “In” and “Out” Magnify Buttons to
decrease or increase the resolution of the Storyboard
frames on the Canvas, but there are some limitations. You can magnify the Storyboard to a resolution larger than the current Canvas resolution.
(However, a Storyboard recorded at a higher resolution than the current Canvas will be displayed as
well as possible.) You cannot zoom out farther than
the resolution of the recorded Storyboard (so a Storyboard recorded at Full resolution cannot be
zoomed out).
Displaying Full-Screen Storyboards
Press the On Button below the Animation Timeline
to enable the Permanent Storyboard display. Then
press the Canvas Button to display the Storyboard
full-screen on the Canvas. The Permanent StoryAnimation Environment
5-244
Revision A
Animation Environment
5-244
Revision A
Liberty Artist’s Manual
Liberty Artist’s Manual
board Buttons are available at the bottom of the
screen for various playback options. See page 5-251
for a full description of these functions.
Storyboard Elevator and Path Window
Press on one of the six Storyboard elevator levels to
choose it for playing a Storyboard. To change the
path in the current Storyboard elevator level, press
in the Path Window and select the disk/directory/
filename of a Storyboard file to play back.
File Data Button
Press the File Data Button to call up the Storyboard
File Control Popup. Here you can enter title information and comments that will be saved with the
Storyboard when you perform a Record. You can
also choose recording formats and compression
schemes.
Browse Button
Pressing the Browse Button will create a browse
image of the storyboard using the current frame,
similar to normal Liberty browse images.
Revision A
5-245
Animation Environment
Revision A
5-245
Animation Environment
CHYRON Corporation
CHYRON Corporation
File Control Popup
Figure 5-60. File Control Popup
Title Window
Press and type in text to title the Storyboard.
Comment Window
Press and type in comments about the Storyboard.
Animation Environment
5-246
Revision A
Animation Environment
5-246
Revision A
Liberty Artist’s Manual
Liberty Artist’s Manual
Format Window
Press to toggle between SGI 3 and Apple Quicktime
formats.
Packing Window
Automatically set based on format choice.
Compression Window
Press to cycle through 5 compression choices for the
SGI 3 format. For Apple Quicktime, choose
between Uncompressed or JPEG. See table below
for a comparison of compression types.
Interlacing Window
Currently, always non-interlaced.
Orientation Window
Currently, always Bottom-to-Top.
Compression Schemes
These are some notes on the 5 compression schemes
supported by Liberty for SGI 3 movies. They
include comparisons between file size and playback
rate of movies recorded with each scheme, at various resolutions.
The basic compression schemes are summarized
here (in order of highest to lowest disk storage
required):
Uncompressed: Achieves 30 FPS at lower image
resolutions, but requires the most disk space.
Revision A
5-247
Animation Environment
Revision A
5-247
Animation Environment
CHYRON Corporation
CHYRON Corporation
MVC1: SGI proprietary algorithm designed for
rapid decompression of motion video. Pretty good
playback rate obtained with some loss of image
quality.
RLE: A "lossless" compression algorithm for storing images, but introduces patterns in solid colors
when played back from the movie library. Not the
best choice when high playback rates are desired.
MVC2: An improved version of MVC1, since data
compression and playback rates are higher. JPEG:
Best compression in terms of saving disk space, but
image degradation is ugly and achieving a reasonable playback rate is impossible.
The following comparisons were done by rendering
and playing back the same animation in all of the
configurations listed below. The animation consists
of 13 frames of numbers from 0 to 12. The frames
have a high number of repeating pixels.
Image resolution:
720 x 540 (FULL)
Format
Animation Environment
5-248
Revision A
Size (K)
Playback Rate (FPS)
Uncompressed
20218192
13.5
MVC1
1997648
11.8
RLE
904530
6.9
MVC2
508867
10.6
JPEG
247936
1.5
Animation Environment
5-248
Revision A
Liberty Artist’s Manual
Liberty Artist’s Manual
Image resolution:
360 x 270 (FINE (1/2) resolution)
format
size (k)
playback rate (FPS)
at Full Res:
at Native Res:
Uncompressed
5054992
11.0
39.0
MVC1
528884
11.0
35.0
RLE
233420
10.0
24.0
MVC2
151027
11.0
38.0
JPEG
95484
4.0
5.0
Image resolution:
240 x 180 (NORMAL (1/3) resolution)
format
Revision A
5-249
Animation Environment
size (k)
playback rate (FPS)
at Full Res:
at Native Res:
Uncompressed
2246992
24.0
60.0
MVC1
239908
23.0
58.0
RLE
107075
20.0
43.0
MVC2
68681
24.0
63.0
JPEG
58680
9.0
12.0
Revision A
5-249
Animation Environment
CHYRON Corporation
CHYRON Corporation
Image resolution
180 x 135 (COARSE (1/4) resolution)
format
Animation Environment
5-250
Revision A
size (k)
playback rate (FPS)
at Full Res:
at Native Res:
Uncompressed
1264192
31.0
84.0
MVC1
138904
37.0
78.0
RLE
60949
33.0
61.0
MVC2
45823
38.0
82.0
JPEG
42688
15.0
19.0
Animation Environment
5-250
Revision A
Liberty Artist’s Manual
Permanent Storyboard Buttons
Figure 5-61. Permanent Storyboard Buttons
Revision A
5-251
Animation Environment
Liberty Artist’s Manual
Liberty Artist’s Manual
At the bottom of the Timeline is a permanent row of
buttons that duplicate the Storyboard Playback Buttons. Use them to run storyboards at any time, for
example, while editing keyframes in the Keyframe
Timeline. (Otherwise, too many popups up at one
time can cause problems.) These buttons are identical to the Storyboard Playback Buttons described
above. Press the On Button to enable/disable the
Permanent Storyboard Buttons.
Magnifying the Storyboard Playback
Liberty allows zoom-in, zoom-out, autopan, and
full-screen (the Canvas Button) display for the Storyboard. These functions work with either the Storyboard Popup or the Permanent Storyboard
Functions.
When the Permanent Storyboard is on, you can run a
Storyboard by pressing and dragging on the preview
strip above the timeline, just like wireframe preview. Note that this function will work with any
Storyboard, not necessarily the one that corresponds
with the animation currently on the Timeline.
Recording Over Part of an Existing
Storyboard
When you have recorded a Storyboard and play it
back and find you want to change only a part of it,
you can use the following procedure:
To record over part of an already recorded
Storyboard:
•
Revision A
5-253
Animation Environment
Revision A
Make the changes in the animation in the Timeline.
5-253
Animation Environment
CHYRON Corporation
CHYRON Corporation
•
Set the Skipin and Skipout windows so that the
part of the animation you want to tape over with
is the only part that records. It will record over
the corresponding frames of the Storyboard.
•
Press on the Storyboard Button. The Storyboard Popup appears.
•
Press on the elevator level of the Storyboard you
want to record over part of.
•
Make sure Append is not on, and press OK.
•
Press Run. The Storyboard Confirmation Popup
appears. Your choices are Yes, No, and Cancel.
•
Press No. The Storyboard is recorded over.
When using this procedure, make sure that the
duration of the Storyboard and the duration of
the animation match, or you will tape over the
wrong parts.
When you play back the Storyboard by pressing the
Once, Loop, or Swing Buttons, only the newly
recorded frames play back. To play back the entire
Storyboard, reset Skipin and Skipout to zero. In
other words, the settings of Skipin and Skipout control which frames of the Storyboard play back. You
can play back the entire animation without setting
Skipin/Skipout to zero by resetting Storyboard playback to the beginning (the Begin Button) and pressing the Forward Play Button and holding it down.
Animation Environment
5-254
Revision A
Animation Environment
5-254
Revision A
Liberty Artist’s Manual
Liberty Artist’s Manual
Record Animation Button (Final Render Mode)
Figure 5-62. Playback Buttons
Press to turn on. Pressing the Run Button with this
mode on renders the animation at full resolution out
to the current target video recording device (or hard
disk).
Background Render
You can record to a recording device “in the background” while at the same time running a second
version of Liberty.
To render an animation in the background:
Revision A
5-255
Animation Environment
Revision A
•
1.
Save a version of the animation that is ready
to render. You must save the animation with
the correct in-time. Holdin, Skipin, Dur, etc.
are also saved in the animation file.
•
2.
Set all record parameters. This includes
everything on the Target Setup Menu - the
appropriate device, etc. It's important to set
each VTR's destination correctly, or if only
using one VTR, to make it the current VTR.
Everything in the Run Popup (fields vs.
frames, etc.) is also saved in the database file
when you exit Liberty.
•
3.
Exit Liberty.
•
4.
In a shell, type: liberty32 -b path/filename &
(For example, liberty32 -b /usr/people/liberty/
5-255
Animation Environment
CHYRON Corporation
CHYRON Corporation
image/local/hd0/anim1.an &)
begins to render.
•
5.
The animation
Start another version of Liberty. You can
start Liberty from the desktop or from another
shell. When using Liberty avoid initializing the
record device. Any changes you make in the
record parameters will not affect the animation
that is currently being background rendered.
Note: If you want to stop the background render
before it’s finished, exit liberty and in one of the
shells type:
killall liberty32
Run Animation Button
Press to run the animation. The mode of playback
depends on which mode button is turned on, Preview, Storyboard, or Record.
Run Popup
Figure 5-63. Run Popup
Animation Environment
5-256
Revision A
Animation Environment
5-256
Revision A
Liberty Artist’s Manual
Liberty Artist’s Manual
Pressing the corner button of the Run Button calls
up the Run Popup.
Frame/Field Modes
Here you can choose Frame Mode to record by
frames or choose Field Mode to record by fields (if
the designated recording device supports field
recording). Use Field Mode for the smoothest
motion in an animation, though it takes twice as long
as frame mode. Horizontal, vertical or diagonal
motion can be flickery when rendered in Frame
Mode. You can record to hard disk either in frames
or fields. Storyboard renderings always are in
frames, ignoring the field mode if it’s on. You also
have the option of recording the even or odd field
first. Only change this if an animation rendered by
fields is showing undue flicker.
Matte Modes
Also on the Run Popup, two record modes allow you
to record high-contrast mattes of your animation, for
creating a matte reel. The Matte Only Mode records
animating elements white on black (black appears
where there is transparent background). Invert Matte
records animating elements black on white.
Ring Bell
When Ring Bell Mode is on, Liberty will emit a
bell-like tone when an animation finishes rendering.
Create Log
When Create Log Mode is on, the progress of the
animation is printed frame-by-frame in the shell outside of Liberty.
Revision A
5-257
Animation Environment
Revision A
5-257
Animation Environment
CHYRON Corporation
Animation Environment
CHYRON Corporation
5-258
Revision A
Animation Environment
5-258
Revision A
Index
A
Abekas
3-38
Accent Panel Menu (text)
Accent Position Button
accents
4-411
4-412
4-411
Accept Edit Button
4-425
Action Button
4-220
Action Popup
4-220
5-57
Type Button 5-65
Actor Popup Menu
Actor
5-56, 5-59
Edit Keyframe Button 5-60
Edit Path Button 5-60
Name Window 5-58
Begin and End Windows
Actor Popup Menus
5-104
Actor Type Popup
5-45
actors, animation
5-5, 5-44
adding
5-51
assigning an image to
changing types
5-105
5-105
5-54
deleting 5-52
editing 5-50
looping 5-58
moving 5-53, 5-59
naming 5-58
paths 5-71, 5-106
stretching 5-55, 5-59
turning off 5-53
copying
Revision A
Index-1
Revision A
Index-1
CHYRON Corporation
CHYRON Corporation
Add Keyframe Button
Add Prefix Button
Add User Button
adding actors
5-71
4-61
3-11
5-51
Adjust Button, Color Mixer Mode
Adjust Mask Button
Air Brush Mode
4-372
4-26
Align Text Button
alpha value
4-50
4-405
4-23
Alt Style Mode
3-32
animation
fades
5-82
Animation Environment
Animation Peek Bar
5-1
5-227
animation playback functions
Animation Playback Menu
5-222
5-11
Animation Storyboard Button
5-231
5-5, 5-38
5-5, 5-6
compressing 5-56
deleting all 5-52
Animation Timeline
animation layers
layers
5-55
5-52
moving 5-54
turning off 5-53
navigating 5-9
copying
inserting
animations
actors
5-44
5-38
5-36
adding on to
checking
Index-2
Revision A
Index-2
Revision A
Liberty Artist’s Manual
Liberty Artist’s Manual
5-52
length of 5-37
loops 5-39
deleting
recalling and saving
recording
5-34
5-43
5-39
5-41
in and out times
one frame of
5-41
partially
anti-aliasing
4-16, 4-138
varying anti-aliasing of paint brushes
Apply Button
4-309
Apply Color Button (to a grid)
Artstar Button Popup
4-58
4-456
aspect ratio, automatic change
Auto-composite Popup
Axis Lock Button
B
Back Button
4-439
4-132
4-215
background color
4-34
Background Color Button
Bevel Mode
Bind Macro Button
Blend Colors Button
blending colors
Revision A
4-416
4-37
4-35
4-324
blurring masks
Index-3
4-258
4-416
Bind Macro File Button
Revision A
4-53
3-31
Bias Button, Curve Popup
Blur Button
4-161
4-372
Index-3
4-26
CHYRON Corporation
CHYRON Corporation
Brightness Slider
4-294
4-227
4-234
browsing files
filmstrips
foreign file formats
Brush Display
4-20
Brush Size Slider
Buffers Panel
4-230
4-22
4-74
Bump Map Button
4-335
burning in a Write-on Actor
C
Calculator
4-67
buttons, list of
4-71
second (hidden) panel
calculator
4-68
1-5
turning off
1-5
Cancel Edit Button
Canvas
5-136
4-425
4-5, 4-104
Canvas Buffer
4-104
Canvas Button
4-13
Canvas Configuration Panel Menu
3-21
3-25
Frame-rate Buttons 3-27, 5-36
Other Resolution Popup 3-22
X Resolution Button 3-22
Y Resolution Button 3-22
Dots Per Inch Button (DPI)
CanvasButton
Cel Actor
4-64
5-45, 5-106
Center Button (text)
Index-4
Revision A
4-404
Index-4
Revision A
Liberty Artist’s Manual
Liberty Artist’s Manual
Change Step Button
4-423
5-36
Check Animation Button
5-165
Chroma Key Mode
4-351
Chroma Key Popup
4-448
Chyron Motion File
Chyron Motion File (*.cmf) Format
Chyron Motion File, format
5-27
Chyron Motion Files, recalling
circular
5-31
4-369
Circle Mask Button
circles, making
4-262
4-310, 4-311
Clamp Mask Button
4-391
Clear Button, Color Mixer Mode
Clone Paint Mode
CMYK Mode
4-278
4-42
Color Adjust Menu
4-461
Color Correct Button
Color Mixer
4-50
4-37
Clear Color Button
4-299
4-49
4-33, 4-34, 4-35
copying colors 4-52
elevator 4-34
Global Mode 4-36
Color Palette
color ramps
4-35
Color Slider Scales
4-46
changing colors with
4-51
using with multiple colors
Color Space Button
Revision A
Index-5
4-447
Revision A
4-50
4-42
Index-5
CHYRON Corporation
CHYRON Corporation
colors
4-35, 4-37, 4-309
changing 4-51
mixing 4-49
blending
on a black and white monitor
picking from the Canvas
Color-table Actor
4-38
5-47
Color-table Actor Edit Popup
Color-table Cycle Button
Color-table Edit Col Button
Color-table File Button
5-160
5-161
Color-table Duplicate Button
5-161
5-162
5-161
Color-table Smooth Button
Compress Button
4-48
5-162
5-56
Config (OK) Button
3-45
Config Environment
3-1
customizing menu colors
functions, list of
3-5
3-1
Menu Color Configuration Palette
elevator
3-5
3-7
3-6
Set Button 3-7
Read Button
Reset Button
panel menus, list of
3-2
CONFIGURATION ENVIRONMENT
Configuring VTRs
3-37
Copy Actor Button
5-54
Copy Prefix Button
4-62
copying colors
3-1
4-52
4-225
multiple files 4-226
copying files
Index-6
Revision A
Index-6
Revision A
Liberty Artist’s Manual
Liberty Artist’s Manual
5-74, 5-81
copying keyframes
Create Directory Button
Cue Button
3-33
4-427
Current Step Button
4-422
Cursor Mode Buttons
cursor styles
4-24
3-53
3-53
Cursor_Panel_Menu
Curve Draw Button
Curve elevator
4-242
4-249
Curve Gap Popup
4-245
4-247
4-253
color of curve 4-255
editing points 4-251
rotating curves 4-257
center axis 4-256
saving curves 4-255
scaling curves 4-257
selecting points 4-249
Curve Popup
closing curve
curve resolution
4-260
customizing menu colors
Cut Button
4-107
Cycle Actor
D
dating files
Default
5-46, 5-119
4-219, 4-233
3-6
default menu colors
Revision A
Index-7
1-2, 3-5
Revision A
3-6
Index-7
CHYRON Corporation
CHYRON Corporation
Default Scheme(s) Button
Define Key Button
3-6
4-416
Delay Macro Button
Delete Actor Button
4-415
5-52
Delete Directory Button
3-33
5-71
Delete Keyframe Button
Delete Macro Button
4-415
Delete Rest Button
4-425
Delete Step Button
4-423
Delete User Button
3-12
4-221
multiple files 4-226
deleting files
desktop publishing
4-47
Diagram Popup
with Programmed Brush
4-27
Diagram Prefix with Clamp Mask
Difference Mask Button
Direction Button
4-371, 4-393, 4-395
4-393
4-59
direction functions
functions constrained by direction buttons, list of
painting with
4-59
4-241
3-33
creating 3-33
deleting 3-33
renaming 3-34
setting 4-205
directories
Directory Button (dir)
4-206
Directory Panel Menu
3-33
Create Directory Button
Index-8
Revision A
3-33
Index-8
Revision A
Liberty Artist’s Manual
Liberty Artist’s Manual
3-33
Directory Button 3-34
Delete Directory Button
Rename
Disk Button
4-206
Disk Panel menu
disk space
4-453
4-235
Display Button (Mask Buffer)
Distort Paste Mode
4-129
Dots Per Inch Button (DPI)
drawing
4-81
3-25
4-247
drawing curves
4-247
Dropframe Button (VTR Menu)
dropframe mode
Duration Button
E
Edge Button
4-435, 4-453, 5-18, 5-33, 5-36
5-37
4-339
Edge Detection Button
4-341
Edit Button, Color Mixer Mode
Edit Keyframe Button
Edit Macro Button
Edit Macro Popup
Edit Path Button
4-50
5-60, 5-65
4-419
Edit Macro File Popup
elevator
4-453, 5-33
4-419
4-422
5-60, 5-106
3-5
1-3, 4-16
adding 4-62
copying 4-62
elevators
Revision A
Index-9
Revision A
Index-9
CHYRON Corporation
CHYRON Corporation
4-263
ellipses, making
4-125
Emboss Paste Mode
enabling Liberty software
Environment Buttons
environments
4-5
1-2
Login Environment
Erase All Button
4-407
Erase Text Button
4-407
4-34
erasing the screen
Even Field Button
4-14
4-341
Extrude Paste Mode
Eye Button
4-121
4-134
F
fades, animation
Fast Exit
2-1
4-14
Erase Button
Erase-Paint
3-52
5-82
3-29
fast temps
4-86
fast temps and masks
File Button
3-28
4-206
File Button (on Actor Popups)
File Mode Button
4-207
File Mode Popup
4-209
5-105
4-205
navigating 4-219
Unix Path Mode 4-214
File Popup Menu
Index-10
Revision A
Index-10
Revision A
Liberty Artist’s Manual
Liberty Artist’s Manual
File Select Functions
4-226
File Type Popup
4-444
Fill Mask Button
4-383
Fill Mask Modes
4-384
Filmstrip Actor
5-46, 5-120
4-412, 5-108, 5-116, 5-120
4-234
creating 4-207
filmstrips
browsing
Filter Array
4-326
Filter Button
4-326
Filters, Distort Popup
4-137
Filters, interpolation
4-137
Filters, user-defined
4-139
First Step (I 4-422
Fold Paint Mode
fonts
4-283, 4-342
4-402
foreign file formats
browse images
4-169
4-230
4-159
saving 4-225
recalling
foreign languages
4-410, 4-411
Fractal Popup
4-282
Frame Button
5-241
Frame Numbers in Keyframe Popup
Frame-rate Buttons
FTP Popup
3-27, 5-36
4-145
Full-page Button
4-64
Full-Screen File Menu
Revision A
Index-11
Revision A
4-219
Index-11
5-66
CHYRON Corporation
CHYRON Corporation
Alpha Button
4-229
4-227
browsing files
4-230
4-219
prefix buttons 4-235
selecting files 4-226, 4-235
foreign file formats
dating files
Full-screen File Menu
calling up
G
4-213
Gamma Slider
4-294
Global and Local Modes
Global Palette Mode
Grab Popup
4-132
4-36
4-429
grabbing video
4-428, 5-122
Gradated Rectangle Mask
gradations, color
4-369
4-35
Gravity Button (Curve Popup)
Grid Button
4-255
4-54
grid functions
applying color to a grid
4-58
functions constrained by grid, list of
setting grids
H
Hardware
4-57
4-457
hardware platforms
Help! Button
1-2, 3-7
1-6
Holdin and Holdout Buttons
Index-12
Revision A
4-59
5-40
Index-12
Revision A
Liberty Artist’s Manual
Liberty Artist’s Manual
Holdin Button
5-40
Holdout Button
Home Button
5-40
5-9, 5-51
Horizontal/Vertical Buttons
Host Button
4-206
4-48
HSL Color Space
HSL Mode
4-42
HSV Mode
4-42
Hue Button
4-318
Hue Paint Mode
4-280
I
Image Tools 2 Panel
Insert Step Button
4-339
4-423
Install Option Button
installation
3-52
1-2, 3-52
Inverse Colors Button
Invert Prefix Button
J
Jitter Paint Mode
4-37
4-63
4-285
Jitter Paint with pressure
K
Revision A
Index-13
Kerning Button
4-406
keyboard entry
1-4
Revision A
4-59
4-289
Index-13
CHYRON Corporation
CHYRON Corporation
numeric
1-4, 4-13, 5-2
keyboard keys
4-416
assigning macros to 4-416
list of functions assigned to 4-417
assigning functions to
keyframe
attributes
5-79
Keyframe Attributes Popup
Keyframe Elevator
5-72
Keyframe Popup Menu
Keyframe Timeline
keyframes
5-79
5-65
5-65, 5-70
5-65
adding and deleting
5-71
5-69, 5-70
copying 5-74, 5-81
editing 5-80
moving 5-72
attrubutes
L
4-423
Last Step (>I) Button
Layer Number Button
layers, animation
5-54, 5-55
5-5, 5-6
5-55
moving 5-54
turning off 5-53
zero layer 5-6
copying
layers, animations
inserting
5-52
Leading Button (Text)
Line Draw Button
Index-14
Revision A
4-405
4-242
Index-14
Revision A
Liberty Artist’s Manual
Liberty Artist’s Manual
Line Gap Popup
4-245
4-467, 4-469
5-194
step-by-step 4-469
testing 4-476
Line Morph
animations
4-470
Line Morph Add Button
Line Morph Add Keyframe Button
Line Morph Color Button
4-474
4-471
Line Morph Copy Keyframe Button
Line Morph Delete Button
4-474
4-470
Line Morph Delete Keyframe Button
4-475
4-477
Line Morph Erase Button
Line Morph Keyframe Timeline Slider
Line Morph Lock Button
4-475
4-471
Line Morph Move Button
Line Morph OK Button
4-476
Line Morph Reset Button
Line Morph Test Button
4-476
Line Morph Tune Button
Lock Button(Axis)
4-475
4-472
4-132
Lock Button, Scale
4-133
2-1, 3-10
3-11
deleting 3-12
login accounts
adding
logging in, logging out
2-1
3-12, 3-14
for 3-10
passwords
uses
Login Environment
2-1
Loop Playback Button
Revision A
Index-15
Revision A
5-242
Index-15
4-473
CHYRON Corporation
CHYRON Corporation
looping animations
M
macro files
5-39
4-412
binding to keyboard keys
4-416
4-419
playing 4-414
recording 4-413
editing
macros
4-412
4-63
magnify functions
4-66
zooming in and out
Main
4-457
Main Actor Edit Button
Map Button
Mask
5-50
4-315
4-74
Mask Actor
5-48
5-162
Mask Actor Edit Popup
Mask Brightness Button
Mask Channels Button
Mask Display Modes
Mask File Button
Mask Hue Button
5-168
Mask Invert Button
5-179
5-179
5-165
Mask Mode Popups
Mask Panel Menu
Revision A
4-81
4-58, 4-391
Mask Inplace Button
Index-16
4-375
5-178
Mask Grid Button
Mask Mode
5-170, 5-171, 5-172, 5-173, 5-174
5-163
4-363
Index-16
Revision A
Liberty Artist’s Manual
Liberty Artist’s Manual
5-167
Mask Tint Button
Mask2 Panel
4-389
1-3, 4-363
4-372
blurring 4-372
fast 3-29
painting into 4-241
recalling into 4-159
masks
adjusting
saving and recalling
unmasking
4-363
masks,growing
4-373
masks,shrinking
4-373
Match Mask Button
matchsticks
math
4-364
4-386
5-69, 5-70, 5-97
4-67
measuring distances on the Canvas
4-39
menu buttons
activating
1-3
Menu Color Configuration Palette
default colors
3-6
Menu Color Scheme Palette Elevator
3-5
Menu Configuration Palette
elevator
3-5
3-7
Reset Button 3-6
Set Button 3-7
Read Button
Menu Configuration Panel Menu
3-28
3-32
Mode 3-31
Alt Style Mode
Bevel
menu parameters
menus
Revision A
Index-17
3-6
1-3
Revision A
Index-17
CHYRON Corporation
CHYRON Corporation
4-207
Minus Button
Mirror Buttons
mixing colors
4-134
4-49
5-47, 5-194
Line Morph 5-144, 5-194
step-by-step 5-200
testing 5-149
Morph Actor Popup 5-137
Triangle Morph 5-139, 5-194
step-by-step 5-196
Morph Actor
4-467
5-194
Line Morph 4-467, 4-469
step-by-step 4-469
testing 4-476
Triangle Morph 4-468, 4-477
step-by-step 4-477
morphing
animations
Mosaic Button
4-338
Motion Tracking
5-205
1-3
mouse, using Liberty with a
Move Actor Button
Move Button
5-53
4-108
Move Keyframe Button
moving files
5-72
4-225
4-226
multiple files
Multiple Color Mode
4-50
Multiple Colors Mode
N
4-35
nesting Write-on Actors
Next Step (>) Button
Index-18
Revision A
5-136
4-422
Index-18
Revision A
Liberty Artist’s Manual
Liberty Artist’s Manual
Noise Paint Mode
4-284, 4-303
normalizing pictures
NormalPasteMode
numbered files
4-112
4-207
O
Odd Field Button
Off Button
4-294
4-341
5-53
OK, Erase OK, and Cancel Buttons, Paste Emboss Mode
Option Panel
3-48
Other Resolution Popup
P
paint brush modes
Air Brush
3-22
4-25
4-26
Programmed Brush
4-26
4-26
Brush 4-29
Solid Brush
User
paint brushes
Paint Button
4-20
4-242
Paint Environment
Paint Gap Popup
4-1
4-243, 4-281
5-135
with Write-on Actor
Paint Modes
Paint Panel
4-274
4-240
painting with small or very transparent brushes
palette
Revision A
Index-19
4-34
Revision A
Index-19
4-25
4-129
CHYRON Corporation
CHYRON Corporation
4-19
panel call buttons
Config Environment
3-2
panning in a magnified picture
passwords
4-65
3-12, 3-14
Paste Button
4-109
Paste Distort Mode
4-129
Paste Emboss Mode
4-125
Paste Extrude Mode
4-121
4-399
Paste Mask Button
paste modes
4-109
Paste Normal Mode
Paste Paint Button
4-112
4-280
pasting
Move Button
4-108
with prefix buttons
pastinginplace
4-111
4-62
Pause Macro Button
4-415
Permanent Storyboard Buttons
Perspective Transform
Pick Color Button
4-40
Pick Multiple Colors
Play Button
4-39
4-280
5-13
Play VTR Button
4-428
Playback Once Button
Plus Button
Index-20
Revision A
4-130
4-38
Pick Colors Popup
Pick Paint Mode
5-253
5-241
4-207
Index-20
Revision A
Liberty Artist’s Manual
Liberty Artist’s Manual
Point List Button(Motion Tracking option)
Point Mode
5-205
polygons, making in Curve Popup
4-257
polygons, making in Shapes Popup
Posterize Button
prefix buttons
4-15, 4-60
pre-press applications
4-235
4-47
4-435
4-435, 4-453, 5-18, 5-33
Preroll Button
Pressure Diagram
Pressure Paint
4-290
4-288
Pressure Paint Mode
4-286
Previous Step ( 4-422
Programmed Brush Mode
Prompt Window
R
Read Button
4-26
1-3, 1-4, 4-13
3-7
Recall Button
4-158
Recall Cel Button
5-105
Recall from Temp Button
4-85
Recalling
multiple files
4-61
recalling
5-34
4-254
animations
curves
File Mode Button
Revision A
Index-21
4-265
4-314
on the Full-Screen File Menu
Pre-roll
Revision A
4-260
4-207
Index-21
CHYRON Corporation
CHYRON Corporation
File Popup Menu
4-205
4-159
foreign file formats
4-364
text 4-410
masks
Recalling pictures
4-106
Record Animation Button
5-255
Record Macro File Button
4-160, 4-413
5-43
5-39
one frame of 5-41
partially 5-41
to disk 4-439, 4-443, 5-21, 5-24
recording animations
in and out times
Rectangle Mask Button
rectangles, making
Reference Actor
4-367
4-264
5-48
Show Troupe Button
5-56
Rename Directory Button
renaming files
3-34
4-225
4-226
multiple files
4-408
Render Text Button
Repeat Prefix Button
Reset Button
4-60
3-6
Reset to Zero Button
5-241
resolution, Canvas
functions
3-22
3-21
maximum
Reveal Color
Reveal Hue
Index-22
Revision A
4-317
4-318
Reveal Luminance
4-318
Reveal Paint Mode
4-279
Index-22
Revision A
Liberty Artist’s Manual
Liberty Artist’s Manual
Reverse Points, Curve Popup
RGB Mode
4-260
4-42
Ripple Button
4-333
Rotation and Scaling of Actors Larger Than the Screen
Rotationi n Paste Distort
Rotoscope, button
4-453
4-430
Rotoscoping
rotoscoping
4-132
4-453
Rotoscoping, layers undo
Run Animation Button
S
Safe Title Button
4-446
5-256
4-390
Save and Recall State Buttons
Save As Button
4-415
4-169, 4-225
4-199
Shrinkwrap Button
Save Scheme Button
3-7
Save to Temp Button
4-85
saving
4-167
5-35
curves 4-255
animations
4-207
4-205
foreign file formats 4-169, 4-225
masks 4-364
text 4-410
File Mode Button
File Popup Menu
Saving pictures
4-106
Scale in Paste Distort
Revision A
Index-23
Revision A
4-133
Index-23
5-49
CHYRON Corporation
CHYRON Corporation
4-133
Scale Lock Button
seamless rectangle for tiling
4-226, 4-235
selecting files
Set Button
4-283
3-7
Set Magnify Button
4-65
Set Scheme Button
3-7
Set User Password Button
Setup VTR Popup
3-12
4-438, 4-442, 5-20, 5-23
Shape Button
4-242
Shape Popup
4-262
color of the shapes
4-268
4-267
filling and outlining shapes
Gradation Button
4-267
recalling and saving shapes
rotating and scaling shapes
Shift Colors Button
Show Button
4-38
4-155
Show Troupe Button
Shrinkwrap Button
5-56, 5-182
4-199
Shuttle and Jog Sliders
size of the file (in KB)
4-427
4-219
Skipin and Skipout Buttons
Skipin Button
5-41
5-41
Skipout Button
5-41
Slant in Paste Distort
slider scales
4-268
4-267
4-133
1-4
number windows associated with
1-4
SMPTE Safe Title and Safe Action Fields
Index-24
Revision A
Index-24
4-390
Revision A
Liberty Artist’s Manual
Liberty Artist’s Manual
software license
3-52
Solid Brush Mode
4-26
Sony BVU and BVW VTRs
sorting files
3-38
4-230
Source Button (SRC)
3-43
Source Set-up Popup
4-437
source video recorder See video recorders: source and target
Speed Diagram
5-97
5-101
adding 5-103
boundary 5-101
deleting 5-104
moving 5-101
tangents 5-101
Speed Nails
Square Mask Button
squares, making
stars, making
4-369
4-263
4-265
starting up
setting directory
Startup
4-205
1-1
Step Key Button
4-425
Stop Macro Button
4-415
Storyboard Elevator
5-237, 5-245
Storyboard Resolution Modes
Stretch Actor Button
5-55
sub-pixel positioning
Swap Colors Button
4-130
4-38
Swap with Temp Button
Revision A
Index-25
Revision A
5-235
4-85
Index-25
CHYRON Corporation
CHYRON Corporation
Swing Playback Button
Switcher Actor
5-47
System Info Button
T
tablet
5-242
3-7
1-3
3-54
configuring
Tablet Configuration Panel
Tablet Panel
3-54
3-54
tablet pressure
4-286
4-442
Target Selection Buttons
Target Set-up Popup
4-441
target video recorder See video recorders: source and target
Temp Elevator
4-75, 4-84
Temp Overlay
4-85
Temp/Mask Popup
4-79
1-3, 4-83
fast 3-28, 4-86
temps
saving and recalling
tension of curves
text
4-85
4-259
4-400
4-411
aligning 4-405
fonts 4-402
accents
in animations
5-129
international characters
kerning
4-406
leading, line spacing
rendering
Revision A
4-405
4-408
rotating and scaling
Index-26
4-410, 4-411
4-407
Index-26
Revision A
Liberty Artist’s Manual
Liberty Artist’s Manual
saving and recalling
4-410
4-401
sizing 4-404
selecting
Text Actor
5-46, 5-129
Text Edit Button
Text Panels
4-401
4-400
4-410
Text Save and Recall
The
3-32, 4-431
The Adjust Colors Button
4-293
4-55
The Grid Popup
4-142
Tile Button
Tile function, seamless patterns
Tile Set Button
4-142
with Copy Prefix
timecode
4-143
5-36
calculating
4-69
frames per second
Timecode Elevator
Tint Button
Tint Mode
3-27
4-427
Timeline, Animation
5-5
4-319
5-167
Tint Paint Mode
Transfer
4-280
4-83
Transfer Buffer
4-83, 4-210
Transfer Panel
4-106
Transform Text Button
transparency
4-407
4-15
Transparency Slider Scale
Revision A
Index-27
4-342
Revision A
4-23
Index-27
CHYRON Corporation
CHYRON Corporation
transparent background
4-16, 4-53
4-468, 4-477
5-194
Step-by-step 4-477
step-by-step 4-477
Triangle Morph
animations
triangles, making
Troupe Actor
4-264
5-48
5-56
Show Troupe Button
U
unbind a keyboard key
Undefine Button
4-417
4-417
Under Prefix Button
4-61
4-214
4-215
browse images 4-230
Unix Path Mode
Back Button
unmasking
4-363
Use Mask Button
4-366
User Brush Mode
4-29
User Login Accounts
3-10
User Name Text Window
3-14
User Number Password Text Window
User Number Window
3-14
3-14
3-10
3-11
Button 3-12
User Panel Menu
Add User Button
Delete User
Set User Password Button
User Popup
3-12
3-14
3-14
3-14
User Name Text Window
User Number Window
Index-28
Revision A
Index-28
Revision A
Liberty Artist’s Manual
Liberty Artist’s Manual
User Password Text Window
User Popup
3-14
3-14
3-14
3-14
Password Text Window 3-14
User Name Text Window
User Number Window
User
V
3-45
V Adj Button
video boards
video noise
3-37, 4-155
4-284, 4-303
video recorders
configuring
3-36, 4-426
3-43
address of
communications parameters
multiple VTRs
ports
3-44
3-37
3-41
source and target
3-43, 4-157
3-37
adjusting 3-45
video boards
controlled by Liberty, list of
3-38
4-426, 5-13
4-428, 5-122
rotoscoping 4-453
source and target 4-426, 5-12
controlling
grabbing from
Vidjet Button
4-455
VTR Configuration Panel
Grab and Show Buttons, configuring for
VTR Configuration Panel Menu
VTR Panel Menu
3-36
4-425, 4-426
4-426
recorders 4-426
configuring video recorders
controlling video
VTR Set-up Popup
4-432
VTR Set-up Popups
Revision A
Index-29
Revision A
5-15
Index-29
4-157
CHYRON Corporation
CHYRON Corporation
W
Warp Corners
Wrap Button
4-130, 4-135
4-342
5-46, 5-131, 5-151
5-136
Gap Popup 5-135
Write-on Actor
burning in
Paint
Write-on Actors
nesting
5-136
X
3-22
Y
3-22
Z
4-66
X Resolution Button
Y Resolution Button
zooming in and out
Index-30
Revision A
Index-30
Revision A