1
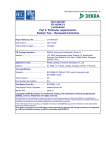
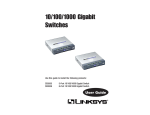
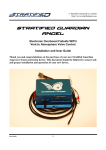
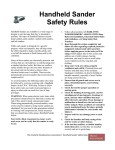
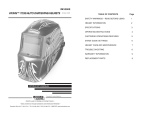
Power Miter II™ Chop Saw
Operations Manual
“Safe, Reliable and Easy to Operate”
1
Safety Instructions for Miter Saw
Safety is a combination of common sense, staying alert and knowing how your miter saw
works. Read this manual to understand this miter saw.
Reduce the Risk of Dangerous Environment:
• Use the miter saw in a dry place protected from rain.
• Keep work area well lighted.
• Place the saw so neither the user nor bystanders are forced to stand in line with blade.
Thrown debris could injure people in it’s path.
To reduce the risk of injury from unexpected saw movement:
• Put the miter saw on a firm level surface where there is plenty of room for handling and properly
supporting the workpiece.
• Support the miter saw so the table is level and the saw does not rock.
• Bolt or clamp the miter saw to its support.
Drive Belt Cover
Power Switch
Blade Cover
Blade Retaining Nut
Blade
Motor
Blade Adjustment Screw
Return Spring
Guard
Miter/Angle Guide
WARNING
1. Read the manual before using this saw.
2. Wear safety goggles that meet ANSI Z87.1 or in Canada CSA Z94-3-88 Standards.
3. Tighten Blade Retaining Nut and all parts before sawing.
4. Do not operate the saw without guards in place.
5. Keep hands away from the moving blade.
6. Do not perform any operation freehand.
7. Do not reach around or behind saw blade.
8. Unplug saw before changing blade or servicing.
9. Release trigger and wait for blade to stop before moving workpiece or changing setup.
10. Do not expose to rain or use in damp locations.
11. Plug power cord into a properly grounded outlet protected by a 15 amp circuit
breaker or time delay fuse. In Canada use time delay fuse marked “D”.
• For extra stability - Drill holes into your workbench to accommodate the rubber feet of the
Power Miter II Saw, or remove the feet and bolt your saw directly to your workbench.
• This saw is designed to cut soft metals (lead, zinc, brass, aluminum) and soft wood. It is not
designed to cut steel or thick materials.
2
Safety Instructions for Miter Saw
BEFORE YOU BEGIN
INSPECT YOUR MITER SAW.
• Disconnect The Miter Saw to reduce the risk of injury from accidental starting before changing the
setup, changing the blade, or adjusting anything.
• The blade teeth should always point downward at the front of the saw.
• Tighten the Blade Retaining Bolt.
• Tighten the cover plate screws.
Check For Damaged Parts. Check for:
• Proper alignment of moving parts
• Damaged electric cords
• Binding of moving parts
• Broken parts
• Stable mounting
• Function of arm return spring. Push the arm all the way down, the let it rise up
until it stops by itself.
• Other conditions that may affect the way the miter saw works.
• If any part of this miter saw is missing, bent, or broken in any way, or any electrical parts don’t
work, turn the saw off and unplug it. Replace damaged, missing, or failed parts before using the
saw again.
Keep Guards In Place, in working order, and in proper adjustment.
Maintain Tools With Care. Keep the miter saw clean for best and safest performance. Follow instructions
for lubricating. DON’T put lubricants on the blade while it is spinning.
To Reduce The Risk Of Injury From Jams, Slips Or Thrown Pieces
• Use Only Supplied Accessories. Follow the instructions that come with the accessories. The use of
improper accessories may cause risk of injury to persons.
• Choose the right 4 inch diameter blade for the material and the type of cutting you plan to do.
• Make sure the blade is sharp, undamaged and properly aligned. With the saw unplugged, push the
blade all the way down. Hand spin the blade and check for clearance.
• Make sure the blade and arbor collars are clean.
• Make sure the Blade Retaining Nut is firmly tightened.
• Make sure all clamps and locks are tight and there is no excessive play in any parts.
• Keep Work Area Clean. Cluttered areas and benches invite accidents. Floor must not be slippery.
To reduce the risk of burns or other fire damage, never use the saw near flammable liquids, vapors or
gases.
Plan Ahead To Protect Your Eyes, Hands, Face and Ears
To reduce the risk of injury from accidental contact with moving parts, don’t do layout, assembly, or
setup work on the miter saw while any parts are moving.
Reduce the risk of Accidental Starting. Make sure switch is in the extended “OFF” position before
plugging miter saw into a power outlet. Don’t force tool or attachment to do a job it was not designed to do. Use a different tool for any workpiece that can’t be held in a solidly braced, fixed
position.
CAUTION: This machine is not designed for cutting ferrous metals (steel, iron and iron based metals).
Use this miter saw to cut only thin wood, or soft metals like aluminum. Other materials may shatter,
bind on the blade, or create other dangers.
3
Safety Instructions for Miter Saw
Dress For Safety
Any power tool can throw foreign objects into the eyes. This can result in permanent eye damage.
Wear safety goggles (not glasses) that comply with ANSI Z87.1 (or in Canada CSA Z94-3-M88). Everyday
eyeglasses have only impact resistant lenses. They are not safety glasses. Safety goggles are available
at many local retail stores. Glasses or goggles not in compliance with ANSI or CSA could seriously hurt
you when they break.
Do not wear loose clothing , gloves, neckties or jewelry (rings, wrist watches). They can get caught and
draw you into moving parts.
• Wear nonslip footwear.
• Tie back long hair.
• Roll long sleeves above the elbow.
Inspect Your Workpiece
Plan your work to avoid thrown pieces caused if the workpiece binds on the blade and is torn from your
hands.
Never Cut Freehand:
• Cut only one workpiece at a time.
• Brace your workpiece solidly against the fence and Miter/Angle Guide so it will not rock or twist
during the cut.
• Make sure there’s no debris between the workpiece and its supports.
• Make sure no gaps between the workpiece, fence and Miter/Angle Guide will let the workpiece shift
after it is cut in two.
• Keep the cut off piece free to move sideways after it’s cut off. Otherwise it could get wedged
against the blade and could be thrown violently.
• Clear everything except the workpiece and related support devices off the table before turning the
miter saw on.
• Secure Work. Use clamps or a vise to help hold the work when it’s practical.
Use extra caution with large, very small or awkward workpieces:
• Use extra supports (tables, saw horses, blocks, etc.) for any workpiece large enough to tip when
not held down to the table top.
• Never use another person as a substitute for a table extension, or as additional support for a
workpiece that is longer or wider than the basic miter saw table.
• Do not use this saw to cut pieces too small to let you easily hold the work. Thumbs should not be
closer to the blade than the outside edge of the fence.
• When cutting irregularly shaped workpieces, plan your work so it will not slip and pinch the blade
and be torn from your hands. A piece of molding, for example, must lie flat or be held by a fixture
or jig that will not let it twist, rock or slip while being cut.
• Properly support round material such as dowel rods, or tubing. They have a tendency to roll while
being cut, causing the blade to “bite.” To avoid this, always use a fixture designed to properly hold
your workpiece.
Whenever Saw Is Running
WARNING: Don’t allow familiarity (gained from frequent use of your miter saw) to cause a careless
mistake. A careless fraction of a second is enough to cause a severe injury.
• Before starting your cut, watch the miter saw while it runs. If it makes an unfamiliar noise or
vibrates a lot, stop immediately. Turn the saw off. Unplug the saw. Do not restart until finding
and correcting the problem.
4
Safety Instructions for Miter Saw
Keep Children Away.
• Keep all visitors a safe distance from the miter saw.
• Make sure bystanders are clear of the miter saw and workpiece.
Don’t Force Tool.
• It will do the job better and safer at its designed rate. Feed the saw into the workpiece only fast
enough to let the blade cut without bogging down or binding.
Before freeing jammed material:
• Turn switch “OFF”.
• Wait for all moving parts to stop.
• Unplug the miter saw.
After finishing a cut:
• Release the switch, and wait for all moving parts to stop before moving your hands.
Before Leaving The Saw
• Never Leave Tool Running Unattended.
• Turn switch off.
• Wait for all moving parts to stop.
• Unplug the miter saw.
• Make workshop child-proof. Lock the shop. Disconnect master switches. Store tool
away from children and others not qualified to use the tool.
Motor Specifications and Electrical Requirements
Power Supply and Motor Specifications
WARNING: To reduce the risk of electrical hazards, fire hazards, or damage, or damage to
the tool, use proper circuit protection. Your saw is wired at the factory for operation using the
voltage shown. Connect tool to a power line with the appropriate voltage and 15-amp
branch circuit. To reduce the risk of shock or fire, if power cord is worn or cut, or damaged in
any way, have it replaced immediately.
Voltage
Hertz (Cycles)
Watts
RPM
Shaft Rotation (blade end)
Brake
110V
60
250
8000
Clockwise
Automatic
Motor Safety Protection
1. If the motor won’t start, release the trigger switch immediately and unplug the tool. Check
the saw blade to make sure it turns freely. If the blade is free, try to start the motor again. If
the motor still does not start, refer to the “Motor Trouble-Shooting Chart.”
2. If the motor suddenly stalls while cutting, release the trigger switch, unplug the tool, and
free the blade. The motor may now be restarted and the cut finished.
3. Fuses may “blow” or circuit breakers may trip frequently for the following reasons:
a. Motor Is Overloaded-Overloading can occur if you feed too rapidly or make too
many start/stops in a short time.
b. Improper or dull saw blade is used.
5
Unpacking
WARNING: To reduce the risk of injury from unexpected starting or electrical shock, do not
plug the power cord into a source of power during unpacking and assembly. This cord
must remain unplugged whenever you are working on the saw.
WARNING: If any part is missing or damaged, do not plug the saw in until the missing or
damaged part is correctly replaced.
Basic Saw Operations
Body and Hand Position
Never place hands near cutting area. Place hand at least 4” from path of blade.
Hold workpiece firmly to the fence to prevent movement toward the blade.
When holding the workpiece to the left side of the blade, always use your left hand. Use your
right hand to hold the workpiece to the right side of the blade.
Before making a cut, make a “dry run” with the power off so you can see the path of the
blade.
Keep hands in position until trigger has been released and the blade has completely stopped.
WARNING: Do not try to cut short pieces. You cannot properly support the workpiece and
keep your hand down the required distance from the blade.
Miter/ Angle Cut
Loosen the Miter Lock Bolt. Rotate miter/angle guide clockwise from 0° to 45°. Retighten
miter lock bolt. With power off, test blade alignment to confirm that blade will not cut into
the miter/angle guide.
Occasionally the path of the blade will shift out of adjustment. This should be tested for
prior to using the saw. To test for this possibility, please do the following:
1. Unplug the saw.
2. With the miter/angle guide set at 0° pull
the blade down as far as possible.
3. If the saw clears the fence return the
blade to the top position.
4. Turn the miter/angle guide to 45° and pull
the blade down as far as possible.
5. If the blade clears, the saw is adjusted
Fence
properly. If during either test the blade hits
Miter/Angle Guide
the fence, continue with step 6.
6. Loosen the top front left bracket screw.
(see diagram on page one, screw labeled
blade adjustment screw)
7. Repeat steps 2-4. Grasping the handle, move the blade either left or right until the
blade clears the fence at both tested angles.
8. After the blade has been adjusted to clear the fence, retighten the screw in step 6.
9. Repeat steps 2-5.
6
Basic Saw Operations
Workpiece Support
Long pieces need extra supports. The supports should be placed along the workpiece so the
workpiece does not sag and your hand holding the workpiece is positioned 4” or more from the
blade path. The support should let the workpiecelieflat on the base and work table during the
cutting operation.
Lubrication
Lubricate blade drive shaft (2 lube ports) with machine oil
before each use.
Lubricating Ports
Removing and Installing Blade
WARNING: To reduce the risk of injury from a thrown workpiece or thrown pieces of blade, do not use
a blade larger or smaller than 4” diameter.
WARNING: To reduce the risk of injury from unexpected starting, unplug the saw whenever you are
removing or installing the blade.
1. Unplug the saw from the outlet.
2. Remove blade cover.
3. Using two adjustable wrenches, secure the Hex Nut located behind the blade with one wrench,
then loosen the Blade Retaining Nut by turning clockwise. Remove front Blade Support Washer,
then carefully remove Blade.
4. Securely install new blade with teeth pointing down. Then replace Blade Support Washer.
WARNING: Always use both Blade Support Washers to maintain stability and safety of the Blade
NOTE: Use only Power Miter II™ blades designed for use with your Power
Miter II™ Saw. After installing new blade, make sure that the blade clears the Miter/Angle Guide
Slot at the 0° and 45° positions.
5. WARNING: Never use saw without Blade Cover securely in place.
Make sure that the Blade is seated properly on the Arbor. Replace blade retainment nut and
tighten securely by turning Blade Retaining Nut counterclockwise.
6. Replace and tighten Blade Cover securely.
Blade Washer
Blade
Blade Cover
Blade Retaining Nut
Blade Blade Washer
Blade Retaining Nut
7
Basic Saw Operations
Removing and Installing Blade Drive Belt
WARNING; To reduce the risk of injury from unexpected
starting, unplug the saw whenever you are removing or
installing the Belt.
WARNING: Never use saw without Drive Belt Cover securely
in place
1. Unplug the saw from the outlet.
2. Remove Drive Belt Cover.
3. Loosen Motor Mount Bolts.
4. Pivot motor forward, and remove Drive Belt.
5. Replace Drive Belt, pivot motor backwards to tighten
Drive Belt.
6. Securely tighten Motor Mount Bolts.
NOTE: Drive belt tension-Drive belt should give
1/4” - 3/8” with moderate pressure.
7. Replace and securely tighten Drive Belt Cover.
Drive Belt
Troubleshooting Guide
Motor
PROBLEM
PROBABLE CAUSE
Motor does not start.
1. Fuse.
Motor does not turn
off/on.
SUGGESTED CORRECTIVE ACTION
2. Brushes worn.
3. Other.
- 15-Amp time delay fuse, or circuit
breaker.
- Get Authorized service.
- Get Authorized service.
1. Defective switch.
- Get Authorized service.
General
PROBLEM
PROBABLE CAUSESUGGESTED CORRECTIVE ACTION
Blade binds, jams.
Tool vibrates or shakes.
1. Dull blade.
2. Improper blade.
3. Warped blade.
1. Saw blade not round.
2. Saw blade damaged.
3. Saw blade loose.
4. Other.
- Replace blade.
- Replace blade.
- Replace blade.
- Replace blade.
- Replace blade.
- Tighten Blade Retaining Nut
- Get Authorized service.
Diamond Tech International Warranty
Your Power Miter II Saw is fully guaranteed for three years. If failure occurs for any reason other
than misuse during this period, it will be corrected free of charge when product is shipped to our
distribution center. Blades and Drive Belt wear even in normal use and cannot be guaranteed.
8
Diamond Tech International
5600-C Airport Blvd., Tampa, FL. 33634
HELPLINE (800) 937-9593
FAX:(813) 806-2923 • E-MAIL:[email protected] • www.dticrafts.com