1
Comic Life v. 1.3.4
User Manual
Introduction
Comic Life makes creating digital comics a snap. Use Comic Life to produce high quality comics for posting on the
web, including in a movie or printing out for friends.
With a comprehensive set of features, Comic Life gives you numerous ways to explore your creativity - liven up
holiday snaps, tell a story, even quickly create fun and helpful "how-to" guides.
Feature highlights
CoreImage filtering Turn your photos into artistic illustrations perfect for your comic.
Video Capture Plug in your iSight or other video camera and grab images right alongside your comic.
Custom Page Sizes Whatever page size you need Comic Life can match it.
Quick Comic tool Get a head-start by selecting an iPhoto album and turning it into a laid-out comic ready for
balloons and captions in one step.
Digital Strip font Realistic comic lettering right from the start.
.Mac integration Easy publishing to the web.
RSS newsfeed The easy way to share your .Mac comics with the world.
Quartz rendering State-of-the-art rendering technology means smooth balloons and text.
iPhoto integration Integrated access to your libraries and when you're done you can send your finished comic back
to iPhoto 5 ready for turning into an high-quality book.
Various page formats Design comics for all kinds of media: web, video and print.
Custom lettering Freely distortable and rotatable comic lettering lets you create exciting sound effects and dramatic
titles.
Speech balloons All types of balloons can be easily placed and edited specifically: Speech, thought, whisper and
exclamation. Other balloons are available for special situations. Balloons can be easily extended for longer speeches
and fitting into tight spaces.
Captions Introduce a new scene or provide some background information with a caption.
Stylesheets Easily define a consistent style for every element in your comic for a professional look.
Page organizer Quickly access and reorder pages.
Page templates Choose from a wide variety of page templates included in the application and easily create your
own.
QuickTime export Create a movie to put on a DVD or to include in a larger video project.
Infinite undo Limited only by your computer memory.
Flexible text Take advantage of the OS X text features to mix fonts and styles.
Panels Create realistic layouts with panels that can automatically trim images and balloons to their edges.
WYSIWYG layout What you see is what you get.
Fun UI Comic Life's user interface has been designed to be fun and intuitive.
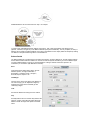
The Work Area
Comic Life gives you an efficient work area and user interface to create your comics.
Getting familiar with the work area
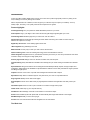
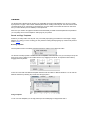
The Comic Life work area is arranged to help you focus on creating and editing comics. The work area consists of
the following components:
1. Menu bar The menu bar contains menus for performing tasks. The menus are organized by topic. For example the
Pages menu contains commands for working with pages.
2. Tool bar The tool bar contains clickable icons for common actions. You can customize the contents to suit your
work style.
3. Page edit area The main editing area where you'll compose your pages.
4. Resource area Provides access to your photos and page templates as well as details on the selected element and
the current styles.
5. Element well Contains the various comic elements such as balloons, captions and display lettering for titles and
sound effects.
6. Page organizer Provides an overview of all the pages in your comic and quick access to any particular page. You
can also reorder pages here.
Quick Tutorial
Creating a comic page in Comic Life is very simple - the user interface is laid out in just the way you need:
1. Choose a template.
2. Choose your images and drop each one on to a panel.
3. Add balloons and captions to the panels.
4. Add sound effects and a title.
5. You're done!
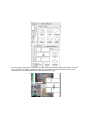
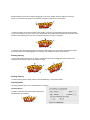
Choosing a template
A template is a particular layout of panels on a page. The templates are smart in that the layout is automatically
adjusted to suit the dimensions of your page.
Whenever a blank page is created the template area is automatically expanded to reveal the available templates. You
can use the popup menu to view the different template collections.
When you've found a template you like drag it on to the page (or simply double click it). The template is adjust to fill
the available space on the page (within the margins).
The template area is automatically collapsed.
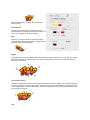
Adding images
If you're using iPhoto you'll see your iPhoto Library displayed below the template area - if you're not using iPhoto
you'll see your home folder displayed below.
Choose the iPhoto album or folder that contains the photos you wish to use in this comic.
Note: the mini-Finder in Comic Life is smart in that it will automatically create and show thumbnails for any
image files it finds in the current folder making it easy to identify the images you need. Large folders may
take a few moments to fully display all the available images depending on the speed of your Mac.
Click and drag an image from the iPhoto album or folder and release the mouse button when you are over the panel
to which you wish to add the image. There is a momentary pause as Comic Life adds the image and fits it to the
panel such that it completely fills the panel. You can adjust the position of the image by clicking and dragging on the
visible part of the image. You can resize it by dragging the green resize handles that surround the image.
Note: when an image is dropped on a panel the image becomes attached to the background of a panel.
When the panel is moved the image moves with it. To adjust the image (to reposition it within the panel for
example) double click on the panel and the image will become editable.
Continue adding images until all the panels are filled.
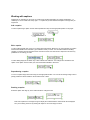
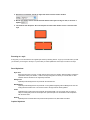
Adding balloons
Once your images are laid out in panels it's time to add some balloons. Drag a balloon from any of the balloon wells
at the bottom of the window and drop it onto an panel.
1.
2.
3.
A balloon is created on the panel and ready to be edited. Enter whatever you want and then either click outside the
text area or hit the "enter" key on your keyboard to save the new text.
Notice that the balloon has resized itself to fit the new text - if there is more text than before. You can easily resize the
balloon further to better fit the new text by dragging the green resize handles around the balloon. As your mouse
moves over the balloon you'll notice two markers appearing and disappearing. The orange marker on the tip of the tail
highlights the spot to drag to adjust the position of the tail - so you can line it up with the person who is speaking. The
other marker that's near the center of the balloon is a special handle that lets you move the balloon and the tail at the
same time. To adjust the position of the balloon click inside of the balloon.
Notice that the tail (the part of the balloon that indicates who is speaking) does not move. You can move the tail by
clicking on the tip of the tail and dragging it to a new position.
While you are dragging the balloon or tail you've probably noticed that they are drawn beyond the edges
of the panel on which the balloon was created. This is not typical for comic which normally have balloons
and other lettering cut off at the edge of the panel. This is called "clipping" and is the common look for
balloons in comics - they only break the edge of a panel to add dramatic effect. The reason Comic Life
has the opposite behavior is because many photos you might want to use do not have the room for
balloons. Future photos can be taken with consideration for balloons and you can change this default
behavior.
You can enable the clipping behavior for a particular element by choosing the "Arrange->Clip" menu item.
To enable clipping as the default behavior check the "Clip new non-image elements to panels." check box
in the Preferences.
Continue placing balloons and editing until you're happy with the composition. See balloons for more information on
working with balloons.
Adding captions
Adding captions is very similar to adding balloons - simply drag and drop them on the panels and edit the text. See
Captions for more information.
Sound Effects and Titles
The final step is adding any sound effects and titles to your composition. Sound effects and titles are both created
with the Lettering element. To add a lettering element simply drag and drop from the Lettering well onto a panel.
Instead of adding the element immediately a sheet is presented where you can enter the text and specify the font for
the lettering.
The reason for this is that lettering elements are converted to lines and curves before being added to the
comic. This allows them to be drawn in novel ways such as with gradient fills or warped for more
interestng effects than is possible with standard text in balloons and captions.
Enter the text for your lettering element (and choose a new font if desired) then click "Place Lettering".
The element is placed on the comic (centered on your drop location) and drawn with the default style.
You can move the element to wherever it is needed by clicking and dragging in the normal way. However the drag
handles at the corners have a different effect than resizing images, balloons and captions. Instead of resizing the
element uniformally dragging a handle moves just the one handle and the lettering element is distorted to fill the new
area. The two center handles a special and warp the letters in a curve. This lets you get dramatic effects with very
little effort. Adjust the handles to get a design you like.
Continue adding lettering elements until you are happy with your composition. See Lettering for more information on
working with Lettering.
Your page is finished. You can now keep adding pages or if you're done print it out or post it to the web. Have fun.
Common Operations
This section describes many of the operations that you will frequently use when working with Comic Life.
Making Changes
Many of the changes can be made by directly interacting with the elements on the page for example moving, resizing
and rotating.
Selecting Elements
Elements can be selected by clicking on them. Typically one element at a time will be selected - when you click on a
different element any other elements will be deselected. To select more than one element hold down the "shift" key
while clicking. You can also select groups of items by dragging a selection box around the elements. You can toggle
the selected state of an element by holding down the "shift" key and clicking on the element. To select all the
elements on a page use the "Edit->Select All" menu item.
Moving Elements
To move an element or elements select them and click on one of the selected elements and, while holding the mouse
button down, drag the element(s) to the new location.
Resizing Elements
Only one element at a time can be resized. Select the desired element and use the handles bordering the element to
adjust its size. Note that different elements have different resize behaviors. See the section on each element for more
information.
Rotating Elements
Two types of elements can be rotated: image elements and lettering elements. To rotate one of these elements select
it and click on the rotation handle near the center of the element. While holding down the mouse button drag the
mouse in a circular motion to rotate the element to the desired angle. To limit the rotation to 90° angles hold down the
"shift" key while dragging - the element will snap to the nearest 90° angle. If you release the shift key while dragging
the element will once again freely rotate to the specified angle so make sure you release the mouse button before
releasing the "shift" key to set the element to the snapped angle.
Deleting Elements
To delete any elements on a page simply select them and hit the "delete" key or choose the "Edit->Delete" menu
item.
Reordering Elements
Sometime elements will be behind or in front of other elements on the page. You can use the Arrange menu to
change this ordering. Use "Send to Back" to move an element to back of the display order. Use "Bring to Front" to
bring an element to the front.
Note: If you are using panels the ordering behavior can be slightly different. See the section on Panels for
more information.
Clipping Elements
A common feature of comics is having elements trimmed to the edge of panels so the panels are clearly
distinguishable on the page. By default Comic Life doesn't clip any lettering elements on a panel or image (if the
image is not on a panel) because many photos you might first use do not have room for balloons. However you can
enable clipping for new elements by checking the "Clip new non-image elements to panels" option in the Preferences.
New elements dropped on top of a panel will then be automatically clipped to the edge of the panel. If you drag an
element off of a panel it will no longer be clipped to the panel edge. If you drag an element on to a panel it will
automatically clip to the edge of the panel. This behavior can be disabled on a per-element basis by unchecking the
"Clip" checkbox in the element attributes on the "Details" tab. This is useful for times when elements should "break"
the edge of a panel for dramatic effect.
Editing Text
Some elements on the page are containers for text (captions, bubbles and lettering) - to edit the text in these
containers double click on one of them or hit the "Return" key if the element is selected. For captions and bubbles the
text are in the container becomes editable and the entire contents are selected. Start typing to replace the selected
text or click at the desired character position to make minor changes. To save your changes either click outside of
the editing area or hit the "enter" key on your keyboard.
For lettering elements a sheet descends with the editable text - make the necessary changes in the sheet and click on
the "Convert to graphics" button to update the element on the page.
Details
The Details section of the user interface gives you access to extra controls for different elements. The controls
change depending on the select element. If no elements are selected on a page then the controls for the page are
displayed. If multiple elements are selected then "Multiple Selection" is displayed as you cannot make Detail changes
to multiple elements simultaneously. However some common operations can be applied to multiple elements through
menu items.
The Details area is split between Attributes controls and Style controls. Attribute controls provide access to special
features of each type of element. Style controls handle characteristics such as fill colors and line widths.
You can choose the style that an element should use by selecting the style from the popup on the Details tab or in
the toolbar. The element is redisplayed with the new style. If you created a new style and want to apply it to a number
of elements simultaneously you can use "Edit->Copy Style" and "Edit->Paste Style".
Note: The style attribute section allows you to modify a single element, apply a style to an element or to
create a new style out of the attributes of that element. When you first make changes to a style, an
asterisk (*) is put next to the style name, so you know that this element is a variation of that style. If you
like the variation, you can Update the style. If you don't like your changes, you can Revert. If you want to
use this new style with other elements in the future, then create a New style.
Styles
Styles let you quickly make uniform changes to multiple elements in your comic. Want all captions to have the same
gradient fill? Use a style. Want all panels to have a particular frame width? A style can do it.
Comic Life comes with built-in styles that can be tweaked and then made into new styles. Each type of element
(balloon, panel, lettering, etc) has its own inital style and can have any number of additional styles letting you create
different looks for different elements of the same type. For example you may want thought balloons to have one style
and speech balloons to have another.
To change the style of an element, choose from the Style popup menu, or simply experiment until you create a style
you like.
If you have made a variation to the exisiting style, then an asterisk appears next to the style name. Your element is
now unique!
If you want to share this new style, then create a New style. New styles can be created under Style Attributes with
the '+ New' button - a sheet appears that lets you name the new style. When you click "OK" the new style is created
and the element is set to use the new style. Now you can set other elements to have the same style.
You can also Update the current style - be careful! - this will also change the attributes of every other element (that is
the same kind and using this style).
If you don't like your changes, press the Revert button to go back to the original style.
If you created a new style and want to apply it to a number of elements simultaneously you can use "Edit->Copy
Style" and "Edit->Paste Style". See "Working with Styles" for more information.
Undo
Comic Life provides full support for undo - practically any operation can be immediately undone letting you fearlessly
explore its features.
The number of operations that can be undone is limited only by the available memory of your computer.
The undo memory is reset whenever you save the comic.
Quick Comic
The Quick Comic feature is a greate way to create a comic from an iPhoto Album by specifying a few simple
parameters and letting Comic Life do the page, panel and image layout. Then you can get straight the fun part of
adding bubbles and captions!
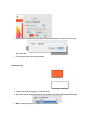
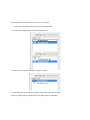
Creating a Quick Comic
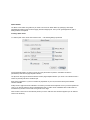
To create a quick comic choose "File->Quick Comic...". The following dialog is presented:
Choose the iPhoto Album you wish to use for the comic (the number of photos in each album is shown in
parentheses). Next select a page template collection.
The layout for each page is selected at random from the page template collection you choose. The collections have a
number of panel layouts with a consistent style.
Next choose a stylesheet - if you've not created any stylesheets of your own, then there will be just the Default
selection available.
Finally choose a page format and orientation. The format you should choose depends on how you want to publish the
comic. If you want to print then choose a standard paper size. For video choose a standard video or HD format. For
web almost any format is can be used as long as it's not too large.
Click "Create" to have Comic Life build and present your comic. After the comic document appears you can edit and
save it in the usual way.
Pages
Comic Life is a special page layout program designed for making comics easy. A comic is laid out on one or more
pages. When first started Comic Life presents you with an empty page in the edit area with its associated thumbnail
in the page organizer.
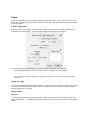
A Note on Page Sizes
By default Comic Life is configured to show page that's suitable for the web. You can change the page size by
choosing the "File->Page Format..." menu and picking a different Page Size in the popup menu:
You can also adjust other page settings here including specifying a completely custom page size.
Sizes are specified in points - there are 72 points to an inch and 28.35 points to a centimeter.
Tip: If you have a particular page size you always want Comic Life to use you should specify that in the
Preferences.
Laying out a page
You could immediately start adding images and balloons or what ever you like to this page, but most comics are laid
out as a series of panels that let you structure your story. Comic Life provides a couple of easy ways to create a
particular panel layout for your page.
Layout options
Grid layout
To create a page with a regular grid layout where each panel is the same size as the others use the "Page->New
Page with Grid Layout...". A sheet appears where you can specify the number of rows and columns for the page and
a gutter.
Note: The gutter is the spacing between the cells and the margin.
Enter the rows, columns and gutter values you desire and click the OK button. A new page is created after the current
page.
Template layout
Page templates provide many irregular page layouts which you can view in the Page Template browser which is
described in the next section: Libraries.
Custom layout
Comic Life also lets you design a completely custom layout by placing panels directly on the page and adjusting them
to suit your needs. See the Panels section for more information.
Adding pages
There are four ways to create a new page:
Blank Page
To create a new blank page use the "Page->New Blank Page" menu item. A blank page is added after the current
page.
Page with grid layout
Use the "Page->New Page with Grid Layout..." option described above.
Page from a template
At any point you can drag a page template on top of the current page being edited and create a new page with that
template.
Page from current page
You can easily create a new page of panels based upon the layout of the current page. Choose "Page->New Page
like Current Page".
Deleting pages
To delete a page make sure it is displayed in the edit area either by selecting it in the organizer or by using the "View>Page Up" or "View->Page Down" menu items.
Once the page is selected choose the "Page->Delete Page" menu item. A confirmation sheet is displayed. Clicking
"OK" will delete the page.
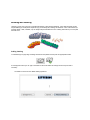
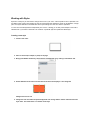
Reorganizing pages
You can change the order of pages in the organizer by dragging pages up and down the organizer:
1.
2.
3.
Page Controls
A small portion of the window is dedicated to some handy page controls as shown below:
The "+" button adds a new blank page after the current page. The "-" button deletes the current page (after you have
confirmed the action in a sheet). Clicking on the button with a gear reveals the context menu for working with pages.
This menu can also by revealed by Cmd clicking on the page organizer:
Most of these menu items have been described before so we'll focus on the additional entries.
Make Text on Page Bigger increases the size of all the text in balloons and captions on the page.
Make Text on Page Smaller decreases the size of all the text in balloons and captions on the page.
Delete All Text on Page deletes all the text in balloons and captions on the page.
Note: lettering elements are not affected by these three actions.
These actions are also available in the Page menu on the menu bar.
Page Details
There are no special options for pages.
Page Styles
See the Page section of the Working with Stylesheets section.
Libraries
The Libraries tab is divided into two sections. The expandable top section holds templates you can use to quickly
layout panels on a page. It also holds an individual panel well for creating custom layouts. The lower section shows
your iPhoto library (if you use iPhoto) on the iPhoto tab, your home folder on the Finder tab and a live video feed
from your video camera (if one is available) on the Capture tab.
When ever you create a new page the Libraries tab is automatically revealed and the templates area expanded so
you can quickly choose a new template or start laying out your pictures.
Panels and Page Templates
Panels let you easily create comic layouts - they can smartly clip anything put inside them to their edges - images,
balloons, etc - letting you focus on telling your story instead of fussing with tidying things up. We'll look at panels in
another section.
Browsing templates
If the template browser is not already expanded expand it by clicking on the disclosure button.
The browser smoothly expands to show three rows of templates. If there are more rows you can easily scroll up and
down row-by-row by clicking on the scrollbar arrows or by dragging the scroll bar. Or expand the area further by
dragging the Library divider:
Comic Life comes with a few different template collections that are suited for different situations. You can view the
different collections by selecting any of them from the popup menu.
Using a template
To use one of the templates you can drag and drop it onto a blank page or simply double-click it.
1.
2.
If the current page is empty (has no elements of any kind on it) the panels from the template are added to the current
page. Otherwise a new page is created directly after the current page and the panels are added to that. In either
case the panels are automatically stretched to fit the dimensions of the page.
3.
4.
If the template browser was not expanded by you it is automatically collapsed to provide more room for browsing your
images. If it does not collapse you can force it to by clicking once more on the disclosure triangle. The template
browser shrinks until just a single row is displayed.
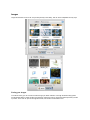
Photos
Comic Life provides three photo browsers - one for iPhoto, one for the files located in your home folder (or anywhere
on your computer) and one for your video camera. All browsers provide similar functionality with some minor
differences.
Adding a photo
When you have found a photo click on it and while holding down the mouse button drag it to the page.
1.
2.
If you want the image to be added to a panel drag the image over the panel and release the mouse. The image is
automatically added to the panel, resized to fill the available space in the panel and clipped to the edges.
3.
4.
You can keep adding images until all the panels are filled.
iPhoto Browsing
The iPhoto Browser automatically displays all the images in your iPhoto Library. The thumbnails are gradually loaded
and displayed. To switch to a different album select the album from the popup menu. The thumbnails for that album
are loaded and displayed in the area below.
If you want to change the size of the thumbnails use the slider at the bottom of the tab. The resizing behavior
operates in a similar manner to iPhoto - it changes the number of columns to maximize the use of the available
space. At maximum size just one thumbnail per row is displayed. At minimum size five thumbnails per row are
shown.
Finder Browsing
Comic Life has a smart Finder to help you locate images in your folders. Whenever a folder is opened all the files are
checked and thumbnails are created and displayed for any images letting you find them visually rather than by using
their typically obscure file names.
Any non-image files are shown with their normal icons. To open a folder simply double-click on the folder.
Note: While thumbnails are loading you can still navigate the file-system to other folders - so don't worry
about waiting if you're not at the correct folder.
To pop up out of a folder you can use the arrow button beside the folder label. This takes you up one level in the
folder hierarchy.
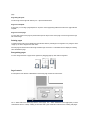
Video Capture
If you have a video camera connected to your computer you can grab images from it directly and drop them onto
your comic. You can drag and drop from the live video feed:
Or you can click on the freeze button to take a traditional snap shot and then drag the frozen image. The video will
remain frozen until you click on the freeze button again:
Panel and Image Layout
The primary layout element in Comic Life is the panel. This can be thought of as a box into which you can place an
image and whatever other elements such as balloons and captions are needed.
Add a panel
To add a panel simply drag a panel from the panel well on the Libraries tab. A new panel is added and selected on
the page.
Repositioning a panel
To move a panel simply select it and drag it to the appropriate location. You can use the Arrange->Align menu to
quickly position the panel relative to the page.
Resizing a panel
Select the panel and drag any of the resize handles to change the size.
Note if the panel is irregular then the resize handles actually change the shape of the panel rather than
resizing the panel in a rectangular manner. (See the panel inspector for more information).
Adding an image to a panel
Once you've positioned and sized your panel you'll want to add an image. Choose an image in the Browser and drag
it on top of your panel. Release the mouse button to add the image to the panel. The image is scaled to best fill the
panel and selected allowing you to adjust its position with the panel. See the Working with images section for more
information.
If you have any other elements in the panel notice that the image is dropped behind them as images are
always made the background of the panel (unless another image is already the background).
Panel Details
The panel details lets you switch between rectangular and polygonal panels.
Irregular
Panels are typically rectangular in shape but you can create irregular shaped panels by checking this box. When
checked the four corners of the panel are able to be positioned independently allowing you to reshape the panel as
needed. You can change the number of sides of the panel from a minimum of 3 (for triangular panels) to a maximum
of 8 (for complex polygons).
If you uncheck the box the panel will be converted back to a rectangle that is sized to the maximum bounds of the
irregular panel.
Lock
Prevents the panel from being moved or resized.
Style properties
Use the Style popup menu to pick a different style, or simply experiment until you create a style you like.
If you have made a variation to the selected style, then an asterisk appears next to the style name. Your element is
now unique!
If you want to share this new style, then create a New style.
New styles can be created under Style Attributes with the '+ New' button - a sheet appears that lets you name the
new style. When you click "OK" the new style is created and the element is set to use the new style. Now you can
set other elements to have the same style.
You can also Update the current style - be careful! - this will also change the attributes of every other object (in this
style).
The default style cannot be changed, so you will need to create a new style, which you can then use on other
elements.
If you don't like your changes, press the Revert button to go back to the original style.
Images
Images are the basis of Comic Life - they're always handy in the Library, and can be be manipulated in many ways.
Finding your images.
In the Photo Library you can choose to browse through your iPhoto collection or through the Finders filing system.
Use the bottom slider to control the size of the previews, and the top menu to choose the folder/ import that you want
to preview. Comic Life can open most image file formats, and will even render PDFs to use!
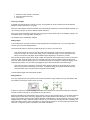
Adding images.
When you find an image you like, you can grab it and drag it into a Panel. You can always just drag it on the page by
itself if you want, but a panel will allow you to clip the image so you only see the important bits.
When placing the image in a panel, you need to move the mouse cursor over the panel itself, so when you release
your picture it will be 'put inside' the panel. This is how you can control if a Panel clips the sides of a photo off - if your
mouse cursor is inside the panel, then the photo will clip. TIP: If you can't get the right placement/ clipping, then try
putting the photo down and picking it up from a different part.
Once your image is placed in a panel, it will expand to make best use of the panel space. Now is the opportunity to
make sure your image is placed exactly as you want it.
Manipulating images.
An image can:
- Be clipped at the edges of a panel, by making sure the mouse cursor is above the panel when you release your
photo
- Be rotated by grapping the purple rotate handle. Holding down shift will lock rotation into 90 degree angles - handy
for changing landscape to portrait layout
- Be rescaled on the fly by dragging the green selection circles
- Be flipped on either axis by utilizing the Image Attributes in the Details
- Have it's own independant frame and shadow
TIP: If you have many overlapping windows and it becomes difficult to grab your photo, try to grab it by the
semitransparent handle in the middle. This will always allow you to drag.
Help! My images are locked in a panel!
Comic Life 'locks' the image into a panel after you deselect it - this makes it easy for you to move you new panel and
image around as a unit. But if you decide you want to edit your image (or delete the image from a panel), just
remember to DOUBLE CLICK. This will select the actual image inside a panel, and now you can re-size, rotate etc
until you are happy. Then just click in some space to deselect the photo, and it will lock back in.
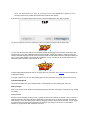
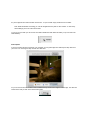
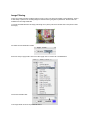
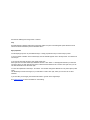
Image Filtering
Comic Life provides a number of filtering options to help you turn your photos into realistic comic illustrations. There is
a wide variety of options from converting images to black & white to giving them a painted look. All these filters are
available from the Image Details tab.
To access the Details tab select an image (if the image is in a panel you'll need to double-click on the panel to select
the image):
and make sure the Details tab is visible:
Now we're ready to apply a filter. Click on the filters popup menu to see the list of available filters:
Choose the "Painted 3" filter:
Your image should now show the painted filter effect:
Try out some of the other filters in the menu to see what effect they have - you'll find there is a wide variety. And
we've also provided some Styles for you to try out.
Tip: If you update the Default style to have a filter then all images with the Default style (and any new
images) will all be filtered in the same way.
The Invert checkbox inverts the colors in the image (after any filter has been applied) for a photo negative effect.
The Colorize checkbox applies the color shown in the color well to the image - you can get sepia like effects with this
- or any other color tone you might like. Again the colorize is applied after any selected filter (and after invert if that is
selected).
Adding speech and thought balloons
Speech and thought balloons let you give your pictures come alive as your characters use the balloons to
communicate and provide access to their thoughts.
To add a balloon simply drag the balloon of your choice on to the page and drop it in the appropriate location:
1.
2.
3.
Editing balloon text
To edit the text in the balloon simply double-click on the balloon and the text will become editable.
Note: When a balloon is selected you can also hit "return" on your keyboard to be editing.
You can change the font, point-size and most every characteristic of the text using the Format->Font menu.
Text in balloons is always center justified. This follows the standard comic convention.
Once you're done editing hit the "Enter" key or use the mouse to click outside the editing area. Your changes will be
shown in the balloon.
Resizing a balloon
To resize a balloon select it and drag any of the green resize handles on the perimeter of the balloon.
Moving a balloon
To move a balloon simply select it and drag from within the balloon. The balloon will follow your mouse.
Moving the tail
Once the balloon text is appropriately sized and positioned you'll want to position the tail so that balloon is associated
with the right person. Mouse over the bubble and you'll see a marker handle show up that indicates the place to click.
Click on this handle and drag the tail into place.
To move the balloon and its tail simultaneously click on the special center handle that shows up when you
mouse over a balloon. Dragging this handle will move them both.
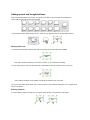
Adding additional balloons
Sometimes you have more text than can comfortably fit in one balloon and need for the text to span multiple
balloons. Perhaps the character is pausing for thought before continuing speaking or you need to make a thought fit
a particular space. Comic Life lets you do this by adding additional balloons to the speech or thought.
Add an additional balloon
To add another balloon to an existing balloon simply drag the extension balloon from the well and drop it on a balloon
that needs extending. The new balloon is automatically connected to the existing balloon and displayed as the same
type as the original balloon.
This balloon can be manipulated in the same manner as described above. Note how the balloon smoothly connects
to the previous balloon. If the two overlap their outlines are joined cleanly. If they are separate a connecting tail is
drawn between automatically maintaining the visual connection for you.
Additional balloons can each have their own style.. for example:
To achieve this, add additional Speech balloon as per above. Then, select each balloon and change it's type
(Speech, Television, Thought etc.) in the Balloon Atributes panel (in the Details tab). The only exception; a clump of
balloons cannot contain a whispered balloon- this is due to the difference in line styles (dotted for whispered). Setting
one balloon to whispered will change all the connectd balloons.
Balloon Details
The balloon details lets you adjust the type of balloon from Speech, Thought, Whisper etc. and the margins between
the text and the balloon outline if needed. You can also choose the style for the balloon (you can set different styles
for each individual balloon in a group of connected balloons - letting a character switch from speech to an
exclamation) or override the style attributes if necessary.
Kind
Change the kind of balloon being drawn. Choose
between: Speech, Thought, Exclamation 1,
Exclamation 2, Whisper, Rough 1, Rough 2,
Rounded, Square, Space or TV.
Text Margin
If the text is too close to the edges of the balloon (or
not close enough) you can adjust the margins by
assigning new values to the horizontal (H) and
vertical (V) margins.
Lock
Prevents the balloon from being moved or resized.
Clip
Normally balloons are cut off where they intersect the
edges of a panel. Unchecking this option allows the
balloon to break the edge of the panel for dramatic
effect.
Style properties
Use the Style popup menu to pick a different style, or
simply experiment until you create a style you like.
If you have made a variation to the selected style,
then an asterisk appears next to the style name.
Your element is now unique!
If you want to share this new style, then create a
New style.
New styles can be created under Style Attributes with
the '+ New' button - a sheet appears that lets you
name the new style. When you click "OK" the new
style is created and the element is set to use the new
style. Now you can set other elements to have the
same style.
You can also Update the current style - be careful! - this will also change the attributes of every other object (in this
style).
The default style cannot be changed, so you will need to create a new style, which you can then use on other
elements.
If you don't like your changes, press the Revert button to go back to the original style.
See Balloon Styles for more information on each setting.
Working with captions
Captions let you introduce an new scene or provide some narrative information for example: "Meanwhile..." or
"Suddenly!" or "It was a dark and stormy night...". A caption lets you add whatever descriptive or thought text you
might need.
Add a caption
To add a caption drag a caption from the element palette and drop it at the appropriate position on the pageL
1.
2.
3.
Edit a caption
To edit a caption double click on top of it or simply select it and hit the "Return" key on your keyboard. The caption
text becomes editable and is selected. Type in whatever words you need. You can make whatever formatting
changes you need to the text using the Format->Font and Format->Text menu items. Caption text can have any
justification or font setting you need.
To finish editing simply hit the "Enter" key or click outside of the edit area. Your changes are committed to the
caption. If the caption cannot contain your new text its height adjusted to fit the text.
Repositioning a caption
To move a caption simply select it and drag it to the appropriate location. You can use the Arrange->Align menu to
quickly position the caption relative to the enclosing panel or page.
Resizing a caption
Select the caption and drag any of the resize handles to change the size.
Note if the caption box is not large enough to display the contained text the extra text will not be displayed.
So if you're missing some text try resizing the caption to see if it is simply too small.
Caption Details
The caption inspector details you adjust the margins between the text and the caption outline if needed. You can also
choose the style for the caption or override the style attributes if necessary.
Type
Text Margin
If the text is too close to the edges of the caption (or
not close enough) you can adjust the margins by
assigning new values to the horizontal (H) and vertical
(V) margins.
Lock
Prevents the caption from being moved or resized.
Clip
Normally captions are cut off where they intersect the
edges of a panel. Unchecking this option allows the
caption to break the edge of the panel for dramatic
effect.
Style properties
Use the Style popup menu to pick a different style, or
simply experiment until you create a style you like.
If you have made a variation to the selected style, then
an asterisk appears next to the style name. Your
element is now unique!
If you want to share this new style, then create a New
style.
New styles can be created under Style Attributes with
the '+ New' button - a sheet appears that lets you
name the new style. When you click "OK" the new
style is created and the element is set to use the new
style. Now you can set other elements to have the
same style.
You can also Update the current style - be careful! this will also change the attributes of every other
object (in this style).
The default style cannot be changed, so you will need
to create a new style, which you can then use on other
elements.
If you don't like your changes, press the Revert button to go back to the original style.
See Caption Styles for more information on each setting.
Working with lettering
Lettering in Comic Life covers two compositional elements: Titles and Sound Effects. Comic titles frequently involve
warped lettering (for example the Superman logo) or interesting fills, outlining and shadows. Comic sound effects (for
example "POW", "ZAP", "BOING", etc) are always warped and filled with color. Lettering elements let you accomplish
both with ease.
Adding lettering
To add lettering to a page drag a lettering element from the palette and drop it at the appropriate location.
A sheet appears where you can type in the letters for the sound effect and change the font and point size if
necessary.
The initial font is set from the default lettering stylesheet.
Click on "Convert to Graphics" to add the lettering to the page.
Sound effects are special in that they are not handled as regular text. The text is converted to a graphic
representation that enables creative display capabilities such as per-character gradient fills, merged
drawing and warping - this is described further below.
The lettering is displayed centered on the drop point with whatever default style is in effect for lettering.
Note that the letters are organized such that if the letters are closely packed the preceding letters overlap
the following letters in a natural hand-lettered style.
Editing lettering
If you would like to change the font or the text of lettering simply double click on it and the lettering sheet will
reappear so you can adjust the text and font upon which the lettering is based. Once you click the "OK" the new text
is warped to fit the current lettering outline.
If you have used any of the character adjustment tools these changes will need to be reapplied.
Moving lettering
Simply click and drag the lettering to the appropriate location.
Resizing lettering
Resizing lettering is where the fun begins. Dragging the corner resive handles warps the lettering to fit the new
shape. You can add a lot of drama to a sound effect by dragging out its top two corner handles.
To bend the lettering use the top and bottom center handles. These are special handles that gently bend the letters
so they curve to fill the new space. These center handles retain their relative position between their respective corner
handles so that adjusting the corners does not interfere with the curve that you've applied.
To uniformly resize the lettering hold down the "shift" key while dragging the corner handles. The lettering is scaled
around the rotation point. Shift dragging the curve handles has no effect beyond the normal behavior.
Rotating lettering
You can rotate a lettering element to any angle by selecting the element and dragging the rotate handle around.
Holding down shift locks the angle to the nearest 90° angle.
Deleting lettering
To delete a lettering element simply select it and hit the Delete key or choose Edit->Delete.
Lettering Details
The Lettering Details offers a few extended features for Lettering.
Horizontal Spread
Increases or decreases the horizontal space between the
individual letters in the lettering.
Note that this has little or no impact when the letters are
aligned vertically.
Vertical Spread
Increases or decreases the vertical space between the
individual letters in the lettering. Note that this has little or no
impact when the letters are aligned horizontally.
Skew
Skew lets you rotate the baseline of the lettering without
rotating the letters (for a stair-step effect) - providing a useful
dynamism without impacting legibility.
Stagger
The stagger buttons cause the individual letters to be alternately shifted up and down or left and right. This gives the
lettering a jumbled effect for added impact. You can keep clicking either of the buttons to increase the effect. Use
Edit->Undo to revert back.
Join character outlines
Sometimes you'll want the characters to be displayed individually and have the outlines of each overlap. Other times
you'll want the letters to be joined neatly together. Checking this option draws the lettering as a single graphic object
so that a gradient fill is draw across all the letters, outlines are merged (where they overlap) and the shadow (if any)
is beneath all the characters.
Lock
Prevents the lettering from being moved or resized.
Clip
Normally lettering is trimmed where they intersect the edges of a panel. Unchecking this option allows the sound
effect to be drawn outside the panel for dramatic effect.
Style properties
Use the Style popup menu to pick a different style, or simply experiment until you create a style you like.
If you have made a variation to the selected style, then an asterisk appears next to the style name. Your element is
now unique!
If you want to share this new style, then create a New style.
New styles can be created under Style Attributes with the '+ New' button - a sheet appears that lets you name the
new style. When you click "OK" the new style is created and the element is set to use the new style. Now you can
set other elements to have the same style.
You can also Update the current style - be careful! - this will also change the attributes of every other object (in this
style).
The default style cannot be changed, so you will need to create a new style, which you can then use on other
elements.
If you don't like your changes, press the Revert button to go back to the original style.
See Lettering Styles for more information on each setting.
Working with Styles
Styles are a handy way to make uniform changes to the look of your comic - want all panels to have a particular color
and width to their border? Want captions to have the same background gradient fill? These are all editable in a single
place - the Styles Attributes in the Details tab. All the styles settings in a comic are called a "stylesheet".
You can save and load stylesheets independently from a comic - allowing you to easily create multiple comics with a
standard look. If you want ALL elements to be created in a particular style then Update the 'default' style.
Creating a new style
1. Create a new comic
2. Place an element (for example, a panel) on the page.
3. Bring up the Details interface by choosing View->Show Details or by clicking on the Details" tab.
4. All the attributes for the object, and the style for the object are displayed - lets change the
background colour to red.
5. Change the color and watch the panel background color change. Notice now the *asterisk next to the
style name. This shows there is a variation to the style.
6. Press the 'Save As' button, and a pop-up menu asks you to name your new style. Lets call it "Big
Red". Press OK.
7. You can now use this style for other elements.
Updating a style
1. Create a new Panel by dragging it out from the Library
2. Now set it's style to the "Big Red" style we just created by choosing it in Style Attributes (In Details)
3. Make a change to the panel, for example, lets make the frame thicker.
4. Now there is an asterisk* next to our style. That means we have made a variation.
5. We like our change, and we want all elements with the same style to change as well, so we click "✓
Update"
6. The asterisk* now dissapears. Also our first panel now has a thick border as well - it uses the same
style
Reverting to a style
At any point you can revert back to the original style chosen by selecting 'Revert'. A pop up menu will remind you that
you will loose your changes to the style - to prevent this you should update the current style or create a new style.
Panel Stylesheet
Style menu
Select the panel style you want, or make changes to the style as a variation. Select Update to change the
style itself to match your variation, create a new style using Save As which you can use later on other
elements. Revert will return to the orginal style selected.
Background
Optionally fill the background of the panel with the selected color.
With Gradient
Optionally fill the background of the panel with a color gradient beginning with the Background color and
ending with the Gradient color. The circular control to the right sets the actual gradient.
Frame
Optionally draw a frame around the panel with the specified width. The Type popup lets you specify a
shape for rectangular panels. Some shapes have special shapes such as bevels that can be adjusted
with the Factor field.
Shadow
Optionally draw a shadow behind the panel with the specified color, Blur radius and Offset.
Caption Stylesheet
Style menu
Select the caption style you want or simply make some changes as a variation to the style. You can
Update the style (which affects all elements in this style), create a new style using Save As, or simply
Revert back to the original style.
Background
Optionally fill the background of the caption with the selected color.
With Gradient
Optionally fill the background of the caption with a color gradient beginning with the Background color
and ending with the Gradient color. The circular control to the right sets the actual gradient.
Frame
Optionally draw a frame around the caption with the specified width. The Type popup lets you specify a
shape for rectangular panels. Some shapes have special shapes such as bevels that can be adjusted
with the Factor field.
Shadow
Optionally draw a shadow behind the caption with the specified color, Blur radius and Offset.
Font
Specify the default font and font color for new captions - note that existing captions using this stylesheet
will not change their fonts - this is to avoid losing any special formatting you may have been applied. The
font will change when a style is manually selected in the Inspector style menu. You are not restricted from
changing the font with the Font Panel once the caption is created.
Balloon Stylesheet
Style menu
Select the bubble style you want or simply make some changes as a variation to the style. You can
Update the style (which affects all elements in this style), create a new style using Save As, or simply
Revert back to the original style.
Background
Optionally fill the background of the bubble with the selected color.
With Gradient
Optionally fill the background of the bubble with a color gradient beginning with the Background color and
ending with the Gradient color. The circular control to the right sets the actual gradient.
Frame
Optionally draw a frame around the bubble with the specified width.
Shadow
Optionally draw a shadow behind the bubble with the specified color, Blur radius and Offset.
Font
Specify the default font and font color for new bubbles - note that existing bubbles using this stylesheet
will not change their fonts - this is to avoid losing any special formatting you may have been applied. The
font will change when a style is manually selected in the Inspector style menu. You are not restricted from
changing the font with the Font Panel once the bubble is created.
Image Stylesheet
Style menu
Select the image style you want or simply make some changes as a variation to the style. You can
Update the style (which affects all elements in this style), create a new style using Save As, or simply
Revert back to the original style.
Filter
Optionally filter the image to add an effect.
Invert
Optionally invert the colors in the image to give a "negative" effect.
Colorize
Optionally convert the image into monochrome based on the color in the color well.
Frame
Optionally draw a frame around the image with the specified width.
Shadow
Optionally draw a shadow behind the image with the specified color, Blur radius and Offset.
Lettering Stylesheet
Style menu
Select the lettering style you want or simply make some changes as a variation to the style. You can
Update the style (which affects all elements in this style), create a new style using Save As, or simply
Revert back to the original style.
Fill
Optionally fill the background of the lettering with the selected color.
Gradient
Optionally fill the background of the lettering with a color gradient beginning with the Background color
and ending with the Gradient color. The circular control to the right sets the actual gradient.
Outline
Optionally draw a border around the lettering with the specified color. The Count field specifies how many
borders should be drawn around the lettering. If there is more than one border around the lettering the
outline color is alternated with the Alt color. The Width specifies how thick the border should be.
Shadow
Optionally draw a shadow behind the lettering with the specified color, Blur amount and Offset.
Font
Specify the default font for new lettering elements. This font can be changed on the Lettering creation
sheet.
Page Stylesheet
The page stylesheet is much like every other element's stylesheet, however it does have a few unique
points. To select the page, you need to click on some empty part of the page. The details tab will show
'PAGE ATTRIBUTES' and STYLE ATTRIBUTES. The page itself has no attributes (this is handled by File> Page Format), so we will focus on the Style Attributes.
Style Menu
Select the Page style you want or simply make some changes as a variation to the style. You can Update
the style (which affects all elements in this style), create a new style with Save As, or simply Revert back
to the original style. For simplicity, we reccomend that you simply update the default style once you are
happy with the page numbering style. From then on, all new pages will look like this one.
Fill
Optionally fill the page with the selected color.
Gradient
Optionally fill the page with a color gradient beginning with the Background color and ending with the
Gradient color. The circular control to the right sets the actual gradient.
Page Number
Optionally draw a page number on the page. You can choose which edge the page number aligns to with
the popup menus, and use Inset to move the page number closer or further away from the page centre.
Backdrop
The backdrop is like a panel for your page number. It can be set to a caption style, and have it's own
vertical size, horizontal size, and rotation. For more control over this create a special caption style for
page number backdrops. To achieve this do the following:
1. Create a caption style using an available caption
If you don't have one drag a temporary one onto the comic to get access to the caption styles editor
2. In the Caption Styles Attributes tweak the settings till you get something you like.
3. Click on "Save As" to create a new caption style for page numbers.
4. Delete the temporary caption if you created one.
5. Deselect everything on the page to get back to the page attributes (probably there
already).
6. Select the new caption style in the Caption Style menu.
7. Click Update to get all pages to use this style (assuming you're modifying the Default
style).
Font
Specify the font, size, and colour for Page Numbers.
Publishing
The ultimate product of Comic Life is a published comic - the application lets you publish in a variety of forms which is
a major reason for some of the unusual page formats that are supported. You can of course print your comic using
the standard print dialog - but you can also export your comic as HTML or a QuickTime movie. This section explores
all these options.
Printing
If you intend to print your comic you will get best results by choosing a page format that matches your printer. Comic
Life comes with a wide selection of standard page sizes. Once your comic is complete you can print it simply by
choosing File->Print... and clicking "Print".
Note: Don't be alarmed if it seems to take a while to print Comic Life uses your high-resolution images for
best results and this can slow down the printing process.
If you want a quick proof of your comic make sure the "Low-Res Proof" option is selected in the Comic
Life settings of the Print sheet. The printer will use the screen resolution images (~ 72 dpi) for faster
printing. Note that this setting is remembered while the application is running so if you need a final proof
then you must uncheck this option.
Export to HTML
Comic Life can turn your comic into a convenient web presentation with the Export to HTML feature. To access this
feature choose "File->Export to HTML...". On the export sheet enter the name and location of the folder that will hold
the HTML files and images. You can also choose a theme for the frame that will surround the comic and the quality of
the JPEG images. Click on the "Export" button to create the HTML files. Once the export is complete you will find a
number of files in the new folder with the name you selected. These are:
Launcher.html
A file containing the HTML needed to display the comic its own window. You will need to copy the link to
another webpage in order to integrate the comic with a website - depending on where you upload the
comic folder you may need to edit the javascript.location value:
<a href="javascript:location='MyComic/Comic.html';
window.open('Comic.html',
'MyComic',
'width=XXX,height=YYY,scrollbars=no,
toolbar=no,status=no,resizable=no')
">MyComic</a>
Comic.html
The actual comic HTML file - what is loaded into the new window.
pages.js
A JavaScript file that lists all the pages as a JavaScript array and initializes other important variables.
This file is used by the Comic.html file
images folder
Contains the images needed to draw the frame around the comic. Used by Comic.html
pages folder
Contains the JPEG images of all the pages in the comic named Page_1.jpg, Page_2.jpg etc.
Export to QuickTime
Comic Life can turn your comic into a QuickTime movie for use as part of a multimedia project. The QuickTime movie
can be imported into iMovie or Final Cut Pro/Express for further editing or simply added directly to an iDVD project.
To export a QuickTime movie choose File->Export to QuickTime... In the export sheet choose a name and location
for the movie as well the quality of the JPEG images that form the frames of the movie and the duration that each
page will be presented. Click on "Export" when you are ready start the process.
.Mac Integration
Comic Life has great support for .Mac users. Within Comic Life you can publish your comics to your .Mac account
and make them easily available to family, friends and/or fans. Comic Life creates a stylish layout of your comic where
visitors can click on thumbnails to read in a popup window with page controls for easy stepping the pages of your
comic.
Publishing to .Mac
To publish your comic on your .Mac homepage all you need to do is load up the comic in Comic Life and choose
File->Publish to .Mac. The following sheet is presented where you can specify the name to give the comic and the
quality of the JPEG images posted as well as a frame that will be shown around your comic.
Once you click OK Comic Life proceeds to render the necessary JPEGs and then upload all the files necessary to
display your comic. The main index.html is generated and (if this is not the first comic you've published) the new
comic is moved to be the first comic on display.
Once complete you are presented with a sheet that has various options.
Clicking on Open in Browser opens the homepage in your preferred browser. Send email automatically creates an
email with a link to your site. The URL shown in the dialog is also selectable if you want to copy/paste it into another
location.
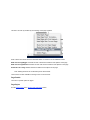
Managing your .Mac Comics
After you've posted a few comics to your page you'll probably want to begin to remove some of the older ones. You
might also want a different name for your homepage than the default.
You can do both of these things within Comic Life. Choose File->Manage .Mac Comics to bring up the Comic
Manager. The simple interface hides some sophisticated features. With this interface you can reorder comics, delete
and rename them as well as change the name of your home page.
None of the changes take effect until you click on the Apply button.
To reorder comics simply drag the comics up and down the list:
1.
2.
To delete a comic check the box next to the comic in the table.
You can retitle your comic homepage by typing in a new name at the top of the dialog.
When you're happy with your changes click on the "Apply" button to update .Mac.
You're done!
Advanced lettering
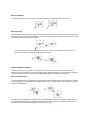
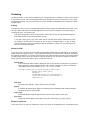
Fitting words in a ballon
Once you've made a few comics or even added a few balloons you'll notice that sometimes the words in a balloon
naturally fit the available space and other times there is a lot of empty space in the balloon - and the balloon is taking
up too much room. For example:
In this example we can see that the words do not form an outline that matches the balloon shape and the result looks
bad. There are a couple of approaches to solve this problem and usually a combination of the two will get the desired
result.
The first approach is to adjust the shape of the balloon to better fit the words. Stretching this balloon out horizontally
will definitely help the words to fit. If you have room in the panel try resizing the balloon to different balloon shapes to
best fit the words.
The next approach is to adjust the line breaks in the words to force the text to make an oval shaped outline. For
example a line break after "THIS IS" will make sure that not too much text is at the top of the balloon. Continue
adding line breaks until the text makes a pleasing oval or circular outline.
The final approach is to change the words. If you can't get the existing words to fit in a pleasing way try choosing
different words. Balloons benefit from small words. Long words make it difficult to get the shape you need - unless, of
course, that word just happens to land at the widest point of the balloon.
After applying these techniques this is what a well laid out balloon would look like:
Preferences
Comic Life's Preferences let you specify a preferred page format and stylesheet for new comics. You can also
choose whether Comic Life checks for new versions when it is launched.
Adding Fonts
Comic Life comes with a very useful comic lettering font (DigitalStrip) that's great for many projects but you will soon
be looking for more fonts to add variety to your effects, titles, balloons and captions.
The good news is that Mac OS X and the web make adding fonts very easy and cheap! There are literally hundreds
of quality fonts available for free on the web and some are very useful for making comics. There are even a few web
sites that are dedicated to comic fonts - though many of their fonts are not free.
Where to find fonts
Comic Font Sites These sites have excellent free and commercial comic fonts available for download:
Blambot - www.blambot.com
Lots of lettering, titling and sound effect fonts and some free samples.
www.comic.com
Lots of lettering, titling and sound effect fonts and some free samples.
Those sites also have lots of useful tips on creating comics so take a look around while you're there.
General Font Sites These sites have a wide variety of fonts available for download:
www.fonts.com
A huge site with lots of free fonts
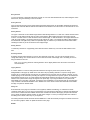
Adding fonts
Once you've downloaded a font making it available to Comic Life is very simple.
1. If the font is compressed (e.g.: .zip, .sit etc) uncompress it first.
2. Open a new Finder window (in the Finder: File->New Finder Window)
3. In the new window navigate to your HOME->Library->Fonts folder
You can of course add them to your computer Library->Fonts folder if you want the font to be available to every user
of the computer.
4. Drag your new font to the Fonts folder
5. Open the Font Panel - your new font should be listed in the "All Fonts" category.
The Font Book application (part of Mac OS X since 10.3) makes it easy to organize your fonts - try creating font
collections for balloon, sound effect and title fonts so that they're easy to find when you're creating a comic.