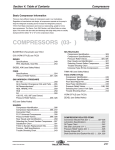
1
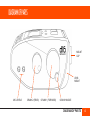
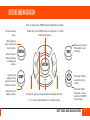
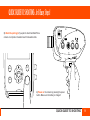
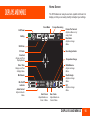
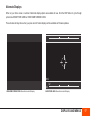
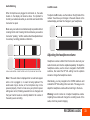
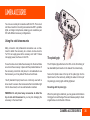
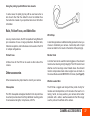
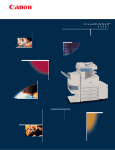
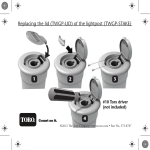
COMPANY STATEMENT
You are the new owner of a Digital Bolex D16, and we hope you are proud. By selecting
our camera, you are helping to preserve the experience and aesthetic of shooting film in
the digital age, and supporting an independent camera company that strives to provide the
highest quality design standards and components for its products.
Thank you for going on this journey with us. We don’t think you’ll be disappointed.
Sincerely,
The Digital Bolex Team
COMPANY STATEMENT
2
TABLE OF CONTENTS
Diagram of Parts 4
Buttons & Navigation 7
Quick Guide to Shooting 8
The Battery 12
•
Charging the battery
•
Shooting time
•
Using exterior power sources
•
Replacing the battery
•
Storage & inactivity
The Interchangeable Lens Mount 14
•
Attaching a lens
•
Changing the lens mount
•
Crop factor
Displays & Menus 16
•
Home Screen
•
Alternate Displays
•
Menus
Updating the Firmware 26
Data Management 28
•
Using CF cards
•
About the Internal SSD
•
Offloading the files to the computer
•
Editing Folder Names
Video monitoring 30
•
Color Modes
•
White Balance
•
Articulating the onboard monitor
•
SD out to external monitor
•
HDMI out to external monitor
•
External Icons Display
•
Mounting an EVF
Recording Audio 32
•
Powering on the Mic ports
•
Phantom power
•
Adjusting the recording volume
•
Adjusting the headphone volume
•
File format
Using the Crank 30
Camera Accessories 32
•
Using the cold shoe mounts
•
Using The pistol grip
•
Rails, follow focus, and matte box
•
Other Accessories
Shot Modes & Timelapse 35
Installing our Software 38
•
LightPost Powered by Pomfort
•
Other Post Workflow Options
•
Transcoding for Windows and Linux Users
Troubleshooting 36
Specs 38
TABLE OF CONTENTS
3
DIAGRAM OF PARTS
MOUNT
CAP
LENS
MOUNT
MIC LEVELS
CRANK 2 (REAR)
CRANK 1 (FORWARD)
CRANK HANDLE
DIAGRAM OF PARTS
4
DIAGRAM OF PARTS
COLD
SHOE
MOUNT
1/8 VIDEO
JACK
12V 4-PIN
XLR (OUT)
HDMI PORT
12V 4-PIN XLR (IN)
AUDIO XLR
HEADPHONE
JACK
DIAGRAM OF PARTS
5
DIAGRAM OF PARTS
ARTICULATING
MONITOR
MONITOR
ACCESSORY
MOUNTS (2)
COLD SHOE
MOUNT
FAN VENT
LENS MOUNT
EXTERNAL
SCREWS (3)
MENU
BUTTON
RECORD
BUTTON
DISPLAY
BUTTON
ENTER/
1:1 MODE
POWER
BUTTON
CF CARD
SLOTS
USB3
PORT
MEDIA
DOOR
DIAGRAM OF PARTS
6
BUTTONS AND NAVIGATION
When in camera menu, ENTER selects highlighted menu option.
Accesses camera
menu.
Outside of a menu, ENTER zooms in on disply for a 1:1 mode
that aids critical focus.
When powering
down, functions as
“cancel” button.
Press once to record.
Press again to stop
recording.
When camera is
alseep, pressing
once wakes up
camera.
Cycle through
display overlay
options: icons off,
third lines, normal.
Hold down to put
display to sleep.
Press and hold for 5
seconds to turn on
camera.
Use the left, right, up, and down buttons to navigate the menu.
In 1:1 mode, use the buttons to move the field of view.
Press and hold for
5 seconds, or press
once then hit ENTER
to power down.
BUTTONS AND NAVIGATION
7
QUICK GUIDE TO SHOOTING... In 8 Easy Steps!
MENU
REC
ENTER
DISP
1) Insert two CF cards (See “Data Management”
on Page 28) if you prefer to shoot on cards. If
you prefer to use the internal SSD, you do not
need additional storage media.
2) Attach a lens to the C-mount (or other mount)
on the front of the camera.
QUICK GUIDE TO SHOOTING
8
QUICK GUIDE TO SHOOTING... In 8 Easy Steps!
3) Attach the pistol grip if you plan to shoot handheld. Place
camera on a tripod or shoulder mount for steadier shots.
REC
MENU
ENTER
DISP
4) Power on the camera by pressing the power
button. Make sure the battery is charged!
QUICK GUIDE TO SHOOTING
9
QUICK GUIDE TO SHOOTING... In 8 Easy Steps!
5) Attach a microphone to the XLR ports or Line-in port if you want to record
audio (See “Recording Audio” on Page 32). Use the menu to navigate to the
SOUND submenu and adjust the CH 1 and CH 2 MIC settings to turn on the audio
channels for your microphone. Adjust the CH 1 and CH 2 PHTM settings to turn
on phantom power if necessary.
6) Remove the lens cap and use the onboard
monitor (See “Video Monitoring” on Page 18) to
check your focus.
ENTER
Use the ENTER BUTTON to see your footage
in a 1:1 ratio for easier focusing. Reframe your
focus area by using the left, right, up and down
arrows. Exit 1:1 mode by pressing the ENTER
BUTTON again.
7) Press the record button to start shooting.
Press the record button again to stop recording.
QUICK GUIDE TO SHOOTING
10
QUICK GUIDE TO SHOOTING... In 8 Easy Steps!
8) Power down your camera and connect it to
your computer via USB3 cable (See “Data Management” on Page 28) to access your footage.
The camera’s internal SSD drive will appear on
your desktop like any external hard drive, allowing you to copy footage to a safe destination.
Warning: Do not turn on your camera while it
is still mounted to the desktop. This may cause
errors to your SSD. Always eject your camera’s
drive from the computer before turning it on.
To delete footage from the camera, navigate to
the FORMAT menu (See “Data Management”, on
Page 28.) and format the drive in camera.
Warning: Never delete footage directly from
the hard drive through your computer. This may
cause the hard drive to perform abnormally.
If you copied footage to CF cards, power down
the camera, remove your cards, and place them
in a card reader attached to your computer.
8 simple steps.
That’s all there is to it!
QUICK GUIDE TO SHOOTING
11
THE BATTERY
When charging is complete, the “lightning bolt” icon will
disappear and the battery icon will appear full. The 4-PIN XLR
icon will remain as long as the AC power adapter is connected.
The D16 has an internal 12V, 40Wh LiPo battery with a life
expectancy of 1000 charge cycles. The battery is not removable.
You may also charge the internal battery by connecting third
party battery solutions via the 4-PIN XLR port.
Charging the battery
If the 4-PIN XLR icon on your display appears red instead
of white, something is wrong and the battery may not be
charging properly.
When your camera arrives, the internal battery may not be fully
charged. In order to ensure the longest life from your battery,
you should charge your camera before you begin shooting, and
always charge the battery to 100% whenever possible.
To charge the battery, connect the AC power adapter via the
4-PIN XLR input on the left side of the camera.
When the AC power adapter is properly connected and your
battery begins charging, a “lightning bolt” icon will appear over
the battery icon on your camera’s display, and a white 4-PIN
XLR icon will appear next to the battery.
BATTERY ICON
4-PIN ICON
appears when
AC charger or
external power
is connected.
You will want to determine the source of the problem before you
continue shooting, or you may risk the camera shutting down.
To determine whether the problem is caused by the internal
battery or your AC power adapter, try plugging the camera into
a different 12V power source that you know works correctly.
If the battery charges normally, you will need to replace your AC
power adapter. If the problem does not go away, it may be time
to replace your battery.
(See “Replacing the battery” on Page 13 for more details.)
Shooting time
When fully charged, your battery will last around 3 hours of
shooting time, depending on your shot length and environment.
THE BATTERY
12
Hot and cold temperatures affect your battery life, as does
continuous shooting and shooting long takes.
Your battery icon displays the percentage charge of the battery.
It will also update while charging, until the battery is full (100%).
We suggest plugging into your AC power adapter when the
battery life drops below 10% to ensure continuous shooting.
To maximize the shooting time and life of your internal battery,
we suggest keeping the camera powered down when not in
use, keeping AUTO SLEEP mode activated, and having the AC
power adapter connected when possible.
Auto Power Off
The D16 has the ability to auto power off after 1 or 5 minutes
of inactivity. This helps to save power between shots. You can
activate or disable auto power off by navigating to the POWER
MGMT submenu. (See “Displays and Menus” on Page 25.)
Note: You can temporarily put your display to sleep and save
power by pressing and holding the DISP button for 3 seconds.
To wake the camera from sleep, press the MENU button once.
Using external power sources
The Digital Bolex D16 is designed for use with external power
sources for versatility while shooting in different conditions.
Any 12V power source or battery with a 4-PIN XLR connection
can be used to charge your camera. We recommend keeping
the camera plugged into your AC power adapter or an external
power source whenever possible to ensure long battery life.
Replacing the battery
Your Digital Bolex D16 comes with a standard 1 year warranty.
While your camera’s internal battery comes with an estimated
shelf life of 5 years, after a certain number of charge cycles, or
if a problem occurs, your battery may need to be replaced.
Replacement of the D16 battery requires professional repair
services, which must be performed at an authorized repair
center. Use of an unauthorized facility will void your warranty, if
you are still within your one year warranty period.
Please contact us if you are in need of assistance regarding
your battery via our website, www.digitalbolex.com/contact.
Storage & Inactivity
The D16’s LiPo battery is designed for continual use, and will
degrade if left unused for long periods of time. If planning to
store the D16, it is optimal to store the camera at a 40% to
50% battery charge. Storing at 0% or 100% may decrease the
longevity of the battery more rapidly.
THE BATTERY
13
THE INTERCHANGEABLE LENS MOUNT
Your D16 comes with a C-mount, the same mount used on
16mm Bolex film cameras, allowing you to use legacy 16mm
and Super 16mm lenses right out of the box with no crop factor.
Attaching a Lens
To attach a lens to your C-mount camera, unscrew the mount
cap on your camera, unscrew the protective cap at the bottom
of your lens, and attach the lens to the camera via the screw
threading on the front of the lens mount.
Changing the Lens Mount
The D16 has an interchangeable lens mount system that allows
you to natively use a variety of popular mounts like EF, PL,
Micro 4/3, and C-Mount turret on your camera. The process of
changing mounts is easy and fast, you only need a screwdriver.
Before you change the mount
If you would like to use lenses for a different mount system
other than the default C-mount, you will first need to power
down the camera, remove any lens you have attached to the
mount, and make sure the mount cap is in place.
Make sure you have a safe place to store screws and the
C-mount so that you can use it again in the future.
Removing the C-Mount
There are 3 outer screws on the outside of the C-mount, two on
the top of the camera (A), one on either side of the fan vents,
and one on the underside of the lens mount (B).
A
Note: Only C-mount lenses are compatible with the C-mount.
A
With a Philips-head screwdriver, carefully remove the 3 screws
and store them in a safe place.
THE INTERCHANGEABLE LENS MOUNT
14
B
When these are removed, you will be able to remove the outer
shell of the C-mount to access the mounting block. There are
4 screws here (C), two on the top and two on the bottom, that
also need to be removed.
With the C-mount detached, you may now attach your preferred
mount to the camera. Each mount may have slightly different
instructions for installation, so consult the instructions that came
with your mount. When all screws are back in place, attach a
lens, and power on the camera. You are now ready to shoot.
Crop Factor
With a sensor plane similarly sized to a Sumer 16mm film
plane, the D16 is designed for best use with Super 16mm (in
2K mode) and 16mm (in 1080p mode) cinema lenses.
C
C
Lenses designed for other popular formats, such as MFT (Micro
4/3) or 35mm can be used on the D16, but that may result in a
crop (slight to moderate zoom) or vignetting, depending on the
properties of that lens.
In Super16mm mode, using 35mm lenses on the D16 will result
in a 2x crop; MFT lenses will be an approximately 1.43x crop.
Using a 16mm lens on 2K mode may result in slight vignetting.
C
C
In 16mm mode, using 35mm lenses on the D16 will result in a
a 2.3x crop; MFT lenses will be an approximately 1.65x crop.
THE INTERCHANGEABLE LENS MOUNT
15
Home Screen
DISPLAYS AND MENUS
The D16 features an easy-to-use menu system and clear icon
display so that you can easily identify and adjust your settings.
Crank Mode
XLR Power
Battery
100%
50%
A
B
SSD use
Frames Remaining
24FPS
2K
71716
Remaining
SSD Drive
Frames Per Second
Adjust via Menu or by
using Crank
Resolution
Adjust via Image
Menu
CF Cards
Recording Indicator
Crosshair
Display on/off via
Display Button
Temperature Gauge
Date / Time
Display on/off via
Settings Menu
White Balance
Adjust via Image
Menu
Mic Volume
Shutter Angle
Adjust via Image
Menu
ISO
Adjust via Image
Menu
Mic On/Off
indicator
Audio Format
Adjust via Audio
Menu
1
2
AIFF 08/13/14
48K 12:10:35
I
Front Crank
Adjust/disable via
Crank 1 Menu
A
WB
D
172.8
400
Rear Crank
Adjust/disable via
Crank 2 Menu
DISPLAYS AND MENUS
16
Alternate Displays
When on your home screen, a number of alternate display options are available for use. Click the DISP button to cycle through
options like SHOW THIRD LINES or HIDE HOME SCREEN ICONS.
These modes will stay active when you press record. Future displays will be available via firmware updates.
16:9
4:3
HIDE HOME SCREEN ICONS. Record button will still display.
3:2
SHOW THIRD LINES. Record button will still display.
DISPLAYS AND MENUS
17
Menus
When you press the MENU button on your camera, the menu
will display in your onboard monitor. The menu consists of a
MAIN MENU and seven submenus: IMAGE, SOUND, DATA,
CRANK, DISPLAY, SHOT MODE, and SETTINGS.
To navigate, use
IMAGE
SOUND
DATA
CRANK
DISPLAY
SHOT MODE
SETTINGS
to scroll
to select and return
Adjust settings that
affect image capture
option for that setting, and press and right again (or ENTER)
to save your selection. Then use left to return to the submenu
and adjust other settings, or hit MENU to exit the menu display.
Image Menu
The IMAGE menu settings control the look of the image, like
RESOLUTION, FRAME RATE, ISO, SHUTTER ANGLE, and
DEAD PIXEL CORRECTION. These items all affect the look of
your recorded image beyond stored metadata. Always make
sure that these settings are correct before you begin to shoot.
To navigate, use
MENU TO EXIT
main menu of the d16. hit the menu button to open; menu again to close.
Navigation
Use the arrow buttons to scroll through the submenus. Use right
to select a setting to change, up/down to scroll to your preferred
to scroll
RESOLUTION
FORMAT
ISO
FPS
to select and return
Adjust resolution
2048 x 1152 (2K)
SHUTTER ANG
WHT BALANCE
DPC FILTER
MENU TO EXIT
DISPLAYS AND MENUS
18
WHT BALANCE
Sound Menu
This setting allows you to select one of three white balances for
your footage: DAYLIGHT, TUNGSTEN, or FLUORESCENT.
The balance you select will be reflected in both your onboard
and any external monitors, as well as your raw metadata.
Your metadata and white balance is changeable in post without
degrading your image, an advantage of the CinemaDNG raw
format, but the white balance you select here will create an
“as shot” starting off point for your transcoding sotware.
To navigate, use
to scroll
RESOLUTION
FORMAT
ISO
FPS
to select and return
RGB DAYLIGHT
RGB TUNGSTEN
RGB FLUORESCENT
SHUTTER ANG
WHT BALANCE
DPC FILTER
In the SOUND menu, you can choose to change your FORMAT from
96khz to 44.1khz, change each audio channel to OFF, ON, or LINE IN,
turn on/off PHANTOM POWER for your LEFT and RIGHT channels,
select whether you want the AUDIO VOLUME METERS to display on
your home screen, and adjust your HEADPHONE VOLUME.
To navigate, use
to scroll
FILE FORMAT
CH 1 MIC
CH 2 MIC
L PHTM PWR
R PHTM PWR
VOL DISPLAY
HP VOL
to select and return
OFF
MIC 1 ON
Line 1 In ON
MENU TO EXIT
MENU TO EXIT
Headphone volume is one of the on-the-fly options that can be
assigned to a crank wheel in the CRANK menu for easy adjustment
in the field. (See “Crank Menu” on Page 24.)
DISPLAYS AND MENUS
19
To navigate, use
Data Menu
to scroll
to select and return
On the next screen, confirm that you want to format the drive.
The DATA menu is where you control the data storage of the
camera. There are options to FORMAT your SSD and CF
CARDS, COPY data from the camera to a computer, and edit
the name of the directory where your footage is stored.
FORMAT SSD
Before you start shooting, and after your SSD is full, you will
need to format the SSD inside the camera.
Warning: before you format the SSD, make sure all of your
footage is backed up to an external hard drive or CF cards. To
transfer directly from the SSD to a computer, see “Transfering
Via Computer” on PAGE 22.
FORMAT : SSD
Are you sure you want to format?
Formatting will erase all data.
NO
YES
Once you press YES to confirm, MENU
you must keep
camera on
TO the
EXIT
until formatting is completed.
Copying to CF...
In the DATA menu, select the SSD FORMAT option and press
ENTER
to startuse
formattingtoyour
drive. to select and return
To navigate,
scroll
COPY DATA
SSD FORMAT
CF FORMAT
DIR NAME
Format SSD
WARNING : DO NOT POWER OFF
CAMERA WHILE COPYING
When formatting is complete, you may now shoot.
It is recommended to
format the SSD to clear
all data on the camera
MENU TO EXIT
TO
MENU
To format a CF card, using the CF
CARD A
andEXIT
CF CARD B
options and repeat this process as needed to prep CF cards
before shooting, and after backing up full CF cards.
DISPLAYS AND MENUS: FORMATTING
20
TRANSFERRING TO CF CARDS
Copying to CF...
Clips will not automatically transfer from the SSD to the CF
cards. However, you can choose to transfer footage to the CF
cards after you shoot by using the COPY DATA option.
To navigate, use
to scroll
COPY DATA
SSD FORMAT
CF FORMAT
DIR NAME
to select and return
SSD to PC by USB 3
SSD to CF Cards
MENU TO EXIT
WARNING : DO NOT POWER OFF
CAMERA WHILE COPYING
You may cancel the copy any time, however you will not be able
to pick up where you left off if you cancel. If you fill your CF card
but there is still footage to be copied, you will
be EXIT
prompted to
MENU TO
enter a new card. The copy will then pick up where it left off.
CF Card Full.
Please insert a new CF Card.
In the DATA menu, navigate to COPY DATA, and select to
transfer data from the internal SSD drive to CF cards. Your copy
will start immediately, and continue until all footage is copied.
Make sure you are using empty CF cards of an appropriate
size, so that you won’t have an error copying your footage.
MENU TO EXIT
DISPLAYS AND MENUS: DATA TRANSFER
21
TRANSFERING VIA COMPUTER
To transfer footage directly from the internal SSD to a computer
via USB3, power down the camera and connect the USB3
cable to the back of the camera. Wait for the drive to show up
on your computer as an external drive.
Warning: The first time you connect your camera to a computer,
it may take up to 10 minutes for the computer to recognize and
pair with the camera. This is normal. Unplugging the camera
before it has properly connected could result in your computer
crashing.
Copying SSD by USB 3.0...
On PC: Most Windows users will need an additional program
to access the footage from your camera, called an HFS reader.
The HFS reader enables you to read the type of drive installed
in the camera, which works natively with Mac computers.
For Windows users we recommend the free HFS Explorer by
Catacombae. Instructions and download can be found online:
http://www.catacombae.org/hfsx.html
When your camera is powered off and plugged in via USB3,
HFS Explorer “D16SSD” will appear under ‘My Computer’.
Drag and drop the folders inside to your preferred destination.
Warning: Do not delete footage from the camera via Windows
Explorer or Mac Finder. This could damage the write structure
of your SSD. Always delete footage by formatting your drive
using the FORMAT SSD option in the camera’s DATA menu.
TRANSFERRING WITHOUT SHUTTING DOWN
WARNING : DO NOT POWER OFF
CAMERA WHILE COPYING
MENU TO EXIT
Once the drive has mounted, you will be able to access your
camera’s internal drive like any external hard drive.
If you do not wish to shut down the camera to copy footage, for
example if you are on set and simply need to check playback
of a take via LightPost (See “Playback” on Page 35) you may
transfer to a Mac computer while still powered on. Connect the
USB3 cable to the back of the camera. Navigate to the DATA
TSFR option and select to transfer your footage vial USB3.
Wait for the drive to show up on your computer.
Note: This option will not work on Windows computers.
DISPLAYS AND MENUS: DATA TRANSFER
22
KEEP YOUR CAMERA POWERED AT ALL TIMES
DIR NAME
Data transfer may take a long time depending on how much
footage you have to copy, whether you are using fast CF cards,
and whether your computer is equipped with USB3 capabilities. To
ensure proper copying of your data if the camera is still powered
on, make sure to keep your camera plugged in while you copy.
By default, the D16 records footage to a folder labeled with the
date of your shoot, and inside that a Scene number starting
with Scene-001.
If the battery gets too low, you will receive one warning to plug in
your charger or an external battery. If you are not able to connect
to a power source, your camera may shut down, causing errors to
the SSD and potentially corrupting CF cards.
If you would like to change the name of the directory your
footage is stored in, you may do so here. Select the DIR NAME
option in the DATA menu, then use the up/down arrows to select
letters or numbers. Hit enter or back to save your folder name.
To navigate, use
WARNING:
to scroll
COPY DATA
SSD FORMAT
CF FORMAT
DIR NAME
to select and return
Folder Name :
Scene-001
Press ENTER to store
Battery Low.
Plug in Charger.
MENU TO EXIT
DISPLAYS AND MENUS: DATA TRANSFER
23
Crank Menu
Display Menu
The CRANK menu allows you to assign different functions to
the front and rear crank wheels on the left side of the camera,
allowing you to adjust those settings while recording without
needing to re-enter the menu.
The DISPLAY menu lets you change the look of your home
screen and external monitor.
Settings include SHUTTER ANGLE, LCD GAIN, HEADPHONE
VOLUME, ISO, COLOR MODE, and LCD ZOOM, which allows
you to zoom in to a 1:1 view of your footage, perfect for checking
focus. Select OFF when not using cranks to avoid accidentally
changing these settings while shooting.
To navigate, use
CRANK 1
CRANK 2
to scroll
to select and return
OFF
Shutter Angle
ISO
LCD Zoom
HP Volume
LCD Gain
Color Mode
MENU TO EXIT
To navigate, use
to scroll
LCD GAIN
ICONS LCD
COLOR MODE
OVERSCAN
MIRROR LCD
HDMI OUT
SD VIDEO OUT
to select and return
LOW
MED
HIGH
Enhanced 1
Enhanced 2
MENU TO EXIT
LCD GAIN controls the brightness of the onboard monitor. It is
recommended to leave this setting on MED whenever possible.
ICONS LCD allows you to choose whether your home screen
icons appear on your onboard display; these can also be
removed temporarily by cycling through the alternate displays
with the DISP button (See “Alternate Displays” on Page 17.)
DISPLAYS AND MENUS
24
OVERSCAN guarantees you see the full image being recorded
when using external monitors. Some monitors and EVFs crop
the 2K image to 1080, not showing you the entire frame being
recorded, which can lead to accidentally recording elements
outside the 1080 view. With this mode ON, you know that you
are seeing the complete recorded image.
Settings Menu
MIRROR LCD flips the image on your LCD.
You can also view the camera’s firmware and hardware
versions, control the speed of the camera’s built-in fan, and
access diagnostic information useful for troubleshooting.
HDMI OUT and SD VIDEO OUT ned to be turned on when you
have an external monitor connected via HDMI or SD port.
The SETTINGS Menu allows you to adjust the DATE and TIME
of your camera, to set up whether your want your camera
to power down after one or five minutes of inactivity, and to
restore the factory default settings.
Warning: Using RAW mode while LCD GAIN is set to LOW
may make it difficult to judge proper exposure.
COLOR MODE
COLOR MODE allows you to choose whether your monitor
displays a color image while shooting. If you do not want to
preview your image in color, you may choose to show your
monitors in BLACK & WHITE or NON-DEBAYERED mode
instead, which is useful for checking accurate exposure and
sharpness of their footage. Shooting with one of these alternate
modes will not effect your metadata or recorded color image.
Warning: RAW mode will appear to show a grid on your
monitor. This grid will not appear on your final image
To navigate, use
to scroll
to select and return
DATE / TIME
POWER MGMT
SET DEFAULT
CAMERA INFO
FAN CONTROL
DIAGNOSTICS
MENU TO EXIT
DISPLAYS AND MENUS
25
UPDATING THE FIRMWARE
On the bottom of the camera is a small hatch attached via 4
small screws. Using a philips head screwdriver, unscrew this
hatch to expose the USB2 port. This port is what you will use to
upgrade your firmware.
When a new version of the D16 firmware is released, you will
want to update your camera.
To start, move the switch on the lefthand side up towards the
lens port to engage Update Mode.
Before you begin, make sure you have downloaded our BOLEX
UTILITIES program and the latest version of your firmware,
always available on our website at www.digitalbolex.com/
downloads.
accessing the
USB2 slot
on the underside of the
camera.
Connect the USB2 cord to the computer, and open our BOLEX
UTILITES program. (If you do not currently have this installed,
please see “Installing the Software” on Page 38.)
(Check which version of the firmware you have currently
installed in the “Settings Menu” on Page 25.)
Hold the power button for 3 seconds to turn on the camera.
Keep the camera connected to an external power supply to
ensure the camera does not lose power during your upgrade.
UPDATING THE FIRMWARE
26
If you have switched into Update Mode properly, color bars will
appear on your onboard LCD in place of the normal D16 startup
screen.
The firmware will automatically begin to download onto your
camera. The progress bar on the Firmware Updater software
willt tell you how fast the update is occuring andwill give you a
time estimate remaining on the update.
Please make sure not to power down the camera or unplug the
USB2 cable until the firmware has been installed successfully
and you exit the Updater software.
When the firmware has been installed, your camera will
automatically power down. Now is the time to unplug the USB2
cable, reset the Update switch to Normal Mode, and replace
the plastic cover with your screwdriver. You may also close out
of the Digital Bolex Utilities application.
Power your camera back on to access the new features and
changes available in the latest firmware.
Additional menus and special features may become active in
later versions of the firmware so be sure to make sure your
camera is always up to date with the latest version, available for
download at www.digitalbolex.com/downloads.
UPDATING THE FIRMWARE
27
DATA MANAGEMENT
MENU
REC
ENTER
DISP
Managing data on your D16 is easy. The D16 records two
file types, .CinemaDNG and .aiff, to CF cards and an internal
256GB or 512GB Enterprise-class SSD.
The internal SSD acts as a redundant backup system and
buffer for the CF cards; footage shot will write first to the SSD
and then may be transferred to CF cards, if desired, ensuring
no data-loss on the cards. This means you can use any CF
cards with the D16, even if without the highest write speeds.
accessing the
Using CF cards
cf card slots in
the rear of the
camera.
The D16 can handle CF cards of any size and write speed. We
recommend using CF cards of at least 16GB each, as the D16
writes 5GB per minute of footage, and CF cards can fill quickly.
Both CF cards do not need to be the same size, but it is
recommended. You do not need to two CF cards to shoot, you
may use only one at a time.
Inserting the CF cards
To insert the CF cards into your D16, open the door on the rear
of the camera. There are two CF slots: A (top) and B (bottom).
Close the door whenever you are not inserting or removing
cards to avoid getting any dust or debris inside the camera.
DATA MANAGEMENT
28
When CF cards are inserted, the frame counter on your home
screen will display YELLOW (CF frames remaining) instead
of white (SSD frames remaining). When this yellow counter
reaches zero, you will need to insert a new CF card. If this
counter is RED, you will need to format your CF card.
About the Internal SSD
The SSD is capable of storing approximately 81 minutes of
footage in 2K and 120 minutes in 1080p at 24 FPS. The SSD
will record footage whether CF cards are in the camera or not.
Formatting the SSD
If you don’t have CF cards in the camera, the frame counter on
the top right of the Home Screen shows you how many frames
there are remaining on your SSD. When that counter reaches
zero, the SSD is full, and you cannot shoot any longer without
formatting.
Only format the SSD once you have confirmed that your footage
has been safely backed up to a hard drive. (If you do not know
how to back up your footage, see “Data Transfer” on Page 22.)
Shooting with just the SSD
Some users may find it preferable to use the D16 without any
CF cards, using only the internal SSD to store your footage.
Shoot as you would normally, and to access your footage,
connect the camera to your computer via USB3 cable.
Be aware that footage from the internal SSD, when it’s full,
can take up to 2 hours to transfer via regular USB2. If you do
not have a computer with a USB3 connection, we recommend
using the SSD as a redundant backup for your CF cards rather
than shooting to SSD because of this download time.
Offloading files to the computer
There are two way of getting your footage from the camera
into the computer for backup and editing. If you use CF cards,
you can remove the cards from the camera and use a CF card
reader to access the files on your computer. When the cards are
backed up, you can format the SSD and cards in the camera,
and continue shooting.
If you are shooting with only the SSD, you will need to connect
the camera directly to the computer via USB3 in order to access
your footage. (If you do not know how to back up your footage
using the internal SSD, see “Data Transfer” on Page 22. )
Editing folder names
By default, the camera records footage to folders organized by
shoot date and take number. If needed, it is possible to rename
your existing file folder to suit the needs of your project.
(To edit folder names, see “Dir Name” on Page 23.)
DATA MANAGEMENT
29
VIDEO MONITORING
The D16 has a number of video monitoring options available to
help you understand your footage while shooting.
Color Modes
The D16 has three color modes through which you can view
your footage on the onboard monitor or an external monitor:
COLOR, BLACK AND WHITE, and NON-DEBAYERED (RAW).
White Balance
The D16 comes with three white balances settings: DAYLIGHT,
TUNGSTEN, and FLUORESCENT. While white balance can be
altered in post due to the flexiblity of raw, you should choose
the closest white balance to your scene as a starting point.
Articulating the onboard monitor
The onboard monitor can articulate up 15 degrees to provide a
better viewing angle while shooting. Use a fingernail or soft tool
to pop the tab on top of the monitor.
Use your
fingernail or a
soft tool to pop
up the tab. Using
a metal tool may
scrape the top of
your camera.
BLACK AND WHITE mode shows you your images in black
and white only.
COLOR mode shows you your footage in color with a calibrated
color matrix. To set the white balance see the next section.
NON-DEBAYERED mode is the preferred way to check the
exposure of your camera image, because the onboard monitor’s
Rec709 colorspace does not have enough depth to show the
full color depth of the D16’s raw images.
Areas that appear pure white in NON-DEBAYERED mode
will be “blown”; any areas with texture are “safe”, even if they
appear blown in the COLOR or BLACK AND WHITE modes.
SD out to external monitor
If you want to connect your D16 to a Standard Definition
monitor, the 1/8th video jack on the left side of the camera will
provide 640x480 connection to any SD monitor.
VIDEO MONITORING
30
HDMI out to external monitor
Attaching an EVF
The D16 features a full-sized HDMI port that provides a 1080p
signal compatible with any HD monitor, including wireless
monitors.
EVFs that take advantage of the D16’s HDMI output are perfect
companions to the camera when you need more critical focus or
looks while shooting.
Recording the HDMI signal
The top and side cold shoes of the D16 are perfect mounting points
for an EVF.
Some users may want to record the 1080p video signal through
the HDMI port in order to save it as a compressed video file.
Recording the HDMI signal is technically possible via a variety
of third party recorders.
Other cameras with built-in image compression are capable of
outputting a signal compatible with HDMI standards, however
due to the raw recording format, recording a clean HDMI signal
is not possible with the D16.
Because an HDMI signal is not capable of showing the full
color-depth of 12-bit raw, this signal is not as accurate to color,
brightness, and saturation as HD footage you would normally
capture via HDMI on other cameras.
For this reason, we do not recommend recording the HDMI
signal, and instead suggest you transcode your raw files to
the desired video format so as to maintain the integrity of your
footage.
evf mounted to side shoe
via adjustable arm
VIDEO MONITORING
31
RECORDING AUDIO
The D16 has a built-in audio recorder that captures productionlevel sound from external microphones. The D16 records two
channels of 24-bit, 96kHz (or 44kHz) audio in the AIFF format.
The D16 comes with two phantom-powered XLR ports (L) and
(R) on the left-side of the camera for recording audio from two
different mics, such as a boom, shotgun, or lavalier. There is
also a Line-in port for smaller, self-powered microphones.
Powering on the mic ports
Plug in one or more mics to the XLR ports or the Line-in port.
There are only 2 audio channels, so you may only have 2
microphones plugged in at any time.
Use the menu to navigate to the SOUND submenu. Then select
the CH 1 MIC or CH 2 MIC setting, depending on which port
you are using. Turn the channel ON to utilize that XLR port, or
select
Line-in touse
use the Line-in
that
channel
instead.
To navigate,
to scrollport forto
select
and return
FILE FORMAT
CH 1 MIC
CH 2 MIC
L PHTM PWR
R PHTM PWR
VOL DISPLAY
OFF
MIC 1 ON
Line 1 In ON
Phantom power
To activate phantom power, use the menu to navigate to the
SOUND submenu, then select the L or R PHTM PWR setting.
Use the up/down buttons to select PHANTOM POWER ON,
then
ENTER totosave
Toleft/right
navigate,oruse
scrollyour choice.
to select and return
Phantom Power OFF
FILE FORMAT
Phantom Power ON
CH 1 MIC
CH 2 MIC
L PHTM PWR
R PHTM PWR
VOL DISPLAY
It is possible to use microphones that do not rely on phantom
power with
D16. To use these microphones, navigate to the
HPthe
VOL
SOUND menu and turn off phantom power for that XLR port.
MENU TO EXIT
Warning: Never plug a non-phantom powered mic into a D16
XLR port unless you are sure that phantom power is turned off.
This may damage the sound board of the camera.
Adjusting the recording volume
Like any pro audio-recorder, The D16 allows you to adjust the
volume of both individual audio channels for optimal recording
from each connected microphone.
RECORDING AUDIO
32
Audio Metering
Line/Mic Levels
When microphones are plugged in and turned on, the audio
meters on the display will become active. It’s important to
monitor your audio levels while you record to avoid audio that’s
too loud or too quiet.
To adjust Line/Mic levels, use the knobs on the right side of the
camera. You will see your changes in the audio meters on the
camera display, and hear the changes in your headphones.
Make sure your audio is recorded as loudly as possible without
crossing into the red. Crossing into the red means your audio is
too loud or “peaking,” and the volume should be adjusted lower
to avoid any recording problems or distortion.
Adjusting the headphone volume
display audio meters. correct meter on the top, peaked on the bottom.
Note: If the audio meter is displayed but no level bars appear
when a mic is plugged in, no sound is being captured. The
audio levels may be too low, or the microphone may not be
powered properly. Check to make sure your phantom power
settings are correct, if battery-powered mics are charged, and
that your line/mic levels are correctly dialed for the volume of
the audio you are recording.
Headphone volume is distinct from the line/mic volume of your
audio channels, and must be adjusted separately. To adjust the
headphone volume, use the menu to navigate to the SOUND
submenu, then select the HP VOL setting. Use the up/down
arrows to change the headphone volume.
Alternatively, you may navigate to the CRANK submenu and
activate the HP VOL setting on the rear crank. This way you can
adjust the headphone volume without returning to the menu.
Warning: Line/mic knobs do not adjust headphone volume.
Adjusting these knobs will change the recording levels of the
audio, which may result in clipping.
RECORDING AUDIO
33
USING THE CRANKS
There are two cranks on the left side of the D16 camera which
can be programmed to perform a number of different functions
that you may want to adjust on-the-fly while recording.
Home Screen Icons
To check which setting your cranks are assigned to without
accessing the crank menu, look at the crank icons on the
bottom right of the Home Screen.
100%
50%
A
B
71716
24FPS
2K
AIFF 08/13/14
48K 12:10:35
I
SSD use
Remaining
Assigning functions
To assign a function to the cranks, hit the MENU button and
select the CRANK menu. There are currently 6 functions that
may be assigned to each crank:
- Shutter Angle
- ISO
- LCD GAIN (onboard monitor brightness)
- Headphone Volume
- Color Mode
- LCD Zoom
Select the crank you would like to use (CRANK 1 is the forward
crank and CRANK 2 the rear) and choose the option you want
to be able to adjust. When not in use, it is recommended to
switch both cranks to OFF to avoid unintentionally changing
your settings while recording.
You cannot have both cranks set to the same option at the
same time.
1
2
AIFF 08/13/14
48K 12:10:35
I
A
WB
D
WB
A
D
172.8
400
Using both crank options at once
We encourage users to set both cranks if you need to access
some functions on the go. However, if you are using both the
RAW color mode for checking exposure and have turned LCD
Gain to LOW, you may have issues checking exposure. We
recommend always staying on MED when using RAW mode.
USING THE CRANK
34
SHOT MODES & TIMELAPSE
The D16 has three SHOT MODES that allow for distinct functions:
CONTINUOUS, SINGLE FRAME, and TIME LAPSE. You can
access
the SHOT
To navigate,
useMODE submenu
to scroll from the
to MAIN
selectMENU.
and return
SHOT MODE
IMAGE
SETTING
Under the SHOT MODE menu, select TIME LAPSE to active
this
and its
SETTINGS.
Tomode
navigate,
use
to scroll
to select and return
INTERVAL
TIME BASE
EXPOSURE
Continuous
Single Frame
Time Lapse
SECOND
MINUTE
Interval time base unit.
CONTINUOUS
INTERVAL
Is the standard shooting mode for motion picture capture, shooting
at the frame rates you’ve chosen in the IMAGE menu.
Set the number of time intervals you would like the camera to
wait between shots, from 1 - 60.
SINGLE FRAME
TIMEBASE
MENU TO EXIT
Is intended for animation, and records one frame every time the
record button or trigger is pressed.
Time Lapse Mode
Create timelapses easily in camera without an intervalometer or
external trigger.
MENU TO EXIT
Set your INTERVAL to record based on SECONDS or MINUTES.
EXPOSURE
Set the speed of your exposure between 1/25th of a second to
1/500th of a second. (This will override any shutter angle you
have already set for your continuous shooting.)
SHOOTING SINGLE FRAMES
35
CAMERA ACCESSORIES
You can use a variety of accessories with the D16. There are 2
cold shoe mounts for mounting accessories like EVFs, portable
lights, or shotgun microphones, allowing you to customize your
D16 with different accessory configurations.
Using the cold shoe-mounts
Many consumer and professional accessories use a shoemount to attach the accessory to a camera. A shoe-mount is
“hot” if it can supply power to the accesory, and “cold” if it does
not supply power, like those on the D16.
To use the shoe-mount, slide the accessory into the shoe. Make
sure to lock the accessory in place with the provided fastener. If
the accessory cannot lock into place, it is not advisable to use
that accessory, as it may slide off the mount and break.
1/4-20 (standard tripod) mounts are commonly used with a
shoe-mount to secure other accessories that cannot slide right
into the shoe-mount, such as external audio recorders.
WARNING: Do not place heavy accessories in either the
top or side cold shoe-mount or you may risk damaging the
accessory or the mount itself.
The pistol grip
The D16 pistol grip attaches to the D16 via the front-facing of
two standard tripod mounts on the base of the camera body.
Secure the tripod screw at the top of the pistol grip into the
tripod mount on the camera by rotating the wheel on the top of
the pistol grip, turning right until fully tightened.
Recording with the pistol grip
When the pistol grip is attached, you may press and hold down
the trigger to record footage. Press and release quickly to shoot
single frames or short bursts of frames.
CAMERA ACCESSORIES
36
Using the pistol grip with different lens mounts
In some cases, the pistol grip may still be used even when a
lens mount other than the default C-mount is installed. See
the instruction manual of your preferred lens mount for further
information.
Rails, Follow Focus, and Matte Box
Wrist Strap
Like any cinema camera, the D16 is capable of being fitted with
pro accessories for use on large productions. Standard rails,
follow focus systems, and matte boxes can be used on the D16
in multiple configurations.
A wrist strap provides an additional safety precaution when you
choose to hand-hold your camera. A wrist strap with a tripod
screw can attach to the mount at the bottom of the pistol grip.
Follow Focus
Monitor Hood
A follow focus for the D16 can be used on either side of the
camera.
Other accessories
A monitor hood can be useful for reducing glare on the onboard
monitor when shooting in bright daylight. The D16 monitor hood
attaches via the two large screw threads above the onboard
monitor and provides shade and an angled view of what’s on
the screen. Best used with MIRROR LCD mode. (See Page 25)
Other accessories may help make the most of your camera.
Weather-sealed Skin
Cheeseplate
The D16 has a rugged outer body with few points of entry for
moisture and small particles, but for shoots on the beach or in
raining, humid, or snowy weather, your camera will be better
protected with a rubber, weather-sealed skin that fits snugly
over the ports on the left side of the camera.
The D16 cheeseplate is designed to attach to the top cold shoe
mount and provides more than thirty additional mounting points
for accessories like lights, microphones, or EVFs.
CAMERA ACCESSORIES
37
INSTALLING OUR SOFTWARE
Both PC and Mac users will need to install our Bolex Utility
to update your camera with the latest firmware. PC users will
also need to download an HFS reader to copy footage directly
from the camera using Windows Explorer, if not using CF cards.
(See “Displays And Menus: Data Transfer” on Page 22.)
To update your firmware, download either the PC or MAC
version of our Bolex Utilities program and the latest firmware
update on our site at www.digitalbolex.com/downloads.
Then follow the instructions on the Bolex Utilities Firmware
Updater (For details, see “Updating The Firmware” on Page 26.)
LightPost Powered by Pomfort
Your Digital Bolex comes with an installation code for LightPost,
a data backup, one-light color correction, and transcode tool
for Mac OS X that can take your CinemaDNG files and export
them to various compressed file formats popular for editing.
OS Requirements
LightPost runs on on Mac OS X versions 10.7 and above, and
is optimized for use with Retina display laptops for work on set.
Brief Instructions
Unlike more complicated programs that can have a steep
learning curve to achieve the results you want, LightPost’s fourstep workflow makes working with raw simple and intuitive.
The Copy Room
When your camera is connected to the computer, or you have
inserted CF cards into a card reader, the Copy Room allows
you to transfer all (or select) footage to chosen destination
drives. LightPost uses a sum check to verify data as it’s copied,
ensuring no corruption in your transfer, and will alert you if there
is not enough space to store the footage you are trying to copy.
LightPost is the recommended way for copying footage from
your D16. Copying directly from the camera to a drive could
cause corruption due to the big number of files being transferred.
Adding Clips to Library
If you already have CinemaDNG footage on a hard drive and
you do not need to import footage through the Copy Room,
you can select Library > Add Clips to Library, and access the
footage in subsequent rooms as you would with copied footage.
LightPost for Playback
If you want to see playback of footage on set, turn the camera
off (or use the DATA TSFR menu), connect it to a Mac computer,
INSTALLING THE SOFTWARE
38
and open LightPost. You can use the Add Clips to Library option
to view footage directly from the camera without copying it first.
The Organize Room
In the Organize Room, you can view your imported clips, make
notes in clip metatdata for the editor, rate your takes on a 1-5
star system, set in/out points, and arrange your clips into smart
folders and custom folders.
The Color Room
Fast color controls allow you to create and save one-light looks
for your clips which can be shared with other users of LightPost.
Change attributes like tint, saturation, exposure, sharpness,
color temperature, highlight and shadow color balance, and
others to achieve great looks in seconds.
Export Room
Like the Copy Room, here you can quickly output your footage
to multiple destinations one at a time or at once. Choose from
editing formats like ProRes422 or ProRes4444, or exhibition
formats standard for iPad, iPhone, and more.
Detailed Instructions
Detailed instructions for LightPost are available by accessing
the HELP > QUICK START GUIDE in the LightPost Software.
Other Post Workflow Options
While some NLE (Non-Linear Editing) platforms require you to
use compressed video formats such as ProRes422 for editing,
it is not always necessary to transcode your footage before you
work with it in post.
Newer NLEs like the Adobe Creative Cloud Suite allow you to
import raw CinemaDNG image sequences directly into your
timeline for editing, making your post workflow a breeze.
Users of Adobe Premiere Pro CC, After Effects CS6 or CC,
or SpeedGrade CC do not need to transcode CinemaDNG
footage before using it in a timeline.
If you have recorded audio on the D16, you will need to import
the .AIFF audio track separately from your CinemaDNG image
sequence. They will both have the same length on the timeline
and can be easily linked together for editing.
Transcoding for Windows and Linux Users
Windows and Linux users will have to use an alternative method
to transcode their footage, since LightPost is only available for
Mac OS X. We suggest using an Adobe Creative Cloud program
like Premiere or LightRoom, or the latest version of DaVinci
Resolve to transcode from CinemaDNG files to compressed
video on a Windows or Linux system.
INSTALLING THE SOFTWARE
39
TROUBLESHOOTING
If you’re having a problem with your D16, here are a list of
common questions and solutions. If you have a question
not mentioned in this section, please contact us at www.
digitalbolex.com/contact, or visit our online forums at http://
www.digitalbolex.com/forum/
My external battery is plugged in, but the external battery
symbol is red or doesn’t appear.
Your external battery is either drained or not working. Try
charging the battery and then connecting to the camera again.
If you have another battery or your AC acapter handy, test
those to make sure the problem is not with your 4-pin XLR port.
How do I remove the battery?
Answers to other frequently asked questions are available
online: http://www.digitalbolex.com/faq/
The D16 battery is not removable. We suggest using a single
long-length external 12V battery while shooting as a companion
to the D16’s internal 3-4 hour battery to ensure continual use.
BEFORE SHOOTING
WHILE RECORDING
I want to remove the pistol grip. Does it come off?
My Home Screen Icons disappeared.
Removing the pistol grip is easy. Use the tighening wheel at the
top of the pistol grip, right under the camera body, to loosen the
screw mount of the pistol grip. The grip will slide off, allowing
you to mount the camera to a tripod or other rigging system..
You may have accidentally clicked the DISP button. Click the
button again to cycle through your monitor views. You can also
turn the home icons on and off in the MENU. Navigate to the
DISPLAY MENU and select the ICONS LCD option.
Why won’t my lens auto focus?
My monitor is only showing me black and white images.
The D16’s default C-mount does not support auto focus for
lenses. All lenses must be focused by hand, whether they have
auto-focusing mechanisms or not. Please keep an eye out for
annoucements of when a focusing C-mount will be available.
You may have changed the color mode. In the MENU, navigate
to the DISPLAY MENU, and change the COLOR MODE option.
If you have COLOR MODE assigned to a crank, rotate until
color is restored.
TROUBLESHOOTING
40
My CF cards icons are marked with an X
If your CF cards are marked with an X, they may not be
formatted properly. Navigate to the DATA MENU and select the
card you want to format.
My CF cards are empty but my frame counter is at zero
This change should be reflected in the audio meters on the
bottom left corner of your home screen.
Always make sure that your audio meters are turned on when
recording audio. If the audio meters are not moving, audio may
not be recording properly. To turn the volume display on and
off, navigate to the SOUND MENU and select VOL DISPLAY.
If your CF cards are empty and formatted properly, you may
need to format your internal SSD. Navigate to DATA MENU and
select the SSD Drive.
IN POST
Note: Only format the SSD when you are sure all of the data
stored on the drive has been properly backed up!
If your CF card is corrupted before you are able to dump the
footage on it to the computer, try copying footage directly from
the D16’s internal SSD drive. We advise you to back up footage
frequently when using cards, to ensure that all data is intact.
I have microphones plugged in, but when I check the
footage, my audio files are empty!
There are a number of issues that could cause your audio
not to record properly. If you are using phantom-powered
microphones, make sure to navigate to the AUDIO MENU, and
make sure that phantom power is turned on for each channel
you wish to use. Some mics can’t accept phantom power and
need to be powered by their own batteries. If your microphones
do not have phantom power, make sure that they have fresh
batteries, and that phantom power is turned OFF.
If both of these have been checked, make sure your audio
levels are turned up to an appropriate volume. Use the audio
knobs on the righthand side of the camera to adjust the volume.
My CF card is corrupt
If your CF card is corrupted before you being shooting, use the
DATA MENU to format the card. That should solve the issue.
How do I edit my DNG files?
There are a number of ways to edit your DNG files. We suggest
using our LightPost software to do a grade that can be exported
to Quicktime for fast editing in any professional editing software.
If you want to edit directly from your raw CinemaDNG files, you
can do so in Adobe Premiere’s latest Creative Cloud edition.
TROUBLESHOOTING
41
SPECS
Resolution
2048 x 1152 (Super 16mm mode)
1920 x 1080 (16mm mode)
1280 x 720 (720p - coming soon)
720 x 480 (480p - coming soon)
Format
Adobe CinemaDNG
Color depth
12 bit 4:4:4
File size
2 to 3 MB per frame in RAW
Sensor
Kodak 1” CCD: 12.85 mm (H) x 9.64 mm (V)
Pixel Size 5.5 micron
Framerate 23.98, 24, 25. In the future, up to 32 fps at 2K, 60fps at 720p, 90 fps at 480p
Sound
Balanced, 2 channel 24-bit, 96kHz via XLR
Viewfinder
320x240, 2.4” diagonal
SPECS
42
Video out 1920 x 1080 HDMI via HDMI port
640 x 480 via 1/8” video jack
(HD-SDI not currently available)
Ports
HDMI, Audio XLR (2), 1/8” video, headphone, USB 3.0,
4-PIN XLR (INPUT) 4-PIN XLR (OUTPUT)
Data Storage
Dual CF card slots, Internal 256GB or 500GB Enterprise SSD
Power
Material
Size (body) Size (grip)
Lens mount
Weight
ISO Options
Internal battery, 12V External via 4 pin XLR port
Carbonized aluminum
Also in the box
Approximately 3.6”H (91mm) x 3.3”W (84mm) x 7.8”D (199mm)
4.5”H (115mm) x 1.6”W (40mm) x 2.6”D (65mm)
C-mount comes standard, EF, PL, and M43 mounts available
5lbs
100, 200, 400
Pistol grip, USB 3.0 cable, USB 2.0 cable, 4 pin XLR Battery cable, video cable,
LightPost Powered by Pomfort transcoder/raw conversion software.
SPECS
43
Special Thanks: Maxim, Mark Schumacher
(c) 2014 Cinemeridian, inc.