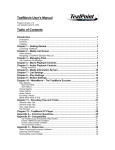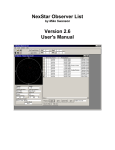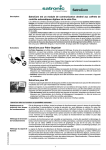
1
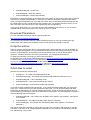
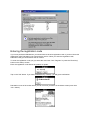
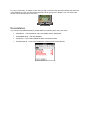
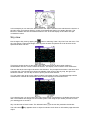
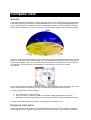
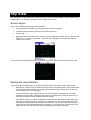
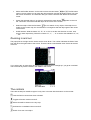
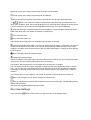
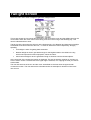
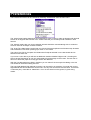
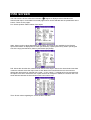
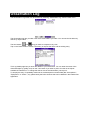
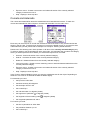
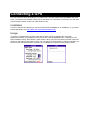
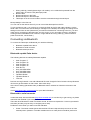
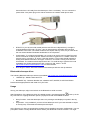
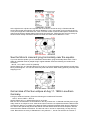
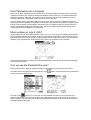
Planetarium User Manual
Contents
Installation 4
To get Planetarium up and running you need to: 4
If you upgrade from a previous version: 4
Notes about installing Planetarium on a memory card or memory stick 4
Download Planetarium 5
Unzip the archive 5
Which files to install 5
Additional star data bases 6
Installing the files on the PDA 6
Entering the registration code 7
Deinstallation 8
Introduction / First steps 9
Entering the location 9
Compass view 9
Sky view 11
Twilight 12
Registration 13
About shareware 13
The Planetarium demo version 13
Why register? 13
Where to buy 13
Join the mailing list 13
Setting the location 14
The Location Screen 14
There are several ways to set the coordinates 14
Setting the time 16
The Menu 17
Compass view 18
General 18
Displayed information 18
Selecting the current object 19
The controls 19
Magnetic Declination 21
Sky View 22
Screen layout 22
Setting the view direction 22
Zooming in and out 23
The controls 23
Sky View Settings 24
Twilight Screen 26
Preferences 27
Info screen 28
Meteor Showers 30
Observation Log 31
Databases 32
The Import and Export features 32
Location Pick List 32
Objects 33
Comets and Asteroids 34
Connecting a GPS 36
Installation 36
Usage 36
Connecting a Telescope to Planetarium 37
Connecting via Serial Port 37
Connecting via Bluetooth 40
Usage Examples 43
Find or identify a planet 43
Determine sunrise and sunset 43
See the Moon's crescent lying horizontally near the equator. 44
Get an idea of the Sun eclipse at Aug 11. 1999 in southern Germany 44
The Sun never sets in polar summer 45
Find the Big Dipper and Polaris 45
Observe a retrograde loop of a planet 46
Determine the next full moon 46
Use Planetarium as a compass 47
Moon eclipse on July 5, 2001 47
Can we see the Perseids this year? 47
Disclaimer 48
Disclaimer 48
Legal Disclaimer 48
Entering numbers in Planetarium 49
Entering orbital elements of a comet 50
Installation
To get Planetarium up and running you need to:
1. Download the Planetarium archive planet24.zip (if you have not already)
2. Unzip the files contained in planet24.zip
3. Decide which files you want to install
4. Install the files on your PDA device
5. Start Planetarium and enter the registration code (if you have purchased Planetarium,
otherwise the program runs as demo version)
If you upgrade from a previous version:
In previous versions there were two files to install: planet24.prc and PlnStars9096.prc (or
PlnStars1600.prc). They are now combined in one single file. This allows to move everything into the
memory card or stick. (PlnStars9096 could not be moved to the card). This is why the new file
planet24.prc is bigger than planet24.prc, but PlnStars9096 is no longer needed and you can delete it
from your PDA to save space:
•
Start the Palm launcher (in case you use a third-party launcher, switch to the Palm-Launcher)
•
Select the menu item "App/Delete..."
•
Look for the entry "PlnStarData.lib" and select it
•
Tap "Delete"
•
Tap "Yes" and "Done"
Then you can install the new file as described farther below.
You may decide not to install these files:
•
PlanetariumDB.pdb - the location list
•
UserObjsDB.pdb - the objects list
•
PlnCometsDB.pdb - comets and asteroids
If you have entered personal locations you should not install the file PlanetariumDB.pdb. If you want to
install it, export your personal locations to a memo so that you can reimport them after installing the
file. (See the chapter "Databases" for more details.)
If you have entered user objects yourself, you should not install the file UserObjsDB.pdb. If you want
to install it, export your personal objects to a memo so that you can reimport them after installing the
file. (See the chapter "Databases" for more details.)
If you have entered orbital elements for comets and asteroids you should export your personal entries
to a memo so that you can reimport them after installing the file PlnCometsDB.pdb. (See the chapter
"Databases" for more details.)
Notes about installing Planetarium on a memory card or
memory stick
•
You can install the file planet24.prc and the optional star data base PlanetariumStars.pdb on
the memory card.
•
All the other files ( PlanetariumDB.pdb, UserObjsDB.pdb, PlnCometsDB.pdb) must stay in
main memory.
Exception to this rule:
You can install the following files into the memory card, if you do NOT intend to add data to them:
•
PlanetariumDB.pdb - Location list
•
UserObjsDB.pdb - Deep Sky Objects
•
PlnCometsDB.pdb - Comets and Asteroids
Explanation: If these files reside on the card and are not present in main memory they will be copied to
main memory together with planet24.prc each time you start the application and will be discarded
when you stop the application. So if you add new entries, they are discarded as well and the files will
be copied again from the card at the next start. (Please note, you need the files from version v2.2 or
later. Files from older versions do not get copied along with the application).
This copying takes place only if you don't have the files installed in main memory. If you have them
installed both in main memory and on the card, they won't be copied.
Download Planetarium
You can download Planetarium from the following web site:
http://www.aho.ch/pilotplanets/release.htm
You will also find information about the latest release there and you can join a mailing list to get
notified when new versions are available. Current comet data is also posted on this site.
Unzip the archive
A zip file contains several other files in compressed format. Storing files this way has advantages: a)
They are all grouped together. You just download one file and have everything you need. b) They are
stored in compressed form and therefore need less download time. c) The zip file contains a
checksum. Should there be an error during transmission, you would get notified about it.
To extract the contents of a zip file you need a special program.
On Windows you could use the StuffIt Expander from http://www.stuffit.com/win/expander/index.html
or WinAce from http://www.winace.com or WinZip from http://www.winzip.com.
If you have a Macintosh you could also use the StuffIt Expander from
http://www.stuffit.com/win/expander/index.html or "ZipIt" from http://www.maczipit.com.
Please read the instructions that come with these programs on how to use them.
Which files to install
planet24.zip contains the following files:
•
Planet24.prc - The main executable application file.
•
PlanetariumStars.pdb - An optional star data base with additional stars down to m7.
•
PlanetariumDB.pdb - A list of 600 Major cities.
•
UserObjsDB.pdb - A list of about 200 deep sky objects.
•
PlnCometsDB.pdb - A list of some comets and asteroids.
You need to install at least the file Planet24.prc. If you install PlanetariumStars.pdb, you have stars
down to m7. Without this file you have stars down to about m6. You can download larger star data
bases from the Planetarium for PalmOS website (see below). All the other files are optional, but it is
recommended to install them to have some initial data in the program. The data base files correspond
with the following lists in the program:
•
PlanetariumDB.pdb - The Location Pick list (Menu item "Options / Set Location", then tap the
"Pick" button)
•
UserObjsDB.pdb - The Objects list (Menu item "Options / Objects")
•
PlnCometsDB.pdb - The Comets and Asteroids list (Menu Item "Options / Comets and
Asteroids")
The data in these lists is backed up during HotSync every time you have made changes or entered
new data. To fill some or all of these lists with initial data you can install the corresponding .pdb files
from planet24.zip. They contain:
•
PlanetariumDB.pdb - About 600 major cities from all over the world.
•
UserObjsDB.pdb - 110 Messier objects and 110 Caldwell objects.
•
PlnCometsDB.pdb - Some comets and asteroids.
Additional star data bases
On the download page http://www.aho.ch/pilotplanets/release.htm there are additional star data base
files available in different sizes and with different numbers of stars.
First select one of the star data base files that you would like to install. Note: You need only one of
these files. For example, if you want stars down to m9, you download and install the file for m9 (and
not m7 + m8 + m9). After unzipping the downloaded file you get a file called PlanetariumStars.pdb that
you install.
This file can either be installed in RAM or on a memory card. Especially for the larger files it is
recommendedable to install them on the memory card.
•
To install the file in RAM install it like any other file via Hotsync. This is a good option for the
smaller files if your PDA does not have a card slot.
•
To install it on the memory card, you could also install it via Hotsync by selecting the card as
destination, but we do not recommend this, as this process is VERY SLOW! For the largest
files, it can take up to several hours, depending on the device and card you have. It is feasible
for the smaller files, but for the large files there are alternatives:
o
Use a memory card reader. This is a device that can read and write the memory card
that you connect via USB with your PC.
o
Use the "Card Export" software from Softick (http://www.softick.com). This is a cool
program that lets your PDA work like a memory card reader when it is placed into the
docking station.
Both ways, you get an additional disk drive on your PC to view the memory card. To install the
file copy it into a specific folder onto the card. The Planetarium star data base file needs to be
at: \PALM\Launcher\PlanetariumStars.pdb
To change the star data base file, just repeat this procedure with another file.
You can also install a large star data base file on the card and a small one into RAM. Then the
program will automatically select the file on the card if the card is present, and if no card is present, it
will use the file in RAM.
Installing the files on the PDA
To install these files onto your PDA, please have a look at your documentation that came with your
device. There should be a chapter explaining how applications are installed.
For very novice users, this is a little bit more detailed (I cannot give you completely detailed
instructions on this here because it depends on the device and brand, but in general it works like this):
1. Start the Palm Desktop Application on the PC or Mac.
2. Select the "Install" function.
3. Select one or more .prc and .pdb files and prepare them for installation.
4. During the next HotSync they get transferred to your Device.
Entering the registration code
If you have purchased Planetarium you should have received a registration code. If you don't have this
registration code, Planetarium just runs as demo version. When you enter the registation code,
Planetarium will get converted into the full version.
To enter the registration code you got, select the menu item "Info / Register" or press the "Enter Key"
button on the startup screen.
Enter the registration code without any blanks or quotes.
Tap on the "OK" button. If you have entered the key correctly, you will get a confirmation.
Planetarium runs as full version which you can convince yourself of in the About screen (menu item
"Info / About")
For very novice users: To select a menu item you tap on the lower left silk screen button just at the left
of the graffiti area. Then you should see the menu bar at the top of the display. You now select with
the pen one of the items from this menu.
Deinstallation
If you wish to deinstall Planetarium, please delete the following items from your Palm:
•
Planetarium - The Planetarium main executable and the data bases
•
PlnStarDataLib.lib - The star database
•
PlnGPS.lib - If you have installed the GPS connection feature
•
PlnTelescope.lib - If you have installed the Telescope connection feature
Introduction / First steps
This chapter helps you getting started after you have successfully installed Planetarium on your Palm.
It shows you how to enter your location and gives you a short explanation of the two main views.
Entering the location
In order to calculate the sky for your place, you first need to enter the coordinates of your location.
Select the menu item "Options / Set Location" or tap on the location text at the lower left to get to the
Location screen.
The Location screen is divided in an upper and a lower part.
In the upper part you can see the time zone and Daylight Saving Time (DST) configuration of your
Palm. (This value can be changed in the Palm's Preferences application.) Planetarium uses this entry
to calculate UTC (Universal Time Coordinated, the time in Greenwich) which is the base for calculating
astronomical events.
In the lower half you set the location you want Planetarium to calculate the sky for. Look up the
coordinates in an atlas or on the web or tap on the "Pick" button to choose a location from the list. You
also need to enter the time zone of that location. Planetarium uses this value to calculate events like
sun rise in local time for that location.
The Daylight Saving Time (DST) switch adds one hour to the time zone. Check this box during
summer when the location observes daylight saving time and uncheck it during winter. Please note:
Planetarium can not automatically calculate the transition dates for DST, so you need check and
uncheck this switch manually according to the summer or winter time of the location.
If you want Planetarium to calculate the sky for your home location, just set the time zone and the DST
to the values shown in the upper half of the screen.
Compass view
Now select the menu item "View / Compass view" to get to compass view.
is active (white clock on dark background). When the "Now" button is
Make sure the "Now" button
active, Planetarium uses the current time from the Palm's clock.
In Compass view, the information for celestial objects is given in azimuth (the horizontal angle
between north and the direction of the object, counted eastwards) and altitude (the vertical angle
between the horizon and the height of the object). Azimuth is measured in degrees, counted
eastwards. Altitude is also measured in degrees, 0° is at the horizon, 90° is at the zenith. Negative
values are below horizon.
These two values are shown graphically. The circle at the right of the display shows the azimuth of the
objects on a compass scale. To use this dial, turn the Palm Organizer so that 'N' points to the north. (If
you don't know where north is, try to turn the Palm so that the Sun or the Moon icon points to the Sun
or to the Moon. During the night you could also try to find Polaris if you are in the northern
hemisphere).
The semicircle on the left shows the altitude. Hold your Palm Organizer upright so that 'Z' points to the
zenith. Objects below the horizon line 'H' are not visible at the specified time and location.
With the selector at the upper right you can choose the Sun, the Moon or a planet as the current
object. The current object has lines drawn from the center and the various numbers are data for the
current object. You can also select any other object as the current object by tapping the button with
the magnifying glass icon.
Many people find it difficult to estimate the altitude of an object on the sky. This is a simple trick to
improve these estimates.
Example:
In this example you can see in the left semicircle that Jupiter and Saturn are well above the horizon. In
the right circle you find their direction: Jupiter is southeast and Saturn is in eastern direction. The
Moon is in western direction and therefore about to set. In the left display we find that it has just
crossed the horizon.
Sky view
Now change to Sky view by tapping the
button or selecting "View / Sky View" from the menu. The
sky view shows a camera-like image of the sky with the stars and planets as it can be seen at the
specified location and time.
This picture shows the sky for the same place and the same time as above when looking in
shoutheastern direction. The line marks the horizon. The display covers a field of view of about 90°.
The two dials at the lower right indicate the view direction. The principle behind them is the same as in
Compass view: The left semicircle shows the altitude of the center of the sky map, the right circle
shows the azimuth. You can tap on them to quickly set the view direction.
You can use the pen to tap on any object to select it and show its name. The selected object will be
marked with a crosshair and information about it will be displayed on the bottom lines.
If you drag the pen you can move the sky map: Place the pen somewhere on the display and move it a
little. The crosshair will change to a four arrows symbol. Then drag the pen where you want to move
your starting point to and lift it.
Sky view also has a "Now" button: The leftmost button
The Info button
object.
on the tool bar just below the title bar.
only appears when an object is selected. It will show an information page about the
To search for an object tap on the Find button
leads you to the Sky View Settings screen where you can specify what you
The Settings button
want to see in the sky map.
button brings you back to compass view.
The
You can zoom in and out with the pull down list at the upper right The number indicates the size of the
field of vision.
You can use graffiti strokes to set the view direction quickly:
•
Write "N","E","S" or "W" to select north, east, south or west.
•
Write "0", "1", ..., "9" to select an altitude of 0°, 10°, ..., 90°.
Twilight
Select the menu item "View / Twilight" to get to the twilight screen.
The twilight screen shows:
•
Sun rise and set
•
Moon rise and set
•
Twilight times
Civil, Nautical and Astronomical twilight are defined as the times when the Sun is 6°, 12° and 18°
below the horizon respectively. Roughly speaking,
•
Civil twilight is when it is getting dark somewhat.
•
Nautical twilight is when it gets dark enough for the brightest stars to be visible in the sky,
which was important for nautical purposes, hence the name.
•
Astronomical twilight is when it gets dark enough to observe even the faintest objects.
Now you have completed your first steps with Planetarium. To learn more about the capabilities of the
program, please read the other chapters of the manual.
Registration
About shareware
Shareware is a marketing method, not a type of software or even strictly just a distribution method.
When software is marketed through normal retail channels, you are forced to pay for the product
before you've even seen it. The Shareware marketing method lets you try a program before you buy
it. Since you've tried the program, you know whether it will meet your needs before you pay for it. A
Shareware program is just like a program you find in major stores, catalogs, and other places where
software is purchased; except you get to use it, on your own computer, before paying for it.
The Planetarium demo version
The Planetarium software you find on the internet is fully functional. If you install it on your Palm it will
run as demo version and will give you plenty of time to try it out and check if you like it. After a while it
will begin to show a remainder screen at program start to convince you either to register it or to
remove it again from the Palm. If you decide to register, you will receive a registration code which you
enter into the program. This will convert the program into the registered version and disable all
remainder screens.
Why register?
When you register you will get a registraion code you can enter into Planetarium that disables the
reminder screens, so you can fully enjoy the program. The shareware fee is not very high compared to
the amount of functionality you get. We are not a big company with high administrative overhead. This
allows us to give you the software for a very competitive price ($24). However, we need some revenue
to be able to continue developing software and supporting our users.
Where to buy
Please visit http://www.aho.ch/pilotplanets/register.htm for a list of sales points.
Join the mailing list
If you would like to be notified about new releases you can join the Planetarium mailing list
(http://www.aho.ch/pilotplanets/maillist.htm).
Setting the location
The Location Screen
In order to calculate the sky for your place, you first need to enter the coordinates of your location.
Select the menu item "Options / Set Location" or tap on the location text at the lower left to get to the
Location screen.
The Location screen is divided in an upper and a lower part.
In the upper part you can see the time zone and Daylight Saving Time (DST) configuration of your
Palm. (This value can be changed in the Palm's Preferences application.) Planetarium uses this entry
to calculate UTC (Universal Time Coordinated, the time in Greenwich) which is the base for calculating
astronomical events.
In the lower half you set the location you want Planetarium to calculate the sky for. Look up the
coordinates in an atlas or on the web (see below) or tap on the "Pick" button to choose a location from
the list. You also need to enter the time zone of that location. Planetarium uses this value to calculate
events like sun rise in local time for that location.
The Daylight Saving Time (DST) switch adds one hour to the time zone. Check this box during
summer when the location observes daylight saving time and uncheck it during winter. Please note:
Planetarium can not automatically calculate the transition dates for DST, so you need check and
uncheck this switch manually according to the summer or winter time of the location.
If you want Planetarium to calculate the sky for your home location, just set the time zone and the DST
to the values shown in the upper half of the screen.
There are several ways to set the coordinates
•
Look them up in an atlas or on the web and enter them manually
These are a few web sites where you can look up the coordinates for your town:
http://www.heavens-above.com/countries.asp
http://www.astro.com/cgi-bin/atlw3/aq.cgi?&lang=e
http://www.getty.edu/research/tools/vocabulary/tgn/index.html
•
Tap on the "Pick" button to choose a location from the list. This brings you to the Location Pick
List. Choose a category at the upper right, select a location and tap the "OK" button.
If the location pick list is empty, either install the file PlanetariumDB.pdb which came with the
program and contains about 600 major cities, or enter data yourself, or import data from a text
file. Please find more details with the description of the Location Pick List in the chapter “Data
bases”.
•
If you have installed the GPS connection plug-in, switch on your GPS and connect it to the
Palm, press the "GPS" button and wait until the data is transferred. Read more about how to
install this in the Chapter “Connecting to a GPS”.
Setting the time
There are three ways to change the time the sky map or compass info is calculated for:
•
The "Now" button
. If the now button is active (white clock on dark background)
Planetarium uses the current time from the Palm clock and updates the display every minute.
•
Set the date or time manually. Choose the menu items Options/Set Date and Options/Set
Time or just tap on the date and time text at the lower left to open the date and time entry
screens. You can set the date and time to any value in the range of the Palm calendar (years
1904 to 2031).
•
Use the Page up/down scroll buttons. Each press of these buttons adds or subtracts a given
value to the current time. This way you can step through the time and observe the sky
interactively. Use the menu 'Time Increment' to select the appropriate time step. The odd
numbers are multiples of 23h56m (one sidereal day) and are useful for studying planetary
motions in Sky view because the stars stay at their positions after each step.
If your device has a 5-way navigator, please note that it has two modes in sky view: Moving
mode where you can change the view direction and time step mode where you can step the
time as described above. Use the center button to toggle between these two modes.
The Menu
The Options menu has the following items:
•
Set Location - Set your current location
•
Set Date - Set the date
•
Set Time - Set the time
•
Preferences - Opens the Preferences screen.
•
Magn. Declination - Shows the magnetic declination or variation for the current location and
lets you select true or magnetic azimuth.
•
Objects - Edit the objects list
•
Comets and Asteroids - Edit the comets and asteroids list
•
Night mode - Switch the night mode on and off (color devices only)
The View menu has the following items:
•
Compass View - Select Compass view
•
Sky View - Select Sky view
•
Twilight - Show Sunrise and -set and the Twilight times
•
Meteor Showers - Shows a list of annual meteor showers
•
Observation Log - Lets you take notes about your observations
The T-Step menu lets you select a time step which is used with the two page up/down scroll buttons to
step through the time. The last item "Custom..." lets you select an arbitrary time step.
The Info menu has the following items:
•
Help - Displays a help text for the currently selected view.
•
About - Shows the program version, the copyright, the web site and the support address.
•
Register - To enter the registration key.
Compass view
General
In Compass view the information for celestial objects is given in azimuth (the horizontal angle between
north and the direction of the object, counted eastwards) and altitude (the vertical angle between the
horizon and the height of the object). Azimuth is measured in degrees, counted eastwards. Altitude is
also measured in degrees, 0° is at the horizon, 90° is at the zenith. Negative values are below horizon.
These two values are shown graphically. The circle at the right of the display shows the azimuth of the
objects on a compass scale. To use this dial, turn the Palm Organizer so that 'N' points to the north. (If
you don't know where north is, try to turn the Palm so that the Sun or the Moon icon points to the Sun
or to the Moon. During the night you could also try to find Polaris if you are in the northern
hemisphere).
The semicircle on the left shows the altitude. Hold your Palm Organizer upright so that 'Z' points to the
zenith. Objects below the horizon line 'H' are not visible at the specified time and location.
You use compass view to do the following:
•
•
•
Find a Planet or an object in the sky
Use your Palm as a compass. (Read in the chapter Usage Examples how to do this.)
Determine at a glance which planets or other objects of interest are above and below horizon
Follow the path of the sun during the day to find the best time for taking a phot
Displayed information
In the upper left and right corners you can see Altitude and Azimuth for the current object. Altitude is
positive above horizon, negative below. Objects in the circles are drawn in grey if they are below the
horizon. Azimuth is counted eastwards, starting with 0° at North. If you prefer Azimuth to start with
zero at South, you can select this in the Preferences screen. In the Magnetic Declination screen you
can select if the azimuth numbers should be corrected for magnetic declination so that they
correspond to bearings on a magnetic compass.
Inside the right circle there are the equatorial coordinates of the current object shown below the text
"r.a. / dec.". In the other quarter, the constellation, magnitude and distance of the current object are
shown.
At the bottom there are the location and the time shown on the left side and on the right side there is
the Local Mean Sidereal Time (LMST) and the Julian Date
Selecting the current object
With the pull down list at the upper right you can choose the Sun, the Moon or a planet as the current
object. The current object has lines drawn from the center and the various numbers are data for the
current object. You can also tap on any symbol in the circles to make that object the current one.
To make a object not in the list the current object, tap on the find button
. This leads you to the
Select screen where you can select any planet, star, deep sky object, constellation, comet or asteroid.
The pull down list can be customized by selecting the item "Customize...". This brings you to the
Selected Objects screen.
For each of the 12 entries you can:
•
Assign another object by tapping on the object name
•
Select if it should be shown in the circles by checking or unchecking the checkbox.
There are 12 entries you can freely assign. The 13th entry in the pull down list is always the last
search made with the find button.
The controls
There are several pen-sensitive regions in Compass view:
•
The Now button
•
The
•
The Find button
lets you select any object as the current one.
•
The Info button
shows detailed information about the current object.
•
The rise/set table button
down list.
•
The twilight button
uses the Palm's current time when activated.
button brings you to Sky view.
shows a table of rise and set time of all the objects in the pull
brings you to the twilight page.
•
If you tap on the time, date or location texts you can set another time or location.
•
The Julian Date number is also sensitive. If you tap on it, you can set the time by entering the
Julian Date.
•
Tapping on the "Az." text at the upper right brings you to the Magnetic Declination page.
•
Tapping on the moon phase picture displays information about the Moon.
Magnetic Declination
A compass points to magnetic north, not true north. This angular difference is called magnetic
declination (also called magnetic variation). It is different for each place on earth and is slowly
changing over the years. To learn more about magnetic declination, read Chris M. Goulet's excellent
Magnetic Declination FAQ (http://www.rescuedynamics.ca/articles/MagDecFAQ.htm) or visit the
Geomagnetism website of the National Geophysical Data Center
(http://www.ngdc.noaa.gov/seg/geomag/).
This program uses the World Magnetic Model (http://www.ngdc.noaa.gov/seg/WMM/DoDWMM.shtml)
to calculate declination values over a period of 5 years. New coefficients will be published at the end of
each period and an updated version of this program will be available shortly afterwards.
The accuracy of the model is claimed to be better than 1 degree, but greater errors are possible due to
local factors like ore deposits, mountain ranges or power lines which the model does not account for.
The 'Azimuth Display' switch controls how azimuth values are displayed in Planetarium. If [True] is
selected, the azimuth values are shown as bearings to true north. If [Magnetic] is selected, the azimuth
values are corrected by the declination and show the bearing you would read on a magnetic compass.
To indicate magnetic bearings in compass view the label beneath the number shows 'AzM' instead of
'Az.'.If [Magnetic] is selected, a line for magnetic north is drawn in the compass display while 'N'
always points to true north.
Sky View
Sky view draws a camera like map of a part of the sky. You can use this display to get familiar with the
constellations or to see where a planet moves in relation to the stars.
Screen layout
The screen is divided vertically into several sections.
•
At the top there is the title bar. At the right there is the zoom pulldown.
•
Just above the map there is the tool bar with various buttons.
•
The sky map
•
Below the map at the bottom there is the info area. It shows the location, the time and the view
direction or – if an object is selected – the name, the constellation, the magnitude and the
position of the object.
In full screen mode the title bar and the info area are removed to make more space for the sky map.
Setting the view direction
There are several methods how you can set the view direction or the part of the sky that is shown:
•
Drag the sky: Place the pen somewhere into the sky map and keep it down. Move it a little and
a four arrows symbol will be shown. Hold the pen down and drag it where you want to move
your starting point to, then lift it again.
•
If your PDA has a 5-way navigator you can use it to change the view direction. The 5-way
navigator has two modes: a) Moving around and b) Time step/zoom. Press the center key of
the 5-way navigator to switch between these two modes.
•
View direction dials: If no object is selected, the view direction dials appear at the lower right.
They two circles have the same meaning as in compass view. The left semicircle shows the
view altitude and the right circle shows the view azimuth. You can tap on the circles to open a
popup list with a few general directions to choose from. You can also tap on the small arrows
next to the circles to move the view direction stepwise horizontally or vertically.
•
Alt/Az and RA/Dec buttons. On the tool bar there are two buttons
and
. The RA button
opens a screen where you can enter the right ascension and the declination where you want
the screen centered to. The AZ button lets you enter the azimuth and altitude of the screen
center.
•
appears on the tool
Center the selected object. If an object is selected the center button
bar. This button moves the selected object to the centre of the screen.
•
you can search for any object. If the object is not
Search an object: With the find button
visible on the current map, the view direction is changed so that the object gets to the centre
of the screen.
•
Graffiti strokes: Write the letters "N", "E", "S" or "W" to set the view direction to north, east,
south or west respectively. Write the numbers "0", "1", ..., "9" to set the view altitude to 0°, 10°,
..., 90°.
Zooming in and out
The popup list on the right can be used to set the zoom factor. The number indicates the field of view
from the left to the right border of the screen. There are three customizeable zoom factors at the end
of the list.
If you select 180° as zoom factor and change the view direction to "straight up" you get an overhead
view of the full sky with the zenith in the middle of the screen.
The controls
There are several pen-sensitive regions in sky view. Let's start with the buttons on the tool bar:
Uses the Palm's current time when activated.
Toggles full screen mode on and off.
Select what will be drawn on the sky map.
Switches the constellation lines on and off.
Search for a star or an object.
Set the center of the map to a given right ascension and declination.
Set the center of the map to a given azimuth and altitude.
Mirrors left/right and up/down. This allows to simulate the view through some telescopes.
The + and - buttons increase or decrease the magnitude limit. This determines how
many stars are drawn. Note: Each zoom level has its own magnitude limit. Tapping on the text opens
a screen where you can see and set the magnitude limits for each zoom level individually.
Open the telescope commands popup list (only available if you have installed a telescope driver.
Read more about this in the chapter "Connecting a Telescope").
Go to compass view
Go to the Observation Log
The following three buttons are only avaliable when an object is selected:
Center the selected object. When you select an object and then tap the center button, the object is
centered in the screen and "locked"; if you change the time with the up/down buttons or the 5-way
navigator, the object stays centered until you tap the center button again or change the view direction
by other means.
Show information about the selected object
Unselect the selected object
The Zoom selector at the upper right is used to select the size of the field of view. The last six entries
of the list can be customized by selecting the entry "Customize...".
The location, date and time texts can be tapped to set another time or location.
The view direction dials at the lower right open a popup list with a few general directions to choose
from. You can also tap on the small arrows next to the circles to move the view direction stepwise
horizontally or vertically. Please note that the view direction dials are only visible when no object is
selected.
If your device has a 5-way navigator, you will see an indicator of the mode next to the title bar:
The 5-way navigator can be used to change the view direction.
The up and down keys of the 5-way navigator can be used for time steps. The left and right keys
change the zoom level.
The center key toggles between these two modes.
Sky View Settings
When you tap the
button on the tool bar, you get to the Sky View Settings screen.
Here you can select what should be drawn on the sky map:
•
Grids: You can choose whether an RA/dec grid or an Alt/Az grid or no grid at all should be
drawn.
•
Constellation lines, names and boundaries
•
Ecliptic and Horizon
•
Planets: this also includes the Sun and the Moon
•
Objects: Whatever is selected in the objects list
•
Comets: Whatever is selected in the comets and asteroids list.
•
Telrad circles. A Telrad finder is an optical device that superimposes three circles on your field
of view. You can use these circles to measure distances between objects. Enter the diameters
of the three circles of your Telrad finder into the three entry fields to display circles of that size
in the sky view.
The Magnitude Filter lets you specify how many objects are drawn in the sky map. This is depending
on the zoom level. For view fields above 60 degrees, the leftmost field applies, for view fields from 20
to 60 degrees the middle field applies and for high zoom views the rightmost field applies. You enter
the limiting magnitude. Only objects that are brighter than this limit will be drawn.
The Magnitude Filter for the stars corresponds to the
the magnitude limit for stars for the currently selected zoom level.
control in the sky view. It shows
The star data base contains information about the colors of the stars. You can select how this is used
to draw the stars. "White" draws all stars white. "True" draws the stars with their true color. "Intense"
draws the stars with intensified colors.
The Tap info determines what kind of coordinates should be drawn on the two bottom lines in sky view
when you tap on the map with the pen. You can select from RA/Dec, Az/Alt, and HA/Dec (HA = Hour
Angle) or no info at all. Choose the one that fits your telescope mount. You can select HA to be either
from 0h to 24h or ascending to 12h on both sides of 0h with indication of E or W.
When checkbox "Bold stars" is checked, the faintest stars are drawn with 2x2 pixels dots, otherwise
they are single pixels. Check this box if you think the single pixel stars are hard to see.
Twilight Screen
Select the menu item "View / Twilight" to get to the Twilight screen.
This screen shows the rise, transit and set times of the sun and the moon and the twilight times for the
current date. When the moon rises in the evening it will set in the moring of the following day. This
case is indicated with an arrow.
Transit time is the time when the object is at the highest point. Civil, Nautical and Astronomical twilight
are defined as the times when the Sun is 6°, 12° and 18° below the horizon respectively. Roughly
speaking,
•
Civil twilight is when it's getting dark somewhat.
•
Nautical twilight is when it gets dark enough for the brightest stars to be visible in the sky,
which was important for nautical purposes, hence the name.
•
Astronomical twilight is when it gets dark enough to observe even the faintest objects.
At the upper left of the screen the location is displayed. This text is sensitive, tapping on it brings you
to the Location screen. The date text at the upper right is sensitive, too. Tapping on it lets you choose
another date.
The rise and set times of the sun and the moon are defined as the time when the upper border
crosses the horizon. The rise and set time calculations take an atmospheric refraction of about 0.5°
into account.
Preferences
The Preferences screen can be reached by selecting "Preferences" from the main menu.
The 'Angle format' setting determines how Planetarium prints numbers, wither as degrees with decimal
fraction or as degrees with minutes of arc. Please note that you can always enter numbers in both
formats.
The 'Azimuth' setting lets you choose whether azimuth should be counted starting with 0° at North or
at South. Azimuth is always counted clockwise.
The 'Invert Time Step buttons' switch lets you choose if the page up/down scroll buttons step forwards
and backwards in time when pressing up or down or vice versa.
The switch 'Sync Sky & Compass view' determines if objects selected in one view should also be
selected in the other one.
If you have a color device you will see an additional checkbox labelled "Night mode". Checking this
switch causes Planetarium to use only red and black for all drawings on the screen. The red color is
said not to affect the pupils once they got used to the darkness.
With the 'Use alternative time dialog' checkbox you can select if the new style time dialog or the old
one should be used when setting the time.
The entry field labelled 'High Altitude Correction' can be used in an aeroplane. You enter the current
flight altitude and this will affect the horizon line in the sky view and the rise and set times. Conversion:
1 kilometer (km) = 3300 feet or 10000 feet = 3 km. Do not use this on the ground, it gives wrong
results.
Info screen
The Info screen is shown when the Info button
is tapped. It displays various data about an
astronomical object. It is divided into several pages which can be selected with the pushbuttons at the
bottom. There are five pages:
Pos: Shows position related values of the object
Stats: Shows various values depending on the object. This page is only available for the Planets.
Special information is displayed for the Sun (the solstices), Jupiter (the moons), Saturn (the angular
size of the rings) and the Moon, Mercury and Venus (the phase).
R/S: Shows the next few rise, transit and set events of the object. Next to the rise and set times there
is also the azimuth where the object rises or sets. Next to the transit times there is the maximum
altitude the object reaches, marked with a caret ^. If only a dash "-" is displayed for rise and set times,
the object won't rise or set like the sun in polar summer for example or Polaris, the northern star. The
small little line between the lines shows which event comes next.
Time: Shows values regarding the current location and time.
Phases: Shows the dates for the next few moon phases. This page is only available for the Moon. The
small little line between the lines shows which phase event will be next
Meteor Showers
The Meteor Showers screen can be reached by selecting "Meteor Showers" from the main menu.
This screen shows a list of annual meteor showers. The columns show the name, the date of the
maximum and the zenith hourly rate. The currently active showers are written in bold font. The current
date is displayed at the upper right and can be changed by tapping on it.
You can select a meteor shower and then tap on the
particular meteor shower or
button to get more information about that
tap on the sky view button
to go to the sky view. If the shower is currently active, the radiant is
shown in sky view, otherwise the center of the sky view shows where the position of the radiant will be
during the activity period.
button sets the time to the shower maximum time. This allows you to go quickly to the
The
season when the shower will be active and check whether it is above the horizon during the night at
your location.
The
button brings you to compass view.
If the checkbox 'Show in Sky View' is checked, all currently active meteor showers radiants will be
drawn in the sky view.
Observation Log
The Observation Log screen can be reached by selecting "Observation Log" from the main menu.
The Observation log lets you take notes of the observations you make. You can sort the list either by
date or by object name.
The two buttons
and
bring you back to compass or sky view.
Tap on the "New" button to create a new entry or tap into the list to edit an existing entry.
This Log details page lets you enter the details of your observation. You can enter the name of the
observed object by graffity or tap on the "List" button if you want to pick it from the list of objects
available in Planetarium. To change the date or time of the observation, just tap on it.
To simplify the entry of repeatedly used texts in the desctiption/comments field (like "Atmosphere:",
"Equipment:" or "Photo:", etc), please study the Palm shortcuts that can be defined in the Preferences
application.
Databases
Planetarium uses three data bases for the location pick list, the objects list and the comets and
asteroids list. These three data bases have some things in common.
Every time you make a HotSync they are backed up to your Palm backup directory on the PC. The
backed up files have the following filenames:
•
the location pick list: PlanetariumDB.pdb
•
the objects list: UserObjsDB.pdb
•
the comets and asteroids list: PlnCometsDB.pdb
You might have noticed that files with the same name are also present in the zip file where you found
the other Planetarium files. These files contain initial data for the data bases: For the location data
base there are about 600 cities, the objects list contains over 200 deep sky objects and the comets
and asteroids data base contains a few comets and asteroids. It is optional to install these initial data
files. If they are not installed, Planetarium just creates a new empty data base and the corresponding
list will be empty.
Planetarium allows to change entries or add new entries to these data bases. You might want to use
the "Personal" category or create a new category for this. Please note that all the changes you make
to existing entries or the new entries you add go into the data base files PlanetariumDB.pdb,
UserObjsDB.pdb, PlnCometsDB.pdb. Your data gets merged with the initial data you installed. If you
reinstall one of the files from the zip archive or a previous backup of yours, the complete data base is
replaced and your changes will be erased. To provide a workaround for this problem the import and
export feature has been made.
The Import and Export features
The export feature stores all items of a category in textual form into one or more memos. The memos
are automatically created and have a title like: "Planetarium Locations Europe". The import feature is
the counterpart. It reads a memo and adds all entries to the data base. With these features you can:
•
Share Planetarium data with your friends. For example if you have added your favourite deep
sky objects to the data base in your Personal category, you select the Personal category,
select the menu item "Export" and beam the resulting memo to your friend. Your friend creates
and selects a new category where he wants to place the items, then selects the menu item
"Import", chooses the memo you beamed and presses the "Import" button.
•
Save your personal entries when you reinstall the data base. For example you might have
installed the location data base and have deleted all categories outside America to save
space. Now you plan a trip to Europe and wish to reinstall the initial file. However, if you do
that, the complete data base will be replaced and that means the personal entries you added
will have gone. So you export the personal category into a memo beforehand, reinstall the
initial data base file and reimport your personal entries afterwards.
•
Get new data from the internet. For example there is a list of Alignment stars for the LX200
telescope on the page http://www.aho.ch/pilotplanets/release.htm. To transfer this list into
Planetarium you need to copy the list from your Internet browser to the clipboard and paste it
into a new memo in your Palm Desktop application. Then make a HotSync to transfer the new
memo to the Palm. On the Palm, create and select a new category or just select the category
where you want the entries. Then select the menu item "Import", choose the memo with the
data and tap the "Import" button.
Location Pick List
The location pick list stores the coordinates of locations. This is useful when you travel around.
To reach the location pick list, select "Options / Set Location" from the main menu, then tap on the
"Pick" button.
The buttons:
•
OK - To select a location, tap on the location and press "OK".
•
Cancel - To leave the location pick list.
•
New - To add a new location.
•
Details - To edit a location, tap on the location and press "Details".
The menu items:
•
Delete all - Deletes all items from the currently selected category.
•
Import from memo - Reads a memo containing locations and adds them to the currently
selected category.
•
Export to memo - Creates a new memo and wrtites all entries of the currently selected
category in textual form into it.
•
Help - Displays a short help text.
Please note that the menu items operate on all items of the currently selected category only. To
select a category use the pulldown list at the upper right. It is important that you select the category
where you want to place the items before you execute the import menu command.
Objects
The objects list stores objects with fixed coordinates like galaxies, planetary nebulaes or just your
favourite stars. To reach the objects list, select "Options / Objects" from the main menu.
Each object can be turned on or off with the checkbox at the left of the line. Only checked objects are
shown in the sky view. To edit an object just tap on it to get to the details screen.
Please note: The following menu items operate on all items of the currently selected category only.
To select a category use the pulldown list at the upper right. It is important that you select the category
where you want to place the items before you execute the import menu command.
•
Show all - Checks all objects of the currently selected category.
•
Hide all - Unchecks all objects of the currently selected category.
•
Delete all - Deletes all items from the currently selected category.
•
Import from memo - Reads a memo containing objects and adds them to the currently
selected category.
•
Export to memo - Creates a new memo and wrtites all entries of the currently selected
category in textual form into it.
•
Help - Displays a short help text
Comets and Asteroids
The comets and asteroids list stores the orbital elements of asteroids and comets. To reach the
comets and asteroids list select "Objects / Comets and Asteroids" from the main menu.
Each entry can be turned on or off with the checkbox at the left of the line. Only checked entries are
shown in the sky view. To edit an entry just tap on it to get to the details screen. If you intend to enter
orbital elements yourself, please find an example in the chapter “Entering orbital elements”.
Please note: The following menu items operate on all items of the currently selected category only.
To select a category use the pulldown list at the upper right. It is important that you select the category
where you want to place the items before you execute the import menu command.
•
Show all - Checks all entries of the currently selected category.
•
Hide all - Unchecks all entries of the currently selected category.
•
Delete all - Deletes all items from the currently selected category.
•
Import from memo - Reads a memo containing comet or asteroid data and adds them to the
currently selected category.
•
Export to memo - Creates a new memo and wrtites all entries of the currently selected
category in textual form into it.
•
Help - Displays a short help text.
In the "Comet / Asteroid Details" screen you enter the orbital elements for the object. Depending on
whether it is a comet or an asteroid the data set differs slightly.
For Asteroids you need:
•
the Epoch as Julian date
•
the Mean anomaly M in degrees
•
the semimajor axis a in AU
•
the eccentricity e
•
the orbit inclination i in degrees (J2000)
•
the argument of perihelion
•
the longitude of the ascending node
•
the magnitude parameters H and G
in degrees (J2000)
For Comets you need:
•
the time of perihelion as Julian date
•
the perihelion distance q in AU
•
the eccentricity e
in degrees (J2000)
•
the orbit inclination i in degrees (J2000)
•
the argument of perihelion
•
the longitude of the ascending node
•
the magnitude parameters H0 and k
in degrees (J2000)
in degrees (J2000)
The data for comets and asteroids need to be updated once in a while. The data can be used for
several months before the accuracy deteriorates. Check http://www.aho.ch/pilotplanets/release.htm for
current data once or twice a year.
Connecting a GPS
You can connect a GPS via serial port or via BlueTooth. The GPS needs to provide NMEA output (for
profis: The GPGGA and GPRMC sentences are decoded). For connection via serial port you will need
a special cable. Please contact your GPS dealer for this.
Installation
In order to use the GPS feature you need to install the file GPSNMEA.prc or GPSBT.prc on your Palm.
Please download it from http://www.aho.ch/pilotplanets/release.htm.
Usage
To get the coordinates from the GPS, enter the Location screen by selecting the menu item
Options/Set Location or by tapping on the location text. If the file GPSNMEA.prc or GPSBT.prc has
been installed correctly, there will be a "GPS" button. When you tap on this button the Palm opens the
serial port and waits for data from the GPS. You can tap the "Cancel" button to abort this operation. As
soon as some valid data has been received, the coordinates are copied into the Location screen.
Connecting a Telescope to Planetarium
If you have a telescope that can be controlled by a computer you can connect it to Planetarium either
via the serial port or via Bluetooth.
Connecting via Serial Port
To connect the Telescope via serial port you need the following:
•
•
•
•
•
Handheld with serial port
Serial cable for the handheld
Serial cable for the telescope
Perhaps a null modem and a gender changer
Serial telescope driver
PalmOS devices with serial Port
Devices that have a serial port (without claim to completeness):
•
•
•
•
•
•
•
•
•
Treo 600, Treo 300, Treo 270, and Treo 90
Tungsten C, T, T2, T3, W, Zire 71,
Garmin iQue 3600
Palm m500, m505, m515, m125, m130, i705,
Palm m100 and m105.
Palm V series
Palm III series (includes Palm VII, PalmPilot, Handera/TRGPro, Symbol SPT1500)
Sony Clie TH, T, TJ, TG, NX, NR, SJ, and SL series
Visor Solo, Deluxe, Prism, Platinum, Neo, Pro, Edge
Check also the list on http://www.pcables.com/index.html
Please note: Those devices that have only an USB port can not connect. The USB-to-serial converters
avaliable for the PC will not help here, because the Palm USB port is something different than the PC
USB.
Serial cables and connection
For the handheld do not just buy a serial Hotsync cable! This might work well with the PC, but not with
the telescope. The reason is that many Palm devices have serial ports with digital voltage levels only.
They need level converters to bring the signals to proper RS232 levels, and these are usually built into
the serial cable. But they need power, and Hotsync cables usually take this power from the PC side
(from the RTS signal for example). This makes sense to save the Battery of the handheld. However,
when connecting to the telescope we only have three lines. There is no RTS or similar signal where
the level converters could take their power. So what you need is a cable that takes the power for the
level converter electronics from the PDA side.
Very old Palms have the level converters built into the device, and a serial hotsync cable or cradle will
work well for them.
This is a good source for serial cables: http://www.pcables.com/index.html
Connection:
To connect to the handheld you need a serial cable for your telescope. This is a standard accessory
that is intended to connect the telescope directly with the PC or Laptop. To get such a cable contact
your telescope dealer.
Depending on the serial cable you have got for your handheld, you might need a null modem and
gender changer in between or not.
The null modem crosses the serial data lines, so that the telescope and the handheld do not both talk
on the same line while listening on the other.
The gender changer is needed to let you plug the two female cables together.
Serial telescope driver
The following telescope drivers are available (http://www.aho.ch/pilotplanets/release.htm):
•
LX200.zip – Meade LX200 and ETX.
•
NexStarM.zip – Celestron NexStar 5,8, 4/60/80/114GT, N8GPS, N11GPS and Ultima
•
skycmd.zip – SkyCommander and ServoCAT
•
LosGem.zip – Losmandy Gemini
Download the appropriate file and install it on your Palm.
Please note: You need an AutoStar or Hand Controller device!
You must not connect the Telescope directly to the Palm without the AutoStar or Hand
Controller in between, this might damage your Palm or the telescope!
Known problems with the Tungsten T3
The Tungsten T3 (and possibly other models) have a bug in its serial port software. This causes the
T3 to require hardware handshake even if Planetarium said it should not. The result is that the Palm
waits for a CTS signal that it does not get from the telescope and therefore it does not send any
characters. Hopefully PalmOne will bring out an update patch one day.
There are two solutions for this currently:
1) Search for a software called "SerialFix" by Larson Computing. This is a small shareware program
that fixes this.
2) Use a little adapter that routes the RTS signal of the T3 back to its own CTS input, so that it gets the
signal it needs. If you have experience with soldering, you can make one yourself. Here is the wiring
diagram:
In this wiring diagram I put the bridge on both sides, so it will work with any setup, but in fact you will
need it only on the Palm side. Put this adapter just after the Palm cable, before any null modem or
gender changer.
Usage
If the telescope driver is installed properly, the telescope button
shows up in the sky view tool bar.
Tapping this button opens a popup menu with the available functions.
•
•
Query Position - Asks the telescope where it is pointing at and displays a symbol in the sky
map.
Set position - Only available if you have a Goto telescope and if you have selected an object
in the sky map. Commands the telescope to that object.
Trouble shooting
The "Serial port communication error" appears when Planetarium does not receive back any data from
the telescope. There are several possible reasons for this situation:
1. Wrong cable (try inserting/removing a null modem). Is it a cable that is powered from the
device side, not from the PC (telescope) side?
2. Broken cable
3. Broken serial port in the Palm
4. Broken serial port in the telescope
5. Telescope not in the correct mode to receive commands through the serial port.
Most probably it is the first one.
You can rule out the last two items if you can control the telescope from the PC.
To rule out items 2 and 3, you could try to connect the Palm to the PC and make a Hotsync via the
serial cable. You will have to set the Hotsync manager on the desktop accordingly and change some
settings on the Palm as well. (Note that if you need a null modem for connecting to the PC, you don't
need one for connecting to the telescope, and vice versa. ) If you can make a hotsync, the cable is
working and the handheld as well. However, it might still be the wrong cable (e.g. when it takes its
power from the PC, not the Palm.)
Connecting via Bluetooth
To connect the Telescope via Bluetooth you need the following:
•
•
•
Bluetooth capable Palm device
Bluetooth to serial converter
Bluetooth telescope driver
Bluetooth capable Palm device
The following devices are natively Bluetooth capable:
•
•
•
•
•
•
•
•
•
•
•
Palm Tungsten T
Palm Tungsten T2
Palm Tungsten T3
Palm Tungsten T5
Palm Zire 72
Sony Clié PEG-NZ90
Sony Clié PEG-UX50
Sony Clié PEG-UX40
TapWave Zodiac
TapWave Zodiac 2
Treo 650
Devices runnung PalmOS 4 can add a Bluetooth SD card. Google for Palm Solutions Group Bluetooth
SD Card to get information or find a store. Also check ebay!
At the time of writing (November 2004) no Bluetooth add-on solution for PalmOS 5 is known to the
author.
Check http://www.palm.com/bluetooth for up-to date information.
Bluetooth to serial converter
I tested the setup with the AIRcable (http://www.aircable.net/). It is a bit tricky to get running, so please
read all of their website if you have problems.
There are other Bluetooth to serial converters around, all a bit more expensive. I have not yet tested it
with them (and they may be tricky to configure just as well).
Problems to solve when you want to use the AIRcable:
•
Power: The newer models (those with the blue LED and 4 dip switches) can use 5-15 Volts
external power. (Attention: The older models used 4-10 Volts!) So this would be just fine for
those who have 12V ready from the telescope or from a car battery. You can connect the
power either via a power plug on the side of the device or between serial pins 9 and 5.
•
RTS/CTS: If you have an older model (with the red LED and 3 dip switches), a bridge is
required between RTS and CTS (pins 7 and 8). Otherwise the AIRcable does not send
characters to the Palm. The newer models do not require that any more, but you need to set
the new switch labelled "Hardware handshake" to the off position.
•
Configuration: To configure the AIRcable, you connect it to the PC running HyperTerm and
send it commands via the keyboard. Set the baud rate in HyperTerm to 115200. Check the
setup by typing <control-A> H <enter>. Note the capital H. The module should respond by
writing some status information. Now type <control-A> A3 <enter> to bring it into ServiceSlave Mode. The module should respond with "OK". To avoid having to type the PIN code
repeatedly also disable authentication with <control-A> PD <enter>. Check
http://www.aircable.net/AIRcable/CLI.html for further details.
•
Don't forget to set the baud rate to 9600 for the telescope with the mini dip switches.
Bluetooth telescope driver
The following Bluetooth telescope drivers are available (http://www.aho.ch/pilotplanets/release.htm):
•
LX200BT.zip - Meade LX200 and ETX
•
NexStarBT.zip - Celestron NexStar 5,8, 4/60/80/114GT, N8GPS, N11GPS and Ultima
Download the appropriate file and install it on your Palm.
Usage
Set up your telescope, align it and switch on the Bluetooth to serial converter.
shows up in the
Start Planetarium. If the telescope driver is installed properly, the telescope button
sky view tool bar. Tapping this button opens a popup menu with the available functions.
•
•
Query Position - Asks the telescope where it is pointing at and displays a symbol in the sky
map.
Set position - Only available if you have a Goto telescope and if you have selected an object
in the sky map. Commands the telescope to that object.
At the first time you issue a command the program tries to establish connection via Bluetooth. You are
prompted to select a nearby Bluetooth device. Select your Bluetooth to serial converter. You might
have to enter the PIN code. Once connection is established, the commands are sent to the telescope.
The Bluetooth link is held active for subsequent commands.
If the Palm is switched off either manually or automatically the Bluetooth connection is dropped and
has to be reestablished when you switch the Palm on again and want to send another command. The
program will automatically try to reconnect to the device you selected previously. If the Bluetooth-serial
converter is switched off, connection is lost and you will have to reenter the PIN code to establish it
again (unless you have configured it not to require authenitfication).
If you find the auto-off switching of the Palm annoying you can try out this little program that lets you
specify a longer auto-off time: http://home.vrweb.de/~jswi/SoftPalm/AutoOff.html
Special issues with the Tungsten T3
There is a bug in the T3 that prevents the T3 from accepting a correct PIN to the Bluetooth-serial
converter. It stays in the dialog and keeps asking for the PIN.
The best solution to this is to check in the manual of your Bluetooth-serial converter if it is possible to
configure it not to require autihentification: The T3 won't ask you for the PIN any more.
If this is not possible, then the following procedure is necessary:
•
•
•
After powering on the Bluetooth-serial converter, start the Preferences application and select
Bluetooth.
Tap "Trusted devices"
Add the Bluetooth-serial converter to the list (or if it is already there, delete it, then re-add it)
Note: This will have to be repeated every time you switch off and on your Bluetooth-serial converter.
Usage Examples
On this page I describe some things that you can do with Planetarium. You are invited to do these
step-by-step procedures with me and see if you get the same results.
Find or identify a planet
Let's assume the time is Aug, 22. 1998, 11:00 pm and the night sky is clear and we want to know if we
can see Jupiter on the sky. Let's further assume we are located at Chicago. So enter the following as
Location and Timezone:
41.8°N, 87.7°W, GMT-6, DST on
Set the date to Aug, 22. 1998 and the time to 11:00 pm.
Select Compass view and from the pull down list at the upper right select Jupiter. Align the display so
that "N" points to north. Try to find Jupiter in the direction indicated by the line. It should be visible
about 24 degrees above the horizon in the shouth east.
Now we see that there is another bright object in the east just above the horizon. To identify it, switch
to Sky view. From the zoom pull down list at the upper right select 90°. Use the view direction dials at
the lower right to set the view direction to East and the view altitude to 30°. Try to match bright stars in
the sky with bright stars on the display. If you are sure you have found the object of interest on the
display, tap on it to get its name; in this example, it is Saturn.
Determine sunrise and sunset
Let's find the time of sunrise and sunset on Aug, 22. 1998 in Boston. To do this, enter the following as
Location and Timezone:
71.1°W, 42.3°N, GMT-5, DST on
Set the date to Aug, 22. 1998.
Select the menu item "Options / Twilight". The display will show many data concerning the Sun and
twilight. Sunrise is at 5:59 am and sunset is at 7:35 pm
At the right there is a picture of Compass view at the time of sunset to verify it. Please note that
sunrise and sunset are when the Sun has an altitude of -0.83°. One reason for this is that the Sun is
not a point of light but a disk about 0.5° wide. The other reason is that the atmospheric refraction lets
objects at the horizon appear slightly higher than they really are. Taking this into account, the top of
the Sun's disk visually crosses the horizon line when it's center has an altitude of -0.83°.
See the Moon's crescent lying horizontally near the equator.
If you live near the equator you can sometimes see the Moon lying horizontally like a smilie. This is
rather an unfamiliar view for people living in higher latitudes. Enter the following as Location and
Timezone:
36.8°E, 1.3°S, GMT+3, DST off (Nairobi)
Set the date to Apr 20. 1999 and the time to 10.00 pm. Choose Compass view and have a look at the
Moon phase diagram. You can also select Sky view and see the Moon setting perfectly vertically when
stepping hours.
Get an idea of the Sun eclipse at Aug 11. 1999 in southern
Germany
Let's go to southern Germany. Enter the following as Location and Timezone:
10.0°E, 48.5°N, GMT+1, DST on
Set the date to Aug 11. 1999 and the time to 12.35 pm.
Both the Sun and the Moon are small disks on the sky of about 0.5° in diameter and they have to get
really close for an eclipse to occur. Most of the new moons are not eclipses because the Moon's orbit
is inclined by about 5° in respect to the plane of Earth's orbit and it passes either above or below the
Sun. But on this specific day look at the azimuth and the altitude of the Sun and compare it with the
azimuth and the altitude of the Moon. The are both 158.4° and 55.3° respectively, so they are very
close. Because the accuracy of Planetarium is only about 0.1°, we can not tell if this is a total or a
partial eclipse, nor the exact contact times. But in fact it was a total eclipse. And a totally clouded one,
too...
When switching to Sky view you can get a graphical representation of the moon moving in front of the
sun.
The Sun never sets in polar summer
Let's go to Inuvik (Canada): 68°N, 134°W, GMT-7, DST on
Set the date to June, 21. 1999. Now select Compass view and observe the altitude of the Sun as you
step hour by hour through the day. It will not go below 1.4°.
Find the Big Dipper and Polaris
If you live in northern hemispheres, enter your location and try to find the Big Dipper and Polaris in Sky
view. You might know that they are always in the north, so set your view direction to north using the
view direction dial at the lower right. You can also use the search function for finding them, accessible
by tapping the button with the magnifying glass. Please note that the official name for Big Dipper is
"Ursa Major"
Observe a retrograde loop of a planet
The early medieval astronomers had great difficulty in explaining the planetary motions. Let's see why.
Set the location to 47°N, 8°E, GMT+1, DST off.
Select Nov 28. 1998, 7:00 am.
Select Sky view and make sure that the planets are switched on.
Set the view direction to SE, the view altitude to 30° and the zoom factor to 120°.
You should see the Sun a few degrees below the horizon and Mars about 45° above. Set the time
increment to 6.981 days or to 29.918 days. Using one of these odd numbers has the advantage that
the stars seem to stay at their place and we can watch the motion of the planet against them. Step
now the time up and observe Mars wandering through the constellations. Perhaps you need to switch
off Objects and Comets and set a magnitude ilmit for the stars to make the display drawing faster. In
March 1999 Mars will slow down and in April it will move in the opposite direction! This retrograde loop
will last until June and then Mars will continue in the usual direction. Unfortunately it becomes harder
then to observe Mars in the real sky because it is also getting closer to the Sun and therefore the sky
will be too bright to see it.
Determine the next full moon
If you are afraid of vampires and werewolves you need to know the date of the next full moon. The
fastest way to get to this information is to select compass view, switch on the now button and tap on
the moon phase display. Then in the Object Information screen select [Phases] at the bottom. The little
horizontal line separates past and future events, so look for the next full moon below this line. Uuuh,
it's coming soon...
Use Planetarium as a compass
Enter your location and switch the Now button on. If the Sun is visible on a clear sky turn your Palm
organizer so that the Sun symbol in the azimuth diagram points to the Sun. The aizmuth scale then
shows the directions. Note that you do NOT need to correct for the declination between true and
magnetic North pole! The azimuth scale points to the true North pole.
To get it more precisely get a string and tie an object on it so that you have a pendulum. Hold your
Palm organizer as horizontally as possible in the sunlight. Wait until the string doesn't swing any more
and let it cast a shadow onto the display. Select the Sun in compass so that you get a line from the
center in the azimuth diagram to the Sun symbol. Now turn the Palm Organizer so that this line is
exactly aligned with the shadow of one the string.
Moon eclipse on July 5, 2001
Set the Date to July 5, 2001 and the time to 20:21 UTC. (You can just go to compass view and enter
the Julian Date 2452096.1215). Switch to Sky view and search for the Moon. You can see the moon
and two dotted circles. These circles are the penumbra and the umbra of the earth. You can also see
that this is only a partial moon eclipse as the moon does not completely enter the umbra.
Use the time step buttons to advancve forward and backward in time to see the moon move through
the shadow of the earth..
Can we see the Perseids this year?
Select the menu item "Options / Meteor Showers" and scroll down in the list until you find the
Perseids. Tap the line with the Perseids and tap on the
maximum of the Perseid shower.
button. This will set the time to the time of
Now tap on the
button to go to sky view and check where the shower is. From the two view
direction dials at the lower right we can tell that the Perseids are nearly in the Zenith at 6:31 am (at
least in Zurich). This is a very good position. By stepping backwards in time we can check where the
Perseids are during the night.
Disclaimer
Disclaimer
Planetarium is copyright © 1998-2005 by Andreas Hofer.
Planetarium is provided "as-is" and without warranty of any kind, express or implied. I can accept no
liability for data loss or any other problems caused directly or indirectly by the use of Planetarium.
Planetarium is shareware - this means you can try it for a while and see if you like it. If you find that
you are frequently using Planetarium then you need to register it to be able to legally continue using it.
If you decide not to register it after a reasonable evaluation period, you should stop using Planetarium
and delete it from your Palm. You may give unregistered copies to others under the same terms - they
may try it and then either register or remove it. Planetarium (together with this document) may be
included on any disk or CDROM of shareware sold by non-profit organizations. If you wish to include it
in a commercial software collection, please contact me at [email protected]
Legal Disclaimer
THIS SOFTWARE IS PROVIDED "AS IS" AND ANY EXPRESS OR IMPLIED WARRANTIES,
INCLUDING (BUT NOT LIMITED TO) THE IMPLIED WARRANTIES OF MERCHANTABILITY AND
FITNESS FOR A PARTICULAR PURPOSE ARE DISCLAIMED. IN NO EVENT SHALL THE AUTHOR
OR CONTRIBUTORS BE LIABLE FOR ANY DIRECT, INDIRECT, INCIDENTAL, SPECIAL,
EXEMPLARY OR CONSEQUENTIAL DAMAGES INCLUDING (BUT NOT LIMITED TO)
PROCUREMENT OF SUBSTITUTE GOODS OR SERVICES, LOSS OF USE, DATA OR PROFITS;
OR BUSINESS INTERRUPTION HOWEVER CAUSED AND ON ANY THEORY OF LIABILITY,
WHETHER IN CONTRACT, STRICT LIABILITY, OR TORT (INCLUDING NEGLIGENCE OR
OTHERWISE) ARISING IN ANY WAY OUT OF THE USE OF THIS SOFTWARE, EVEN IF ADVISED
OF THE POSSIBILITY OF SUCH DAMAGE.
P.S.:
The author of Planetarium can not be held responsible for star gazers falling asleep at their working
place!
Entering numbers in Planetarium
You can enter angles into Planetarium either as degrees with decimal fraction or as degrees with
minutes of arc. In order to allow Planetarium distinguish between these two variants, there are some
rules:
•
Degrees with decimal fraction need to be entered like an ordinary floating point number (e.g.
12.3 or -87.65) with an optional degree sign at the end (e.g. 12.3°). Even though Planetarium
only displays a certain number of decimal digits, you can always enter more digits and they
will be stored internally and used for the calculations.
•
Degrees with minutes of arc need to be entered with a degree symbol as separator (e.g.
12°18' ). The minutes tick at the end is optional (e.g. 12°18 ). As the degree symbol can cause
troubles either when entering as graffiti stroke or when editing a memo, the colon character
can be used instead (e.g. 12:18' or 12:18). The minutes part can have a decimal fraction (e.g.
12:18.75' or 12:18.75 ). Even though Planetarium does never display this fraction, if you enter
it it will be stored internally and used for the calculations.
These rules also apply for numbers read from a memo when importing data bases. We recommend
using the colon when editing data memos on the PC because the degree character might be
converted into something else on some systems when transferring it to the Palm.
Entering orbital elements of a comet
You can find orbital elements for comets and asteroids on this web site:
http://cfa-www.harvard.edu/iau/Ephemerides/index.html
For example, you can find the following data for comet C/2002 C1 (Ikeya-Zhang):
C/2002 C1 (Ikeya-Zhang)
Epoch 2002 Mar. 27.0 TT = JDT 2452360.5
T 2002 Mar. 18.9809 TT
MPCM
q
0.507060
(2000.0)
P
Q
z +0.019621
Peri.
34.6726
-0.5491662
-0.6906635
+/-0.000009
Node
93.3672
+0.6195519
-0.7143233
e
0.990051
Incl.
28.1217
+0.5608671
+0.1128098
From 541 observations 2002 Feb. 1-Mar. 24, mean residual 0".6.
To enter this into Planetarium, select the menu item "Options / Comets and Asteroids" and select the
"Personal" category at the upper right. Then tap on the "New" button and enter the values as shown in
the picture below.