1
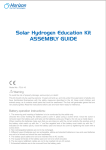
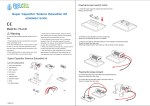
H-racer 2.0
ASSEMBLY GUIDE
Model No.: FCJJ-23
Warning
To avoid the risk of property damage, serious injury or death:
This kit should only be used by persons 12 years old and up, and only under the supervision of adults who
have familiarized themselves with the safety measures described in the kit. Keep small children and
animals away, as it contains small parts that could be swallowed. The fuel cell generates gases that are
very easily ignited. Read the instructions before use and have them ready for reference.
Battery operation instructions:
1. The removing and inserting of batteries is to be conducted by the adults only.
When inserting the batteries make sure that you are doing so with the correct polarity (the positive end of
the battery must match up with the “+” and the negative end of the battery must match up with the “-”
indicated on the battery pack) and then close the battery compartment.
2. Non-rechargeable batteries are not to be recharged.
3. Different types of batteries such as rechargable, alkline and standard batteries or new and used batteries
are not to be mixed and should be used separately.
4. The two spare red&black cables are not to be inserted into an AC socket.
5. Exhausted batteries are to be removed from the battery compartment.
ASSEMBLY GUIDE
H-racer 2.0
What do you need?
H-Racer 2.0
AA batteries=2 Units
Connect one of the flexible tubes to the small purging valve. Make
sure the tube is inserted all the way into the base of the purging valve
nozzle.
Connect another flexible tube to the nozzle of the refueling input valve.
Make sure the tube is inserted all the way into the base of the nozzle
of the refueling input valve.
TIP: To fit the flexible tubes onto the nozzle of the valve, connect the tube
by twisting it against the nozzle, then push the nozzle into the tube until the
tube is snuggly fitted to the base of the nozzle.
Position the fuel cell onto the square slot located in the middle
of the car chassis. The positive mark on the fuel cell should be
positioned on the side with the red cable, and the negative
mark on the side with the black cable. Push the fuel cell into
the chassis.
Water=25ml
LR44 batteries=3 Units
Place the refueling input valve above the opening
on the left side of the chassis. Make sure the red
cable is positioned above the refueling input valve
tubing. Slide the refueling input valve onto its
mount located at the opening on the side of the
chassis. With a downward motion, click the valve
into place ensuring it is smoothly aligned with the
outer surface of the chassis.
Place the purging valve above the opening on the
right side of the chassis. Slide the purging valve
onto its mount located at the opening on the side
of the chassis. Make sure the refueling valve tube
is not in the way of the purging valve tubing. With
a downward motion, click the valve into the slot on
the chassis. Make sure that the whole body of the
purging valve is positioned in the slot on the
chassis and the purging button is positioned
outside the edge of the chassis.
Position the black cable terminal between the fuel cell holder
and the fuel cell end plates, and position the red cable terminal
in the same manner on the opposite side. Make sure the holes
are aligned.
Align the fuel cell holder with the two holes on the car chassis.
Place the screws into the screw holes and make sure the
screws are entered through the cable terminal holes and
straight into the chassis.
*Please note there are two types of screws. The smaller
screws are used for the fuel cell and the larger screws are
used for the car body.
Use a screwdriver to attach the fuel cell end plate and the red
& black cable terminals to the screw holes on the chassis.
Make sure the metal terminals from the cables are closely
touching the fuel cell end plates. Do not tighten the screws
until the two screws are partially entered into the chassis.
Drive the screws into the chassis making sure all the parts are
connected tightly without moving.
Force is required to drive these
screws into place, to avoid
damage to the kit ask an adult
to drive in the screws.
Connect one end of the flexible tubes to the lower
nozzle on the storage cylinder and the other end of
the flexible tube to the nozzle on fuel cell located
nearest to the motor. Connect the other end of the
flexible tube on the refueling input valve to the other
nozzle located on the fuel cell. Connect the purging
valve tube to the upper nozzle located on the storage
cylinder. Make sure all tubes are properly positioned
as in diagram.
Warning: Make sure these connections are
correct. Any other connection will not allow
proper operation of the car and its fuel cell
power system. Also ensure the wires are not
touching the wheels and the
tubes are not kinked or
pinching.
Place the front and rear bumpers onto the bumper frames on
the chassis.
*Be careful not to place the bumpers upside down. Make sure
the rear bumpers fit correctly onto the frame.
Position the body of the car onto the chassis. Align the holes
on the chassis with the holes on the car body top. Use a
screwdriver (not included) to attach the body to the chassis
using the set of 4 large screws and make sure the screws are
entered straight into the chassis. Do not tighten the screws
until all screws are partially entered into the chassis. Drive the
screws into the chassis until no gaps are left between the
body and the chassis.
Remove the H2 sticker from its backing and position it on the
car accordingly.
Enabling DC powered operation
Open the battery compartment located underneath
the refueling station by sliding the cover according
to the arrow.
Place two 1.5V AA alkaline batteries inside the
battery compartment as indicated, then close the
battery compartment.
RY
AA
TE
BAT
The assembly of your H-racer 2.0 is now complete.
RY
E
ATT
B
AA
Slowly pour water into the water tank opening above
the refueling station until the water level reaches the
top. Let the water rest in the tank for at least 5 minutes
before moving on to the next step. This allows the
electrolyzer time to absorb the water.
Water
TIP: For optimal
operation and longer
life of the refueling
station, use of distilled
water is highly
recommended. You can
purchase distilled water
from your local
drugstore or pharmacy.
Creating renewable hydrogen using power from the sun
Attach the back of the solar panel to its small rectangular
support provided in the kit. You can decide to place the solar
panel vertically or horizontally depending on how you position
the support on the back of the panel. Connect the black cable to
the black input jack on the solar cell, and the red cable to the red
input jack on the solar cell.
Connect the other end of the cable to the input
jack of the refueling station.
Place the solar panel in direct sunlight.
Warning: Make sure these connections
are correct. If connected incorrectly the
refueling station may not function
properly.
Switch the refueling station to the "☼" sign. The small blue
lights will now be flashing and you are now producing
hydrogen fuel using unlimited power from the sun! You can
see you are producing hydrogen when small oxygen bubbles
form on the right side of the water tank. Turn the switch off
and the hydrogen production will stop.
If it is getting dark, or if the
sun is not very powerful, or
if you want to accelerate
refueling time, you can at
any time switch the
refueling station to "DC". In
this case hydrogen would
be produced using the
power of two AA alkaline
batteries (not included)
placed earlier inside the
refueling station.
To purge the complete fuel cell power system,
remove all the air out of the balloon by pulling
on the syringe. Stop pulling on the syringe
once all the air is removed from the balloon.
Disconnect the syringe connector valve from
the additional input valve attached to the
refueling station by turning it counterclockwise, allowing the connector to pop out. Your
storage tank is now purged and ready to
receive hydrogen from the refueling station.
off
DC
Refueling and operation
Push all the air out of the syringe. Insert the gas
purging syringe into the car’s input valve turning the
syringe’s connector valve clockwise while gently
pressing in.
Connect the refueling station’s output valve to the car’s input valve turning clockwise while gently pressing in. Make sure the switch
beneath the car's chassis is at the "off" position.
Using the solar panel, make sure it is placed in direct sunlight. It will take about 10 minutes in strong sunlight for the car's tank to fill
up with hydrogen using the standard solar panel included. Keep the refueling station powered until the balloon inside the hydrogen
storage cylinder is full. Once the operation is complete and the balloon is full, make sure you turn the refueling station to the "off"
position.
Alternative: It will take at least 1 minute for the balloon to fill with hydrogen using the "DC"
power switch if the batteries are new.
TIP: After 20 minutes of continuous use, turn the Hydrogen Station off, and let it rest for at
least 10 minutes before starting it again.
Warning: Continuous operation of the
Hydrogen Station could damage it
permanently.
Remote control
Step 1: Use the screwdriver to open the cover of
the battery compartment.
Step 2: Insert 3 new LR44 batteries with the
correct polarity positions.
Step 3: Use the screwdriver to close the cover
of the battery compartment.
Activation of fuel cell and operation
Press the up, down buttons on the remote control to control forward and
backward motions of the car. Press the right button to keep the car
moving forwards. Press the button located in the middle to keep the car
moving backwards. Watch the car go! The car can turn when it moves
backwards. If the car runs slowly or cannot run with a fully charged
balloon, refer to the following step.
Turn the switch to “warm up” position. You can see the green light under
the gas storage cylinder flashing. Leave the car until it fully consumes the
hydrogen and activates the fuel cell. After the flashing light disappears,
turn the switch to the “off” position. Repeat refueling process again to fill
storage container with hydrogen.
It is estimated that on a full tank and after “warm up” the H-racer 2.0 will
run up to several minutes. Once the operation is complete and the
balloon is full, make sure you turn the hydrogen station to the “off”
position.
ON OFF WARM UP
H-RACER 2.0 TECHNICAL SUPPORT
1. The car does not move or runs slowly:
a. Re-insert the batteries in the remote control or remove the used batteries and insert new batteries into the remote
control with correct polarity.
b. Turn the switch to “on” position, if it is in the “off” or “warm up” position.
c. Activate the fuel cell by turning the switch to "warm up" position. You can see the green light under the gas storage cylinder flashing. Leave the car until it fully consumes the hydrogen and activates the fuel cell. After the flashing light disappears, turn the switch to the "on" position.
d. Press the purging valve to purge the remaining gases and then charge the hydrogen storage balloon fully again.
e. Make sure the wheels are free of obstacles. Point the remote control directly at the car.
2. The car runs for a short time:
a. Charge the car until the balloon in the tank swells fully along the wall of the tank.
b. Activate the fuel cell again or prolong the activation process as in 1.c.
c. Charge the car, press the purging valve to purge it, and then re-charge the car again until it is fully charged.
3.The green LED lights do not flash and/or no bubbles appear in the Hydrogen Station’s water tank:
a. If you are using solar panels, make sure the solar panel is in direct sunlight. The standard solar cell included with the
Hydrogen Station will fill the H-racer 2.0 after at least 10 minutes in strong sunlight. Also, check whether the cable connections are correct.
b. If you are using the "ON" battery power option and bubbles are appearing slowly the batteries may be out of power.
Please replace the alkaline batteries inside the Hydrogen Station with new alkaline batteries.
c. If the bubbles are appearing slowly or if there are no bubbles in the Hydrogen Station’s water tank, first add water to the
water tank filling it to the top and then position the tube connected to the syringe at the top left outlet from the tubing where
the bubbles should be released. Pull the inner plunge of the syringe towards you. Empty the water in the syringe into the
water tank. Repeat this step several times until you see the bubbles come out from the top left outlet.
4. The balloon inside the car's storage tank does not fill up:
a. Make sure all the tubes inside the car are well connected and that the output valve of the hydrogen station is well
connected to the input valve of the car (press the output valve tightly into the input valve). You may want to unplug and
plug the connectors once more to be sure.
b. If all connections are correct and bubbles are released, and the balloon still does not fill up - your H-racer 2.0 refueling system may be damaged due to improper use. Do not attempt to repair or fix your H-racer 2.0, contact
[email protected] for assistance.
c. Remove the used batteries and insert new ones with the correct polarity.
If you have any further issues contact [email protected]