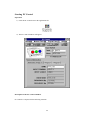
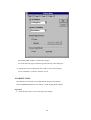
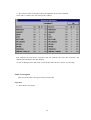
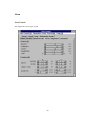
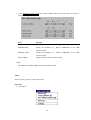
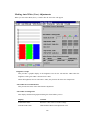
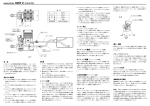
1
PC Control for Windows
Users Manual
OVERVIEW
NEC Corporation thanks you and congratulates you for your selection and purchase of this software
product, The NEC Projector Software package.
This software package allows the operator complete computer control of the NEC MultiSync XG
Projection Systems. Most functions associated with the hand held remote controls on the projection
system itself may be performed utilizing this software utility.
Additionally, the user may create, manipulate and store convergence and picture parameter
information in the form of disk files. These disk files may be archived on floppy or hard disk for future
use. This is especially convenient if the projector operator encounters considerably more input sources
than the NEC Projection System can accommodate within its own local memory management system.
Furthermore, if you move the NEC MultiSync XG Projection System from location to location or
periodically adjust the projected image size, you will find this package of great value. Through the use
of the NEC Projector Control Software you may store on disk and recall as needed picture parameter
and convergence files specific to the screen size and video input device to be displayed.
And yet another application of this feature is the ability to transfer picture parameter information from
one NEC MultiSync XG Projection System to another in installations where two or more NEC
MultiSync XG Projection Systems are installed. This will eliminate the need to set up each NEC
MultiSync XG Projection System individually for identical display sources. Simply download all setup
information from one NEC projector into your computer and upload this data to the other NEC
MultiSync XG Projection Systems within your facility.
The ability to upload and download or transfer picture parameter files from the computer to other NEC
MultiSync XG Projection Systems on site, or remotely, will shorten setup times dramatically.
2
Contents
Preparation
Package Contents.................................................................................................................................. 4
Pin Description ..................................................................................................................................... 6
Projector OPTION Terminal......................................................................................................... 6
When used as an RS-232C port .................................................................................................... 7
When used as an RS-422 port....................................................................................................... 7
ISS-6020 Switcher REMOTE2 Terminal ..................................................................................... 8
When used as an RS-232C port .................................................................................................... 9
When used as an RS-422 port....................................................................................................... 9
Examples of Personal Computer Connections............................................................................. 10
Installation .......................................................................................................................................... 12
Constitution......................................................................................................................................... 13
3
Package Contents
Floppy Disks
Three 3.5 inch, 2HD 1.44Mbyte disks are included in this package. The disks have the necessary
programs to operate this software on an IBM or compatible personal computer with a VGA color
display adapter installed.
Select and execute SETUP.EXE in the PC Control Software in Windows. Follow the messages and
install the PC Control Software to your computer.
4
Package
Packaged floppy disk
Three 3.5 inch, 2HD 1.44Mbyte disks
System Conditions
Projection system
NEC MultiSync XG Projection System
(Stand alone or combined with the ISS-6020)
Personal computer
IBM PC/AT or compatible computers with *Windows
3.1 or higher
RAM
4Mbytes or more (recommended)
CPU
*i486, Pentium or compatible chip
Video board
VGA, S-VGA, etc.
Serial port
RS-232C 1 channel
RS-232C 2 channel for Auto White
Operating system
Windows 3.1 or higher
Mouse
Compatible with Windows
Video capture board
Feature Connector required
Pixel depth
24-bit RGB
Digitizing size
640x480 or 320x240 pixel (full motion)
640x480 pixel (still-image)
MCI (Media Control Interface) Driver required
Camera
Video system
NTSC or PAL
Resolution
At least 640 pixels (Horizontal)
At least 480 pixels (Vertical)
Serial COMM Port setup
Confirming to RS-232C standard
Baud rate
4800bps - 38400bps
Data length
8bits
Parity
Odd
Stop bit
1 bit
Communication mode
Full duplex
* Windows is the trademark of Microsoft Corp.
* i486 and Pentium are trademark of Intel Corp.
5
Pin Description
Projector OPTION Terminal
Mini D-SUB 15 Pins
l
Pin No.
I/O
Signal Name
Function
2
O
Transmit Data +
7
O
Transmit Data -
1
I
Receive Data +
6
I
Receive Data -
8
O
Request to Send -
Transmission request to the PC
12
I
Clear to Send -
Transmission authorization from the PC
15
Signal Ground
Ground
9, 10
Frame Ground
Case ground
3, 4, 5, 11, 13, 14
Not Connected
Not use
Data transmission to the PC
Data reception from the PC
Either the RS-232C or RS-422 standard can be selected for the transmission mode of the
projector.
l
When using the OPTION terminal of the projector as an RS-232C port, only pins 6, 7, 8
and 12 will be valid. Do not connect anything to pins 1 and 2. When using this terminal as an RS422 port, only pins 1, 2, 6 and 7 will be valid. Do not connect anything to pins 12 and 8.
l
The OPTION terminal of the projector is set to the RS-232C standard at the factory. To use
the projector with an RS-422 interface, contact your authorized NEC dealer.
6
When used as an RS-232C port
1) Request to Send →
To the Clear to Send of the PC
2) Transmit Data →
To the Receive Data of the PC
3) Receive Data ←
From the Transmit Data of the PC
4) Clear to Send ←
From the Request to Send of the PC
5) Signal Ground
To the Signal Ground of the PC
When used as an RS-422 port
1) Transmit Data + →
To the Receive Data of the + PC
2) Receive Data + ←
From the Transmit Data + of the PC
3) Receive Data - ←
From the Transmit Data - of the PC
4) Transmit Data - →
To the Receive Data of the - PC
5) Signal Ground
To the Signal Ground of the PC
7
ISS-6020 Switcher REMOTE2 Terminal
Mini D-SUB 15 Pins
l
Pin No.
I/O
Signal Name
Function
1
O
Transmit Data +
6
O
Transmit Data -
2
I
Receive Data +
7
I
Receive Data -
12
O
Request to Send -
Transmission request to the PC
8
I
Clear to Send -
Transmission authorization from the PC
9
O
Data transmission to the PC
Data reception from the PC
Used internally
15
Signal Ground
Ground
10
Frame Ground
Case ground
3, 4, 5, 11, 13, 14
Not Connected
Not use
Either the RS-232C or RS-422 standard can be selected for the transmission mode of the
switcher.
l
When using the REMOTE2 terminal of the switcher as an RS-232C port, only pins 6, 7, 8
and 12 will be valid. Do not connect anything to pins 1 and 2. When using this terminal as an RS422 port, only pins 1, 2, 6 and 7 will be valid. Do not connect anything to pins 12 and 8.
l
See the user's manual of the switcher for information about the setting (the switching of RS232C and RS-422) on the REMOTE2 terminal of the switcher.
8
When used as an RS-232C port
1) Clear to Send ←
From the Request to Send of the PC
2) Receive Data ←
From the Transmit Data of the PC
3) Transmit Data →
To the Receive Data of the PC
4) Request to Send →
To the Clear to Send of the PC
5) Signal Ground
To the Signal Ground of the PC
When used as an RS-422 port
1) Receive Data + ←
From the Transmit Data + of the PC
2) Transmit Data + →
To the Receive Data of the + PC
3) Transmit Data - →
To the Receive Data of the - PC
4) Receive Data - ←
From the Transmit Data - of the PC
5) Signal Ground
To the Signal Ground of the PC
9
Examples of Personal Computer Connections
l
When using the projector in standalone mode:
(without the MultiSync ISS-6020 Switcher)
l
When using the projector and the ISS-6020 switcher in LEVEL1 mode:
10
l
When using the projector and the ISS-6020 switcher in LEVEL2 mode:
11
Installation
To install the PC Control for Windows program:
1) Start Windows.
2) Insert the PC Control for Windows disk into your floppy drive.
3) Execute SETUP.EXE in the floppy disk.
4) Follow the on-screen instructions for installing PC Control for Windows program.
Results
The PC Control, Setup Manager and Configuration icons are created in the PC Control for MultiSync
XG group.
PC Control for MultiSync XG group
12
Constitution
This manual consist of the following volumes:
Volume1 - Setup Manager Manual
Volume2 - Configuration Manual
Volume3 - PC Control for Windows Manual
Volume4 - Auto Convergence Manual
Volume5 - Gain Control Manual
Volume6 - Gain Control(Service Man) Manual (*)
Volume7 - Data Base Manual
Volume8 - Trouble Shooter Manual
Volume9 - Auto White(User) Manual
Volume10 - Auto White(Reference) Manual
(*)
Volume11 - Flash ROM Version Up Manual
(*)
*For service personnel
13
Volume 1-Setup Manager Manual
This permits a view of the screen size and throw distance information and the information of the
projector external view diagram and ceiling suspension mount and bracket external view diagram
corresponding to the projector setup method.
Contents
Starting Setup Manager ...................................................................................................................... 15
Basic Screen ....................................................................................................................................... 15
Menu........................................................................................................................................... 17
Throw Distance................................................................................................................... 18
Projector Model .......................................................................................................... 19
Scale Mode ................................................................................................................. 20
Projection Distance Table........................................................................................... 20
Cabinet Dimension ............................................................................................................. 21
Standard Ceiling Mount & Bracket Dimension................................................................... 21
Deluxe Ceiling Mount & Bracket Dimension ..................................................................... 22
Print .................................................................................................................................... 22
Exit ..................................................................................................................................... 23
14
Starting Setup Manager
Operation
1) Click the Setup Manager icon of the PC Control applications file.
2) The Basic Screen is displayed.
Basic Screen
This displays the basic screen.
15
Menu
This displays the menus that perform such operations as switching of the display screen,
screen printing, and the exiting of this application.
Screen Selection
This selects whether to click the tab at the upper portion of the dialog box with the mouse, or
to switch the display screen with the arrow key provided that the control focus is located
above this tab.
Throw Distance
This displays the information and calculation method of the screen size and throw distance.
Cabinet Dimension
This displays the external view diagram of the projector.
Standard Ceiling Mount & Bracket Dimension
This displays the external view diagram and dimensions diagram of the standard type of
ceiling mount and bracket.
Deluxe Ceiling Mount & Bracket Dimension
This displays the external view diagram and dimensions diagram of the deluxe type of ceiling
mount and bracket.
Projector Model
This selects the model of the target projector.
Scale Mode
This switches the unit of the screen size and projection distance information.
Projection Distance Table
This is a chart of screen sizes and projection distances.
16
Menu
This displays the menus that perform such operations as switching of the display screen, screen
printing, and the exiting of this application.
Throw Distance
This displays the information and calculation method of the screen size and throw distance.
Cabinet Dimension
This displays the external view diagram of the projector.
Standard
This displays the external view diagram and dimensions diagram of the standard type of ceiling
mount and bracket.
Deluxe Ceiling Mount & Bracket Dimension
This displays the external view diagram and dimensions diagram of the deluxe type of ceiling
mount and bracket.
Print
This prints a hard copy of the current window.
Exit
This exits Setup Manager.
17
Throw Distance
This displays the information and calculation method of the screen size and throw distance.
Operation
1) Click the tab at the upper portion of the dialog box illustrated below to switch the display
screen, or press the arrow key provided that the control focus is located above this tab, then
select the screen contents.
The Diagonal of Screen Size is the screen measured corner-to-corner on the diagonal.
The Width of Screen Size is the screen measured edge to edge horizontally.
A, B, and C are projection distances.
18
2) Select the target projector with Projector Model.
3) Select the unit with Scale Mode.
4) Enter arbitrary values for Diagonal, Width, A, B, and C, or use the spin button to see how
various projection distances are recalculated and displayed.
5) Select the Projection Distance Table to see the automatic recalculation of numerical values
Diagonal, Width, A, B, and C.
Note:
The projection distance calculated when arbitrary values have been entered is the product of a
simple formula.
Therefore, the numerical values of the Projection Distance Table should be given priority.
When the Throw Distance is Ceiling/Front, increasing the screen size will cause the dimension "E"
to be displayed between the ceiling mounted unit and the ceiling.
Projector Model
This selects the model of a specific projector.
The information contents related to the Throw Distance will differ depending on the model of the
projector.
Operation
1) Click the down arrow to select the model of the target projector.
Note:
When the model is changed, the various items of information of the Projection Distance Table will
change to contents which are suited to the selected model.
19
Scale Mode
This switches the information of the screen size and the throw distance as well as the unit of the
Projection Distance Table.
Operation
1) Select millimeters or inches from the dialog bax.
Note:
The diagonal screen size will always be displayed inches.
Projection Distance Table
This is a table of the projection distances.
Values comparable to those entered as Installation Information selected automatically.
Operation
1) Use the scroll bar to search the table.
2) To select a screen size and projecton distanse, click on it with the mouse.
Note:
The projection distance calculated when arbitrary values have been entered is the product of a
simple formula. Therefore, the numerical values of the Projection Distance Table should be given
priority.
20
Cabinet Dimension
This displays the external view diagram of the projector.
Operation
1) Click the tab at the upper portion of the dialog box illustrated below to switch the display
screen, or press the arrow key provided that the control focus is located above this tab, then
select the screen contents.
Standard Ceiling Mount & Bracket Dimension
This displays the external view diagram and dimensions diagram of the standard type of ceiling mount
and bracket.
Operation
1) Click the tab at the upper portion of the dialog box illustrated below to switch the display screen
, or press the arrow key provided that the control focus is located above this tab, then select the
screen contents.
21
Deluxe Ceiling Mount & Bracket Dimension
This displays the external view diagram and dimensions diagram of the deluxe type of ceiling mount
and bracket.
Operation
1) Click the tab at the upper portion of the dialog box illustrated below to switch the display screen
, or press the arrow key provided that the control focus is located above this tab, then select the
screen contents.
Print
This prints a hard copy of the current window.
Operation
1) Click Print. A confirmation window will appear.
22
2) Click <OK> to print the copy.
Click <CANCEL> to return to the basic screen.
Exit
This quits Setup Manager.
Operation
1) Click Exit.
23
Volume 2-PC Control for Windows Configuration Manual
This sets the communication port settings and the communication baud rate settings.
Contents
Starting Configuration Set Up............................................................................................................. 25
PC Communication Ports............................................................................................................ 26
Color Analyzer Communication Ports ........................................................................................ 26
24
Starting Configuration Set Up
Operation
1) Click the Configuration icon in the PC Control application file.
2) The Configuration Set Up window will appear.
3) Click <OK> to save the settings to a file.
Click <CANCEL> to close the PC Control window.
Description of the Configuration Set Up Window
PC Communication Ports
This sets the communication ports and communication baud rate for communicating with the
projector.
Color Analyzer Communication Ports
This sets the communication port for the color analyzer needed for the Auto White adjustment.
25
PC Communication Ports
This sets the communication ports and communication baud rate for communicating with the projector.
In the example above, the COM1 port is selected for communication and the baud rate is set at
9600 BPS.
Note:
The communication baud rate must match the OPTION baud rate of the projector.
The projector’s baud rate is set with OPTION TERM and BAUDRATE in the [ADJUST][OPTION]-[SETTING MODE] menu.
Color Analyzer Communication Ports
This sets the communication port for the color analyzer needed for the Auto White adjustment.
In the example above, the COM2 communication port is selected.
26
Volume 3-PC Control for Windows Manual
This application controls the projector with a PC via a (RS-232C) serial interface.
Contents
Starting PC Control............................................................................................................................. 29
Basic Operation .................................................................................................................................. 33
Projecting an Image .................................................................................................................... 33
Menu................................................................................................................................................... 34
Menu........................................................................................................................................... 34
User Control Mode ............................................................................................................. 34
Expert Control Mode .......................................................................................................... 34
Gain Control ....................................................................................................................... 35
Data Base (One Entry) ....................................................................................................... 35
Data Base (EEPROM) ....................................................................................................... 35
Auto Convergence............................................................................................................... 35
Trouble Shooter .................................................................................................................. 35
Auto White (User) .............................................................................................................. 35
Exit ..................................................................................................................................... 35
Normal Func. .............................................................................................................................. 36
Power.................................................................................................................................. 36
Input Sw.............................................................................................................................. 37
Input List............................................................................................................................. 39
Display Pattern ................................................................................................................... 39
Mute ................................................................................................................................... 40
Beam................................................................................................................................... 41
On Off Timer ...................................................................................................................... 42
Sleep Timer......................................................................................................................... 46
Store ................................................................................................................................... 46
Expert Func. ............................................................................................................................... 48
Signal Entry ........................................................................................................................ 48
Source Information ............................................................................................................. 54
Option................................................................................................................................. 59
Setting Mode............................................................................................................... 59
Menu Mode ................................................................................................................ 72
Passcode ..................................................................................................................... 78
27
PJ Address .................................................................................................................. 79
PJ Version .................................................................................................................. 80
Default Data ............................................................................................................... 81
28
Starting PC Control
Operation
1) Click the PC Control icon in the application file.
2) The PC Control window will appear.
Description of the PC Control Window
PC Control is comprised of the following elements.
29
Projector Status Display
Displays the status of the current projector.
All CRTs are turned on at Power ON and off at Power OFF.
CRT corresponding to the ON/OFF state of the beam are switched on and off.
CRT corresponding to the ON/OFF state of Picture Mute are switched on and off.
Clicking each CRT with the left mouse button switches that CRT on or off.
Input Switch Information
This displays the currently selected signal's input name, signal name, and the address of the
projector.
Menu Bar
The menu bar varies depending on the function, but the opening window has:
Menu
Calls up other functions and closes this application.
Normal Func.
Enables a number of basic functions.
Expert Func.
Executes Signal Entry , sets Source Information, and performs the various
Option settings.
Help
Starts Help.
Tool Bar
This provides easy access to basic operations that are frequently used.
30
Click on an icon to activate the corresponding function.
Switches power ON/OFF.
Activates remote control numerical keypad signal switching.
Switches signals using the Input List.
Activates the various Mute settings.
Switches the display screen.
Turns the beam ON/OFF.
Saves the current adjustment values.
Activates Gain Control.
Activates Data Base (One Entry).
Activates Data Base (EEPROM).
Activates Auto Convergence.
Activates Troubleshooting.
Activates Auto White (User).
Source Information
Displays detailed information on the currently displayed input signal and enables the various
settings to be changed using the Expert Control Mode.
Those items that can be set are displayed with a white background. When the cursor is moved to
this area, the arrow becomes a
to indicate that the setting can be changed.
31
32
Basic Operation
Projecting an Image
How to project an image
1) Switch on the projector's main power.
2) Switch on the power to the connected equipment.
3) Start PC Control.
4) Switch on the prjector's CRTs.
Select Power in the normal function or click the
button on the tool bar.
5) The projector POWER ON confirmation window will appear.
Click <OK>.
6) Select the input signal.
Select Input Sw in the normal function or click the
button on the tool bar.
7) The Input Sw window will appear so you can select an input signal.
To access registered input signals, select the Input List from the normal function menu or click the
button on the tool bar.
How to Switch Off the Power
1) Switch off the power to the projector.
Select Power or click the
button on the tool bar.
2) The projector POWER OFF confirmation window will appear.
Click <OK>.
3) Select Exit and quit PC Control.
4) Switch off the main power to the projector.
5) Switch off power to the connected equipment.
33
Menu
Menu
Select menu to display:
User Control Mode
Transfers to the User Control Mode.
The User Control Mode only enables you to perform basic functions.
Expert Control Mode
Transfers to the Expert Control Mode.
Select Expert Control Mode, and the PASS CODE input window will appear.
34
You need the correct PASS CODE to access Expert Control Mode.
In this mode you can use the “Expert Func.” menu and in the Gain Control screen a number of
adjustments that had been restricted are now enabled.
You also gain access to restricted function, under menu including: “Data Base(One Entry)”, “Data
Base(EEPROM)”, “Auto Convergence”, “Troubleshooter” and “Auto White(User) “.
Gain Control
This adjusts the various type of gain.
See Gain Control Manual.
Data Base (One Entry)
This saves or loads to a text file various gain data and the parameters registered with each scan.
See Data Base Manual.
Data Base (EEPROM)
This backs up or loads EEPROM data.
See Data Base Manual.
Auto Convergence
This displays the Auto Convergence function screen.
See Auto Convergence Manual.
Trouble Shooter
This displays trouble chart and executes failure check.
See Trouble Shooter Manual.
Auto White (User)
This adjust the color temperature of the screen automatically by using a color analyzer.
See Auto White (User) Manual.
Exit
Quits the application.
35
Normal Func.
This enables you to operate of a number of basic functions.
When the projector power is OFF, functions other than Power will be inactive and dimmed. You will
not be able to select them.
Power
When the projector is on standby, this turns the CRTs on or off.
Operation
1) Select the Power or click
on the tool bar.
2) The Power On/Off confirmation window will appear.
Click <OK> to turn the CRTs on or off.
When the power is to be switched off, the Store confirmation window will appear if any
adjustments or changes have been made.
Click <Yes> will store the changed in the projector and switch the power off.
Click <No> will erase the changed and switch the power off.
Click <Cancel> to return to the basic screen.
36
Input Sw
This switches input signals.
Operation
1) Select Input Sw, click
on the tool bar, or click on INPUT in the Input Switch frame.
2) The input signal selection will appear. Choose an input signal.
Using the Projector Alone
The Input SW window like the one below will appear.
Click an input terminal button to switch of the signal.
Click <CANCEL> to return to the basic screen.
The INPUT-B or INPUT-C input terminal button will vary depending on whether you have the
optional RGB INPUT board or VIDEO INPUT board.
Using the Projector With One Switcher
37
The Input SW window like the one below will appear.
Click the slot number of the switcher you want for the projector’s input signal.
Click <CANCEL> to return to the basic screen.
Using the Projector With Two or More Switchers
The Input SW window like the one below will appear.
Select the slot number of the parent switcher in the lower left-hand corner, choose the slot
number of the child, then click <ENTER> to switch the input signal.
Click <CANCEL> to return to the basic screen.
38
Input List
Switches the input signal from the list of currently registered input signals.
Operation
1) Select Input List or click
on the tool bar.
2) Select an input signal from the list by double clicking on the description or by clicking <OK>.
Click <CANCEL> to return to the basic screen.
Note:
You can not switch to a signal that dose not conform with the current setting mode (Connect
Condition).
Display Pattern
Selects a pattern for the image.
Operation Procedure
1) Select Display Pattern or click
on the tool bar.
39
2) Select SOURCE/TEST.
Choosing TEST will enable the Test Pattern items.
3) Click <OK> to project the pattern.
Click <CANCEL> to return to the basic screen.
Mute
This turns Picture Mute, Display Mute, and Sound Mute ON or OFF.
Operation
1) Select Mute or click
on the tool bar.
40
Item
Function
Picture Mute
Set ON to blank the image.
Display Mute
Set ON to blank the on-screen display.
Sound Mute
Set ON to turn off the audio.
3) Click <OK> to execute.
Click <CANCEL> to return to the basic screen.
Note:
Sound Mute is only available when connect to a switcher or the projector is equipped with sound.
Beam
Switches each of the CRTs (R, G, and B) on and off.
Operation
1) Select Beam or click
on the tool bar.
2) Click the check box for the CRT to be turn on or off.
Click <CANCEL> to return to the basic screen.
41
3) Click <OK> to turn on the checked CRT(s), the unchecked CRT(s) will not turn on.
Note:
This operation can also be executed by clicking on the CRTs show in the projector diagram.
The beam of the clicked CRT will toggle on or off.
On Off Timer
This permits the power of the projector to be switched on and off automatically by timer setting.
Operation
1) Select On/Off Timer.
2) The On/Off Timer window will appear.
42
3) Select a line that is to be set by clicking from the list.
4) Select the On/Off Timer Mode.
43
Item
On/Off Timer
Function
Sets the time for switching the power on and off.
This selection will take effect when an unregistered (blank) list
has been selected.
Off Timer
Sets only the time at which the power is switched off.
The time at which the power is switched on cannot be set when
this setting has been selected.
On Timer
Sets only the time at which the power is switched on.
The time at which the power is switched off is automatically set
to 4 hours later.
5) Select the day(s) on which the power is switched on/off.
Item
Function
MON
Execution will be on Monday.
TUE
Execution will be on Tuesday.
WED
Execution will be on Wednesday.
THE
Execution will be on Thursday.
FRI
Execution will be on Friday.
SAT
Execution will be on Saturday.
SUN
Execution will be on Sunday.
MON-FRI
Execution will be from Monday until Friday.
MON-SAT
Execution will be from Monday until Saturday.
MON-SUN
Execution will be from Monday until Sunday.
44
6) Select the Every Week.
Item
No
Function
Only the selected week will be executed.
The setting contents will be deleted after program execution.
Yes
Execution will be weekly.
The setting contents will not be deleted even after the program
has been executed.
7) Set the time for switching the power on and off.
Slide the horizontal scroll bar or enter the time directly. (Only number keys and the colon ":" key
can be entered.)
When the display of the time scale is the 12 HOUR format, the am/pm time is switched with the
AM/PM button.
8) Click <OK> to set the On Off Timer.
Click <CANCEL> button or reselect the list to cancel the contents of the setting.
Click <CLEAR> to delete the setting contents.
The confirmation window is displayed and select <Yes> to delete the On Off Timer settings.
9) Select the execution of the set On Off Timer.
Item
Function
INACTIVE
Stops the operation of the On Off Timer.
ACTIVE
The On Off Timer is started with the set contents
45
Note:
This function will not operate unless projector XG Ver 1.10 or higher is connected.
When projector XG Ver 1.xx is connected, settings of Power On only or settings of Power Off
only cannot be made.
The time display format varies depending on the setting in “Date, Time display” of the option
menu mode.
Sleep Timer
This automatically specifies the time at which the power is switched off.
Operation
1) Select Sleep Timer.
2) Click the down arrow and select the Sleep Timer value that is set in the list items, or enter the
Sleep Timer directly and edit.
3) Click <OK> to set the Sleep Timer.
Click <CANCEL> to returns to the basic screen.
Note:
The Sleep Timer cannot be set longer than 2 hours.
This function will not operate unless projector XG Ver 1.10 or higher is connected.
Store
Stores the settings and adjustment values for the projector.
46
Operation
1) Select Store or click
on the tool bar.
2) The STORE window will appear.
Item
Function
CURRENT
Overwrites the current signal to save the settings.
Note: that an unregistered signal cannot be selected while it is being
projected.
NEW
Saves the settings as a new signal.
CANCEL
Does not save settings.
How to save setting as a new signal
1) The confirmation window will appear.
The List No. for which the signal is registered and the User Name (signal name) are
displayed.
2) Click <YES> to execute the signal registration.
Click <NO> to return to the basic screen.
3) A proportional representation of when the signal registration will be completed is displayed
on a graph.
47
Note:
When projector XG Ver 1.xx is connected, <NEW> will be inactive and dimmed.
Note that registration will not be possible unless there are blanks after List No. 51.
Expert Func.
This sets the Signal Entry, Source Information and various Options.
Can be used in the Expert Control Mode.
Items
Function
Signal Entry
Registers the input signal.
Source Information
Changes settings for the input signal.
Option
Performs various settings.
Signal Entry
Registers the projector’s input signals.
Operation
1) Switch to the Expert Control Mode.
2) Select Signal Entry.
3) The Signal Entry List screen is displayed.
48
4) The registration number is selected.
If the line to be registered is not displayed, scroll down to view 100 entries that be verified or
selected.
Except for the <ENTRY DELETE> function, more than one entry cannot be selected.
5) Select a registration number and the Signal Entry window will appear.
If you have selected a blank line, the NEW ENTRY button will be automatically selected.
6) Select a Signal Entry function.
Item
Function
49
NEW ENTRY
Makes a new signal registration.
ENTRY COPY
Copies the selected, registered signal to another line.
ENTRY MOVE
Moves the selected, registered signal to another line.
ENTRY DELETE
Deletes the selected, registered signal.
DATA COPY
Copies the selected, registered signal data to other registered
signal data.
CHANGE DEFAULT
Makes
the
selected,
registered
signal
data
the
new
default(Normalize value).
SOURCE EDIT
Enables you to edit the selected, registered signal.
NEW ENTRY
1) Click <OK> and the Input Sw selection window will appear.
Click <CANCEL> to return to the basic screen.
2) Enter the User Name(signal name) or click the down arrow to select a User Name and click
<OK>.
Click <CANCEL> to return to the basic screen.
3) The Entry Data Select window will appear.
4) Select a status for the registered signal: DEFAULT, TEMPORARY, or ENTRY NUMBER.
50
Click <CANCEL> to return to the basic screen.
Item
Function
DEFAULT
Registers the signal as the DEFAULT data.
TEMPORARY
Registers the signal as the current projected signal.
ENTRY NUMBER
Registers the signal by copying the data from another registered
signal.
The operation that selects the copy source of the signal data is the
same as that at the time of DATA COPY.
ENTRY COPY
1) The ENTRY COPY LIST window will appear.
2) Select the registration number of the location to be copied and click <OK>.
Click <CANCEL> to return to the basic screen.
ENTRY MOVE
1) The ENTRY MOVE LIST window will appear.
2) Select the registration number of the new location and click <OK>.
Click <CANCEL> to return to the basic screen.
ENTRY DELETE
1) The DELETE confirmation window will appear.
Click <OK> to delete the selected, registered data.
Click <CANCEL> to return to the basic screen.
51
DATA COPY
1) The DATA COPY SOURCE LIST window will appear.
2) Select the registration number of the copy destination and click <OK> to display the DATA
COPY MODE windows.
Click <CANCEL> to return to the basic screen.
Item
Function
ALL
Copies all the data of the signal
EXCEPT H-POSI & PHASE
Copies the data of the signal H-POSITION and PHASE
adjustment gain.
H-POSITION and PHASE gain are copied with the cancel
value.
3) Click <OK> to copy the data.
Click <CANCEL> to return to the basic screen.
Note:
The DATA COPY MODE window is not displayed when projector XG Ver. 1.xx is connected.
CHANGE DEFAULT
1) The CHANGE DEFAULT confirmation window will appear.
52
2) Click <OK> to make adjustment values of the selected signal the DEFAULT data. These will
then be used when normalizing the adjustment values.
Click <CANCEL> to return to the basic screen.
SOURCE EDIT
1) The SOURCE EDIT confirmation window will appear.
2) The various items can be edited by clicking the down arrow.
3) Click <OK> to save the editing contents.
53
Click <CANCEL> to return to the basic screen.
Note:
Editing of the currently projected signal data is not possible.
SYNC CONTROL, SOURCE LOCK, and SYNC TERMINATION can be edited only at the
time of an RGB signal.
Source Information
Changes the input signal information and various other settings.
Operation
1) Switch to the Expert Control Mode.
2) Select Source Information or click on the Source Information setting on the basic screen.
54
The Source Information display is divided into 3 pages.
Switch display pages by clicking on the Information Page tab located at the top of the Source
Information dialog box.
Note:
Only those items with a white background can be set. When the cursor moves onto an activated
command it changes to
which indicates that it can be set.
NAME
Registers the name of the input signal.
SYNC CONTROL
This function sets the detection method for the sync signal.
This is normally set to AUTO.
Item
Function
AUTO
Automatically determines sync whether the sync composite or HV separate.
G-SYNC
Selects sync-on-green.
TRY-SYNC
Selects the 3-value sync signal (Hi Vision signal).
55
COUNTER
Resets the signal’s display frequency.
DISPLAY TIME
Resets the signal’s display time.
SOURCE LOCK
This sets the RGB signal lock on and off.
This setting is only enabled when the input signal is RGB, or when it is deteriorated or otherwise
adversely affected.
Normally set to OFF.
Item
Function
ON
Stops automatic discrimination and signal switching to accommodate a
different RGB signal.
OFF
Executes automatic discrimination and signal switching to accommodate a
different RGB signal.
AKB
This function sets the automatic white balance on or off.
Item
Function
ON
The AKB detection signal appears and the white balance is automatically
adjusted.
OFF
The AKB detection signal disappears and the white balance is no longer
adjusted automatically.
Note:
When AKB is OFF and the projector has been used for a long period, the white balance setting
may be slightly off. To prevent this, periodically set the AKB back ON.
56
POSITION
This sets the vertical adjustment range.
Item
Function
WIDE
The adjustment range becomes wider.
NARROW
The adjustment range becomes narrower.
Note:
When an interlaced signal input is of poor quality, setting this function to NARROW may
improve the image.
FONT
This function sets the font size used in the on-screen display.
Item
Function
NORMAL
Calculates and displays the optimum font size from the vertical scanning
lines.
SMALL
Displays a font that is approximately 75% of NORMAL.
APERTURE
This changes the frequency characteristics of the video circuit and sets the aperture for correcting
the contour. This setting can be made only when the input signal is an RGB signal.
Item
Function
MANUAL
Selects the arbitrary correction value from among the 8 types of aperture
correction values.
AUTO
Aperture correction is automatically performed depending on the horizontal
frequency of the input signal.
Note:
The factory setting is set to MANUAL LEVEL 0.
57
SYNC TERMINATION
This function sets the termination resistance for the sync signal.
This setting is only enabled when the input signal is RGB. Selection of either 75w or Hi-Z is
permitted.
Note:
The factory setting is set to "75Ohm” and is usually left alone.
Select "Hi-Z" for TTL signals.
58
Option
This sets various function.
Operation
1) Switch to the Expert Control Mode.
2) Select Option.
Setting Mode
This sets the various Setting Mode items.
Operation
1) Select Setting Mode.
2) The Setting Mode window will appear.
59
The Setting Mode window is divided into 4 pages.
To switch between pages, click the Page tab at the top of the dialog box.
3) Change the various settings then click <OK> to activate the changes.
Click <CANCEL> to return to the basic screen.
PJ ORIENTATION
This function sets the setup to accommodate the projection orientation.
The PJ ORIENTATION items are on Page 1 of the Setting Mode window.
Operation
1) Click the down arrow to access the projection settings.
60
2) Select a setting from the menu.
Setting
Orientation
CEILING / REAR
Ceiling suspension/Rear projection
FLOOR / REAR
Floor standing/Rear projection
CEILING / FRONT
Ceiling suspension/Front projection
FLOOR / FRONT
Floor standing/Front projection
3) When ypu change a setting, the confirmation window will appear. Click <Yes> to change the
settings.
Note:
When the projection type is reset, it may also be necessary to reset the projector.
Please contact your NEC dealer to make these changes.
Connect Condition
This sets the switcher connections.
The Connect Condition items are on Page 1 of the Setting Mode window.
61
Operation
1) Click the down arrow to access the Connect Condition settings.
2) Select any one of the items below.
Item
Function
Standalone
Used with a single projector.
Sw 1 Level
Used with one switcher connected.
Sw 2 Level
Used with two or more switchers connected.
3) When you change connection mode, you will be asked whether or not to restart the projector.
To change the connection mode immediately, click <Yes> and the projector will restart.
Click <No> and the new connection mode will become active next time the projector is started.
Click <CANCEL> to delete the connection mode changes.
Related
Switcher Connection Settings
Default Input Select
This function sets the input signal for when the power is first switched on.
The Default Input Select items are on Page 1 of the Setting Mode window.
62
Operation
1) Select “Last” or “Default” from the dialog box.
Item
Function
Last
When the power is switched on, this setting projects the input
signal that was used last.
Default
When the power is switched on, this setting projects the same
input signal that you selected every time.
2) Select Default and the Input Sw selection window will appear automacically(see Initial Input
Signal Settings). Select the input signal to be projected when the power is switched on.
The “Default” selection will be canceled if Input Sw is not selected.
3) Click <OK> to change the setting.
Note:
If the projection was less than 10 minutes prior to restarting, it will not be recognized as being,
"the signal last projected". When LAST is selected, the <DEFAULT INPUT> button is inactive
and dimmed.
Focus Edge Mode
This sets the screen edge electronic focus mode.
The Focus Edge Mode items are on Page 1 of the Setting Mode window.
Operation
1) Select all or separate form the dialog box.
63
Item
Function
All
Adjusts the edge focus for all the three CRTs simultaneously.
Separate
Adjusts the edge focus of each CRT individually.
2) Click <OK> to change the setting.
S-Video Mode
This function sets the signal discrimination for the S-Video input. With this setting S-Video signal
aspect ratio (i.e., cinema signal and wide signal) identification becomes possible.
The S-Video Mode items are on Page 2 of the Setting Mode window.
Operation
1) Click the down to access the S-Video Mode settings.
2) Select any one of the items below.
Item
Function
S2
Identifies the cinema signal or the wide signal.
S1
Identifies only the cinema signal.
OFF
No signal discrimination.
3) Click <OK> to change the setting.
Note:
Aspect Ratio
Cinema (or full-mode) signal
16 : 9
Wide signal
4:3
The S-Video Mode automatic discrimination might operate incorrectly when the input signal
does not correspond to the S1/S2 mode. If this happens, turn the S-Video mode “OFF”.
Please also read the instruction manual of the signal equipment being connected.
64
Video Mode
This function sets the video mode.
The Video Mode items are on Page 2 of the Setting Mode window.
Operation
1) Click the down arrow to acvcess the Video Mode settings.
2) Select any one of the items below.
Item
Function
AUTO
The video modes will be determined automatically.
NTSC3.58
Sets the NTSC3.58 mode.
NTSC4.43
Sets the NTSC4.43 mode.
PAL
Sets the PAL mode.
SECAM
Sets the SECAM mode.
3) Click <OK> to change the setting.
Note:
"MANUAL" will be displayed automatically when NTSC 3.58, NTSC 4.43, PAL, or SECAM
are set.
When the projector is displaying an RGB signal, the Video Mode is inactive and the display is
dimmed.
Select a mode other than AUTO when connecting a non-standard signal such as a monochrome
signal, a deteriorated signal, or a video game.
Monochrome signals may not project properly in the AUTO mode.
65
Auto Power On Mode
This determines whether the projector enters the standby mode or the CRTs are turned on when the
projector’s main Power switch is ON.
The Auto Power On Mode items are on Page 2 of the Setting Mode window.
Operation
1) Select “INACTIVE” or “ACTIVE” form the dialog box.
Item
Function
INACTIVE
The projector is on standby when the power cable is connected to
an outlet.
ACTIVE
The power is switched ON when the power cable is connected to
an outlet.
2) Click <OK> to change the setting.
Warm-Up Mode
This sets the Warm-Up Mode settings.
The Warm-Up Mode items are on Page 2 of the Setting Mode window.
Operation
1) Select “INACTIVE” or “ACTIVE” form the dialog box.
Item
Function
INACTIVE
Projects the signal immediately after projector is turned on.
ACTIVE
The projector warms up for the time you specify.
66
2) Select Active and the Warm-Up Time can be specified.
Click the down arrow to set the time.
3) Click <OK> to change the setting.
Note:
When the Warm-Up Mode is activated, the on-screen display indicates “Warm-Up Mode”. After
the time you set has elapsed, the picture is projected.
Automatic Data Store
This automatically stores any changes that have been made.
The Automatic Data Store items are on Page 3 of the Setting Mode window.
Operation
1) Select “Disable” or “Enable” form the dialog box.
Item
Function
Disable
Adjustment data is not stored automatically.
Enable
Adjustment data is stored automatically.
2) Click <OK> to change the setting.
Note:
Automatic storage will occur when:
* The END button on the projector’s remote control is pressed several times and the source
67
screen returns.
* The input signal is switched.
* The projector’s power is switched OFF.
* Every 10 minutes.
When the Automatic Data Store is disabled, data is only stored after <YES> is selected in the
STORE confirmation window.
Phosphor Saver
This protects the screen phosphor by periodically shifting the screen vertically and horizontally. The
shifts are minute and imperceptible.
This function reduces CRT burn-in.
The Phosphor Saver is on Page 3 of the Setting Mode window.
Operation
1) Select off or on from the dialog box.
Item
Function
Off
Phosphor Saver function inactive.
On
Phosphor Saver slightly shifts the image vertically and
horizontally.
2) When On has been selected, it will be possible to specify Interval and Step of the right side.
When Off is selected, the display will be in a dim color and selection will not be possible.
Setting Item
Item Contents
68
INTERVAL
Click the down arrow and select the interval time.
STEP
Click the down arrow and select the movement width.
3) Click <OK> to change the setting.
Note:
The Phosphor Saver function is temporarily canceled when the on-screen display is shown or the
ADJUSTMENT mode is entered. At this time, the source screen may shift significantly.
When projector XG Ver 1.xx is connected, “Interval” and “Step” will be inactive and dimmed.
Signal Switching Mute
This function automatically mutes the video or audio when the signal is being switched.
The Signal Switching Mute items are on Page 3 of the Setting Mode window.
Operation
1) Select mute on or off for the sound or picture in the signal switching mute dialog box.
Item
Sound Mute
Function
On
Mutes the audio while the signal is being switched.
Off
Outputs the audio while the signal is being switched.
69
Picture Mute
On
Mutes the video while the signal is being switched.
Off
Outputs the video while the signal is being switched.
2) Click <OK> to change the setting.
Direct Entry Access
This setting permits direct switching from the projector’s remote control to the registered signal
numbers 1 through 10 on the INPUT LIST.
This functions the same as when the INPUT LIST is displayed and a signal 1 through 10 is chosen.
When more than one signal of the same frequency has been registered, this function is also used to
select a signal.
The Direct Entry Access items are on Page 3 of the Setting Mode window.
Operation
1) Select “Disable” or “Enable” from the dialog box
Item
Function
Disable
Signal switching is not activated.
Enable
The remote can be used to switch to the corresponding signal, 110.
2) Click <OK> to change the setting.
Note:
To use this function, simultaneously press the CTL button on the projector’s remote control and
the INPUT number that corresponds to the signal’s registration number.
B-Focus Tracking
70
This sets the blue-focus tracking.
Defocusing the blue CRT may improve the white uniformity.
The B-Focus Tracking items are on Page 4 of the Setting Mode window.
Operation
1) Select on or off from the dialog box.
Item
Function
Off
Defocuses the blue CRT.
On
Does not defocus the blue CRT.
2) Click <OK> to change the setting.
Note:
The amount of defocusing varies according to the horizontal frequency.
Option Term. Baud Rate
This sets the OPTION terminal data transfer speed.
The range is from 4800 bps to 38400 bps.
The Option Term. Baud Rate items are on Page 4 of the Setting Mode window.
Operation
1) Click the down arrow to display the data transfer speeds.
2) Select a speed.
71
Item
Function
4800 BPS
Sets the data transfer speed to 4800 bps.
9600 BPS
Sets the data transfer speed to 9600 bps.
19200 BPS
Sets the data transfer speed to 19200 bps.
38400 BPS
Sets the data transfer speed to 38400 bps.
3) Click <OK> to change the setting.
Note:
The factory pie-set is 9600 bps.
The REMOTE 1 terminal is fixed at 9600 bps. When peripheral equipment such as a switcher is
connected to this terminal, ensure the data transfer speed of the OPTION terminal is 9600 bps.
Menu Mode
This sets the various Menu Mode options.
Operation
1) Select Menu Mode.
2) The Menu Mode setting window will appear.
72
3) Change the various settings and Click <OK> to save.
Click <CANCEL> to return to the basic screen.
Message Mode
This sets the on-screen massage display.
Operation
1) Click the down arrow to access the Message Mode settings.
73
2) Select any one of the items below.
Item
Function
MANUAL
The on-screen display is shown when the operation button is pressed or
when controlled from connected equipment.
To switch off the on-screen display, set Display Mute to OFF or use the
DISPLAY button on the projector’s remote control.
AUTO
The on-screen display is shown when the operation button is pressed or
when controlled from connected equipment. The on-screen display is
switched off automatically after the time (in seconds) that you select.
3) Click <OK> to change the setting.
Message Color
This sets the on-screen display color.
Operation
1) Click the down arrow to display the Message Color.
2) Select color or green from the dialog box.
Item
Function
COLOR
The on-screen display is displayed in color.
GREEN
The on-screen display is displayed in green.
3)Click <OK> to change the setting.
Note:
74
A color display may be difficult to read. If so, the GREEN display is recommended(see OnScreen Settings).
Date, Time Display
This sets the on-screen display format for the date, day, and time.(see DATE, TIME Settings)
Operation
1) Click the down arrow to access the Date and Time Display settings.
2) Select a format:
Item
Options
Display
Date
OFF
Month/Day/Year is not displayed.
MM/DD/YY
Displayed in all numerals as: Month/Day/Year.
Month/MM/DD/YY
Displayed as: Month (in English)/Day/Year(in numerals).
OFF
Day is not displayed.
ON
Day is spelled out in English .
OFF
Time is not displayed.
HH:MM:SS 24HOUR
Time is displayed in the 24-hour format.
HH:MM:SS AM/PM
Time is displayed in the AM/PM format.
Day
Time
3) Click <OK> to change the setting.
Date, Time Preset
This sets the date, day, and time that are displayed on the screen. see DATE, TIME Settings)
Operation
1) Select Auto or Manual from the dialog box.
75
Item
Function
AUTO
Sets the projector’s clock to the same time and day as stored in your PC.
A confirmation window appears.
Click <OK> to make the change.
MANUAL
Displays the input screen. Set the date and time for the projector.
Click <OK> to make the change.
This time input format varies depending on the setting in “Date, Time
Display” item.
Note:
The projector is equipped with a built-in clock that will continue to run for about 3 days after the
main power is switched off. After that, the clock will need to be reset.
76
If the projector is left in standby, the clock will continue to run regardless of how long the
projector is left unused .
PJ Address Display
This displays the projector’s address on the screen.
Operation
1) Select on or off from the dialog box.
Item
Function
OFF
Projector address is not displayed.
ON
Projector address is displayed.
2) Click <OK> to change the setting.
New Signal Message
The message for when an unregistered signal has been input is displayed on the screen.
Operation
1) Select on or off from the dialog box.
Item
Function
OFF
Message is not displayed.
ON
Message is displayed.
2) Click <OK> to change the setting.
Note:
When projector XG Ver 1.xx is connected, New Signal Message will be inactive and dimmed.
77
Passcode
How to set the pass code
1) Select the Passcode - Entry.
2) The current pass code window is displayed if a pass code has already been registered. Enter the
registered pass code. To enter a new pass code, Click <OK> and New Pass code window
appears.
The New Pass code window is also displayed automatically if a pass code has not already been
registered.
3) Enter the new pass code.
"0000" and "9999" are not permitted.
4) The Confirm New Pass code window appears. Enter the new pass code once again to confirm it.
5) The pass code is registered.
How to cancel the pass code
1) Select the Passcode - Disable.
78
2) Enter the pass code in the Current Passcode window.
Click <OK> to access the Pass code Disable window.
3) Click <OK> and the pass code is disabled.
PJ Address
Changes the projector address.
Operation
1) Select PJ Address.
2) The PJ Address setting window will appear.
3) Use the spin button or type in a number to set an address for a projector.
4) Click <OK> to set the projector address.
Note:
Set the address to "01" when using only one projector.
79
PJ Version
This displays the projector's hardware and software version information.
Operation
1) Select PJ Version.
2) The PJ Version Number window will appear.
80
Default Data
This displays the registration information of the default data.
Operation
1) Select Default Data.
2) The Default Data window will appear.
Note:
When projector XG Ver 1.xx is connected, Default Data will be inactive and dimmed.
81
Volume 4-Auto Convergence Manual
This describes how to operate PC Control for Windows' Auto Convergence.
Contents
ACAT Installation Procedure in Projector .......................................................................................... 83
Projector hardware...................................................................................................................... 83
Computer Hardware and Software Installation ........................................................................... 84
Video Plus Capture Card Software Installation........................................................................... 85
ACAT Software Installation ....................................................................................................... 85
Adjustments ................................................................................................................................ 86
Starting Auto Convergence ................................................................................................................. 86
Menu................................................................................................................................................... 88
Auto Convergence....................................................................................................................... 88
Auto Mode 1....................................................................................................................... 88
Auto Mode 2....................................................................................................................... 91
All Convergence ................................................................................................................. 93
Alignment ........................................................................................................................... 94
Static Convergence ............................................................................................................. 95
Exit ..................................................................................................................................... 97
Initial Setting .............................................................................................................................. 97
Slice Level .......................................................................................................................... 98
Rough Adjustment Point ..................................................................................................... 99
Alignment Offset Select.................................................................................................... 100
Alignment Offset Detect ................................................................................................... 101
Unit Parameter.................................................................................................................. 101
Option....................................................................................................................................... 103
Guide Line ........................................................................................................................ 103
Maximized Video Capture................................................................................................ 104
Video Capture Driver ....................................................................................................... 104
Capture Media .................................................................................................................. 104
Display ..................................................................................................................................... 105
Overlay, Preview .............................................................................................................. 106
Live Video ........................................................................................................................ 106
Video Source .................................................................................................................... 107
Video Display ................................................................................................................... 107
Save DIB File ................................................................................................................... 107
82
ACAT Installation Procedure in Projector
ACAT Parts List:
1-CCD VIDEO Camera
1-Camera Mounting Bracket & hardware
1-Lens for camera
1-Video capture card
1-Camera Video Cable (BNC to White connector)
1-Camera Power Cable (Four pin Round Din to Red connector)
There are three major elements to this installation procedure.
1) Install the video camera and mounting bracket in the projector.
2) Install the capture card and software into your computer.
3) Configure and adjust the software for the capture card and the video camera.
Projector hardware
1) Open the top cover of the projector and remove the cover for the front lens housing. Remove the
camera lens hole cap. Note that to properly fit the camera lens, the lens hole opening must be
enlarged by approximately 1/4 inch, to a full 2 inches in diameter. This can be done with a large
half-round wood file or a hole saw. Work carefully, to prevent personal injury and avoid getting
plastic material inside the projector. Refer this step to a specialist if you are unsure of your
ability to safely use these tools.
2) Before mounting the camera in its mounting bracket determine the projector installation position.
There are two general mounting positions, ceiling mount for an overhead installation and floor
mount if the projector will be a floor standing system. Use the four screws supplied with the
mounting bracket to attach the camera to this bracket. Refer to the note below for the proper
bracket side to use.
NOTE: The top side of the camera bracket is the side where the two angle adjustments screws are
located. For a ceiling mounted projector installation, the camera is mounted on the top side
of the bracket. For a floor mounting installation, the camera is mounted opposite from the
top side.
3) To make camera installation easier, connect the video and power cables to the camera before
actually mounting the video camera inside the projector.
4) The camera and bracket assembly is mounted between the Red and Green tubes on the CRT
83
support brace. Using the two screws supplied, install the video camera bracket into the projector.
5) Route the cables under the Green and Red lenses over to the Front IR board. Connect the power
cable's red connector to the SP terminal (red terminal) on the Front IR board. Connect the video
cable's white connector to the SQ terminal (white terminal) on the Front IR board.
6) Remove the plastic covers from the video camera and lens and screw the lens on the camera.
7) Re-install the front lens cover housing back on the projector.
Computer Hardware and Software Installation
1) Turn off the computer. Discharge any possible static electrical charge from your body by touching
the metal case of the computer. Next, unplug the AC power cord, video monitor cable, and
remove the top cover of the computer.
NOTE: The computer's main RAM memory must be no longer than 8 megabytes for the video
capture card work properly. Also, the VGA circuitry in the computer must include a
feature connector. Consult your computer manual or ask your dealer.
2) Locate the VGA video card in the computer. See the note below if you cannot locate the VGA
video card. You must install the video capture card in a card soft next to this VGA video card.
This is necessary because the video capture card must connect to the feature connector on the
VGA card by means of a ribbon cable. To place these cards next to each other may require
rearranging the position if certain other plug-in cards in your computer. If you are unsure of your
abilities for this, you may need to enlist a computer technician for assistance. Locate the feature
connector on your VGA card and connect the supplied ribbon cable between the video capture
card and the feature connector on the VGA card. Consult the manual supplied with the video
capture card for details on properly connecting this ribbon cable.
NOTE: If your computer does not have a plug-in VGA card, the VGA video circuitry is contained on
the computer's main board. Unfortunately, some computer main board VGA circuits and
even some VGA plug-in cards do not provide a feature connector. You may need to consult
your computer's manual or a technician to determine where the VGA feature connector is
located. If the VGA circuitry is on the main board, and does not have a feature connector,
you may be able to install a VGA card with a feature connector in an open card slot next to
the video capture card. However, this is only possible if you can disable the VGA circuitry
on the computer's main board. Consult the video capture card installation manual and a
computer technician if you are able to make the above determination.
84
3) Locate the VGA jumper cable that is supplied with the video capture card. This cable has one end
with RCA connectors and a 15 pin "D" connector that plugs into the video capture card input.
The other end will plug into the VGA card monitor output. Your video monitor will then plug
into the RGB video output of the video capture card. Refer to Page 14 of the video capture card
manual for more details.
Video Plus Capture Card Software Installation
1) Start Windows.
2) Insert Video Plus Software Utility & Drivers Version 2.01 disk into Drive A.
3) From filer (i.e. file manager) select Drive A.
4) Select INSTALL.EXE file.
5) Select OK to make WinVideo directory.
6) Select YES to install AVI and MCI drivers.
7) Driver Screen: Install both C&T AVI Video Capture Driver and C&T [MCI] Overlay Driver. See
pages 18 and 19 of the Video Plus manual for more derails.
8) From filer copy PCVIDEO.INI from WinVideo directory to your Windows directory.
ACAT Software Installation
1) Start Windows.
2) Insert PC Control Software disk into Drive A.
3) From filer (i.e. file manager) select Drive A and select SETUP.EXE. Follow the instructions to
install the PC Control software on your computer's hard drive.
4) Reinstall the cover on the computer.
85
Adjustments
1) Connect the Video Input of the Video Plus card (page 14 Video Plus manual) to the projector
ACAT connection.
2) Connect the serial interface cable from an unused computer COMM. Port of the computer to the
projector Option port.
3) Select Configuration file from PC Control group.
4) Select the proper unused COMM. Port for your computer (default is COMM:1).
5) Open PC Control file. If "No PJ Connection" error message appears, recheck the configuration file
or try using the COMM:2 port. Once communication is established, from MENU select Auto
Convergence and enter a pass code if requested.
6) From Control Panel select Chips MCI PC Video file. Select NTSC video standard, Video 1 input,
change port address to "AB6" and change buffer address to "14". Align the video in ACAT
window by selecting Control Panel.
7) Select Align Video. Rotate the camera lens aperture adjustment ring (closest to camera) to the
largest aperture, (lowest F number). Adjust the camera lens focus adjustment ring (front ring) for
the sharpest image. Rotate camera lens zoom adjustment ring (middle ring) to just fill the video
window. Use the Video Plus Adjust Video Alignment menu (page 32 of Video Plus manual) to
align the video image in the window. Use both the zoom and alignment menu to completely fill
the image in the window. When done select OK.
8) Select Color Control. Check align that the camera lens aperture ring (closest to camera) is set to
the largest aperture. (lowest F number). From the Adjust Color menu set brightness to 200 and
contrast for best picture. When done select OK.
Close all windows and refer to ACAT manual to perform Auto Convergence.
Starting Auto Convergence
Described here is how to select the initial settings required to Auto Convergence.
Operation
1) Start PC Control for Windows and display the basic screen.
86
2) Pull down "Menu" and select-"Auto Convergence" or click the
button on the tool bar.
When in the User Control Mode, a screen will appear asking for your pass code.
3) The Auto Convergence window (illustrated below) is displayed.
4) Adjust the video capture window size and set the video display position.
5) Align the cross hairs of the test pattern within the Setting Guide Line.
If the alignment correction is off significantly, the auto convergence adjustment may not function
properly.
The adjustment of the screen size should be performed manually since the amplitude of the screen is
not adjusted.
6) Set the slice level.(See Slice Level)
7) Detect the rough adjustment point. (See Rough Adjustment Point)
87
Menu
Auto Convergence
Select Auto Convergence to display the menu.
Auto Mode 1
Auto Mode 1 executes the following:
Rough adjustment point detection
Alignment correction
Convergence correction
Operation
1) Select Auto Mode 1.
2) The Auto Mode 1 execution confirmation window is displayed.
Click <OK> to detect the rough adjustment point.
88
Click <CANCEL> to return to the Auto Convergence window.
3) The rough adjustment point is detected.
The rough adjustment point coordinates are shown. Click <OK> to correct the alignment.
If you get a detection error, check the slice level setting value.
4) The alignment is corrected and the new values are displayed.
Click <OK> and you will return to the rough adjustment point detection window.
5) Close whether or not to locate the new rough adjustment point.
89
Click <YES> to locate the new rough adjustment point.
Click <NO> to start the convergence correction.
6) If you select <YES>, the alignment adjustment values are displayed. Click <OK> to start the
convergence correction.
If you get a detection error, check the slice level setting value.
7) The convergence is corrected for the red and blue CRTs and the corrected values are displayed.
8) Exit
The display returns to the Auto Convergence window.
90
Auto Mode 2
Auto Mode 2 executes the following:
Alignment correction
Convergence correction
Operation
1) Select Auto Mode 2.
2) The Auto Mode 2 execution confirmation window is displayed.
Click <OK> to correct the alignment.
Click <CANCEL> to return to the Auto Convergence window.
3) The alignment is corrected and the new values are displayed.
Click <OK> and the rough adjustment point detection window will appear.
91
4) Close whether or not to locate the new rough adjustment point.
Click <YES> to locate the new rough adjustment point.
Click <NO> to start the convergence correction.
5) If you select <YES>, the alignment adjustment values are displayed. Click <OK> to start the
convergence correction.
If you get a detection error, check the slice level setting value.
6) The convergence is corrected for the red and blue CRTs and the corrected values are displayed.
7) Exit
The display returns to the Auto Convergence window.
92
All Convergence
This corrects the dynamic and static convergence for the selected CRT.
Operation
1) Select All Convergence.
2) The CRT selection window will appear. Select the CRT to be corrected.
Click <OK> to start the convergence correction.
Click <CANCEL> to return to the Auto Convergence window.
3) The convergence is corrected.
Press ESC during the correction to force an exit.
A confirmation window will appear.
Click <Yes> to stop the convergence correction and return to the Auto Convergence window.
Click <No> and the convergence correction will continue.
4) The corrected values are displayed when the convergence correction is completed.
Click <OK> to return to the Auto Convergence window.
93
An "M" is displayed to the right of the corrected value when the wave form is over the range.
Alignment
This corrects the alignment.
Operation
1) Select Alignment.
2) The alignment is corrected.
Press ESC during the correction to force an exit.
A confirmation window will appear.
Click <Yes> to stop the alignment correction and return to the Auto Convergence window.
Click <No> and the alignment correction to continue.
94
3) The corrected values are displayed when the alignment correction is completed.
Click <OK> to return to the Auto Convergence window.
B.G. indicates the value before correction, and A.G. indicates the value after correction. Adj.
indicates the amount the value has changed.
An "M" is displayed to the right of the corrected value when the wave form is over the range.
Static Convergence
This corrects the static convergence for the specific CRT.
Operation
1) Select Static Convergence.
95
2) The CRT selection window will appear. Select the CRT to be corrected.
Click <OK> to start the static convergence correction.
Click <CANCEL> to return to the Auto Convergence window.
3) The static convergence is corrected.
The CRT values are displayed while the static convergence is being corrected.
Detection is performed a maximum of 3 times except when the detection data for the first and
second times are the same, a third detection is not performed.
Press ESC during the correction to force an exit.
A confirmation window will appear.
Click <Yes> to stop the correction and return to the Auto Convergence window.
Click <No> and the static convergence correction will continue.
96
4) The corrected values are displayed when the static convergence correction is completed.
Click <OK> to return to the Auto Convergence window.
Exit
This exits Auto Convergence.
Operation
1) Select Exit.
2) If an adjustment has been made, the Store confirmation window will appear.
3) Auto Convergence is exited.
Initial Setting
Select Initial Setting to display the menu.
97
Slice Level
This sets the detection level for various adjustment points.
The H and V image data histograms from the camera and the current slice level values are
displayed.
Operation
1) Select Slice Level.
2) Only the green CRT lights and the image is switched to the CROSS-COARSE test pattern.
3) The Histogram window is displayed.
4) Use the H and V slice level spin buttons to set the slice level.
Set the high level where the rough adjustment point is at its maximum.
Click <OK> to change the slice level to the set value.
Click <CANCEL> to return to the Auto Convergence window.
Click <RESTORE> to return the values to their previous settings.
5) When there is noise occurring on the capture screen (i.e., Histogram) , operate each of the H
and V valid range spin buttons to set the noise portion outside the valid range.
For example, to eliminate the noise from the diagram above, lower the V End value to 460 to set the
noise outside the valid range.
98
Click <OK> to change the valid range values to the set values.
Click <CANCEL> to return to the Auto Convergence window.
Click <RESTORE> to return the values to their previous settings.
Note:
The portion that exceeds the set slice level becomes the Rough Adjustment Point .
The graph outside the valid range is displayed in gray.
Rough Adjustment Point
This locates the rough adjustment point.
Operation
1) Select Rough Adjustment Point.
2) The rough adjustment point location window will appear.
Click <OK> to locate the rough adjustment point.
Click <CANCEL> to return to the Auto Convergence window.
3) The rough adjustment point is located and the coordinates are displayed.
If an error occurs, check the Slice Level values.
4) Click <OK> to return to the Auto Convergence window.
99
Alignment Offset Select
This corrects the alignment distortion caused by the projector's built-in camera.
Operation
1) Select Alignment Offset Select.
2) The Alignment Offset Select window will appear.
3) Select the alignment offset data:
None
Correction is not used.
Default Ceiling
Correction data for ceiling suspension are used.
Default Floor
Correction data for floor standing arrangement are used.
User Detection
Correction data that were detected and created with Alignment Offset
Detect are used.
Click <OK> to select the offset data set.
Click <CANCEL> to return to the Auto Convergence window.
100
Alignment Offset Detect
This detects the alignment distortion caused by the projector's built-in camera.
Use this function only after the alignment has been adjusted.
Only the alignment distortion from the camera angle offset can be defected.
Operation
1) Select Alignment Offset Detect.
2) The video capture screen will appear at its maximum size, and the amount of alignment
distortion correction needed will be detected.
3)
When the alignment distortion correction is completed, the safe confirmation window will
appear.
Click <OK> to save the data to a file named AOFFUSR.AOF located in the application directory.
To use this data, choose it with the Alignment Offset Select.
Click <CANCEL> to return to the Auto Convergence window.
Unit Parameter
This detects the parameters of the various wave forms(*) used in the alignment and convergence
correction.
This operation should only be performed by service personnel.
*parameters of the Various wave forms
This is the relative value of the amount of offset seen by the camera and the amount of correction wave
form gain.
101
Operation
1) Select the Unit Parameter.
2) The confirmation window will appear.
Click <OK> to detect the unit parameters.
Click <CANCEL> to return to the Auto Convergence window.
3) Detection of the correction unit parameters is repeated a maximum of 5 times.
To abort the procedure, press ESC.
Click <Yes> to abort the correction unit detection and return to the Auto Convergence window.
Click <No> to continue.
4) The unit parameters are saved to a file when they have been detected more than one time.
You will be prompted whether or not to save the detection results to a file named ACTPARA.OLD.
Note:
102
The Unit Parameter command is not normally displayed.
To access this command, you must enter a service personnel pass code.
Option
Select Option to display the menu.
Guide Line
This displays the guide line on the Auto Convergence capture screen.
Operation
1) Select Guide Line to access the preference menu.
2) Select Setting Guide to display the initial setting frame.
3) Select Block Guide to display the rough adjustment block frame.
To remove the Guide Line display, re-select the same command.
103
Maximized Video Capture
This enlarges the Auto Convergence window to its maximum size (640 x 480) and displays the
image from the camera.
Operation
1) Select Maximized Video Capture.
2) The Auto Convergence window will be displayed at its maximum size ( 640 x 480), and the
image from the camera will be displayed.
3) The confirmation window appears.
Click <OK> to return to the Auto Convergence window.
Video Capture Driver
This displays the video capture driver name and version number.
Operation
1) Select Video Capture Driver.
2) The video capture driver name and version number will appear.
Click <OK> to return to the Auto Convergence window.
Capture Media
This enables you to select the clip board or bit mapped file for video capture.
Operation
1) Select Capture Media.
2) Select either Clip Board or BMP File.
104
Clip Board
This selection uses the clip board for the capture and check mark will appear beside it on the
menu.
Note:
The clipboard captures at higher speed than the BMP file provided that the personal
computer has sufficient memory. If memory is insufficient and disk swapping occurs
frequently, the capture might not be performed properly. In this case, specify BMP File.
Clip Board is selected as the default.
BMP File Selection
This selection uses a bit mapped file for the capture, and check mark will appear beside it on
the menu.
Note:
This BMP file requires approximately 900 KBytes.
Display
Select Display to access the menu.
105
Overlay, Preview
This enables you to switch between the overlay and preview display.
Operation
1) Select Overlay to switch to the overlay display mode. A check mark will appear beside it on the
menu.
2) Select Preview to switch to the preview display mode. A check mark will appear beside it on the
menu.
Note:
The rough adjustment frame seen with Guide Line or during correction execution will not appear in the
preview display.
When using a video capture board that enables overlay display, it is recommended to use the overlay
display mode.
Live Video
This shows the preview display in real time.
Operation
1) Select Live Video. A check mark will appear beside it on the menu when live vidoe is enabled.
106
Video Source
This function is available when your video capture driver supports the Video Source parameter
setting dialog box. It enables you to switch between input signal sources and other sources.
Operation
1) Select Video Sourceto view the dialog box for your video capture driver. From here you can
switch between input signals and other sources.
Note:
All operations are disabled while the setting dialog box is open.
Video Display
This function is available when your video capture driver supports the Video Source parameter
setting dialog box. It enables you to set the display position and to perform other adjustments.
Operation
1) Select Video Display to view the dialog box for your video capture driver. From here you can
set the display position and perform other tasks.
Note:
All operations are disabled while the setting dialog box is open.
Save DIB File
This saves the current video capture frame to a bit mapped file with the same size and number of
colors used as at the time of ACAT correction.
Operation
1) Select Save DIB File.
2) The confirmation window will appear.
107
Click <OK> to save the current frame with the file name, PCVCAPT.BMP.
Click <CANCEL> to return to the Auto Convergence window.
Note:
The PCVCAPT.BMP file requires approximately 900 Kbytes.
108
Volume 5-Gain Control Manual
This describes how to operate PC Control for Windows's Gain Control.
Contents
Menu................................................................................................................................................. 110
Gain Control ............................................................................................................................. 110
Picture Gain...................................................................................................................... 111
Position Gain .................................................................................................................... 112
Static Convergence Gain................................................................................................... 113
R,G,B Gain....................................................................................................................... 114
Focus Gain........................................................................................................................ 115
Alignment Gain................................................................................................................. 116
Dynamic Convergence Gain ............................................................................................. 117
Kelvin Gain ...................................................................................................................... 119
Sound Gain ....................................................................................................................... 120
Astig Gain......................................................................................................................... 121
Uniformity Gain................................................................................................................ 122
Raster Centering Gain ...................................................................................................... 123
Store ................................................................................................................................. 123
Exit ................................................................................................................................... 124
Normalize, Load, Cancel .......................................................................................................... 124
109
Menu
Gain Control
This adjusts the various types of gain.
110
Select Gain Control or click the tab in the upper portion of the dialog box to access the menu.
Note:
In the User Control Mode only Picture, Position, Static Conv, and Sound are activated. The invalid
gains are dimmed and cannot be selected.
Picture Gain
This adjusts the gain image.
Operation
1) Select Gain Control or click the
button on the tool bar.
2) The Gain Control window will appear.
3) Select Picture, Position from the pull-down menu or click the <Picture, Position> tab in the
upper portion of the dialog box to access the Picture Gain controls.
4) Slide the horizontal bar to adjust each level.
5) Click each Picture Gain item with the mouse to Normalize, Load or Cancel the adjusted levels.
111
Item
Function
BRIGHT
Adjusts the brightness
CONTRAST
Adjusts the image (contrast)
COLOR
Adjusts the color density
SHARPNESS
Adjusts the sharpness of the image quality
TINT
Adjusts the tint
Note:
The COLOR, SHARPNESS, and TINT adjustments cannot be made with an RGB signal.
The TINT adjustment cannot be made with a PAL/SECAM signal.
The beam is emitted from all three CRTs while adjustments the brightness. You cannot cut off
the beam while making this adjustment.
Position Gain
This adjusts the position of the image.
Operation
1) Select Gain Control or click the
button on the tool bar.
2) The Gain Control window will apear.
3) Select Picture, Position from the pull-down menu or click the <Picture, Position> tab in the
upper portion of the dialog box to access the Position Gain controls.
4) Slide the horizontal bar to adjust each level.
5) Click each Position Gain item with the mouse to Normalize, Load or Cancel the adjusted levels.
112
Item
Function
SHIFT ROUGH
Course adjustment
FINE
Fine adjustment
IMAGE SIZE
Adjusts the size of the image
BLANKING
Adjusts the display range
Static Convergence Gain
This adjusts the convergence offset for the center of the screen.
Operation
1) Select Gain Control or click the
button on the tool bar.
2) The Gain Control window will apear.
3) Select Static Conv, R.G.B. from the pull-down menu or click the <Static, R.G.B.> tab in the
upper portion of the dialog box to access the Static Convergence Gain controls.
4) Slide the horizontal bar to adjsut each RED/GREEN/BLUE Static Convergence Gain level.
5) Click RED/GREEN/BLUE item with the mouse to Normalize, Load or Cancel the adjusted levels
for the selected CRT.
113
Item
Function
RED
Static Convergence for the RED CRT
GREEN
Static Convergence for the GREEN CRT
BLUE
Static Convergence for the BLUE CRT
Note:
The static convergence adjustment must be adjusted for each CRT individually.
The static convergence adjustment should be made after a video has been projected for at least
20 minutes.
R,G,B Gain
This adjusts the input level of the video signal.
Operation
1) Switch to Expert Control Mode.
2) Select Gain Control or click. the
button on the tool bar.
3) The Gain Control window will apear.
4) Select Static Conv, R.G.B. from the pull-down menu or click the <Static, R.G.B.> tab in the
upper portion of the dialog box to access the R.G.B. Gain contorols.
5) Slide the horizontal bar to adjust each RED/GREEN/BLUE input level.
6) Click RED, GREEN or BLUE with the mouse to Normalize, Load or Cancel the adjusted levels
for the selected CRT.
Note:
If not connected to a video unit, the RGB Gain controls will be inactive, and the display will be
dimmed.
114
Focus Gain
This electronically adjusts the focus of the center and periphery of the image.
Operation
1) Switch to Expert Control Mode .
2) Select Gain Control or click the
button on the tool bar.
3) The Gain Control window will apear.
4) Select Focus from the pull-down menu or click the <Focus> tab in the upper portion of the
dialog box to access the Focus Gain controls.
5) Slide the horizontal bar to adjust each item.
6) Click the CRT radio button to switch CRTs.
7) Click each item with the mouse to Normalize, Load or Cancel the adjusted levels for the selected
CRT or all of the CRTs.
Item
Function
CENTER
Focuses the entire screen for a single CRT.
EDGE ALL
Focuses the periphery for all of the CRTs.
EDGE SEPARATE
Focuses the periphery for a single CRT.
EDGE CORNER
Focuses the four corners of the screen for a single CRT.
Note:
Either EDGE ALL or EDGE SEPARATE is displayed automatically from the depending on the
Focus Edge function you select.
115
Before you make the Focus Gain adjustments, first display the FOCUS test pattern.
Alignment Gain
This eliminates horizontal and vertical distortion.
Operation
1) Switch to the Expert Control Mode .
2) Select Gain Control or click the
button on the tool bar.
3) The Gain Control window will apear.
4) Select Alignment from the pull-down menu or click the <Alignment> tab in the upper portion of
the dialog box to access the Alignment Gain controls.
5) Slide the horizontal bar to adjust each item.
6) Click each item with the mouse to Normalize, Load or Cancel the adjsuted levels.
Item
Function
TILT, SKEW
Eliminates horizontal and vertical tilt distortion.
BOW
Eliminates horizontal and vertical bow-type distortion.
AMPLITUDE
Eliminates horizontal and vertical amplitude distortion.
LINEARITY
Eliminates horizontal and vertical linear distortion.
116
KEY-STONE
Eliminates horizontal and vertical keystone distortion.
PIN-CUSHION
Eliminates horizontal and vertical pin-cushion distortion.
LINEAR-BALANCE
Adjusts the horizontal and vertical balance.
KEY-BALANCE
Adjusts the horizontal and vertical keystone balance.
PIN-BALANCE
Adjusts the horizontal and vertical pin-cushion balance.
LINE DISTORTION
Corrects S-shaped horizontal and vertical lines distortion.
(Center)
LINE DISTORTION
Corrects S-shaped horizontal line distortion around the perimeter of
(Edge)
the screen.
DC H-LINEAR
Eliminates horizontal linear raster distortion.
This Adjustment is for use by service personnel only.
Note:
Before you make Alignment Gain adjustments, first display the CROSS-COARSE test pattern.
The DC H-LINEAR adjustments correlate the linear qualities of each projector when two or
more are used simultaneously (e.g., a double stack for a 6-tube specification).
When only one projector is used, there is almost no need to make DC H-LINEAR adjustments.
Dynamic Convergence Gain
This adjusts horizontal and vertical convergence.
Operation
1) Swich to the Expert Control Mode.
2) Select Gain Control or click the
button on the tool bar.
3) The Gain Control window will apear.
4) Select Dynamic Conv from the pull-down menu or click the <Dynamic> tab in the upper portion
of the dialog box to access the Dynamic Convergence Gain controls.
5) Slide the horizontal bar to adjust each item.
6) Click the CRT radio button to switch CRTs.
7) Click each item with the mouse button to Normalize, Load or Cancel the adjusted levels for the
selected CRT.
117
Item
Function
TILT, SKEW
Eliminates horizontal and vertical tilt distortion.
BOW
Eliminates horizontal and vertical bow-type distortion.
AMPLITUDE
Eliminates horizontal and vertical amplitude distortion.
LINEARITY
Eliminates horizontal and vertical linear distortion.
KEY-STONE
Eliminates horizontal and vertical keystone distortion.
PIN-CUSHION
Eliminates horizontal and vertical pin-cushion distortion.
LINEAR-BALANCE
Adjusts the horizontal and vertical balance.
LINE DISTORTION
Corrects S-shaped horizontal lines distortion on the screen.
(Center)
LINE DISTORTION
Corrects S-shaped lines distortion at the top or bottom edge of the
(Edge)
screen.
PHASE
Adjusts the phase of the POINT adjustment wave form .
PHASE Adjustment
PHASE adjusts the Convergence wave form phase.
This adjustment was set at the factory and normally there is no need to reset the level.
Readjusting PHASE adjustment could affect the other Convergence adjustments.
Note:
Before you make the Dynamic Convergence Gain adjustments, first display the CROSS-
118
COARSE test pattern.
Adjusting the Dynamic Convergence Gain will slightly affect the Static Convergence Gain
levels. If this Happens, readjust the Static Convergence Gain levels.
Kelvin Gain
This adjusts the color temperature and white balance.
Operation
1) Switch to the Expert Control Mode.
2) Select Gain Control or click the
button on the tool bar.
3) The Gain Control window will apear.
4) Select Kelvin from the pull-down menu or click the <Kelvin> tab in the upper portion of the
dialog box to access the Kelvin Gain controls.
5) Slide the horizontal bar to adjust each item.
6) Click each item with the mouse to Normalize, Load or Cancel the adjusted levels.
Item
Function
COLOR TEMPERATURE
Adjusts the color temperature
WHITE BALANCE
Adjusts the white balance
Note:
Before you make the Kelvin Gain adjustments, first display the WINDOW-WHITE test pattern.
119
The adjustable color temperature range is from 3200 K to 9500 K.
Adjust so White raises and Black lowers the brightness.
The White balance is adjusted for each individual CRT.
Sound Gain
This adjusts the audio system gain.
Operation
1) Select Gain Control or click the
button on the tool bar.
2) The Gain Control window will apear.
3) Select Sound from the pull-down menu or click the <Sound> tab in the upper portion of the
dialog box to access the Sound Gain controls.
4) Slide the horizontal bar to adjust each item.
5) Click each item with the mouse to Normalize, Load or Cancel the adjusted levels.
Item
Function
VOLUME(S)
Adjusts the (SLAVE) volume
VOLUME(M)
Adjusts the (MASTER) volume
BALANCE
Adjusts the left and right balance
TREBLE
Adjusts the treble
BASS
Adjusts the bass
Note:
When using the projector alone, except when the model is equipped with sound, the Sound Gain
controls will be inactive and the display will be dimmed.
When a video unit is connected to a sound-equipped projector, all the gains will be activated.
120
When a video unit is connected to a projector that is not equipped with sound, only VOLUME(S)
will be activated. All the other controls will be dimmed.
Astig Gain
This adjusts the beam form.
Operation
1) Switch to the Expert Control Mode.
2) Select Gain Control or click the
button on the tool bar.
3) The Gain Control window will apear.
4) Select Astig from the pull-down menu or click the <Astig> tab in the upper portion of the dialog
box to access the Astig Gain controls.
5) Slide the horizontal bar to adjust each item.
6) Click the CRT radio button to switch CRTs.
7) Click each item with the mouse to Normalize, Load or Cancel the adjusted levels for the selected
CRT.
Item
Function
CENTER
Adjusts the entire screen for each CRT.
EDGE
Adjusts all four edges for each CRT.
121
CORNER
Adjusts the four corners for each CRT.
Note:
Before you make Astig Gain adjustments, first display the DOT-FINE test pattern.
Uniformity Gain
This adjusts the balance between screen brightness and color.
Operation
1) Switch to the Expert Control Mode.
2) Select Gain Control] or click the
button on the tool bar.
3) The Gain Control window will apear.
4) Select Uniformity, Raster from the pull-down menu or click the <Uniformity, Raster> tab in the
upper portion of the dialog box to access the Uniformity Gain controls.
5) Slide the horizontal bar to adjust each item.
6) Click each item with the mouse to Normalize, Load or Cancel the adjusted levels.
Item
Function
BRIGHT
Adjusts the brightness of the center and peripheral portions of the
screen
WHITE
Adjusts the color balance at the left and right sides of the screen
Note:
Before you make Uniformity Gain adjustments, first display the ALL-WHITE test pattern.
122
Raster Centering Gain
This adjusts the vertical raster position for all three CRTs.
Operation
1) Switch to the Expert Control Mode.
2) Select Gain Control] or click the
button on the tool bar.
3) The Gain Control window will apear.
4) Select Uniformity, Raster from the pull-down menu or click the <Uniformity, Raster> tab in the
upper portion of the dialog box to access the Raster Centering Gain controls.
5) Slide the horizontal bar to adjust the Raster Centering Gain.
6) Click "CRT ALL" with the mouse to Normalize, Load or Cancel the adjusted level.
Store
This stores all of the adjusted levels in the projector.
Operation
1) Select Store.
2) The STORE window will apear.
Item
Function
CURRENT
Overwrites the current projector signal to save the settings.
Note: An unregistered signal cannot be selected while it is being
projected.
123
NEW
Saves the settings as a new signal.
CANCEL
Does not save settings.
Exit
This exits the Gain Control function
Operation
1) Select Exit.
2) The Gain Control function will be exited.
Normalize, Load, Cancel
This returns the levels for each gain to standard (Normalize), last memory (Load), or unadjusted
(Cancel).
Operation
1) Choose the gain for which the levels will be restored from the [Normalize, Load, Cancel] pulldown menu.
124
2) Select the function with the Normalize/Load/Cancel selection window.
3) Click <OK> to normalize, load or cancel.
Click <CANCEL> to return to the Gain Control window.
Note:
Normalize/Load/Cancel for the specific gain cannot be activated by clicking it with the mouse.
125
Volume 6-Gain Control Manual For Service Man
This describes how service personnel can operate Gain Control through PC Control for Windows.
Contents
Starting Gain Control (Service Man) ................................................................................................ 127
Menu................................................................................................................................................. 129
Gain Control ............................................................................................................................. 129
Raster Centering ............................................................................................................... 129
Focus Balance................................................................................................................... 130
Ref. White Balance........................................................................................................... 130
Store ................................................................................................................................. 131
Exit ................................................................................................................................... 132
Normalize, Load, Cancel .......................................................................................................... 133
126
Starting Gain Control (Service Man)
Operation
1) Start "PC Control for Windows".
2) Select Expert Control Mode. The PASS CODE input window will appear.
3) Enter the pass code for service personnel and switch to the Expert Control Mode.
4) Select Menu. Gain Control (Service Man) will now be available. Select it.
5) The Gain Control (Service Man) window will appear.
127
128
Menu
Gain Control
This adjusts the various types of gain.
Raster Centering
This adjusts the horizontal and vertical position.
Operation
1) Select Expert Control Mode and the PASS CODE input window will appear.
2) Enter service personnel pass code.
3) Select Gain Control (Service Man).
4) The Gain Control (Service Man) window will appear.
5) Slide the horizontal and vertical scroll bars to make adjustments.
6) Click the CRT button to switch from one color to another.
7) Click Normalize, Load or Cancel on the Gain Control header bar with the mouse to activate or
reset the changes.
129
Focus Balance
This adjusts the horizontal deflection of the dynamic focus correction wave.
Operation
1) Select Expert Control Mode and the PASS CODE input window will appear.
2) Enter the service personnel pass code.
3) Select Gain Control (Service Man).
4) The Gain Control (Service Man) window will appear.
5) Slide the scroll bar to balance the focus.
6) Click Normalize, Load or Cancel on the Gain Control header bar with the mouse to activate or
reset the changes.
Note:
This is one dynamic focus memory for each horizontal deflection circuit for a total three.
This adjustment has been stored previously in memory at the factory. There is no need to make
adjustments unless the focus phase has been offset by the exchange of F-DRIVE PWB, OSC PWB,
or WAVE PWB.
Ref. White Balance
This adjusts of the amplitude of the video signal and AKB reference signal as well as the bias of the
G2 control voltage.
Operation
1) Select Expert Control Mode and the PASS CODE input window will appear.
2) Enter the service personnel pass code.
3) Select Gain Control (Service Man).
4) The Gain Control (Service Man) window will appear.
5) Adjust each Ref. White Balance Gain scroll bar.
6) Click CRT button to move one color to another..
130
7) Click Normalize, Load or Cancel on the Gain Control header bar with the mouse to activate or
reset the changes.
Item
Function
DRIVE CONTROL
Adjusts the amplitude of the video signal
BRIGHT BIAS
Adjusts the amplitude (i.e., BIAS of BRIGHT) of the AKB
reference signal
BRIGHT GAIN
Adjusts the amplitude (i.e., GAIN of BRIGHT) of the AKB
reference signal
BLACK BIAS
Adjusts the bias of the G2 control voltage
Note:
The DRIVE CONTROL adjusts only the red and blue CRTs.
Store
This stores the projector‘s current gain setting.
Operation
1) Select Store.
131
2) The STORE window will appear.
Item
Function
CURRENT
Overwrites the current projector signal to save the settings.
Note: An unregistered signal cannot be selected while it is
being projected.
NEW
Save the settings as a new signal.
CANCEL
Does not save settings.
Note:
The different Gain Control (Service Man) adjustments each have their own memory.
Use care when storing data.
If stored data is inadvertently returned to the factory default values, run the Normalize function.
The data are stored by saving them.
Exit
This exits the Gain Control (Service Man).
Operation
1) Select Exit.
2) The Gain Control (Service Man) function will be exited.
132
Normalize, Load, Cancel
This returns the levels for each gain to standard (Normalize), last memory (Load), or unadjusted
(Cancel).
Operation
1) Choose the gain for which the levels will be restored from the [Normalize, Load, Cancel] pulldown menu.
2) Select the function with the Normalize/Load/Cancel selection window.
3) Click <OK> to normalize, load or cancel.
Click <CANCEL> to return to the Gain Control (Service Man) window.
Note:
Normalize/Load/Cancel for the specific gain cannot be activated by clicking it with the mouse.
133
Volume 7-Data Base Manual
This describes how to operate PC Control for Windows' Data Base (One Entry) and Data Base
(EEPROM).
Contents
Data Base (One Entry) ..................................................................................................................... 135
File (One Entry Mode).............................................................................................................. 136
Open (One Entry Mode) ................................................................................................... 137
Close (One Entry Mode)................................................................................................... 138
Exit (One Entry Mode) ..................................................................................................... 139
Load (One Entry Mode)............................................................................................................ 139
Save (One Entry Mode) ............................................................................................................ 140
Data Base(EEPROM)....................................................................................................................... 141
File (EEPROM Mode).............................................................................................................. 142
Open (EEPROM Mode) ................................................................................................... 143
Close (EEPROM Mode)................................................................................................... 145
Exit (EEPROM Mode) ..................................................................................................... 145
Load (EEPROM Mode)............................................................................................................ 145
Load to System(EEPROM Mode) .................................................................................... 146
Load to D-Con (EEPROM Mode) .................................................................................... 147
Load to System & D-Con (EEPROM Mode).................................................................... 148
Save (EEPROM Mode) ............................................................................................................ 151
Save from System (EEPROM Mode) ............................................................................... 151
Save from D-Con (EEPROM Mode)................................................................................ 153
Save from System & D-Con (EEPROM Mode) ............................................................... 155
134
Data Base (One Entry)
This saves or loads to a text file various gain data and the parameters registered with each scan.
The function can only be used in the Expert Control Mode.
Operation
1) Select Data Base (One Entry) or click
on the tool bar.
If you're starting from the user mode, you will need to enter a pass code in the PASS CODE
window that will appear.
2) The Data Base (One Entry) window is displayed.
135
The Load Source Information display area provides the Source Information for the opened file.
The information displayed here is what it was at the time it was stored; it is not information that
was actually loaded.
The Comment display area is where you can find notes and add comments to the opened file.
Note:
When the file is not open, [File]-[Close] and [Load] are invalid. They will be dimmed and cannot
be selected.
File (One Entry Mode)
Select File from the Data Base (One Entry) window to display the pull-down menu.
136
This saves or loads to a text file the various gain data and the parameters registered with each scan.
This function is then exited.
Open (One Entry Mode)
This opens the data file to be loaded.
Operation
1) Select Open.
2) The file selection window will appear.
Enter or select the file name. Click <OK>, or double click the file name list to open the selected
file.
Click <CANCEL> to return to the Data Base (One Entry) window.
3) When you open the file, the Load Source Information and Comments for that file will appear in
the Data Base (One Entry) window.
137
4) The Load command becomes activated.
Note:
The file extension default is GAD.
The Source Information of the opened file appears in the Load Source Information display area.
The information displayed here is what it was at the time it was stored; it is not information that
was actually loaded.
The Comment display area is where you can find notes and add comments to the opened file.
Close (One Entry Mode)
This closes the open data file.
Operation
1) Select Close.
The opened file is closed. The Load Source Information and Comment display of the Data Base
138
(One Entry) window are no longer displayed, and the [Load] command is no longer activated.
Exit (One Entry Mode)
This exits Data Base (One Entry).
Operation
1) Select Exit.
2) Data Base (One Entry) is exited.
Load (One Entry Mode)
This loads the various gain data to the projector.
Operation
1) Select Load to System.
2) The various gains are loaded to the projector and affect the image being projected.
3) The data load completed window appears.
Click <OK> to return to the Data Base (One Entry) window.
139
Save (One Entry Mode)
This saves the gain data and parameters for a current signal to a text file.
Operation
1) Select Save from System.
2) The File Save window will appear.
Enter or select the file name. Click <OK>, or double click the file name list to save to the
selected file.
Click <CANCEL> to return to the Data Base (One Entry) window.
3) When an existing file is selected, the write confirmation window will appear.
Click <YES> to overwrite the selected file.
Click <NO> to return to the File Save window.
Note:
The file extension default is GAD.
140
Data Base(EEPROM)
This backs up or loads EEPROM data.
The function can only be used in the Expert Control Mode .
Operation
1) Select Data Base (EEPROM) or click
on the tool bar.
If you're starting from the user mode, you will need to enter a pass code in the PASS CODE
window that will appear.
2) The Data Base (EEPROM) window is displayed.
141
The Information display area provides the EEPROM File Entry List and the load and save ratios
for EEPROM data.
The Comment display area displays the comments for the opened file.
Note:
When the file is not open, [File]-[Close] and [Load] are invalid. They will be dimmed and cannot
be selected.
File (EEPROM Mode)
Select File from the Data Base (EEPROM) window to display the pull-down menu.
142
This saves or loads to a file the projector or D-Conv PWB EEPROM data. This function is then
exited.
Open (EEPROM Mode)
This selects the EEPROM data file to load.
Operation
1) Select Open.
2) The EEPROM File Open window will appear.
Enter or select the file name. Click <OK>, or double click the file name list to open the selected
file.
Click <CANCEL> to return to the Data Base (EEPROM) window.
3) When both projector EEPROM data and D-Conv PWB EEPROM data exist for the selected
file, a window will appear to confirm whether both files should be opened at the same time.
143
Select <YES> to open both files.
Select <NO> to open only the selected file.
4) When the file is opened, the EEPROM File Entry List, and Comment area are displayed in the
Data Base (EEPROM) window.
Note:
The file extension defaults are:
Data Classification
Extension
Projector
GRD
D-Conv’ PWB
DRD
144
Close (EEPROM Mode)
This closes the open EEPROM data file.
Operation
1) Select Close.
2)
The opened file is closed and the Information and Comment display of the Data Base
(EEPROM) window are no longer displayed.
Note:
When both the projector EEPROM data and D-Conv PWB EEPROM data files are open, both will
close.
Exit (EEPROM Mode)
This exits Data Base (EEPROM).
Operation
1) Select Exit.
2) Data Base (EEPROM) is exited.
Load (EEPROM Mode)
Select Load from the Data Base (EEPROM) window to display the pull-down menu.
This loads the EEPROM data from the open file to the projector.
145
Load to System(EEPROM Mode)
This loads the projector's EEPROM data.
Operation
1) Select Load to System.
2) If the projector power is ON, a window will appear warning that the projector's power will be
turned off.
Click <OK> to turn the projector OFF so the data can be loaded.
Click <CANCEL> to return to the Data Base (EEPROM) window.
3)
The projector's EEPROM data loading rate is displayed graphically in the Data Base
(EEPROM) Information window.
146
4) The EEPROM Data Base window is displayed upon completion.
Click <OK> to return to the Data Base (EEPROM) window.
Load to D-Con (EEPROM Mode)
This loads the D-Conv PWB's EEPROM data.
Operation
1) Select Load to D-Conv.
2) If the projector power is OFF, a window will apear warning that the projector's power will be
turned on.
Click <OK> to turn the projector ON so the data are loaded.
Click <CANCEL> to return to the Data Base (EEPROM) window.
3)
The D-Conv's EEPROM data loading rate is displayed graphically in the Data Base
(EEPROM) Information window.
147
4) The EEPROM Data Base window is displayed upon completion.
Click <OK> to return to the Data Base (EEPROM) window.
Load to System & D-Con (EEPROM Mode)
This loads both the projector's and D-Conv PWB's EEPROM data.
Operation
1) Select Load to System & D-Conv.
148
2) If the projector power is OFF, a window will appear warning that the projector's power will be
turned on.
Click <OK> to turn the projector ON so the data are loaded.
Click <CANCEL> to return to the Data Base (EEPROM) window.
3)
The D-Conv's EEPROM data loading rate is displayed graphically in the Data Base
(EEPROM) Information window.
4) If the projector power is ON, a window will apear warning that the projector's power will be
turned off.
149
Click <OK> to turn the projector OFF so the data are loaded.
Click <CANCEL> to return to the Data Base (EEPROM) window.
5)
The projector's EEPROM data loading rate is displayed graphically in the Data Base
(EEPROM) Information window.
6) The EEPROM Data Base window is displayed upon completion.
Click <OK> to return to the Data Base (EEPROM) window.
150
7) The EEPROM File Entry List and Comment boxes of the Data Base (EEPROM) window are no
longer displayed.
Save (EEPROM Mode)
Select Save from the Data Base (EEPROM) window to display the pull-down menu.
This saves EEPROM data from the current projector or D-Conv PWB to a file.
Save from System (EEPROM Mode)
This saves the projector's EEPROM data to a file.
Operation
1) Select Save from System.
2) The File Save window is displayed.
Enter the file name or select it. Then click <OK>, or double click on the file name list to save to
the selected file.
Click <CANCEL> to return to the Data Base (EEPROM) window.
151
3) When an existing file has been selected, a window will appear confirming whether to overwrite
the file.
Click <YES> to overwrite the selected file.
Click <NO> to return to the File Save window.
4)
The projector's EEPROM data saving rate is displayed graphically in the Data Base
(EEPROM) Information window.
152
Note:
The file extension default is GRD.
Save from D-Con (EEPROM Mode)
This saves the D-Conv PWB's EEPROM data to a file.
Operation
1) Select Save from D-Con.
2) If the projector power is OFF, a window will apear warning that the projector's power will be
turned on.
153
Click <OK> to turn the projector ON so the data can be saved.
Click <CANCEL> to return to the Data Base (EEPROM) window.
3) The File Save window is displayed.
Enter the file name or select it. Then click <OK>, or double click on the file name list to save to
the selected file.
Click <CANCEL> to return to the Data Base (EEPROM) window.
4) When an existing file has been selected, a window will appear to confirming whether to
overwrite the file.
154
Click <YES> to overwrite the selected file.
Click <NO> to return to the File Save window.
5) The D-Conv's EEPROM data saving rate is displayed graphically in the Data Base (EEPROM)
Information window.
Note:
The file extension default is DRD.
Save from System & D-Con (EEPROM Mode)
This saves the projector's and D-Conv PWB's EEPROM data to a file.
Operation
1) Select Save from D-Con.
2) If the projector power is OFF, a window will appear warning that the projector's power will be
turned on.
155
Click <OK> to turn the projector ON so the data can be saved.
Click <CANCEL> to return to the Data Base (EEPROM) window.
3) The File Save window is displayed.
Enter the file name or select it. Then click <OK>, or double click on the file name list to save to
the selected file.
Click <CANCEL> to return to the Data Base (EEPROM) window.
4) When an existing file has been selected, a window will appear to confirming whether to
overwrite the file.
Click <YES> to overwrite the selected file.
Click <NO> to return to the File Save window.
156
5) The D-Conv's EEPROM data saving rate is displayed graphically in the Data Base (EEPROM)
Information window.
6)
The projector's EEPROM data saving rate is displayed graphically in the Data Base
(EEPROM) Information window.
157
Note:
When saving one file with either the GRD or DRD file extension, the other file will be saved
automatically.
The file extension defaults are:
Data Classification
Extension
Projector
GRD
D-Conv’ PWB
DRD
158
Trouble Shooter Manual
This describes how to use PC Control for Widow’s Troubleshooter.
Contents
Starting Trouble Shooter................................................................................................................... 160
Troubleshooter .................................................................................................................................. 160
Trouble Chart............................................................................................................................ 161
Trouble Acquisition .................................................................................................................. 163
Trouble Content ........................................................................................................................ 164
Failure Check............................................................................................................................ 166
159
Starting Trouble Shooter
Troubleshooter operates in the Expert Control Mode.
Operation
1) Select Trouble Shooter.
If you're starting from the user mode, you will need to enter a pass code in the PASS CODE
window that will appear.
2) The Trouble Shooter window is displayed.
Troubleshooter
160
<Power Supply>
Displays the Trouble Chart for the Power Supply.
<No Power On>
Displays the Trouble Chart for No Power On.
<Conv Drive>
Displays the Trouble Chart for Conv Drive problems.
<Focus Drive>
Displays the Trouble Chart for Focus Drive problems.
<Astig Drivel>
Displays the Trouble Chart for Astig Drive problems.
<HV-related>
Displays the Trouble Chart for high-voltage-related operation.
<H-DEF>
Displays the Trouble Chart for H-DEF problems.
<Failure Check>
Executes Failure Check .
<Exit>
Exits Troubleshooter.
161
Trouble Chart
Operation
1) Check the chart and click <YES> or <NO> to advance.
Click <PREVIOUS> to return to the previous selection.
Click <EXIT> to quit Troubleshooter.
Note:
When the chart is advanced to the end, the Trouble Acquisition Window is displayed.
162
Trouble Acquisition
Trouble Listing Display Area
Displays suggestion for dealing with the trouble.
Schematic Diagram
Displays the board number.
Service Manual Page
Displays the service manual reference page number.
<PREVIOUS>
Returns to the previous selection.
<EXIT>
Exits Trouble Shooter.
163
Trouble Content
Trouble
The current or registered trouble item name.
Date
Today's date or the registered date.
Name
The name of the service person who registered the which this trouble item.
Content
Messages or registered trouble contents regarding the current trouble.
<VIEW>
The Trouble Entry List window and the current registered contents will appear. Double clicking on
the number or click <OK> will display the entry in the Content Entry area.
164
<DELETE>
The Trouble Entry List window and the current registered contents will appear.
Double click on the registered data number to be deleted or click <OK> to delete selected
registered data.
<ENTRY>
The Trouble Entry List and the current registered contents will appear.
Double click on the number to be registered or click <OK> to register the select entry.
Click <CANCEL> to abort and return Trouble Content window.
165
Failure Check
This displays the error code and its contents.
Operation
Click <NEXT> to display the next error.
Click <PREVIOUS> to see the previous error.
Click <CANCEL> to end the Failure Check.
166
Volume 9-Auto White (User) Manual
Auto White (User) refers to the automatic adjustment of the color temperature of the screen (using a
color analyzer) to the color which was set by the user.
This section describes how to operate PC Control for Windows' Auto White (User) function.
Contents
Making Auto White (User) Adjustments........................................................................................... 168
Menu................................................................................................................................................. 170
File............................................................................................................................................ 170
Open ................................................................................................................................. 170
Exit ................................................................................................................................... 171
Auto White ............................................................................................................................... 171
White Adjustment ............................................................................................................. 171
White & Black Adjustment............................................................................................... 172
Movement Range Adjust................................................................................................... 173
White Balance .......................................................................................................................... 173
Select ................................................................................................................................ 174
Learn................................................................................................................................. 175
White ........................................................................................................................ 175
White & Black.......................................................................................................... 176
Display ..................................................................................................................................... 176
Zoom In ............................................................................................................................ 177
Zoom Out.......................................................................................................................... 177
Option....................................................................................................................................... 177
Measure Start.................................................................................................................... 178
Measure Stop .................................................................................................................... 178
Color Analyzer Info. ......................................................................................................... 178
167
Making Auto White (User) Adjustments
When you start Auto White (User), a window like the one below will appear.
Brightness Graph
This provides a graphic display of the brightness ratio for the red and blue CRTs when the
brightness of the green CRT is assumed to be 100%.
When the brightness ratio of each CRT is 100%, they become the same color temperature.
Auto White Process Information
This provides the status of the white balance adjustment.
Auto White Tracking Data
This displays the data being adjusted during the white balance process.
Display
Contents
BASIC BLK OUT
Reference value of the G2 control voltage
W/B BLACK GAIN
White Balance Black Gain adjustment value
168
W/B BLACK GAIN ADJ.
White Balance Black Gain degree of change
BLK OUT
G2 control voltage at time of adjusting White Balance Black
Gain
W/B WHITE GAIN
White Balance White Gain adjustment value
W/B WHITE GAIN ADJ.
White Balance White Gain degree of change
White Balance Data Select Information
The information of the selected white balance data is displayed.
Note:
The White Balance Black Gain adjustment is performed so that the value of BLK OUT becomes
the same value (+/- 1 Step) as BASIC BLK OUT.
Making Auto White (User) Adjustments
1) Connect a color analyzer to the projector and personal computer.
2) Start the PC Configuration settings from Windows and set the color analyzer communications
port so that it is not the same as the one used for communications with the projector.
3) Input an all-white signal to the projector.
4) Start "PC Control" from Windows.
5) Select Auto White (User) or click the
button on the tool bar to display the Auto White
(User) window.
Select Open and select the white balance data file.
6)
The file extension default is WBD.
7) Choose Select the adjustment reference data.
8) Select Auto White execute a white balance adjustment.
9) After the adjustment is completed, select Store to save the new settings.
Note:
When performing the white balance, please allow sufficient time to elapse.
Going too quickly can cause unstable brightness and an adjustment cannot be made.
169
Menu
File
Select File from the Auto White (User) window to display the pull-down menu.
The white balance data file can be selected and this application exited.
Open
Select the white balance data file.
Operation
1) Select Open.
2) The White Balance Data File Open window appears.
Enter the file name or select it. Click <OK> or double click the file name list to open the selected
file.
Click <CANCEL> to return to the Auto White (User) window.
170
The file extension defaule is WBD.
Exit
This exits the Auto White (User) function.
Operation
1) Select Exit.
2) When the white balance has been adjusted, the Store confirmation window appears.
3) The Auto White (User) function will be exited.
Auto White
Select Auto White from the Auto White (User) window to display the pull-down menu.
The various white balance adjustments are performed here.
White Adjustment
Adjust the color of the white side using the data of the selected white balance data file as a reference.
Adjust the color of the black side so that it becomes the same as the factory adjustment condition.
Paying attention to the white side only, after the adjustment the data is created with White and that data
is used to execute this command which permits simple adjustment of the color.
Note that data created with White & Black can also be used, but only the white side will be adjusted.
Operation
1) Select White Adjustment.
2) The Auto White verification window appears.
171
3) Click <OK> to execute Auto White.
Click <CANCEL> to return to the Auto White (User) window.
White & Black Adjustment
Adjust the color of the white side and the black side using the data of the selected white balance data
file as a reference.
Note that the white balance data that can be used is only data created with White & Black.
Operation
1) Select White & Black Adjustment.
2) The Auto White verification window appears.
3) Click <OK> to execute Auto White.
Click <CANCEL> to return to the Auto White (User) window.
172
Movement Range Adjust
This command is used for making the G2 control voltage a reference without shifting the current color.
This projector automatically corrects color shifts due to such factors as aging of the CRT using the
AKB circuit, but at time the G2 control voltage is changed and adjusted.
The Auto White adjustment will at times be executed automatically by this command.
Operation
1) Select Movement Range Adjust.
2) The Auto White verification window appears.
3) Click <OK> to execute Auto White.
Click <CANCEL> to return to the Auto White (User) window.
White Balance
Select White Balance from the Auto White (User) window to display the pull-down menu.
173
The selecting and editing of white balance data stored in the file and the measuring of brightness are
performed here.
Select
This selects and edits the white balance data stored in the file.
Operation
1) Choose Select.
2) The White Balance Data Select window appears acon with a list of the white balance data and
other data stored in the file.
To select data from the list, click on it with the left button of the mouse.
<ENTRY DELETE>
The selected white balance data are deleted from the file.
<OK>
Selects the white balance data.
<CANCEL>
The display returns to the Auto White (User) window.
174
<EDIT>
Used to attach a comment to the selected white balance data.
<EDIT CANCEL>
Stops the comment entry.
<SAVE>
Saves the described comment with the file.
Learn
Select Learn from the Auto White (User) window to display the pull-down menu.
The current input signal brightness is measured.
White
Only data of the white side is created.
This data is used by White Adjustment.
Operation
1) Select White.
2) The Auto White verification window appears.
175
3) Click of the <OK> to execute Auto White.
Click <CANCEL> to return to the Auto White (User) window.
White & Black
The data of the white side and the black side are created.
These data are used by White Adjustment or White & Black Adjustment.
Operation
1) Select White & Black.
2) The Auto White verification window appears.
3) Click <OK> to execute Auto White.
Click <CANCEL> to return to the Auto White (User) window.
Display
Select Display from the Auto White (User) window to display the pull-down menu.
This enlarges or reduces the ratio of the brightness graph.
176
Zoom In
This enlarges the ratio of the brightness graph.
Ratios change by: 200%, 150% and 125%.
Operation
1) Select Zoom In, or click the brightness graph with the left button of the mouse. The ratio of the
brightness graph will zoom in.
Zoom Out
This reduces the ratio of the brightness graph.
Ratios change by: 125%, 150% and 200%.
Operation
1) Select Zoom Out, or click the brightness graph with the right button of the mouse. The ratio of
the brightness graph will zoom out.
Option
Selecting Option from the Auto White (User) window to display the pull-down menu.
This displays the brightness of the current input signal as well as the information from the color
analyzer.
177
Measure Start
This measures the brightness of the current input signal.
Operation
1) Select Measure Start.
2) The measured brightness is displayed as a graph.
Note:
All operations are suspended while this command is executed.
Execute Measure Stop before performing other operations.
Measure Stop
This stops the brightness measurement.
Operation
1) Select Measure Stop.
Color Analyzer Info.
This displays the information from the color analyzer.
Operation
1) Select Color Analyzer Info..
The various information concerning the connected color analyzer are displayed.
2) Click <OK> to return to the Auto White (User) window.
178
Volume 10-Auto White (Reference) Manual
Auto White (Reference) refers to the adjustment to the color which was set prior to shipping using a
color analyzer when the CRT has been replaced.
This function is for service personnel only.
This section describes how to operate PC Control for Windows' Auto White (Reference) function.
Contents
Making Auto White (Reference) Adjustments .................................................................................. 180
Menu................................................................................................................................................. 183
File............................................................................................................................................ 183
Open ................................................................................................................................. 183
Save .................................................................................................................................. 184
Exit ................................................................................................................................... 185
Auto White ............................................................................................................................... 185
White Reference ....................................................................................................................... 186
Display ..................................................................................................................................... 187
Zoom In ............................................................................................................................ 187
Zoom Out.......................................................................................................................... 188
Option....................................................................................................................................... 188
Measure Start.................................................................................................................... 188
Measure Stop .................................................................................................................... 189
Auto White Test Pattern ................................................................................................... 189
Color Analyzer Info. ......................................................................................................... 190
179
Making Auto White (Reference) Adjustments
When you start Auto White (Reference), a window like the one illustrated below will appear.
Brightness Graph
This provides a graphic display of the brightness ratio for the red and blue CRTs when the
brightness of the green CRT is assumed to be 100%.
When the brightness ratio of each CRT is 100%, they become the same color temperature.
Auto White Process Information
This provides the status of the white reference adjustment.
Auto White Tracking Data
This displays the data being adjusted during the white reference process.
Display
Contents
2.5V Data,Range,Error
The 2.5 V Voltage adjustment reference value and error
values for the TP7x04 voltage
Initial A1 BLK BIAS
Bright Bias adjustment value
180
Initial A1 BLK OUT
TP7x04 voltage value for Bright 60% (amplitude) A1
Initial A2 BLK OUT
TP7x04 voltage value for Bright 0% (amplitude) A2
C.Tracking BRT BIAS
Bright Bias adjustment value at the time of Contrast Tracking
C.Tracking DRV CTL
Drive Control adjustment value at the time
of Contrast Tracking
C.Tracking BLK OUT
TP7x04 voltage value at the time of
Contrast Tracking
B.Tracking BRT GAIN
Bright Gain adjustment value at the time of Bright Tracking
B.Tracking BRT BIAS
Bright Bias adjustment value at the time of Bright Tracking
B.BRT( 0%) BLK OUT
TP7x04 voltage value at the time of Bright 0%
B.BRT(60%) BLK OUT
TP7x04 voltage value at the time of Bright 60%
Making Auto White (Reference) Adjustments
1) Connect a color analyzer to the projector and personal computer.
2) Start the PC Configuration settings from Windows and set the color analyzer communications
port so that it is not the same as the one used for communications with the projector.
3) Input an NTSC3.58 or PAL all-white signal to the projector.
4) Start "PC Control" from Windows.
5) Transfer to the Expert Control Mode.
When asked for a pass code, enter the service personnel pass code.
6) Select Auto White (Reference) to display the Auto White (Reference) window.
7) Select Auto White Test Pattern to display the WINDOW-AW test pattern.
Projector model
Output level
XG-1350, 1100, 750
Level 7
XG-1351, 1101, 751
Level 4
8) Temporarily adjust VR7009 to the following voltage at TP7012 on the GAIN CTL PWB.
181
9) Input a cross-hatch signal. Check that the video signal amplitude at the same TP (test point) is
not off from the adjustment value.
If the amplitude is off, adjust it to the regulation amplitude with VR7008.
Projector model
Video amplitude
XG-1350, 1100, 750
1.0[Vp-p]
XG-1351, 1101, 751
0.7[Vp-p]
10) Display the WINDOW-AW test pattern.( see 7) )
11) Check the following voltage.
If the voltage is off, adjust VR7009.
If this voltage is off, the cutoff voltage will also be off; therefore, adjust as accurately as
possible.
12) Perform the drive control gain adjustment for the red CRT and blue CRT so that following
voltage becomes the same voltage as aforementioned operation 11).
Projector model
Adjustment place
XG-1350, 1100, 750
TP7401/7601 on the VIDEO OUT PWB
XG-1351, 1101, 751
TP7901 on the R-CRT OUT PWB
TP7941 on the B-CRT OUT PWB
13) Select Auto White and execute the white reference adjustment.
14) After the adjustment is completed, set AKB to ON and then to OFF.
15) Select Store to save the new settings.
182
Note:
Once Step 11 has been completed, it isn't necessary to repeat this step when making subsequent
white reference adjustments. Step 12, however, should be performed every time.
When performing the white balance, please allow sufficient time to elaspe.
Going too quickly can cause unstable brightness and an adjustment cannot be made.
Menu
File
Select File from the Auto White (Reference) window to display the pull-down menu.
The white reference data file can be read, saved, or this application can be exited.
Open
Select the white reference data file to read white reference data.
Operation
1) Select Open.
2) The White Reference Data File Open window appears.
183
Enter the file name or select it. Click <OK> or double click the file name list to open the selected
file.
Click <CANCEL> to return to the Auto White (Reference) window.
The file extension default is WR*.
Save
This saves white reference data to a file.
Operation
1) Select Save.
2) The White Reference Data File Save window appears.
Enter the file name or select it. Click <OK> or double click the file name list to save the selected
file.
Click <CANCEL> to return to the Auto White (Reference) window.
184
The file extension default is WR*.
3) When an existing file has been selected, the save confirmation window appears.
Click <YES> to overwrite the selected file.
Click <NO> to return to the File Save window.
Exit
This exits the Auto White (Reference) function.
Operation
1) Select Exit.
2) The Auto White (Reference) function will be exited.
Auto White
This starts the white reference adjustment.
Operation
1) Select Auto White.
2) The confirmation window appears.
185
Click <OK> to start the white reference adjustment.
Click <CANCEL> to return to the Auto White (Reference) window.
3) The white reference adjustment process will appear.
When the brightness ratio of each CRT is 100%, they are the same color temperature.
White Reference
Select White Reference from the Auto White (Reference) window and a pull-down menu will appear.
The brightness is measured and the white reference data are is saved.
Operation
1) Input an NTSC3.58 or PAL all-white signal to the projector.
2) Select Learn.
3) The brightness data measurement window appears.
Click <OK> to start measuring the brightness.
Click <CANCEL> to return to the Auto White (Reference) window.
186
4) When the brightness measurement is completed, the White Reference Data File Save window
appears.
Enter the file name or select it. Click <OK> or double click the file name list to save the selected
file.
Click <CANCEL> to return to the Auto White (Reference) window.
The file extension default is WR*.
5) When an existing file has been selected, the save confirmation window appears.
Click <YES> to overwrite the selected file.
Click <NO> to return to the File Save window.
Display
Select Display from the Auto White (Reference) window and a pull-down menu will appear.
This enlarges or reduces the ratio of the brightness graph.
Zoom In
This enlarges the ratio of the brightness graph.
Ratios change by: 200%, 150% and 125%.
Operation
1) Select Zoom In, or click the brightness graph with the left button of the mouse. The ratio of the
brightness graph will zoom in.
187
Zoom Out
This reduces the ratio of the brightness graph.
Ratios change by: 125%, 150% and 200%.
Operation
1) Select Zoom Out, or click the brightness graph with the right button of the mouse. The ratio of
the brightness graph will zoom out.
Option
Select Option from the Auto White (Reference) window and a pull-down menu will appear.
This displays the brightness of the current input signal, the Auto White test pattern, and the
information from the color analyzer.
Measure Start
This measures the brightness of the current input signal.
Operation
1) Select Measure Start.
2) The measured brightness will appear as a graph.
Note:
All operations are suspended while this command is executed.
Execute Measure Stop before performing other operations.
188
Measure Stop
This stops the brightness measurement.
Operation
1) Select Measure Stop.
Auto White Test Pattern
This turns the Auto White Test Pattern display.
Operation
1) Select Auto White Test Pattern.
2) The Auto White Test Pattern selection window will appear.
3) Click a radio button.
Selection
Function
OFF
Switches off the Auto White Test Pattern
Window Pattern
Displays the Auto White Test Pattern at screen center
All Pattern
Displays the Auto White Test Pattern all over the screen
4) Select the test pattern output level.
Click the down arrow to choose an output level.
189
5) Click <OK> to activate the Auto White Test Pattern and level you have selected or turned off.
Click <CANCEL> to return to the Auto White (Reference) window.
Color Analyzer Info.
This displays the information from the color analyzer.
Operation
1) Select Color Analyzer Info.
The various information concerning the connected color analyzer are displayed.
2) Click <OK> to return to the Auto White (Reference) window.
190
Volume 11-Flash ROM Version Up Tool Manual
The Flash ROM Version Upgrade method for service personnel in PC Control for Windows will be
described.
Contents
Starting Flash ROM Version Up Tool .............................................................................................. 192
Operation Method for flash ROM Version Up.................................................................................. 193
Menu................................................................................................................................................. 194
File............................................................................................................................................ 194
System Hex File Open ...................................................................................................... 194
D-Con Hex File Open....................................................................................................... 195
Exit ................................................................................................................................... 196
Version Up................................................................................................................................ 196
Load To System ................................................................................................................ 197
Load To D-Con................................................................................................................. 199
Option....................................................................................................................................... 201
Option Term. Baud Rate ................................................................................................... 202
Information ....................................................................................................................... 202
191
Starting Flash ROM Version Up Tool
The starting method of the version upgrade tool will be described.
Operation
1) Start "PC Control for Windows".
2) Select the Expert Control Mode and the pass code window will appear.
3) Enter the pass code for service personnel.
4) Under the menu pull-down menu is the Flash ROM Version Up command. Select it.
5) The warning message will appear.
6) Click <OK> to display the Flash ROM Version Up Tool window.
192
The version of the current System Flash ROM is displayed in the FLASH ROM Version.
The date of the selected program file is displayed in the Upload File Data.
Operation Method for flash ROM Version Up
The version upgrade operation procedure will be described.
Operation Procedure
1) Select Option Term. Baud Rate to set the baud rage.
2) Select File to select the program file.
3) The list of program files will appear.
4) Select Version Up to start the version upgrade of the projector.
5)
An indication of the version upgrade advancement is displayed graphically under the
Information heading of the FLASH ROM Version Upgrade Tool window.
6) The Flash ROM Check Sum will appear after the version upgrade is completed.
193
Menu
File
A pull-down menu such as the one illustrated in the diagram below will appear.
System Hex File Open
This selects the file for System program.
D-Con Hex File Open
This selects the file for D-Con program.
Exit
The exits the Flash ROM Version Up Tool.
System Hex File Open
This selects the file for System program.
Operation
1) Select System Hex File Open.
2) The System Hex File Open window will appear.
194
Enter the file name or select it and then click <OK>, or double click on the file name list to open the
selected file.
Click <CANCEL> to return to the Flash ROM Version Up Tool window.
3) A list of the program files which are loaded in System will appear.
Note:
Program files are automatically searched with the selected file name as the source.
D-Con Hex File Open
This selects the file for D-Con program.
Operation
1) Select the D-Con Hex File Open.
2) The D-Con Hex File Open window will appear.
Enter the file name or select it and then click <OK>, or double click on the file name list to open the
selected file.
Click <CANCEL> to return to the Flash ROM Version Up Tool window.
3) A list of the program files which are loaded in D-Con will appear.
Note:
Program files are automatically searched with the selected file name as the source.
195
Exit
This exits the Flash ROM Version Up Tool.
Operation
1) Select Exit.
2) The restart confirmation window will appear after Version Up result window is displayed.
3) Click <OK> to close this application.
Note:
This exits the Flash ROM Version Up Tool window and return to the PC Control window , when
the Version Up is not performed.
Version Up
A pull-down menu such as the one illustrated in the diagram below will appear.
Load To System
The executes the Version Up of the System Flash ROM.
Load To D-Con
The executes the Version Up of the D-Con Flash ROM.
196
Note:
Version Up will appear in a dim color and cannot be selected unless the program file is selected.
Load To System
The executes the Version Up of the System Flash ROM.
Operation Procedure
1) Select Load To System.
2) The version upgrade confirmation window will appear.
Click <OK> to start the version up.
Click <CANCEL> to return to the Flash ROM Version Up Tool window.
3) The system Flash ROM is initialized.
4)
An indication of the version upgrade advancement is displayed graphically under the
Information heading.
The remaining time is and estimation and some error will be present.
197
A press of the ESC key during loading will display the version upgrade cancellation confirmation
window.
Click <OK> to cancel version up.
Click <CANCEL> to continue version up.
5) The version upgrade completion message will appear when the version upgrade is completed.
198
6) Click <OK> to display the Check Sum of the Flash ROM that was version upgraded.
Note:
Load To System is dimmed and cannot be selected unless the System program file is selected.
Load To D-Con
The executes the Version Up of the D-Con Flash ROM.
Operation
1) Select Load To D-Con.
2) The version upgrade confirmation window will appear.
Click <OK> to start the version up.
Click <CANCEL> to return to the Flash ROM Version Up Tool window.
199
3) The D-Con Flash ROM is initialized.
4)
An indication of the version upgrade advancement is displayed graphically under the
Information heading.
The remaining time is and estimation and some error will be present.
A press of the ESC key during loading will display the version upgrade cancellation confirmation
window.
Click <OK> to cancel version up.
Click <CANCEL> to continue version up.
5) The version upgrade completion message will appear when the version upgrade is completed.
200
6) Click <OK> to display the Check Sum of the Flash ROM that was version upgraded.
Note:
Load To D-Con is dimmed and cannot be selected unless the D-Con program file is selected.
Option
A pull-down menu such as the one illustrated in the diagram below is displayed.
Option Term. Baud Rate
This sets the communications baud rate.
Information
This displays the check sum for the Flash ROM.
201
Option Term. Baud Rate
This sets the communications baud rate.
Operation
1) Select Option Term. Baud Rate, and then the option term. baud rate setting window will appear.
2) Click the clown arrow to select the communication baud rate.
Click <OK> to select the communication baud rate.
Click <CANCEL> to return to the Flash ROM Version Up Tool window.
Information
This displays the check sum for the Flash ROM.
Operation
1) Select Information, and the window such as the one illustrated below will appear.
202
2) Click <OK> to display the check sum.
203
RS-232C Command Reference for XG series CRT
projectors.
You can control the main functions from external equipment such as personal computer using the
REMOTE 2 terminal. The following sections explain the interface.
Interface Condition
Serial communications system conforming to RS-232C standard.(recommended) or RS-422 standard..
Baud rate
: 4800 / 9600 /19200 / 38400bps (selective)
Data length
: 8 bits
Parity
: Odd
Stop bit
: 1 bit
Communication procedure
: Full duplex
Note : If you use projector at stand alone condition, you can use above four baud rate.
When you use other condition, switcher 1 level, switcher 2 level and multiple pj,
19200 bps and 38400bps are not available.
The default baud rate setting is 9600 bps in Projector.
When you change serial communication system RS-232C and RS-422, the projector requires to
change setting of switch (S8121) on SYSTEM PWB.
Examples of Personal Computer Connections
When using the projector in standalone mode. (Without the ISS-6020 switcher.)
204
When using the projector and the ISS-6020 switcher in 1 LEVEL mode.
205
When using the projector and the ISS-6020 switcher in 2 LEVEL mode.
206
Wiring of RS-232C and RS-422 for XG-Series Projectors
Wiring of RS-422
PJ
OPTION Port
Pin #
SIGNAL
1
RXD1IN+
2
TXD1OUT+
6
RXD1IN7
TXD1OUT15
GND
ISS-6020
REMOTE 2 Port
Pin #
SIGNAL
1
TXD1+
2
RXD1+
6
TXD17
RXD115
GND
PC Terminal
To positive transmit line from PC
To positive receive line of PC
To negative transmit line from PC
To negative receive line of PC
To Ground of PC
PC Terminal
To positive receive line of PC
To positive transmit line from PC
To negative receive line of PC
To negative transmit line from PC
To Ground of PC
Wiring of RS-232
PJ
OPTION Port
Pin #
SIGNAL
6
RXD1IN7
TXD1OUT8
RTS1OUT12
CTS1IN15
GND
ISS-6020
REMOTE 2 Port
Pin #
SIGNAL
6
TXD17
RXD18
CTS112
RTS115
GND
PC Terminal
To negative transmit line from PC
To negative receive line of PC
To negative Clear to Send of PC
To negative Request to Send from PC
To Ground of PC
PC Terminal
To negative receive line of PC
To negative transmit line from PC
To negative Request to Send from PC
To Clear to Send of PC
To Ground of PC
207
Control Data Format
Command 1
Code based on the command system.
Unit Address(UA) Code allocated to each equipment.
Command 2
Code allocated to the main functions of the projector.
Data Length
Number of bytes of the data that is transmitted.
Data
Data that is transmitted.
Check Sum (CKS)
Lower eight bits digits of sum total of the first byte to the byte just before the
last.
Command Communication Sequence
When a external equipment gives the command to the projector, the projector returns an ACK
(ACKNOWLEDGE).
The projector returns an ACK if it has received the command correctly. If it has not received the
command correctly due to data error, it will not return a NAK. Therefore, when the external
equipment send a command, make sure that it receives the ACK.
208
The explanation of "UA " in each command.
Each control command has data “ UA ". “UA” means Unit Address of projector. To control the
projector, necessary to send “UA” correctly.
It is Hex format data and determined the following;
PJ Address
UA(Unit Address)
01
40H
02
41H
03
42H
63
7EH
64
7FH
How to make " UA "
UA = (Hex data of PJ address) + (3FH)
1)Set the PJ address in the OPTION menu.
2)Convert the PJ address to Hex format data.
3)Add that data and "3FH ".
ex)
In case the PJ address is "01 ".
UA = 01H + 3FH = 40H
In case the PJ address is "02 ".
UA = 02H + 3FH = 41H
In case the PJ address is "10 ".
UA = 0AH + 3FH = 49H
In case the PJ address is "20 ".
UA = 14H + 3FH = 53H
In case the PJ address is "64 ".
UA = 40H + 3FH = 7FH
209
The explanation of "CKS " in each command.
Each control command requires to attach a "CKS " at the end of command. "CKS " means Check Sum
of command.
It is also Hex format data. Calculation procedure is the following;
Top data (Command 1 )+ Second data(UA) + + Before data of CKS
1)Add each Hex data from top of command to before of CKS.
2)CKS is subordinate Hex data of 2 figures in a calculation result.
ex)
In case of the PJ address is "01 ".
POWER ON Command
9FH UA 4EH 00H CKS
UA = 01H + 3FH = 40H
9FH + 40H + 4EH + 00H = 12DH
CKS = 2DH
Transmit Data : 9FH 40H 4EH 00H 2DH
POWER OFF Command
9FH UA 4FH 00H CKS
UA = 01H + 3FH = 40H
9FH + 40H + 4FH + 00H = 12EH
CKS = 2EH
Transmit Data : 9FH 40H 4EH 00H 2EH
210
Command List for XG Series Projectors
Contents
* 1 PROJECTOR POWER ON
* 2 PROJECTOR POWER OFF
* 3 SCAN CHANGE
* 4 PICTURE BRIGHT GAIN SET
* 5 PICTURE CONTRAST GAIN SET
* 6 PICTURE COLOR GAIN SET
* 7 PICTURE SHARPNESS GAIN SET
* 8 PICTURE TINT GAIN SET
* 9 PICTURE MUTE ON
* 10 PICTURE MUTE OFF
* 11 SOUND MUTE ON
* 12 SOUND MUTE OFF
* 13 DISPLAY MUTE ON
* 14 DISPLAY MUTE OFF
211
1. PROJECTOR POWER ON
* FUNCTION *
Projector is turned on main power.
If you want to only turn on the projector’s main power and display a picture, send only this command
to projector.
* DATA *
9FH UA 4EH 00H CKS
* ACKNOWLEDGE *
3FH UA 4EH 00H CKS
2. PROJECTOR POWER OFF
* FUNCTION *
Projector is turned off main power.
If you want to only turn off the projector’s main power and display a picture, send only this command
to projector.
* DATA *
9FH UA 4FH 00H CKS
* ACKNOWLEDGE *
3FH UA 4FH 00H CKS
212
3. SCAN CHANGE
* FUNCTION *
Switching signals.
If you want to only change the input signal, send this command to projector.
* DATA *
DFH UA B0H 02H ( DATA 1 ) ( DATA 2 ) CKS
DATA 1
Switch mode
00H : Direct switch. ( Equal to remote controller 10 keys operation. )
01H : Require input list number and switch.
DATA 2
Switching number
When DATA 1 is " 00H ", switch in the below list.
DATA 2
01H
02H
03H
04H
05H
06H
07H
08H
09H
0AH
0BH
0CH
SETTING CONDITION
PJ STAND ALONE
SWITCHER LEVEL 1
INPUT A RGB
M-01
INPUT A VIDEO
M-02
INPUT A S-VIDEO
M-03
INPUT B RGB / VIDEO
M-04
INPUT B S-VIDEO
M-05
M-06
INPUT C RGB / VIDEO
M-07
INPUT C S-VIDEO
M-08
M-09
M-10
-
SWITCHER LEVEL 2
-
0FH
10H
11H
12H
13H
14H
15H
16H
17H
18H
19H
1AH
-
-
M-01 S-01
M-01 S-02
M-01 S-03
M-01 S-04
M-01 S-05
M-01 S-06
M-01 S-07
M-01 S-08
M-01 S-09
M-01 S-10
21H
22H
-
-
M-02 S-01
M-02 S-02
A8H
A9H
-
-
M-10 S-08
M-10 S-09
213
When DATA 1 is " 01H ", switch according to INPUT LIST number. ( 00 - 99 )
DATA 2
00H
01H
02H
03H
04H
05H
06H
07H
08H
09H
0AH
0BH
0CH
0DH
0EH
0FH
10H
11H
12H
INPUT LIST NUMBER
01
02
03
04
05
06
07
08
09
10
11
12
13
14
15
16
17
18
19
61H
62H
63H
98
99
00
* ACKNOWLEDGE *
7FH UA B0H 01H DATA CKS
DATA
FFH : When the projector cannot execute SCAN CHANGE, projector return FFH to PC.
The others : The projector complete SCAN CHANGE.
214
4. PICTURE BRIGHT GAIN SET
* FUNCTION *
Set PICTURE BRIGHTNESS gain.
* DATA *
DFH UA BBH 06H ( DATA 1 ) ( DATA 2 ) ( DATA 3 ) ( DATA 4 ) ( DATA 5 ) ( DATA 6 ) CKS
DATA 1
DATA 2
DATA 3
DATA 4
DATA 5
DATA 6
TRANSMIT DATA
GAIN SELECT FLAG
CRT SELECT FLAG
GAIN SELECT FLAG
YORK SELRCT FLAG
ADJUSTMENT FLAG
GAIN DATA
00H : PICTURE
Don’t care in this function. Normally FFH.
00H : BRIGHTNESS
Don’t care in this function. Normally FFH.
00H : Absolutely , 01H : Relativity
00H - FFH , 80H-7FH
* ACKNOWLEDGE *
7FH UA BBH 06H ( DATA 1 ) ( DATA 2 ) ( DATA 3 ) ( DATA 4 ) ( DATA 5 ) ( DATA 6 ) CKS
DATA 1
DATA 2
DATA 3
DATA 4
DATA 5
DATA 6
ACKNOWLEDGMENT
GAIN SELECT FLAG
CRT SELECT FLAG
GAIN SELECT FLAG
YORK SELRCT FLAG
ADJUSTMENT FLAG
GAIN DATA
Same transmit data
Same transmit data
Same transmit data
Same transmit data
Same transmit data
00H : OK , Other : Range over
215
5. PICTURE CONTRAST GAIN SET
* FUNCTION *
Set PICTURE CONTRAST gain.
* DATA *
DFH UA BBH 06H ( DATA 1 ) ( DATA 2 ) ( DATA 3 ) ( DATA 4 ) ( DATA 5 ) ( DATA 6 ) CKS
DATA 1
DATA 2
DATA 3
DATA 4
DATA 5
DATA 6
TRANSMIT DATA
GAIN SELECT FLAG
CRT SELECT FLAG
GAIN SELECT FLAG
YORK SELRCT FLAG
ADJUSTMENT FLAG
GAIN DATA
00H : PICTURE
Don’t care in this function. Normally FFH.
01H : CONTRAST
Don’t care in this function. Normally FFH.
00H : Absolutely , 01H : Relativity
00H - FFH , 80H-7FH
* ACKNOWLEDGE *
7FH UA BBH 06H ( DATA 1 ) ( DATA 2 ) ( DATA 3 ) ( DATA 4 ) ( DATA 5 ) ( DATA 6 ) CKS
DATA 1
DATA 2
DATA 3
DATA 4
DATA 5
DATA 6
ACKNOWLEDGMENT
GAIN SELECT FLAG
CRT SELECT FLAG
GAIN SELECT FLAG
YORK SELRCT FLAG
ADJUSTMENT FLAG
GAIN DATA
Same transmit data
Same transmit data
Same transmit data
Same transmit data
Same transmit data
00H : OK , Other : Range over
216
6. PICTURE COLOR GAIN SET
* FUNCTION *
Set PICTURE COLOR gain.
* DATA *
DFH UA BBH 06H ( DATA 1 ) ( DATA 2 ) ( DATA 3 ) ( DATA 4 ) ( DATA 5 ) ( DATA 6 ) CKS
DATA 1
DATA 2
DATA 3
DATA 4
DATA 5
DATA 6
TRANSMIT DATA
GAIN SELECT FLAG
CRT SELECT FLAG
GAIN SELECT FLAG
YORK SELRCT FLAG
ADJUSTMENT FLAG
GAIN DATA
00H : PICTURE
Don’t care in this function. Normally FFH.
02H : COLOR
Don’t care in this function. Normally FFH.
00H : Absolutely , 01H : Relativity
00H - FFH , 80H-7FH
* ACKNOWLEDGE *
7FH UA BBH 06H ( DATA 1 ) ( DATA 2 ) ( DATA 3 ) ( DATA 4 ) ( DATA 5 ) ( DATA 6 ) CKS
DATA 1
DATA 2
DATA 3
DATA 4
DATA 5
DATA 6
ACKNOWLEDGMENT
GAIN SELECT FLAG
CRT SELECT FLAG
GAIN SELECT FLAG
YORK SELRCT FLAG
ADJUSTMENT FLAG
GAIN DATA
Same transmit data
Same transmit data
Same transmit data
Same transmit data
Same transmit data
00H : OK , Other : Range over
217
7. PICTURE SHARPNESS GAIN SET
* FUNCTION *
Set PICTURE SHARPNESS gain.
* DATA *
DFH UA BBH 06H ( DATA 1 ) ( DATA 2 ) ( DATA 3 ) ( DATA 4 ) ( DATA 5 ) ( DATA 6 ) CKS
DATA 1
DATA 2
DATA 3
DATA 4
DATA 5
DATA 6
TRANSMIT DATA
GAIN SELECT FLAG
CRT SELECT FLAG
GAIN SELECT FLAG
YORK SELRCT FLAG
ADJUSTMENT FLAG
GAIN DATA
00H : PICTURE
Don’t care in this function. Normally FFH.
03H : SHARPNESS
Don’t care in this function. Normally FFH.
00H : Absolutely , 01H : Relativity
00H - FFH , 80H-7FH
* ACKNOWLEDGE *
7FH UA BBH 06H ( DATA 1 ) ( DATA 2 ) ( DATA 3 ) ( DATA 4 ) ( DATA 5 ) ( DATA 6 ) CKS
DATA 1
DATA 2
DATA 3
DATA 4
DATA 5
DATA 6
ACKNOWLEDGMENT
GAIN SELECT FLAG
CRT SELECT FLAG
GAIN SELECT FLAG
YORK SELRCT FLAG
ADJUSTMENT FLAG
GAIN DATA
Same transmit data
Same transmit data
Same transmit data
Same transmit data
Same transmit data
00H : OK , Other : Range over
218
8. PICTURE TINT GAIN SET
* FUNCTION *
Set PICTURE TINT gain.
* DATA *
DFH UA BBH 06H ( DATA 1 ) ( DATA 2 ) ( DATA 3 ) ( DATA 4 ) ( DATA 5 ) ( DATA 6 ) CKS
DATA 1
DATA 2
DATA 3
DATA 4
DATA 5
DATA 6
TRANSMIT DATA
GAIN SELECT FLAG
CRT SELECT FLAG
GAIN SELECT FLAG
YORK SELRCT FLAG
ADJUSTMENT FLAG
GAIN DATA
00H : PICTURE
Don’t care in this function. Normally FFH.
04H : TINT
Don’t care in this function. Normally FFH.
00H : Absolutely , 01H : Relativity
00H - FFH , 80H-7FH
* ACKNOWLEDGE *
7FH UA BBH 06H ( DATA 1 ) ( DATA 2 ) ( DATA 3 ) ( DATA 4 ) ( DATA 5 ) ( DATA 6 ) CKS
DATA 1
DATA 2
DATA 3
DATA 4
DATA 5
DATA 6
ACKNOWLEDGMENT
GAIN SELECT FLAG
CRT SELECT FLAG
GAIN SELECT FLAG
YORK SELRCT FLAG
ADJUSTMENT FLAG
GAIN DATA
Same transmit data
Same transmit data
Same transmit data
Same transmit data
Same transmit data
00H : OK , Other : Range over
219
9. PICTURE MUTE ON
* FUNCTION *
Turn on " PICTURE MUTE ".
* DATA *
9FH UA 3DH 00H CKS
* ACKNOWLEDGE *
3FH UA 3DH 00H CKS
10. PICTURE MUTE OFF
* FUNCTION *
Turn off " PICTURE MUTE ".
* DATA *
9FH UA 3CH 00H CKS
* ACKNOWLEDGE *
3FH UA 3CH 00H CKS
11. SOUND MUTE ON
* FUNCTION *
Turn on " SOUND MUTE ".
* DATA *
9FH UA 3FH 00H CKS
* ACKNOWLEDGE *
3FH UA 3FH 00H CKS
220
12. SOUND MUTE OFF
* FUNCTION *
Turn off " SOUND MUTE ".
* DATA *
9FH UA 3EH 00H CKS
* ACKNOWLEDGE *
3FH UA 3EH 00H CKS
13. DISPLAY MUTE ON
* FUNCTION *
Turn on " DISPLAY MUTE ".
* DATA *
9FH UA C5H 00H CKS
* ACKNOWLEDGE *
3FH UA C5H 00H CKS
14. DISPLAY MUTE OFF
* FUNCTION *
Turn off " DISPLAY MUTE ".
* DATA *
9FH UA C4H 00H CKS
* ACKNOWLEDGE *
3FH UA C4H 00H CKS
221