1
Rheinisch-Westfälische Technische Hochschule Aachen
Informatik 4
Prof. Dr.-Ing. Felix Freiling (geb. Gärtner)
Diplomarbeit
Honey-DVD
vorgelegt von:
Cand. Inform. Nils Gedicke
Matrikelnummer 228 758
22. Dezember 2005
Gutachter:
Prof. Dr. F. Freiling
Prof. Dr. H. Lichter
Betreuer:
Dipl. Jur. Maximillian Dornseif
Hiermit versichere ich, daß ich die Arbeit selbständig verfaßt und keine anderen als die
angegebenen Quellen und Hilfsmittel benutzt, sowie Zitate kenntlich gemacht habe.
Aachen, den 22. Dezember 2005
(Nils Gedicke)
Abstract
This work describes the development and implementation of an easy to use, bootable
solution on DVD for deploying Honeynets. To achieve this different existing bootable
Linux systems on CD and virtualisation techniques are reviewed and analysed for their
usability in this work and finally combined to a working solution for the problem. The
whole software is assembled on a single DVD which is used as booting and data source
for the complete system since nothing will be installed on the harddrives.
The standard method for deploying a Honeynet is to setup the Honeypots and the
Honeywall on different real systems. The approach of this work is to virtualise all
systems and put them together in a virtual network and thus giving a high flexibility
for the Honeynet layout.
The whole Honeynet is configured and maintained via a centralised controller on the
DVD’s base system which allows for an easy configuration of the single components
and automates all necessary procedures in the virtual network.
Zusammenfassung
Der in dieser Arbeit verfolgte Ansatz beschaeftigt sich mit der Entwicklung und Implementierung einer einfachen Moeglichkeit um Honeynets mit Hilfe einer bootbaren DVD
einzurichten. Um dieses Ziel zu erreichen werden verschiedene existierende, von einer
CD oder DVD bootbare, Linux Systeme und Virtualisierungstechniken untersucht,
auf ihre Tauglichkeit in diesem Projekt geprueft und schliesslich zu einem lauffaehigen System zusammengesetzt. Die gesamte Software wird auf einer einzigen DVD
untergebracht, die sowohl zum Starten des Systems als auch als einzige Datenquelle
verwendet wird. Eine Installation, auch in Teilen, des Systems auf einer Festplatte ist
nicht erforderlich.
Im Normalfall werden Honeynets auf verschiedene Rechner fuer die Honeywall und die
Honeypots verteilt. Die Herangehensweise in dieser Arbeit ist es jedoch alle Systeme
zu virtualisieren und zu einem virtuellen Netzwerk zu verbinden, wodurch eine hohe
Flexibilitaet der moeglichen Honeynet Layouts erreicht wird.
Konfiguriert und gewartet wird das so aufgebaute Honeynet durch ein zentrales Programm auf der DVD, welches saemtliche noetigen Prozeduren zum Erstellen und Betreiben des Honeynets automatisiert.
If you know the enemy and know yourself, you need not fear the result of
a hundred battles.
– Taken from “On the art of war”
Sun Tzu
Contents
.
.
.
.
.
.
.
.
.
.
.
.
.
.
.
.
.
.
.
.
.
.
.
.
.
.
.
.
.
.
.
.
.
.
.
.
.
.
.
.
.
.
.
.
.
.
.
.
.
.
.
.
.
.
.
.
.
.
.
.
.
.
.
.
.
1
1
1
2
4
4
2. Base concepts
2.1. Live Linux distributions . . . . . . . . . . . . . .
2.1.1. Requirements to a live Linux distribution
2.1.2. Distribution similarities . . . . . . . . . .
2.2. Virtualisation . . . . . . . . . . . . . . . . . . . .
2.2.1. Methods of Virtualisation . . . . . . . . .
2.2.2. Detecting Virtualisation . . . . . . . . . .
2.3. Summary . . . . . . . . . . . . . . . . . . . . . .
.
.
.
.
.
.
.
.
.
.
.
.
.
.
.
.
.
.
.
.
.
.
.
.
.
.
.
.
.
.
.
.
.
.
.
.
.
.
.
.
.
.
.
.
.
.
.
.
.
.
.
.
.
.
.
.
.
.
.
.
.
.
.
.
.
.
.
.
.
.
.
.
.
.
.
.
.
.
.
.
.
.
.
.
7
7
7
8
9
9
12
14
3. Components of the Honey-DVD
3.1. Base system components . . . . . .
3.1.1. The live Linux distribution
3.1.2. The Virtualisation software
3.2. Honeynet components . . . . . . .
3.2.1. Data control . . . . . . . .
3.2.2. Data capture . . . . . . . .
3.2.3. Honeypot images . . . . . .
3.3. Summary . . . . . . . . . . . . . .
.
.
.
.
.
.
.
.
.
.
.
.
.
.
.
.
.
.
.
.
.
.
.
.
.
.
.
.
.
.
.
.
.
.
.
.
.
.
.
.
.
.
.
.
.
.
.
.
.
.
.
.
.
.
.
.
.
.
.
.
.
.
.
.
.
.
.
.
.
.
.
.
.
.
.
.
.
.
.
.
.
.
.
.
.
.
.
.
.
.
.
.
.
.
.
.
15
15
15
17
20
20
21
21
22
.
.
.
.
.
23
23
23
25
30
33
1. Introduction
1.1. Know your enemy - The Honeynet Project
1.1.1. History of Honeynets . . . . . . . .
1.1.2. Deploying a Honeynet . . . . . . .
1.2. About this work . . . . . . . . . . . . . .
1.2.1. The Honey-DVD . . . . . . . . . .
4. Building the Honey-DVD
4.1. Layout of the prototype . . . .
4.1.1. The virtual Honeynet .
4.1.2. The Honeypots . . . . .
4.1.3. The Honeynet controller
4.2. Implementation analysis . . . .
.
.
.
.
.
.
.
.
.
.
.
.
.
.
.
.
.
.
.
.
.
.
.
.
.
.
.
.
.
.
.
.
.
.
.
.
.
.
.
.
.
.
.
.
.
.
.
.
.
.
.
.
.
.
.
.
.
.
.
.
.
.
.
.
.
.
.
.
.
.
.
.
.
.
.
.
.
.
.
.
.
.
.
.
.
.
.
.
.
.
.
.
.
.
.
.
.
.
.
.
.
.
.
.
.
.
.
.
.
.
.
.
.
.
.
.
.
.
.
.
.
.
.
.
.
.
.
.
.
.
.
.
.
.
.
.
.
.
.
.
.
.
.
.
.
.
.
.
.
.
.
.
.
.
.
.
.
.
.
.
.
.
.
.
.
.
.
.
.
.
.
.
.
.
.
.
.
.
.
.
.
.
.
.
ix
Contents
4.2.1. Problems of the implementation . . . . .
4.2.2. Possible solutions . . . . . . . . . . . . . .
4.3. The current version . . . . . . . . . . . . . . . . .
4.3.1. The revised virtual Honeynet . . . . . . .
4.3.2. Changes to the Honeypots . . . . . . . . .
4.3.3. The Honeynet controller (second version)
4.4. Summary . . . . . . . . . . . . . . . . . . . . . .
.
.
.
.
.
.
.
.
.
.
.
.
.
.
.
.
.
.
.
.
.
.
.
.
.
.
.
.
.
.
.
.
.
.
.
.
.
.
.
.
.
.
.
.
.
.
.
.
.
.
.
.
.
.
.
.
.
.
.
.
.
.
.
.
.
.
.
.
.
.
.
.
.
.
.
.
.
.
.
.
.
.
.
.
34
35
37
37
39
39
39
5. Honey-DVD documentation
5.1. Honey-DVD bootup . . . . . . . . . . . . . . .
5.2. Using the Honey-DVD Controller . . . . . . . .
5.2.1. The default mode . . . . . . . . . . . .
5.2.2. Customising the Honeynet . . . . . . . .
5.2.3. Starting and maintaining the Honeynet
5.2.4. Honey-DVD shutdown . . . . . . . . . .
5.3. Possibilities besides the Controller . . . . . . .
5.3.1. The Honeywall interface Walleye . . . .
5.3.2. The QEMU console . . . . . . . . . . .
5.3.3. The Honey-DVD base system . . . . . .
5.4. Important notes . . . . . . . . . . . . . . . . .
5.4.1. Passwords . . . . . . . . . . . . . . . . .
5.4.2. Testing release . . . . . . . . . . . . . .
.
.
.
.
.
.
.
.
.
.
.
.
.
.
.
.
.
.
.
.
.
.
.
.
.
.
.
.
.
.
.
.
.
.
.
.
.
.
.
.
.
.
.
.
.
.
.
.
.
.
.
.
.
.
.
.
.
.
.
.
.
.
.
.
.
.
.
.
.
.
.
.
.
.
.
.
.
.
.
.
.
.
.
.
.
.
.
.
.
.
.
.
.
.
.
.
.
.
.
.
.
.
.
.
.
.
.
.
.
.
.
.
.
.
.
.
.
.
.
.
.
.
.
.
.
.
.
.
.
.
.
.
.
.
.
.
.
.
.
.
.
.
.
.
.
.
.
.
.
.
.
.
.
.
.
.
.
.
.
.
.
.
.
.
.
.
.
.
.
41
41
42
43
44
46
48
48
48
48
49
49
49
50
6. Performance of the Honey-DVD
6.1. Performance tests . . . . . .
6.1.1. Test setup . . . . . .
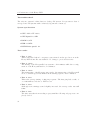
6.1.2. Applied tests . . . .
6.1.3. Test results . . . . .
6.2. Analysis of the test results .
6.2.1. Worst case scenario
6.3. Summary . . . . . . . . . .
.
.
.
.
.
.
.
.
.
.
.
.
.
.
.
.
.
.
.
.
.
.
.
.
.
.
.
.
.
.
.
.
.
.
.
.
.
.
.
.
.
.
.
.
.
.
.
.
.
.
.
.
.
.
.
.
.
.
.
.
.
.
.
.
.
.
.
.
.
.
.
.
.
.
.
.
.
.
.
.
.
.
.
.
.
.
.
.
.
.
.
51
51
51
52
52
56
57
58
.
.
.
.
.
.
.
.
.
.
.
.
.
.
.
.
.
.
.
.
.
.
.
.
.
.
.
.
.
.
.
.
.
.
.
.
.
.
.
.
.
.
.
.
.
.
.
.
.
.
.
.
.
.
.
.
.
.
.
.
.
.
.
.
.
.
.
.
.
.
.
.
.
.
.
.
.
7. Conclusion and outlook
59
Bibliography
61
A. Abbreviations
63
B. Default Honeynet configuration
B.1. Default Honeywall configuration (File excerpt) . . . . . . . . . . . . .
B.2. Honepot configuration . . . . . . . . . . . . . . . . . . . . . . . . . . .
B.2.1. FreeBSD 5.3 configuration . . . . . . . . . . . . . . . . . . . . .
65
65
71
71
x
Contents
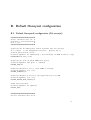
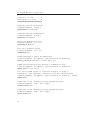
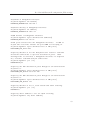
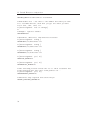
B.2.2. Redhat 8 configuration . . . . . . . . . . . . . . . . . . . . . . .
C. Sourcecode
71
73
xi
List of Tables
3.1. Performance of different virtualisers compared to real systems running
on a live Linux distribution . . . . . . . . . . . . . . . . . . . . . . . .
18
4.1. Exported configuration files of the Redhat 8 system . . . . . . . . . .
4.2. Exported configuration files of the FreeBSD 5.3 system . . . . . . . . .
4.3. Default Honeynet configuration . . . . . . . . . . . . . . . . . . . . . .
28
28
31
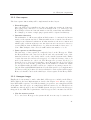
6.1. Testresults . . . . . . . . . . . . . . . . . . . . . . . . . . . . . . . . . .
56
B.1.
B.2.
B.3.
B.4.
B.5.
71
71
72
72
72
FreeBSD 5.3 default system configuration . .
FreeBSD5.3 default services started via initd
FreeBSD 5.3 additional default services . . .
Redhat 8 default system configuration . . . .
Redhat 8 default services . . . . . . . . . . .
.
.
.
.
.
.
.
.
.
.
.
.
.
.
.
.
.
.
.
.
.
.
.
.
.
.
.
.
.
.
.
.
.
.
.
.
.
.
.
.
.
.
.
.
.
.
.
.
.
.
.
.
.
.
.
.
.
.
.
.
.
.
.
.
.
.
.
.
.
.
xiii
List of Figures
1.1. Generic GenII Honeynet layout . . . . . . . . . . . . . . . . . . . . . .
3
2.1. Virtualisation in two different ways . . . . . . . . . . . . . . . . . . . .
11
4.1. Network layout of the Honey-DVD . . . . . . . . . . . . . . . . . . . .
4.2. Mountpoints for the disc images of a Honeypot. . . . . . . . . . . . . .
4.3. Network layout of the Honey-DVD (current version) . . . . . . . . . .
24
27
38
xv
Listings
2.1. Redpill.c [21] . . . . . . . . . . . . . . . . . . . . . . . . . . . . . . . .
4.1. Excerpt from HoneyController.c . . . . . . . . . . . . . . . . . . . . . .
14
32
xvii
Danksagungen
An dieser Stelle möchte ich allen Menschen danken, die mich bei dieser Arbeit unterstützt und begleitet haben.
Zuallererst geht mein Dank an Prof. Dr.-Ing. F. Freiling für die Möglichkeit, mein
Studium mit dieser Arbeit im Gebiet der verlässlichen verteilten Systeme zu beschließen.
Weiterer Dank geht an Prof. Dr. H. Lichter für die Übernahme der Zweitkorrektur.
Maximilan Dornseif möchte ich für die Betreuung während dieser Arbeit danken.
Michael Koch und Stefan Hahn gebührt mein Dank dafür, dass sie mich von den
schlimmsten orthographischen Sünden abhielten.
Meinen aachener Studienkollegen danke ich für die schöne Zeit und die immer willkommene
Ablenkung.
Ich danke meinen langjährigen Freunden aus Hamm – für ihre Freundschaft und
moralische Unterstützung.
Mein besonderer Dank gilt meinen Eltern, Dr. Reinhild und Dr. Volker Gedicke, die
mir das Studium ermöglicht und mich die ganzen Jahre unterstützt haben.
xix
1. Introduction
The introduction of computer networks and especially the internet has brought great
new possibilities. Distributed computing, worldwide communication networks and
global information exchange are only three among hundreds. But as allways, with
new possibilities new risks are included.
Like in the rea lworld there always will be the hackers, cracker or whatever you might
call those who seek to cause trouble in the cyberspace. Since the modern society
heavily relies on computers and network communication, those are the modern targets
for attacks on almost any resource in the world. The spectrum reaches from relatively
simple denial of service attacks on single targets via the distribution of malicious
software like trojans or viruses to the attempts of gaining complete control over target
systems and using them as bases for causing further harm.
1.1. Know your enemy - The Honeynet Project
Through the centuries the words of Sun Tzu were a widely used strategy and a well
known advise in many conflicts. But today to know your enemy is no longer only a
strategy in ordinary warfare; also in the efforts taken against the computer criminals
it is of big interest to know why and how someone is doing something.
The Honeynet Project [10] was founded in 1999 with the goal to learn as much as
possible about the adversaries and their actions.
1.1.1. History of Honeynets
The idea was to develop a network, dedicated for the only purpose to be attacked
and compromised while the administrator could stealthily monitor the actions of the
attacker. The base concept was to deploy a subnetwork of so called Honeypots, computers designed for being hacked and equipped with additional monitoring software,
in systems with some importance and thus rather high probability of being attacked.
But in deploying such networks great risks are included.
For example, an adversary might gain controll of a Honeypot, use it as base for further attacks and cause harm to other non Honeypot systems. To prevent this, some
standards [16] for Honeynets were defined:
1
1. Introduction
Definition 1 (Data Controll)
Once a Honeypot within the Honeynet is compromised, we have to contain the activity
and ensure the Honeypots are not used to harm non Honeynet systems. There must
be some means of controlling how traffic can flow in and out of the Honeynet, without
beeing detected by the attacker. Data Control always takes priority over Data Capture.
Definition 2 (Data Capture)
Capture all activity within the Honeynet and the information that enters and leaves
the Honeynet without attackers knowing they are being watched.
Definition 3 (Data Collection)
If the Honeynet is part of a distributed environment, then that Honeynet must meet the
third requirement of Data Collection. Once data is captured, it is securely forwarded to
a centralised data collection point. This allows data captured from numerous Honeynet
sensors to be centrally collected for analysis and archiving.
GenII Honeynets
After some Honeynets, the so called GenI networks, where deployed the shortcomings
of the implementation where obvious. The second generation, so called GenII, of
Honeynets was designed to solve these issues.
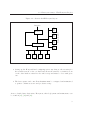
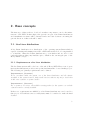
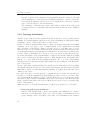
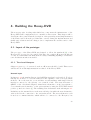
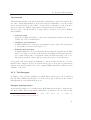
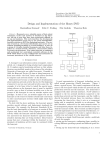
The biggest change in the layout from the GenI to the GenII Honeynets is the introduction of the Honeywall. Figure 1.1 shows how this component divides the network
into the production network and the Honeynet. The Honeywall is equipped with three
network interfaces. No IP-address is assigned to the two network interfaces connected
to the production network and the Honeypots and the traffic is directly forwarded
between these two interfaces without increasing the TTL. Thus the Honeywall should
be completely invisible to an adversary attacking the Honeynet. The third interface,
connected to the main network router is for management purpose and doesn’t interfere in any way with the Honeynet traffic. Data Controll and Data Capture are both
implemented on the Honeywall and also Data Collection can be done there.
Every Honeypot is equipped with tools to capture data which is not accessible in the
connections data flows and stealthily export this data to the Data Colletion server.
1.1.2. Deploying a Honeynet
Deploying a Honeynet is a rather complex task. The most critical point of the setup
are:
• The Honeypots must be configured and different operating systems installed and
patched for Honeypot usage.
2
1.1. Know your enemy - The Honeynet Project
Figure 1.1.: Generic GenII Honeynet layout
Production
Machine
Production
Machine
Router
Production Net
Production
Machine
Internet
Production
Machine
Honeywall
Honeypot
Honeypot
Honeypot
Honeypot
Honeynet
• Setting up the Honeywall and configuring it in a way that provides security for
the normal network on the one hand and allows the attacker a certain freedom
on the other hand is critical for the whole setup and must be done with great
care.
• The data capture and controll mechanisms must be configured and maintained
to grant a continuous secure and productive setup.
A more detailed introduction into Honeynets, their deployment and maintenance can
be found in [17], [19] and [18].
3
1. Introduction
1.2. About this work
The Honeynet Project took a first step to create a simple solution for the problem of
Honeynet deployment by creating the Honeywall CDROM. The Honywall CDROM is
a bootable CD which allowes the user to setup and maintain a Honeywall in a quite
intuitive and easy to use fashion. Furthor development of this CD finally led to the
current release called Roo [20], which can be used to easily install a Honeywall on any
PC system.
1.2.1. The Honey-DVD
The idea behind the Honey-DVD is to take the next step and implement a solution for
not only deploying a functional Honeywall but a complete Honeynet setup with not
much more effort than booting the DVD.
For this goal, different techniques from different fields must be analysed for their
usability in this work:
• Live Linux distributions
Live Linux Distributions are distributions of the Linux system capable of booting
from a CD or DVD and able to run completely in the memory without interacting
with harddiscs.
• Virtualisation techniques
The complete Honeynet setup must be implemented as a virtual network of
independent systems. The different Virtualisation techniques available have huge
differences in their performance and usability with different operating systems.
• Remote configuration
Since the Honey-DVD should be controlled with a centralised tool which should
allow the user to configure every component of the Honeynet, the Honeypots
operating systems must allow for remote configuration.
Finally the chosen components and methods must be combined to an implementation
which fulfils the following requirements:
• The Honey-DVD should be bootable on every system able to boot from a DVD.
• The Honey-DVD should provide a complete GenII Honeynet setup including
different Honeypots and the Honeywall.
4
1.2. About this work
• The Honeynet setup should be easy, but the Honey-DVD should allow to configure all important values.
• The maintenance of a running Honeynet, including at least basic capabilities for
the analysis of the Captured data, should be possible and the provided tools
easy to use.
• The Honey-DVD should not interfere with the data stored on the harddrives of
the machine its running on.
5
2. Base concepts
The first step of this work is to decide about what components to use for the infrastructure of the DVD. In this chapter the general concepts of live Linux distributions
and virtualisation software will be discussed and some basic decisions concerning the
general direction of this work will be made.
2.1. Live Linux distributions
A live Linux distribution is a distribution of the operating system Linux which is
capable of starting and running from a CD or DVD without the need of beeing installed
to a harddisc. Many live Linux distributions go even further and are able to run
comletely without using any harddisc space, which is also an integral part of the
Honey-DVDs concept.
2.1.1. Requirements to a live Linux distribution
The live Linux system will be the base of the whole Honey-DVD. Hence it is of great
interest that this system provides some specific fundamentals to be used in this project.
The following two primary requirements can be defined:
Requirement 4 (Stability)
To be considered stable, the system core of the linux distribution and all software
installed on the system must be fairly tested versions without any major issues that
would cause software or system crashes.
Requirement 5 (Security)
For a system to be secure, all available security patches for the system core and the
software must be correctly installed.
If these two requirements are fulfilled by a live Linux distribution it can be used for
this project. Nevertheless some secondary issues must be considered to make the final
decision.
7
2. Base concepts
Requirement 6 (Minimal software)
The more software is running on the system the more resources are bound. Since
diskspace, memory and performance will be critical issues, a system which lacks unnecessary software is to be prefered to a system which comes with a complete software
package. Another simple reason for minimal software is that the more software is
running the more failures and potential security issues may occur.
Requirement 7 (Easy maintenance)
To preserve the requirements 4 and 5 beyond the first versions it should be easy to
update and patch main system components and software.
Requirement 8 (Compatibility)
The system must be compatible to the most hardware. That means it must not only
have the supported modules installed to the kernel but also autodetect all available and
necessary resources during startup.
Requirement 9 (Supports customisation)
To build a virtual Honeynet upon the live Linux, it may be necessary to modify some of
the components already provided by the distribution. One example would be the startup
sequence and automatic login behaviour of the most distributions.
A system fulfilling all of these requirements would be an optimal system to build on.
Nevertheless, there are many different ways to build such a system and hence one has
to look closer to the pros and cons of each single one to decide.
2.1.2. Distribution similarities
When analysing different live Linux distributions, it turns out that the first steps and
the main layout of nearly every distribution are very similar. The common implementation of the boot sequence of a live system is like this:
1. Boot the Linux kernel with an initial ramdrive image
2. Execute a startup script contained in this image
3. Detect CD- or DVD-Drive and allocate space for the ramdrive
4. Mount compressed read-only image from the CD or DVD into the ramdrive
5. Copy and link all files to the needed locations to boot the main system from the
read-only image
8
2.2. Virtualisation
6. Start Linux boot sequence from the ramdrive
From this point onward the behaviour of the system depends on the Linux distribution
which was taken as the base of the live system. Every distribution has its own ways
of organising its’ startup scripts and its own runtime behaviour. Some live systems
are based on major distributions like Debian, Fedora or Slackware while others go
their own way and assemble the necessary parts completely independently. A Linux
system built especially to run as a live system can be designed to be extremely small
with respect to its purpose but most times customisation is quite complex since nearly
every additional software must be recompiled and reconfigured to run on these systems. On the other hand, a system based on another distribution can access the base
distributions package repositories to customise and update the system. But since the
base structure is given by a distribution originally built for harddisk installation, it
will never be as small as a special build might be and it will inherit the advantages
and disadvantages of its base distribution.
2.2. Virtualisation
The second integral part of the Honey-DVD is the Virtualisation. Virtualisation allows
to imlpement multiple computer systems on the hardware of only one really existing
machine. Those additional so-called, virtual machines will act independant of each
other with their own operating system and virtual resources. In this work virtualisation
will be used to implement a complete virtual Honeynet as described in chapter 1.1.1.
2.2.1. Methods of Virtualisation
One of the main questions during the design phase was, which software would be
the best for the virtualisation. Since there are not only many different providers of
implementations but also different ways of doing the virtualisation, the problem of
choosing the right virtualisation software is not an easy one.
The first thing to consider is how the virtualisation can be done. The only thing
common to all kinds of virtualisation is the need of a software layer that provides
the illusion of real machines to multiple instances of guest operating systems. This
layer is called the Virtual Machine Monitor (VMM) and is necessary since every single
operating system will try to directly access the hardware as described in [23]. But the
different implementations of this softwarelayer use different strategies to achieve their
goal.
[22] provides a good basis for categorising the different approaches. The first differences
are in the fundamental behaviour of the VMM. The two strategies available here are:
9
2. Base concepts
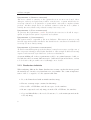
• Full system simulation
Simulating a complete system means to provide software implementations for
everything. Not only the CPU and its instruction set, but also all hardware
registers, harddisks and other peripherals must be implemented. Full system
simulators like Simics [8] are mainly used to develop and test complex electronic
systems that are not PCs. They are lacking some features for long time operation in production environments. Another disadvantage inherent to this kind of
virtualisation is the great overhead due to redundancy occurring if more than one
virtual system is being hosted. Since only comlete systems are simulated and
no components shared amoung different virtual machines, every single virtual
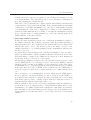
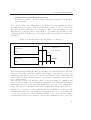
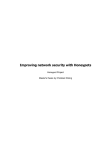
machine will have its own virtual hardware. As shown in figure 2.1 a), all instructions will be executed by the VMMs which implement the virtual machines
and use the real hardware only for their own calculations. The advantage of this
strategy is that by simulating a complete system, side effects like unexpected
register values, wich will be discussed in chapter 2.2.2, will not occure since the
virtual machine will be an exact duplicate of the real machine.
• Emulation of system behaviour
Instead of simulating a complete system with all its components, one can restrict
himself to emulating only the behaviour of a machine. This means, that by using
time and resource sharing algorithms and, if necessary, converting the instruction
set of the virtual machine to instructions for the real machine, the VMMs will
pass the commands issued by the guest operating system to the real hardware
for execution. This solution is shown in figure 2.1 b). In this case, the overhead
of running multiple virtual machines is significantly smaller since the virtual
machines are sharing the real hardware for all calculations.
As stated above, the complete simulation of a system provides a virtual machine that
is indistinguishable from a real machine. But the complete simulation of a system,
not to mention multiple systems, is quite costly and hence the second method is the
method of choice for the virtualisation of the Honey-DVD’s Honeynet.
But also after deciding about this general question there are again two different possibilities of implementing the emulation:
• User mode emulation
The first possibility is to emulate multiple instances of the real systems hardware
by executing other operating systems like ordinary user space programms. This is
possible if the VMM is integrated into the host operating system and provides the
means for the guest systems to run in the unprivileged mode. The consequence
of this is, that all unprivileged instructions of the guest operating systems can
be executed directly on the real hardware, while only the privileged ones must
10
2.2. Virtualisation
Figure 2.1.: Virtualisation in two different ways
a) Full system simulation
Guest
OS
Guest
OS
Guest
OS
VMM
VMM
VMM
b) Emulating system behaviour
Guest
OS
Guest
OS
Guest
OS
Virtual Machine Monitor
Host OS
Host OS
Real Hardware
Real Hardware
General instructions
Unprivileged instructions
Privileged instructions
be controlled by the VMM.
The advantage of this kind of virtualisation is that there is only a very small
overhead and thus the performance of the virtual machines is nearly the same as
of real machines. The drawback on the other hand is that the guest operating
systems must be modified to be able to run in user space and under the controll
of a certain VMM and thus available patches for operating systems are currently
restricted to Linux and a few BSD versions.
• Emulation of complete systems
The second way of implementing the VMM is to try and emulate the behaviour
of a complete computer system, independent of the real hardware. In contrast to
the full system simulation, the emulator will not be a software implementation
of a real system, but just reproduce the behaviour of a real system. To do this
the virtualisation software must provide virtual counterparts for the complete
hardware of the machine it is virtualising and be able to transpose commands
given to the virtual computer into commands for the real hardware.
Since, in contrast to the user mode emulation, all instructions will be processed
by the VMM, this strategy causes more overhead than the user mode emulation.
11
2. Base concepts
But the overhead of the emulation is is still smaller than the overhead of the full
system simulation, because just some preliminary filtering to convert between the
host and guest instruction sets is done before instructions of the hosted system
can be directly passed to the real hardware.
The advantage of this strategy on the other hand is, that it allowes the guest
operating system to be any unmodified system which would run on the emulated
machine.
2.2.2. Detecting Virtualisation
Another point of interest is the question if and how any user of an operating system
running on a virtual machine can find out about the virtualisation. This is interesting
within the context of this work from two points of view:
On the one hand a virtual machine may be considered an unworthy target for hacking
attempts. It is very easy to reset a virtual system to its original state and thus
undo all efforts of any hacker. Thus people who are up to deploying some tools for
later use won’t choose a virtual system for their attack and some Trojans and worms
won’t install but rather automatically delete themselves and any traces of their former
presence when a virtualisation is detected. A second reason is that the knowledge
about the true nature of the system might be a hint for any attacker that he is within
the borders of a Honeynet and thus monitored. With this knowledge the attacker may
just choose to leave without doing anything but maybe also to do some weired things
and fill up the logs with useless junk. And in this case the usefulness of the Honeynet
is no longer given.
On the other hand, virtual machines are widely used in datacenters and by hacking
the virtual system and break out of the virtual environmant, any adversary would gain
immediate controll over all virtual systems running on a single host and cause great
damage to its owner.
Of course it would be of some interest to gain knowledge about the actions taken by
a hacker to break the virtualisation. But in this case there would be a problem: The
idea behind the Honey-DVD is to run a complete Honeynet on one real system. If any
adversary would break the virtualisation he would be in controll of the Honeynet and
all the captured data. Hence the deployed Honeynet would no longer be a trustworthy
source of information.
Thus it would be best if the virtual nature of a Honeypot would not be detectable.
• Detecting full system simulation
It has been shown that in the context of performance the simulation of a complete
system is a great drawback. In the case of detectability of virtualisation it is a
great advantage. Since every single component of a real machine is remodelled in
12
2.2. Virtualisation
software there is no way for a program to decide whether it is running on a real
or a virtual machine. The only feasible way to detect this kind of virtualisation
is by fingerprinting the virtual systems.
This can be done by gathering the complete system data available and run checks
on the hardware components of the machine. If the virtual machine is in a default
configuration of a well known simulator one can derive a rather high probability
of a virtualisation. But if the configuration is changed or the virtualisation
software is rather unknown the probability of detecting the virtualisation rapidly
drops. Another method of fingerprinting is to derive the systems nature from
timing analysis of the target system.
• Detecting emulated systems
Nearly the same argument as in the case of full system simulation applies to
the emulated systems. But sadly the other way round. By passing unprivileged
instructions directly to the real hardware the virtual system gets comparatively
fast but also easy to detect. The system operator can change every bit of the
emulated hardware to avoid fingerprinting but the virtualisation will most assuredly be detected.
[12] states that seventeen instructions of the Intel Pentium Processor are unpreviliged but still sensitive, which basically means these instructions won’t cause
traps that must be caught by the VMM but the behaviour of these instructions
depends upon the processor mode of the system.
An unprivileged instruction with access to the systems interrupt descriptor table
register (IDTR) is the store interrupt descriptor table register (SIDT) command
which stores the contents of the IDTR to a given memory location. Since there
is a minimum of two operating systems, the host system and the hosted, running
at the same time and only one IDTR on the real hardware, the VMM must relocate the register for the hosted operating system to not conflict with the hosts
one.
One very simple tool for virtualisation detection which uses the SIDT instruction is redpill [21]. As shown in listing 2.1, the tool just stores the IDTR to a
predefined location and then compares the value of its sixth byte to the default
0xd0. If the register points to a higher address, then the redpill was executed on
a virtual machine and the return value will be one.
This programm is only one way of detecting virtualisation and its reliability depends on the hosted operating system, i.e. Redpill will most ashuredly detect the
virtualisation on a Linux system while it might fail on FreeBSD. Nevertheless,
since this kind of behaviour is inherent in the design of the most emulation softwares available it is nearly impossible to avoid being detectable for any system
emulator.
13
2. Base concepts
Listing 2.1: Redpill.c [21]
i nt s w a l l o w r e d p i l l ( ) {
unsigned char m[ 2 + 4 ] ,
r p i l l [ ] ” \ x 0 f \ x01 \ x0d \ x00 \ x00 \ x00 \ x00 \ xc3 ” ;
∗ ( ( unsigned∗)& r p i l l [ 3 ] ) = ( unsigned )m;
( ( void ( ∗ ) ( ) ) & r p i l l ) ( ) ;
return (m[5 ] > 0 xd0 ) ? 1 : 0 ;
}
2.3. Summary
In this chapter the general concepts of live Linux distributions and Virtualisation was
discussed.
In the case of virtualisation the differences between full system simulation and emulation of system behaviour were analysed and the decision to use the latter in this work
was made.
Finally, the possibilities of detecting a virtual machine were discussed with the result
that it is currently quite impossible to avoid detection because of some issues inherent
in current processor and operating system design.
14
3. Components of the Honey-DVD
After discussing the general concepts of live Linux distributions and virtual systems it
is now time to analyse and decide about the exact components used for the implementation of the Honey-DVD. The first part of this chapter will discuss which live Linux
implementation and which virtualiser would be suited best for this work. The second
part then will look at the components necessary to implement a Honeynet.
3.1. Base system components
To implement the Honey-DVD one has to recall what was discussed in chapter 2.
Bearing in mind the requirements of this project one can take a closer look at the
different possible software solutions for the problems to solve.
3.1.1. The live Linux distribution
As described in chapter 2.1.2 some considerations where necessary to decide which live
Linux distribution would be best suited to be the basement of the Honey-DVD. The
first thing to decide was if an independent, or even self made, live Linux or a system
based on a major distribution would be the best choice.
Given the requirements 4 and 5 it would be good to have a system specially build for
the purpose of serving as Honey-DVD base system, but this would for sure go beyond
the scope of this work. A slim independent distribution would most likely lead to some
problems, since some of the necessary components to build the Honey-DVD will most
likely be missing, and the update capabilities to maintain security are not give. To
be sure to have access to all necessary tools and updates for this project, i.e. kernel
patches, security features and additional software, the choice is to use a system based
on a major distribution.
The differences among the single distributions are again quite small and hence it is
the liking of the one or the other which is decisive here. Today nearly all major distributions provide update and installation mechanisms, packet management utilities and
quite big software repositories in the web. One of the distributions with the largest
repositories is the Debian distribution. This distribution is easy to maintain without
the need of a running x-server and the frequency of security updates is quite high and
15
3. Components of the Honey-DVD
allways up to date. Hence this distribution will be used for the Honey-DVD.
From all Debian-based systems available, the KNOPPIX [13] live Linux is probably
one of the best and most common ones. Advantages of using this distribution would
be:
• Detailed documentation
The documentation of KNOPPIX is really detailed and many additional sources
of information are available.
• System compatibility
The hardware detection and compatibilities of KNOPPIX are amongst the best
and often mentioned to be equal or even better than the ones of commercial
Linux distributions.
• On-the-fly decompression
All data is stored on the CD/DVD and only decompressed into RAM when it is
used. Unused and unmodified data is deleted from the RAM-drive while virtually
the directory structure is unchanged.
But on the other side it also has a big disadvantage:
• Distribution size
KNOPPIX is one of the largest live Linux distributions available. Its enormous
selection of software is big enough to allow its use as a full-blown Linux distribution for every-day tasks what is absolutely contrary to the minimal software
requirement (Requirement 6).
Another quite promissing live Linux distribution is GRML [2]. Based on the KNOPPIX distribution it comes with equal hardware compatibility, and the differences to
KNOPPIX in the base components were only minor, so that the KNOPPIX documentation is accurate to work with GRML. Some additional advantages of this distribution
are:
• Designed for recovery and administrator use
This distribution was originally build as a rescue system to allow system administrators an easy way of recovering data from defect systems. Hence it is
equipped with all necessary tools and modules to use the most common and
even some of the uncommon hardware and also tools for system monitoring and
testing are included.
16
3.1. Base system components
• Good customizability
The over all structure of the system, i.e. the startup scripts, configuration, etc.,
is easy to understand and the customisation can be done quite easy by using the
standard Debian tools for installing or removing software.
• Minimalistic system
When started, the standard GRML system boots into a Linux zsh-prompt and
allows access to three root and three user consoles. Additionally it starts an
IPTables monitor as well as a system monitor and a syslog viewer. One teletypewriter (tty) gives a normal login prompt while two ttys are left for x-server
usage, but the capabilities included in GRML are reduced to the x-server and a
simple window manager wmi which is not started after system boot by default.
Since GRML is basically a KNOPPIX striped of all unnecessary software and equipped
with easy to use admin tools it seems to be the optimal answer to the question what
live Linux to use on the Honey-DVD.
The only disadvantage that may occure is that since GRML is based on Debian, its
native packet format is deb-packet format and hence software that is only available
in Redhat Paket Manager (RPM)-packages will most likely cause problems during the
installation. But this is a minor drawback, since the Debian repositories provide acces
to a vast amount of packages and hence even if the original program is only available
as RPM the chances are high that a Debian portation or at least substitution will be
available.
3.1.2. The Virtualisation software
The virtualisation software used on the Honey-DVD will probably be one of the most
performance consuming programs running on the system. To avoid performance loss
it would be good to avoid every unnecessary program or program instance and use
software with preferably high performance. As shown in chapter 2.2.1, using a system
emulator would be the best way to achieve this, and, to be more precise, the usermode
emulation would seem to be the best solution regarding the performance.
To evaluate which software would be the best for the Honey-DVD some testing with
different emulators was done. To measure the overall performance of a virtual machine
compared to a real machine a benchmark test was applied. The used benchmark is the
nbench-byte 2.2.2 benchmark [3], a linux port of the BYTE Magazine’s BYTEmark
benchmark program [1]. It was chosen because it uses several real live algorithms
for benchmarking a system. In this way it is possible to predict the systems overall
performance in different tasks and compare the results. Amongst others these four
algorithms are applied:
17
3. Components of the Honey-DVD
• Numeric sort
An algorithm that sorts an array of 32-bit integers.
• String sort
Sorts an array of strings with arbitrary length.
• Fourier coefficients
A numerical analysis routine for calculating series approximations of waveforms.
• IDEA encryption
A cryptographic block cipher algorithm.
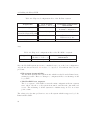
After the application of these tests, three indexes relative to a predefined base benchmark taken on an AMD K6/233 processor are generated which measure the overall
capabilities of the system. The higher the index, the faster the system compared to
the baseline. Another interesting thing is the virtual network. To test this a simple
series of ping request, with a packetsize of 1508 bytes, was send from a remote system
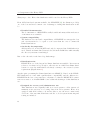
in the network and the average responsetime of 400 pings was taken. The results of
these tests can be found in table 3.1.
Table 3.1.: Performance of different virtualisers compared to real systems running on
a live Linux distribution
Numeric sort
String sort
Fourier coefficients
IDEA encryption
Memory index
Integer index
Floating-point index
Average ping timings
UML
740,3
103,37
15694
2496,3
10,078
7,862
12,538
0,62ms
Xen
736,2
98,28
15630
2431,7
9,315
7,379
12,073
0,65ms
Real system
770,4
114,48
15731
2563,8
11,033
8,914
13,058
0,53ms
VMWare
84,31
6,227
1386
481,4
1,681
1,182
1,351
58ms
QEMU
76,74
4,257
1319,9
253,61
0.650
0.758
0.681
65ms
These first experiments with Xen [11], whose VMM is directly integrated into the
kernel, and UML [7], which mainly just allows a Linux kernel to run as a user space
program, showed two things:
• The maximum performance of the guest operating systems was nearly the same
as on real machines.
18
3.1. Base system components
• The timings of the virtual network were only slightly slower then of the real
machine.
The network test with Xen had an additional result:
• The connection was quite unstable. Some packet losses and even complete link
failure occured.
Given these observations UML would be probably the best choice, but as mentioned in
chapter 2.2.1, only modified Linux kernels will run on this VMM. But the same problem would also apply to Xen, even if the network problems would be solved. Some
modified BSD versions to run in the Xen environment are available. Even a patch
for Microsoft Windows XP was created, but due to some leagal issues never officially
released. Also these modifications and patches only apply to newer system kernels
what additionally diminishes the amount of usable operating systems. Hence the user
mode emulation is not the right choice to virtualise the Honeypots.
In its book [17] the Honeynet-Project gives advice to use VMWare-Workstation [9],
a commercial full system emulator, to virtualise the Honeypots. Hence this was the
first choice for testing full system emulation. VMWare emulates multiple x86 based
machines in one consistent framework and allows to customise the virtual systems, i.e.
adding and removing resources or changing the network infrastructure, as needed in a
very comfortable manner.
Another interesting candidate was the software QEMU [4], released under the GNU
Lesser General Public License. QEMU allows to emulate x86/x86-64 PCs as well
as PowerMac, PowerPC and SPARC Sun4m systems. It is not as comfortable as
VMWare, since all configration is done via the commandline at startup and a text
based monitor interface during runtime. It not only accepts disc immages in its own
qcow format, but also UMLs cow and some versions of VMWares vmdk format are
supported. Other additional image formats are the easily exportable raw-, linux compressed cloop- and the simple dd-image. QEMU also comes with an accelerator module
which is optional and allows QEMU to run most of the target application code directly
on the host processor without the additional filtering for instruction sets if a PC is
emulated on a PC. Sadly this accelerator is a closed source proprietary product and
redistribution is prohibited.
To be comparable the same tests as to the user mode emulators were applied to the
system emulators. The results can also be seen in table 3.1.
Since QEMU is only slightly slower than VMWare and given the open source nature
of the project, which would allow the redistribution on the Honey-DVD, it seems to
19
3. Components of the Honey-DVD
be a good choice for the virtualisation in this work. The only drawback, compared to
VMWare, is, that the code hasn’t been reviewed for security issues and hence it is yet
unknown if and how an adversary could break out of the virtual environment.
3.2. Honeynet components
As described in chapter 1.1.1 the structure of a Honeynet is composed out of several
components. The Honeypots on the one side and the gateway/Honeywall on the other.
As discussed the different elements have their different functions in the Honeynet. To
build the Honey-DVD one has to decide which software to use for the implementation
of these funktions.
3.2.1. Data control
The data control mechanisms of the Honey-DVD will be implemented in two layers,
according to [16]:
• Connection rate limitation
Connection rate limitation is used to restrict the number of connections a Honeypot can initiate. In this way it is, for example, possible to prevent the further
distribution of malware from a Honeypot.
The connection rate limitation can quite easily be done with IPTables1 , a very
powerful tool, that is used for implementation of firewall rules under linux. It
provides the capabilities to define rules to accept all incoming connections while
outbond traffic will be restricted to a predefined amount of possible connections
per time period. This restriction can be applied separately for each of the TCP,
UDP, ICMP, or other protocols and even some exceptions for special connections
may be implemented. (i.e. DNS, NTP or similar standard queries.)
• Extrusion prevention
In the case of data control intrusion detection is not meant as preventing intrusion into our honeynet but rather intrusion into other systems with the honeynet
as a source. For this cause a modified version of the Snort intrusion detection
system called snort_inline is used. It allows to analyse outbound packets for
known attacks and gives the possibility of either dropping or modifying those
packets. The second way is interesting because the attacker will be able to verify
that his packets are delivered but won’t know why his attacks fail.
1
Detailed
information
of
IPTables
functionality
http://netfilter.org/projects/iptables/index.html
20
can
be
found
at
3.2. Honeynet components
3.2.2. Data capture
The data capture functionality will be implemented in three layers.
1. Firewall logging
Since the Honeypots normally won’t have any traffic any activity is of interest.
By logging every connection or connection attempt from or to a Honeypot the
Honeywall provides some basic information even if no actual data was transfered.
For example port scans or single ping requests will be captured in this way.
2. Intrusion detection
The maintainer of a Honeynet will most likely want to be informed if a known
attack on the system was tried. This information is not critical, but allows for
example some statistical evaluations off what attacks are the most common and
which backdoors the most known ones. Another reason for an intrusion detection
system (IDS) is, that an IDS allows to log all network traffic for later use to do
some offline analysis of the collected traffic with a vast number of tools.
3. Data capture on the Honeypots
The last layer of data capture is completely based on the Honeypots. While
the Honeywall has total control about the in- and outbound traffic, some of the
intruders actions are only clearly visible on the attacked system itself. Either
because the network connection is encrypted or because the activity of the tools
used by the intruder are only local. The Honeynet Project uses Sebek [15], a
keystroke logger, developed specifically to meet Honeynet needs. Sebek collects
process tree, socket and file opening data and is available for Linux 2.4, Linux
2.6 and Win32 while the BSD versions are considered as testing versions. Roo
[20], the Honeywall CDROM distributed by the Honeynet Project, implements a
sebek server and [16] defines Sebek as a standard for data capture in Honeynets.
Hence sebek will be used as the third layer of data capture in the Honey-DVD.
3.2.3. Honeypot images
Finally the decision must be made, what kind of Honeypots to include in the HoneyDVD. Althoug the later Implementation described in chapter 4.3.1 will use a doublelayer-DVD with a capacity of 8.5 GB, the initial concept was to use a single-layer-DVD
as medium. Since the space on a single-layer-DVD is restricted to 4.7 GB and about
700 MB are allready used by the base GRML-System, the space left for the Honeypot
images is about 4 GB. The requirements of the honeypots can be measured as follows:
• Not the newest version
To be used as a Honeypot the system should in some way be attractive for
21
3. Components of the Honey-DVD
hackers. One way to achieve this is to install older versions of widely used
operating systems instead of the newest and best patched ones. But of course
a system which is too old would also be a bad choice, because no new security
threads will be monitored on those systems. A system which is about one year
old seems to be the best trade-of between up-to-dateness of the system and the
known security issues.
• Compatibility to sebek
Another requirement of the operating system is that it must be supported by
sebek. The documentation of the current version of the linux-client (i.e. v 3.0.3)
states that it has been successfully tested on Redhat systems with kernel 2.4.
The BSD-Versions are available for FreeBSD 5.3, NetBSD 2.0 and OpenBSD 3.7.
The recently released win32 version runs on Windows 2000, XP and 2003.
• Free distribution
To be able to include the Honeypots image in the Honey-DVD, the used operating
system must be free distributable.
• Availability of services
Some services like a web- or FTP-server should be available on the Honeypots.
Hence free implementations of this services must exist for the operating system
in use.
Putting all these things together, the possible solutions are reduced to the BSD and
Linux distributions. And due to the available space on the DVD and the space requirements of the operating systems, including the possibility of compiling additional
software on the Honeypots, only two base-images, each with 1.5 GB image size, will
be included in the Honey-DVD. I.e. a BSD and a Linux image. Which specific ditributions will be included into the Honey-DVD will be decided in chapter 4.1.2.
3.3. Summary
The analysis of the different implementations of live Linux distributions and virtualisation software was the first part of this chapter. It resulted in the decision to use
the GRML live Linux distribution and the system emulator QEMU to implement the
Honey-DVD.
In the second part the different components that will be used to build the Honeynet
were discussed and different possibilities for theri implementation were analysed. Finally decisions were made to to include a Linux and a BSD Honeypot in the HoneyDVD and to follow the standards, defined by the Honeynet Project, for the implementation of data control and data capture.
22
4. Building the Honey-DVD
The next step after deciding with which base components the infrastructure of the
Honey-DVD will be implemented is to assemble a first version. This chapter will be
divided into three parts. First the description of the system layout and implementation
of the First version, then the problems that occurred during the implementation and
finally some solutions and the changes done to implement the current version of the
Honey-DVD.
4.1. Layout of the prototype
The prototype of the Honey-DVD was designed to follow the standards [16] of the
Honeynet Project as close as possible. But since the complete Honeynet should run
on only one real machine and without the necessity of installing anything to a harddrive
some modifications where inevitable.
4.1.1. The virtual Honeynet
Chapter 1 gives a good overview about how a Honeynet should be build. This section
will describe how this implementation is realised on the Honey-DVD.
Network layout
In chapter 1.1.1 the standard layout of a GenII Honeynet has been described. To adopt
this layout one has to look at the differences and equalities of the both deployment
methods. In a real network, you would have several machines with single network
interfaces connected to the gateway over a switch or hub. The network feature of
QEMU on the other hand assigns a virtual network interface on the host system to
every virtual network interface on the guest systems by using the TUN/TAP virtual
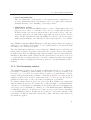
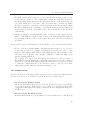
point-to-point device driver [6]. The resulting network structure is shown in figure 4.1.
In this layout, the internal device is the network bridge br0 while the network interface
eth0 is used as the connection to the external network. The network interface eth1
is used as a command interface which will not be connected to the Honeynet, but
23
4. Building the Honey-DVD
Figure 4.1.: Network layout of the Honey-DVD
Honey-DVD base system
SSHD
eth1
eth0
Firewall / IDS
implemented on the base system
br0
TUN/TAP
TUN/TAP
TUN/TAP
TUN/TAP
TUN/TAP
TUN/TAP
TUN/TAP
TUN/TAP
Honeypot
Honeypot
Honeypot
Honeypot
Honeypot
Honeypot
Honeypot
Honeypot
will provide the means to export logs, send alarm signals to the administrator or to
configure the Honeynet from the outside via an SSH connection. All virtual tunX
devices are connected to the network bridge and form the network of Honeypots while
the base system is used as the gateway to connect the internal bridge br0 with the
external interface eth0.
This design is quite similar to the Self-Contained Virtual Honeynets discussed in [17].
The main difference here is that, in the original design all Honeypots were running
in the VMWare framework, which internally uses a network bridge to implement the
virtual network and furthor provides a single network inteface on the real machine
as a connection to this network. QEUM doesn’t provide this framework and hence
every single virtual machine has its’ own network interfaces TUN/TAP counterpart
on the real system that must be connected to the Honeynet via an aditional network
bridge. A consequence of this is, that, since it is not possible to directly connect two
network bridges, the Honeynet implementation on the Honey-DVD will use IPTables
NAT capabilities to connect the virtual and the external network.
24
4.1. Layout of the prototype
The Honeywall
The main functionality of the Honeywall will be implemented on the base system. For
the data controll implementation of the first version it will suffice to use the scripts
and tools included in [17]. Since this book dates back to 2004 more recent versions of
the used scripts are available which will be discussed and used in this work.
The key part of the Honeywall is a script called rc.firewall. It provides multiple
functionalities:
• Network setup
Setup the bridging and NAT to connect the external and internal networks and
activate the local controll interface.
• Configure rate limitation
Configure IPTables for connection rate limitation and to pass outbound packets
to snort_inline as described in chapter 3.2.1.
• Filtering Sebek packets
Configure IPTables to keep Sebek packets from leaving the virtual network. This
may be necessary to prevent Sebek packets from leaving the Honeynet if send to
a broadcast address, since every system outside the Honeynet will be able to see
this packets and hence this would give away the presence of the Honeynet.
Some parts of the data capture mechanisms, i.e. Snort and the Sebek-server, are also
installed and configured on the base system. In the case of Snort the program and its
rulebase was already included in to the original GRML distribution, while Sebek is
available on the web1 .
4.1.2. The Honeypots
In chapter 3 the general possibilities for which kinds of Honeypots can be included
into the Honey-DVD was discussed. Now the next point of interest is the detailed
implementation of the different Honeypots.
Honeypot operating systems
As discussed in chapter 3.2.3 a Linux and a BSD distribution should be included into
the Honey-DVD. The Debian Linux distribution, as mentioned before, has a really
1
Current
versions
of
the
Sebek
http://www.honeynet.org/tools/sebek/
client
and
server
can
be
found
at
25
4. Building the Honey-DVD
big web repository which allows access to all kinds of programs and services and thus
would be a good candidate for a Honeypots system. But a very importand thing is
that the Sebek client must be supported by the system.
There are two ways of installing Sebek on a Linux system:
• Installing a precompiled version
Precompiled versions of the Sebek client are available for the linux kernel versions
2.4.19-2.4.30.
• Compile the module
A second possibility is to just compile the Sebek module against the kernelsources of the Honneypots Linux kernel.
Since no precompiled version of the Sebek client is available to match against the
Debian kernel and, according to the Sebek documentation, Debian is not amongst the
supported Linux distributions, another distribution must be used.
The documentation of the Sebek sourcecode explicitely mentions the Redhat 8 distribution as supported distribution, and after compiling the client against the kernel
sources of the Redhat 8 system the first tests confirmed this. Redhat, as a widely
used Linux distrubution, has equal big packet repository in the web as Debian, and
its’ RPM packet format is one of the most commonly used formates. Hence a Redhat
8 Honeypot will be used as the first image included in the Honey-DVD.
As mentioned in chapter 3.2.3 the BSD version of the Sebek client is available for
explicitly three BSD versions. Of those systems FreeBSD 5.3 seems to be the best
choice, since, compared to the other two, many programs are available for this system
either as a port or directly from the provider. Hence the second image included in the
Honey-DVD will be a FreeBSD 5.3 Honeypot image.
Honeypot configuration
The configuration possibilities of the Honeypots should be as complete but also as
easy to use as possible. The following points were the basis for the decision of how to
realise configurations:
• Reusability of images
It should be possible to reuse the base images and run several Honeypots with
different configurations from them.
26
4.1. Layout of the prototype
• Configuration before Honeypot startup
It should be possible to do the necessary configuration changes before the Honeypot is started.
To be able to change the configuration of the Honeypots before starting the system
one must edit the according config files in the image. But to be able to run several
Honeypots from the same image one would have to make copies of the image for every
single Honeypot and store them on the DVD. To avoid this a second image for the
configuration files of the Honeypot base images will be used. Figure 4.2 shows the
general idea:
Figure 4.2.: Mountpoints for the disc images of a Honeypot.
Disc image
/
Honeypot
file system
hda
/etc
Disc image
/etc/conf
hdb
The virtual machine running the Honeypot will have two virtual harddrives. The first
harddrive (hda) will contain the complete system image of the Honeypot, but every
configuration file will be “exported” to the second harddrive (hdb). These files will
then be linked to their original locations to not break the standard boot procedure of
the operating system.
Since the size of the second harddrive image is extremely small (i.e. 10MB) it will
be no problem to make copies of this image at runtime of the Honey-DVD and start
different Honeypots from the base images with their own copy of the configuration
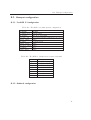
image. The exported configuration files of the Redhat image are shown in table 4.1.
During the boot sequence of the Redhat system, the harddisks are mounted and all
symlinks functional at the time when the configuration files are accessed during the
boot process. In this way every configuration change done to the files in the configuration harddrive will be active during bootup and all configurations can be done quite
27
4. Building the Honey-DVD
Table 4.1.: Exported configuration files of the Redhat 8 system
Original file
/etc/sysconfig/network
New location
(Relative to hdb root)
/network/network
/etc/sysconfig/
network-scripts/ifcfg-eth0
/etc/resolv.conf
/network/ifcfg-eth0
/etc/hosts
/hosts
/resolv.conf
Contained configuration
information
Networking activation and
hostname configuration
Ethernet device configuration
IP-addresses of
DNS-servers to use
List of hosts and hostnames
easy.
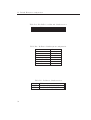
Table 4.2.: Exported configuration files of the FreeBSD 5.3 system
Original file
/etc/rc.config
New location
(Relative to hdb root)
/rc.config
Contained configuration
information
Complete basesystem configuration
Since the FreeBSD system uses a more centralised way to store the base configuration,
only the file shown in table 4.2 needs to be exported. Nevertheless there are two
problems:
• File system incompatibility
The FreeBSD standard file system is ufs, which is readable under Linux but no
writing is possible. Hence no changes to configuration files on a ufs-image would
be possible.
• The FreeBSD boot sequence
The boot sequence of FreeBSD accesses the main configuration files in a system
state, when only the root file system is mounted, and then also just with read
access. The mounting of all file systems for runtime usage is done at a later
point of time.
The solution for the first problem is to use a file system which is supportet by both,
Linux and FreeBSD:
28
4.1. Layout of the prototype
• FreeBSD has integrated support for the ext2 file system and would be able
to use this as a source for the configuration. Sadly the ext2 support ends at
the filechecking utility which is doing file system checks on all devices listed in
/etc/fstab during the boot sequence. The problem would be solvable by editing
the fsck bootscript to exclude the ext2 file system from checks, but when editing
the files contained in the ext2 image on the Linux system, some inconsistencies
occur which prevent the ext2 image from being remountable in the FreeBSD
environment.
• Another possibility of solving this issue was to search the “least common denominator”. The FAT file system is supported by both systems and although it is
not the native system of either one it seems to have none of the above mentioned
problems.
In case of the second problem changes to the FreeBSD boot procedure where inevitable:
• In case of the network and similar configurations there seems to be no objection
to just write a script to reconfigure everything needed at the end of the booting
sequence while using default values for the initial startup. The hostname on the
other side is the real issue, since it will be difficult to change the name of an
allready running BSD-host.
The solution here was to edit and change the standard bootup procedure of
FreeBSD. By just mounting the configuration filesystem before the contained
values are needed and unmounting it again after they have been read it is possible
to bring the configuration file to the attention of the bootup process in time
without interfearing with the standard mounting process.
The available services
For the base version of the Honey-DVD only a few services besides the SSH and telnet
services were chosen to be available on the Honeypots for testing purpose.
• Services of the Redhat system
On the Redhat system these services were an Apache2 webserver and an FTPserver called proftpd. Both services can be started as daemons with external
configuration files which can easily be included in the configuration images for
the Honeypot.
• Services of the FreeBSD system
Included in FreeBSD are a great number of services which can be controlled via
29
4. Building the Honey-DVD
the initd daemon. Like on the Redhat system the basic configuration contains
the Apache2 webserver as well as an FTP-Server. Additionally the FreeBSD
system comes with a TFTP-Server and some minor services like chargen, echo,
time etc.
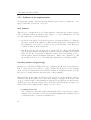
4.1.3. The Honeynet controller
The structure of the Honeynet controll program developed for the Honey-DVD is
devided into several stages of execution with different options for the user:
Stage 1: Configuration
When started, the first thing the controller does is to ask for the configuration method
that should be applied:
• Default configuration
This option is the simplest configuration method. Every single value of the
Honey-DVD is set to default. A list of these values is shown in table 4.3.
• Customise configuration
When choosing to customise the Honeynet setup, the controller will continue to
ask what specific components shall be customised. Possible choices are:
-Configure the Honeywall
-Configure the number and kind of Honeypots
-Configure the Honeypots
The second possibility, to customise the configuration, is more complex. It provides
access to the single components and then gives the choice to either do a complete
reconfiguration or to maintain some or all of the default values. Nevertheless, some of
the choices will have consequences to following ones.
• Configuration dependencies
Some of the configuration options will depend on each other. For example, when
choosing to change the number and kind of the Honeypots to another value, say
two Redhat systems, the controller will ask to configure the Honeypots. If not
at least one of the Honeypots is reconfigured both would use the default values
and end up in a conflict situation.
30
4.1. Layout of the prototype
Table 4.3.: Default Honeynet configuration
Component
General
Identifier
Honeypot number
IP-range
DNS-server
Gateway
Default value
2
192.168.0.0
217.237.150.97
192.168.0.11
Honeywall
Management IP
Management network
Gateway
DNS-Server
Hostname
IP
Macaddress
192.168.0.100
192.168.0.0/24
192.168.0.11
217.237.150.97
Starbug
192.168.0.101
52:54:00:12:34:59
Hostname
IP
Macaddress
Apollo
192.168.0.102
52:54:00:12:34:5a
Redhat Honeypot
FreeBSD Honeypot
• Value dependencies
Some values, i.e. IP-addresses and hostnames, will be usable only once. The
controller will check for these values to be unique in the Honeynet and, on
finding an equality, ask the user to change one or more of the values.
After the configuration is done the controller enters the second stage.
Stage 2: Startup
In this stage no user interaction is possible. The controller will now write out the
previously defined configuration values to the appropriate files and then start the
Honeynet. Listing 4.1 shows an excerpt from the sourcecode with the specific steps to
start the honenet.
31
4. Building the Honey-DVD
Listing 4.1: Excerpt from HoneyController.c
void s t a r t H o n e y n e t ( Honeynet ∗ n e t ) {
i nt i ;
char commandstring [ maxcommandlen ] ;
FILE ∗ p i d f i l e ;
p r i n t f ( ” S t a r t i n g t h e Honeynet . I t might t a k e some time t o \
l o a d t h e s y s t e m s . . . . . . . . . \ n” ) ;
[...]
p r i n t f ( ” C r e a t i n g c o n f i g u r a t i o n ima g es . . . . . \ n” ) ;
writeout Honeywall conf ( net ) ;
writeout Honeypot conf ( net ) ;
p r i n t f ( ” S t a r t i n g t h e network . . . . . . \ n” ) ;
start network ( ) ;
p r i n t f ( ” S t a r t i n g Honeywall . . . . . \ n” ) ;
i f ( start Honeywall ( ) )
net−>Honeywall . s t a r t e d = 1 ;
p r i n t f ( ” S t a r t i n g Honeypots . . . . . \ n” ) ;
i f ( start Honeypots ()
net−>Honeypots . s t a r t e d = 1 ;
[...]
}
In this case all components have been reconfigured and thus all configuration values
must be written to new configuration images before starting. In general the startup
procedure of the Honeynet is as follows:
1. Create the necessary copies of the configuration images and write out the configuration values if necessary.
2. Bring up all real network devices and network bridges
3. Start the data capture and data controll mechanisms of the Honey-DVD
4. Start the Honeypots
After these steps are completed the Honeynet is running and ready to work.
32
4.2. Implementation analysis
Stage 3: Runtime
After the Honeynet is started the controllers job is to provide some basic controll
mechanisms to maintain the Honeynet. The provided funktions are:
• Reconfigure a Honeypot (only additional services, no ip reconfiguration)
• Configure and start an additional Honeypot (includes restart of the Honeywall
and hence short brake in the external connection of the Honeynet)
• Restart the complete Honeynet with current configuration
• Stop the Honeynet for complete reconfiguration
• Stop the Honeynet and shutdown the Honey-DVD
Additional functionalities like data analysis are only available outside of the controller
and very limited due to the fact that the whole Honey-DVD system is running in the
real machines’ memory and hence the possibilities of storing great amounts of data
are restricted. The Honey-DVD Controller provides possibilities to export captured
data like IPTables-logs to a remote location on the net while Sebek and Snort are
both capable of exporting their data to SQL-Servers themselves. Nevertheless, some
capabilities are available on the Honey-DVD as well:
• Iptables monitor
As described in chapter 3.1.1 the GRML live Linux CD provides an IPTables
monitor which shows all currently active inbound and outbond connections.
• Honeypot snapshots
As can be seen in listing 4.1 QEMU is started with the option -snapshot which
causes it to use temporal files for storing changes and never write anything to
the original image files. Nevertheless QEMU allows to save the current status of
the guest system to any specified media.
• Mail information
By using swatch [5] it is possible to send an e-mail notification to the system
operator if any suspicious activity on the Honeynet is logged to the Honey-DVDs
log base.
4.2. Implementation analysis
Although the first layout was working quite well there are some problems and drawbags
inherent to this design that are not acceptable for the Honey-DVD.
33
4. Building the Honey-DVD
4.2.1. Problems of the implementation
To analyse the quality of the first implementation it is necessary to classify the occurring problems into at least two categories.
Main problems
This category contains all those problems which are restricting the possible applications of the Honey-DVD and thus are importand to be solved. Gladly there are only
two issues which are of such an importance:
1. As described in chapter 4.1.1 the Honeynet is operating in NAT-mode. Thus the
IP-range of the Honeynet must be a different network from the external network.
In bridging-mode it would be possible to choose the IP-range of the Honeynet
completely without such restrictions.
2. The Honeynet Project [10] uses and propagates the Roo Honeywall CD-ROM
[20] as the standard Honeywall setup for their networks. In future versions it is
planed to use Roo as a means of distributed data collection by having one Roosystem gather data from multiple Honeynets. Thus being compatible to this
efforts will, from now on, be an additional requirenment to the Honey-DVD.
Secondary problems (Fingerprinting)
In chapter 4.1.2 the Honey-DVDs method for configuring the Honeypots was described.
Due to these layout it is possible to easily configure the Honeypots before starting
them, but the necessary interference with the standard configuration methods of the
Honeypots operating systems causes the issue of fingerprinting.
Fingerprinting means, that an adversary, who knows about the structure and key
elements of the Honey-DVD, can look for these things to identify the Honeynet. One
great problem in terms of fingerprinting is, that the Honey-DVD is absolutely static.
All Honeypots in a Honeynet setup based on the Honey-DVD will use the same base
images. Hence there allways will be things one can look for:
• Configuration files
The configuration files and additional harddisks will be easy targets for fingerprinting. One can either look for the particular symlinks, the centralised stored
configuration files, or just the harddisk device.
34
4.2. Implementation analysis
• Available services
Since the Honey-DVD should allow to configure and deploy multiple Honeypots
from the same image all services must be available for activation on the base
Honeypot image. On an active Honeypot only some of this services will be
running, but all other services are still available for activation. An adversary
will only have to look for a list of installed services to fingerprint the collection
of services available on a Honeypot.
• Network timing
Since the network structure of a Honeynet based on the Honey-DVD will allways
be the same and the performance of the single Honeypots is not independent
of the other Honeypots it may be possible to find some unique reactions, for
example in the network timing, to specific commands given to a Honeypot. By
identifying these reactions it would be possible to fingerprint the Honeynet and
the Honey-DVD.
4.2.2. Possible solutions
Solving the main problems is a task of some complexity because the solutions to the
single problems are interfering with each other:
Solving the main problems
The following solutions for the first problem were possible:
• One way to solve the problem is to find a way of treating the Honeynet bridge
as if it was a standard network interface and thus being able to use the Roo
Honeywall scripts2 , and thus solving the second problem, nearly without any
modifications. But the only way to connect two bridges would be by using a
third program which provides two virtual network interfaces to create a tunnel
between the bridges.
• Another possibility is to reimplement the firewallwall script to be able to manage
several internal interfaces. But the necessary changes to the firewall script would
be quite complex and the compatibility to Roo could not be guaranteed.
With regard to the issue of adding Roo compatibility to the Honey-DVD, the best
solution would be to directly use the Roo packages provided by the Honeynet Project.
2
The
single
components
of
Roo
are
http://www.honeynet.org/tools/cdrom/roo/repo/
available
as
RPM-packets
at
35
4. Building the Honey-DVD
But there is another problem:
The GRML system is based on Debian and thus the native packet formate is DEB.
Although it is possible to convert one formate to another by using tools like alien the
innstallation scripts of the packages would still be designed for a Fedora system. This
issue is also shortly discussed in [20], but postponed to future work.
To change to a Redhat or Fedora based live Linux distribution for adding the Roo
support to the Honey-DVD would solve this issue, but, since the support for NATrouting has been removed from the Roo Honeywall and is no longer supported by the
Honeynet Project, the bridging problem must still be solved first.
A way of solving both problems is to add another virtual machine to the network on
which Roo will be installed. By virtualising the Honeywall also some more flexibility
due to modularisation will be added to the Honey-DVD, but possible consequences,
like the performance loss due to virtualisation, will have to be analysed.
How to prevent Fingerprinting
The problem of fingerprinting can not be solved due to the allready mentioned static
nature of the Honey-DVD. Nevertheless one can try to make the fingerprinting as hard
as possible. In the case of the modified configuration procedures and the additional
images a possibility to achive this is, to add a script to the Honeypots boot procedure
that executes the following steps:
1. Replace the symlinks with the real files
2. Delete the files on the configuration harddisk (i.e. override with zero)
3. Unmount the configuration harddisk
4. Remove the mount entry from /etc/fstab
5. Delete the configuration folder
6. Selfdelete the cleanup script
This procedure can not prevent the scanning of the existing devices, but it helps masking the changes and reduces their obviousness.
In the case of the installed services different measures could be taken:
36
4.3. The current version
1. Remove the inactive services after booting the system
This would be quite complex, since it would mean to remove the binaries as
well as all documentation files, log files and other components installed with the
service.
2. Restrict the services
Another solution would be to restrict the set of available services to mainly the
services available in the base distributions of the Honeypots operating systems.
I.e. Services available in Redhat 8 and FreeBSD 5.3. But this would restrict also
the possible number of different kinds of honeypots that can be deployed.
4.3. The current version
Based on this analysis the current version of the Honey-DVD was implemented.
4.3.1. The revised virtual Honeynet
The Honeynet layout implemented in this version of the Honey-DVD follows the previously discussed idea to solve both of the main problems at once. By using the standard
Roo distribution as an additional virtual machine, not only the compatibility but also
the bridging problem can be solved.
New network layout
The addition of the Honeywall machine results in some grave changes in the network
layout of the Honey-DVD which is shown in figure 4.3.
Again the interfaces eth0, eth1 and eth2 are used for external, internal and management connections. The additional network bridges br1 and br2 are used to connect
the external and management interfaces of Roo to the external interfaces of the real
machine, while the old bridge br0 will be used to connect the Honeypots to Roo’s
internal interface.
The Roo Honeywall
The Roo Honeywall CDROM [20] was designed to be an easy to install solution for
Honeynet controll. Unlike the Honey-DVD it is installed to a harddisc and after some
basic configurations will be a complete system implementing a Honeywalls capabilities
of data controll, data capture and some features for furthor analysis.
Once running it can be monitored and controlled via a web interface called Walleye
37
4. Building the Honey-DVD
Figure 4.3.: Network layout of the Honey-DVD (current version)
Honey-DVD base system
eth0
br0
TUN/TAP
TUN/TAP
br2
eth1
TUN/TAP
TUN/TAP
TUN/TAP
TUN/TAP
TUN/TAP
TUN/TAP
TUN/TAP
TUN/TAP
Honeypot
Honeypot
Honeypot
Honeypot
Honeypot
Honeypot
Honeypot
Honeypot
Roo
TUN/TAP
br1
and thus is a quite optimal solution for an easy to maintain Honeynet. One drawback of Roo in respect of usability in the Honey-DVD is, that the manual [14] states
the minimal requirement of disc space to be 5GB for testing purpose and 10GB for
productive usage. As a result to this it was necessary to change the medium for the
Honey-DVD to be a Double-Layer-DVD with a capacity of 8.5GB. But also on this
larger medium it was only possible to use a 4GB image for the Honeywall due to available disc space. The consequences of this intrinsically to small image will be discussed
in chapter 6.
38
4.4. Summary
4.3.2. Changes to the Honeypots
In the current layout the Honeypots are quite unchanged. The single change worth
mentioning is the export of the FTP and Apache HTTP directories to the configuration
image, which opens up the possibility to easy change the contents of the Honeypots
websites and downloadable files before the honeypot is started and gives a meaning to
the additional harddrive with respect to fingerprinting.
4.3.3. The Honeynet controller (second version)
For an exact description of the new controller please refere to the documentation chapter 5. At this point it should suffice to describe the main changes between the first
and second implementation of the Honeynet controller.
• From a developers point of view the change from C to C++ in the used programming language is one of the biggest changes. By handling the single Honeypots
as objects instead of simple C structures without any encapsulation it was not
only possible to drastically reduce the code complexity, but also to increase the
possibilities for further development without having to rewrite most parts of the
code.
• Another big change is to revise the single steps an possible configuration changes
the user can make to guarantee the best user friendliness without getting to
complex.
• A minor change is the addition of some features like the possibility of stopping
and reconfiguring single Honeypots without influencing the other systems, or
the possibility of using an external Honeywall instead of the Roo Honeywall
contained in the Honey-DVD.
4.4. Summary
The implementation of a prototype of the Honey-DVD was successful.
After analysing the drawbags of this implementation the necessary changes for the next
version were decided. Issues that had to be solved were the inability of the HoneyDVD to use a network bridge for the connection between the internal and external
network, and consequential tie to use NAT-routing in the firewall.
The compatibility to the Honeynet Projects new Honeywall CDROM, called Roo, was
also not given and since this would be quite important it was declared as an additional
39
4. Building the Honey-DVD
requirenment to the Honey-DVD.
Both problems were solved by virtualising the Honeywall wich also provided a greater
modularity for the complete system.
Also the minor problem of fingerprinting was discussed and, due to the inevitability
of this problem, countermeasures were found.
Finally the current version of the Honey-DVD was implemented, incorporating the
results of the analysis.
40
5. Honey-DVD documentation
Now it is time to take a look at the Honey-DVD as a whole and discuss its behaviour
and usability from the system bootup to the running Honeynet and finally the shutdown. This chapter will not be a users manual in the usual sense, but will closely
follow the sequence of different steps a user can or must take to maintain a Honeynet
based on this work.
5.1. Honey-DVD bootup
When booting from the Honey-DVD the fist thing that will happen is the appearance
of the welcome screen. If the user does nothing the process will continue after a short
time and the system will be booted. Nevertheless the user may choose from some
options, most of them inherited from the original GRML-CD. Among many others the
main features here are:
• Start memtest86
• Check integrity of the Honey-DVD files
• Set the framebuffer mode to be used for text console
• Set the keyboard layout for the Honey-DVD base system
If no special option is chosen the system will start the GRML-kernel with its normal
boot sequence. It will first detect the Honey-DVD sourcedrive and continue with the
hardware autodetection while installing the base system into a ramdrive.
After the basic boot routines are completed and runlevel two has been reached the
following base setup of the ttys will be available:
• tty1 to 3:
Root console running zsh.
• tty4:
From this console the x-window system will be started with the user honeydvd.
41
5. Honey-DVD documentation
• tty5 and 6:
These ttys will provide a console for the user honeydvd.
• tty7 and 8:
Tty 7 and 8 are reserved for the x-server output. The Honey-DVD will use tty
8 for the graphical x-server output.
• tty9:
A normal login prompt.
• tty10:
This tty shows the current IPTables state.
• tty11:
Table of running processes.
• tty12:
Current syslog messages.
The x-server at tty4 (output on tty8) will start with Windowmaker, a very slim window
manager which is absolutely sufficient for the Honey-DVD. The autorun functionality
of Windowmaker is configured to start the Honey-DVD Controller program which will
be used for the further configuration process of the Honeynet.
5.2. Using the Honey-DVD Controller
The Honey-DVD Controller is a program designed for configuring and maintaining
the Honeynet. When started, it first brings up the three network bridges described in
chapter 4.3.1, connects the external interfaces eth0 and eth1 to the respective bridges
and then prompts the user for the next steps:
• Start the Honeynet in default mode
If this option is chosen the Honeynet is started in a predefined configuration. The
basics of this configuration were already described in table 4.3. More details can
be found in chapter 5.2.1.
• Customise the Honeynet configuration
This option allows the user to customise the most important aspects of the
Honeynet like Honeypot number, IPs and services to start.
• Shutdown the Honey-DVD
This opition will end the Controller and shutdown the system.
42
5.2. Using the Honey-DVD Controller
5.2.1. The default mode
If the system is started in its default configuration the Honey-DVD Controller will call
the following default script:
#!/bin/sh
#start honeywall
echo "Starting Honeywall Roo....."
/usr/local/bin/qemu -snapshot -macaddr 52:54:00:12:34:56 \
-n /cdrom/Images/qemu-ifup-br-wall -nics 3 \
-hda /cdrom/Images/RooBase.img \
-hdb /cdrom/Images/Roo.img &
sleep 5
#start honeypots
echo "Starting Redhat Honeypot....."
/usr/local/bin/qemu -snapshot -macaddr 52:54:00:12:34:59 \
-n /cdrom/Images/qemu-ifup-br-pot -hda /cdrom/Images/Redhat.img \
-hdb /cdrom/Images/Redhat.conf.img &
sleep 5
echo "Starting FreeBSD Honeypot....."
/usr/local/bin/qemu -snapshot -macaddr 52:54:00:12:34:5a \
-n /cdrom/Images/qemu-ifup-br-pot -hda /cdrom/Images/FreeBSD.img \
-hdb /cdrom/Images/FreeBSD.conf.img &
sleep 5
This script starts the Honeywall and two Honeypots with the images contained on the
DVD. It is also a good example of how the virtual machines will be started in general:
• The option -snapshot is used to tell QEMU that all images are read only and
it should use a temporary file for saving all changes of the file systems.
• -macaddr is used to define the macaddress of each Honeypots network interfaces.
By default QEMU uses the macaddress defined here as the address of the first
interface and increases it by one for every additional network interface. Since the
Honeywall will have three network interfaces the first macaddress for a Honeypot
will be three more than the Honeywalls base macaddress.
43
5. Honey-DVD documentation
• The -n option defines the configuration script for the TUN/TAP interfaces. This
script configures what shall be done with the virtual network interfaces after they
are available. In the case of the Honeypots they will be started and added to the
networkbridge br1 while the script for the Honeywall just brings the interfaces
up.
• The next command for the Honeywall is the -nics option which just defines the
number of virtual network interfaces.
• The last arguments -hdX are defining which image file should be used as which
harddrive in the virtual system. The default boot device is hda.
The sleep timers after each qemu command are introduced not only to allow the user
to see the output of the starting virtual machines, but also to prevent certain race
conditions which could possibly occur with the result, that the numbering of the virtual network interfaces is broken. This would cause problems because the Honey-DVD
Controller expects the Honeywall to use the interfaces tun0, tun1 and tun2 and will
add those interfaces to the according network bridges automatically. tun0 is expected
to be the external interface, tun1 the internal and tun2 the management interface.
After the execution of the default start script is completed the Honey-DVD Controller
will proceed to the runtime menu described in chapter 5.2.3.
5.2.2. Customising the Honeynet
The Honey-DVD Controller gives the possibility to customise the Honeynet before
starting. It allows to change the configuration of the Honeywall and Honeypots.
Changing the Honeywall configuration
The Roo Honeywall has a vast amount of configuration options. The Honey-DVD
Controller allows to customise some of the more basic features while leaving the more
complex ones at default1 state. This is acceptable since the Walleye interface, described
in chapter 5.3.1, allows a complete reconfiguration of all values if needed. Nevertheless
for future development the Honey-DVD Controller was built in a way that allows
adding or removing configuration options without any problem.
The values which can be customised in the Honey-DVD Controller are:
• The IP address of the Honeywalls management interface.
1
The detailed default Honeywall configuration can be found in the appendix B.1
44
5.2. Using the Honey-DVD Controller
• The Netmask of the Honeywalls management network.
• The gateway the Honeywalls management interface will use for outbound communication.
• The DNS-server the Honeywall will use.
• The IP-address or IP-range of the clients allowed to connect to the Honeywall
from the outside.
• Should the Honeywall alert the administrator via e-mail if suspicious activities
are detected?
• In case the answer was yes: Which e-mail address should be informed?
• Should the SSH-daemon be started?
• Again if the answer was yes: Should a remote connection of the user root be
allowed?
• The public IP-addresses of the Honeypots.
• The DNS-server the Honeypots are allowed to contact without any connection
rate limit.
• The IP-range of the Honeynet.
• The broadcast address of the Honeynet.
An alternative to reconfiguring the Honeywall is to set the Honeywall to be external. In
this case the virtual Roo system will not be started and the external network interface
eth0 of the base system will be added to the Honeynets network bridge directly. This
alternative should be chosen if a Honeywall is already running on another system in
the network an the Honey-DVD is used to add Honeypots to the already existing
Honeynet.
Changing the Honeypot configuration
This feature allows the user to reconfigure the Honeypots. The first thing he could do
is to set the number of honeypots to a different value. The minimum is one, while the
maximum possible number of honeypots is set to five in this Version of the HoneyDVD Controller. If the user chooses to increase the number of Honeypots he will be
prompted to configure the additional Honeypots.
Another option the user might choose is to reconfigure a single Honeypot of those
45
5. Honey-DVD documentation
already existing in the Honeynet.
Independent of his choice, if he gets to the Honeypot configuration these are the values
he will have to configure:
• The Honeypots hostname.
• The domainname of the domain the Honeypot will be in.
• The IP-Address of the Honeypot.
• The IP-Address of the Honeypots network.
• The according netmask.
• The standard gateway used by the Honeypot.
• The DNS-server the Honeypot will use.
• The services which should be started on the Honeypot.
In this version of the Honey-DVD the available services are still restricted to an FTPand HTTP-server for testing purpose of the different possibilities to start these services
on the Honeypots. But for a production release of the Honey-DVD more services can
be added to the Honeypots easily, while the necessary changes to the Controller are
minimal.
5.2.3. Starting and maintaining the Honeynet
After the configuration is done the Honeynet is started. The single steps taken during
the start process are strongly dependent on how the network was configured.
• If the configuration wasn’t changed the system is started with the default script
described in chapter 5.2.1.
• With a customised configuration, the Honey-DVD Controller will first start the
Honeywall and connect its interfaces to the appropriate network bridges before
starting the Honeypots one by one.
• If the Honeywall was deactivated due to an existing external Honeywall, its start
is skipped and the external interface added to the Honeynet bridge before the
Honeypots are started.
46
5.2. Using the Honey-DVD Controller
Virtual machine start sequence
The start sequence for every virtual machine, independent of its functionality in the
Honeynet (i.e. Honeywall or Honeypot), is divided into four parts:
1. Copy the default configuration image of the according system to /home/honeydvd.
2. Write out the new configuration values to the image.
3. Start the virtual machine.
4. Retrieve the virtual machines process identifier (PID) form a pid-file2 .
There might be some minor differences in the exact execution of these steps dependent
on the started system. For example, to write out the configuration file for the FreeBSD
system, at first the file must be created outside of the image and then moved to it by
a sudo command due to write restrictions on the msdos filesystem.
Controller functionality at runtime
After the Honeynet is started the Honey-DVD Controller will proceed with the runtime
mode. In this mode the user will have the following possibilities:
• Restart a single Honeypot.
• Stop a single Honeypot.
• Stop, reconfigure and restart a single Honeypot.
• Add a Honeypot to the network.
• Restart the Honeynet with the current configuration.
• Stop the Honeynet and return to Configuration menu.
The first four options will only be available if a customised Honeynet setup is started.
In the defaultmode only the last two options can be chosen. This is due to the steps
that are taken according to single honeypots.
Since all virtual machines are running from read only images it is safe to just kill the
QEMU process supporting the machine to stop it without the risk of corrupting the
file systems. That’s why the PID was retrieved in the startup sequence. If started
2
QEMU is able to generate a pidfile containing its PID if told so via the commandline arguments
47
5. Honey-DVD documentation
from the default script no PID for single Honeypots is available and hence only the
complete Honeynet may be restarted. Of course it would have been possible to retrieve
the PIDs of the virtual machines from the default script, but one of the main reasons
for using this script instead of letting the Honey-DVD Controller start the Honeynet
is to be independent of it if default mode was chosen. The advantages of this design
will be discussed in chapter 5.3.3.
5.2.4. Honey-DVD shutdown
In some of the Controller’s menus there will be the possibility to choose to shutdown
the Honey-DVD. If this option is chosen the Honey-DVD Controller will at first stop
all Honeynet components, then give the halt command to the system and terminate
itself. After this the GRML shutdown sequence will start, do all necessary steps and
finally prompt the user to remove the Honey-DVD from the DVD-drive before stopping
the system.
5.3. Possibilities besides the Controller
The Honey-DVD Controller is not the only means to maintain the Honeynet. It can
be seen as the basis for setting up the system, while more detailed operations are done
with other tools.
5.3.1. The Honeywall interface Walleye
Walleye is a Webinterface designed by the Honeynet Project [10] to maintain the Roo
Honeywall. It is an easy usable tool not only for the administration but also for data
analysis. On the one hand it allows the user to reconfigure the complete Honeywall
way beyond the basics configured in the Honey-DVD Controller. On the other hand
it also allows the user to monitor the Honeynets activities and evaluate the collected
data. A more detailed description of the possibilities of Walleye can be found in the
Online User’s Manual [14] of Roo.
5.3.2. The QEMU console
QEMU allows the user to switch to a console by pressing strg-alt-2. In this console
the user has different possibilities. The most useful commands are:
• commit
This command is used to write all changes back to the images. In case of the
48
5.4. Important notes
Honey-DVD write errors will occur on the images contained in the DVD, but it
is possible to write changes back to the configuration image and thus use it to
export logged data.
• savevm
Using this command allows the user to save the current state of the virtual
machine to a file.
• loadvm
loadvm restores the state of a virtual machine from a file.
The complete list of commands can be found at the QEMU website [4].
5.3.3. The Honey-DVD base system
The base system of the Honey-DVD also provides some additional functionalities
through the scripts available in the /home/honeydvd/scripts/ directory.
One quite important issue is the case in which the Honey-DVD is started on hardware
with only one network interface. Following the design of the Roo Honeywall the
Honey-DVD expects a system with an additional interface to manage the Honeywall.
If this interface is missing the script CombineManagement.sh will change the layout
of the virtual network and add the Honeywall’s management interface to the external
network bridge of the Honey-DVD.
Another possibility is to change the default configuration of the Honeynet. Additional
Honeypot images from other sources may be added to the script honeynet.sh without
any interference to the Honey-DVD Controller.
5.4. Important notes
Although the Honey-DVD is able to start a complete Honeynet setup without more
user interference than selecting the default start method it is quite important that
the user is aware of some things and takes some steps directly after the Honeynet is
started:
5.4.1. Passwords
All passwords in the Honeynet are set to default values. It is strongly suggested to
change these passwords after starting the Honeynet.
49
5. Honey-DVD documentation
• The root password for the Honeypots as well as the Honeywall is honey.
• On the Honeywall an additional user named roo is available whose password is
also honey. This user and password are also used in the Walleye interface.
• Every Honeypot has the user called user with the password honey0815.
5.4.2. Testing release
The current version of the Honey-DVD is still a testing release than a version for
productive usage. Hence the Honeynet is not to be put in place as is. For example
the Sebek sources are still visible on the Honeypots and must be removed or hidden
before the system can be deployed.
50
6. Performance of the Honey-DVD
The next step after building the current version of the Honey-DVD is to test and
analyse its behaviour on different systems. Based on the results it should be possible to
measure the usability of the implementation in real life scenarios and gather knowledge
about the necessary enhancements to make the Honey-DVD a feasible solution for the
task of creating an easy to use application for setting up and maintaining Honeynets.
6.1. Performance tests
A series of tests was done to measure the performance of the Honey-DVD. These tests
were applied to different systems to get an overview which components are critical for
the usability of the implementation.
6.1.1. Test setup
It was of great importance, that the only variables in the applied tests would be the
components of the system running the Honey-DVD. Testing in completely different
network setups would have caosed too man interferences and thus the test results
would not be comparable and quite useless for this purpose. Hence the following test
setup was used:
• The test was always done with two machines.
-The test machine running the Honey-DVD.
-The testing machine performing the tests and gathering the results.
• The Honeywall management interface was added to the external network bridge
as described in chapter 5.3.3
• Both machines were connected to a minimal network with a category 5 patch
cable.
51
6. Performance of the Honey-DVD
6.1.2. Applied tests
The tests applied to this setup should give an overview of the usability and behaviour
of the Honey-DVD, and hence the local behaviour (i.e. times needed for single setup
steps) must be included as well as the behaviour observed from a remote machine. To
fulfil this, the following tests where performed:
1. Taking the booting time of the base system from Honey-DVD start till the
Honey-DVD Controller is available.
2. Taking the time needed to start the Honeywall alone on the test system.
3. Taking the time needed to start the default configuration.
4. Taking the response time (ping) of a single Honeypot without the Honeywall or
other active Honeypots.
5. Taking the response time (ping) of a single Honeypot in the default configuration.
6. Taking the response time of the Walleye interface of the Honeywall when no
Honeypot is running.
7. Taking the response time of the Walleye interface of the Honeywall in the default
configuration.
For testing purpose the Honeywall was configured to do an automatic reconfiguration
after the boot sequence to gain additional information on this process. This was
important to measure the performance loss mentioned in chapter 4.3.1.
6.1.3. Test results
As mentioned in chapter 6.1.1 the testmachine was the only thing changed for different test rounds. During the tests it became obvious that the tested systems can be
categorised into three classes. Hence only the results for the reference systems will
be presented here with further information, while a complete but compact list of the
results can be found in table 6.1.
Test machine class 1
This class contains the memory restricted machines with average processor capabilities. The reference system was a one year old laptop.
52
6.1. Performance tests
System specifications
• CPU: Intel Pentium M
• CPU-Speed: 1,6GHz
• RAM: 512MB
• FSB: 400MHz
• DVD-Drive speed: 8x
Test results:
• Test 1: 3min Timer was started when bootsequence was activated and stopped
as soon as the Honey-DVD Controller was available.
• Test 2: 19min This total time contains the startup time of the Honeywall’s base
system which was 13 minutes and 6 minutes needed for a the reconfiguration of
the Honeywall.
• Test 3: 21min The time for the complete system startup was higher then for the
startup of the Honeywall alone. The Honeypots finished their startup sequence
after 4 minutes.
• Test 4: 70ms This is an average value of 400 ping requests. At the first ping
request, and then in periods of 50 ping requests, the time was over 200ms due
to the need of DVD access.
• Test 5: 80ms The timings were nearly the same as in the stand alone test but
the amount of lag due to DVD access was slightly increased.
• Test 6: 2min The time was taken from sending a query until the following
webpage was completely loaded. Since the data transfer of the webpages alone
was very quick mostly the whole time seemed to be used for calculation.
• Test 7: 2,5min This time was taken while the Honeypots were activated but
not doing anything. Even the presence of the Honeypots seems to influence the
Honeywall’s performance.
53
6. Performance of the Honey-DVD
Test machine class 2
The reference system for this class is a desktop PC system. It represents a class of
average home PC systems with a relatively big amount of memory.
System specifications
• CPU: Athlon-XP 1900+
• CPU-Speed: 1,6GHz
• RAM: 1,0GB
• FSB: 266MHz
• DVD-Drive speed: 16x
Test results:
• Test 1: 3min
Timer was started when bootsequence was activated and stopped as soon as the
Honey-DVD Controller was available. No change to previous test series.
• Test 2: 14min
The startup of the Honeywall’s base system took 11 minutes while the reconfiguration of the Honeywall itself took 3 minutes.
• Test 3: 14min
The startup time of the Honeynet was equal to the startup time of the Honeywall
alone, both Honeypots had finished their starting sequence after 2 minutes.
• Test 4: 60ms
This is the average timing of 400 ping requests. The first ping had a value of
over 200 milli seconds due to DVD access.
• Test 5: 60ms
Although some timings seemed slightly increased the average value was still
60ms.
• Test 6: 1min
The time was taken from sending a query until the following webpage was completely loaded.
54
6.1. Performance tests
• Test 7: 1min
This time the measured timings for the standalone Honeywall and the default
setup were the same.
Test machine class 3
The third class is the class of modern high end PCs. The representative of this class
is a new desktop PC.
System specifications
• CPU: Athlon 64 3200+
• CPU-Speed: 2GHz
• RAM: 2GB
• FSB: 1GHz
• DVD-Drive speed: 16x
Test results:
• Test 1: 1min
Again no change to previous test series.
• Test 2: 6min
The startup of the Honeywall base system took 4 minutes, the reconfiguration 2
minutes.
• Test 3: 6min
The starting sequence of the Honeypots took 1 minute.
• Test 4: 60ms
The ping results were not different from the previous test series. Again the first
ping was high due to DVD access.
• Test 5: 60ms
No change to the standalone behaviour.
55
6. Performance of the Honey-DVD
• Test 6: 30sec
The time was taken from sending a query until the following webpage was completely loaded. In case of the login page the time was a bit shorter then the time
needed for database accesses later.
• Test 7: 30sec
No change to standalone test.
6.2. Analysis of the test results
Table 6.1 shortly summarises the results of the tests above.
Table 6.1.: Testresults
Test 1
(time in min)
Test 2
(time in min)
Test 3
(time in min)
Test 4
(time in ms)
Test 5
(time in ms)
Test 6
(time in min)
Test 7
(time in min)
Type 1
3
3
Type 2
3
3.5
Type 3
1
3
3
3
2.5
1.5
19
20
17
23
21
14
13
15
6
7
21
24
18
27
23
14
14
15
6
7
70
70
70
70
70
60
60
65
60
60
80
80
75
80
80
60
60
60
60
60
2
2.5
2
3
2
1
1
1
0,5
0,5
2.5
2.5
2.5
3
2
1
1
1
0,5
0,5
One thing, that is equal in all systems is, that the Honeywall is the all-dominant part
of the Honey-DVD setup. It is the virtual system which takes the longest period of
time to start and perform any activity and thus determines the overall performance of
the Honey-DVD nearly independent of the running Honeypots. Thus another test was
applied to measure the performance loss due to the decision to virtualise the Honeywall:
The Roo Honeywall was installed to the reference system of class one and the needed
time for reconfiguration after the boot sequence was taken like in the tests applied to
56
6.2. Analysis of the test results
the Honey-DVD. The result was a time of approximately two minutes.
Comparing this time to the six minutes, measured on the Honey-DVD, the performance
of the Honey-DVDs Honeywall is about three times slower than on a real system. But
given the fact that an implementation on the base system of the Honey-DVD would
also suffer from the unavailability of harddisk space and hence would again have a
reduced performance, this loss is acceptable in this implementation.
Another importand result is that the available memory in the real system running the
Honey-DVD seems to be a bottleneck. Although the Honey-DVD is able to run on
systems with 512MB RAM (testing class 1) it is quite obvious that the performance
and usability of the Honey-DVD on this system is not really acceptable. Even the
systems in testing class two with 1GB RAM needed a lot of time to start the default
network and had a one minute delay in the Walleye interface.
The tests on the high end machines may be interpreted as a continuation of this pattern. The following calculation also supports the conclusion that memory must be the
critical component:
6.2.1. Worst case scenario
The worst case scenario of the Honey-DVD would be a scenario in which nearly all virtual systems were modified in a way that almost the complete data of there harddrives
must be stored in the memory1 .
• In the default configuration two Honeypots with an image size of 1,5GB are
running. This results in a memory usage of 3GB.
• The Honeywall has an image size of 4GB.
These images would use a total of 7GB RAM in the worst case. Another GB would
probably be needed for the base system and calculation purpose and thus, to guarantee the full functionality of the Honey-DVD with the highest possible performance in
the worst case scenario, at least 8GB of RAM would be needed.
According to these thoughts it is quite sure that, although the CPUs of the class three
systems were nearly twice as fast as the CPUs form testing class one and two, the
biggest part of the better performance came from the, again doubled, RAM size.
1
Unmodified data would be removed from memory if possible and reloaded from the DVD if needed
57
6. Performance of the Honey-DVD
6.3. Summary
The performance of the revised implementation of the Honey-DVD was measured in
this chapter with the result, that the usability of the Honey-DVD is strongly dependent
on the available amount of memory. The analysis of the worst case scenario emphasised
that the Honeywall is the most critical component and thus the reduction of its memory
usage would be a main goal for future development.
58
7. Conclusion and outlook
Within this work a system was developed which fulfils the requirements defined in
chapter 1.2.1. The Honey-DVD is an easy to use method of deploying Honeynets
without the necessity of installing anything to a harddrive. To achieve this, different
components where analysed and tested regarding the requirements of this work.
The available live Linux distributions where analysed regarding the necessary base requirements of stability and security as well as additional features like the lightweightness of the system or the possibilities to install additional software and maintain an
up to date status of the system. Finally the decision was made that a slim live Linux
system based on the Debian distribution should be used for this work.
The next step was to decide about the virtualisation software which should be used
to run the Honeypot systems. The different advantages and disadvantages of full system simulation and emulation of system behaviour were discussed and finally different
possibilities of the latter were tested for usability. The final choice was in favour of
QEMU, a small open source system emulator which is comparable to the commercial
VMWare, which is used in the most Honeynet setups of the Honeynet Project.
After choosing two operating systems for the Honeypots the prototype of the HoneyDVD was successfully implemented on a 4.7GB DVD. This version was proof of the
general possibility of a successful implementation but had some major drawbags in
the deployment possibilities as well as in the compatibility to the standardised Roo
Honeywall, distributed by the Honeynet Project.
The current version of the Honey-DVD solved those problems and stands as the result
of this work. It was implemented on a 8.5GB Double Layer DVD and allows to deploy
a fully functional Honeynet on nearly every PC capable of booting from a DVD. The
deployed network is easy to maintain and, due to the modular design of the network
it is possible to use it either as a stand alone system or as an additional part of an
already existing honeynet.
Nevertheless the performance analysis showed that the usability of this implementation
is strongly dependant on the memory of the used hardware. Further development could
59
7. Conclusion and outlook
explore possibilities to reduce the necessary amount of memory. Interesting ways of
realising this would be:
• Using the upcoming remote logging capabilities of Roo. In this way it should be
possible to reduce the size of the Honeywall image to a minimum while exporting
the captured data to a remote location.
• Implement a Roo compatible Honeywall on the base system. Doing this, one
would avoid the problem of fixed disc image sizes due to the dynamic nature of
the live Linux memory management.
60
Bibliography
[1] Bytemark.
http://www.byte.com/bmark/bdoc.htm. Last checked: 12.2005.
[2] grml - linux for geeks.
http://www.grml.org. Last checked: 12.2005.
[3] Linux/unix nbench.
http://www.tux.org/~mayer/linux/bmark.html. Last checked: 12.2005.
[4] Qemu generic open source processor emulator.
http://www.qemu.org. Last checked: 12.2005.
[5] Swatch: The simple watcher of logfiles.
http://swatch.sourceforge.net/. Last checked: 12.2005.
[6] Universal tun/tap driver.
http://vtun.sourceforge.net/tun/. Last checked: 12.2005.
[7] The user-mode linux kernel home page.
http://user-mode-linux.sourceforge.net/. Last checked: 12.2005.
[8] Virtutech simics.
http://www.virtutech.com. Last checked: 12.2005.
[9] Vmware - virtual infrastructure software.
http://www.vmware.com/. Last checked: 12.2005.
[10] Webpage of the honeynet project.
http://www.honeynet.org/. Last checked: 12.2005.
[11] The xen virtual machine monitor.
http://www.cl.cam.ac.uk/Research/SRG/netos/xen/index.html.
checked: 12.2005.
Last
61
Bibliography
[12] Cynthia E. Irvine John Scott Robin. Analysis of the intel pentium’s ability to
support a secure virtual machine monitor. 2000.
http://www.cs.nps.navy.mil/people/faculty/irvine/publications/2000/,
Last checked: 12.2005.
[13] Klaus Knopper. Knoppix - live linux.
http://www.knopper.net/knoppix/. Last checked: 12.2005.
[14] The Honeynet Project. The roo unline user’s manual.
http://www.honeynet.org/tools/cdrom/roo/manual/index.html.
checked: 12.2005.
Last
[15] The Honeynet Project. Know your enemy: Sebek. November 2003.
http://www.honeynet.org/papers/sebek.pdf, Last checked: 12.2005.
[16] The Honeynet Project. Honeynet definitions, requirements, and standards ver
1.6.0.
http://www.honeynet.org/alliance/requirements.html, October 2004. Last
checked: 12.2005.
[17] The Honeynet Project. Know Your Enemy - Learning about security threads.
Pearson Education, Inc., 2nd edition, 2004.
[18] The Honeynet Project. Know your enemy: Genii honeynets. May 2005.
http://www.honeynet.org/papers/gen2/index.html, Last checked: 12.2005.
[19] The Honeynet Project. Know your enemy: Honeynets. May 2005.
http://www.honeynet.org/papers/honeynet/index.html,
Last
12.2005.
checked:
[20] The Honeynet Project. Know your enemy: Honeywall cdrom roo. August 2005.
http://www.honeynet.org/papers/cdrom/roo/index.html, Last checked:
12.2005.
[21] Joanna Rutkowska. Red pill... or how to detect vmm using (almost) one cpu
instruction.
http://invisiblethings.org/papers/redpill.html. Last checked: 12.2005.
[22] Amit Singh. An introduction to virtualization.
http://www.kernelthread.com/publications/virtualization/, 2005. Last
checked: 12.2005.
[23] Abdrew S Tannenbaum. Moderne Betriebssysteme. Pearson Education Deutschland GmbH, 2., überarbeitete auflage edition, 2003.
62
A. Abbreviations
DVD
Digital Versatile Disc
IDS
Intrusion detection system
IDTR
Interrupt descriptor table register
PID
Process identifier
RPM
Redhat Packet Manager
RWTH
Rhein-Westfälische Technische Hochschule
SIDT
Store interrupt descriptor table register
SSH
Secure Shell
tty
Teletypewriter
VMM
Virtual Machine Monito
63
B. Default Honeynet configuration
B.1. Default Honeywall configuration (File excerpt)
############################
# Site variables that are #
# global to all honeywalls #
# at a site.
#
############################
# Specify the IP address(es) and/or networks that are allowed
# to connect to the management interface. Specify any to
# allow unrestricted access.
# [Valid argument: IP address(es) | IP network(s) in CIDR notation | any]
HwMANAGER=192.168.0.0/24
# Specify the port on which SSHD will listen
# [Valid argument: TCP (port 0 - 65535)]
HwSSHD_PORT=22
# Specify whether or not to start SSHD at startup.
# [Valid argument: yes | no]
HwSSHD_STARTUP=yes
# Specify whether or not root can login remotely over SSH
# [Valid argument: yes | no]
HwSSHD_REMOTE_ROOT_LOGIN=yes
# NTP Time server(s)
# [Valid argument: IP address]
HwTIME_SVR=
############################
# Local variables that are #
65
B. Default Honeynet configuration
# specific to each
#
# honeywall at a site.
#
############################
# Specify the system hostname
# [Valid argument: string ]
HwHOSTNAME=roo-honeywall
# Specify the system DNS domain
# [Valid argument: string ]
HwDOMAIN=localdomain
#Start the Honeywall on boot
# [Valid argument: yes | no]
HwHONEYWALL_RUN=yes
# To use a headless system.
# [Valid argument: yes | no]
HwHEADLESS=yes
# This Honeywall’s public IP address(es)
# [Valid argument: IP address | space delimited IP addresses]
HwHPOT_PUBLIC_IP=192.168.0.101 192.168.0.102
# DNS servers honeypots are allowed to communicate with
# [Valid argument: IP address | space delimited IP addresses]
HwDNS_SVRS=217.237.150.97
# To restrict DNS access to a specific honeypot or group of
# honeypots, list them here, otherwise leave this variable blank
# [Valid argument: IP address | space delimited IP addresses | blank]
HwDNS_HOST=
# The name of the externally facing network interface
# [Valid argument: eth* | br* | ppp*]
HwINET_IFACE=eth0
# The name of the internally facing network interface
# [Valid argument: eth* | br* | ppp*]
HwLAN_IFACE=eth1
66
B.1. Default Honeywall configuration (File excerpt)
# The IP internal connected to the internally facing interface
# [Valid argument: IP network in CIDR notation]
HwLAN_IP_RANGE=192.168.0.0/24
# The IP broadcast address for internal network
# [Valid argument: IP broadcast address]
HwLAN_BCAST_ADDRESS=192.168.0.255
# Enable QUEUE support to integrate with Snort-Inline filtering
# [Valid argument: yes | no]
HwQUEUE=yes
# The unit of measure for setting oubtbound connection limits
# [Valid argument: second, minute, hour, day, week, month, year]
HwSCALE=hour
# The number of TCP connections per unit of measure (HwScale)
# [Valid argument: integer]
HwTCPRATE=20
# The number of UDP connections per unit of measure (HwSCALE)
# [Valid argument: integer]
HwUDPRATE=20
# The number of ICMP connections per unit of measure (HwSCALE)
# [Valid argument: integer]
HwICMPRATE=50
# The number of other IP connections per unit of measure
# (HwSCALE)
# [Valid argument: integer]
HwOTHERRATE=10
# Enable the SEBEK collector which delivers keystroke and
# files to a remote system even if an attacker replaces
# daemons such as sshd
# [Valid argument: yes | no]
HwSEBEK=yes
# Enable the Walleye Web interface.
#[Valid argument: yes | no]
67
B. Default Honeynet configuration
HwWALLEYE=yes
# Specify whether whether to drop SEBEK packets or allow them
# to be sent outside of the Honeynet.
# [Valid argument: ACCEPT | DROP]
HwSEBEK_FATE=DROP
# Specify the SEBEK destination host IP address
# [Valid argument: IP address]
HwSEBEK_DST_IP=10.0.0.1
# Specify the SEBEK destination port
# [Valid argument: port]
HwSEBEK_DST_PORT=12345
# Enable SEBEK logging in the Honeywall firewall logs
# [Valid argument: yes | no]
HwSEBEK_LOG=no
# Specify whether the dialog menu is to be started on login to
# TTY1
# [Valid argument: yes | no ]
HwMANAGE_DIALOG=yes
# Specify whether management port is to be activated on start
# or not.
# [Valid argument: yes | no ]
HwMANAGE_STARTUP=yes
# Specy the network interface for remote management. If set
# to br0, it will assign MANAGE_IP to the logical bridge
# interface and allow its use as a
# management interface. Set to none to disable the management
# interface.
# [Valid argument: eth* | br* | ppp* | none]
HwMANAGE_IFACE=eth2
# IP of management Interface
# [Valid argument: IP address]
HwMANAGE_IP=192.168.0.100
68
B.1. Default Honeywall configuration (File excerpt)
# Netmask of management Interface
# [Valid argument: IP netmask]
HwMANAGE_NETMASK=255.255.255.0
# Default Gateway of management Interface
# [Valid argument: IP address]
HwMANAGE_GATEWAY=192.168.0.11
# DNS Servers of management Interface
# [Valid argument: space delimited IP addresses]
HwMANAGE_DNS=217.237.150.97
# TCP ports allowed into the management interface. If SSH is
# used this list must include the port SSHD is listening on.
# [Valid argument: space delimited list of TCP ports]
HwALLOWED_TCP_IN=22 443
# Specify whether or not the Honeywall will restrict outbound
# network connections to specific destination ports. When
# bridge mode is utilized, a management interface is required
# to restrict outbound network connections.
# [Valid argument: yes | no]
HwRESTRICT=yes
# Specity the TCP destination ports Honeypots can send network
# traffic to.
# [Valid argument: space delimited list of UDP ports]
HwALLOWED_TCP_OUT=22 25 43 80 443
# Specity the UDP destination ports Honeypots can send network
# traffic to.
# [Valid argument: space delimited list of UDP ports]
HwALLOWED_UDP_OUT=53 123
# Specify whether or not to start swatch and email alerting.
# [Valid argument: yes | no]
HwALERT=no
# Specify email address to use for email alerting.
# [Valid argument: any email address]
69
B. Default Honeynet configuration
[email protected]
# NIC Module List - Set this to the number and order you wish
# to load NIC drivers, such that you get the order you want
# for eth0, eth1, eth2, etc.
# [Valid argument: list of strings]
#
# Example: eepro100 8139too
HwNICMODLIST=
# Blacklist, Whitelist, and Fencelist features.
# [Valid argument: string ]
HwFWBLACK=/etc/blacklist.txt
# [Valid argument: string ]
HwFWWHITE=/etc/whitelist.txt
# [Valid argument: string ]
HwFWFENCE=/etc/fencelist.txt
# [Valid argument: yes | no]
HwBWLIST_ENABLE=no
# [Valid argument: yes | no]
HwFENCELIST_ENABLE=no
# The following feature allows the roo to allow attackers into
# the honeypots but they can’t send packets out...
# [Valid argument: yes | no]
HwROACHMOTEL_ENABLE=no
# Should we swap capslock and control keys?
HwSWAP_CAPSLOCK_CONTROL=no
70
B.2. Honepot configuration
B.2. Honepot configuration
B.2.1. FreeBSD 5.3 configuration
Table B.1.: FreeBSD 5.3 default system configuration
Varable
defaultrouter
hostname
ifconfig_ed0
inetd_enable
keymap
linux_enable
moused_enable
scrnmap
sshd_enable
Value
192.168.0.11
Apollo.localdomain
inet 192.168.0.102 netmask 255.255.255.0
YES
german.cp850
YES
YES
NO
YES
Table B.2.: FreeBSD5.3 default services started via initd
Service
ftp
telnet
tftp
daytime
time
echo
discard
chargen
File
/usr/libexec/ftpd
/usr/libexec/telnetd
/usr/libexec/tftpd
internal
internal
internal
internal
internal
B.2.2. Redhat 8 configuration
71
B. Default Honeynet configuration
Table B.3.: FreeBSD 5.3 additional default services
Service
HTTP
File
/usr/local/apache/bin/apachectl
Table B.4.: Redhat 8 default system configuration
service
Hostname
Domainname
IP
Default gateway
Broadcast address
Netmask
Network
file
Starbug
localdomain
192.168.0.101
192.168.0.11
192.168.0.255
255.255.255.0
192.168.0.0
Table B.5.: Redhat 8 default services
Service
HTTP
FTP
72
File
/usr/local/apache/bin/apachectl
/usr/local/sbin/proftpd
C. Sourcecode
The complete sourcecodes of this work are available on the CD provided with this
document.
73