1
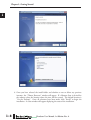
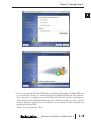
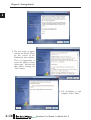
Getting Started Chapter 1 In This Chapter... Introduction................................................................................................................ 1–2 Purpose of this Manual.............................................................................................. 1–2 About Getting Started............................................................................................... 1–2 Online Help Files and Other Documentation............................................................. 1–2 Technical Support..................................................................................................... 1–2 Conventions Used....................................................................................................... 1–3 Key Topics for Each Chapter...................................................................................... 1–3 Before you begin........................................................................................................ 1–4 Productivity Suite System Requirements................................................................... 1–5 Step 1: Install Programming Software...................................................................... 1–6 Step 2: Launch Programming Software................................................................... 1–11 Online Help............................................................................................................. 1–12 Step 3: Install Hardware........................................................................................... 1–13 Step 4: Apply Power to CPU.................................................................................... 1–16 Step 5: Establish PC to CPU Communications......................................................... 1–17 Step 6: Open/Read Hardware Configuration.......................................................... 1–18 Step 7: Create a Project............................................................................................ 1–20 Step 8: Save Project.................................................................................................. 1–26 Step 9: Write Project to CPU.................................................................................... 1–27 Step 10: Place CPU in RUN Mode............................................................................ 1–28 Step 11: Test the Project Using the Monitor Mode................................................ 1–29 Chapter 1: Getting Started Introduction 1 2 3 4 5 6 7 8 9 10 11 12 13 14 A B C D Purpose of this Manual Thank you for purchasing the AutomationDirect Productivity2000 Programmable Controller (CPU) family of products. This hardware user manual provides information that will help you install, set up, program, troubleshoot, and maintain your Productivity2000 CPU system. The manual includes information that is critical to the safety of the personnel who will install and use the controller and to the machinery, processes, and equipment controlled by the CPU. The manual also includes important information about power and signal wiring, mounting of the CPU, and configuring the CPU system. About Getting Started If you are familiar with Programmable Controllers in general, then following the simple steps in this first chapter may be all you require to start being productive using a Productivity2000 CPU system. After you have completed the steps, your Productivity2000 controller will be running the ladder logic project that you programmed. Online Help Files and Other Documentation The Productivity2000 programming software, Productivity Suite, is available as a download from our website. See http://www.automationdirect.com/products/pseries.html. The Productivity Suite software includes searchable online help topics covering all aspects of the software, instruction set, module setup, and communications. In addition, each base, power supply, CPU, and I/O module includes an installation insert. Technical Support We strive to make our manuals the best in the industry. We rely on your feedback to let us know if we are reaching our goal. If you cannot find the solution to your particular application, or if for any reason you need technical assistance, please call us at: 1–770–844–4200 Our technical support group will work with you to answer your questions. They are available Monday through Friday from 9:00 A.M. to 6:00 P.M. Eastern Time. We also encourage you to visit our web site where you can find information about our company and specific technical information about a wide array of our products. http://www.automationdirect.com 1–2 2000 Hardware User Manual, 1st Edition, Rev. A Chapter 1: Getting Started Conventions Used When you see the “note pad” icon in the left-hand margin, the paragraph to its immediate right will be a special note. Notes represent information that may make your work quicker or more efficient. The word NOTE: in boldface will mark the beginning of the text. When you see the “exclamation point” icon in the left-hand margin, the paragraph to its immediate right will be a warning. This information could prevent injury, loss of property, or even death in extreme cases. Any warning in this manual should be regarded as critical information that should be read in its entirety. The word WARNING in boldface will mark the beginning of the text. Key Topics for Each Chapter The beginning of each chapter will list the key topics that can be found in that chapter. 2000 Hardware User Manual, 1st Edition, Rev. A 1–3 1 2 3 4 5 6 7 8 9 10 11 12 13 14 A B C D Chapter 1: Getting Started 1 2 3 4 5 6 7 8 9 10 11 12 13 14 A B C D Before you begin... It is recommended that the following items be available to make this short step-by-step introduction to the Productivity2000 System go smoothly. Productivity2000 System Example P2-04B Base P2-Fill Module P2-01AC Power Supply P2-08TRS Output Module P2-550 CPU Module P2-08SIM Module PC Running Windows 7, 8, 8.1 Productivity Suite Programming Software PS-PGMSW Not available from Automationdirect.com USB-A to Micro USB-B Programming Cable Download software from our webste at: www.automationdirect.com under “Programmable Controllers”. AC Power Cord Screwdriver TW-SD-VSL-2 Wire Strippers DN-WS Hookup Wire Not available from Automationdirect.com. 1–4 2000 Hardware User Manual, 1st Edition, Rev. A Chapter 1: Getting Started Productivity Suite System Requirements Productivity Suite Windows-based programming software (CD-ROM or web download) works with Windows® XP (Home or Professional), Vista (Home, Basic, Premium, 32 or 64-bit) or Windows 7, 8, 8.1, (Home, Professional, Ultimate, 32 or 64-bit). Please check the following requirements when choosing your PC configuration: • Windows XP Personal Computer with a 333 MHz or higher processor (CPU) clock speed recommended; Intel Pentium/Celeron family or AMD K6/Athlon/Duron family, or compatible processor recommended. •Vista or Windows 7 or Windows 8, 8.1, Personal Computer with a 800 MHz or higher processor (CPU) clock speed recommended; Intel Pentium/Celeron family or AMD K6/Athlon/Duron family, or compatible processor recommended. • SVGA 1024x768 pixels resolution. (1280x1024 pixels resolution recommended). • 300MB free hard-disk space. •RAM: Windows XP 2.0.0.x or higher; 1GB memory (2GB recommended). Windows XP 1.10 or lower; 128MB free RAM (512MB recommended). Windows 7, 8, 8.1 or Vista; Version 2.0.0.x or higher, 2GB memory (4GB recommended). Version 1.10 or lower, 512MB (1GB recommended) • CD-ROM or DVD drive for installing software from the CD. • USB or Ethernet Port for project transfer to CPU. NOTE: USB or Ethernet cable is also required for communications between PC and CPU. 2000 Hardware User Manual, 1st Edition, Rev. A 1–5 1 2 3 4 5 6 7 8 9 10 11 12 13 14 A B C D Chapter 1: Getting Started Step 1: Install Programming Software 1. D ownload the latest version of the Productivity Suite Programming Software from the Automationdirect website. Or, if the Productivity Suite Programming Software CD is available, insert it into your PC CD drive. The splash screen should appear after a short time. 2. Click on the “Install” button at the splash screen and follow the dialog boxes. 1 2 3 4 5 6 7 8 9 10 11 12 13 14 A B C D 3. If the CD does not auto-run, click your PC Start menu (bottom left corner of screen), and select Run. • In the Open: prompt text box, Type in “D: install.exe”, where “D:” is the drive letter of the CD drive being used, or browse to the location of the “install.exe” file that was downloaded and select that file. • Select OK and follow the dialog boxes through the next pages. NOTE: See the Productivity Suite Installation and Productivity Suite Startup topics for additional details if needed. 4. C arefully read the software license agreement. If you agree to the terms and conditions of this agreement, select the “I accept the terms of the License Agreement” and then the “Next” button. 1–6 2000 Hardware User Manual, 1st Edition, Rev. A Chapter 1: Getting Started 5. T he “Choose Install Folder” window will open next. If this is the first installation of the Productivity Suite Software on your PC, choose (a) Install New Instance: This option will install a new instance of the Productivity Suite software in the default location, C:\Program Files\AutomationDirect\Productivity Suite <Software Version>; or choose a different one using the Browse button. If the installer detects a previous version of Productivity Suite on your PC, there is another option available with this window: (b)Replace Existing Instance: This option allows you to uninstall the previous version of the software and install the new version in its place. If this option is chosen the following window appears. Click “Uninstall” to continue. 2000 Hardware User Manual, 1st Edition, Rev. A 1–7 1 2 3 4 5 6 7 8 9 10 11 12 13 14 A B C D Chapter 1: Getting Started 1 2 3 4 5 6 7 8 9 10 11 12 13 14 A B C D 6. O nce you have selected the install folder and whether or not to delete any previous instances, the “Choose Shortcuts” window will appear. If a Shortcut Icon is desired for the software select the location where the icon will be created. The default location is “On the Desktop”. Once all selections have been made, click “Install” to begin the installation. A status window will appear displaying the status of the installation. 1–8 2000 Hardware User Manual, 1st Edition, Rev. A Chapter 1: Getting Started 7. Do you want to install DataWorx P3K Software? (Following Dialog Box) DataWorx P3K runs on a network PC and acts as a translator between the Productivity2000 and SQL databases. If you select Yes, an evaluation version of DataWorx P3K will also install on your computer. The evaluation version allows full functionality, but is limited to 30 minute sessions. Separate database software is required, but is not included. See our website for more information on purchasing DataWorx P3K. Choose Yes or No and select “Next”. 2000 Hardware User Manual, 1st Edition, Rev. A 1–9 1 2 3 4 5 6 7 8 9 10 11 12 13 14 A B C D Chapter 1: Getting Started 1 2 3 4 5 6 7 8 9 10 11 12 13 14 A B C D 8. T he next screen to appear contains the Release Notes for this version of the Productivity Suite software. This is an opportunity to review the software version release notes. You may read these before selecting the “Next” button. 9. T he Installation is now complete. Select “Done”. 1–10 2000 Hardware User Manual, 1st Edition, Rev. A Chapter 1: Getting Started Step 2: Launch Programming Software After installing the Productivity Suite Programming Software, PS-PGMSW, launch the software by double clicking the desktop Productivity Suite Icon. Or from the PC’s ‘Start’ menu, slide the mouse pointer through the menus (start>All Programs>AutomationDirect>Productivity Suite x.x.x.x>Productivity Suite) to the Productivity Suite Programming Software selection, and use the left mouse button to click on it. The Productivity Suite Programming Software will start up and display the Main Window as shown here. NOTE: The recommended minimum screen size for the Productivity Suite Software is 1024 X 786 pixels. Click on the ‘Start a New Project’ in the Start Productivity dialog box to open a programming window. 2000 Hardware User Manual, 1st Edition, Rev. A 1–11 1 2 3 4 5 6 7 8 9 10 11 12 13 14 A B C D Chapter 1: Getting Started 1 2 3 4 5 6 7 8 9 10 11 12 13 14 A B C D The Programming Window is divided into menus and toolbars that work together to make project development as simple as possible. Online Help It is essential that you use the Productivity Suite online Help to familiarize yourself with the software. Keep it open on your desktop and refer to it frequently as you build your system. Click on the toolbar Help button to open the Help file. 1–12 2000 Hardware User Manual, 1st Edition, Rev. A Chapter 1: Getting Started Step 3: Install Hardware The Productivity2000 CPU system components snap together to form a configured CPU in minutes. See Chapter 5, Installation and Wiring, for more detailed hardware installation information. What follows are the basic steps: 1. Install power supply in the base and engage locking tab. Locked 2. Install CPU in the base and engage locking tab. 2000 Hardware User Manual, 1st Edition, Rev. A 1–13 1 2 3 4 5 6 7 8 9 10 11 12 13 14 A B C D Chapter 1: Getting Started 3. Install I/O Modules and engage locking tabs. 1 2 3 4 5 6 7 8 9 10 11 12 13 14 A B C D Locked Unlocked 4..Connect appropriate wiring to the power supply (P2-01AC) and I/O (P2-08TRS module) in this example. AC(L) AC( (L) AC(N) AC( (N) GN D GND LOGIC LO OG O G GIC GND GN ND The power supply and load are connected through an AC current source. 1–14 Power wer Supply S l 2000 Load To Load ACL Hardware User Manual, 1st Edition, Rev. A Chapter 1: Getting Started 5. C onnect USB cable. Use a Micro USB cable with a Type A and Micro Type B connectors as shown below. 2000 Hardware User Manual, 1st Edition, Rev. A 1–15 1 2 3 4 5 6 7 8 9 10 11 12 13 14 A B C D Chapter 1: Getting Started 1 2 3 4 5 6 7 8 9 10 11 12 13 14 A B C D Step 4: Apply Power to CPU Ensure proper wiring and the correct voltage is available before connecting wiring to the power supply. Once this is verified, connect power to the power supply. Once power is applied, the CPU will perform a self evaluation and verification. See Chapters 2 and 5 of this manual for more power supply and input wiring information. P2-01AC P2-01AC P2-01AC P2-01DCAC P2-01DCAC P2-01AC 100-240 VAC AC(L) 24VAC 24VAC AC(L) +V ACL AC(N) -V ACN GNDGND GND GND LOGIC LOGIC GND GND LOGIC GND LOGIC GND AC(N) 1–16 12–24 VDC 12-24VDC 2000 Hardware User Manual, 1st Edition, Rev. A Chapter 1: Getting Started Step 5: Establish PC to CPU Communications Select “Choose CPU” icon on the CPU Toolbar and the dialog box shown below will appear. Highlight the installed CPU listed in the dialog box and select “Connect”. When initially going Online with the CPU, a popup window will notify you of a project difference between the CPU and the PC. Select “No, Use PC Project” command button. 2000 Hardware User Manual, 1st Edition, Rev. A 1–17 1 2 3 4 5 6 7 8 9 10 11 12 13 14 A B C D Chapter 1: Getting Started 1 2 3 4 5 6 7 8 9 10 11 12 13 14 A B C D Step 6: Open/Read Hardware Configuration Before we create a project we must configure the hardware so we’ll have default input and output tags for use in our project. With the CPU in “STOP” Mode, select Hardware Configuration under Application Tools and the following screen opens. 1–18 2000 Hardware User Manual, 1st Edition, Rev. A Chapter 1: Getting Started This screen shows the user tag names for all sixteen I/O points. Select “OK”. 1 2 3 4 5 6 7 8 9 10 11 12 13 14 A B C D 2000 Hardware User Manual, 1st Edition, Rev. A 1–19 Chapter 1: Getting Started 1 2 3 4 5 6 7 8 9 10 11 12 13 14 A B C D Step 7: Create a Project We’re going to start by entering a simple ladder logic program in the order that follows. Rung #1 Select the “END” position on Rung #1 with your cursor. From the Instruction List on the right, scroll down to Counters/Timers section and double click on the Simple Timer (STMR) instruction. The “Simple Timer” instruction automatically is placed on the selected rung and the Simple Timer (STMR) dialog box pops up. 1. Enter ‘T1_SP’ into the Preset Value field. 2. Enter ‘T1_CURVAL’ into the Current Value field. 3. Enter ‘T1_DN’ into the Done field. 4. Select “OK”. The Define Tags dialog box opens. Select OK. 5. Enter preset time value of 300ms into “Intial Value” field for Tag T1_SP. 1–20 2000 Hardware User Manual, 1st Edition, Rev. A Chapter 1: Getting Started Place the cursor on the first position on Rung #1 as shown below. In the Instruction List on the right, scroll up to Contacts section and double click on “NO Contact (NO)”. A NO Contact (NO) is placed at this rung position and a dialog box pops up. 1. Enter ‘T1_Start’ into the text box. 2. Select OK. The Define Tags dialog box opens. Select “OK”. 2000 Hardware User Manual, 1st Edition, Rev. A 1–21 1 2 3 4 5 6 7 8 9 10 11 12 13 14 A B C D Chapter 1: Getting Started With the cursor on Rung #1, to the right of contact ‘T1_Start’, we are going to begin drawing a branch circuit. Under the Edit drop down menu, select “Wire”, then select “Down”. Notice that a wire has been added. 1 2 3 4 5 6 7 8 9 10 11 12 13 14 A B C D NOTE: There is also a wire Erase With Cursor tool in the Edit drop down menu that is used to erase any lines that were created using the Wire tools. 1–22 2000 Hardware User Manual, 1st Edition, Rev. A Chapter 1: Getting Started Next we’ll draw a wire to the left. Under the Edit drop down menu, select “Wire”, then select “Left”. Next we’ll add another normally-open contact. Place the box cursor on the first position on the newly created SubRung #1. From the Instruction List click & drag a Contact (NO) into this box. A NO Contact (NO) dialog box pops up. 1. Enter ‘T1_Manual’ into the field. 2. Select “OK”. The Define Tags dialog box opens. Select “OK”. 2000 Hardware User Manual, 1st Edition, Rev. A 1–23 1 2 3 4 5 6 7 8 9 10 11 12 13 14 A B C D Chapter 1: Getting Started 1 2 3 4 5 6 7 8 9 10 11 12 13 14 A B C D Rung #2 Next we’ll add another normally-open contact at the start of Rung #2. Click & drag a “NO Contact (NO)” into this box. A NO Contact (NO) dialog box pops up. 1. In the empty tag field press the down arrow on the right to open a drop-down list; scroll down and select ‘T1_DN’. 2. Select “OK”. Next we’ll add an Out coil at the end of the rung. Place the cursor at the end of the rung. From the Instructions list Coil section, double click on an “Out Coil (OUT)”. An Out Coil (OUT) is placed on the rung and a dialog box pops up. 1. In the tag field press the down arrow on the right to open a drop-down list; scroll down and select ‘DO-0.1.2.1’. 2. Select OK. 1–24 2000 Hardware User Manual, 1st Edition, Rev. A Chapter 1: Getting Started The ladder program now looks like this. When either of the T1 contacts are energized, the timer starts. When it times out, contact T1_DN energizes and turns on the rung 2 output. 2000 Hardware User Manual, 1st Edition, Rev. A 1–25 1 2 3 4 5 6 7 8 9 10 11 12 13 14 A B C D Chapter 1: Getting Started 1 2 3 4 5 6 7 8 9 10 11 12 13 14 A B C D Step 8: Save Project Save the project by opening the File drop-down menu and selecting Save Project. 1–26 2000 Hardware User Manual, 1st Edition, Rev. A Chapter 1: Getting Started Step 9: Write Project to CPU Next we will transfer the project to the CPU. Transfer Project is accessed by selecting Transfer Project from the File Menu. Select “To CPU” from the Transfer Project menu. The project will then be Transferred to the CPU from the PC. During the transfer a status window will open displaying the process. 2000 Hardware User Manual, 1st Edition, Rev. A 1–27 1 2 3 4 5 6 7 8 9 10 11 12 13 14 A B C D Chapter 1: Getting Started 1 2 3 4 5 6 7 8 9 10 11 12 13 14 A B C D Step 10: Place CPU in RUN Mode Next, verify the Run/Stop switch on the CPU faceplate is placed in the Run position and then place the CPU in RUN mode on the Productivity Software Toolbar so the ladder logic program executes. NOTE: If the Run/Stop switch on the CPU is in the Stop position, the Run button on the Programming Software Toolbar will be disabled. jjjjjjjjjjjjjjjjjjjjjjjjjjjjjjjjjjjjjjjjjjjjjjjjjjjjjjjjjjjjjjjjjjjjjjjjjjjjjjjjjjjjjjjjjjjjjjjjjjjjjjjjjjjjjjjjjjjjjjjjjjjjjjjjjj jjjjjjjjjjjjjjjjjjjjjjjjjjjjjjjjjjjjjjjjjjjjjjjjjjjjjjjjjjjjjjjjjjjjjjjjjjjjjjjjjjjjjjjjjjjjjjjjjjjjjjjjjjjjjjjjjjjjjjjjjjjjjjjjjjjjjjjjjjjjjjjjjjjjjjjjjjjjjjjjjjjjjjjjjjjjjjjjjjjjjjjj 1–28 2000 Hardware User Manual, 1st Edition, Rev. A Chapter 1: Getting Started Step 11: Test the Project Using Monitor Mode In this next step, use the Monitor Mode and Data View to test the ladder logic program. Select Monitor Mode from the top of the Ladder Logic screen to display the status of Boolean and Integer Tags. Using Data View, the Tag values can be viewed or manipulated for testing the project. The Data View window can be accessed by selecting Data View from the Tools Menu of the Main Menu. For the Simple Timer Instruction, a Monitor button is provided that, when selected, will load the tags associated with the instruction into Data View. 2000 Hardware User Manual, 1st Edition, Rev. A 1–29 1 2 3 4 5 6 7 8 9 10 11 12 13 14 A B C D Chapter 1: Getting Started The tags will be placed in a separate Tab titled New Task - STMR as seen below. 1 2 3 4 5 6 7 8 9 10 11 12 13 14 A B C D The remaining tagnames in the Ladder Logic can be added to the Data View window by clicking on a blank area in the Tagname column. This will display a drop down menu where the tags can be selected. Scroll down the list and select the tags to be added. 1–30 2000 Hardware User Manual, 1st Edition, Rev. A Chapter 1: Getting Started Once all of the tagnames have been added, they can now be monitored and manipulated. See the Data View help file topic for additional details if needed. NOTE: Force must be enabled for a Tag in the Tag Database before Force can be used in Data View. 2000 Hardware User Manual, 1st Edition, Rev. A 1–31 1 2 3 4 5 6 7 8 9 10 11 12 13 14 A B C D Chapter 1: Getting Started 1 2 3 4 5 6 7 8 9 10 11 12 13 14 A B C D Notes 1–32 2000 Hardware User Manual, 1st Edition, Rev. A