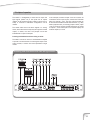
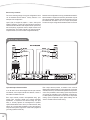
1
Intelli-X 2 26 Intelli-X 2 48 User Manual w w w. a p e x - a u d i o . e u APEX NV Schoebroekstraat 62 3583 Beringen (Paal) BELGIUM Tel: + 32 (0)11 28 61 91 Fax: + 32 (0)11 25 56 38 e-mail: [email protected] website: www.apex-audio.eu Trademarks The APEX trademark is owned by APEX N.V. All other brand, product and company names and any other registered names or trade marks mentioned in this manual belong to their respective owners. Disclaimer APEX N.V. has taken all possible steps to ensure that the information given here is both correct and complete. In no event can APEX accept any liability or responsibility for any loss or damage to the owner of the equipment, any third party, or any equipment which may result from use of this manual or the equipment which it describes. The information provided in this document may be modified at any time without prior warning. Specifications and appearance may differ from those listed and illustrated. Any complaint against APEX N.V. shall be governed by the laws of Belgium. Intelli-X2 26 Intelli-X2 48 System management processors May 2011/ Order code for this document: 90-40-40-000100 Serial number of this product: © 1999 - 2011 APEX N.V. All rights reserved. This manual may not be reproduced or transmitted, either in part or as a whole, by any means, be they mechanical or electronic, without the express written permission of APEX N.V. Important safety instructions Important safety instructions CAUTION: to reduce the risk of electric shock, do not remove cover (or back). No user-serviceable parts inside. Refer servicing to qualified service personnel. The lightning flash with arrowhead symbol, within an equilateral triangle, is intended to alert the user to the presence of an un-insulated “dangerous voltage” within the product’s enclosure that may be of sufficient magnitude to constitute a risk of electric shock to persons. The exclamation mark within an equilateral triangle is intended to alert the user to the presence of important operating and maintenance (servicing) instructions in the literature accompanying the equipment. Instructions Before installing or operating the equipment, read all safety instructions, warnings and operating instructions. Heed all warnings. Follow all instructions. Keep all safety, installation and operating instructions for future reference. Installing and operation location Do not use this apparatus near water. Do not expose this apparatus to drips or splashes. Do not place any objects filled with liquids, such as vases, on the apparatus. Do not install near any heat sources such as radiators, heat registers, stoves, or other apparatus (including amplifiers) that produce heat. No naked flames, such as lighted candles, should be placed on the apparatus. The apparatus should be located close enough to the AC outlet so that you can easily grasp the power cord plug at any time. The mains plug, the appliance coupler or the mains switch is used as the disconnect device. Either device shall remain readily operable when the apparatus is installed or used. Power source and grounding This product should be operated only from the power source indicated on the apparatus or in the operating instructions. If you are not sure of the type of power supply to the premises where the equipment is to be used, consult your product dealer or local power company. Do not defeat the safety purpose of the polarised or grounding-type plug. A polarised plug has two blades with one wider than the other. A grounding type plug has two blades and a third grounding prong. The wide blade or the third prong is provided for your safety. If the provided plug does not fit into your outlet, consult an electrician for replacement of the obsolete outlet. Connect Class I construction apparatus to an AC outlet with a protective grounding connection. Do not overload wall outlets, extension cords or integral convenience receptacles, as this can result in a risk of fire or electric shock. Do not install the apparatus in a confined space such as a book case or similar unit. Do not block any ventilation openings. Protect the power cord from being walked on or pinched, particularly at plugs, convenience receptacles and the point where they exit from the apparatus. Ensure that foreign objects and liquids cannot get into the equipment. Unplug this apparatus during lightning storms or when unused for long periods of time. Install in accordance with the manufacturer’s instructions. Only use attachments/accessories specified by the manufacturer. 4 Use only with the cart, stand, tripod, bracket or table specified by the manufacturer, or sold with the apparatus. When a cart is used, use caution when moving the cart/ apparatus combination to avoid injury from tip-over . Cleaning, maintenance and servicing Unplug the apparatus from the wall outlet before cleaning. Do not use liquid cleaners or aerosol cleaners. Use a damp cloth for cleaning. Do not attempt to service this product yourself, as opening or removing covers may expose you to dangerous voltage or other hazards. Refer all servicing to qualified service personal. Servicing is required when the apparatus has been damaged in any way, such as power-supply cord or plug damaged, liquid has been spilled or objects have fallen into the apparatus, the apparatus has been exposed to rain or moisture, does not operate normally or has been dropped. point for recycling of electric and electronic devices. Customer participation is important to minimize the potential affects on the environment and human health that can result from hazardous substances that may be contained in this product. Please, dispose of this product and its packaging in accordance with local and national disposal regulations including those governing the recovery and recycling of waste electrical and electronic equipment. Contact your local waste administration, waste collection company or dealer. Intended use The equipment may only be used for the purpose described in the operation instructions. Never carry out any work on the equipment other than as specified in the operating manual. Never push objects of any kind into this product through openings, as they may touch dangerous voltage points or short-cut parts, which could result in a fire or electric shock. Children should never use the apparatus without close adult supervision. WARNING: excessive sound pressure levels can cause hearing loss. Environmental precaution Electrical and electronic equipment may contain hazardous substances for humans and their environment. The “crossed out wheelie bin” symbol present on the device and represented above is there to remind one of the obligation of selective collection of waste. This label is applied to various products to indicate that the product is not to be thrown away as unsorted municipal waste. At the end of life, dispose of this product by returning it to the point of sale or to your local municipal collection 5 Table of contents Table of contents Important safety instructions 4 Introduction 8 Product highlights Foreword Before you get started 8 8 9 About this manual 9 Applicable versions 9 Inspection and unpacking 9 Operating environment 9 Power requirements 9 Installation 9 Front and rear panel description 10 Front panel 10 Rear panel 11 Wiring the unit 13 Changing AES-3 impedance 13 Principles of operation 14 Using the Intelli-X2 17 17 17 The Menu System Home page and general menu navigation The softkeys Menu entry level softkeys – Locate and Lock functions Preset Menu 17 18 19 19 20 Factory Presets User Presets Naming User Preset Categories Audio Menu 20 Local I/O submenu Input settings Output settings 20 20 21 21 Input Channels submenu Input channel submenu softkeys – Copying and Ganging Channels Gain Delay Graphic EQ Parametric EQ Compressor Input channel submenu softkeys – Copying and Resetting menu items Mix Matrix submenu 6 19 Mix Matrix submenu softkeys – Copying and Resetting matrix settings 21 21 22 22 22 23 24 24 24 On-line Registration Output channels submenu 25 Output channel submenu softkeys – Copying and Ganging Channels Output Delay Driver Alignment Crossover Parametric EQ Gain Limiter Output channel submenu softkeys – Copying and Resetting menu items Meters submenu Settings menu Sync submenu Network submenu Notes on networking Clock submenu LCD submenu 25 25 26 26 26 27 27 28 28 Security menu Secuity men softkeys – Locking and PIN change 31 31 About menu 32 Log menu 32 Technical specifications Limited Warranty 33 29 29 29 30 31 31 38 Register your product Please take the time to register your product on-line by typing the following URL in your browser: http://productregistration.apex-audio.eu/ As well as registering the product on-line, please take the trouble to record the serial number of the unit in the space provided on page 3 of the manual, and keep the manual in a safe place. 7 Introduction Dear customer, Thank you for buying the Apex Intelli-X2. The Intelli-X2 is a professional quality, DSP-based system management processor. It can be used in both analogue and digital environments, and provides all the equalisation, crossover filtering, time alignment and limiting required by the current generation of high performance loudspeaker systems. Product highlights • Two versions: 2-in, 6-out and 4-in, 8-out • LCD display with intuitive menu system • No external computer necessary • Inputs and outputs selectable as analogue or digital in pairs • User-selectable analogue input sensitivities and output levels • Sample Rate Conversion available on digital inputs • External wordclock input with switchable termination • Internal wordclock output • Automatic redundant clock source selection with definable hierarchy • Internal sample rates available from 44.1 kHz to 192 kHz • Any input can be assigned to any output to create one or more crossovers of various configurations • Input channel DSP facilities: • Gain adjustment and phase inversion • Delay (1.5 s max.), definable as time or distance, with temperature and RH compensation • 30-band ISO-centred graphic equalisation • 12-band parametric filtering, with choice of 16 filter types • Compressor • Adjustable gain at matrix crosspoint • Output channel DSP facilities • Delay (1.5 s max.), definable as time or distance, with temperature and RH compensation • Driver alignment delay (30 ms max.), definable as time or distance • 12-band parametric filtering, with choice of 16 filter types • High- and low-pass crossover filtering with choice of filter types • FIR/IIR filter implementation • Peak/RMS limiter • Internal preset library • Event logging system • Ethernet remote control using Intelli-Ware PC application; static IP, DHCP and auto-IP compatible; wired or wireless • High reliability PSU with PowerCON® connector • Professional quality XLR and EtherCON® connectors throughout • 1U 19” rack-mounting unit Foreword The Apex Intelli-X2 is a multi-purpose system management processor with a powerful set of DSP features. Its applications include signal routing and distribution, room equalisation, speaker and driver time alignment and crossover implementation in high-quality, fixed or portable sound reinforcement and monitoring systems. It is designed to be inserted in the signal chain between the mixing console and the power amplifiers, and can be interfaced with both analogue and digital audio systems. It is equally applicable to FOH and monitor applications. Due to its extremely high quality and careful design, the Intelli-X2 is also eminently suitable as a room equaliser, an active crossover or audio DA – or all three - in a studio or cinema. As a loudspeaker processor, the Intelli-X2 ’s primary purpose is to act as a frequency crossover, using sophisticated filters to split the full audio spectrum into two or more narrower frequency bands (the number depending on the requirements of the loudspeaker system being used). As any input can be routed to any output, a wide variety* of common crossover configurations can be realised with the Intelli-X2 48, including: • • • • • Mono, up to 8-way Stereo 3-way Stereo 4-way 3-channel 2-way 4-channel 2-way * The range of crossover configurations available with the Intelli-X2 26 is more restricted than with the Intelli-X2 48 due to the reduced I/O provision. The crossover characteristics (usually supplied by the manufacturer of the loudspeakers being used) can be quickly and easily entered into the Intelli-X2, and then stored in the unit for later recall. This is of great advantage with touring systems, where the configuration of the speaker rig necessarily changes from venue to venue. The Intelli-X2 ’s remote control capabilities allow fine tuning of the sound system to be carried out from a remote PC, typically a wireless-enabled tablet PC. 8 Before you get started About this manual Operating environment Carefully read all instructions and warnings before operating this appliance. Keep this manual in a safe place so that it can be referred to when required. This appliance is designed to operate in most normal climates, at a temperature between 0 °C and 50 °C (32 - 122 °F), with relative humidity between 10% and 60%. The latest manual revision can be downloaded from the download section of the Apex website: http://www.apex-audio.eu The Intelli-X2 incorporates internal fan-cooling, which should keep the unit within its operating temperature range in most situations. However, should the unit be installed in an equipment rack it is important to ensure that the temperature inside the rack does not exceed the upper limit. This could be the case when the rack contains power amplifiers. Under such circumstances, additional rack-mounted cooling fans may be necessary. This manual describes use of Intelli-X2 fitted with firmware version v1.2.1.0 Applicable versions This manual covers the following versions of the Intelli-X2 processor: • Intelli-X2 48 – four inputs, eight outputs • Intelli-X2 26 – two inputs, six outputs Power requirements BEFORE you connect any unit to the mains, please make sure that the voltage of your local AC supply is within the acceptable range of the unit. The functionality of the two versions is very similar and, unless stated otherwise, it can be assumed that the contents of the manual applies to either version. When a text reference to “Intelli-X2 ” appears, it can be taken to mean both the Intelli-X2 26 and Intelli-X2 48. If there is some operational or functional difference between the two versions, this will be clearly indicated by the logo on the left. The Intelli-X2 is designed to work from an AC supply between 100 V and 240 V, at a frequency between 50 and 60 Hz. No AC voltage selector is provided as the device automatically adjusts to the incoming AC voltage. Inspection and unpacking Installation This appliance has been carefully packed in the factory and the packaging was designed to withstand rough handling. Should the unit appear to have been damaged in transit, do not discard any of the packing material and notify the carrier immediately as they will be responsible. If the unit is brought into a warm room from a cold environment, internal condensation may occur. Ensure that the unit has been allowed to reach ambient temperature before switching it on. Save all the packing materials for future use if you ever need to ship the unit again. Please check the list below against the contents of the packaging. If any items are missing or damaged, contact the Apex dealer or distributor where you purchased the unit. • • • • Intelli-X2 processor AC power cables with Neutrik PowerCON® connector Network cable (“straight” type) CD-ROM with Intelli-Ware software and other product documentation • This manual Precautions should be taken so that the appliance is properly grounded at all times. This unit must be earthed. Although this unit is intended for installation in a standard 19-inch rack it can nevertheless be used freestanding. If the unit is installed in a flight-case or in an equipment rack, fix the unit with all four screws through the front panel holes. For normal use no extra support is needed, but in more extreme conditions, such as on the road, we recommend the unit is supported at the rear. The Intelli-X2 is fan-cooled, with intake on the left-hand side of unit (looking from the front) and extract on the right. Allow at least 10 cm (4 inches) at each side of the unit for sufficient ventilation. 9 Front and rear panel description Front panel 11 6 5 10 7 1 2 8 3 4 14 9 13 Front panel General Controls: 1 2 3 4 5 6 7 8 9 The multi-function 240 x 64 pixel LCD graphic display allows control of the Intelli-X2’s audio and control functions via the unit’s menu system. The h button is used in conjunction with the menu system. The I button is used in conjunction with the menu system. The BACK/HOME button is used in conjunction with the menu system. The ENABLE button is used in conjunction with the menu system. The UNDO button is used in conjunction with the menu system. The Function (Fn) button is used in conjunction with the menu system. Note – keys 2 to 7 also have “soft” functions which vary with the menu pages. Rotary control for menu navigation, data entry, etc. The control can also be pressed inwards, to perform an “Enter” action in the menu system. The MUTE/SELECT button defines the function of all channel “soft” buttons [13] and [16]. It incorporates a bicolour LED, which illuminates red = ”Mute”, green = ”Select”. Note that the soft buttons remain in “Mute” mode until the appropriate menu level has been entered. A full description of the menu system is given in Section “The Menu System”. 10 11 10 The front panel Ethernet port allows convenient connection of a PC for remote control purposes. There are two further Ethernet ports on the rear panel for permanent network connections in a fixed installation. The white REMOTE LED is concerned with control via Inteli-Ware software. It illuminates steadily when the unit is 12 17 15 18 12 16 connected to a network and a valid IP address has been set up, and will blink when unit parameters are being changed via Intelli-Ware. The Intelli-X2 is powered on and off by a front panel switch; an adjacent white LED illuminates when the unit is powered. Input Controls: 13 14 15 Each input channel has a “soft” button below its meter, which performs either a Channel Select function (in conjunction with the menu system), or mutes the input channel, depending on the setting of the Master MUTE/ SELECT button [9]. Each input channel has a 6-segment tricolour LED bargraph meter which indicates the signal level in the channel. The meter is calibrated in dBFS, where 0 dB corresponds to digital clipping. The bottom ‘Sig’ segment illuminates at an input level of -48 dBFS. The top ‘Comp’ segment illuminates when gain reduction in the channel is being applied by the compressor. Input channel AES LED(s). Each pair of input channels has a red LED which illuminates if those channels are selected to be an AES-3 digital input pair. Two LEDs are fitted to the Intelli-X2 48, and one to the Intelli-X2 26. Output Controls: 16 17 18 Each output channel has a “soft” button, whose function is identical to the input channel buttons [13]. 7-segment bargraph metering is provided for each output channel; the meters are similar to the input channel meters [14], but the highest segment indicates operation of the output channel limiter, and the bottom ‘Sig’ LED illuminates when the output channel signal level is 48 dB below the RMS limiter threshold. Output channel AES LED(s). These perform the same function as [15] for the output channels. Four LEDs are fitted to the Intelli-X2 48, and three to the Intelli-X2 26. Rear panel 8 10 9 5 7 4 6 3 Rear panel Input channels A and C* have inputs on latching 3-pin female XLR connectors. These connectors are dual-purpose and may be either analogue or digital, the selection being made via the menu system. In the analogue mode, the inputs are electronically balanced, with an impedance of >10 kΩ. Maximum input level is selectable via the menu system, and may be set to +18, +21, +24 or +27 dBu. * Inputs C and D are not fitted to the Intelli-X2 26. On this version, input connectors A and B are both used in analogue mode, or input connector A only is used in digital mode. Output channels 1, 3, 5 and 7* have outputs on 3-pin male XLR connectors. These connectors are also dual-purpose and may be either analogue or digital. In the analogue mode, the outputs are electronically balanced, with an impedance of <50 Ω . Maximum output level is selectable via the menu system, and may be set to +15, +18, +21 or +24 dBu (into 600 Ω). 3 When used in the digital mode, each connector carries two channels of audio, as per the AES-3 standard. A front panel LED [15] illuminates when digital mode is selected and a valid AES-3 signal is detected. Input impedance is 110 Ω (selectable to 75 Ω for AES-3id by internal jumper. See “Changing AES-3 impedance”). The Intelli-X2 will also accept S-PDIF digital audio at this connector. When used in the digital mode, each connector caries two channels of audio, as per the AES-3 standard. A front panel LED [18] indicates when digital mode is selected. Output impedance is 110 Ω (selectable to 75 Ω by internal jumper. See “Changing AES-3 impedance”). The pinout is as shown below, and is applicable to both analogue and digital signals: PIN CONNECT 1 2 3 GND ‘Hot’ ( + ) ‘Cold’ ( - ) XLR3F 1 The connectors for input channels B and D* are identical to those for channels A and C, except that they are only functional when the analogue mode is selected for the input. If inputs A & B are selected to be a digital pair, only the input connector for channel A is used; similarly, if channels C & D are selected to be a digital pair, only the connector for channel C is used. 2 All audio connections to the Intelli-X2 and all control connections with the exception of the front panel Ethernet port (see [16] above), are made via the rear panel. 1 2 The pinout is as shown below, and is applicable to both analogue and digital signals: PIN CONNECT 1 2 3 GND ‘Hot’ ( + ) ‘Cold’ ( - ) XLR3M 11 4 The connectors for output channels 2, 4, 6 and 8* are identical to those for the odd-numbered channels, except that they are only functional when the analogue mode is selected for the output. If outputs 1 & 2 are selected to be an AES-3 digital pair, only the output connector for channel 1 is used, and so on in pairs. * Outputs 7 and 8 are not fitted to the Intelli-X2 26. The same odd/even pairing applies to the remaining outputs in digital mode. 5 The Intelli-X2 ’s internal wordclock is available at the WCLK OUT BNC socket. This allows the Intelli-X2 to be the master clock source in a digital system. The output is standard TTL level (0 to +5 V pk-pk). Impedance is 75 Ω. 6 A second BNC socket is provided for connection of an external wordclock, allowing the Intelli-X2 to be synchronised to an external master clock source. The clock signal amplitude should be between 1 and 10 V pk-pk. When this input is selected as the clock source, the external wordclock is available as a fully re-clocked “loop-through” at the wordclock output socket [5] for connection to additional units. 7 Wordclock input termination switch. When using an external wordclock source, if the unit is the only one in use, or is the last in a “chain” of inter-connected units, the 75 Ω termination should be switched on. In all other cases, it should be off. 8 The rear panel Ethernet ports allow the Intelli-X2 to be connected to an Ethernet network, for remote control via Intelli-Ware. Two ports are provided to permit units to be “daisy-chained”. There is also an Ethernet port on the front panel for ease of temporary PC access when the unit is installed in a rack. 9 RS-232 serial port. This connector is currently unused. The connector is a female 9-pin Dsub, and if made functional by future firmware, will connect to a PC’s COM port with a standard 9-pin cable. 10 A female Neutrik PowerCON® connector provides AC Mains input. 12 Wiring the unit Wiring the unit The use of twin-and-screen cable is recommended for both inputs and outputs. Inputs Outputs Preferred wiring for both balanced and unbalanced sources is illustrated below: Preferred wiring for both balanced and unbalanced destinations is illustrated below: Balanced Balanced Unbalanced Unbalanced Changing AES-3 impedance AES-3 input and output impedances default to 110 Ω. It is possible to modify this for each input and output pair to match the AES-3 id standard of 75 Ω. Jumper positions located on the main PCB motherboard (see above) determine whether an input or output pair’s impedance is 110 or 75 Ω. Jumpers are not factory fitted. Adding the jumper will set the impedance to 75 Ω. 13 Inputs C and D and outputs 7 and 8 not fitted to the Intelli-X2 26. Principles of operation Intelli-X 2-48 Block diagram 14 Principles of operation The Intelli-X2 is fundamentally a matrix with four inputs and eight outputs (Intelli-X2 48) or two inputs and six outputs (Intelli-X2 26). By assigning inputs to outputs in various ways, a variety of crossover or distribution configurations can be realised. The central matrix block in the block diagram is a “mixing” matrix, which means that one input may be assigned to several outputs, or indeed, vice versa. The principle can be best illustrated with a couple of examples: In this example, the stereo outputs of the two consoles are connected to the four inputs in pairs, and the main FOH feeds taken from Outputs 1 and 2. The same routing principle can be used to derive additional mixed stereo feeds for, e.g., delay towers (Outputs 3 and 4) or recording (Outputs 7 and 8). Inputs 1 and 3 (L output of consoles A and B respectively) are routed to Outputs 1, 3 and 7 while Inputs 2 and 4 (the R outputs) and routed to Outputs 2, 4 and 8. Summing and distribution with two mixing consoles: The Intelli-X2 48 can be used as a mixer/distribution amplifier to provide a convenient means of combining the outputs of two mixing consoles, a common live sound requirement in larger venues. Summing and distribution with two mixing consoles 15 Stereo 3-way crossover: This is one of the large range of crossover configurations which can be achieved with the Intelli-X2. Factory Preset 5 is an example of this configuration. Input A (Left) is assigned to Outputs 1, 2 and 3, and Input B (Right) to Outputs 4, 5 and 6. The crossover filters in the output channels are then defined so that Output Channel 1 passes only the low-frequency programme content, Output Channel 2 the mid-frequencies and Output Channel 3 the high-frequencies. Output Channels 4, 5 and 6 are then configured identically. Note that some configurations are only possible with the Intelli-X2 48; the limitation is imposed in all cases by the number of inputs and outputs available. The first of the above examples may only be realised with the Intelli-X2 48, as four inputs are required. The second may be configured with either the Intelli-X2 26 or 48. Stereo 3-way crossover Input and Output Channel facilities It can be seen from the block diagram that all input channels are identical, and all output channels are identical, in terms of the facilities available to the user. Each input channel provides user-adjustable delay, gain, polarity, both 1/3-octave graphic and 12-band parametric equalisation, a compressor and channel muting. The input delay is normally adjusted for time-alignment of speaker systems distributed around a venue (i.e. under balconies, delay towers, etc.) and the other parameters to tailor the frequency response and dynamic range of the overall audio programme (providing system/room EQ etc). 16 Each output channel provides, in addition to the crossover filtering itself, additional delays (for time alignment of individual cabinets and drivers), and further level adjustment and dynamics control. The parameters used in setting up the output channels will normally be specified by the loudspeaker manufacturers, to obtain optimum performance from the various components making up the loudspeaker system (these settings can be stored or recalled from the Preset Library). Using the Intelli-X2 The Menu System Powering up the unit When the Intelli-X2 is powered on, the APEX logo is displayed on the LCD screen while system initialisation and internal diagnostic checks are being run. All front panel LEDs are tested as part of these checks. The Boot status page is displayed briefly, confirming the firmware version number. All unit operations and audio parameters are controlled through the Intelli-X2 ’s menu system. This section describes the various menus and submenus in turn. Home page and general menu navigation After the boot-up is complete, the display shows the Home Page: control can be used to select an alternative option, change the parameter value or tick/untick a checkbox, as the case may be. Altering numeric values – a shortcut The Home page is the menu “entry level”, and confirms the names of the currently-loaded project and preset (which will be those in use when the unit was last powered-down), the model type, and current digital audio sample rate and wordclock source. To access the main menus, press the Enter button [8] (the rotary encoder). Entry to these menus is displayed in the form of icons, illustrated below: Note that not all the options in this menu (and others) are visible simultaneously. Use the h and i buttons [2] and [3], or the rotary control [8] to move along the row. In all menus, the item selected for access is indicated by a highlighted icon. It may be selected by pressing the Enter button [8]. Pressing the BACK/HOME button [4] at any time will move the display “back up” the menu one level, and a “long” press will return the menu directly to the Home page. (The exception to this is when softkeys have been enabled. Selecting and adjusting parameters When a list of items is displayed within a menu or submenu, the rotary control is used to scroll through the items rapidly. Each item is highlighted in turn. The highlighted item may be selected for adjustment by pressing Enter, when a ‘scroll’ symbol will appear next to the current setting. While this is visible, the rotary The range of some parameters is considerable, and the resolution of adjustment very small, so in some situations, using the rotary control to enter a high parameter value directly is quite laborious. A shortcut data entry method allows a much faster way of entering a known value: 1.Select the parameter to be adjusted so that it is highlighted. 2.Press and hold Enter (>2 sec). 3.This expands the parameter value by inserting leading zeroes as required, and highlights the first available digit position. 4.Use the rotary encoder to select a different digit position, if required, and press Enter again to select it. 5.The rotary enoder may now be used to alter that digit alone. Press Enter when the correct integer is showing. 6.Repeat steps 4 and 5 until the full value is entered. 7.Scroll to the right hand end of the number string, and press Enter to complete the adjustment. Editing text fields Several menu displays include text fields which may be renamed by the user. The field available for editing will be highlighted. Press the Enter button again to highlight the first character of the field. Press once more to enable character editing. Note that a ‘scroll’ symbol appears at the end of the field. Use the rotary control to alter the highlighted character. The characters available are: ABCDEFGHIJKLMNOPQRSTUVWXYZ abcdefghijklmnopqrstuvwxyz0123456789_ - + . [ ] ( ) Note that the first character is a blank space. Use this to delete unwanted characters. Each character in the field may be edited in turn, using the rotary control to select the next. When complete, press BACK/ HOME to highlight the entire field. 17 The softkeys The six keys around the LCD are “soft” keys – that is, they perform different actions depending on the current menu page being displayed. In general, only some of the softkeys are enabled in each page, and some menu pages have no softkey functions. In the descriptions of the menus which follow, availability of softkey functions are indicated at the appropriate places by the use of the softkey symbol: If available, softkey functions are enabled by pressing the Fn button [7]. This will open a screen overlay, which will indicate the action that each of the softkeys now in use will have. Many of the overlays time-out after approx. 5 seconds if no selection is made. Others remain in place, and require definite input from the user. Menu entry level softkeys – Locate and Lock functions Some softkey functions are available from the menu entry level (i.e., when the six main menu icons are displayed): – opens an overlay with the following options: – Locate unit. This is a useful feature when using multiple units with Intelli-Ware. Selecting Locate causes the unit’s icon on the Intelli-Ware screen to flash to allow immediate identification. All six softkeys on the front panel also flash. The Locate function can be cancelled by pressing h . (A corresponding Locate function can be initiated from IntelliWare) – Lock/Unlock function. This is a useful safety feature; pressing Lock/Unlock prohibits access to the Audio, Settings or Security menus. A padlock symbol appears on the icons for those menus. To unlock, press Fn, then Lock/Unlock again to open the Unlocking the unit data entry window. 18 A 4-digit PIN needs to be entered to unlock the menus. Press Enter to select the first digit position, and again, to allow digits 0 to 9 to be entered with the rotary encoder. Press Enter when the correct digit is showing. Note that the digit position reverts to an asterisk. Using the rotary encoder, scroll to the remaining digit positions, entering the correct digit each time. When all four digits have been entered, press Apply h. The menus will now be unlocked. Note the BACK/HOME button can be used to cancel the PIN at any time. The factory default PIN is 1234. See “Security Menu” for details of how to change the PIN. Preset Menu For full details on how to import presets from other manufacturer’s DSP devices please visit the Apex website (www.apex-audio.eu) and download the latest white-paper. The Intelli-X2 has 100 internal memories for storing Presets; 10 are pre-configured Factory Presets, and the other 90 are denoted User Presets. The User Presets are arranged into nine banks – called Categories - of ten. A Preset is a complete set of unit parameters and settings, including all audio parameters such as input selection and level, equalisation, delay, input/output routing, crossover configuration, limiter settings and so on. If one of the ten Factory Presets is not suitable for your configuration, you can set up the Intelli-X2 (e.g. for a particular speaker make, model and configuration), and store the settings in a User Preset so that they can be recalled again for future use. You can also name each User Preset and sort them into meaningful categories (for example, by speaker manufacturer) to enable easy access. Presets may be also be protected to prevent inadvertent overwriting. The Preset menu initially offers a choice of the Factory Preset bank (Bank 0) or the nine User Presets banks (Banks 1 to 9). Only the first five banks can be displayed; use the Scroll buttons h and i to see the others. Factory Presets Recalling a Factory Preset – A Factory Preset may be recalled (loaded) by pressing the Fn button from a Category list. This opens an option window: Press Recall to load the Preset, or Recall & Mute to recall it, but mute the outputs (for safety). The Factory Preset Bank is pre-loaded with a set of ten common crossover configurations : PRESET NAME DESCRIPTION 1 2 3 4 5 6 7 8 9 10 Default Stereo 2-way Stereo 2-way + sum sub Stereo 2-way with delays Stereo 3-way Stereo 3-way + sum sub Stereo 3-way + 2 aux Stereo 4-way LCR 2-way + sub Monitors 2-way Factory default preset Bi-amp stereo system Bi-amp stereo with mono sub Bi-amp FOH and delay Tri-amp stereo system Tri-amp stereo with mono sub Tri-amp FOH+2 monitor feeds Quad-amp stereo system Bi-amp LCR + mono sub 4 x bi-amp monitors These Presets provide a useful starting point for using the Intelli-X2 in a real situation; the filter characteristics, delay times and other parameters will need to be adjusted to suit the equipment and venue. User Presets Use the rotary control to highlight one of the User Preset Categories, press Enter to select it. Initially all User Preset memories are empty. (Once Presets have been renamed by the user (see below), the names appear in the list instead.) Only the first five memories can be displayed; use the Scroll button [2] to see the others. More details about a Preset can be obtained by pressing the Enter button, which confirms the Name and a Description. Recalling a User Preset – A User Preset may be recalled (loaded) by pressing the Fn button from a Category list. This opens an option window: Press Recall to load the Preset, or Recall&Mute to recall it, but mute the outputs (for safety). Naming and saving a Preset Naming a Preset before saving it is strongly recommended. When an empty Preset is selected from a Category List, the Name field (initially Unnamed Preset) is highlighted to indicate that character editing may be performed. When complete, press BACK/HOME to highlight the entire field, and then turn the rotary control to select the Description field; this may be edited in exactly the same way. After pressing BACK/HOME again, press the Fn button, which will open an overlay. Press Save to store the current unit parameters in the Preset memory, together with the new Name and Description; alternatively, select Cancel. 19 Editing a Preset A Preset may be overwritten and/or renamed once it has been created. To edit a Preset, select it from its Category list and open its Preset Details screen. Press the Fn button and select Edit from the overlay (the ENABLE button). The Name field will now be highlighted for editing. Note that it is not necessary to actually have a Preset loaded into the unit to edit its Name and Description. However, when the edited fields are saved, the current unit parameters will be stored, which will overwrite the previous contents of the Preset memory location. Clearing a Preset To erase the contents of a Preset memory, select the Preset from its Category list and open its Preset Details screen. Press the Fn button and select Erase from the overlay (the Fn button). Naming User Preset Categories Preset Categories may be renamed using Intelli-Ware. It is not possible to perform this function from the unit’s front panel. Please see the Intelli-Ware’s Help files for more information. Audio Menu The Audio Menu is where all audio parameters and settings are adjusted. The top page of the Audio Menu offers five further submenus: The screen shows the connectivity parameters for the selected input channels. Use the rotary control to move the highlight up and down the list. Label A and B – this lets you change the name of the input channels (from Input A, etc.) to one of your choice, to suit the application in which the Intelli-X2 is being used (e.g. FOH Main L). Press Enter to select one of the submenus. Local I/O submenu The Local I/O submenu is concerned with the physical inputs and outputs of the unit. The initial selection of Local I/O will display the settings for Inputs A and B; The MUTE/ENABLE buttons for these inputs will illuminate green to confirm which channels’ settings are being displayed. Note that I/O settings are always displayed for channels in pairs; the corresponding settings for other pairs of input or output channels may be displayed by pressing the MUTE/ENABLE button for either channel of the pair. Input settings 20 Mode – set to Analog when using in an analogue system, and AES3 with a digital system. The channel’s input A-D converter is in circuit when Analog is selected, and bypassed in the AES3 setting. Because the AES digital format carries two audio channels (as multiplexed data), selection of AES3 puts both input channels A and B into the digital mode, though only Input A’s physical connector is used. On the Intelli-X2 48, the same principle applies to input Channels C and D. When AES3 is selected, the AES LED will illuminate if a valid AES3 signal is detected, and blink if not. Maximum analogue input level – this sets the maximum signal level which can be applied to the inputs in the analogue mode before internal clipping occurs. The default value is +21 dBu, but may be changed to +18, +24 or +27 dBu if preferred. In an analogue system, this parameter should be set to suit the clip levels available in the rest of the system. Note that this setting is applied to all input channels, regardless of where the adjustment is made. The maximum analogue input level corresponds to 0 dBfs - “digital clipping” – indicated by the top segment of the input bargraph meter. Ground lift – Pin 1 of the input channels’ XLR connectors are normally connected to internal signal ground; in some circumstances, it may be necessary to remove this link to avoid hum loops. Ticking the checkbox (by pressing Enter when the field is highlighted) lifts the ground. Note that ground lift is applied to all input connectors, regardless of where the adjustment is made. SRC bypass – the Intelli-X2’s digital inputs are able to accept input sample rates of between 32 and 192 kHz. Sample Rate Converters (SRCs) are fitted to each input to convert the sample rate of the incoming audio to that of the internal processing. The default is for the SRCs to be in circuit, but depending on the synchronisation topology being employed, they may be bypassed by ticking the checkbox. The various parameter screens show the settings for one Input Channel at a time. The MUTE/SELECT buttons [13] under the Input Channel meters are used to select which channel’s settings is displayed. Output settings From the Input Channel menu page, the following softkey functions are available: Input channel submenu Softkeys – Copying and Ganging Channels The screen shows the connectivity parameters for the selected output channels. Use the rotary control to move the highlight up and down the list. Label A and B – this lets you change the name of the output channels (from Output 1, etc.) to one of your choice, to suit the application the in which the Intelli-X2 is being used (e.g. Side Hang 3 L). Mode – as with the input connectors, set to Analog to derive analogue signals from the output connectors and to AES3 for use with a digital system. When AES3 is selected, the AES LED [15] will illuminate. Maximum analogue output level – this sets the maximum signal level which can be applied to the outputs in the analogue mode before internal clipping occurs. The maximum analogue output level corresponds to 0 dBfs, and is indicated by the top segment of the output bargraph meter. The default value is +21 dBu, but may be changed to +15, +18 or +24 dBu if preferred. Consideration should be given to the headroom available in subsequent equipment when setting this parameter. – opens an overlay with the following options: – Copy Channel parameters. This feature lets you copy all the parameters of the currently-selected input channel to one or more other channels, reducing set-up time, and removing the possibility of mis-matching channels. When Copy Channel is selected, a further dialogue box opens asking for the destination channel(s) to be identified. The MUTE/SELECT button for the source channel flashes; press the MUTE/SELECT button(s) for the destination channel(s). Select Apply h. Alternatively, select Cancel (BACK/ HOME) to abort the operation. – Gang/Ungang input channels. Input channels’ controls may be ganged together so that adjusting a parameter in one channel also alters that parameter in those channels that are ganged to it. This is obviously extremely useful with stereo sources. The ganging operation also copies the source channel’s parameters to the destination channel(s), but once ganged, independent per-channel adjustment of parameter values is no longer possible. A “chain” symbol appears at the top right of the Input Channel screen of ganged channels. Unganging channels is the same procedure; press Fn followed by Gang/Ungang then deselect the channels to be unganged by pressing their MUTE/SELECT buttons. Gain Input Channels submenu The Input Channels submenu allows adjustment of the various parameters in each Input Channel signal chain. The submenu offers five menu items, Gain, Delay, Graphic EQ, Parametric EQ and Compressor. Two gain parameters are available for adjustment. Use the rotary control to move the highlight to the parameter required. Level – this sets the gain of the input stage for the selected Input Channel (post the ADC in the case of analogue inputs). The default gain setting is 0 dB, but can be set to any value from -80 dB to +15 dB, in 0.1 dB increments. Polarity – this allows phase inversion to be applied to the selected Input Channel. The options are Normal and Inverted. 21 Delay Graphic EQ Each Input Channel of the Intelli-X2 may have up to 1.5 s of delay inserted. This would normally be used for time-aligning speakers in different locations, i.e., under balconies etc. Use the rotary control to highlight the parameter required; five are available for adjustment: The Intelli-X2’s Input Channel includes a 30-band (1/3-octave) graphic equaliser (GEQ), providing +/-15 dB of gain adjustment in each band, from 25 Hz to 20 kHz. Enable – either the ENABLE or Enter buttons may be pressed to insert delay in the channel. Default is Off. Enable – either the ENABLE or Enter buttons may be pressed to enable the graphic equaliser. Default is Off. Duration – allows the delay to be set in units of time, from 0 to 1.5 s, in microsecond increments. Note that the duration is also displayed as the equivalent number of digital samples. Mode – selects the band-pass filter type used in the equaliser. Default setting is Constant-Q, the alternative is Proportional-Q Distance – this provides an alternative method of setting the delay time, in units of distance, from 0 to 500 m. Entering a delay in terms of distance will usually be more convenient in real-world situations. Note that distance may also be entered in feet, if preferred. (The internal distance-to-time conversion is based on a nominal speed of sound of 346.5 m/s (1,137 ft/s), at 20 °C and 50% RH) Three primary GEQ parameters are available for adjustment: Band – press Enter when Band is highlighted to enter the equaliser adjustment mode. Use the h and i buttons to select the band to be adjusted. Both filter and gain parameters are permanently enabled for adjustment once Band is selected. Use the Enter button to switch between them, and BACK/ HOME to go back to Band. Temperature – the speed of sound varies with temperature; this parameter is used in conjunction with Distance. The ambient temperature may be entered here to obtain a more accurate delay value. The range available is -20 °C to +50 °C and the default value is +21 °C. Note that the temperature may be entered in °F if preferred, and that the value used applies to all delay settings throughout the unit. Humidity – the speed of sound also varies with the relative humidity (RH) of the air. If known, the RH may be entered here, as a percentage from 0% to 100%, with a default value of 50%. Note that the humidity value used applies to all delay settings throughout the unit. • Frequency – selects the filter band to be adjusted • Gain – allows 15 dB of cut or boost to be applied in the selected band. IMPORTANT NOTE: The graphic equaliser function is not available if the Intelli-X2’s sample rate is set to 176.4 kHz or 192 kHz. Parametric EQ As well as a graphic equaliser, each Input Channel of the Intelli-X2 is equipped with a 12-band parametric equaliser. This provides an alternative and more accurate method of tailoring the frequency response, and is useful when running RTA analysis during room tuning. To enable the entire Parametric EQ section, press the Enable button. Default is Off. 22 All 12 filters offer an identical selection of filter types (see below). The filter parameters are displayed across three screen pages; press the h and i buttons to scroll between pages. For each filter, five EQ parameters are available for adjustment: Enable – the Enter button enables the filter. Default is Off. Type – 16 different algorithms are available for each filter. The default is Bell-Sym. The full list is: TYPE Bell-Symmetrical Bell-Asymmetrical Notch Low-Shelving 6dB/oct Low-Shelving 12dB/oct High-Shelving 6dB/oct High-Shelving 12dB/oct All-Pass 90° All-Pass 180° Low-Pass 6dB/oct Low-Pass 12dB/oct Low-Pass Vari-Q 12dB/oct High-Pass 6dB/oct High-Pass 12dB/oct High-Pass Vari-Q 12dB/oct Band-Pass DISPLAYED AS: GAIN? Q? Bell-Sym Bell-Asym Notch Low-Shelv 6dB/o Low-Shelv 12dB/o High-Shelv 6dB/o High-Shelv 12dB/o All-Pass 90 All-Pass 180 L-Pass 6dB/o L-Pass 12dB/o L-Pass VarQ 12dB/o H-Pass 6dB/o H-Pass 12dB/o H-Pass VarQ 12dB/o Band-Pass The Gain? And Q? columns in the table show whether these two parameters are fixed or available for adjustment () for each filter type. Note that Type is a common parameter which applies to all 12 filters making up the equaliser. Frequency – this shows the centre frequency of the selected filter. It may be varied over the range 10 Hz to 22 kHz, in 0.1 Hz increments. Note that the default values are at standard frequencies: FILTER DEFAULT FREQUENCY 1 2 3 4 5 6 7 8 9 10 11 12 31.5 Hz 63.0 Hz 125 Hz 200 Hz 315 Hz 500 Hz 800 Hz 1.25 kHz 2 kHz 3.15 kHz 6.3 kHz 12.5 kHz Gain – for filter types allowing adjustable gain, this parameter allows between -40 and +15 dB of gain to be applied at the selected frequency. Q – for filter types allowing adjustable Q, the bandwidth of the filter section may be set in the range from Q = 0.1 (wide) to 48 (a very narrow notch). IMPORTANT NOTE: The input section’s parametric equaliser function is not available if the Intelli-X2’s sample rate is set to 176.4 kHz or 192 kHz. Compressor The dynamic range of the input channel signal can be controlled with the Compressor section. All the normal compressor parameters are available for adjustment: Enable – either the ENABLE or Enter buttons may be pressed to enable the compressor. Default is Off. Threshold – this is the input signal level above which compression is applied. Signals above the Threshold (i.e., the louder part of the programme) will have their dynamic range reduced to a degree set by the Ratio control (see below). The Threshold is adjustable between -80 dBFS and 0 dBFS (the default value). When the signal level exceeds the threshold – i.e., when the compressor is applying gain reduction – the Comp LED at the top of the input signal meter illuminates. Ratio – this controls how much the louder signals are compressed by. The default is 1:1, which means no compression is applied, and the dynamic range of the output signal is the same as that of the input signal. A ratio of 2:1 means that signals above the threshold have their dynamic range halved. The ratio may be adjusted in the range 1:1 (no compression) to 20:1 (generally regarded as limiting). Soft-Knee – if this checkbox is ticked, the value of Ratio increases gradually for signals around the threshold level. This can reduce any undesirable artefacts of gain reduction. Attack – this sets how rapidly the compressor acts when the programme level exceeds threshold. The default value is 5 ms, and attack can be set in the range 0.5 ms to 100 ms. Release – this sets how long it takes the gain reduction to be removed after the signal level has dropped below the threshold. The default value is 250 ms, and release can be set in the range 5 ms to 5 s. Side-chain – this is the internal control path which monitors the signal level and determines the amount of gain reduction to be applied. Normally the path has a Flat frequency response, but it may be set to High-Pass or Band-Pass if preferred. 23 High-pass mode will fit most applications, avoiding any unpleasant “pumping” or “breathing” effects due to the lowfrequency content in the programme material. Band-pass mode operates in a similar fashion, but may be better suited to audio material containing a lot of high-frequency content. The Mix Matrix is where the Intelli-X2’s basic configuration is defined, in terms of which inputs are routed to which outputs. Flat mode can be selected when the compressor is used as a sound level limiter. Make-up Gain – depending on the type of programme material, using a compressor can reduce (or increase) the overall signal level. Adjusting Make-up Gain allows overall unity gain through the compressor to be restored. A range of 0 dB to +10 dB is available. Mix Matrix submenu Some practical examples of input-output routing are given in “Principles of Operation”. Each Intelli-X2 output has a corresponding Mix Matrix screen, showing which inputs are routed to it, and the gain or attenuation applicable to each connection. Stereo Operation: It is important to note that when ganging several input channels together the compressor detection circuits of these channels are linked. Thus, when using the compressor on stereo channels, it is very important to gang left and right channels in order to prevent the stereo image from shifting. When working with separate subwoofers or a centre feed, it is advisable not to gang these channels with the left and rights channels as this may lead to unexpected results. As opposed to what many compressors do, the ganged channels are not summed before the detection circuit. Instead, it is the highest detected signal that triggers the compression. This implementation gives far better results. Input channel submenu Softkeys – Copying and Resetting menu items From within any of the Input Channel menu items, two further softkey functions are available in addition to Copy Channel and Gang/Ungang: 24 When Mix Mtx is selected from the Audio submenu, the screen initially shows the routing for Output 1. The inputs that are routed to Output 1 will have their MUTE/SELECT buttons [9] showing green, and the on-screen checkbox for the input will be ticked. Output 1’s MUTE/SELECT button [11] will also show green. To assign (or de-assign) inputs from Output 1, either press the relevant Input MUTE/SELECT buttons, or scroll with the rotary control to the appropriate checkbox and press Enter. The inputs assigned to any other output can be displayed by pressing that output’s MUTE/SELECT button, and changed in the same way. The Intelli-X2’s Mix Matrix is a Variable Gain Matrix, which means that gain or attenuation can be applied to any I/O crosspoint. The default value is 0 dB, by scrolling to the Gain field on the display and pressing Enter, the rotary control can be used to change this in the range -80 dB to +15 dB. Every crosspoint can have its own gain setting. – Copy single menu item parameters. This function is similar to Copy Channel, but only copies the parameters for the currently-selected Input Channel menu item – e.g., if selected from the Delay screen, only the Delay block’s parameters will be copied. Mix Matrix submenu Softkeys – Copying and Resetting matrix settings – Reset single menu item parameters. When Reset is selected, a Yes h or No i choice is offered; on selecting Yes, the parameters for the currently-selected menu item are reset to those stored in the currently-loaded Preset, effectively cancelling any alterations that have been made since the Preset was loaded . – Copy the matrix settings. This function is similar to Copy Channel but only copies the settings of the Mix Matrix. Note that because the Mix Matrix screen displays input assignments to one output channel at a time, it is the output channels that form the “source” and destination(s)” for copying. From the MixMatrix submenu, two softkey functions are available: – Reset matrix settings. When Reset is selected, a Yes h or No i choice is offered; on selecting Yes, the matrix settings for the currently-selected output are reset to those stored in the currently-loaded Preset, effectively cancelling any alterations that have been made since the Preset was loaded. Output Channels submenu The Output Channels submenu allows adjustment of the various parameters in each Output Channel signal chain. The submenu offers six menu items, Delay, Driver Alignment, Crossover, Parametric EQ, Gain and Limiter. The various parameter screens show the settings for one Output Channel at a time. The MUTE/SELECT buttons [11] under the Output Channel meters are used to select which channel’s settings is displayed. Output channel submenu softkeys – Copying and Ganging Channels From the Output Channel menu page, the following softkey functions are available: – opens an overlay with the following options: – Copy Channel parameters. This feature lets you copy all the parameters of the currently-selected output channel to one or more other channels. When Copy Channel is selected, a further overlay opens asking for the destination channel(s) to be identified. The MUTE/SELECT button for the source channel flashes; press the MUTE/SELECT button(s) for the destination channel(s). Select Apply h. Alternatively, select Cancel (BACK/HOME) to abort the operation. – Gang/Ungang output channels. Output channels’ controls may be ganged together so that adjusting a parameter in one channel also alters that parameter in those channels that are ganged to it. This is obviously extremely useful with multichannel outputs. The ganging operation also copies the source channel’s parameters to the destination channel(s), but once ganged, independent per-channel adjustment of parameter values is no longer possible. A “chain” symbol appears at the top right of the Output Channel screen of ganged channels. Unganging channels is the same procedure; press Fn followed by Gang/Ungang then deselect the channels to be unganged by pressing their MUTE/SELECT buttons. Output Delay Each Output Channel of the Intelli-X2 may have up to 1.5 s of delay inserted. This would normally be used for time aligning the various speakers making up the system – for example, individual speaker hangs with subs. Use the rotary control to highlight the parameter required; five are available for adjustment: Enable – either the ENABLE or Enter buttons may be pressed to insert delay in the channel. Default is Off. Duration – allows the delay to be set in units of time, from 0 to 1.5 s, in microsecond increments. Note that the duration is also displayed as the equivalent number of digital samples. Distance – this provides an alternative method of setting the delay time, in units of distance, from 0 to 500 m. Entering a delay in terms of distance will usually be more convenient in real-world situations. Note that distance may also be entered in feet, if preferred. (The internal distance-to-time conversion is based on a nominal speed of sound of 346.5 m/s (1,137 ft/s), at 20 °C and 50% RH) Temperature – the speed of sound varies with temperature; this parameter is used in conjunction with Distance. The ambient temperature may be entered here to obtain a more accurate delay value. The range available is -20 °C to +50 °C and the default value is +21 °C. Note that the temperature may be entered in °F if preferred, and that the value used applies to all Output Channels. Humidity – the speed of sound also varies with the relative humidity (RH) of the air. If known, the RH may be entered here, as a percentage from 0% to 100%, with a default value of 50%. Note that the humidity value used applies to all delay settings throughout the unit. 25 Driver Alignment Enable – the Enter button may be pressed to enable the filter. There is no default setting as such, as whether a filter is enabled or not is entirely dependent on the Preset in use and the output being configured. Type – 19 different algorithms, based on the three most common filter types are available for each crossover filter. For each filter type, the algorithms differ in the slope of the frequency response (often referred to as the “order” of the filter). The full list is: In addition to the delay inserted with the Delay parameter above, each Output Channel may also have an additional delay added. This Driver Alignment delay is included to timealign individual drivers within a cabinet (especially useful for custom designed cabs). Thus Driver Alignment is concerned with individual drivers, while output Delay is concerned with overall time alignment of cabinets within a line array or point source system. Delay and Driver Alignment may be thought of as “coarse” and “fine” delays. The parameters available are: Enable – either the ENABLE or Enter buttons may be pressed to insert driver alignment delay in the channel. Default is Off. Duration – allows the delay to be set in units of time, from 0 to 30 ms, in microsecond increments. Note that the duration is also displayed as the equivalent number of digital samples. Distance – this provides an alternative method of setting the delay time, in units of distance, from 0 to 100 m. Entering a delay in terms of distance will usually be more convenient in real-world situations. Crossover This screen is where each Output Channel has its frequency response defined, in terms of a hi-pass and a lo-pass filter. As well as being able to set the turn-over frequencies of each filter, it is also possible to define the filter algorithm used to more accurately tailor the response. Each of the two filters in each crossover has three parameters which may be set on-screen. Use the rotary control to scroll through the six available, pressing Enter to select the one to be adjusted. 26 TYPE DISPLAYED AS: Butterworth filters Linkwitz-Riley filters Bessel filters Butterw.6dB/o Butterw.12dB/o Butterw.18dB/o Butterw.24dB/o Butterw.30dB/o Butterw.36dB/o Butterw.42dB/o Butterw.48dB/o Linkwitz-R.12dB/o Linkwitz-R.24dB/o Linkwitz-R.36dB/o Linkwitz-R.48dB/o Bessel 12dB/o Bessel 18dB/o Bessel 24dB/o Bessel 30dB/o Bessel 36dB/o Bessel 42dB/o Bessel 48dB/o Frequency – The turn-over frequency of each filter is adjustable from 10 Hz to 20 kHz, in 0.1 Hz steps. Parametric EQ As well as the crossover filters, each Output Channel of the Intelli-X2 is equipped with a 12-band parametric equaliser. These are used to further refine the frequency response of the output to suit a particular type of loudspeaker or driver. Loudspeaker manufacturers will generally supply the equaliser characteristics to be employed for optimum performance. To enable the entire Parametric EQ section, press the Enable button. Default is Off. All 12 filters offer an identical selection of filter types (see below). The parameters are displayed across three screen pages; press the h and i buttons to scroll between pages. For each filter, five EQ parameters are available for adjustment: Enable – the Enter button enables the filter. Default is Off. Type – 16 different algorithms are available for each filter. The default is Bell-Sym. The full list is: TYPE Bell-Symmetrical Bell-Asymmetrical Notch Low-Shelving 6dB/oct Low-Shelving 12dB/oct High-Shelving 6dB/oct High-Shelving 12dB/oct All-Pass 90° All-Pass 180° Low-Pass 6dB/oct Low-Pass 12dB/oct Low-Pass Vari-Q 12dB/oct High-Pass 6dB/oct High-Pass 12dB/oct High-Pass Vari-Q 12dB/oct Band-Pass DISPLAYED AS: GAIN? Q? Bell-Sym Bell-Asym Notch Low-Shelv 6dB/o Low-Shelv 12dB/o High-Shelv 6dB/o High-Shelv 12dB/o All-Pass 90 All-Pass 180 L-Pass 6dB/o L-Pass 12dB/o L-Pass VarQ 12dB/o H-Pass 6dB/o H-Pass 12dB/o H-Pass VarQ 12dB/o Band-Pass The Gain? And Q? columns in the table show whether these two parameters are fixed or available for adjustment () for each filter type. Note that Type is a common parameter which applies to all 12 filters making up the equaliser. Frequency – this shows the centre frequency of the selected filter. It may be varied over the range 10 Hz to 22 kHz, in 0.1 Hz increments. Note that the default values are at standard frequencies: FILTER DEFAULT FREQUENCY 1 2 3 4 5 6 7 8 9 10 11 12 31.5 Hz 63.0 Hz 125 Hz 200 Hz 315 Hz 500 Hz 800 Hz 1.25 kHz 2 kHz 3.15 kHz 6.3 kHz 12.5 kHz Gain – for filter types allowing adjustable gain, this parameter allows between -40 and +15 dB of gain to be applied at the selected frequency. Q – for filter types allowing adjustable Q, the bandwidth of the filter section may be set in the range from Q = 0.1 (wide) to 48 (a very narrow notch). Gain Two gain parameters are available for adjustment. Use the rotary control to highlight the parameter required. Level – this sets the post-EQ gain for the selected output Channel (pre the DAC in the case of analogue outputs). The default gain setting is 0 dB, but can be set to any value from -80 dB to +15 dB, in 0.1 dB increments. Polarity – individual outputs may be phase-inverted as well as inputs. Polarity inverts the currently-selected Output Channel. The options are Normal or Inverted. Limiter For full details on how to correctly calculate limiter parameters please visit the Apex website (www.apex-audio.eu) and download the latest white-paper. To fully protect loudspeakers and other downstream equipment from damage, each output is provided with a two-stage limiter. One stage responds to the RMS level of the signal, the other is a very fast-acting limiter responding to signal peaks. The thresholds may be set independently for each stage, but note that the Peak threshold must always be higher than the RMS threshold. RMS Threshold – this is the RMS signal level above which limiting is applied. It can be set as either dBu - the actual output signal level, as would be appropriate when analogue outputs are in use, or as dBFS, which is applicable to digital outputs. The threshold may be set at any level below 0 dBFS (the default) down to -80 dBFS. The corresponding analogue 27 signal level will depend on the setting of Max. Analog out level parameter which was set in the Local I/O submenu for the particular Output Channel. With the default value of 21 dBu, a digital output level of 0 dBFS is equivalent to an analogue signal level of +21 dBu, and the two methods of setting the limiter threshold will retain this relationship. Peak Threshold – this is set in an identical manner to RMS Threshold. The software prevents the Peak Threshold from being lower than the RMS Threshold; if this were possible, the peak limiter would be unable to operate. When the signal level exceeds either threshold – i.e., when the limiter is working – the Limit LED at the top of the output signal meter [12] illuminates. Attack – this sets how rapidly the RMS limiter acts when the programme level exceeds the RMS threshold. The default value is 0.5 ms, and attack can be set in the range 0.1 ms to 100 ms. The attack time of the Peak Limiter is fixed (and very fast!) Release – this sets how long it takes the gain reduction applied by the RMS limiter to be removed after the signal level has dropped below the relevant threshold. The default value is 5 ms, and release can be set in the range 5 ms to 10 s. The release time of the Peak Limiter is fixed. Output channel submenu softkeys – Copying and Resetting menu items From within any of the Output Channel menu items, two further softkey functions are available in addition to Copy Channel and Gang/Ungang: – Copy single menu item parameters. This function is similar to Copy Channel, but only copies the parameters for the currently-selected Output Channel menu item – e.g., if selected from the X-Over screen, only the X-Over block’s parameters will be copied. – Reset single menu item parameters. When Reset is selected, a Yesh or No i choice is offered; on selecting Yes, the parameters for the currently-selected menu item are reset to those stored in the currently-loaded Preset, effectively cancelling any alterations that have been made since the Preset was loaded. 28 Meters submenu This submenu lets you configure how the Intelli-X2’s bargraph meters function. Fallback time – default setting is Normal, but may be set to Fast if preferred; this may make monitoring of rapid, transient signals easier. Clip Hold – may be set at any time between 0.2 s and 3 s. The default is 2 s. Settings Menu The Settings Menu is where some of the unit’s basic operating conditions are defined. Once these have been established, the menu will only rarely need to be accessed. The top page of the Settings Menu offers four further submenus: Press Enter to select one of the submenus. Sync submenu Use the rotary control to scroll to the Primary Src, Secondary Src or Tertiary Src fields, press Enter, then use the rotary control to scroll through the options in the list above. Press Enter again to select one. Note that if Internal is set as Primary Src, it is not possible to define any external sources as backup. Whatever choices are made for the primary and backup sync sources, the source currently selected and its status are always displayed at the bottom of the screen in the Sync source: field (not modifiable). Network submenu Sample rate – The Intelli-X2 will operate at several common sample rates. The default is 96 kHz. Scroll to the Sample rate: field, press Enter and scroll again to select an alternative. Available sample frequencies are: 44.1 kHz, 48 kHz, 88.2 kHz, 96 kHz, 176.4 kHz and 192 kHz. When the Intelli-X2 is being used with Apex’s Intelli-Ware software application, an Ethernet network connection needs to be established between the computer running Intelli-Ware and the unit(s). Network settings are available in this submenu help to permit this connection to be set up correctly. Sync source – As with all digital audio equipment, it will be necessary to decide an operating methodology for wordclock synchronisation in order to use the Intelli-X2 effectively in each practical application. Use of the wrong wordclock source can give undesirable (and unpredictable) results, ranging from occasional clicks to total silence! In most cases all that needs to be done is enable the AUTO-IP box. A valid IP address will then be assigned to the Intelli-X2 (note that this is not an instant process and will take a few seconds). If a static IP address is to be used then scroll to the IP Address and SubNet fields to enter the correct settings. The Intelli-X2 has a three-level hierarchy of sync sources, with automatic switching to the next “level”, should one fail. The screen allows you to allocate one of four* possible sync sources as the primary sync, and also as the secondary and tertiary backups. The available sources are: Internal – the Intelli-X2’s own internal clock generator AES AB – the wordclock is derived from an incoming AES3 digital audio signal at Inputs A/B If using external network management and monitoring applications then ensure that the SMNP box (Simple Network Management Protocol) is enabled. Generally such applications are only used for managing very large networks (in large corporations etc.) but can be implemented in fixed installations such a broadcast facilities or large AV installations. After any changes have been made in the Network submenu, exiting the page (by pressing BACK/HOME) first opens a screen requesting confirmation that the changes are to be applied. AES CD - the wordclock is derived from an incoming AES3 digital audio signal at Inputs C/D* Wordclock – uses an externally-supplied clock signal at the rear panel WCLK IN BNC connector * Inputs C/D are not fitted on the Intelli-X2 26 Press the h softkey to apply the changes or BACK/HOME to reject them. 29 Notes on networking Providing that the network is properly configured, Intelli-Ware is capable of automatically detecting and controlling any Intelli-X2 device connected to the network. Please refer to the Intelli-Ware documentation for more details on controlling the Intelli-X2 remotely. Configuring simple IP networks is something that most system engineers would be aware of. Explaining the details of IP networking is therefore outside the scope of this manual, however we believe some salient points do require further clarification. IP Addresses All computers, whether they are Windows, Linux or Mac OS based, and most network-based devices such as the Intelli-X2, obtain an IP address by the following means: • If a static IP address has been assigned to the computer or device, then that IP address must always be used. Static IP addresses are fixed and do not change. This is useful when installing Intelli-X2 devices into fixed installations whereby all networked audio equipment has been assigned a unique and unchanging IP address. This is very useful for network management. • If the device or computer is set to automatic mode (whereby no static IP address has been defined) then a unique IP address will be used; however this address may vary every time the device is connected to the network. If a DHCP server is available on the network then the Intelli-X2 will use the IP address provided by it. If no DHCP server is available, the Intelli-X2 will automatically select a unique and unused IP address in the range 169.254.1.0 to 169.254.254.255 (this is referred to as Auto-IP). Further information In most applications, communication between the Intelli-X2 and Intelli-Ware software will not require any configuration and will effectively work ‘out of the box’. However, when the Intelli-X2 is used in more network critical environments (e.g., broadcast or AV installations) some additional network settings may be required and the information provided below may be of interest. The communication protocol used by the Intelli-X2 is UDP/ IP based. It is based on Unicast communications (point-topoint) for the remote control of properties (e.g., modifying an input gain or the frequency of a filter) and Multicast (point-tomultipoint) for auto-discovery of devices and property changes (such as driving meters within Intelli-Ware). Multicasting is preferred over broadcasting as it is more suited for network bandwidth control. Note that if IGMP (Internet Group Multicast Protocol) features 30 are available in your access point/switch then do enable them. By default, most network equipment will flood multicast traffic to all hosts which is not ideal. If your access point or switch also has IGMP snooping capability then enable this too. The default outgoing multicast address is: 239.128.0.0 By default, the Intelli-X2 uses the following UDP ports: Port 50000 50001 50002 Use Outgoing multicast notifications Incoming multicast notifications (currently unused) Incoming unicast commands Ethernet cables Nowadays, computers and network devices automatically detect the type of connection (irrespective of whether straight or crossover Ethernet cabling is used). The Intelli-X2 operates in the same manner, hence there is no need to worry about cable wiring when out in the field. Remember that there are limits to Ethernet cable length between two devices and this is 100 meters. Going wireless Using wireless networks may be challenging, but the key to success is to use good quality rugged wireless access points and configure them correctly. Configuring an access point is not that difficult. There is no requirement to install any software as the computer’s web browser is sufficient (all access points have a built-in webserver). Just type in the IP address of your access point into your web browser and you’ll be able to configure the device. It is good practice to keep the firmware of your access point up-to-date, as you would do with your Intelli-X2. Some required features may not be present at the time of purchase but may have been added by now. Recent Wi-Fi™ certified access points have basic Quality of Service (QoS) features called Wi-Fi Multimedia (WMM). These features are not always enabled by default. For reliable and fast communication between the Intelli-X2 and Intelli-Ware this function should be enabled. In some applications, there may be a requirement to boost the signal level of both the access point and computer (outdoor stadium shows for example). External boosters are available but these will require that the original antenna of the access point or computer be removed (this has a bearing on the type of access point chosen). Note: always check local regulations concerning maximum permitted wireless signal power before up-rating your equipment. If you wish to purchase a wireless access point, do consult with your Apex distributor or with Apex directly to obtain a list of recommended units. Clock submenu The Intelli-X2 maintains an event log which may be viewed on the front panel LCD or by using Intelli-Ware; the Clock submenu allows the internal clock/calendar to be set correctly so that the log details are accurate. Date: This field is selected by default; to change the date, press Enter to highlight the day only, then either press Enter again to modify the day with the rotary control, or use the rotary control to select either the month or the year. These can then be altered in the same manner. Time:Clock setting is performed in the same manner; from the initial submenu select the Time: field with the rotary control and then press Enter to select the hour. LCD submenu This single parameter in this menu lets you adjust the LCD screen brightness to suit your working environment. The scaling is as a percentage of the maximum brightness, and the default value is 100%. Security Menu It may be advisable to “lock” certain features of the Intelli-X2, to prevent inadvertent system changes from being made at a critical time. The Security menu offers three options, the default state being that all restrictions are ‘off’, and thus all the relevant changes can be made if wished. Security menu softkeys – Locking and PIN change From the Security menu, the following softkey functions are available: – Change PIN code. This allows the PIN needed for the Unlock function to be changed from the factory default code. Pressing Change pin code opens the Modifying the pin code dialogue box: A tick in the checkbox means that the operating function is enabled. Press Enter to remove/replace the tick. The three options are: Allow mute – when unticked, the front panel MUTE buttons become inoperative. This applies to both the Input channels and Output channels. Note that it is the MUTE buttons themselves that are disabled – active channels cannot be inadvertently muted, and channels already muted cannot become unmuted. Scroll to the Old Pin Code field, and enter the current PIN using the same method as for entering the PIN code to unlock. (You cannot change the PIN without knowing the current one). Then scroll to the New Pin Code field and enter the new code. Press Apply to make the change or BACK/HOME to Cancel. Allow preset recall – when unticked, it is not possible to load a different Preset . – Lock/Unlock function. This is the same Lock function that is available from the main menu top page. Selecting Lock prohibits access to the Audio, Settings or Security menus. Because the Security menu is no longer accessible once Lock is applied, unlocking must be selected from the main menu top page. Allow remote control – when unticked, no commands sent via Ethernet ports (i.e. from Intelli-Ware) will be executed. In large theatre systems, for example, this is a useful function once the unit has been set up ready for a show, as it ensures that no computer activity on the network can affect the unit. 31 About Menu This page gives permanent information regarding the particular Intelli-X2 unit. None of the fields are modifiable. The data displayed consists of: Internal temp: the unit’s internal temperature in both °C and °F. Battery: state of the internal device which maintains the non-volatile memories when the unit is off. Owner: this will normally be ‘Apex’ Device ID: unique hardware identification number Firmware: the version number of the internal software Press i to return to page 1. Press i to open the second page.. Log Menu The last 25 events of the internal event log are displayed across five pages. Use the h and i buttons to scroll between the pages. The log lists the events in reverse order, with the most recent at the top of Page 1. The date and time of the event appears against a brief description. 32 Technical specifications Electrical specifications Balanced line level input Connectors Type Impedance Common mode rejection Max input level Frequency response THD+N Dynamic range Crosstalk AD conversion 3-pin XLR (software switch-able between analog and AES-3) electronically balanced >10 k ohms, balanced >90 dB 18, 21, 24 or 27 dBu software selectable, balanced, 1% THD+N 20 Hz - 20 kHz, ±0,5 dB less than 0,005%, +4 dBu, 20 Hz- 20 kHz, 22 kHz BW 120 dB, 20 Hz to 20 kHz, un-weighted at +21 dBu headroom settings >90 dB 24-bit, sigma-delta Balanced line level outputs Connector: Type Impedance Max output level Frequency response THD+N Dynamic range: Crosstalk: DA conversion resolution: 3-pin XLR (software switch-able between analog and AES-3) electronically balanced <50 ohms, balanced 15, 18, 21, 24 dBu software selectable, into 600 ohms, balanced, 1% THD+N 20 Hz - 20 kHz, ±0,5 dB less than 0,005%, +4 dBu, 20 Hz- 20 kHz, 22 kHz BW 120 dB, 20 Hz to 20 kHz, un-weighted at +21 dBu headroom settings >90 dB 24-bit AES-3 inputs Connector Type Impedance Supported formats Supported sample rates 3-pin XLR (software switch-able between analog and AES-3) transformer isolated 110 ohms or 75 ohms selectable (internal jumper), balanced AES-3 and SPDIF up to 24-bit 32 to 192 kHz AES-3 outputs Connector Type Impedance 3-pin XLR (software switch-able between analog and AES-3) transformer isolated 110 ohms or 75 ohms selectable (internal jumper), balanced Word-clock input Connector: Termination: Input level: Word clock output Connector Impedance Output level BNC 75 ohms switch-able 1 to 10 Vpp BNC 75 ohms TTL 5 Vpp 33 Digital processing Sample rate: Internal processing: Input / output channel: 44,1 kHz, 48 kHz, 88,2 kHz, 96 kHz, 176,4 kHz or 192 kHz selectable 32-bit floating point Intelli-X² 26: 2 in x 6 out Intelli-X² 48: 4 in x 8 out Network remote control Built-in Ethernet switch Connectors Protocol IEEE 802.3 10Base-T/100 Base-TX 3 x Neutrik EtherCon, Auto MDI-MDIX Proprietary UDP/IP based, SNMP RS-232 Connector D-sub 9-pin female Mains Connector: Voltage: Power consumption: Neutrik PowerCon Auto-detect 100-240 Vac (+/- 10%) – 50-60 Hz Intelli-X² 26 < 60 VA Intelli-X² 48 < 60 VA DSP specifications 34 Input channels functions Gain -80 to +15 dB, 0,1 dB steps Polarity normal / inverted Delay Duration Distance Temperature Relative humidity 0 to 1500 ms, sample rate depend steps, 0 to 500 m -20 to 50 °C (-4 to 122 °F), 0,1° steps 0 to 100%, 0,1% steps (Temperature and relative humidity are common to all delays) GEQ 30-band ISO centred, +/-15 dB, proportional-Q or constant-Q mode selectable PEQ Bands Filter types Frequency Gain Q 12 Bell-Symmetrical, Bell-Asymmetrical, Notch, Low-Shelving 6dB/oct, Low-Shelving 12 dB/oct, High-Shelving 6 dB/oct , High-Shelving 12 dB/oct, All-Pass 90°, All-Pass 180°, High-Pass 6 dB/oct, High-Pass 12 dB/oct, High-Pass Vari-Q 12 dB/oct, Low-Pass 6 dB/oct, Low-Pass 12 dB/oct, Low-Pass Vari-Q 12 dB/oct, Band-Pass 10 Hz to 22 kHz, 0,1 Hz steps -40 to +15 dB, 0,1 dB steps (when applicable) 0,1 to 48, 0,01steps (when applicable) Compressor Threshold Ratio Knee Attack time Release time Side-chain mode Make-up gain -80 to 0 dBfs, 0,1 dB steps 1:1 to 20:1, 0,1 steps hard or soft 0,5 to 100 ms, 0,1 ms steps 5 to 5000 ms, 0,1 ms steps flat, high-pass or band-pass mode 0 to +10 dB, 0,1 dB steps Mix matrix functions Gain -80 to +15 dB, 0,1 dB steps Routing enabled/disabled Output channels functions Delay Duration Distance Temperature Relative humidity 0 to 1500 ms, sample rate depend steps, 0 to 500 m -20 to 50 °C (-4 to 122 °F), 0,1° steps 0 to 100%, 0,1% steps (Temperature and relative humidity are common to all delays) Driver alignment Duration Distance 0 to 30 ms, sample rate depend steps, 0 to 1029 cm, 0,1 cm steps (temperature and relative humidity independent) PEQ Bands Filter types Frequency Gain Q 12 Bell-Symmetrical, Bell-Asymmetrical, Notch, Low-Shelving 6 dB/oct, Low-Shelving 12 dB/oct, High-Shelving 6 dB/oct , High-Shelving 12 dB/oct, All-Pass 90°, All-Pass 180°, High-Pass 6 dB/oct, High-Pass 12 dB/oct, High-Pass Vari-Q 12 dB/oct, Low-Pass 6 dB/oct, Low-Pass 12 dB/oct, Low-Pass Vari-Q 12 dB/oct, Band-Pass 10 Hz to 22 kHz, 0,1 Hz steps -40 to +15 dB, 0,1 dB steps (when applicable) 0,1 to 48, 0,01 steps (when applicable) High-pass and low-pass crossover Filter types Frequency Butterworth 6 to 48 dB/octave, 6 dB steps Linkwitz-Riley 12 to 48 dB/octave, 12 dB steps Bessel 12 to 48 dB/octave, 6 dB steps 10 Hz to 20 kHz, 0,1 Hz steps FIR filters At 48 kHz: At 96 kHz: 5 x 1024 taps or 8 x 512 taps 3 x 1024 taps or 8 x 512 taps Gain -80 to +15 dB, 0,1 dB steps Polarity normal / inverted Limiter Type RMS threshold Peak threshold RMS attack Peak attack Release Dual-stage, RMS + Peak limiter -80 to 0 dBfs (or dBu equivalent), 0,1 dB steps -80 to 0 dBfs (or dBu equivalent), 0,1 dB steps 0,1 to 100 ms, 0,1 ms steps 0 ms 5 to 5000 ms, 0,1 ms steps 35 Environment 36 Operating Temperature: Relative humidity: 0 to 50 °C (32 to 122 °F) 10 to 60%, non-condensing Storage Temperature: -20 to 70 °C (-20 to 158 °F) Mechanical specifications Dimensions Weight Unit Width Height Depth 483 mm (19-inch) 43,6 mm (1,75 inch - 1U) 286 mm Unit (Nett) Intelli-X2 26 Intelli-X2 48 3,75 kg 3,75 kg Package Width Height Depth Gross (Shipping) Intelli-X2 26 Intelli-X2 48 5,5 kg 5,5 kg 590 mm 120 mm 400 mm In the interest of product development, Apex reserve the right to modify or improve specifications of this product at any time, without prior notice and without any obligation to change or update equipment already delivered. 37 Limited warranty Limited warranty Apex N.V. (“Apex”) warrants you, the original purchaser, or any party that purchases the device from you, that its products are free from defects in material and workmanship under normal use for a period of two (2) years from the date of original purchase. The date of purchase is the date which appears on the first invoice or any other proof of purchase provided by an Apex approved dealer. Subject to the conditions and limitations set forth below, Apex will, at its discretion, either repair or replace any part of its products that prove to be defective, provided that the product is returned with proof of purchase, shipping prepaid, to an authorised Apex approved service facility. Warranty cover of any repairs will only extend to the end of the original warranty period. We will be happy to provide you with a list of authorised dealers to whom you can return the defective unit or who will give you a returns note to enable you to send the unit to the factory. Service turn-around time will be as fast as reasonably possible. If you are not satisfied with the repair, contact Apex. Exclusions and limitations This limited warranty covers only repair or replacement for defective products manufactured by Apex. Apex is not liable for, and does not cover under warranty, any loss of data or any costs associated with determining the source of system problems or removing, servicing or installing Apex products. This warranty excludes 3rd party software, connected equipment or stored data. Apex does not warrant that the operation of the product will be uninterrupted or error-free. In the event of a claim, Apex’s sole obligation shall be replacement of the hardware. This limited warranty does not cover: (1) any damage to this product that results from improper installation, accident, abuse, misuse, natural disaster, insufficient or excessive electrical supply, abnormal mechanical or environmental conditions or other external causes; (2) any damage caused by operating the product outside the permitted or intended uses described by Apex; (3) any damage caused by any unauthorized disassembly, repair, or modification; (4) consumable parts, such as batteries; (5) any cosmetic damage. Apex is not liable for consequential damages. This limited warranty also does not apply to any product on which the original identification information (including serial number) has been altered, obliterated or removed or any product that has not been handled or packaged correctly. Warranty services will be furnished only if the product is accompanied by a copy of the original retail dealer’s invoice. Warranty claims other than those indicated above are expressly excluded. 38 www.apex-audio.eu [email protected] Copyright © APEX N.V. All rights reserved. This manual may not be reproduced or transmitted, either in part or as a whole, by any means, be they mechanical or electronic, without the express written permission of APEX N.V. Please recycle