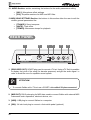
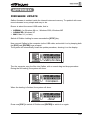
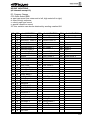
1
MULTIMEDIA PLAYER Manuale di Istruzioni User Manual Ver.: 1.0 INDEX IMPORTANT NOTES ..................................................................................................... 75 Notes on the instrument ............................................................................................. 75 Notes on this manual .................................................................................................. 76 Limitations to responsability ....................................................................................... 76 GALILEO BRIEF DESCRIPTION .................................................................................. 77 CONTROL PANEL ......................................................................................................... 78 REAR PANEL ................................................................................................................. 80 SIDE PANEL ................................................................................................................... 81 CONNECTION EXAMPLES ........................................................................................... 82 FIRST SETUP ................................................................................................................. 83 Language selection .................................................................................................... 84 USB mode selection ................................................................................................... 84 Switching off ............................................................................................................... 85 CONNECTING AND USING YOUR MICROPHONE ..................................................... 86 USING HEADPHONES .................................................................................................. 86 SELECT AND PLAY SONGS ......................................................................................... 87 How to load a song ..................................................................................................... 87 Playing back a song ................................................................................................... 89 CONNECTING A COMPUTER ....................................................................................... 91 Windows 98 Second Edition ....................................................................................... 91 Windows ME - 2000 - XP ........................................................................................... 94 Mac O.S. 9.1 or higher ............................................................................................... 95 Use of a computer to manage files stored in Galileo memory ................................... 96 MIDI FILE EDIT FUNCTIONS ...................................................................................... 100 Transpose function ................................................................................................... 101 Mute function ............................................................................................................ 101 Tempo (change) function .......................................................................................... 102 THE LIST ...................................................................................................................... 103 Saving a List ............................................................................................................. 105 QUICK FILE SEARCH ................................................................................................. 106 MICROPHONE EFFECT .............................................................................................. 107 73 EQUALIZER ................................................................................................................. 108 MIDI Files Equalizer ................................................................................................. 108 MP3 Files Equalizer .................................................................................................. 109 SAVE GALILEO SETUP ON THE MEMORY CARD ................................................... 110 GLOBAL SETTINGS .................................................................................................... 113 Display contrast ........................................................................................................ 113 Song playback mode ................................................................................................ 114 System settings ........................................................................................................ 116 VIDEO SETTINGS ........................................................................................................ 120 Display mode ............................................................................................................ 120 Colors selection ........................................................................................................ 123 Screen center and Auto-AV ...................................................................................... 124 APPENDIX .................................................................................................................... 125 Firmware update ....................................................................................................... 125 System releases verify ............................................................................................. 126 Info messages .......................................................................................................... 126 Error messages ........................................................................................................ 127 Troubleshooting guide .............................................................................................. 130 Sound list .................................................................................................................. 136 74 IMPORTANT NOTES • Before connecting the power supply unit to the mains please verify that voltage is the same as indicated on the power supply unit. • Handle with care knobs and switches. • Do not place, if possible, the instrument near units that may strongly interfere with it e.g. radio, TV sets, monitors, etc. • Do not place Galileo near to heat sources, wet places, dust or strong magnetic fields. • Do not place Galileo under direct sun rays. • By no reasons objects or liquids of any kind should be introduced into the instrument. • To clean Galileo use a soft cloth or compressed air, never use alcohol, solvents or detergents. • Use always shielded and good quality cables. When you disconnect plugs please use the connector itself, do not pull cables. • Before any connection of the unit make sure that all other units (with particular reference to power amps and speakers) are switched off. You will avoid noisy and dangerous sound peaks NOTES ON THE INSTRUMENT To obtain the best performance, please note and strictly follow the indicated herebelow instructions. • Galileo uses only Smart-Media memory card type. • Be extremely careful with the memory cards; do not place them close to heat sources, or in wet or dusty environments. Do not touch the metal contacts switch with fingers. Use the original protection case when memory cards are not inserted into the Galileo. Files format recommendations: • Galileo plays only standard MIDI files (extension .MID), files MIDI for Karaoke (.KAR) and MP3 audio files (.MP3). Files with different extensions will not be shown on the display. • In order to be correctly read, the MIDI files must be General MIDI (GM) standard type. • It is not possible to play MIDI files bigger than 320 Kbytes. 75 NOTES ON THIS MANUAL • Preserve this manual with care. • This manual is part of the instrument itself. No responsibility will be taken for the content of this manual. • The manufacturer reserves itself the right to modify parts, details, or accessories to improve the instrument of for any constructive or marketing reason, in every moment and without the need of upgrading quickly this manual. • All rights are reserved; the reproduction of any part of this manual is forbidden, without written approval from the manufacturer. • Read carefully the information contained in this manual. You won’t waste your time and will obtain the best performances from the instrument. • The information in square brackets ([]) refer to the silk screening of the controls on the instrument itself. For example [TEMPO] means the TEMPO key. • The drawings on this manual are merely intended as useful information and can slightly differ from the ones shown on the instrument display. • All trademarks listed in this manual are property of the Manufacturer. LIMITATIONS TO RESPONSABILITY Voice Systems and Voice Systems dealers are not responsible for any damage caused by any improper use or modifications of the instrument, and for loss or destruction of any or all data. 76 GALILEO BRIEF DESCRIPTION Voice Systems Galileo is a file player able to play files in the Standard Midi (.MID), Karaoke (.KAR) and MP3 audio standards. In addition, it allows to play MIDI files containing audio tracks and MP3 files with karaoke. The Midifile sound generation is created by a General Midi (GM) card, with a 42 notes polyphony, which provides 393 sounds, Reverb and Chorus effects,10 drum sets sounds. By means of the internal video board, Galileo allows to display on a TV screen the song lyrics, for all file formats Midifile, Kar, MP3™ (coding ID3 Ver.2.00). The output signal is an RGB with embedded audio. As to memory cards, Galileo uses the Smart-MediaTM format, in sizes from 8MB to 128MB; it supports long file name structure (more than 8 characters), as well as folders structures. When connected to a computer, via USB cable, Galileo is used as a Mass Storage device, and it is recognized as a removable disk. Galileo does not needs any particular software for file storage: by a simple drag and drop operation you may easly transfer data from the computer to the Smart-MediaTM card and viceversa; everything in a simple and safe way. The instrument includes a microphone input (with independent Gain and Level controls), provided with internal effect and two eq sets for each one of MIDI files and MP3 files. The audio signal is sent also to the SCART plug, in order to connect Galileo to a TV set, without necessarily connecting it to an audio power amp. The interface is multi lingual, and together with the graphic display and the data entry keys, allow an easy use of Galileo. Moreover, in order to keep you updated about the latest improvements and/or modifications we suggest you to check from time to time all news included into our web site www.vsgalileo.com. 77 CONTROL PANEL 13 12 1 2 11 10 9 3 4 5 6 7 8 1. [GAIN]: potentiometer to trim the input gain for the microphone connected to [MIC IN] plug. 2. [LCD GRAPHIC DISPLAY]: backlit display (122 x 32 pixels) that shows all instrument settings. 3. [MASTER]: this potentiometer adjusts the Volume level of the signals on the [LINE OUT] and [RGB VIDEO OUT] back panel plugs. 4. [BALANCE]: balance potentiometer for MIDI and MP3 sources. The LEDs on the side of the slider show the sources actually active: • • [MP3]: the player is playing an MP3 file [MIDI]: the player is playing a MIDI file Recalling not mixed songs (only MIDI or only MP3) we recommend to place the slider in the side of the active source or in the middle, since the other source is not active. In case that MIDI songs contain one or more MP3 tracks, both LEDs will switch on: use the slider pot to obtain the correct balance between the sources. 78 5. [MIC.]: this potentiometer controls the microphone output level. The [OVL] LED if it lighted on indicates the overload (distortion) signal. If this happens, decrease the input gain with the [GAIN] control, in order to have the LED blinking occasionally. 6. CURSORS section: this section contains, controls the cursors shown on the display and let the displayed folders run and, more precisely: • • • • [UP]: it moves cursor up. [SELECT]: it moves cursor right. In the main video page it is used for the Dir function. [DOWN]: it moves cursor down. [BACK]: it moves cursor left. In the main page, it recalls the Dir function 7. CONTROLS section: instrument general control keys. • • • • [ON / ENTER]: it is a control which is needed and suitable: A) to switch on the instrument B) to load the selected files to be played C) to select the functions to be displayed D) to confirm some functions of the instrument which require “ confirmation “ E) to store the modifications which have been made on the presets. [ESC]: it is the escaping key to leave a setting procedure without saving the modifications. [PLAY]: play the selected song. When pressed during the playback, it works as a pause key. [OFF / STOP]: stops the playback. By holding down this button for a second, the Standby mode will be activated. 8. [MEMORY CARD]: insert here the SmartMedia memory card. Please insert the card with the metal contact on the lower side. 9. Encoder [DATA ENTRY]: rotary knob to set the displayed parameters. 10. SET-UP section: section containing the buttons used to recall the general settings procedures. • • [GLOBAL]: shows the menu to control display contrast, file play mode and other system parameters. [VIDEO]: functions related to set up the TV display. 11. CARD Section: these buttons are used for the memory card management. • • • [SAVE]: Button used to save data into the card [LIST]: It shows the songs contained in the active list (chain of songs) [DIR]: It displays the contents of the memory card. 79 12. AUDIO Section: section containing the buttons for the audio parameters editing • • [MIC.]: Microphone effect settings. [EQ.]: Equalizer sections for MIDI and MP3 files. 13. MIDI SONG SETTINGS Section: the buttons in this section allow the user to edit the midifile general parameters like: • • • [TRANSP.]: Song transpose. [MUTE]: Track mute. [TEMPO]: Metronome tempo for playback. REAR PANEL 1 2 3 4 5 6 1. [RGB VIDEO OUT]: SCART plug used to connect a TV set. Using a TV Set it is possible to display the lyrics of the song (for karaoke purposes) and get the audio signal in order to avoid the use of a separate sound system. ATTENTION! To connect Galileo with a TV set use a SCART cable with all 21 pins connected. 2. [MIDI OUT]: DIN 5 poles plug for MIDI data, used to connect Galileo with external MIDI instruments such expanders, electronic drums, etc… 3. [USB]: USB plug to connect Galileo to a computer. 4. [SW]: 1/4 inch Jack plug to connect a foot-switch pedal (optional). 80 5. [LINE OUT]: 1/4 inch Jack plugs for the output audio signal of Galileo, to connect external sound systems. In case of use of a mono signal, connect the [L/MONO] plug only. 6. [AC-IN]: connector for the external power supply unit. ATTENTION! To connect the power supply of Galileo use only the adapter provided with the instrument. If some problems occur with the original adapter, please address it to the nearest authorized service point. VOICE SYSTEMS does not guarantee the instrument if used with other adapters. SIDE PANEL 1 2 1. [PHONES]: 1/4 inch stereo Jack plug to connect headphones. Use only headphones with a minimum 16 Ω impedance. 2. [MIC. IN]: 1/4 inch Jack plug to connect a microphone. Using this input, on the audio outputs (but also on the [RGB VIDEO OUT] plug) the signal from both songs and microphone will be reproduced, reducing the need of using an external sound system. As stated before, Galileo provides also an internal effect unit, to add depth and spectrum to your voice. 81 CONNECTION EXAMPLES 82 FIRST SETUP Once you have connected Galileo to the power supply, the [ENTER] key LED will light up, showing that the instrument is presently in “energy saving mode” (“Stand-By”). To switch on the instrument hold down for a second the [ENTER] button, the display will show the startup video page: and then the operating system version installed (FIRMWARE REL.): The contents of the inserted memory card (“root” directory) will be displayed: If the memory card is not inserted, the display will show: informing that to proceed it is necessary to insert the card. 83 LANGUAGE SELECTION Galileo has a multi-lingual user interface, therefore the first operation to execute is to select the desired language. To do this press [GLOBAL], using the key [CURSOR DOWN] select the SYSTEM field and press [ENTER], now select MORE: and, if not, set select ENGLISH for the LANGUAGE parameter. USB MODE SELECTION Even if you haven’t still connected Galileo to your computer system, it is a good rule to setup now the USB mode, to avoid all possible erros during the first connection. Galileo has three different functional modes, depending on the different operating system with which it shall work. The USB mode setup is located in the same video page used for the language selection (reported above). In the following table are listed all the possible Galileo USB modes: OPERATING SYSTEM Windows 98 Second Edition Windows ME Windows 2000 Home or Professional Windows XP MAC 9.1 or higher 84 USB MODE NORMAL NORMAL NORMAL ADVANCED MAC After having selected the language and the right USB mode press [ENTER] to confirm the new settings and to leave the setup page. Press [ESC] to abort the operation. SWITCHING OFF The Galileo switch off procedure includes also the saving of all internal system parameters. To switch Galileo off hold down the [STOP] button: the instrument will ask you for a confirmation: then press [ENTER] to switch into “Stand-By” mode while, by pressing any other button, it will switch back to the normal mode. ATTENTION! If Galileo is switched off without pressing the [STOP] button (for example by pulling the power supply cable) all the settings which have been performed by the user will be lost. 85 CONNECTING AND USING YOUR MICROPHONE Connect your microphone to the [MIC IN] plug on the Galileo side panel. As a first step it is necessary to regulate the input signal gain to avoid excessive distortions. To do this proceed as follows: Set the [GAIN] pot in a middle position and the [MIC] slider pot in the position where you would like to have optimum volume. Please note that the slider [MIC] controls only the volume, and it is not responsible for any distortion. At this point, trim the [GAIN] pot so that the [OVD] LED blinks occasionally while having a loud signal (e.g. shouting). NOTE For a better microphone performance we suggest to use a balanced connection. USING HEADPHONES To connect an headphone set use the [PHONES] input plug. The system will automatically detect the presence of headphones, showing on the display the following page: Use the [DATA ENTRY] encoder, when the main page is displayed, to set the desired headphones volume. NOTE The [MASTER] slider does not regulate the headphones output level. 86 SELECT AND PLAY SONGS HOW TO LOAD A SONG After the power on procedures, Galileo enables automatically the Dir function (that is in every moment possible to recall by simply pressing [DIR]): selected folder cursor icon indicating the file type or folder folders and files stored in the selected directory NOTE The Dir function is also automatically displayed every time a memory card is inserted. This function allows the access to the content of the inserted memory card, to load the desired song or to program a list. It is possible to see from the picture above that this video page informs you about the directory (folder) actually selected. The “root” directory is always selected at the first access The middle of the display shows the contents of the selected directory (folder), that can contain other subdirectories (sub-folders), MIDI files, MP3 files, or lists. For each type, Galileo shows a different icon as described herebelow: directory MIDI file MP3 file file list (it is a proprietary file generated by Galileo) 87 By using the computer, it is possible to create a “tree” of directories (folders) where each folder can contain itself one or more folders, as reported in the herebelow example: To navigate inside the directory “tree” and to select the desired file use the following buttons: • • • • • • • [UP]: to move cursor up. [SELECT] when the cursor highlights a directory: to open the selected directory. [SELECT] when the cursor highlights a file: to insert the file in a list [DOWN]: to move cursor down. [BACK]: to go back to the previous directory. [ENTER] when the cursor highlights a directory: to open the selected directory. [ENTER] when the cursor highlights a file: to load the selected file (MIDI, MP3 or List) It is also possible to move the cursor by using the [DATA ENTRY] knob. When loading a MIDI file the display will show: for all the time which is necessary to load the data in the internal memory. 88 PLAYING BACK A SONG When the selected file is ready for the playback, the display shows the MIDI or MP3 “play page”. MIDIFILE selected folder selected song metronome tempo measure counter Beat-meter FILE MP3 selected folder selected song elapsed time When the [PLAY] button is pressed, the LED will light up and playback of the song will start. When the [STOP] key is pressed the playback of the song stops and by pressing [PLAY] again the playback is it temporarily interrupted and the unit enters a “Pause Mode“ (Pause). The pause mode is indicated by the flashing [PLAY] LED. By pressing [PLAY] again the execution will restart from the pause point. To load a new song, stop the playback by pressing [STOP] and then let the memory card display its contents using, the [DIR] key, the [CURSOR] section buttons or the [DATA ENTRY] encoder (only if headphones are not connected) and select the desired song. To program the next song (that will be played automatically at the end of the current song), after having displayed the memory card content, select the deired song with the [SELECT] 89 key (the number “01” will appear near the file name) press [ENTER]. When the display is back to the main page press [STOP] to execute immediately the new song or wait that the previous playing will end. NOTES It is important to remind that all control and configuration functions are always accessible, without stopping the playback of a song. In addition to all normal functions such as volumes and balance, you can control in real time the modifications on the MIDI files, EQ section, microphone, prepare a list and so on. To program and playback a song list, please refer to the “List” chapter. While reproducing a song, either MIDI or MP3, do not extract the memory card to avoid the interruption of the playback. When the function “HEADER JUMP” (see chapter “Song playback modes”) is active, the MEAS. field could not start with measure 1.1 depending of where the first note is located. For what concerns the description of the MIDI files containing MP3 files, please consult the advanced user manual. 90 CONNECTING A COMPUTER To copy, cancel, move or rename a file inside the Smart media™ card it is necessary to connect Galileo to computers using the included USB cable. During the first connection the computer will ask for the drivers needed for the management of the USB interface. The Operating Systems Windows ME, 2000, XP and Mac 9.1 (or superior) are able to install automatically the required drivers (plug and play feature). If your system has installed a Windows 98 Second Edition, it will be necessary to install the drivers from the CD provided with your Galileo. Hereunder the operations needed to install the drivers are descripted for each O.S. WINDOWS 98 SECOND EDITION Switch on Galileo and setup the NORMAL USB mode in the OTHER SETTINGS video page of the Global menu (for further info see the “FIRST SETUP” chapter). Switch on the PC and wait until the O.S. is fully loaded. Insert the Galileo CD-ROM in the PC drive and connect the PC with the USB cable to the Galileo. The OS will automatically detect the new hardware, identifying type and manufacturer, and will ask for the needed drivers: Click on “Next”, 91 and select “Search for the best driver for your device”. Click again on “Next”: It is now necessary to select the “CD-ROM drive” and click “Next”. A message box will display the driver name that will be installed and its path: 92 click again on “Next”, the PC will search and install all necessary files: When completed the following message box will be displayed: 93 WINDOWS ME - 2000 - XP Switch on Galileo and setup the NORMAL USB mode (for Win ME or 2000) or ADVANCED (for Win XP) in the OTHER SETTINGS screen of the Global menu (for further info see the “FIRST SETUP” chapter). Switch on the PC and wait until the O.S. is fully loaded. Connect the PC with the USB cable to the Galileo. The OS will automatically detect the new hardware, identifying type and manufacturer: and installing the required driver by itself: A message regarding the USB device connected will be displayed: and how this device is recognized by the OS: When the operation is completed, on the try bar will appear the following icon: This icon means that a device with a memory card is connected to the PC and it will be showed at any connection of the Galileo. 94 MAC O.S. 9.1 or higher Switch on Galileo and select the MAC-OS USB mode in the OTHER SETTINGS video page of the Global menu (for further info see the “FIRST SETUP” chapter). Switch on the computer and wait until the O.S. is fully loaded. Connect the PC with the USB cable to the Galileo. The OS will automatically detect the new hardware, identify type and manufacturer, and il will install all needed drivers. When finished, on the computer desktop will appear the “Galileo” or “Untitled” icon, indicating that the device was correctly installed. NOTES In addition to the icon shown on the computer, at every connection (at power-on or by inserting a new card, etc), the instrument will show: informing about the succesful connection and the USB mode choosen. Using a Mac computer and recalling the Dir function on Galileo, on the instrument display will be shown four folders named “Desktop folder”, “The volume settings folder”, “Trash” e “—Move & Rename”. These are system folders that will not be displayed when controlling the contents of the memory card with the computer. To extract the memory card from Galileo when it is connected to a Macintosh computer, it is necessary to select the “Eject” command and extract quickly the card. This command is available by clicking on the Galileo icon with the C key pressed. 95 USE OF A COMPUTER TO MANAGE FILES STORED IN GALILEY MEMORY Once installed the necessary drivers to manage the memory card, the use of Galileo with the computer is very intuitive and simple. The O.S. manages the Galileo as a “Removable disk” unit. Clicking on “My computer”, all devices installed will be shown, including the “Removable disk”. The “Removable disk” is Galileo. Click on the icon to see immediately the content of the card. 96 In case other subdirectories are present just click as usual on their icons to see the contents. Now you can copy files from the computer to Galileo memory card, erase them or create/ cancel folders. Of course if a proper program is installed it will be possible to reproduce and listen thru the computer the MIDI and MP3 files of Galileo. During any operation with the computer, the monitor will show the relating messages. On Galileo, the [SAVE] key LED will blink. Due to the characteristics of some OS it may happen that the “Copy in progress” message box disappears before the [SAVE] key LED stops to blink. In this case avoid to disconnect the USB cable and to extract the card until the LED goes off (this because the operation is still in progress). COPY OF FILES FROM COMPUTER INTO GALILEO MEMORY CARD To copy one or more files into Galileo it is necessary to select the files (or folder) on the computer hard drive, and drag them into the “Removable Disk” icon. Of course it is possible to use the “Copy” and “Paste” commands (recall them clicking with the right mouse click) or the C + c and C + v keyobard keys. 97 ERASING FILES OR FOLDERS FROM GALILEO MEMORY CARD Select the “Removable Disk” icon, then the desired files or folder. Use “Delete” command, or the ® key. CREATING NEW FOLDERS IN THE GALILEO MEMORY CARD Select the “Removable disk” icon (o a folder stored in it) and use the “New” command (in the window that can be showed by right mouse button): 98 then “Folder”. A “New Folder” will be created. Change the name as desired and press E. It is possible to create subfolders (folder which contains folders), please note that Galileo accepts a maximum of 5 levels of sub-folders. NOTES Using the NORMAL USB mode, in case of errors using the memory card, the OS may show up messages not properly related to the error occurred. To know the exact cause of the error, check the Galileo display and the messages here reported (for more informations see the “Error messages” chapter). It is not possible to copy more than 512 files in the “Root” directory and in any other folder. Using a Mac computer, it may happen that, after having inserted a memory card into Galileo, the icon does not appear on the computer desktop . In this case it is necessary to extract and reinsert the memory card. To grant a good management of the memory cards, we suggest to format them with Galileo (see “Card Informations” chapter). Using Windows98 SE, after having extracted a memory card which can already be inside, it’s advisable to wait at least for 7 seconds to insert a new one. 99 MIDI FILE EDIT FUNCTIONS Galileo provides some useful MIDI files editing functions, that are available by pressing the buttons of the MIDI SONG SETTINGS section. These functions are all on real time, therefore performable during a song playback. They offer the great advantage to be extremely quick and really helpful to modify a song while playing it. These functions are: - TRANSP: it allows the user to change the key of the selected song. - MUTE: it allows muting of a track (exclusion of a track). - TEMPO: it allows to change the metronome tempo. To recall these functions press the proper key (both in play or stop mode). The display will show the setup video page related to the selected function: the LED of the key will start blinking, to show that internal parameters of the function are in editing situation, but the function hasn’t yet been applied to the file. Press [ENTER] and the new parameters will be activated: the song will play following the new settings. To deactivate the function, press the function key again. The modifications made as above described, do not change the MIDI data stored into the memory card, but just the way how they are played back from Galileo. It is possibile to store the editing parameters of each song: in this case, when a song is recalled, the user settings will be applied. Please refer to the “SAVE GALILEO SETUP ON THE MEMORY CARD” chapter. Plase check also the “SONG PLAYBACK MODE” chapter for other useful information. NOTE These functions are not available for MP3 files. Please be careful in using these function in MIDI files containing MP3 files. Here below the details of each MIDI SONG SETTINGS function. 100 TRANSPOSE FUNCTION This function allows to modify the key of the song being played, in other words to transpose an exact number of semitones (half tones) on all the tracks (MIDI channels) except the one containing the drum sound. This track (normally the n.10, named DRUM TRACK) must not normally be transposed as this may cause the playing of drum timbres different from those previously chosen or selected which might interefere with the beat of the musical backing. By pressing [TRANSP.] the display will show the editing video page: where the following parameters are reported: • • BIAS: It sets the value of transposition (semitone) DRUM TRACK: It sets the drum track which has to be played After having set up your chosen settings, press [ENTER] to confirm and activate them or [ESC] to abort the operation. In both cases Galileo will show back the main video page. To deactivate the transposer function press the [TRANSP.] or [ESC] keys (the led will switch off). In both cases the display will show the main page. If you desire to show or modify the transpose parameter when the function is active, press and hold down the [TRANSP.] button. MUTE FUNCTION The MUTE function allows, while playing a song, to reduce the velocity (and therefore the volume) or completely mute (remove) one or more instruments (tracks) from the playback. To activate the function press the [MUTE] key, the display will first show the configuration page: 101 which contains the following parameters: • • CHANNEL: It selects the one of the 16 tracks the mute is to apply to; in other words th “signals “ MODE: to select the MUTE mode: - OFF: it showst hat the track is played the track is played - HALF: it shows that the track is played at half volume - ON: it shows that the track is muted Press [ENTER] to activate the function or [ESC] to cancel the aborted operation. In both cases the display will show the main video page. If you wish to check and/or modify the Mute parameter while the function is active, press and hold down the [MUTE] key. To deactivate the mute function press the [MUTE] key (the led will switch off). TEMPO (CHANGE) FUNCTION The TEMPO function allows the user to vary the metronome tempo of a song being played. By pressing the [TEMPO] button the Galileo display will show the following video page: These are the configuration parameters: • • • RATIO: It allows you to regulate the variation not in “absolute” tempo, but of a recalculation percentage, to ensure proportional variation in the performance of the song, features rallentados or accelerandos. If the ratio is set at 200%, the new tempo will be twice the original one while if the ratio is set at 50%, the new tempo will be the half. NEW: It displays the new tempo value. ORIGINAL: It displays the original tempo value. Once the desired settings are made, press again [ENTER] to activate them. If you wish to cancel the new values press [TEMPO] or [ESC]. In both cases the display will show back the main page. If you wish to check and/or modify the Tempo parameters while the function is active, press and hold the [TEMPO] key. 102 THE LIST The Galileo allows you to create pre-arranged sequences of songs, both MIDI or MP3, also if stored in different folders. However, when the instrument is switched off these sequences are lost. To prevent this, these programs can be saved in the form of List files. To program a LIST, first of all, you have to display the memory card contents by pressing [DIR]: Using the [UP] and [DOWN] keys (CURSOR section), move the cursor on the first song you want to add to the list and press [SELECT]. A small progressive number will be displayed near the file name: This number indicates the song position inside the LIST. Execute the above procedure to insert all desired songs, also if stored in different folders. The “LIST” icon is displayed, informing that a list is being processed. To deselect a file inserted in a list, it is enough to place the cursor on the desired song and press again [SELECT]. Once the list programming has been completed, press [ENTER] to confirm or [ESC] to cancel the selections. If confirmed the system will load the first song: and will show the main page: 103 indicating that a List (not a single song), is really running. Now press [PLAY] and Galileo will start the playback; once the song is terminated (by itself or pressing [STOP]) the second song will be loaded and played, then the third one and so on. By pressing [STOP] for some seconds, it will be possible to stop in a definitive way the LIST playback. To verify or edit in every moment the list contents (also during the playback) press the [LIST] key. If you need to change the position of a song inside a list, select the desired song using the encoder knob, and then select the new position with the [UP] and [DOWN] keys. By pressing [SELECT], the selected song will be removed from the list. To remove all songs from a list previously programmed, press and hold down the [LIST] key. The display will show: press [ENTER] to confirm or [ESC] to cancel. NOTES In the PLAY MODE section, you can edit the start mode of the songs programmed in a list (see also “SONG PLAYBACK MODE”). The “LIST” field at the top right corner of the display is not shown if the list contains just one song. To learn more about the Galileo messages during song playback, please see also “INFO MESSAGES” and “ERROR MESSAGES”. 104 SAVING A LIST To save a previously programmed list press [LIST] and, when the contents is shown, press [SAVE]. The system will ask for a List name: Use [SELECT] and/or [BACK] keys to move the cursor and [UP], [DOWN] or the encoder to insert the desired characters. To save the LIST in another directory press [DIR] key and select the desired folder. Press [ENTER] to start saving. During the save process, the display will show: WARNING!! Due to the USB interface features,if Galileo is connected to a computer, it will not be possible to save data into the memory card. In this case the following message will be shown: At this point disconnect the USB cable and repeat the saving procedure. When Saving a list with an already saved, the system will automatically rewrite the original file. 105 QUICK FILE SEARCH Using the FILE ENTRY function, you can search for a specific element inside the memory card (such as a MIDI / KAR file, a MP3 file, a list or a folder), without scrolling the content of all the memory card. Press and hold down the [DIR] key, the Galileo display will show: Now, using the encoder and the [UP] and [DOWN] keys, insert the first letter of the word to be found. Use [BACK] and [SELECT] keys to move the cursor and add more letters. For example, by inserting the “F” letter, Galileo will find all the files which name starts with “F.” If you already know the enteire name of a file to search, you can insert it complete, so that the search will be immediate. Press [DIR] and the system will start the search process: and it will show the first file found. Press [DIR] again to search the next file. Press [ESC] to leave the function. At the end of the search process (no more entry found) the system will display: Press [ESC] to show again the DIR function. 106 MICROPHONE EFFECT As from the description in the introductory side and in the connection description, it is possibile to connect a microphone to Galileo via the [MIC IN] plug. The signal coming from the microphone can be controlled with a dedicated effect, similar to delay, and redirected to the [LINE OUT] and [RGB VIDEO OUT] outputs. To control this effect press [MIC.] key, in the AUDIO section of the control panel. The following screen will be shown: where the following configuration parameters are present: • • • LEVEL: it trims the effect level. TIME: it sets the repeat duration. FEEDBACK: it sets the decay time. Once the necessary checks are made press [ENTER] to confirm and store the new values or [ESC] to cancel them. 107 EQUALIZER Galileo is provided with two internal equalizers to control the sound generated from the MIDI tracks and the MP3 files. The EQ for the MIDI tracks is a two band semi-parametric, while the one for MP3 files is a two band graphic with anti-clipping system. To access the two EQ screens press [EQ.] in the AUDIO section on the fromt panel: MIDI FILES EQUALIZER As explained above, the EQ for the MIDI tracks is a two band semi-parametric device. A parametric eq allows both the control of gain into specific frequencies as well as but also to select the work frequencies themselves. Before accessing the control parameters select AUDIO MIDI FILE in the previously described screen. The display will show: These are the control parameters: • • • • LO G: it controls boost or cut of low frequencies with a range of ± 12 dB. FR.: it set the central work frequency for the LOW EQ in a range from 0 Hz (FR=0) to 4,7 KHz (FR=127). HIGH G: it controls boost or cut of high frequencies with a range of ± 12 dB. FR.: set the central work frequency for the HI EQ in a range from 0 Hz (FR=0) to 18,75 KHz (FR=127). Once made the necessary checks press [ENTER] to confirm and store the new values or [ESC] to cancel. 108 MP3 FILES EQUALIZER The MP3 files EQ is graphic, with two bands, allowing the regulation of low and high frequencies. In addition it is completed with an anti-clipping system, that is controllable with 3 different setups, in order to avoid signal saturation. To access the parameter regulation screen select AUDIO MP3 in the eq selection screen: These are the control parameters: • • • BASS: it controls boost (positive values) or cut (negative values) of low frequencies with a range of ± 15 dB. TREBLE: it controls boost (positive values) or cut (negative values) of low frequencies with a range of ± 15 dB. ANTI CLIP: it sets the anti-clip system modes. The anti-clip reduces the higher signal peaks: it is possible to deactivate it (select OFF) or set three different attenuation modes: minimum (MIN), medium (MED) o max (MAX). Once the necessary checks are made press [ENTER] to confirm and store the new values or [ESC] to cancel them. 109 SAVE GALILEO SETUP ON THE MEMORY CARD Galileo offers the possibility of saving, for each MIDI or MP3 file, all setup information collected into the MIDI SONG SETTINGS, AUDIO and VIDEO sections, and recall them automatically at any time when a song is loaded. As stated before, these functions are related to the type of file which have been loaded. Therefore for each MIDI file it will be possible to save: • • • • All MIDI SONG SETTINGS functions Microphone setup EQ setup (for the specific MIDI file EQ) Video setup For an MP3 file it will be possible to save: • • • EQ setup (for the specific MP3 file EQ) Microphone setup Video setup If we are working with a MIDI file containing MP3 tracks it will be possible to select all the above described options. In case of saving procedure of MIDI file settings all saving operations will create a .INI file in the memory card, or alternatively a .TXT file if we need to save the MP3 functions. For an easier search, these info files will have the same name of the song. These file can be successively saved and modified with any text editor that you have in your computer; by this way it will be possible to modify without executing any other saving procedure. To save all desired presets first of all load the desired song, then modify the parameters and press [SAVE] key. At this point the display will show: SAVE which is a parameter that allows to select the saving options. 110 In case of a MIDI file it will be possible to select: • SMF PARAMETERS: which relate to all parameters of the MIDI SONG SETTINGS section functions, therefore: - Transpose - Mute - Tempo • SMF & AUDIO: which relate to all parameters of the MIDI SONG SETTINGS as well as to AUDIO sections functions, therefore: - Transpose - Mute - Tempo - Microphone - MIDI Equalizer • SMF & EQUALIZER.: which relate to all parameters of the MIDI SONG SETTINGS and MIDI EQ sections functions, therefore: - Transpose - Mute - Tempo - MIDI Equalizer • SMF & MICROPHONE: which relate to all parameters of the MIDI SONG SETTINGS and MICROPHONE sections functions, therefore: - Transpose - Mute - Tempo - Microphone • AUDIO: which relate to all parameters of the AUDIO section functions, therefore: - Microphone - MIDI Equalizer • SMF & VIDEO: which relate to all parameters of the MIDI SONG SETTINGS and VIDEO sections functions, therefore: - Transpose - Mute - Tempo - Video (except CENTER andAUTO-AV parameters) • VIDEO: which relate to all parameters of the VIDEO section functions, therefore. • ALL (SMF): which relate to all parameters related to MIDI files, therefore: - Transpose - Mute - Tempo - Microphone - MIDI Equalizer - Video (except CENTER andAUTO-AV parameters) 111 In case of an MP3 file it will be possible to save: • EQUALIZER: which controls the parameters of the MP3 equalizer. • MICROPHONE: which controls the parameters of the microphone. • AUDIO: which controls all the parameters of the AUDIO section, therefore: - Microphone - MP3 Equalizer • VIDEO: which controls all the parameters of the VIDEO section. • ALL (MP3): which controls all parameters related to MP3 files, therefore: - Microphone - MP3 Equalizer - Video (except CENTER andAUTO-AV parameters) To complete the saving of the selected parameters press [ENTER]. During data writing, the following message will be displayed: and then the system will display again the main page. NOTES While Galileo is connected to a computer it is not possible to make any saving operations. In this case the display will show: Then disconnect USB cable and repeat the operations. Once the “Save” operation has been completed a .TXT o .INI file will be created, with the same name of the MIDI or MP3 reference file but with a name length composed by a max of 8 characters. All operations related to the parameter modifications included in the .TXT or .INI files are listed in the Advanced User Guide. 112 GLOBAL SETTINGS By pressing the [GLOBAL] key, in the SET-UP section of the front panel, it is possible to access to all global settings to setup and customize the instrument adjusting it to your needs. These settings will take care of: • • • Display contrast setup (DISPLAY CONTRAST) Setup of song playback mode (PLAY MODE) System setup (SYSTEM) After having pressed the above descripted key, the display will show the GENERAL SETTINGS MENU screen (we will name it from now on GLOBAL menu): To recall a desired function, first of all, select the correspondent field with the [CURSOR] keys and then press [ENTER]. To trim the value use the rotary encoder. Once the necessary checks are made, press [ENTER] to confirm and store the new values or [ESC] to cancel and reset everything and recall the previous values. DISPLAY CONTRAST Galileo display has a contrast control in order to obtain the best readability if the user is in different positions toward the display. To access to this control select DISPLAY CONTRAST from the Global menu and press [ENTER], the display will show the screen: that contains the following fields: • • CONTRAST: which shows the display contrast value. REVERSE: which recalls the display reverse mode. Select NO to see the display in standard mode or YES to see it in reverse mode. STANDARD mode REVERSE mode 113 SONG PLAYBACK MODE When selecting the PLAY MODE field in the Global menu, the following screen will be shown: Please note that this screen does not contain programming parameters but a sub-functions menu, that are used for song playback. These settings are: • • • Transpose, Mute and Tempo functions activation mode (SONG USER SETTINGS) List (and list’s songs) playback modes (START MODE) Pedal settings (FOOT SWITCH ACTION) USER SETTINGS Through this function it is possible to set the instruments working when an .INI (SMF parameters) or .TXT (MP3 parameters) file is present. These files are created from Galileo after a “Save” operation (for more informations see chapter “SAVE GALILEO SETUP ON THE MEMORY CARD”). When selecting SONG USER SETTINGS, the following screen will be shown: In this screen the MODE parameter is present. This parameter can be set as follows: MODE MIDIFILE If a file .INI is not in the memory FILE-HOLD card, the MIDI SONG SETTINGS functions mode will be unchanged If a file .INI is not in the memory FILE-RESET card, the MIDI SONG SETTINGS functions mode will be disabled The MIDI SONG SETTINGS HOLD functions mode will be unchanged even in the presence of a .INI file All the MIDI SONG SETTINGS RESET functions will be disabled even in the presence of a .INI file 114 FILE .MP3 If a file .TXT is not in the memory card, the MP3 parameters values will be unchanged If a file .TXT is also in the memory card, the MP3 parameters will be unchanged START MODE SETTINGS The video page that is displayed when selecting the START MODE contains all the parameters to configure the list execution mode, and the song header skip function settings. These are the parameters: • • • MODE: it sets the playback mode of the songs loaded via a list. By selecting SINGLE, after having loaded the next song the system will wait a click on the [PLAY] key to start the playback of the new song. By selecting CONTINUE the next song will be played automatically. LOOP: when the last song of a list has been completed, it specifies if the system will playback the first song again (by selecting YES) or stop (by selecting NO). HEADER JUMP: by selecting YES, it specifies if you may to skip the header MIDI data (normally they are placed before the first note or the first lyrics letter). This function has the great advantage of loading at a great speed the sound generation setup messages without any need to wait for the first empty music measures before starting the playback. FOOT SWITCH SETTINGS This function allows to assign a command to the footswitch pedal conneted to the [FOOT] plug on the back panel. To recall the screen, select FOOT SWITCH ACTION: la quale contiene i seguenti parametri: • ACTION: it inserts in this field the function you want to assign to the pedal and the following are the available functions: - PLY-STP: which at each pedal pressure Galileo switches from Play to Stop and viceversa. - PSE-CNT: which at each pedal pressure Galileo switches on and off positions from Pause (song pause) to Continue (song restart). 115 • POLARITY: this field is necessary to inform that you must supply Galileo with inputs and info relating to the kind of pedal which is connected to : - -: normally open (N.A.) +: normally closed (N.C.) SYSTEM SETTINGS The video page SYSTEM SETTINGS is displayed when the SYSTEM command is selected, and it contains all functions not strictly connected to song playback, but for example to obtain informations or configurate the Galileo accessory settings. The available functions are as follows: • • • • • MIDI data output port selection (MIDI ROUTER) Informations on the memory card and its format (CARD INFORMATIONS) Language setting (MORE…) USB mode setting (MORE…) Installed firmware informations (MORE…) MIDI ROUTER SETTINGS Router MIDI intendsto be the possibility to specify if the data contained in a single track (to which corresponds a specific MIDI channel) must be transmitted to the internal sound generation board or to the [MIDI OUT] port on the back panel. Selecting ROUTER MIDI, it will be possible to see the setting screen: With the CHANNEL command you can select, via the rotary encoder, the track (from 1 to 16) where you want to address the contents. On the PORT field the actual link will be displayed. The channel-output links are described on the next page. 116 - INTERNAL: the data of the selected track are sent exclusively to the internal sound generator. - EXTERNAL: MIDI data of the selected track are sent exclusively to the [MIDI OUT] port. ATTENTION! Remember that selecting EXTERNAL option for a specific track, this track cannot be played from the internal sound generator. CARD INFORMATIONS The CARD INFORMATION function allows to be continuously updated with information regarding the memory card total capacity and the remaining free space. This screen contains also the format function for the memory card. It is advisable to format the cards with the computer, because this type of format allow a larger storage space for your files. Use the Galileo function when the card has some errors and the computer is not able to perform the formatting. To recall the function simply select CARD INFORMATIONS, the display will show the followng screen: • • SIZE: it shows, in MByte, the total capacity of the inserted memory card. FREE: it informs about the free space, in KByte As displayed, by pressing [ENTER] key, it will be possible to format the memory card. In this case the display will ask you to provide a further confirmation: 117 Press [ENTER] to continue or [ESC] to cancel. In case of confirmation, the following screen will be displayed: as long as it is required to complete the formatting procedure. ATTENTION! Remember that all the data in the memory card will be lost when you format it. If you proceed to format from the computer, pay attention to preset the File System as FAT type. NOTES The load time will be slightly longer if the card has been formatted with the computer. The cards formatted thru Galileo will be named “Galileo”. This way, using a Mac computer (not a PC) the “No title” icon will be displayed with Galileo name. If Galileo is USB cable connected to the computer, the connection will be momentarily disabled during the format process. When a format has been completed thru a PC, it is advisable to pull the memory card out of Galileot and then plug it in again. 118 OTHER SETTINGS By selecting OTHER… it is possible to see the screen will show where to set the language and the USB mode (for more informations see chapter “FIRST SETUP”). In addition this function allow to check the operating system and hardware versions. The following are the displayed parameters: • • LANGUAGE: it selects the desired language for all display data. USB: it selects the USB mode how to connect Galileo to a computer. This setting depends on the OS installed in the computer, as follows: - NORMAL: if your computer is Windows 98 s.e., Windows ME, Windows 2000 based - ADVANCED: if you use Windows XP - MAC: if you use a Mac O.S. 9.1 (or later versions) • RELEASE: It displays the software (first number from left) and hardware versions installed into Galileo. 119 VIDEO SETTINGS As described in the “CONNECTIONS” chapter, Galileo is equipped with a SCART plug to connect a TV set, to display karaoke lyrics and other information regarding the playback songs. The VIDEO menu, is accessible by pressing [VIDEO] key in the SET-UP section of the front panel: contains all settings related to the TV data display, and more precisely: • • • Display mode and characters size (MODE) Color selection (COLORS) Screen adjustment and auto AV selection (CENTER - AV) To select one of the functions use the CURSOR keys to move and press [ENTER] to access configuration screen. NOTE To get a quicker and more efficient setup of the VIDEO section, it is advisable to do the settings with the TV Set connected and during a song playback. In this way you can see your setting in real time. DISPLAY MODE To set the display mode and character size, select MODE in the VIDEO menu. 120 • MODE: it sets the display mode, actually the karaoke info you want to display on the TVset. It is possible to select: - LYRICS: on the screen of the TV set only the song lyrics are displayed. - MIXED: both lyrics and song information are displayed. 121 - LIST: the content of the loaded list is displayed. - SONG: all the main parameters of the loaded song are displayed. 122 • FONT: it selects the size of the fonts to display on the TV screen. NOTE The LARGE dimension is not available when one of the LIST and/or SONG modes are loaded. COLORS SELECTION A further customization for the video settings is the color selection. You can actually choose the color to visualize text and song parameters on the Tv set. It is possible to select a color for each of the parameter and the song text (already sung or to sing). To recall this function select COLORS: It is possible to select the colors for: • • • TEXT: fixed fields, song text that needs to be sung, song text alredy sung. BACKGROUND: Tvset background. SYLLABLE: song text in syllable ATTENTION! If the parameters or part of the text are not displayed on the screen please check the screen colors that you have selected. It may happen for example that you selected the same color both for the background and the text. 123 SCREEN CENTER AND AUTO-AV The last setting regarding Galileo connected Tv set is the centering of the screen of the TV and the automatic selection of the audio and the video modes. To access to this function please select CENTER-AV: The following parameters are present: • • CENTER: this parameter allows to select one of the 16 presets to center Galileo display on the TV set. AUTO AV: by selecting YES it is possible to activate the automatic selection of the TV set audio video input. Therefore when you switch on the TV, it will go automatically on AV. Select NO to deactivate this function. NOTE Deactivating AUTO-AV option it will be necessary to manually select AV channel on the TV, to visualize the song text and/or the additional information. 124 APPENDIX FIRMWARE UPDATE Galileo firmware is resident inside the internal instrument memory. To update it with more recent releases is very simple and easy to do. Ensure to select the correct USB mode, that is: • • • NORMAL: for Windows 98 s.e., Windows 2000, Windows ME ADVANCED: Windows XP MAC: Mac 9.1 (or later) Switch off Galileo holding for some seconds the [STOP] key. Now connect Galileo to the computer via the USB cable, and switch it on by keeping both the [ESC] and [ENTER] keys pressed. The system will automatically recall the update procedure, showing it on the display: Thru the computer copy the files into Galileo, with a normal drag and drop procedure. During the file loading, the system will show: When the loading is finished, the system will show: Press now [ESC] to switch off Galileo and [ENTER] to switch it on again. 125 ATTENTION! While loading update files, be extremely careful not to switch off either Galileo or the computer, and do not disconnect the USB cable. Do not modify the update file contents. SYSTEM RELEASES VERIFIY As described above, the system informs about the firmware release actually installed thru the initial screen and the “OTHER INFORMATIONS” screen in the Global menu. With the computer it is also possible to verify the bootstrap and preset information, clicking on the Galileo icon when the instrument is in the update mode (switch on and press keys [ESC] and [ENTER]). INFO MESSAGES The display screen set is completed with a series of messages that we list here. These messages are useful to inform the user of malfunctioning or other issues (error or information messaging). This chapter reports all information messages, normally used when the system is not able to complete a certain operation with the data on the memory card. CARD FULL The memory card cannot load further files. Create some free space by deleting files or use another memory card. DIRECTORY FULL The root directory can save max 512 files. If you are trying to save more files this message will be displayed, and the saving procedure will not be possible. Create some more free space in this folder or create and use a subfolder. 126 NO FILES The ELEMENT SEARCH function did not give any result. NO SONGS In the inserted memory card there is no song of the selected list. ERROR MESSAGES Error messages are displayed when an error occurs or has occurred in managing the memory card, or because of a system malfunction. HARDWARE FAULT There are some errors in the internal hardware. Please refer to a Voice Systems Authorized Service for assistance. WRITE PROTECTED When the memory card is protected it is not possible to store any further datas in it; then remove the protection and repeat the operation. 127 ILLEGAL CARD The memory card inserted is not formatted. This error can be displayed also when, inserting a formatted card, Galileo finds some errors in the main sector. In this case, try to pull and reinsert the memory card, or repeatedly switch off and on Galileo. INVALID FILE The selected file is not a MIDI, KAR, MP3 file, or has some errors and cannot be performed. ILLEGAL ADDRESS The file memory address is wrong. Correct the error and make a file copy. This error can be also displayed when, in the case of the copy of one or more files, there is an attempt to load a song while you are writing it. FILE TOO BIG The internal Galileo memory reserved to MIDI files allows to load files with a maximum size of 320 KByte each. This message is displayed when a selected file exceeds this limit. READ ERROR Some errors occur in opening a file. The file can be damaged. Try to correct the error executing a copy of the file in the memory card. 128 WRITE ERROR The system is not able to store data into the memory card. The card can be damaged. Try to correct the errors by using the formatting procedure thru Galileo. INVALID FILE NAME The name of the selected file is wrong. Try to correct the error making a copy of the file in the memory card. 129 TROUBLESHOOTING GUIDE PROBLEMS The instrument doesn't switch on POSSIBLE REASONS PROBLEMS WITH GALILEO Press and hold the [ON] button Lack of switch on command down Check that the power supply Lack of mains supply unit is connected to the main supply and to the Galileo The power supply unit is broken or, if not certified for Power Supply troubles Galileo, it may not work properly Contact or take directly Galileo Boostrap failure to an Authorized Service Center No sound is heard by The slider [BALANCE] is set reproducing a MIDI file on MP3 No sound is heard by reproducing an MP3 file Playing back a MIDI file, the audio output signal is in distortion situation Playing back a MP3 file, the audio output signal is in distortion situation Distortion in microphone sound. The Led [OVL] lights up Adjust the slider to middle range or MIDI The slider [BALANCE] is set on MIDI Adjust the slider to middle range or MP3 The MIDI File equalizer is set at too high gain values Reduce the equalizer gain The MP3 File equalizer is set with high gain values Reduce the equalizer gain or use the Anti-Clip function The input gain of microphone signal is too high Reduce the input gain using the [GAIN] potentiometer The input gain of microphone signal is too low The microphone signal The microphone might be is weak either broken or of low quality The microphone connection to Galileo is unbalanced 130 SUGGESTED POSSIBLE SOLUTIONS Increase the input gain using the [GAIN] potentiometer Replace the microphone Use a balanced connection Weak headphones signal Inserting a memory card, the "Illegal card" error message is displayed Is displayed the "File too big" error message by selecting a MIDI File Recalling the DIR function, wrong characters and file / folder names are displayed Loading a song the "Illegal address" is displayed The [PHONES] output signal level is adjusted with low values The headphones impedance is not right for a proper use with Galileo The memory card is not Eject and re-insert the memory formatted or has serious faults card or format it in the main sectors The loaded MIDI File has a size larger than 320 KBytes It is not possible to load a MIDI File with a size larger than 320 KBytes The DIR function is recalled while the file copy is not completed Wait until the file copy has been completed (the [SAVE] Led is switched off ). If it doesn't work, eject and reinsert the card During a file copy, you are trying to load a not completely stored file (the [SAVE] Led is still blinking) The memory card could be broken Some MIDI File tracks The MIDI Router is set in are not reproduced EXTERNAL for some tracks The MIDI SONG SETTINGS functions are not available When a new song is loaded, the MIDI SONG SETTINGS functions are disabled The saved song settings are not activated When a MIDI File is loaded, the measure counter doesn't start from 1 Increase the headphones signal level (see par. "Using headphones") Use headphones with a minimum impedance of 16 Ohm An MP3 file is selected Wait for the file copy completing (the [SAVE] Led is switched off ). Try to copy the file again or format the card Check the MIDI Router setting all tracks in INTERNAL (see par. "Global settings - System settings") The MIDI SONG SETTINGS are available with MIDI File only The FILE-RESET or RESET modes are selected Select the desired mode (see par. "Global settings - Song playback modes") The mode HOLD is selected Select the desired mode (see par. "Global settings - Song playback modes") The HEADER JUMP function is activated Disable the function (see par. "Global settings - Song playback modes") 131 Impossibility to stop The LOOP function is the play back function activated of a songs list Saving the settings It is not possible recalling the (SAVE function) the SAVE function while Galileo is "USB connected" connected to a computer message is displayed The memory card is formatted The free space in the by Galileo. Galileo formats the memory card showed cards according its features by Galileo doesn't and with a slight difference match to the one compared with the computer showed by the format. This can make this computer small difference in the free space calculation The instrument has been The Global and Video switched off without pressing settings are not stored the [OFF] button, but it has when switching off been disconnected Galileo immediately by pulling the plug or the power cord Galileo doesn't switch Lack of switch off command off 132 Press and hold down the [STOP] button and check the play list mode disabling the LOOP function (see par. Global settings - Song playback modes") Disconnect the USB cable Switch off Galileo by pressing and holding down the [OFF] button Press and hold down the [OFF] button. Then press [ENTER] PROBLEMS WITH PERSONAL COMPUTER (Windows operating systems) When doing the first The USB cable / connector is Connect the USB cable time connection, the not connected computer doesn't The USB cable is broken Replace the USB cable require / install the drivers (USB Galileo is not switched on. The Switch on the instrument connection not memory card is not inserted actived) Open the "Control Panel" and The "Control Panel" settings disable the "Use automatic are wrong. settings" for the USB Host Controller. Check that both the "USB Keyboard", "Legacy USB Support" and "Assign IRQ for During the drivers The BIOS settings are wrong USB" BIOS functions are installation for enabled. If problems are still Windows 98, the unsolved please contact a PC operating system service center freezes in a blue The actually installed BIOS screen (Fatal version doesn't manage the Update the BIOS version Excpetion error) USB peripherals Check possible peripherals Probable conflicts with others conflicts by using the "Control peripherals Panel" Remove or update the drivers Probable conflicts with CD of the device that generates burning unit conflicts Wait that During a copy / delete file the [SAVE] Led Windows 98 freezes The memory card has been stops to blink. An interrupted when extracting the extracted before completing write data can cause data loss memory card from file copy / delete procedure and / or problems into the Galileo card. Set the right USB mode (see Windows ME, 2000, The USB mode in Galileo is par. "First setup - USB mode XP require drivers wrong selection") installation The memory card has been extracted from Galileo During a file copy / Remove from the memory card The memory card is "write delete procedure, the the silver label for the "write protected" PC screen shows the protect" "Unit disconnected or During a file copy / delete wait removed" or that the [SAVE] Led stops to "Impossible to write to The memory card has been blink. A non completed "write the peripheral" errors extracted during a copy / procedure" can cause data delete procedure loss and problems into the card. 133 It might happen that the The PC screen doesn't progress bars showed by the show the "Copy in operating system don't show The file copy procedure is in progress" message the right time required to during a file copy. The progress complete the operation. [SAVE] Led on Galileo Hovewer, write data is in is blinking. progress. Wait until the [SAVE] Led is switched off. Some delay could be Copy the CD or FD contents File copies from CD or generated, and not caused by into the hard disk if this type of floppy disk are slow Galileo, during a directly copy coping procedure is frequently from CD or FD. used These files are not compatible Some files, stored in with Galileo or have been the memory card, are stored more than 512 files in a not showed by Galileo folder Some MIDI, MP3 or KAR files, stored in The file system of the memory the memory card, are card is not refreshed not showed by Galileo Wait for the file copy completing (the [SAVE] Led is switched off). If it doesn't work, eject and re-insert the card Wait for the file copy completing (the [SAVE] Led is After a memory card The file system of the memory switched off ). If it doesn't format, some files are card is not refreshed work, eject and re-insert the still showed by Galileo card The "Removable disk" icon is not displayed The PC has disabled the Re-start the PC checking that by the PC, also if Galileo is connected and that Galileo is connected to drivers after a wrong procedure. the memory card is inserted. the PC and the memory card is inserted. 134 PROBLEMS WITH MACINTOSH COMPUTER Due to the features of the After you have operating system, it may extracted and rehappen that the computer Extract and re-insert the inserted the memory doesn't show that the memory memory card card into Galileo, the card is present when the same computer screen is ejected and re-inserted in a doesn't show the icon rather short time The Galileo shows "Desktop folders", "Trash" and "---Move They are system folders which are are not visualized on the & Rename" folders computer. which are not visualized on the computer. The computer shows all the folders which are contained into the Check and adjust the right Most probably the USB memory card and USB mode (see par."First which are classified as connnection has been setup - USB mode selection") "Protected". Under this (improperly) installed. circumnstance is not possible to save other files. TV DISPLAYING PROBLEMS Check that the AV channel of the input where Galileo is connected it is actived. Check AV channel not selected the AUTO AV function (VIDEO menu) in Galileo Check that all the 21 pins of The TV doesn't show The SCART cable is wrong the SCART cable have been nothing connected Check the function for the colors selection (see par. All colors are setted as "Black" "Video settings - Colors selection") Adjust the volume on the TV It is not possible to Volume is low and Galileo ([MASTER] slider) heard the audio from the TV The SCART cable is broken Replace the SCART cable The reproduced MIDI file doesn't implement the syllabication The syllabication is not Check the function for the showed by the TV The syllabication and text colors selection (see: par. colors are the same "Video settings - Colors selection") 135 SOUND LIST MAIN SOUNDS (all channels except 10) PG 0 1 2 3 4 5 6 7 8 9 10 11 12 13 14 15 16 17 18 19 20 21 22 23 24 25 26 27 28 29 30 31 136 GENERAL MIDI PG Grand Piano 32 Bright Piano 33 E. Grand Piano 34 Honky Tonk 35 Electric Piano 1 36 Electric Piano 2 37 Harpsichord 1 38 Clavinet 39 Celesta 40 Gloken 41 Music Box 42 Vibes 43 Marimba 44 Xylopon 45 Chimes 46 Dulcimer 47 Drawbar Organ 48 Jazz Organ1 49 Rock Organ 1 50 Church Organ 1 51 Reed Organ 52 Musette 53 Harmonica 54 Tango Accordion 55 Nylon Guitar 56 Steel Guitar 57 Jazz Guitar 58 Clean Guitar 1 59 Muted Guitar 60 Overdrive Guitar 61 Distort. Guitar 62 GtR Harmonics 63 GENERAL MIDI Acoustic Bass 1 Finger Bass Pick Bass Fretless 1 Slap Bass 1 Slap Bass 3 Synth Bass 1 Synth Bass 2 Violin 1 Viola Violoncello Double Bass Tremolo Strings Pizzicato Harp Timpani Str Ensamble 1 Str Ensamble 2 Synth Strings 1 Synth Strings 2 Choir Aah Voice Ooh Syn Voice Orchestra Hit Trumpet 1 Trombone 1 Tuba Mute Trumpet French Horn 1 Brass Syn Brass 1 Syn Brass 2 PG 64 65 66 67 68 69 70 71 72 73 74 75 76 77 78 79 80 81 82 83 84 85 86 87 88 89 90 91 92 93 94 95 GENERAL MIDI Soprano Sax Alto Sax 1 Tenor Sax Baritone Sax Oboe English Horn Bassoon Clarinet 1 Piccolo Flute Recorder Pan Flute Blow Bottle Shakuhachi Wistle Ocarina Square 1 Sawtooth 1 Calliope Chiff Charang Voice Fifths Bass Lead 1 Fantasy 1 Warm Pad Polysynth Choir Bowed Metallic Halo Sweep PG 96 97 98 99 100 101 102 103 104 105 106 107 108 109 110 111 112 113 114 115 116 117 118 119 120 121 122 123 124 125 126 127 GENERAL MIDI Rain Soundtrack Crystal Atmosphere 1 Brightness Goblins Echoes Sci-fi Sitar Banjo Shamisen Koto 1 Kalimba Bag Pipe Fiddle Shanai Tinkle Bell Agogo Steel Drum Woodblock Taiko Drum Melodic Tom 1 Synth Drum 1 Reverse Cymbal Guitar Fretnoise Breath Noise Seashore Bird Tweet Telephone 1 Helicopter Applause Gunshot SOUND VARATIONS (all channels except 10) PC: Program Change CC0: Bank Select MSB w: pan type sound (low notes sent to left, high notes left to right) d: other velocity response v: velocity split type sound o: special release on sound 32*: this variation can also be obtained by sending varation #24 PG CC0 1st VARIATION CC0 2nd VARIATION 0 8 Piano 1w 10 Piano 1d 4 8 Detuned El. Piano 1 16 Electric Piano 1v 5 8 Detuned El. Piano 2 16 Electric Piano 2v 6 8 Coupled Hps. 14 8 Church Bell 9 Carillon 16 8 Detuned Organ 1 16 60's Organ 1 17 8 Detuned Organ 2 19 8 Church Organ 2 16 Church Organ 3 21 8 Accordion (italian) 24 8 Ukelele 16 Nylon Guitar o 25 8 12 Strings Guitar 16 Mandolin 26 8 Hawaiian Guitar 27 8 Chorus Guitar 28 8 Funk Guitar 16 Funk Guitar 2 30 8 Feedback Guitar 31 8 Guitar Feedback 33 8 Finger Bass 2 34 8 Picked Bass 2 38 1 Syn Bass 101 8 Synth Bass 3 39 8 Synth Bass 4 16 Rubber Bass 40 8 Slow Violin 48 8 Orchestra 50 8 Syn Strings 3 52 32* Choir Aahs 2 54 8 Synth Voice 2 57 1 Trombone 2 60 1 Fr. Horn 61 8 Brass 2 62 8 Syn Brass 3 16 Analog Brass 1 63 8 Syn Brass 4 16 Analog Brass 2 80 1 Square 2 8 Sine Wave 81 1 Saw 8 Doctor Solo 85 8 Lead Voice 2 91 8 Pad Choir CC0 3rd VARIATION 24 60's Electric Piano 24 Harpsi o 32* Organ 4 32* Organ 5 32* Nylon Guitar 2 137 PG CC0 1st VARIATION 98 1 Syn Mallet 100 8 Brightness 2 101 8 Goblins 2 102 1 Echo Bell 104 1 Sitar 2 107 8 Taisho Koto 115 8 Castanes 116 8 Concert BD 117 8 Melodic Tom 2 118 8 808 Tom CC0 2nd VARIATION 2 Echo Pan 9 Electric Perc 1 CC0 3rd VARIATION EFFECT VARIATIONS PG 120 121 122 123 124 125 126 127 CC0=1 Guitar Cut Noise Fl. Key Click Rain Dog Telephone 2 Car Engine Start Laughing Machine-gun PG CC0=6 120 121 122 123 124 125 Train 126 127 138 CC0=2 CC0=3 CC0=4 CC0=5 String Slap Thunder Wind Horse Gallop Bird 2 Door Creaking Door Closing Stream Bubble Scratch Wind Chime Car Breaking Car Pass Car Crash Police Siren Screaming Lasergun Punch Exposion Heart Beat Footstep CC0=7 Jet Takeoff CC0=8 Starship CC0=9 Burst Noise DRUM SET (MIDI channel 10) 27 - D#1 28 - E1 29 - F1 30 - F#1 31 - G1 32 - G#1 33 - A1 34 - A#1 35 - B1 36 - C2 37 - C#2 38 - D2 39 - D#2 40 - E2 41 - F2 42 - F#2 43 - G2 44 - G#2 45 - A2 46 - A#2 47 - B2 48 - C3 49 - C#3 50 - D3 51 - D#3 52 - E3 53 - F3 54 - F#3 55 - G3 56 - G#3 57 - A3 58 - A#3 59 - B3 60 - C4 61 - C#4 62 - D4 63 - D#4 64 - E4 65 - F4 66 - F#4 67 - G4 68 - G#4 69 - A4 70 - A#4 71 - B4 72 - C5 73 - C#5 74 - D5 75 - D#5 76 - E5 77 - F5 78 - F#5 79 - G5 80 - G#5 81 - A5 82 - A#5 83 - B5 84 - C6 85 - C#6 86 - D6 87 - D#6 88 - E6 Prog 1: HQ STD SET1 High Q Slap Scratch Push Scratch Pull Sticks Square Click Metronome Click Metronome Bell HQ STD1 Kick2 HQ STD1 Kick1 Side Stick HQ STD1 Snare1 Hand Clap Snare Drum2 HQ Low Floor Tom Closed Hi Hat [EXC1] HQ High Floor Tom Pedal Hi Hat [EXC1] HQ Low Tom Open Hi Hat [EXC1] HQ Low Mid Tom HQ Hi Mid Tom Crash Cymbal 1 HQ High Tom Ride Cymbal1 Chinese Cymbal Ride Bell Tambourine Splash Cymbal Cowbell Crash Cymbal 2 Vibraslap Ride Cymbal 2 Hi Bongo Low Bongo Mute High Conga Open High Conga Low Conga High Timbale Low Timbale High Agogo Low Agogo Cabasa Maracas Short Whistle [EXC2] Long Whistle [EXC2] Short Guiro [EXC3] Long Guiro [EXC3] Claves High Wood Block Low Wood Block Mute Cuica [EXC4] Open Cuica [EXC4] Mute Triangle [EXC5] Open Triangle [EXC5] Shaker Jingle Bell Belltree Castanets Mute Surdo [EXC6] Open Surdo [EXC6] Prog 2: HQ STD SET2 HQ STD2 Kick2 HQ STD2 Kick 1 Prog 9: HQ ROOM SET HQ Room Kick2 HQ Room Kick1 HQ STD2 Snare1 HQ ROOM Snare1 HQ STD Snare2 Prog 17: HQ POWER SET Prog 25: HQ ELEC. SET HQ Power Kick2 HQ Power Kick1 HQ Elect Kick2 HQ Elect Kick1 Gated Snare Elec SD HQ Room Snare1 HQ Power Snare1 HQ Elec Snare1 HQ Power Low Tom2 HQ Power Low Tom2 Elec Low Tom2 HQ Power Low Tom1 HQ Power Low Tom1 Elec Low Tom1 HQ Power Mid Tom2 HQ Power Mid Tom2 Elec Mid Tom2 HQ Power Mid Tom1 HQ Power Mid Tom1 Elec Mid Tom1 HQ Power High Tom2 HQ Power High Tom2 Elec High Tom2 HQ Power High Tom1 HQ Power High Tom1 elec High Tom1 Reverse Cymbal 139 Prog 26: HQ TR808 SET 27 - D#1 28 - E1 29 - F1 30 - F#1 31 - G1 32 - G#1 33 - A1 34 - A#1 35 - B1 36 - C2 37 - C#2 38 - D2 39 - D#2 40 - E2 41 - F2 42 - F#2 43 - G2 44 - G#2 45 - A2 46 - A#2 47 - B2 48 - C3 49 - C#3 50 - D3 51 - D#3 52 - E3 53 - F3 54 - F#3 55 - G3 56 - G#3 57 - A3 58 - A#3 59 - B3 60 - C4 61 - C#4 62 - D4 63 - D#4 64 - E4 65 - F4 66 - F#4 67 - G4 68 - G#4 69 - A4 70 - A#4 71 - B4 72 - C5 73 - C#5 74 - D5 75 - D#5 76 - E5 77 - F5 78 - F#5 79 - G5 80 - G#5 81 - A5 82 - A#5 83 - B5 84 - C6 85 - C#6 86 - D6 87 - D#6 88 - E6 140 Prog 27: HQ DANCE SET HQ 909 BD HQ 808 BD 808 Rim Shot 808 Snare Drum HQ Dance Kick HQ Elec Kick2 HQ 909 Snare 808 Low Tom2 808 CHH [EXC1] 808 Low Tom1 808 CHH [EXC1] 808 Mid Tom2 808 OHH [EXC1] 808 Mid Tom1 808 Hi Tom2 808 Cymbal 808 Hi Tom1 HQ Dance Snare1 Elec Low Tom2 808 CHH [EXC1] Elec Low Tom1 808 CHH [EXC1] Elec Tom2 808 OHH [EXC1] Elec Mid Tom1 Elec Hi Tom2 HQ Dance Snare1 Elec Hi Tom1 Reverse Cymbal 808 Cowbell 808 High Conga 808 Mid Conga 808 Low Conga 808 Maracas 808 Claves Prog 33: JAZZ SET Jazz BD2 Jazz BD1 Prog 41: BRUSH Prog 49: ORCHESTRA Closed Hi Hat Pedal Hi Hat Open Hi Hat Ride Cymbal Jazz BD2 Jazz BD1 Concert BD2 Concert BD1 Brush Tap Brush Slap Brush Swirl Concert SD Castanets Concert SD Timpani F Timpani F# Timpani G Timpani G# Timpani A Timpani A# Timpani B Timpani C Timpani C# Timpani D Timpani D# Timpani E Timpani F Prog 57: SFX SET * * * * * * * * * * * High Q Slap Scratch Push Scratch Pull Sticks Square Click Metronome Click Metronome Bell Guitar Slide Gt Cut Noise (down) Gt Cut Noise (up) Double Bass Up Key Click Laughing Screaming Punch Heart Beat Footsteps1 Concert Cymbal2 Footsteps2 Applause Concert Cymbal1 Door Creaking Door Closing Wind Chime Car Engine Start Car Pass Car Breaking Car Pass Car Crash Police Siren Train Jet Take-off Helicopter Startship Gun Shot Machinegun Lasergun Explosion Dog Horse Gallop Birds Rain Thunder Wind Sea Shore Stream Bubble * * * Applauses * 27 - D#1 28 - E1 29 - F1 30 - F#1 31 - G1 32 - G#1 33 - A1 34 - A#1 35 - B1 36 - C2 37 - C#2 38 - D2 39 - D#2 40 - E2 41 - F2 42 - F#2 43 - G2 44 - G#2 45 - A2 46 - A#2 47 - B2 48 - C3 49 - C#3 50 - D3 51 - D#3 52 - E3 53 - F3 54 - F#3 55 - G3 56 - G#3 57 - A3 58 - A#3 59 - B3 60 - C4 61 - C#4 62 - D4 63 - D#4 64 - E4 65 - F4 66 - F#4 67 - G4 68 - G#4 69 - A4 70 - A#4 71 - B4 72 - C5 73 - C#5 74 - D5 75 - D#5 76 - E5 77 - F5 78 - F#5 79 - G5 80 - G#5 81 - A5 82 - A#5 83 - B5 84 - C6 85 - C#6 86 - D6 87 - D#6 88 - E6 Prog 65: STANDARD SET High Q Slap Scratch Push Scratch Pull Sticks Square Click Metronome Click Metronome Bell Kick Drum2/Jazz BD2 Kick Drum1/Jazz BD1 Side Stick Snare Drum1 Hand Clap Snare Drum2 Low Floor Tom Closed Hi Hat [EXC1] High Floor Tom Pedal Hi Hat [EXC1] Low Tom Open Hi Hat [EXC1] Low Mid Tom Hi Mid Tom Crash Cymbal 1 High Tom Ride Cymbal1 Chinese Cymbal Ride Bell Tambourine Splash Cymbal Cowbell Crash Cymbal 2 Vibraslap Ride Cymbal 2 Hi Bongo Low Bongo Mute High Conga Open High Conga Low Conga High Timbale Low Timbale High Agogo Low Agogo Cabasa Maracas Short Whistle [EXC2] Long Whistle [EXC2] Short Guiro [EXC3] Long Guiro [EXC3] Claves High Wood Block Low Wood Block Mute Cuica [EXC4] Open Cuica [EXC4] Mute Triangle [EXC5] Open Triangle [EXC5] Shaker Jingle Bell Belltree Castanets Mute Surdo [EXC6] Open Surdo [EXC6] Prog 73: ROOM SET Prog 81: POWER SET Prog 89: ELECTR. SET Power Kick Elec BD Gated Snare Elec SD Room Low Tom2 Room Low Tom2 Gated Snare Elec Low Tom2 Room Low Tom1 Room Low Tom1 Elec Low Tom1 Room Mid Tom2 Room Mid Tom2 Elec Mid Tom2 Room Mid Tom1 Room Hi Tom2 Room Mid Tom1 Room Hi Tom2 Elec Mid Tom1 Elec Hi Tom2 Room Hi Tom1 Room Hi Tom1 Elec Hi Tom1 Prog 90: TR-808 SET 808 Bass Drum 808 Rim Shot 808 Snare Drum 808 Low Tom2 808 CHH [EXC1] 808 Low Tom1 808 CHH [EXC1] 808 Mid Tom2 808 CHH [EXC1] 808 Mid Tom1 808 Hi Tom2 808 Cymbal 808 Hi Tom1 Reverse Cymbal 808 Cowbell 808 High Conga 808 Mid Conga 808 Low Conga 808 Claves 141 MIDI IMPLEMENTATION CHART Voice Systems Galileo Multimedia Player Date: 18/06/03 Version: 1.0 FUNCTION TRANSMITTED RECOGNIZED REMARKS 1-16 X BASIC DEFAULT *1 X X CHANNEL CHANGED Mode 3 X Default MODE X X Messages ****** X Altered 0-127 X *1 NOTE True Voice NUMBER O X Note ON *1 VELOCITY O X Note OFF O X *1 AFTERTOUCH Key's O X Ch's O X *1 PITCH BENDER O X *1 CONTROL O X CHANGE O X PROGRAM CHANGE *1 O X *1 SYSTEM EXCLUSIVE X X Song Pos SYSTEM O X Song Sel COMMON X X Tune O X Clock SYSTEM X O Commands REAL TIME X X Local On-Off AUX O X All note off MESSAGES O X Active Sense X X Reset NOTES: *1: These messages are transmitted to the MIDI OUT port if Router function is setted as External for the specific channel Mode 1: OMNI ON, POLY Mode 3: OMNI OFF, POLY Mode 2: OMNI ON, MONO Mode 4: OMNI OFF, MONO 143 NOTE: This equipment has been tested and found to comply with the limits for a Class B digital Device, persuant to Part 15 if the FCC Rules. These limits are designed to provide reasonable protection against harmful interference in a residential installation. This equipment generates, uses and can radiate radio frequency energy and, if not installed and used in accordance with the instruction, may cause harmful interference to radio comunications. However, there is no guarantee that the interference will not occur in a particular installation. If this equipment does cause harmful interference to radio or television reception, which can be determinated by turning the equipment off and on, the user is encuraged to try to correct the interference by one or more of the following measures: - Reorient or relocate the receiving antenna. Increase the separation between the equipment and receiver. Connect the equipment into an outlet on a circuit different from that to which the receiver is connected. Consult the dealer or an experienced Radio/Tv technician for help. The user is cautioned that any changes or modification not expressly approved by the party responsable for compliance could void the user’s authority opearate the equipment. Sales Division: Via Borgo, 68 / 70, I-47836 Mondaino (RN) Italy tel.+39-0541-981700 - fax +39-0541-869605 e-mail: [email protected] - Internet: www.viscount-organs.com - www.viscount.it Distribution for Italy: TITAN MUSIC S.A. Strada Genghe di Atto, 80 - 47031 Acquaviva – Repubblica di San Marino tel.0549-999164 - fax 0549-999490 e-mail: [email protected] - Internet: www.viscount-organs.com - www.viscount.it