1
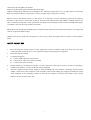
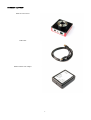
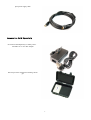
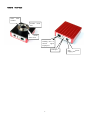
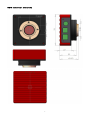
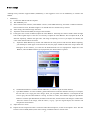
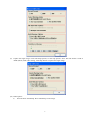
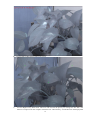
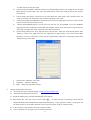
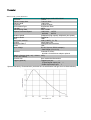
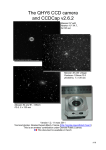
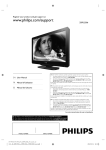
IMG1S CCD user manual
Version V1.2
CONTENT
SAFETY PRECAUTIONS................................................................................................................................................. 1
STANDARD EQUIPMENT............................................................................................................................................. 2
Accessories Sold Separately............................................................................................................................................. 3
Camera Interface................................................................................................................................................................. 4
Camera Software Installation............................................................................................................................................. 5
DC201 Input Voltage Range............................................................................................................................................. 5
Service Temperature and Humidity of Camera................................................................................................................. 5
How to avoid CCD sensor moisture in high humidity environments................................................................................ 5
Notes about Long term use camera and Remote Observatory........................................................................................ 5
About controlling for BLOOMING................................................................................................................................. 6
Clean the surface of CCD chip and the glass window.................................................................................................... 6
Setting GAIN and EXP..................................................................................................................................................... 6
IMG1S mechanical dimensions......................................................................................................................................... 7
Simple usage..................................................................................................................................................................... 8
MaxIm DL Image Measure.................................................................................................................................................12
IMG1S CCD Image Calibration......................................................................................................................................... 13
Guiding by using IMG1S (for astronomic photography)................................................................................................ 15
Parameter......................................................................................................................................................................... 17
Welcome to take the QHYCCD product.
Before using the camera please read this manual carefully.
IMG1S is designed for industrial test, biographical test, laboratory image and so on, it is high sensitive. The sample
depth is 14 bit(monochrome) / 42 bit(color version), the light range of one pixel is 0-16383.
IMG1S’s CCD is the SONY Exview 1/2 inch frame. It is progressive. Exview technology improves the shape of
microlens on the CCD, to increase the sensitivity under the near infrared band (700-1000nm). IMG1S builds in the
TEC, to decrease the hot noise. It also possess the low speed read out mode, this mode increase the SNR of the image,
so IMG1S is also suit for using in dark environment.
IMG1S possesses the high-speed USB2.0 port to transfer the data between CCD camera and computer. It can export the
14bit no compressive RAW images.
IMG1S possesses the guide port, the protocol is ST-4, using a RJ11 6pin guide cable to connect it with equatorial
mount.
SAFETY PRECAUTIONS
1.
2.
3.
4.
5.
The CCD chip and cooling system are more fragile than a small or medium sized CCD. Take extra care when
transporting and storing the device. Any significant impacts may damage your equipment.
Keep clear with the radiator.
Connection Sequence:
(1) Connect USB cable from camera to PC
(2) Connect 9-pin cable from camera to DC201
(3) Connect 12V power to DC201.
Internal diameter of connection to DC201 is 2.1mm. The inner of the plug is positive, the outer of the plug is
cathode. If the polarity is wrong, the DC201 may be damaged.
Note the computer and the AC/DC adapter is earth grounding well. The computer’s grounding and the AC/DC
adapter’s must be the same. Otherwise, if the computer or the AC/DC adapter get creepage, the USB port will be
easily damaged. If the grounding couldn’t be assured, the computer’s shell and the cathode of the AC/DC
adapter’s must be connect with a wire.
1
STANDARD EQUIPMENT
IMG1S CCD camera
USB cable
IMG1S DC201 DC adapter
2
9pin power supply cable
Accessories Sold Separately
Accessories Sold Separately is sold by zones.
100-240V AC to 12V DC Adapter
Full Air proof box with electric heating silicon
gel
3
Camera Interface
Glass filter
window
Camera
Part
Front
C
mount
inner screw
Guiding Port or
control
signal
output port
USB port
4
9pin
power
supply port
Camera Software Installation
1.
2.
3.
4.
5.
6.
7.
Run the driver install program.
Connect the IMG1S with the computer. Do not connect the 9pin cable now.
System will find new device. Wait till installation finished(In XP select “No”->”Next Step”->”Install automaticly.
Use 9pin power cable connect DC201 and IMG1S. Please note the side with EMC ring should connect to DC201.
Connect DC201 with 12V input. The LED of DC201(+15,-15.+5) should be on.
Run the EZPlantary program , choose “camera-scan camera”, now the IMG1S will be on, click one resolution,
the realtime image will show.
There are 4 LEDs in the camera, if the guiding port is in use, they will be on, otherwise they are off.
DC201 Input Voltage Range
The DC201 requires a regulated 12V input. The normal input range is 11V-13V. If you exceed 13V common when you
are using an external battery, the higher voltage will reduce the life of the TEC and Fan. If you exceed 13V, please limit
the maximum power of your Cooling Settings. The power of the IMG1S is 10W if the TEC is on, so the power supply
should be 12V and exceeds 2A.
Service Temperature and Humidity of Camera
Service Temperature of this camera is from -20C/-4F to +30C/86F.
Relative Humidity amount is from 0% to 90%.
How to avoid CCD sensor moisture in high humidity environments
In certain environments, when the temperature of the camera drop below the dew-point, dew or ice may form on the
camera. This is simply a law of nature. However, ice and/or dew which form on the surface of CCD chip or optic
window will impact your images. If dew or ice forms on the surface of CCD, the water can flow onto the electric board,
which leads to short circuit or data corruption. It is critical that you avoid dew or ice formation during operation on the
CCD chip. However, the TEC’s power of IMG1S is low, the dew hardly appear. If the dew appear on the glass window,
you must stop IMG1S working immediately. If the dew appear on CCD chip, it means the camera is not airproof. You
should open the camera in a dry environment, wait for the chip dry, and seal the camera. Note: the camera must be
opened in a dry environment, if the air contain water, it maybe appears dew again.
Notes about Long term use camera and Remote Observatory
If you have to keep the camera working for a long time or the camera is working in a remote observatory, please note
the safe notice, and we recommend that you consult your area dealer for more details.
5
Note: Don’t supply power to the CCD for several days or even weeks if possible. Use a power controller to control 12V
input or AC input.
About controlling for BLOOMING
IMG1S CCD chip have the -110dB anti-overflow foundation. Generally, the overflow is blocked. But it is possible to
overflow for shooting very bright target. So if it is controllable, it must avoid photo the very bright target.
Clean the surface of CCD chip and the glass window
If dust coats the surface of the CCD-it will impact the your images and possible create “dust donuts” and other artifacts.
If there is only a small amount of dust, we suggest just using flat fields calibration to remove them.
How to clean the glass window?
1. Get off the len
2. Use the air-blowing to clean the glass window. If the dust is tightness, use the cleaner for DSLR to clean. Note: do
not use the lens paper, because the filter covers coating, the lens paper will easily damage it.
How to clean the CCD chip?
1. Open the camera in a dry enviroment
2.
Use the air-blowing to clean the glass window. If the dust is tightness, use the cleaner for DSLR to clean.
3.
Seal the camera in a dry environment. Note: It must be seal in a dry environment, because if the air contain water,
the camera maybe get dew when using.
Setting GAIN and EXP
User can setting QHYCCD’s gain and expose time.
GAIN is the gain of the ADC’s amplifier, the range is 0-67. EXP is the expose time for one frame. Good setting will get
good dynamic range.
6
IMG1S mechanical dimensions
7
Simple usage
Although many softwares support IMG1S, EZPlantary is the suggestion. You can use EZPlantary to examine the
IMG1S.
1. EZPlantary
(1) Connect the IMG1S and the computer.
(2) Run EZPlantary.exe
(3) Select Camera-Scan Camera, if the IMG1S is shown, select IMG1S directly, and select a suitable resolution.
The resolution is lower, the FPS is higher. User should choose a suitable one by real fact.
(4) After setting, the realtime image will show.
(5) Adjust the GAIN and the EXP, the image will be realtime.
(6) If using the color version of IMG1S, adjust the Color Balance. Generally, the camera couldn’t show the right
color of the original object’s color. So it’s necessary to adjust the Color Balance. We can adjust the R, G, B
channels separately, calibrate the right color. The range of adjusting is 0-63. If you adjust one channel, the
color of the channel will be increased.
a) Adjust the White Balance by manual: The method is the most precision and universal. Before adjusting,
you should put a white paper in the head of the lens, the paper should fill full in the image. Watch the
Histogram in the software, you could see the RGB channels are not superposition. Adjust the Color
Balance, when the RGB channels get superposition, the white balance is perfect.
b)
c)
Global White Balance: Click the Global WB button, it will auto adjust the white balance.
Spot White Balance: In some condition, global white balance could not calibrate correctly. For example,
the red color is in a large part of the image, when you use global white balance, it will adjust the red
color to gray, thus the white balance is wrong. In order to avoid it, the software supply the Spot White
Balance. Click the Spot WB button, the button will turn blue, and the mouse will change to a little hand.
Move the mouse to the image, click the white ( or gray ) part for original object, the software will
compute the white balance.
(7) Adjust the lens in focus.
(8) Capture the non-compressed video: Click File-Video Record Options, set the record options. Note: The FIT
format is used in RAW (Mono) mode. After setting, click REC button to record video.
8
(9) Capture the single image: Click File-Snap Options, set the snap options. Note: The FIT format is used in
RAW (Mono) mode. After setting, click Snap button to capture the single image.
(10) Other options:
a)
Favorite-Show TimeStamp: Show TimeStamp on the image.
9
b)
c)
Favorite-Show OSD: Show OSD on the image.
Favorite-High Priority Disk Write: This item will increase the priority on writing files into disk. The
function is improved for the computer which has less video memory. It could decrease the display FPS
10
d)
e)
f)
g)
h)
i)
j)
k)
2.
to make sure the writing file speed.
Camera Setup-Color/Mono: Different camera uses different Bayer Pattern. We should choose the right
Bayer Pattern to get the right color. Note: The RAW (Mono) mode uses no Bayer Pattern, the image is
monochrome.
Camera Setup-14bit Image: Choose this item will capture the 14bit image. Note: With this item, the
image is monochrome, the format is FIT, and the read speed is low speed.
Camera Setup-High Speed Readout: Choose this item will use the high speed read out. It will cost more
system resources, and increase the noises.
Camera Setup-SDRAM bypass: Choose this item will not use the SDRAM. If use the SDRAM,
capturing will more continuous, and the FPS will be higher, but the noise will increase at the same time,
the image will appear the stripe, especially in the dark environment.
Camera Setup-Camera Fine Tone: Open the Fine Tone windows, adjust the CCD Timing and the ADC
Timing to improve the SNR. The first two adjustment of ADC Timing is the most useful. When
adjusting, cover the CCD camera, set the gain to a high number, adjust the CCD Timing and the ADC
Timing to improve the SNR.
Screen Zoom: Adjust the zoom ratio.
Language: Select the language.
Help: Show help and about message.
MaxIm DL ASCOM Connection
(1) Download the newest ASCOM software in http://ascom-standards.org/.
(2) Install the ASCOM platform software.
(3) Install the IMG1S driver and the ASCOM plug-in for IMG1S.
(4) Run MaxIm DL, click the camera control button
, in Setup window, click Setup Camera-Camera
Model-ASCOM-Advanced-IMG1S/2S StarSenseSci-Properties, in the properties window, set the gain and
the offset and so on. Click OK to back the Camera Control window, click the Connect button.
(5) In the Camera Control window, choose the Expose window.
(6) Choose Find Star, set the expose time in the Second textbox.
11
(7)
(8)
(9)
(10)
(11)
3.
Click the Option-No Calibration.
Set the bin mode. For IMG1S, the X=1 and Y=1.
Click Start button to start capture.
After capture, the image will show. Adjust the Screen Stretch simply to get a suitable image.
After capture, the image is the RAW format, it is monochrome. In MaxIm DL, choose Color-Convert Color,
set the OFFSET X=0, Y=0, choose Generic RGB in Select Camera. Watch the result in the preview window.
If the color is not right, change the OFFSET and the type of camera.
AstroART ASCOM Connection
(1) Download the newest ASCOM software in http://ascom-standards.org/
(2) Install the ASCOM platform software.
(3) Install the IMG1S driver and the ASCOM plug-in for IMG1S.
(4) After install AART3.0, install AART4.0 update. Copy the piccdgui.dll into the AART directory, the
piccdgui.dll could be downloaded from the AART website.
(5) Run AstroART, Choose Plug-in-CCD Camera. In the Setup window, choose Imaging/GuideCamera as
ASCOM, click SETUP button, choose IMG1S/2S StarSenseSci. Click the Properties button, set the GAIN
and the OFFSET.
(6) If IMG1S connects successfully, AART will show the temperature window, set the Target number.
(7) Set bin mode in the Setting window of CCD control window.
(8) Set the expose time in the CCD control window. Click START to capture.
(9) In the 1*1 bin mode, in order to get the colorful image, you should choose color-CCD Color Synthesis. Select
RGB image and suitable X Y OFFSET to get it.
MaxIm DL Image Measure
The FIT images could be measured in MaxIm DL.
Run MaxIm DL, choose View-Screen Stretch, or click
button, to show Screen Stretch window. Adjust the little
triangles, the image’s luminance will be changed. Note: The Screen Stretch tool only changes the image’s screen
luminance, the original image’s luminance could not be changed.
Choose View-Information Window, or click
, to open the Information window. The mouse across the image will
change to a 3-concentric circles. In the Information window, choose the Mode Aperture first, now you can see some
information.
12
1.
Cursor : Aperture mode shows statistics on the area under the circular cursor as the mouse is moved around
the image. The current Cursor position and inner and outer radii are shown at the top. The Pixel value directly
under the cursor is also shown.
2. The following measurements are made only within the aperture (inner circle): the Maximum, Minimum,
Median, Average, and standard deviation (Std Dev).
(1) Pixel: Show the pixel luminance in the center.
(2) Maximum: Show the brightest pixel’s luminance.
(3) Minimum: Show the darkest pixel’s luminance.
(4) Median: Show the median of the pixel’s luminance in the inner circle.
(5) Average: Show the average of the pixel’s luminance in the inner circle.
(6) Std Dev: Show the standard deviation of the pixel’s luminance in the inner circle.
3. The following measurements are made inside the aperture after first subtracting the average value in the
annulus (between the middle and outer circles).
(1) Magnitude: As calibrated using the Calibrate button. (For astronomy).
(2) Intensity: Sum of all pixels within aperture less background.
(3) SNR: SNR is calculated as the ratio of intensity to the standard deviation of the background times the
square root of the number of pixels.
4.
The following measurements are made using only the background annulus (between the middle and outer
circles)
(1) Bgd Avg: Show the average of the background luminance.
(2) Bgd Dev: Show the deviation of the background luminance.
If you want to see more information, please watch the MaxIm DL user manual.
IMG1S CCD Image Calibration
Image calibration means to calibrate the CCD with a BIAS field, a DARK field and a FLAT field. You can completely
remove thermal noise of the CCD through proper calibration. Additionally, you can obtain better image highlights. You
can remove dark spots which are caused by dust on the surface of the CCD. Image calibration is a critical step for
serious astronomical photography.
In order to obtain accurate calibration information, you need to use the IMG1S temperature controller. CCD should be
set in fixed temperature state. And temperature should remain the same when shooting.
The Calibration Principle of CCD Image:
Calibrated image=[(L-B)-(D-B)]/(F-B)=(L-D)/(F-B)
13
There, L is the actual shooting image, D represents the Dark Frame images, B represents BIAS image and F means the
FLAT image.
1.
Capture BIAS Image
BIAS image means exposure time of images is Zero. You need avoiding any light to enter into CCD Sensor when you
shoot image. So you have to cover the lens cap of camera.
Set Exposure Time to 0, and then use the low speed to shoot many (10 -50 sheets) BIAS image. Save and overlap
them .Use the function of average overlapping, do not match with position to get one BIAS Master image. Save this
image.
Partial Cropped BIAS Image ( B )
2. Capture DARK Image
DARK Image means the image which of the exposure time is the same as the time it took officially. You have to avoid
any light enter into CCD sensor. Therefore you have to cover the lens lid.
The exposure time should be set the same with shooting time .and then use the low speed
and mode 1 * 1 to shoot about (10 -50 sheets) BIAS image. Save and overlay these images to form a Dark Master
image. Save the image.
Partial Cropped DARK Image (D)
14
DARK image which be calibrated by BIAS Field ( D-B )
3. Capture FLAT Image
FLAT image can be used to rectify the problem of the center light but the edge dark which caused by the vignette of
optical system. It also can be corrected the problem due to some small dust on the CCD sensor glass surface.
Flat-field calibration method is this: you need uniform luminous lightbox. The lightbox will be placed in front of the
telescope. You would set the appropriate exposure time, then continuous shoot 10-50 frame flat-field images. Save and
overlay these images to form a FLAT Master image, save the image.
To obtain an accurate flat-field calibration, Please note the following matters:
You have to take immediately flat-field images before the shooting or after finishing shooting. Like do this in order to
avoid dismantling the device, dust on CCD surface and vibration of CCD cause the change of location. The scope of
exposure is better for 30% of the maximum dynamic range , which means you have gotten 20000-30000 pixel of flatfield image.
Images of BIAS Master, DARK Master and FLAT Master will be calibration data as image post-processing of the
captured images.
Guiding by using IMG1S (for astronomic photography)
IMG1S contains a guiding spot, it can be used as a guiding CCD with ASCOM. IMG1S uses 1*1 bin and normal
download speed default.
1. Guiding by using IMG1S in MaxIm DL
(1) Download the newest ASCOM software in http://ascom-standards.org/.
(2) Install the ASCOM platform software.
(3) Install the IMG1S driver and the ASCOM plug-in for IMG1S.
(4) Connect IMG1S and computer with the guide cable.
(5) Run MaxIm DL, click the camera control button
, generally, it uses Camera2 to guide. In the camera2’s
Setup window, click Setup Camera-Camera Model-ASCOM-Advanced-IMG1S/2S StarSenseSci-Properties,
in the properties window, set the gain and the offset and so on. Click OK to back the Camera Control
15
(6)
(7)
(8)
(9)
(10)
(11)
(12)
(13)
(14)
(15)
(16)
(17)
2.
(1)
(2)
(3)
(4)
window, click the Connect button.
In the Camera Control window, choose the Guide option group.
Set expose time in Seconds textbox. The unit is second.
Click Settings, open the Guider Settings window, choose Settings-Exposure Settings-Reset, reset the image
area to the largest. Click OK.
Choose Expose option group, click Start button to take an image.
Adjust the Screen Stretch tool to adjust the luminance.
Click the Setting button again, open the Guider Setting window, select an area in the image, the area is the
guide area you will use.
Choose Expose option group, click the Start button to take an image. The image is the selected area.
Find a star in the image, select it by dragging.
Click Calibrate button, to calibrate the equatorial mount.
After calibration, choose Options-No Calibration.
Choose Track option group, click Start button to start guiding. When guiding, the 4 LEDs on the back of
IMG1S will on, they are the 4 guiding directions.
You can watch the guiding curves by clicking the graph button.
Guiding by using IMG1S in PHD
Download the newest ASCOM software in http://ascom-standards.org/.
Install the ASCOM platform software.
Install the IMG1S driver and the ASCOM plug-in for IMG1S.
Connect IMG1S and computer with the guide cable.
(5) Run PHD, choose Connect to Camera (
)-ASCOM v5 camera, click OK to watch ASCOM Camera
Chooser window, choose IMG1S/2S StarSenseSci, then click Properties button, set GAIN and so on. Click
OK to come back.
(6) Choose Mount-On Camera, then click Connect to telescope (
(7) Click
) button.
button, start exposing. At the right of the button, you can change the expose time with the Pull-
Down Menu, and adjust the screen luminance with the Screen Gamma slider.
(8) Find a star in the realtime video, click it, PHD will choose the star by a green square frame.
(9) Click
to start guiding. When guiding, the 4 LEDs on the back of IMG1S will on, they are the 4
guiding directions.
(10) You can watch the guiding curves by choosing Tools-Enable Graph.
16
Parameter
IMG1S CCD Camera Parameter
CCD sensor
CCD size
Effective Image Area
Effective pixel
Pixel size
CCD readout Type
Full Well
Anti Blooming Gate
Capture Download Speed
Readout speed
Readout Noise
ADC
ADC (color version)
Cooling
Maximum Delta T
Power
Input voltage
Interface
Weight (Camera body only, without
DC201 and cables)
Camera size
Trigger (optional)
SONY Super HAD CCD ICX267
1/2inch
7.6mm*6.2mm
1360*1024
4.65μm*4.65μm
Progressive Scan
25KeYes, -110dB
1360*1024 14FPS
640*480
25FPS
24Mpixel/s (high speed) 12Mpixel/s (low speed)
Typical 8e14bit
42bit (14bit*R,G,B)
single stage TEC
30 degree below ambient
10W
DC12V (Input to DC201 adapter)
Safe Range (11V-13.5V)
Industrial C-mount
NIKON & CANON lens adapter optional
267g
See mechanical dimensions
Trigger input port
1
Expose signal output port 1
Guide signal output port
1
Spectral Sensitivity Characteristics (excludes lens characteristics and light source characteristics)
17