1
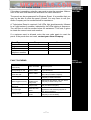
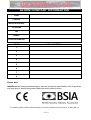
USER MANUAL SECURIT 900C CONTROL PANEL COMPANY PROFILE IntelliSense have been successfully making security products for over 20 years and lead the security industry throughout the world with many innovative and class-leading products. We pride ourselves with quality and cost-effective products like this Securit 900C control panel. IntelliSense would like to thank you for the purchase of this control panel. Ask your Alarm Company about the other great products we produce for the security industry. We are world leaders in Dual Technology Sensors, PIRs, External Sounders and Breakglass Sensors. WARNINGS This product has mains voltage present within the housing. Please take the necessary precautions in not allowing any liquid to spill on or into the housing. There are no user serviceable parts inside this product. STANDARDS This unit conforms to EMC directive 89/336/EE, LVD 73/23/EEC & R&TTE (CTR21). This unit has been tested to the required standards for emission, immunity and LVD regulations as set out by the EU. This unit conforms to the requirements of BS 4737 part 1 1986 which relates to security control equipment. PRODUCT DESCRIPTION The control panel is an 8 zone programmable microprocessor controlled unit using state-of-the-art technology and building techniques. The panel has many advanced features that are normally only found on more expensive units. There are many options in the programming functions to allow the panel to be versatile and user friendly. This allows the panel to be the ideal choice of your Alarm Company. This product has been carefully designed and tested to give many reliable years of service. Please ensure that the alarm system is regularly serviced at least once a year by your Alarm Company. —2— SETTING THE SYSTEM SETTING THE SYSTEM Ensure that all windows and doors are secure and all detectors are clear before proceeding. Enter the user code. The DAY LED will flash and the exit tone will sound from any internal speakers and the keypad buzzer. Leave the premises by the authorised route. Any pulsed tone should become continuous once you have left the building and the sensors have cleared. The control panel sets after the exit timer runs out. At this point, the tone should cease followed by two beeps. If the tone does not become continuous after all the sensors have cleared, return to the keypad and press the * key to abort the setting procedure. If the internal sounder activates after the timer has expired, return to the keypad, enter your user code to stop the alarm, enter the code again to reset the system. Refer to Fault Clearing on page 7. SELECTING FULL SET Selecting Full Set Enter user code and press 1. If your system has been programmed for quick set, press # - 1 to full set the system. SELECTING PART SET Selecting Part Set Enter user code and press 2. If your system has been programmed for quick set, press # - 2 to part set the system. The exit sounds are programmable by your Alarm Company, only the fault pulse tone and set acknowledge bleeps may sound. SELECTING HOME SET Selecting Home Set Enter user code and press 3. If your system has been programmed for quick set, press # - 3 to home set the system. The exit sounds are programmable by your Alarm Company, only the fault pulse tone and set acknowledge beeps may sound. ISOLATION OF ALARM ZONES ISOLATION OF ALARM ZONES There may be occasions when you need to isolate or prevent any alarm from additional zones. Enter the user code and press 6 followed by the zone number or numbers of the zones you want to isolate. The LEDs for the isolated zones will flash. Wait 5 seconds or press * to finish. Enter the user code to set the system. If an error is made, enter the user code, press 6 then *. Restart the sequence as before. Zones that cannot be isolated • Fire • PA • Silent PA • Tamper —3— DISARMING THE SYSTEM DISARMING THE SYSTEM Enter the protected area by the authorised entry route. A single continuous tone will be heard from any internal speakers and from keypads. Proceed directly to the keypad and enter your user code. The system will disarm. WHILE PANEL IS IN ALARM TAMPER FAULTS While the panel is in Alarm Go directly to the keypad and insert your user code, the system will disarm and the sounders stop, the zone/s will light on the control panel to indicate the cause of the alarm. Refer to page 7 to reset the alarm. TAMPER FAULTS The control panel has tamper circuits, giving protection from unauthorised tampering. If the tamper circuit is broken during the unset period, any internal speakers will activate and the tamper and possibly a zone LED will illuminate. Proceed directly to the keypad and enter your user code. The internal sounder will stop. Refer to page 7 to reset the alarm. After reset, if the tamper light remains on then the cause of the tamper condition is still present. Refer to Fault Clearing on page 7. PERSONAL ATTACK PERSONAL ATTACK If your system has a personal attack button fitted this will be linked into the alarm system as a 24 hr device. The PA button will be active all the time. If the PA button is pressed, all the sounders will operate and the zone programmed as PA will indicate on the keypad. Enter your user code, the sounders will stop. Go to the personal attack button(s) and reset with the special key provided. Refer to page 7 to reset the alarm. If the light remains on refer to Fault Clearing on page 7. Note: If the panel is armed and a PA is activated, you will need to disarm the system as explained above. PERSONAL ATTACK FROM REMOTE KEYPAD Personal Attack from remote keypad If your Alarm Company has programmed personal attack on the keypads, pressing and holding the * and # keys together for 3 seconds activates the system as if a PA button was pressed. The only difference is that the LEDs will scroll. Entering the user code will stop the sounders. Refer to page 7 to reset the alarm. —4— FIRE FIRE Your Alarm Company may have linked smoke detectors to the control panel. If activated the sounders will pulse. Make sure that every one leaves the premises. When you are sure that it is safe to return, proceed directly to keypad enter the user code. The sounders will stop. Refer to page 7 to reset the alarm. USER FUNCTIONS & OPTIONS CODE CHANGE CODE CHANGE The system has 8 user codes. The default user 1 code is 1-2-3-4. There may be times that you need to change your user code. To help you remember your new code, write it down before changing it and after you have successfully changed and memorised the code destroy the written code. Remember, try not to use obvious codes such as the current year, 1-1-1-1 etc. To change user code 1, enter your existing code then press 8, followed by 1 for user 1. Enter your new 4-digit code the keypad will give two beeps. If the panel does not accept your code then there may be a conflict with another user code. The panel will abort the code change and retain the old code. Three beeps will be heard from the keypad. Try again with a different code. To change user 2 code go through the above procedure but press 8, followed by 2 for user 2, then the required code. The other users are changed in the same way using existing code, 8, user number, new code. User code access levels • • • • User 1 code can alter all user codes Other users can only alter their own code All codes have the same access authority Code 8 is reserved for Duress USER CODE ACCESS LEVELS If for any reason you forget or mistype your master code (user 1) when changing it, your Alarm Company will need to be contacted to reset the panel codes. DURESS DURESS User code 8 is reserved to be enabled by your Alarm Company as a duress code. When used it will operate normally as all other codes but will also send a silent duress signal to the alarm monitoring station, see page 7. USE WITH CARE. —5— SYSTEM TEST SYSTEM TEST Periodically it is advisable to check that the system is working correctly and to check that the sensors are communicating with the panel. These tests should be performed at least every 3 months. To do this, go to a keypad, enter a user code then press 5. The outside bell will sound and all of the zone LEDs will light for 5 seconds. The strobe will continue to flash while the test is in progress. When any sensor is activated or a door fitted with a contact is opened, the internal speaker will give two beeps. The zone light will illuminate until the test is cancelled. Proceed to the next zone until you have completed testing all the zones. Return to the keypad — all zones that have responded will be illuminated. To Cancel, enter a user code and wait for two beeps. CHIME CHIME The control panel offers the ability to have chime on a zone when unset. This feature will emit two beeps via the internal speaker and keypad buzzer whenever a zone is activated. To enable chime, enter the user code, press the 9 key and the number key that represents the zone(s) you want on chime. The light for the zone will illuminate. Press * to accept the zones on chime. To remove chime on all zones enter the user code, press the 9 and * keys. LOGS LOGS The user has the ability to look at a log of the last 16 alarms. This is useful if the panel has been reset and you need to find the zone that caused the alarm. Enter a user code, then 0. The most recent alarm is displayed first with a single bleep, then stepping through each event automatically. —6— RESETTING THE ALARM SYSTEM If the alarm is sounding, enter the user code to stop the sounders. Make a note of the zone that caused the activation for future reference. RESETTING THE ALARM SYSTEM The panel can be programmed for Engineer Reset. It is possible that you may not be able to reset the panel yourself. You may have to call your Alarm Company on the number below for assistance. A Technistore Reset is required if all LEDs light simultaneously followed by a 5-digit series of numbers, indicated by the LEDs lighting in sequence. You will have to call the number below for assistance. This code is given to obtain the correct reset code number. If a customer reset is allowed, enter the user code again to reset the panel. If the panel does not reset, contact your Alarm Company. Reset Type Customer Engineer Technistore Assistance telephone number Tampers Alarms FAULT CLEARING SYMPTOM Zone LED on continuously FAULT CLEARING CAUSE Alarm activated ACTION Reset the panel. Leave protected area and wait for tone to go continuous. Check for open doors, or a detector is in fault, call your Alarm Company. Go quicker to exit or call your Alarm Company to extend exit time. Tone pulsing on exit Zone in Fault Tone continues to pulse after exit Zone in Fault Alarm triggers on exit Timer ran out Alarm triggers on entry Timer ran out, deviated from entry route Follow entry procedure, call your Alarm Company to extend entry time. Tamper LED stays on after reset Tamper fault Call your Alarm Company. No mains light Mains off, fuse blown Battery LED on Fault on battery circuit Switch mains on. Check other mains appliances. Call electricity supplier or your Alarm Company. Check mains is on. Call your Alarm Company to check battery. —7— ALARM COMPANY INFORMATION NAME COMPANY INSTALLATION DATE TELEPHONE FAX MOBILE OTHER INFORMATION ZONE AREA COVERED 1 2 3 4 5 6 7 8 Please Note IntelliSense are always endeavouring to improve quality and specification of all its products and may alter or amend this product and instructions without notice. IntelliSense 2002. Printed & Manufactured in the UK by IntelliSense. Document No. II1-0901 Rev 1.0 —8—