1
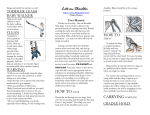
Wasabi360Ultra
InstallationGuidev1.2
For HW version 1.0 Introduction
To install your Wasabi X360 Ultra you will have to disassemble your Xbox Phat. We recommend you follow one of the many Xbox Phat Disassembly guides online. Now, disassemble your Xbox until you get to the point that it looks like Figure 1, below: Figure1
ContentsofyourWasabi360UltraKit
Figure2
1. Wasabi PCB and housing 5. Wasabi Power Cable 2. Black SATA Cable 6. Wasabi SATA Cable 3. Red SATA Cable 7. SATA Exchange Board 4. ESATA Cable 8. Probe (for 74850C Drive only) 1. Disconnect the SATA and power cables from the disc drive and remove the drive from your Xbox 2. Then disconnect the SATA and power cables from the Xbox as in Figure 3 below. Figure3
3. Insert the Wasabi power cable as shown in Figure 4. Note that the white connector of the power cable goes to the Xbox, (black will go to the drive). Also note the orientation of the two empty slots on the power connector; if the power cable is inserted incorrectly you may damage your drive! 4. Insert the L shaped connector of the Red SATA cable into the Xbox as shown below. Note that you must use the Red SATA cable here or your Wasabi 360 Ultra will not work. Figure4 5. Peel off the paper on the back of the SATA Exchange Board and attach to the metal case of the Xbox as shown below. Figure5
6. Feed the cables of the Wasabi SATA cable through the case and attach to the SATA exchange board as shown in Figure 6 below. The colours are labelled on the board for your convenience. Figure6 6b. Also connect the red and black wire of the Wasabi SATA cable to the red and black wire of the Wasabi Power cable and connect the blue and white wire from the Wasabi Power cable to the connector labelled "Blu" as shown in Figure 6b. Figure6b
7. Connect the SATA cables to the SATA exchange board. Connect the Red SATA cable to the connector labelled “XB” and connect the Black SATA cable to the connector labelled “Drv”. Figure7
8. Feed the Green cable, White cable, and Blue/White cable of the Wasabi Power Cable through the case as shown in Figure 8. Figure8
9. Insert the Black SATA cable and Wasabi Power Cable into the back of the drive as shown in Figure 9. Note orientation of power cable, inserting incorrectly will damage your drive! Figure9
10. Place the DVD drive back into the console taking care that the cables wrap around the drive neatly. Do so gently, as using force could potentially damage the twisted wires. And the tricky part is done! Before reassembling your Xbox you may want to test all the connections first by plugging in your Wasabi (To do this skip to step 12). Figure10 11. You will notice now that there is a 3 pin cable that is not connected to anything. This cable and the push button on the power cable are only used if you have a Liteon 74850C drive. For information on use of these components refer to the key pulling section of our User Manual (not yet supported). For now, just tuck this cable away neatly. Figure11
Figure12 12. Reassembling your Xbox. You may refer to one of the Xbox reassembly guides online if you need. Reassemble your Xbox leaving the side with the Wasabi cables showing as in Figure 11 below. Figure13
13. Insert the Green and White cables into your Wasabi 360 Ultra Figure14
14. Insert the Wasabi SATA cable into your Wasabi 360 Ultra (Note Orientation!!) Figure15
15. Now insert the Wasabi 360 Ultra into the Xbox 360 chassis. You should hear the clips “click” when done correctly. 17. And you’re done! You may now enjoy your Wasabi 360 Ultra and all the features it has to offer.