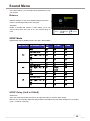
1
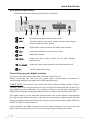
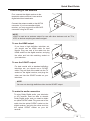
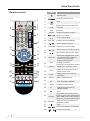
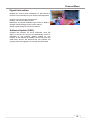
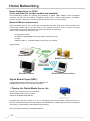
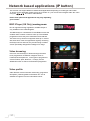
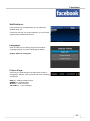
User Manual
Icecrypt T2300HD
Content:
Content .............................................................................................................. 2
Introduction ...................................................................................................... 4
Introduction and Features
Quick Start Guide ............................................................................................. 5
Unpacking, Safety information
Controlling the receiver, Front Panel information ............................................................................. 6
Rear Panel connections, Connecting up your digital receiver ........................................................ 7
Connecting to your Antenna, HDMI, SCART and Audio devices ..................................................... 8
Remote Control .................................................................................................................................... 9
Switching on for the first time............................................................................................................. 10
Service search ...................................................................................................................................... 11
Basic Operations .............................................................................................. 12
Day to day use of your receiver .......................................................................................................... 13
Menu Information .............................................................................................. 14
Menu overview
Channel Menu ................................................................................................... 15
Auto Tuning .......................................................................................................................................... 15
Manual Tuning ...................................................................................................................................... 16
Programme Edit ................................................................................................................................... 17
Signal info, Software Update .............................................................................................................. 18
Picture Menu ..................................................................................................... 19
TV System, SCART Mode, Aspect Ratio, Resolution
Sound Menu ...................................................................................................... 20
Balance, SPDIF outout, SPDIF delay
Time Menu ......................................................................................................... 21
Clock, On/Off timer, Sleep / Auto Sleep timer, Time Zone
Menu Time out and Menu Transparency
Option Menu ...................................................................................................... 22
OSD, Audio, Subtitle Language. Hearing Impaired, PVR File System, Factory Default ................ 22
Network configuration ......................................................................................................................... 23
ECO Power, Antenna Power, Country, Software Update (USB) and System Information ............. 24
Lock Menu ......................................................................................................... 25
System Lock, Set Password, Block Programmes, Parental Guidance
Multimedia Player ............................................................................................. 26
Your Media, Movies, Music .................................................................................................................. 26
Photos, Thumbnails, Files ................................................................................................................... 27
Setting Movie Preview Window. Setting Resume Play and Slide Show ......................................... 28
Devices (USB), DTV Mode, supported media format information ................................................... 29
Audio, Music and Picture format information ................................................................................... 30
Personal Video Recording and Playback ........................................................................................... 31
2
Content
Electronic Programme Guide .......................................................................... 33
EPG information, Programme reminder, Scheduling features
MHEG-5 / Teletext ............................................................................................. 34
MHEG-5 Digital Text and conventional Teletext functions
Home Networking ............................................................................................. 35
UPnP, Network Media requirement, Digital Media Player ................................................................. 35
Playing Media files: Movies, Photos, Music ...................................................................................... 36
Network Based Applications (IP Button) ........................................................ 37
BBC iPlayer (UK only), Video browsing, Video profiles.
HbbTV (Only available for certain models and markets) .............................. 38
System overview, Red key .................................................................................................................. 38
Main menu, EPG, Video On Demand (VOD), Teletext ....................................................................... 39
YouTube (Only available for certain models and markets) ........................... 40
Youtube Leanback, Watching videos, Control Menu, Search Videos, Categories
Skype (Only available for certain models and markets) ............................... 41
Login to your account, Main Menu ..................................................................................................... 41
Making Video calls, making Voice calls ............................................................................................. 42
Facebook ........................................................................................................... 43
Stay in touch with Facebook on you receiver
Twitter (Only available for certain models and markets) .............................. 45
Stay in touch with Twitter on your receiver
Web browser ..................................................................................................... 46
Surf the internet using the built-in browser
Google Maps ..................................................................................................... 47
Free web mapping service application provided by Google
Flickr / Picasa .................................................................................................... 48
Photo sharing applications
Samba File sharing ........................................................................................... 49
Access your files on your Android device via Wi-Fi
Games ................................................................................................................ 49
Download and Play games on your receiver
Trouble Shooting .............................................................................................. 50
Technical Specifications .................................................................................. 51
Introduction
The ICECRYPT T2300HD digital receiver is fully compliant with the international Digital
Video Broadcasting DVB-T and DVB-T2 standard. In order to receive these services, all
that is required is a conventional terrestrial aerial.
Features
The ICECRYPT T2300HD has the following features:
DVB-T/DVB-T2 compliant
MPEG-2 MP@ML, H.264(MPEG-4 Part 10) SD &HD transport stream
decoding
480i, 576i, 720p, 1080i, 1080p video resolution
MHEG-5 Interactive Services (Red Button)
Over 1500 TV, Radio and Data channel memory - subject to broadcast
On Screen Display with multi-language support
Favourite groups and Favourite channel selection
7-Day Electronic Programme Guide (EPG)
Automatic and Manual channel search
Versatile channel editing functions (Favourite, Move, Rename and Sort)
Picture in Graphics support (PiG)
32-bit colour On Screen Display (OSD)
Time set by GMT offset automatic and manual, Summer Time support
Subtitle support DVB EN300743 and EBU
Teletext support DVB ETS300472 by VBI and OSD
Automatic last channel memory
Logic Channel Number (LCN) support
Parental Lock
Automatic PAL/NTSC conversion
Multimedia playback with MP3, WMA, OGG, JPEG, BMP, PNG, MPG, TS,
TRP, MP4 etc.
Lock/Delete/Rename,Preview playback, Browse record files information
Full control for multimedia playback: Play/Pause/Stop/FF/FR/Prev/Next
FAT16/FAT32/FAT12/NTFS Hard Disk support
Web Browser, Google Maps, Facebook, HbbTV, Home Networking,
Picasa, Samba and other OTT Functions.
(Please note OTT Functions may vary depending on market.)
Multi-language support
USB updates.
Quick Start Guide
Unpacking
Please check that you have received the following items with the digital receiver.
Remote control unit
Two batteries for the remote control(AAA 1.5V)
One HDMI cable
A copy of this User Manual
Note: Accessories may vary according to your local area.
Safety precautions
Please read carefully the following safety precautions.
This unit is designed to operate between 90 and 250 volts. Please consult your local
installer if you are unsure of your local mains supply voltage before installation.
The mains adapter should be readily accessible so it can be easily unplugged when
necessary.
Note: This digital receiver is designed for indoor use only.
Do Not:
Connect or disconnecting anything to the unit whilst the unit is powered, apart from
USB accessories.
Expose the digital receiver to any liquids or install the unit in high humidity locations
such as bathrooms etc.
Place the digital receiver close to any heat sources or in direct sunlight.
Cover the unit as it will impair the cooling of the unit.
Open the digital receiver casing under any circumstances, or the warranty will be
void. Refer all repairs to a qualified service technician.
Use any solvents or spray cleaner to clean the unit..
Do:
Remember to provide adequate ventilation when installing the unit in a cabinet, by
allowing a minimum of 10cm of space surrounding the unit. Avoid placing the unit on
top of another device such as DVD player etc.
Place the digital receiver on a firm and level surface.
Protect the power cord from being damanged. If the cord is damaged, do not use the
digital receiver and get the cord replaced by a qualified service technician.
Disconnect the unit from mains power supply when the unit is to be left unused for
long periods of time.
Disconnect the unit from mains power and from the aerial when a thunderstorm is
expected.
Use only a lightly damp cloth to clean the unit.
Quick Start Guide
Controlling the digital receiver
You can operate the ICECRYPT T2300HD digital receiver with the remote control or
via the buttons on the front panel.
NOTE
When not in use, please keep the unit in stand-by mode in order to allow
event times to function normally.
Front panel
button switches the digital receiver between standby mode and
active mode.
CH+/CH- to change to previous or next channel sequentially
IR Sensor for receiving remote control signals. Point the remote control
handset here.
Front panel 4-digit LED displays the current time in standby mode and
current channel number when in use
Standby mode RED LED indicator
USB port for USB device such as a memory stick (behind the dust cover).
Quick Start Guide
Rear panel connections
The T2300 HD has the following connections on the back:
Connect the terrestrial aerial to this socket
Terrestrial signal loop output socket: Connect other digital
receiver products to this socket.
Digital audio output socket for the audio-video receiver
Local area network (connect to your router)
USB device socket
Audio and video output socket for the high definition
television set
Audio and video output socket for the older television set
12V DC power inlet socket
Connecting up your digital receiver
For power connection, always follow the LIFO rule: Last in First out!
Always disconnect the unit from the mains power socket before connecting or
disconnecting anything else (apart from USB hot plug devices)
PLEASE NOTE: This receiver has an Eco Low Power Saving function (under 1 Watt in
Standby). When this is turned ON the RF loop out will not be active and will not pass a TV
signal when the unit is in Standby. If you require the RF loop out to be active and pass a TV
signal while in Standby mode please keep the Eco Low Power Save function set to OFF.
This digital receiver can be used with most television sets on the market, except perhaps
the very old types without AV inputs of any kind. In most cases the digital receiver will work
with most televisions and other devices by using the correct kind of cable (HDMI, SCART to
SCART, SCART to RCA cables etc.).
Where possible, use HDMI connections for best results. However, if you are unsure the
type of cable you require for you TV set or AV devices, please contact your dealer.
Quick Start Guide
Connecting to the antenna
First, connect the digital receiver to the
terrestrial antenna so that it can receive
digital television broadcasts.
Connect the antenna cable to the ANT IN
connector. If you have another digital
receiver, you may connect it to the LOOP
connector using an RF lead.
NOTE
LOOP is used as an antenna output for use with other devices such as TV’s,
VCR, or devices requiring an antenna signal.
To use the HDMI output
If you have a high definition television set,
you should use an HDMI cable for best
results. Plug one end of the cable into the
HDMI socket on the digital receiver, and plug
the other end into the matching socket on
your television.
To use the SCART output
For best results with a standard definition
television set, you should use a SCART
cable. Plug one end of the cable into the TV
socket on the digital receiver, and plug the
other end into the SCART socket on your
television.
NOTE
You can not view high definition video via the SCART output.
To make the audio connection
To enjoy Dolby Digital audio, your television
or A/V receiver must be able to decode
Dolby Digital audio, and you need to obtain
an optical S/PDIF cable. Plug one end of the
cable into the optical S/PDIF socket on the
digital receiver, and plug the other end into
the optical S/PDIF socket on your AV
receiver.
Quick Start Guide
Remote control
Key
1
2
5
4
3
6
7
9
8
10
12
13
11
15
14
14
13
Function
1
Standby/ON
2
Change the HD format
3
Mute
4
FAV
Displays the favourite group list
5
SUB
Subtitles
6
TXT
7
AUDIO
Volume up / down
8
9
0~9
10
PR+,PR-
Direct channel entry
Change channels up/down
Back to previous channel
11
12
Teletext
Display the Audio window.
TV/RADIO Selects TV or Radio mode
13
Move cursor up or down in menu
14
Move cursor right or left in menu
15
OK/LIST
16
EPG
17
MENU
Selects the highlighted item in the
menu screen or when entering
a value in any input mode.
Displays the channel list.
Displays the EPG
(Electronic Programme Guide)
17
18
16
19
20
21
24
26
22
23
25
27
18
EXIT
Return to the previous menu or
exit from main menu
19
INFO
Displays the current channel
information
20
MEDIA
Start the Media Player
28
29
21
AD
Audio Description ON/OFF
22
WIDE
Change the aspect ratio
23
IP
25
PAUSE
26
RECORD
29
Optional OTT functions on
selected models
Play
24
27
28
Displays the on-screen menu
When USB is not connected, press to
freeze TV picture, press again to release.
When USB is connected, press to
pause live TV (time-shift function)
Optional record functions on
selected models
Stop
Press to fast forward or fast backward
Previous and next
Quick Start Guide
Switching on for the first time
First insert batteries provided into the remote control. Take care when opening the
battery compartment and insert the batteries observing the polarity, which is
marked on the base of the battery compartment.
Ensure that your television set is switched on and on the correct video channel so
that you will be able to see the on-screen display from the digital receiver.
Once you have checked that you have connected your digital receiver correctly,
you can then plug in the mains power.
Press the
button on the top left corner on the remote control. In a few
moments, you should see an on-screen menu and you should see the channel
indicator lit on the front panel of the receiver.
If you do not see anything on your TV, try pressing the V Format button on the
remote control. If after several tries you still get no picture, check that the television
is set to the correct input.
When you see the on-screen menu, you can start searching for available television
and radio services.
CAUTION
If the digital receiver no longer responds properly to the remote control
commands, first check that the IR sensor is not obstructed. Otherwise the
batteries in the remote may be flat. Replace only with 1.5 V AAA size batteries.
Do not mix different types of batteries, or new with old batteries.
Do not use rechargeable batteries.
Never recharge the old batteries.
Observe the polarities indicated inside the battery compartment.
Replace exhausted batteries immediately.
If you are not using the remote control for a long period of time, remove the
batteries. The manufacturer accepts no liability for the damage resulting
from leaking batteries.
Please dispose of used batteries in an environmentally sound manner.
Quick Start Guide
Service Search
After you have checked all your connections to your receiver, you can now perform a service search.
Powering up for the first time.
When powering up for the first time, you will be guided through the following installation steps:
Press
keys to highlight menu language,
then press OK. Then repeat to select DVB Tuning
type and COUNTRY and press OK to confirm.
Then press OK key to search channels .
Select
Confirm
The receiver will now start to search for
channels. This will take several minutes.
After the channel search is complete, the
receiver will display the first channel in the
channel list.
If you have signal from more than one
transmitter you will be asked to select your
local transmitter from the list. Please ensure
you select the correct transmitter for your
region
NOTE
Not all menus are accessible until the receiver has some channels stored.
Basic Operations
Stand-By
Press
key to turn your receiver ON or Stand-by.
Changing channels
To change channels, you can:
Use the numeric keys (0-9) on the remote to enter the channel number directly.
If the channel number is invalid, the "Invalid number” message with be displayed. Press OK key to
close this message.
Press
keys, or the PR+, PR- keys to change the channel up or down.
Volume control
Press
keys or VOL+,VOL- keys to change the volume (level 0 to 30).
Mute
Press
key to mute the volume. You can press
key again to restore the volume, or
any of the volume control keys to restore the volume.
Teletext
Press TXT key to display the Teletext information
Subtitles
Press SUB key to display the subtitle menu.
Last channel memory
Press
PR key to return to the last watched channel.
Video Resolution
Press V-FORMAT to change video resolution.
Audio Description
Press the AD key to toggle the Audio Description ON and OFF.
Aspect Ratio
Press WIDE to change the aspect ratio.
Channel Information Banner
This information banner is displayed after each channel
change to display information of that channel for
several seconds.
To view the channel information at any time, press
INFO key to enter into the information window.
Listen to Radio Stations
Press TV/RADIO key to toggle between TV and Radio mode.
Basic Operations
OK/LIST
1. Press the OK or LIST key to display TV or Radio
Programme list.
2. Press
keys to navigate the channel list up or
down, and then press OK key to select the highlighted
channel.
3. Press MENU or EXIT key to exit this list.
Display/Confirm
Select
Audio
1. Press
2. Press
key to display the Audio Menu.
keys to select between Left-Left, Right-
Right and Left-Right.
3. Press EXIT key to close this window.
Note: Changing the audio mode will only apply to the
current channel, other channels are unaffected.
Select
Display
Favourite Channels
1. Press FAV key display the Favourite Group menu.
2. Press
keys to select the Favourite Group.
Press
keys to select the channel up or down.
Press OK key at the selected channel.
Press EXIT key to exit.
FAV
Display
Change
Select
Electronic Programme Guide (EPG)
Press the EPG key to display the EPG.
At the bottom of the guide the following function keys
are available:
Blue key/Yellow key: To scroll detailed information
when it runs over one page.
Green key: To set a programme reminder
Red key: To display programme schedule.
EPG
Display
Select
Menu Information
When you press MENU key, you can enter Main Menu.
Menu Overview
- Auto Tuning
- DTV Manual Turning
- Programme Edit
- Signal Information
- Software Update(OAD)
- TV System
- Scart Mode
- Aspect Ratio
- Resolution
CHANNEL
PICTURE
SOUND
TIME
OPTION
LOCK
APPLICATIONS
Media Player
- Movie
- Music
- Photo
- File
- Setup
- Device
- Return to DTV
- Balance
- AD Switch
- SPDIF Mode
- SPDIF Delay
- Clock
- Off Time
- On Time
- Sleep Timer
- Auto Sleep
- Time Zone
- Menu TimeOut
- Menu Transparency
- OSD Language
- Audio Language
- Subtitle Language
- Hearing Impaired
- PVR File System
- Restore Factory Default
- Network Configuration
- Eco power save
- Antenna power
- Country
- Software Update (USB)
- System Information
- Lock System
- Set Password
- Block Programme
- Parental Guidance
How to Navigate
Displays the Menu OSD
Moves among menus or options
Exit all On-Screen
Changes or adjusts the option
Goes back to the previous screen
Selects (Enters) a menu or
confirms a selection
Enters the number (0~9)
Channel Menu
Auto Tuning
To use Auto Tuning to search for available channels, please proceed with the following steps:
Your ICECRYPT receiver supports the following digital TV systems:
1. Press the MENU key to display the
Channel Menu.
2. Highlight Auto Tuning and press OK to
select Auto Tuning.
3 The receiver will now display the Country
Region list.
4. Highlight your country from the
Country Region list and press OK to begin
Auto Tuning for the selected country.
5. Auto Tuning may take several minutes.
The following screen shows the channel
tuning progress and number of channels
found so far.
6. When Auto Tuning has finished, you can
press OK key to display the TV Channel List
and select a channel to watch.
Country Region List:
Channel Menu
Manual Tuning
You can also use Manual Tuning to search for available channels per frequency. Unlike
analogue TV, where each channel occupies a frequency, in Digital Television each channel
frequency may contains a number of TV and Radio channels.
To use Manual Tuning, please proceed with the following steps:
1. Press the MENU key to display the
Channel Menu.
2. Highlight DTV Manual Tuning and press OK.
3. Use the Left/Right keys to select the channel
frequency that you would like to search for channels
on and press OK.
4. After Manual Tuning has finished the number
of TV, Radio and Data channels found will be
displayed.
5. When Manual Tuning has finished, you can
press OK key to display the TV Channel List
and select a channel to watch.
Channel Frequency range by country:
Channel Menu
Programme Edit
(1)Press FAV button to change favourite list
between Fav 1 and Fav 8
(2) Press
keys to highlight the desired channel.
(3) To add the highlighted channel to favourite list,
press GREEN button. The favourite icon will be
displayed next to channel name. Press GREEN button
again to remove channels from favourite list - the icon
will also disappear.
(4) To delete the highlighted channel press the RED
key. A confirmation screen will pop up with the
message: "Delete the programme?".
Press OK key to confirm deleting the selected
channel, or press EXIT key to cancel.
Red
Delect
Select
Confirm
(5) To MOVE the highlighted the channel to another
channel location, press the YELLOW key. You can
press PR+,PR- to move the channel to the desired
channel location, then press OK key to confirm.
Yellow
Move
Select
Confirm
(6) To SKIP the highlighted channel, press green key.
You will then see a SKIP icon next to that channel
name.
Pressing the BLUE key again will UN-SKIP the
channel, and the icon will also disappear.
Blue
Skip
Radio Channel Edit:
Press
key to switch between TV Programme edit
and Radio Programme edit.
Select
Confirm
Channel Menu
Signal Information:
Displays the current signal information for that channel in
real time. The information may be used for fault diagnostics.
Channel: The current UHF channel index.
Network: The current Network name.
Modulation: TV channel modulation type, DVB-T or DVB-T2.
Strength: Signal strength for the current channel.
Quality: Signal quality for the current channel.
Software Update (OAD):
Upgrade new software via On-Air Download. Once this
option is set ON, the receiver will automatically check for
availability of new software updates suitable for your
receiver. If new software is available, receiver will enter into
OAD mode, where it will download the new software and
upgrade itself. After upgrade, the receiver will restart itself.
Picture Menu
The Picture menu allows you to optimise your ICECRYPT to best suit your TV.
To enter the TV System Menu, Press Menu key, then use the
keys and navigate to “Picture” menu,
where you will find the following options:.
TV System
You can select between the two TV system standards:
SCART Mode
You can select between RGB and Composite output from
your SCART socket. If your TV can receive RGB video
signal, we recommend using this setting as it offers the best
TV picture quality.
Select
Display
Confirm
Aspect Ratio
You can select from 16:9 Auto, 4:3 Auto,16:9 Wide Screen,
16:9 Pillar box, Pan Scan, Letter Box, 16:9 Pan Scan, 4:3
Combined, 16:9 Combined, Zoom2, Zoom3 and Zoom4 to
best suit your TV.
Select
Confirm
Select
Confirm
Resolution
You can select one of the many TV picture resolutions the
ICECRYPT supports. We recommend that you select the
resolution that best suits your TV's capabilities.
Supported TV resolutions for the two TV system standards:
Sound Menu
In the Sound Menu, you can adjust audio parameters to suit
your system:
Balance
Balance setting 0 to 100, where default setting is 50 which
means Left and Right audio levels are equal.
AD Switch
Enable or Disable AD function. It also allows you to set
volume value when AD is set to on. The volume range is
0~30.
Select
Display
Confirm
SPDIF Mode
Digital Audio output (SPDIF) format: Off / Raw / Raw (HDMI)
Supported Digital Audio output (SPDIF) formats.
SPDIF Delay (0mS to 250mS)
Select from:
Auto: Auto mode will enable the receiver to adjust the Audio to meet the Video timing.
Manual: You can manually adjust the delay between the Audio timing and Video timing from 0 to 250mS.
(1mS = 1/1000 of a second)
Time Menu
You can set the various time related functions on your unit:
Clock
Time as defined by the broadcaster.
Off Time
Sets the time for the receiver to enter standby automatically.
On Time
Sets the time for the receiver to switch on automatically.
Select
Display
Confirm
Sleep Timer
Automatic count-down timer to standby mode. Selectable between 10mins to 240mins.
Auto Sleep
When activated unit will turn to standby if no commands are received for the time set.
Time Zone
Menu Time Out
You should set this to your local Time Zone.
Time period before Menus auto closes.
Set from OFF to up to 4 mins.
Menu Transparancy
Sets the transparency of the Menu system from:
25% to 100%, where 25% is most transparent, and 100%
indicates solid colours.
Note:
In order for all timer related functions to operate correctly, you need to keep the unit connected to your
mains power outlet. This also includes any scheduled recording settings.
Option Menu
The following options are available within this MENU:
OSD Language
Sets the On-Screen Menu language.
Audio Language
Sets the default audio language for all channels (whenever
multiple audio languages become available). The user can
also change it by using the AUDIO button on the remote
control when watching TV or listening to Radio channels.
Subtitle Language
Sets the default subtitle language for all the channels
(whenever multiple subtitle languages become available).
The user can also change the language by using the SUB
button on the remote control when watching TV or listening
to Radio channels.
Hearing Impaired
Enables or disables the subtitles for hearing impaired.
If set to ON, the receiver will display subtitles specifically
designed for the hearing impaired.
PVR File System
Sets the various parameters and functions for PVR mode:
Select Disk: Sets the default USB port and logic disk index
for PVR. Shows the basic information and format of the
selected USB (There are 3 USB ports available in receiver).
Time Shift Size: Sets the max file size for time shift function.
Speed Check: To check the current USB transport speed.
Banner Show Time: Sets the PVR banner timeout time.
USB Remove Start: Remove current USB form port.
Always Time shift: When set to on, the time shift function
will always be on when the PAUSE key is pressed.
Restore Factory Default
1- Highlight this option and press OK if you wish to reset
your unit to Factory Default.
2- You will see menu requestion for your PASSWORD.
3- Enter your PASSWORD to proceed with resetting your
unit to Factory Default.
Warning:
This will delete all your channels and personal settings.
Note:
The default password is 0000
Option Menu
Network Configuration
Your ICECRYPT DTV has a network feature which allows it
to connect to your network in the following ways:
1- DHCP, where your unit will automatically obtain the
required network settings from your modem.
2- You can also set up your network configuration manually.
Note:
In most domestic installations, DHCP is most likely to be used.
Wired Ethernet Connection
Typical ways to connect your unit to your network via Ethernet cables:
If you have a CABLE / ADSL Modem with multiple Ethernet ports:
Model Port wall socket
Receiver Rear Panel
Modem
(ADSL/VDSL/CABLE TV)
Modem Cable
LAN Cable
If you have a Cable / ADSL Modem and using an external Router:
Model Port wall socket
Receiver Rear Panel
Modem
(ADSL/VDSL/CABLE TV)
Modem Cable
LAN Cable
Router
(with DHCP option)
LAN Cable
Note: If you are experiencing connection issues, please contact your installer.
23
Option Menu
ECO Power Save
This receiver has an Eco Low Power Saving function (under 1w in Standby). When this is
turned ON the RF loop out will not be active and will not pass a TV signal when the unit is in
Standby. If you require the RF loop out to be active and pass a TV signal while in Standby
mode please keep the Eco Low Power Save function set to OFF.
Antenna Power
Sets antenna power supply ON or OFF.
Switch this to ON if you are using an antenna amplifier which
requires power from the receiver. (5V and 0V respectively) .
Country
Setting your local country will select the correct TV UHF
channel list. So please ensure you have set your receiver
to your local country.
Software Upgrade (USB)
From time to time ICECRYPT will provide software updates
in order to improve the performance and specifications
of your unit. When available, the unit is designed to
accept the update via the USB port via a USB memory stick.
System Information
In this menu you can view the system information of your
receiver such as Model name, Software version, System ID
and the software release date.
24
Lock Menu
With the Lock Menu you can lock functions or programmes to prevent unauthorised access to settings or
channels.
Lock System
When Lock System is ON, the Auto Tune and Manual Tune
Menus are password protected.
Set Password
Use this MENU to set your password.
First you must enter the OLD password.
Then enter your NEW password.
Enter your NEW password once more to confirm
password change.
Note:
The default password is 0000
Password can be any number between 0-9.
If you lost your password, please contact your supplier.
Block Programme
Use this function to lock any channel
Highlight the channel you would like to lock and press
the GREEN key.
Press green key again will remove the lock on that channel.
Parental Guidance
This function allows you to set an age related restriction
to protect minors from certain types of programmes.
Please note this will only work if the broadcaster provides
the correct information
25
Multimedia Player
Your ICECRYPT receiver’s built-in Multimedia player allows you to enjoy movies, music and photos on
your TV. To access your multimedia, please refer to the information below:
Your Media
To locate your media, press Menu and use the
and select APPLICATION.
Select “Media Player Item”
keys
Movies
Highlight the movie you would like to watch, and press OK to
confirm. If you are in preview mode (see p.28), you can
press the RED key to go FULL SCREEN.
On the lower part of your remote you will find all the common
media control keys readily available to control your media
such as PLAY, PAUSE, STOP etc.
You can also Fast Forward as well as ZOOM IN and OUT.
Music
Similar to watching a movie, this time use the
keys
to highlight your music files and press OK to PLAY the track.
On the lower part of your remote you will find all the common
media control keys readily available to control your media
such as PLAY, PAUSE, STOP etc.
26
Multimedia Player
Your ICECRYPT receiver’s built-in Multimedia player allows you to enjoy movies, music and photos on
your TV. To access your multimedia, please refer to the information below:
Photos
Highlight the photos you would like to view, and press OK to
view in FULL SCREEN.
Press the MENU key to access controls of your slide show,
such as viewing direction, sequence, random, zoom and
shrink.
Also you can press the RED key to go to THUMBNAIL mode.
Thumbnail
Press the RED key to access the THUMBNAIL mode.
You can navigate within this list by using the
keys.
Press the RED key to display the photo slide show in
full screen.
File
You can view all your file types in this mode.
Press the MENU key to access the FUNCTION MENU,
where you can manage your files such as copying and
deleting files.
27
Multimedia Player
Setting the preview window for movie files. (On/OFF)
Open the Setup page and press
From “Movie” Press
key and press
to set the preview window setting.
key to mark the highlight on the “Movie”.
key
Preview = ON, user can preview the movie and picture
in the preview window.
Preview = Off, only full screen is available.
Setting Resume Play:
From “Movie” Press
key and press
to set the Resume Play setting.
key
Resume Play = ON
Resume Play = Off
Slide Show settings:
From “Movie” Press
Press
key to display “Photo”.
key to mark the highlight the following:
Set the photo “Slide time” 0~30 sec.
Where Slide time is the time between each slide change.
Set the photo “Slide mode” 0~59”.
Up to 60 different slide modes are available when viewing
slides in full screen.
28
Multimedia Player
Device
The DEVICE menu allows you to select which USB
devices to play from.
Press the
key to highlight USB device.
Press OK key to select the device.
You will then see a V tag next to the selected device.
Return to DTV
Select this option and press OK to EXIT the Multimedia
mode and return to DTV (Digital Television Mode).
Supported Media Formats
VIDEO FORMATS:
File Extension
Container
dat, mpg, mpeg
MPG, MPEG
ts, trp, tp, m2ts
vob
MPEG2-TS
H264-TS
MPEG2-PS
Video Codec
Resolution
/Frame Rate
MPEG2
1920x1080@30P
MPEG2, H264
1920x1080@30P
MPEG2
1920x1080@30P
MPEG4, H264
mp4
AVI, MP4
Xvid 1.01/1.02/1.03
1920x1080@30P
Xvid 1.10-beta 1/2
mkv
MKV
AVI(1.0, 2.0),
divx, avi
DMF0,1,2
H.264, MPEG2,4
1920x1080@30P
MPEG2,MPEG4, H264
Xvid 1.01/1.02/1.03
1920x1080@30P
Xvid 1.10-beta 1/2
Motion JPEG
AVI, MOV
JPEG
640x480@30P
as f, wmv
ASF (Rev. 01.20.03)
VC1
1920x1080@30P
flv/s wf
flas h formats
H.264
1920x1080@30P
Please note: Although listed above some licensed Video formats may not be supported.
SUBTITLE FORMATS:
Internal Subtitle Formats:
Text Based: SRT, UTF8, ASS, SSA, 3GPP, USF.
Image Based: VOBSUB, OGS.
External Subtitle Formats:
Text Based: SRT, ASS, SSA, SMI, SUB, SUBVIEWER, MICRODVD)
Image Based: SUB/IDX
29
Multimedia Player
Audio Formats:
Audio Codec
File Extension
MPEG1/2 Layer1
MP3
MPEG1/2 Layer2
MP3
MPEG1/2 Layer3
MP3
AC3
EAC3
N/A
(work with video files only)
N/A
(work with video files only)
Bit/Sampling Rate
16KHz ~ 48KHz(Sampling rate)
8Kbps ~ 384Kbps(Bit rate)
16KHz ~ 48KHz(Sampling rate)
8Kbps ~ 320Kbps(Bit rate)
16KHz ~ 48KHz(Sampling rate)
32Kbps ~ 640Kbps(Bit rate)
32KHz, 44.1KHz, 48KHz(Sampling rate)
32Kbps ~ 6 Mbps
32KHz, 44.1KHz, 48KHz(Sampling rate)
Free Format (Bit rate)
AAC, HEAAC
M4A/AAC
OGG
OGG
~ 48KHz (Sampling rate)
N/A
64Kbps ~ 1.5Mbps (Bit rate)
(work with video files only)
8KHz ~ 48Khz (Sampling rate)
LPCM
IMA-ADPCM/MSADPCM
G711 A/mu-law
LBR (cook)
N/A
(work with video files only)
8KHz ~ 48KHz(Sampling rate)
8KHz ~ 48Khz (Sampling rate)
64~128Kbps (Bit rate)
(work with video files only)
8KHz (Sampling rate)
(work with video files only)
Support AAC,HEAAC V1
* only support stereo decoding
384Kbps (Bit rate)
N/A
N/A
Remark
32Kbps ~ 448Kbps(Bit rate)
6Kbps ~ 96Kbps (Bit rate)
8KHz ~ 48Khz (Sampling rate)
Music Formats:
Picture Formats:
30
Multimedia Player
Personal Video Recorder (PVR):
Please note: PVR is only available for certain countries.
The ICECRYPT receiver supports DTV programme record and playback functions. Any DTV programme
can be recorded and be viewed via the PVR file browser.
The receiver also supports Timeshift, and Always on Timeshift functions.
Please note: A suitable USB drive must be connected.
Record:
In normal viewing mode, press RECORD key on your
remote to start recording. You will see a Record ICON with
timing appear on the top left of your TV screen, indicating
the programme is currently being recorded.
Pressing the STOP ( ) key will display a menu "Do you
want to stop record?"
Press the OK key to stop recording and save the recorded
programme, or press the EXIT key to continue recording.
Note: When you stop recording, the programme you have just
recorded will be automatically added to the PVR RECORD
folder in PVR sub-menu.
PVR Menu:
In the PVR menu you can see a list of recorded programmes.
Press the RED key to switch to full screen mode,
and press EXIT key to return to preview mode.
Press the MENU key for additional functions
Press OK or
key to play the programme.
Press
key to stop playing.
Press
keys to play fast forward or fast reverse.
File Browser:
All the recorded files are displayed in the File Browser and
can be previewed in the Preview Window.
Use the
keys to highlight the file that you would like to
Preview, and press OK to watch it in the Preview Window.
Press the RED key to go FULL SCREEN.
Press the EXIT key to return to preview mode.
31
Multimedia Player
Playback:
The Media Player supports various trick modes during file playback:
PAUSE/RESUME
2x-32x times fast forward or fast reverse to search or skip to a particular scene.
Please note:
For FAST FORWARD, at up to 4x speeds you will see a continuous frame sequence of the movie. For
speeds of 8x to 32x you will see individual frame by frame sequences displayed in intervals.
For FAST REVERSE at any speed, you will only see individual frame by frame sequences displayed in
intervals.
½ to 1/32 Slow Motion: Press the Slow Motion icon in the PVR playback menu to enable slow motion.
Step Display: Press the Step icon in the PVR playback menu or the PAUSE key to enable this function.
Then each subsequent key press of the PAUSE key will advance the picture to the next frame.
Jump to Time: During playback, you can select a time point and jump to that point.
Jump Thumbnail: During playback, you can also select a Thumbnail and jump to that point.
Jump Forward/Backward: By pressing the
seconds intervals respectively.
or
key you can jump Forward or Backwards in 30
Drag to Time: Holding down the
or
key will “drag” the time bar forward or backwards. When the
key is released the picture will jump to the “dragged” point.
A-B Loop: While playing a file, press the PLAY key again to set your desired point A and press the PLAY
key once more to set your desired point B. Now the Media player will play within the two set points in a
loop (Max.6 hours).
SKIP: You can set SKIP section within your media file. To set a SKIP section, first press PLAY to play the
file. Then press the RED key to set the start point and press the RED key again to set the end point of
the SKIP. Once set, the Media player will skip this section during playback
INFO: Press INFO button to display more functions
Timeshift:
Timeshift is a convenient feature for when the user needs to briefly pause the “Live” TV programmes (to
answer the telephone etc.) and then to resume viewing the programme afterwards.
Detailed Specifications PVR:
File System: NTFS, FAT32 and Linux ext2, ext3.
USB hot and cold plug.
Stream format: MPEG2 - SD & HD, H264 - SD & HD, Radio.
USB Port Selection: Max USB disk partitions = 2.
Disk Format, Speed Test and Free Space Detect.
DRM: Encryption/Decryption (AESDMA 128Bits & CI+PVR)
32
Electronic Programme Guide
EPG:
The Electronic Programme Guide (EPG) is a comprehensive
on-screen display of channels, their programme
schedules and information all in one. The user can directly
select channels from this guide to view or transfer the
programme scheduling to the PVR.
The EPG provides the following information:
Channel Number
Channel Name
Programme Name
Programme Duration
Short Programme Information
Extended Programme Information
Programme reminders:
Press the RED key to display the “EPG Record/Reminder”
schedule listing.
Press the GREEN key to display the EPG Record/Reminder
settings. From there you can set reminders for the each of
the programmes that you are interested to watch.
EPG scheduling features:
The following features are available for better management
of programme record scheduling:
Once - Schedule a single recording.
Every Day - Schedule to record every day.
Weekly - Schedule to record once a week.
Red
Select
Green
Delete
33
Confirm
Yellow
Edit
Return
Blue
Add
MHEG-5 / Teletext
MHEG-5:
MHEG-5, also known as Digital Text is widely used in DTV
broadcasters around the world. It provides a variety of
interactive TV functions from on-demand programmes,
news and weather to interactive games.
When available, you will be prompted to press the RED or
TXT button to access the service. Once the service has
been accessed, the receiver will download the MHEG data
from the broadcaster. Everything from the menu system
right down to the content is downloaded off air, thus ensuring
that every MHEG-5 equipped TV and set-top box can be
operated in the same manner.
When the MHEG-5 menus are displayed, simply follow the
navigation instructions which has been integrated into the
menu system. Input method can be alpha-numeric and via
colour coded keys on your remote.
Select
Confirm
Teletext:
Teletext is the earlier form of digital text and unlike MHEG-5,
where the data is accessed by the digital receiver, Teletext
can only be accessed by a teletext equipped TV set.
Similar to MHEG-5, Teletext provides a wealth of information
from programme guides, news and weather to also basic
games. Navigation is done by numeric entry, colour coded
keys on the TV remote and a few dedicated teletext buttons.
Press colour buttons on the bottom jump to marked teletext
page. Also, you can enter page number directly by 0~9 digital
keys to access any page you want to jump to.
Press colour button on the bottom jump to marked
teletext page
Red
Green
Yellow
Blue
34
Home Networking
Home Networking via UPnP
(Only available for certain models and markets)
Home Networking enables the sharing and streaming of digital media between UPnP compatible
consumer devices such as network compatible set-top boxes, network media players, computers,
printers, cameras, cell phones, and other multimedia devices such as a media server.
Network Media requirement:
UPnP compatible devices can connect and communicate with each other over a home network. This
works using a similar set-up you may have for your Internet connection. In fact, a router is the key
communication point of the network as it is used to link devices to each other.
Here's a quick checklist of what you'll need:
- Icecrypt DTV receiver
- At least one Digital Media Server (e.g. laptop, network drive etc)
- A router
- Ethernet cable, or a wireless bridge to connect to your network
Typical system:
Media server
Network music player
Wired A/V renderer
Wireless A/V server/renderer
Digital Media Player (DMP) :
A Digital Media Player, sometimes know as a Renderer, is
provided in your receiver so it can play media files.
1. Display the Digital Media Server list:
Connect your receiver to your home network.
Enter the DMP mode on your receiver.
Search for available Media Servers.
Universal Plug and Play (UPnP) is a set of networking protocols that allows networked devices to
discover each other's presence on the network, and enables them to share network services for data and
file sharing, communications, and entertainment streaming.
UPnP is intended primarily for residential networks.
35
Home Networking
2. Select media Type:
Select the desired Digital Media Server and it will display the media type available on that server.
3. Play media files:
You can watch movies, listen to music and display your
photos stored on your server on the Icecrypt digital receiver.
Movies:
Press
key to play, press
key to pause.
key to stop, press
Press
key to jump to the previous or next movie.
Press
key to play fast forward and slow forward.
Photos:
Press
Press
Press
Press
key to display photo, press
key to stop
key to jump to previous and next picture.
keys to enlarge and shrink picture.
key to rotate picture.
Music:
Press
key to play, press
key to pause.
key to stop, press
Press
key to jump to previous and next track.
Press
key to play fast forward and slow forward.
36
Network based applications (IP button)
This receiver can support different network based applications depending on model type and location.
To access these application please press the IP button on your remote and navigate within the menu
using the
and colour coded buttons.
Please note options and applications may vary depending
your location.
BBC iPlayer (UK Only) coming soon:
Due to regional licensing regulations, the BBC iPlayer is
only available in the United Kingdom.
The BBC iPlayer is a web-based TV and Radio service that
enables users to watch or listen to catch-up TV and Radio
programmes where they have missed the live broadcast.
This service is by far the most popular catch-up TV service
with about 20% of the UK’s population regularly accessing
the iPlayer service and now, they are launching a HTML5
version specifically designed for intelligent TV usage.
Video browsing:
Users can use the iPlayer to browse through the entire
list of programmes via different categories such as
Featured, Most Popular etc., or the types of programmes
such as Drama, Sport, News etc., or simply use the
SEARCH function to search for the desired programme.
Video profile:
Other features such as favourite video listing, programme
description, parental guidance information etc. are all
available at a glance from the information banner.
37
Network Based Applications
HbbTV (Only available in certain models and markets)
Hybrid Broadcast Broadband TV or “HbbTV”, is a major new pan-European initiative aimed at
harmonising the broadcast and broadband delivery of entertainment to the end consumer through
connected TVs and set-top boxes.
Through the adoption of HbbTV, consumers will be able to access new services from entertainment
providers such as broadcasters, online providers and CE manufacturers – including catch-up TV, video
on demand (VoD), interactive advertising, personalisation, voting, games and social networking as well
as programme related services such as digital text and EPGs.
The hybrid terminal has the capability to connect to 2 networks in parallel. On the one side it can be
connected to a broadcast DVB network(e.g. DTB-T, DVB-S or DVB-C). With this broadcast connection
the hybrid terminal can receive standard broadcast A/V, application data and application signaling
information. Even if the terminal is not connected to broadband, its connection to the broadcast network
allows it to receive broadcast-related applications. In addition, signaling of stream events to an
application is possible via the broadcast network.
System overview:
General HbbTV functions such as EPG, Video on demand and Teletext.
Red key:
Press RED key to activate an application.
38
Network Based Applications
Main Menu:
Click the RED key when the menu bar is displayed at the
bottom of the screen will show available functions.
EPG:
Informative EPG with programme information shown.
At the bottom of the screen you will find colour-coded
multi-function keys:
BLUE/ YELLOW key to scroll UP and DOWN the page.
GREEN key: Reminder.
RED key: Schedule.
Video on demand:
Choose the videos that you would like to watch
Teletext:
Teletext service from the Teletext key on your remote.
For more information, visit: http://www.hbbtv.org
39
YouTube Leanback
YouTube Leanback
(Only available for certain models and markets)
YouTube Leanback is a different way of watching videos on YouTube. It is simple to use, easy to navigate
with your keyboard's arrow keys. The videos are streamed so you will get quick loading and playback.
Watching Videos:
Autoplay - videos will play as soon as YouTube Leanback starts.
Control Menu:
Click the
or ENTER key to display the Control Menu.
Play/Pause.
Fast forward / Rewind
Previous / Next: Go to Previous / Next video
*FLAG the video - YouTube relies on its users to flag the content of videos as inappropriate, and a
YouTube employee will view a flagged video to determine whether it violates the site's terms of service.
Search Videos:
You can search for specific videos on YouTube:
1. Press the
key to bring up On-screen Keyboard.
2. Enter the keywords for the video.
The results will be displayed at the bottom of the screen.
Categories:
Use the
keys to change between categories defined by YouTube Leanback:
The categories are:
A.
B.
C.
D.
E.
F.
G.
H.
Comedy
Entertainment
Film & Animation
How-To & Style
Music
News & Politics
Science & Technology
Travel & Events
40
Skype
Skype (Only available for certain models and markets)
Skype is a proprietary Voice Over Internet Protocol service (VOIP). This service allows users to
communicate with others by voice, video, and instant messaging over the Internet. Phone calls may also
be placed to recipients on the traditional telephone networks. Calls to other users within the Skype
service are free of charge, while calls to land line telephones and mobile phones are charged via a debitbased user account system.
1. Login Skype:
Login your Skype account by entering your Skype Name
and Password.
2. Main Menu:
Here are some screen shots of Skype in action:
a.
b.
d.
41
Skype
3. Making Video/Voice calls.
Skype offers two ways to connect to someone. One is via video call so that you can see the other
person on-screen and talk at the same time. The other way is the more traditional voice call where you
and the other person communicate by voice only.
Video Call
Select an online contact that you want to connect and click
the [ Video Call ] button.
Click the [ End Call ] button to end the call.
Voice Call:
Select an online contact that you want to connect and click
the [ Voice Call ] button.
Click the [ End Call ] button to end the call.
Please Note: To use voice and video call functions an
external USB camera and microphone would be needed.
Please contact your dealer (only available for certain
models and markets)
For more information on Skype, please visit: http://www.skype.com
42
Facebook
Facebook is a social networking service. Users are required
to register before using the site, after which they may create
a personal profile, add other users as friends, and exchange
messages, receive automatic updates of their friends.
Login to Facebook:
When you first enter Facebook using the receiver, you will
be given an ACTIVATION CODE.
Use your personal computer and go to:
http://www.facebook.com/device and enter the CODE.
Your receiver will then Auto Login into Facebook.
To navigate: Press the corresponding Numeric Keys shownon top of the screen:
Facebook Home:
Press numeric key 1 to change go to Home page, where
you will see Facebook news feeds, status update, video
and photos from you and your friends.
Profile:
Press numeric key 2 to change go to Profile page, where.
you will see the Facebook Wall, info, videos, photos and
Friends, and information about you.
43
Facebook
Notifications:
Press numeric key 3 for Notification of your status and
updates about you.
If someone has sent you a friend request to you, the Friend
request will be notified in this screen.
Language:
Press numeric key 4 to change page to the Facebook
Language settings. There are 3 languages available:
English, Spanish, Portuguese.
Colour Keys:
Colour key are used throughout to allow quick access to
ChangeUser, Refresh, View Comment and “Like” something
in Facebook.
RED key - Change to different user
GREEN key - Refresh status
BLUE key - View comments.
YELLOW key - “Like” something.
44
Twitter
Twitter
(Only available for certain models and markets):
Twitter is an online social networking and micro-blogging service that enables its users to send and read
text-based posts,known as "tweets", of up to 140 characters.
To navigate: Press the corresponding Numeric Keys shown on top of the screen:
1. Home:
Press key 1 for Home page, where your friends and your
tweets are displayed.
2. Profile:
Press key 2 for Profile page, where only your tweets are
displayed.
3. Messages:
Press key 3 for Messages page, where all your messages
are displayed, both sent and received.
4. People:
Press key 4 for People page, where you can see who is
following you, as well as who you are following.
5. Topics:
Press key 5 for Topics page, where you can the latest
“Hot Topics” in the Twitter community around the world.
45
Web browser
You can use the built-in web browser to browse the web.
Default view displays Google home page search engine.
Red Cursor:
Use
keys move Red Cursor:
Cursor over icons or hyperlinks and then press OK to
“Click” and go there!
Control Menu:
Press the Menu key to display the Control Menu (each icon is explained in the bubble):
Example:
Click on
go to Previous / Next page.
Click address bar (Website add) to enter website addresses by using the on-screen keyboard.
Add a Bookmark:
Click “+” to bookmark a website.
Click OK to confirm.
Bookmark List:
Click the “BOOK” icon to access all your Favourite websites
in your bookmark list.
Here you can access your bookmarked sites or delete
them from the list by clicking on the “Bin” icon.
History:
Click the “CLOCK” icon to access all your navigation
“HISTORY” list.
Here you can revisit the sites on this list, or delete them
from the list by clicking on the “Bin” icon.
46
Google Maps
Google Maps is a free web mapping service application provided by Google. It offers detailed street
maps, navigation route planner tools for traveling on foot, car or by public transport for numerous
countries around the world and interesting tools like “Street Views” from around the world.
1. Get directions:
Start by entering the starting point A and end point B.
Then Google map will display the suggested routes on screen.
2. Zoom IN/OUT:
Click the RED ZOOM IN key to enlarge the map.
Click the GREEN ZOOM OUT key to reduce the map.
3. Search:
To find a location, enter the location in the “Search box” and click the “Search” key
The result will show on the left side of screen.
4. Options:
Change the Map style in Options.
47
.
Flickr:
Flickr
(Only available for certain models and markets):
Flickr is an image and video hosting website, web services suite, and online community.
To navigate: Press the corresponding Numeric Keys shown
on top of the screen:
1. Flickr Explore - you can take a look at all recently posted
pictures on the site and also check out what it deems to be
the most interesting pictures posted.
2. My photos - Show the pictures that user put on Flickr.
3. Contacts - Invite your friends to look at your photos.
4. Group - Share photo to a group and interact with others.
Picasa:
Picasa is an image organizer and viewer for organizing and
editing digital photos, plus an integrated photo-sharing website.
To navigate: Press the corresponding Numeric Keys shown
on top of the screen:
1. Explore - You can take a look at all recently posted
pictures on the site and also check out what it deems to be
the most interesting pictures posted.
2. My photos - Show the pictures that user put on website.
3. People - Add you friends on the People page to start
sharing photos with your friends.
4. Language - Change language setting
48
Samba File Sharing
Press MEDIA button to enter to media player menu.
Enter to Device sub-menu. Then you can find a Net
Device item listed in the end of device list. Press
OK/LIST to enter, the screen as right screen shot will
be displayed. And you can find all the local terminals
which is accessible.
1. Select one of terminal IP address that you want to
login.
2. Input correct user name and password.
3. Select Login button and press OK/LIST key to enter.
Access your files on your Android device via LNA with
Samba File Sharing!
Samba provides a simple way to access files on your
Android smart phone over a local network. To use this
option you will need to first install the Samba app on your
smart phone.
Provided that you have correctly setup Samba on your smart
phone, you will be able to browse your SD card contents via
your local network.
For more information, please visit: https://play.google.com
and search for “Samba File Sharing”
Games:
Depending on your location, various games are available for
your entertainment.
Note: In order to use your game applications, you will first
need to plug a USB memory stick into your receiver.
Then using the
, OK, and colour keys, you can
navigate and select the games of your choice, or browse
through available games for download.
Please note: Some games may need an extra controller to
operate, please contact your dealer (Only available for
certain models and markets)
Note : If you have tried all of the above suggested actions and the problem persists,
please contact your dealer or authorised service centre.
49
Trouble shooting:
If you suspect there is a fault with your unit, please check the following trouble shooting guide before
calling an authorised service agent.
Warning! Under no circumstances attempt to repair the receiver yourself. Tampering with the unit may
result in electric shock and will invalidate your warranty.
No user serviceable parts inside: Refer all servicing to an authorised repair centre.
Problem
Possible causes
What to do
The display on the front
panel does not light up.
Main cable is not connected.
Check that the main cable is
plugged into the power socket.
No sound or picture,
but the front panel shows
red light.
The receiver is in standby mode.
Press the standby button.
No signal or weak signal.
Check the cable connections,
antenna and other equipment
connected between the antenna
and the receiver.
Signal is too strong.
Connect a signal attenuator to
the antenna input.
Antenna noise factor too high.
Change to an antenna with lower
noise factor.
The antenna is faulty.
Change the antenna.
No sound or picture.
Bad picture / blocking
error.
Battery exhausted.
Change the batteries.
RCU is incorrectly aimed.
Aim RCU at the receiver, or check
that nothing blocks the front panel.
The RCU is not working.
Note : If you have tried all of the above suggested actions and the problem persists,
please contact your dealer or authorised service centre.
50
Technical Specifications:
TUNER & CHANNEL
Tuner:
Input Connector:
Frequency Range:
Aerial Supply:
Carrier Mode:
Constellation:
DVB-T/DVB-T2
IEC 169-2,Female/Male
174-230MHz 470-862MHz
5V, max 100mA
1k, 2k, 4k, 8k, 16k and 32k
QPSK, 16, 64, 128 and 256 QAM
DVB COMPLIANT A/V DECODING
Aspect Ratio:
4:3, 16:9 (Pan-and-Scan, Letterbox)
Video Resolution:
576i, 576p, 720p, 1080i, 1080p
FRONT PANEL
Display:
Buttons:
LEDs:
4 Digit 7 Segment LEDs
Channel Up, Down, Standby
Power, Standby
A/V & DATA IN/OUT
TV SCART:
HDMI:
S/PDIF:
USB:
Ethernet:
Video CVBS/RGB
HD Video/Audio output
DOLBY Digital Audio output
USB 2.0 Host
RJ-45, 10/100 Base-T
POWER SUPPLY
Input Voltage:
Type:
Power Consumption:
Passive Standby:
90 - 250V AC, 50/60Hz
SMPS
Running Max 8W
Under 1W
PHYSICAL SPECIFICATION
Size:
218 x 124 x 36mm
Weight(Net):
0.5KG
Ean Code:
5060086981100
Features and specifications are subject to change without prior notice.
For more information please visit: http://www.icecrypt.com
For support, please contact us at:
e-mail: [email protected]
Hot-line: 08712 003 191 - only available inside the UK, for overseas please use email or contact
your local dealer
51