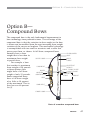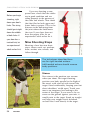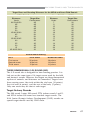
1
archery How to Use This Pamphlet The secret to successfully earning a merit badge is for you to use both the pamphlet and the suggestions of your counselor. Your counselor can be as important to you as a coach is to an athlete. Use all of the resources your counselor can make available to you. This may be the best chance you will have to learn about this particular subject. Make it count. If you or your counselor feels that any information in this pamphlet is incorrect, please let us know. Please state your source of information. Merit badge pamphlets are reprinted annually and requirements updated regularly. Your suggestions for improvement are welcome. Send comments along with a brief statement about yourself to Youth Development, S209 • Boy Scouts of America • 1325 West Walnut Hill Lane • P.O. Box 152079 • Irving, TX 75015-2079. Who Pays for This Pamphlet? This merit badge pamphlet is one in a series of more than 100 covering all kinds of hobby and career subjects. It is made available for you to buy as a service of the national and local councils, Boy Scouts of America. The costs of the development, writing, and editing of the merit badge pamphlets are paid for by the Boy Scouts of America in order to bring you the best book at a reasonable price. BOY SCOUTS OF AMERICA MERIT BADGE SERIES Archery Requirements 1. Do the following: a. State and explain the Range Safety Rules: (1) Three safety rules when on the shooting line (2) Three safety rules when retrieving arrows (3) The four whistle commands used on a range and their related verbal commands b. State and explain the general safety rules for archery. Demonstrate how to safely carry arrows in your hands. c. Tell about your local and state laws for owning and using archery tackle. 2. Do the following: a. Name and point to the parts of an arrow. b. Describe three or more different types of arrows. c. Name the four principal materials for making arrow shafts. d. Make a complete arrow from a bare shaft. e. Explain how to properly care for and store arrows. 3. Do the following: a. Explain how to properly care for and store tabs, arm guards, shooting gloves, and quivers. b. Explain the following terms: cast, draw weight, string height (fistmele), aiming, spine, mechanical release, freestyle, and barebow. c. Make a bowstring. 35856 ISBN 978-0-8395-3259-0 ©2004 Boy Scouts of America 2010 Printing BANG/Brainerd, MN 4-2010/056826 4. Explain the following: a. The importance of obedience to a range officer or other person in charge of a range b. The difference between an end and a round c. The differences among field, target, and 3-D archery d. How the five-color National Archery Association (NAA) or Fédération Internationale de Tir à l’Arc (FITA) target is scored e. How the National Field Archery Association (NFAA) black-and-white field targets and blue indoor targets are scored f. The elimination system used in Olympic archery competition 5. Do ONE of the following options. Option A—Using a Recurve Bow or Longbow a. Name and point to the parts of the recurve bow or longbow you are shooting. b. Explain how to properly care for and store recurve bows and longbows. c. Show the nine steps of good shooting for the recurve bow or longbow you are shooting. d. Demonstrate the proper way to string a recurve bow or longbow. e. Locate and mark with dental floss, crimp-on, or other method, the nocking point on the bowstring of the bow that you are using. f. Do ONE of the following: (1) Using a recurve bow or longbow and arrows with a finger release, shoot a single round of one of the following BSA, NAA, or NFAA rounds: (a) An NFAA field round of 14 targets and make a score of 60 points (b)A BSA Scout field round of 14 targets and make a score of 80 points (c) A Junior 900 round and make a score of 180 points Archery 3 (d)An FITA/NAA indoor round I and make a score of 80 points (e) An NFAA indoor round and make a score of 50 points ( The indoor rounds may be shot outdoors if this is more convenient.) OR (2) Shooting 30 arrows in five-arrow ends at an 80-centimeter (32-inch) five-color target at 15 yards and using the 10 scoring regions, make a score of 150. OR (3) As a member of the NAA’s Junior Olympic Development Program (JOAD), qualify as a Yeoman, Junior Bowman, and Bowman. OR (4) As a member of the NFAA’s Junior Division, earn a Cub or Youth 100-score Progression Patch. Option B—Using a Compound Bow a. Name and point to the parts of the compound bow you are shooting. b. Explain how to properly care for and store compound bows. c. Show the nine steps of good shooting for the compound bow you are shooting. d. Explain why it is necessary to have the string on a compound bow replaced at an archery shop. e. Locate and mark with dental floss, crimp-on, or other method, the nocking point on the bowstring of the bow that you are using. 4 Archery f. Do ONE of the following: (1) Using a compound bow and arrows with a finger release, shoot a single round of one of the following BSA, NAA, or NFAA rounds: (a) An NFAA field round of 14 targets and make a score of 70 points (b)A BSA Scout field round of 14 targets and make a score of 90 points (c) A Junior 900 round and make a score of 200 points (d)An FITA/NAA indoor round I and make a score of 90 points (e) An NFAA indoor round and make a score of 60 points ( The indoor rounds can be shot outdoors if this is more convenient.) OR (2) Shooting 30 arrows in five-arrow ends at an 80-centimeter (32-inch) five-color target at 15 yards and using the 10 scoring regions, make a score of 160. OR (3) As a member of the NAA’s Junior Olympic Development Program (JOAD), qualify as a Yeoman, Junior Bowman, and Bowman. (4) As a member of the NFAA’s Junior Division, earn a Cub or Youth 100-score Progression Patch. OR Archery 5 Contents Bow and Arrow . . . . . . . . . . . . . . . . . . . . . . . . . . . . . . . . . . 9 Archery Safety Rules. . . . . . . . . . . . . . . . . . . . . . . . . . . . . . . 11 Archery Equipment. . . . . . . . . . . . . . . . . . . . . . . . . . . . . . . . 17 Making a Bowstring . . . . . . . . . . . . . . . . . . . . . . . . . . . . . . . 29 Option A—Recurve Bows and Longbows. . . . . . . . . . . . . . . . 41 Option B—Compound Bows . . . . . . . . . . . . . . . . . . . . . . . . . 47 Shooting a Bow and Arrow. . . . . . . . . . . . . . . . . . . . . . . . . . 53 Archery Games and Tournaments . . . . . . . . . . . . . . . . . . . . . 63 Archery Terms. . . . . . . . . . . . . . . . . . . . . . . . . . . . . . . . . . . . 72 Archery Resources. . . . . . . . . . . . . . . . . . . . . . . . . . . . . . . . . 76 Archery 7 .Bow and Arrow Bow and Arrow When a Scout picks up a bow and arrow, he becomes heir to one of humankind’s oldest legacies. Archery plays a large part in stories of Cherokee hunters and is at the heart of the Robin Hood legend. The Huns were famous for their composite ox-horn bows, and the Moguls of India made bows entirely of steel. But for all its age, archery remains a living and vibrant sport that is still practiced throughout the world. Although modern laminated recurve and compound bows look little like the primitive bows our ancestors used, the essentials of archery are unchanged. A steady hand, a good eye, and a disciplined mind remain essential to the modern archer. Like many other sports, archery is a fun way to exercise minds as well as bodies. The sport has dozens of variations. Many archers start with target archery, shooting arrows at a five-color, 10-ring target. But the sport also offers field archery, clout archery, 3-D archery, action archery, walk-up rounds, and many others. A composite bow is made of more than one material. The first composite bows were made of wood, bone or horn, and animal tendons. A laminated bow is a composite bow made of layers of such materials that have been glued together. A recurve bow curves back on itself. A compound bow has a cable system that makes the bow easier to draw. You will learn about each of these kinds of bows as you earn the Archery merit badge. If this merit badge is your first step into the world of the bow and arrow, then we welcome you to a challenging and enjoyable sport. If you already are an archer, then we hope to increase your understanding and appreciation of archery. Archery 9 .Archery Safety Rules Archery Safety Rules Archery is lots of fun, but fun can quickly turn into tragedy unless every archer observes some commonsense safety rules. As a Scout and an archer, you must learn and practice these simple rules any time you are using a bow and arrow. Archery Range Safety Rules A. Three Rules When on the Shooting Line 1. Know and obey the range commands (see section C below). 2. Always point the arrow in a safe direction, either at the ground or at the target. 3. When done shooting, place the bow in your bow stand and step back from the shooting line. B. Three Rules When Retrieving Arrows 1. Retrieve arrows only when the shooting line is clear and the range officer signals “Retrieve your arrows.” 2. As you walk forward to the target waiting line, pick up any arrows on the ground (your own and all others as well). 3. Only one archer may pull arrows from the target at a time; all others stand 6 feet back from the target at the target waiting line. Before you think about using a bow, learn these safety rules and make up your mind to follow them every time you are on an archery range or anywhere else shooting a bow. Remember that most accidents are the result of carelessness and thoughtlessness. Archery 11 Cleared Safety Area 60 feet Recommended minimum 50 Feet maximum 100 feet 25 feet 50 yards 25 feet targets 40 yards 30 yards 150 feet Fencing or rope 20 yards Sod cover within fenced area 10 yards 9 feet behind shooting line Bow Benches Rack 30 feet Entrance to range Shooting Line Waiting Line Equipment Cabinet Benches Orientation tarp or shelter N .Archery Safety Rules C. Range Commands The whistle commands used on a range, and their related verbal commands, are as follows. An end is the 1. Two blasts on a whistle—”Step to the shooting line.” You may step to the shooting line and pick up your bow. You may not pick up any arrows. shot (usually three 2. One blast on a whistle—”Commence shooting.” You may pick up an arrow and shoot this end. When you are done, put your bow in a bow stand and step to the waiting line. 3. Three blasts on a whistle—”Retrieve your arrows.” You may go downrange and retrieve your arrows. Follow the three rules for retrieving arrows (above). 4. Four or more blasts on a whistle—”STOP!” or “Cease fire!” Do not shoot. Immediately let down, place your arrow in your quiver and your bow in its stand, and step back to the waiting line until the emergency is cleared. number of arrows to six) during one turn. To let down is to slowly relax the bowstring without releasing the arrow. General Archery Safety Rules • Keep all arrows in their quiver until ready to shoot. • To carry arrows in your hands, carry them securely with both hands around all of the arrows and with your palms facing down. However, the best way to transport an arrow is safely in its quiver. • Be sure the area around and beyond your target is clear before you shoot. Never draw a bow if anyone is in front of the shooting line. • Always aim and shoot at a definite target; never shoot just for the sake of shooting. Be sure of your target and that it is safe to shoot at it. If you are not sure, take a closer look. If, after a closer look, you are still not sure, do not shoot. • Shoot only at targets that are thick enough to stop your arrow. Do not shoot if there is any chance your arrow might ricochet (bounce off) from the target or other object and hit someone. • Use arrows that are the proper length for you. Arrows that are too short can cause serious injury. Archery 13 Archery Safety Rules. • Never shoot an arrow up into the air. A fletching refers to an arrow’s feathers or plastic vanes. • Walk, do not run, on the archery range. If you run, you might accidentally cross in front of another group of archers, step on arrows lying on the ground, or fall and trip into a target and be injured by the arrows sticking out of it. • When retrieving arrows from behind a target, particularly on a field range or at an isolated target, lean your bow against the face of the target or stick an arrow in the top of the target with the fletching up. This will warn other archers that you are behind the target. • Always use proper safety equipment, including an arm guard, a finger tab or glove, and a bow sling. • Always inspect your equipment before shooting. Repair or replace damaged equipment. Replace the bowstring when it becomes worn. • Always have an arrow on the string when shooting a bow. Dryfiring—shooting a bow without an arrow—can seriously damage a bow and possibly injure the archer. Never dryfire a bow. Laws on Archery Many states and local communities have laws governing archers. Some laws cover ownership and registration of archery tackle (equipment). Others govern hunting and fishing with a bow and arrow. 14 Archery .Archery Safety Rules On the shooting range, the range officer on duty serves as the person in charge. The range officer is there to help ensure the safety of all participants and bystanders, and to ensure the range is a safe environment for archery shooting. Therefore, for your own safety and the safety of others, it is imperative that you respect the range officer and follow all rules as posted. Archery equipment is shown and described in the next section. Ask your merit badge counselor or members of a local archery club about the laws in your area. Learn and follow all state and local laws on using a bow. Archery 15 .Archery Equipment Archery Equipment Nock Having the right equipment is as important as having proper instruction in how to shoot. Your equipment should fit you and fit the type of shooting you plan to do. Have an experienced archer help you choose the right equipment. The equipment you will need includes a bow (a longbow, recurve bow, or compound bow), arrows and a quiver to hold them, an arm guard, a tab or shooting glove, and a bow sling. Fletching Index fletching Choosing and shooting a compound bow is different from choosing and shooting longbows and recurve bows. In this pamphlet, see “Option A—Recurve Bows and Longbows” or “Option B—Compound Bows” for information about the type of bow you will be shooting. Arrows Shaft An arrow has four parts: the shaft (body or stem), the nock (notched tip), the fletching (feathers or vanes), and the point (arrowhead). The index fletching is the odd-colored fletching and is perpendicular (at right angles) to the slot in the nock. Points Different types of arrows have different points. The arrow in the parts photo is a target arrow. Several other arrow points also are shown. Broadheads are used for bow hunting big game. The fish head is for bow fishing. Blunts are used for practice and for hunting small game such as squirrels and game birds. The field point is used when shooting field rounds and when shooting at stumps and hummocks on roving trips through fields and forests. Point Parts of an arrow Archery 17 Archery Equipment. Different arrow points Broadhead Fletchings You also can tell arrows apart by their fletchings. • Target arrows use small fletchings. These can be feathers from 2 to 3 inches long or plastic vanes about 11/2 to 2 inches long. • Flu-flu fletchings are used to limit the range of an arrow. These fletchings are most often used on blunt-tipped arrows. They slow the arrow’s flight and make it drop quickly. Fish head Blunt target point • Hunting arrows use longer fletchings, usually 4 to 5 inches long. The fletchings usually have a strong spiral that causes the arrow to rotate, which improves its flight when the point is a broadhead. Shaft Materials Modern arrow shafts are made from four principal materials: wood, aluminum, fiberglass, or carbon fiber. Beginning archers usually use arrows with wood shafts. Wood is the least expensive shaft material and is popular with many archers. Port Orford cedar from the Pacific Northwest is the preferred wood shaft material because of its straight grain and light weight. Wood was the only arrow shaft material until about 1947, when aluminum shafts became available. Aluminum shafts are straighter than wood and do not warp with humidity the way wood does. An aluminum shaft will, however, bend if it hits a hard surface with enough force. Bent shafts must be straightened to be used safely. Fiberglass shafts were introduced in the 1960s. Fiberglass will stand up to more abuse than either wood or aluminum shafts. Although fiberglass shafts are reasonably straight, they are not as straight as good aluminum or carbon fiber shafts. Fiberglass, the heaviest of all shaft materials, is more expensive than wood but less expensive than aluminum or carbon fiber. Types of fletchings Target arrow fletching 18 Archery Flu-flu fletching .Archery Equipment Carbon fiber shafts were introduced in 1983. They are the lightest, strongest, and most expensive shafts. Carbon fiber is the preferred shaft material of today’s competitive archers. Matching Arrows to Your Bow When selecting arrows, it is important to match them to your bow. Matched arrows will fly truer and be more accurate than those that are not matched. To match arrows to your bow, you must know the draw weight of your bow and your draw length. Together, these figures will determine the spine of the arrow you need. Spine is a measure of the stiffness of an arrow shaft relative to its thickness, weight, and length. The draw weight of your bow is the amount of pull (measured in pounds) that is required to draw (pull back) an arrow its full length. A bow’s draw weight is marked on its handle. (For more about draw weight, see “Option A—Recurve Bows and Longbows” or “Option B—Compound Bows.”) Try to test a variety of arrows before you buy your own. When you order arrows, include your bow draw weight, arrow length, and the type of arrow you need: target, field, or hunting. Also specify the fletching and the type of point you need. With this information, you will be able to get a perfect match for your bow. Care of Arrows Take care of your arrows. Improper care can affect accuracy and cause injury. Look for signs of damage before, during, and after shooting. Start with the nock and work your way to the point. If the nock is cracked or broken, replace it. If feathers or vanes are coming off, glue them back in place. To reshape crushed feathers, try holding them over steam from boiling water. The heat and moisture will smooth the feathers and make the barbs stand up. Check the shaft for straightness. If an arrow is bent, put it aside and straighten it after you are done shooting. Check wood, fiberglass, or carbon fiber arrows for cracks or splinters in the shaft. Break a cracked or splintered arrow in half and Archery 19 Archery Equipment. Back The draw length of your arrow of bow can be measured several Select an arrow length that is 1 inch 1" ways. The best way to beyond the back of determine correct arrow the bow. length is to draw a special measuring arrow that has been marked every inch, like a ruler. When you are at full draw, your correct arrow length is read from the marked arrow where it crosses the back of your bow. Face of bow Measuring arrow marked in inches Be sure your arrows are long enough for your bow. Another way to estimate proper arrow length is to stand with both arms extended in front of you with your fingertips touching. The distance from your fingertips to the base of your neck will give a close estimate of your correct arrow length. throw it away. A cracked or splintered arrow, if shot, could explode and cause serious injury. Lightly sand and polish any rough spots in an arrow’s finish. Check for missing or dulled points. Missing points must be replaced. Hone dulled points with a fine file, then clean them with steel wool. Store your arrows where they will not get wet or undergo temperature change. Many archers have special cases for storing their arrows. Others keep them in quivers hanging on a wall. Never put anything on top of your arrows; this could damage the fletching and bend the shafts. 20 Archery .Archery Equipment To make common repairs, follow the instructions for attaching nocks, points, and feathers in the section “Making Arrows.” Quivers Quivers hold your arrows when you are shooting. The style of quiver you choose will depend on the type of archery you shoot. • Belt quivers attach to your belt and allow you to reach arrows easily. Styles include vertical, diagonal, hip, pocket, and holster. • Ground quivers stick in the ground. They may have a rack to hold your bow as well as a container to keep your arrows upright. • Back quivers sling over either shoulder. One drawback to these quivers is that you must reach high to withdraw an Belt quiver arrow, a problem if you are trying to sneak up on game or you are target shooting in a forested area. Ground quiver • Bow quivers attach to the bow, giving hunters the convenience of carrying only one piece of equipment through the brush. Some field archers use bow quivers, but tournament archers usually find them too clumsy. Back quiver Bow quiver Archery 21 Archery Equipment. Making an Arrow Start with a bare shaft; attach a nock, a point, and three fletchings (and if you want, a crest) and you have made an arrow. Most archers make their first arrows with wooden shafts. The directions that follow are for making an arrow with a wood shaft and feather fletchings. If you want to make an arrow with different materials, discuss the possibilities with your Archery merit badge counselor. To make one arrow, you will need a fletching jig, an arrow shaft, a hand taper tool, a point, a nock, three fletchings, fletching glue or cement, and epoxy cement. Don’t forget your Scout knife. To make a wood arrow: Step 1—Cut the shaft to length. The picture shows a Scout cutting a wood arrow shaft using a Scout knife. Refer to the previous section on “Matching Arrows to Your Bow” to decide how long you should make your arrow. Step 2—Attach the nock and the point. Tapers are needed on each end of the shaft to provide a good surface for gluing on the nock and the point. Cut the tapers as shown (2a), using a hand taper tool. The long taper is for the point, and the short taper is for the nock. 22 Archery 1 2a .Archery Equipment 2b 2c 3a Put glue in the nock (2b) and spread the glue by twisting the nock onto the shorter taper (2c). The nock can be glued with fletching cement, but use a more rugged glue such as epoxy or hot glue for the point. Put the glue on the long taper, then twist the point onto the shaft to spread the glue and make a good bond. Step 3—After the glue on the nock has set, attach the fletchings. Placing fletchings accurately requires a fletching jig, as shown in the photos. Place a feather in the jig’s clamp (3a) so that the rounded part of the feather is about 3/4 inch from the back end of the clamp. Spread fletching glue evenly along the edge of the feather held in the clamp (3b, next page). Place the clamp in the jig. Make sure the fletching and the glue are in good contact with the shaft. The jig shown here uses a magnet to hold the clamp in place. Other jigs use the weight of the clamp to hold the fletching tight alongside the shaft. Do not hold these clamps in place. Let gravity do the job of holding the feather on the shaft while the glue dries. Archery 23 Archery Equipment. When the glue has dried, rotate the jig’s nock receiver 120 degrees until you hear a click. Repeat the above steps to glue the second fletching to the shaft. To complete your arrow, repeat the steps to glue the third fletching to the shaft. Step 4—Once your arrow is 3b finished, you might want to put a crest on it to identify it as yours. To add a crest, place a pattern of colored bands around the shaft about 2 inches in front of the fletchings. Put the crest close enough to the fletchings that it does not get buried in the target. Arm Guard Without an arm guard, your shirtsleeve or the skin of your The arm guard, worn over the arm that holds the bow, protects the forearm from the slap of the bowstring after the arrow is released. The arm guard also provides a smooth surface for the bowstring to strike. It usually is made of plastic or tough cordovan leather reinforced by a steel band. Adjustable elastic straps hold the guard snugly over the inside forearm. lower arm will often “grab” the bowstring, causing you to shoot low. The arm guard is the easiest accessory to select. Almost any commercial brand is suitable. Though absolutely essential, probably no part of the beginner’s equipment is so often overlooked. 24 Archery .Archery Equipment The hunting arm guard usually is wider and longer than guards used on field and target ranges. It has three or four straps instead of two. Shooting Glove, Tab, or Mechanical Release Aids Protect your shooting fingers with a shooting glove or tab. Even the lightest bow will soon make untrained fingers sensitive, eventually causing blisters. All archers should use finger protection, no matter how tough they think their fingers are. The most experienced and skilled archers always shoot with a glove or tab. Without a glove or tab, the release of your arrow— which is the most crucial motion in shooting—may be faulty. Shooting Glove The glove type of finger protection has three fingertips connected to a wrist strap. The glove should fit snugly, but not tightly, over the three shooting fingers. Carefully select a glove that fits well and is comfortable. Shooting glove Many top target archers use a tab because it gives greater control and a smoother release. Tab The simplest and least expensive finger protection is the tab. Available in various forms, the tab generally is a loose flap of plastic or leather that lies over the fingers that draw the bowstring. As a beginner, you may find the tab awkward, but with a little practice you can become comfortable using one. Archery 25 Archery Equipment. Mechanical Release Aids Mechanical release aids that replace the fingers in holding and releasing the bowstring have grown in use in recent decades. The three major types of mechanical releases are rope, solid (one-piece), and moving sections. Use extreme care with mechanical releases. The Boy Scouts of America recommends that mechanical release aids be used only under the strict supervision of a qualified merit badge counselor. 26 Archery .Archery Equipment Because the finger release is an important part of championship form, mechanical releases are not allowed in tournaments sanctioned by the Fédération Internationale de Tir à l’Arc (FITA), known in the United States as the International Archery Federation. These tournaments include the Olympics, world championships, and U.S. national championships. Bow Slings The best way to hold a bow is to hold it without wrapping your fingers around it. However, if you shoot this way the bow will jump out of your hand when you release the string. You will need a bow sling to keep the bow from falling to the ground. Different styles of bow slings can be bought or made, out of cord or leather. The two major types are the finger sling and the wrist sling. Try the different styles of bow slings to see which one works best for you and needs no adjustment after each shot. Wrist slings are either mounted on the bow and laid across the wrist, or looped around the wrist with an end going around the bow and hooked onto the loop on the inside of the wrist. Wrist sling The finger sling attaches around the thumb and the index finger of the bow hand. You also can make a simple finger sling using a shoestring. Archery 27 .Making a Bowstring Making a Bowstring In earlier times, bowstrings were made from raw animal and vegetable fibers. Later, linen came into use because it was strong and did not stretch as much as those fibers—two primary requirements for bowstring material. In recent years, science has developed excellent synthetic fibers, including Dacron, which most beginning archers use for their bowstrings. Though there are many ways to make a bowstring, the method described here is most commonly used and one of the simplest for a Scout. Work carefully and you will be finished in about an hour. With practice, you can make a bowstring in less than a half hour. To make your bowstring, you will need a bowstring jig, a serving jig, a spool of Dacron bowstring material, a spool of nylon serving string, a marking pen, and a pair of scissors or a knife. Bowstring servings Archery 29 Making a Bowstring. 1/2" 1 3/4" 3/8" 3 1/2" Hole 7" 30" 8" 1" 1" 3/8" Hole 1/2" 3 1/2" 29" Hole Dia. 59" 3 1/2" 11/2" Bowstring-Making Jig Materials Needed One 2" 4" (very straight) board, 8 feet long One 9-inch 3/8" birch dowel Two 3/8-inch wing nuts Two 3/8-inch flat washers Two 31/2-inch 3/8" carriage bolts Six 21/2-inch #10 wood screws 30 Archery Construction Tips 1. Set the dowels in 2-inch holes. 2.Make the uprights by reducing the 11/2-inch side of a 2 4 to 1 inch. 3.Glue and screw the uprights to their bases. 2" .Making a Bowstring Setting Up the Jig and Making the Dacron Bundle Step 1—Clamp the bowstring-making jig to a table. Turn the rotating end of the jig so it is along the jig’s axis. Step 2—Move the jig’s sliding end so its dowel is just the length of a bowstring from the dowel on the rotating head that is farthest away. (That distance is the length of an old bowstring that fits your bow or, if an old bowstring is not available, 4 inches less than the length of your bow.) Step 3—Turn the rotating head perpendicular to the axis of the jig. Make sure both wing nuts are tight. Step 4—Start the bowstring by wrapping several turns of the Dacron bowstring thread around the groove in one of the dowels in the rotating head. Wrap the string so it is caught under some of the wraps and can be pulled tight without slipping. Step 5—Pass the string around the other dowel in the rotating head, around the dowel in the sliding head at the other end of the jig, and back to the dowel at which you started. This is one “trip” around the jig. Make five trips around for a 10-strand bowstring or six trips for a 12-strand bowstring. 4 Step 6—End the last trip, not at the beginning dowel on the rotating head, but at the other dowel on the rotating head. Wrap the thread around the ending dowel so it will not slip. Set the spool of Dacron out of the way. Archery 31 Making a Bowstring. Making the First Serving Step 1—Use the serving jig to make a serving for the upper loop of the bowstring. Pull about 3 inches of serving thread from the jig. Let the jig hang while you hold the end of the string. Step 2—Move the jig so it is tight against the bundle of Dacron thread strung between the dowels on the rotating head. Put the jig as close to one of the rotating head dowels as you can without forcing the serving string out of its natural vertical position. Step 3—Holding the serving string taut, pull it slightly away from the direction the serving is to be made. Then make one turn with the serving thread around the Dacron bundle. Step 4—Transfer the end of the serving string to the other hand and, keeping it taut, hold it close to the Dacron bundle. Turn the serving jig around the Dacron bundle and the end of the serving string about 12 times. Step 5—Let the serving jig hang, and cut off the end of the serving string you are holding. Be sure you do not cut any of the threads in the Dacron bundle. 4 Step 6—Continue serving the bundle (wrapping serving thread around it) until you are about 11/2 inches from the second dowel on the rotating head. 6 32 Archery .Making a Bowstring Making the Serving-Finishing Knot The final step in making the serving is to finish it using the servingfinishing knot. The serving-finishing knot requires an extra piece of Dacron thread 18 inches long. Step 1—Fold the extra piece in half and lay it along the bundle so that the bend in the Dacron thread forms a loop that sticks out beyond the edge of the serving. 1 Step 2—Make about eight or 10 more turns with the serving string around the bundle and the extra piece of Dacron thread. (It helps to have someone hold the extra piece in place while you make the wraps around it.) Step 3—When the wraps are done, cut the end of the serving string so it has a 3-inch tail. Step 4—Tuck the tail through the loop of Dacron thread. 2 6 Step 5—Hold both ends of the Dacron thread with one hand and the end wrappings of the serving with the other. Then, pull the loop with the end of your serving back through the wrapped serving. Step 6—Pull the tail tight and cut it off where it comes out from under the serving. This completes the serving. Archery 33 Making a Bowstring. Making the Upper-Limb Loop Before you can make the upper-limb loop, you must cut the ends of the Dacron thread that were wrapped around the dowels of the rotating head. Step 1—Holding the spool of Dacron thread, unwind the thread from around the dowel. Then, snip the thread at the edge of the serving. Step 2—Find the other end of the Dacron thread by turning the rotating head of the jig so it is along the jig’s axis, with the dowel and its attached thread toward the center. 3 Step 3—Lift the Dacron bundle off the dowel. Unwrap the end of the Dacron thread from the dowel and snip the thread at the edge of the serving. Step 4—Slide the Dacron bundle until the serving wraps around the dowel and the ends of the serving are offset by about 1/4 inch. 4 4 34 Archery .Making a Bowstring Step 5—Measure 11⁄2 inches from the end of the loop (the dowel) and mark the serving. This is where the next serving will start. Step 6—Start the serving by pulling about 3 inches of serving thread from the serving jig and poking it up between the two sides of the serving at the point you marked. 5 Step 7—Hold the end of the string so it angles slightly away from the center of the bowstring jig and so the serving jig is tight against the serving. 7 Step 8—Make one turn around the two sides of the serving, lay the end of the serving thread along the Dacron bundle toward the center of the bowstring jig, and continue to make turns with the serving jig. 8 Step 9—Continue the serving for about 4 inches. Finish it with the serving-finishing knot. The finished loop is the larger upperlimb loop. 9 Archery 35 Making a Bowstring. Making the Lower-Limb Loop Step 1—To make the lower-limb loop, first swap the ends of the Dacron bundle on the bowstring jig and turn the rotating head so it is perpendicular to the axis of the jig. Step 2—Repeat all of the steps for making the upper-limb serving and the upper-limb loop, except the lower loop will be only 1 inch long. Making the Center Serving The center serving is most easily made when the string is on a bow. Step 1—Slide the upper-limb loop about halfway down the upper limb. Step 2—Twist the string by rotating the lower-limb loop about 12 times. Step 3—Place the lower-limb loop into the bowstring notches in the lower limb, then string the bow and check the string height. If it is too low, unstring the bow, twist the string a few more times, and recheck the string height. Step 4—Use a bow square to find the point on the string that is at the same level as the arrow rest. Mark the Dacron bundle 2 inches above and 5 inches below that point, and serve between the two marks (4) finishing with a serving- finishing knot. When this serving is done, you will have made a serviceable bowstring. 4 36 Archery .Making a Bowstring Applying the Nocking Point The nocking point is about 3⁄8 inch above the place where a bow square rests on the arrow rest and it is perpendicular to the bowstring. Mark this point, and either wrap extra serving string around the bowstring to build a small mound (as shown here) or place a brass nocking point on the string (see view 1). The nocking point will ensure that the arrow meets the same place on the bowstring for each shot (see view 2). 1 2 Archery 37 Making a Bowstring. You now have a homemade bowstring jig and can use it to make a bowstring. Step 1—Attach Dacron thread to one of the nails and wind the thread around the other nail until you have the number of strands the thread package recommends. Or, wind the Dacron thread around the nails until you have 10 strands for a 25-pound bow or 12 strands for a 35-pound bow. Step 2—Tie the two ends of the thread together and cut off the loose ends. Step 3—Shift the string on both nails until the knot you have just made is about 21/2 inches from one nail. Step 4—Using the knot as a guide, mark the string directly opposite it. Also make two marks at the other end of the string. These marks should also be about 2 1⁄2 inches from their nail. These two sections will form the loops. Step 5—Slip the knot and marks on the string toward the middle of the board until the two sets of marks are opposite each other. You must now separate the two sets of strings. A commercially made jig has a specially grooved device to hold them apart, but a small block of wood will do as well. 38 Archery .Making a Bowstring An Alternative Bowstring Jig You can make a bowstring jig using two nails and a wooden board or plank about 6 feet long. Step 1—Drive a headless nail into one end of the board. If you have a spare bowstring, put one end of the string over the nail. Step 2—Stretch the string the length of the board, then drive a nail into the other end at that point. When you put the loose end of the string over the second nail, the string should be taut. If you do not have a spare string to make this measurement, place the two nails so they will be 4 inches closer together than the length of your bow. This is the distance along the face of the bow between the string grooves (the ends of the bow where the bowstring is fitted) of the unstrung bow. Step 6—You are now ready to serve the loops. Refer to the previous instructions for how to make the servings on the two sets of strings. Shift the string until the served sections are around the nails. The ends of the servings should be offset by about 1⁄4 inch. Close the loops using the technique described previously. Archery 39 .Option A—Recurve Bows and Longbows Option A—Recurve Bows and Longbows Early archers used simple longbows and recurve bows. The first bows were made from a single piece of wood, and usually they had straight limbs. Where good bow wood was scarce, people learned to make composite bows from wood, horn, and sinew. These bows were often recurved, much like the one illustrated in this chapter. You may select a single-piece bow, which does not come apart, or a takedown bow, which breaks into three sections: a handle riser and upper and lower limbs. Takedown bows are easier to store and more convenient for travel than single-piece bows. An archer who hunts and target-shoots can use the same handle riser with two sets of limbs, rather than use two separate bows for these pursuits. Whatever bow you choose, the two most important factors in selecting it are its draw weight and its length. If you decide to buy a takedown bow, make sure the limbs fit snugly and do not move at the points where they attach to the handle riser. Draw Weight Draw weight is the amount of force needed to pull the bowstring back the length of the arrow. That force is measured in pounds. For easy comparison, because arrows come in many lengths, draw weight is always measured with the bowstring drawn back a standard distance of 28 inches. The number of pounds it takes to pull the bowstring back that far is the bow’s draw weight. A bow marked 33# at 28" has a draw weight of 33 pounds. A bow’s draw weight will be marked on its handle or lower limb. The limb is the upper or lower part of the bow that bends when the bowstring is drawn. A beginner archer with a takedown bow only needs to buy new limbs—not a whole new bow—to improve gear. Archery 41 Option A—Recurve Bows and Longbows. Another kind of draw weight is called the actual draw weight. This is the amount of force you exert on the bowstring when you are shooting. Actual draw weight may vary Upper limb from the draw weight marked on the bow, depending on the length Back Face of your draw. Determine your length of draw by holding the bow with an extended arm and drawing Sight window the bowstring back until the index Arrowplate finger is under the center of the Arrow rest chin. If your draw length is 28 inches, Handle your actual draw weight is the riser same as the draw weight marked section Serving on your bow. If your draw length Grip is less than 28 inches, your actual draw weight is less than the String height weight marked. A good draw weight to start with is 20 or 25 pounds. This String weight will allow you to learn and practice the skills of archery. Lower limb Archery is not a test of strength, but of skill. If your bow is too Recurve heavy, you will have a hard time learning to shoot accurately. You Shown are all of the parts of a modern recurve should be able to pull and hold bow. Modern longbows have the same parts, your bow at full draw 10 times for except they have no recurve and may not have 5 to 10 seconds at a time without a sight window (the cutaway part of the bow shaking or getting tired. above the handle). Tip String notch To determine the actual draw weight of your bow, add 2 pounds for every inch over 28 inches that you pull back your bowstring, or subtract 2 pounds for every inch under. For example: You have a bow marked 33# at 28" (33 pounds at 28 inches), and your draw length is 26 inches. Your actual draw weight is 29 pounds: 33 – (2 inches 2 pounds). If your father shoots the same bow with a draw length of 29 inches, his actual draw weight is 33 + (1 inch 2 pounds), or 35 pounds. 42 Archery .Option A—Recurve Bows and Longbows Bow Length Bow length is measured along the contour of the face of the bow (the side nearest the string) from limb tip to limb tip. The length is marked on the bow just below the draw weight. An example of a bow-length marking is “ATA 64 inch.” (ATA stands for Archery Trade Association, which sets standards for bow and string length.) The length of the bow you choose will depend mainly on the type of shooting you will do. Generally, target bows are longer than those designed for hunting. Target bows typically are 60 to 70 inches long; hunting bows are 54 to 64 inches long. In general, the longer the bow, the smoother and more accurate the shot; the shorter the bow, the more arrow speed and ease of handling when hunting. A good bow length to start with is about 64 inches. After you learn the fundamentals of good shooting and you have practiced enough to strengthen your shooting muscles, you may choose to go to a heavier bow. Caring for a Recurve Bow or Longbow Always unstring your bow when you are not using it. This will lengthen the bow’s life and keep it from taking on a permanent bend. Store the unstrung bow in a cool, dry place, hanging it vertically or horizontally on pegs. An occasional coat of furniture wax will help protect the finish. Never use your bow as a walking stick or allow it to strike objects that will nick or scar it. Scratches can turn into splinters and eventually result in a broken bow. When a bow might be exposed to rain or possible damage, place it in a bow case, a long narrow sack made of soft material. A bow is a delicate instrument. With proper care, it will last for many years. Recurve bow Longbow Archery 43 Option A—Recurve Bows and Longbows. The Bowstring and Its Care A bow square is a T-shaped device used to measure nocking height and string height. The National Archery Association advises beginners to use bowstrings made of Dacron with a serving (a wrapping of thread that protects the bowstring where the arrow is set) made of multifilament nylon thread. Get an expert to help you select a bowstring that is the right length and has the right number of strands for your bow. You can determine your bowstring’s nocking point with a ruler or a bow square. Lay the shaft of your arrow on the arrow rest and find the point on the string that would place your arrow perpendicular (at a 90-degree angle) to the string. Always use a bow stringer when stringing your bow. Improper stringing or using step-through or push-pull methods can cause permanent damage. 44 Archery .Option A—Recurve Bows and Longbows Now measure 3/8 inch up from the bottom of the arrow to find your correct nocking point. Mark this spot with serving thread, crimpon nock locator, or something else so you can find the exact location easily, every time. Inspect the string carefully before and after each day’s shooting. If any of the main strands are broken, replace the string. Check the serving and repair or replace it if it is loose or worn. The serving protects the string’s delicate fibers from directly contacting the arrow nock and assures longer string life. Store the bowstring with your bow. Arrowplate Keep your bowstring well-waxed with either a commercial bowstring wax or a wax you can make yourself using one part resin to three parts beeswax. Nock locator Arrow rest String height 90º Nocking height String center serving Mark the nocking point— the point on the string where the notched end of the arrow fits—to make it easy to locate. Archery 45 .Option B—Compound Bows Option B— Compound Bows The compound bow is the only fundamental improvement in bow technology since prehistoric times. The advantage of the compound bow is that the variation in draw weight as the bow is drawn can be modified from the ever-increasing draw weight variation of the recurve or longbow. This mechanical advantage is accomplished with two cams or eccentrics and a cable that passes over them, as shown. At full draw, compound bows Idler wheel normally have a draw Axle weight that is less than its maximum draw weight Buss Upper limb cable at partial draw. For example, a bow that reaches its maximum Shooting Limb bolt string draw weight of 50 pounds Cable guard slide at three-quarter draw Riser Cable guard might have a full draw window nocking weight of only 25 pounds. arrow rest point Serving Some compound bows Grip have a full draw weight of as little as 20 percent of the maximum. That is, Limb bolt they have an 80 percent let-off. Lower limb Cam Parts of a modern compound bow Archery 47 Option B—Compound Bows. Tip: To avoid dryfiring, it is best to always have an arrow on the string when shooting a bow. Dryfiring, or shooting a bow without an arrow, can seriously damage a bow and possibly injure the archer. H. Wilbur Allen patented the compound bow in 1969. Another characteristic of a compound bow is that when the bowstring is drawn to the bow’s preset draw length, the bow cannot be drawn any further. This means your bow must be adjusted to your draw length. Most compound bows have a limited range of draw-length adjustments. A knowledgeable adult should make the adjustments. You may select a single-cam bow or a two-cam bow. The single-cam bow will have an idler wheel at one end of the bow and the cam at the other end, as shown. A two-cam bow will have cams at both ends. Both types perform well. Your choice will depend on your preferences. Try both types before you decide which kind you want. Whatever bow you choose, the two most important factors in selecting it are its draw weights (both maximum and at full draw) and its length. Draw Weights Draw weight is the amount of force needed to pull back the bowstring. That force is measured in pounds. A compound bow has two draw weights—the maximum draw weight and the weight at full draw. Most good compound bows have adjustable draw weights. The maximum draw weight, the factory-set draw length, and the ATA bowstring length usually are marked on the face of the lower limb. (ATA stands for Archery Trade Association, which sets standards for bow weight and bow and string length.) For example, a compound bow might be marked 50# at 29", and 28" bowstring. That bow can be adjusted to have a maximum draw weight of 50 pounds; it has a draw length of 29 inches as it comes from the factory box; and it requires a 28-inch bowstring. The maximum draw weight and draw length could be adjusted to fit your needs, but the string length will always be 28 inches. 48 Archery .Option B—Compound Bows A good maximum draw weight to start with is about 35 pounds with a full draw weight of about 20 pounds. This weight will allow you to learn and practice the skills of archery. Archery is not a test of strength, but of skill. If your bow is too hard to pull, you will have a hard time learning to shoot accurately. You should be able to pull and hold your bow at full draw 10 times for 5 to 10 seconds at a time without shaking or getting tired. After you learn the fundamentals of good shooting and you have strengthened your shooting muscles with practice, you may choose to increase the maximum and full draw weights of your bow. Bow Length The length of a compound bow is measured from the axle of the cam or idler on the upper limb to the axle of the cam on the lower limb. An example of a bow length is “ATA 34 inch.” Archery 49 Option B—Compound Bows. Bows usually are stored hanging by the riser in a horizontal position in a cool, dry place. Do not subject a bow to excessive heat. The high temperatures reached in a truck or car left in the sun can damage any bow. The length of the bow you choose will depend mainly on the type of shooting you will do. Generally, target bows are longer than those designed for hunting. Compound bows for target-shooting are typically 38 to 44 inches long; hunting bows are 32 to 38 inches long. In general, the longer the bow, the smoother and more accurate the shot; the shorter the bow, the more arrow speed and ease of handling when hunting. For a compound bow, a good length to start with is 36 or 38 inches. Caring for a Compound Bow A compound bow requires constant care. Because it is a highly technical piece of machinery, any adjustments must be done by a bowyer trained to work on compound bows. The user’s manual included with the bow will give you detailed care instructions. The manual will tell you whether and when to lubricate the axles, whether and when to replace the cables and string, and how to store your bow. Follow the manufacturer’s instructions carefully and your bow will give good service over many years. The Bowstring and Cables and Their Care A bow square is a T-shaped device used to measure nocking height and string height. 50 Archery Determine your bowstring’s nocking point—the spot where you fit the notched end of the arrow—using a ruler or a bow square. Lay the shaft of your arrow on the arrow rest and find the point on the string that would place your arrow perpendicular (at a 90-degree angle) to the string. Now measure 3/8 inch up from the bottom of the arrow to find your correct nocking point. Mark this spot with serving thread or crimp-on nock locator so you can easily find the exact location every time. Keep your bowstring and nonmetal cables well-waxed with a commercial silicon-based bowstring wax. Inspect the string carefully before and after each day’s shooting. If the string is frayed, check the string carefully for broken strands. .Option B—Compound Bows If any of the strands are broken, replace the string. If no strands are broken, give the string a good coat of wax to help prevent further fraying. Check the serving and repair or replace it if it is loose or worn. The serving protects the delicate fibers of the strands from directly contacting the arrow nock and assures longer string life. Replacing the string and most other repairs and adjustments made on a compound bow require that the tension on the string and cables be relieved. A special compound bow press holds the bow and allows the limbs to flex without pulling the string. This is the only safe and convenient method that will not damage the bow. Only a knowledgeable, professional bowyer should repair and adjust the bow. A bowyer is someone who makes or services bows. Archery 51 .Shooting a Bow and Arrow Shooting a Bow and Arrow A bow is not ready for action until it is braced (strung). If you are shooting a recurve bow or longbow, use a stringer to string your bow each time. The photos show the proper ways to string straight and recurve bows. Improper stringing can damage or twist a bow’s limbs. When you string your bow, also check the string height (fistmele). The string height is the distance between the handle and the string when the bow is strung. The manufacturer sets the correct string height. On most modern bows, it is from 7 to 9 inches (18 to 23 centimeters). If your bowstring is too short, the string height will be too great and the bow limbs will be under too much strain. If the bowstring is too long, the string height will be too little and the string may give you a lot of arm and wrist slap. String stringer Rope stringer Archery 53 Shooting a Bow and Arrow. Before you begin shooting, sight down your bow’s limbs. The string should go straight down the middle of both limbs. If If you are shooting a compound bow, check that the cables are in good condition and are riding properly in the grooves of the cams and wheels. Also check that the tiller for both upper and lower limbs is proper. Tiller is the distance to the bowstring from the joint where the limb meets the riser. If your bow does not have the proper tiller, let an experienced adult archer fix it. your bow has a twisted limb, let Nine Shooting Steps an experienced Shooting a bow has nine basic steps: stance, nock, set, predraw, draw, anchor, aim, release, and follow-through. adult archer fix it. The techniques described here are for right-handed archers. Left-handed archers should reverse body positions. Stance Your stance is the position you assume when you shoot. For target shooting, position your body parallel to the flight of the arrow, with your left side toward the target. Stand comfortably, keeping your feet about shoulders’ width apart. Touch your toes to an imaginary line leading to the center of the target. If you were to lay an arrow on the ground against your toes, it would point to the target. Stand up straight and keep your weight evenly balanced on both feet. Look directly at the target. Stance 54 Archery .Shooting a Bow and Arrow Nock Nocking the arrow means placing the arrow on the string and the bow. With your right hand, lay the shaft of the arrow on the arrow rest. Nock the arrow (fit its notched end onto the string) at the proper nocking point, just below and touching the nock locator. Be sure the index (odd-colored) feather is facing away from the bow. Nock Set Keep your shoulders level. Set your left hand (if you are righthanded) comfortably in the handle of the bow. Lightly hold the bow with its weight against the base of your thumb. Center the bow’s pressure in the Y formed by your thumb and index finger. Avoid an overly tight grip on the bow handle because a tight grip chokes the bow’s natural action. Place three fingers of your right hand on the bowstring, index finger above the arrow and middle two fingers below it. The string should rest in the first joint of all three fingers. Your right hand is now forming a hook on the bowstring. Set Archery 55 Shooting a Bow and Arrow. Predraw Raise your left arm and the bow until the arrow is pointed directly at the target. At the same time, rotate your left elbow downward so it will not be in the way of the string when you release. Your left hand lightly holds the handle of the bow. The elbow of your drawing arm should be near the level of your nose. If the arrow keeps falling off the rest, try putting all three fingers below the arrow. Draw Extending your left arm fully and keeping your left shoulder down, begin to draw the bowstring with your right hand. Keep your right hand and elbow at shoulder level. Your right forearm becomes a straight-line extension of the arrow. Use your strong back muscles to draw the bow, concentrating on smoothly and steadily moving your elbow straight back. Be sure to draw your bow the same length each time. Anchor Draw 56 Archery The anchor point is where the archer’s hand and bowstring touch the face at full draw. It is essential that you use the same anchor point for every shot. The anchor point serves as the rear sight. .Shooting a Bow and Arrow Under-the-chin anchor The two basic anchors are the “under-the-chin” anchor that most target archers use, and the “side-of-the-face” anchor that most bowhunters use. Beginners are advised to start with the “under-the-chin” anchor, because it calls for consistency and can easily be checked. Also, it allows for easier string alignment and more accurate shooting. As you reach full draw, your head will rest on top of your hand. Your index finger will contact your jawbone, forming a solid contact point. The bowstring will touch the tip of your nose and the center of your chin. These three contact points make this anchor solid and reliable. A sloppy anchor is the same as a loose sight. Side-of-the-face anchor Archery 57 Shooting a Bow and Arrow. Aim Two basic methods are used for aiming a bow: bow sight and point of aim. The bow-sight method is more accurate and easier to learn. Whatever method of aiming you use, be sure to hold until you are sure of a good shot. Snap shooting—releasing too quickly—does not allow you to aim properly and can be difficult to overcome later if it becomes a habit now. Take your time, aim well, then shoot. Bow Sight Bow sights of all kinds are available. Some are simple pins, while others are complex sights for advanced target competition. All sights work the same way. Their only difference is that some are more easily adjustable for different distances. To start, try a simple pin or target-type sight. You can make your own. Place a strip of foam tape on the back of your bow above the handle. Then put a round-headed pin (the kind with a glass or enamel bead head) in the tape so that the head is visible on the arrow side of the bow. To establish a sight for 10 yards, put the pin in the tape about 5 inches above the handle, with the pinhead sticking out to the left of the bow about 1/4 inch. Choose a small (1-inch) aiming spot on your target, 10 yards away. With the arrow fully drawn and anchored, raise or lower the bow so that the pinhead is in line with the right eye and the aiming spot, and release the arrow. Shoot three to six arrows in the same way and see where they group. If all arrows hit the aiming spot, you have established the 10-yard sight. If the arrows group a little high, move the pin up a bit. Adjust the sight until the arrows consistently hit at or near the spot. Mark the 10-yard sight on the strip of tape. Homemade bow sight 58 Archery .Shooting a Bow and Arrow After you have established the 10-yard sight, stand 20 yards from your target and try to locate the 20-yard sight. To start, move the pin down about 1/8 inch below the 10-yard sight and try it. You should be close. For the 30-yard sight, move the pin about 1/4 inch below the 20-yard sight. The 40-yard sight will then be nearly 1/2 inch below the 30-yard sight. To shoot well with a bow sight, you must learn to come to full draw and hold the sight pin dead-center on the target. Make sure your anchor is solid. Once at full draw, look past the string and you will see the sight pin and the target. One or the other will be out of focus. It does not matter which one is in focus; concentrate on the one with which you feel most comfortable. When the arrow is fully drawn and anchored, and the sight is steady on the bull’s-eye, release the arrow. (See “Release” later in this chapter.) Some archers use a strip of tape with distances marked on it. By trial and error, as described in this section, they have figured out where to move their sight pin in that tape to shoot a specific distance. Homemade sights work as well as store-bought sights; the adjustments At full draw, the archer looks over the tip of the arrow at a marker in front of the target. In the illustration, the point of aim is too far from the archer; the arrow misses the target completely. By moving the marker and changing the point of aim, the archer can arrive at an accurate trajectory. Line of sight Point of aim just are not as precise. Trajectory Archery 59 Shooting a Bow and Arrow. Cast is the distance a bow can shoot an arrow. If you fish, you know that a throw of a fishing line or net is also a cast. 60 Archery Point of Aim The point-of-aim method requires the archer to rely on instinct. The archer looks down the arrow shaft to a spot on the ground in front of the target called the point of aim. Usually, the point of aim is a rock, a piece of paper, light-colored plastic, or other marker. In effect, the archer uses the point of the arrow as a sight. If the arrow misses the target, the point-of-aim marker is moved, forward or back, until the arrow strikes the target center. (See the illustration.) Thanks to modern technology and an open philosophy that archery is a sport for just about anyone, thousands of people with disabilities are able to participate in archery both competitively and for fun. Archery equipment manufacturers have developed gear especially for archers with special needs. A number of organizations and facilities actively support and promote archery for people with disabilities. In addition, to help equalize competition among archers with disabilities, multiple categories of competition have been developed. Serious archers are able to compete at the elite level, as well. In fact, since 1996, the Fédération Internationale de Tir à l’Arc (which governs international rounds and coordinates archery in the Olympics) has actively pursued the establishment of competition rules for archers with special needs. .Shooting a Bow and Arrow Release Releasing is simply a matter of relaxing the fingers that hold the string while you maintain the tension in your back. When your draw fingers relax, the string will escape, and the arrow will be on its way. Before you release, run a quick mental check of all the other steps. If everything is right, release, and you will see your arrow strike the bull’s-eye. Follow-Through As you release, maintain your good shooting form and keep your eyes on the target. Try to move as little as possible. Some people wait until the arrow hits the target before they relax. Movement during the follow-through can cause an otherwise good shot to miss the mark. In a good follow-through, your right hand will be at the back of your neck, and your bow arm will still be lined up perfectly with the target. Archery 61 .Archery Games and Tournaments Archery Games and Tournaments An archery tournament has one or more rounds. In each round, archers shoot a series of arrows at specified distances and target faces. Archery tournaments can last from a few hours to several days. Competitive archery has three styles: target, field, and 3-D. Target archery is shot on a large, open field with multicolored target faces. This is the type of archery shot in the Olympics. Field archery is shot on a roving course. Archers shoot at different angles and distances, moving through woods and fields as if in search of wild game. 3-D archery also is shot on a roving course, but the targets are molded foam replicas of game animals. Field and 3-D archery are good practice for bow hunting. Archery 63 Archery Games and Tournaments. Field Archery and Target Archery Field archery is set up on a course or roving range similar to the field archery plan shown later in this chapter. Different target faces and shooting distances are used for 14 targets. Stakes driven into the ground mark the exact shooting spot for each target. The archer stands behind the stakes to shoot. Outdoor target archery is set up in an open field, using 122-centimeter (48-inch) target faces. In most cases, the target position is set and the shooting line is moved when different distances are shot. The longest distances are shot first. Indoor target archery is shot in a building, using 60- or 40-centimeter targets at a distance of 18 meters (20 yards). Target archers straddle the firing line, with one foot in front of and one foot behind the line. In NFAA competition, Junior Division archers are grouped by age: Cubs (younger than 12), Youth (12 to 14), and Young Adult (15 to 17). Adults (18 and over) are grouped by type of shooting. Flights, or groups of archers with similar average scores, are set up to compete against each other. In NAA competition, archers are grouped by age: Cadet (younger than 12), Junior (12–14), Intermediate (15–17), and Adult (18 and over). Adults also are classified, but by their scores. These four organizations govern archery tournaments. See the resources section for ways to contact them. USA Archery/National Archery Association—Governs American target archery rounds and approves international target and field rounds for Americans in Olympic and FITA competitions. The NAA is a member of the International Archery Federation and the U.S. Olympic Committee. National Field Archery Association—Governs American field archery rounds for amateur and professional competition. The NFAA is a member of the International Field Archery Association. Fédération Internationale de Tir à l’Arc—Based in Switzerland, governs international rounds and coordinates archery in the Olympics. International Bowhunting Organization—Governs 3-D rounds. 64 Archery .Archery Games and Tournaments 4 2 5 3 6 Field archery plan 7 1 8 start 10 Finish 9 Field Archery Rounds The NFAA’s field, hunter, and animal rounds; the BSA’s Scout field round; and the IBO’s 3-D round all are field rounds. Field Round (NFAA) The field round, originally developed to give archers a way to practice bow hunting, has become as much a game as it is hunting practice. The course is set up in the woods, using 14 targets that vary in size from 20 centimeters (8 inches) to 65 centimeters (26 inches). Archers shoot four arrows at each target. For 11 of the targets, the four arrows are shot from the same position, but distances vary for different targets. Distances and target sizes are listed in the chart, “Target Sizes and Shooting Distances for the NFAA and Scout Field Rounds.” NFAA field target Archery 65 Archery Games and Tournaments. Shooting positions are marked with white stakes. They do not follow in any special order and may be arranged as best suits the terrain. The targets have five scoring rings. The black center or spot is one-fifth the outer diameter of the target and has an inner circle half the diameter of the spot. The inner circle is used in breaking tied scores. Standard field-round scoring is 5 points for the black bull’s-eye or spot, 4 points for the two white areas, and 3 points for the two outer black areas. Championship scoring uses all five rings with scores from 5 to 1. Scout Field Round (BSA) The Scout field round is an adaptation of the NFAA field round for Boy Scout camps. The targets and scoring are the same as for the NFAA field round. However, the distances to be shot are different so that less space is required. Hunter’s Round (NFAA) The hunter’s round is designed to give the archer practice in concentrating on the target area. The target is all black, with lighter lines marking the five scoring areas. Shooting distances are slightly less than in the field round, but the same course is used, with red stakes marking the shooting positions. Archers must change positions for each shot in a hunter’s round. Scoring is the same as in a field round: 5 points for the bull’s-eye or spot, 4 points for the next two rings, and 3 points for the two outer rings. Animal Round (NFAA) The animal round, designed for bow hunting practice, is laid out on the same course as the field and hunter’s rounds. However, animal target faces are used instead of circular black-and-white targets. Targets have two scoring areas, the “vital” and “nonvital” areas. Three arrows may be used for each target. The first arrow to hit scores; any remaining arrows are not scored. Thus, if the first arrow hits the target, the second and third arrows are not scored. Scoring is shown in the chart. 66 Archery .Archery Games and Tournaments Target Sizes and Shooting Distances for the NFAA and Scout Field Rounds NFAA Field Round Distances Target Size Yards Centimeters 80-70-60-50 65 65 65 60 65 55 65 50 50 45-40-35-30 50 45 50 40 50 35-35-35-35 50 30 35 25 35 20 35 15 35 35-30-25-20 ft. 20 Scout Field Round (BSA) Distance Target Size Yards Centimeters 7 20 11 35 15 50 20 65 12 35 16 50 21 65 13 35 17 50 22 65 14 35 18 50 23 65 19 50 Animal Round Scoring HITS First arrow Second arrow Third arrow VITAL AREA 20 points 16 points 12 points NONVITAL AREA 18 points 14 points 10 points Three-Dimensional (3-D) Round (IBO) The 3-D round also is designed for bow hunting practice. It is laid out on the same type of 14-target course used for the field and hunter’s rounds. However, the targets are three-dimensional replicas of animals, and distances are unmarked. Targets have three scoring areas: the circle within the vital area (10 points), the vital area (8 points), and the rest of the body (5 points). Only one arrow may be shot at each target. Target Archery Rounds The 900 round, Junior 900 round, FITA indoor rounds I and II, and NFAA indoor 300 round are standard target rounds. The NAA Junior Olympic Archery Development (JOAD) rounds are special target rounds used by JOAD clubs. Archery 67 Archery Games and Tournaments. 900 Round (NAA) This is an outdoor target round. The course is set up in an open area. A 122-centimeter (48-inch) five-color target with 10-ring scoring is used. Scoring, from the center out, is 10-9-8-7-6-5-4-3-2-1. The distances and numbers of arrows shot (for a total possible or perfect score of 900) are 30 arrows at 60 meters 30 arrows at 50 meters 30 arrows at 40 meters Shooting is in ends of six arrows. This means the score is checked and arrows are recovered after each six arrows have been shot. Junior 900 Round (NAA) This outdoor target round is similar to the 900 round. The target face and scoring are the same, but distances are shorter. Distances and numbers of arrows shot are 30 arrows at 50 meters 30 arrows at 40 meters 30 arrows at 30 meters Indoor FITA Round I (NAA and FITA International) A 40-centimeter five-color target face is used, with 10-ring scoring: 10-9-8-7- 6-5-4-3-2-1. Thirty arrows are shot at 18 meters. Shooting is in ends of three arrows. Indoor FITA Round II (NAA and FITA International) This is similar to FITA Round I, with 30 arrows shot. But, the distance is 25 meters and the target has a 60-centimeter face. Shooting is in ends of three arrows. NFAA Indoor 300 Round The 300 round consists of 60 arrows shot in 12 five-arrow ends. (The score is marked and arrows are recovered after each five arrows have been shot.) The round is shot at a 40-centimeter blue NFAA target from 20 yards. Scoring, from the center out, is 5, 4, 3, 2, and 1, with a total possible score of 300. 68 Archery .Archery Games and Tournaments Junior Olympic Archery Development (NAA) The NAA’s youth archery training program, Junior Olympic Archery Development (JOAD), classifies young archers by their scores. The ratings are Yeoman, Junior Bowman, Bowman, Junior Archer, Archer, Master Archer, Expert Archer, and Olympian. Outdoor shooting distances are 15, 20, 25, 30, 40, 60, and 70 meters. Outdoor qualifying rounds are shot in ends of six arrows at five-color 122-centimeter (48-inch) targets. The indoor distance is 18 meters (20 yards). Qualifying rounds are shot in ends of six arrows at 60-centimeter (24-inch) faces. Progressively higher scores are required for advancement. All JOAD qualifying rounds use the five-color target with 10-ring scoring. Scoring NAA and NFAA Targets Here is a typical archery scorecard. Each arrow is scored in a separate box, with the highest scores in a given end on the left side of the scorecard. Ends are scored from top to bottom on the card. The number of hits and the score for each end are recorded in the two right-hand columns. The total number of hits and total score are determined by adding the results of each end. Archery 69 Archery Games and Tournaments. Olympic and world archery titles are governed by the FITA, known in the United States as the International Archery Federation. FITA delegates from member nations make all decisions about equipment, rules of conduct, and every other aspect of tournament archery. 70 Archery Barebow vs. Freestyle Archers shooting barebow style may not use sights or other shooting aids. No mechanical release devices are allowed; only fingers, tabs, or gloves. Archers shooting freestyle may use approved shooting aids. In target archery, freestyle permits stabilizers and pin sights but does not allow release aids or optical sights. In field archery, freestyle allows stabilizers, release aids, and optical sights. National, International, and Olympic Shooting After you have earned the Archery merit badge, you might want to try your skills in a tournament. Local clubs put on tournaments for both target and field shooters. You might even set your sights on national, international, or Olympic competition. The recognized championship round for national, international, and Olympic archery tournaments is called the FITA. The FITA is shot in groups of 36 arrows at four distances marked off in meters. FITA distances are: Gentlemen—90, 70, 50, and 30 meters; Ladies—70, 60, 50, and 30 meters. The longer distances are always shot first. In the FITA, two different-size target faces are used: a 122-centimeter (48-inch) face at the longer two distances, and an 80-centimeter (32-inch) face at the shorter two distances. Both faces have five color zones—gold, red, blue, black, and white. A scoring line divides each zone into two areas, making a total of 10 scoring zones. These zones are worth from 10 points (for the center) to 1 point (the outer ring). The highest score possible in a single FITA round is 1,440. In most international tournaments, including the Olympics, competition starts with one FITA round shot over two days. The top 32 archers at the end of the FITA round advance to the single elimination match play, where they shoot one-on-one against their competition. Twelve arrows shot at 70 meters determine the winner of each match, who then advances to the next level of competition. Ties are broken with a single arrow shoot-off. Archery Terms. Archery Terms anchor point. The point on an archer’s face that the index finger or drawing hand touches during holding and aiming. arm guard. A piece of leather or other material worn on the arm that holds the bow to protect the forearm from being slapped by the bowstring. arrowplate. Material glued to the side of the bow where the arrow contacts it. The plate protects the bow from the friction of the arrow. Some modern bows have adjustable arrowplates to help tune the bow precisely. arrow rest. A small protrusion on the bow where the arrow rests during the draw. axle. The shaft around which a cam or idler wheel of a compound bow rotates. back. The outer side of the bow, farthest away from the string. barbs. The two sharp points of an arrowhead that project backward. bow arm. The arm that holds the bow while shooting. bow sight. A sighting device attached to a bow. bowstring wax. A silicon or beeswaxbased material used to lubricate bowstrings and to keep them from fraying. bow weight. See draw weight. brace. To string a bow. broadhead. A hunting point with two or more cutting edges. 72 Archery buss cable. The cable on a compound bow that goes around the cams and wheels. Cables can be made of stainless steel or a special bowmaker’s fiber. butt. Any material designed to stop arrows. A target face is pinned on the butt. cable guard. A steel rod mounted to a compound bow riser to keep the buss cable from interfering with the arrow. cable guard slide. A plastic slide that holds the buss cable onto the cable guard. It slides on the cable guard to allow the buss cable to move away from the riser as the bow is drawn. cam. The wheel-like device at the end of a compound bow limb that causes the draw weight to peak and then fall off as full draw is achieved. cast. The distance a bow can shoot an arrow. creep. To let the arrow move forward after reaching full draw, but before release. Creep is caused by a loss of back tension. crest. Bands of color decoration on an arrow, used for identification. crossbow. A bow designed to be shot similarly to a gun, with a groove or barrel that directs the arrow and a trigger that releases the string. draw. The act of pulling back the bowstring. draw length. The length of your full draw; the distance at which the arrow is drawn back before it is released. .Archery Terms draw weight. The amount of pull, measured in pounds, needed to draw an arrow back to an archer’s full draw length. For easy comparison of recurve bows and longbows, draw weight is always measured with the bowstring drawn back a standard distance of 28 inches. The draw weight of a compound bow is the pounds of pull needed to hold the bow at the draw length at which the bow is set. Also see maximum draw weight. drawing arm. The arm that draws the bowstring. face. The scoring surface on a target. The face is usually made of paper, but other materials such as thin plastics and plasticized paper are in common use. Also, the side of the bow nearest the string. finger sling. A strap attached to the thumb and index finger of the bow hand and used to keep the bow from falling after an arrow’s release. fistmele. The traditional term for string height. Fistmele was measured by placing the fist on the bow handle and raising the thumb toward the string. This method of measurement is not applicable to most modern bows. fletch. To put feathers or plastic vanes on the arrow near its nock. fletcher. One who puts feathers or vanes on an arrow. Also a term for the jig used to place feathers on the arrow when cementing them to the shaft. flight arrow. A light arrow used in shooting for distance. flight bow. A bow designed for maximum cast with little consideration for accuracy. flu-flu. An arrow used to shoot aerial disc targets or hunting birds. It has very large feathers that slow it rapidly after the first 30 yards and cause it to drop quickly. glove. Three leather fingers held with a wrist strap on the first three fingers of the release hand. The glove protects the archer’s fingers. handle. The rigid center portion of the bow that is held during shooting. head. The point or tip of the arrow. hit. To strike the target for a score. holding. Keeping an arrow at full draw while aiming. index feather. The feather that is perpendicular to the bow during the draw; usually the odd-colored feather. instinctive shooting. Shooting without the aid of a sighting device or a point of aim. kisser button (kisser). A marker placed on the bowstring so it touches the archer’s lips when the archer is at full draw. The kisser helps establish a better anchor point. let down. To slowly release tension from full draw without releasing the arrow. limb bolt. The bolt used to attach the limbs to the riser. limb socket. A section at the end of a riser that is made to hold the limbs in place. Limb sockets are used on takedown recurve bows and compound bows. longbow. A straight bow that has only one curve when strung. maximum draw weight. The peak draw weight of a compound bow. Maximum draw weight usually is reached at about 75 percent of full draw. nocking point. The point on the bowstring where the notched end of the arrow (the nock) is fitted. The nocking point is often marked by extra serving or nock locators. nock locator. An attachment to the center serving of a bowstring used to mark the nocking point. The nock locator may be a metal crimp-on, a piece of plastic that shrinks to fit, or an additional serving. overbowed. Equipped with too strong a bow. Archery 73 Archery Terms. overdraw. To draw an arrow so far that the point passes the face of the bow. perfect end. In target archery, six arrows shot consecutively into the gold zone. point of aim. A method of aiming in which the archer sights down the arrow shaft at a marker, usually an object on the ground, to try to hit the target. Also, the object used as the marker. range. Distance to be shot; or a shooting ground, indoors or out. riser. The handle part of a compound bow. round. A series of arrows shot at specified target faces at set distances. roving. Shooting at random objects at unknown distances. serving. A wrapping of thread around the bowstring to protect it where the arrow is nocked and where the loops fit in the bow’s string grooves. shooting line. A line at a specified distance from the target. In field archery, the shooter stands behind the shooting line; in target archery, the shooter straddles the line. sight pin. An indicator an archer puts on the bow to use as an aid in aiming. sight window. The cutaway section of the bow above its handle. spine. The stiffness of an arrow shaft relative to its thickness, weight, and length. stabilizer. A weighted rod screwed into the bow to help steady it and reduce undesirable twisting of the bow and bowstring. string fingers. The three fingers used to draw the bowstring. string grooves. The two ends of the bow where the bowstring is fitted. Also known as string nocks or string notches. 74 Archery string height. The distance between the bow’s handle and bowstring when the bow is strung. String height is set by the manufacturer and usually is from 7 to 9 inches. strung bow. A bow that is ready for shooting; also called a braced bow. tab. A flat piece of leather or plastic worn on the drawing hand to protect the fingers when drawing the string and to ensure a smooth release. tackle. Any or all of an archer’s equipment. tassel. A large piece of yarn worn on the archer’s belt and used to wipe arrows clean. tiller. The distance to the bowstring from the joint of the limb and riser of a compound bow. A well-tuned bow will have the same tiller for both upper and lower limbs. torque. An undesirable twisting of the bow or bowstring on release. toxophilite. An archer or one who is interested in all aspects of archery, including its history. trajectory. The path of the arrow in flight. vanes. The feathers or plastic substitutes that act as rudders in steering the arrow. wand. A slat 2 inches wide and 6 feet high, shot at from a distance of 100 yards. The wand shoot is a holdover from medieval competitions. weight of bow. See draw weight. wheel. A round cam. The wheel may be an eccentric with its axle off-center or an idler wheel with the axle in the center. wrist sling. A strap attached to the bow and the wrist of the archer’s bow hand, used to keep the bow from falling after an arrow’s release. Archery Resources. Archery Resources Scouting Literature Basic Illustrated Archery Visit the Boy Scouts of America’s official retail Web site at http:// www.scoutstuff.org for a complete listing of all merit badge pamphlets and other helpful Scouting materials and supplies. Books and Videos Adams, John. Archery (Know the Sport). Stackpole Books, 1996. Boga, Steven. Archery (Backyard Games). Stackpole Books, 1997. Fadala, Sam. Traditional Archery. Stackpole Books, 1999. Hamlett-Wood, Michael. Field Archery: A Complete Guide. Robert Hale Ltd, 2002. Haywood, Kathleen M., and Catherine F. Lewis. Archery: Steps to Success. 2nd ed. Human Kinetics, 1996. Sapp, Richard. Archer’s Digest. 7th ed. Krause Publications, 2003. United States Olympic Committee. A Basic Guide to Archery. Griffin, 1997. 76 Archery Wallentine, Douglas. Making Indian Bows and Arrows, The Old Way. Eagle’s View, 1988. Wise, Larry. Bow and Arrow: The Comprehensive Guide to Equipment, Technique, and Competition. Stackpole Books, 1992. The following books and videos are available from Quintessential Productions, Web site http://www. qproductsarchery.com, or USA Archery (National Archery Association), Web site http://www.usarchery.org/ usarchery/html/merchandise.html Rowe, Ruth. Archery: The Basics. #053V (video). ______. Archery: Refining Your Form. #033V (video). ______. Fundamentals of Recurve Target Archery. #030B (book). Rowe, Ruth, and Alan Anderson. Simple Maintenance for Archery. #031B (book). Instructional archery videos, including Larry Wise’s The Complete Guide to Beginning Archery, are available from Robinhood Video Productions Inc., 1600 Reynoldsburg-New Albany Road, Blacklick, OH 43004; telephone 614-322-1038; Web site http://www. robinhoodvideos.com. .Archery Resources Periodicals Archery Focus magazine Toll-free telephone: 800-671-1140 Web site: http://www.archeryfocus.com Organizations and Web Sites International Archery Federation (Fédération Internationale de Tir à l’Arc) Avenue de Rhodanie 54 CH-1007 Lausanne Switzerland Web site: http://www.archery.org International Bowhunting Organization Telephone: 440-967-2137 Web site: http://www.ibo.net National Field Archery Association Toll-free telephone: 800-811-2331 Web site: http://www.nfaa-archery.org USA Archery (National Archery Association/NAA) One Olympic Plaza Colorado Springs, CO 80909 Telephone: 719-866-4576 Web site: http://www.usarchery.org U.S. and International Archer Telephone: 520-742-5846 Web site: http://www.usarcher.com Acknowledgments The Boy Scouts of America thanks devoted Scouter Robert W. Goodrich, Ph.D., Randolph, Vermont, for his large role in this new edition of the Archery merit badge pamphlet. He compiled and wrote the manuscript, assisted with photography, and cheerfully remained active with this project through the end. The BSA greatly appreciates his expertise and involvement. Thanks to John Goodrich, D. Timothy Scronce, and Arthur Hall for their contribution to this pamphlet. Thanks to Jack Pedersen and Craig Pedersen for the many hours they spent assisting with photography. Thanks also to the City of Richardson (Texas) and its staff at Breckinridge Park for allowing the BSA to use their first-rate archery facilities during a photo shoot. Robert Goodrich, left Archery 77 Archery Resources. Photo and Illustration Credits Robert W. Goodrich, courtesy—pages 34–35 (all), 37 (two bottom), 38–39 (all), and 51 ©Photos.com—page 9 All other photos and illustrations not mentioned above are the property of or are protected by the Boy Scouts of America. John McDearmon—pages 12, 30, 42, 45 (bottom), 47, 59, and 65 78 Archery Notes Notes Merit badge library Though intended as an aid to Boy Scouts, Varsity Scouts, and qualified Venturers in meeting merit badge requirements, these pamphlets are of general interest and are made available by many schools and public libraries. The latest revision date of each pamphlet might not correspond with the copyright date shown below, because this list is corrected only once a year, in January. Any number of merit badge pamphlets may be revised throughout the year; others are simply reprinted until a revision becomes necessary. If a Scout has already started working on a merit badge when a new edition for that pamphlet is introduced, he may continue to use the same merit badge pamphlet to earn the badge and fulfill the requirements therein. In other words, the Scout need not start all over again with the new pamphlet and possibly revised requirements. Merit Badge Pamphlet American Business American Cultures American Heritage American Labor Animal Science Archaeology Archery Architecture Art Astronomy Athletics Automotive Maintenance Aviation Backpacking Basketry Bird Study Bugling (see Music) Camping Canoeing Chemistry Cinematography Citizenship in the Community Citizenship in the Nation Citizenship in the World Climbing Coin Collecting Collections Communication Composite Materials Computers Cooking Crime Prevention Cycling Dentistry Disabilities Awareness Dog Care Drafting Electricity Electronics Emergency Preparedness Energy Year 2002 2005 2005 2006 2006 2006 2004 2008 2006 2004 2006 2008 2006 2007 2003 2005 2005 2004 2004 2008 2005 2005 2005 2006 2008 2008 2009 2006 2009 2007 2005 2003 2006 2005 2003 2008 2004 2004 2008 2005 Merit Badge Pamphlet Engineering Entrepreneurship Environmental Science Family Life Farm Mechanics Fingerprinting Fire Safety First Aid Fish and Wildlife Management Fishing Fly-Fishing Forestry Gardening Genealogy Geology Golf Graphic Arts Hiking Home Repairs Horsemanship Indian Lore Insect Study Journalism Landscape Architecture Law Leatherwork Lifesaving Mammal Study Medicine Metalwork Model Design and Building Motorboating Music and Bugling Nature Nuclear Science Oceanography Orienteering Painting Personal Fitness Personal Management Pets Year 2008 2006 2006 2005 2008 2003 2004 2007 2004 2009 2009 2005 2002 2005 2005 2002 2006 2007 2009 2003 2008 2008 2006 2008 2003 2002 2008 2003 2009 2007 2003 2008 2003 2003 2004 2009 2003 2008 2006 2003 2003 Merit Badge Pamphlet Photography Pioneering Plant Science Plumbing Pottery Public Health Public Speaking Pulp and Paper Radio Railroading Reading Reptile and Amphibian Study Rifle Shooting Rowing Safety Salesmanship Scholarship Scuba Diving Sculpture Shotgun Shooting Skating Small-Boat Sailing Snow Sports Soil and Water Conservation Space Exploration Sports Stamp Collecting Surveying Swimming Textile Theater Traffic Safety Truck Transportation Veterinary Medicine Water Sports Weather Whitewater Wilderness Survival Wood Carving Woodwork Year 2005 2006 2005 2004 2008 2005 2002 2006 2008 2003 2003 2005 2001 2006 2006 2003 2004 2009 2007 2005 2005 2004 2007 2004 2004 2006 2007 2004 2008 2003 2005 2006 2005 2005 2007 2006 2005 2007 2006 2003 BOY SCOUTS OF AMERICA • SUPPLY GROUP NatiONal diStribUtiON CeNter 2109 Westinghouse Boulevard P.O. Box 7143 Charlotte, NC 28241-7143 www.scoutstuff.org direCt Mail CeNter P.O. Box 909 Pineville, NC 28134-0909 For fast credit card orders— VISA, MasterCard, American Express— call BSA operators toll-free 1-800-323-0732 T philmont scout r anch northern tier eagle scout On the road to high adventure he Supply Group is r eady to be a partner on your tr ail to Eagle through high adventur e. The adventur e is your s, and we ar e r eady with the gear you will need. You can depend on the latest in light weight, dur able, qualit y gear that will meet and sur pass your toughest r equir ements. w w w.scoutstuff.org SKU 35856 7 30176 35856 35856 florida sea base 7 2010 Printing