1
QUICK
START
GUIDE
AStrO
Ver.10.309
Toll Free : 1 (877) 462-7296
Visit : www.Alfano-usa.com
1
Thank you for purchasing the latest in data acquisition technology, the AStrO.
We hope that it surpasses your expectations.
This is the Quick Start Manual for the AStrO, please take a few minutes to
acquaint yourself with the features this product offers you.
We have tried to make the manual as user friendly as possible, making it
easy for you to input data.
As we are always striving for excellence in our products, we welcome your
feedback and comments on this product, guide or any of our other products.
Satisfied customers are our business.
Look for new innovations to come in the future.
Happy Racing!
Note:
If you require a detailed manual, please see AstrO’s user manual in our web site
ALFANO DATA ACQUISITION Inc.
---------------------------------------------------------------------------------------------------------------------------Toll Free: 1 (877) 462-7296
www.Alfano-usa.com
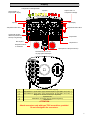
2
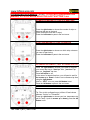
Display
Configurable 10 shift lights RPM
Gear position
Graphic RPM 1 or
temperature 1 Display
Graphic RPM 1 or
Temperature 2 Display
RPM Display
Lap time
Temperature Alarm LED 1
Temperature Alarm LED 2
Configurable lap time
difference (between last lap,
best lap or targeted lap)
Temperature 1
Best lap time
Temperature 2
Navigation Guide of
21 characters
Speed (direct or with speed sensor)
Download data to a PC via
very high speed infrared pen
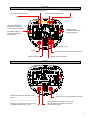
A
B
C
D
E
F
G
G-Force sensor for track mapping
Temperatures 1 inputs “NTC” type, thermocouple “K” type (EGT, CHT, WT,…)
Temperatures 2 inputs “NTC” type, thermocouple “K” type (EGT, CHT, WT,…)
Magnetic or infrared receiver (for lap times)
Speed sensor
RPM direct connection (for low powered ignition)
RPM sensor
ATTENTION
Attach connectors only with type TX20 screwdriver, provided.
Do not overtighten the connectors.
3
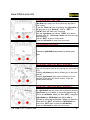
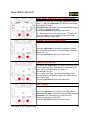
START
High Pre-Set Temperature Alarm 1
High Pre-Set Temperature Alarm 2
Low Pre-Set Temperature Alarm 2
Low Pre-Set Temperature Alarm 1
When both LEDS are off :
temperature is between the
Low and High Pre-Set Range
2 Flashing LEDS :
Temperature is Above the
Pre-Set High Range
When Bottom LED is on :
temperature is Below the
Pre-Set Range
Total number of Laps
STOP
Access to the counters memorized in ON mode
Number of laps in the Session
Number of sessions
STOP
Simple push of button gives access to menu 1
from 1 to 7
Access to the counters memorized in ON mode
--------------------------------------------------------------Holding for 2 seconds gives access to menu 2
« CONFIG SYSTEM » from 10 to 28
Time remaining to record data in minutes. This
varies according to configuration and sensors
connected to the system
4
www.Alfano-usa.com
BEFORE BEGINNING TO START YOUR RECORDING GO TO CONFIGURATION MENUS (Page 8 OF THIS MANUAL)
TO START; PRESS BOTH BUTTON AND HOLD 3 sec
To scroll through the menus: press briefly the left button.
To make your selection from one of the menus: press the right button.From STOP Mode,(The screen w/the STOP icon) if you hold the
left button for more than 2 seconds you will be in Configuration Mode.
From any screen: if you hold the left button for more than 2 seconds,
it will bring you back to Stop Mode. Also, If you delay too long on a certain screen, it will bring you automatically back to Stop Mode, .
TO START RECORDING
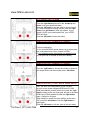
This is the main menu for the AStrO.
“174”:Time in minutes available to record data.
"C°": Choice that was made between Celcius over
Fahrenheit (C° or F°).
"D": Dynamic mode over Peak Delay (D or P).
"(1), (2)"...: Number of strips or beacons at that track.
"Km/h": Choice that was made between Metric or Imperial
(mph).
"C": (on the right bottom of screen) tells you to press right
button to get into the counters.
Press the left button to pass to the next menu.
TO TURN OFF
Pressing the right button will manually turn off the
unit.
TO REVIEW MAXIMUMS ONLY
If on this menu you read "No Maximum", it means you
have no data in memory.
When data has been stored, pressing the right button will
bring you to the Maximum RPM, Speed, Gear, Temp 1,
Temp 2, combining all the laps and best of all laps.
Press the left button to pass to the next menu.
Toll Free:1 (877) 462-7296
5
www.Alfano-usa.com
TO REVIEW BEST LAP TIME
"No Best Lap" means you do not have any lap data in
your system.
If you see "Best Lap" then by pressing the right button it
will bring you to your “BestLap”. Wait for “EXIT” &
“VIEW” which will flash every 4 seconds.
With the right button you choose “VIEW” to be able to
playback your lap. Arrows up & down will allow you to go
back and forth.
Wait for “EXIT” to get out of this menu.
Press the left button to pass to the next menu.
DATA REVIEW or RECALL
Press the right button and select to review your
laps
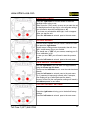
DATA REAL TIME PLAY BACK SCREEN 2
The unit will position itself at your last lap (ie: in this case 9
of 9)
Pressing left button (left arrow) will bring you to the previous lap.
Pressing right button( right arrow) will bring you to the
next lap.(in this case you cannot choose, as you are
already at the last lap)
DATA REAL TIME PLAY BACK SCREEN 3
On a chosen lap, wait a few seconds for “VIEW”, press
the right button and you will be able to playback (with the
right button to go up left to go down) that particular lap. If
you hit the left button when you see “EXIT”, using the
right button or left button you will be able to
choose an other lap to playback. When you have finished wait for “EXIT” and press the left button and
wait to see “EXIT”again to press the left button .
Press the left button to pass to the next menu.
Toll Free:1 (877) 462-7296
6
www.Alfano-usa.com
TO CLEAR RECORDED DATA
This screen will allow you to erase, by pressing the right
button, all your data except the counters and configuration
settings. (It will ask for a confirmation which will be input
with the right button)
Press the left button to pass to the next menu.
DIFFERENT DATA COUNTERS
Tip:For some counters your vehicle must be in motion
(speed needed)
Counters 1-2-3: (Time) Accumulate your engine’s running
time in Start Mode (motion required).
Counters 4-5-6: (RPM Time) Accumulate your engine’s
running time.
Counters 7-8: (Miles) Accumulate distance traveled (in
motion)
Pressing the right button will bring you to the 1st counter.
Pressing the left button will switch from counter “OFF”,
“ON” or “RESET”.
Press the right button to pass to the next counter (until
you reach a counter on which you want to record).
Press the left button to pass to the next menu.
Please download EGT, SPEED, G-Force Sensors Installation Guides
from our web Site:www.Alfano-usa.com
Toll Free:1-877-462-7296
7
www.Alfano-usa.com
CONFIGURATION MENUS (10-28) :TO ACCES CONFIGURATION
MENUS; AT STOP MODE HOLD THE LEFT BUTTON 3 sec
NUMBER of MAGNETIC STRIPS or BEACONS
Press the right button to choose the number of strips or
beacons that are on the track.
(most tracks have less than 3 strips).
Press the left button to pass to the next menu.
STARTING MAGNETIC STRIP or BEACON
Press the right button to choose on which strip or beacon
you want to start timing.
Press the left button to pass to the next menu.
DIFFERENTIAL w/BEST ,LAST or TARGETED LAP
Press the right button to choose if you want to compare
your current lap time to “best lap” time, “previous” lap
time or a “targeted” lap time.
Press left button to set.
In the case of a targeted lap time, you will need to wait for
the arrows up or down in order to set a reference lap time,
using the right button.
Wait for “EXIT” to be on, press left button to set.
Press the left button to pass to the next menu.
LOW / HIGH TEMPERATURE ALARM
Tip: Prior to this configuration go to Menu 22 and choose
between “Celcius” or “Fahrenheit”.
Press the right button to choose your low temperature target for Temp 1 (wait for arrows up or down), press the left
button to set .
Toll Free:1 (877) 462-7296
8
www.Alfano-usa.com
LOW / HIGH TEMPERATURE ALARM (Continue)
Then that will bring you to your high temperature target for
Temp 1. Using the right button you will now set the high
Temp target for Temp 1.
Left button sets and brings you to low temperature setting
for Temp 2. Repeat same steps
Press the left button to pass to the next menu.
Tip: During practice you should have your 1st alarm LED
on until you pass your low temp then both LEDS flash
when you reach your max. temp.
ENGINE CYCLE for RPM READING
Press the right button to choose the number of strokes
(Tip: for karts 2 cycle ignition or 4 cycle Briggs & Honda's
always use x 1)
Press the left button to pass to the next menu.
DISPLAY TIME DELAY
By pressing the right button, this feature allows the driver
a delay, giving him time, while driving, to watch the RPM
peak. He can choose between 0.4 and 4.4.
With increments of 0.4 .
At 0.4 there is no delay, you will be on dynamic mode.
By increasing the increments it allows him greater time to
see his peak data.
Press the left button to pass to the next menu.
SHIFT LIGHTS
Press the right button to choose the first LED (wait for
arrows up and down), choose the desired RPM, press the
left button to set.This brings you to the next LED .
Repeat same steps for each LED .
Press the left button to pass to the next menu.
Toll Free:1 (877) 462-7296
9
www.Alfano-usa.com
SPEED
**Prior to this configuration, go to Menu 23 and choose
either metric (cm) or Imperial (inches) measurements.
Press the right button to start speed configuration and
press again the right button to choose if you are using a
sensor or not.
Press the left button to set and pass to the next menu.
SPEED WITHOUT SENSOR
(For Direct Drive)
If you have chosen without sensor, pressing the right button will allow you to enter the tire’s size (wheel circumference) wait for the arrows up and down,and set with left
button.Next set the number of teeth on small sprocket
using right button and with arrows up and down, set
again with left button.
Finally, using the right button set the gear size of the rear
axle (number of teeth), and left button sets & passes to
next menu.
SPEED w/SPEED SENSOR
(For Vehicle w/Clutch)
If you are using a speed sensor, you will be using the
"ON" sensor menu.
Tip: when sensors face magnets, 2 green LEDS from shift
light are on.
Use right button to set sensor "ON"
Press the left button to enable entering of data
SPEED
Press the right button to enter the tire size (wheel circumference) (wait arrows up or down).
Press the left button to set and pass to the next menu.
Toll Free:1 (877) 462-7296
10
www.Alfano-usa.com
PITS SPEED LIMIT ALARM
Press the right button and wait for the arrows up and
down, to set your speed limit alarm.
Press the left button to set and pass to the next menu.
Tip: When driving and entering the pits, press the right
button, then left button to view your speed. If your
speed is OVER your preset speed limit, your UPPER
LEDS will flash.
Press the left button to leave this menu.
GEAR POSITION (NUMBER OF GEARS)
For this configuration:
1/ You will need RPM & speed sensors as your gear position is calculated from a ratio of speed to RPM
2/ Your engine must be running and your wheels turning
(ie: Put your kart on a stand or drive your vehicle)
GEAR POSITION (NUMBER OF GEARS)
Press the right button to choose the number of gears on
your engine and to set that number press left button.
GEAR POSITION (TO SET EACH GEAR RATIO)
Now you are in the configuration of your 1st gear.
As soon as you reach a targeted RPM level (ie: 2500
RPM) and stabilize yourself at that level, press the right
button, change to the next (2nd) gear and get to the same
RPM level (ie:2500) stabilize & press the right button
again. Repeat for all gears.
When finished to accept the gear settings (at the menu
“OK”) press the left button or use the right button to
begin again.
Press the left button to set and pass to the next menu.
Toll Free:1 (877) 462-7296
11
www.Alfano-usa.com
BAR GRAPH
Press the right button to choose to view the 2 bar graphs;
As a display for both RPM , [½ RPM & ½ Temp] or [½
Temp 1 & ½ Temp 2] .
Press the left button to set and pass to the next menu.
DISPLAY MASK (ON / OFF)
Press the right button, to choose masking (“OFF”) or not,
for each line of data.
To switch to the next line, press the left button.
At the end of your selection press the left button to set
and pass to the next menu.
Tip: the data will remain in memory for further use but will
not be displayed while driving
TEMPERATURE UNIT (C° or F°)
Tip: This must be set up prior to configuration of Menu 13
Low / High Temp alarm.
Press the right button to choose between Celcius or
Fahrenheit.
Press the left button to set and pass to the next menu.
DISTANCE UNIT (Km or Mile)
Tip: This must be set up prior to configuration of menu
Menu 17 Speed Configuration.
Press the right button to choose between Metric (km/h) or
Imperial (mph)
Press the left button to set and pass to the next menu.
Toll Free:1 (877) 462-7296
12
www.Alfano-usa.com
BACKLIGHT ON/OFF
Press the right button to choose wether to make the
backlight menu active or not.
When on active ("ON" mode), as soon as you start the unit
the backlight menu will pop up for a few seconds asking if
you will need to have the backlight on or off.
If you have not activated the back light, it will not appear
when you start the unit.
Press the left button to set and pass to the next menu.
G-FORCE SENSOR
Hold the sensor upward until you reach a maximum value,
then press the right button.
Repeat same, holding sensor downwards, then left, then
right. Install sensor flat on your Vehicle.
You should see a "YES" on your screen, meaning your GForce calibration is OK.
In case you see "NO" you will need to start the process
over.
Press the left button to set and pass to the next menu.
DATA SECURITY PASSWORD
With the right button, you can enter a 2 digit password,
using the arrows up and down.
Then press the left button to set once the code has been
chosen.
Press the left button to set and pass to the next menu.
Tip: If password is improperly entered, after 5 attempts,
your display will go to start Mode and the data in
memory will be lost (the configuration settings will remain).
Left button passes to next menu
FACTORY DEFAULT SETTINGS
Press the right button to bring you to the default factory
settings.
Press the left button to set and pass to the next menu.
Toll Free:1 (877) 462-7296
13