1
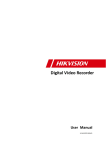
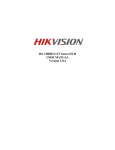
Quick Start Guide
DS-7200HVI-ST Series DVR (V1.0.2)
Menu Structure
use the Setup Wizard at this time, click the Cancel button.
The menu structure of the DS-7200HVI-ST Series DVR is as
You may also choose to use the Setup Wizard at a later time
followed:
by leaving the “Start Wizard when DVR starts?” checkbox
more important settings of your DVR. If you do not wish to
checked.
To start using the Setup
Wizard:
1. Click the Next button
on the Wizard
window.
Startup and Shutdown
2. This will take you to
the User Permission
Proper startup and shutdown procedures are crucial to
expanding the life of your DVR.
window.
3. Navigate to the Admin
To start your DVR:
Password input field.
1. Ensure the power supply is plugged into an electrical
4. Enter the admin password into the Admin Password
outlet. It is HIGHLY recommended that an
input field. By default,
Uninterruptible Power Supply (UPS) is used in
the password is
conjunction with the unit.
12345.
2. Press the POWER switch on the rear panel. After the
5. To change the admin
power has been started up, the POWER indicator will
password, check the
light green.
New Admin
To shut down the DVR:
Password checkbox.
1. Enter the Shutdown menu by clicking on Menu >
Enter the new password and confirm the password in the
ShutDown.
given fields.
6. Click the Next button. This will take you to the HDD
Management
window.
7. To start HDD
management, click the
Enter button.
2. Select the ShutDown button.
8. If a new HDD was
recently installed, select the HDD from the list to
3. Click the Yes button.
initialize it. Initializing the HDD will format and remove
Using the Setup Wizard
By default, the Setup Wizard will start once the DVR has
loaded. The Setup Wizard will walk you through some of the
all data from it.
9. After the HDD has been initialized, click the OK button
which will take you back to the Setup Wizard window.
10. Click the Next button. This will take you to the Record
Quick Start Guide - DS-7200HVI-ST Series DVR
1
button to finish and exit the Setup Wizard.
Settings Window.
11. To enter the Record
Settings window,
Congratulations! You’ve completed the Setup Wizard. The
click the Enter
next step in the initial setup process is to setup the system
button.
date and time.
12. Select the Schedule
tab.
13. Click the Edit button. This will open up a new recording
schedule.
14. Check both the
Setting Date & Time
It is extremely important to setup the system date and time to
accurately timestamp recordings and events.
Enable Schedule
To set date and time:
and All Day
1. Enter General Settings
checkbox. This will
menu by clicking
enable the recording
Menu> Settings >
schedule and have it
General.
record continuously all day.
2. Enter the correct date
15. Click the OK button.
and time under System
This will take you
back to the
Time.
3. Click the Apply button to save the setting.
Schedule tab. To
a different channel,
Live View
select the channel or all under Copy To and click the Copy
Some icons are provided on screen in Live Preview mode to
button.
indicate different camera status. These icons include:
copy the schedule to
16. Click the Next
Main Output
button. This will
take you to the
Aux Output
Network Settings
window.
Event Alarm: Indicates video loss, video tampering,
17. To configure
network settings, click the Enter button.
motion detection or relay alarm.
18. Enter the IP Address, Subnet Mask and Default
Record: Indicates the current channel is recording.
Gateway.
19. Click the OK button to return to the Setup Wizard.
The recording may have been started manually, from a
20. Click the Next button.
schedule, and/or triggered from motion or alarm.
This will take you to
the Camera
Event Alarm & Record
Management
window.
21. Select Add to add IP
camera, and click OK to return to Setup Wizard.
22. If all the settings are entered as desired, click the Done
2
PTZ Control
Settings for a PTZ camera must be configured before it is
used. Before proceeding, verify that the PTZ and RS-485 of
Quick Start Guide - DS-7200HVI-ST Series DVR
the DVR are connected properly.
Pattern Settings: Enter PTZ pattern configuration menu.
PTZ Menu: Enter PTZ menu.
PTZ Settings
PTZ Settings: Enter PTZ settings menu.
To configure PTZ settings:
Playback
1. Click Menu > Settings > PTZ to enter the PTZ Settings
Playback by Search
menu.
To playback files from a general search:
2. Select channel
where PTZ camera
1. Enter into the Video Search menu by clicking Menu >
Video Search.
is installed next to
Camera label.
2. Select General tab,
and Set the search
3. Configure the
settings of baud rate, date bit, stop bit, parity, flow control,
parameters by
PTZ protocol and address.
selecting cameras to
4. Click OK to save settings and exit the PTZ Settings menu.
search, video/file type
PTZ Control
and the start/end
The PTZ control panel in the live preview window provides
time.
a series of PTZ control buttons, as shown in the following
figure:
3. Click the Play button
to start playback of
all the files found
with the specified
search criteria or
click the Search
button to bring up the list of search results. After search
results are presented, select the file you would like to
1. Directional Pad/Auto-scan Buttons: Controls the
movements and directions of the PTZ. The center button
playback and press Play to enter synchronous playback
is also used to start auto-scan of PTZ.
cameras selection.
4. Recordings will automatically be played back in the
2. Zoom: Used to zoom in and out with the PTZ.
Playback interface.
3. Focus: Used to adjust the focus of the PTZ.
4. Iris: Used to open up or close the iris of the PTZ.
Playback from Live Preview
5. Speed: Adjusts the movement speed of the PTZ.
You may also instantly playback from a channel while
6. Light: Turns PTZ light (if applicable) on and off.
watching a Live Preview. The playback will be of recordings
7. Wiper: Turns PTZ wiper (if applicable) on and off.
from the past 5 minutes.
8. Zoom In: Instantly zooms PTZ in.
9. Center: Centers PTZ. Camera: Select a PTZ camera.
Preview Menu
Call Preset: Call a PTZ preset.
Call Patrol: Call a PTZ patrol.
Call Pattern: Call a PTZ
To playback from a channel instantly in Live Preview:
• Using a Mouse:
1. Right-click the mouse on desired channel and select the
Playback button.
2. Recordings from
pattern.
the selected
Preset Settings: Enter PTZ
channel will start
preset configuration menu.
playing back in the
Patrol Settings: Enter PTZ
Playback interface.
patrol configuration menu.
An Attention
Quick Start Guide - DS-7200HVI-ST Series DVR
3
message will appear if there are no recordings found from
the previous 5 minutes. You may also press the Play
Video Export.
2. Select desired
button to view the day’s recording for the selected
parameters to search
channel.
for files to export.
3. You may also select additional channels for playback
3. Press the Export
from the channel list on the right hand side of the
button. This will take
Playback interface.
you to the Video Search menu.
• Using the Front Panel/Remote:
4. Select the files to export. You may also click the Play
button to verify that these files are indeed the ones you
1. Press the PLAY button. This will take you into the
would like to export.
Playback interface.
2. Enter the channel you would like to view recordings for
5. The size of the
on the front panel or remote (i.e. press ‘SHIFT’, the
currently selected files
STATUS light will turn green, then press ‘1’ for channel
is displayed in the
1, press ‘2’ for channel 2).
lower-left corner of
the window. Select the
3. Recordings will begin for the selected channel.
Next button to enter
Playback from System Log
You may also playback recordings from the System Log.
the Export menu.
6. Select device to export to from drop-down list (USB Flash
To playback video from
Drive, USB HDD, and DVD Writer). If backup device is
the System Log:
not recognized:
1. Enter the Log Search
•
Click the Refresh
button.
menu by clicking
•
•
Menu>
Maintenance >Log
Reconnect device.
Check for
compatibility from
Search.
vendor.
2. Set Major Type setting to Information.
3. Set Minor Type setting to Start Record or End Record.
7. Click Start to begin backup process.
4. Set Start Time and End Time.
8. After the backup process has completed, you may select
5. Click the Search button.
the files from your device and click the Play button to
6. A list of results with your search criteria will be displayed.
verify that it has been exported successfully.
Select the video log to playback and click Play.
7. The recording will begin to play in the Playback interface.
Note: Video Player software will automatically be copied
on to the device that the recorded files were exported on.
Backup
Recorded files can be backed up to various devices, such as
USB flash drives, USB HDDs or a DVD writer.
To export recorded
files:
1. Enter the Export
Video menu by
clicking Menu >
4
Quick Start Guide - DS-7200HVI-ST Series DVR
Quick Start Guide
DS-7200HVI-ST Series DVR (V1.0.2)
Using the Front Panel Controls
DS-7204HVI-ST Front Panel:
1. Status Indicators:
•
•
•
POWER: the POWER indicator turns green when DVR is powered up.
STATUS: the indicator lights when compound key switches to numeric/letter input mode.
Tx/Rx: TX/RX indictor flickers green when network connection is functioning normally.
2. IR Receiver: operation by IR remote control.
3. Compound Buttons:
• 1 MENU: (1) Enter numeral “1”; (2) Access the main menu interface
• 2ABC/F1: (1) Enter numeral “2”; (2) Enter letters “ABC”; (3) The F1 button when used in a list
field will select all items on the list. In PTZ Control mode, it will turn on/off PTZ light.
• 3DEF/F2: (1) Enter numeral “3”; (2) Enter letters “DEF”; (3) The F2 button is used to cycle
through tab pages. It will also bring up the Channel & OSD Position settings.
• 4GHI/ESC: (1) Enter numeral “4”; (2) Enter letters “GHI”
(3) Exit and back to the previous menu
• 5JKL/EDIT: (1) Enter numeral “5”; (2) Enter letters “JKL”; (3) Delete characters before cursor;
(4)Select the checkbox and ON/OFF switch; (5) Start/stop record clipping in playback
• 6MNO/PLAY: (1) Enter numeral “6”; (2) Enter letters “MNO”;
(3) Playback, for direct access to playback interface
• 7PQRS/REC: (1) Enter numeral “7”; (2) Enter letters “PQRS”; (3) Manual record, for direct
access to manual record interface; manually enable/disable record
• 8TUV/PTZ: (1) Enter numeral “8”; (2) Enter letters “TUV”; (3) Access PTZ control interface
• 9WXYZ/PREV: (1) Enter numeral “9”; (2) Enter letters “WXYZ”; (3) Multi-camera display in
preview
• 0/A: (1) Enter numeral “0”; (2) switch between input methods (upper and lowercase alphabet,
symbols and numeric input)
4. SHIFT: Switch of compound keys between the numeric/letter input and functional control.
5. Control Buttons:
•
Directional buttons: In menu mode, the direction buttons are used to navigate between different
fields and items and select setting parameters. In playback mode, the Up and Down buttons are
used to speed up and slow down record play, and the Left and Right buttons are used to select the
recording 30s forwards or backwards. In preview mode, these buttons can be used to cycle
through channels.
• Enter: The Enter button is used to confirm selection in menu mode; or used to select checkbox
fields and ON/OFF switch. In playback mode, it can be used to play or pause the video. In
single-frame play mode, pressing the Enter button will advance the video by a single frame. And
in auto sequence preview mode, the buttons can be used to pause / resume auto sequence.
6. USB Interface: Connects USB mouse or USB flash memory devices.
Quick Start Guide - DS-7200HVI-ST Series DVR
5
DS-7208HVI-ST Front Panel:
1. USB Interface: Connects USB mouse or USB flash memory devices.
2. Status Indicators:
• POWER: the indicator lights in green when DVR is powered up.
• READY: the indicator lights in green when the device is running normally.
• STATUS: the indicator lights when compound key switches to numeric/letter input mode.
• ALARM: the indicator lights in red when there is sensor alarm occurring.
• HDD: the indicator flickers in red when HDD is reading/writing.
• Tx/Rx: TX/RX indictor flickers green when network connection is functioning normally.
3. IR Receiver: operation by IR remote control.
4. Compound Buttons:
•
•
1 MENU: (1) Enter numeral “1”; (2) Access the main menu interface
2ABC/F1: (1) Enter numeral “2”; (2) Enter letters “ABC”; (3) The F1 button when used in a
list field will select all items on the list. In PTZ Control mode, it will turn on/off PTZ light.
• 3DEF/F2: (1) Enter numeral “3”; (2) Enter letters “DEF”; (3) The F2 button is used to cycle
through tab pages. It will also bring up the Channel & OSD Position settings.
• 4GHI/ESC: (1) Enter numeral “4”; (2) Enter letters “GHI”
(3) Exit and back to the previous menu
• 5JKL/EDIT: (1) Enter numeral “5”; (2) Enter letters “JKL”; (3) Delete characters before
cursor;
(4)Select the checkbox and ON/OFF switch; (5) Start/stop record clipping in playback
• 6MNO/PLAY: (1) Enter numeral “6”; (2) Enter letters “MNO”;
(3) Playback, for direct access to playback interface
• 7PQRS/REC: (1) Enter numeral “7”; (2) Enter letters “PQRS”; (3) Manual record, for
direct access to manual record interface; manually enable/disable record
• 8TUV/PTZ: (1) Enter numeral “8”; (2) Enter letters “TUV”; (3) Access PTZ control
interface
• 9WXYZ/PREV: (1) Enter numeral “9”; (2) Enter letters “WXYZ”; (3) Multi-camera
display in preview
• 0/A: (1) Enter numeral “0”; (2) switch between input methods (upper and lowercase
alphabet, symbols and numeric input)
5. SHIFT: Switch of compound keys between the numeric/letter input and functional control.
6. Control Buttons:
• Directional buttons: In menu mode, the direction buttons are used to navigate between
different fields and items and select setting parameters. In playback mode, the Up and Down
buttons are used to speed up and slow down record play, and the Left and Right buttons are
used to select the recording 30s forwards or backwards. In preview mode, these buttons can
be used to cycle through channels.
• Enter: The Enter button is used to confirm selection in menu mode; or used to select
checkbox fields and ON/OFF switch. In playback mode, it can be used to play or pause the
video. In single-frame play mode, pressing the Enter button will advance the video by a
single frame. And in auto sequence preview mode, the buttons can be used to pause / resume
auto sequence.
6
Quick Start Guide - DS-7200HVI-ST Series DVR
DS-7216HVI-ST Front Panel:
1. IR Receiver: operation by IR remote control.
2. USB Interface: Connects USB mouse or USB flash memory devices.
3. Status Indicators:
• POWER: the indicator lights in green when DVR is powered up.
• READY: the indicator lights in green when the device is running normally.
• STATUS: the indicator lights when the compound key switches to numeric/letter input
mode.
• ALARM: the indicator lights in red when there is sensor alarm occurring.
• HDD: the indicator flickers in red when HDD is reading/writing.
• Tx/Rx: TX/RX indictor flickers green when network connection is functioning normally.
4. DVD-ROM: Space for DVD-ROM.
5. Control Buttons:
• Directional buttons: In menu mode, the direction buttons are used to navigate between
different fields and items and select setting parameters. In playback mode, the Up and Down
buttons are used to speed up and slow down record play, and the Left and Right buttons are
used to select the recording 30s forwards or backwards. In preview mode, these buttons can
be used to cycle through channels.
• Enter: The Enter button is used to confirm selection in menu mode; or used to select
checkbox fields and ON/OFF switch. In playback mode, it can be used to play or pause the
video. In single-frame play mode, pressing the Enter button will advance the video by a
single frame. And in auto sequence preview mode, the buttons can be used to pause / resume
auto sequence.
6. SHIFT: Switch of compound keys between the numeric/letter input and functional control.
7. Compound Buttons:
• 1 MENU: (1) Enter numeral “1”; (2) Access the main menu interface
• 2ABC/F1: (1) Enter numeral “2”; (2) Enter letters “ABC”; (3) The F1 button when used in a
list field will select all items on the list. In PTZ Control mode, it will turn on/off PTZ light.
• 3DEF/F2: (1) Enter numeral “3”; (2) Enter letters “DEF”; (3) The F2 button is used to cycle
through tab pages. It will also bring up the Channel & OSD Position settings.
• 4GHI/ESC: (1) Enter numeral “4”; (2) Enter letters “GHI”
(3) Exit and back to the previous menu
• 5JKL/EDIT: (1) Enter numeral “5”; (2) Enter letters “JKL”; (3) Delete characters before
cursor;
(4)Select the checkbox and ON/OFF switch; (5) Start/stop record clipping in playback
• 6MNO/PLAY: (1) Enter numeral “6”; (2) Enter letters “MNO”;
(3) Playback, for direct access to playback interface
• 7PQRS/REC: (1) Enter numeral “7”; (2) Enter letters “PQRS”; (3) Manual record, for
direct access to manual record interface; manually enable/disable record
• 8TUV/PTZ: (1) Enter numeral “8”; (2) Enter letters “TUV”; (3) Access PTZ control
interface
• 9WXYZ/PREV: (1) Enter numeral “9”; (2) Enter letters “WXYZ”; (3) Multi-camera
Quick Start Guide - DS-7200HVI-ST Series DVR
7
display in preview
0/A: (1) Enter numeral “0”; (2) switch between input methods (upper and lowercase
alphabet, symbols and numeric input)
8. JOG SHUTTLE Control: The JOG SHUTTLE control can be used to move the active selection
in a menu. The inner ring will move the selection up and down; the outer ring will move it left
and right. In the Playback mode, the inner ring is used to jump 30 seconds forward/backward in
a video. The outer ring can be used to speed up/slow down the video. In Preview mode, it can
be used to cycle through different channels.
•
8
Quick Start Guide - DS-7200HVI-ST Series DVR