1
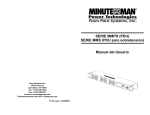
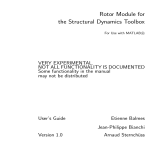
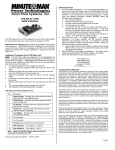
MMS620V16PC6
MMPD615V12PC6
MMPD2020V60DCL
User’s Manual
Para Systems, Inc.
1455 LeMay Dr.
Carrollton, TX 75007
Phone: 1-972-446-7363
Fax: 1-972-446-9011
Internet: minutemanups.com
UPS Sizing: sizemyups.com
PN – 34000303
Table of Contents
1. Introduction ..........................................................................................3
2. Introduction to the Front Panel ..........................................................3
3. Installation and Operation...................................................................4
3.1. Unpacking .......................................................................................4
3.2. Selecting Installation Position .........................................................4
3.3. Installation .......................................................................................5
3.3.1. Vertical Mounting ..................................................................5
3.4 Connecting the Equipment...............................................................6
3.5. Connecting to the Power Source ....................................................6
4. Troubleshooting...................................................................................6
Appendix...................................................................................................7
A.1. Specifications..................................................................................7
A.2. Obtaining Service............................................................................9
A.3. Limited Lifetime Warranty ...............................................................10
A.4. Declaration of Conformity ...............................................................11
© Copyright Para Systems, Inc., 2006
1
English
Important Safety Instructions .................................................................2
This manual contains important instructions that should be followed during the
installation and the operation of the Power Distribution Unit (PDU).
English
SAVE THESE INSTRUCTIONS
•
•
•
•
•
•
•
•
•
•
•
•
•
•
•
•
•
To ensure safety in all applications where a PDU is hardwired to the Electrical
Supply, ensure that a Qualified Service Personnel installs the system.
The PDU systems supplied with a power cord can be safely connected to the wall
outlet by the user.
Make sure that the AC Utility outlet is properly grounded.
Do not open the unit there are no serviceable parts inside. This will void the
warranty.
Do not try to repair the unit yourself, see Obtaining Service.
Please make sure that the input voltage of the PDU matches the supply voltage.
Use a certified input power cord with the correct plugs and sockets for the
appropriate voltage system.
Make sure the PDU is installed in the proper environment as specified. (0-40°C
and 0-90% non-condensing humidity)
Do not install the PDU in direct sunlight.
Install the PDU indoors as it is not designed for outdoor use.
This PDU supports electronic equipment in offices, telecommunications, process
control, medical, security, and IT applications.
This PDU is intended for use in a Controlled Environment.
Servicing of PDU must be performed by Qualified Service Personnel Only.
CAUTION – To reduce the risk of fire, connect only to a branch circuit with over
current protection in accordance with the National Electric Code, ANSI/NFPA 70
(3KVA)
CAUTION - Connect the PDU to a two pole, three wire grounding AC wall outlet.
The receptacle must be connected to the appropriate branch protection (circuit
breaker or fuse). Connection to any other type of receptacle may result in a
shock hazard and violate local electrical codes. Do not use extension cords,
adapter plugs, or surge strips.
CAUTION - To reduce the risk of electrical shock with the installation of this PDU
equipment and the connected equipment, the user must ensure that the
combined sum of the AC leakage current does not exceed 3.5mA.
CAUTION - To de-energize the outputs of the PDU: Disconnect the PDU from
the AC wall outlet.
Para Systems Life Support Policy
As a general policy, Para Systems Inc. (Para Systems) does not recommend the use
of any of its products in life support applications where failure or malfunction of the
Para Systems product can be reasonably expected to cause failure of the life support
device or to significantly affect its safety or effectiveness. Para Systems does not
recommend the use of any of its products in direct patient care. Para Systems will
not knowingly sell its products for use in such applications unless it receives in writing
assurances satisfactory to Para Systems that (a) the risks of injury or damage have
been minimized, (b) the customer assumes all such risks, and (c) the liability of
Para Systems Inc. is adequately protected under the circumstances.
Chapter One:
Introduction
Thank you for purchasing a MINUTEMAN Power Distribution Unit (PDU) product. It
has been designed and manufactured to provide many years of trouble free service.
Please read this manual before installing your MMPD or MMS Series, PDU models
MMPD615V12PC6, MMS620V16PC6, MMPD2020V60DCL as it provides important
information that should be followed during installation and operation of the PDU
allowing you to correctly set up your system for the maximum safety and performance.
Included is information on customer support and factory service if it is required. If
you experience a problem with the PDU please refer to the Troubleshooting guide in
this manual to correct the problem or collect enough information so that the
MINUTEMAN Technical Support Department can rapidly assist you.
Chapter Two:
Introduction to the Front Panel
Receiving Inspection
After removing your MINUTEMAN PDU from its carton, it should be inspected for
damage that may have occurred in shipping. Immediately notify the carrier and
place of purchase if any damage is found. Warranty claims for damage caused by
the carrier will not be honored. The packing materials that your PDU was shipped in
are carefully designed to minimize any shipping damage. In the unlikely case that the
PDU needs to be returned to MINUTEMAN, please use the original packing material.
Since MINUTEMAN is not responsible for shipping damage incurred when the
system is returned, the original packing material is inexpensive insurance. PLEASE
SAVE THE PACKING MATERIALS!
2
3
English
IMPORTANT SAFETY INSTRUCTIONS
External Ground Stud
Input Power Cord
Circuit breaker
Output receptacles
To connect an external ground wire.
To connect to Utility.
Over current protection.
To connect the equipment.
5.
6.
Power Switch
Surge LED (green)
To turn the PDU On/Off.
The LED is illuminated when providing Surge
protection. The LED is off when the Surge
protection devices are damaged or if the
utility power is not present.
The LED is illuminated when the utility power
is present. The LED is off when the utility
power is not present.
7.
Power On LED (green)
Chapter Three:
Installation and Operation
The packing condition and the external outlook of the PDU should be inspected
carefully before installation. Retain the packing material for future use.
3.
d.
e.
Remove the PDU from the plastic bag. Use CAUTION the plastic bag holding
the PDU is very slippery so be careful in unpacking and handling the PDU.
Standard Package includes:
a. PDU
b. Vertical Mount (0U), mounting hardware
c. User's Manual
d. Warranty Document
e. Platinum Protection Document (if applicable)
Mechanical Loading - Mounting of the equipment in the rack should be such that
a hazardous condition is not achieved due to uneven mechanical loading.
Circuit Overloading - Consideration should be given to the connection of the
equipment to the supply circuit and the effect that overloading of the circuits
might have on over-current protection and supply wiring. Appropriate
consideration of equipment nameplate ratings should be used when addressing
this concern.
Reliable Earthing - Reliable earthing of rack-mounted equipment should be
maintained. Particular attention should be given to supply connections other than
direct connections to the branch circuit (e.g. use of power strips).
3.3. Installation
3.3.1. Vertical Mounting 0 (zero) U
Side Mounting:
1.
2.
3.1. Unpacking
1. Take the PDU out of the box.
2.
c.
3.
Snap on the 0U mounting brackets to the backside of the PDU as shown.
Orient the PDU to the desire position and then attach the PDU to the rack with
the retaining screws (provided) as shown.
The installation is complete. See Connecting the Equipment.
3.2. Selecting Installation Position
The Minuteman PDU Series is intended to be install in a temperature controlled
environment that is free of conductive contaminants. Avoid locations near heating
devices, water or excessive humidity, or where the PDU is exposed to direct sunlight.
Route power cords so they cannot be walked on or damaged.
Operating Temperature (Max): 0 to 40 degrees C (+32 to +104 degrees F)
Operating Elevation: 0 to 3,000m (0 to +10,000 ft)
Operating and Storage Relative Humidity: 0 - 90%, non-condensing
Storage Temperature: 0 to 65 degrees C (+32 to +149 degrees F)
Storage Elevation: 0 to 15,000m (0 to +50,000 ft)
Rack Mount Instructions - The following or similar rackmount instructions are
included with the installation instructions:
a. Elevated Operating Ambient - If installed in a closed or multi-unit rack assembly,
the operating ambient temperature of the rack environment may be greater than
room ambient. Therefore, consideration should be given to installing the
equipment in an environment compatible with the maximum ambient temperature
(Tma) specified by the manufacturer.
b. Reduced Air Flow - Installation of the equipment in a rack should be such that
the amount of airflow required for safe operation of the equipment is not
compromised.
4
Side Mount
Flush Mount
Flush Mounting:
1.
2.
3.
Align the center hole of the 0U mounting brackets (backside) to the mounting
hole on the rack. Attach the 0U mounting bracket to the rack with the retaining
screws (provided).
Snap the PDU into the 0U mounting bracket.
The installation is complete. See Connecting the Equipment.
5
English
English
1.
2.
3.
4.
Appendix
English
Plug the equipment into the output receptacles on the PDU. Do not use extension
cords, adapter plugs or surge strips on the output of the PDU. Ensure that the load
does not exceed the maximum output rating of the PDU (refer to the information label
on the PDU or the Electrical Specifications in this manual).
3.5. Connecting to the Power Source
1.
Verify that the voltage and frequency ratings match that of the Utility power, and
then connect the AC Input power cord into a two-pole, three -wire grounded
receptacle only. The receptacle shall be installed near to the PDU and shall be
easily accessible. Do not use extension cords, adapter plugs, or surge strips.
The PDU has an external ground stud for attaching an external ground wire from
the rack to the PDU.
NOTE:
Each individual input power cord for the dual circuit PDU
(MMPD2020V60DCL) must be connected to its own Branch Circuit.
2. Turn the Power Switch to the on position (Not on all models).
3. The Power On LED (green) will illuminate indicating that the PDU is on and
providing power to the connected equipment (Not on all models).
4. The Surge LED (green) will illuminate indicating that the PDU is on and providing
surge protection to the connected equipment (Not on all models).
5. Turn on the connected equipment.
6. The installation is complete the PDU is ready for normal operation.
Chapter Four:
Troubleshooting
If the PDU malfunctions, check the list below to resolve the problem. Should the
problem persist, call for service.
Situation
Power On LED is not on
and there is no output
power.
Check Items
1.Input power cord not
plugged in to the wall outlet.
2.Input circuit breaker is
tripped.
3.The circuit breaker at the
service panel is tripped.
4.No Utility power available.
Solution
1.Connect the Input power
cord to the wall outlet.
2.Unplug the input power cord
and reset the input circuit
breaker. Connect the Input
power cord to the wall outlet.
3.Unplug the input power cord
and reset the circuit breaker
at
the
service
panel.
Connect the Input power cord
to the wall outlet.
4.Contact your local Utility
company.
The Power On LED is off,
There is an internal fault, call
but there is output power.
for Service.
One
of
the
connect With a voltmeter, check the 1.If there is an AC voltage at
equipment does not turn output receptacle for an AC the output receptacle, check
on.
voltage.
the connected equipment.
2.If there is not an AC voltage
at the output receptacle, there
is an internal fault, call for
Service.
The Surge Protection LED
The surge protection devices
is off.
are blown, call for Service.
6
A.1. Specifications
Model Number
Maximum Load Capacity
INPUT PARAMETERS
Number of Phases
Nominal Voltage
Frequency
Input Protection
OUTPUT PARAMETERS
Nominal Voltage
Frequency
Branch Circuit Protection
Circuit Quantity
ENVIRONMENTAL
Operating Temperature
Storage Temperature
Operating/Storage Humidity
Operating Elevation
Storage Elevation
PHYSICAL
Input Power Cords
Input Plugs
Output Receptacles
Mounting Format
Net Dimension
(L x W x H)
Net Weight
Lbs (Kgs)
Ship Dimensions
(L x W x H)
Ship Weight
Lbs (Kgs)
REGULATORY COMPLIANCE
Safety/Approvals
MMPD2020V60DCL
16Amps per circuit
Single (1∅2W +G)
120VAC
50/60Hz
Re-settable circuit breakers (2)
120VAC
50/60Hz
UL 60950-1
2 (16Amp circuits)
+32° - +104°F (0° - 40°C)
+32° - +149°F (0° - 65°C)
0 - 90%, non-condensing
0 to 3,000m (0 to +10,000 ft)
0 to 15,000m (0 to +50,000 ft)
15-feet (2)
NEMA L5-20P (2)
20-Total (10 per circuit)
NEMA 5-15/20R
Vertical (Zero U)
60.0 x 1.64 x 1.50”
(1524.0 x 41.4 x 38.1 mm)
8.16
(3.70)
63.27 x 4.80 x 3.07”
(1607 x 122 x 78 mm)
9.0
(3.87)
UL 60950-1, cUL (CSA 22.2), CE
7
English
3.4. Connecting the Equipment
English
Number of Phases
Nominal Voltage
Frequency
Input Protection
Surge Energy
OUTPUT PARAMETERS
Nominal Voltage
Frequency
Branch Circuit Protection
Circuit Quantity
ENVIRONMENTAL
Operating Temperature
Storage Temperature
Operating/Storage
Humidity
Operating Elevation
Storage Elevation
PHYSICAL
Input Power Cord
Input Plug
Output Receptacles
Mounting Format
Net Dimension
(L x W x H)
Net Weight (Lbs)
Ship Dimensions
(L x W x H)
Ship Weight (Lbs)
REGULATORY COMPLIANCE
Safety/Approvals
MMPD615V12PC6
12Amps
MMS620V16PC6
16Amps
A.2. Obtaining Service
If the PDU requires Service:
Single (1∅2W +G)
120VAC
50/60Hz
Re-settable circuit breaker
N/A
2000 Joules
120VAC
50/60Hz
UL 60950-1
One
+32° - +104°F (0° - 40°C)
+32° - +149°F (0° - 65°C)
0 - 90%, non-condensing
0 to 3,000m (0 to +10,000 ft)
0 to 15,000m (0 to +50,000 ft)
6-feet
NEMA 5-15P
6
NEMA 5-15R
NEMA 5-20P
6
NEMA 5-15/20R
Vertical (Zero U)
12.0 x 1.64 x 1.5”
16.0 x 1.64 x 1.5”
(304.8 x 41.4 x 38.1 mm)
(400.0 x 41.4 x 38.1 mm)
1.32
1.98
(0.60)
(0.90)
12.60 x 4.80 x 3.07”
16.53 x 4.80 x 3.07”
(320 x 122 x 78 mm)
(420 x 122 x 78 mm)
2.0
3.0
(0.77)
(1.07)
UL 60950-1,
cUL (CSA 22.2), CE
Specifications are subject to change without prior notice.
8
UL 1449, UL 60950-1
cUL (CSA 22.2), CE
1.Use the TROUBLESHOOTING section to eliminate obvious causes.
2.Verify there are no circuit breakers tripped. A tripped circuit breaker is the most
common problem.
3.Call your dealer for assistance. If you cannot reach your dealer, or if they cannot
resolve the problem call or fax MINUTEMAN Technical Support at the following
numbers; Voice phone (972) 446-7363, FAX line (972) 446-9011 or contact
Minuteman UPS at [email protected]. Please have the following
information available BEFORE calling the Technical Support Department.
A. Your name and address.
B. Where and when the unit was purchased.
C. All of the model information about your PDU.
D. Any information on the failure, including LEDs that may not be illuminated.
E. A description of the protected equipment, including model numbers if possible.
F. A technician will ask you for the above information and, if possible, help solve
your problem over the phone. In the event that the unit requires factory service, the
technician will issue you a Return Material Authorization Number (RMA #).
G. If the PDU is under warranty, the repairs will be done at no charge. If not, there
will be a charge for repair.
4. Pack the PDU in its original packaging. If the original packaging is no longer
available, ask the Technical Support Technician about obtaining a new set. It is
important to pack the PDU properly in order to avoid damage in transit. Never use
Styrofoam beads for a packing material.
A. Include a letter with your name, address, daytime phone number, RMA number,
a copy of your original sales receipt, and a brief description of the problem.
5. Mark the RMA # on the outside of all packages. The factory cannot accept any
package without the RMA # marked on the outside.
6. Return the PDU by insured, prepaid carrier to:
Para Systems Inc.
MINUTEMAN UPS
1455 LeMay Drive
Carrollton, TX 75007
ATTN: RMA # _______
9
English
Model Number
Maximum Load Capacity
INPUT PARAMETERS
A.4. Declaration of Conformity
Para Systems Inc. (Para Systems) warrants this equipment, when properly applied
and operated within specified conditions, against faulty materials or workmanship for
Lifetime from the date of purchase (certain conditions apply). For equipment sites
within the United States and Canada, this warranty covers repair or replacement of
defective equipment at the discretion of Para Systems. Repair will be from the
nearest authorized service center. Replacement parts and warranty labor will be
borne by Para Systems. For equipment located outside of the United States and
Canada, Para Systems only covers faulty parts. Para Systems products repaired or
replaced pursuant to this warranty shall be warranted for Lifetime applying to the
original product. This warranty applies only to the original purchaser who must have
properly registered the product within 10 days of purchase.
Application of Council Directive(s):
UL
The warranty shall be void if (a) the equipment is damaged by the customer, is
improperly used, is subjected to an adverse operating environment, or is operated
outside the limits of its electrical specifications; (b) the equipment is repaired or
modified by anyone other than Para Systems or Para Systems approved personnel;
or (c) has been used in a manner contrary to the product’s User's Manual or other
written instructions.
Manufacturer’s Address:
1455 LeMay Drive, Carrollton, Texas 75007 (USA)
Any technical advice furnished before or after delivery in regard to use or application
of Para Systems’ equipment is furnished without charge and on the basis that it
represents Para Systems’ best judgment under the circumstances, but it is used at
the recipient’s sole risk.
EXCEPT AS PROVIDED HEREIN, PARA SYSTEMS MAKES NO WARRANTIES,
EXPRESSED OR IMPLIED, INCLUDING WARRANTIES OF MERCHANTABILITY
AND FITNESS FOR A PARTICULAR PURPOSE. Some states do not permit
limitation of implied warranties; therefore, the aforesaid limitation(s) may not apply to
the purchaser.
EXCEPT AS PROVIDED ABOVE, IN NO EVENT WILL PARA SYSTEMS BE
LIABLE FOR DIRECT, INDIRECT, SPECIAL, INCIDENTAL, OR CONSEQUENTIAL
DAMAGES ARISING OUT OF THE USE OF THIS PRODUCT, EVEN IF ADVISED
OF THE POSSIBILITY OF SUCH DAMAGE. Specifically, Para Systems is not
liable for any costs, such as lost profits or revenue, loss of equipment, loss of use of
equipment, loss of software, loss of data, cost of substitutes, claims by third parties,
or otherwise. The sole and exclusive remedy for breach of any warranty, expressed
or implied, concerning Para Systems’ products and the only obligation of Para
Systems hereunder, shall be the repair or replacement of defective equipment,
components, or parts; or, at Para Systems’ option, refund of the purchase price or
substitution with an equivalent replacement product. This warranty gives you
specific legal rights and you may also have other rights, which vary from state to
state.
10
Standard(s) to which Conformity is declared:
UL 60950-1, cUL, UL1449 (UL1449 is for Surge models only)
Manufacturer’s Name:
Para Systems, Inc. (MINUTEMAN UPS)
Type of Equipment:
Information Technology Equipment
Model No:
MMPD615V12PC6, MMS620V16PC6, MMPD2020V60DCL
Year of Manufacture:
Beginning January 1, 2007
I, hereby declare that the equipment specified above conforms to the above
Directive(s).
Robert Calhoun
(Name)
Robert Calhoun
(Signature)
Manager Engineering
(Position)
Date: January 1, 2007
Place:
Carrollton, Texas, USA
11
English
English
A.3. Limited Lifetime Product Warranty
NOTES:
English
12