1
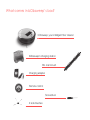
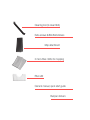
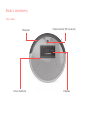
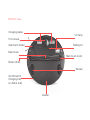
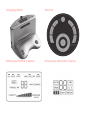
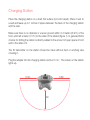
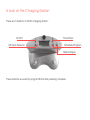
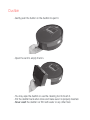
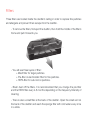
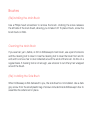
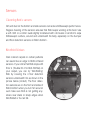
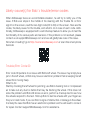
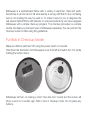
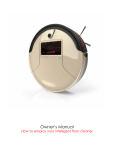
Ow
www.bObsweep.com
n e r’s M a n u al
How to employ your intelligent floor cleaner
Congratulations on purchasing your intelligent floor cleaner! bObsweep is now at
your service. To see Bob at his best, please read the Quick Start Guide and this
manual thoroughly. Welcome to the bObsweep family and happy cleaning!
Since the following instructions cover both the bObsweep Standard and the
bObsweep PetHair models, some generalizations are used. The characteristics and
appearance of your bObsweep may differ slightly from some explanations and pictures in this manual.
If you ever have questions or concerns feel free to contact our helpful team at:
[email protected]
Contents at a Glance
Important Safety Instructions
What comes in bObsweep’s box?
bObsweep’s Anatomy
Get bObsweep Ready to Clean
Auto-Cleaning and Scheduling
Maintaining bObsweep
Storing bObsweep
Replacing bObsweep’s Battery
Replacing the Remote’s Batteries
Troubleshooting bObsweep
bObsweep’s Home Checkup Guide
Warranty Information
bObsweep’s Cleaning Behavior
bObsweep FAQs
Important Safety Instructions
Basic safety precautions should always be followed, including the following:
- Read ALL instructions before using.
- To protect against electrical shock, do not immerse any part of bObsweep into
water or other liquid. The mopping attachment is an exception. The cloth can be
dampened with water before its placement on the mopping attachment.
- Unplug bObsweep from outlet when not in use and before conducting maintenance.
- Do not operate Bob or his charging station if it has been damaged in any way. If
bObsweep is not working as he should, has been dropped, damaged, left outdoors,
or dropped in water, contact our customer care center at [email protected].
- Do not handle the charger or robotic vacuum cleaner with wet hands; use only on
dry surfaces.
- Do not use bObsweep outdoors.
- bObsweep is not intended for use by persons (including children) with reduced
physical, or mental capabilities, or lack of experience and knowledge, unless under
the close supervision of a person responsible for their safety.
- Do not pull or carry the charging station by the cord, use the cord as a handle,
close the door on the cord, or pull the cord around sharp edges or corners. Keep
the cord away from heated surfaces. Do not unplug by pulling on the cord. To unplug, grasp the plug, not the cord.
- Do not mutilate or incinerate the battery, as it will explode at high temperatures.
- Do not attempt to open the charger. Repairs should only be carried out by a qualified customer care center.
- Do not expose the charger to high temperatures or allow moisture or humidity of
any kind to come into contact with the charger.
- Do not let Bob pick up toxic materials (chlorine bleach, ammonia, drain cleaner,
etc.).
- Do not let bObsweep pick up anything that is burning or smoking, such as cigarettes, matches, or hot ashes. Do not use Bob to pick up flammable or combustible
liquids such as gasoline, nor use it in areas where they may be present.
- Do not use bObsweep in an enclosed space filled with vapors given off by oil
based paint, paint thinner, moth proofing substances, flammable dust, or other explosive or toxic vapors.
- Leaks from battery cells can occur under extreme usage or temperature conditions. If the liquid gets on skin, wash quickly with water. If the liquid gets into the
eyes, flush them immediately with clean water for a minimum of 10 minutes. Seek
medical attention.
- Do not use appliance for other than intended usage as specified in this manual.
What comes in bObsweep’s box?
bObsweep, your intelligent floor cleaner
bObsweep’s charging station
Blo main brush
Charging adapter
Remote control
Screwdriver
2 side brushes
Cleaning tool (to clean Bob)
Extra screws & Blindfold stickers
Mop attachment
2 micro-fiber cloths for mopping
Filter refill
Owner’s manual, quick start guide
Bumper stickers
Bob’s anatomy
Top view
Bumper
Cover buttons
Head sensor (IR receiver)
Display
Bottom view
Charging plates
UV lamp
Front wheel
Side brush holder
Battery lid
Main brush
Main brush motor
Brush holder
Wheels
On/Off switch
Charging inlet
(on Bob’s side)
Dustbin
Charging station
Remote
bObsweep PetHair’s display
bObsweep Standard’s display
bObsweep PetHair’s cover buttons
MODE Cleaning mode
PROGRAM Cleaning program
UV UV lamp
DOCKING Auto-charge
START Start
bObsweep Standard’s cover buttons
Cleaning mode
Cleaning program
UV lamp
Start
Get bObsweep Ready for Cleaning
Charging Station
Place the charging station on a hard, flat surface (not soft carpet). Place it next to
a wall and leave up to 1 inches of space between the back of the charging station
and the wall.
Make sure there is no obstacle or uneven ground within 2-3 meters (6-9 ft.) of the
front, and half a meter (1.5 ft.) to the sides of the station (figure 1). In general, Bob’s
chance for finding the station is directly related to the amount of open space in front
and to the sides of it.
The IR transmitter on the station should be clean without dust or anything else
covering it.
Plug the adapter into the charging station and turn it ‘on’. The screen on the station
lights up.
0.5m
0.5m
3m
Charging Bob
Self-Charging
bObsweep is smart and will automatically search for his charging station when his
battery falls below 15%.
You may also direct bObsweep to the charging station anytime by pushing the
‘Charge’ button on the remote.
If you press any button while Bob is looking for his charging station, he will stop
searching and will enter standby.
Manual Charging
On the charging station:
Place bObsweep directly onto the plugged-in charging station. Make sure the power button on Bob’s side is turned ‘On’ and his charging plates sit directly on top of
the station. You will know bObsweep is charging when you see the battery bars
flashing on the cover screen.
Using the adapter:
Plug bObsweep directly using his adapter. His power inlet is on the side of his body
above the ‘On/Off’ button.
Charging Time
The two-digit number on the screen shows how long bObsweep has been charging.
You can calculate the exact number of minutes Bob has been charging for. Multiply
the number on the screen by 10. Note that the number starts from 0 every time
Bob is put to charge regardless of how full the battery is. For example, if the screen
shows the number 36 that means Bob has been charging for 360 minutes (6 hours).
The counter restarts at 100.
Even if bObsweep is fully charged, you will still see red bars blinking on his digital
display screen. On bObsweep PetHair the word ‘ready’ appears on the screen as
soon as the battery is full.
Bob can sit on his charging station for up to 5 non-working days. You can also
remove Bob from his charging station or adapter when he is charged. In this case,
turn Bob ‘Off’ or he will lose charge.
Cover Buttons
bObsweep PetHair
bObsweep Standard
MODE Cleaning mode
Cleaning mode
PROGRAM Cleaning program
Cleaning program
UV UV lamp
UV lamp
DOCKING Auto-charge
Start
START Start
Clean an entire floor, a medium, or a small room:
To use Bob’s cover buttons to clean an entire floor, a medium, or a small room:
- Press MODE (
). “AUTO” sign will appear on the screen.
- Press PROGRAM (
) once, twice, or three times, to choose between
modes 1, 2, or 3 to indicate the size of your room: 1 is for large spaces, 2 for
medium, and 3 for small.
- After you make your selection, press START (
).
- In mode 1 Bob cleans until the battery falls below 15%. In mode 2 Bob works
for 30 minutes and stops. In mode 3 Bob works for 15 minutes and stops.
Take Bob back to his charging station or turn him ‘Off’ after he is done cleaning in
programs (modes) 2 or 3. In program 1 (auto mode), Bob looks for the station when
his battery falls below 15%.
Choose Bob’s movement patterns:
To use Bob’s cover buttons and choose his movement patterns:
- Press MODE (
) twice. SPOT sign will appear on the screen.
- Press the PROGRAM button once, twice, or three times to choose Bob’s
movement pattern:
- 1 indicates spiral pattern (1-4 mins).
- 2 indicates zigzag pattern (1-4 mins).
- 3 indicates linear pattern along the walls and corners (about 10mins).
- Press START (
).
Send Bob to charge:
- Press DOCKING on bObsweep PetHair, or press MODE (
) 3 times. The
red battery sign with “three full bars” will appear on Bob’s screen.
- Press START(
). bObsweep will start looking for his charging station.
Switch the UV light On/Off:
- The UV light is turned ‘On’ by default every time you switch bObsweep on.
- Press UV (
) to turn the UV light Off or back On.
- Do not look directly into the UV light while ‘On’.
Remote Control
The remote control works at an average distance of 10 feet. It has to be pointed
directly at bObsweep with no obstacle blocking the signal. bObsweep’s remote
has the following buttons:
Power
Auto
Spot
Wall/Corners
Charge
UV
Speed
Navigation Arrows
Pause
Power - Puts Bob in standby mode.To put bObsweep in standby mode, the
power switch on his side must be set to ‘On’.
To fully power off, use the On/Off button located on bObsweep’s side.
Auto - Activates bObsweep’s default cleaning mode.
Walls/Corners - Sets Bob to follow along the walls and furniture.
UV - Turns the UV light On/Off.
Spot - Sets bObsweep to clean using spiral, spot-cleaning movements.
Charge - Sends Bob to search for his charging station.
Speed - Sets bObsweep’s movement to one of his 3 speeds: slow, medium,
and fast.
Arrows - Guides bObsweep to move forward, backward, right, or left.
Hold the button to keep bObsweep moving in the desired direction. Releasing the button will stop him.
Pause - Pauses or un-pauses Bob’s movement.
Bob’s mopping feature
To install Bob’s mopping extension, hold it with its tails facing down. Place it between the wheels and press it down gently. You will hear a ‘click’. Attach the mop
cloth to the holder. Once the mop is installed, Bob will mop, sweep, and vacuum
simultaneously (figure 2). Remove the mopping extension when Bob is cleaning
carpets or rugs.
When mopping is done, use both hands to detach the extension. Gently press the
tails inwards to take it out.
The mopping cloth can be washed and twist-dried manually or in the washing machine. A spare cloth is provided in your package for your added convenience.
Auto-Cleaning and Scheduling
A look at the Charging Station
There are 5 buttons on Bob’s charging station:
On/Off
OK/Auto Resume
Time/Clock
Schedule/Program
Select/Adjust
These buttons are used to program Bob’s daily cleaning schedule.
Setting the Time & Day
8AM is the default time. When turning the charging station ‘On’ for the first time or
after it has been unplugged, it shows the default time.
To set the current time & day on bObsweep’s charging station, follow these steps:
- To set current time’s hour digits, press Time/Clock once. The digits for the
hour will blink. Use Adjust (+) to set the current hour. Press OK to save.
- To set current time’s minute digits, press Time/Clock twice until the digits
for minutes blink. Use Adjust (+) to set the current minutes. Press OK to save.
- To set the current weekday, press the Time/Clock three times until the sign
for weekdays blink on the screen. Press the Adjust Button (+) to set the current
day. Press OK to save.
Note: Press the OK button to save each setting within 30
seconds; otherwise the operation will quit without saving.
Scheduling Cleaning
After setting the current time and day on Bob’s station, you can program Bob’s daily
cleaning schedule:
- To set the desired hour digits, press Schedule/Program once. The digits for
the hour blink. Use Adjust (+) to select the desired hour and press OK to save.
- To select the desired minute digits, press Program twice, until the digits for
minutes blink. Use Adjust (+) to set the desired minutes for cleaning to start.
Press OK to save.
- To schedule Bob’s cleaning days, press Program three times. The sign for
each day will flash for 5 seconds and then will stay still. This indicates that the
corresponding day has been selected for cleaning. Use the “+” button to move
on to the next day. If you want to skip a certain day, press the “+” button while
the sign is still blinking. When all desired days are selected press OK to save.
- If you select a day by mistake and would like to delete it, use the station’s On/
Off button to cancel that day.
- You can choose any and all weekdays for cleaning. Bob starts his cleaning at
the selected time (i.e. 10:20) on all programmed days (i.e. Mo,Tu,Th).
Note: If Bob’s charging station is unplugged, or turned off,
his schedule will be reset.
Auto-resume: Set Bob to (re)start cleaning when fully charged
The auto-resume feature is among the unique features that sets bObsweep apart
from other robotic vacuum cleaners. This feature enables Bob to get back to work
as soon as his battery is fully recharged.
To activate auto-resume, press the Auto-Resume/OK button on the station. A
broom-shaped sign lights up on the station’s screen. This means that Bob is on
auto-resume and will automatically head back to work when his battery reaches full
charge.
While auto-resume is On, bObsweep leaves the charging station and begins
cleaning EVERYTIME his battery is full. To cancel this setting, press Auto-Resume/OK again to turn it Off. When On, the auto-resume mode will stay in
effect until it is turned Off by you, or if the charging station is unplugged.
If bObsweep’s Cleaning Schedule arrives as he is being charged, he will leave his
charging station and start cleaning. The fastest way to reset Bob’s cleaning schedule is to unplug his charging station and re-plug after 5 minutes as this will erase its
memory and put it back to default mode.
If for any reason bObsweep’s battery level falls below 8% he will stop and chirp to
inform you of his location. Please take Bob and place him on his charging station.
bObsweep’s Maintenance
Dustbin
- Gently push the button on the dustbin to eject it.
- Open the vent to empty the bin.
- You may wipe the dustbin or use the cleaning tool to brush it.
- Put the dustbin back when done and make sure it is properly inserted.
- Never wash the dustbin nor fill it with water or any other fluid.
Filters
Three filters are located inside the dustbin’s ceiling in order to capture fine particles
and allergens and prevent their escape from the dustbin.
- To remove the filters, first eject the dustbin, then hold the middle of the filter’s
frame and pull it towards you.
- You will see three layers of filter:
+ Mesh filter for larger particles.
+ Pre-filter or electrostatic filter for fine particles.
+ HEPA filter for sub-micron particles.
- Brush dust off the filters. It is recommended that you change the pre-filter
and the HEPA filter every 4-6 months depending on the frequency/intensity of
cleaning.
- There is also a small filter at the back of the dustbin. Open the small vent on
the back of the dustbin and wash the sponge filter with cold water every once
in a while.
Brushes
(Re)installing the Main Brush
Use a Philips head screwdriver to remove the brush. Undoing the screw releases
the left side of the main brush, allowing you to take it off. To place it back, screw the
brush back on Bob.
Cleaning the Main Brush
If you see hair, yarn, debris, or dirt on bObsweep’s main brush, use a pair of scissors
and the cleaning tool to clean it. Use the cleaning tool to clean the brush from end to
end and to remove hair or dust collected around the ends of the brush. Do this on a
regular basis. If cleaning tool is not enough, use scissors to cut off any hair wrapped
around the brush.
(Re) installing the Side Brush
When bObsweep is first delivered to you, the side brush is not installed. Use a dark
grey screw from the small plastic bag of screws included inside bObsweep’s box to
assemble the side brush in place.
Sensors
Cleaning Bob’s sensors
Dirt and dust on the bottom and side sensors can reduce bObsweep’s performance.
Regular cleaning of the sensors ensures that Bob keeps working at his best. Use
a soft cloth or a cotton swab slightly moistened with cold water or alcohol to wipe
bObsweep’s surface, around and underneath his belly, especially on the bumper
and floor detection sensors on Bob’s bottom.
Blindfold Stickers
Dark colored carpets or certain patterns
can seem like an edge to Bob’s infrared
sensors. If you notice that Bob stops with
Error 4 (Trouble Nr 4 for Bob PetHair) on
your carpet, you can try ‘blindfolding’
Bob by covering the 4 floor detection
sensors underneath him as shown in the
picture below (circled). The floor detection sensors are on the front and sides of
Bob’s bottom when you turn him around.
Just make sure Bob is not getting anywhere near stairs or sharp edges when
blindfolded or he can fall.
Dirt sensors
For a more efficient cleaning, bObsweep is equipped with dirt detecting sensors.
If Bob reaches a spot with a lot of dirt or debris while cleaning, his dirt sensors will
activate, the “DIRTY” sign on the screen will turn to ON, and Bob will increase the
cleaning intensity of that area.
Battery
To replace the battery:
- Open the battery cover using a screwdriver, take the battery out, and unplug
the connection.
- To install, plug back the battery (make sure you put it in the correct way) and
place it back in. Tighten the cover using the screwdriver and turn bObsweep
around.
Storing bObsweep
bObsweep should not be left unused with his power switched ON for more than one
week. If you are not using bObsweep for an extended period of time, switch him
OFF. Then, unplug the charging station, remove Bob’s battery, and store everything
in a dry place at room temperature.
Do not leave Bob in direct sunlight.
Troubleshooting bObsweep
Likely cause(s) for Bob’s trouble/error codes
When bObsweep faces an uncomfortable situation, he will try to notify you of the
issue. If Bob ever stops in the middle of his cleaning with the Trouble Nr. or Error
sign lit on the screen, read the two digit code (00 to 09) on the screen. Here are the
codes, the likely cause for the trouble, and what to do in case of each code. Additionally, bObsweep is equipped with a self-checkup feature to allow you to test the
functionality of its various parts and sensors. If the problem is not resolved, please
contact us at [email protected] and we will gladly take care of the issue.
Not a fan of reading? go to http://owners.bobsweep.com or scan this smart-phone
barcode:
Trouble/Error Code 00
Error code 00 pertains to an issue with Bob’s left wheel. The issue may simply be a
jam in the left wheel, or Bob may have an electronic problem that is keeping his left
wheel from moving freely.
What to do:
Start by checking the left wheel for jamming; use Bob’s cleaning tool or compressed
air to take out any dust or debris that may be blocking the wheel. If this does not
solve the problem and Bob still shows an error, perform a checkup test to see how
the wheels respond to the test. Hold up Bob to feel his wheels with your fingers as
they run in test mode. If you can find no signs of obstruction or damage in the wheel,
it is likely the case that Bob has an electronics problem and he will need to come in
for repair. Contact [email protected] for assistance.
Trouble/Error Code 01
Error code 01 pertains to an issue with Bob’s right wheel. The issue may simply be
a jam in the right wheel, or Bob may have an electronic problem that is keeping his
right wheel from moving freely.
What to do:
Start by checking the right wheel for jamming; use Bob’s cleaning tool or a can of
compressed air to take out any dust or debris that may be blocking the wheel. If this
does not solve the problem and Bob still shows an error, perform a checkup test to
see how the wheels respond to the test. Hold up Bob to feel his wheels with your
fingers as they run in test mode. If you can find no signs of obstruction or damage in
the wheel, it is likely the case that Bob has an electronics problem and he will need
to come in for repair. Contact our helpful support team for help.
Trouble/Error Code 02
Error code 02 relates to Bob’s main brush and can happen if the main brush can
not work freely.
What to do:
Open and take out the main brush, clean it thoroughly from end to end. If you see a
congestion in the main brush motor area (the square metal part that holds the brush
on Bob), try to clean it using a sharp ended tool like a pair of tweezers. If the congestion is not easily removable Bob’s main brush motor may need to be replaced.
On shag carpet or rug take out the main brush and allow Bob to vacuum, or replace
the main brush with Bob’s soft-bristled Blö brush. If the problem persists on hard
flooring with clean main brush and no congestion in the brush motor area, it is likely
the case that Bob has an electronics problem. Contact our helpful support team for
help.
Trouble/Error Code 03
Error code 03 means that Bob’s front wheel is jammed and cannot move freely.
What to do:
Depending on the amount of debris congesting the front wheel’s passages you may
be able to clean the hair using a can of compressed air and Bob’s cleaning tool. If
the congestion is too stiff and not removable from the outside, open bObsweep and
disassemble the front wheel, remove the obstruction, and put it back in place after
reassembling. For a comprehensive how-to video visit owners.bobsweep.com.
Trouble/Error Code 04
Bob can not see! His ground/edge detecting sensors (4 sensors on front and sides
of Bob’s bottom) are blocked or are dirty.
What to do:
What kind of flooring are you using Bob on? On dark carpet or rug use Bob’s blindfold stickers as instructed to resolve the error.
If the flooring is not dark or patterned, turn Bob around and wipe sensors with a
clean, dry cloth until they are completely clean.
If the issue persists, run a checkup test on bObsweep.
If Bob needs a change of ground/edge detecting sensors contact our support team.
Alternatively, you can change Bob’s sensors at home. All you need is a new set of
ground/edge detection sensors and a Philips head screwdriver. We have a video
that demonstrates the process on Bob’s owners’ corner: owners.bobsweep.com.
Trouble/Error Code 05
Error code 05 means that the wall detecting sensors around the bumper are blocked
or are dirty.
What to do:
Start by a visual check of the transparent windows on the front bumper. If they are
too dirty for you to see what is behind them, wipe bObsweep’s bumper with a clean,
damp cloth. Ensure nothing is jammed under the front bumper; tap slowly and cautiously on the bumper and use compressed air to take out the debris. If the issue
persists, try running a checkup test on Bob.
If the test shows that the sensors are not working as they should, contact our support team to arrange a repair session for Bob.
Trouble/Error Code 06
Error code 06 points to Bob’s touch sensors. It is likely that a small piece of debris
is stuck under the bumper.
What to do:
Check the front bumper; slowly tap on it to take the obstacle out; Use compressed
air to take out dust and debris. If the issue persists, try running a checkup test on
Bob. While in the test mode, press the corner ends of the bumper until you hear/
feel a tiny “click” sound. If the bumper is not clicking on the ends, it is possible that
one or more of Bob’s touch sensors has a broken arm and the sensors need to be
changed.
Changing Bob’s front bumper, or parts of the bumper, is an easy task that can
be done at home. You will need a new bumper and a Philips head screwdriver,
and of course we have a video that will walk you through the steps:
owners.bobsweep.com
Trouble/Error Code 07
Error code 07 also points to Bob’s main brush. This time the message means that
the main brush is installed incorrectly.
What to do:
Open the main brush and put it back in place. Make sure the square metal-end is
well fitted into the square metal part on the main brush holder.
Trouble/Error Code 08
The reason for error code 08 is that Bob’s dustbin is not properly installed, or that
the metal contact points on the bottom of the dustbin are too dirty.
What to do:
Take out the dustbin and empty it. Turn the dustbin around and check the two metal
connections on the bottom of it; wipe them clean. Look into the bObsweep and
clean the metal contact points where the dustbin is inserted in.
Trouble/Error Code 09
Error code 09 generally means that Bob’s mainboard is malfunctioning and will need
replacement.
What to do:
So Bob is in need for surgery! Do not worry! Bob doctors are an email away. Contact
us at [email protected]. We won’t rest until Bob is back on his feet :”)
bObsweep’s Checkup Guide
Bobsweep is a sophisticated fellow with a variety of electronic chips and parts.
Sometimes it can be hard to tell what exactly is wrong with Bob if he is not feeling
well or not working the way he used to. To make it easy for you to diagnose the
real reason behind Bob’s odd behavior or reduced productivity, we have equipped
bObsweep with a simple check-up program. The checkup procedure is a simple
routine that helps you test each part of bObsweep separately. You can perform the
checkup routine on Bob using this guidebook.
Put Bob in Checkup Mode
Make sure Bob is switched ‘Off’ using the power switch on his side.
Hold down the first button on bObsweep’s cover from left and switch him ‘On’ (while
holding the button down).
bObsweep will turn on making a short “doo-doo-doo” sound and the screen will
show a word or a number sign. Bob is now in checkup mode. Do not press any
buttons.
Test Bob’s edge detecting sensors
Right after putting bObsweep into checkup mode, look at the screen. You should
see four lights indicating AUTO, TIME, SPOT, and UV (bObsweep Standard), or
TROUBLE NR, MIN CLEANING, CAPACITY, and CHARGING (bObsweep PetHair),
as well as a letter or number in the center of Bob’s display lit on the display. If all
four lights didn’t turn ON upon entering the checkup mode, flip bObsweep over
and clean the edge detecting sensors with a clean cloth. Check again to see if the
lights will turn ON. If the problem persists, Bob’s sensors may need to be changed.
Contact us.
To check the edge detecting sensors, lift up bObsweep (more than 15cm) from the
floor. You will see that the four lights will turn off.
Do not press any buttons on bObsweep and continue to the next step.
Test the wall and obstable detecting sensors
Keep bObsweep in the same mode as before. Place him back on the floor. Use
a thick, flat, and white surface, to imitate a wall and drag it around Bob’s bumper.
On bObsweep PetHair, the 5 indicators along the top of the display will light up, as
you move your imitation wall around the bumper.
On bObsweep Standard, the following signs light up on the screen one after another: Third battery bar , Second battery bar, First battery bar, The word Dirty, The
word Error.
Test the touch and bumper sensors
To move on to this test, press the first left button on Bob twice (UV on Bob PetHair,
Mode on Bob Standard). The screen will go blank. Now you may test Bob’s touch/
bumper sensors.
Press on the right and left side of Bob’s bumper. On bObsweep PetHair, the words
Dirt and Mins. Cleaning light up as a result. On bObsweep Standard, the words
“Battery” and “Error” light up. If you press the center of the bumper, both words appear at the same time. If any or both signs fail to turn on, it is likely that Bob needs
a new bumper.
Test Bob’s display
Press the first left button on bObsweep one more time. Each icon on the screen will
light up in a repeating rotation.
Test Bob’s brush motor and vacuum suction
Press the far left button on bObsweep one more time until all icons on the screen
light up. Now press the ‘Program’ button (second button from the left).
In this mode the brushes start rotating and you will feel air flowing from the back of
the dustbin. Ignore the signs and numbers on the display in this test mode.
Test the UV light and Wheels
The final step of the checkup, tests Bob’s UV light and wheels.
Hold Bob with your hand or lift him off the floor to keep him from running away. Then
press the third button from the left on Bob’s cover (Mode button on Bob PetHair, UV
sign on Bob Standard). Wheels drive forward.
Flip Bob over, and you should see the UV lamp light up.
Press the Mode (UV sign on Bob Standard) once more. Wheels drive backwards,
and the UV lamp turns Off.
If everything responds properly, Bob’s internal parts are working correctly. Contact
our helpful support team at [email protected] if you have a question, or
need help with Bob.
Support and Warranty
Warranty information
A bObsweep purchased from an authorized seller and used anywhere in the world
includes a one (1) year Limited warranty on parts (except consumable parts) and
labor. This includes a 6-month battery warranty. The warranty does not cover consumable parts (brushes, filters, mop). Additional coverage plans are available for
purchase at: http://www.bobsweep.com/coverageplan.
Even after bObsweep’s warranty is over, we will share the maintenance costs with
you. During the first five years of your purchase, we will replace/repair bObsweep
when needed and subsidize the replacement/repair charges. The exact amount of
our co-pay may vary. We will cover not less than 25%.
To receive warranty services you must register bObsweep online. You must also
keep the original receipt of your purchase.
To register Bob visit
https://www.bobsweep.com/warranties
bObsweep’s cleaning behavior
Most of the time, bObsweep can be left on one of the Auto-cleaning modes without
supervision. The three AUTO modes set Bob’s movements in different patterns that
best match the size and layout of his working area. Plus, he detects dirtier areas that
need extra attention as he crosses them, and gives them more attention.
Sometimes Bob may seem to avoid one area or a room for a while, but be patient
while he searches out dirt particles in his own way. Bobsweep’s pattern may look
quite different from the way a human would clean: he sometimes turns in circles,
expanding outward to clean a certain spot. Or he may go back and forth in the
middle of the room, zigzagging over a small area. Rest assured, frequent directional
changes are normal for Bob while he changes cleaning modes and algorithms. So,
it is best to let Bob work in his own way even if his movements appear odd. Moving
bObsweep around, manipulating its movements excessively, or picking him up will
disrupt his cycle. If you leave Bob to do the job on his own, you will notice the excellent results when you open the dustbin at the end of the cleaning cycle. If you wish
to control Bob’s movements to cover/avoid a certain area, we recommend that you
only do so using the remote. If your rooms are divided by higher ledges than Bob is
able to climb, you may gently push him over.
Although Bob is capable of transitioning between rooms and most floor types, this
does not mean that he always chooses to move onto the next area when he arrives
at a transition. Bob may appear to be ignoring some spaces or spending too much
time in others, but rest assured that his algorithms are designed to render an efficient cleaning job by the end of a full cycle.
bObsweep’s challenges
While in most homes bObsweep will fit like a glove, in some homes, the environment
may be a bit challenging to him. Bob is designed to fit well with rooms and furniture
of most shapes and sizes, but certain settings may confuse him momentarily. Bob
might find a way into small spaces or get trapped under some of your furniture,
but he is good at finding a way out in time. Chairs with narrow legs, or furniture
that is just a bit too low for his infrared bumper sensors may block off some spots
you would like Bob to clean. Irregularly shaped items, such as chairs with circular
bottoms, might trick his sensors as well. Sometimes Bob will attempt to drive up
angled surfaces, getting stuck for a few minutes before he decides to clean somewhere else. This is because bObsweep wants to cover every spot in the home and
will try his hardest to overcome any obstacle. As long as he does not show an error
message or trouble number on the display, allow him to find his way out and continue cleaning. Observing where Bob’s challenges are in your particular setting, and
if possible spreading/adjusting some of the furniture accordingly, is the best way to
maximize Bob’s efficiency.
Bob loves carpets. However, certain designs might confuse the infrared sensors
bObsweep uses to detect the floor beneath him. Dark colors on rugs may confuse
him by simulating an edge, causing an Error or Trouble Number 4 to pop up on his
display. As a solution, the four sensors on Bob’s underbelly may be covered with
“blindfold” stickers. With these equipped, bObsweep will permanently sense floors
underneath him. If your rug requires the use of blindfold stickers, be sure that Bob
will stay away from edges or stairs since he is unable to detect them with the stickers on.
If you have a plush carpet with long fibers or fringes, Bob’s main brush may have
trouble turning on them for long.
Bob’s brush is wide and has long bristles that are in constant contact with the surface he is cleaning. While this is an asset for deep cleaning on most surfaces, on
some carpets this causes Bob to stop due to excessive friction. If you see “Error
2” or “Trouble Number 2” too frequently on Bob’s display, simply remove his main
brush and let him vacuum the carpets while using only his side brush to sweep.
When mopping extension is attached to Bob, he will have a tough time going over
elevated transitions or unsmooth surfaces. This is because the mopping extension
is designed to sit on the floor to allow the mopping fiber to fully rob against it. Be
sure to remove the mopping extension when you do not need Bob to mop the
floors.
bObsweep FAQs
1. Where can I find bObsweep’s training videos?
bObsweep’s “how-to” videos can be found at Bob’s owners’ corner:
http://owners.bobsweep.com.
2. How long should Bob’s battery last?
The exact time depends on the type of the surface bObsweep is cleaning as well as
the age of the battery. Generally, the smoother the surface (hardwood or tile for example), the longer the battery will last. When fully charged, a brand new Bob usually
cleans between 45 to 90 minutes.
3. The battery of my bObsweep never seems to charge fully. How do I know that
it is full and ready to clean?
When bObsweep charges using the wall adapter or charge-up station, the red bars
flash on his digital display. Although Bob is fully charged within 4 hours, on the standard bObsweep you will still see the battery bars blinking. On the PetHair model you
will also see the word “Ready” light up on the screen.
4. How often should I empty the dustbin?
Bob’s dustbin has a 1 L capacity, which is three times larger than most advanced
robotic vacuum cleaners on the market today. Often times this means you will not
need to empty the dustbin immediately after a cleaning. Depending on the size of
the room and the amount of particles piled up, bObsweep can perform up to around
six cleanings before the dustbin is full. Simply remove the dustbin and check to see
if emptying is necessary.
5. How often should I clean bObsweep’s brushes?
Bob’s brushes do a lot of work picking up hair and larger debris, so it is recommended that you clean the main and side brushes every 1 to 4 uses.
However, if you clean them more frequently, Bob will be able to store more dirt in
his dustbin, rather than on his brushes. If you notice a thick covering of hair, dust,
and debris on his brushes, remove and clean them. Remember to clean the interior
of bObsweep where the brushes connect to assure they stay in good condition for
a long time.
6. My bObsweep won’t turn on no matter what I do.
If Bob has not been charging for a long time and does not turn on when pressing
the side power button, or when placing him on his charging station, it’s likely that the
battery has been drained too low for bObsweep to operate. To recharge him, unplug
the adapter that normally attaches to the charging station and plug it directly into
the inlet on Bob’s side, found above the ON/OFF switch. Then, let bObsweep recharge fully before using again. Afterwards, you will be able to charge Bob manually
or automatically using the docking station. If you place Bob on his charging station,
always make sure to turn him ON first, to activate the charging plates on the bottom.
When bObsweep is charging, the battery bars on the display blink.
7. Why is my bObsweep beeping?
If Bob is left ON but he is not cleaning or charging, he makes a beeping sound once
every five minutes to warn you that his battery is being drained. Press the power
button on the remote to put bObsweep in standby mode or turn him off completely
using the side power button. You will have to switch this button ON the next time
you want Bob to clean.
bObsweep also makes this noise when he encounters problems cleaning and needs
your assistance. In addition to the noise, you will see an Error or Trouble Number
on the digital display which lets you know why your bObsweep has stopped. You
can decode this message by consulting the Troubleshooting section of the manual.
8. Bob is having trouble finding his charging station. Where is the best place to
put the station?
For Bob to find his charging station, he needs to face it directly. bObsweep will find
his station more easily if it is placed near the perimeter of the room with plenty of
space in front, so that he may detect the station from afar. In order for Bob to dock
properly, be sure to place the charge-up station about 2 inches away from the wall,
facing outward on a flat surface like hardwood or tile flooring instead of carpet. To
facilitate Bob’s work, find a spot for the charging station where Bob has a higher
chance of passing through.
9. I left Bob’s brush in for multiple cleans and am having problems removing it.
If the main or side brushes are difficult to remove, it is likely because hair, string, or
other debris have been caught in them and are clogging the areas where they attach
to bObsweep. You can use scissors to cut the hair wrapped around either brush,
until you are able to remove it. You may need to gently pull the main brush up or
down to reach the corners, but do not force the brushes out as this can damage
them.
10. bObsweep is getting stuck under some of my furniture or travelling into areas
with wires that tangle up the brush. How can I stop him from going into these
areas?
bObsweep is determined to cover all the spaces he can find in your home. Because
of this, he might get himself into trouble once in a while. If he finds his way under a
piece of furniture that he can barely fit under, he may struggle to get out. If there is
only one open entrance, Bob may take a few minutes to figure out how to escape
on his own. You will not have to assist him when this happens, unless bObsweep
stops cleaning and starts beeping.
11. Why does Bob start even though I did not tell him to clean?
bObsweep may begin cleaning on his own only if you press the Full Go button
or if he is scheduled to clean. First, look at the display on Bob’s charging station.
If you see a small image of a broom with the word “GO” to the right side, Bob is
programmed to start working immediately once his battery fully recharges. Click the
Full Go button located to the left side of the charge-up station’s screen to disable
this function. If this is not the case, the next thing to check is bObsweep’s cleaning
schedule. Make sure you have set the correct time on the charging station. It is a 24
hour clock, so you will need to enter 1:00 if it is 1 AM and 13:00 if it is 1 PM. Apply
the same rule when programming Bob’s weekly cleaning schedule.
12. When is a good time to use the circle and zigzag spot functions?
The circle spot function is best for cleaning a small area with a large amount of dirt
or dust. It is a great way to target only one area that has become dirty such as a spill
that must be swept or mopped in an otherwise clean area. The zigzag ppot function
is another option that is useful when cleaning small spaces. It is also very effective
when mopping, to minimize streaking on tile or hardwood floors.
13. My bObsweep is stopping and showing an Error or Trouble Number on the
screen, how can I fix this?
bObsweep uses an Error/Trouble Nr to notify you of the specific reason his work
has been interrupted. This intelligent, self-scanning feature allows you to identify the
source of the problem quickly. An Error/Trouble Nr is rarely the sign of a defect and
usually has a simple solution. Along with the word Error on the standard bObsweep
or Trouble Nr on the PetHair model, there will also be a number on the center of
Bob’s screen (where Bob’s cleaning minutes can regularly be seen) from 00 to 09.
Each number coincides with a specific issue Bob is having at the time. To understand Bob’s language, consult the Troubleshooting section of the manual for the
cause of the problem as well as its solution.
14. What is the best way to clean Bob’s wheels?
To remove the most dirt and dust collected in bObsweep’s wheels, use the cleaning
tool or compressed air to clean the creases of the wheels. For more efficient removal, put Bob in Check-Up mode (found in the Home Check-Up Guide section of this
manual) and test the wheels. Clean the sides and bottom of the wheels while they
spin for the most thorough clean.
15. My bObsweep just stopped while cleaning and the screen went off, what to
do?
Like other electronic devices with a CPU (computers, smart phones, etc.), bObsweep
might experience a momentary halt in its operating system. You can usually get Bob
back to work by simply turning the power button on its side OFF and ON again. If
this does not solve the issue, Bob might need a restart. You can restart him by plugging the power adapter directly to the inlet on its side.
16. I have a question and need to contact bObsweep’s support team.
Need help with Bob? Our devoted team is ready to help you! You can reach us by
phone or e-mail.
Call us toll free 1-888-549-8847 for support in Canada and the United States. Or,
email us at [email protected]. Our goal is to get back to you within a day.
To order parts, or for Bob’s how-to videos, repair videos, troubleshooting videos,
and to connect with your extended bObsweep family members and fellow Bob
owners visit Bob’s owners’ corner at: http://owners.bobsweep.com.
sealed with care
bObsweep