1
EXMARaLDA Partitur-Editor
Manual
Version 1.5.1
Last update: 20th October, 2011
By: Thomas Schmi dt
EXMARaLDA Partitur-Editor – Manual
Table of Contents
TABLE OF CONTENTS
I.
PRELIMINARY REMARKS .......................................................................................................................................... 7
XM L, EXMARaLDA and the Part itur-Editor............................................................................................................................. 7
“Words of Caution” ......................................................................................................................................................................... 8
II.
US ER INTERFACE ......................................................................................................................................................... 10
III.
PANELS ............................................................................................................................................................................... 14
A.
B.
Keyboard............................................................................................................................................................................... 14
Link panel ............................................................................................................................................................................. 15
C.
D.
E.
Audio/Video panel .............................................................................................................................................................. 16
Praat panel ............................................................................................................................................................................ 21
Annotation panel.................................................................................................................................................................. 24
F.
IPA panel .............................................................................................................................................................................. 25
IV.
FUNCTION REFER ENCE ............................................................................................................................................ 27
A.
File Menu .............................................................................................................................................................................. 27
File > New... ......................................................................................................................................................................... 27
File > New fro m wizard... .................................................................................................................................................. 27
File > New fro m speakertable... ........................................................................................................................................ 28
File > New fro m timeline................................................................................................................................................... 28
File > Open........................................................................................................................................................................... 30
File > Restore ....................................................................................................................................................................... 30
File > Save ........................................................................................................................................................................... 30
File > Save as... .................................................................................................................................................................... 31
File > Error list... ................................................................................................................................................................. 31
File > Page setup… ............................................................................................................................................................. 32
File > Print…........................................................................................................................................................................ 33
File > Output... ..................................................................................................................................................................... 33
File > Impo rt......................................................................................................................................................................... 39
File > Expo rt......................................................................................................................................................................... 44
File > Exit ........................................................................................................................................................................... 46
B.
Ed it Menu ............................................................................................................................................................................. 47
Ed it > Undo .......................................................................................................................................................................... 47
Ed it > Copy........................................................................................................................................................................... 47
Ed it > Paste........................................................................................................................................................................... 48
2
EXMARaLDA Partitur-Editor – Manual
Table of Contents
Ed it > Cut ........................................................................................................................................................................... 48
Ed it > Search in events....................................................................................................................................................... 48
Ed it > Find next ... ................................................................................................................................................................ 50
Ed it > Rep lace in events... ................................................................................................................................................. 50
Ed it > Go to... ....................................................................................................................................................................... 50
Ed it > EXAKT search... ..................................................................................................................................................... 51
Ed it > Select ion.................................................................................................................................................................... 51
Ed it > Select ion > Select ion to new ................................................................................................................................. 52
Ed it > Select ion > Left part to new .................................................................................................................................. 52
Ed it > Select ion > Right part to new ................................................................................................................................ 52
Ed it > Select ion > Select ion to RTF................................................................................................................................. 52
Ed it > Select ion > Select ion to HTM L ............................................................................................................................ 52
Ed it > Select ion > Print selection… ................................................................................................................................. 52
Ed it > Preferences… ........................................................................................................................................................... 52
Ed it > Part itur preferencess… ........................................................................................................................................... 59
C.
View Menu ........................................................................................................................................................................... 64
View > Keyboard ................................................................................................................................................................ 64
View > Lin k panel.............................................................................................................................................................. 64
View > Audio/ Video panel ............................................................................................................................................... 64
View > Praat panel ............................................................................................................................................................. 64
View > Annotation panel .................................................................................................................................................. 64
View > IPA panel ............................................................................................................................................................... 64
View > Show toolbar .......................................................................................................................................................... 65
View > Show large text field ............................................................................................................................................. 65
View > Show grid................................................................................................................................................................ 65
View > Show special characters ....................................................................................................................................... 65
View > Color empty events ............................................................................................................................................... 66
View > Change scale constant…...................................................................................................................................... 66
View > Text proportional / Time proportional............................................................................................................... 67
D.
Transcription-Menü............................................................................................................................................................. 68
3
EXMARaLDA Partitur-Editor – Manual
Table of Contents
Transcription > Meta information … ................................................................................................................................ 68
Transcription > Speakertable… ........................................................................................................................................ 70
Transcription > Recordings… ........................................................................................................................................... 71
Transcription > St ructure errors … ................................................................................................................................... 72
Transcription > Calculate annotated time… ................................................................................................................... 73
Transcription > Seg mentation errors… ........................................................................................................................... 73
Transcription > Export Seg mented Transcription … ..................................................................................................... 74
Transcription > Count Segments… .................................................................................................................................. 75
Transcription > Word list…............................................................................................................................................... 76
Transcription > Insert Utterance Nu mbers...................................................................................................................... 77
Transcription > Transformat ion….................................................................................................................................... 78
Transcription > Clean up... ................................................................................................................................................ 79
Transcription > Glue transcriptions... .............................................................................................................................. 79
Transcription > Chop transription… ................................................................................................................................ 80
Transcription > Chop audio…........................................................................................................................................... 81
Transcription > ExSync Event Shrinker .......................................................................................................................... 83
E.
Tier Menu ............................................................................................................................................................................. 84
Tier > Tier properties … ..................................................................................................................................................... 84
Tier > Add tier… ................................................................................................................................................................. 85
Tier > Insert tier…............................................................................................................................................................... 86
Tier > Remove t ier… .......................................................................................................................................................... 86
Tier > Move tier upwards … .............................................................................................................................................. 86
Tier > Change tier order…................................................................................................................................................. 86
Tier > Hide tier..................................................................................................................................................................... 86
Tier > Show all tiers............................................................................................................................................................ 86
Tier > Remove empty events............................................................................................................................................. 86
Tier > Ed it tiers…................................................................................................................................................................ 86
F.
Event Menu .......................................................................................................................................................................... 88
Event > Event properties…................................................................................................................................................ 88
Event > Remove .................................................................................................................................................................. 89
4
EXMARaLDA Partitur-Editor – Manual
Table of Contents
Event > Shift characters to the right................................................................................................................................. 89
Event > Shift characters to the left ................................................................................................................................... 90
Event > Merge...................................................................................................................................................................... 90
Event > Split ......................................................................................................................................................................... 91
Event > Double split ........................................................................................................................................................... 91
Event > Extend to the right ................................................................................................................................................ 92
Event > Extend to the left .................................................................................................................................................. 92
Event > Shrink on the right................................................................................................................................................ 92
Event > Shrink on the left .................................................................................................................................................. 93
Event > Move to the right .................................................................................................................................................. 93
Event > Move to the left ..................................................................................................................................................... 93
Event > Find next event...................................................................................................................................................... 94
Event > Insert Pause............................................................................................................................................................ 94
G.
Timeline Menu..................................................................................................................................................................... 95
Timeline > Ed it timeline item... ........................................................................................................................................ 95
Timeline > Insert timeline item......................................................................................................................................... 96
Timeline > Remove gap ..................................................................................................................................................... 96
Timeline > Remove all gaps .............................................................................................................................................. 96
Timeline > Remove unused timeline items..................................................................................................................... 97
Timeline > Make timeline consistent ............................................................................................................................... 97
Timeline > Smooth timeline.............................................................................................................................................. 97
Timeline > Interpolate timeline... ..................................................................................................................................... 97
Timeline > Remove interpolated times............................................................................................................................ 98
Timeline > Confirm timeline item(s) ............................................................................................................................... 98
Timeline > Shift absolute times... ..................................................................................................................................... 98
Timeline > Add bookmark… ............................................................................................................................................ 99
Timeline > Fine tuning mode ............................................................................................................................................ 99
Timeline > Bookmarks…................................................................................................................................................... 99
H.
Format-Menü......................................................................................................................................................................100
Format > Apply stylesheet ...............................................................................................................................................103
5
EXMARaLDA Partitur-Editor – Manual
Table of Contents
Format > Open fo rmat table... .........................................................................................................................................103
Format > Save fo rmat table as... .....................................................................................................................................103
Format > Edit format table... ...........................................................................................................................................103
Format > Format tier.........................................................................................................................................................104
Format > Format tier labels... ..........................................................................................................................................104
Format > Format timeline... .............................................................................................................................................104
Format > Format timeline items... ..................................................................................................................................104
Format > Set frame end ....................................................................................................................................................105
Format > Reformat ............................................................................................................................................................106
Format > Underline ...........................................................................................................................................................106
I.
Help Menu ..........................................................................................................................................................................107
Help > EXMARaLDA on the web .................................................................................................................................107
Help > About… .................................................................................................................................................................107
Help > Check for update… ..............................................................................................................................................108
V.
APPENDIX A: SIMPLE EXMARALDA CONVENTIONS...............................................................................109
VI.
APPENDIX B : S EGMENTATION ALGORITHMS ............................................................................................110
General Information on Seg mentation .....................................................................................................................................110
What to segment? .........................................................................................................................................................................110
How to segment? ..........................................................................................................................................................................111
Troubleshooting and Segmentation...........................................................................................................................................111
Segmentation: “HIAT: Utterance and Words”........................................................................................................................112
Segmentation: “DIDA: Words” .................................................................................................................................................115
Segmentation: “GAT: Intonation Units”..................................................................................................................................117
Segmentation: “CHAT: Utterance”...........................................................................................................................................118
Segmentation: “IPA : Words and Syllables” ............................................................................................................................119
VII. APPENDIX C: EXMARALDA AND S TYLES HEETS .......................................................................................121
What is a Stylesheet? ...................................................................................................................................................................121
What is the purpose of Stylesheets?..........................................................................................................................................121
Where to get Styleshets? .............................................................................................................................................................122
Using Stylesheets Partitur-Ed itor ..............................................................................................................................................122
VIII. APPENDIX D: SHORTCUT OVERVIEW .............................................................................................................126
IX.
APPENDIX E: S YNCHRONIS ATION OF AN EX MARALDA TRANSCRIPTION WITH A
DIGITIS ED AUDIO RECORDING IN PRAAT....................................................................................................128
Vo rbereitung .................................................................................................................................................................................128
Synchronisation ............................................................................................................................................................................131
6
EXMARaLDA Partitur-Editor – Manual
I.
Preliminary Remarks
PRELIMINARY REMARKS
This user manual describes the EXMARaLDA Partitur-Editor in its current version (1.5.1 of October 2011). If you’re using the Editor for the first time, please be kindly advised to read this
manual and consult it, while familiarising yourself with the program. Over the years we have
learnt the importance of a detailed documentation for the user. However, we also learnt that updating, as well as maintaining such documentation, may be very time-consuming, especially considering that the EXMARaLDA user group is a multilingual one. Unlike previous versions, this
user manual, thus, no longer includes a “tutorial”. Instead we now offer a few short English do cuments in the “Help” menu on the EXMARaLDA website (www.exmaralda.org), which elaborate on the individual steps (References to these documents have been marked in green in this
user manual). In addition, a fifteen minute video tutorial can be found there, explaining the basic
steps of transcribing with the Editor.
XML, EXMARaLDA and the Partitur-Editor
The Partitur-Editor, which is in focus of this manual, is a tool for the input and output of transcriptions. EXMARaLDA is an XML-based system for computer-assisted discourse transcription. It represents the foundation of the Research Centre on Multilingualism (In German:
“Sonderfoschungsbereich 538 Mehrsprachigkeit”) of the University of Hamburg and their database “Multilingualism“. It is not necessary to continuously remember these connections when
using the Editor, but it is certainly useful to bear them in mind. More specifically this means:
There are other options to create and edit EXMARaLDA transcriptions besides the PartiturEditor (i.e. with the help of the transcription tools Praat, ELAN or FOLKER, with any XMLEditor as the “Simple EXMARaLDA” formatting me thod; in a conventional text editor or
word processing program).
The main purpose of the Editor is not, to supply a tool that creates “pretty” musical scores, but
to create transcription data in a form that can further be used in computer-assisted processing
(especially in computer-assisted queries). Nonetheless, input and output in the musical score
format can be created with the Editor.
As an XML-based system, EXMARaLDA makes use of the concept of separating the logical
and graphical structure of data. EXMARaLDA transcriptions, thus, “are not” musical scores
and do not “consist” of tiers – these are only elements, which made use of in reference to the
graphical display of EXMARaLDA transcriptions on screen or on paper. EXMARaLDA is
only familiar with elements that relate to the logical structures of the transcriptions, such as
“events“, “time intervals“, “speakers“ etc. Thus, you can find all of these elements in the user
controls of the Partitur- Editor. In other words: the graphical structure of a musical score does
not have an independent meaning. It is merely one of the many possible visualisations t hat
may be calculated out of the logical structure of an EXMARaLDA transcription. Due to the
fact that this graphical structure is the result of a calculation, the Partitur- Editor is not really a
“What you see is what you get”-kind-of- instrument. When using the Partitur-Editor it is therefore helpful to keep the logical structure behind it in mind, and not only its graphical appea rance.
7
EXMARaLDA Partitur-Editor – Manual
Preliminary Remarks
In a nutshell: You do not need to be an expert in the field of text technology to create tra nscriptions in the Partitur-Editor, but a general understanding of the EXMARaLDA concept
could prove itself as helpful. Due to the fact that this user manual does not focus on the co ncepts of EXMARaLDA, kindly note the following publications:
Schmidt, Thomas (2002a): EXMARaLDA – ein System zur Diskurstranskription auf dem Co mputer. In: Arbeiten zur Mehrsprachigkeit (Working Papers in Multilingualism), Series B
(34). Hamburg.
Schmidt, Thomas (2002b): Gesprächstranskription auf dem Computer – das System
EXMARaLDA. In: Gesprächsforschung (Online journal about verbal interaction), Volume
3, 1-23.
Schmidt, Thomas (2003): Visualising Linguistic Annotation as Interlinear Text. In: Arbeiten zur
Mehrsprachigkeit (Working Papers in Multilingualism), Series B (46). Hamburg.
Schmidt, Thomas (2005): Computergestützte Transkription – Modellierung und Visualisierung
gesprochener Sprache mit texttechnologischen Mitteln, (Series: “Sprache, Sprechen und
Computer”, 7). Frankfurt a. M.
Schmidt, Thomas / Wörner, Kai (2005): Erstellen und Analysieren von Gesprächskorpora mit
EXMARaLDA. In: Gesprächsforschung (Online journal about verbal interaction), Volume
6, 171-195.
Schmidt, Thomas (2009): Creating and Working with Spoken Language Corpora in
EXMARaLDA. In: Lyding, Verena (ed.): LULCL II: Lesser Used Languages & Computer
Linguistics II.
“Words of Caution”
As an additional preliminary remark, and in order to avoid misunderstandings, we would like to
bring three important circumstances to your attention:
EXMARaLDA is a “Work in Progress”
After more than ten years of development on the Partitur-Editor, it has reached a stable state and
is being successfully put to use in numerous projects. Nonetheless, future versions will expand
its functionality and there may still be undiscovered errors in the current funct ionality. If you
should encounter such errors or have any suggestions or feedback, we would be grateful if you
were to send us a detailed description via e- mail (see also Help > About... ). We will then try our
best to remedy the situation.
Software updates are published regularly, in which the errors of previous versions have been
resolved and new functions are introduced. It is, thus, advisable to work with the current version
of the Editor, even if this means a regular new installation of the software. This manual is also
being updated on a regular basis. If you subscribe to the EXMARaLDA mailing list, you will be
informed about the availability of a new version regularly (see this option on our homepage
http://www.exmaralda.org in the sub menu “Help”).
8
EXMARaLDA Partitur-Editor – Manual
Preliminary Remarks
The EXMARaLDA Partitur-Editor is neither the new syncWRITER, nor the new HIAT-DOS
In some aspects the Partitur-Editor does follow the model of these two programs, but essentially
it has a different approach: It should not only serve as an in- and output instrument for transcriptions written in form of musical scores, but also produce data beyond that – data that is suitable
for further extensive, computer-assisted processing. Thus, many things work differently than the
users of syncWRITER or of HIAT-DOS may be used to.
This manual is not a guideline for transcribing
EXMARaLDA is a formal framework that is situated at a level of abstraction above the specific
transcription systems like HIAT, DIDA, GAT etc. Therefore, this manual does not provide specific instructions on how phenomena of spoken language should be transcribed. This needs to be
defined separately in the transcription conventions.
A manual for the transcribing with the EXMARaLDA according to HIAT transcription conventions was published in the summer of 2004:
Rehbein, Jochen / Schmidt, Thomas / Meyer, Bernd / Watzke, Franziska / Herkenrath, Annette
(2004): Handbuch für das computergestützte Transkribieren nach HIAT. In: Arbeiten zur
Mehrsprachigkeit (Working Papers in Multilingualism) (Series B). Hamburg.
In addition to this HIAT- manual, the sub menu “HIAT” on the EXMARaLDA-Homepage
(http://www.exmaralda.org) features an extensive collection of samples for transcribing with the
EXMARaLDA Partitur-Editor according to HIAT. These examples consist of a screenshot in the
Partitur-Editor, a screenshot of an RTF output, an XML file that can be edited in the PartiturEditor and, if available for the chosen example, an audio file .
The IDS Mannheim compiled a manual for transcribing with the EXMARaLDA Partitur-Editor
according to DIDA:
Schütte, Wilfried (2004): Transkriptionsrichtlinien für die Eingabe in EXMARaLDA (ab Vers ion 1.2.7) nach DIDA-Konventionen. Mannheim: Institut für Deutsche Sprache.
For further information, please contact the IDS in Mannheim.
9
EXMARaLDA Partitur-Editor – Manual
User Interface
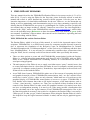
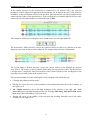
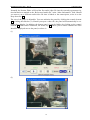
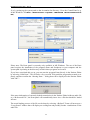
II. USER INTERFACE
The two main components of the interface are the musical score (1) and the oscillogram (2).
If required, the panels discussed in the following chapter can be added.
The oscillogram will only be displayed, if the transcription is linked to an audio or video file (via
Transcription > Recordings...). Should the list of linked recordings not hold a .wav file, only
a time line will be displayed instead of the oscillogram:
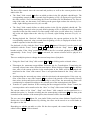
The buttons for playing the recording can be found between the oscillogram and the musical
score:
Their functions are (from right to left):
(1) Play the second before the selection in the oscillogram
(2) Play the first second of the selection
(3) Play the current selection (Shortcut: Ctrl + Space)
(4) Play the last second of the selection (Shortcut: Ctrl + Shift + Space)
(5) Play the first second after the selection
10
EXMARaLDA Partitur-Editor – Manual
User Interface
(6) Loop the selection
(7) Play from cursor position (Shortcut: Ctrl + F4)
(8) Pause (Shortcut: Strg + F5)
(9) Stop (Shortcut: Strg + F6)
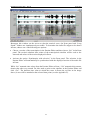
The musical score and the oscillogram are linked to each other. Thus, if the current selection of
the musical score is equipped with absolute time values, the start (4b) and end point (5b) of the
musical score will coincide with the start (4a) and end point (5a) of the oscillogram selection. In
reverse, the buttons “Add event...” and “Append interval” can be used to insert events or time
intervals into the musical score according to the current selection in the oscillogram. A detailed
description can be found in the document How to make a transcription from a digital recording.
The musical score is composed of one or more tiers. Every tier contains events that are assigned
to one or more intervals on the timeline. A detailed description of the basic units of an
EXMARaLDA transcription can be found in the document Understanding the basics of EXMARaLDA.
The visual nature of the oscillogram view can be altered by scrolling:
Pressing and holding the Control key (CTRL) and scrolling up or down zooms in and out
of the display horizontally, hence, a greater or smaller time unit is then shown per pixel.
Pressing and holding the Control (CTRL) and the Shift key and scrolling up or down
zooms in and out of the display vertically, hence, the oscillations are increased and decreased
in size. This can be particularly useful, if the recording is too quiet.
11
EXMARaLDA Partitur-Editor – Manual
User Interface
If the current selection in the oscillogram is connected to the musical score, the selection
boundaries will be displayed in green (at the beginning) and in red (at the end). If the selection
boundaries in the oscillogram are altered in this state, these alte rations will also be applied to the
connected time values in the musical score. If the oscillogram view and the musical score are not
connected, the selection boundaries will be displayed in blue.
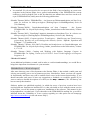
The buttons to modify the oscillogram can be found under it on the right hand side:
The first button (“Shift selection”) moves the current selection in such a way that the new star ting point is the same as the previous endpoint. The length of the selection is maintained:
The second button (“Detach selection”) keeps the current selection, but detaches the musical
score from it. The colours of the boundaries then change from green/red to blue. The third button
(“Assign times”) assigns the start and end time of the current selection in the oscillogram to the
currently selected time points in the musical score.
The selection boundaries in the oscillogram can be changed in the following way:
Clicking and pulling with the mouse
Placing the cursor near one of the boundaries and scrolling thereafter moves the boundary to
the right or left
Alt + Right Arrow key moves the right boundary of the selection to the right. Alt + Left
arrow key moves the right boundary to the left. Pressing Shift along with Alt and the arrow
keys moves the left boundary of the selection.
Placing the cursor in the middle of the selection and scrolling thereafter moves the entire
boundary to the right or left
12
EXMARaLDA Partitur-Editor – Manual
User Interface
There are two possible ways to choose longer selections:
Using the button “Navigate in the recording” (above the oscillogram view to the left) opens a
dialog that allows input of selection boundaries in numbers:
Double-clicking sets a mark in the oscillogram view. The next double-click then places a
selection from the marked position up to the second double-click.
13
EXMARaLDA Partitur-Editor – Manual
Keyboard
III. PANELS
A.
Keyboard
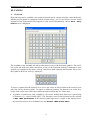
Keys that may not be available on a normal keyboard can be entered using the virtual keyboard.
Should your keyboard be equipped with the required keys, you do not need to use the virtual
keyboard. If the keyboard does not appear on your screen automatically, choose Vie w > Keyboard to have it displayed.
The scrollbar on the left hand side allows alterations in size of the keyboard symbols. The scrollbar on the left hand side allows alterations in size of the keyboard symbols. Furthermore, most
symbols are equipped with a short “tool tip” that shows both: meaning and function. Hover over
the symbol to have the “tool tip” displayed:
To insert a symbol into the musical score, move the cursor to that position in the musical score
and click on the desired symbol. To choose a different character set than the one on the ke yboard, click on the arrow and select a different keyboard from the list. Please note:
A number of symbols are only available in a few fonts, namely those that cover a great range
of Unicode (e.g. “Arial Unicode MS”). The font that is used in the keyboard can be selected
in Edit > Edit preferences. If the desired symbol appears as a square in the musical score,
the tier's font needs to be reformatted (see also Format > Ed it format table ).
14
EXMARaLDA Partitur-Editor – Handbuch
B.
Link Panel
Link panel
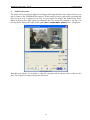
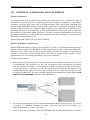
The link panel links event descriptions to external image, audio, video and text files. Should the
link panel not appear on your screen, choose Vie w > L ink panel to have it displayed.
To link an event to an external file, select the event in the musical score and choose whether it's
an image, audio, video or text file in the “Link Medium” me nu. Enter the storage location of the
file to be linked in “Link URL”. Click “Browse…” to open a new dialog. Here, you can search
for the file on your computer.
The appearance of the upper part of the link panel depends on the type of media file chosen. An
image will be shown in the upper half of the link panel. The same applies to a linked video file.
When linking audio and video files, the panel will display an additional player for the playback
of these files. The content of a linked text file will be d isplay in a preview window.
15
EXMARaLDA Partitur-Editor – Manual
C.
Audio/Video Panel
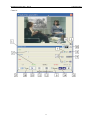
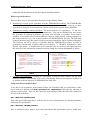
Audio/Video panel
The Audio/Video panel plays digitised recordings and assigns absolute time values of the recording to points on the EXMARaLDA timeline. When working with a single audio recording that
does not need to be re-aligned or the like, it is not required to display the Audio/Video panel.
When working with a single audio recording that does not need to be realigned or the like, it is
not required to display the Audio/Video panel Vie w > Audio/Video panel to have it displayed.
Depending on whether it is an audio or video file, the panel will be shown with or without a display. The controls are almost identical in both cases.
16
EXMARaLDA Partitur-Editor – Manual
Audio/Video Panel
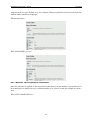
Controls:
17
EXMARaLDA Partitur-Editor – Manual
Audio/Video Panel
Normally the Partitur-Editor will load the first audio/video file into the currently open transcription that has been marked as the “Referenced media file” in the “Meta Information” field. Should
you want to use a different audio/video file that is linked to the transcription, select it on the
drop-down list 1 .
The size of the panel is adjustable. You can minimize the panel by clicking the control element
6 by hiding the slide bar (1). Should you open a video file, the panel will automatically be e xtended by a display. In addition, the button panel (2) can be hidden by clicking on the control
element 5 . Under these conditions, the arrow key 4 allows you to choose whether the video
should be displayed next to the panel, or above it.
(1)
(2)
18
EXMARaLDA Partitur-Editor – Manual
Audio/Video Panel
The three slide controls show the start and end position, as well as the current position in the
audio/video file:
The “Start” slide control 2 defines at which position in the file playback should begin. The
corresponding numerical value (seconds from beginning of file) is displayed in green below
the slide controls. Zur Feineinstellung des Werts verwenden Sie die Maustasten. For fine tuning of the value, use the mouse. Left clicking on the green digits reduces the value by 0,1 seconds, right clicking increases it by 0,1 seconds.
The “Stop” slide control defines at which position in the file the playback should end. The
corresponding numerical value (seconds from beginning of file) is displayed in red in number
sequence below the slide controls. For fine tuning of the value, use the mouse key. Left clicking on the red digits reduces the value by 0,1 seconds, right clicking increases it by 0,1 seconds.
During playback the “Position” slide control displays the current position in the file. The
corresponding numerical value (seconds from beginning of file) is displayed in black in the
number sequence below the slide controls.
For playback of a file, click the “Start” button 10 = F1 button. If desired, it can be paused and
continued with the “Pause” button 11 = F2 or stopped with the “Stop” button 12 = F3.
beendet werden. If the “Stop” position or the end of the file is reached, playback will terminate
automatically. If the “Loop” option 18 is activated, the current selection will be played in a
loop.
There are multiple options to change the start and stop times of playback :
Using the “Start” and “Stop” slide control 2 and 3 or clicking on the coloured values.
Übertragen der momentan ausgewählten Zeitwerte aus der Transkription: Transferring the
currently selected time values from the transcription: When clicking on button 8 the absolute
time value of the current selection in the transcription in the Editor will be determined and
transferred to the “Start” slide control. There is an equivalent button for the “Stop” slide co ntrol.
Synchronising the start and stop times with the selection in the transcription. If the sync options of the start or stop slide controls 7 are selected, the transfer of the currently selected
time values in the transcription will automatically be used. Thus, the start and stop times will
continuously be adjusted according to the selected part of the transcription in the Editor.
Transfer of a pause duration: If the recording has been stopped with the “Pause” button, the
current position can be transferred to the “Start” or “Stop” slide control with button 9 .
The current values of the “Start”, “Stop” and “Pause” slide controls can be transferred to a
marked time point (i.e. from the recording into the transcription) with button 3 . If no time point
is marked on the timeline of the transcription, these buttons will be deactivated.
The two arrow keys 14 haben Sie vom Audio/Video panel aus einen direkten Zugriff auf die
Position des Cursors in der Partitur. By clicking, the cursor can be moved to an event further to
the right or to the left.
Depending on whether an audio or video file has been opened, the control element 15 or the
control element 16 will be activated.
19
EXMARaLDA Partitur-Editor – Manual
Audio/Video Panel
The “camera” 15 allows you to generate single frames from the imported video file in the tra nscription in a .png format. In order to do this, move the “Start” slide control 2 to the desired
position of the video and click on the “Camera”. A pop-up window will then appear and you will
be asked to choose a storage location for the image file.
Should you want to select a different storage location than the one that the program automatica lly generated, click “Browse…”. Please note that the file ending “.png” may not be changed.
If you have added a tier for links in your transcription and placed the cursor into the event of this
tier, the panel will offer the option to link the event to the newly generated “Snapshot”. Click on
“Link to transcription”. A detailed description on linking files can be found in the reference under III. Panels > B. Link panel.
The “scissors” 16 allow you to create “audio snippets” in the .wav format in a synchronised
transcription linked to an audio file. Place the cursor in the event for which you would like to
create an audio snippet and click on the “scissors”. A pop-up window will then appear and you
will be asked to choose a name and a storage location for the audio file.
Should you want to select a different name or storage location than the one that the program automatically generated, click “Browse…”. Please note that the file ending “.mov” may not be
changed.
If you've added a tier for links in your transcription and placed the cursor into the event of this
tier, the panel will offer the option to link the event to the newly generated “Audio snippet”.
Click on “Link to transcription”. A detailed description into linking files can be found in the reference III. Panels > B. Link panel. Please note that the embedding of media files will not always
run smoothly. A successful linking depends on…
the file format of the video (we recommend .avi or .mov),
the performance features of the video card of your computer, and
the Codec settings.
Should you encounter problems, please consult the document Audio and Video Support in
EXMARaLDA.
20
EXMARaLDA Partitur-Editor – Manual
D.
Praat Panel
Praat panel
The Praat panel plays digitised recordings and assigns absolute time values of the recording to
points on the EXMARaLDA timeline. Should the Praat panel not appear on your screen, select
View > Praat Pane l to have it displayed.
Configuration of Windows and Praat for working with EXMARaLDA:
The current version of Praat can be found on http://www.praat.org. There, the current version of
Sendpraat is available as well, on http://www.fon.hum.uva.nl/praat/sendpraat.html.
Download both programs and save them in the same directory (e.g. c:\Programs\Praat). Then
create the path,
1) by either entering the directory at Ed it > Preferences in the tab “Paths” under “Praat Directory” – at this location praat.exe and sendpraat.exe are also stored
21
EXMARaLDA Partitur-Editor – Manual
Praat Panel
2) or by setting up the system path so that it contains the directory: Go to the Control Panel (e.g.
in MS Windows XP Start > Control Panel > System > Advanced > Environment Variable).
Please note: The Praat panel is currently only available in MS Windows. The use of the Praat
panel requires the installation of the programs Praat and Sendpraat on your computer and the
system path is pointing to the directory in which these pro grams are located.
If you have completed this set up, you can start the program Praat directly in the Partitur-Editor
by selecting “Start Praat”. This will take a few seconds. Wait until the program has started co mpletely and then confirm the “Starting Praat...” dialog that will be displayed in the Partitur-Editor
with “OK”“.
If the meta information of currently loaded transcription in the Partitur-Editor holds an audio file
as a “Referenced File”, the Praat panel will automatically insert it as a file that should be loaded
in Praat.
The actual loading process of the file can be done by selecting “(Re)load”. Praat will now open a
“Long Sound” window that will display an oscillogram and possibly further visualisations of the
audio file:
22
EXMARaLDA Partitur-Editor – Manual
Praat Panel
Rearrange this window on the screen so that the musical score, the Praat panel and “Long
Sound” window are simultaneously accessible. To determine the audio file snippet to be shown
in Praat, choose one of the following two options:
Choose a section of the transcription in the Partitur-Editor and then choose “Set” in the Praat
panel. The section's absolute time values of the transcription's timeline will be used as the
start and end values of the section displayed in Praat.
Activate the option “Synchronize with selection” in the Praat panel. The selection in the
Partitur-Editor will automatically be synchronised with the displayed section of the audio file
in Praat.
While “Set” transmits time values from the Partitur-Editor to Praat, “Get” transmits this communication the other way around. For this, mark a point on the timeline in the Partitur-Editor and
click “Get”. The absolute time value at which the cursor in Praat (the red line in the image
above) is now will be attached to the selected time point (see also Appendix E).
23
EXMARaLDA Partitur-Editor – Handbuch
E.
Annotation Panel
Annotation panel
The Annotation Panel allows the systematic and consistent adding of annotations to a transcription. The way it functions is comparable to the functionality of the virtual keyboard. It consists
of a compilation of symbols that can be added into the musical score by clicking on them.
Firstly, however, the annotation panel allows these symbols to be organised hierarchically (i.e. in
a tree structure). Secondly, the user can define categories for the annotation panel freely (see
How to use and configure the annotation panel). Third, the annotation panel can “intelligently” adapt itself to the annotation task by hiding certain category sets in the hierarchy depending on the current selection in the musical score.
Show the annotation panel via View > Annotation Panel. If available, the last annotation specification file will be loaded automatically. To load a new specification, click “Open...” and select
the XML file in which the annotation specifications are defined.
An annotation specification file consists of one or more annotation sets. In the annotation panel
an individual tab is opened for every annotation set. Every annotation set consists of categories
within categories that are presented in the form of a tree. Categories can be equipped with a tag
and a description, however, this is not a requirement. Tags are displayed in bold in the tree, descriptions of the selected category are displayed in the text window below the tree. Double clicking on a category with a tag adds the tag to the current cursor position in the musical score.
24
EXMARaLDA Partitur-Editor – Manual
F.
IPA Panel
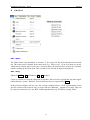
IPA panel
The IPA-Panel supplies the symbols of the International Phonetic Alphabet. The symbols are
organised by parameters, such as manner or place of articulation. The Panel consists of three
tabs:
Vowels and Suprasegmentals:
Consonants:
25
EXMARaLDA Partitur-Editor – Manual
IPA Panel
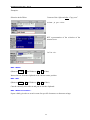
Diacritics:
A larger version of the symbol will be displayed in the lower part of the panel, when hovering
over the symbol with the cursor. Clicking on the symbol adds it to the current cursor position in
the musical score.
26
EXMARaLDA Partitur-Editor – Manual
File Menu
IV. FUNCTION REFERENCE
A.
File Menu
File > Ne w...
(Shortcut CTRL+N on Windows, ⌘+N on Mac)
Creates a new transcription. The new transcription consists of a timeline with two time points, a
speakertable containing a speaker X, as well as a “T” tier that both, the speaker and the category
“v” (for ‘verbal’), are assigned to. To change the attributes of the configured speaker, go to
File > Speakertable.... To change other tier properties, go to Tier > Tier properties.... The
tier contains a default format. To change the format, select Format > Format tier... or Edit > Preferences....
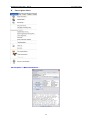
File > Ne w from wizard...
Opens an assistant to create a new transcription step by step.
The individual steps that are also explained in the assistant are:
27
EXMARaLDA Partitur-Editor – Manual
File Menu
1. Specifying Meta Data. If you're managing a corpus with the Corpus-Manager, the meta- data
can be imported from the COMA file. The recording and speaker information of the COMA file
will also be imported in the following steps.
2. Assignment of Audio and/or Video Files
3. Defining a Speakers
4. Defining a pattern to generate tiers for every speaker.
File > Ne w from speakertable...
Generates a new transcription from a speakertable and a stylesheet (see also Appendix C). The
stylesheet that is specified in the user settings (see Edit > Preferences…) in “Speakertable to
transcription” will be used. If there is no entry, a local stylesheet with a tier of the type “T” and
the category “v” per speaker will be generated.
First, the window to edit a speakertable is displayed. Insert the desired speakers and edit their
properties (see F ile > Speakertable...). The stylesheet will be applied by clicking “OK”. A
new, empty musical score will be created with the tiers defined by the stylesheet.
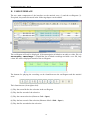
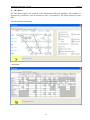
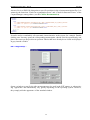
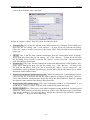
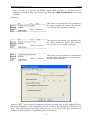
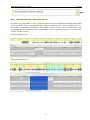
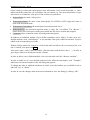
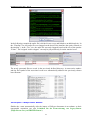
File > Ne w from timeline...
Opens a window, in which the timeline of a new transcription can be divided with means of an
audio or video file before starting the transcription. Thus, prominent events within the recording
(i.e. speaker change in interviews, change in camera settings in television productions etc.) can
be inserted as time points. This can greatly simplify the transcription with certain recording
types. First, you are asked to select one or more audio or video files (see Transcription > Recordings... ). Then, the following window will appear and open the audio or video file selected I
28
EXMARaLDA Partitur-Editor – Manual
File Menu
the previous step will be opened in a new player:
The maximum interval length for the resulting intervals can be defined via the “Maximum interval length” check box. For instance, if the check box is activated, the value is set to five seconds,
and you insert time points at 11.0 and 25.0 seconds, additional time points will automatically be
inserted between these two time points, so that no intervals of more than 5 seconds are created.
Click the start button to start playback of the recording. Then hit “SPACE” whenever you want
to insert a new time point (i.e. at a speaker change). The list will show the time po ints you have
inserted.
Play the recording to the end and click “OK” afterwards. A new, (empty) transcription will open
in the Editor and the timeline will contain the values you have set.
29
EXMARaLDA Partitur-Editor – Manual
File Menu
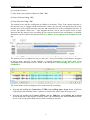
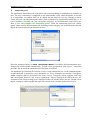
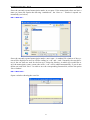
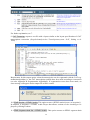
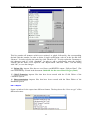
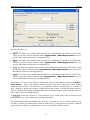
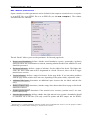
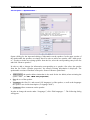
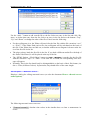
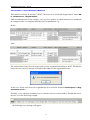
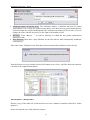
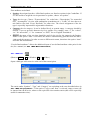
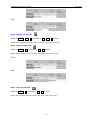
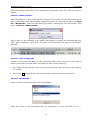
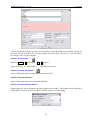
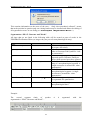
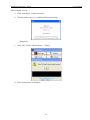
File > Open ...
(Shortcut CTRL+O on Windows, ⌘+O on Mac)
Opens a saved transcription. A standard file window of the system will be displayed, as well as
all files ending in “.exb” and “.xml”. Normally, the start directory is the one that was used for the
last save. Additionally, information on the currently selected file can be displayed on the right. If
the file is an EXMARaLDA basic transcription, its meta information will be displayed. Othe rwise, a notification stating that it is not an EXMARaLDA basic transcription will appear. Select
“Show Info” to see information of the selected file. Activate the option “Auto” to display info rmation for every selected file automatically.
Wählen Sie die zu öffnende Datei und klicken Sie auf „Öffnen“. Die Partitur muss anschließend
einmal vollständig formatiert werden. Bei größeren Transkriptionen kann das mehrere Sekunden
dauern.
Um eine
zugehörige
Formatierungstabelle
zu
öffnen,
siehe
Format > Open format table....
Hint: If you would like to work on two transcriptions simultaneously, open the EXMARaLDA
Partitur-Editor twice. (Do not use File > New, for the opening of a new file closes the current
one.)
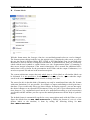
File > Restore
Opens the last save of the currently opened transcription. All changes since the last save will be
discarded. This menu item will only be activated, if a last saved version is available.
File > Save
(Shortcut: CTRL+S on Windows, ⌘+S on Mac)
30
EXMARaLDA Partitur-Editor – Manual
File Menu
Saves the currently opened transcription under its set name. If the transcription does not have a
name yet, hence the caption bar showing “untitled.exb”, the “Save as...” window is opened a utomatically (see below).
File > Save as...
Saves the currently opened transcription under a new name. A standard file window of the system will be displayed as well as all files ending in “.exb” and „.xml“. Normally, the start dire ctory is the one that was used for the last save. Select the directory in which you would like to
save the transcription, enter a name (the suffix “.exb” will be added automatically, if you do not
define one) and click “Save”. In order to save the corresponding format table, activate the option
“Save formats“.
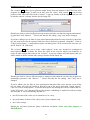
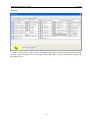
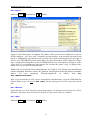
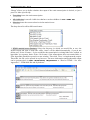
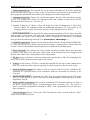
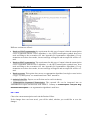
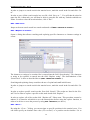
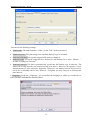
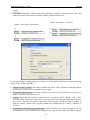
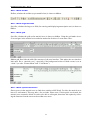
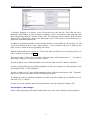
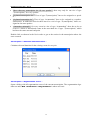
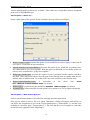
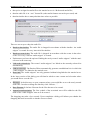
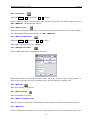
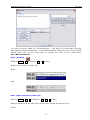
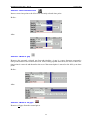
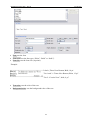
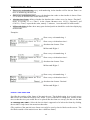
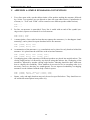
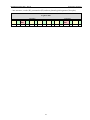
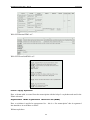
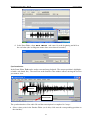
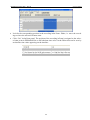
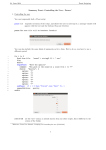
File > Error list...
Opens a window showing the error list.
31
EXMARaLDA Partitur-Editor – Manual
File Menu
An error list is an XML file that points to specific positions in the existent transcription files. It is
written by the functions “Check for segmentation errors” and “Check for Structure Errors” of the
Corpus Manager, among others. (see the COMA Docume ntation).
<?xml version=„1.0“ encoding=„UTF-8“?>
<error-list>
<errors>
<error
file=„ENDFAS/Bilingual/Sezen_Aksu/EFE07dt_Sez_b_0408_f_100295/EFE07dt_Sez_b_0408_2_ENF.xml“
tier=„TIE16“ start=„T41“ done=„no“>Annotation mismatch</error>
<error
file=„ENDFAS/Mono_tk/Guznur_Bayar/Selbtk_Guz_m_0222_t_121092/Selbtk_Guz_m_0222_1_ENF.xml“
tier=„TIE11“ start=„T7“ done=„no“ >Annotation mismatch</error>
<!-- [...] -->
</errors>
</error-list>
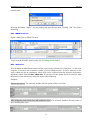
It can be used to comfortably edit systematic inconsistencies in the corpus, for example. Double
clicking on a list entry opens the corresponding transcription, should it not be open already, and
places the cursor on the position in question. Entries that have already been visited are displayed
in grey instead of black.
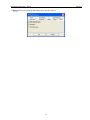
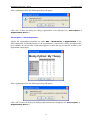
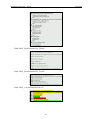
File > Page setup…
Opens a window to specify the side measurements to be used in the RTF output, or when printing. Appearance and functionality vary greatly depending on the operating system. However,
they comply with the appearance of the standard window.
32
EXMARaLDA Partitur-Editor – Manual
File Menu
File > Print…
(Shortcut: CTRL+P on Windows, ⌘+P on Mac)
Opens a window to print the transcription. Appearance and functionality vary greatly depending
on the operating system. However, they comply with the appearance of the standard window for
printing.
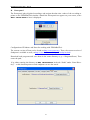
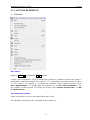
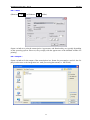
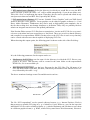
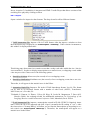
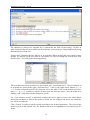
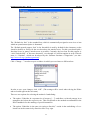
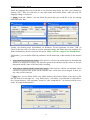
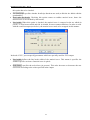
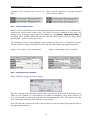
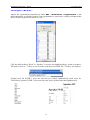
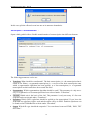
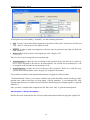
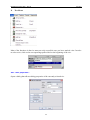
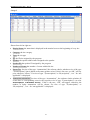
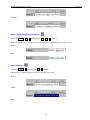
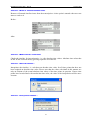
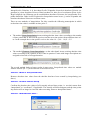
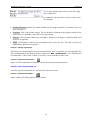
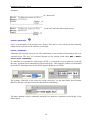
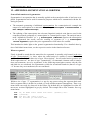
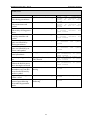
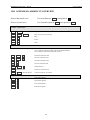
File > Output...
Opens a window for the output of the transcription in a format for presentation, used for the display in a browser or the integration in a word processing document (i.e. MS Word).
33
EXMARaLDA Partitur-Editor – Manual
File Menu
“Range” allows you to define whether the output of the entire transcription is desired, or just a
part of it. More specifically:
Everything issues the entire transcription
All visible tiers issues all visible tiers that have not been hidden via Tier > Hide Tier
Selection issues the current selection in the musical score.
The drop-down list offers different formats:
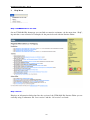
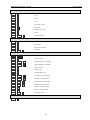
1. HTML musical score (Partitur): Select the directory in which you would like to save the
HTML output and enter a name (the suffix “.html” will be added automatically, if you do not
define one). Select “Frames“, if you would like the transcription's existing links to be realised as
hyperlinks in a separate frame. Select “No frames“ if the transcription does not contain links, or
if the hyperlinks should be opened in a new window. Then click “Save“ to implement the output.
Thereafter, the file can be opened in any browser. The meta information and speakertable output
can be parametrised via Edit > Preferences > Stylesheets as “Head to HTML“. See also:
Appendix C: “EXMARaLDA and Stylesheets”.
34
EXMARaLDA Partitur-Editor – Manual
File Menu
2. RTF musical score (Partitur): Select the directory in which you would like to save the RTF
output and enter a name (the suffix “.rtf” will be added automatically, if you do not define one).
Then click “Save” to implement the output. Thereafter, the file can be opened and edited in any
word processor that can read RTF files (especially MS Word).
3. SVG musical score (Partitur): SVG means “Scalable Vector Graphics” and is an XML-based
format to describe vector graphics. Vector graphics can be edited in graphic software (i.e. Corel
Draw, Adobe Illustrator). Furthermore they can be used as high-quality print templates, due to
the fact that scaling does not damage sharpness or definition. Thus, they are probably the best
solution to integrate musical scores into printed publications.
If the Partitur- Editor creates SVG files from a transcription, it writes an SVG file for every musical score section that has been created due to a line break. These are saved in a shared directory
and compiled in a superordinate HTML file that refers to the SVG files in such a way that they
can be viewed with a browser that is capable of displaying SVG files.
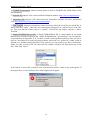
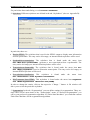
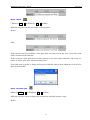
When choosing this output option, the following panel is shown on the side of the file dialog:
In it, the following parameters for the output can be set:
Subdirectory for SVG files: sets the name for the directory in which the SVG files are supposed to be saved. This directory will be created in the same folder as the superordinate
HTML file, if it is not available yet.
Base filename for SVG files: sets the base file name for the SVG files. The full name of an
SVG file then consist of this base file name, followed by the number of the musical score section, followed by the suffix “.svg”.
The above mentioned settings create files and directories such as :
Subdirectory for SVG files
Dateiname
Base filename
The file “SVG-output.html” can be opened with any browser (e. g. Internet Explorer, Firefox)
that possesses a suitable SVG plug- in (e. g. of Adobe or Corel). However, you can also open the
individual SVG files with a suitable software (e. g. Adobe Illustrator) and edit them or save them
in a different graphic format (e. g. WMF, which can be pasted into a Word document), if desired.
35
EXMARaLDA Partitur-Editor – Manual
File Menu
4. XML Partitur: This option creates an XML-coded version of the musical score representation
(“Interlinear Text”) of the current transcription. The settings chosen under
File > Partitur parameters… and those of the current format table (see also Format > Edit format table… ) will be used. The XML coding is compliant with the DTD (“interlinear-text.dtd”). The current version is available in the download area of the EXMARaLDA
Homepage. We assume that this function is not of interest to most users. It is intended for users
that plan on developing their own visualisation (containing XSL stylesheets and the like).
5. HTML Segment Chain List: This option creates a HTML file in which the speaker contrib ution is organised in a segment chain list. Segment chains are defined as interrelated events in a
transcription tier. This form of output is similar to the classic line notation used in conversation
analysis, in theatre scripts or in printed interviews, among others.
6. Free Stylesheet Transformation: Uses a stylesheet on a transcription (see also Appendix D)
that is selected via Edit > Preferences in the tab “Stylesheets” under “Free stylesheet visualisation”.
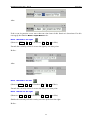
7. HTML Partitur + Flash Player: This option creates a HTML musical score (as in option 1). In
addition, it integrates a Flash Player that allows sections of the recording to be played by clicking
on them.
36
EXMARaLDA Partitur-Editor – Manual
File Menu
Requirements for the use of this option are
that the transcription is linked to an MP3 file (via Transcription > Recordings... ) . Other
audio or video recordings will not be played by the Flash Player. If there is no link to an MP3
file, an error message will appear and the HTML musical score will not be created.
that the transcription is at least partially aligned. Hence, some time points on the timeline need
to be equipped with absolute time values that refer to the recording.
Take note that this option creates three additional files in the same directory, in addition to the
HTML file that contains the musical score:
The files “player.swf” and “seeker.swf” are Flash applications that serve the purpose of playing
the recording. The file “seeker.html” is designed to integrate the Flash components into the musical score.
8. HTML Segment Chain List + Flash Player: This option creates an HTML segment chain list
(as in option 5). In addition, it integrates a Flash Player that allows to listen to the sections of the
recording, by simply clicking on a position in the list.
37
EXMARaLDA Partitur-Editor – Manual
File Menu
For further explanation, see 7.
9. GAT Transcript: exports a text file with a layout similar to the layout specifications of GAT
transcription convention (Gesprächsanalytisches Transkriptionssystem: GAT, Selting et al.
1998).
Requirement for this output option is that the transcription can be segmented with the GAT segmentation algorithm, i.e. the GAT transcription symbols have been used according to convention
(see also Appendix B: Segmentation Algorithms). If segmentation errors have been made, an
error message will appear and no output file will be created.
10. HTML Partitur + HTML5 Audio: This option creates a HTML musical score (as in option 1).
In addition, it integrates a HTML5 Audio Player that allows sections of the recording to be
played by clicking on them.
11. HTML Segment chain list + HTML5 Audio: This option creates an HTML segment chain
38
EXMARaLDA Partitur-Editor – Manual
File Menu
list (as in option 5). In addition, it integrates an HTML 5 Audio Player that allows sections of the
recording to be played by clicking on them.
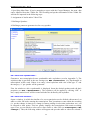
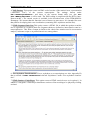
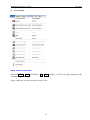
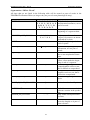
File > Import
Opens a window for import in other formats. The drop-down list offers different formats:
1. TASX Annotation File: Imports a file in TASX format. After the import, a window to clean
the transcription up is displayed (see Transcription > Cleanup ). Under certain circumstances,
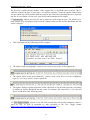
this window is displayed thereafter:
This dialog states that some tiers contain events that overlap each other within the tier (“the tier
is not stratified”). In order to display transcriptions as a musical score, overlapping events within
a tier may not exist. Choose one of the following options:
Stratify by deletion: deletes one (the second) of two overlapping events
Stratify by distribution: distributes one (the second) of two overlapping events into a new tier.
Thereafter, it will appear in the musical score in the Editor.
2. Annotation Graph File: Imports a file in the ATLAS-Interchange format, Level 0. The format
can be used as an exchange format with a number of other tools (ANVIL, Transformer,
MAVVissta, etc.). For this, see:
T.Schmidt, S. Duncan, O. Ehmer, J. Hoyt, M. Kipp, D. Loehr, M. Magnusson, T. Rose & H.
Sloetjes (2008): An exchange format for multimodal annotations. In: Proceedings of the
Language Resource and Evalutation Conference 2008, Marrakech, Paris: ELRA.
3. ELAN Annotation File: imports a transcription created in ELAN (EUDICO Linguistic Annotator). Select the file to be imported and click “Open” (normally the file ending is “.eaf”). After
the conversion a “Cleanup-Dialog” will allow you to clean the transcription up according to ce rtain criteria (see Transcription > Cleanup…). Thereafter, the transcription will appear as a
musical score in the Editor.
39
EXMARaLDA Partitur-Editor – Manual
File Menu
4. FOLKER Transcription: imports a transcription created in FOLKER (the FOLK-Editor of the
IDS Mannheim.
5. Winpitch file: imports a file created with the Winpitch software (http://www.winpitch.com/).
6. Transcriber file: imports a file created with the Transcriber software (for more information
visit: http://trans.sourceforge.net/en/presentation.php).
7. Praat Textgrid: Imports a transcription created in Praat. Select the TextGrid you would like to
import and click “Open”. Thereafter, the transcription will appear as a musical score in the Editor. Take note that the Editor expects a “regular” TextGrid for the import, and not a “short”
TextGrid.
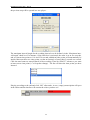
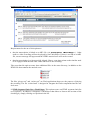
8. Simple EXMARaLDA text file: A Simple EXMARaLDA file is a transcription in .txt format
that has been created according to the “Simple EXMARaLDA” specifications. You can find these specifications in Appendix A. If you have created a transcription according to these specific ations in a text editor or a word processing software and saved it as “plain text” (either coded as
Unicode or a standard coding specified by the system), you can import a text file to the PartiturEditor. For this, search for the file and select the suitable coding in the drop-down list on the
side. Then click “Open”.
If the import is successful, a musical score representation will be visible in the transcription. If
the import fails, an error message of the following kind will appear:
40
EXMARaLDA Partitur-Editor – Manual
File Menu
The first line contains the line number of the original file, in which the error occurred. The s econd line contains the type of error (here: “no speaker separator”, hence the speaker abbreviation
was not ended in a colon) and the third line presents the entire line containing the error. Open the
text file in a text Editor, fix the error, save the file and reattempt the file import.
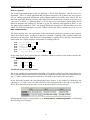
9. Plain text file: imports any text file into a single tier in the musical score. The window pr esents options as to according to which rule the content of the text file will be distributed into the
events of the tier:
This is illustrated in the following text file example:
The option “Split at paragraphs” creates a new event for every line of the original file :
The option “Split at non-word characters” creates a new event for every row of alphabetic
signs (i.e. for every “word”) of the original file:
The option “Split at regular expression” allows the input of any desired expression, according
to which text will be distributed into the events. For instance, the expression [\.\?] for the text
above would deliver the following result:
10. Tree Tagger Output: imports a text file that contains Part-Of-Speech-Annotation, hence a
word per line, as well as separated by tabs according to the Tree Tagger format
(http://www.ims.uni-stuttgart.de/projekte/corplex/TreeTagger/) i.e.:
41
EXMARaLDA Partitur-Editor – Manual
File Menu
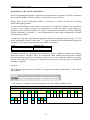
The data will be imported into two or three tiers (depending on whether the initial file only co ntains POS-Tags, or lemmas as well). One tier is used for the text (the words), the second for the
annotation (the POS-Tags) and, if necessary, a tier for lemmas. The tiers will be assigned to a
dummy speaker “X”. Every word is placed in a separate event:
11. TEI file: imports a transcription that is coded according to the guidelines of the Text Encoding Initiative (TEI) in XML (see Schmidt, Th. 2005: Time based data models and the TEI Guid elines for Transcriptions of Speech. In: Arbeiten zur Mehrsprachigkeit (Working Papers in
Multilingualism), Series B.). Select the transcription to be imported and click “Open”. After the
conversion, a “Cleanup-Dialog” will allow you to clean the transcription up according to certain
criteria (see Transcription > Cleanup... ). Thereafter, the transcription will appear as a musical
score in the Editor.
12. Import via XSL stylesheet: imports an XML file in any desired format by applying a suitable
XSL stylesheet that transforms the original format into an EXMARaLDA basic transcription.
After selecting the file to be imported, you will be asked to specify such an XSL stylesheet:
The name of the stylesheet will be saved for the next import.
13. HIAT-DOS file: “imports” HIAT-DOS files. Please note that the quotation marks around the
word “import” are supposed to raise awareness to an important circumstance :
In essence, it is not possible to find a perfect EXMARaLDA correspondence for a given
HIAT-DOS data. The “import” function only supplies a rough version that normally needs to
be edited manually afterwards.
The function was developed for HIAT-DOS files at the Research Centre “Multilingualism” of
the University of Hamburg. This explains the replacement rules for Scandinavian special
characters, for example. The HIAT-DOS files created at the Research Centre neither work
with intonation tiers, nor with underlining. Therefore, we have no experience as to what hap42
EXMARaLDA Partitur-Editor – Manual
File Menu
pens to these elements when “imported”.
In order to “import” a HIAT-DOS file, fill in the following field:
Transcript file: This is the file with the actual transcription text. Normally, HIAT-DOS gives
these files the file ending “.dat”. Click “Browse...” to look for the file with the file dialog.
(Hint: The “import” result is a lot better, when using HIAT-DOS files that do not contain line
breaks yet.)
Info file: This is the file that contains information from the transcription head. Normally,
HIAT-DOS gives these files the file ending “.inf”. Click “Browse...” to look for the file with
the file dialog. Even if no file is selected, the “import” can be carried out – the transcription
head will simply remain blank.
Speakers file: This is the file that contains the names and abbreviations of the speakers. Normally, HIAT-DOS gives these files the file ending “.sig”. Click “Browse...” to look for the
file with the file dialog. Even if no file is selected, the “import” can be carried out – the
speakertable will be generated automatically, speaker abbreviations and names can be added
afterwards in the Partitur-Editor.
Method for calculating synchronisation points: When calculating the synchronisation points,
either only the left, or both the left and the right boundaries of entries in the HIAT-DOS tiers
can be used. Reliable synchronisation points are mostly the left boundaries. However, adding
the right tiers may minimise the editing effort afterwards.
Remove holes (after manual wrap): This (time-consuming) method is recommended if you
would like to “import” a HIAT-DOS file with an afterwards edited line break.
Replace symbols: HIAT-DOS uses a non-ANSI-compliant coding method for German special
characters. These signs are replaced by default (as well as some substitute signs for Scandinavian special characters). If you would like to change the characters that should be replaced,
click “Change...” , to get the following dialog:
43
EXMARaLDA Partitur-Editor – Manual
File Menu
This list contains all instances which were replaced, as glyph, followed by the corresponding
decimal Unicode number. In order to delete a single replacement, select it in the list and click
“Remove”. In order to delete the entire list, click “Remove all”. To only replace the German sp ecial characters and “ß”, click “Standard”. In order to add a replacement, enter the decimal
Unicode into the fields “To be replaced” and “Replacement” and click “Add!”. Exit the dialog
with “OK”, to save the changes.
14. ExSync file: imports files that are read from syncWRITER output (“ExSync Data”) (The
exact functionality is listed in the document Guideline for the conversion of Legacy Data).
15. CHAT Transcript: imports files that have been created with the CLAN Editor of the
CHILDES System.
16. Phon transcription: imports files that have been created with the Phon Editor of the
Phonbank-System.
File > Export
Opens a window for the export into different formats. The drop-down list “Save as type” offers
different formats:
44
EXMARaLDA Partitur-Editor – Manual
File Menu
1. TASX Annotation File: The exported file can be opened and edited in the TASX-Annotator.
Please note that such an export is only useful, if at least some of the points on the timeline have
been equipped with absolute time values (non-existing times will be interpolated).
2. Annotation Graph File: Exports the current transcription into the Atlas Interchange format,
Level 0. The format can be used as an exchange format with a number of other too ls (ANVIL,
Transformer, MAVVissta, etc.). For this, see:
T. Schmidt, S. Duncan, O. Ehmer, J. Hoyt, M. Kipp, D. Loehr, M. Magnusson, T. Rose & H.
Sloetjes (2008): An exchange format for multimodal annotations. In: Proceedings of the
Language Resource and Evalutation Conference 2008, Marrakech, Paris: ELRA.
3. ELAN Annotation File: The exported file can be opened and edited in ELAN. Please note that
such an export is only useful, if at least some of the points on the timeline have been equipped
with absolute time values (non-existing times will be interpolated). Furthermore, you should
have specified the underlying media file (see Transcription > Recordings... ).
4. FOLKER Transcription: Exports the current transcription into the format of the FOLKER Ed itor. Take note that for every speaker only the first tier of type “T(ranscription)” will be taken into
account. Contents of annotation and description tiers will thus be lost during export.
5. PRAAT Textgrid: The exported file can be opened and edited in Praat. Please note that such
an export is only useful if at least some of the points on the timeline have been equipped with
absolute time values (non-existing times will be interpolated).
6. TEI file: exports a file that is coded according to the specifications of the Text Encoding Init iative (TEI) in XML. Different export options are offered:
Generic: In this option, a TEI file is created that transfers the text into events without alterations. This is the most basic form of exporting. It results in practical data for most results.
Based on Modena method: This option is used in a project at the University of Modena. Requirement for a practical result is the compliance with the conventions in reference to the
event text.
Based on AZM method: see Schmidt, Th. 2005: Time based data models and the TEI Guidelines for Transcriptions of Speech. Arbeiten zur Mehrsprachigkeit (Working Papers in Multilingualism), Serie B.
Based on HIAT segmentation: this variation contains the TEI document mark-up for units of
the HIAT system (words, pauses, non-phonological items, utterances etc.). The export requires a successful segmentation according to HIAT. If the segmentation fails, an error message will appear.
7. CHAT transcript: Exports a file in the CHAT format that can be opened with the CLANEditor of the CHILDES-System.
45
EXMARaLDA Partitur-Editor – Manual
File Menu
Different variants are offered:
Based on CHAT segmentation: he requirement for this type of output is that the transcription
can be segmented with the CHAT algorithm, i.e. the CHAT transcription symbols have been
used according to the convention (see also Appendix B: Segmentation Algorithms). If se gmentation errors have been made, an error message will appear and no output file will be created.
Based on HIAT segmentation: The requirement for this type of output is that the transcription
can be segmented with the HIAT algorithm, i.e. the HIAT transcription symbols have been
used according to the convention (see also Appendix B: Segmentation Algorithms). If se gmentation errors have been made, an error message will appear and no output file will be created.
Based on events: This option does not use a segmentation algorithm, but single events in tiers
of type “T(ranscription)” are transformed into CHAT utterances.
8. Audacity Label File: Exports a text file that can be read in Audacity.
9. EXMARaLDA Segmented Transcription: The exported file can be integrated into an
EXMARaLDA corpus and browsed with EXAKT. Contrary to Transcription > Export Segmented Transcription ... no segmentation algorithm is used here.
File > Exit
Closes the current transcription and exits the Partitur- Editor.
If the changes have not been saved, you will be asked, whether you would like to save the
changes.
46
EXMARaLDA Partitur-Editor – Manual
B.
Edit Menu
Edit Menu
Submenu “Selection”
Edit > Undo
The Undo feature was introduced in version 1.5. It reverses the last action that has been carried
out. The action itself is named in the menu item (e.g. “Edit event”). Up to 20 actions are saved,
which can be undone again. In the case of some actions, the musical score needs to be reformatted after calling up the menu item. This can take a few seconds in larger transcriptions.
Edit > Copy
(Shortcut: CTRL + C on Windows, ⌘ + C on Mac)
Copies a selected text into the clipboard. From there, the text can be copied into any other application that has a “paste” function. Texts in different tiers are separated by Enter.
If the selection includes all tiers (see also second example below), a RTF representation of the
specific section of the musical score is copied into the clipboard – instead of text only. This can
be copied as a musical score into RTF-enabled applications (esp. WORD) by using “Paste”.
47
EXMARaLDA Partitur-Editor – Manual
Edit Menu
Examples:
Content of the clipboard after “Copy text”
Selection in the Editor
Stimmt ja gar nicht.
RTF representation of the selection of the
musical score
fällst mir
Edit > Paste
(Shortcut: CTRL + V on Windows, ⌘ + V on Mac)
Inserts the text from the clipboard at the current cursor position.
Edit > Cut
(Shortcut: CTRL + X on Windows, ⌘ + X on Mac)
Cuts the currently selected text and puts it into the clipboard.
Edit > Search in events...
Opens a dialog in order to search events for specific characters or character strings :
48
EXMARaLDA Partitur-Editor – Manual
Edit Menu
The character or string to be searched for is entered into the field “Search string”. In order to
enter characters that are not available on the keyboard, you can open a virtual keyboard by using
the button below on the left.
“Search area” indicates the tiers that are to be searched. When opening the search dialog, these
include, by default, all the tiers that are not hidden. In order to change the search area, click
“Search area”: You will get the following dialog:
The tiers that are not to be searched are listed on the left (“Unselected tiers”). The tiers that are to
be searched are listed on the right (“Selected tiers”). Click on the single arrow buttons (“>” or
“<”), in order to transfer specific tiers from one list to the other. Click on the double arrow buttons (“>>” or “<<”), in order to transfer all tiers from one list to the other. Close the window by
clicking “OK” (only then will the changes be saved).
Use “Case sensitive search” to determine whether the use of upper or lower case initial letters
should be considered as well (If this option is ticked, the use of upper and lower case initial le tters will be considered).
Click “Search” in order to run the search according to the defined parameters. The result of the
search is given in the “Result” list. The found occurrences are highlighted in red and are put in a
frame.
49
EXMARaLDA Partitur-Editor – Manual
Edit Menu
In order to jump to a search result in the musical score, mark the result in the list and click “Go
to”.
In order to save all the search results in a text file, click “Save as...”. You will then be asked to
name the file. Afterwards, you will then be able to open this file with any Unicode enabled text
Editor. In order to close the search window, click “Close”.
Edit > Find next...
Jumps to the next search result in a search conducted with Ed it > Search in events....
Edit > Replace in events...
Opens a dialog that allows searching and replacing specific characters or character strings in
events.
The character or string to be searched for is entered into the field “Search string”. The character
or string to be replaced is entered into the field “Replace string”. The determination of the
“Search area” is done as described above ( Edit > Search in events…).
Searching and replacing always considers the use of capital and small initial le tters.
In order to jump to a search result in the musical score, mark the result in the list and click “Go
to”.
In order to replace specific search results, first click “Search”. The results are listed in the “R esult” list. In order to replace a specific result, mark it and click “Replace”..
In order to replace all of the results click “Replace all”. Please note: This procedure cannot be
undone! It is therefore advisable to save the transcription before using the replace function, in
order to be able to reverse the process by using File > Restore (see above).
Edit > Go to...
By using the “Go to...” dialog, you can navigate to specific positions in the musical score. You
can either specify an absolute time value (“Go to time”) or a position on the timeline “Go to
50
EXMARaLDA Partitur-Editor – Manual
Edit Menu
timeline item”.
By using the button “Apply”, you can jump to the specified position. Clicking “OK” also closes
the dialog.
Edit > EXAKT search...
Opens a dialog for an EXAKT search:
To see how the EXAKT search works, see Working with EXAKT.
Edit > Se lection
This submenu includes features that concern a previously selected part (“Selection”) of the tra nscription. In essence, this selection is made up of all displayed tiers. It can be reduced in two
ways (which can also be combined): Entire tiers can be removed from the selection by dismissing them with the function Tier > Hide tier. If only specific time points are to be selected, mark
the section on the timeline by using the mouse (click and drag).
Example:
Initial transcription: The selection includes all time points of the seven tiers.
After hiding the non-verbal tiers and translation tiers: The selection includes all time points of
the remaining three tiers.
51
EXMARaLDA Partitur-Editor – Manual
Edit Menu
After selecting a section on the timeline: The selection only includes the time points 4 to 6 of the
three remaining tiers.
The second step is to determine what will happen to the previously made selection. The PartiturEditor offers five different options for this:
Edit > Se lection > Selection to new
Turns the current selection into a new transcription. For example third option named above:
Edit > Se lection > Left part to new
Divides the transcription at the current cursor position or selection and turns the part left to the
position into a new transcription.
Edit > Se lection > Right part to new
Divides the transcription at the current cursor position or selection and turns the part right to the
position into a new transcription.
Edit > Se lection > Selection to RTF
Turns the current selection into an RTF musical score output (see File > Output… ).
Edit > Se lection > Selection to HTML
Turns the current selection into an HTML musical score output (see File > Output… ).
Edit > Se lection > Print selection…
Prints the current selection (see also File > Print… ).
Edit > Preferences…
Opens a window to determine user-defined settings. The window is divided into eight subitems:
1. Fonts: The tab “Fonts” allows the assignment of default fonts and methods for underlining :
52
EXMARaLDA Partitur-Editor – Manual
Edit Menu
The “Default tier font” is the standard font, which is automatically assigned to new tiers or into
which an opened transcription is formatted.
The “Default general purpose font” is the font which is used by default for the characters on the
virtual keyboard, as well as for the text box above the musical score. For this you sho uld pick a
font that covers as many Unicode areas as possible. Currently, the best font for this purpose is
“Arial Unicode MS”. A freeware alternative, even though it is still incomplete in some Unicode
areas, is “Gentium”, which was developed by the “Summer Institute of Linguistics” (see also:
http://www.sil.org/~gaultney/gentium/).
Click “Change…” in order to open a window in which you can choose a different font.
In order to save your changes, click “OK”. (The settings will be saved when closing the Editor
and are loaded again at the next start.)
There are two options for selecting the method of underlining :
The option “Underline in a separate tier of category […]” underlines a selected passage in an
annotation tier below the respective tier. This corresponds to the method recommended in the
HIAT handbook for the marking of special intonations.
The option “Underline in the same tier (using a diacritic)” results in the underlining of a selected text in the same tier by diacritics after every sign.
53
EXMARaLDA Partitur-Editor – Manual
Edit Menu
For particulars about underlining, see also Format > Underline
2. Stylesheets: Different stylesheets are defined in the tab “Stylesheets” (also see Appendix D):
In particular, these are:
Head to HTML: The stylesheet that is used in the HTML output to display meta information
and the speakertable. The entry can be left empty; an internal default stylesheet will be used.
Speakertable to transcription: The stylesheet that is found under the menu item
File > New from speakertable… generates a new transcription from a speakertable. The
entry can be left empty; an internal default stylesheet will be used.
Transcription to format table: The stylesheet that is found under the menu item Format > App ly stylesheet is used to format the transcription. The entry can be left empty; an
internal default stylesheet will be used.
Free stylesheet visualization:
This
stylesheet
is
found
under
the
menu
item
File > Visua lization > Free stylesheet visualization .
HIAT utterance list to HTML: This stylesheet is found under the menu item Segmentation > HIAT Segmentation > Utterance List (HTML).
In order to change the entries, click on the respective “Change...” button. A file window will
allow you to select the particular stylesheet.
3. Segmentation: In the tab “Segmentation” you can define settings for segmentation. These se ttings affect several menu items of the “Transcription” menu. In “Preferred Segmentation” you
can set your preferred segmentation algorithm. In “Finite State Machines” you can define custom
Finite State Machines for the segmentation algorithms.
54
EXMARaLDA Partitur-Editor – Manual
Edit Menu
In particular, these are:
HIAT: The finite state machine that describes the segmentation algorithm for HIAT files.
These are used for various functions under Segmentation > HIAT Seg mentation (see section H of the function references and Appendix B).
DIDA: The finite state machine that describes the segmentation algorithm for DIDA files.
These are used for various functions under Segmentation > DIDA Segmentation (see section H of the function references and Appendix B).
GAT: The finite state machine that describes the segmentation algorithm for GAT files. These
are used for various functions under Segmentation > GAT Seg mentation (see section H of
the function references and Appendix B).
CHAT: The finite state machine that describes the segmentation algorithm for CHAT files.
These are used for various functions under Segmentation > CHAT Segmentation (see section H of the function references and Appendix B).
Furthermore, you can use this dialog to choose the form of pauses that are inserted via Event >
Insert Pause.... Prefix states which characters precede the pause description. Suffix defines
which characters follow. Via “Decimal” you can define whether a decima l point or a comma is
used. “Round to” defines the number of digits behind the comma, to which the pause measur ement is rounded. The settings automatically adapt to the transcription system that has been selected under “Preferred Segmentation”.
4. Auto Save: In the tab “Auto save” you can choose if you would always like to create an automatic backup copy of the transcription you are working on.
The automatically generated backup copy will save your data in case of a system crash, as you
are able to restore your transcription from the backup copy. If this option is activated, a backup
copy with a clear name is created for the session, every time the Editor is started.
55
EXMARaLDA Partitur-Editor – Manual
Edit Menu
You can use the following settings:
Enable undo: The undo function (“Undo”) in the “Edit” menu is activated
Enable auto save: The generating of an automatic backup copy is activated.
Auto save file name: Accept the suggested file name or change it.
Auto save path: Accept the suggested save location for the backup file or select “Browse…”
in order to change the location.
Auto save interval: The data is automatically copied into the backup copy in intervals. The
shorter the saving intervals, the better protected your data is. However, the capacity of your
internal memory is also used more frequently. The preset “ten-minute- interval” has proven itself to be a reasonable choice here. However, if required you may increase or decrease this
time interval.
5. Languages: In the tab “Language” you can define the language in which you would like to
work with the EXMARaLDA Partitur-Editor.
56
EXMARaLDA Partitur-Editor – Manual
Edit Menu
Select the language that you would like to use from the drop-down list. Save your settings by
clicking “OK”. Then you will have to close and restart the Partitur-Editor. After this step, the
language change is activated.
6. Media: In the tab “Media” you can define the player that you would like to use for playing
audio and video files.
Usually, the default player (DirectShow on Windows, ELAN-Quicktime on MAC, JMF on
Linux) is the best choice. In order to activate changed settings, the Editor has to be restarted. For
further information, please consult the document Audio and Video support in EXMARaLDA.
Furthermore, you can define different parameters for the behaviour of the timeline in the musical
score:
Auto anchor transcription to media: if this option is selected, the transcription is automatically
linked to an assigned recording. The first time point on the timeline has the value 0.0, the last
time point has the value of the end of the recording.
Auto remove unused timeline items after merge: If this option is chosen, an automatic check
searches for unused time points on the timeline after events have been merged. If there are
any, they will be removed.
7. Paths: Here you can firstly define, into which directory the Partitur-Editor writes the Log file
(the file with error messages etc.: “Log file directory”). Secondly, you can define in which dire ctory (“Praat directory”) the programs “praat.exe” and “sendpraat.exe” are located, which is ne cessary for using the Praat panel.
57
EXMARaLDA Partitur-Editor – Manual
Edit Menu
8. Menus: Here you can show and hide project specific menus.
58
EXMARaLDA Partitur-Editor – Manual
Edit Menu
Edit > Partitur preferencess…
Opens a window in which parameters can be defined for the output as a musical score on a printer, as an RTF file, as an HTML file or as an XML file (see also File > Output...). The window
is divided into five subitems:
The tab “Break” allows you to set the parameters for line and page break :
Respect word boundaries: defines whether word boundaries (spaces, apostrophes, hyphens)
should be taken into consideration at a break, meaning whether breaks in the middle of a word
should be prevented.
Horizontal tolerance: defines a range of tolerance for the width of the break. The higher this
value, the fewer small units will be fragmented at a break. However, there will be a bigger
musical score section.
Vertical tolerance: defines a range of tolerance for the page brake. If you encounter problems
with the page break (which can be the case, depending on the printer used), adjust this value.
Additional label space: determines an additional space between the tier labels and the first
entry.
Remove Empty Lines: determines, whether empty lines that resulted from a page or line break
should be removed.
Number partitur areas 1 : determines if the musical score sections (“partitur areas”) are numbered consecutively.
Smooth right boundaries: defines whether the right musical score section’s boundaries should
be smoothed out to one line (This only works for printer and RTF-output, not for HTML-
1
”Partitur areas” is a literal translation fro m the German term “Partiturbereich”, however, for the purpose of better
understanding, we will be further referring to “musical score sections”.
59
EXMARaLDA Partitur-Editor – Manual
Edit Menu
output).
Save space: determines, whether empty lines should be “reduced” at output after a break. The
numbering of the musical score would be slightly indented in this case:
Option “Save Space” activated:
Option “Save Space” deactivated:
In the tab “General” further parameters can be set, which apply to all forms of output (meaning
printer, RTF, HTML and XML):
Include timeline in output: determines whether the entries on the timeline (numbering and/or
absolute time values) are to be included in the output.
Put timeline outside frame: determines whether the entries on the timeline are going to be
inside or outside of the musical score.
Frames: defines how the sections of musical score are framed. “Left”, “Right”, “Top”, “Bo ttom” determine whether the frame lines are drawn on the left, the right, at the top or the bottom. “Color” specifies the colour of the frame (click the button in order to open a window to
choose a colour). “Frame style” specifies whether the framing lines are “Solid”, “Dashed” or
“Dotted”.
Prepend meta information and speakertable: defines whether the meta information and the
speakertable are to be included in the output or not (only valid for RTF and HTML output).
60
EXMARaLDA Partitur-Editor – Manual
Edit Menu
Please note that it is relevant for HTML output which stylesheet is specified and if a
stylesheet is specified. These specifications are made under Edit > Preferences... ) in “Head
to HTML”.
Examples:
The entries on the timeline were included in
the output (outside the frame). The musical
score section is framed with a solid line.
The entries on the timeline were included into
the output (inside the frame). The musical
score section is framed with a solid line.
The entries on the timeline were not included
into the output. The musical score section is
framed with a dotted line.
In the tab “RTF”, you can specify parameters which are specially used for RTF output. RTF output can be problematic, as the calculation processes of Java do not match those of MS Word e ntirely. Thus, displacement and missing characters may occur. Some of the here mentioned parameters serve the purpose of compensating those inaccuracies.
61
EXMARaLDA Partitur-Editor – Manual
Edit Menu
Critical size percentage: defines from what extend onward the size of an entry in a musical
score’s line is considered critical. This means it states from which point onward the mechanisms for the compensation of inaccuracies are to be applied. The preset 95% has proven to be
a reasonable value here. You can, of course, increase or decrease this figure, if required.
Right margin buffer: defines a buffer area at the right margin of the musical score section.
This can be done in order to compensate inaccuracies in the calculation. If the options “Glue
adjacent IT elements” and “Glue empty IT elements” (see below) are deactivated, this value
can be 0. Otherwise, it should be set to a value between 5 and 20.
Calculate page breaks: specifies whether page breaks are to be calculated for the RTF doc ument.
Glue adjacent events: specifies whether adjacent events in the musical score’s line should be
combined once the first one has reached the critical size. For MS Word 97 this option has to
be selected. For MS Word 2000 it has the small disadvantage that synchronisation rate may
possibly shift a little bit. However, it also has the advantage that words that have been “torn
apart” due to synchronisation will be put back together. Do not use this option in MS Word
2000 if you are working with framing single elements.
Glue empty events: specifies whether empty events in the musical score’s line should be
combined with the preceding element. Do not use this option if you are working with framing
or underlining single elements in colour.
Use CellFit parameter: specifies whether the “CellFit” parameter is used. The activation of
this option helps to prevent mistakes, which can occur when reading output RTF files in MS
Word 2002 (= Word XP)..
In the tab “HTML”, you can specify parameters which are specially used for HTML output :
Make links: specifies whether links that have been made in the transcription should be implemented as hyperlinks in HTML.
Make anchors: defines whether anchors should be assigned to the musical score section –
meaning links for outside reference. In order to work with the wordlist output (see below),
62
EXMARaLDA Partitur-Editor – Manual
Edit Menu
this option has to be checked.
Use JavaScript: specifies whether JavaScript functions are used (to link the tier labels with the
speakertable).
Don’t make line breaks: Checking this option creates an endless musical score, hence the
musical score is not divided by line breaks.
Pixel width: When this option is checked, the musical score is wrapped at the set width (in
pixels). A value between 400 and 600 is suitable for most common monitors. In order to work
with the word list output (see below), the musical score needs to be wrapped in this manner.
In the tab “SVG” you can specify parameters which are specially used for SVG output:
Pixel width: defines the line break width of the musical score. This means it specifies the
width of specific sections of musical score in pixels.
Scale factor: specifies the scale factor (in percent). This value increases or decreases the musical score according to the value specified in the output.
63
EXMARaLDA Partitur-Editor – Manual
C.
View Menu
Vie w Menu
View > Keyboard
Defines, whether the keyboard is shown or hidden (virtual keyboard, see also section III “Pa nels”). The keyboard can also be hidden by using the “x” in the top right corner of the keyboard
window.
View > L ink panel
Defines, whether the panel for creating links is shown or hidden (link tool). The link panel can
also be hidden by using the “x” in the top right corner of the link panel window.
View > Audio/Video panel
Defines, whether the panel for playing audio and video files is shown or hidden (audio/video
tool, see also section III “Panels”). The audio/video panel can also be hidden by using the “x” in
the top right corner of the panel window.
View > Praat panel
Defines, whether the panel for communication with Praat is shown or hidden (Praat tool, see also
section III “Panels”). The Praat panel is only available on Windows computers. Therefore, this
menu item should not appear when using other systems.
View > Annotation panel
Specifies, whether the Annotation panel (see also section III “Panels”) is shown or hidden.
View > IPA panel
Specifies, whether the IPA panel (see also section III “Panels”) is shown or hidden.
64
EXMARaLDA Partitur-Editor – Manual
View Menu
View > Show too lbar
Defines, whether the toolbar (as presented below) is shown or hidden.
View > Show large text field
Specifies, whether the large text field (for entering and displaying transcription text) is shown or
hidden.
View > Show grid
Specifies, whether the grid on the musical score is shown or hidden. Using the grid makes it easier to navigate in the musical score and also makes the division of events more clear :
Hidden grid lines hide the table- like structure of the user interface. This makes the user interface
look more like a “musical score”, especially if the background colour of blank events is set to
“white” (see also “Format Menu” and “View Menu”):
View > Show special characters
Shows spaces in the musical score as little dots (similar to MS Word). For this, the musical score
has to be reformatted. This may take a few seconds. Please note: If this option is activated, the
musical score cannot be edited! In order to be able to edit again, deactivate this option by selec ting the function from the menu or the toolbar once more.
65
EXMARaLDA Partitur-Editor – Manual
View Menu
“Standard View” (musical score can be ed- “Show special characters” activated (musical
ited):
score can not be edited):
View > Co lor empty events
Defines, whether the blank spaces in the transcription that do not contain an event should have a
coloured tint when viewed on the screen. The colour will not be included in the output. The
shading colour is preset to “grey” and can be changed by using Format > Edit format table. In
the dialog, go to “EMPTY-EDITOR” and then click the “Edit” button beside the entry “Background color”, in order to pick your colour.
The calculation of the coloured shading is time-consuming. Therefore, it is advisable to deactivate this option for larger transcriptions, as this will make the Editor work significantly faster.
Option “Color empty events” deactivated:
Option “Color empty events” activated:
View > Change sca le constant…
Opens a dialog to change the scale constant.
The scale constant is the value that is added to the set point size of the fonts for the display in the
Editor. A scale constant of +5 will display a text which is formatted as 10 pt, with a font size of
15 pt. Use the slider in order to change the scale constant and click “OK”. The musical score has
to be reformatted afterwards. This may take a few seconds.
Note: The font size in the text box above the musical score can be changed by using the slider at
the right margin of the box:
66
EXMARaLDA Partitur-Editor – Manual
View Menu
View > Text proportional / Time proportional
In normal view, the width of “cells” within the musical score is calculated according to the width
of the text inside them (“text proportional”). When switching to the “time proportional” view,
the width is calculated according to the length of time of the interval. Furthermore, the
oscillogram and the musical score are synchronised. This is equivalent to the view of tools like
ANVIL, ELAN or Praat.
Text proportional view:
Time proportional view:
67
EXMARaLDA Partitur-Editor – Manual
D.
Transcription Menu
Transcription-Menü
Transcription > Meta information…
68
EXMARaLDA Partitur-Editor – Manual
Transcription Menu
Opens a dialog in which the transcription's meta information can be saved and edited, i.e. info rmation about the transcriber, the recordings, the conventions etc. The meta information is organized into a set of attribute-value pairs. Some of them are predefined:
Project Name: the name of the project.
Transcription Name: the name of the transcription. For HTML or RTF output, this name is
used as the document name.
Transcription Convention: the transcription convention made use of.
Referenced File: the associated digitised audio or video file, if available. The “Browse...”
button next to this field opens a dialog with which this file can be located and assigned.
Comment: allows comments on the recording and transcription.
In addition, an unlimited number of user-defined attributes can be added. To add a new userdefined attribute, click “Add attribute”. A new attribute- value pair is added to the table. It can be
edited in the corresponding text fields.
Double clicking marks the content of a field in the table and allows the overwriting of the co ntent. Conclude your input with Enter.
If the space under “Value” does not suffice, click the button with the three dots “(...)” in order to
get a larger window in which you can edit it further.
In order to delete a user-defined attribute, select it in the table and click “Remove attribute”.
In order to make use of a user-defined attribute from a different transcription, click “Template”
and browse for the transcription in the file dialog that appears.
To change the order in which the attributes are listed, select the attribute you would like to move
and click “Up” or “Down”.
In order to save the changes made in the meta information, close the dialog by clicking “OK”.
69
EXMARaLDA Partitur-Editor – Manual
Transcription Menu
Transcription > Speakertable…
Opens a dialog for the input and editing of information on the speakers. In the upper section of
the speakertable the speakers are simply listed. In order to add a new speaker click “Add speaker”. In order to delete an existing speaker from the list, select the corresponding entry in the list
and click “Remove speaker”.
In order to add or change the information corresponding to a speaker, first select the speaker
from the list. Under “Speaker properties” the already existing information is displayed. The
speakertable consists of attribute- value pairs. Some of them are predefined:
Abbreviation: the speaker abbreviation that is also used for the tier labels (when activating the
option “Auto”, see Tier > Edit Tier properties).
Sex: the sex of the speaker.
Languages: the first (L1) and second (L2) language(s) of the speaker, as well as the languages
the speaker uses in the transcription (“Languages used”).
Comment: allows comments on the speaker.
In order to change the entries under “Languages”, click “Edit languages...”. The following dialog
will appear:
70
EXMARaLDA Partitur-Editor – Manual
Transcription Menu
To assign a language to a speaker, select it from the list on the left side. Then click the corr esponding “Add”-button. In order to delete a language, select it in the table on the right and c lick
the corresponding “Remove” button. (Please note: The languages codes available in the list have
adopted from “Ethnologue” (http://www.ethnologue.com/). Look up the website should you r equire more information on this list.
In addition, an unlimited number of user-defined attributes can be added for the speakers. To add
a new user-defined attribute, click “Add attribute”. A new attribute- value-pair is added to the
table. It can be edited in the corresponding text fields.
Double clicking marks the content of a field in the table and allows the overwriting of the co ntent. Conclude your input with Enter.
If the space under “Value” does not suffice, click the button with the three dots “(...)” in order to
get a larger window in which you can edit it further.
In order to delete a user-defined attribute, select it in the table and click “Remove attribute”.
In order to apply all the already defined attributes for the current speaker to other speakers in the
transcription, click “Collect attributes”.
In order to make use of a user-defined attribute from a different transcrip tion, click “Template”
and browse for the transcription in the file dialog that appears.
To change the order in which the attributes are listed, select the attribute you would like to move
and click “Up” or “Down”.
In order to save the changes made in the speakertable, close the dialog by clicking “OK”.
Transcription > Recordings…
Opens a dialog through which digital audio and/or video files can be linked to the transcription.
71
EXMARaLDA Partitur-Editor – Manual
Transcription Menu
Use the “Add...” button to add a media file to the list. Select an entry in the list and click “Remove“ to delete that entry from the list. Select an entry in the list and use the buttons “Top”,
“Up” and “Down” to change the order of the files. Please note the following:
For the oscillogram view, the Editor will search for the first file with the file extension “.wav”
or “.WAV”. If the Editor finds such a file, the oscillogram will be calculated on the basis of
this file. If the Editor does not find one, a timeline without an oscillogram is drawn on the basis of the first file in the list.
The player always loads the first file in the list. If you load a different media file with help of
the Audio/Video Panel, it will be placed at the top of the list.
The “HTML Partitur + Flash Player” output (see File > Output...) searches for the first file
with the extension “.mp3” or “.MP3”. If no such file is found, the corresponding error message will appear.
Normally, files in the list should only be distinguishable on the basis of their file format (A udio vs. Video, different Codecs). In particular, they should all be of the same length.
Transcription > Structure errors…
Displays a dialog for editing structural errors (see also the document How to edit and correct
transcriptions).
The following structural errors can occur:
“Temporal anomaly”: absolute time values in the timeline have to show a monotonous increase.
72
EXMARaLDA Partitur-Editor – Manual
Transcription Menu
“More than one transcription tier for one speaker”: there may only be one tier of type
“T(ranscription)” for every speaker.
“Orphaned transcription tier”: Tiers of type “T(ranscription)” have to be assigned to a speaker.
“Orphaned annotation tier”: Tiers of type “A(nnotation)” have to be assigned to a speaker.
Furthermore, in addition to this tier there has to be a tier of type “T(ranscription)” that is assigned to the same speaker.
“Annotation mismatch”: for every event in a tier of type “A(nnotation)” there has to be an
event or a chain of interrelated events in the associated tier of type “T(ranscription)” which
has/have the same start and end point.
Double click an element in the list in order to get to the section in the transcription where the
error occurred.
Transcription > Calculate annotated time…
Calculates the total duration for the existing events in every tier
Transcription > Segmentation errors…
Opens a dialog with all segmentation errors of the current transcription. The segmentation algorithm set under Edit > Preferences > Segmentation is taken as a basis.
73
EXMARaLDA Partitur-Editor – Manual
Transcription Menu
In the table in the upper half of the dialog, all segmentation errors are listed that resulted from
the segmentation of the entire transcription. For every error the following information is noted in
four columns:
Tier: the tier, in which the segmentation error occurred.
TLI: the time point on the timeline at which the segmentation error occurred.
Error: the cause of the error.
Processed output: the output that has been processed up to the occurrence of the error.
If an entry is selected in the table, the content of the corresponding column is shown in the text
field in the lower part of the dialog. This can be especially useful for longer error messages or
longer processed output.
Select the errors you would like to edit by clicking on the corresponding column in the table.
Click “Go to” to move the musical score to the position where the error occurred.
Correct the error. The dialog can remain open.
Click “Refresh" to have the remaining segmentation errors displayed.
Should segmentation errors remain, repeat from step 1.
Close the dialog by clicking onto the “x” in the top right corner.
Transcription > Export Segmented Transcription…
Applies the segmentation algorithm set under Edit > Preferences > Segmentation to the
transcription that is currently opened. If the segmentation runs successfully a dialog that allows
saving the transcription pops up. Note that the segmented transcription can not be read by the
Partitur-Editor. The purpose of segmenting the transcriptions is their integration into an
EXMARaLDA corpus, and to use them for the work with EXAKT. Thus, during this process,
you should not overwrite the existing basic transcription, but give the segmented transcription a
new name.
74
EXMARaLDA Partitur-Editor – Manual
Transcription Menu
If the segmentation fails, the following dialog will appear:
Click “OK” to have the dialog for editing segmentation errors displayed (see Transcription >
Segmentation Errors...).
Transcription > Count Segments…
Applies the segmentation algorithm set under Edit > Preferences > Segmentation to the
transcription that is currently opened. If the segmentation is successful, a dialog will appear that
gives statistics for various units of the transcription in a table (the type of units are defined by the
segmentation algorithm):
If the segmentation fails, the following dialog will appear:
Click “OK” to have the dialog for editing segmentation errors displayed (see Transcription >
Segmentation Errors...).
75
EXMARaLDA Partitur-Editor – Manual
Transcription Menu
Transcription > Word list…
Applies the segmentation algorithm set under Edit > Preferences > Segmentation to the
transcription that is currently opened. If the segmentation is successful, a dialog will appear that
shows all units segmented as words in a list:
Click the table heading “Word” or “Speaker” to sort the list alphabetically by words or speakers.
The button “Save as...” allows you to save the word list as an HTML file. You have two options:
“Simple word list (HTML)” saves the word list as a simple alphabetically sorted word list.
“Word list by speaker (HTML)” first sorts the word list by speakers and then alphabetically.
76
EXMARaLDA Partitur-Editor – Manual
Transcription Menu
Transcription > Insert Utterance Numbers
This function will only be shown if “HIAT” has been set as “Preferred Segmentation” under Edit > Preferences > Segmentation .
Adds an annotation tier of the category “no” for every speaker in which utterances are numbered
in a temporal order, as compliant with the HIAT segmentation, e.g.:
Before:
After:
The requirement is that, first, the transcription can be segmented according to HIAT. Should this
not be the case, an error message will appear that addresses the segmentation error.
In this case, check and correct the segmentation errors with the function Transcription > Segmentation errors....
Secondly, every utterance boundary has to coincide with an event boundary. Should this not be
the case, as in the following example...
... the following error message will appear:
77
EXMARaLDA Partitur-Editor – Manual
Transcription Menu
In this case, split the affected event into two at its utterance boundaries.
Transcription > Transformation…
Opens a dialog which allows flexible transformation of a transcription into different formats :
The following parameters can be set:
Transform: What should be transformed? The basic transcription (i.e. the transcription that is
edited in the Editor), a segmented transcription (i.e. a version of the basic transcription onto
which a segmentation algorithm has been applied), or a list transcription (i.e. a segmented
transcription in which units have been sorted into lists?
Segmentation: Which segmentation algorithm should be used? This parameter is only necessary if a segmented or a list transcription has been selected under “Transform”.
List unit: Which unit is the basis of the list? This parameter is only necessary if a list tra nscription has been selected under “Transform”.
Stylesheet: Which (XSL) stylesheet should be applied to the transcription? If you leave the
field blank no stylesheet will be used and the output will be in XML. Suitable stylesheets can
be found on the EXMARaLDA website under “Download”.
Output: Which file type should the output be? You can choose between HTML, XML, TXT
and “other”.
78
EXMARaLDA Partitur-Editor – Manual
Transcription Menu
Various transformation scenarios are available. These make use of stylesheets that are integrated
in the code (EXMARaLDA.jar).
Transcription > Clean up ...
Opens a dialog that offers options for the automatic clean up of the transcription:
Remove empty events: Activate this option if you would like to remove empty events from all
tiers: that is, events that do not contain text.
Smooth timeline with a threshhold of: Activate this option if you would like to combine timeline entries that lie very close together. With the help of a threshold you can define which e ntries are to be considered as “lying close together”.
Bridge gaps smaller than: Activate this option if you've provided timeline entries with absolute time values and would like to close the gaps in the timeline that are smaller than the predefined value in milliseconds. To set this value, move the scroll bar to the desired value.
Remove unused timeline items:
is
equivalent
to
(see below).
the
menu
item
Time-
line > Remove unused time line items
Remove gaps: is equivalent to the menu item Timeline > Remove gaps (see below).
Normalize IDs: Ensures that IDs for time points, tiers, speakers etc. are assigned consistently.
Transcription > Glue transcriptions...
Glues a second transcription to the end of the currently opened transcription.
First, you are asked to select a file to be glued. Thereafter, a dialog will appear with which you
can define the assignment of tiers in the current transcription (“Transcription 1”) and the tra nscription you intend to glue (“Transcription 2”). The tiers that have been assigned to each other
are shown in the right text field (“Mappings”).
79
EXMARaLDA Partitur-Editor – Manual
Transcription Menu
To assign the tiers individually (“by hand”), use the following functions :
Add: To carry out an individual assignment, select both of the entries in the left text fields and
click “Add” to add this pair to the right text field.
Remove: In order to undo an assignment, select the entry in question in the right text field and
click “Remove”.
Remove all: In order to delete all assignments, click “Remove all”.
There are two ways to assign the tiers automatically:
Auto (Position): Assigns the tiers according to their position, hence the first tier in transcription 1 will be assigned to the first tier in transcription 2, the second tier in transcription 1 will
be assigned to the second tier in transcription 2 etc.
Auto (Properies): Assigns the tiers according to their properties, hence tiers with the same
speaker abbreviation and the same category are assigned to each other.
It is possible to combine both manual and automatic assignment with each other.
“Timeline Method” allows you to choose whether time points should be sorted according to their
absolute time values when they are being glued, (“Merge timelines”, is recommended for fully
aligned transcriptions) or whether the two timelines should simply be stringed together (“Append
timelines”).
Once you have completed the assignment of the files click “OK” to glue the transcriptions.
Transcription > Chop transription …
Divides the entire transcription into various partial transcriptions while keeping the original file.
80
EXMARaLDA Partitur-Editor – Manual
Transcription Menu
Minimum number of timeline items: The minimum number of timeline intervals per partial
transcription is set so that the original transcription is divided into ten partial transcriptions.
(In this example the original transcription had a timeline consisting of 252 intervals.) You can
change the value with the arrow keys to the right of the number at will.
Directory: Click “Browse…”, to select a directory in which the new partial transcription
should be saved.
Base filename: Then enter a base filename for the files that are then automatically numbered
consecutively.
Then enter a base filename for the files that are then automatically numbered consecutively.
Now the directory you previously selected will contain a set of new .xml files that each represent
a section of the original transcription.
Transcription > Chop audio…
Divides a copy of the audio file of the musical score into a number of smaller audio files (“audio
snippets”).
Please note that the use of this function requires,
81
EXMARaLDA Partitur-Editor – Manual
Transcription Menu
that you've assigned an audio file to the musical score via “Referenced media file“,
that the audio file is in “.wav” format file (other audio formats can not be processed) and
that the timeline has as many absolute time values as possible.
There are two ways to chop the audio file:
Based on the timeline: The audio file is chopped in accordance with the timeline. An “audio
snippet” is created for every interval of the timeline.
Based on events in tier: The audio file is chopped in accordance with the events in the selec ted tier: For every event an “audio snippet” is created.
Furthermore you have the option of linking the newly created “audio-snippets” with the musical score in the same step:
Link to the selected tier: The created “audio snippets” are linked to the currently selected tier
automatically.
Link to a new tier: The Partitur-Editor automatically generates an additional tier in which the
“audio snippets” are linked to the musical score.
Don’t link: The “audio snippets” are only generated without being linked to the musical score.
In the lower section of the dialog you will then be asked to enter a name and a location where
you would like to save the file:
Directory: Is the directory on your computer where you would like to save the newly created
audio files. In order to change the directory click “Browse…”.
Base filename: Is the base filename for the files that are to be created.
Append event description: The first symbol of the associated text will be added to the filename of the “audio snippets” that are to be created.
The chopping may take a few seconds. Upon completion a dialog will inform you whether the
chopping has been successful or whether errors occurred:
82
EXMARaLDA Partitur-Editor – Manual
Transcription Menu
In the following example the audio file is divided in two ways and linked to an additional tier: In
the “Timeline” tier, the audio file was chopped on the basis of the timeline (the option “Based on
the timeline”), in the “Tier” tier, the audio file was only chopped based on the tier of the speaker
“Fichte”. The assigned “audio snippets” can only be played directly from the musical score.
The newly generated files are saved in the previously defined directory. A consecutive number
and the first symbol of the associated event were automatically added to the previously chosen
base filename:
Transcription > Ex Sync Event Shrinker
Shrinks the events automatically after the import of ExSync-documents in accordance to their
typographic expansion (see also Leitfaden für die Konvertierung von Legacy-Daten:
„Importie ren von syncWRITER-Daten“).
83
EXMARaLDA Partitur-Editor – Manual
E.
Tier Menu
Tier Menu
Most of the functions in the tier menu are only accessible once you have marked a tier. In order
to select a tier, click on the corresponding speaker label at the beginning of the tier :
Tier > Tier properties…
Opens a dialog that allows editing properties of the currently selected tier.
84
EXMARaLDA Partitur-Editor – Manual
Tier Menu
Four attributes are defined:
Speaker: the assigned speaker. All defined speakers are listed as options in the ComboBox. If
it is not useful to assign the tier in question to a speaker, choose “no speaker”.
Type: the tier type. Choose “T(ranscritpion)” for verbal tiers, “D(escription)” for nonverbal
tiers, “A(nnotation)” for tiers with annotations (translations etc.), “L(ink)” for tiers that co ntain links to files and “U(ser) D(efined)” for other tiers. The correct assignment of the tier
type is especially important for segmentation functions.
Category: the tier category. It can be defined freely or remain empty. A category should be
defined, if you set up more than one tier for a speaker. For example, enter “v” for “verbal”,
“nv” for “nonverbal”, “c” for “comment” or “ENG” for an “English Translation”.
Display: the name of the tier that should be used for the tier for the output in the PartiturEditor. If the option “Auto” is activated, this name is automatically generated from the abbreviation and the category. In order to enter a different tier name, deactivate the option “Auto”
and enter the desired name.
“User defined attributes” allows the additional input of user-defined attribute-value pairs for the
tier (for a manual, see File > Edit Meta Information ).
Tier > Add tier…
(Shortcut: CTRL + A on Windows, ⌘ + A on Mac)
Opens a dialog to add a new tier at the end of the transcription.
The entries under “Speaker”, “Type” and “Category” are equivalent to the ones described above in
Tier > Ed it tier properties.... If the option “Copy events from” is selected, empty events will
be inserted into the new tier, wherever the copied tier also contains entries (this can be especially
useful for annotation tiers)..
85
EXMARaLDA Partitur-Editor – Manual
Tier Menu
Tier > Insert tier…
(Shortcut: CTRL + I on Windows, ⌘ + I on Mac)
Opens a dialog to insert a new tier above the currently selected tier. The dialog is identical to the
Tier > Add tier… dialog described above.
Tier > Remove tier…
Removes the currently selected tier. A confirmation prompt is then carried out. In order to hide a
tier, rather than deleting it permanently, use Tier > Hide tier.
Tier > Move tier up wards…
(Shortcut: CTRL + Windows, ⌘ + on Mac)
Moves the currently selected tier upwards.
Tier > Change tier order…
Opens a dialog that allows changing the tier order:
Select the tier that you would like to move, click “Move up” to move it up or “Move down”, to
move it down. In order to save the changes made, close the dialog by clicking “OK”.
Tier > Hide tier
Hides the currently selected tier.
Tier > Sho w all tiers
Shows all hidden tiers again.
Tier > Remove empty events
Removes empty events, hence events that only contain spaces, from the currently selected tier.
Tier > Ed it tiers…
Opens a dialog that contains an overview of all properties of all tiers and allows these to be
86
EXMARaLDA Partitur-Editor – Manual
Tier Menu
changed.
Shown from left to right are:
Display Name: the name that is displayed in the musical score at the beginning of every tier
Category: the tier category
Type: the tier type
ID: the ID tier assigned by the program
Speaker: the speaker abbreviation assigned to the speaker
Speaker ID: the speaker ID assigned by the program
Number of Events: the number of events within this tier
Parent Tier: for tiers of the type “A(nnotation)” the software checks, whether a tier of the type
“T(ranscription)” that is linked to the same speaker exists. If this is the case, an “OK” will appear, otherwise “#Error”. For tiers of type “T(ranscription)” or “D(escription)”, “n.a.” for “not
applicable” is displayed.
Annotation mismatches: for tiers of the type “A(nnotation)”, the software checks whether all
events have a corresponding event in the respective tier of type “T(ranscription)” (see also
Transcription > Structure errors ). If this is the case, “OK” will appear, otherwise the
number of faulty annotations will be shown. For tiers of type “T(ranscription)” or
“D(escription)”, “n.a.“ for “not applicable” is displayed.
87
EXMARaLDA Partitur-Editor – Manual
F.
Event Menu
Event Menu
Event > Event properties…
(Shortcut: CTRL + Enter on Windows, ⌘ + Enter on Mac, as well as by right clicking into the
corresponding event)
Opens a dialog to edit the currently selected event:
88
EXMARaLDA Partitur-Editor – Manual
Event Menu
The event text can be edited via “Event description” – this may be of convenience especially
when writing extensive descriptions. “User defined attributes” allows the entry of user defined
attribute- value pairs for the event (how to operate this field can be found under
File > Meta information ).
Event > Remove
(Shortcut: CTRL + D on Windows, ⌘ + D on Mac)
Removes the currently selected event.
Before:
After:
Event > Shift characters to the right
(Shortcut: CTRL + + R on Windows, ⌘ + + R on Mac)
Shifts the characters to the right of the current cursor position into the next event.
Vorher:
89
EXMARaLDA Partitur-Editor – Manual
Event Menu
Nachher:
Event > Shift characters to the left
(Shortcut: CTRL + + L on Windows, ⌘ + + L on Mac)
Shifts the characters to the left of the current cursor position into the previous event.
Before:
After:
Event > Merge
(Shortcut: CTRL + 1 on Windows, ⌘ + 1 on Mac)
Merges two or more selected events in a tier into one event.
Before:
Select:
After:
90
EXMARaLDA Partitur-Editor – Manual
Event Menu
Event > Split
( Shortcut: Strg + 2 on Windows, ⌘ + 2 on Mac)
Splits the current event into two at the cursor position.
Before:
After:
If the current event only includes a time span from one time point to the next, a new time point
will be inserted on the timeline.
If the event has a time span from one time point up to two time points thereafter, like in the e xample, it will be split at the interjacent time point.
If the time span is greater, a dialog will open in which the time point at which the event is to be
split can be selected:
Event > Double sp lit
(Shortcut: CTRL + 3 on Windows, ⌘ + 3 on Mac)
Splits the current event according to the current text selection in three events.
Before:
91
EXMARaLDA Partitur-Editor – Manual
Event Menu
After:
If the event in question covers more than one time interval this function is deactivated. In this
case apply the function Event > Split Event twice.
Event > Extend to the right
(Shortcut: CTRL + + on Windows, ⌘ + + on Mac)
Extends the currently selected event to the right by one time point.
Before:
After:
Event > Extend to the left
(Shortcut: CTRL + + on Windows, ⌘ + + on Mac)
Extends the currently selected event to the left by one time point.
Event > Shrink on the right
(Shortcut: Strg + Alt + on Windows, ⌘ + Alt + on Mac)
Shrinks the currently selected event by one time point from the right.
Before:
92
EXMARaLDA Partitur-Editor – Manual
Event Menu
After:
Event > Shrink on the left
(Shortcut: CTRL + Alt + on Windows, ⌘ + Alt + on Mac)
Shrinks the currently selected event by one time point from the left.
Event > Move to the right
(Shortcut: CTRL + on Windows, ⌘ + on Mac)
Moves the currently selected event to the right by one time point.
Before:
After:
Event > Move to the left
(Shortcut: CTRL+ on Windows, ⌘ + on Mac)
Moves the currently selected event to the left by one time point.
93
EXMARaLDA Partitur-Editor – Manual
Event Menu
Event > F ind next event
Looks for the next event in the tier that is currently active from position of the current selection.
Event > Insert Pause
Inserts a pause into the
selected event with the length of the current selection in the
oscillogram. The specific notation of the pause can be set via Ed it > Preferences > Seg mentation....
94
EXMARaLDA Partitur-Editor – Manual
G.
Timeline Menu
Timeline Menu
Time line > Ed it timeline item...
Opens a dialog to edit the absolute time value of the currently selected event:
The absolute time value can either be entered as a decimal number (i.e. in seconds) or as
hh:mm:ss.xxx. The entries:
181.23
00:03:01.23
03:01.230
for example all represent the same, namely: “3 minutes, 1 second and 230 milliseconds”.
95
EXMARaLDA Partitur-Editor – Manual
Timeline Menu
Time line > Insert timeline item
Inserts a new time point to the left of the currently selected time point.
Before:
After:
Time line > Remove gap
Removes the currently selected gap from the timeline. A gap is a space between consecutive
time points that does not contain an event. When calling up this menu item, the first of these two
time points is removed and thereafter the rest of the transcription is moved to the left by one time
point.
Before:
After:
Time line > Remove all gaps
Removes all gaps from the transcription.
96
EXMARaLDA Partitur-Editor – Manual
Timeline Menu
Time line > Remove unused time line items
Removes all unused timeline items from the transcription. A time point is unused when no event
starts or ends on it.
Before:
After:
Time line > Make timeline consistent
Checks the timeline for inconsistencies, i.e. after absolute time values. Absolute time values that
do not fit into a monotonously growing sequence are removed.
Time line > Smooth time line...
Interpolates the timeline, i.e. calculates an absolute time value for all time points that have not
been assigned an absolute time value. Please note that the values calculated in this manner are
only an estimate of the actual absolute time values of the time points in question. I f more time
points have been defined with an absolute time value, the value of the interpolation will be more
accurate.
Time line > Interpolate timeline ...
97
EXMARaLDA Partitur-Editor – Manual
Timeline Menu
Interpoliert die Zeitachse, d. h. berechnet für alle Zeitpunkte, denen kein absoluter Zeitwert zugeordnet ist, einen absoluten Zeitwert. Bitte beachten Sie, dass die so berechneten Werte in der
Regel lediglich eine Näherung an die tatsächlichen absoluten Zeitwerte der betreffenden Zeitpunkte darstellen. Dabei ist das Ergebnis der Interpolation umso besser, je mehr Zeitpunkte mit
korrekten absoluten Zeitwerten versehen waren.
There are two methods of interpolation. For this, consider the following transcription in which
no absolute time value is available at time point 2 :
The method Linear Interpolation inserts missing absolute time values according to the number
of time points that lie between the previous and the next time point with an absolute time va lue. In the example above time point 2 receives the value 1.0 + (4.0 – 1.0)/2 = 2.5:
The method Character Count Interpolation, on the other hand, inserts missing absolute time
values according to the symbols in the events in question. Events with longer descriptions are
assigned to intervals of a longer duration:
The second method leads to better results in most cases. Interpolated time values are marked
with an Asterisk [03.3*] in the timeline of the musical score.
Time line > Remove interpolated times
Removes absolute time values from the timeline that have been created by interpolating (see
above).
Time line > Confirm timeline ite m(s)
Confirms the absolute time values of all currently selected time points, i.e. sets their status from
“interpolated” to “confirmed”, if applicable. The Asterisk will then disappear and the time points
in question will no longer be removed when executing “Remove interpolated times”.
Time line > Sh ift abso lute times...
98
EXMARaLDA Partitur-Editor – Manual
Timeline Menu
Moves all absolute time values in the timeline by the specified value. The value may also be
negative.
Time line > Add bookmark…
Adds a bookmark to a point on the timeline or allows the renaming of an already existing bookmark. A bookmark can facilitate finding significant sections of a transcription again (see Timeline > Bookmarks). Select the time point in question by clicking into it on the time line. Then
choose Timeline > Add bookmark .
Enter a name for the bookmark in the window that appears or rename the bookmark and click
“OK” upon completion of your entry. The name of the bookmark will appear in the timeline
thereafter:
Time line > Fine tuning mode
Activates or deactivates the mode for fine tuning the absolute time references. If the mode is
turned on the behaviour of the Editor will change as shown in the following:
By scrolling, the absolute time value of a selected time point can be increased or decreased by
0.1 seconds.
By pressing F1 only the first second of the currently selected time intervals is played.
Time line > Bookmarks…
Opens a window with the selection of all set bookmarks.
Select the section in the transcription that you would like to access and click “Go to…”.
99
EXMARaLDA Partitur-Editor – Manual
H.
Format Menu
Format-Menü
With the format menu, the font type, font size, text and background colors etc. can be changed.
The format options change both the way the musical score is displayed on the screen, as well as
the way the output is displayed (Print, RTF, HTML or SVG document). Font size and bold print
should not be used as carriers of linguistic information. In EXMARaLDA, these are exclusively
coded with the used symbols or symbol chains (see also “Segmentation-Menu”). Formatting is
thus not an integral component of the actual transcription, but is treated like additional info rmation that is only relevant for the presentation in the Editor and the o utput. Furthermore, it is
saved as a separate file and not in the actual transcription.
The system architecture ensures that only whole tiers or all tier labels or all timeline labels can
be formatted. It is not possible to format individual sections of a tier, e.g. to underline single
words in the transcription, to print them in bold or change their font.
The reason for this is that this kind of formatting can only be transformed into other file formats
with some limitations. It is not possible, for example, to import underlinings or bold print into a
data base. If you would solely like to use these features for display purposes, you can later apply
the desired changes to an exported RTF document. If they are part of your transcription conventions, however, (e.g. emphasized speech needs to be underlined according to your conventions)
you should consider whether you can express the marked phenomena with the help of symbolic
means.
The default format is automatically applied to every transcription made with the Editor (to co nfigure the default font see Ed it > Edit Preferences… ). Editing the format of a tier (or of the
speaker labels or the timeline) is done by calling the following dialog via Format > Edit format table :
100
EXMARaLDA Partitur-Editor – Manual
Format Menu
Font: sets the font.
Font style: sets the font type (“Plain”, “Bold” or “Italic”).
Font size: sets the font size (in points).
Example:
Labels:„Times New Roman, Bold, 10 pt“
Tier 1 and 3: “Times New Roman, Plain, 12 pt”
Tier 2: “Courier New”, Italic, 8 pt”
Text color: sets the color of the text.
Background color: sets the background color of the text.
101
EXMARaLDA Partitur-Editor – Manual
Format Menu
Choosing the color is done by selecting it from the dialog:
Examples:
Tier 1 to 3: Red, blue and green as text colors
Tier 2: grey as a background color
(to emphasize the expansion of non- verbal events
for example)
Alignment: sets the alignment of the text within the event description. This setting only takes
effect in the Editor. For the output the font is always aligned to the left.
Example:
Tier 2: „Centre“
Border sides: defines whether the events should be framed.
Border color: sets the frame color.
Border style: defines the style of the border (“solid”, “dashed” or “dotted”).
Examples:
Tier 1 and 3: grey solid border lines on the right
102
EXMARaLDA Partitur-Editor – Manual
Format Menu
Tier 2: blue dotted border lines on the left, right,
above and below
(to emphasize the expansion of non- verbal events
for example)
Height calculation: defines by which method the tier height should be calculated. There are
three alternatives:
Generous: This is the default setting. The tier height is adjusted to the biggest symbol of the
chosen font as a guideline, much like in text processing.
Miserly: If this option is chosen the tier height is adjusted to the biggest symbol actually used
in the tier in question.
Fixed: If this option is chosen, the tier height can be set by the user. The unit are Pixels (is
equivalent to the font unit “points”).
Format > Apply stylesheet
Generates a new formatting for the current transcription from a stylesheet (see also Appendix D).
The stylesheet that is specified in the user settings (see Edit > Preferences... ) in “Transcription
to format table” will be used. If there is no entry, a local stylesheet will be used.
Format > Open format tab le...
Opens a saved format table and applies it to the currently opened transcription.
Format > Save format table as...
Saves the current format table as a separate file with a new name.
Format > Ed it format table...
Opens a dialog for editing numerous tier formats:
103
EXMARaLDA Partitur-Editor – Manual
Format Menu
Choose the format from the list that you would like to edit and choose your required settings in
the lower half of the dialog. You can enter sample text in the field “Test Area”. Close the dialog
by clicking “OK” to apply changes.
Format > Format tier...
(Shortcut: CTRL+ F on Windows, ⌘ + F on Mac)
Opens a dialog to format the
currently selected tier.
Format > Format tier labels...
Opens a dialog that allows formatting of the speaker label.
Format > Format timeline ...
Opens a dialog that allows formatting the timeline.
Format > Format timeline items...
Opens a dialog to set the format of the time points on the timeline. The settings will be displayed
in the Editor as well as used for the RTF or HTML output or when printing.
104
EXMARaLDA Partitur-Editor – Manual
Format Menu
Show every n-th numbering: every n-th numbering in the timeline will be shown. Enter 0 to
have no numbering shown at all.
Show every n-th absolute time: every n-th absolute time value on the timeline is shown. Enter
“0” to have no absolute time values shown at all.
Absolute time format: defines whether the absolute time values are to be shown “Decimal”,
hence in seconds, or as (“Time”) in the format hh:mm:ss.xxx. 183.21 (“Decimal”) and
03:03.21 (“Time”) represent the same, namely “3 minutes, 1 seconds and 230 milliseconds”.
Miliseconds digits: defines how many post decimal positions should be used when displaying
milliseconds.
Examples:
Show every n-th numbering: 1
Show every n-th absolute time: 1
Absolute time format: Time
Miliseconds Digits: 1
Show every n-th numbering: 0
Show every n-th absolute time: 1
Absolute time format: Time
Miliseconds Digits: 3
Show every n-th numbering: 1
Show every n-th absolute time: 2
Absolute time format: Decimal
Miliseconds Digits: 1
Format > Set frame end
Specifies the position of the frame of the musical score. The default setting is set in such a way
that all tiers lie within the musical score frame. If you would like to change this, reorder all the
tiers so that the tiers you would like to be placed into the frame are on top (for this see also Tier > Change tier order). Select the last tier that is supposed to be below the frame by clicking
the tier label. Only choose the menu item hereafter.
(The position of the musical score frame can easily be seen by the tier labels on the screen : The
tier labels outside of the musical score have a different frame.)
105
EXMARaLDA Partitur-Editor – Manual
Format Menu
Examples:
no “frame end”
„frame end“ nach der dritten Spur gesetzt
Format > Reformat
Forces a recalculation of the musical score format. This can be of use when you have manually
adjusted some intervals on the timeline for example.
Format > Underline
Underlines the currently selected text. This underlining is not considered formatting in the co nventional sense. The way it is executed depends on the settings found under Edit > Preferences > Font > Underline .
If “Underline in a separate tier with category XXX” is selected the event in question is split and
the entry is placed into an annotation in an associated tier. This complies with the recommended
procedure for marking accents of the HIAT manual (Rehbein et al. 2004).
The settings “Underline in the same tier (using a diacritic)” on the other hand, insert suitable
diacritics into the currently selected tier that form an underlining.
The latter method is more comfortable normally, but limits the systematic search-ability of the
transcription.
106
EXMARaLDA Partitur-Editor – Manual
I.
Help Menu
Help Menu
Help > EXMARaL DA on the web
On our EXMARaLDA homepage you can find an extensive assistance via the menu item “Help”,
in particular a vast collection of examples for the practical work with the Partitur-Editor.
Help > About…
Displays an information dialog that lists the version of the EXMARaLDA Partitur-Editor you are
currently using. Furthermore the “Java version” and the “OS version” are listed :
107
EXMARaLDA Partitur-Editor – Manual
Help Menu
The button “Copy debug info…” allows the copying of the log file content (the error messages
etc.) into the clipboard. This is especially useful if you encounter errors in the software and would
like to send the error messages to the developers.
Help > Check for update…
Shows you a web page that informs you whether the currently used version of the Partitur-Editor
is the newest.
108
EXMARaLDA Partitur-Editor – Manual
Simple Exmaralda Conventions
V. APPENDIX A: SIMPLE EXMARALDA CONVENTIONS
1.
Every line starts with a speaker abbreviation of the speaker making the utterance followed
by a colon. Two speakers are not allowed to share the same abbreviation. Capitalization is
relevant (i.e. “Tom” and “TOM” will be treated as two different speaker abbreviations):
TOM: .....
TIM: .....
2.
Per line, an utterance is transcribed. Every line is ended with an end-of-line symbol (carriage return). Spaces are allowed for a clear structure.
TOM: Hallo, Tim!
TIM: Hallo, Tom.
3.
A transcription of non- verbal actions that accompany the utterances (i.e. that happen simultaneously), can be placed in square brackets before the utterance.
TOM: [winkt] Hallo, Tim!
TIM: [winkt] Hallo, Tom.
4.
An annotation of the utterance (e.g. a translation) can be placed in curly brackets behind the
utterance. It is placed into the same line as the associated utterance.
TOM: [winkt] Hallo, Tim! {Salut, Tim!}
TIM: [winkt] Hallo, Tom. {Salut, Tom!}
5.
Overlapping parts of the utterances of different speakers are placed into angle brackets. The
closing angle bracket is followed by any desired string that indexes the overlapping of the
utterances, followed by another closing angle bracket. Indexing should be done with numbers to simplify the readability. These numbers do not need to be in ascending order (it is
necessary, however, that they are unambiguous). For an improved readability overlapping
utterances can be indented with the help of tabs or spaces.
TOM: [winkt] Hallo, <Tim!>1> {Salut, Tim!}
TIM: [winkt] <Hallo>1>, Tom. {Salut, Tom!}
6.
Square, curly and angle brackets may only be used as specified above. They should not occur within the transcription in any other way.
109
EXMARaLDA Partitur-Editor – Manual
Segmentation Algorithms
VI. APPENDIX B: SEGMENTATION ALGORITHMS
General Information on Segmentation
Segmentation is an operation that is normally applied to the transcription after it has been co mpleted. Segmentation can be used for numerous purposes which can be summarized with the fo llowing keywords:
The automatic generating of additional representations for a transcription for example the
output of a transcription as an utterance list (cf. e.g.. Transcription > Transformation or
File > Output > GAT transcript ).
The splitting of the transcription into relevant (linguistic) analysis units that are used in the
computer-assisted evaluation of a transcription or a transcription corpus. The analysis instr ument “Alphabetic Wordlist” (cf. e. g. Transcription > Word list ) requires the transcription
to be segmented into words, and the counting of segments (cf. e. g. Transcription
> Count segments) requires the prior segmentation of the units to be counted.
This introduction sheds light on the general segmentation functionality. For a detailed description of individual menu items, see the respective section in the function reference.
What to segment?
Firstly it should be noted that the material to be segmented is normally only located in the tiers
of type “T(ranscription)”, i.e. there, where the verbal action of a speaker is transcribed orthographically or literarily. Neither tiers of type “D(escription)”, for non-verbal action, gestures and
facial expressions etc., nor tiers of type “A(nnotation)”, for annotated elements such as translations and comments, are to be segmented. In the following transcription extracts only the first
and third tier are considered for segmentation, while the second and fourth tier (that are of type
“A” because they are translations) are not considered :
Within a tier of type “T” segmentation is a step by step process along the segment chain unit.
Such a segment chain is defined as a chain of events without temporal interruptions. These se gment chains can easily be observed in the Editor: By default they are highlighted in white between two sections highlighted in grey by default. The example above thus contains four se gment chains:
KLA:
ERW:
ERW:
KLA:
Oh, da kommt einer. Kommt noch einer. ((hustet)) Wa/?
((hustet)).
Och nee, dat jiwet ja nich.
Oh, dat kann ja nich wahr sein.
110
EXMARaLDA Partitur-Editor – Manual
Segmentation Algorithms
How to segment?
The actual segmentation takes place by applying a “Finite State Machine” onto the tiers to be
segmented. This is a simple algorithm that recognizes utterance end symbols and word separ ators etc. and by using this information, splits segment chains into smaller units. Due to the fact
that both name and meaning of these units differ from one transcription system to the next (e.g.
“utterances” in HIAT vs. “phrasing units” in GAT) and every transcription system makes use of
different utterance end symbols for its units (e.g. the five utterance end symbols in HIAT vs. the
five phrase-final symbols in GAT), the Partitur-Editor has a number of different finite state machines for different transcription systems. Which of these the Editor should use can be set via
Edit > Preferences....
The finite machine uses the regularities of the individual transcription systems to split segment
chains into smaller units. As shown in the given example a splitting of the segment chains into
utterances can take place with the HIAT segmentation by means of the full stops and question
marks made use of (that complete an utterance according to HIAT):
KLA:
ERW:
KLA:
KLA:
ERW:
KLA:
Oh, da kommt einer .
((hustet)) .
Kommt noch einer .
((hustet)) Wa/ ?
Och nee, dat jiwet ja nich .
Oh, dat kann ja nich wahr sein .
In the same way it is recognized that the embedded chain of symbols in the double brackets describes non phonological material:
KLA: ...
ERW:
((hustet)).
KLA:
...
KLA:
((hustet)) Wa/?
Troubleshooting and Segmentation
Due to the fact that the segmentation algorithm relies on the regularities of the transcription system, segmentation problems may arise when these regularities are not adhered to while transcribing, i.e. when certain transcription symbols are not used as specified by the conve ntion.
In the following example the non-phonological unit “hustet” is not marked as defined by the
convention, i.e. with a pair of round brackets at the beginning and at the end, as specified in
HIAT. Here the brackets at the end of event in the transcription tier are missing:
Menu items that require a segmentation (e.g. Transcription > Count segments... ) will prompt
the following error message:
111
EXMARaLDA Partitur-Editor – Manual
Segmentation Algorithms
This contains information on the cause of the error – “Only close parenthesis allowed”, means
that at the position in question only one closing bracket may be inserted and allows the editing of
all segmentation errors in one dialog (see Transcription > Segmentation Errors...).
Segmentation: “HIAT: Utterance and Words”
All signs that are not listed in the following table will be treated as parts of words in the
EXMARaLDA Partitur-Editor (as long as they are part of a non-phonological entry).
Standard Values
Name
UtteranceEndSymbols
SpaceSymbols
.|!|? |…|˙|
|
Quote
„|
OpenParenthesis
(|
CloseParenthesis
)|
MiscellaneousPunctuation
PauseSymbols
Explanation
'|: |; |,|-|_ |‿ |—|/
|
•|·|
Mark the end of an utterance (followed
by a space if desired).
Marks the end of a word or is placed
after an Utterance End Symbol or “other punctuation”.
Marks the beginning and the end of
reported speech. Utterance End Symbols within reported speech are ignored.
A double occurrence marks the beginning of a non-phonological segment. A
single occurrence is treated like “other
punctuation”.
A double occurrence marks the end of a
non-phonological segment. A single
occurrence is treated like “other
punctuation”.
Marks intra-segmental phenomena and
is segmented like punctuation..
Mark pauses and are segmented like
non-phonological data..
Example:
The
second
segment
chain
of
speaker
segmentation: “HIAT: Utterance and Words”...
112
A
is
segmented
with
the
EXMARaLDA Partitur-Editor – Manual
Segmentation Algorithms
... into utterance, words (W), punctuation (IP) and non-phonological segments (Non-pho):
Segment chain
Utterance
W
Wie
IP Non- IP W
Pho
•
geht
Utterance
IP W
IP W
es
Dir
113
IP W
IP NonPho
Alles (( hustet
IP W
IP
?
))
?
klar
EXMARaLDA Partitur-Editor – Manual
Segmentation Algorithms
Possible errors
Cause
Example
Error message
Speaker’s utterance starts
with closing parentheses.
) Ich mache eine Äußerung
Speaker’s utterance starts
with an utterance end
symbol.
Utterance end symbol is
followed by closing parentheses.
Utterance end symbol followed by utterance end
symbol.
Utterance end symbol and
space are followed by
closing parentheses.
Utterance end symbol and
space are followed by utterance end symbol.
Pause symbols in double
round parenthesis.
A third opening parentheses.
Speaker’s utterance ends
without the double parenthesis having been closed.
After a double opening
parentheses only one has
been closed followed by
another symbol.
Reported speech begins
within a word.
Utterance ends without
reported speech having
been ended by quotation
marks.
! Ich mache eine Äußerung
Error:
No
parentheses
closing, No utterance end
symbol,
No
end
of
input
allowed
Error:
No
parentheses
closing, No utterance end
symbol,
No
end
of
input
allowed
Error: No closed parenthesis,
no
further
utterance
end
symbol allowed
Ich mache eine (Äußerung.)
Ich mache eine Äußerung.!
Error: No closed parenthesis,
no
further
utterance
end
symbol allowed
Ich mache eine (Äußerung. )
Error: No close parenthesis,
no
utterance
end
symbol
allowed
Ich mache eine Äußerung. !
Error: No close parenthesis,
no
utterance
end
symbol
allowed
Ich ((geht • zur Tür)) hau ab.
Error: No end of input, no
open parenthesis, no pause
symbol allowed
Error: No end of input, no
open parenthesis, no pause
symbol allowed
Error: No end of input, no
open parenthesis, no pause
symbol allowed
Ich ((geht (oder rennt) zur
Tür)) hau ab.
Ich hab Husten ((hustet.
Ich ((hustet)mache eine Äußerung.
Error: Only close parenthesis
allowed
Ich mach“e eine Äußerung.“
Error:
allowed
No
Und er sagt: „Ich mache eine
Äußerung
Error:
allowed
No
114
opening
end
of
quote
input
EXMARaLDA Partitur-Editor – Manual
Segmentation Algorithms
Segmentation: “DIDA: Words”
All signs that are not listed in the following table will be treated as parts of words in the
EXMARaLDA Partitur-Editor (as long as they are part of a non-phonological entry).
Name
CAPITALS
PLUS
NUMBERS_AND_COMMA
PAUSE
WORD_SEPARATORS
EQUALS_SIGN
SPACE
Standard value
Explanation
A|B |C|D | E| F| G|H
|I|J|K |L|M |N |O| P
|Q|R |S |T |U| V| W|
X | Y | Z| Ä | Ö | Ü |
+|
Only for the description of nonmorphemized utterances, not as
part of a word..
0|1|2|3|4|
5|6|7|8|9|,|
Only as part of time reference
(as part of a pause or an incomprehensible section).
Marks the beginning and the
end of a pause.
*|
→ | ↟| ↑ | ↓ | < | > | - | / |
=|
|
Marks a quick connection to the
beginning of a segment chain.
Symbols for suprasegmental
phenomena, are not part of
words.
Marks an elision or is placed
into a non- morphemized utterance.
Space can occur in various
places, often marks the beginning or end of a segment..
Marks the beginning of an incomprehensible section or one
that is difficult to comprehend.
Marks the end of an incomprehensible section or one that is
difficult to comprehend.
Marks the beginning of an ellipsis.
OPEN_PARENTHESIS
(|
CLOSE_PARENTHESIS
)|
OPEN_SQUARE_BRACKET
[|
CLOSE_SQUARE_BRACKET
]|
Marks the end of an ellipsis.
AMPERSAND
&|
A double occurrence marks the
reference section in the speaker
tier.
Only within incomprehensible
sections.
PERIOD_OR_ELLIPSIS
COLON
.||…|
:|
115
Either within a word (to characterize the length) or as part of
time reference.
EXMARaLDA Partitur-Editor – Manual
Segmentation Algorithms
Example:
The second segment chain of speaker
tion: “DIDA: Utterance and Words”…
X
is
segmented
with
the
segmenta-
... into utterances, words (W), punctuation (IP) and non- morphemized utterances (NMU) and
pauses (PAUSE):
Segment chain
W
IP
ja:“
NMU
HUSTET
Possible errors
Cause
Capital
words
letters
IP
IP
(
W
was
IP
)
IP
W
denn
Cause
IP
PAUSE
*1,5*
IP
W
IP
sonst ↑
Error message
within jA
Small letters within non- Ich mache] eine Äußerung.
morphemized utterances
116
Error:
Nicht
erlaubt:
Großbuchstabe,
offene
Klammer,
geschlossene
Klammer, Punkt oder Ellipse,
Zahl oder Komma
Error: Nicht erlaubt: offene
Klammer,
geschlossene
Klammer, Zahl oder Komma,
Doppelpunkt,
Punkt
oder
Ellipse,
Pausenzeichen,
Prosodiezeichen,
Wortbestandteil
EXMARaLDA Partitur-Editor – Manual
Segmentation Algorithms
Segmentation: “GAT: Intonation Units”
Standard value
Name
IU_END_SYMBOLS
OPEN_PARENTHESIS
(|
CLOSE_PARENTHESIS
)|
CLOSE_ANGLE
>|
SPACE
Explanation
?|,|-|;| .|
Marks phrase-finals of a phrasing unit.
Marks the beginning of a pause or of a section
that is difficult to understand. Full stops in
between round brackets will not be considered
utterance end symbols of a phrasing unit.
Marks the end of a pause or of a section that is
difficult to understand. Full stops in between
round brackets will not be considered utterance end symbols of a phrasing unit.
Marks the end of a commentary annotation
(e.g.: <laughing< what?>) and can occur after
the final symbol of the phrasing unit.
Can occur after end symbol of the phrasing
unit.
Marks elision of two phrasing units. If it occurs twice, the first symbol will be assigned to
the phrasing unit and the second symbol will
be assigned to the second phrasing unit. If it
occurs once, the use of the space determines
which phrasing unit the symbol will be assigned to.
|
EQUALS
=|
Example:
The following segment chain of speaker S1 is segmented into phrasing units (PU) with the se gmentation: “GAT: Intonation Units” ...
... will be segmented as follows:
PU
ja:;
PU
Segment chain
PU
PU
(.) die VIERziger =das=s: !WA:HN!sinnig viele die =oder
scheiden
generation so;=
sich da ham SCHEIden lassen.=
ÜBERhaupt.
117
lassen
EXMARaLDA Partitur-Editor – Manual
Segmentation Algorithms
Segmentation: “CHAT: Utterance”
Name
Standard value
PERIOD
.
QUESTION_MARK
?
EXCLAMATION_MARK
!
SPACE
Explanation: All CHAT utterance end symbols (both the “Basic Utterance terminators” as well
as the “Special Utterance Terminators”, cf. MacWhiney 2000: 60 and 66 ff.) are combined from
symbol chains that end in a full stop, a question mark or an exclamation mark. In addition, the
segmentation algorithm allows one (optional) space after the utterance end symbol.
Example:
The following segment chain of speaker CHI is segmented into utterances (U) segmented with
the segmentation: “CHAT: Utterance” ...
... will look following when segmented into utterances (U):
Segment chain
U
Mummy!
U
I want something+...
U
Something to drink.
118
U
Can I?
EXMARaLDA Partitur-Editor – Manual
Segmentation Algorithms
Segmentation: “IPA: Words and Syllables”
The IPA segmentation algorithm segments a transcription done according to the IPA conventions
into words and syllables. Details on these conventions were presented by
Thoma, Dieter & Tracy, Rosemarie (2005): L1 and Early L2: What's the difference? Vortrag,
DGfS-Jahrestagung in Köln.
A written and published version of these conventions is currently not available. The conventions
in respect to the symbols relevant for segmentation are relatively simple: word endings are
marked by spaces, different syllables of a word are separated from another by full stops. Marking
syllable boundaries is optional, i.e. word segmentation will take place independent of further
separation into syllables.
As opposed to the other segmentation algorithms, with IPA segmentation, tiers of type “T” will
not be segmented by default. Only those “T” –type tiers that have been additionally assigned the
category “v-pho” (please note the lower case) will be segmented.
Name
Standard value
WordBoundaries
<SPACE>
SyllableBoundaries
.
Explanation: Words are separated from each other by spaces, syllables (optional) are separated
from each other by full stops. There is no additional check whether the transcription symbols
have been applied according to convention. In particular it is not checked, whether the symbols
used are part of the IPA inventory. All symbols except for spaces and full stops, are interpreted
as words or syllables.
Example:
The following segment chain of speaker X is segmented with the segmentation: “IPA: Words
and Syllables” ...
... into words (w), syllables (sl), word boundaries (wb) and syllable boundaries (sb) :
w
w
b
hɜns.xen
w
Segment chain
hɜns.xen klain giŋ a.lain ɪn di : wai.tə wɜlt hi.nain
w
w w
w
w
w w
w w
b
b
b
b
b
klai
n
gi
ŋ
ɪn
a.lain
sl
s
b
sl
sl
sl
s
l
s
b
sl
hɜn
s
.
xe
n
klai
n
gi
ŋ
a
.
lai
n
119
di
:
w
wai.t
ə
...
w
b
w
wɜl
t
w
b
w
hi.nai
n
EXMARaLDA Partitur-Editor – Manual
Possible errors
Cause
Segmentation Algorithms
Example
Error message
Two syllables or word
boundaries come after one
another.
hɜns..xen
A segment chain begins
with a word or syllable
boundary.
.hɜns.xen
hɜns .xen
120
Error: No syllable or word
boundary, no end of input
allowed
Error: No syllable or word
boundary, no end of input
allowed
EXMARaLDA Partitur-Editor – Manual
Stylesheets
VII. APPENDIX C: EXMARALDA AND STYLESHEETS
What is a Stylesheet?
A stylesheet is an XML document that contains instructions that can be “understood” and implemented by a given software (a stylesheet processor) designed to implement it. Normally a
stylesheet is used to create a new XML or HTML document from a given XML document. Due
to the fact that EXMARaLDA data is always XML-based data, the stylesheet technology is most
suitable in data processing to establish a high flexibility with a relatively low amount of programming involved. It is not necessary to fully understand this technology in order to make use
of stylesheets in the Partitur-Editor effectively. Therefore, no detailed explanation is delivered in
this manual. Should you be interested to take a deeper look at this technology we recommend the
following as an introductory work:
Michael Fitzgerald (2003): Learning XSLT. O’Reilly.
What is the purpose of Stylesheets?
Within EXMARaLDA the purpose of the stylesheet is to take on reoccurring transcription tasks
that are regular enough to be automated, yet the exact procedure relies on parameters that differ
from user to user. Due to the fact that it is not possible to predict and integrate all potential p arameters for these tasks into the Partitur-Editor, the Editor is equipped with a number of functions that allow for user defined parameters to be set for stylesheets.
Examples of this tasks are:
When setting a new transcription, a specific number of tiers should be added for every speaker automatically. The parameters for this task can depend on the transcription conventions
used, for example, for instance, if a transcription is made according to the HIAT conventions,
every speaker needs a verbal tier, a tier for special pronunciation and a tier for comments. For
a DIDA transcription, only a verbal tier and a comment tier are required per speaker, as well
as a global comment tier. By using a suitable stylesheet in combination with the function F ile
> New from speakertable , this task can be automated:
An existing transcription is to be formatted automatically subject to the tier types e.g. all tiers
of category “v” should be formatted in “Arial, 12pt, bold” and all tiers of category “nv”
should be formatted in “Times, 10pt, italic”.
A HIAT utterance list should be issued as an HTML file, the individual utterances should be
121
EXMARaLDA Partitur-Editor – Manual
Stylesheets
numbered and all annotations and descriptions should be hidden.
Where to get Stylesheets?
There are three ways to get stylesheets for the use in the Partitur-Editor:
Download of a ready-to-use stylesheet from the EXMARaLDA website: The EXMARaLDA
website offers a number of ready-to-use stylesheets to download. The majority of these
stylesheets is designed for transcriptions with the transcription systems HIAT and DIDA.
Adapting an already existing stylesheet: The actual purpose of a stylesheet – i.e. the userdependent setting of parameters as an automated task – can only be fulfilled if the user creates
the stylesheet in question by himself. For many users creating a stylesheet “from scratch”
would be of too much effort. It often suffices to adjust a simple already existing stylesheet to
the needs of the user (e.g. one of those found on the EXMARaLDA website). The following
example illustrates why this option can be easier than learning the entire stylesheet language:
The section to the left is a part of a stylesheet from the EXMARaLDA website. It assists in
generating a format table. It defines that a tier of category “v” should be formatted in “Arial,
normal, 16pt, black”. A modification of the stylesheet (see the section to the right) can leave
the majority of the instructions unaltered and only change the sections highlighted in yellow :
<!-- Format für verbale Spuren -->
<xsl:when test=„@category='v'„>
<xsl:element name=„tier-format“ >
<xsl:attribute name=„tierref“>
<xsl:value-of select=„@id“ />
</xsl:attribute>
<property name=„font-name“>Arial</property>
<property name=„font-face“ >Plain</property>
<property name=„font-size“ >16</property>
<property name=„font-color“ >black</property>
[…]
</xsl:element>
</xsl:when>
<!-- Format für verbale Spuren -->
<xsl:when test=„@category='v'„>
<xsl:element name=„tier-format“ >
<xsl:attribute name=„tierref“>
<xsl:value-of select=„@id“ />
</xsl:attribute>
<property name=„font-name“>T imes</property>
<property name=„font-face“ >Italic</property>
<property name=„font-size“ >12</property>
<property name=„font-color“ >blue</property>
[…]
</xsl:element>
</xsl:when>
Times
Arial
Creating own stylesheets: Creating own stylesheets is both the most complex and the most
extensive method. A knowledge of the code of the Partitur- Editor is not required, it suffices to
be familiar with the structures of EXMARaLDA XML files.
Using Stylesheets Partitur-Editor
To be able to use stylesheets in the Partitur-Editor, the stylesheets that you would like to make
use of need to be defined under Edit > Preferences > Stylesheets.Thereafter the functions in
question can be called . There are five functions in the Partitur-Editor that allow their parameter
to be set with stylesheets:
File > New from speakertable
This is the option illustrated above, it allows tiers in a new transcription to be generated automa tically from the speakertable.
File > Visua lize > HTML partiture
Here, a stylesheet can be used to issue meta information and speakertables (the so-called tran122
EXMARaLDA Partitur-Editor – Manual
Stylesheets
scription head) in a user-defined way. For example, different stylesheets can be used to issue the
attribute name in different languages:
Without stylesheet:
With “Head2HTML_de.xsl”:
File > Visua lize > Free stylesheet visualization
Here the stylesheet is applied to the entire basic transcription. In this manner, representations of
the transcription in musical score or column notation or as a list of events for example are gene rated:
With „BT2ColumnHTML.xsl“:
123
EXMARaLDA Partitur-Editor – Manual
Stylesheets
With “BT2PartiturHTML.xsl”:
With “BT2EventListHTML.xsl”:
Format > Apply Stylesheet
Here, a format table is created from the transcription with the help of a stylesheet and used in the
Editor afterward.
Segmentation > HIAT segmentation > Utterance list (HTML)
Here, a stylesheet is applied to an utterance list – this is a “list transcription” that is segmented
into utterances in accordance to HIAT:
Without stylesheet:
124
EXMARaLDA Partitur-Editor – Manual
Stylesheets
With “HIAT_PlainUtteranceList_Tbl.xsl”:
With “HIAT_PlainUtteranceList_Txt.xsl”:
With “HIAT_ColoredUtteranceList.xsl”:
125
EXMARaLDA Partitur-Editor – Manual
Synchronisation
VIII. APPENDIX D: SHORTCUT OVERVIEW
Note to Macintosh users:
For most shortcuts, CTRL corresponds to ⌘ .
Note to German users:
For German keyboards, CTRL corresponds to STRG .
1. Audio / Vi deo Pl ayer
CTRL + SPACE
Play selection
CTRL + SHIFT + SPACE
Play last second of selection
CTRL +
F4
Play
CTRL +
F5
Pause
CTRL +
F6
Stop
2. Waveform displ ay / selection
move left selection boundary (when near left boundary)
move right selection boundary (when near right boundary)
move selection (when near selection centre)
MOUSE WHEEL
ALT + SHIFT +
Decrease selection start
ALT + SHIFT +
Increase selection start
ALT +
Decrease selection end
ALT +
Increase selection end
CTRL + SHIFT + S
Shift selection
CTRL + MOUSE WHEEL
Zoom waveform in/out
CTRL + SHIFT + MOUSE WHEEL
Vertical zoo m for waveform
3. File menu
CTRL + N
New transcription...
CTRL + O
Open transcription...
CTRL + S
Save transcription...
CTRL + P
Print transcription...
126
EXMARaLDA Partitur-Editor – Manual
Synchronisation
4. Edi t menu
CTRL + Z
Undo
CTRL + C
Copy
CTRL + V
Paste
CTRL + X
Cut
CTRL + F
Search in events...
CTRL + W
Find next
CTRL + H
Replace in events...
CTRL + G
Go to...
CTRL + SHIFT + F
EXAKT search...
5. Tier menu
CTRL + A
Add tier...
CTRL + I
Insert tier...
CTRL +
Move tier upwards
Hide t ier
CTRL + ALT + H
6. Event menu
CTRL + ENTER
Event properties...
CTRL + D
Remove event
CTRL + SHIFT + R
Shift characters to the right
CTRL + SHIFT + L
Shift characters to the left
CTRL +
1
Merge events
CTRL +
2
Split event
CTRL +
3
Double split event
CTRL + SHIFT +
Extend event to the right
CTRL + SHIFT +
Extend event to the left
CTRL + ALT +
Shrin k event on the right
CTRL + ALT +
Shrin k event on the left
CTRL +
CTRL +
CTRL + ALT + N
Move event to the right
Move event to the left
Find next event
7. Format menu
CTRL + U
Underline
127
EXMARaLDA Partitur-Editor – Manual
Synchronisation
IX. APPENDIX E: SYNCHRONISATION OF AN EXMARALDA
TRANSCRIPTION WITH A DIGITISED AUDIO RECORDING IN PRAAT
Vorbereitung
Copy the audio file to the hard drive (has to be either .aiff- or .wav format)..
Start EXMARaLDA Partitur-Editor (Version 1.3 or higher)
a. If the PRAAT panel is not displayed, select: View > Sho w panels > Praat panel
b. Open the transcription to be edited
c. Arrange main window (musical score) and Praat panel so that they do not overlap and
that there is some space left for PRAAT, e.g.:
Edit meta information (File > Meta-Information…)
a. Click “Browse…” next to “Referenced File”, look for the audio file on your hard drive
and close the dialog with “OK”.
128
EXMARaLDA Partitur-Editor – Manual
Synchronisation
Start Praat and set it up
a. Click “Start Praat” in the Praat panel.
b. Wait for Praat to start (i.e. until Praat'sWelcome dialog) …
… disappears).
c. Click “OK” on the “Starting Praat…” dialog:
d. Close the Praat Picture Window:
129
EXMARaLDA Partitur-Editor – Manual
Synchronisation
Open the audio file in Praat
a. Click “(Re)load” in the Praat panel
b. Wait until an Editor for “Long Sound [file name]” is opened in Praat:
The Editor also appears in the Praat Object Window:
c. Organize the Praat Editor Window and Partitur-Editor so that you can see both on the
screen:
130
EXMARaLDA Partitur-Editor – Manual
Synchronisation
d. In the Praat Editor, chose Vie w > Zoom… and enter 0.0 as the beginning and 60.0 as
the end value (the oscillogram cannot show more than 60 seconds):
Synchronisation
In the Praat-Editor Tab can be used to start and stop playback. The current position is highlighted with a red dotted line,. The scroll bar at the bottom of the window allows moving the section
you want to view:
Posi tion
Scroll-Leiste
The synchronization of the audio file and the transcription is completed in 3 steps :
Select a time point in the Partitur-Editor (to do this, click onto the corresponding position on
the timeline):
131
EXMARaLDA Partitur-Editor – Manual
Synchronisation
Look for the corresponding position in the recording in the Praat- Editor, i.e. move the recording to where the selected element starts
Click “Get” in the Praat panel. The position of the recording in Praat is assigned to the selec ted time point in EXMARaLDA as anN absolute time value. In the Editor this can be seen by
an absolute time value appearing on the timeline:
132