1
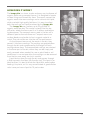
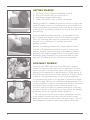
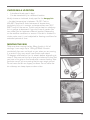
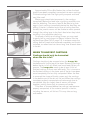
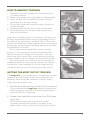
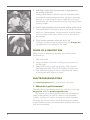
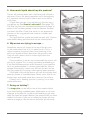
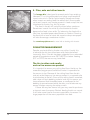
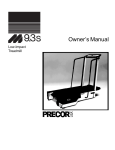
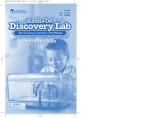
OWNER’S MANUAL CONTENTS HOW DOES IT WORK?. . . . . . . . . . . . . . . . . . . . . . . . . . . . . . . . . . . . . . . . . . . . . . . . . . . . . . . . . . . . 1 GETTING STARTED . . . . . . . . . . . . . . . . . . . . . . . . . . . . . . . . . . . . . . . . . . . . . . . . . . . . . . . . . . . . . . . . 2 HOW MANY WORMS?. . . . . . . . . . . . . . . . . . . . . . . . . . . . . . . . . . . . . . . . . . . . . . . . . . . . . . . . . . . . . 2 CHOOSING A LOCATION. . . . . . . . . . . . . . . . . . . . . . . . . . . . . . . . . . . . . . . . . . . . . . . . . . . . . . . . 3 MOVING THE BIN. . . . . . . . . . . . . . . . . . . . . . . . . . . . . . . . . . . . . . . . . . . . . . . . . . . . . . . . . . . . . . . . . . . 3 WHAT TO FEED YOUR WORMS. . . . . . . . . . . . . . . . . . . . . . . . . . . . . . . . . . . . . . . . . . . . . . . 4 HOW MUCH TO FEED YOUR WORMS . . . . . . . . . . . . . . . . . . . . . . . . . . . . . . . . . . . . . 5 WHEN TO HARVEST CASTINGS. . . . . . . . . . . . . . . . . . . . . . . . . . . . . . . . . . . . . . . . . . . . . . 6 HOW TO HARVEST CASTINGS. . . . . . . . . . . . . . . . . . . . . . . . . . . . . . . . . . . . . . . . . . . . . . . . 7 GETTING THE MOST OUT OF YOUR BIN. . . . . . . . . . . . . . . . . . . . . . . . . . . . . . . . 7 SIGNS OF A HEALTHY BIN. . . . . . . . . . . . . . . . . . . . . . . . . . . . . . . . . . . . . . . . . . . . . . . . . . . . . 8 FAQ/TROUBLESHOOTING . . . . . . . . . . . . . . . . . . . . . . . . . . . . . . . . . . . . . . . . . . . . . . . . . . . . . 8 1. Where do I get the worms?. . . . . . . . . . . . . . . . . . . . . . . . . . . . . . . . . . . . . . . . . . . . . . . . . . . . . . 8 2. What are compost worms?. . . . . . . . . . . . . . . . . . . . . . . . . . . . . . . . . . . . . . . . . . . . . . . . . . . . . . . 9 3. Help, my bin’s starting to smell…. . . . . . . . . . . . . . . . . . . . . . . . . . . . . . . . . . . . . . . . . . . 10 4. Should I add water?. . . . . . . . . . . . . . . . . . . . . . . . . . . . . . . . . . . . . . . . . . . . . . . . . . . . . . . . . . . . . . . 10 5. How much liquid should my bin produce?. . . . . . . . . . . . . . . . . . . . . . . . . . . . . . . 11 6. My worms are trying to escape…. . . . . . . . . . . . . . . . . . . . . . . . . . . . . . . . . . . . . . . . . . . 11 7. Going on holiday? . . . . . . . . . . . . . . . . . . . . . . . . . . . . . . . . . . . . . . . . . . . . . . . . . . . . . . . . . . . . . . . . . . 11 8. Flies, ants and other insects. . . . . . . . . . . . . . . . . . . . . . . . . . . . . . . . . . . . . . . . . . . . . . . . . . . 12 DISASTER MANAGEMENT. . . . . . . . . . . . . . . . . . . . . . . . . . . . . . . . . . . . . . . . . . . . . . . . . . . . 12 The bin is rotten and smelly, and no live worms are present. . . . . . . . . 12 The floor was removed too early to harvest castings and the contents have fallen out the bottom. . . . . . . . . . . . . . . . . . . . . . . . . . . . . . . 13 The bin has fallen over and the contents have fallen out . . . . . . . . . . . . . 13 HOW DOES IT WORK? The hungry bin is a clean, simple and easy way to dispose of organic waste using compost worms. It is designed to create an ideal living environment for them. The worms convert the organic waste into worm castings and a nutrient-rich liquid, which are both high-quality fertilisers. It is easy to collect both the castings and liquid produced by the hungry bin. The hungry bin can process up to 2 kg (4.5 lb) of organic waste per day. The waste is placed into the top of the bin, where the worms eat it as it softens and begins to decompose. The compost worms used in the bin are a different species from earthworms. Compost worms are surface feeders and prefer to live in organic material or mulch. They do not burrow into the soil like earthworms. As the compost worms eat the waste in the bin, they convert it into worm castings. The castings are pushed down through the bin and compressed by the weight of fresh castings above them. The compressed castings are retained in the lower part of the bin, where they can be simply and easily removed when needed, for use as plant food or soil conditioner. In normal operation, the castings can be removed from the bin once every two to six months. Liquid drains down through the bin and passes through a filter housed in the floor, into the drip tray. This liquid is an ideal fertiliser. It is best to dilute the liquid with water before feeding it to plants, as it is very concentrated. A good dilution ratio is one part worm liquid to 10 parts water. 1 GETTING STARTED 1. 2. 3. 4. Fill the bin ¾ full with moist bedding material Start with at least 500 gm of live worms Add finely chopped food scraps Cover with hessian sack or damp newspaper Bedding material is needed to settle the worms into their new home. Compost, humus, soil, potting mix or coconut fibre can all be used to bed the compost worms into the bin. Take care to ensure that the bedding material you use to start the bin is free draining. Place the bedding material directly into the bottom of the bin. It is best to fill the bin ¾ full with the bedding material. Two × 40 litre bags (80 litres) of commercially available compost mix or potting mix is an ideal amount of bedding material. Moisten the bedding material with some water, but don’t saturate it. The bedding should be as wet as a wrung-out sponge. Add the worms to the top of the bedding material and cover with approximately 2.5 cm (1 in) of food scraps (preferably finely chopped). The amount of food you add each day will depend on your starting worm population. HOW MANY WORMS? Approximately 2000 adult worms (or 500 gm) is a good number to use when you start your bin. However, the more worms you start with, the faster the bin will reach maximum capacity. A full population is approximately 12,000 worms, or 3 kg (6.5 lb) of adult worms. It takes about six to eight months to breed a full population from a small starting population. As the population grows it will regulate its numbers to match the food supply. Your bin will not become overpopulated. The number of worms in the bin will be determined by the amount and type of food you feed the bin. Similarly, there is no minimum amount of food you need to feed the bin each day. As long as the bin is fed regularly, and you follow the feeding guidelines, the bin will operate without problems. You can cover the worms with damp newspaper, sacking or old carpet to encourage them to come to the surface. Keep the lid closed as worms don’t like direct light – the lid is also designed to prevent insects from getting into the bin. 2 CHOOSING A LOCATION • A sheltered shady spot is best • Can be moved easily to a different location Ideally choose a sheltered, shady spot for the hungry bin – the ideal temperature is between 15–25° Celsius (60–85° Fahrenheit). Avoid extremes of temperature, particularly full sun in summer, as temperatures over 35°C (95°F) may kill the worms. The bin can be kept on a balcony or in a garage or basement if you don’t have a garden. You can wheel your bin between different locations depending on the weather conditions or season. If the bin is outdoors in winter, make sure it is not subjected to freezing conditions for extended periods of time. MOVING THE BIN Take care when moving the bin. When the bin is full of castings, it can weigh up to 125 kg (275 lb). If the bin accidentally tips over and lands on you when you are moving it, a serious injury may result. Lean the bin over about 15 degrees and balance it on its wheels before attempting to move it. Take care not to slip or lose your balance. Ensure that you have a firm grip on the handle and a secure footing. Take particular care if you are moving the bin over rough ground. Do not move the bin on slippery surfaces. Do not move the bin sideways on steep slopes or down stairs. 3 WHAT TO FEED YOUR WORMS Compost worms benefit from a balanced diet. They will eat most normal kitchen fruit and vegetable scraps. Avoid feeding the worms large quantities of meat, citrus, onions and dairy foods. Some processed food also contains preservatives, which discourage the worms from eating it. These foods won’t harm your worms, but they will avoid them and those scraps will break down and rot in the bin. The worms will eat their preferred food first but like to have some variety. The smaller and softer the scraps, the easier it is for the worms to digest and process them into castings. Compost worms will also eat garden or yard waste, and animal manure. If adding lawn clippings take care to only add a little at a time. Fresh lawn clippings can heat up and cause problems. If you do place animal manure in your bin ensure that the animals have not been treated with a nti-worm medication, as it may still be effective in their dung. It is also not advised to use dog or cat droppings if you intend to use the castings and liquid in your food garden, as the animals may have gut parasites, which can potentially infect humans. LIKES DISLIKES Most fruit and vegetable scraps Citrus, acidic fruit skin Pulp from the juicer Spicy foods, onion, garlic, leeks, capsicums Cooked food Meat and dairy products Tea leaves/bags and coffee grounds Bread, pasta and processed wheat products Crushed/ground eggshells Shiny paper Hair, vacuum cleaner dust Fats or oils Soiled paper, tissues, handy towels, shredded egg cartons, toilet roll inners, paper lunch wrap Shredded moist newspaper and cardboard Lawn clippings in small quantities (spray free), weeds, clippings, prunings, dirt and leaves Sawdust (untreated), wood ash 4 HOW MUCH TO FEED YOUR WORMS • Add up to 2.5 cm per day • Uneaten food should not be more than 5 cm deep • Only add more food as it is eaten It is very important that the hungry bin is not overfed. Compost worms prefer to eat their food as it begins to decompose, but not if it has become slimy and smelly. If the bin is overfed, the food scraps will begin to rot before the worms can eat them. Rotting food scraps not only smell, but also interfere with the life cycle of the worms and the operation of the bin. Rotting food is anaerobic – or oxygen deprived. Because worms breathe through their skin, anaerobic conditions prevent the worms from breathing properly, and may cause them to die. Worms can eat roughly their own body weight in food a day, so make sure that you only add about the same volume of food each day as there are worms. A fully functioning bin will have up to 3 kg (6.5 lb) of compost worms. Start by feeding the worms a small amount of food each day. Each time you feed the bin, check that uneaten food is not accumulating. You could chop up large food scraps into small pieces – the smaller and softer the scraps, the easier it is for the worms to digest and process them into castings. Slowly increase the amount you feed the worms as the population multiplies. The worms will breed and increase in numbers to match the food supply. Building up a full population of worms (about 3 kg) can take up to six months. Remember the hungry bin is not the same as a rubbish bin. A garbage truck does not magically empty it every week. The worms cannot eat the food as fast as it is possible for you to put it in, especially if the population is small when you start. It is better to underfeed your worms than overfeed them. A good rule of thumb is that uneaten food should be no more than 5 cm deep. You can check this by digging through the top layer of the bin and checking how deep the uneaten food is. In a healthy bin finished castings should be present 5–10 cm (2–4 in) below the top layer. You should also be able to see a mixture of adult and juvenile worms, indicating that the worms are breeding. If uneaten food is building up, simply stop putting new food into the bin until the worms have eaten the food present. 5 Approximately 20 cm (8 in) below the surface the food should have been completely converted into worm castings. Finished castings look like high quality compost and have very little smell. Worm eggs should also be present in the castings immediately below the food layer; signifying conditions are ideal for breeding. The worms need to be able to lay their eggs in fresh castings immediately below the food they are eating. If the bin is overfed and a layer of rotting food has formed, the juvenile worms will be unable to move upwards through the rotting layer to the fresh food when they hatch, resulting in the population declining. To remedy a build-up of rotting scraps, you may need to gently fork a small amount of fibrous material into the top food layer (See FAQ 3, page 10). In extreme cases the rotting food will need to be removed completely and the bin restarted, as rotten food can take a long time to break down in the bin. WHEN TO HARVEST CASTINGS Castings should only be harvested when the bin is full Castings should only be removed when the hungry bin has become full to the top of the taper. Removing castings before the bin is full will affect how much food the bin can process. The hungry bin needs to be at least ¾ full of finished castings to work most efficiently. This is to ensure the finished castings in the lower part of the bin have been cured completely, and are fully compacted. When the floor is removed, the shape of the bin means only the castings in the bottom part of the bin will fall out. When the castings have been properly compacted and had enough time to consolidate, they are largely free of worms and clump together, making them easy to remove and handle. If the floor is removed before the castings have become properly compacted, all the material present in the bin, including the worms, will fall out. This may take as long as 8 weeks. 6 HOW TO HARVEST CASTINGS 1. Remove the drip tray and pour any liquid present into a suitable container. 2. Release the latches securing the floor to the lower body. 3. Lower the floor from the bottom of the bin. The floor should be full of finished castings. 4. Tip the floor upside down and tap sharply to knock out finished castings. 5. If needed, clean the filter with a hose or some water. 6. Replace the floor over the lower body and secure in place with the latches. Some worms may be present in the castings. The worms can be easily separated from the castings by spreading them on the upturned lid, and placing it on top of the bin. The worms present will retreat from the light deeper into the castings and the top layer can be removed. The separated worms can then be tipped back into the bin. Plants have evolved to uptake the nutrients created by worms – their castings are one of the most beneficial fertilisers for plants. Castings are PH neutral, so are very safe to use with all plants. Even a small amount of castings or liquid added to soil will improve the performance of plants. They can be used in the same way you use compost, or heaped around plants. Pure castings may burn the roots of small plants if used undiluted. For use on smaller plants it may be necessary to mix the castings with other soil first. GETTING THE MOST OUT OF YOUR BIN The hungry bin is a living ecosystem. It is important that ideal conditions are maintained in the bin for it to operate most efficiently. Maintaining ideal conditions in the bin is easy – simply follow these basic rules: 1. Feed the bin a maximum layer of 2.5 cm (1 in) at any time Do not overfeed your hungry bin. Spread the food evenly over the top layer of the bin. You should not feed the bin more than 2.5 cm (1 in) per day. 2. Uneaten food should be no more than 5 cm (2 in) deep at any time Do not allow uneaten food to build up in the bin. If uneaten food has accumulated, it will begin to rot. Rotten food is acidic and putrid, and worms will not eat it. 7 3. Add fibre and/or lime occasionally to help balance the acidity of the bin Adding some fibrous material such as shredded paper or cardboard, dead leaves, sawdust, old grass clippings (brown) or a sprinkling of lime or wood ash when you feed the bin will help reduce the acidity, and keep the bin smelling sweet. 4. Avoid large quantities of processed and/or acidic food Processed food, like bread or pasta, can quickly become acidic as it decomposes. Large amounts of acidic foods such as lemon rinds, onion and fruit skins should also be avoided. 5. Only harvest castings when the bin is full Castings should only be removed when the hungry bin has become full to the top of the taper. SIGNS OF A HEALTHY BIN When the bin is operating correctly, you should notice the following: 1. Very little smell 2. Large numbers of worms including juvenile worms in the top layer 3. Good quality worm castings and very little uneaten food approximately 30 cm (12 in) below the top layer 4. The liquid draining from the bin should be the colour of strong tea with little or no smell FAQ/TROUBLESHOOTING See www.hungrybin.co.nz for more detailed information. 1. Where do I get the worms? The best place to purchase worms for your bin is from the hungry bin website, www.hungrybin.co.nz Our worms are of the highest quality and are supplied ready to be placed into your bin. Worms are harvested to order, so they will arrive in the best condition possible. Although the worms have a shelf life of up to two weeks, to get the best results, we recommend installing them into your bin immediately. 8 For best results we recommend starting the hungry bin with a minimum of 500g of live worms. You can start the bin with fewer worms, but it will take longer for the population to grow and reach maximum capacity. At maximum capacity a hungry bin has approximately 3 kg of adult worms present. HARVEST YOUR OWN WORMS You can start the hungry bin with compost worms dug out of existing worm farms, compost heaps or harvested from the natural environment. Wild compost worms can live in lawns, fields and under trees and you may be able to harvest some to start your bin. A good way to attract compost worms is to make a thin layer of food scraps on the ground in a suitable location and cover it with sackcloth. Add fresh food scraps every week. After a few weeks you will notice worms beginning to appear – these can be harvested and placed in your hungry bin. Compost worms are fast breeders. Under ideal conditions they will double their numbers every three months. 2. What are compost worms? Compost worms are different from common garden worms that live in soil. Unlike earthworms, compost worms do not make burrows in the soil, but live in the surface layer (the top 30 cm or 12 in). They have evolved to eat rotting plant matter on the forest floor, and are perfectly suited to break down organic waste. Compost worms are generally smaller than earthworms. Tiger worms (Eisenia foetida), red worms (Lumbricus rubellus) and Indian blue worms (Perionyx excavatus) are the most common worms used for composting. WORM LIFE CYCLE Worms join by a mucus ring exchange sperm Worms take about 3 months to become an adult Mucus ring passes over the head of the worm as it hardens into a coccon Each worm can mate and lay an egg every 7–10 days Baby worms hatch from one end of the cocoon at about 3 weeks Egg fertilisation takes place in the cocoon after being released from the worm 9 3. Help, my bin’s starting to smell... If your hungry bin is starting to smell, or the food is rotting before the worms can eat it, add a fine layer of fibrous brown material each time you feed the worms to help balance the bin. You can also sprinkle a fine layer of soil or potting mix into the bin to help balance it. A diet of food scraps can be too rich for the worms unless the scraps already contain plenty of fibre (lots of vegetable stalks for example), in which case you won’t have to add as much to keep your worms healthy and your bin smelling sweet. The food in the hungry bin needs to have the right ratio of carbon to nitrogen for the bin to be most effective. The ideal carbon to nitrogen ratio for a worm farm is 20:1, however food scraps can often have a ratio of 12:1. To balance the ratio of carbon to nitrogen, some extra material high in carbon may need to be added to the bin. Fibrous materials are carbon-rich, which also help balance the higher level of nitrogen in food scraps. Also referred to as bulk or roughage – fibre doesn’t tend to break down and rot as quickly as food scraps. It includes paper or cardboard, dead leaves, sawdust or wood shavings, vegetable stalks, old grass clippings (brown). The bin may also develop an unpleasant smell if it has become too acidic. Sprinkle a small amount of dolomite lime or rock dust on the top layer to help reduce the acidity of the bin. Adding fibre to the food when you are putting it in the bin may also help reduce problems with acidity. 4. Should I add water? Generally you should not need to add water to the hungry bin. Food scraps have a high water content, which helps keep the bin moist. The design lets excess water drain from the bin, but ensures enough moisture is retained to maintain optimal conditions. The worms do need to be moist though, so if the bin has dried out, sprinkle a little water on the top of the bin. If you have added dry matter like shredded paper you may also need to add water. Take care not to drown the worms, the top should only be as wet as a wrung-out sponge. If you are not getting much liquid it may be evaporating before you get a chance to use it. In this case you can place a suitable jug or bottle under the floor to catch the juice. Placing a funnel in the neck of a bottle will help catch the juice. 10 5. How much liquid should my bin produce? The bin will produce about half a litre (one pint) of liquid a day when it has a full worm population and is fed regularly. It is important that the liquid is free to drain from the bin at all times. If liquid from your bin is not collecting in the drip tray, it may be too dry. See Should I add water? (See page 10). The filter tray may also have become blocked with paper or plastic if this has been placed in the bin. Remove the floor and check the filter. Check that the bin is not exposed to intense sun for long periods and move to a shadier spot if necessary. The liquid fertiliser should be mixed one part with 10 parts water before being sprinkled onto the soil around plants. 6. My worms are trying to escape ... Sometimes worms will cluster at the top of the bin, and on the underside of the lid, if it is about to rain. This is a natural response to prevent them from drowning in the wild, or to migrate to fresh food when the ground is wet. They will return down into the surface layer when the rain has passed. If the conditions in the bin are unfavourable the worms will also try to migrate. This is usually caused by overfeeding, or if the food has become too acidic. However, if you keep the lid on as recommended, it is almost impossible for them to escape. Occasionally a worm may fall from the bin into the drip tray, especially if castings have recently been removed. If the food is too wet the worms will look fat and pale. Add some dry leaves or shredded paper. Gently use a fork to turn the top layer and create some drain holes on the surface. If heavy rain is flooding your bin try moving it to a more sheltered location. 7. Going on holiday? The hungry bin can be left for two to four weeks without fresh food. Adding shredded paper, dead leaves or dry lawn clippings to the food for a week or two before you go away helps the food last longer. Moisten the material after you have added it to the bin. If you are on holiday for longer you may need to arrange to have the worms fed while you are away. 11 8. Flies, ants and other insects The hungry bin is designed to prevent pests from entering. However, it is a living ecosystem and some small beneficial insects can exist in the bin quite happily. Sometimes these other insects are eating food the worms don’t like or prefer not to eat. Insects may also be present in food scraps that are introduced to the bin, e.g. fruit fly larvae. The food in the bin will naturally attract other creatures. Sometimes insects like white fly are attracted to the bin because the food is too acidic. Try balancing the food with a little lime, shredded paper, dead leaves or sawdust. Covering the food with a hessian sack, old carpet or damp newspaper will also discourage unwelcome visitors. See www.hungrybin.co.nz for more info on dealing with insects. DISASTER MANAGEMENT Despite your best efforts disaster may strike. Usually this is because the bin has either been over fed or balanced incorrectly. Also, if the bin has been subjected to an extended period of temperatures over 35°C (95°F) or below freezing (0°C or 32°F) the worms may have died. The bin is rotten and smelly, and no live worms are present It is important to remove any rotting food from the bin as the anaerobic (oxygen-poor) conditions make it impossible for the worms to live. Remove all the rotting food from the bin and set aside. Keep any live worms present in a separate pile to reintroduce to the bin. Once all the rotting food is removed, add a layer of fresh bedding material and any live worms you have recovered. Add shredded paper or cardboard to the bedding to promote even better aeration, and to balance any excess nitrogen causing the rotten smells. If there are very few worms left, you may need to purchase or harvest more live worms. Restart feeding the bin as normal. It will take some time for the worm population to recover if a large proportion of the worm population has died. 12 The floor was removed too early to harvest castings and the contents have fallen out the bottom The tapered shape of the hungry bin compresses the castings as they move down through the bin. When the floor is removed, only the castings at the very bottom of the bin should fall out, as the remainder are held in place by the shape of the bin. If the castings in the bin are not sufficiently compressed when the floor is removed, some, or all the material in the bin will fall out. Usually this happens because the floor has been removed too early, or before the castings or bedding material have become compressed. It is also an advantage to allow the bin to become full to the top with finished castings before removing the floor. A full bin is less likely to have problems as the volume of the castings helps moderate the bin, and prevent problems. If the contents have fallen out completely, reinstate back into the bin in the same order that they came out of the bin, with the oldest material to the bottom, and the live worms at the top. If only some of the material has fallen out, but the majority of the castings are still in the bin, replace the floor back onto the bin, and simply return the castings that have fallen out to the top of the bin. Placing finished castings in the top of the bin will not affect the worms present in the bin, but you may need to wait for the worms to migrate to the surface again before you can feed the bin at full capacity. The bin has fallen over and the contents have fallen out Get the bin back into an upright position. Reinstate the material that has fallen out – in the same order it came out in if possible – with finished castings toward the bottom and live worms on top. You may need to wait a few days before feeding the bin again as the worms will not all be present at the surface of the bin. See www.hungrybin.co.nz for more detailed information. 13 PO Box 13 504, Onehunga Auckland 1643, Aotearoa, New Zealand Freephone 0508 685 685 Phone +64 9 634 9029 Fax +64 9 634 9129 www.lowimpact.co.nz PRINTED ON 100% RECYCLED PAPER www.hungrybin.co.nz