1
USER’S MANUAL
TABLE OF CONTENTS
TABLE OF CONTENTS........................................................................................................................................................1
HOW TO USE THIS MANUAL..............................................................................................................................................8
RECENT ADDITIONS TO QUICK-MD .................................................................................................................................9
FEATURES, FUNCTIONS AND CONCEPTS.....................................................................................................................25
A Word or Two on Navigation..........................................................................................................................................25
Online Help......................................................................................................................................................................25
Yellow Fields....................................................................................................................................................................25
RESPONSIBILITY CODES .............................................................................................................................................26
FOR LOUISIANA KIDMED USERS ONLY......................................................................................................................26
Billing Notes ....................................................................................................................................................................27
Payment Posting .............................................................................................................................................................27
Ledger Date ....................................................................................................................................................................27
Date Fields.......................................................................................................................................................................27
QUICK-REFERENCE – A TYPICAL DAY IN THE OFFICE.................................................................................................28
Scheduling Quick-Reference – Using Q-Schedule..........................................................................................................28
Function Keys used in Q-Schedule..............................................................................................................................28
Scheduling an Appointment..........................................................................................................................................28
Deleting an Appointment..............................................................................................................................................28
Moving an Appointment................................................................................................................................................28
Verifying Appointments.................................................................................................................................................28
Printing Super Bills.......................................................................................................................................................29
Reports.........................................................................................................................................................................29
Scheduling Quick-Reference – Using Multi-View Scheduler............................................................................................29
Function Keys used in the Multi-View Scheduler..........................................................................................................29
Scheduling an Appointment..........................................................................................................................................29
Deleting an appointment ..............................................................................................................................................29
Moving an appointment................................................................................................................................................29
Verifying Appointments.................................................................................................................................................30
Waiting List...................................................................................................................................................................30
Adding a patient to the waiting list.............................................................................................................................30
Booking a patient from the waiting list.......................................................................................................................30
Printing Super Bills.......................................................................................................................................................30
Reports.........................................................................................................................................................................30
Entering New Patients..................................................................................................................................................31
Looking Up Patients.....................................................................................................................................................31
Entering Charges.........................................................................................................................................................31
Working in the Patient’s Ledger....................................................................................................................................31
Deleting Patients..........................................................................................................................................................32
Recapping Transactions Quick-Reference - Daily Recaps..............................................................................................32
Billing Quick-Reference
.........................................................................................................................................................................................32
How Quick-MD Bills......................................................................................................................................................32
Batch Billing Paper Claims...........................................................................................................................................33
Batch Billing Electronic Claims.....................................................................................................................................33
Printing an Individual HCFA 1500 form........................................................................................................................33
Quick-MD User Manual
Page 1 of 308
Payments Quick-Reference – Posting Payments............................................................................................................33
Ledger .........................................................................................................................................................................33
....................................................................................................................................................................................33
Posting Modules ........................................................................................................................................................33
IMPLEMENTING QUICK-MD FOR THE FIRST TIME.........................................................................................................35
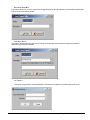
Installing Quick-MD..........................................................................................................................................................37
Installing Quick-MD on the Server.........................................................................................................................37
Installing Quick-MD on the Clients........................................................................................................................37
Installing Q-Schedule on the Clients.....................................................................................................................37
Setting up Mobile X-Ray..................................................................................................................................................37
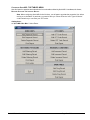
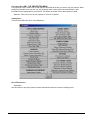
Configuring Quick-MD - THE TABLES MENU.................................................................................................................38
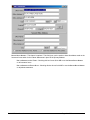
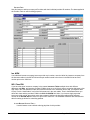
ICDM (Diagnosis) CODES...........................................................................................................................................39
Add Diagnosis Record...........................................................................................................................................39
Edit Diagnosis Record...........................................................................................................................................39
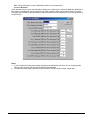
Deleting Diagnosis Record....................................................................................................................................40
Print Report...........................................................................................................................................................41
CPT CODES................................................................................................................................................................43
Adding CPT Code Record.....................................................................................................................................43
Fee Schedule........................................................................................................................................................44
Edit CPT Code Record..........................................................................................................................................46
Delete CPT Code Record......................................................................................................................................47
Print Report...........................................................................................................................................................47
REFERRING PHYSICIANS .........................................................................................................................................49
Adding Referring Record.......................................................................................................................................49
Edit Referring Record............................................................................................................................................50
Delete Referring Record........................................................................................................................................51
Print Report...........................................................................................................................................................51
Downloading Reports to Text Files........................................................................................................................52
Print Labels...........................................................................................................................................................54
INSURANCE COMPANIES..........................................................................................................................................55
Add Insurance Record...........................................................................................................................................55
Edit Insurance Record...........................................................................................................................................56
Delete Insurance Record.......................................................................................................................................58
Print Report...........................................................................................................................................................59
Drug Table....................................................................................................................................................................61
Add Drug Record......................................................................................................................................................61
Edit Drug Record......................................................................................................................................................61
Delete Drug Record..................................................................................................................................................61
Print Report...............................................................................................................................................................61
Customizing Quick-MD - THE PROPERTIES MENU......................................................................................................63
Office Demographics....................................................................................................................................................63
Office Data................................................................................................................................................................63
Provider Table..........................................................................................................................................................65
Id from Refering Physician Table – ..........................................................................................................................65
Insurance ID Numbers..............................................................................................................................................66
Location Table..........................................................................................................................................................67
Payment Table..........................................................................................................................................................67
Adjustment Table......................................................................................................................................................68
Financial Class Table................................................................................................................................................69
Patient Source Table................................................................................................................................................71
Sort Code Table........................................................................................................................................................72
Patients........................................................................................................................................................................72
Patient Defaults........................................................................................................................................................72
Patient Custom Information - Male............................................................................................................................73
Patient Custom Information - Female.......................................................................................................................73
Recall Table..............................................................................................................................................................75
Browser Defaults......................................................................................................................................................76
Patient Dunning Notices...........................................................................................................................................77
Marital Status Table..................................................................................................................................................77
Employment Status Table.........................................................................................................................................78
Quick-MD User Manual
Page 2 of 308
Relationship Table....................................................................................................................................................78
Standard Appointment..................................................................................................................................................79
Appointment Defaults................................................................................................................................................79
Charge Entry................................................................................................................................................................80
Cpt Entry Options......................................................................................................................................................80
Place of Service Table..............................................................................................................................................82
Type of Service Table...............................................................................................................................................83
Modifiers Table.........................................................................................................................................................84
Set 1500 Extra Data Fields.......................................................................................................................................84
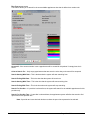
Printed Forms...............................................................................................................................................................85
Printer Settings.........................................................................................................................................................85
HCFA 1500 Settings.................................................................................................................................................85
Using the Test Grid...............................................................................................................................................86
Patient Statement Settings.......................................................................................................................................87
Super Bill Settings.....................................................................................................................................................88
Laser/Inkjet Address Label Settings..........................................................................................................................89
Other Form Setup.....................................................................................................................................................90
Texas Worker’s Compensation Work Status Report.................................................................................................90
Texas Worker’s Compensation Medical Evaluation Report......................................................................................91
Options.....................................................................................................................................................................91
Miscellaneous Defaults.............................................................................................................................................91
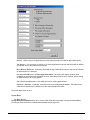
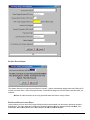
Auto Check E-Mail: Click this box on if you want the system to automatically check your email for you..................94
Medical Records Settings: ...................................................................................................................................96
Other Defaults: .....................................................................................................................................................98
Third party information:.........................................................................................................................................99
Table Data Paths......................................................................................................................................................99
Electronic Filing..........................................................................................................................................................100
Electronic Medicare, Medicaid, Blue Cross and Clearing House Settings..............................................................100
Electronic Remittance Settings...............................................................................................................................103
SCHEDULING APPOINTMENTS IN QUICK-MD..............................................................................................................105
Using Q-Schedule..........................................................................................................................................................105
Setting Up...................................................................................................................................................................105
Using Templates.....................................................................................................................................................105
Using The Scheduler ................................................................................................................................................106
Create an Appointment...............................................................................................................................................107
Moving Appointments.................................................................................................................................................108
Blocking an Entire Day...............................................................................................................................................108
Pg Up/Pg Dn..............................................................................................................................................................108
Reports.......................................................................................................................................................................108
Print Appointment Listing........................................................................................................................................109
Print Appointment Listing for a date range..............................................................................................................109
Print Super Bills......................................................................................................................................................110
Search For Existing Appointment...........................................................................................................................110
Query Appointments...............................................................................................................................................111
Next Av...................................................................................................................................................................112
Referring Physician Report.....................................................................................................................................112
Appointment Audit Report.......................................................................................................................................112
Appointment Settings.................................................................................................................................................114
Set Appointment Reasons .....................................................................................................................................115
Set Provider Names................................................................................................................................................115
Set Super Bill Data .................................................................................................................................................115
Using the Standard Appointment Scheduler..................................................................................................................117
Moving Appointments.................................................................................................................................................119
Using Templets..........................................................................................................................................................119
Using the Appointment Functions...............................................................................................................................120
Multi-View Scheduler.....................................................................................................................................................124
Setting Up...................................................................................................................................................................124
Show Status – If this option is set the status for the appointment will print on the List Appointments for a Day report.
................................................................................................................................................................................125
Set Provider Names................................................................................................................................................126
Quick-MD User Manual
Page 3 of 308
Setting up groups....................................................................................................................................................127
Set Appointment Reasons......................................................................................................................................128
Setting Super Bill Coordinates................................................................................................................................129
Set status codes.....................................................................................................................................................130
Set Color Description..............................................................................................................................................131
File maintenance utilites.........................................................................................................................................131
Using the Scheduler...................................................................................................................................................132
Create an Appointment...............................................................................................................................................133
Waiting List.................................................................................................................................................................135
Adding a Patient to the Waiting List............................................................................................................................136
Booking a Patient from the Waiting List......................................................................................................................136
Appointment Reports..................................................................................................................................................136
List Appointments For a Day...................................................................................................................................137
Print Listing for a period..........................................................................................................................................137
List Appointments Combined..................................................................................................................................137
Query Appointment Status Codes...........................................................................................................................138
Appointment Audit Report.......................................................................................................................................138
Batch Print Super Bills............................................................................................................................................139
Third Party Export...................................................................................................................................................139
List Templets..........................................................................................................................................................139
Check Eligibility.......................................................................................................................................................140
Next Available............................................................................................................................................................140
Patient Search............................................................................................................................................................142
E-Mail.........................................................................................................................................................................142
Jump To.....................................................................................................................................................................143
Templet......................................................................................................................................................................143
Hi Resolution Appointment Scheduler...............................................................................................................................144
Day View........................................................................................................................................................................145
Next Available by color...................................................................................................................................................146
THE FILE MENU............................................................................................................................................................147
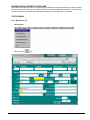
Add a New Patient File...............................................................................................................................................147
Duplicate Patient Window.......................................................................................................................................150
Entering Patients Insurance Information ....................................................................................................................151
Historical Primary Insurance Companies: .............................................................................................................153
Secondary Insurance..................................................................................................................................................154
Historical Secondary Insurance Companies: ........................................................................................................155
Third Insurance..........................................................................................................................................................155
Other Features of the Patient Demographics Screen.................................................................................................156
[Statement] - Patient Statement Information...........................................................................................................156
[diagnosis] - Patient Diagnoses Table.....................................................................................................................157
[!off msg] - Inner Office Messages..........................................................................................................................159
[state msg] - Statement Message Box....................................................................................................................159
[emg] - Emergency Contact....................................................................................................................................159
[soft 2] - Other Sort Codes ....................................................................................................................................160
Print........................................................................................................................................................................160
Data Output Processor........................................................................................................................................160
[ledger] - The Ledger ............................................................................................................................................162
Patient Ledger.....................................................................................................................................................162
Enter Charges New Claim ..............................................................................................................................163
Charge Entry Screen....................................................................................................................................163
Other Charge Information Screen.............................................................................................................165
The Payments Screen - using Un-Applied Credits...................................................................................168
Supplier Other Information Form..............................................................................................................170
Enter Charges Patient Claim...........................................................................................................................171
Add Charges To Last Claim.............................................................................................................................171
Current Ledger.................................................................................................................................................172
History Ledger.................................................................................................................................................178
Dependant Balances.......................................................................................................................................180
Dependants.....................................................................................................................................................180
Exit...................................................................................................................................................................180
Quick-MD User Manual
Page 4 of 308
[balances] - Patient Ledger Balances.....................................................................................................................182
[Info] - custom information screen..........................................................................................................................182
[co%] - Co-Percent & Deductible............................................................................................................................182
To implement this feature based on a percentage:.............................................................................................183
To Implement this feature based on a fixed dollar amount:.................................................................................183
Session Information:............................................................................................................................................184
[CONTRACT] - Contract Payment Information.......................................................................................................184
[recalls] - Patient Recalls........................................................................................................................................185
Using Un-Applied Credits........................................................................................................................................187
Configuring Quick-MD to handle Un-Applied Credits..........................................................................................187
Accepting Un-Applied Credits.............................................................................................................................188
Applying Un-Applied Credits...............................................................................................................................189
Applying Un-Applied Credits during Charge Entry.........................................................................................189
Applying Un-Applied Credits using the Payment Posting Modules................................................................189
[managed care] - MANAGED CARE MODULE...................................................................................................190
[cpt] – Cpt Code Tracking.......................................................................................................................................192
ELECTRONIC MEDICAL RECORDS............................................................................................................................193
Setting up the Electronic Medical Records Interface...........................................................................................194
Attaching documents to patient’s file...................................................................................................................196
OPERATIVE TRANSCRIPTIONS....................................................................................................................196
Reviewing Operative Transcription’s............................................................................................................198
OTHER DOCUMENTS ..................................................................................................................................199
Using Templates..........................................................................................................................................199
Insertion Commands................................................................................................................................199
Using the Naming Convention......................................................................................................................201
Creating and Attaching Other Documents to a Patient’s File.......................................................................202
Reviewing/Editing Attached Documents......................................................................................................203
Patient Phone Messages....................................................................................................................................205
Adding a New Message...................................................................................................................................206
Tracking and Printing of Prescriptions ...............................................................................................................208
[FORMS] – Texas Workers Compensations Forms................................................................................................210
Lookup Patient File.....................................................................................................................................................211
Look Up Patient File Screen................................................................................................................................211
Patient Files Browser..............................................................................................................................................212
Fast Charge Entry......................................................................................................................................................213
Open Patient Ledger..................................................................................................................................................214
Delete Patient File......................................................................................................................................................214
BILLING IN QUICK-MD.....................................................................................................................................................216
How Quick-MD Bills.......................................................................................................................................................216
THE BILLING MENU - (Paper Filing).............................................................................................................................216
Patient Statements.....................................................................................................................................................216
Primary Insurance......................................................................................................................................................219
Secondary Insurance..................................................................................................................................................221
Third Insurance..........................................................................................................................................................221
REBILL CLAIMS.........................................................................................................................................................222
Report Last Batch Printed..........................................................................................................................................222
Delete Billing Notes For Last Batch Printed................................................................................................................222
THE E- BILL MENU (Electronic Filing)..............................................................................................................................223
E-Billing Medicare, Medicaid, Louisiana Blue Cross Blue Shield and Ochsner.............................................................223
Electronic Clearing House Billing...................................................................................................................................227
E-Bill Reports.................................................................................................................................................................227
ELECTRONIC REMITTANCE (ANSI 835).........................................................................................................................228
835 Report.....................................................................................................................................................................229
Loading the 835 file........................................................................................................................................................230
ENTERING PAYMENTS IN QUICK-MD............................................................................................................................231
THE PAYMENTS MENU................................................................................................................................................231
Patient/Insurance Payments Posting..........................................................................................................................231
Quick Insurance Payment Posting Module – By Claim...............................................................................................233
To Save an Unfinished EOB Posting......................................................................................................................235
Resuming an Unfinished EOB Posting...................................................................................................................235
Quick-MD User Manual
Page 5 of 308
Insurance Payments By Invoice.................................................................................................................................236
Patient/Insurance Payments (By Invoice/Uc) – (Unapplied Credits)...........................................................................238
RECAPING TRANSACTIONS FOR A DAY IN QUICK-MD...............................................................................................242
THE RECAPS MENU.....................................................................................................................................................242
Daily Recap ...............................................................................................................................................................242
Sample Daily Recap Report....................................................................................................................................242
Daily Payments .........................................................................................................................................................243
Sample Daily Payments Report..............................................................................................................................243
Daily Charges.............................................................................................................................................................244
Sample Daily Charges Report................................................................................................................................244
Daily Adjustments ......................................................................................................................................................245
Sample Daily Adjustments Report..........................................................................................................................245
...............................................................................................................................................................................245
Recap Summary For a Time Period.......................................................................................................................246
Sample Recap Summary for Time Period Report...................................................................................................246
ANALYZING YOUR INFORMATION IN QUICK-MD.........................................................................................................247
THE REPORTS MENU..................................................................................................................................................247
Query Patient File.......................................................................................................................................................247
Query Payments.........................................................................................................................................................248
Sample Query Payments Report:...........................................................................................................................249
Query Adjustments.....................................................................................................................................................250
Sample Query Adjustments Report:........................................................................................................................250
Query Charges...........................................................................................................................................................251
Sample Query Charges Report:..............................................................................................................................252
Mail Merge..................................................................................................................................................................253
Print Labels................................................................................................................................................................255
Ageing Report (Brief)..................................................................................................................................................256
Sample Ageing Report (Brief):................................................................................................................................257
Aging Report (Detailed)..............................................................................................................................................258
Sample Ageing Report (Detailed):..........................................................................................................................259
Ageing Report (for one insurance company)..............................................................................................................260
Sample Ageing Report (For one Insurance Company):..........................................................................................260
Aging Report (All Insurance Companies)...................................................................................................................261
Sample Ageing Report (For All Insurance Companies):.........................................................................................261
Ageing Report (By Claim)...........................................................................................................................................263
Sample Ageing Report (By Claim):.........................................................................................................................263
Financial Class Ageing Summary Report...................................................................................................................264
Sample Financial Class Ageing Report:..................................................................................................................265
Collections Work Report.............................................................................................................................................266
Sample Collections Work Report:...........................................................................................................................267
Cpt Codes Analysis Report........................................................................................................................................268
Sample CPT Codes Analysis Report:.....................................................................................................................268
Payment Analysis By Cpt Code Report......................................................................................................................269
Sample Diagnosis Codes Analysis Report:.............................................................................................................270
Charge & Payment For Companies Set In Patient Responsible.................................................................................271
Average Reimbursement Report................................................................................................................................272
Sample Reimbursement Report..............................................................................................................................272
Insurance Claims Not Billed.......................................................................................................................................273
Sample Insurance Claims Not Billed Report:..........................................................................................................273
Claims With Credit Balances......................................................................................................................................274
Sample Claims with Credit Balances Report:.........................................................................................................274
Claims With Balance Owed........................................................................................................................................275
Sample Claims with Balance Owed Report:...........................................................................................................275
Managed Care Expirations.........................................................................................................................................276
Sample Managed Care Expirations Report:............................................................................................................276
Financial Summary For Providers..............................................................................................................................277
Sample Financial Summary For Providers Report:.................................................................................................277
General Ledger Summary..........................................................................................................................................278
Sample General Ledger Summary Report:.............................................................................................................279
Quick-MD User Manual
Page 6 of 308
Patient Recall Report..................................................................................................................................................280
List Blocked Bills........................................................................................................................................................281
Sample List Blocked Bills Report:...........................................................................................................................281
List Late Promise to Pay Payments............................................................................................................................282
List Promise to Pay Contracts....................................................................................................................................283
ADVANCED FEATURES OF QUICK-MD..........................................................................................................................284
THE SYSTEM UTILITIES MENU...................................................................................................................................284
Data Files Rebuild......................................................................................................................................................284
Data Files Re-index....................................................................................................................................................285
Reset Lock Fields in Appointments............................................................................................................................285
Purge Appointment File..............................................................................................................................................286
Move Ledgers to History.............................................................................................................................................286
Set Operator Rights....................................................................................................................................................286
Edit Zip Code Record.................................................................................................................................................289
Canned Notes............................................................................................................................................................289
Reassign Sort Code...................................................................................................................................................291
Delete Billing Note......................................................................................................................................................291
Generate Contract Ledger Entries..............................................................................................................................292
Post Re-occuring Charges and Payments..................................................................................................................292
Set Next Patient Number............................................................................................................................................293
Run Deleted Records Ledger Report.........................................................................................................................293
Check for Orphaned Ledgers.....................................................................................................................................294
INTRA-OFFICE EMAIL......................................................................................................................................................295
SENDING AN EMAIL.....................................................................................................................................................296
WAITING ROOM WIZARD................................................................................................................................................297
Starting The Wizard.......................................................................................................................................................297
Patient Information.........................................................................................................................................................297
Primary Insurance Information.......................................................................................................................................298
Alternate Billing Information...........................................................................................................................................299
Emergency Contact Information.....................................................................................................................................300
Accessing The Waiting Room Information.....................................................................................................................300
SETTING UP AND USING THE HL7 INTERFACE...........................................................................................................301
Setting up the HL7 interface to send message..............................................................................................................301
Running IMED scan as a service...................................................................................................................................301
IMED Scan ....................................................................................................................................................................302
Setting up the HL7 interface to read electronic super bills.............................................................................................303
Loading electronic superbills..........................................................................................................................................303
ONLINE TUTORIALS........................................................................................................................................................304
HOW TO............................................................................................................................................................................306
FREQUENTLY ASKED QUESTIONS...............................................................................................................................306
What does a claim consist of?.......................................................................................................................................306
What are Responsibilities Codes?.................................................................................................................................306
What types of Billing Methods does Quick-MD have?...................................................................................................307
What date is used to determine what information is on the daily recap?........................................................................307
How do I perform recaps for only the work I did?...........................................................................................................307
Can I Change the Font Size on my Reports?.................................................................................................................307
Why do my HCFA forms, Patient Statements or SuperBills not line up from top to bottom?...............................308
How do I clear a file lock?...................................................................................................................................308
Exiting Quick-MD...............................................................................................................................................................308
Quick-MD User Manual
Page 7 of 308
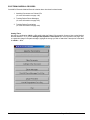
HOW TO USE THIS MANUAL
This manual details everything you need to know to effectively run your practice with Quick-MD.
When using this manual you should know that there are four ways to find the information you are interested in. The
first is the Table of Contents. The second is the Recent Additions. The third is the FAQ. And the fourth is to utilize the
find feature “<CTRL>+F” inside Adobe Acrobat to search for specific text.
To navigate this Manual, click on the subject you are interested in viewing in the TABLE OF CONTENTS, which is
located behind the Bookmark tab to your left. This will jump you to that section of the manual. When you are at the
section you wish to read, you can click the Bookmark tab again to close it and make your document full screen.
Additionally, you should know that when ever you see a link that reads (for more information see page #), clicking on
the page number will jump you to that section of the manual.
After the TABLE OF CONTENTS, you will find a RECENT ADDITIONS TO QUICK-MD section. You should use this
section to get an overview of the many different features in Quick-MD. Additionally, each time the software is
updated, you will want to use this section to learn about your new features and how to best utilize them.
After this, the manual walks you through installing and configuring the software. If you are setting the program up for
the first time, you will want to carefully read this section. Your VAR will walk you through most of this setup, but you
should take the time to become familiar with what information you need to gather and to begin thinking about how
you want to customize the software to meet the needs of your particular practice.
After the installation and setup section, the manual will walk you through the various aspects of using your new
system. It is broken down in a logical order that begins with scheduling, moves through working with your patients,
then on to Billing and finally explains how to use the other features of the program that are available to you.
The manual ends with a FREQUENTLY ASKED QUESTIONS section. Use this section to learn how to perform
specific tasks that you might be having trouble understanding how to perform.
Sincerely,
The Quick-MD team.
Quick-MD User Manual
Page 8 of 308
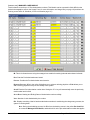
RECENT ADDITIONS TO QUICK-MD
This section of the Manual describes the latest features of Quick-MD as new versions are released. Reading through
the list of features is a great way to get an overview of the many intricacies of the program. As new versions of the
program are released, you will want to check this section of the Manual to see what new features are added and how
to use them.
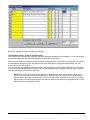
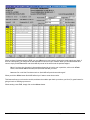
Version 5.0
•
You can now print the Texas Workers Compensation forms DWC-69 and DWC-73. (See Page 147)
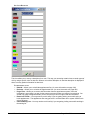
•
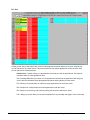
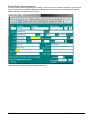
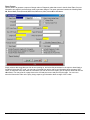
A check box was added to the Insurance/Employer record that you check if the record Represents an employer.
On the browse screen the Ins. Companies will be blue and The Employers will be green. (See page 55)
•
The patient’s DOB was added to the phone messages print out.
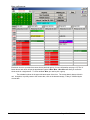
•
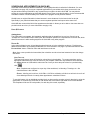
A Complete day view was added to the Multi-View Scheduler. Click on the “D” button to switch to a full day view.
Your monitor must be set in at least 1024 X 768 to use this feature. You can do all tasks on the day screen that
can be done on the front screen except change the calander day, you must go back to the front screen to change
the date.
•
The Hi-Resolution Multi-View Scheduler now ready for use. It will allow you to see 8 more time slots per page on
the main screen and also has the complete day for a provider booking screen.
•
The Query Patient File report will now give you a list of deceased patients.
•
A "Date Last Verified" field was added to the patient's insurance screen.
•
The patient's diagnosis table now prints when the print button on the patient's demographic screen is clicked.
•
You can now set a "Claim Adjustment Reason Code" on the edit charge screen when Medicare is secondary.
When the system sees that a Medicare is set as secondary and you edit (F4) a charge the cursor will be in the
claim adjustment reason code field on opening of the charge screen.
•
In every place in the system that you enter addresses, you can now type the zipcode in the city name and the
city, state, and zip will be auto entered. If the zip code is not recognized you will be asked for the info and QuickMD will recognize it from then On. There will be a red Z by the city name to remind you of this feature.
•
You can define your Blue Cross writeoff adjustment code in Properties/Misc. Defaults. If it is defined and you
have auto writeoffs turned on it will use the defined code for The Blue Cross write offs on the auto entered
adjustments.
•
A “Print Canned Notes Listing” button was added to the Canned Notes Menu
•
You can now set a Supervising Phy. on the Supplier Information Screen for the claim.
•
You can set an associated drug on the CPT Code record. If a drug is set on the CPT record it will automatically
set the NDC information on the patient charge entry screen when the operator enters the CPT code. If the NDC
information is set the NDC Info Button will say “NDC Info Set” if it is not set, the button will Read “NDC Info”.
•
A checkbox “Include Primary Insurance” was added to the charges daily recap. If checked it will include the name
of the primary Ins. Company under each charge if it is set in the patient’s file.
•
In the Multi-View and the Hi-Resolution scheduler a “Search By Color” button was Added. It will search for the
next available appointment based on the color that is set on the time slot.
•
The patient’s cell phone number ill not print on the demographics print out.
Quick-MD User Manual
Page 9 of 308
Version 4.9
•
On the patient's insurance screens, if the relationship is set at self and an insurance company ID# is set, the
system will display a warning if the first and last name of the subscriber does not match the first and last name of
the patient.
•
A new report was added to "Query Patient Ledger" in the F9 Ledger Prints Menu. This report will list all claims
itemized that have a non-zero balance. The dates on the ledger Query screen are ignored if set for this report.
•
All "Daily Recap Reports" now have the check box "Recap All Providers Separately" and work the same as the
"Daily Recap Report" described below.
•
A visit date from and visit to date was added to the Mail Merge. If these two dates are filled in, the patient must
have visited in that date range to be included in the merge. The date of visit is determined by the from date if set
or the ledger date if the from date is not set on the charge.
•
The age data field in the patient demographics screen has been changed to show the age in months if the patient
is less than 2 years old.
•
The "Daily Recap Report" now has a check box "Recap All Providers Separately". If this box is checked it will
print a recap for each provider that has any ledger entries for the day being run. They will appear in the data
output processor one after another.
•
A Sort Code selection drop down was added to the "List Blocked Bills".
•
You can know run the Daily Recap Report and have it group the reports by the provide. If you go to "Daily Recap
Reports" and check the box labeled "Recap All Providers Separately" you will get a separate report for each
provider.
•
NDC information was added to the charge records. To use this feature your should first enter the drugs your
office administers into the drug table in TABLES. You will need to know the NDC number for each drug and the
type of units it is issued in. International Units, Milliliter, Gram or Unit. So, before entering drugs you will need to
edit your settings. We recommend setting IU for International Units, Mill for Milliliter, Gram for Gram, and U for
unit. After the drug table is set up you can then attach a drug when you are entering charges. On the oher charge
info screen you will see a button that says NDC info. Click on that button and a screen will appear that will sllow
you to browse the drug file and attach a drug to that charge.
Version 4.8
•
The provider table in properties was expanded from 26 providers to 50
•
A data field for the NDC number was added to the drug table records.
•
The Query charges report can now be run by operator.
•
You can now run the daily recap reports by operator group codes.
•
We added a report to the multi-view appointment system that will let you print a listing of your appointment
templates by provider and day of the week.
•
The + and – keys will increase or decrease a date field by one day in the other charge information and Edit
charge screens.
Quick-MD User Manual
Page 10 of 308
•
You can define your workman’s comp financial class to the system now. If you define it to the system (1) When
the supplier form pops up it will default 10a to Yes. (2) when you enter the ledger date the from and to dates will
default to the ledger date. To define your Workman’s comp to the system go to Properties/Misc. Defaults/Other
Defaults and type in the number that represents your W.C. Class in the financial class table.
•
In Properties/1500 settings & properties/Patient Statement settings a new check box was added. The box is
labeled “Use Address In Provider Table Instead of Office Address”. If you check this box for the 1500 form it will
put the address listed in the provider’s table in block 33 instead of the office address. If you check it for the
patient statements it will still use the office name on the statements but will use the address listed in the
provider’s table.
•
The ledger report from the ledger print menu always prints in landscape now.
•
The query payments and query adjustments reporting can now be narrowed to an operator.
•
The electronic clearing house, Medicare and Medicaid direct modules will now sen the NPI number if the check
box “Send NPI number” in the electronic filing modules is checked.
•
The new CMS 1500 form was added. There is a check box in properties that will allow you to switch back and
forth between the new and old 1500 form. The new form must be alighed before trying to use it.
•
The date of the last patient’s payment was added to the standard and definable patient statement.
•
A second default sig line, and a default unit of measurement where added to the drug record.
•
A font size can now be selected in the Data Output Processor. See the button at the top that reads Font.
•
Expanded location table form 10 to 30. Expanded payment table from 25 to 50. Expanded adjustment table from
25 to 50. Expanded financial class table from 25 to 50. Expanded sort code table from 85 to 99.
•
Now able to define two clia id numbers to the system. The one defined under properties/Electronic Medicare
Settings is the default clia number used by the system. The one defined under properties/Electronic BCBS
settings is the additional clia number. The additional clia number is activated by placing a note, on a lab charge,
that contains the text “CLIA2”.
•
Ability to create templates in Microsoft Word. (For more information see page 193)
•
Checking “Put Primary Diagnosis on Ledger Browse” under Properties/File Browser Setting, well set the first
diagnosis in diagnosis column of the ledger browser screen instead of the pointers to the diagnosis table.
•
Added a place for the cell phone number on the patient’s demographics screen.
•
Added horizontal scroll bar and font size option to the data output processor.
•
Changes were made to the prescriptions module. A second Sig line was added. A unit of measurement field was
added next to the dispense number. You can set what you need, Pills, Pack, Tube, etc. This is a user defined
table of 6 positions that can be set in Properties/Misc. Defaults/Medical Record Settings. Also, the patient’s DOB
will print on the prescriptions just to the right of the account number and a check box to mark the prescription
inactive was added.
•
Added new insertion commands. (For more information see page 199)
•
Added the ability to print address labels by diagnosis code.
•
Now you can include the line item diagnosis and provider on the “Itemized by Date Range” Report.
•
PDF export for all reports. (For more information see page 160)
Quick-MD User Manual
Page 11 of 308
•
A EMR button was added to the patient demographics and current ledger screens. Clicking on this button will
start then Medical Records interface and of course you can still start this interface by pressing shift/F1.
•
On the drug browse screen you now have the ability to press the F1 key and see all information on that record.
•
There are now two print all buttons in the data output processor. One will print all and close the DOP the other
will print all and leave the DOP open.
•
A new check box was put in Properties/Misc. Defaults. “Strictly enforce ledger date range”. If this box is checked
QM will not let the operator exit the ledger date fields of new payments, charges, and adjustments until the ledger
date is set within the range specified in Properties/Misc. Defaults. When editing any ledger entries, if the ledger
date is not within the set range the ledger date data field will be grayed out and not operable.
•
Two new definable super bill data fields were added to the super bill in the Multi-View scheduler. The 2 note
fields can be placed on the super bill. To set the coordinates, go to Properties/Super bill setup in the Multi-View
scheduler.
•
The ability to run the Query Charges Report for a range of NUMERICAL CPT codes was added. The fields for
the code ranges on the report are for the CPT code and not the CPT office code. The field for a single CPT code
was for the CPT office code but has been changed to use the actual CPT code.
•
The Insurance Claims Billed Report was modified. It now has a check box “Use Actual Balance”. If this is
checked the report will use the actual balance of the claim as is in the ledger(all charges, payments, adjustments
are considered). If it is not checked the report will works as it did in the past which is the dollar amount that was
put in block 30 of the 1500 form. Also, totals for Primary, Secondary, and Third billings was added at the bottom
of the report.
Version 4.7
•
Louisiana Kidmed electronic filing module was added. The Kidmed company must be setup as the third Ins. In
the patient’s file. The charges must carry the “A” responsibility code. The Kidmed company
must be defined in properties/Ins. ID numbers. The electronic kidmed settings
must be set in properties. The file name will be H450????.KID
•
The prescription records were changed so that up to 4 prescriptions per record
can be added. (For more information see page 208)
Also, a drug table was added to the tables menu. You can now pull the drugs into the prescription records from
the table. (For more information see page 61)
•
On the prescription browse screen you can now highlight a prescription and press
The F3 key and a refill will be generated. (For more information see page 208)
•
On the diagnosis browse screen, you have a complete browse data field. If you enter characters in this field the
browse will pull up all records that have that set of characters in the description line no matter where it is on the
line. This browse May take longer to come up depending on how many diagnosis records you have on file. (For
more information see page 157)
•
Units of service were added to the daily charges recap report. (For more information see page 244)
•
Modifiers were added to the daily charge recap report (For more information see page 244
•
The link codes in the CPT records was expanded from 4 to 8. (For more information see page 43)
•
A full text search was added to the CPT records browse screen. This allows you to type in any text into the
CPT code browse screen and Quick-MD will search for all records that contain this text.
•
Price updating was added to the edit charge screen when you pull in a CPT
Quick-MD User Manual
Page 12 of 308
code from this screen. To work you must turn it on in properties/Misc. defaults.
(For more information see page 91)
•
Default sig, refills, and dispense was added to the drug record.
(For more information see page 61)
•
During charge entry you can now verify the new patient codes with ranges between
99201 thru 99205 and 99242 thru 99245. This can be turned on in properties/other
defaults. (For more information see page 98)
The check box will read Verify use of new patient cpt codes. If this is on
and one of the above codes is used and there are already entries in this patient’s
ledger you will get a warning.
11/11/04
•
During charge entry you can now have Quick-MD check to see if the cpt code being
Entered is listed in the cpt codes tracking table. If the code is not in the table you will
Get a warning. For this to work you must have the check box in misc. defaults/ other Defaults that reads
“Warn if cpt code is not listed in tracking table checked. (For more information see page 98
This will work on All cpt codes that have the track
cpt code check box checked in the master cpt code Record. (For more information see page 43)
11/11/04
•
Seven new data import codes were added to the medical records module. (For more information on using
templates in the medical records module see page 199)
[CAID#] This will insert the patient Medicaid # into the document.
[PATPHN] This will insert the patient’s home phone #
[FNAM] If this code is found in the document the Ref Phy/ Facility browse screen
will appear and allow you to select an entity and then place the entity name
into the document. If the [FNAM] is found and the operator selects an entity, then the following 4 codes Will
be looked for in the document.
[FADD] This will insert the entities address.
[FCSZ] This will insert the entities city, state, zipcode.
[FPHN] This will insert the entities phone#
[FFAX] This will insert the entities fax#
11/16/04
•
The ability to print address labels for referring physicians was added to the Referring physician’s Table
menu. 11/19/2004
•
A new referring physician report was added to the Quick-MD reports menu. 12/03/2004
• 16 new buttons were added to the managed care window. One at the bottom labeled
Med Records will start the medical records interface. The other 15 are at the end
Of each line and will start the medical records interface with the information carried
From that line to the create other document. Five new commands were added to the templates as listed below:
[MEDSERV] This will pop up a box for the user to enter up to 70 characters to be inserted into the document.
[FROMDATE] & [TODATE] This will insert the from and to date from the line on the managed care form.
[REFNUM] This will insert the precert number from the line.
[DIAGS] This will pop up a box where the user can enter two diagnoses in and they, along with their
description, will be inserted into the document. 12/21/2004
•
A new check box was added for each line in the managed care form. This row of check boxes is labeled “IB”.
This stands for Inbound. This is for clients that are using the managed care module for tracking inbound and
outbound referrals. So the referrals that are inbound can be checked and the outbound will be left
unchecked. 12/21/2004
•
A diagnosis reference table was added to the charge entry screen.01/05/2005
Quick-MD User Manual
Page 13 of 308
•
Accident Time was added to the supplier info screen. This must be set for Medicare Claims if auto or other
accident is set at “Y”. 01/05/2005
•
The payment posting modules will now get the check number from the download of the Ansi 835 module.
Both the Line item and claim posting modules will do this. This was changed since Medicare now puts
multiple checks in the ANSI 835 file. When the payment posting modules see the check number downloaded
form the 835 EOB module the check number field will not be visible, but the check numbers will be placed on
the posted payments in the patient’s ledgers. 01/25/2005
•
Working diagnoses was added to the charge entry screen. 01/16/2005
•
The Multi-View scheduler was rolled out. 02/10/2005
•
A button was added to the provider table screen. “Other #s”. On this new screen you can add 2 ins.
Companies for block 31 and two for block 25 on the paper hcfa 1500 form. If a company is set in any of these
fields the license number set will be put in the appropriate place. 02/15/2005
•
The provider listed on the claim was added to the patient quick posting module.02/16/2005
•
The ability to block billing for an entire claim was added. You can block the primary, secondary, or tertiary
insurance billing. Adding a note anywhere within the claim does this. To block primary the description line of
the note would be BLOCKI, secondary would be BLOCKS and third would be BLOCKA. Once you delete this
note the billing will be picked up. You can add the note from the Charge entry screen by checking the box
“Block billing to primary ins” checkbox. The List Insurance Claims Not Billed report will list the blocked claims
by putting [Blocked] in front of the Insurance Company name. 02/16/2005
•
An adjustment total per provider was added to the line item quick payment posting module. 02/16/2005
•
A promise to pay module was added to the contract button in the patient’s demographics screen. It will all
you set up, up to 24 expected payments. If it is setup, when the operator enters a payment with the “P”
responsibility code in the patient’s ledger or from the patient quick payment module. The system will ask the
operator if it is a promise to pay payment. If the answer is yes it will post the payment in the ledger and also
into the promise to pay module. There are two reports for the P.T.P module. One will list past due payments
and one will list all P.T.P. contracts and there statuses. With the P.T.P. module the entire contract receivable
is still in the patient’s ledger not in the P.T.P module. The P.T.P. module just tracks expected payments and
lets you know if the payments are not received. 02/23/2005
•
A new report option was added to the patient’s ledger print menu. “Query Patients Ledger”. This report has
five options to query with. (1) List only payments (2) List Payments and charges (3) List payments, charges,
and adjustments (4) List only Charges (5) List only notes. 02/25/2005
•
Electronic filing buttons were added to all the ansi electronic filing modules. 03/04/2005
•
A new check box was added to browser defaults in properties. Put service date in left Column of ledger
browse screen. If checked and the line is a charge with the from Date set it will be put in the left column
instead of the ledger date. 03/08/2005
•
The print itemized by date range in the ledger print menu was changed to reflect only totals in the date range
and not totals of the entire ledger. More detailed totals for the date range where added. 03/08/2005
•
In all 3 insurance quick payment posting modules, you may now work in the patients Ledger by pressing
shift/F1 while the cursor is in the claim number field. All functionality works as though you are accessing the
patient’s ledger from the Patient’s file. 03/08/2005 (for more information see page 231)
•
A Jump To button was added to both views schedulers. 03/09/2005 (for more information see page 143)
•
The F11 key in the both views schedulers (apply templet) will now pop up a Window for you to pick a day
templet to apply. For example, with this feature you can apply a templet from one day of the week to another
day of the week. 03/09/2005 (for more information see page 119)
Quick-MD User Manual
Page 14 of 308
•
A standard patient statement was added. It will print a patient statement on plain White paper. To use it
check the box on the patient statements batch billing screen That reads “Standard Statement”. Note this will
have no effect if the file elec. Statements box is also checked. Also, default settings for patient elect. Filing
and standard statements can be set in properties/misc defaults/other defaults so the user will not have to
remember to check either of the boxes. If the standard statement default is checked here, when you print a
patient statement form within the patient’s ledger, the standard statement will be used. The standard
statement looks at only two properties in Quick-MD (1) the number of lines on the page in patient statement
settings. (2) the font size for statements in printer settings. 03/28/2005 (for more information see page 216)
•
You can now print a single address label from the patient’s, referring physician’s and insurance’s browse
screens. This print job is designed to use either Sieko or Dymo label printers. (for more information see page
212)
•
Three new insertion commands where added to the medical records module.
[$PAT] will insert a dollar sign and the patient’s current balance.
[$ALL] will insert a dollar sign and the entire balance of the ledger.
[$INS] will insert a dollar sign and the Ins. Balance. 05/11/05 (for more information see page 199)
•
A new check box was added to the master insurance record screen. “This Is A Medigap Company”. Check
this box if this is a medigap company that medicare will cross the claims over to. 05/17/05 (for more
information see page 55)
•
Two new check boxes were added to Properties/Electronic Remittance Settings. Both of these check boxes
apply to the claim & line item quick payment posting module.
1. Auto reassign secondaries – If this is checked when the electronic remittance is downloaded to one of
the payment posting modules, if there is a secondary insurance setup for the patient then the
reassignment will be set as S.
2. Auto second billing notes on medigap companies – If this is checked when the post button is clicked on
one of the payment posting modules a secondary billing note will be put on the claim if (a) The patient’s
second insurance Company has the box “This is a medigap company checked” in the master insurance
record. (b) The patient’s primary insurance company is Medicare. (c) The reassign code for the claim or
line item is set at S. 05/17/05 (for more information see page 103
•
An Average reimbursement report was added to the Reports menu. 07/12/2005 (for more information see page
272)
•
Promise to pay contract balance was added to the super bill in the multi-view scheduler
•
Effective date of policy was added to the patient’s subscriber secondary and third insurance screens. These
dates, if set, will appear on all Quick payment posting modules. When re-assigning claims to S or A from the
payment posting modules it is the operator’s responsibility to check these dates before re-assigning. When
working inside the patient’s ledgers, where the operator cannot see the effective date, the system will check them
for you when you re-assign a claim. If a date of service on the claim is before the effective date a warning
message will appear. 07/26/05
•
The read ebill report will now automatically recognize what kind of file you are attempting to open and use the
proper reader for the file. So, the read 997 and TA1 options are now gone from the ebill menu. 07/29/05.
•
In properties/misc def/other defs, a data field for mammography certification number was added. If this number is
placed in the system and a 760?? Mammography code is used then the number will be sent in the electronic files
or will be printed in block 32 of a paper claim. 10/20/05
•
A new UPIN number data field was added in the provider records in properties. Be sure you set the UPIN
number on all providers before doing any billing. 11/08/05
Version 4.6
Quick-MD User Manual
Page 15 of 308
•
A new check box was added to the Ref.Phy/Facility record. It has two options
Person or Facility. They will all be Person by default. You must change the
Ones in your table that are non-persons to the facility before any electronic
Filing can be done. (For more information see page 49)
•
A new report was added to the reports menu. “Insurance Ageing Report By Claim” (For More information
see page
•
You can now default the facility where services were rendered field on the
Supplier form. This will work for all new primary Medicare & Champus claims
That are put into the ledgers. To do this, (1) Set up your office in the Ref.Phy/Facility Table (2) Set the field in
Misc.Defaults/Other defaults/ ID number of your office in the facility table.
•
A new menu option “Read E-bill Report” was added to the ANSI E-Billing menu.
When you click on this it will bring up the open file dialog. The dialog will open in
The folder that is set in Properties/Elect. Remit Settings/Path. (You should set this path the same as your
communications software download path.) If a file is selected, the Contents of that file will be placed in the DOP
for viewing or printing.
NOTE: This Works only on asci text files such as the edit report and reject report returned by Medicare.
•
E-Mail address and work phone number was added to the statement screen of the
patient file. The e-mail address is also exported in the Appointment system export
Report. (For more information see page 156)
•
A Pin# can be placed in block 24K for any company. Check the 24K block in the
Ins. Record. (For more information see page 55)
Make sure the PIN# is set in the provider’s tables in the extra numbers
Column or the class column. (For more information see page 65)
•
A license number for facilities can be printed in block 32 by making sure the
Record is marked as a facility and the number is placed in the licenses # data
Field. (For more information see page 49)
•
You can now file BCBC BMS claims in a separate batch with the BCBS electronic
Filing module (Louisiana Only). To do this you must set the ID# of the BMS company in the BC
Electronic settings in properties. After the number is set a “file only BMS claims”
Check box will appear on the electronic filing screen. If you check the box then
Only BMS claims will be picked up. Also, the name of the company in the insurance
Master file MUST BE BMSSIG.
Version 4.5
•
•
•
CPT codes tracking was added. There is a check box in the master CPT record to enable tracking for each CPT
code desired. If this box is checked in the master record, when this code is entered in the patient’s ledger, it will
also make a record of it in the patient’s CPT tracking record. The description will be the description set in the
master CPT record “Tracking Description”. If this is not set then the CPT description will be used.
(For more information see page 43)
A new button has been added to the Patient Demographic Screen that allows you to view and print your tracked
CPT codes.
(For more information see page 192)
Diagnosis description was expanded to 80 chars in the master table, but in the patients diagnosis tables it will
carry in only 40 chars. Also, an inactive check box was added to the master diagnosis file. When checked it will
warn the operator.
(For more information see page 39)
Quick-MD User Manual
Page 16 of 308
•
•
•
•
•
•
•
•
•
•
•
•
•
•
A message code was added to the master CPT code record and will display on the charge entry screen if it is
set. The message code is a pointer to a message in the canned notes file.
(For more information see page 43)
An expected $ reimbursement was added to the fee schedule in the CPT codes. If the expected $ is set and the
flag that turns on the checking feature is set, Quick-MD will tell the operator during payment posting if the
payment is short of what is expected. The check box is in Properties/Misc Defaults/Other defaults.
(For more information see page 44)
Everywhere in the system that addresses the Prior Auth number it has been expanded from 15 to 20 characters.
(For more information see page 190)
A check box to ignore secondary claims was added to the LA electronic Medicaid filing.
The operator was added to all ledger notes.
(For more information see page 162)
The Co-payments amounts were added to the charge entry screen.
(For more information see page 163)
In Q-Schedule, the <F11> key will apply the current template to the day.
(For more information see page 105)
In Q-Schedule, under the “Settings” button a new check box was added, “Apply template to existing days”. If
checked Q-Schedule will automatically apply any new template to all future days as long as no appointments
have been booked on that date.
(For more information see page 105)
The cut & paste will move the red or blocked slots under the appointment and restore the current template to the
cut area of the day.
(For more information see page 108)
The search for next available appointment will now put a date and time in a question box. If the operator clicks no
then the search will continue.
(For more information see page 112)
A new check box called “Stop Book” was added to the patient demographics screen in the lower right hand
corner. If it is checked the enhanced appoint system will block the operator from booking this patient.
The amount of payments for the date of last payments on the balances screen will now have the total of the
payments for that date.
(For more information see page 182)
A new check box was added to “Charge Entry Options” that will allow the system to not add charges to last claim
if the last claim has the “P” responsibility on it.
(For more information see page 80)
A backup path for electronic claims files was added to the Clearing House Electronic settings. All electronic ANSI
files will be backed up to this path instead of to the floppy drive.
You can now filter the ledger to show only claims that patient’s are responsible for. You can filter out all
insurance claims by now hitting <Shift>+<F5A>.
(For more information see page 172)
•
A group code was added to the operator rights screen. This allows you to group users together by a one
character code so that e-mails can be sent to groups of people, such as front desk staff or Billing clerks.
•
A Quick-MD startup monitor resolution was added to properties/misc defaults/ other defaults. If set the system
will change the windows monitor resolution to the selected resolution when Quick-MD is started. When Quick-Md
is exited the resolution will be changed back to what it was before starting Quick-MD.
•
HIPAA notice & Pending insurance balance was added to the Patient Statement
settings in properties. The pending insurance balance is calculated by the following
rules; If the claim has a balance and the “P” responsibility is not on the claim,
then the balance of the claim is summed into the pending Ins. Balance.
•
In Properties/Misc. defaults a new check box was added. Put only balance forward on patient statements. If
checked only a balance forward will appear on the patient statement and not the charges forward and the credits
forward.
•
Third party export was added to the enhanced scheduler. You can now export a file to use with Televox’s
automated appointment calling system.
Quick-MD User Manual
Page 17 of 308
Version 4.4
•
•
•
•
•
•
•
•
•
An additional field that allows you to search by Date of Birth has been added to the patient lookup screen.
(For more information see page 211)
Quick-MD is now integrated with the following Electronic Medical Records packages: Mednotes, Medinotes,
Medamation, SOAPware and Pacific Voice Products.
You can now default the cursor in supply form to the prior Auth#
(For more information see page 80)
A cancel button was added to the patient’s insurance screens.
When pulling a PO# from the managed care module into the supply form the System now checks the date range
to the service date of the charge. When pulling it into an appointment it now checks the date range against the
date Of the appointment.
The operator that created the patient file will be shown in the lower right corner Of the patient demographics
screen. All the patients entered before V4.4 will be Defaulted to operator #1.
You can default the prior Auth# in managed care module to the previous number by pressing the <F1> key.
(For more information see page 190)
Super bill printed checkbox was added to the enhanced appointment system. When checked it will put a $ in
front of patient name.
Last CPT code entered in the patient’s ledger was added to the super bill print. Beginning and ending session
dates was added to the super bill print.
(For more information see page 115)
Version 4.3
•
•
•
•
•
•
•
•
•
•
Historical secondary insurance information was added. To force a use secondary company put the & symbol
in the comment filed followed by the company ID#.
(For more information see page 154)
A new payment posting module was added. It will post payments by line Item and will allow you to use unapplied credits. This module can be used for both patient and insurance payment posting.
(For more information see page 231)
The Paper forms batch billing modules have a check box that will allow you to run a pre-billing report before
printing the paper claims.
(For more information see pages 219,221,221)
The Brief Ageing report can be narrowed to patient responsible balances only.
(For more information see page 256)
The Current Ledger Browse Window can be narrowed to 1 claim by pressing <Shift> + <F2> and entering a
claim number. To see the entire ledger again, enter a zero.
(For more information see page 172)
A check box to default the cursor in the company ID# field of the patient Statement window was added to the
Properties/Misc. Defaults/Other Defaults Screen.
(For more information see page 98)
You can now exclude financial classes on the paper insurance batch billing.
(For more information see page 216)
The check for duplicate patient on the name & SS# will now show all patients that match the name or SS#
and will show their financial class on the duplicate Patient information window.
(For more information see page 150)
Re-Bill un-paid insurance claims module was added to the batch billing menu.
(For more information see page 222)
A new address labels module was added on the reports menu. Before using it the coordinates must be set in
properties. It will allow you to print single tractor feed labels or 1” X 4” labels that come on an 8” X 11” sheet
Of 20 labels.
(For more information see page 255)
Quick-MD User Manual
Page 18 of 308
•
•
•
•
•
•
•
•
•
•
•
•
•
<Shift> + <F4> in the Current Ledger Browse Screen will toggle the ledger to zero & Non-zero balance
claims. (For more information see page 172). A default for this was added to the browser defaults in
properties. (For more information see page 76)
The Search for a existing patient appointment now has buttons to search
30,60,90,180, and year out. (for more information see page 110)
Generation was added to the patient demographics screen. When filled out
The generation will be sent in all electronic claims transmissions. (For more information see page 147)
A new report was added to the report menu. Financial class ageing summary. (for more information see
page 263)
You can now set the default on the new appointment system status code. This
Is done in the settings screen. (for more information see page 114)
Dispense, Sig, and Print without DEA number was added to prescriptions. (for more information see page
208)
Primary, Secondary, and Third Ins. Copay was added to the Inter-Office Message box. (for more information
see page 159)
In the enhanced appointment system. A time range to search for future Appointments was added. (for more
information see page 114)
Default referring Phy. Was added to the provider table. (for more information see page 65)
For all reports that are over 80 columns a landscape check box was added To the report screens.
A new report was added to the Recap menu. It will summarize your Daily recaps for a span of up to two
years. (For more information see page 245)
In the mail merge module the ability to merge just patient or insurance Balances was added. (For more
information see page 253)
F1-See More was added to the referring Phy. Browse screen.
Version 4.2
•
•
•
•
•
•
•
•
•
•
Managed Care Module was added.
(For more information see page 187)
Default area code was added.
(For more information see page 72)
You can now exclude payments & adjustments when filing claims.
(For more information see page 154)
A payment entry screen was added to the charge entry screen. It will allow the Operator to auto apply patient
credits to charges.
(For more information on Un-Applied credits see page 187)
Shift-F3 will make a billing note a regular note. So now you can re-bill
Claims without deleting the billing note and instead turning it into a
Regular note.
(For more information see page172)
Report on last batch billing run and delete billing notes for last batch billing
Run was added to the billing menu.
(For more information see page222)
In misc. defaults a check box was added that will allow the providers name
To print in block 33 along with the office name and address.
(For more information see page98)
TPL number was added when Medicaid is secondary to a private Ins.
(For more information see page 154)
Appointment audit report was added to Q-Schedule.
(For more information see page 112)
Diagnosis codes can be removed from patient receipt.
(For more information see page 98)
Quick-MD User Manual
Page 19 of 308
VERSION 4.1
•
Quick-MD now keeps track of all deleted ledger records except Notes.
There is a report in System Utilities that will allow you to report on
The deleted entries.
(For more information see page 293)
VERSION 4.0
•
The delete billing notes function now gives you the ability to narrow to one Ins. Company.
(For more information see page291)
•
You can now use templates for other documents in the Medical Records Interface.
(For more information see page202)
The balances screen now lists the Referring Physician. That was set on the last claim in the Patient’s ledger.
(For more information see page 182)
You can now exclude financial classes from the Brief Ageing Report, Detailed Ageing Report, and the
Collection Work Report.
(For more information see pages 256, 257, 263)
A Custom Information screen was added to the patient file.
(For more information see page 182)
There is now a check box on the clearing house initial run screen, that if checked will Only pick up claims for
companies that have a clearing house ID# set in the insurance Record.
(For more information see page 227 )
During the charge entry process, Quick-MD will now check to make sure all diagnosis attached to the charge
are set in the patient’s diagnosis table.
(For more information see page 163)
•
•
•
•
•
VERSION 3.9
•
•
•
•
•
•
•
•
•
Inner Office E-Mail was added, you can also e-mail patient notes.
(For more information see page 295)
Recurring Charges & Payments Module was added in System Utilities.
(For more information see page 292)
“Have not visited since date of” was added to patient file query report.
(For more information see page 247)
The ability to narrow recall report to one type of recall was added.
(For more information see page 279)
CPT codes report can now be narrowed to a range of codes.
(For more information see page 268)
Inner-Office E-Mail system was added to Q-Schedule.
(For more information see page 105)
A 4 column appointment listing report was added to Q-Schedule. Check the 4 column listing box in settings
to activate.
(For more information see page 109)
Insurance Table records have a check box to use SS# in block 25 for companies
that want the providers SS# instead of the tax ID# in that block.
(For more information see page 55)
You can now put SS number on super bill in the New Appointment system.
(For more information see page 154)
Quick-MD User Manual
Page 20 of 308
•
•
•
A 2 character Credentials field was added to the provider table.
(For more information see page 65)
You can now add secondary and third billing notes from quick payment posting
Modules ledger browse screens. Add screen to manual
(For more information see page 154)
You can now edit operator & location on the edit screens of charges,
Payments, and adjustments.
(For more information see page 154)
VERSION 3.8
•
•
•
•
•
•
•
•
•
•
•
•
•
•
•
Medical Records Interface
(For more information see page 193)
Phone Messages
(For more information see page 205)
Prescription Information
(For more information see page 208)
Extension for work phone in patient file was added.
(For more information see page 147)
Orphan ledger search utility was added to System Utilities.
(For more information see page 294)
You can block billing to patient for just one claim with the “P” responsibility
On it by adding a note to the claim with BLOCK PATIENT! on the Description line.
(For more information see page 154)
A new report was added (Collections Work Report)
(For more information see page 263)
A check box to default services dates in charge entry screen was added to
Misc. Defaults screen.
(For more information see page 91)
Fax number was added to Ref.Phy. File.
(For more information see page 49)
Guarantor was added to patient file query report on the select by parameters.
(For more information see page 247)
You can now set colors in the appointment reasons by placing
[A],[R],[G],[S],[B], or [Y] at the end of the reason line. The amount of
time to reserve for the appointment can be set by placing {2},{3},[4}
{5}, or {6} at the end of the reason line.
(For more information see page 115)
Patient’s address was added to the Q-Schedule more information screen,
And may be edited from the patient’s name field if the patient ID# is set.
(For more information see page 107)
Search for future appointments was added to Q-Schedule and the Standard Appointment System.
(For more information see page 105)
A check box “Allow user to enter ledgers” was added to operator rights.
(For more information see page 286)
Electronic Remittance now browses the folder set in the path setting for
the remittance file to report or download to payment posting modules.
The download will go into the line item posting module if the checkbox
“Line item posting” is checked in the remittance settings screen in properties.
(For more information see page 103)
VERSION 3.7
•
5 more extra ID#’s added to provider records.
(For more information see page 65)
Quick-MD User Manual
Page 21 of 308
•
•
•
•
•
•
•
•
•
•
•
Insurance class codes added to insurance file & ability to set 10 class ID#’s in
provider record.
(For more information see page 55)
Patient balance aging in reports & billing in based on a new date set in charges, ”Date
patient responsibility is set” . The system auto sets the date when charges are entered
with the “P” responsibility or when you re-assign to the “P”. If the date is not set
then aging is based on the service date.
A new report was added to the enhanced scheduler. List appointments for a period.
(For more information see page 109)
You can now disable the standard appointment system. In properties/Misc.
defaults there is a check box to enable/disable.
(For more information see page 91)
A new report was added to the new appointment system. ”Referring Phy. Report.”
(For more information see page 112)
The Download in the Data Output processor was changed to download the text
File to the path & filename of the word processing path in properties/Misc. Defaults.
(For more information see page 160)
Birthday listing by month was added to Patient File Query report.
(For more information see page 247)
All Recap reports can now be run in ID# or Alpha order.
(For more information see page 242)
Line Item Payment Posting Module was added.
Electronic remittance can be set to download to line item posting.
In electronic remittance properties, the path should now be set
Only to the folder that the remit files are down loaded to and not
Include the file name. When you press the report or download
Button in the remittance module the folder browse dialog will
Appear and you select the appropriate file name.
(For more information see page 103)
VERSION 3.6
•
•
•
•
•
You may have up to 3 additional primary Ins. Companies and Quick-MD can be set
to automatically decide which company to use when filing a claim, or the company
can be indicated on one of the charges of the claim.
(For more information see page 153)
For DME billing you can set the provider’s DME number and define the DME
company to Quick-MD and will place the number in block 33 and the reserved column
(For more information see page 65)
Many reports can now be run by By Date Of Service and also by the ledger date.
(For more information see page 247)
The Mail Merge report has the ability to select by date of birth before and after. It also can be run by
diagnosis code.
(For more information see page 253)
New appointment system added that will book 4 slots per provider
(For more information see page 105)
The mouse wheel will now scroll the time slot screen in Q-Schedule. It will also scroll the Data Output
Processor Screen.
(For more information see page 106 and 160)
VERSION 3.5
•
of the charges.
Appointment system templates for each provider for each day was added.
You must have the new file APTEMP.DAT for this to work. Make sure
Quick-MD User Manual
Page 22 of 308
•
•
this file is put on your system and check the Use Appointment Templates
box in the Misc. Defaults screen in properties.
(For more information see page 119)
There are new check boxes in Misc. Defaults that will stop the provider
Tax Id and Government Provider Ins numbers from printing on receipts
and itemized statements.
(For more information see page 91)
A check box has been added in Misc. Defaults that will stop Invoices priced
at $0.00 or less from billing billed in all Ins billing.
(For more information see page 91)
Version 3.4
•
•
•
•
•
•
•
•
•
•
•
•
•
•
•
•
CPT Codes fee schedule expanded to 25 companies.
(For more information see page 44)
When posting payments in ledgers you can now set ask about write offs.
(For more information see page 91)
Four more colors were added to appointment system’s time slots.
(For more information see page 105)
Cut & Paste appointments with a double click on patient’s name.
(For more information see page 108)
Fixed dollar patient co-percent billing was added.
(For more information see page 183)
A new blocked bills report was added
(For more information see page 281)
A second Medicare company ID can be defined in Insurance ID# table.
(For more information see page 55)
The first 4 diagnosis’s and medical record number can be put on super bill.
(For more information see page 114)
You can set insurance company records inactive.
(For more information see page 55)
Ask about reassignments check box was added to misc. defaults.
(For more information see page 91)
A CPT codes modifier table was added to properties.
(For more information see page 84)
Open patient ledger was added to the File menu. This will take the operator
directly to the patient’s ledger from the look up screen.
(For more information see page 214)
In Miscellaneous Defaults, A check box was added that will display the service date on
the ledger browse screen.
(For more information see page 91)
You can now set a refresh for the appointment screen in Misc. Defaults.
If checked it will refresh the screen about every 10 seconds when a day is open.
(For more information see page 91)
A check box has been added to the insurance company records that will block all
claims for that company from being sent to the clearing house.
(For more information see page 55)
An invoice billing system for companies has been developed that will bill
companies that are setup in the statement box of the patient file. An associated
check box was added to misc. defaults screen to support this new utility.
(For more information see page 91)
Version 3.1 to 3.3
•
Number super bills
(for more information see page 117)
Quick-MD User Manual
Page 23 of 308
•
•
You can type SS in the policy # data field to auto put SS#
(for more information see page 151)
You can type zip code in all city data fields in patient files
(For more information see page 147)
On the super bill you can now define date of last payment and ledger balance.
(For more information see page 115)
Invoice balance on ledger browse screen.
(For more information see page 172)
Two additional sort codes were added for enhanced patient reporting
Electronic patient statements
(For more information see page 216)
Canned Notes has now been added
(For more information see page 289)
A new checkbox in Misc. Defaults will allow you to put a balance forward on receipts
(For more information see page 91)
Each operator now has there own Insurance payment posting file.
Patient payment posting module can pickup any balance & now be used for
Insurance payment posting.
(For more information see page 231)
Each operator now has there own insurance posting file in the insurance posting module.
•
The <F7> key on the appointment screen will print a super bill for 1 patient
•
New ageing report that list balances by insurance companies in alpha order.
(For more information see page 261)
More totals have been added to the patient ledger balance screen.
(For more information see page 182)
You can set default sex, provider, and financial class for patient file creation.
(For more information see page 72)
In operator rights the deletions can be set for each type of ledger entry.
(For more information see page 286)
Check Box in CPT records to set them in-active & warn operator.
(For more information see page 46)
You can set a flag that will make the CPT code appear in front of the description
on charge entry.
(For more information see page 91)
When adding notes to ledger, you can add up to 5 notes at one time.
(For more information see page 162)
Paper insurance batch billing can be done in alpha, ID#, or primary ins. order.
(For more information see page 219, 221, 221)
Automatic dunning notices for over 30,60,90,120 days on patient statements.
(For more information see page 77)
Second office address with check boxes that allow you to use either address
for patient billing and insurance billing.
(For more information see page 63)
Charges can now be excluded to stop the charge from being
billed on the 1500 form or electronically.
(For more information see page 172)
On patient statement batch billing you can enter a date that will stop billing
on all patients that have been billed on or after the entered date.
(For more information see page 216)
•
•
•
•
•
•
•
•
•
•
•
•
•
•
•
•
•
•
•
Quick-MD User Manual
Page 24 of 308
FEATURES, FUNCTIONS AND CONCEPTS
Quick-MD is an extremely powerful and flexible system that can be tailored to match the needs and workflow of any
medical practice. As you work with the program you will find that it is both intuitive and logically laid out. This section
describes some key features, functions and concepts that you should be familiar with before you begin setting up and
using your new system.
A WORD OR TWO ON NAVIGATION
Although Quick-MD is a true windows application and you can use your mouse to navigate menus and make
selections, the system was designed so that you can navigate Quick-MD entirely from the keyboard. This
dramatically speeds up your ability to both enter and retrieve information.
<ENTER> – It is not necessary to use the <TAB> button to move your cursor from field to field when entering
information into Quick-MD’s various screens, although you can certainly still do so if you wish. Quick-MD
allows the use of the <ENTER> button to move from field to field when entering information. This was done to
imitate the Unix character based systems, which do allow for faster data entry than using a mouse to
Navigate windows.
<TAB> - Moves your cursor from field to field when you are entering information into the various screens of
the program.
<SHIFT> + <TAB> - returns cursor to previous field.
<ALT> + <UNDERLINED LETTER> - Many of the menu’s in Quick-MD contain an Underlined letter. Holding down
the <ALT > key and selecting the <UNDERLINED LETTER> performs the function of that button without the user
having to take their hands off the keyboard.
NOTE: Users who learn to use the <ALT> keys will be much faster than those who rely on the mouse.
<HOT KEYS> - The key that is hot has a dotted line around it. The enter key will activate the key that is hot.
Also the up and down, left and right arrow keys on the keyboard will move the hot key in the desired
Direction. Once the desired function key becomes hot, simply press the enter key. This is a very fast way of
utilizing Quick-MD’s features!
<ESC> KEY- There is never a reason to use the X at the top right of each screen. This means abort and you
will lose any changes you have made. If there is not a SAVE or EXIT button then the <ESC> key allows you to
exit windows.
<F12> KEY – Opens the Standard Scheduler from anywhere in the patient’s demographics or ledger and
allow the user to return to his original spot when finished scheduling.
ONLINE HELP
Each screen in Quick-MD will have a button with a red question mark on it; this is a help button. Clicking on a help
button will start a tutorial explaining the uses and concepts of that particular feature. (for more information see page
301)
YELLOW FIELDS
While using Quick-MD you will notice that many fields on the various screens are colored with a yellow background.
Yellow Fields are special fields that allow you to either browse the information from a table <F1> or add information
<F10> directly to that table if it is not yet setup. The two keys that you have to remember to use in the Yellow Fields
are:
<F1> - Allows the user to browse that table to lookup information.
<F10> - Allows user to add to entries directly to any of the four main tables in Quick-MD on the fly. These
tables are the ICDM TABLE (for more information see page 39), CPT CODE TABLE (for more information see
page 43), INSURANCE COMPANIES TABLE (for more information see page 55) , and the REFERRING PHYSICIAN TABLES
(for more information see page 49) ,.
Quick-MD User Manual
Page 25 of 308
RESPONSIBILITY CODES
Quick-MD uses Responsibility Codes to define to the system who is responsible for a claim’s balance.
IMPORTANT: IT IS IMPOSSIBLE TO USE QUICK-MD WITHOUT A THOROUGH UNDERSTANDING OF THE RESPOSIBILTY CODES!
The four responsibility codes are:
I
S
A
P
= Primary Insurance
= Secondary Insurance
= Third Insurance
= Patient Responsibility
A claim, which may have multiple invoices (or line item “charges”), can only have ONE responsibility at a time. Think
of a claim as a charge, or a group of charges, on a 1500 form. Obviously, only one party at a time can be responsible
for this one 1500 form. Once the responsible party has paid their portion of the claim, then you can reassign the
balance to another party. But again, there is only ONE party responsible for the claim at this time. This process of
accepting payments and reassigning responsibility happens as many times as necessary until the claim eventually
either comes to a zero balance or is written off.
Each invoice (or line item charge) carries a responsibility code that was assigned during the CHARGE ENTRY process.
This defines to Quick-MD who is currently responsible for that balance. Remember that it is only the charges on a
claim that determine responsibilities. You can have payments and adjustments from various sources other than the
responsible party, you are only looking at the responsibility codes of the charges to determine who the responsible
party is.
Once the payer (for this original responsibility) has paid and you wish to re-assign the balance to either secondary,
third insurance or the patient, simply place the additional responsibility code to any “one” of the invoices (charges)
within a claim, and the whole claim is then reassigned. All other charges in the claim will inherit the new
responsibility. In other words, you only have to change the responsibility of one of the charges (invoices) within a
claim, to tell the system to bill the next responsible party for the remaining claim balance.
Should the payer pay one or more of the invoices (charges), but deny one or more of the invoices (charges), and you
wish to reassign the ones paid to the next payer and to re-bill the ones denied to the same responsible party, it will
be necessary to start a new claim with the ones to be re-billed. This will allow the responsibility to remain the same
on the new claim and allow you to reassign the ones paid to the new responsibility. This is currently done by going to
the ledger for this patient. When the ledger opens up, it opens to the last claim. Make a note of the last claim number.
Highlight the claim you wish to re-bill (leaving the responsibility the same) and hit F4 to edit. When the edit screen
pops up, simply go to the Claim field and assign it the next available claim number. Change the Invoice number to
Invoice number one. Do this for all invoices that you wish to remain at this responsibility code. Keep in mind they will
all carry the same Claim number, but each one will receive the next available Invoice number.
Additionally, the system will ask for a responsibility code when posting a payment. The responsibility code that
applies to the payer making the payment should be entered at this time. Remember, it is only charges, not payments
or adjustments, that determine the responsibility of the claim as a whole.
FOR LOUISIANA KIDMED USERS ONLY
For clients in La. that wish to file their claims direct to Kid Med you will first have to make application with them and
secure a submitter ID#. You will then go to Properties/Electronic filing/Electronic Ochsner/Kidmed Settings and setup
the submitter id and the file name. You will need to create a directory on either your server drive or the local hard
drive of the machine transmitting the claims called "ebill". Put the following, in the field labeled “Path to
communications directory” under Properties/Electronic filing/Electronic Ochsner/Kidmed Settings,
c:\ebill\H450???.kid. (if you created a folder on your server drive use it’s name in place of c:\ebill)
Next, you will need to create a Kid Med insurance company in the master insurance table. You can do this by going
to tables/Add Insurance Record. Remember the id of the insurance company that you just created, then go to
Quick-MD User Manual
Page 26 of 308
Properties/Insurance Id Numbers, in the field labeled “Your Kid Med ID# From the Insurance File” put in the Kid Med
ID#.
When setting up a patient’s account, the Kid Med insurance company must be defined as the patient’s third
insurance company. Any Kid Med charges entered will need to have the responsibility of ‘A’. After entering a Kid Med
claim, the electronic version of the KM3 form will be displayed, if you need to access the KM3 form after the claim is
entered go to the current ledger, highlight a Kid Med claim, and hit the shift-F8 key combination.
BILLING NOTES
Quick-MD puts a red billing note in the ledger when a claim is billed and shows the user whether it’s a Primary
Insurance (1000), Secondary Insurance (1001), Third (1002) or Patient Billing (1003) note. When Quick-MD is told to
bill a particular Responsibility Code, it runs through all the ledgers checking for claims that have no billing notes on
them.
IT IS VERY IMPORTANT TO UNDERSTAND THIS CONCEPT!
PAYMENT POSTING
ALWAYS post payments and adjustment to the individual claim that you are receiving payment on. All claims
eventually come to a zero balance once payments and adjustments have been appropriately applied. NEVER post
all payments and adjustments to only one claim in a patient’s ledger, as this will leave one claim with a credit balance
and all other claims with balances owed. If you are going to be filling secondary claims electronically to THIN or
Medicare you must post you payments by line item.
LEDGER DATE
All daily recaps use the ledger date and NOT the date of service for reporting. The Ageing Reports will give you the
option of running them either by ledger date or date of service.
DATE FIELDS
You never have to enter the current year in Quick-MD. Leaving any year field blank will automatically cause the
system to enter the current year. Additionally, you never have to enter today’s date in Quick-MD. Simply type a “9” in
any date field to have the system place today’s date in the field for you.
Quick-MD User Manual
Page 27 of 308
QUICK-REFERENCE – A TYPICAL DAY IN THE OFFICE
This Quick-Reference walks you through the various features of Quick-MD that would be used over the course of a
typical day in the office.
SCHEDULING QUICK-REFERENCE – USING Q-SCHEDULE
Q-Schedule is a separate, but integrated, application that is started from its own icon. When open, this
Scheduler operates on a separate tab on the tool bar, which allows for access to it while working anywhere in
Quick-MD or any other program. (for detailed information on using Q-Schedule see page 105)
FUNCTION KEYS USED IN Q-SCHEDULE
<F1> or <Double-Click> – Opens the Patient Booking Screen
<F2> - View appointment information for the selected time slot.
<F3> - make the selected time slot Red
<F4> - make the selected time slot Green
<F5> - make the selected time slot Blue
<F6> - make the selected time slot Yellow
<F7> - make the selected time slot Silver
<F8> - print a Super Bill for the selected time slot
<F9> - block entire day
SCHEDULING AN APPOINTMENT
(for detailed information about Scheduling an Appointment see page 107)
1. Select the Provider you wish to book an appointment for to display their appointment book(s)
2. Use the Calendar to select the day you wish to book the appointment on. Then choose a
time slot from the available appointment books.
NOTE: You can also Search for next available appointment by hitting the NEXT. AV. Button on
the menu bar.
3. Hit <F1> or <DOUBLE CLICK> to open the Booking Screen.
4. Enter the Patient’s Name for new patients, or if you are booking for an existing patient hit
<F1> to browse for the appropriate patient.
5. Complete Booking Screen Information
6. Hit <OK> to schedule the appointment.
DELETING AN APPOINTMENT
1.
2.
3.
4.
Select the Appointment you wish to delete.
Hit <F1> or <DOUBLE CLICK> to open the Booking Screen.
Hit the <CANCEL> button.
Quick-MD will ask you if you want to delete this appointment, select <Yes>.
MOVING AN APPOINTMENT
1.
2.
3.
4.
5.
6.
7.
8.
Select the Appointment you wish to move.
Hit <F1> or <DOUBLE CLICK> to open the Booking Screen.
Hit the <CUT> button.
Quick-MD will ask you if you want to cut this appointment, select <Yes>.
Select the time slot you wish to move the appointment to.
Hit <F1> or <DOUBLE CLICK> to open the Booking Screen.
Hit the <PASTE> button.
Quick-MD will ask you if you want to paste this appointment, select <Yes>.
VERIFYING APPOINTMENTS
You can easily see which appointments have been verified or not from within the scheduler. Verified
appointments will have an * before the name of the patient. To mark an appointment as verified, follow
these steps.
1. Select the Appointment you wish to verify.
2. Hit <F1> or <DOUBLE CLICK> to open the Booking Screen.
Quick-MD User Manual
Page 28 of 308
3. Click the button next to the Verified Field.
4. This appointment will now be preceded by an * when viewed in the scheduler.
PRINTING SUPER BILLS
Super Bills can be printed in batches by a date or individually as needed.
•
•
To print a batch of Super Bills for an entire day, go to the REPORTS menu and select PRINT SUPER
BILLS. Enter the date you wish to print Super Bills for.
To print an individual Super Bill, put your cursor in the timeslot of the appointment for which you
want the Super Bill printed and hit the <F8> key.
REPORTS
The reports menu allows you to gather information about your appointments and other related material.
Appointment Listing – prints an appointment listing for a specific day.
Appointment Listing for a period – prints an appointment listing for a specified date range.
Print Super Bills – Prints a batch of Super Bills for all patients scheduled for a specified
date.
Search for Existing Appointment – Queries the scheduler for an existing appointment.
Query Appointments – Allows you to search for appointments based on specified criteria
Referring Physician Report – prints a report of who referred your patients to you by a
specified date range
Appointment Audit Report – generates a report by a specified date that shows which
patients showed up for their appointments and whether or not charges where entered for this
patient on that day.
SCHEDULING QUICK-REFERENCE – USING MULTI-VIEW SCHEDULER
The Multi-View Scheduler is a separate, but integrated, application that is started from its own icon. When open, this
Multi-View Scheduler operates on a separate tab on the tool bar, which allows for access to it while working
anywhere in Quick-MD or any other program. (for detailed information on using the Multi-view Scheduler see page
124)
FUNCTION KEYS USED IN THE MULTI-VIEW SCHEDULER
<F2> - View appointment information for the selected time slot.
<F3> - Make the selected time slot Red.
<F8> - Print a Super Bill for the selected time slot.
<F9> - Block fields for a time period.
<F11> - Apply a template to the current day.
SCHEDULING AN APPOINTMENT
(for detailed information about scheduling an Appointment see page 124)
1. Use the calendar to select the day you wish to book the appointment on. Then choose a time slot
from the available appointment books. Note: You can also search for the next available appointment
by hitting the NEXT AVAILABLE button at the top of the form.
2. <DOUBLE CLICK> to open the booking screen.
3. Enter the Patient’s name for new patients, or if you are booking for an existing patient hit <F1> to
browse for the appropriate patient.
4. Complete booking screen information.
5. Hit <OK> to schedule the appointment.
DELETING AN APPOINTMENT
1.
2.
3.
4.
Select the Appointment you wish to delete
<DOUBLE CLICK> to open the Booking Screen.
Hit the <CANCEL> button.
Quick-MD will ask you if you want to delete this appointment, select <YES>.
MOVING AN
APPOINTMENT
1. Select the appointment you wish to move.
Quick-MD User Manual
Page 29 of 308
2.
3.
4.
5.
6.
7.
8.
<DOUBLE CLICK> to open the booking screen
Hit the <CUT> Button.
Quick-MD will ask you if you want to cut this appointment, select <Yes>
Select the slot you wish to move the appointment to.
<DOUBLE CLICK> to open the booking screen
Hit the <PASTE>button
Quick-MD will ask you if you want to paste this appointment, select <Yes>.
VERIFYING APPOINTMENTS
You can easily see which appointments have been verified or not from within the scheduler. Verified
appointments will have an * before the name of the patient. To mark an appointment as verified, follow these
steps.
1.
2.
3.
4.
Select the Appointment you wish to verify.
<DOUBLE CLICK> to open the booking screen.
Click the button next to the verified field.
This appointment will now be preceded by an * when viewed in the scheduler.
WAITING LIST
ADDING A PATIENT TO THE WAITING LIST
1. <DOUBLE CLICK> on the time slot that you want to book this appointment for.
2. Add the information to the booking screen.
3. Click on the <PUT ON W.LIST> button.
4. The system will ask you if you want to add this patient to the waiting list. Click <YES>.
5. Click <OK> on the waiting list screen.
6. Click <OK> on the Booking Screen.
BOOKING A PATIENT FROM THE WAITING LIST
1. <DOUBLE CLICK> on the time slot where you want to book the appointment.
2. On the booking screen click on the button <WAITING LIST>
3. Click the <BK> button next to the appointment that you want to book.
4. Confirm the dialog boxes by clicking <OK> and <Yes>
5. Click <OK> on the booking screen.
PRINTING SUPER BILLS
Super bills can be printed in batches by a date or individually as needed.
• To print a batch of super bills for an entire day, go to the REPORTS menu and select BATCH
PRINT SUPER BILLS. Enter the date you wish to print super bills for.
• To print an individual super bill, put your cursor in the timeslot of the appointment for which
you want the super bill printed and hit the <F8> key.
REPORTS
The reports menu allows you to gather information about your appointments and other related material.
List Appointments for a day – Prints an appointment listing for a specific day.
List appointments Combined – Lets you print a daily appointment listing for multiple providers.
Batch Print Super Bills – Prints a batch of super bills for all patients scheduled for a specified date.
Query appointment status codes – Allows you to search for appointments using their status code.
Referring Physician Report – prints a report of who referred your patients to you by a specified
date range.
Appointment Audit Report – generates a report by a specified date that show which patients
showed up for their appointments and whether or not charges where entered for this patient on that
day.
Third Party Export – Export you appointment listing for a day to be used by software provided by a
third party.
PATIENT QUICK-REFERENCE - WORKING WITH PATIENTS
(for detailed information about Working with Patients see page 124)
Quick-MD User Manual
Page 30 of 308
ENTERING NEW PATIENTS
Getting there:
From Quick-MD’s front screen click the <File> menu, then select <Add New Patient File>. Or from the
Quick-MD front screen, click the
icon.
Once the Patient Demographic screen appears, you can begin to enter the patient’s information. Remember
that the <Enter> key allows you to move from field to field. Once the <Save> button has been clicked, the
[Primary Insurance Button] will become activated so you can move right on to setting up the patients
insurance.
LOOKING UP PATIENTS
Getting there:
From Quick-MD’s front screen click the <File> menu, then select <Lookup Patient>. Or from the QuickMD front screen, click the
icon.
Once the “Patient Browse Screen” appears, you can search by ID, SS#, Medical Record#, Last Name or first
name. You can also search by a partial first name by entering as many characters of the name as you know
into the “Medical Records” field.
ENTERING CHARGES
(for detailed information on Entering Charges see page 163)
Charges are either entered as each patient leaves the office (checking out patients) or are done in batches at
a later time. Either way, they are done in the same way, via the Charge Entry Screen.
Getting There:
In any Patient Demographic Screen, click on the <Ledger> button and then click either <Enter
Charges New Claim>, < Enter Charges Patient Claim> or < Enter Charges Last Claim>.
You can also get to this screen from the File Menu by selecting <File> then < Fast Charge Entry>.
The CHARGE ENTRY SCREEN is a multi-screen form that flows in such a manner that you can easily enter all the
necessary information needed to complete a HCFA 1500 form in the most efficient manner possible. The
flow of using the charge entry screen is as follows:
1.
2.
3.
4.
5.
Enter CPT Code for charge
Enter up to 4 diagnosis codes for the charge
Provide Other Information pertaining to the charge
Repeat above steps for each new charge to be added to claim
Once all charges are entered, enter the necessary supply record information.
WORKING IN THE PATIENT’S LEDGER
(for detailed information about the Patient’s Ledger see page 172)
FUNCTION KEYS USED IN THE PATIENT’S LEDGER
<F1> - PAY –
Used to apply a payment to the highlighted “charge” in the ledger
<F2>- ADJ –
Used to apply a adjustment to the highlighted “charge” in the ledger
<F3> - NOTE – Used to post a note to the highlighted claim
<F4> - EDIT – Used to Edit the highlighted charge, payment, adjustment, or note
<F5> - REASSIGN – Used to apply a reassign to the highlighted claim in the ledger
<F6> - CLMBAL – Will populate the Invoice and Total fields at the bottom of the ledger with the
balances for the highlighted claim.
Quick-MD User Manual
Page 31 of 308
<F7> - LEDBAL - Will populate the Ins$ and Pat$ fields at the bottom of the ledger with the insurance
and patient balances for this patient.
<F8> - SUPPLY – Brings up the Supplier Screen to view the supplier information for this claim.
<F9> - PRINTS - Allows you to print an Individual HCFA form for this claim. Also allows you to print a
patient statement and a itemized claim to be used as a patient receipt.
<F10> - DELETE – deletes the highlighted entry
<F11> - EXCLUDE - Used to exclude a charge from being included when re-billing a claim
<SHIFT> + <F3> - CONVERT NOTE- Used to convert a red billing note to a regular note so that the claim
can be re-billed while retaining an audit trail of previous activity.
<SHIFT> + <F2> - BROWSE 1 CLAIM- Used to filter the ledger to display only the desired claim
<SHIFT> + <F4> - TOGGLE ZERO CLAIMS- Used to hide all claims with a zero balance
<SHIFT> + <F5> - ONLY P CLAIMS- Used to show only patient responsible claims.
DELETING PATIENTS
Getting there:
From Quick-MD’s front screen click the <File> menu, then select <Delete Patient File>.
RECAPPING TRANSACTIONS QUICK-REFERENCE - DAILY RECAPS
(for detailed information about Recapping Transactions see page 242)
All daily totals are reported via the <Recaps> menu located on Quick-MD’s front screen. You can select a “Daily
Recap” which reports all charges, adjustments and payments for a day in one report or run reports on just,
charges, adjustments or payments for a day.
Each of these reports can be narrowed down by “operator”.
(For more information see “Recapping Transactions for a Day” on page 242)
BILLING QUICK-REFERENCE
(for detailed information about Billing in Quick-MD see page 216)
HOW QUICK-MD BILLS
Quick-MD will go through all patient ledgers and look for claims with balances owed for the chosen
responsibility code. If there is no red billing note on the claim and the claim has a balance owed, then it will
be picked up for billing.
Whenever an insurance company or the patient is billed, Quick-MD will place a notation entry in the patient’s
ledger saying who was billed, when they were billed, and the amount of the bill. These billing notations also
have their own invoice numbers. A primary insurance billing notation will have an invoice number of 1000, a
secondary insurance billing notation will have an invoice number of 1001, a third insurance billing notation
will have an invoice number of 1002, and a patient billing notation will have an invoice number of 1003. Do
Quick-MD User Manual
Page 32 of 308
not delete these invoices. Quick-MD uses them to determine if the responsible parties listed on the claim
have been billed.
Quick-MD will consider the claim paid when there is a zero balance on the claim. All claims must reach a
zero balance at some time, whether by payment or write off, so post all payments and adjustments to the
claim they are intended to pay or adjust.
BATCH BILLING PAPER CLAIMS
(for detailed information about Batch Billing Paper Claims see page 216)
All batch billing of paper claims is done via the “Billing” Menu located on Quick-MD’s front screen. From here
you can batch bill patient statements both on paper and electronically. You can also batch bill paper claims
for Primary, Secondary and Third Insurance Companies. You can also re-bill the last batch printed and
delete billing notes for the last batch printed.
BATCH BILLING ELECTRONIC CLAIMS
(for detailed information about Batch Billing Electronic Claims see page 223)
All batch billing of electronic claims is done via the “Ebill” Menu located on Quick-MD’s front screen. The
procedure is:
1. Select the company you wish to bill for.
2. Select <Initial Run>.
3. Once the report has been brought to the screen, click the <End> button to scroll to the bottom of the
report. If the report says “**** NO ERRORS FOUND - BATCH READY FOR TRANSMISSION ****”
then proceed to step 7, if the report says **** ERRORS FOUND - BATCH NOT READY FOR
TRANSMISSION **** then proceed on to step 4.
4. Click Repeat Billing Run, this will only pull out the claims with errors.
5. Print the error report and correct each of the problems.
6. Continue re-running the Repeat Initial Run until the report is empty, meaning there are no more
errors in the batch.
7. Click <Live Billing Run>.
8. If you want to remove a claim from this billing batch, click <Remove Claim from Run>.
9. If you wish to save a backup of this billing batch, click <Copy Last Run to Disk>.
10. To read the response file from your last transmission, click <Read Response File>.
PRINTING AN INDIVIDUAL HCFA 1500 FORM
1.
2.
3.
4.
Open the desired Patient’s Ledger.
Select the claim you wish to print the HCFA for.
Hit <F9> to bring up the print window
Choose the appropriate option you wish to print.
PAYMENTS QUICK-REFERENCE – POSTING PAYMENTS
(for detailed information about Posting Payments see page 231)
Payments can be posted in two ways in Quick-MD. You can post payments directly to charges in the patient’s Ledger
or you can use the Payment Posting Modules.
LEDGER
To post a payment in the ledger, open the ledger and select the charge that you wish to apply the payment to. Hit
the <F1> key to post a payment.
POSTING MODULES
Payments can also be posted through any of the four Patient Posting Modules in Quick-MD. Each is described
briefly below:
Quick-MD User Manual
Page 33 of 308
Patient/Insurance Payments (By Claim) – Use the feature to post either Patient or Insurance Payments by
Claim. Used to post Payments to ONE patient at a time. Allows you to quickly apply Un-applied credits to a
patients claims.
Insurance Payments (By Claim) – Use the feature to post either Patient or Insurance Payments by Claim. Used
to post Payments to more than one patient at a time.
Insurance Payments (By Invoice) – Use the feature to post either Patient or Insurance Payments by Invoice.
Used to post Payments to more than one patient at a time.
Patient/Insurance Payments (By Invoice/UC) - Use the feature to post either Patient or Insurance Payments
by Invoice. Used to post Payments to more than one patient at a time. If you are posting large EOB’s, this is the
module you want to use. This module also allows you to apply Un-applied credits to patient’s claims.
Quick-MD User Manual
Page 34 of 308
IMPLEMENTING QUICK-MD FOR THE FIRST TIME
There are three different and distinct ways to implement a new Practice Management System.
1. The recommended way to convert from your existing system to Quick-MD, is to simply install Quick-MD on
your network and run parallel. Meaning on a specified day, all patients from that point forward are entered
as they come in and billed out of the new system. All patients prior to that specified date are billed out of the
old system. As payments are received they are posted against the charge in the system they were billed out
of. In a short time, the old system will wind down, usually 90 to 120 days. This also gives the office the
opportunity to be sure all of the patient information is correct. By far the least expensive and less stressful
way of implementing a new practice management system!
2. In some situations, a data or partial data conversion might be possible. This will all depend on whether or
not the information out of the old system is available in an ASCII format. There are three things to keep in
mind when considering a data conversion. A.) If there is trash data in your old system, there will trash in your
new one also, as all of the bad comes over with the good during a conversion. B.) Never expect to be able to
convert ledger history-only balance forwards. Therefore the old system has to stay up to be able to access
history on claims that need refilling. C.) It is an additional expense to the office.
3. The third way is to do a manual balance forward set-up. This would also require the old system to stay up
so the old claims would be accessible.
Below is an outline of the recommended steps for implementing Quick-MD.
1. Install Quick-MD
(for more information see INSTALLING QUICK-MD on page 37)
2. Go to System Utilities/Set Operator rights-set up all users of the system, issue ID#’s and Passwords and
define their degrees of operator rights.
(for more information see USER RIGHTS on page 286)
3. Go to Properties and start with Office Data, then work your way down the menu populating all of the tables
and fields that are applicable. In Miscellaneous Defaults there are many features that may be turned on
and off to tweak the system to your way of doing business.
(for more information see CUSTOMIZING QUICK-MD on page 63)
4. Go to Tables on the main screen of Quick-MD, and enter your Cpt codes, Diagnosis Codes, Insurance
companies, and Referring Physicians.
(for more information see Configuring Quick-MD on page 38)
You are now ready to start entering Patients and their charges!
If you have decided to use the manual balance forward approach, you will need to:
Gather information on all patients that have an account balance.
• Create a patient file for each of those patients, leaving the balances off at this point.
For each patient file:
• Fill in the general information
• Set up the patient's payment responsible parties (Primary Ins., Secondary Ins., Third Ins., and Patient/Other)
• Insert any standing diagnoses into the patient's diagnosis table. During the process of creating the patient
files, you will need to set up a file for any new patients that come in and continue to use your old system in
parallel with the new system.
After all patient files with a balance are set up, set up two new codes in your CPT code file, a BALANCE FORWARD
INSURANCE and BALANCE FORWARD PATIENT code. The balance forward insurance code MUST HAVE an inhouse code and CPT number of "BFI", the balance forward patient code MUST HAVE an in house code and CPT
number of "BFP".
Quick-MD User Manual
Page 35 of 308
After your two balance forward CPT codes are set up in the master CPT code table, start entering the balances for
each patient into Quick-MD. The portion of the balance that is insurance will be entered as a charge with the inhouse CPT code of "BFI". The portion of the balance that is patient will be entered as a charge with the in-house
code of "BFP". If a patient has an insurance and a patient balance, DO NOT enter the BFI and BFP codes on the
same claim. Enter the BFI portion and save the charge, then enter the BFP portion and save the charge. In other
words the BFI portion will be claim number one and the BFP portion will be claim number two.
IMPORTANT: Both balance forward entries must be on a claim of their own with no other charges on the claim.
When you are at this phase of implementation it is important that you get the balances in as quickly as possible
because at this time you will also need to enter all charges, payments, etc. into Quick-MD that the practice incurs. In
other words, once the patient's balance forward is entered into Quick-MD then ALL charges, payments, adjustments
and billings must be done in Quick-MD to keep the patient balance and billing statuses accurate. Payments,
adjustments, etc. that apply to the balance forward charges are posted to the balance forward claims.
When all patients and their balances forwards are in Quick-MD you will then have Quick-MD produce an aging report
by patient and compare Quick-MD balances with your information from outside Quick-MD to make sure all your
transfers are accurate. Correct any mistakes you may find and the startup is complete. Run your pre-existing system
parallel with the new system until you are comfortable with dropping the old system. When payments are received
for charges that were brought across as balance forwards, post them to the charges in the old system as well to the
balance forward in the new system. In a short amount of time the old system will wind down. Remember that you will
still have to refer to your old system for detail and information on charges, payments, etc. that happened before the
implementation of the new system.
Quick-MD User Manual
Page 36 of 308
INSTALLING QUICK-MD
Installing Quick-MD on the Server
1. Create a folder named “qmed” and share it out on the network.
2. Copy the contents of your installation CD into this folder via the DOS prompt.
3. Create a subdirectory under this folder and name it “meddocs”
INSTALLING QUICK-MD ON THE CLIENTS
Create a new Short Cut that points to quickmd.exe in the shared qmed folder on the server.
INSTALLING Q-SCHEDULE ON THE CLIENTS
Create a new Short Cut that points to newaps.exe in the shared qmed folder on the server.
INSTALLING MULTI-VIEW SCHEDULER ON THE CLIENTS
Create a new Short Cut that points to book.exe in the shared qmed folder on the server.
Note: You can only use the Q-Schedule or the Multi-View Scheduler, not both, so you will need to
decide which one fits your needs. Once you have decide on the one that you want, make sure that all of
the client’s short cuts point to the correct executable.
SETTING UP MOBILE X-RAY
1. Set up the Business in the provider table.
a. Go to the PROPERTIES Menu.
b. Then, the PROVIDER TABLE.
c. Choose the provider button on the far right. This should be provider number 26.
d. Enter the MEDICAID and MEDICARE numbers.
2. Check the Mobile Xray box.
a. Go to the PROPERTIES menu.
b. Then, “MISCELLANEOUS DEFAULT SETTINGS”
c. Next, “OTHER DEFAULTS”
d. Finally, check the “FILE CLAIMS FOR MOBILE XRAY.” Box.
3. Set the Medicare number in the Referring Physician / Facility table in the MEDICARE UPIN# field.
4. Set the Medicaid number in the Referring Physician / Facility table in the MEDICAID# field.
Quick-MD User Manual
Page 37 of 308
CONFIGURING QUICK-MD - THE TABLES MENU
Use this feature to populate and maintain the four main tables utilized by Quick-MD - ICDM CODES, CPT CODES,
REFERRING PHYSICIANS and INSURANCE RECORDS.
Note: When configuring Quick-MD for the first time, you will want to populate the properties first, before
moving on to the tables. In particular, you need to have you “Place Of Service” and “Type Of Service”
codes set before you can enter your CPT codes.
Getting there:
At “QUICK-MD’S MAIN MENU:” Select TABLES
Quick-MD User Manual
Page 38 of 308
ICDM (DIAGNOSIS) CODES
This table maintains all of the Diagnosis Codes that your practice deals with. Use this feature to add, edit and
delete your Diagnosis Codes.
Add Diagnosis Record
OFFICE CODE – Enter an Office code for the new record. In most instances you would use the same code as
the ICDM Code you are setting up. But you can make this any code you wish. This allows the practice to
refer to diagnoses records by any code they wish.
ICDM CODE – Enter an ICDM code for the new record.
DESCRIPTION – Enter a description for the new record.
Edit Diagnosis Record
Use this feature to edit an existing ICDM code.
Enter one of the four pieces of information above and click <BROWSE>.
Quick-MD User Manual
Page 39 of 308
Select appropriate diagnosis record and hit <ENTER> or double click on record.
Make corrections to record and <OK>.
Deleting Diagnosis Record
Enter one of the four pieces of information above and click <BROWSE>.
Quick-MD User Manual
Page 40 of 308
Choose a diagnosis record and hit <ENTER> or double click on the record.
WARNING: Do not delete a record if it has been used in a patient file. This delete function is primarily used
during the initial setup of the tables.
This screen confirms deletion of record. If you are sure you want to delete this record, choose <YES>.
Otherwise, choose <NO>.
NOTE: Once deleted, a record cannot be recovered. The diagnosis would have to be added through the
ADD function.
Print Report
Select Print Order and then click <OK>.
Quick-MD User Manual
Page 41 of 308
From the DATA OUTPUT PROCESSOR, you can either download or print the report.
Quick-MD User Manual
Page 42 of 308
CPT CODES
This table maintains all of the CPT Codes that your practice deals with. Use this feature to add, edit and delete
your CPT Codes.
Adding CPT Code Record
OFFICE CODE – Enter your internal office code for this new CPT record. In most instances you would use the
same code as the CPT code you are creating. But for added flexibility, Quick-MD allows you to enter your
own internal code here. This gives you the ability to set the same CPT code up in various ways with different
parameters (ie. different Place of Service, Type of Service and the Amount of Charges-with or without
modifiers pre-attached. You may group CPTs by categories or bundle them together). This means that you
can tailor CPT Codes to mirror the different scenarios that your practice engages in. Using Office Codes
relieves the burden of having to modify these CPT codes at the time of charge entry, which reduces errors
and boosts productivity.
CPT CODE – Enter the CPT code for this new CPT record. You can attach up to three Modifiers to your CPT
codes by simply adding them to the end of the CPT code. Note that there must be a dash between the cpt
code and the modifier. For example 71020-TC. Quick-MD picks up the modifiers by recognizing the dash.
Another example with two modifiers would be 12345-TC-AA and you can add up to three modifiers to your
CPT record. 12345-TC-AA-XX
DESCRIPTION – Enter the description for this new CPT record.
PLACE OF SERVICE – Choose the place of service where this new CPT record will be performed.
Quick-MD User Manual
Page 43 of 308
NOTE: The PLACE OF SERVICE TABLE (for more information see page 82) should include all places the
provider performs services at.
TYPE OF SERVICE – Choose the type of service that this new CPT record relates to.
NOTE: This TYPE OF SERVICE (for more information see page 83) should include all Types of services
the providers offers.
AMOUNT OF CHARGE – Enter your normal and customary charge for this new CPT record.
MEDICARE ALLOWABLE – Enter the amount Medicare will reimburse for this new CPT record.
MEDICARE WRITE OFF – Enter the difference between the amount of your charge and the total payments from
Medicare and the patient for this CPT record.
MEDICAID WRITE OFF – Enter the difference between the amount of your charge and the total payments from
Medicaid and the patient for this CPT record.
CHAMPUS WRITE OFF – Enter the difference between the amount of your charge and the total payments from
Champus and the patient for this CPT record.
CHECK TO MAKE IN-ACTIVE – If checked, this will make the record inactive and you will be prompted that this
record is inactive when generating charges. However, you are still allowed to use this record when
generating charges.
SEX – Put appropriate sex if CPT is gender specific.
STANDARD UNITS – Enter number of units if the CPT record has a standard number of units associated with it.
GL CODE – This field allows for an external GL code to be entered for use in preparing financial statements.
REQUIRE REFERRING PHY ON MEDICARE CLAIMS – If checked, this will require that a referring physician is listed on
all Medicare Claims.
MESSAGE CODE: – Hitting <F1> here allows you to attach a message from your canned notes to this CPT
code. (For more information on Canned Notes see page 289) The attached messages will appear in the
charge entry screen whenever this code is used. (For more information see page 163)
LINK CODES – this feature allows you to link this code to other CPT records. Use this feature when one CPT
code is always used in conjunction with one or more other codes. Hitting F1 allows you to browse your CPT
records to pull the codes you wish to link into these fields.
TRACK THIS CPT CODE – Check this box to have Quick-MD track this code each time it is used on a patient’s
charge. You can easily access all the codes you’ve tracked from within the Patient’s Demographic Screen.
(For more information see page 192)
DESCRIPTION – Used only if you are tracking this CPT Code. This allows you to put your own description into
the CPT tracking table. If you leave this blank, the normal CPT Code description will be used.
FEE SCHEDULE
This button allows you to link this CPT record with up to 25 fee schedules. These fee schedules can then be
linked to insurance companies and it is possible to do automatic write-offs upon charge entry. If you want
Quick-MD to automatically put the adjustment in the ledger at the same time of entering the charges, then
turn the feature “do automatic write-offs when entering charges” on in MISC. Defaults as well as define
to the system the ID#’s for your adjustment codes.
These are also listed at the top in MISC Defaults. (for more information see page 91)
Quick-MD User Manual
Page 44 of 308
To set up a fee schedule, pull in the id# of the insurance company, enter your normal and customary
charge, subtract the negotiated fee from your normal charge, and enter that number into the write-off field.
See note below.
NOTE: This is typically used when an insurance company reimburses on a schedule that is not related to
the Medicare fee schedule. If the fee schedule is a percentage (%) of Medicare allowable, this fee
schedule will be set in that insurance record. (Note: Medicare allowable has to be set in the CPT
records for this to work.) It is also possible to tell the system to use a particular fee schedule that is
already setup, in the insurance record, for that payer. See Insurances in Main Tables
ID# - Allows for the input of the insurance record that this fee schedule will be tied to. As always, this yellow
field allows you to browse the Insurance Table by hitting <F1> and then pulling in the proper selection.
COMPANY NAME – this field will automatically be filled when the insurance company ID# is entered.
$ BILL – Enter the normal and customary charge amount for this CPT record.
$WRITE OFF – Enter the difference between the normal and customary charge and the fee schedule-this is
the write-off amount. It is possible to do automatic write-offs upon charge entry, if so desired. Turn the
feature “do automatic write-offs when entering charges” on in MISC. Defaults as well as define to the
system the ID#’s for your adjustment codes. These are also listed at the top in MISC Defaults.
NOTE: This is typically used when an insurance company reimburses on a schedule that is not related to
the Medicare fee schedule. If the fee schedule is tied to a percentage (%) of Medicare allowable, this
fee schedule will be set in the insurance record (note: Medicare allowable will have to be set in each
CPT record.). It is also possible to tell the system to use a particular fee schedule that is already setup,
in the insurance record for that payer. See Insurances in Main Tables
Quick-MD User Manual
Page 45 of 308
$ EXPECTED – Enter your negotiated price that you are expecting the insurance company to reimburse you. QuickMD will warn you at the time you are posting payments if the amount is different from your negotiated price.
NOTE: In order for this to work you must check “Compare Ins. Payments to Expected $ Amount” in
<Properties> - <Misc Defaults> - <Other Defaults>. (For more information see page 98)
When done, click <OK> to save.
Edit CPT Code Record
Enter one of the four pieces of information above and click <BROWSE>.
Choose CPT code record and hit <ENTER> or double click on a record.
Quick-MD User Manual
Page 46 of 308
Make any corrections you wish and select <OK>.
Delete CPT Code Record
Enter one of the four pieces of information above and click <BROWSE>.
Choose a CPT code record and hit <ENTER> or double click on the record.
This screen confirms deletion of the record. If you are sure you want to delete this record, choose <YES>.
Otherwise, choose <NO>.
NOTE: Once deleted, a record cannot be recovered. You would have to reenter the CPT code through the
ADD function.
IMPORTANT: DO NOT DELETE A RECORD IF IT HAS BEEN USED IN A PATIENT FILE. THE DELETE
FUNCTION IS PRIMARILY USED DURING INITIAL SETUP OF THE TABLES.
Print Report
Quick-MD User Manual
Page 47 of 308
Select Print Order, Report Enter, or range of codes, and <OK>.
From the DATA OUTPUT PROCESSOR, you can either download or print the report.
Quick-MD User Manual
Page 48 of 308
REFERRING PHYSICIANS
This table maintains all of the referring physicians that your practice deals with. Use this feature to add, edit and
delete your referring physician records.
NOTE: This table is used for both referring physicians, the facility where the service is rendered and
pharmacies.
Adding Referring Record
F. NAME – Enter physician’s first name
L. NAME – Enter physician’s last name
MIDDLE – Enter physician’s middle initial
ADDRESS – Enter physician’s address on both lines, if needed
CITY – Enter physician’s city
NOTE: zip code records do not work in this area
STATE – Enter physician’s state
ZIP – Enter physician’s zip code
PHONE – Enter physician’s phone number
MEDICARE PIN# – Enter physician’s Medicare Pin#
MEDICAID# – Enter physician’s Medicaid #
LICENSE# – Enter license number if this record is for a FACILITY. If not a facility, leave blank.
Quick-MD User Manual
Page 49 of 308
HOSPITAL ID# – This field is used only by labs importing data from a hospital and is not applicable for
physicians.
TYPE OF RECORD – This field defines whether this record is a person or a facility. All new records are marked
as a person by default. If this record is to be a facility, then check the facility box. When the record is a
facility, you must enter the information in the last name field only. Do not put anything in the first name
field!
<OK> – saves the record.
<CANCEL> – Exits without saving changes.
NOTE: When adding a referring facility record, facility name is entered in the L. Name field.
Edit Referring Record
Enter last name and click <BROWSE>.
Choose record and hit <ENTER> or double click on record.
Make corrections to record and <OK>.
Quick-MD User Manual
Page 50 of 308
Delete Referring Record
Enter last name and <BROWSE>
Choose record and hit <ENTER> or double click on record.
This screen confirms deletion of the record. If you are sure you want to delete this record, choose <YES>.
Otherwise, choose <NO>.
NOTE: Once deleted, a record cannot be recovered. You would have to reenter the referring physician
through the ADD function.
WARNING: DO NOT DELETE A RECORD IF IT HAS EVER BEEN USED IN A PATIENT FILE. THE
DELETE FUNCTION IS PRIMARILY USED DURING INITIAL SETUP OF THE TABLES.
Print Report
Quick-MD User Manual
Page 51 of 308
Select Print Order and <OK>.
From the DATA OUTPUT PROCESSOR, you can either download or print the report.
DOWNLOADING REPORTS TO TEXT FILES
All reports can be saved to text files for use with an external program. Simply choose the folder where
you want the file placed and then give it a name.
Quick-MD User Manual
Page 52 of 308
Quick-MD User Manual
Page 53 of 308
PRINT LABELS
Choose yes here and you will get a list of mailing labels for all of the referring Physicians and facilities in
your database.
Quick-MD User Manual
Page 54 of 308
INSURANCE COMPANIES
This table maintains all of the insurance companies that your practice deals with. Use this feature to add, edit
and delete your insurance records.
Add Insurance Record
NAME – Enter insurance company name
ADDRESS 1 – Enter insurance company address
ADDRESS 2 – Enter second line of insurance company address, if applicable
CITY – Enter insurance company’s city.
NOTE: Do not enter a zip code here. That feature is only used on the patient demographics screen.
STATE – Enter insurance company’s state
ZIP – Enter insurance company’s zip code
PHONE – Enter insurance company’s phone number
FAX – Enter insurance company’s fax number
MODIFIER – Enter insurance company’s modifier that will be attached to all charges submitted to this
Quick-MD User Manual
Page 55 of 308
company, if applicable.
CONTACT NAME – Enter insurance company’s contact person’s name
HOSPITAL ID# – This field is used only by labs importing data from a hospital and is not applicable for
physicians.
INSURANCE CLASS#- This features is used to assign a single Provider Pin# to multiple insurance companies.
This allows you to group insurance companies together by assigning them the same Class Code. Once
these codes are assigned to the individual insurance records you can reference them from within the
PROVIDER TABLE (for more information see page 65) to define what Pin# they will be assigned.
EXAMPLE: You might have 15 Blue Cross/Blue Shield insurance companies in your insurance tables and
want to define the Providers Pin# to all of them. In this instance, you would give them a class of BCBS (or
whatever you wish). Then in the Provider Table, you would assign this class whatever number is
appropriate.
PRINT PROVIDER PIN# IN 24K – If checked, this will put the provider’s pin number in block 24K. The PIN
number is pulled from the provider table and must be set there for this to work. (For more information see
page 65)
INACTIVE – If checked, this will make record inactive and you will be prompted that this record is inactive when
accessing the table. However, you may still utilize this insurance record.
MCR FILING ID# – Enter the MCR electronic filing ID#, if this is a MCR supplemental, if applicable.
CLEARING HOUSE PAYER ID – Enter insurance company’s clearinghouse payer ID, if applicable
COMMENT – Enter any miscellaneous comment regarding this particular insurance company.
BLOCK CLAIMS TO CLEARING HOUSE – If checked, no claims for this insurance company will be sent electronically
to the clearing house. These claims will be generated on paper.
FEE SCHEDULE TO USE (0-25) – Enter the fee schedule table number assigned to this insurance company, if
applicable. (for more information see ADDING CPT CODE RECORD on page 43)
NOTE: Entering a fee schedule table number in this field will override the company ID set in the CPT
record fee schedules.
PERCENTAGE OF MEDICARE ALLOWABLE – Enter in this field the percentage of the Medicare fee schedule that this
insurance company will pay, if applicable. For example, 150% of the Medicare fee schedule would be
entered as 150. The Medicare allowable has to be set in the CPT records for this to work.
NOTE: This setting will override the above fee schedule setting.
$ AMOUNTS ON INS FORM – Check this box, if for this insurance company, you need to have
the decimal points removed from all of the amount fields that print on the 1500 form.
REMOVE DECIMALS FROM
THIS COMPANY IS AN EMPLOYER – Check this box if this company is used as an employer. Company that are set
as employer will show up green in the insurance browser.
<OK> – saves the record.
Edit Insurance Record
Quick-MD User Manual
Page 56 of 308
ID – Enter the Insurance ID if known. Use the <F1> key to browse the table if the ID is not known.
NAME – Enter Name or partial name of the insurance company.
Select record and hit <ENTER> or double click on record.
NOTE: Employers will be listed in green on the Browse screen.
Quick-MD User Manual
Page 57 of 308
Make corrections to the record and click <OK>.
Delete Insurance Record
Enter last name or ID# and <BROWSE>.
Quick-MD User Manual
Page 58 of 308
Choose record and hit <ENTER> or double click on record.
This screen confirms deletion of record. If you are sure you want to delete this record, choose <YES>.
Otherwise, choose <NO>.
NOTE: Once deleted, a record cannot be recovered.
IMPORTANT: DO NOT DELETE A RECORD IF IT HAS EVER BEEN USED IN A PATIENT FILE. IF YOU
TRY AND FILE OR REFILE A CLAIM THE INSURANCE COMPANY INFORMATION WILL NOT BE
AVAILABLE. THIS DELETE FUNCTION IS PRIMARILY USED DURING INITIAL SETUP OF THE
TABLES.
Print Report
Quick-MD User Manual
Page 59 of 308
Select Print Order, Report Enter and <OK>
From the DATA OUTPUT PROCESSOR, you can either download or print the report.
Quick-MD User Manual
Page 60 of 308
DRUG TABLE
This table maintains all of the Drugs you prescribe using the prescription module in Quick-MD (for more
information see page 208). Use this feature to add, edit and delete your Drug Records.
ADD DRUG RECORD
Type in the Description of the drug you wish to add.
Type in the Default Refills, Dispense amounts and Default Sig for the drug you are adding and hit OK.
If you are going to be billing procedures associated with this drug then you will need to fill out the NDC number,
Default Dispensed and the Default Unit of Measurements. You can setup the Default Unit Of Measurements in
properties. (See Page 96)
EDIT DRUG RECORD
Type in the name of the drug you wish to edit. When the description box comes up simply edit the drug and hit
OK.
DELETE DRUG RECORD
Type in the name of the drug you wish to delete and hit OK.
PRINT REPORT
Use this feature to print a report of all the drugs you have added to Quick-MD.
Quick-MD User Manual
Page 61 of 308
Quick-MD User Manual
Page 62 of 308
CUSTOMIZING QUICK-MD - THE PROPERTIES MENU
The properties menu is used to set up and configure Quick-MD to the way you want to run your practice. When
setting up Quick-MD for the first time, you will go through each of these menu items and fill them in with
information that is appropriate for your practice. This section describes each of these options in detail.
IMPORTANT: There should only be one Operator at a time in Properties!
Getting there:
From the Quick-MD main menu, select PROPERTIES
OFFICE DEMOGRAPHICS
OFFICE DATA
Use this feature to set up the practice location information that will be printed on all billing forms.
Quick-MD User Manual
Page 63 of 308
SECOND OFFICE ADDRESS – This feature is optional. This field gives you the option to have this address used on the
Insurance forms and/or for the Patient Statements in place of the primary address.
USE THIS ADDRESS FOR INS. FORMS – Checking this box forces Quick-MD to use the SECOND OFFICE ADDRESS
on all insurance forms.
USE THIS ADDRESS FOR PATIENT STATE - Checking this box forces Quick-MD to use the SECOND OFFICE ADDRESS
on all patient statements.
Quick-MD User Manual
Page 64 of 308
PROVIDER TABLE
Use this feature to add up to twenty-six Providers with their individual provider ID numbers. The data supplied in
the Provider Table is used for billing purposes.
Ins. #/ID#
If an individual insurance company issues a provider a pin number, enter the id# of the insurance company from
the insurance tables in the INS.# Field and the pin number issued to the doctor in the ID# field to have this
number print on the 1500 form.
INS. Class/ID#
If you have the same insurance company in the master Insurance Tables multiple times with different
addresses and ID#’s, and want the provider’s PIN# to show up on all of their claims, you assign this payer a four
digit class in the main INSURANCE TABLES and insert the number in the “INSURANCE CLASS” field. (ie. BCBS for Blue
Cross). Put this “classification” in all of the like insurances in the main tables. Then in the PROVIDER TABLES you
define this class and the provider’s PIN# in the INS. CLASS/ID# field. Also, if you have a single payer that
issues a provider a pin#, then simply enter that company’s id# from the insurance table and his assigned
number in the INS ID#/ ID# field. It will now print on the 1500 form. The Standard Scheduler also accesses this
table for setting up books for scheduling patients.
ID FROM REFERING PHYSICIAN TABLE –
Use this feature to set a default referring physician for this provider.
Quick-MD User Manual
Page 65 of 308
NOTE: The perf. Medicare and perf. Medicaid numbers are now deprecated.
INSURANCE ID NUMBERS
If your practice bills as a clinic, then this feature allows you to define clinic numbers for Medicare, Medicaid, or
Blue Cross. It is additionally used to identify the six major Insurance Plans that require Provider ID numbers.
This table tells Quick-MD to pull the Insurance Plan ID numbers from the Insurance File for billing purposes on
the HCFA1500.
Steps:
1. If your Providers are billing electronically to Medicare and Medicaid, and use a clinic to bill all physician
claims under, enter the clinic number for Medicare and Medicaid.
2. The other nine fields require the Insurance ID numbers, of each insurance listed, if applicable.
Quick-MD User Manual
Page 66 of 308
LOCATION TABLE
This feature allows you to define up to ten locations where your practice performs service. (i.e. satellite
locations) The selection is made when entering the patient demographics and during the charge entry process,
and is for reporting purposes only.
NOTE: This table is strictly for reporting purposes and is different from the PLACE OF SERVICE TABLE. The
PLACE OF SERVICE (for more information see page 82) is utilized on the 1500 form and is defined by
HCFA.
PAYMENT TABLE
This feature allows you to define up to twenty-five description types for posting payments.
By posting payments according to description type, the user is able to generate numerous reports showing the
revenue generated for each payment type. Generally speaking, self-pay payments types, government payers,
BCBS, your 5 or 6 larger commercial payers, and a commercial or private insurance payment will give you all of
the necessary types for in-dept reporting.
EXAMPLE: PATIENT CHECK, PATIENT CASH, MEDICARE CHECK, MEDICAID CHECK, Blue Cross, Aetna, Cigna, Untied
Healthcare, & PRIVATE INSURANCE CHECK. MAYBE WORKERS COMP, ATTORNEY’S, OR LIABILITY IF APPLICABLE.
Quick-MD User Manual
Page 67 of 308
GL CODE - Use this feature to generate revenue totals by code. For instance, if a CPA firm prepares your
financial statements or you use an accounting package in your office such as QuickBooks, Win books,
Peachtree, etc., these codes would group the payment information by their GL codes.
IMPORTANT: When setting up the program for the first time you will want to try, in as much as it is possible,
to have the entries in the Payment Table, The Adjustment Table and the Financial Class tables
correspond to each other. For example, if Patient Check is setup in field one of the payment table, then
you would want the number one position in the adjustment table to be a patient write off, and in the
Financial class table, the first one would be self-pay. The reason being, that the desired selection may
be brought in by simply entering the number of the desired selection and hitting the enter key. For
example, if BCBS is number 4 in all tables, then when desiring to enter BCBS in the Financial class,
payments or adjustments tables, simply enter the number 4, and hit enter to bring in BCBS. It is easier
to remember the number if they are the same in all tables.
ADJUSTMENT TABLE
This feature allows you to define up to twenty-five description types for posting adjustments.
By posting adjustments according to description types, the user is able to generate many meaningful reports to
see how much money is being adjusted off.
EXAMPLE: COURTESY DISCOUNT, PROFESSIONAL DISCOUNT, MEDICARE WRITE-OFF, MEDICAID WRITE-OFF, BCBS WRITE
OFF, AETNA, ETC. After your major payers you will want to enter PRIVATE INSURANCE WRITE-OFF, TRANSFER IN,
TRANSFER OUT, PATIENT AND/OR INSURANCE REUND, NSF CHECK, ETC.
Quick-MD User Manual
Page 68 of 308
“+”/ “-“: This determines whether the adjustment moves money “into” or “out of” a patients ledger.
Enter a “+” to add money to the patient ledger (or increase the amount of money he owes the office).
Enter a – to entries that will decrease the patient’s account receivables. Keep in mind that all refunds
and NSF’s will carry the “+” as it will need to add back to the ledger in order to zero it out.
CODE For Ins. Payment Reversal – Enter the number that you wish to use for your insurance recoup
adjustment. If this code is set, when entering a negative payment on the Insurance payments by
Invoice Screen, an adjustment of the type defined will be entered into the ledger.
GL CODE- Use this feature to generate adjustment totals by code. For instance, if a CPA firm prepares
your financial statements or you use an accounting package in your office such as QuickBooks, Win
Books, Peachtree, etc., these codes would group the adjustment information by their GL codes for entry
into the General Ledger of your accounting software.
IMPORTANT: When setting up the program for the first time you will want to try, in as much as it is
possible, to have the entries in the Payment Table, The Adjustment Table and the Financial
Class tables correspond to each other. For example, if Patient Check is setup in field one of the
payment table, then you would want the number one position in the adjustment table to be a
patient write off, and in the Financial class table, the first one would be self-pay. The reason
being, that the desired selection may be brought in by simply entering the number of the
desired selection and hitting the enter key. For example, if BCBS is number 4 in all tables, then
when desiring to enter BCBS in the Financial class, payments or adjustments tables, simply
enter the number 4, and hit enter to bring in BCBS. It is easier to remember the number if they
are the same in all tables.
FINANCIAL CLASS TABLE
Financial Classes allow you another way of grouping and viewing your patients. This time you are grouping by
Quick-MD User Manual
Page 69 of 308
your practices major payers. Defining meaningful financial classes allows you to run powerful reports on where
your money is coming from.
NOTE: This table is used for reporting purposes only. It is designed to give the office reporting by
financial classifications.
DESCRIPTION – Enter the names of your major payment sources, ie. Self Pay, Medicare, Medicaid, Blue Cross,
5 or 6 Major Insurance companies, Commercial/Private Insurance, Attorney’s, Worker Comp. etc.. You can
define up to twenty-five pay classifications.
Color – This feature allows you to define a color code for each financial class. These colors will be visible in
the PATIENT FILES BROWSER (for more information see page 212) so that you can visibly see the Patients
Financial Class when browsing for them.
IMPORTANT: When setting up the program for the first time you will want to try, in as much as it is possible,
to have the entries in the Payment Table, The Adjustment Table and the Financial Class tables
correspond to each other. For example, if Patient Check is setup in field one of the payment table, then
you would want the number one position in the adjustment table to be a patient write off, and in the
Financial class table, the first one would be self-pay. The reason being, that the desired selection may
be brought in by simply entering the number of the desired selection and hitting the enter key. For
example, if BCBS is number 4 in all tables, then when desiring to enter BCBS in the Financial class,
payments or adjustments tables, simply enter the number 4, and hit enter to bring in BCBS. It is easier
to remember the number if they are the same in all tables.
Quick-MD User Manual
Page 70 of 308
PATIENT SOURCE TABLE
This feature allows you to list up to fifty Patient Source types. This data allows the office to track how Patient’s
became aware of their practice. It also allows for tracking and reporting on which marketing avenues are
providing the most success.
Quick-MD User Manual
Page 71 of 308
SORT CODE TABLE
Use this feature to define up to ninety-nine Sort (report codes) Codes to further classify patients for reporting
and business management purposes. You may assign up to 3 sort codes per patient for reporting purposes. For
instance, you could tell how many left handed, red headed, shoe size 4 women were in your database!
EXAMPLE: Could be used to sort patients who are smokers and nonsmokers.
You will also use sort codes to assist in your collection process. Set up three codes called “Collection Letter 1”,
“Collection Letter 2” and “Collection Letter 3”. (For more information on Generating Collection Letters, see MAIL
MERGE on page 253)
NOTE: Sort Codes are also utilized when doing reoccurring billing. (For more information see page 292)
PATIENTS
PATIENT DEFAULTS
Use this feature to set up the default fields on the PATIENT’S DEMOGRAPHICS SCREEN. This saves time when setting
up new patients in the system. When adding patients that fall outside of these defaults, you can simply overwrite
the default values with that of the patient you are entering.
CITY – Enter the default city name.
STATE – Enter the default State.
ZIP – Enter the default zip code.
Quick-MD User Manual
Page 72 of 308
DEFAULT AREA CODE – Enter the default Area code.
DEFAULT SEX – Enter the default sex.
DEFAULT PROVIDER – Enter the number of default provider from the provider tables.
DEFAULT FINANCIAL CLASS– Enter the default financial class.
ACCEPT ASSIGNMENT – Applies to Medicare only. Use this feature to always accept the Medicare assignment.
SIGNATURE IS ON FILE - Check if you want the SIGNATURE ON FILE to default to Yes.
LOOP PATIENT FILE CREATION OPTION – When checked, the LOOKUP PATIENT FILE (for more information see page 211)
with always open after you exit a patient’s demographic screen.
PATIENT CUSTOM INFORMATION - MALE
Use this feature to define the field names for any custom information you wish to track for your male patients.
SCREEN NAME: Choose a name to identify your custom screen .i.e. Family History or Patient
History
CHECK BOX LABELS: Enter up to 10 descriptions for custom check boxes. These will be yes or no (true or
false) answers to information you wish to tract on male patients. .i.e. - diabetes, hypertension, heart disease,
or maybe tests you want to track results, etc.
TEXT LINES LABELS: Enter up to 10 descriptions for custom text lines. These fields will allow the office to type up to
70 characters into each field for tracking information on each patient.
PATIENT CUSTOM INFORMATION - FEMALE
Use this feature to define the field names for any custom information you wish to track for your female patients.
Quick-MD User Manual
Page 73 of 308
SCREEN NAME: Choose a name to identify your custom screen. i.e. Patient History, Family History
CHECK BOX LABELS: Enter up to 10 descriptions for custom check boxes. These are yes or no (true or false)
answers to information that you wish to track on your female patients.
Text Lines Labels: Enter up to 10 descriptions for custom text lines. These fields will allow for up to 70
characters to be typed in for tracking info or results.
Quick-MD User Manual
Page 74 of 308
RECALL TABLE
This feature allows you to list up to twenty-five reasons for Patient Recall appointments. You can have the date
for a certain recall automatically calculated by adding the number of months in square brackets at the end of the
description. (for more information see page 185)
Quick-MD User Manual
Page 75 of 308
BROWSER DEFAULTS
Use this feature to set the Default Search Field (the place where your cursor will always show up in first) when
browsing the DIAGNOSIS TABLE, CPT CODE TABLE or PATIENT FILES.
This feature gives the user flexibility when browsing, but does not exclude you from searching by any of the
other fields. Simply move your cursor from the selected one to the one you are interested in.
Open Current Ledger With Only Non-Zero Claims – Use this feature to hide all Claims with a zero balance
from being displayed when the current ledger is open.
NOTE: Whether this feature is turned on or off, you can still toggle the display of zero balance claims while in
the ledger by hitting <SHIFT> + <F4>. (for more information see page 172)
Put Service Date In Left Column Of Ledger Browse – Use this feature if you want the ledger browse to
contain the “date of service” in the left column instead of the “ledger date”.
Quick-MD User Manual
Page 76 of 308
PATIENT DUNNING NOTICES
This feature allows you to print dunning messages on your Patient Statement for accounts OVER 30 DAYS, OVER 60
DAYS , OVER 90 DAYS and OVER 120 DAYS . The system will automatically decide which notice to put on the patients
statement depending on the amount of time the account is past due.
NOTE: The data supplied in Patient Dunning Notices will be printed on Patient Statements for notification of
past due accounts and will overwrite any global messages set in patient statements batch billing, if the
patient is past due on their account.
MARITAL STATUS TABLE
Use this feature to define up to eight Marital Status descriptions with the appropriate codes used for billing
purposes as required and defined by HCFA.
Quick-MD User Manual
Page 77 of 308
EMPLOYMENT STATUS TABLE
This feature allows you to define up to ten Employment Status descriptions types with the appropriate codes
used for billing purposes as required and defined by HCFA.
RELATIONSHIP TABLE
Use this feature to define up to twenty Patient Relationships to the subscriber of the insurance and the
appropriate codes used for billing purposes as required and defined by HCFA.
Quick-MD User Manual
Page 78 of 308
STANDARD APPOINTMENT
APPOINTMENT DEFAULTS
Use this feature to set APPOINTMENT DEFAULTS for the STANDARD SCHEDULER ONLY.
IMPORTANT: These defaults only apply to the STANDARD SCHEDULER (for more information see page 117). To
configure the defaults of the Q-SCHEDULER you must open the Q-SCHEDULER and use the SETTINGS button.
(for more information see page 114) To configure the defaults of the MULTI-VIEW SCHEDULER you must
open the MULTI-VIEW SCHEDULER and use the PROPERTIES button. (for more information see page 124)
Quick-MD User Manual
Page 79 of 308
HOLIDAYS - When trying to set appointments for the dates selected Quick-MD will pop a warning box.
TIME INTERVALS - You can select 10 minute or 15 minute appointment intervals and Quick-MD will default
all calendar days to the selected time intervals.
BLOCK WEEKEND SCHEDULING - If selected, Quick-MD will pop a warning box when a user tries to schedule
an appointment for a weekend.
POP INNER OFFICE MESSAGES - or Pop Ledger Information: The system will display the inner office
messages or information from the patient account, depending on which box is checked, when booking
an appointment for an existing patient.
CHECK FOR FUTURE APPOINTMENTS - Quick-MD will look for existing appointments.
USE DEFAULT PROVIDERS - If selected, select a Provider for #1 default and #2 default. The appointment
Calendar will default Book 1 and Book 2 to the selected default Providers.
Select the <OK> button to save.
CHARGE ENTRY
CPT ENTRY OPTIONS
Charge Entry Input Options allows you to control which fields the cursor stops in during the CHARGE ENTRY
process (for more information on OTHER CHARGE INFORMATION see page 165).
Quick-MD User Manual
Page 80 of 308
NOTE: To enable this feature you MUST select the first option, Input Optional Charge Data. Once this
box is checked you can begin selecting the fields you want the cursor to stop in or skip over in the Other
Charge Information Screen. For the fields you do not select to stop in, you will have to click that field to
enter data.
The last box labeled, “Do not add charges to last claim if “P” responsibility is on the claim” is used to
define the action of the “Add charges to Last Claim” feature in the Ledger button found on the Patient
demographics screen. When checked, if the last claim in the ledger has a “P” responsibility on it, Quick-MD will
automatically create a new claim, to add these charges to, instead of adding them to a Patient Responsible
claim.
(for more information see page 171)
Quick-MD User Manual
Page 81 of 308
PLACE OF SERVICE TABLE
This feature allows you to define up to ten Place Of Service (POS) descriptions with the appropriate Service
Code. The data supplied in the Place of Service Table is set as a default in the CPT Records to distinguish the
place where services are rendered for that code. These POS codes are set by HCFA and must appear on the
1500 form.
Quick-MD User Manual
Page 82 of 308
TYPE OF SERVICE TABLE
This feature allows you to define up to ten TYPE OF SERVICE descriptions with the appropriate Type Code.
NOTE: The data supplied in the Type of Service Table is used in the CPT Records to distinguish the Type of
service being performed. These codes are set by HCFA and must appear on the 1500 form. They are set in
this master table and then assigned to each CPT record, thereby defaulting to the proper TOS during the
charge entry.
Quick-MD User Manual
Page 83 of 308
MODIFIERS TABLE
This feature allows you to set up 25 modifiers and their descriptions. This table will be accessed during the
charge entry process. The modifier fields on the “Other Charge Information Screen” are yellow fields and can
be accessed with the <F1> key.
SET 1500 EXTRA DATA FIELDS
This feature allows you to define two extra blank fields on the 1500 form should a payer require additional
information not currently on the 1500 form. Generate a grid from Properties/Printed Forms/1500
Settings/Print Grid. Then align the 1500 form and the test grid and enter the corresponding column and line
numbers where the payer wants it to print on the 1500 form. See PRINTER SETTINGS (PROPERTIES MENU/
Printed Forms) for up and down line adjustments. During the charge entry process, on the Supplier form, you
will now see the new name of this field show up. Enter your required data here to have it print on the claim form.
Quick-MD User Manual
Page 84 of 308
PRINTED FORMS
PRINTER SETTINGS
This feature contains the Font Size and Left Margin for printing HCFA 1500 forms, Patient Statements, Super
Bills, and Reports. It also allows you to format Reports for Landscape printing and to Dither, meaning the ability
to lower information that is printing too high on a form. In Windows, different printers have different printerdrivers, therefore if you need more than one printer printing the forms, unless you are extremely lucky, you will
need to have the same exact printer and printer drivers, as there is only one setting!
The test grid will represent the size of the Font being used, if you wish to change the size, simply enter the size
desired into the Font Size field. Re-print the test grid.
When you print your grid, and lay it over your form, if the left margin is too far to the left, increase the number in
the L. Margin field and reprint the grid till you have moved it to the right enough.
If information is printing high on a form and needs to be lowered, the solution is referred to as “dithering”. Take
the form that you have printed a test grid on and note the line number you wish to move downward, and the
amount you wish it to be lowered. 1=whole line, 2=1/2 line, 3=1/3 line and 4=1/4 line.
IMPORTANT: When a dither is inserted into a particular line, it moves all entries on the rest of the page
down by the amount specified.
HCFA 1500 SETTINGS
Use this feature to setup Quick-MD to properly fill out your HCFA 1500 forms. This must be done prior to printing
any 1500 forms.
Quick-MD User Manual
Page 85 of 308
Step One: Print a Test Form
Load your printer with your laser 1500 forms and then <PRINT GRID>. This will print the test grid out on your
HCFA 1500 form.
USING THE TEST GRID
The test grid is how you will line up your 1500 forms, your Super Bills and your Patient Statements, so it is
important that you understand how to correctly use it.
The grid is laid out as follows:
The numbers across the top are the column numbers. They go from 1 to 0 (which equals 10) and then repeat
again 1 to 0 for the next block of numbers. (i.e. 1-10, 11-20, 21-30, etc) It is helpful to pencil in the 10, 20, 30, 40
,50 etc. across the top of the page. The numbers down the left hand side are line numbers.
Quick-MD User Manual
Page 86 of 308
You will take the form that you have just printed this grid on top of, and circle all of the “x’s” that fall where you
want your fields to print. This will tell you the exact line and column numbers that you will then plug into your
coordinates of these fields.
TRICK: Take a pencil and for each zero in the column row along the top of your grid, write the appropriate
value that that zero carries. So over the first 0 you would write a 1 to signify that all the numbers
following that zero are really 11,12, 13, 14. Over the second 0 you would write a 2 to signify that all the
numbers following that zero are really, 21, 22, 23… Doing this allows you to easily see the “accurate”
column number when plugging in coordinates.
IMPORTANT: If the left margin is off or information on your form needs to be shifted downward, these
adjustments are made in PRINTER SETTINGS. You will also set your font sizes here. (for more information
see page 85).
Step Two: Plug in your Coordinates
Now you can simply go through the list of fields and plug in the appropriate column number for each entry. Use
the <Page Up> <Page Down> buttons to view the rest of the list.
Important: Plot all of the coordinates on the 1500 form!
PATIENT STATEMENT SETTINGS
Use this feature to line up Quick-MD to print out on your pre-printed patient statements.
Note: Quick-MD also comes with a standard patient statement. It does not print on top of pre-printed
forms. If you would like to use the standard statement, check the box labeled “Print Using Standard
Patient Statement” under Properties / Miscellaneous Defaults / Other Defaults. You do not need to
setup this section of properties if you are using the standard patient statements. (for more information
see page 98 )
Step One: Print a Test Form
Load your printer with your pre-printed patient statements and then click <PRINT GRID>. This will print the test
grid out on your Patient Statements. (for more information on using the Test Grid see page 86)
Quick-MD User Manual
Page 87 of 308
Step Two: Plug in your Coordinates
You will now decide which fields print on your forms. For each field that you want to print, plug in the appropriate
line and column numbers from your test form. If you need a field to print in two places, then you would specify
the second coordinates as well. Use the <PAGE UP> <PAGE DOWN> buttons to view the rest of the list.
NOTE: Entering 0 in both the line and column fields will prevent that field from printing on your forms.
A Special Note on line 40:
Line 40 tells Quick-MD where the Statement detail portion of your form is located. This particular field works
differently in that the LINE1, COLUMN1, LINE2 and COLUMN2 fields function differently here.
LINE 1 – Defines the total number of lines on your Patient Statement. A full size 8.5 x11 will have 62
lines. Use your Test Grid to determine the number of lines on your form.
COLUMN 1 - Defines the Line number of the First Entry in your Statement Detail (date/reference
number/description/charges/credits/running balance/balance forward) portion of your form. This section
is the body of most patient statements. You define where the first line of that body is located.
LINE 2 – Defines the Maximum Entries that your charge/payment detail will allow. In other words, how
many lines from the First line in the Statement Detail section to the last line, before it starts page two.
Note: Normally speaking, the global messages are plotted below your current, 30 ,60, 90.
balance due line and the statement messages are plotted directly above the current, 30, 60, 90
day line. So be sure to take this into consideration when defining to the system the maximum
number of entries above. The number inserted above in Line 2, should stop above the lines the
Statement Messages are plotted on, so they will not overwrite each other!
IMPORTANT: If the left margin is off or information on your form needs to be shifted downward, these
adjustments are made in PRINTER SETTINGS. You will also set your font sizes here. (for more information see
page 85).
SUPER BILL SETTINGS
For the standard scheduler only! If you are using the ENHANCED SCHEDULER or the MULTI-VIEW SCHEDULER these
coordinates are entered in the settings of that application. (For more information see page 115)
Quick-MD User Manual
Page 88 of 308
Step One: Print a Test Form
If you are not using the Q-Scheduler or the Multi-View Scheduler, you may print a test grid from within 1500
settings. To learn how to print a test grid from the Q-Scheduler ( for more information see page 115 if you are
using Q-Scheduler or page 129 if you are using the Multi-View Scheduler)
Step Two: Plug in your Coordinates
You will now decide which fields print on your forms. For each field that you want to print, plug in the appropriate
line and column numbers from your test grid.
IMPORTANT: If the left margin is off or information on your form needs to be shifted downward, these
adjustments are made in PRINTER SETTINGS. You will also set your font sizes here. (for more information see
page 85).
LASER/INKJET ADDRESS LABEL SETTINGS
Use 1 inch x 4 inch double column labels.
In order to line up your labels you will need to print a test grid that you can use to plot the coordinates. To print a
test grid, go to the Patients Statement Coordinates (in Properties/Printed Forms/Patient Statement settings/
Print Grid). (for more information see page 87)
Once you have printed out the grid, lay it over your labels and then plot the coordinates.
Quick-MD User Manual
Page 89 of 308
OTHER FORM SETUP
The Other Form Setup allows you to configure your print to generate the workers Compensation forms DWC-69
and DWC-73. You will first need to download the pdf version of these forms from the DWC website. Quick-MD
can fill out part 1 (General Information) of the preprinted form.
TEXAS WORKER’S COMPENSATION WORK STATUS REPORT
Quick-MD User Manual
Page 90 of 308
The concept for lining up this form is the same as lining up your 1500 or patient statement forms. You may want
to review this information before proceeding. First you generate a grid on top of the DWC73 form. Next, you
adjust your dithers until the rows fall correctly in part 1 of the form. If changes have been made to the dithers
then you will need to generate a new grid. Once the dithers are in place, type in the correct row and column for
each data filed.
TEXAS WORKER’S COMPENSATION MEDICAL EVALUATION REPORT
The concept for lining up this form is the same as lining up your 1500 or patient statement forms. You may want
to review this information before proceeding. First you generate a grid on top of the DWC69 form. Next, you
adjust your dithers until the rows fall correctly in part 1 of the form. If changes have been made to the dithers
then you will need to generate a new grid. Once the dithers are in place, type in the correct row and column for
each data filed.
OPTIONS
MISCELLANEOUS DEFAULTS
Use this feature to define all Miscellaneous Settings that will be used throughout Quick-MD. The majority of
these settings are designed to allow ease of use when enter data and performing functions throughout QuickMD. Quick-MD can be configured to your way of doing business. Unlike the startup files, these settings can be
modified at any time during use of Quick-MD and the changes will be reflected on the client’s computer that
made the changes.
Quick-MD User Manual
Page 91 of 308
ID# FROM PAYMENT TABLE FOR PATIENT CHECK: Enter the number that corresponds to the payment code set up for
patient check payments in the PAYMENT TABLE (for more information see page 67).
NOTE: This feature is to enable the DO AUTOMATIC WRITE OFFS WHEN ENTERING CHARGES TO WORK (for more
information see page 93)
ID# FROM ADJUSTMENT TABLE FOR PATIENT WRITE OFF: Enter the number that corresponds to the adjustment code
assigned for patient write off in the ADJUSTMENT TABLE (for more information see page 68). If no adjustment code
exists, leave this field blank.
NOTE: This feature is to enable the DO AUTOMATIC WRITE OFFS WHEN ENTERING CHARGES TO WORK (for more
information see page 93)
ID# FROM ADJUSTMENT TABLE FOR MEDICARE WRITE OFF: Enter the number that corresponds to the adjustment code
set up for Medicare write off in the ADJUSTMENT TABLE (for more information see page 68). If no adjustment code
exists, leave this field blank.
NOTE: This feature is to enable the DO AUTOMATIC WRITE OFFS WHEN ENTERING CHARGES to work (for more
information see page 93)
ID# FROM ADJUSTMENT TABLE FOR MEDICAID WRITE OFF: Enter the number that corresponds to the adjustment code
set up for Medicaid write off in the ADJUSTMENT TABLE (for more information see page 68). If no adjustment code
exists, leave this field blank.
NOTE: This feature is to enable the DO AUTOMATIC WRITE OFFS WHEN ENTERING CHARGES to work (for more
information see page 93)
Quick-MD User Manual
Page 92 of 308
ID# FROM ADJUSTMENT TABLE FOR OTHER INS. WRITE OFF: Enter the number that corresponds to the adjustment code
that you would like Quick-MD to default to for other insurance write offs in the ADJUSTMENT TABLE (for more
information see page 68). If no adjustment code exists, leave this field blank.
NOTE: This feature is to enable the DO AUTOMATIC WRITE OFFS WHEN ENTERING CHARGES to work (for more
information see page 93)
LEDGER DATE CHECK FROM: This field allows you to define a “date from” parameter that will restrict anyone from
making any entries (charges, payments, adjustments or notes) in the ledger with a date prior to this date, without
being warned that they are working outside of the specified date range.
LEDGER DATE CHECK TO: This field allows you to define a “date to” parameter that will restrict anyone from making
any entries (charges, payments, adjustments or notes) in the ledger with a date after this date, without being
warned that they are working outside of the specified date range.
STATE YOU WILL BE FILING INS. CLAIMS IN: Enter the state that you file claims in.
PAT. STATEMENT PATHS: This field defines the location on the hard drive where Quick-MD will put the patients
statements when they are generated electronically.
WORD PROCESSING PATHS: This field defines the path within your computer that will be used when reports are
downloaded to your computer for use within Word, Word Perfect, Excel or Lotus, etc.
DO AUTOMATIC WRITE-OFFS WHEN ENTERING CHARGES:
Click this box on if you want Quick-MD to automatically write off the amount defined in the Medicare Write Off,
Medicaid Write Off or the Fee Schedules contained within each CPT record.
These CPT records are maintained in the CPT TABLE (for more information see page 43).
You must also define to the system the Medicare, Medicaid. BCBS, and Other Insurance Write Off in the
adjustment tables. This is done at the top left of the Misc. Default screen (see above)
NOTE: For this option to work, the write off fields above must contain the correct data.
NOTE: You will also need to define the proper PAYMENT and ADJUSTMENT codes (for more information see
pages 67 and 68)
MULTIPLY UNITS WHEN ENTERING CHARGES: Click this box on if you want Quick-MD to calculate the total charge by
multiplying the Amount of Charge in the CPT record times the number of units entered when keying charges.
The number of units is found in the Other Charge Information Screen. This screen is turned on or off in the CPT
ENTRY OPTIONS (for more information see page 80).
NOTE: For this option to work, the Amount of Charge in the CPT record must contain an amount. QuickMD will not multiply the number of units if the amount is entered directly in the charge screen.
PRINT TWO CHARGES PER LINE ON 1500 FORM: Click this box on if you want to print two charges per line on the 1500
form.
INCLUDE AMOUNT PAID ON 1500 FORM: Click this box on if you want Quick-MD to include any insurance or patient
payments received on the 1500 Form.
ALWAYS POP-UP SUPPLIER INFO FORM: Click this box on if you want Quick-MD to pop-up the supplier information
form when entering charges on a PATIENT claim. Normally, users only have this form pop up on insurance
claims. However, by clicking this box on, you will get this form to pop up on all claims, including patient claims.
USE PROVIDER LISTED IN PATIENT FILE TO PRINT 1500 FORMS: Click this box on if you want Quick-MD to always use the
provider listed in the patient file on the 1500 form regardless of the doctor chosen on the charge entry screen.
Quick-MD User Manual
Page 93 of 308
Example: This option would pull the patients “default” provider from the demographics screen onto the
HCFA as opposed to the Provider listed on the claim during charge entry.
PUT CPT CODES IN FRONT OF DESCRIPTION: Click this box on if you want the CPT code to appear in the description
box when entering charges. You would use this feature if you have setup house codes that are different from
the CPT Code they define, as Quick-MD pulls in by house code. This way the description field will display the
actual CPT Code before the description of it. (for more information see CPT records on page 43 )
GO DIRECTLY TO REFERRING PHY. ON SUPPLIER INFORMATION FORM OPEN: Click this box on if you want the prompt/cursor
to start at the referring physician field on the supplier information form when it opens. By starting at this field,
you are skipping all of the information primarily related to Illness or Accident (workers comp/liability info). This
feature does not exclude you form entering information in any of these fields. If you want to enter any
information in these fields, you can either back tab or use your mouse to get to these fields.
NOTE: Offices who do a limited amount of Workers Comp would want to check this box.
GET ANY BALANCE IN PAYMENT POSTING: Click this box on to always pull all balances of claims, regardless of the
responsibility, in the Patient/Insurance Payments (by Claim) quick posting module.
GO TO LEDGER DATE ON CHARGE EDIT: Click this box on if you want the prompt to start in the ledger date when
editing claim charges. If not, the prompt will begin in the diagnosis field.
ASK ABOUT REASSIGNMENTS: Click this box on if you want to be asked about reassignment of responsible party
when posting payments in the patient ledger utilizing the F1-Pay function if the patient has a secondary or third
insurance.
ALWAYS PUT PIN# ON 1500: Click this box on if you want the referring physician’s UPIN number to appear on all
insurance claims.
NOTE: Quick-MD will always put the pin# on government claims, even if this option is not checked.
SKIP PATIENTS WITH COMPANIES SET WHEN BILLING PATIENTS: Click this box on to utilize the occupational
medicine/industrial medicine component to generate an invoice to a company instead of individual claims.
PUT MEDICARE AND MEDICAID # ON RECEIPTS: Click this box on if you want the provider’s Medicare and Medicaid
numbers to appear on patient receipts.
PUT TAX ID# ON RECEIPTS: Click this box on if you want the provider’s tax ID# to appear on patient receipts.
AUTO CHECK E-MAIL: Click this box on if you want the system to automatically check your email for you.
SORT CHARGES BY COST ON ENTER: Click this box on if you want charges to automatically be sorted in descending
order by cost, regardless of which order they were entered.
PUT ONLY BALANCE FORWARD ON PATIENT STATEMENT: Click this box on if you only want balance forward to print on
the patient statement and not the charges forward and the credits forward.
DEFAULT DIAGS TO PREVIOUS DIAGS: Click this box on if, in the CHARGE ENTRY SCREEN (for more information see page
211 ) you want the current charge to automatically use the diagnosis from the previous charge line when
entering charges on a claim.
DEFAULT SERV. DATES TO PREVIOUS: Click this box on if you want the service date of the line item that you are adding
to default to the one entered before it.
ALWAYS CHECK ACCEPT ASSIGN: Click this box on if you want to accept assignment on all insurance claims. QuickMD will accept assignment on government claims if that box is checked in Properties/Patients/Patient
Defaults, even if this option is not checked.
Quick-MD User Manual
Page 94 of 308
ASK IF I WANT TO PRINT RECEIPTS: Click this box on if you want to have the window pop-up that asks if you want to
print a receipt after a patient payment is recorded in the charge screen.
PUT BALANCE FORWARD ON RECEIPTS: Click this box on if you want the balance forward to print on the patient’s
receipt.
LOOP PATIENT LOOK UP: Click this box on if you want to have Quick-MD prompt you to look up another patient
when performing the patient look up function. Once you choose save within a patient file, Quick-MD will then
prompt you to look for another patient if this feature is turned on.
ASK ABOUT WRITE OFFS: Click this box on if you want to be prompted about writing off the claim balance when
entering payments in the patient ledger utilizing the F1-Pay function.
CALCULATE WRITE OFFS BY CLAIM: Click this box on if you want to calculate write offs by claim and not by line item.
DON’T ADD RESPONSIBILITIES: Click this box on if you want to replace the existing responsibility code in lieu of
adding the additional responsibility to that field when reassigning a claim.
PUT SERVICE DATE ON LEDGER SCREEN: Click this box on if you want the “date of service” to appear in the comment
field on the patients ledger screen.
AUTO REFRESH APPOINTMENT SCREEN: (STANDARD SCHEDULER ONLY) Click this box on if you want to auto
refresh each user’s screen in a network environment. This will update the screen every 15 seconds for any
changes made to the schedule by another user.
USE APPOINTMENT TEMPLATE: (STANDARD SCHEDULER ONLY) Click this box on if to utilize the appointment
template feature in the appointment schedule. This feature allows templates to be saved and copied in future
periods.
PUT $0.00 INVOICES ON INS. FORMS: Click this box on if you want to put charge items priced at $0.00 on the
insurance form when billing.
AUTO DECIDE INS. CO. TO USE: Click this box on if you want Quick-MD to automatically decide which one of up to
four primary and/or up to 4 secondary insurances assigned to this patient should be used based on the date of
service of the claim.
RECALCULATE COST ON CHARGE EDIT: Click this box on if you want Quick-MD to automatically recalculate the cost of
the CPT Code when you edit the charge by hitting F4 in the ledger.
Quick-MD User Manual
Page 95 of 308
MEDICAL RECORDS SETTINGS:
Use this feature to setup your medical records Interface.
NOTE: In order to use the Electronic Medical Records Interface, each user will have to have Word 97 or later
installed on their local hard drive.
PATH TO MEDICAL RECORDS FOLDER – Set the path to your computer where you will store all your Medical
Documents.
NOTE: You will also want to set your default directory in MS Word. Go to
Tools/Options/File locations and define to Word where these documents will be stored.
ACTIVATE INTERFACE WITH MS WORD – Click this check box to Activate the Medical Records Interface with MS
Word.
NOTE: Also you will need to go to System Utilities/Set Operator Rights and be sure each operator has
the rights to use the Electronic Medical Records and its various features.
PRESCRIPTION REPLY TABLE – Use this feature to define up to 10 of the most common replies your practice uses
when answering patient calls regarding prescriptions.
PHONE MESSAGES REPLY TABLE – Use this feature to define up to 20 of the most common replies your practice
uses when answering patient calls.
Prescription Units Of Measurement – Use this feature to define up to 6 units of measurement that can be
use when creating a prescription. If billing drugs electronically then you will need to add the following units:
IU (International Units), UN (Units), Mill (Milliliter) and Gram (Gram). (for more information see page 208)
Quick-MD User Manual
Page 96 of 308
Quick-MD User Manual
Page 97 of 308
OTHER DEFAULTS:
PUT DIAGNOSIS CODE ON RECEIPT – Use this feature to put the diagnosis codes on your patient receipts.
PUT PROVIDER NAME IN BLOCK 33 OF INSURANCE FORM – If you bill as a clinic and your specialty requires you to
also put the provider name in block 33, check this box.
GO TO COMPANY ID ON STATEMENT WINDOW OPEN – Use this feature to change the cursor default from Patient
Name to Insurance/Company ID # field.
ENABLE PATIENT RECORD LOCKING – Use this feature to enable record locking on Quick-MD. (Consult your
local Quick-MD representative before enabling this feature!)
COMPARE INS. PAYMENTS TO EXPECTED AMOUNT – Use this feature have Quick-MD warn you when you are
receiving a payment that is different from the expected amount listed in the fee schedule.
DEFAULT CURSOR POSITION ON SUPPLY FORM OPEN – This setting lets you configure the position that your
cursor will land in the supply form is opened. (for more information see page 170)
ELECTRONIC FILING MODULES TO USE - Use this feature to tell Quick-MD which billing modules to use. If the
ANSI sections are disabled, then you will only be able to access the NSF billing portion of Quick-MD.
PARAMETERS FOR AMOUNT PAID ON 1500 FORM - Use this feature to configure what information Quick-MD will
print in the payment field of the 1500 form.
MONITOR RESOLUTION – Use this feature to set up the monitor resolution that you want Quick-MD to run at.
If you do not want Quick-MD to change your monitor settings then you will need to choose the System
Setting option.
ID# OF YOUR FACILITY IN THE FACILITY TABLE – Use this feature to set the facility that Quick-MD should default
to when entering Medicare, Rail Road Medicare and Champus Claims. This facility ID will go in the
location for the facility where services where rendered on the 1500 form. (for more information see page
170)
Quick-MD User Manual
Page 98 of 308
ALWAYS SET YOU FACILITY NO MATTER THE INSURANCE COMPANY – Use the feature if you always want your facility
as the facility where service where rendered, regardless of the insurance company that is being billed.
VERIFY USE OF NEW PATIENT CODES – Use this feature if you want the system to warn you when you are
entering new patient CPT codes on existing patients.
Note: Quick-MD considers CPT codes 99201 through 99205 and 99242 through 99245 as new patient
CPTs
PATIENT STATEMENT OPTIONS – Set the default behavior for patient statements. (for more information see
page 216)
NOTE: If PRINT USING STANDARD PATIENT STATEMENT is check then Quick-MD will print the complete
patient statement. Otherwise, it will print on a pre-printed form.
THIRD PARTY INFORMATION:
Quick-MD can export patient demographics to a number of different EMR and Lab systems. To be able to use
this feature you will need to type the location where you want the export file located. Next, you will check the
button labeled Active Third Party Integration or Activate Lab Export. Choose the EMR system that you will
integrate with, and click OK.
TABLE DATA PATHS
Quick-MD User Manual
Page 99 of 308
This feature allows you to select optional data paths to table files. This option is rarely used but would be
utilized if tables were used that were not located within the Quick-MD directories.
ELECTRONIC FILING
ELECTRONIC MEDICARE, MEDICAID, BLUE CROSS AND CLEARING HOUSE SETTINGS
Quick-MD User Manual
Page 100 of 308
Quick-MD User Manual
Page 101 of 308
The Electronic Settings contains the data needed for electronic claim submissions. This information will be
accumulated through applications and correspondence with the intermediary/company you submit your
Medicare, Medicaid, Blue Cross, or clearinghouse claims to.
You will define to the system where your live runs will be located on the hard drive and the file name, if
applicable. You will also tell the system where to retrieve the downloaded reports.
Note: Here at Quick-MD, we like to set up a directory on the root directory, called Ebill, to
hold all of these files. If the field asks for a file name, then this name is issued by the
payer, and will be defined by the user. If it does not, then the file name is hard coded into
the system.
NOTE: When sending claims as a test, the “Type Of Run” should read TEST for testing.
When notified that claims have passed the test, then “Type Of Run” should read PROD for production.
When set in the Test mode, the system will not ask to put the billing notes.
Also, please note that when filing to the clearinghouse, you may tell the system to exclude up to 5
companies.
Note: If you are sending claims to Gateway EDI then your Claims Path and File Name will be
C:\ebill\claims.txt
Quick-MD User Manual
Page 102 of 308
ELECTRONIC REMITTANCE SETTINGS
This Electronic Medicare Remittance Settings contains the data needed for electronic remittance advice from
Medicare.
REMITTANCE FILE PATH: This is the path on your computer where your remittance files are stored.
ADJUSTMENT CODE: Enter the code from the ADJUSTMENT TABLE (for more information see page 68) for
Medicare adjustments.
PAYMENT CODE: Enter the code from the PAYMENT TABLE (for more information see page 67) for Medicare
payments.
SET WRITE-OFF DEFAULT TO “Y”: Turning this option on will default the write off field in the payment posting
module to Y when processing Medicare Electronic Remittances.
Calculate Write Offs For BC/BS (NSF Module): Check this box if you want the system to automatically
calculate the Blue Cross / Blue Shield write offs when posting a NSF ERA.
ADDED RESPONSIBILITY CODE DEFAULT: Turning this option on will default the added responsibility on the
payment posting field to the code defined here.
ALWAYS SET ADJUSTMENTS TO ZERO: Always set the adjustment amount to zero regardless of the other
settings.
AUTO REASSIGN TO SECONDARY: Check this box if you want the system to automatically reassign a claim to
the secondary insurance company when posting electronic remittance files.
AUTO PUT SECONDARY BILLING NOTES FOR MEDIGAP FROM QUICK PAY POSTING: Check this box if you want the
system to automatically put a secondary billing note into your ledger, for medigap insurance companies,
when posting electronic remittance files. You can tell the system that a certain company is a medigap
company by checking the box labeled “This is a Medigap Company” on the insurance information
screen.
CLAIMS STATUS CODES: This button allows you to set up the claims status codes with descriptions that are
sent with the electronic remittance advice.
Quick-MD User Manual
Page 103 of 308
Quick-MD User Manual
Page 104 of 308
SCHEDULING APPOINTMENTS IN QUICK-MD
Quick-MD comes with three different scheduler’s. Our flagship scheduler is called the Q-Schedule. (for more
information see page 105) It runs as a separate application on your toolbar which gives you access to it at
anytime without leaving Quick-MD or any screens that you might be in within Quick-MD. You may also be
working in any other application as Quick-MD doesn’t have to open to use the scheduler. It is the recommended
Scheduler because of its accessibility from outside of the program and its powerful features.
We did leave our original Scheduler in there because in some instances it is the best choice for the job.
Specifically if your practice dictates that you see two separate provider books open at the same time.
Quick-MD also comes with a Multi-View appointment scheduler. It allows you to be able to view more than one
provider’s book at a time. (for more information see page 124)
USING Q-SCHEDULE
Getting there:
The Q-Schedule is a separate, but integrated, application that is started from its own icon. Set an icon to
“newaps.exe’ in the medical folder. When open, this Scheduler operates on a separate tab on the tool bar, which
allows for access to it while working anywhere in Quick-MD or any other program.
SETTING UP
In the upper left hand corner, all providers that have been set up in the scheduler are shown. Providers are
added to the scheduler by accessing the SETTINGS (for more information see page 114) button and then the “SET
PROVIDER NAMES” button. Both first name and last name must be set.
NOTE: Once a new provider has been added, the scheduler must be closed and restarted to have the change
take effect.
USING TEMPLATES
This feature will save a layout of blocked or colored time in the schedule. To create a template, use the
appropriate <F>unction key to set the colors for your template. <F>unction key definitions are found under
the <Help> button on Q-Schedule’s main menu bar. Once you have setup the colors for a particular day,
click
.
NOTE: Templates are configured on a per day of the week basis, ie. Mondays, Tuesdays, etc.. Not
individual dates in the Calendar.
EXAMPLE - blocking out lunch from 12:00 PM to 1:00 PM on a Monday, will block out all lunch hours for all
future Mondays that don’t currently have appointments scheduled on them.
To use this feature, pick an individual provider, block out times and/or set other colors for that day by using the
appropriate <F>unction keys, and click on TMP button next to the bottom right hand corner of the calendar.
The templates will be set for each provider, for each day of the week, separately.
Quick-MD User Manual
Page 105 of 308
USING THE SCHEDULER
To view a particular provider’s schedule, click on that provider’s name and their schedule will appear. Across the
top of the screen the system will display which provider for what day of the week we currently have open. The
calendar is shown at the upper right hand corner. Today’s date will always be circled in red. To go to a
particular day, click on that day. The right and left arrow keys allow for toggling to previous and future months.
Quick-MD User Manual
Page 106 of 308
CREATE AN APPOINTMENT
Click in the time slot of one of the (up to four) appointment books that you want to schedule an appointment for
and select <F1> or double click the time slot to create an appointment.
ID# - Enter the patients ID# if you know it or Select <F1> to bring up the LOOK UP PATIENT FILE SCREEN where
you can search for the patient in your database. (for more information on using the LOOK UP PATIENT FILE
SCREEN see page 211)
IMPORTANT: If you are scheduling an appointment for a patient who is not in your system, then enter
through the ID# field and simply enter the new patient’s name, phone number and the reason for the
visit. This allows you to schedule patients without setting them up in the system first. If the patient does
not show up for the visit then you have not wasted an Id number, nor lost the time to set them up unnecessarily.
NOTE: Also you may want to view this Patient’s Ledger Balances and Inter Office Messages when
scheduling, if brought in by ID#. These features are turned on in SETTINGS (for more information see page
114).
NAME – Once the patient has been pulled into the scheduler by ID#, this field will be populated with the
patient’s name. If you are scheduling an appointment for a new patient, one that is not already setup in
Quick-MD, you can type the patient’s name here.
NOTE: If your cursor is in the name field, and the patient has been pulled into Q-Schedule by ID#, you
can hit <F1> to verify and even edit the patient’s demographics from this field while you are scheduling
your appointments.
REASON - Enter the reason for the visit in the comments field or hitting <F1> will open the APPOINTMENT REASON
TABLE where you have already setup your top 20 Appointment Reason Codes. (for more information see
SETTINGS on pg 114 ) Type the number of the appointment reason listed and hit <Enter>.
VERIFICATION - Select the appropriate code when patient is notified of appointment: When verifying
appointments, click in the desired time slot and hit the <F1> key, to view this patient’s information. If you
Quick-MD User Manual
Page 107 of 308
click on verified, an asterisk (*) will appear on the main screen next to the patient’s names that have been
verified, making it easy to see who is verified and who isn’t.
REF. PHY. - Enter the ID# of the referring physician, if known, or hit <F1> to browse the referring physician
table. If the referring physician is not in your system, you can simply hit <F10> to add them from here.
PRE CERT# - Hit <F1> to open Quick-MD’s MANAGED CARE MODULE to either setup or select a pre-authorization
code for this visit. Double click on the authorization number that applies to this visit and the system will
automatically bring over both the referring physician and the authorization number. Or if you know it, simply
type in the authorization number. Once set on the booking screen , the authorization number can now print
on the superbill, as this is necessary information needed during the charge entry process.
STATUS CODE - Select the appropriate code: To track all patients who either showed up for their appointments
or did not show up for their appointments. Click in the desired time slot and hit the <F1> key to open the
appointment details screen where you can now set the query code. This is usually done at the end of the
business day, or as an appointment comes due, so that the appropriate selection can be made. This
feature is for reporting features only.
NOTE: Some offices will set up a book called cancellations, and move cancellations to this book to keep
the cancelled patient in reporting, making that time slot available for another booking.
COLOR CODE - choose a color that you would like the shade of that appointment field to be. These
appointments can have preset colors and a preset amount of time blocked out. This is done in the
Scheduler Settings, Set Appointment Reasons. The commands are listed there for the setup. (For more
information see page 115)
Select <OK> and the Patient name will appear in the selected time area.
MOVING APPOINTMENTS
Quick-MD allows user to cut and paste appointments when moving an appointment within the schedule is
necessary. To use this feature, click in the desired time slot of the appointment to be moved. Double click or
press <F1> to open the appointment window and click on the <CUT> button. Quick-MD will ask you if you want
to cut the appointment. Choose yes. Then, go to the provider book, time and day that you want to move the
appointment to. Double click or press <F1> to open the appointment window and click on the <PASTE> button.
Quick-MD will ask you if you want to paste the appointment. Choose <YES>.
BLOCKING AN ENTIRE DAY
You can prevent appointments from being scheduled on a particular day by blocking the entire day. Select the
provider you wish to block the day for and then use the Calendar to select the day you wish to block. Put you
cursor in any time slot and hit <F9>. All time slots will be turned to the color red which signifies blocked time. To
unblock the day, put your cursor in any timeslot and hit <F11>. This will revert the blocked day back to the
original template.
PG UP/PG DN
The <PG UP>/<PG DN> buttons allow for moving up and down the time slots within each provider’s books or you
may use a mouse with a scroll wheel.
REPORTS
Quick-MD User Manual
Page 108 of 308
PRINT APPOINTMENT LISTING
Use this feature to Print Appointment Listings for a day, either for an individual provider, or for all providers if
left blank.
Choose a date and a provider
(Leaving this field blank will print all providers in the scheduler).
NOTE:. There are two different report formats available, Standard or Four Column. (for more information
see SETTINGS on pg 114 ).
PRINT APPOINTMENT LISTING FOR A DATE RANGE
Enter the date range and select a provider, or leave blank for all providers.
Quick-MD User Manual
Page 109 of 308
PRINT SUPER BILLS
Use this feature to batch Print Super Bills for a specific date.
DATE - Enter Date for which you want Super Bills printed.
PROVIDER - Enter the Provider for which you want Super Bills printed. (leaving this field blank will print all
providers in the scheduler). Or you may print a single super bill by clicking in the desired time slot and hitting
the F8 key.
SEARCH FOR EXISTING APPOINTMENT
Use this feature to search for and view an existing appointment for a patient.
ID - use the <F1> key to browse your Patient Tables, highlight the patient you want, then hit the enter
key to start your search, or if the patient is not in your patient files, you may search for his/her
appointment by Name. The name search will search on a partial spelling of the name.
NOTE: The system will search much quicker by ID# than a name or partial key.
Quick-MD User Manual
Page 110 of 308
30 DAYS – Click this button to only search out 30 days from today’s date. Makes searching much
Quicker.
60 DAYS - Click this button to only search out 60 days from today’s date. Makes searching much
Quicker.
90 DAYS - Click this button to only search out 90 days from today’s date. Makes searching much
Quicker.
180 DAYS - Click this button to only search out 180 days from today’s date. Makes searching much
Quicker.
1 YEAR - Click this button to only search out 1 Year from today’s date. Makes searching much Quicker.
TO SEARCH BY A DATE
RANGE:
BEGINNING DATE - enter the date you want Quick-MD begin search. Quick-MD defaults to today’s date as
a beginning date for the search.
ENDING DATE - enter the date you want Quick-MD to end search.
Select <SEARCH DATE RANGE> to display all appointments set for this patient.
QUERY APPOINTMENTS
Use this feature to run reports based your on the status codes of your scheduled appointments.
EXAMPLE: I want to run a report of all patients who DID NOT SHOW within a date range.
FROM DATE - select the date you want to begin your report.
TO DATE - select the date you want to end your report.
QUERY CODE - select the appropriate Status code.
PROVIDER - select the appropriate provider.
Select <OK>
DATA OUTPUT PROCESSOR - will display all patients with the selected date of appointments and the selected Query
Code.
Select PRINT ALL to print the report or Select CLOSE to exit
Quick-MD User Manual
Page 111 of 308
NEXT AV.
Use this feature to search for the next available appointment.
START SEARCH AS
OF
WHAT DATE - pick date to start search
START SEARCH AS
appointment
OF
WHAT TIME - use the down arrow key to display the earliest time you can make an
LATEST TIME ACCEPTABLE - use the down arrow key to display the latest time an appointment can be made
Select <OK> to display Appointment Schedule
Note: The system is looking for the first time slot that has nothing booked in it or is
Not blocked with the red color. So in order to use this function, all non-available times
have to be blocked in red.(i.e.-must block out all lunch hours.)
REFERRING PHYSICIAN REPORT
Use this feature to run a report on referring physicians and the patients they referred to you by a date range.
The referring physician has to be set in the scheduler for this report to work. This report may be run for an
individual Provider, or leave blank for all. Quick-MD will run the report listing the Providers alphabetically with the
patients they referred under their name.
APPOINTMENT AUDIT REPORT
Use this feature to run a report that shows whether patients who visited your office on a certain date have
charges in their ledger for that date of service.
NOTE: This feature can only determine whether charges were entered if the patient is pulled into the
scheduler by ID#. If the patient was new and you just entered their name on the scheduler with no ID,
Quick-MD User Manual
Page 112 of 308
the report will tell you whether or not they showed up so that you can check the ledgers to determine if
charges were entered.
Quick-MD User Manual
Page 113 of 308
APPOINTMENT SETTINGS
Use this feature to define the default settings used Q-SCHEDULE. Additionally, you will use this screen to define
provider names/rooms/equipment that you might be scheduling as well as the top 20 reasons for appointments.
You will also define your Super Bill settings here.
START TIME – enter the earliest time that appointments can be scheduled daily for all providers.
NOTE: All of these settings are global settings for the office. So if one provider
starts at 8 am and the other at 9 am, the system will have to be set at 8 am.
INTERVALS – choose between 10 and 15 minute increments for scheduling.
END TIME – enter the latest time that appointments can be scheduled daily for any one provider.
HOLIDAYS – enter holidays observed by office. This feature will automatically block the entire day and will not
allow scheduling of patients.
ACTIVE COLUMNS – This feature allows users to de-activate appointment books 2, 3 or 4 for all providers.
OTHER SETTINGS – these functions allow for turning on or off miscellaneous settings.
BLOCK WEEKENDS – blocks weekend scheduling
SHOW LEDGER TOTALS – allows for the ledger balance screen to be shown when scheduling a patient.
SHOW OFFICE MESSAGE – allows for the inner office message to be shown when scheduling a patient.
Quick-MD User Manual
Page 114 of 308
REFRESH EVERY 15 SEC. – allows for Quick-MD to update any changes to the appointment system every 15
seconds. This feature is for a multi-user system, running on a network.
CHECK FOR FUTURE APPOINTMENTS - will auto check for the first future appointment this patient has, providing
patient was pulled in by ID#.
NOTE: Depending on the size of the data base and the speed of the network, this
Feature may have a tendency to slow down the scheduling process. You can, however, tune this
feature using the # of Days to go out on check for future appointments feature described below.
PRINT 4 COLUMN LISTING - If checked this will print the appointment listing out to mirror the 4 columns of the
scheduler screen. Only the patient names will print on this listing.
DEFAULT STATUS CODE – Use this feature to set a default status code on all new appointments.
NEXT SUPER BILL # – allows user to control the next super bill number used when printing super bills from the
scheduler.
# OF DAYS TO GO OUT ON CHECK FOR FUTURE APPOINTMENTS- This feature allows you specify the number of days that
the “Check for Future Appointments” feature will run through. This allows you to tune the application for
slower networks and large databases.
NOTE: Settings of 0 or 1 will make Quick-MD scan ALL dates into the future. If you want to decrease the
number of days, then settings of two or greater will turn this feature on.
REBUILD APP FILE – this utility allows for the appointment files to be rebuilt in the event data files are
corrupted.
REINDEX APP FILE – this utility allows for the appointment files to be re-indexed in the event data files are
corrupted.
PURGE APP FILE – Use this feature to purge appointment files for a time period, if desired.
RESET LOCKED FIELDS - If a system error message occurs in the appointment file, this feature allows you to
reset lock fields to clear error message and allow the user to continue.
EXAMPLE: System error message will display “appointments locked by another terminal”, and you know
no one else has this day in use. This occurs when someone is scheduling an appointment and windows
locks up or there is a power spike or outage, et al.
IMPORTANT: All operators except the one running this utility must be out of the Appointment System and
Quick-MD!
SET APPOINTMENT REASONS
Here is where you can setup your practice’s top 20 reasons that patients visit your office. These reasons are
used during the booking process. Quick-MD will automatically block out pre-set amount of times and
automatically turn the appointment a color that you select. These commands are on the top of this screen.
SET PROVIDER NAMES
This is where the set up is done for providers/rooms/equipment to be scheduled.
SET SUPER BILL DATA
Quick-MD is designed to fill out your super bill with any or all of the information found on this screen.
Quick-MD User Manual
Page 115 of 308
Step One: Print a Test Form
Load your printer with your pre-printed Super-Bills and then click <PRINT GRID>. This will print the test grid
out on your Super Bills. (for more information on using the Test Grid see page 86)
Step Two: Plug in your Coordinates
You will now decide which fields print on your forms. For each field that you want to print, plug in the
appropriate line and column numbers from your test form.
NOTE: Entering 0 in both the line and column fields will prevent that field from printing on your forms.
Quick-MD User Manual
Page 116 of 308
USING THE STANDARD APPOINTMENT SCHEDULER
The Standard Appointment Scheduler was the original scheduler that was created in Quick-MD. Although further
development will not be done on this scheduler you should not hesitate to use it if the need is there for it. It is a
fully functional and powerful application in its own right.
IMPORTANT: The only reason that you would need to use this Scheduler instead of the Enhanced
Scheduler, would be that the structure of your practice demands that you can see and schedule in two
separate appointment books at the same time, ie. Booking for two doctors where they have to see open
time slots at the same time.
Setting Up
In order to use the Standard Appointment Scheduler, you will need to setup some basic information that tells the
Quick-MD (for more information on setting up the Standard Appointment Scheduler see page 79)
Getting there:
From anywhere in the patient files press the <F12> key.
BOOK 1 - select the <DOWN ARROW KEY> to display Provider Name and select the appropriate Provider if your
office has multiple providers. All providers set up in PROVIDER TABLES (for more information see page 65).
BOOK 2 - you can also select the same provider if he has been set up twice in PROVIDER TABLES (for more
information see page 65) with a book 2. This allows you to set appointments for two Patients with the same
appointment time for this one provider or you can select another Provider to schedule appointments for.
NOTE: You may select two Providers, that upon opening the scheduler, Quick-MD automatically defaults to
these two books. These defaults are set in APPOINTMENT DEFAULTS (for more information see page 79).
The calendar will default to the current date. Double click on selected date to set appointments.
NOTE - Commands across the top will assist you in setting appointments:
Quick-MD User Manual
Page 117 of 308
<F1> - SET APPOINTMENT – allows for you to set an appointment in the selected time slot.
<F2> -NEXT DAY – Use this feature to set appointments for future individual days of the week
<F3> - PREVIOUS DAY – Use this feature to view previous appointments for each individual day of the week
<F4> - BLOCK/UNBLOCK - when <F4> is selected a first time this allows you to Block a selected time from any
appointments being set. When <F4> is selected again on the Blocked time, this allows the time to be UnBlocked and appointment can be set.
<F5> - BLOCK DAY - Use this feature to Block any day of the week from appointment being set.
<F6> - DELETE - Use this feature to delete an appointment that has been scheduled.
<F7>-SUPER BILL - Use this feature to print a single super bill for a selected patient.
<F10> - EXIT - Use this feature to return to Appointment Calendar.
Click in the time slot that you want to schedule an appointment for and select <F1> to Set Appointment.
ID# - select <F1>to browse for an established patient. Highlight the desired patient and hit enter to bring
Patient’s current information to appointments. Patient name and telephone number will follow.
NOTE - While browsing “Patient Tables” you may Press <F1>to See More information on the patient that is
highlighted. Also you may want to view this patient’s ledger and inter office messages when scheduling.
These features are turned on in APPOINTMENT DEFAULTS (for more information see page 79).
If you are scheduling an appointment for a patient who is not in your system already, then skip the ID field
and enter his name and phone number and the reason for the visit, and click <OK>.
Quick-MD User Manual
Page 118 of 308
VERIFY CODE – Use this feature to track whether the patient has been Verified for their appointment or not.
Select the appropriate code.
•
•
•
•
•
Not Verified
Verified
No Answer #1
No Answer #2
No Answer #3
QUERY CODE - Select the appropriate code: After appointment date to track all patients who either showed up
for their appointments or did not show up for their appointments. Click in the desired time slot and hit the
<F1> key to set the query code.
•
•
•
Showed - Patient kept appointment
Did Not Show - Patient did not keep appointment
Cancelled - Patient cancelled appointment
COMMENTS - Enter the reason for the visit in the comments field.
Select <OK> and Patient name will appear in selected time area.
Quick-MD allows users to change blocks with different colors to denote whatever the office desires. The
commands that allow you to do this are listed across the top bar.
EXAMPLE: Some offices denote surgery with green color, post op with yellow, etc. Also, some offices will
change the color of the appointment to silver to indicate that the patient has checked in and is waiting to
be seen.
MOVING APPOINTMENTS
Quick-MD allows users to cut and paste appointments when moving an appointment within the schedule is
necessary. To use this feature, double click in the appointment box where the appointment currently exists.
Quick-MD will ask you if you want to cut the appointment. Choose yes. Then, go to the time and day that you
want to move the appointment to. Double click in that time slot. Quick-MD will ask you if you want to paste the
appointment. Choose yes.
USING TEMPLETS
Quick-MD allows users to utilize templates. This feature will save a layout of blocked or colored time in the
schedule. Once saved, this layout will be copied to all future days that have not been opened. For example,
blocking out lunch from 12:00 PM to 1:00 PM on a Monday, will block out all lunch hours for all future Mondays
that have not been previously opened by a user. To use this feature, schedule initial template and click on TMP
button in upper left hand corner.
NOTE: For This feature to work, first go to properties and click on box, “Use Appointment Templets”,
before attempting to utilize This feature.
Quick-MD User Manual
Page 119 of 308
You can apply a Templet on a day by pressing <F11> while the cursor is in a time slot. The menu will let you
apply a templet from any day of the week.
USING THE APPOINTMENT FUNCTIONS
Main Menu on the Appointment Calendar
Quick-MD User Manual
Page 120 of 308
NEXT MONTH – Use this feature to make appointments for future months
PREVIOUS MONTH - Use this feature to view previous months appointments
FUNCTIONS
LIST APPOINTMENTS
Use this feature to Print Appointments for a Day.
DATE - Enter the date of appointments you want to print.
NOTE: System will default to present date.
PROVIDER - Select the <DOWN ARROW> key to display Provider Name and select the appropriate provider
Select <OK> to List all Appointments on Screen
Select <PRINT ALL> to Print Appointment Report
NOTE: You should have a Printed Report of all Appointments for the date
you selected.
Select <CLOSE> to return to Appointment Reports Menu
SEARCH FOR APPOINTMENTS - Use this feature to search for next available appointment time, assuming all
time slots not available for seeing patients have been blocked.
Quick-MD User Manual
Page 121 of 308
START SEARCH AS
OF
WHAT DATE - pick date to start search
START SEARCH AS
appointment
OF
WHAT TIME - use the <DOWN ARROW KEY> to display the earliest time you can make an
LATEST TIME ACCEPTABLE - use the <DOWN ARROW KEY> to display the latest time an appointment can be
made.
Select <OK> to display Appointment Schedule
SEARCH FOR PATIENTS - Use this feature to view an existing appointment for a patient.
In the yellow field you may use the <F1>key to browse your Patient Tables, highlight the patient you
want, then hit the enter key to start your search, or if the patient is not in your patient files, you may
search for his/her appointment by Name. The name search will search on a partial spelling of the name.
Quick-MD defaults to today’s date as a beginning date for the search.
ENDING DATE - enter the date you want Quick-MD to end search.
Select <OK> to display all appointments set for this patient.
QUERY APPOINTMENTS
This feature is used for reporting purposes.
Quick-MD User Manual
Page 122 of 308
FROM DATE - select the date you want to begin your report.
TO DATE - select the date you want to end your report.
QUERY CODE - select the appropriate query code.
PROVIDER - select the appropriate provider.
Select <OK>
The DATA OUTPUT PROCESSOR will display all patients with the selected date of appointments and the selected
Query Code.
Select PRINT ALL to print report or Select CLOSE to exit
PRINT SUPER BILLS - Use this feature to print Super Bills for all patients with appointments on the
selected date.
DATE - select the date of appointments Super Bills are to be printed
PROVIDER - select the appropriate provider that Super Bills are to be printed. To print Super Bills select
appropriate Printer, then select <OK> to print Super Bills
NOTE: Always select EXIT to exit Appt Reports Menu and return to Appointment Calendar.
NOTE: There is a cut and paste function available in the appointment scheduler that allows you to
move a patient from one appointment to another. Double click with the left mouse key on the time
period that the appointment is currently set for. Go to the new time period and double click with the
left mouse key. Quick-MD will prompt you to paste. Choose <OK> and the appointment is moved.
Once patients are scheduled, click in a desired time slot, and hit the <F1>key to view this patients’ information.
Quick-MD User Manual
Page 123 of 308
MULTI-VIEW SCHEDULER
Getting there:
The Multi-View Scheduler is a separate, but integrated, application that is started from its own icon. Set an icon
to “books.exe’ in the medical folder. When open, this Scheduler operates on a separate tab on the tool bar,
which allows for access to it while working anywhere in Quick-MD or any other program.
SETTING UP
The setting for the appointment can be found by clicking on the properties button. This will bring up the following
screen.
Time Interval: - The time interval can be set to ten or fifteen minutes. Once the time interval is set it should not
be changed.
Start Time / End Time: - The Start and End times set the default start and end times for all doctors.
Holidays To Block: - Stores up to ten holidays. User cannot book appointments on holidays.
Other Defaults:
•
•
•
Block Weekends: - If checked the user will not be able to book appointments on the weekend.
Show Ledger Totals: - If checked the ledger totals for the current patient will be displayed when
booking their appointment.
Show Office Message: - Show any office messages that belong to the patient being booked.
Quick-MD User Manual
Page 124 of 308
•
•
•
Refresh Every 15 Seconds: - If this is checked the appointment screen well refresh itself every 15
Seconds. This will keep terminals in sync if there are more then one users booking appointments.
Check For Future bookings: - When the appointment is booked the system will search for any
appointments for this patient in the future. If a future appointment is found the system will warn the user.
o Note: The feature only works for appointments that are set using the patient’s ID.
Apply Temp To Existing Days: - If this feature is checked, the templet on existing days will be
automatically updated with any changes made to the templet.
o Note: When creating templets it is best to have this option disabled. If it is enabled then the
system will refresh while you are creating an appointment, effectively erasing your current
template. Also, if you are assigning a templet using the <F11> then you will need to book an
appointment to keep it from getting automatically refreshed with the default templet.
Carry Additional Slots To Block On a Cut and Paste: - If this option is checked cut and paste will carry all of
the slots associated with the current appointment.
Restore Additional Slots to Block to the Template When Deleting Appointment: - If this option is checked
the book will be restored to the template settings when an appointment is deleted.
Color To Use For Blocked Time Periods: - This is the color that the system will use when blocking
appointments you can get the color code by checking Set Appointment Reasons. (for more information see
page 128)
Export Path-Filename: - This is the file that is written to when you run the Third Party Export. (for more
information see page 139)
Number of Days To Search: - This is the maximum number of days that the system will search when checking
for future bookings.
Default Group: - This is the group that will be displayed whenever the appointment system is first started.
Default Status Code: - This is the status code that will be used by default whenever a new appointment is
created. (for more information see page 130)
Reporting Options: - These two options affect the List Appointments for a Day report. (for more information
see page 137)
•
•
Standard: - Prints a single column view of the appointment system.
4 Column Listing: - Prints a four-column view of the appointment system.
Do Not Print Empty Times: - If this option is set, empty appointment times will not show up on the List
Appointments for a Day report. (for more information see page 137)
Double Space Listing - If this option is set there will be extra space between each appointment on the List
Appointments for a Day report. (for more information see page 137)
Show Status – IF THIS OPTION IS SET THE STATUS FOR THE APPOINTMENT WILL PRINT ON THE LIST APPOINTMENTS FOR A DAY
REPORT.
Quick-MD User Manual
Page 125 of 308
SET PROVIDER NAMES
The appointment system allows you to book appointments for up to thirty providers.
Quick-MD User Manual
Page 126 of 308
SETTING UP GROUPS
This allows you to set up groups of providers. Each provider in this group will be displayed in a book on the main
screen. Prov1 corresponds to the first book, Prov2 the second book, and so on. The provider numbers here
correspond to the provider numbers in the set provider screen. (for more information see page 125)
Quick-MD User Manual
Page 127 of 308
SET APPOINTMENT REASONS
You can have up to 25 custom reason codes. Each reason code can have a color and a number of slots to
block associated with it. There are 16 standard colors that you can use. You can associate the color by adding
a number in square brackets at the end of the descriptions. The color codes are listed at the bottom of the form.
If you want the reason to default to a certain number of blocks, you can set a number in parentheses at the end
of the description. For example, if you wanted to have new patients colored green and to take up two blocks,
you would enter the following description, “New Patients {2}[3]”.
Quick-MD User Manual
Page 128 of 308
SETTING SUPER BILL COORDINATES
This screen will allow you to setup the layout of your super bill. (for more information see page 115)
Quick-MD User Manual
Page 129 of 308
SET STATUS CODES
Quick-MD we allow you to set up to 10 custom status codes. The codes entered here will show up on the
appointment information screen. (for more information see page 133)
Quick-MD User Manual
Page 130 of 308
SET COLOR DESCRIPTION
This form allows you to set up a description for a color. This way you can assign certain times to certain types of
visit by using a specific color for that time. When a color with a description is used the description is displayed if
there is not any patient information for that block.
FILE MAINTENANCE UTILITES
• Rebuild: - Allows you to rebuild the appointment files. (for more information see page 284)
• Re-index: - Allows you to re-index the appointment files. (for more information see page 285)
• Purge Files: - Allows you to remove old information from the appointment system. Once this
information is gone there is no way for the system to access it unless you restore from a backup. You
should only purge old appointments if you are sure that you will no longer need this information.
• Reset Lock Fields: - You may need to run this utility if you are getting locking errors while trying to
book appointments. The appointment files may get stuck in a locked state due to system failures such
as lose of power.
• Unlock Waiting List: - You may need to run this utility if you are getting locking errors while working in
the waiting list.
Quick-MD User Manual
Page 131 of 308
USING THE SCHEDULER
Each book is set to a provider that comes from a particular group. (for more information see page 127) The “w”
button above each book will put the appointment system in WEEK MODE. WEEK MODE will allow you to see the
whole week for a single doctor. To return to GROUP MODE you need to pick a group.
The calendar is shown in the upper left hand corner of the form. The current date is always circled in
red. At anytime, to quickly return to the current date, click on the button that says, “Today is” followed by the
current date.
Quick-MD User Manual
Page 132 of 308
CREATE AN APPOINTMENT
Double click in the time slot where you want to create an appointment.
Acct# - Enter the patient’s account number if you know it or Select <F1> to bring up the LOOK UP PATIENT FILE
SCREEN where you can search for the patient in your database. (for more information on using the LOOK UP PATIENT
FILE SCREEN see page 211)
IMPORTANT: If you are scheduling an appointment for a patient who is not in your system, then enter
through the ID# field and simply enter the new patient’s name, phone number and the reason for the
visit. This allows you to schedule patients without setting them up in the system first. If the patient does
not show up for the visit then you have not wasted an Id number, nor lost the time to set them up unnecessarily.
NOTE : Also you may want to view this Patient’s Ledger Balances and Inter Office Messages when
scheduling, if brought in by Acct#. These features are turned on in PROPERTIES (for more information see
page 124)
F.NAME – Once the patient has been pulled into the scheduler by Acct#, this field will be populated with the
patient’s first name. If you are scheduling an appointment for a new patient, one that is not already setup in
Quick-MD, you can type the patient’s name here.
NOTE: If your cursor is in the name field, and the patient has been pulled into Multi-View by ID#, you can
hit <F1> to verify and even edit the patient’s demographics from this field while you are scheduling your
appointments.
History – This feature allows you to see a complete history of this patient’s appointments.
Quick-MD User Manual
Page 133 of 308
REASON - Enter the reason for the visit in the comments field or hitting <F1> will open the APPOINTMENT REASON
TABLE where you have already setup your top 25 Appointment Reason Codes. (for more information see
SETTINGS on pg 128 ) Type the number of the appointment reason listed and hit <Enter>.
NOTE: If Quick-MD is setup to interface with a third party EMR you can enter a time behind the reason
code and this appointment will be set at that time in the EMR. For instance if you book someone for
8:00 but type 6:00A behind the reason the appointment will be booked for 6:00 am in the EMR.
VERIFICATION - Select the appropriate code when patient is notified of appointment: When verifying
appointments, click in the desired time slot and hit the <F1> key, to view this patient’s information. If you
click on verified, an asterisk (*) will appear on the main screen next to the patient’s names that have been
verified, making it easy to see who is verified and who isn’t.
REF. PHY. - Enter the ID# of the referring physician, if known, or hit <F1> to browse the referring physician
table. If the referring physician is not in your system, you can simply hit <F10> to add them from here.
PRE CERT# - Hit <F1> to open Quick-MD’s MANAGED CARE MODULE to either setup or select a pre-authorization
code for this visit. Double click on the authorization number that applies to this visit and the system will
automatically bring over both the referring physician and the authorization number. Or if you know it, simply
type in the authorization number. Once set on the booking screen, the authorization number can now print
on the super bill, as this is necessary information needed during the charge entry process.
STATUS CODE - Select the appropriate code: To track all patients who either showed up for their appointments
or did not show up for their appointments. Double click on a time slot to open the appointment details screen
where you can now set the query code. This is usually done at the end of the business day, or as an
appointment comes due, so that the appropriate selection can be made. This feature is for reporting
features only. (for more information on setting up STATUS CODES see page 130)
NOTE: Some offices will set up a book called cancellations, and move cancellations to this book to keep
the cancelled patient in reporting, making that time slot available for another booking.
COLOR CODE - choose a color that you would like the shade of that appointment field to be. These
appointments can have preset colors and a preset amount of time blocked out. This is done in the
Scheduler Settings, Set Appointment Reasons. The commands are listed there for the setup. (For more
information see page 128)
Note1, Note2 – Two notes can be store with each appointment.
Time Duration – Allows you to extend the appointment over multiple units.
Booking Operator – This is the name of the current user.
Date Set – This is the date that the appointment was entered into the system.
Sup# - This is the number of the super bill that was printed for this appointment.
Super Bill Printed – If this box is checked a super bill has been printed for this appointment.
NOTE: If a super bill has been printed for an appointment a $ will appear before the patients name on the
main appointment screen.
Waiting List – This will bring up the WAITING LIST. (For more information see page 135)
Put on W.List – This will but the current patient on the waiting list. (For more information see page 135)
Quick-MD User Manual
Page 134 of 308
WAITING LIST
The waiting list allows you to put patients on the waiting list that already have an appointment, but would like to
have one at an earlier time.
Patient – The Patient’s name is displayed in this field.
Provider/Res. – Displays the provider’s name for this patient’s existing appointment.
Start Date – This is the Starting Date of the current patient’s existing appointment.
End Date – This is the Ending Date of the current patient’s existing appointment.
S, M, T, W, T, F, S – The first letter for each day of the week. If an ‘X’ appears in this column then the current
patient would only like an appointment on that day of the week.
Pref – This is the preferred time of the day that the current patient would like an appointment on.
Number – Clicking on the number to the left of the patient’s name allows you to see the comment for that
appointment. The comment will show up in the comment field at the bottom of the screen.
ED – Allows you to edit the waiting list information for the current patient.
DEL – This will delete the patient from the waiting list.
BK – This will book the patient in a selected time slot. This option is disabled unless you access the waiting list
from the appointment information screen. (for more information see page 133)
Quick-MD User Manual
Page 135 of 308
ADDING A PATIENT TO THE WAITING LIST
To add a patient to the waiting list you first need to book an appointment for that patient. Then on the
Appointment information screen you simply click on the “PUT ON W.LIST” option and the patient will be added to
the waiting list. (for more information see page 133)
BOOKING A PATIENT FROM THE WAITING LIST
To book a patient from the waiting list you first need to choose a time for the appointment. Then enter the
appointment information screen by double clicking. From the appointment information screen you will need to
choose the “WAITING LIST” feature. (for more information see page 133) Finally, you will need to click the BK
button next to the patient that you want to book. (for more information see page 135)
Note: When a patient is pulled from the waiting list, the previous appointment for that patient will be
deleted.
APPOINTMENT REPORTS
Quick-MD User Manual
Page 136 of 308
LIST APPOINTMENTS FOR A DAY
This report allows you list all appointments for a day for a single provider or for all providers if the provider field
is left blank.
PRINT LISTING FOR A PERIOD
This report runs the Day Listing for every day in the range specified.
LIST APPOINTMENTS COMBINED
This feature allows you to print a combined appointment list. A combined appointment list will show all
appointment for all of the providers checked, per time slot.
Quick-MD User Manual
Page 137 of 308
QUERY APPOINTMENT STATUS CODES
This report allows you to list all of the appointment in a date range that match the provider and the query code
selected.
APPOINTMENT AUDIT REPORT
This report will show a list of patients on the day selected that do not have charges for that day in their ledger.
Quick-MD User Manual
Page 138 of 308
BATCH PRINT SUPER BILLS
This feature allows you to run a super bill for all appointments on the day selected. If the provider is blank super
bills for all providers will be printed.
THIRD PARTY EXPORT
This feature will generate an import file for Televox. If the provider field is blank it will export all provider’s
appointments on the day selected.
LIST TEMPLETS
This report will generate a text representation of the doctor’s templets for a selected day of the week.
Quick-MD User Manual
Page 139 of 308
CHECK ELIGIBILITY
If you are using Gateway EDI as your clearing house then you have the option to check eligibility with in the
scheduler. All of the existing patients for the day selected will be sent to gateway. You will get a report back for
each patient explaining their current primary insurance eligibility.
NEXT AVAILABLE
This feature allows you to search for the next available appointment time.
Search Starting With Date – This is the date that the system will start searching from.
Search Ending With Date – This is the date that the system will search too.
Search Starting With Time – This is the time that the system will start searching from.
Quick-MD User Manual
Page 140 of 308
Search Ending With Time – This is the time where the system will stop searching.
Time Unit Duration – The appointment must have at least the number of units listed available.
Search For Provider – If a provider is selected here; the system will search for an available appointment for this
provider only.
Search For Provider Two – If a provider is selected here; the appointment system will allow the search to find
open times for this provider also.
Note: If provider two is set then both books must have the open time requested to be selected.
Quick-MD User Manual
Page 141 of 308
PATIENT SEARCH
The Patient Search lets you search for an appointment for a specific patient.
Patient Acct# <F1> from this field will allow you to look up the patient. (for more information see page 211)
Last Name Key and First Name Key – You may do partial name search with the last and first name keys.
30, 60, 90, 180, 365 Days – This is the number of days in the future that the system will search for the
appointment.
E-MAIL
You can access the inner office E-Mail system from this point in the appointment system. (for more information
see page 295)
Quick-MD User Manual
Page 142 of 308
JUMP TO
Jump To gives you the ability to jump to a certain date in the future.
TEMPLET
The templet button lets you use the layout of the first appointment book to be saved as a templet.(for more
information see page 119)
Quick-MD User Manual
Page 143 of 308
HI RESOLUTION APPOINTMENT SCHEDULER
The High Resolution version of the multi-view appointment system is design to run on systems that have their
monitor set to a resolution of 1024x786 or higher. The section describing the multi-view scheduler applies to
this scheduler as well (for more information see page 124).
Quick-MD User Manual
Page 144 of 308
DAY VIEW
Clicking on the “Day” button above each column of the appointment system allows you to get a complete day
view for that doctor on a single screen. This screen works like the regular appointment screen and from here
you can perform the following actions:
Double Click - Double clicking on a appointment slot will let you book an appointment. Each doctor
has three books for each appointment time.
F2 – Pressing <F2> while your cursor is in an appointment cell that has an appointment will bring up a
screen with the information about the appointment without locking the day for other users.
F3 – Allows you to quickly block or unblock a empty appointment cell under the cursor.
F8 – Will print out a single Super bill for the appointment under the cursor.
F9 – Allows you to block a group of time by setting the block from and block to times.
F11 – Brings up a menu were you can pick a template from any weekday and apply it to the current day.
Quick-MD User Manual
Page 145 of 308
NEXT AVAILABLE BY COLOR
This feature allows you to search for the next available appointment time that is defined to a certain color.
Account # - If the account number is set a appointment will be created for this patient if a empty time slot is
found.
Color to Search For - Only empty appointments that are set to the color that you choose will be accepted.
Search Starting With Date – This is the date that the system will start searching from.
Search Ending With Date – This is the date that the system will search too.
Search Starting With Time – This is the time that the system will start searching from.
Search Ending With Time – This is the time where the system will stop searching.
Search For Provider – If a provider is selected here; the system will search for an available appointment for this
provider only.
Search For Provider Two – If a provider is selected here; the appointment system will allow the search to find
open times for this provider also.
Note: If provider two is set then both books must have the open time requested to be selected.
Quick-MD User Manual
Page 146 of 308
WORKING WITH PATIENTS IN QUICK-MD
Quick-MD was designed to allow you to work with your patients in as simple and intuitive a manner possible.
Most of the work you will do with your patients will occur in the PATIENT DEMOGRAPHICS SCREEN. This one screen
acts as a pivot point from which all the functionality relating to your Patients can be accessed.
THE FILE MENU
ADD A NEW PATIENT FILE
Getting there:
OR click on the
Quick-MD User Manual
icon.
Page 147 of 308
ID# - To have the system automatically assign the next available ID#, simply press the Enter button OR you
may enter in your own patient ID#.
FIRST NAME: - Enter Patient’s first name.
Pressing <F1> in this field will bring up the Waiting Room Patient Data browser.
This browser will contain a list of patients that have entered their demographics through the waiting
room wizard. Picking a patient from this list will allow Quick-MD to fill out the demographics screen and
remove that patient from the waiting room table. Additionally, you can view the patient demographics by
pressing <F3> or print a label by pressing <F2>. The <F2> and <F3> function keys will not remove the
patient from the waiting list. (for more information see page 297)
LAST NAME: - Enter Patient’s last name.
MIDDLE NAME: - Enter Patient’s middle name or middle initial.
GENERATION/TITLE: Enter the patient’s generation or title here. I.e. Jr, Sr., etc..
ADDRESS - Enter Patient’s address.
ADDRESS - location, Enter a second address, if applicable.
CITY: - Enter the Zip Code and system will automatically fill in city, state and Zip Code (once it has been
entered the first time.)
D.O.B: - Enter the Patient’s date of birth in a eight digit format (01/01/2000)
S.S.# - Enter the Patient’s Social Security number
D.L.# - Enter the Patient’s Drivers License number
Quick-MD User Manual
Page 148 of 308
MEDICAL RECORD - Enter the Patient’s clinical number assigned by the facility. This number typically is either a
Hospital record number or maybe a Chart number. This number is not to be confused with the Patient ID
number. Quick-MD can search for and retrieve a Patient’s File by this number.
H.PHN# - Enter the area code and phone number.
W.PHN# - Enter the area code and phone number of Patient’s employer.
EXT# - Enter the extension for the work phone number.
CELL PHN# - Enter the patient’s area code and cell phone number.
SEX - Enter the letter M if the Patient is a male or F if the Patient is a female.
(Stop CH) - If you want to stop electronic billings through Clearing House, click the box to put a check mark
(DECEASED) - If the Patient is deceased, click the box to put a check mark to identify the
Patient as being deceased
NOTE: All fields that have a down arrow on them: you have the ability to make a selection by entering the
number in front of the desired choice and then hitting the enter key, by using the up and down arrow
keys to bring in the desired choice and then hitting the enter key, or by using the mouse to click on the
arrow and then clicking on the desired choice.
CLASS - Use the down arrow key to select the Patient’s Financial Class. The Financial Class is a table set up
by each office for reporting purposes.
NOTE: The FINANCIAL CLASS TABLE (for more information see page 69) can store up to 25 financial
classes. Typically each office will set up the Government Agencies, the larger Insurance Agencies
in their area and group the balance of Insurances under Private or Commercial Insurances. SelfPay, Workers Comp, and Attorney’s (if applicable) would also be included. This table is for reporting
purposes ONLY!
PROVIDER - Use the down arrow key to select the appropriate Provider treating Patient.
NOTE: The PROVIDER TABLE (for more information see page 65) can store up to 26 Providers. Also one
may be defaulted ( Properties/Patient/Patient defaults)
IF YOU ALWAYS WANT THE CHARGES FOR ALL PATIENTS TO SHOW UP UNDER THE PROVIDER SET ON THE DEMOGRAPHIC
SCREEN, REGARDLESS OF THE PROVIDER SELECTED DURING THE CHARGE ENTRY, GO TO PROPERTIES/OPTIONS/MISC.
Defaults, and check the box Use Provider listed in Patient File.
If this box is unchecked, then the Provider selected during the charge entry process will be used on
the 1500 form
LOCATION - Use the down arrow key to select the location Patient receives treatment.
NOTE: The LOCATION TABLE (for more information see page 66) can track up to 10 satellite locations.
EMPLOYER - Enter the name of the Patient’s place of employment. You can also use the F1 key to pull over an
additional employer or use the F10 to add an employer to the table.
EMP. STATUS - Use the down arrow key to select the Patient’s employment status.
NOTE: The EMPLOYMENT STATUS TABLE (for more information see page 78) can store up to 10 statuses.
This is a HFCA defined Table.
SORT CODE - Use the down arrow key to select the appropriate sort (reporting code)code to further classify
Patient for Reporting and management purposes.
NOTE: The SORT CODE TABLE (for more information see page 72) can store up to 99 codes.
Quick-MD User Manual
Page 149 of 308
MARITAL STATUS - Use the down arrow key to select the marital status of Patient.
NOTE: The MARITAL STATUS TABLE (for more information see page 77) can store up to 8 statuses.
BLOCK BILL - Enter the appropriate Responsibility Code below if you do not want to bill this claim:
•
•
•
•
P Patient Statement
I Primary Insurance Billing
S Secondary Insurance Billing
A Third Insurance Billing
NOTE: There is a BLOCKED BILL REPORT (for more information see page 281) available that will give a list of
all blocked bills.
NOTE: If you do not want to save the information you inputted then select the Cancel button to exit.
After all fields of entry have been completed, continue to hit the <ENTER> key and the <SAVE> button will
become hot and will allow Quick-MD to assign the next available Patient ID number and to have all of their
information stored in system. If you hit the <ENTER> key again, the primary insurance button will become hot.
You always want to setup insurances immediately after setting up the demographics, so the system can
auto decide who is responsible for the claim during the charge entry process.
Notes: After the patient’s information has been saved, you can print a label by pressing <F2> or <F3>.
DUPLICATE PATIENT WINDOW
Quick-MD will notify you if there is a potential duplicate entry in the system.
Quick-MD User Manual
Page 150 of 308
ENTERING PATIENTS INSURANCE INFORMATION
Once the patient’s basic demographics are entered, it is time to setup their insurance information. The first three
buttons across the top of the PATIENT DEMOGRAPHICS SCREEN are used for setting up and maintaining the patients
PRIMARY, SECONDARY and THIRD Insurance Policies.
Always Begin by setting up the patients PRIMARY Insurance.
Quick-MD User Manual
Page 151 of 308
INS. ID - Enter the Insurance ID number of the Insurance company in your system. To search, press the <F1>
Key. If the Insurance Company needed is not already in your insurance table, then the <F10>key allows you to
add it on the fly from here.
NOTE: If the patient IS the insured, then you are finished. Simply hit the PULL PATIENT INFO button or hit
<Alt>+< P> (this the quickest way) and all of the patient’s information will be pulled in from the
demographics screen. (This feature does not prevent you from copying the information and then editing
certain fields. An example of when this would be used is when the patient is the child and the parent is
the insured. You can pull the patient info and then most likely change the first name and the social
security number.)
PATIENT’S RELATIONSHIP – Select the Patient’s relationship to person the insurance policy belongs to. These values
are setup by you in the PATIENT RELATIONSHIP TABLE (for more information see page 78)and are HCFA defined.
SEX - Enter the appropriate sex of the insured party. Enter M if the insured is a male. Enter F if the insured is a
female.
L.N. – Enter Last name
F.N. – Enter First Name.
M.N. – Enter Middle Name.
ADDRESS - Enter the address where the Insured resides
ADDRESS 2 - Enter a second address if applicable
Quick-MD User Manual
Page 152 of 308
CITY - Enter the city where the Insured resides-or you may enter in the ZIP CODE here and Quick-MD will
automatically fill out the city, state and zip for you.
STATE - Enter the abbreviation of the state where Insured resides.
ZIP -Enter the Zip Code where the Insured resides
PHONE - Enter the area code and phone number of the Insured
SS# - Enter the social security number
DOB - Enter the date of birth of the Insured
EMP. STAT - Use the down arrow key to select the employment status of the Insured.
NOTE: The EMPLOYMENT STATUS TABLE (for more information see page 78) can store up to 10 statuses.
EMPLOYER NAME - Enter the name of the Employer.
HCFA POL# - Enter the policy number of the Insured from the Insurance Medical Card. If the Policy number is
the person’s social security number’ then enter SS and press the <ENTER> button, this allows Quick-MD to put
Patient’s social security number in HCFA policy number field.
NOTE: If the Policyholder is the patient, and his/her Social Security is their policy number, then Typing SS in
this field will automatically pull the patients Social Security number from the Patient Demographic Screen.
HCFA GROUP# - Enter the group number of the Insured from the Insurance Medical Card.
Quick-MD allows users to track up to four different primary insurances. These insurances can be manually
chosen when entering charges or you can allow Quick-MD to auto decide which primary insurance based on
date ranges.
NOTE: The setting to turn the “auto decide” on is found in MISCELLANEOUS DEFAULTS (for more information see
page 91).
HISTORICAL PRIMARY INSURANCE COMPANIES:
This feature allows users to move insurances to history, by clicking on the “Move to History” button and then
view primary insurances assigned to history by clicking on the appropriate insurance in history. Quick-MD will
automatically bill the proper insurance, based on the date of service and the date entered when moving to
history.
The MOVE TO HISTORY button allows users to move patients current primary insurance to history.
Enter an ending date that Quick-MD will utilize as the last date of service to file this insurance as primary
unless re-billing an older claim. Click <OK>
Quick-MD User Manual
Page 153 of 308
After all fields of entry have been completed, select the SAVE button to allow Quick-MD to save Insurance
Subscriber Information to the Patient’s account
SECONDARY INSURANCE
Use this feature to setup the patient’s secondary insurance information. Aside from the effective date, this information
is setup exactly like the Primary.
The effective date will appear on all quick payment posting modules. When re-assigning claims to Secondary
or Third from the payment posting modules it is the operators responsibility to check these dates before re-assigning.
When working inside the patient’s ledger where the operator cannot see the effective date, the system will check
them for you when you re-assign a claim. If a date of service on the claims is before the effective date a warning
message will appear.
NOTE: When Quick-MD sees that Medicaid is secondary to a private insurance, the group number field will
automatically be changed to the TPL number and will print in block 9A on the HCFA 1500 form.
Quick-MD User Manual
Page 154 of 308
HISTORICAL SECONDARY INSURANCE COMPANIES:
This feature allows users to move insurances to history, by clicking on the “Move to History” button and then view
primary insurances assigned to history by clicking on the appropriate insurance in history. Quick-MD will
automatically bill the proper insurance, based on the date of service and the date entered when moving to
history.
The MOVE TO HISTORY button allows users to move patients current primary insurance to history.
Enter an ending date that Quick-MD will utilize as the last date of service to file this insurance as primary unless
re-billing an older claim. Click <OK>
After all fields of entry have been completed, select the SAVE button to allow Quick-MD to save Insurance
Subscriber Information to the Patient’s account
THIRD INSURANCE
Use this feature to setup the patient’s Third insurance information. This information is setup exactly like the
Secondary.
Quick-MD User Manual
Page 155 of 308
OTHER FEATURES OF THE PATIENT DEMOGRAPHICS SCREEN
In addition to the patient demographics and insurance information, the Patient Demographic screen gives you access
to a wealth of other important information. We will now take a look at each of these in turn.
[STATEMENT] - PATIENT STATEMENT INFORMATION
The statement field is used when the guarantor is not the same person or does not have the same address as the
patient on the demographics screen. (If the guarantor is also a patient and has children who are patients, see
DEPENDANTS on page 180) If a patient statement goes to somewhere other than the address on the main
demographic screen, then Quick-MD will send the statement to the person and address in the statement box.
Quick-MD User Manual
Page 156 of 308
NOTE: If the patient is the guarantor of the account, or the bill goes to the address on the demographic screen,
then you do not need to re-enter their information here. This is only filled out when the patient statement goes
somewhere besides the address on the demographic screen!
NOTE: To send the statement to a company or an attorney, that is set up in the system, hit F1 in the yellow field,
( or hit F10 and add them) pull them in by ID# and then hit the button PULL ID#. This feature will pull in the
appropriate billing address. A prime example of this is in an injury case. The statement would go to an attorney
instead of the patient or insured. If this occurs on a regular basis, you can add that attorney information in the
insurance table and then access it this way instead of typing the same information every time. This would also
apply to billing Companies.
[DIAGNOSIS] - PATIENT DIAGNOSES TABLE
The patient’s diagnosis table is used to store this patients last 25 diagnosis. This screen is normally populated over
time while performing the CHARGE ENTRY PROCESS, but you are free to populate it or review it at anytime. This table is
not only available from the patient’s main demographic screen, but is also used during the charge entry process and
is available from within the patients ledger, by highlighting a charge and hitting F4 to edit, then from the first yellow
pointer field, hitting F1.
Quick-MD User Manual
Page 157 of 308
Diagnosis records are added to the patient’s diagnosis table by typing the diagnosis code in, or from the master
diagnosis table by using the <F1> key in the yellow field to browse. The <F10> KEY from the yellow field allows
you to add a record in the master diagnosis table on the fly.
The I/S column allows the user to define individual diagnoses as isolated (I) or standing (S). If standing is
chosen, Quick-MD will automatically attach those diagnoses to each charge entered for this patient. If isolated is
chosen, the user will manually choose which diagnoses to attach to each charge.
Quick-MD User Manual
Page 158 of 308
[!OFF MSG] - INNER OFFICE MESSAGES
This feature allows you to enter notes you want attached to a Patient File. The message box will appear each time
you open this Patient File if it has something in it.
NOTE: if you have that feature turned on in Settings, in the Enhanced Scheduler, it will also appear when you
choose that patient when scheduling an appointment.
[STATE
MSG]
- STATEMENT MESSAGE BOX
This feature allows you to enter notes you want included on the Patient Statements. When a statement is printed this
message will appear on the Patient’s Statement indefinitely unless you enter an expiration date. These coordinates
have to be set in Properties/Printed Forms/Patient statement settings. (for more information see page 87)
[EMG] - EMERGENCY CONTACT
Quick-MD User Manual
Page 159 of 308
This feature allows the user to input an emergency contract person’s name, phone number and their relation to the
patient in the Patient File.
[SOFT 2] - OTHER SORT CODES
This feature allows the user to select a SECOND and THIRD SORT CODE to further classify a patient for reporting and
business management purposes. Use the down arrow key to select the appropriate Sort Code.
NOTE: To use this feature, the SORT CODE TABLE (for more information see page 72) must be populated with a
listing of reporting codes selected by the user.
STOP BOOKING
This feature will keep this patient from being booked in the appointment system.
PRINT
Use this feature to print a copy of the patient demographics to be placed in your charts. Clicking the <PRINT> button
brings up the DATA OUTPUT PROCESSOR.
DATA OUTPUT PROCESSOR
The DATA OUTPUT PROCESSOR is a window that you will see over and over again in Quick-MD so it is important to
become familiar with how it operates. All reports and print jobs in the system are first sent to the DATA OUTPUT
PROCESSOR where the information can be viewed, downloaded or sent to a printer.
Quick-MD User Manual
Page 160 of 308
<PGDN> – Scrolls the DATA PROCESSOR OUTPUT display forward to the next page of information.
<PGUP> – Scrolls the DATA PROCESSOR OUTPUT display backwards to the previous page of information.
<TOP> – Scrolls the DATA PROCESSOR OUTPUT display backwards to the top of the report.
<END> – Scrolls the DATA PROCESSOR OUTPUT display forwards to the end of the report.
<DOWNLOAD> – Saves the output of the Data Processor to a text or pdf file. Select a path to where you want the
file to go and select a name that you wish to call it. If you change the “Save as type” to pdf the report will be
exported in an Adobe pdf, version 4 and above, format.
<PRINT SCREEN> – Sends all the information visible on the screen to the printer.
<PRINT ALL> – Sends the entire report to the printer.
<PRINTERS> – Select and configure the printer you will be sending the report to.
<CLOSE> – Exits the DATA PROCESSOR OUTPUT Screen.
NOTE: If the report is too wide to be fully displayed in the window, placing your cursor on the double dotted
line and clicking, then using your END and HOME key will allow you to move the processor window back and
forth.
Quick-MD User Manual
Page 161 of 308
[LEDGER] - THE LEDGER
The <LEDGER> button accesses the heart of the Quick-MD billing system. It is where all Patient Claims, Charges,
Payments and Adjustments are created and maintained.
PATIENT LEDGER
This menu is your springboard for interacting with the Ledger. This allows you to quickly jump into the ledger itself.
We will now discuss each option in detail.
Quick-MD User Manual
Page 162 of 308
ENTER CHARGES NEW CLAIM
Use this feature to create a new claim in the patient’s ledger. If the patient has insurance setup, then this claim will
automatically be assigned the I responsibility. If the patient does not have insurance setup, then the claim will be
assigned the P responsibility.
NOTE: IF you do not understand the Responsibility Codes at this point, you need to stop and
learn them as you can not use the system properly without knowing this concept. To learn about
Responsibility Codes see page 26 )
Entering charges on a new claim is done through the CHARGE ENTRY SCREEN. This powerful tool is tied to various other
features throughout Quick-MD in such a way that you can easily enter all information necessary to complete a HCFA
1500 form in the shortest amount of time and with the fewest amount of keystrokes possible. Once you master the
use of this screen, you will be amazed at the speed in which you can create accurate claims in Quick-MD.
Charge Entry Screen
Use this feature to enter line item charges for procedures performed at your practice. The overall concept is to enter
the appropriate CPT Code, attach the corresponding diagnosis codes and post any payments or use Un-Applied
Credits against this procedure.
The proper use of this screen is essential for accurate claim creation, so we will walk you through the entire process
step-by-step.
Note: If you check “Block Billing To Primary Ins. For This Claim” then the system will not bill this claim. Also,
the number in parenthesis behind code, diagnosis and cost corresponds to the block number of these fields
on the HCFA 1500 form.
Quick-MD User Manual
Page 163 of 308
STEP ONE: ENTER THE CPT CODE
*CODE – Enter the Office Code here.
NOTE: If you don’t know the procedure code, the <F1> key allows you to browse the table. You will then have
the option to browse by house code, CPT code or by description. These defaults are set up in BROWSER
DEFAULTS in the PROPERTIES menu. (for more information see page 76).
NOTE: If you want to have the option of entering the CPT code instead of the Office Code, you can turn this
option on. (for more information, see Properties/CPT ENTRY OPTIONS on page 80) But realize that if you
have the same CPT code setup multiple times, ie. With different places of service and/or different pricing,
each with different house codes, then the first CPT record that matches will be brought in. In these cases
you should browse by House Code, or simply enter the house code, to ensure that the appropriate CPT
record is called in.
DESCRIPTION – The description is automatically entered once you have selected a code. It comes over as a default
from the master CPT record.
STEP TWO: ENTER THE DIAGNOSIS CODE(S)
Your cursor is now in the first yellow DIAGNOSIS pointer field. Here you will attach up to 4 diagnosis codes (the max
amount set by HCFA) to your procedure code by pointing to the appropriate records in the PATIENT DIAGNOSIS TABLE
(for more information see page 157).
Note: You can also access the patient’s diagnosis table by clicking on the button at the top of the form.
DIAGNOSIS –FROM THE FIRST YELLOW POINTER FIELD, Hit <F1> to open the PATIENTS DIAGNOSIS TABLE.
Quick-MD User Manual
Page 164 of 308
If this table has the desired entries in it already, then select the appropriate code or codes (you can select up
to four codes at once!) by clicking on the number at the left hand side of the screen (this will turn them green)
that corresponds to the diagnosis codes that you wish to apply to this charge. Clicking <OK> will then fill in
your diagnosis pointers for you. Or you may hit the escape key and simply type the appropriate number(s) in
the pointer field.
If the diagnosis code you need isn’t there, you can add it to this table by hitting the <F1> key and browsing
the master diagnosis table or by simply typing in the ICD9 number. If the one you need is not in the master
table, then you may add it on the fly by hitting the F10 key.(you can customize which field your cursor
defaults to in Browser Defaults in Properties. For more information see page 76.)
Once your diagnosis codes are entered into the Patient’s table, you can select them by clicking on the
number at the left hand side of the screen that corresponds to the diagnosis codes that you wish to apply to
this charge. Clicking <OK> will then fill in your diagnosis pointers for you in the charge entry screen. Or you
may hit the escape key and simply type the appropriate number(s) in the pointer field.
NOTE: It is this procedure of adding to and selecting from this table that ensures that the PATIENT
DIAGNOSIS TABLE always contains the 25 most recent diagnosis codes used for this patient.
In the I/S column, if the diagnosis is labeled “S” for standing, Quick-MD will automatically insert that
diagnosis into the charge screen every time a charge is entered. Any diagnosis labeled “I” for isolated will
not be automatically inserted.
STEP THREE: THE OTHER CHARGE INFORMATION SCREEN
You have now filled in the appropriate Diagnosis Pointers and your cursor is sitting in the last diagnosis field
used. Hit <ENTER> to advance the cursor. When Quick-MD sees an empty diagnosis pointer field, the next time
the enter button is hit, the Other Charge Information Screen will be displayed.
OTHER CHARGE INFORMATION SCREEN
Use this feature to input all of the information required on the HCFA 1500 that relates to this line item charge.
Quick-MD User Manual
Page 165 of 308
Note: The number in parenthesis behind the field descriptions corresponds to the block number of these
fields on the HCFA 1500 form.
Be sure that the Responsibility Code is correct!! For example, if the first entity to be billed is the primary
insurance, then the responsibility code needs to be I. If you only wanted to bill the patient for this charge,
then put a P in the field. If Insurance information has been entered for this patient, and you are entering
Charges New Claim, Quick-MD will automatically assign (I) for Primary Insurance responsibility to the claim.
If no insurance is setup, then the (P) responsibility will be assigned. If you are entering charges using Enter
Charges Patient Claim, then the (P) responsibility will be applied to this claim, regardless if the patient has
insurance.
NOTE: To speed up data entry, isolate the fields on this form that your practice regularly deals with.
Configure Quick-MD’s cursor to only jump to these fields when moving through the form with the Enter
key. (for more information see page 80)
LEDGER DATE – If entering from the FAST CHARGE ENTRY SCREEN, this will default to current date, but it can be
changed. This is the Ledger Date and will be used for recap reporting.
FROM AND TO DATES -If left blank, will use the ledger date as the date of service, but the user can enter in the
appropriate dates of service if other than the ledger date.
PROVIDER - defaults to Provider selected on Patient Demographic Screen, but can be changed.
NOTE: This Providers name and PIN#’s will be used for billing purposes, unless you check the box
Use Provider listed in Patient File in Misc. Defaults in Properties. Then the provider set as a
default in the patient file will always be used for billing, regardless of who is selected here during the
charge entry process. Also, please note the provider used for billing is the provider the charges will
show up for in reporting.
UNITS - Select the appropriate units of service and Quick-MD will automatically multiply units x times cost, if
turned on in Properties/ Misc Defaults/Multiply Units when entering Charges.
Quick-MD User Manual
Page 166 of 308
NOTE: This feature will work ONLY if it is turned on in Miscellaneous Defaults (for more information
see page 91) and the price is set in CPT Records.
Minutes – Use this feature to have Quick-MD calculate the units for you using the ratio x:15, where x is the
number of minutes entered into this field.
PLACE OF SERVICE – Use this feature to enter the place of service. (for more information see page 82) Will
default to what is set in CPT Records.
TYPE OF SERVICE - Use this feature to enter the Type of service. (for more information see page 83) Will default
to what is set in CPT Records.
LOCATION - THIS FEATURE IS USED FOR REPORTING ONLY! Quick-MD has the ability to track up to 10 separate office
locations. Will default to what is set in CPT Records.
EPSDT – Applies to the EPSDT field on the HCFA form.
EMG – Applies to the EMG field on the HCFA form.
COB – Applies to the Coordination of Benefits field on the HCFA form.
MEDICAID PRIOR AUTH. # - If your Medicaid intermediary wants the prior authorization number to be placed in
block 24k on the 1500 form, enter number here. If they want it in block 23, then set it in the Supplier form in
Pre authorization # field.
COMMENT – Use this feature to enter a comment that will appear in the patients ledger in the Com/Check Field.
If you have the feature in PROPERTIES/MISC. DEFAULTS/ “ALWAYS PUT SERVICE DATE ON LEDGER SCREEN” turned on,
then it puts the from date of service in the comment field if it is different than the ledger date.
NOTE: To force Quick-MD to use a historical Primary Insurance company when generating a claim, insert
@ followed by the insurance Id# in the comment field for the historical insurance company you wish to
use.
The available historical insurance companies for that patient, if any, will be listed to the right of the
comment field. (See picture above) This feature will overrule the auto decide insurance function which
is found in Properties/MISCELLANEOUS DEFAULTS (for more information see page 91).
MODIFIERS – You can either type in the modifier to be used or hit <F1> to browse the table. A Cpt code may
have the modifier pre attached with its own house code. This would preclude you from entering the modifier
separately.
Click <OK> to save and exit the OTHER CHARGE INFORMATION SCREEN.
STEP FOUR: ENTER ALL OTHER INFORMATION RELATING TO THE CHARGE
$COST - when procedure code is selected, system will automatically bring over the charge that has been set
in CPT records, or if there is a fee schedule attached to this patients insurance company, it will use their fee
schedule, or the charges may be manually added.
$PAYMENT - This feature allows you to post payments to each procedure. After payment amount is entered,
“Payment Information” box will appear which allows you to input check number and payment type being
made. If the feature in Properties/Misc. Defaults/Ask if you want to print a receipt is turned on, the
system will ask you if you want to print a receipt when this claim is finished. (for more information see page
91) If no payment is being made leave payment field blank.
Quick-MD User Manual
Page 167 of 308
STEP FOUR: Applying Un-Applied Credits to this charge
The Payments Screen - using Un-Applied Credits
At the bottom of the charge entry screen this patients unapplied credit balance will be displayed. If you wish to apply
them to this charge then click on the PAYMENT button at the bottom of the screen.
Enter the check number, the total amount being paid in the payment field, & select the type of payment. The charges
are automatically brought over from the charge entry screen. Enter the amount applied to this charge. The “PIF”
button will pay in full if so desired.
You may also use any unapplied credits at this point, either by typing in the desired amount or clicking “CIF”(credit in
full). The system will display amount of payment left, un-applied credits used, unapplied credits left, total of charges,
total payments made, and balance of the claim.
NOTE: If you need to put money into this patient’s un-Applied credits, when you finish this charge, pull in
your CPT record “Credit” in the next available yellow *Code field (must be a CPT record in the main tables
that has credit in the house code and credit in the CPT number, with a description of your choice, i.e. patient
deposit, that is a 0.00 (zero) dollar charge) and enter the amount of the deposit in the payment field. This will
add this amount to his unapplied credits.
Quick-MD User Manual
Page 168 of 308
WHEN FINISHED IN THE PAYMENT SCREEN, HIT OK TO SAVE.
Once all charges are entered on the claim you, select the SAVE button. This will bring up the SUPPLIER INFORMATION
FORM, IF THIS IS AN INSURANCE RESPONSIBLE CLAIM.(if you wish for this screen to be displayed on (P) patient responsible
claims also, check the box in Properties/Misc. Defaults/ Always pop supplier form) (for more information see
page 91).
STEP FIVE: ENTER SUPPLIER INFORMATION NEEDED TO COMPLETE THE HCFA
Quick-MD User Manual
Page 169 of 308
Supplier Other Information Form
The supplier form is the balance of the information that applies to this claim as a whole.
Note: The number in parenthesis behind the field descriptions corresponds to the block number of these
fields on the HCFA 1500 form.
From the yellow PRIOR AUTHORIZATION field, hit the <F1> key to access the MANAGED CARE MODULE . You may then
double click on the authorization number that applies to this charge, and Quick-MD will automatically populate
both the authorization number (block 23 on the 1500 form) field and the referring physician if set. The ID# of the
Referring Physician (block 17 and 17a on the 1500 form) and ID# of Facility where services are rendered (Block
32 on the 1500 form) are entered here. The <F1> key allows the user to browse the table and make the
appropriate selection. The <F10> key allows the user to add records on the fly. Should this information be the
same as the last claim, hit the duplicate key. Quick-MD is designed to allow the user the flexibility of the cursor
starting in either the “Date of Illness” field if you do a lot of workers comp or in the ID# of Referring Physician, for
those offices who don’t deal with workers comp very often. This cursor default is in Properties/MISC.
DEFAULTS/”GO DIRECTLY TO REFERRING PHYSICIAN ON SUPPLY OPEN”
NOTE: MISCELLANEOUS DEFAULTS allows the user to turn on/off “Go Directly to Referring Phy. On Supplier Form
Open” (for more information see page 91). If this option is turned on, the prompt will start at the Referring
Physician field and will skip over all of the information above it. This, however, does not preclude you from
entering data in the fields you skipped over. It is merely done for convenience and ease of use.
NOTE: The two blank boxes below blocks 10d and 19 are extra, undefined fields that you can define for use in
SET 1500 EXTRA DATA FIELDS (for more information see page 84).
The last three lines give the user the ability to send up to three lines of text when the claim is filed
electronically. These 3 fields are commonly referred to by the payers as the HAO record or the Narrative
Record.
The DUPLICATE button allows the user to copy the information in this screen from the previous claim for this patient.
Quick-MD User Manual
Page 170 of 308
Select the <OK> button to save
The CONFIRM window allows you to print a receipt.
NOTE: This feature can be turned on or off in MISCELLANEOUS DEFAULTS IF YOU DO NOT PRINT RECIEPTS AT THE WINDOW
(for more information see page 91)
ENTER CHARGES PATIENT CLAIM
This feature allows you to enter charges for a Self Pay claim assigning the (P) patient responsibility to the claim,
even if the patient has insurance. It works the same as above.
See Steps 2 through 7 above for completing Patient Claim Charges.
ADD CHARGES TO LAST CLAIM
This feature allows you to attach additional charges to the last claim saved in the Patient’s Ledger, if they have not
been billed. If they have been billed, Quick-MD will automatically start a new claim.
NOTE: You can have Quick-MD check to see if the last claim in the Ledger has the P responsibility and to
create a new claim instead of adding charges to a claim that is now the responsibility of the Patient. This is
set in the CPT Entry options found under the Properties menu. (for more information see page 80)
See Steps 2 through 9 above to complete Adding Charges To Last Claim. If last claim saved was a Patient Claim
Charge, see Steps 2 through 7 only
Quick-MD User Manual
Page 171 of 308
CURRENT LEDGER
The current Ledger is where you go to view all details about your patient’s claims. The Ledger is fully functional in the
sense that you can post payments, adjust charges, edit entries, post notes and reassign responsibilities all from
within this one screen.
Alternating font colors and background shadings distinguish all Claims in the Ledger from one another. Each
Ledger Entry contains several columns, each of which are named by the column headings.
LEDGER DATE – Date Entry was made in the Ledger.
T – Type of Entry. Quick-MD will put a (C) for a charge, (A) for an adjustment, (P) for a payment or an (N) for a
note.
RESP – Shows the user the responsibility of this Entry: (I) for Primary Insurance, (S) for Secondary Insurance, (A)
for Third Insurance and (P) for Patient Responsibility.
NOTE: These codes are how Quick-MD knows who to bill a claim to. When a claim is billed, Quick-MD will
put a red billing note directly under the claim that was billed. It will show the user the claim number billed
and assign a responsibility number as follows: (1000) for Primary Insurance, (1001) for Secondary
Insurance, (1002) for Third Insurance and (1003) for Patient Responsibility.
NOTE: When the user tells Quick-MD to bill, whether on paper or electronically, Quick-MD runs through each
ledger and looks at each claim that fits the responsibility code selected to bill: (I) Primary, (S) Secondary,
(A) Third Insurance or (P) Patient Responsibility that does not have a red billing note (except patient
statements-all patients with a balance will be re-billed regardless of a billing note). So it’s very Important to
understand these concepts of Responsibility Codes and Billing Notes. Quick-MD also shows the user the
invoice number(s) that make up the claim under the INV heading.
Quick-MD User Manual
Page 172 of 308
CLM# - Claim Number
INV# - Invoice Number
DESCRIPTION – Description of Ledger Entry
AMOUNT – Amount of Entry, if applicable.
COM/CHK# - will put the comment from the charge entry here or the check number from payment posting. Unless
the feature in Properties/Misc. Defaults/”Put service date on ledger screen” is turned on. Then the “from
date of service” will appear in this field if it is different form the ledger date.
DIAGNOSIS – list the pointers to the patient’s diagnosis table
NOTE: Checking “Put Primary Diagnosis on Ledger Browse” under Properties/File Browser Setting, well set
the first diagnosis in this column instead of the pointers.
FROM DATE – from date of service
TO DATE – to date of service
To make entries, changes or view additional information, highlight the invoice or claim in question using the Up and
Down arrows keys to move the highlight bar, and use the F keys (1 through 11) as listed below: These commands
are listed across the bottom of the screen for your convenience.
<F1> (PAY) - allows the user to post a payment to the highlighted claim as a whole or each line item.
NOTE: ALWAYS POST PAYMENTS TO THE INDIVIDUAL CLAIM BEING PAID. NEVER POST ALL
PAYMENTS TO ONE CLAIM or just to the last claim the ledger.
IMPORTANT! Remember all claims must eventually come to a zero balance, either through payments or
adjustments!
Quick-MD User Manual
Page 173 of 308
<F2> (ADJ) - allows user to post an adjustment to the highlighted claim as a whole or each line item.
IMPORTANT: Always post adjustment to the individual claim being adjusted. Never post all adjustments to one
claim in the ledger or at the bottom of the ledger.
<F3> (NOTE) - allows the user to post a note to the highlighted claim, up to five lines in length, and gives the user
the option to have the note printed on the Patient’s billing statement if you proceed the note with an (*)asterisk.
BROWSE – Use this feature to select from any of the CANNED NOTES you have set up. (for more information on
setting up CANNED NOTES see page 289).
Quick-MD User Manual
Page 174 of 308
<F4> (EDIT) - Use this feature to edit any Entry in the ledger.
NOTE: To force the system to utilize a historical Secondary Insurance company when generating a claim,
insert “&” followed by the insurance Id# in the comment field for the historical insurance company you wish
to use. Quick-MD will auto decide which one to use based on the date of service, if this feature is turned on
in Properties/Misc. Defaults/Auto decide Insurance to use (for more information see page 91)
NOTE: If you change the CPT Code to a different code than the one listed and want Quick-MD to
automatically update the price, you will need to set that option in Properties-Misc. Defualts. (For more
information see page 91)
<F5> (REASSIGN) - Use this feature to Re-assign the claim. (To re-assign the billing responsibility to another pay
source)
Quick-MD User Manual
Page 175 of 308
NOTE: To re-assign to a historical Secondary Insurance company, you must use the Edit charge feature <F4>
or let the system auto decide which one to use. (for more information see EDIT CHARGE feature above)
NOTE: If you know the company you are reassigning responsibility to is an automatic crossover (medigap
company), check the box “put billing note for added responsibility” and the system will not pick this claim up
and bill it. But it will then be reassigned and in the proper reporting.
<F6> (CLM-BAL) - Use this feature to view the balance of each claim selected. Use the up and down arrow keys
to highlight the claim, then press the <F6> key for the claim balance. The balance of the Invoice highlighted will
also be displayed in the INV. box. The Total box will display the claim balance.
<F7> (LED. BAL) - Use this feature to display the entire ledger claim balance in detail
<F8> (SUPPLY) - Use this feature to edit and view the HCFA 1500 SUPPLIER INFORMATION SCREEN
<F9> (PRINT) - Use this feature to print various forms from the Ledger.
Quick-MD User Manual
Page 176 of 308
PRIMARY INSURANCE CLAIM – Prints a Primary Insurance HCFA form from claim.
SECONDARY INSURANCE CLAIM – Prints a Secondary Insurance HCFA form from claim.
THIRD INSURANCE CLAIM – Prints a Third Insurance HCFA form from claim.
PATIENT STATEMENT – Prints a Patient Statement from the claim.
LEDGER – Sends the Patient’s Ledger to the DATA OUTPUT PROCESSOR .
ITEMIZED CLAIM – Sends an Itemized Claim to the DATA OUTPUT PROCESSOR .
NOTE: This is the same report used when printing a patient’s receipt. If a patient requests another
receipt, you would go to the claim and print this option.
ITEMIZED BY DATE RANGE – Sends Itemized Claims defined by a date range to the DATA OUTPUT PROCESSOR .
QUERY PATIENTS
•
•
•
•
•
•
•
•
LEDGER – Allows you to run a number of different queries on the patient’s ledger.
Report All Payments Only
Report Patient Payments Only
Report Insurance Payments Only
Report Charges and Payments
Report Charges, Payments and Adjustments
Report Charges Only
Report Notes Only
Report Only Claims With a Balance
OTHER FORMS – This item will only be available in Texas
• Print the Texas Workers Compensation form DWC-73
• Print the Texas Workers Compensation form DWC-69
EXIT – Exits the print menu.
<F10> (DELETE) – Use this feature to delete the highlighted entry.
Quick-MD User Manual
Page 177 of 308
NOTE: Can only be used if user has been given the right to do so. (for more information see page 286) Also,
any ledger deletion, with the exception of billing notes, can be reported on in System Utilities/Run Deleted
Ledger Record Reports
<F11> (EXCLUDE) – Use this feature to exclude the highlighted charges from printing on the claim. Charges that
have been excluded will have an asterisk next to them in the ledger. This is the way to exclude invoice(s) paid, fix
invoice(s) denied by editing and re-billing the claim, (simply by hitting the F9 print key) only with the one that
needs rebilling.
NOTE: Be sure to hit the F11 after reprinting the form to remove the asterisk(s) so that
those invoices will be picked up when this claim is reassigned to secondary insurance.
<SHIFT> + <F3> (CONVERT BILLING NOTE) – Use this feature to change a red billing note into a regular note. The note
number will become 999. This type of note will let the system re-bill a claim, but stays in the ledger for audit trail
purposes.
EXAMPLE: In the past, in order to re-file a claim you needed to delete the billing note for Quick-MD to pick up
the claim in the next filing run. Now, you can simply change the billing note to a regular note, which gives you
a more accurate audit trail.
<SHIFT> + <F2> (BROWSE 1 CLAIM ) – Allows you to filter the patient ledger so that it displays only the claim you are
interested in working with.
<SHIFT> + <F4> (TOGGLE ZERO BALANCE CLAIMS ) – Allows you to filter the patient ledger so that it displays only the
claims that have a balance. This will hide all zero balance claims from being displayed, which can make the
ledger easier to read in certain high volume practices.
NOTE: You can set all ledgers to default to hiding zero balance claims with a check box in the Browser Default
window. (For more information see page 76)
HISTORY LEDGER
This feature stores all zero balance claims that were moved from the current ledger to history via the MOVE LEDGES TO
HISTORY FEATURE FOUND IN SYSTEM UTILITIES (for more information see page 286)
Quick-MD User Manual
Page 178 of 308
IMPORTANT: Once zero balance claims are moved to History Ledger, no reports can be generated on those claims
and there is no way to move them back to Current! So be sure this is the desired result!
Quick-MD User Manual
Page 179 of 308
DEPENDANT BALANCES
This feature will display all dependant balances that are listed in the Dependant Ledger, with the total for the family
listed in the grand total. This information is available from any of the patients that are tied together. (for more
information see DEPENDENTS below)
DEPENDANTS
This feature allows for tying all the Dependants ID# numbers and their names to the account of the Guarantor or to
attach family members accounts. From the guarantors account, simply hit the <F1> key in the yellow field, browse
the patient file, and bring in the one you want to select. Once this is done, the dependant’s balances button can be
accessed from any dependant’s account or the guarantor’s account.
EXIT
Quick-MD User Manual
Page 180 of 308
This feature exits the Patient Ledger.
Quick-MD User Manual
Page 181 of 308
[BALANCES] - PATIENT LEDGER BALANCES
This feature gives you the Ledger Totals for the Patient which includes the patient balances and insurance balances Aged. Additionally you can see the Last Provider Seen, Date of Last Visit and Last Referring Physician Seen.
[INFO] - CUSTOM INFORMATION SCREEN
Use this feature to track any custom information you might wish to collect from your patients. There is a MALE CUSTOM
INFORMATION SCREEN and a FEMALE CUSTOM INFORMATION SCREEN , each of which can be configured differently to handle
different information. (to configure see pages 73 and 73) This information may be printed out and attached to the
chart for the Doctors review.
[CO%] - CO-PERCENT & DEDUCTIBLE
This feature of the medical system allows you to bill the patient at the same time as the insurance company for the
percentage or a set dollar amount of the bill that the insurance company is not going to pay.
Quick-MD User Manual
Page 182 of 308
TO IMPLEMENT THIS FEATURE BASED ON A PERCENTAGE:
Set the patients co-percent amount in the patient's financial information record. For example, if the patient's
co-percent amount is 20%, then enter the number 20 in this data field. This MUST be done first.
When entering an insurance claim that you wish to bill the patient for the co-percent, place the “I” and “P”
responsibilities on all of the charges for the claim.
Post a co-percentage billing note to the claim. This is done the same way as posting a regular note, but this
note's DESCRIPTION must start with a percent sign. You may enter anything you wish after the percent sign. The
location of the note within the claim does not matter.
EXAMPLE - % CO-PERCENTAGE Patient BILLING
As long as this note is attached to the claim the patient will be billed for his set co-percent of this claim until
that balance is paid.
If after you have received payment from the insurance company and it turns out that the patient is going to be
responsible for more than the set co-percent amount the steps to take are:
Post the insurance payment to the claim.
Delete the co-percent note.
Quick-MD will now ignore the co-percent and bill the patient for the entire balance of the claim.
TO IMPLEMENT THIS FEATURE BASED ON A FIXED DOLLAR
AMOUNT:
Post a co-percent billing note on the claim. This note needs to begin with a percent sign (%) followed by
a dollar sign ($) and then the dollar figure including two decimal places (Example - %$50.00)
When entering a insurance claim that you wish to bill the patient for the fixed dollar amount, place the “I”
and “P” responsibilities on all of the charges for the claim.
As long as this note is attached to the claim the patient will be billed for his fixed dollar amount of this
claim until that balance is paid. If after you have received payment from the insurance company and it
turns out that the patient is going to be responsible for more than the set fixed dollar amount the steps to
take are:
Quick-MD User Manual
Page 183 of 308
Post the insurance payment to the claim.
Delete the co-percent note.
Quick-MD will now ignore the co-percent and bill the patient for the entire balance of the claim
SESSION INFORMATION:
This feature will let you keep track of the number of sessions or a session date range that is valid for this patient. If
you are using a date range you can have the system warn that the date range is about to expire by setting a date in
the warn date field. If you have a fixed number of session available you can have the system tell you when you are
almost out of session by setting a number in the warn at session fields. These warning will be displayed when you
are entering charges.
[CONTRACT] - CONTRACT PAYMENT INFORMATION
This feature is utilized when patients are set up on a payment plan for a balance owed. The patient agrees to a
certain monthly payment.
NOTE: The entire balance owed is adjusted off of the account utilizing a “write-off to contract adjustment code”
ADJUSTMENT CODE TABLE (for more information see page 68).
CONTRACT AMOUNT - the amount owed by the patient.
MONTHLY CHARGE - the amount the patient agreed to make on a monthly basis.
AMOUNT GENERATED - Quick-MD will accumulate the amount billed at the end of each month.
DATE
OF
LAST GENERATION - Quick-MD will download the last date and the total amount generated.
Quick-MD User Manual
Page 184 of 308
PROMISE TO PAY CONTRACT
This form will allow you to setup, up to 24 expected payments. Once this form is set up, when the operator enters
a payment with a “P” responsibility code, the system will ask the operator if it is a PROMISE TO PAY payment. If the
answer is yes it will post the payment in the ledger and also into the promise to module.
Note: There are two reports based on the information from the PROMISE TO PAY module. One will list past due
payments and one will list all PROMISE TO PAY contracts and there statuses.
Before running Patient statements, run GENERATE CONTRACT LEDGER ENTRIES (for more information see page 292) and
this will go to all ledgers and apply the appropriate amounts to be billed.
[RECALLS] - PATIENT RECALLS
This feature allows the user to run a recall report. (REPORTS/RECALL REPORT). The Patient recall date & reason
for recall will show up on the user defined recall report. Should you decide to send them a letter, Quick-MD will
automatically track the date you merged with Word.
Quick-MD User Manual
Page 185 of 308
NOTE: There is a PATIENT RECALL REPORT (for more information see page 279) that will tell the user who is being
recalled and why. The table is user definable and located within PROPERTIES (for more information see page 75)
Quick-MD User Manual
Page 186 of 308
USING UN-APPLIED CREDITS
Quick-MD allows you to accept and track and apply un-applied credits from patient overpayments to accounts. Any
time a patient over-pays you it will create a credit balance on the claim. This credit balance will automatically become
an un-applied credit, which will be available for posting against other charges or can be refunded back to the patient.
In order to use this feature, you must configure Quick-MD with a new CPT Code and two new adjustment codes.
IMPORTANT: Over-payments from Insurance companies (payments that carry the I, S or A responsibility codes)
will remain regular credits, only over-payments that carry the P responsibility will become un-applied credits.
CONFIGURING QUICK-MD TO HANDLE UN-APPLIED CREDITS
To put pre-payment credits in the ledger you must have a CPT record in the CPT codes table to handle
them. The Office code and CPT code must be “CREDIT”. The description should be something to the effect
of “Patient Overpayment or Deposit”. (for more information on adding CPT records see page 43)
The next step that must be performed is to add two new Adjustment Codes to your Adjustment Table. (for
more information see page 68)
You can see we have added two new entries to the table, entry number 24 and 25. Once this is done you
need to tell Quick-MD which entries from the table are to be used to move the un-applied credits into and out
of the claims. To do this, simply type the number that corresponds to the Transfer Out code in the
appropriate field at the top right of this screen. Then type the number that corresponds to the Transfer In
account.
Note: You can use your standard Transfer In and Transfer Out Codes, but (if you have room) we
recommend that you add two new ones that more accurately describe the moving of funds in and out
of un-applied credits. For example: Add an adjustment called “FROM UNAPPLIED CREDIT” with a for moving money from the un-applied credit accounts. Then add an adjustment code called
“UNAPPLIED PYMT TO ACCT.” with a + for applying this money to claims.
Quick-MD User Manual
Page 187 of 308
ACCEPTING UN-APPLIED CREDITS
There are two ways to enter un-applied credits in Quick-MD, both of which utilize the Charge Entry Screen.
If you want to simply put an over-payment into the patient’s ledger, open up the Fast Charge Entry Screen,
Enter Charges Patient Claim. (for more information see page 213)
In the *Code field type in the CPT Code of CREDIT. Leave the Cost at $0.00 and enter the amount of the
credit you wish to apply in the payment field. Then hit <SAVE> and a new claim will be created in the patient
ledger that will track and handle the un-applied credit.
The other way allows you to take an Over-Payment at the time of charge entry.
Quick-MD User Manual
Page 188 of 308
In this case you would enter the charges as normal and then accept any payments against these charges. If
the patient gives you a payment that is more than the total of payments applied against each charge, you will
pull in the CPT record of CREDIT on the last line and put the balance of the payment into the Payment field.
When you <SAVE> this charge, it will create an over-payment account for you and place a Note on the current
claim that shows you that an over-payment was taken on this claim.
NOTE: If you wish a portion of this payment over payment to be applied to this charge, then enter that
amount in the payment field of that charge, and then enter the amount that goes into unapplied
credits in the payment field of the Credit entry.
APPLYING UN-APPLIED CREDITS
Applying a Patients Un-Applied Credits can be done in several different ways.
APPLYING UN-APPLIED CREDITS DURING CHARGE ENTRY
Once the charge entry screen is filled out, you can apply Un-Applied credits to these charges by
hitting the Payments button at the bottom of the screen. (For more information on using the
Payments screen see page 168)
APPLYING UN-APPLIED CREDITS USING THE PAYMENT POSTING MODULES
In any of the Payment Posting Modules, you can apply Un-Applied credits to charges. (For more
information on using the Payment Posting Modules see page 231)
Quick-MD User Manual
Page 189 of 308
[MANAGED CARE] - MANAGED CARE MODULE
Use this feature to track up to 15 Pre-Authorization numbers. This Module can be accessed in Quick-MD from the
patient’s demographics screen, the Supply Form (for more information see Charge Entry on page 163) and from the
booking screen within Q- Schedule (for more information page 107)
IB: This is for clients that are using the managed care module for tracking inbound and outbound referrals.
DATE: Date the Pre-Authorization was issued.
PROVIDER: Provider the Pre-Authorization was issued to.
REFERRING PHYSICIAN : <F1> in the yellow field allows you to select a referring physician. <F10> allows you to
add a referring physician if they are not already in the system.
AUTH#: Enter the Pre-Authorization number here. Hitting the <F1> key will automatically enter the previously
used number into this field.
ACTIVE DATES: Starting and Ending Dates of Authorization numbers validity.
VISITS: Number of visits Authorized by the number
RV: Displays remaining visits left as the authorization numbers is used during the charge entry process, the
system is counting down.
NOTE: During the scheduling process, hit <F1> from the booking screen in the yellow Pre Cert# field
to access the Managed Care Module, and double click on the pre authorization number that applies
Quick-MD User Manual
Page 190 of 308
for this visit. The system will pull both the number and set the referring physician on the booking
screen. This information can then be printed on the super bills.
Also during the charge entry process, on the supplier form, you may use the <F1> key from the
authorization number field to access the Managed Care Module. Double click on the authorization
number that applies to this charge, and the system will automatically pull it into supplier form and set
the Referring Physician. Quick-MD will count down and display the number of remaining visits in the
RV field of the Managed Care Module.
MED RECORDS/MR: MED RECORDS will start the medical records interface. If you double click on the MR at the
end of the line this will start the medical records interface with information carried from that line to the created
document. (for more information see page 193)
Quick-MD User Manual
Page 191 of 308
[CPT] – CPT CODE TRACKING
This feature allows you to access all of the tracked CPT codes that have been used on this patient. You can
even print a report of this screen by hitting the <Print> button.
Quick-MD User Manual
Page 192 of 308
ELECTRONIC MEDICAL RECORDS
Quick-MD’s Electronic Medical Records is broken down into three functional areas:
1. Attaching Documents to a Patient’s File
(for more information see page 196)
2. Tracking Patient Phone Messages
(for more information see page 205)
3. Tracking Patient Prescriptions
(for more information see page 208)
Getting There:
Use the key combination <Shift> + <F1> while inside the Patient’s Demographic Screen to bring up the Medical
Records Interface. Or, if you are Adding a New Operative Transcription (for more information see page 196 )
to a particular charge in the patients ledger, highlight the charge you wish to attach the Transcription to and then
hit <Shift> + <F1>.
Quick-MD User Manual
Page 193 of 308
SETTING UP THE ELECTRONIC MEDICAL RECORDS INTERFACE
Before you can use Quick-MD’s Electronic Medical Records Interface you must make sure that you have Microsoft
Word 97 and Windows 98 or later installed on the computer.
You activate and configure the Electronic Medical Records via the Medical Records Settings Found in:
Properties >Misc. defaults > Med Record Settings.
PATH TO MEDICAL RECORDS FOLDER – Set the path to your computer where you will store all your Medical Documents.
NOTE: You will also want to set your default directory in MS Word. Inside Word, go to
Tools/Options/File locations and define to Word where these documents will be stored.
ACTIVATE INTERFACE WITH MS WORD – Click this check box to activate the Medical Records Interface with MS Word.
Important: In order to use the Electronic Medical Records Interface, each user will have to
have Word 97 or later installed on their local hard drive. Also you will need to go to System
Utilities/Set Operator Rights and be sure each operator has the rights to use the
Electronic Medical Records and its various features.
Quick-MD User Manual
Page 194 of 308
PRESCRIPTION REPLY TABLE – Use this feature to define up to 10 of the most common replies your practice uses
when answering patient calls regarding prescriptions.
PHONE MESSAGES REPLY TABLE – Use this feature to define up to 20 of the most common replies your practice uses
when answering patient calls.
Quick-MD User Manual
Page 195 of 308
ATTACHING DOCUMENTS TO PATIENT’S FILE
Quick-MD can attach any document created in Microsoft Word 97 or later to your patient’s files. This includes
scanned documents and images. The key is that all of your patient’s documents must be stored in a single directory
that Quick-MD has access to and that you carefully utilize the Naming Convention (for more information see page
201 ).
There are two distinct types of documents that you can attach to your patient’s files.
OPERATIVE TRANSCRIPTIONS
Operative Transcriptions are documents that are attached to specific claims in the Patient’s Ledger. These
documents are mainly used to create a SOAP note that summarizes one particular visit and details the
assessments that led to the generation of that particular claim.
IMPORTANT: You can use Templates to customize your Operative Transcriptions. (for more information
see page 199 )
NOTE: Even if you are using an outside transcription service, you may still attach the transcription to
the claim through the Naming Convention (for more information see page 201 ) when you save it.
To add Operative Transcriptions to a charge, go to the patient’s ledger and highlight the claim that you
wish to attach the document to. Then hit <Shift> + <F1>. Now click <Add New Operative Transcription>.
Highlight the Template you wish to use for this Transcription, and click <Open>.
Quick-MD User Manual
Page 196 of 308
Quick-MD User Manual
Page 197 of 308
When the template opens it will automatically bring over all of the patient’s information that you have defined
and will insert it into the document. When you have finished the document, go to File, then click on Save As.
Be sure that the document is being saved in the Document folder as specified in Medical Records Settings.
(ie. meddocs) This folder can be set as a default in Word, by going to Tools/Options/File locations.
Reviewing Operative Transcription’s
To review Operative Transcriptions attached to a charge, go to the patient’s ledger and highlight the claim that
you wish to review the document for. Then hit <Shift> + <F1> to activate the Medical Records interface. Click
<Operative Transcriptions>. Only the transcription that applies to this claim will appear in the selection box.
Highlight the File Name and hit the Open button to bring the Operative Transcription to the screen.
Quick-MD User Manual
Page 198 of 308
OTHER DOCUMENTS
If you can create a document or scan it into Microsoft Word, you can attach it to the patient’s file using this
feature. Other Documents are not attached to specific a Patient Claim, but are attached to the Patient’s
record as a whole.
There are two distinct ways to create and attach these document types to your patient’s files:
Using Templates
You can create an unlimited number of templates for use in Quick-MD. A template is simply a text or
word document file that you create in advance that allows you to set-up pre-formatted documents.
These templates can be configured to automatically bring over all of the pertinent patient information
from the database.
IMPORTANT: The Templates must be placed in the same folder as your patient documents
documents.(ie. c:\meddocs) and they must be .TXT or .DOC documents. All Templates are
named using the following convention:
Each of your templates will start with the name OHEAD followed by a description and ending with
.TXT or .DOC. For example OHEAD_follow_up.doc is a valid template name. In addition to the
custom text that you add, you can use the following insertion commands to bring specific patient
information into the templates form the database.
Insertion Commands
Document name will be placed by Quick-MD first line column 1 with the following
Insertion commands available for use within the template document. The insertion
commands may be used as many times as the operator chooses.
{document name} {calculated by system on add new document button press)
•
•
•
•
•
•
•
•
•
Quick-MD User Manual
Name - [NAME]
Patient’s Address – [ADD]
Patient’s City State and ZIP – [CSZ]
Acct# - [ACCT#]
DOB - [DOB]
AGE - [AGE]
SS# - [SS]
Sex - [S]
Date of procedures (taken from the service date on the first charge) - [DATE]
Page 199 of 308
•
•
•
•
•
•
•
•
•
•
•
•
•
•
•
•
•
•
•
•
•
•
•
•
•
•
•
•
•
•
•
•
•
•
•
•
•
•
•
•
Procedure1 (CPT codes will be taken from up to the first 6 charges on claim.) - [CPT1]
Procedure2 - [CPT2]
Procedure3 - [CPT3]
Procedure4 - [CPT4]
Procedure5 - [CPT5]
Procedure6 - [CPT6]
Diag1 (all diagnosis’s are taken for the diagnosis’s listed on the first charge) - [DIAG1]
Diag2 - [DIAG2]
Diag3 - [DIAG3]
Diag4 - [DIAG4]
Location (taken from the facility set in the supplier form) - [LOC]
Medicaid# - This will insert the patient Medicaid # into the document. - [CAID#]
Home Phone - This will insert the patient’s home phone # - [PATPHN]
[FNAM] If this code is found in the document Quick-MD will ask you to pick a facility. If
the [FNAM] is found and the operator selects an entity, then the following 4 codes Will
be looked for in the document.
[FADD] This will insert the entities address.
[FCSZ] This will insert the entities city, state, zipcode.
[FPHN] This will insert the entities phone#
[FFAX] This will insert the entities fax#
Today – [TODAY] Inserts today’s date.
Patient Balance – [$PAT]
Entire Balance – [$ALL]
Insurance Balance – [$INS]
Martial Status – [MSTAT]
Drivers License – [DRILIC]
Work Phone – [WRKPHN]
Cell Phone – [CELPHN]
Employer – [EMP]
Guardian Name – [GNAME]
Guardian DOB – [GDOB]
Guardian SS – [GSS]
Guardian Phone – [GPHN]
Primary Insured Name – [INAME]
Primary Insured Address – [IADD]
Primary Insured City State Zip – [ICSZ]
Primary Insured Phone – [IPHN]
Primary Insured Relationship – [IREL]
Primary Insured Social Security – [ISS]
Primary Insured Date of Birth – [IDOB]
Primary Insured Employer – [IEMP]
Primary Insurance Name – [IINS]
Primary Policy – [IPOL]
Primary Group – [IGRP]
Secondary Insurance – [SINS]
Secondary Policy – [SPOL]
Secondary Group – [SGRP]
The next four codes were developed to use with an outbound COMMUNITY CARE
REFERAL FORM:
•
•
•
Quick-MD User Manual
Medserv – [MEDSERV] This code will pop up a box for the user to insert a message into
the document.
From and To dates – [FROMDATE] & [TODATE] This will insert the from and to date
from the line on the managed care module.
Precertification - [REFNUM] This will insert the precert number from the managed care
module.
Page 200 of 308
•
Diagnosis – [DIAGS] This will pop up a box where the user can enter two diagnoses in
and they, along with there descriptions, will print on the document.
EXAMPLE: Inserting the following line of text into a template would create a new document
with the Patient Name, Date of Birth and Sex auto-inserted by Quick-MD.
The patient’s name is [NAME]. The patient was born on [DOB] and the patient’s sex is [S].
Using the Naming Convention
The proper use of the naming convention allows you to easily attach ANY document created in Word
to your patient’s files. Simply open Word and type your document as you wish for it to appear. When
you save your document, save it using the following naming conventions:
Operative Transcriptions naming convention: [Example] P000001C0002.DOC
The file name must start with “P” and then must be followed by six digits representing the
patient’s Account number. A “C” must then follow it and four digits representing the claim
number you wish to attach this document to. The file extension must be .doc.
Example: P000001C0002.DOC
The above name would be for patient ID# 1 and claim (2)Two in the patient’s ledger.
Note: You can only have one Operative Transcription attached to a claim at a time.
Other Documents naming convention: [Example] P000001D****************.DOC
The name must start with a “P” and then followed by six digits representing the patient’s
Account number. A “D” must then follow it and what ever the operator wants to enter after
the D. The file extension must be .doc.
Example: P000001D****************.DOC
The above name would be attached to patient ID# 1. You can replace the ****’s with
any text you wish to identify the contents of the document.
Note: You can as many Other Documents attached to a claim as you wish.
Quick-MD User Manual
Page 201 of 308
Creating and Attaching Other Documents to a Patient’s File
To create a new Other Document, simply open up the Patient’s Demographic Screen that you wish to attach
the document to. Then hit <Shift> + <F1> to activate the Medical Records Interface.
If you want to use a preset template, choose the template from the list and click <Open>. If you wish to
create a new document that is not based on a template, click the <Cancel>.
Quick-MD User Manual
Page 202 of 308
Quick-MD will automatically assign the proper naming convention to this document if you opted not to use a
template, so that it is readily available to the operator when needed.
IMPORTANT: Any document may be attached to a patient file. No matter if you are creating a new
document, scanning the document in or receiving it as an email, when you hit save your file, name it
in the following way: use the letter P followed by the patients 6 digit patient ID number, then the
letter D, followed by something meaningful to you (maybe the date of service) and ending in .DOC.
These documents must be saved in the folder and path defined in Medical Record Settings in
Miscellaneous Defaults in Properties. (for more information see page 96)
Reviewing/Editing Attached Documents
To access a patient’s documents, simply open up the Patient’s Demographic Screen that you are
interested in working with. Then hit <Shift> + <F1> to activate the Medical Records Interface. Click on the
<Other Documents> button.
Quick-MD User Manual
Page 203 of 308
Keep in mind that to get this menu we are at a particular patients demographic screen. So when you click on the
Other Documents button, Quick-MD is going to make ONLY this patient’s documents available to you.
Simply click on the document you want and hit open.
Quick-MD User Manual
Page 204 of 308
PATIENT PHONE MESSAGES
Click on the phone message Button.
The commands are across the bottom of the screen.
<F1> - opens the highlighted message. You may also double-click a record to open it.
<F2> - adds a new message.
<F5> - deletes the highlighted message.
Quick-MD User Manual
Page 205 of 308
The highlighted message can then be printed out or emailed to any of the users of Quick-MD on the network.
NOTE: All phone messages for a day may be printing out at one time by going to any patient demographic screen,
hitting <Shift> + <F1>, and then clicking on the Print All Phone Messages for a Day button.
ADDING A NEW MESSAGE
To add a new message, hit <F2>
Quick-MD User Manual
Page 206 of 308
The user may enter up to 10 lines of text and select from one of the top 20 replies (this table is user definable and is
in the Medical Records settings in Misc. Defaults in Properties. From here the message may be printed out or
emailed to another user of Quick-MD. The Message will now be tracked by the date in which it was entered into
Quick-MD.
Quick-MD User Manual
Page 207 of 308
TRACKING AND PRINTING OF PRESCRIPTIONS
To enter a new Prescription or review past Prescriptions for a patient, go to his demographic screen and hit the Shift
and the <F1> key simultaneously. Then click on the Drugs Prescribed button.
If you would like to review a previous prescription, simply highlight the one you would like to look at and either hit
the <F1> key or double click on it.
Quick-MD User Manual
Page 208 of 308
To ADD A NEW PRESCRIPTION, simply hit the <F2> key.
The date, time, operator, and provider (the one listed in the patient file) will come across as defaults-although all
providers in the practice, are an option.
PROVIDER – Select the Provider who is prescribing this drug.
PHARMACY – In the yellow field, the <F1> key allows you to browse your Insurance/FACILITIES TABLES and bring in the
proper Pharmacy. The <F10> key allows the operator to add to these tables on the fly.
PHONE – Enter the Patient’s Phone Number
DRUG PRESCRIBED – Enter the drugs prescribed. You can enter up to four drugs per prescription. You can setup the
drugs you prescribe in the Tables menu and easily bring them into the prescription by hitting F1 in the yellow field.
(for more information see page 61)
REFILLS – Enter the number of refills.
DISPENSE – Enter the number to dispense.
Unit Type – Enter the unit type. These are custom values that can be set under Properties / Miscellaneous
Defaults / Medical Record Setting / Pscript Units of Measurement.
Inactive – Check this box if the drug is inactive.
SIG – Enter the instructions for use.
COMMENT – Enter any internal comments here, these will not print on the prescription.
INITIALS – Enter the operators Initials here.
Quick-MD User Manual
Page 209 of 308
The top 10 reply’s to the patient are user definable and this table may be populated in Medical Records in MISC.
DEFAULTS in PROPERTIES (FOR MORE INFORMATION SEE PAGE 96). The prescription may be printed out ready for signature. All
of this patients prescriptions will now be tracked by the date that it was entered into Quick-MD.
[FORMS] – TEXAS WORKERS COMPENSATIONS FORMS
•
•
Texas Worker’s Compensation Work Status Report. Clicking on this button will fill out the Texas DWC-73
form.
Texas Worker’s Compensation Medical Evaluation Report. Clicking on the button will fill out the Texas DWC69 form.
Quick-MD User Manual
Page 210 of 308
LOOKUP PATIENT FILE
Getting there:
LOOK UP PATIENT FILE SCREEN
The Patient File can be searched by any of the following fields.
ID# - Patient ID#
SOCIAL SECURITY# - Social Security Number
MEDICAL RECORDS# - Medical Records #
PATIENT NAME – Patient’s First and Last Name
DATE OF BIRTH – Patient’s date of birth
Enter your criteria and then select the <LookUP> button to search.
Quick-MD User Manual
Page 211 of 308
NOTE: Quick-MD allows you to choose what field the prompt starts in when looking up patient files. This is set in
the BROWSER DEFAULTS (for more information see page 76).
Although Quick-MD allows you to set this default, you are still able to look for a patient by any of the other
methods. Simply back tab or click on that field and enter the search data.
PATIENT FILES BROWSER
The Patient Files Browser allows you to select the appropriate Patient by using your up and down arrow key to
highlight the Patient name and press the <ENTER> button to enter the Patient File.
NOTE: Pressing the <F1> key, while a patient’s name is highlighted displays detailed patient information. Also,
<F2> will print a mailing label and <F3> will print a mailing label with the social security, date of birth, phone
number and the patient’s id.
Quick-MD User Manual
Page 212 of 308
To exit PATIENT FILES BROWSER select the <ESC> button.
FAST CHARGE ENTRY
This feature allows the user to enter directly into the CHARGE ENTRY SCREEN to create a new claim in a patient’s ledger
without having to go through the patient’s demographic screen.
Getting there:
At “Quick Med Main Menu:” Select the FILE button
At “drop down menu:” Select FAST CHARGE ENTRY
At “LookUp Patient File:” Enter the information you have available on the desired patient, then select the LookUp
button to search. This will take you directly to the charge entry screen for this patient. (For more information on how
to use the CHARGE ENTRY SCREEN see page 163)
Quick-MD User Manual
Page 213 of 308
OPEN PATIENT LEDGER
Getting there:
At “QUICK MED MAIN MENU:” Select the File button
At “drop down menu:” Select OPEN PATIENT LEDGER
At “LOOKUP PATIENT FILE:” Enter the information you have available on the desired patient, then select the LOOKUP
button to search. This will take you directly to the ledger for this patient. (for more information on the PATIENT LEDGER
see page 172)
DELETE PATIENT FILE
This feature allows you to delete a Patient File, if you have the proper users rights.
NOTE: Quick-MD will not delete a patient file that has ever had an entry in their ledger!
Getting there:
1. At “Quick Med Main Menu:” Select the FILE button
2. At “drop down menu:” Select DELETE PATIENT FILE
Quick-MD User Manual
Page 214 of 308
At “LookUp Patient File:” Enter the information you have available, then select the LOOKUP
button to search
At “Patient Files Browser:” Select the appropriate Patient by using your up and down arrow
Key to highlight the Patient name and press the ENTER button to Delete Patient Account
NOTE: To see more Patient Information, select the <F1> key. To exit “Patient Files Browser” select the <ESC>
button
At “Confirm:” Select the YES button to confirm deleting process. To “Cancel” deleting process, select the NO button.
WARNING: When deleting process is confirmed, the complete patient data file will be deleted from memory and
cannot be restored.
NOTE: Quick-MD will not delete a patient file that has ever had an entry in their ledger.
Quick-MD User Manual
Page 215 of 308
BILLING IN QUICK-MD
HOW QUICK-MD BILLS
Quick-MD will go through all patient ledgers and look for claims with balances owed for the chosen responsibility
code. If there is no red billing note on the claim then it will be picked up for billing.
Whenever an insurance company or the patient is billed, Quick-MD will place a notation entry in the patient’s ledger
saying who was billed, when they were billed, and the amount of the bill. These billing notations also have their own
invoice numbers. A primary insurance billing notation will have an invoice number of 1000, a secondary insurance
billing notation will have an invoice number of 1001, a third insurance billing notation will have an invoice number of
1002, and a patient billing notation will have an invoice number of 1003. Do not delete these invoices. Quick-MD
uses them to determine if the responsible parties listed on the claim have been billed.
Quick-MD will consider the claim paid when there is a zero balance on the claim. All claims must reach a zero
balance at some time, whether by payment or write off, so post all payments and adjustments to the claim they are
intended to pay or adjust.
THE BILLING MENU - (PAPER FILING)
PATIENT STATEMENTS
Use this feature to generate patient statements based on the criteria you specify.
Getting there:
From Main Menu Select BILLING
At drop down menu Select PATIENT STATEMENTS
Quick-MD User Manual
Page 216 of 308
THE BATCH BILL PATIENT STATEMENT SCREEN
STARTING ID# - enter the account number you want the statements to begin processing.
If you want all accounts that are patient’s responsibility to process, enter the number 1.
ENDING ID# - enter the account number you want the statements to end processing.
If you want all accounts that are patient’s responsibility to process, enter the number 9 six
times.
BALANCE FORWARD CUT OFF DATE - All balances prior to this date will come across as a balance forward on your
printed Patient Statements. All balances after this date will be itemized on your Patient Statements. READ
THAT LAST SENTENCE AGAIN! This allows Quick-MD to only itemize patient account balances as per the
wishes of the operator. If you do not enter a date, all patient account balances will come across as a balance
forward. Put the date way back for everything to come across as itemized.
DUE DATE - enter the date payments should be made by.
PRINTING ORDER - (ID#) (Alphabetical) (Zip Code) Click in the circle to mark the printing
order you want statements to be printed.
SEND STATEMENTS ELECTRONICALLY - Click the box to insert a check mark , this allows
Quick-MD to generate an electronic file that is sent to Pro Bill for statement printing and mailing. To utilize this
option, a path and a file name must be set up prior to using.
This maintenance is performed in MISCELLANEOUS DEFAULTS (for more information see page 91).
NOTE: If you are printing your own patient statements in-house, leave this option blank.
PRINT STANDARD STATEMENT – Click the box to insert a check mark, this allows Quick-MD to generate a standard patient
statement. This can be set as the default option by choosing it in OTHER DEFAULTS (for more information see page 98).
Here is an example of the standard patient statement:
Quick-MD User Manual
Page 217 of 308
DERMATOLOGY CLINIC
429 MAIN ST.
BATON ROUGE, LA 70806
Phone #225-852-5784
Statement Date :04/04/2005
Estimated Ins. Pending $
Due Date :04/04/2005
0.00
JOHN DOE
7211 W. LEE ST
SULPHUR, LA 70665
REGARDING #
146 JOHN DOE
PAGE # 1
-------------------------------------------------------------------------------REF# DATE
DESCRIPTION
CHARGES/CREDITS
-------------------------------------------------------------------------------BALANCE FORWARD
0.00
0002 04/04/05
OFFICE CONSULT DETAILED
175.00
-------------------------------------------------------------------------------Current
Over 30
Over 60
Over 90
Over 120
Balance Due
175.00
0.00
0.00
0.00
0.00
175.00
-------------------------------------------------------------------------------NOTICE:This is a bill. Based upon information
from your health plan, you owe the amount
shown.
Quick-MD User Manual
Page 218 of 308
PROVIDER - Use the down arrow key located at the end of the Provider box to select the
appropriate Provider statements are to be processed. To have all statements processed for
every Provider then do not select a Provider, leave Provider box blank.
LOCATION - Use the down arrow key located at the end of the Location box to select the
appropriate Location statements are to be processed i.e.-a satellite location only. To have all statements
processed for every Location then do not select a Location, leave Location box blank.
SORT CODE -Use the down arrow key located at the end of the Sort Code box to select the
Appropriate Sort Code statements are to be processed. To have all statements processed for
every Sort Code then do not select a Sort Code, leave Sort Code box blank.
IGNORE BALANCES LESS THAN - System will default to $1.00. This feature allows
Quick-MD to ignore any Patient balance that is less than the amount indicated in this box
and statements will not be processed.
DO NOT PRINT STATEMENTS TO PATIENTS THAT HAVE BEEN BILLED SINCE - If you do not want
statements to be processed for Patients who received statements on or after a previous date then enter that
appropriate date. To have all statements processed, leave this field blank.
(GLOBAL MESS 1) (GLOBAL MESS 2) (GLOBAL MESS 3) - This feature allows you to enter in
three different messages that you want to print on the Patient Statements.
These messages will print on all statements provided they are configured to print on the statements.
NOTE: If you have Dunning Messages set in Properties/Patients/Patient Dunning Messages(for more
information see page 77), and a patient is late with their payment, the appropriate dunning message will
overwrite the global message.
IMPORTANT: Make sure that your patient statements are loaded in your printer before selecting <OK>. As
the print job does not come to the screen-it goes straight to the printer!
After all these steps have been completed, Select the button marked <OK> to begin processing and printing then go
to step 14. If you do not want statements to be processed, select the button marked <CANCEL>.
To send Patient Statements Electronically:
Click on the box “send statements electronically”
This lays out the electronic file to the path and assigns the file name located in Properties/Misc. Defaults/Patient
statement path.
Use your communication software to send the file to Pro Bill.
NOTE: Pro-Bill will fax an acknowledgement of (Statement Date) (Statement Totals)
(Total Statement Amounts). This acknowledgement letter should match your
print out received from step 1.
PRIMARY INSURANCE
Use this feature to print a batch of HCFA 1500 forms based on criteria you specify.
Getting there:
At “Quick Med Main Menu:” Select BILLING
At “drop down menu:’ Select one of the following: PRIMARY INSURANCE, SECONDARY INSURANCE, THIRD INSURANCE.
Quick-MD User Manual
Page 219 of 308
THE BATCH BILLING SCREEN
DO NOT PRINT FORMS AFTER DATE OF - Any claims with a ledger date of service after this date will not be printed
PROVIDER - Use the down arrow key to select the appropriate Provider. To process all claims for multiple
Providers, leave field blank
LOCATION - Use the down arrow key to select the appropriate location. To process all claims for multiple
Locations, leave field blank
PRINT FOR ONE COMPANY ONLY - Use this feature to print forms for only one Insurance Company when Insurance
ID# is selected
Quick-MD User Manual
Page 220 of 308
EXCLUDE A COMPANY - Use this feature to select up to five Insurance Companies. Any claims with the Insurance
listed in these fields will not be printed.
PRINT ORDER - Use this feature to select the order forms are to be printed. To make a selection, click the circle to
insert a mark. ID order prints by Insurance Company ID# order.
RUN SELECTION
PRINT THE FORMS – Use this feature to send the claims directly to the printer.
ONLY PRINT BILLING REPORT – Use this feature to run a pre-billing report of claims to be billed.
Select the <OK> button to process. Select the CANCEL button to exit without processing.
SECONDARY INSURANCE
Use this feature to print a batch of HCFA 1500 forms based on criteria you specify.
Getting there:
At “Quick Med Main Menu:” Select BILLING
At “drop down menu:’ select one of the following: PRIMARY INSURANCE, SECONDARY INSURANCE, THIRD INSURANCE.
Secondary Insurance claims are selected and printed exactly like Primary Insurance Claims (for more information
see page 219)
THIRD INSURANCE
Use this feature to print HCFA 1500 forms for your claims that have been reassigned to the third insurance(“A”
responsibilities).
Getting there:
At “Quick Med Main Menu:” Select BILLING
At “drop down menu:’ Select one of the following: PRIMARY INSURANCE, SECONDARY INSURANCE, THIRD INSURANCE.
Quick-MD User Manual
Page 221 of 308
Third Insurance claims are selected and printed exactly like Primary Insurance Claims (for more information see
page 219)
REBILL CLAIMS
To re-bill claims, simply enter the date that you want claims older than that date to re-bill. Select your parameters, put
your 1500 forms in the printer, and click OK.
NOTE: Quick-MD is using the date on the existing red billing note to determine which claims to re-bill.
REPORT LAST BATCH PRINTED
Use this feature to run a report of the last Batch of Insurance Claims run.
DELETE BILLING NOTES FOR LAST BATCH PRINTED
Use this feature to delete the billing notes that were posted to the ledgers during the last Batch of Insurance Claims
run.
NOTE: This feature is used when there was a problem with the last batch run, ie. Printer jam, where you need
to re-start the run.
Quick-MD User Manual
Page 222 of 308
THE E- BILL MENU (ELECTRONIC FILING)
Use this feature to file your electronic claims. Filing electronically consists of several steps that we have broken down
below.
Getting there:
From Main Menu Select ELECTRONIC BILLING
Select the appropriate BILLING OPTION
E-BILLING MEDICARE, MEDICAID, LOUISIANA BLUE CROSS BLUE SHIELD AND OCHSNER
The steps for filing electronically to any company are all the same. You simply pick the company you are interested in
filing to and follow the steps laid out below.
STEP 1.
Select INITIAL BILLING RUN. This tells Quick-MD to look through all patient ledgers for claims with no red billing notes
that has the payer set as primary insurance that you have selected to bill.
Quick-MD User Manual
Page 223 of 308
DATE ,
the date entered will be the cutoff date and any claims with a ledger date after the cutoff date will not be
processed.
PROVIDER select the DOWN ARROW BUTTON to display Provider name OR leave blank for all Providers.
Select <OK>
Select END to go to the end of the report to check and see if batch is ready. If the batch is not ready for transmission
Quick-MD will read “Error(s) batch not ready for transmission”. Select <CLOSE> and go to step 2. If batch is ready for
transmission, select <CLOSE> and go to step 3.
Quick-MD User Manual
Page 224 of 308
STEP 2.
Select REPEAT BILLING RUN
When the repeat run is selected, only claims with errors will show up on the report!
Select PRINT ALL to print all pages to correct errors
NOTE: If claim information that is needed to correct an error is unavailable, and you would like to go ahead
and send the run anyway, then select Remove claim from Run: “Input Patient ID#” and “Claim#” located on
Pre-Billing Run Sheet. Select <OK>.
After all errors have been corrected, select REPEAT BILLING RUN. System should read “No Errors Found - Batch Ready
for Transmission”. If errors still exist, take necessary steps to correct and repeat REPEAT BILLING RUN . Once all errors
are corrected, you are ready to do the Live Run.
IMPORTANT: DO NOT RUN “INITIAL BILLING RUN” AGAIN. If initial billing run picks up a claim that you do not
want to transmit for whatever reason, go to “Remove Claim From Run” button. This feature removes this
claim from the electronic batch but DOES NOT REMOVE THE CLAIM FROM THE PATIENT LEDGER. You
must run the live billing run after you run “Remove Claim From Run”.
Select CLOSE to return to BILLING MENU
Step 3.
Select LIVE BILLING RUN
At START LINE RUN? Select YES
At PRINT PAPER CLAIM? Select NO, if you do not want a hard copy for the file.
At PUT BILLING NOTES? Select YES
( Quick-MD will then put a red billing note in the patient ledger, which tells the system that the claim was billed
and the date billed.)
Quick-MD User Manual
Page 225 of 308
NOTE: This live run stays in Quick-MD till you run another Initial run, which then overwrites the last Live Run.
Step 4.
Select RECAP LAST LIVE RUN
At PRINT RECAP OF LAST LIVE RUN? Select the button marked YES
Select PRINT ALL to print Submission Recap
Step 5.
Select MAKE OF COPY LAST LIVE RUN TO DISK
This will make a copy of the last live billing run and place it inside of your ebackup folder.
Step 6.
Select TRANSMIT CLAIMS TO INSURANCE COMPANY
At this point a blank screen will be displayed while Quick-MD calls the insurance company.
Once a connection is made the computer will fill out the required information and upload the batch file.
After your file is finished uploading, exit out of the window.
Step 7.
Note: Your claims may not be immediately available for download; processing times are dependent on the
insurance company.
Select DOWNLOAD INSURANCE REPORTS
At this point a blank screen will be displayed while Quick-MD calls the insurance company.
Once a connection is made the computer will fill out the required information and download the reports.
After the files have finished downloading, exit out of the window.
Quick-MD User Manual
Page 226 of 308
ELECTRONIC CLEARING HOUSE BILLING
Use this feature to file to the other major payers through the Proxy Med clearing house. The steps are the same as
above. But the initial run is slightly different.
In setting up to send claims to ProxyMed, you will need to insert ProxyMed’s Insurance Payer ID#’s in all of the
insurance records in Quick-MD that you want to go electronically. They will go in the Clearing House payer ID#
field in the master insurance records in Quick-MD. When you run your initial run, you will check the box Pick up
all claims for companies that have ID#’s set. When you do the Initial Run, Quick-MD will then look through all
of the patients that have an insurance company attached to them with the payer ID#’s set, for claims that don’t
have a red billing note on them.
Repeat steps 1 through 5 above.
E-BILL REPORTS
To read the response report that you received, from the company that you have billed, you will need to go to
Read E-Bill Reports. This will bring up the ebill folder. From here you simply double click on the file that you
want to open and the system will display the correct report. A TA1 report tells you that the file was transferred to
the company correctly. A 997 report, will show you if errors occurred in the format of the file. If any errors come
back in the 997 report you will need to resend the entire batch, after the errors has been corrected. Once the
claims have been accepted by the insurance company they will run their own set of edits. The file that they send
back to you will contain the number of claims excepted and rejected. An 835 file is your electronic remittance file,
reporting and automatic posting can be preformed on this file.
Quick-MD User Manual
Page 227 of 308
ELECTRONIC REMITTANCE (ANSI 835)
Quick-MD will automatically load electronic remittance files directly into the line item payment module. This will
drastically reduce the amount of time that it takes an office to input payments.
CALCULATE ADJUSTMENTS AS (AMOUNT BILLED – AMOUNT PAID ) - If this option is selected then the adjustment will be the
difference between the amount billed and the amount paid.
USE ADJUSTMENT LISTED IN REMITTANCE FILE – If this option is selected then the system will use the adjustment amount
returned in the 835 file.
PUT ZERO DOLLARS IN ADJUSTMENT – If this option is selected then the system will use a zero dollar amount for the
adjustment.
Quick-MD User Manual
Page 228 of 308
835 REPORT
To get a legible report of the 835 file follow the following steps.
1. Click on the Report EOB button.
2. The system will now ask you to pick a file. Choose your 835 file and click open.
3. Keep a copy of the report for your records.
Quick-MD User Manual
Page 229 of 308
LOADING THE 835 FILE
This option will load the 835 file directly into your payment module.
1. Click on the Load into Payment Posting button.
2. Pick your 835 file and click Open.
3. Verify that the remittance has been downloaded.
4. Go to the main payments menu and choose Insurance Payments (By Invoice) or Insurance Payments
(By Claim).
Note: If you have WORK BY LINE ITEM set in the properties then you will need to choose by invoice, otherwise
you will choose by claim.(for more information see page 63)
5. The payment screen will be populated with all of the information from the remittance file.
Quick-MD User Manual
Page 230 of 308
ENTERING PAYMENTS IN QUICK-MD
THE PAYMENTS MENU
PATIENT/INSURANCE PAYMENTS POSTING
Use the feature to post either Patient or Insurance Payments by Claim.
Getting there:
At Main Menu select “PAYMENTS”
At Drop Down Menu select “PATIENT/INSURANCE PAYMENTS (BY CLAIM)”
NOTE: This module will pull in Patient responsible claims only, starting with the oldest one in the ledger, if you
don’t have “GET ALL BALANCES” checked. If you want this module to always get all balances, both patient and
insurance responsible, check the box GET ANY BALANCE IN PAYMENT POSTING in MISCELLANEOUS DEFAULTS (for more
information see page 91).
In the yellow field, enter the patient ID#. If you don’t know it, the hit the <F1> key to browse the patient file and bring in
this patient.
Enter the payment amount in the PAYMENT field.
Enter the LEDGER DATE you wish this payment to carry.
Enter the responsibility code that the payment is coming from. I for primary insurance, S for secondary, A for third, or
P for patient payment.
Quick-MD User Manual
Page 231 of 308
Enter the check number in the CHK# field.
Pick your PAYMENT and ADJUSTMENT codes you wish this entry to carry in the ledger.
Once you have entered the patients ID#, patient responsible claims with a balance will be brought into the module,
starting with the oldest first. If you have GET ALL BALANCES checked, then insurance claims with a balance will also be
brought over.
The claim number(s) and the balance of the claim will automatically be displayed. Enter the payment amount in the
PAYMENT field. If the patient has an unapplied credit it will be displayed in the upper right hand corner of the screen.
If you wish to apply an unapplied credit, simply type the amount in the UC PAYMENT field. If you wish to write any
portion of the balance off, put a “Y” in the WRITE OFF field and enter the amount in the WRITE OFF AMOUNT. The
current responsibility is displayed at the far right in the CURRENT RESP. field.
If you wish to reassign the balance to a different responsibility, simply enter the code in RE-AS FIELD.
After payment posting is complete select the <POST PAYMENT> button, this allows Quick-MD to post the transactions to
the Patient’s account. If you want to delete a transaction and not post payment, select the <CANCEL> button.
After Post Payment is complete, select the <CANCEL> button to return to Main Menu.
Quick-MD User Manual
Page 232 of 308
QUICK INSURANCE PAYMENT POSTING MODULE – BY CLAIM
Getting there:
You should be in the Menu “POST INSURANCE PAYMENTS AND ADJUSTMENTS”- This module will post one payment and
one adjustment to the claim as a whole.
In the section “COMMON POSTING INFORMATION, at LEDGER DATE: enter date
of EOB or press the enter button for today’s date.
NOTE: System will default to current date.
RESP. CODE - System will default to (I) for Insurance payments, Press the
<ENTER> button.
CHECK NUMBER - Input the check number located on EOB.
PAY SOURCE -Select the DOWN ARROW BUTTON located at the end of the PAY CODE box and select
the appropriate pay source. Press the ENTER button.
Quick-MD User Manual
Page 233 of 308
NOTE: To use this feature the PAYMENT TABLE (for more information see page 67) must be set with a listing
of description types for posting payments.
ADJ CODE - Select the DOWN ARROW BUTTON located at the end of the “adj code” box and select the appropriate
adjustment code. Press the <ENTER> button.
NOTE: To use this feature the ADJUSTMENT TABLE (for more information see page 68) must be set with a
listing of description enters for posting adjustments.
System will automatically drop to “PAT ID#” Input Patient ID number located on EOB. If ID number is not present,
press <F1>to search by name.
After Patient ID number has been selected press the ENTER button to move to “Claim#”
NOTE: Under “Patient and Claim Information” Quick-MD will input the Patient name and address along
with the pay source: (P. Ins-primary insurance name, S. Ins-secondary insurance name, T. Ins-third
party insurance) for verification.
CLAIM# - Input the claim number that payment is being made or press the <F1> key to go the patient’s ledger.
Here you can review the claim being paid. At this point you may also press the Shift + <F1> key to get to a fully
functional ledger browse screen. (for more information see page 31)
NOTE: While browsing the ledger, you may post a note (<F3> Key) to the claim or, if there is a MediGap
secondary, you may post a billing note (see commands at the bottom of the screen) so Quick-MD will not
pick this claim up during secondary batch billing. With the claim being highlighted, hit the enter key to carry
this claim over to the Quick Payment Posting Module.
ADD RESP - Input the responsibility code for the pay source you want the balance to be transferred for billing.
Press the ENTER button
Responsibility Code: (I)- Insurance, (S)- Secondary, (A)- Third, (P)- Patient Responsibility
PAYMENT$ - Input the total payment amount. To view the “Charge List” press <F2>
NOTE: ”Charge List” can only be accessed through the “Payment$” box
NOTE: Pressing <F1> in this field will pop up a calculator that can be used to add numbers. When <OK>
is clicked, the numbers added will be inserted into that payment field.
DO WRITE OFF - Input Y if you are making an adjustment. Input N if no adjustments are to be made.
BALANCE$ - If you selected Y to “write off” input the amount you want adjusted from claim total than press the
enter button. If you selected N to “write off” then the remaining balance will be billed to the selected pay source.
NOTE: At Balance$ system will default to current ledger balance, or will reflect the
amount of the write off.
NOTE: If you do not have time to finish a bulk EOB, skip number 11 through 14. See steps “To Save An
Unfinished EOB Posting.
After all payments are inputted, select the REPORT button to balance payment amount from EOB to Payment amount
inputted to computer. To confirm at “Report Posting Information?” select the YES button
System will display INS POSTING REPORT after payments on report and payments on EOB balance,
Select <CLOSE> to return to “Payments and Adjustment” screen
Select the <POST> button to enable system to post all payment and adjustment transactions to each claim
Select the <CANCEL> button to return to Main Menu
Quick-MD User Manual
Page 234 of 308
TO SAVE
AN
UNFINISHED EOB POSTING
If you do not have enough time to finish inputting payments and adjustments from a bulk EOB then Select the <SAVE>
button
To confirm at “Save Listing?” select the <YES> button
System will read “Listing was Saved”
Select <OK>
Select the <CANCEL> button to return to Main Menu
RESUMING AN UNFINISHED EOB POSTING
Getting there:
At “Main Menu”: Select PAYMENTS
At the drop down menu: Select INSURANCE PAYMENTS
In the section “Common Posting Information” At Ledger Date: Input the date of the unfinished EOB
RESP CODE - Input Key Alphabet of unfinished EOB
CHECK NUMBER - Input check number of unfinished EOB. Press the <ENTER> button
Select the <LOAD> button
To confirm: At “Load Listing?” select <YES> to bring all saved payment activity to screen. You can now continue with
Posting Payments and Adjustments.
Quick-MD User Manual
Page 235 of 308
INSURANCE PAYMENTS BY INVOICE
Getting There:
You will use this payment posting screen the majority of the time since it works with automatic when loading “Line
Item” ERAs. If you file Medicare secondary claims electronically then you are required to post your primary payments
by line Item. ((For more information see page 103)
POST ZERO $ PAYMENTS – Check this box if you want to post a payment of zero dollars to the patient’s ledger. If this box
is not checked then zero dollar payments are not posted.
POST ZERO $ ADJUSTMENTS – Check this box if you want to post an adjustment of zero dollars to the patient’s ledger. If
this box is not checked then zero dollar adjustment are not posted.
LEDGER DATE – This is the date that all of the payments and adjustments will carry.
Quick-MD User Manual
Page 236 of 308
RESP. CODE - System will default to (I) for Insurance payments, Press the
<ENTER> button.
CHECK NUMBER - Input the check number located on EOB.
PAY SOURCE -Select the DOWN ARROW BUTTON located at the end of the PAY CODE box and select
the appropriate pay source. Press the ENTER button.
NOTE: To use this feature the PAYMENT TABLE (for more information see page 67) must be set with a listing of
description types for posting payments.
ADJ CODE - Select the DOWN ARROW BUTTON located at the end of the “adj code” box and select the appropriate
adjustment code. Press the <ENTER> button.
NOTE: To use this feature the ADJUSTMENT TABLE (for more information see page 68) must be set with a listing of
description enters for posting adjustments.
System will automatically drop to “PAT ID#” Input Patient ID number located on EOB. If ID number is not present,
press <F1>to search by name.
After Patient ID number has been selected press the ENTER button to move to “Claim#”
NOTE: Under “Patient and Claim Information” Quick-MD will input the Patient name and address along with the
pay source: (P. Ins-primary insurance name, S. Ins-secondary insurance name, T. Ins-third party insurance)
for verification.
CLAIM# - Input the claim number that payment is being made or press the <F1> key to go the patient’s ledger. Here
you can review the claim being paid. At this point you may also press the Shift + <F1> key to get to a fully functional
ledger browse screen. (for more information see page 31) Once on the F1 browse screen you can pres the <F1> key
again to pull all of the invoice for the claims that is highlighted.
NOTE: While browsing the ledger, you may post a note (<F3> Key) to the claim or, if there is a MediGap
secondary, you may post a billing note (see commands at the bottom of the screen) so Quick-MD will not pick this
claim up during secondary batch billing. With the claim being highlighted, hit the enter key to carry this claim over
to the Quick Payment Posting Module.
ADD RESP - Input the responsibility code for the pay source you want the balance to be transferred for billing. Press the
ENTER button
Responsibility Code: (I)- Insurance, (S)- Secondary, (A)- Third, (P)- Patient Responsibility
PAYMENT$ - Input the total payment amount. To view the “Charge List” press <F2>
NOTE: ”Charge List” can only be accessed through the “Payment$” box
NOTE: Pressing <F1> in this field will pop up a calculator that can be used to add numbers. When <OK> is
clicked, the numbers added will be inserted into that payment field.
NOTE: You can configure the system to automatically apply insurance recoup adjustments. By entering a
negative payment in this field Quick-MD will automatically post the defined adjustment to the ledger. (For
more information see page 68)
DO WRITE OFF - Input Y if you are making an adjustment. Input N if no adjustments are to be made.
BALANCE$ - If you selected Y to “write off” input the amount you want adjusted from claim total than press the enter
button. If you selected N to “write off” then the remaining balance will be billed to the selected pay source.
NOTE: At Balance$ system will default to current ledger balance, or will reflect the
amount of the write off.
Quick-MD User Manual
Page 237 of 308
NOTE: If you do not have time to finish a bulk EOB, skip number 11 through 14. See steps “To Save An
Unfinished EOB Posting.
After Posting the payments you will want to click on the New button before exiting the screen. This will clear the
information. That way the next time you need to post a payment the screen WILL BE BLANK.
If you did not finishing entering the payment you can Exit the screen. Quick-MD will automatically save your current work
and it will be available the next time you open this module.
PATIENT/INSURANCE PAYMENTS (BY INVOICE/UC) – (UNAPPLIED CREDITS)
Getting There:
The screen will open up blank, with the cursor in the responsibility field. Enter the responsibility code that the payment is
from (I,S,A, or P). Enter the check number of the check in the check # field. Enter the ledger date you wish the entries to
carry. Pick a payment and an adjustment code. If you wish to post zero dollar payments and adjustments click in the
check boxes.
Quick-MD User Manual
Page 238 of 308
If you want to post $0 dollar payments and/or adjustments, click the appropriate box (s).
PAT ID# - enter the patient id#. If you don’t know it, you may hit the <F1> and browse the patient file. Highlight the desired
name, and hit <ENTER>.
At this point, if you are only looking for P (patient responsible claims) you hit the <F3> key and Quick-MD will bring over
only patient responsible balances into the module, starting with oldest claims first.
If you are posting insurance payments, at the claim number field, enter the claim number you wish to post a payment to,
then hit the <F1> key to go straight to that claim in the ledger. If you don’t know the claim number, you may hit the <F1>
key to go browse the ledger.
Quick-MD User Manual
Page 239 of 308
Once in the ledger, you highlight an invoice, and hit enter to bring over that invoice, or you may hit the <F1> key to bring
over all invoices within that claim.
NOTE: If you are browsing the ledger by date of service and you enter charges the day of the date of service, then the
ledger date is your date of service. If your date of service is different than the ledger date (the day you enter the
charges - i.e. hospital charges), then go to Properties/Misc. Defaults/Put Service date on ledger Screen and turn this
feature on, so the dates of service will be in the Service Date field.
The <F3> key will allow you to post a note in the ledger to claim that is highlighted. If you wish this note to print on the
patient statement, simply precede the note with an * (asterisk).
IMPORTANT: If the secondary insurance is an automatic crossover from the primary, you may post a red billing not to
the claim so Quick-MD will not pick this claim up and bill it, therefore allowing you to re-assign responsibility to the
secondary for reporting purposes.
Once you have selected the claim and invoices to be paid within that claim, Quick-MD will bring over the existing charge,
payments, and adjustments.
The cursor is now in the yellow payment field. (For convenience purposes, from the next three yellow fields, the <F1> key
will pop up a calculator.) Enter the payment and adjustment. The system is displaying the unapplied credit balances that
this patient has right below his name in the UC Balance field. If you wish to apply any of these credits to this balance,
simply insert the amount in the UC Pay field.
At this point, if there is a balance, and you wish to reassign that balance to the second or third insurance simply type in
the responsibility code (either S or A) you wish to reassign the balance of the to.
Quick-MD User Manual
Page 240 of 308
When you have finished posting the EOB, you may <REPORT> on your entries to be sure the totals match your check. If
there is a discrepancy, you may print out the audit trail in order to find your mistake. When you are satisfied that all is
correct, simply hit the Post button and Quick-MD will post all of the entries into the patients ledgers.
NOTE: If you have lots of entries in the module and need to go back to one in particular, click on the <Find>
button, enter PATIENT ID# and CLAIM #, and Quick-MD will take you there.
IMPORTANT: Do not hit the Post button twice or Quick-MD will post these entries again!
When you hit the <Exit> button Quick-MD will ask you if want to save these entries.
This feature allows you to leave the module, and have the module open back up to where you left off, A great feature for
going to lunch or finishing up tomorrow.
When starting a new EOB, simply click on the <Clear> button.
Quick-MD User Manual
Page 241 of 308
RECAPING TRANSACTIONS FOR A DAY IN QUICK-MD
THE RECAPS MENU
Use this feature to recap all activity (charges, payments and adjustments) for a particular date.
NOTE: In order for the operator defined parameter to work, users must make sure that they are logged into a
terminal with their own user ID# and password. This can be verified by looking at the operator name on the main
screen. (for more information see SET OPERATOR RIGHTS on page 286).
DAILY RECAP
This feature allows you to print or view an overall itemized daily activity report of transactions entered into Quick-MD. All
charges, payments and adjustments will be totaled on this report.
If the totals on this report don’t match your hand totals, then a detailed report with a complete audit trail may be run.
DATE – Enter in the date that you want to recap. At a minimum, this field must be filled in.
PROVIDER – This field allows you to choose a provider or leave blank for all.
LOCATION - This field allows you to choose a location or leave blank for all.
OPERATOR - This field allows you to choose an individual operator or leave blank for all.
When done, select <OK>.
SAMPLE DAILY RECAP REPORT
DAILY RECAP:06/25/2003
Page # 1
PATIENT
PAT.CHRGS INS.CHRGS PAYMENTS CRD.AJST DEB.AJST
================================================================================
11 FUSILIER, BRENT
0.00
85.00
-20.00
0.00
0.00
9 FUSILIER, BRYAN
0.00
125.00
-70.00
-8.42
0.00
================================================================================
TOTAL PATIENTS:
2
0.00
210.00
-90.00
-8.42
0.00
TOTAL CHARGES: $210.00
Quick-MD User Manual
Page 242 of 308
DAILY PAYMENTS
This feature allows you to print or view an overall itemized daily activity report of payments entered into Quick-MD. This
report contains the following fields PATIENT, PATIENT CHARGES , INSURANCE CHARGES , PAYMENT, CREDIT ADJUSTMENTS and DEBIT
ADJUSTMENTS.
DATE – Enter in the date that you want to recap. At a minimum, this field must be filled in.
PROVIDER – This field allows you to choose a provider or leave blank for all.
LOCATION - This field allows you to choose a location or leave blank for all.
OPERATOR - This field allows you to choose an individual operator or leave blank for all.
When done <OK>.
SAMPLE DAILY PAYMENTS REPORT
DAILY PAYMENT RECAP FOR 06/25/2003
Page # 1
PAYMENT
PATIENT
CLM# INV# CHECK#
AMOUNT
================================================================================
PATIENT CHECK
11 FUSILIER, BRENT
3
1 132
20.00
PATIENT CHECK
9 FUSILIER, BRYAN
2
1 432
40.00
PATIENT CHECK
9 FUSILIER, BRYAN
1
1
30.00
----------------------TOTAL:
3
90.00
================================================================================
GRAND TOTAL:
$
90.00
Quick-MD User Manual
Page 243 of 308
DAILY CHARGES
This feature allows you to print or view an overall itemized daily activity report of charges entered into Quick-MD. The
report generated contains the following fields PAYMENT, PATIENT, CLAIM #, INVOICE #, CHECK # and AMOUNT .
DATE – Enter in the date that you want to recap. At a minimum, this field must be filled in.
PROVIDER – This field allows you to choose a provider or leave blank for all.
LOCATION - This field allows you to choose a location or leave blank for all.
OPERATOR - This field allows you to choose an individual operator or leave blank for all.
When done <OK>.
SAMPLE DAILY CHARGES REPORT
DAILY CHARGES RECAP FOR 10/27/2004
Page # 1
ID# Patient Name
CPT Code
CPT Description
$
Amount Units
=========================================================================================
===========
8 ALDER, JACOB
99212-RH
OFFICE VISIT
40.00
1.00
9 FUSILIERJR, BRYAN
99212-LH
OFFICE VISIT
40.00
1.00
--------------------------------------------------------------------------------------------------TOTAL NUMBER OF CHARGES ---->
2
Quick-MD User Manual
Page 244 of 308
DAILY ADJUSTMENTS
Use this feature to print or view an overall itemized daily activity report of adjustments entered into Quick-MD. The report
generated contains the following fields ADJUSTMENT, PATIENT, CLAIM #, INVOICE #, CHECK # and AMOUNT .
DATE – Enter in the date that you want to recap. At a minimum, this field must be filled in.
PROVIDER – This field allows you to choose a provider or leave blank for all.
LOCATION - This field allows you to choose a location or leave blank for all.
OPERATOR - This field allows you to choose an individual operator or leave blank for all.
When done <OK>.
SAMPLE DAILY ADJUSTMENTS REPORT
DAILY ADJUSTMENT RECAP FOR 06/25/2003
Page # 1
ADJUSTMENT
PATIENT
CLM# INV# CHECK#
AMOUNT
================================================================================
PATIENT WRITEOFF
9 FUSILIER, BRYAN
1
1
-3.42
PATIENT WRITEOFF
9 FUSILIER, BRYAN
1
1
-5.00
TOTAL:
2
------------8.42
================================================================================
GRAND TOTAL:
$
-8.42
Quick-MD User Manual
Page 245 of 308
RECAP SUMMARY FOR
A
TIME PERIOD
Use this feature to recap daily summaries for a specified date range.
SAMPLE RECAP SUMMARY FOR TIME PERIOD REPORT
Recap Summary From 01/01/2000 To 06/25/2003 Page # 1
Date
Pat Chrgs Ins Chrgs Tot Chrgs
Payments Credit Adj Debit Adj
================================================================================
12/01/2000
700.00
562.50
1262.50
-145.00
0.00
0.00
12/05/2000
0.00
0.00
0.00
0.00
-20.00
0.00
12/14/2000
0.00
0.00
0.00
-335.00
-142.50
0.00
12/28/2000
0.00
0.00
0.00
-20.00
0.00
0.00
01/17/2003
100.00
0.00
100.00
-40.00
0.00
0.00
01/24/2003
200.00
0.00
200.00
0.00
0.00
0.00
02/02/2003
0.00
583.00
583.00
-70.00
0.00
0.00
06/25/2003
0.00
210.00
210.00
-90.00
-8.42
0.00
-------------------------------------------------------------------------------1000.00
1355.50
2355.50
-700.00
-170.92
0.00
Quick-MD User Manual
Page 246 of 308
ANALYZING YOUR INFORMATION IN QUICK-MD
THE REPORTS MENU
The reports menu is your window into your data. Here you can find meaningful answers to the questions presented to you
in the course of running your practice.
QUERY PATIENT FILE
Use the powerful Query to see any data in any format you choose about your patients. There are actually hundreds, if not
thousands, of possible reports that can be generated in seconds!
Use this feature to select the criteria that you wish to report on. You may select the order of the report:
• 1 = sort by ID#
• 2 = Sort Alphabetically
• 3 = Sort by zip code
Simply define to Quick-MD what information you would like reporting on and then click in the boxes of the information you
want to appear on the report, give the report a name, and then click on <OK>. The report will come to the screen, giving
the user the option of printing the whole report by selecting the Print All button, or paging down to the end, the user can
print only the totals by using the Print Screen button.
Quick-MD User Manual
Page 247 of 308
QUERY PAYMENTS
Use this feature to generate a report history on payment description enters that are set in the PAYMENT TABLE (for more
information see page 67). The report generated contains the following fields: TYPE OF PAYMENT, COUNT and TOTAL.
If any of the fields are left blank, then the report is for all of the payments, all providers and all locations and insurance
companies. But if so desired, then the report can be narrowed down to whatever parameters the user selects.
By selecting INCLUDE AUDIT TRAIL, Quick-MD will generate a detailed report. The report generated will now contain the
following fields: ID, PATIENT NAME , TYPE OF PAYMENT, DATE , CLAIM # and AMOUNT .
Quick-MD User Manual
Page 248 of 308
SAMPLE QUERY PAYMENTS REPORT:
PAYMENTS FROM:01/01/2000 TO:06/24/2003
Page # 1
ID#
PATIENT NAME
TYPE OF PAYMENT
DATE
CLM#
$ AMOUNT
================================================================================
3 MIKE SMITH
PATIENT CHECK
12/01/2000
1
25.00
4 DEBRA TURNER
PATIENT CHECK
12/01/2000
1
80.00
6 SANDRA RYAN
PATIENT CHECK
12/01/2000
1
20.00
7 DAVID RYAN
PATIENT CHECK
12/01/2000
1
20.00
2 JOHN SMITH
MEDICAID PAYMENT
12/14/2000
1
80.00
3 MIKE SMITH
AETNA PAYMENT
12/14/2000
1
75.00
5 SEAN DEVERON
PATIENT CHECK
12/14/2000
1
60.00
6 SANDRA RYAN
AETNA PAYMENT
12/14/2000
1
60.00
7 DAVID RYAN
AETNA PAYMENT
12/14/2000
1
60.00
2 JOHN SMITH
CIGNA PAYMENT
12/28/2000
1
20.00
8 JACOB ALDER
PATIENT CHECK
01/17/2003
2
20.00
8 JACOB ALDER
PATIENT CHECK
01/17/2003
1
20.00
9 BRYAN FUSILIER MEDICARE PAYMENT
02/12/2003
1
75.00
9 BRYAN FUSILIER BLUE CROSS PAYMENT
02/12/2003
1
20.00
8 JACOB ALDER
PATIENT CHECK
02/19/2003
1
580.00
8 JACOB ALDER
PATIENT CHECK
02/19/2003
2
420.00
8 JACOB ALDER
PATIENT CHECK
02/19/2003
3
25.00
9 BRYAN FUSILIER PATIENT CHECK
02/19/2003
8
200.00
9 BRYAN FUSILIER PATIENT CHECK
02/19/2003
2
80.00
9 BRYAN FUSILIER PATIENT CHECK
02/19/2003
4
100.00
9 BRYAN FUSILIER PATIENT CHECK
02/19/2003
5
95.00
9 BRYAN FUSILIER PATIENT CHECK
02/19/2003
10
400.00
15 KIRK SMITH
PATIENT CHECK
03/11/2003
1
20.00
5 SEAN DEVERON
PATIENT CHECK
03/17/2003
2
20.00
22 BRYAN FUSILIER PATIENT CHECK
03/28/2003
2
20.00
9 BRYAN FUSILIER PATIENT CHECK
04/03/2003
11
20.00
9 BRYAN FUSILIER PATIENT CHECK
04/09/2003
11
45.00
9 BRYAN FUSILIER MEDICAID PAYMENT
05/13/2003
23
75.00
31 KEITH KRAMER
MEDICAID PAYMENT
05/19/2003
1
80.00
9 BRYAN FUSILIER PATIENT CHECK
06/17/2003
2
20.00
9 BRYAN FUSILIER PATIENT CHECK
06/17/2003
14
100.00
9 BRYAN FUSILIER PATIENT CHECK
06/17/2003
15
30.00
36 TONYA FUSILIER PATIENT CHECK
06/24/2003
5
200.00
TYPE OF PAYMENT
COUNT
$ TOTAL
=======================================================
PATIENT CHECK
24
2620.00
MEDICAID PAYMENT
3
235.00
MEDICARE PAYMENT
1
75.00
BLUE CROSS PAYMENT
1
20.00
AETNA PAYMENT
3
195.00
CIGNA PAYMENT
1
20.00
------------------------------------------------------33
3165.00
Quick-MD User Manual
Page 249 of 308
QUERY ADJUSTMENTS
Use this feature to generate a report on adjustments that were used during the time frame specified. At Adj. Type make a
selection from the ADJUSTMENT TABLE (for more information see page 68). The report generated contains the following fields:
ID#, PATIENT NAME, TYPE OF ADJUSTMENT , DATE, CLAIM #, Invoice #, Check # and AMOUNT .
SAMPLE QUERY ADJUSTMENTS REPORT:
DAILY ADJUSTMENT RECAP FOR 06/25/2003
Page # 1
ADJUSTMENT
PATIENT
CLM# INV# CHECK#
AMOUNT
================================================================================
PATIENT WRITEOFF
9 FUSILIER, BRYAN
1
1
-3.42
PATIENT WRITEOFF
9 FUSILIER, BRYAN
1
1
-5.00
TOTAL:
2
------------8.42
================================================================================
GRAND TOTAL:
$ -8.42
Quick-MD User Manual
Page 250 of 308
QUERY CHARGES
Use this feature to generate a report on Charge codes or Diagnosis codes that are set in the CPT CODE TABLE (for more
information see page 43) and have been used to generate charges. The report generated contains the following fields:
ID#, PATIENT NAME, CLAIM #, INVOICE#, CPT CODE, DESCRIPTION, UNITS, LEDGER DATE and AMOUNT .
Simply select a date range that you wish to see reporting on, and select the parameters for the report or leave blank to
include all. Select the CPT code, you can use a numerical from and to code to get information about a range of CPT
codes, or Diagnosis code, and check the information you wish to see on the report, give the report a name and click the
<OK> button. You may print all or page down to the end and print screen and print only the totals. You can use a
numerical from and to code on the query charge report to get information about a range of CPT codes.
Quick-MD User Manual
Page 251 of 308
SAMPLE QUERY CHARGES REPORT:
ID#
PATIENT NAME CLM# INV# CPT CODE DESCRIPTION
UNITS LEDG.DATE
$ AMOUNT
================================================================================
9 BRYAN FUSILIER
3
1 99225
OFFICE VISIT - NEW
1.00 02/12/2003
125.00
Diagnosis:100
8 JACOB ALDER
3
1 99225
Diagnosis:789.0
PAY:02/19/2003 JACOB ALDER
OFFICE VISIT - NEW
1.00 02/19/2003
9 BRYAN FUSILIER
7
1 99225
Diagnosis:100
ADJ:02/19/2003 BRYAN FUSILIER
ADJ:02/19/2003 BRYAN FUSILIER
OFFICE VISIT - NEW
9 BRYAN FUSILIER
5
1 99225
Diagnosis:100
PAY:02/19/2003 BRYAN FUSILIER
ADJ:02/19/2003 BRYAN FUSILIER
OFFICE VISIT - NEW
8 JACOB ALDER
Diagnosis:789.0
4
1 99225
OFFICE VISIT - NEW
1.00 03/11/2003
125.00
8 JACOB ALDER
Diagnosis:789.0
5
1 99225
OFFICE VISIT - NEW
1.00 03/11/2003
125.00
15 KIRK SMITH
Diagnosis:100
1
1 99225
OFFICE VISIT - NEW
1.00 03/11/2003
125.00
15 KIRK SMITH
1
2 99225
Diagnosis:100
PAY:03/11/2003 KIRK SMITH
OFFICE VISIT - NEW
1.00 03/11/2003
125.00
9 BRYAN FUSILIER
11
1 99225
Diagnosis:100
PAY:04/03/2003 BRYAN FUSILIER
PAY:04/09/2003 CIGNA
ADJ:03/14/2003 BRYAN FUSILIER
OFFICE VISIT - NEW
PATIENT CHECK
-25.00
1.00 02/19/2003
TRANSFER IN
TRANSFER IN
425.00
155.00
==========
580.00
PATIENT WRITEOFF
MEDICAID WRITE-OFF
COMMERCIAL WRITE OFF
-2000.00
-5.40
-185.00
==========
-2190.40
Quick-MD User Manual
125.00
-100.00
-25.00
1.00 02/19/2003
PATIENT CHECK
TRANSFER IN
125.00
-95.00
-30.00
PATIENT CHECK
-20.00
1.00 03/14/2003
PATIENT CHECK
PATIENT CHECK
TRANSFER IN
125.00
-20.00
-45.00
-30.00
QUERY TOTALS
================================================================================
TOTAL CHARGES.............$
6700.00
TOTAL CHARGE RECORDS......:
33
TOTAL UNITS OF SERVICE....:
37.00
RECEIVABLE................$
3929.60
AVERAGE CHARGE PER UNIT...$
181.08
PATIENT CHECK
MEDICAID PAYMENT
125.00
Page 252 of 308
MAIL MERGE
Use this feature to mail merge information with Word or Word Perfect documents. It is used primarily, however, to
generate canned collection letters on delinquent accounts.
NOTE: Before you can use the Mail Merge function, a path and file name must be set up. This maintenance is
performed in MISCELLANEOUS DEFAULTS (for more information see page 91).
To Generate Collection Letter 1:
When accounts are chosen for collections, one sort code within the Patient file needs to be set to “COLLECTION LETTER 1”.
This is accomplished by generating an ageing report, deciding which accounts will go to collections, and then setting the
sort code for each of those patients. Once done, the screen above can be completed for the “select by” section (at a
minimum, sort code needs to be defined). The “DATA TO MERGE” section is then completed with the information you want to
see on the collection letter. Once complete, click <OK> and proceed with the mail merge function within Word or Word
Perfect. This will complete the task of sending out collection letter 1.
To Generate Collection Letter 2:
To send out the second of three collection letters on accounts that are still unpaid, you will first need to change the sort
code on those accounts. Unlike the initial task of manually setting the sort code to “COLLECTION LETTER 1”, Quick-MD will
automatically accomplish this task by using REASSIGN SORT CODE (for more information see page 291). Once that task is
completed, go through the same procedure above, choosing the sort code of “Collection Letter 2”.
To Generate Collection Letter 3:
To send out the third of three collection letters on accounts that are still unpaid, you will first need to change the sort code
on those accounts. Quick-MD will automatically accomplish this task by using REASSIGN SORT CODE (for more information
see page 291). Once that task is completed, go through the same procedure above, choosing the sort code of
“COLLECTION LETTER 2”.
Quick-MD User Manual
Page 253 of 308
NOTE: The 3 collection letter process is a common procedure used. However, Quick-MD does not restrict you to
using 3. You can do less than three or more than 3. The process above would be repeated for the number of
collection letters you are using. When the patient pays, remember to go un-set the sort code so they will not be
picked up in the next run.
Quick-MD User Manual
Page 254 of 308
PRINT LABELS
You may print labels out of Quick-MD with either your tractor feed printer using single column labels, or with your
laser/inkjet print using 2 column 1 inch by 4 inch labels. The lines to skip between labels for the tractor feed are defined in
Properties/Printed Forms/ Add Laser/Ink settings/lines to skip for labels as is the set up for the Laser labels.
Quick-MD User Manual
Page 255 of 308
AGEING REPORT (BRIEF)
Use this feature to generate a brief account’s receivable aging report that will include the PATIENT’S NAME, PHONE NUMBER, DATE
OF LAST PAYMENTS , and any OUTSTANDING BALANCE for Patient and/or Insurance balances. You have the ability to exclude any
financial class from this report.
NOTE: If you check PATIENT BALANCES ONLY ‘AND’ ask for ALL BALANCES, you can effectively use this report as a prebilling run for patient statements.
IMPORTANT: If the Block Bill feature of the patient demographic screen contains a P, then be aware that these
statements will show up in the pre-billing run but will NOT actually be a part of the batch run.
Quick-MD User Manual
Page 256 of 308
SAMPLE AGEING REPORT (BRIEF):
** ACCOUNT AGING REPORT AS OF 06/24/2003 ALL PROVIDERS
Page
1
Acct# Name
Home Phone
DOL Pay
Current
31 - 60
61 - 90
91 -120
121 +
Total
=========================================================================================
8
11ALDER,JACOB K 3372319941
02/19/2003 500.00
200.00
125.00
250.00
-140.00
935.00
14 BRIDGES,JEFF 222222222
0.00
0.00
0.00
125.00
0.00
125.00
33 DAVIS,JOHNNY 5500980984
550.00
0.00
0.00
0.00
0.00
550.00
5 DEVERON,SEAN D 3374333099
03/17/2003
0.00
0.00
0.00
230.00
0.00
230.00
17 FRUGE,CINDY
3379879878
125.00
50.00
25.00
25.00
0.00
225.00
35 FUSILIER,AMBE 3234234234
350.00
0.00
0.00
0.00
0.00
350.00
9 FUSILIER,BRYAN 3372120724
06/17/2003 600.00
897.10
545.00
155.00
-90.00
2107.10
22 FUSILIER,BRYAN
03/28/2003
0.00
0.00
605.00
0.00
0.00
605.00
27 FUSILIER,BRYAN
500.00
200.00
0.00
0.00
0.00
700.00
28 FUSILIER,BRYAN
500.00
200.00
0.00
0.00
0.00
700.00
29 FUSILIER,BRYAN
500.00
200.00
0.00
0.00
0.00
700.00
32 FUSILIER,BRYAN3333334343
500.00
100.00
0.00
0.00
0.00
600.00
36 FUSILIER,TONYA 2394877987 06/24/2003 350.00
0.00
0.00
0.00
0.00
350.00
========= ========= ========= ========= ========= =========
5645.00
2304.60
1445.00
1160.00
-30.00 10524.60
53.64 %
21.90 %
13.73 %
11.02 %
-0.29 %
Quick-MD User Manual
Page 257 of 308
AGING REPORT (DETAILED)
Use this feature to generate a detailed account ageing report that includes balances separate for patient responsible,
primary, secondary, and third insurances. The report will include the PATIENT’S NAME, PAY SOURCE (PRIMARY) (SECONDARY)
(THIRD) INSURANCE NAME , and the OUTSTANDING BALANCE showing the AGEING STATUS .
Quick-MD User Manual
Page 258 of 308
SAMPLE AGEING REPORT (DETAILED):
** DETAILED ACCOUNT AGEING REPORT AS OF 06/24/2003 ALL PROVIDERS
Page
1
Acct # Name
Current
31 - 60
61 - 90
91 -120
121 +
Total
Ins.Bal
=========================================================================================
8 ALDER, JACOB
500.00
200.00
0.00
250.00
-140.00
810.00
BLUE CROSS
0.00
0.00
125.00
0.00
0.00
125.00
BLUE CROSS
0.00
0.00
0.00
0.00
0.00
0.00
0.00
0.00
0.00
0.00
0.00
0.00
125.00
14 BRIDGES, JEFF
BLUE CROSS
AETNA
33 DAVIS, JOHNNY
CIGNA
BLUE CROSS
5 DEVERON, SEAN
MEDICAID
17 FRUGE, CINDY
AETNA
BLUE CROSS
0.00
0.00
0.00
0.00
0.00
0.00
0.00
0.00
0.00
0.00
0.00
0.00
0.00
125.00
0.00
0.00
0.00
0.00
0.00
0.00
0.00
125.00
0.00
0.00
125.00
400.00
150.00
0.00
0.00
0.00
0.00
0.00
0.00
0.00
0.00
0.00
0.00
0.00
0.00
0.00
0.00
0.00
0.00
0.00
0.00
400.00
150.00
0.00
0.00
150.00
0.00
0.00
0.00
0.00
0.00
0.00
0.00
0.00
0.00
0.00
0.00
0.00
0.00
230.00
0.00
0.00
0.00
0.00
0.00
0.00
0.00
230.00
0.00
0.00
230.00
125.00
0.00
0.00
0.00
50.00
0.00
0.00
0.00
25.00
0.00
0.00
0.00
25.00
0.00
0.00
0.00
0.00
0.00
0.00
0.00
225.00
0.00
0.00
0.00
0.00
-----------------------------------------------------------------------------------------PRIMAR
Y INSURANCE $
845.00
750.00
1330.00
740.00
0.00
3665.00
SECONDARY INSURANCE $ 150.00
314.60
0.00
0.00
100.00
564.60
THIRD INSURANCE $
0.00
0.00
0.00
0.00
0.00
0.00
PATIENT $
4650.00
1240.00
115.00
420.00
-130.00
6295.00
==========
10524.60
Quick-MD User Manual
Page 259 of 308
AGEING REPORT (FOR ONE INSURANCE COMPANY)
Use this feature to generate an aged account’s receivable report for the selected Insurance Company with the PATIENT’S
NAME , CLAIM NUMBER , and any OUTSTANDING BALANCE .
SAMPLE AGEING REPORT (FOR ONE INSURANCE COMPANY):
AGEING REPORT FOR :AETNA AS OF:06/24/2003
Page #
1
ID#
Patient Name
Clm#
Current
Over 30
Over 60
Over 90
Over 120
================================================================================
9 FUSILIER, BRYAN 11
0.00
0.00
0.00
30.00
0.00
9 FUSILIER, BRYAN 12
0.00
0.00
0.00
125.00
0.00
9 FUSILIER, BRYAN 16
0.00
0.00
100.00
0.00
0.00
9 FUSILIER, BRYAN 17
0.00
0.00
125.00
0.00
0.00
9 FUSILIER, BRYAN 18
0.00
0.00
125.00
0.00
0.00
9 FUSILIER, BRYAN 19
0.00
0.00
125.00
0.00
0.00
9 FUSILIER, BRYAN 21
0.00
125.00
0.00
0.00
0.00
9 FUSILIER, BRYAN 22
0.00
125.00
0.00
0.00
0.00
9 FUSILIER, BRYAN 26
0.00
250.00
0.00
0.00
0.00
9 FUSILIER, BRYAN 27
0.00
100.00
0.00
0.00
0.00
9 FUSILIER, BRYAN 29
125.00
0.00
0.00
0.00
0.00
----------------------------------------------------------------------------------------GRAND TOTAL $
1355.00 125.00
600.00
475.00
155.00
0.00
Quick-MD User Manual
Page 260 of 308
AGING REPORT (ALL INSURANCE COMPANIES)
Use this feature to generate an account’s receivable aging report of all Insurance Companies. The report list all Insurance
companies, by ID, and each patient that has that insurance and his aged trail balance. A wonderful report to see what
insurances your patient base has, and how well they are paying you.
SAMPLE AGEING REPORT (FOR ALL INSURANCE COMPANIES):
AGEING REPORT BY INSURANCE COMPANY 06/24/2003 Page #
1
COMPANY #
4 AETNA
Acct # Patient Name
Current
Over 30
Over 60
Over 90
Over 120
Total
-------------------------------------------------------------------------------9 FUSILIER, BRYAN 125.00
600.00
475.00
155.00
0.00
1355.00
34 JOHNSON, AMBER
150.00
0.00
0.00
0.00
0.00
150.00
----------------------------------------------------------------------------------------275.00
600.00
475.00
155.00
0.00
1505.00
COMPANY #
3 BLUE CROSS
Acct # Patient Name
Current
Over 30
Over 60
Over 90
Over 120
Total
----------------------------------------------------------------------------------------8 ALDER, JACOB
0.00
0.00
125.00
0.00
0.00
125.00
14 BRIDGES, JEFF
0.00
0.00
0.00
125.00
0.00
125.00
22 FUSILIER, BRYAN 0.00
0.00
605.00
0.00
0.00
605.00
18 JONES, JIMMY
0.00
0.00
125.00
0.00
0.00
125.00
31 KRAMER, KEITH
0.00
67.50
0.00
0.00
0.00
67.50
15 SMITH, KIRK
0.00
0.00
0.00
230.00
0.00
230.00
----------------------------------------------------------------------------------------0.00
67.50
855.00
355.00
0.00
1277.50
COMPANY #
6 CIGNA
Acct # Patient Name
Current
Over 30
Over 60
Over 90
Over 120
Total
----------------------------------------------------------------------------------------33 DAVIS, JOHNNY
150.00
0.00
0.00
0.00
0.00
150.00
35 FUSILIER, AMBER 150.00
0.00
0.00
0.00
0.00
150.00
9 FUSILIER, BRYAN
0.00
172.10
0.00
0.00
100.00
272.10
34 JOHNSON, AMBER
120.00
0.00
0.00
0.00
0.00
120.00
31 KRAMER, KEITH
0.00
150.00
0.00
0.00
0.00
150.00
----------------------------------------------------------------------------------------420.00
322.10
0.00
0.00
100.00
842.10
Quick-MD User Manual
Page 261 of 308
COMPANY #
2 MEDICAID
Acct # Patient Name
Current
Over 30
Over 60
Over 90
Over 120
Total
----------------------------------------------------------------------------------------5 DEVERON, SEAN
0.00
0.00
0.00
230.00
0.00
230.00
----------------------------------------------------------------------------------------0.00
0.00
0.00
230.00
0.00
230.00
Quick-MD User Manual
Page 262 of 308
AGEING REPORT (BY CLAIM)
Use this feature to generate an ageing report by claim type, provider, and location, for a certain date range. If you wanted
to see an ageing report of all of your secondary claims within in a certain date range, you would check the box labeled
“Secondary Claims” choose your date range and then click OK.
SAMPLE AGEING REPORT (BY CLAIM):
Office :GOODFELLOW CLINIC
INSURANCE AGEING REPORT BY CLAIM FROM 01/01/2005 TO 06/08/2005 Page #
2
Acct # Patient Name
Clm#
Responsible Party At This Time
Current
Over 30
Over 60
Over 90 Over 120
====================================================================================================
10 WHITE, LISA R
1 #
0
0.00
0.00
0.00
1350.00
0.00
Primary Co.
Date of Claim 02/16/2005
10 WHITE, LISA R
0.00
0.00
0.00
500.00
2 #
0.00
0
Primary Co.
Date of Claim 02/16/2005
---------------------------------------------------------------------------------------------------636.00
0.00
1175.00
4800.20
1000.00
GRAND TOTAL $
7611.20
Quick-MD User Manual
Page 263 of 308
FINANCIAL CLASS AGEING SUMMARY REPORT
Use this feature to generate an ageing report by Financial Class.
Quick-MD User Manual
Page 264 of 308
SAMPLE FINANCIAL CLASS AGEING REPORT:
FINANCIAL SUMMARY AGEING BASED ON DATE 06/24/2003 Page # 1
================================================================================
# 1 MEDICARE
Resp
Current
Over 30
Over 60
Over 90
Over 120
Total
-------------------------------------------------------------------------------P.Ins
725.00
750.00
1205.00
510.00
0.00
3190.00
S.Ins
0.00
239.60
0.00
0.00
100.00
339.60
T.Ins
0.00
0.00
0.00
0.00
0.00
0.00
Pat
3350.00
915.00
115.00
170.00
-190.00
4360.00
-------------------------------------------------------------------------------4075.00
1904.60
1320.00
680.00
-90.00
7889.60
# 2 MEDICAID
Resp
Current
Over 30
Over 60
Over 90
Over 120
Total
-------------------------------------------------------------------------------P.Ins
0.00
0.00
0.00
230.00
0.00
230.00
S.Ins
0.00
0.00
0.00
0.00
0.00
0.00
T.Ins
0.00
0.00
0.00
0.00
0.00
0.00
Pat
500.00
200.00
0.00
0.00
0.00
700.00
-------------------------------------------------------------------------------500.00
200.00
0.00
230.00
0.00
930.00
# 3 BLUE CROSS
Resp
Current
Over 30
Over 60
Over 90
Over 120
Total
-------------------------------------------------------------------------------P.Ins
0.00
0.00
0.00
0.00
0.00
0.00
S.Ins
0.00
0.00
0.00
0.00
0.00
0.00
T.Ins
0.00
0.00
0.00
0.00
0.00
0.00
Pat
0.00
0.00
0.00
0.00
200.00
200.00
-------------------------------------------------------------------------------0.00
0.00
0.00
0.00
200.00
200.00
# 4 AETNA
Resp
Current
Over 30
Over 60
Over 90
Over 120
Total
-------------------------------------------------------------------------------P.Ins
120.00
0.00
0.00
0.00
0.00
120.00
S.Ins
150.00
0.00
0.00
0.00
0.00
150.00
T.Ins
0.00
0.00
0.00
0.00
0.00
0.00
Pat
300.00
0.00
0.00
0.00
0.00
300.00
-------------------------------------------------------------------------------570.00
0.00
0.00
0.00
0.00
570.00
GRAND TOTALS
Resp
Current
Over 30
Over 60
Over 90
Over 120
Total
-------------------------------------------------------------------------------P.Ins
845.00
750.00
1330.00
740.00
0.00
3665.00
S.Ins
150.00
239.60
0.00
0.00
100.00
489.60
T.Ins
0.00
0.00
0.00
0.00
0.00
0.00
Pat
4650.00
1315.00
115.00
420.00
-130.00
6370.00
-------------------------------------------------------------------------------GT
5645.00
2304.60
1445.00
1160.00
-30.00
10524.60
Quick-MD User Manual
Page 265 of 308
COLLECTIONS WORK REPORT
Use this feature to generate a report containing all information required to effectively work you practice’s collections. The
report generates all pertinent Patient, Claim and Insurance Information necessary to work past due accounts without ever
having to leave your chair to gather charts, phone numbers, etc. etc. Simply enter the date range of old accounts that you
wish to work, select your parameters (you may even exclude financial class(s) And hit OK. No more chasing charts!
Quick-MD User Manual
Page 266 of 308
SAMPLE COLLECTIONS WORK REPORT:
Collections Work Report 06/24/2003 Page #
1
==========================================================================================
ID#
4 DEBRA A TURNER H.P:337-434-2030 W.P:337-469-5013 EXT SS#433-11-8066
2234 LA GRANGE LAKE CHARLES, LA 70601 DOB:10/20/1965
Prim Ins : Pol#23423409 Grp#5390934
Sec Ins : Pol# Grp#
Third Ins: Pol# Grp#
Guarantor:DEBRA A TURNER
Responsibility Of Claim At This Time :P
DEBRA A TURNER
H.Phone:337-434-2030 W.Phone:337-469-5013 Ext:
Date
Clm# Inv# Resp Description
Prim.Diag Units Amount
-------------------------------------------------------------------------------01/24/2003
2
1 P
NEW OFFICE VISIT
789.0
1.0
200.00
-------------------------------------------------------------------------------200.00
ID#
36 TONYA LYNN FUSILIER H.P:239-487-7987 W.P: EXT SS#987-34-9587
PO BOX 3131 NEW ORLEANS, LA 70128 DOB:01/01/1970
Prim Ins: MEDICARE Pol#987349587 Grp#
Historical Ins.Company :MEDICARE In effect Until :06/24/2003
Sec Ins:AETNA Pol#987349587 Grp#
Third Ins: Pol# Grp#
Guarantor:JEANATTORNEYATL JOHN
Responsibility Of Claim At This Time :P
JEANATTORNEYATL JOHN
H.Phone: 337-499-1313
H.Phone: 337-499-1313
Date
Clm# Inv# Resp Description
Prim.Diag Units Amount
-------------------------------------------------------------------------------06/24/2003
1
1 P
CONTRACT BILLING
1.0
100.00
-------------------------------------------------------------------------------100.00
ID#
36 TONYA LYNN FUSILIER H.P:239-487-7987 W.P: EXT SS#987-34-9587
PO BOX 3131 NEW ORLEANS, LA 70128 DOB:01/01/1970
Prim Ins :MEDICARE Pol#987349587 Grp#
Historical Ins.Company :MEDICARE In effect Until :06/24/2003
Sec Ins :AETNA Pol#987349587 Grp#
Third Ins: Pol# Grp#
Guarantor:JEANATTORNEYATL JOHN
Responsibility Of Claim At This Time :I
ID#
1 MEDICARE Phn#800-222-0155 Contact:JACK SANDERS
PO BOX 789 JACKSON, MS 75589
Subsciber:TONYA FUSILIER SS#987-34-9587 DOB:01/01/1970
Date
Clm# Inv# Resp Description
Prim.Diag Units Amount
-------------------------------------------------------------------------------06/24/2003
2
1 I
OFFICE VISIT - NEW
1.0
150.00
-------------------------------------------------------------------------------150.00
Quick-MD User Manual
Page 267 of 308
CPT CODES ANALYSIS REPORT
Use this feature to generate a report on the total units and total dollar amount generated on every CPT Codes that was
utilized during the time frame selected. The report generated will contain the following fields: House CODE, CPT CODE,
DESCRIPTION, # OF UNITS OR TIMES THIS WAS UTILIZED , TOTAL DOLLARS THIS CODE GENERATED , AVERAGE DOLLAR AMOUNT PER TIME USED, and
PERCENTAGE (%) OF YOUR TOTAL PRACTICE REVENUE THIS CODE REPRESENTS. A WONDERFUL REPORT FOR ANALIZING YOUR PARACTICE!
SAMPLE CPT CODES ANALYSIS REPORT:
CPT CODES ANALYSIS FOR ALL PROVIDERS 01/01/2003 To 06/24/2003
Page # 1
CODE
CPT CODE
DESCRIPTION
#UNITS
TOTAL $
AVG. $ % TOT
================================================================================
100
100
NEW OFFICE VISIT
3.00
200.00
66.67
1.36
15MIN 9999999
15 MINUTE
1.00
125.00
0.00
0.00
90801 90801
PSYCH EVAL
4.00
495.00
123.75
3.37
99212 99212
OFFICE VISIT
8.00
800.00
100.00
5.44
99225 99225
OFFICE VISIT - NEW
37.00
6700.00
181.08 45.58
CONTRC CONTRCT
CONTRACT BILLING
79.00
6505.00
82.34 44.25
CREDIT CREDIT
PATIENT OVERPAYMENT
2.00
0.00
0.00
0.00
-------------------------------------------------------------------------------14700.00
Quick-MD User Manual
Page 268 of 308
PAYMENT ANALYSIS BY CPT CODE REPORT
This report show the amount of money collected, number of units, average per until and percentage of the grand total for
all procedure codes during a date range. The results of report can be limited by Provider, Location or Insurance
Company.
PAYMENT ANALYSIS BY CPT CODE FROM :01/01/2011 TO :07/15/2011
Page # 1
OffCode CPT Code
Description
# Units
$ Total $ Average % Of Total
===================================================================================================
41520
41520
FRENOPLASTY W/Z-PLASTY
1.00
5.00
5.00
2.63%
42831
42831
ADENOIDECTOMY OVER 12 PRIMARY
1.00
25.00
25.00
13.16%
99241
99241
OFFICE CONSULT FOCUSED
1.00
10.00
10.00
5.26%
CREDIT CREDIT
SURGERY DEPOSIT
1.00
150.00
150.00
78.95%
==========
190.00
Quick-MD User Manual
Page 269 of 308
DIAGNOSIS CODES ANALYSIS
Use this feature to generate a report on the total number of Patients and the total dollar amount generated for the selected
dates on each Diagnosis Code utilized. Since more than one diagnosis code may be used with a Procedure code, the
dollar amounts generated in this report or for reference only and not to be used in the accounting process.
SAMPLE DIAGNOSIS CODES ANALYSIS REPORT:
Page # 1
DIAGNOSIS CODES ANALYSIS FOR ALL PROVIDERS 01/01/2003 To 06/24/2003
CODE
ICDM #
DESCRIPTION
TOTAL $ % TOT
PATIENTS
================================================================================
100
100
LEPTOSPIROSIS
3050.00 32.46
14
100.8 100.8
OTHER SPECIFIED LEPTOSPIRAL IN
2150.00 22.88
1
100.81 100.81
LEPTOSPIRAL MENINGITIS (ASEPTI
850.00
9.05
2
100.89 100.89
OTHER SPECIFIED LEPTOSPIRAL IN
125.00
1.33
1
100.9 100.9
LEPTOSPIROSIS, UNSPECIFIED
1295.00 13.78
3
101
101
VINCENT'S ANGINA
125.00
1.33
1
102
102
YAWS
425.00
4.52
2
102.0 102.0
INITIAL LESIONS OF YAWS
150.00
1.60
1
441.3 441.3
ABDOMINAL ANEURYSM, RUPTURED
200.00
2.13
1
789.0 789.0
ABDOMINAL PAIN
325.00
3.46
2
789.32 789.0
ABDOMINAL PAIN
700.00
7.45
4
-------------------------------------------------------------------------------9395.00
Quick-MD User Manual
Page 270 of 308
CHARGE & PAYMENT FOR COMPANIES SET IN PATIENT RESPONSIBLE
This report will give you the total charged and collected during a time period for all companies or for companies that have
a sales person associated with them.
To associate a sales person with a company you add the sales person’s name in the comment field of the employer
record and check the box labeled “This Company is an Employer” has to be checked. (For more info see Add Insurance
Record55)
Only items for Patients that have a company as the guarantor, have the ‘P’ responsibility on the charge and payment and
have payments and charges in the specified date range will show up on the report. (For more information on guarantors
see 31. For responsibilities is 26)
CHARGES & PAYMENTS FROM:07/01/2011 TO:07/15/2011 Page # 1
FOR : JANE DOE
COMPANY NAME
$ INVOICED $COLLECTED
================================================================================
1 WALMART
1435.00
550.00
================================================================================
1435.00
550.00
Quick-MD User Manual
Page 271 of 308
AVERAGE REIMBURSEMENT REPORT
This report allows you to see each insurance company’s reimbursement rate, by unit, for each procedure billed in a
certain date range. For this report to be of any value to the office, the office must be posting their payments by invoice.
To run the report enter a date range, the Provider and location are optional, and setup the insurance companies that you
want information about. When the report is ran Quick-MD will ask you for a filename. The file and location that you pick is
where the data will be written. To view this information in a spread sheet, such as excel, you will need to open the file that
you just saved from within the spread sheet application.
SAMPLE REIMBURSEMENT REPORT
AVERAGE REIMBURSEMENT REPORT FROM 07/12/2005 THRU 07/12/2005,
CPT CODE,NOBLE DRILLING,MEDICAID,U.O.S.DONE,
99243,
90.00,
160.00,
30.00,
The layout will always be the CPT code in the first column, followed by a column for each insurance company, then the
total number of units for that procedure.
Quick-MD User Manual
Page 272 of 308
INSURANCE CLAIMS NOT BILLED
Use this feature to generate a report on the list of Patients and their Insurance claims that have not been billed. This
report looks at the claims, according to the parameters you select, that do not have a red billing note on them.
The report generated contains the following fields: ID#, PATIENT NAME, INSURANCE KIND (primary, secondary, third), INSURANCE
CODE, INSURANCE COMPANY.
SAMPLE INSURANCE CLAIMS NOT BILLED REPORT:
INSURANCE CLAIMS NOT BILLED AS OF 06/24/2003
Page # 1
ID#
PATIENT NAME
INS.KIND
ICODE INSURANCE COMPANY
DATE
CLM# $ BALANCE
=========================================================================================
9
FUSILIER, BRYAN
Secondary
6 CIGNA
02/12/2003
1
100.00
9 FUSILIER, BRYAN
Secondary
6 CIGNA
02/12/2003
3
125.00
9 FUSILIER, BRYAN
Secondary
6 CIGNA
02/19/2003
4
100.00
9 FUSILIER, BRYAN
Primary
4 AETNA
02/12/2003 13
100.00
9 FUSILIER, BRYAN
Secondary
6 CIGNA
02/12/2003 13
100.00
9 FUSILIER, BRYAN
Secondary
6 CIGNA
05/13/2003 23
125.00
9 FUSILIER, BRYAN
Primary
4 AETNA
05/22/2003 26
250.00
9 FUSILIER, BRYAN
Primary
4 AETNA
05/22/2003 27
100.00
9 FUSILIER, BRYAN
Primary
4 AETNA
06/05/2003 29
125.00
31 KRAMER, KEITH
Secondary
3 BLUE CROSS
05/19/2003
1
150.00
33 DAVIS, JOHNNY
Primary
6 CIGNA
06/11/2003
4
150.00
34 JOHNSON, AMBER
Primary
6 CIGNA
06/17/2003
2
150.00
34 JOHNSON, AMBER
Primary
6 CIGNA
06/17/2003
3
120.00
35 FUSILIER, AMBER
Primary
6 CIGNA
06/17/2003
2
150.00
36 FUSILIER, TONYA
Primary
1 MEDICARE
06/24/2003
2
150.00
36 FUSILIER, TONYA
Primary
1 MEDICARE
06/24/2003
3
150.00
----------------------------------------------------------------------------------------TOTAL PRIMARY CLAIMS
:
10 $1445.00
TOTAL SECONDARY CLAIMS :
6 $ 700.00
TOTAL ATT/THIRD CLAIMS :
0 $
0.00
----------------------------------------------------------------------------------------TOTALS FOR ALL CLAIMS :
16 $2145.00
Quick-MD User Manual
Page 273 of 308
CLAIMS WITH CREDIT BALANCES
Use this feature to generate a report on the list of Patient’s and the claim number that have a credit balance. A credit
balance occurs when an overpayment has been posted to a claim. If the claim has a “P” responsibility attached to it, the
credit will be reflected in the patient’s un-applied credit. If the claim carries an I, S or A responsibility, the credit will be for
the insurance company.
SAMPLE CLAIMS WITH CREDIT BALANCES REPORT:
CLAIMS WITH A CREDIT BALANCE AS :01/01/2003 TO:06/24/2003 PAGE #
1
ID#
Patient Name
CLM# $ Balance
Responsibility
================================================================================
8 ALDER, JACOB
2
-290.00
ALDER, JACOB
9 FUSILIER, BRYAN
10
-190.00
FUSILIER, BRYAN
36 FUSILIER, TONYA
5
-50.00
FUSILIER, TONYA
--------------------------------------------------------------------------------530.00
TOTAL CLAIMS WITH CREDIT BALANCE -->
Quick-MD User Manual
3
Page 274 of 308
CLAIMS WITH BALANCE OWED
Use this feature to generate a claims report that have unpaid balances, by date range and responsibility. The report lists
the Patient’s name, claim number, the balance owed, and the responsible party name. This feature allows the user to
track all claims that have not been paid in full.
SAMPLE CLAIMS WITH BALANCE OWED REPORT:
CLAIMS WITH A BALANCE OWED AS :01/01/2003 TO:06/24/2003 PAGE #
1
ID#
Patient Name
CLM# $ Balance Responsibility
Ledg.Date Last Paymt
=========================================================================================
8 ALDER, JACOB
3
150.00 ALDER, JACOB
02/19/2003 02/19/2003
8 ALDER, JACOB
4
125.00 ALDER, JACOB
03/11/2003 02/19/2003
8 ALDER, JACOB
5
125.00 ALDER, JACOB
03/11/2003 02/19/2003
8 ALDER, JACOB
6
125.00 BLUE CROSS
04/17/2003 02/19/2003
8 ALDER, JACOB
7
100.00 ALDER, JACOB
05/19/2003 02/19/2003
8 ALDER, JACOB
8
100.00 ALDER, JACOB
05/22/2003 02/19/2003
8 ALDER, JACOB
9
100.00 ALDER, JACOB
06/11/2003 02/19/2003
8 ALDER, JACOB
10
100.00 ALDER, JACOB
06/11/2003 02/19/2003
8 ALDER, JACOB
11
100.00 ALDER, JACOB
06/17/2003 02/19/2003
8 ALDER, JACOB
12
100.00 ALDER, JACOB
06/17/2003 02/19/2003
8 ALDER, JACOB
13
100.00 ALDER, JACOB
06/24/2003 02/19/2003
14 BRIDGES, JEFF
1
125.00 BLUE CROSS
03/17/2003
33 DAVIS, JOHNNY
3
100.00 DAVIS, JOHNNY
06/11/2003
33 DAVIS, JOHNNY
4
150.00 CIGNA
06/11/2003
33 DAVIS, JOHNNY
5
100.00 DAVIS, JOHNNY
06/17/2003
33 DAVIS, JOHNNY
6
100.00 DAVIS, JOHNNY
06/17/2003
33 DAVIS, JOHNNY
7
100.00 DAVIS, JOHNNY
06/24/2003
5 DEVERON, SEAN
2
105.00 MEDICAID
03/17/2003 03/17/2003
5 DEVERON, SEAN
3
125.00 MEDICAID
03/17/2003 03/17/2003
17 FRUGE, CINDY
1
25.00 FRUGE, CINDY
03/21/2003
----------------------------------------------------------------------------------------1955.00
TOTAL CLAIMS WITH BALANCE OWED -->
Quick-MD User Manual
20
Page 275 of 308
MANAGED CARE EXPIRATIONS
Use this feature to generate a report that shows all of the authorizations, listed in the patient’s managed care module, that
have expired during a time period that you specify.
SAMPLE MANAGED CARE EXPIRATIONS REPORT:
RECEIVED REF.PHY.EXPIRATIONS FROM 10/01/2003 TO 06/08/2005 FOR:JOHN SMITH Page Number :
5
Pat ID Patient Name
Valid Dates
Visits Days Remain P.O.Number
Referring Phy/Primary Insurance
=========================================================================================
217
10/28/2003-04/28/2004
99
0
1797995
HARRIS MCILWAIN MD
Remaining Vists = 99
218
JOEL MATTISON MD
10/28/2003-05/28/2004
221
HARRIS MCILWAIN MD
10/30/2003-04/30/2004
226
VINCENT K FARRIER
10/30/2003-04/30/2004
227
HARRIS MCILWAIN MD
10/29/2003-04/29/2004
229
REF.PHY.NOT SET
10/31/2003-04/30/2004
Quick-MD User Manual
99
0
Remaining Vists =
144758
99
0
99
Remaining Vists =
1797995
99
0
99
Remaining Vists =
1948195
99
0
99
Remaining Vists =
1797995
99
0
99
Remaining Vists =
1940828
Page 276 of 308
99
FINANCIAL SUMMARY FOR PROVIDERS
Use this feature to generate a Financial Report for a selected date range showing the total charges, number of charges,
payments received, credit and debit adjustments, receivable amount, and the overall collection percentage for each
Provider, or for all providers if the provider field is left blank.
Valuable information that is so easy to run the Docs will even run it themselves!
SAMPLE FINANCIAL SUMMARY FOR PROVIDERS REPORT:
FINANCIAL SUMMARY FOR PROVIDERS FROM 01/01/2003 TO 06/24/2003
Page
1
Provider
Charges #Chrgs
Payments Credit Adj Debit Adj Receivable Collection
%
=========================================================================================
1 JOHN A WILSON
14700.00
130
-2665.00
-2570.40
460.00
9924.60
17.58
----------------------------------------------------------------------------------------14700.00
130
-2665.00
-2570.40
460.00
9924.60
17.58
ADJUSTMENT SUMMARY
=====================
1 PATIENT WRITEOFF
2 SELF PAY DISCOUNT
3 MEDICAID WRITE-OFF
4 MEDICARE WRITE-OFF
5 BLUE CROSS WRITE-OFF
6 AETNA WRITE-OFF
7 CIGNA
8 COMMERCIAL WRITE OFF
9 OTHER
10 TRANSFER OUT
11 TRANSFER IN
12 FROM UNAPPLIED CREDIT
13 UNAPPLIED PYMT TO ACCT.
Quick-MD User Manual
-2005.00
0.00
-5.40
0.00
0.00
0.00
460.00
-560.00
0.00
0.00
0.00
0.00
0.00
PAYMENT SUMMARY
=====================
1 PATIENT CHECK
2 VISA/MASTERCARD
3 MEDICAID PAYMENT
4 MEDICARE PAYMENT
5 BLUE CROSS PAYMENT
6 AETNA PAYMENT
7 CIGNA PAYMENT
8 COMMERCIAL PAYMENT
9
10
11
12
13
Page 277 of 308
-2415.00
0.00
-155.00
-75.00
-20.00
0.00
0.00
0.00
0.00
0.00
0.00
0.00
0.00
GENERAL LEDGER SUMMARY
Use this feature to generate a General Ledger Report for a selected date range, listing the total amount received for each
payment and adjustment type and their General Ledger Code.
Quick-MD User Manual
Page 278 of 308
SAMPLE GENERAL LEDGER SUMMARY REPORT:
CHARGES FROM :01/01/2003 TO :06/24/2003
Page # 1
Date
Pat ID Cnum Inum Description
$ Amount GL Code
================================================================================
01/17/2003
8
2
1 OFFICE VISIT
100.00 40002000
01/24/2003
4
2
1 NEW OFFICE VISIT
200.00
02/12/2003
9
1
1 OFFICE VISIT
100.00 40002000
02/12/2003
9
2
1 OFFICE VISIT
100.00 40002000
02/12/2003
9
3
1 OFFICE VISIT - NEW
125.00 40002000
02/12/2003
9
13
3 OFFICE VISIT
100.00 40002000
02/17/2003
11
1
1 NEW OFFICE VISIT
0.00
02/19/2003
8
3
1 OFFICE VISIT - NEW
125.00 40002000
02/19/2003
8
3
2 OFFICE VISIT
100.00 40002000
02/19/2003
9
7
1 OFFICE VISIT - NEW
125.00 40002000
==========
1075.00
PAYMENTS FROM :01/01/2003 TO :06/24/2003
Page # 4
Date
Pat ID Cnum Inum Description
$ Amount GL Code
================================================================================
01/17/2003
8
2
1 PATIENT CHECK
-20.00
01/17/2003
8
1
1 PATIENT CHECK
-20.00
02/12/2003
9
1
1 BLUE CROSS PAYMENT
-75.00
02/12/2003
9
1
1 COMMERCIAL PAYMENT
-20.00
02/19/2003
8
1
1 PATIENT CHECK
-580.00
02/19/2003
8
2
1 PATIENT CHECK
-420.00
02/19/2003
8
3
1 PATIENT CHECK
-25.00
02/19/2003
9
8
1 PATIENT CHECK
-200.00
02/19/2003
9
2
1 PATIENT CHECK
-80.00
==========
-1400.00
ADJUSTMENTS FROM :01/01/2003 TO :06/24/2003
Page # 5
Date
Pat ID Cnum Inum Description
$ Amount GL Code
App. To
=========================================================================================
02/19/2003
8
2
1 TRANSFER OUT
50.00
99212
02/19/2003
9
8
1 TRANSFER OUT
100.00
CREDIT
02/19/2003
9
8
1 TRANSFER OUT
100.00
CREDIT
02/19/2003
9
10
1 TRANSFER OUT
25.00
CREDIT
02/19/2003
9
10
1 TRANSFER OUT
100.00
CREDIT
02/19/2003
9
10
1 TRANSFER OUT
30.00
CREDIT
02/19/2003
9
10
1 TRANSFER OUT
25.00
CREDIT
03/14/2003
9
10
1 TRANSFER OUT
30.00
CREDIT
==========
460.00
Quick-MD User Manual
Page 279 of 308
PATIENT RECALL REPORT
Use this feature to generate a report of the PATIENT’S NAME, RECALL DATE , and the REASON FOR RECALL . You may select report
only or you may opt to send out letters by merging with a word processor. Quick-MD will put the date of the merge in each
patients recall table (on the demographic screen).
Quick-MD User Manual
Page 280 of 308
LIST BLOCKED BILLS
Use this feature to generate a report of all patients that have had their billing blocked. Blocking is accomplished by putting
the appropriate responsibility code in the Block Bill box at the bottom right of the Patients demographic screen.
SAMPLE LIST BLOCKED BILLS REPORT:
Blocked Billing For All Responsibilities
Page #
1
ID# Patient Name
Blocked Bill
Responsible`s Name
================================================================================
5 SEAN DEVERON
Patient/Other
SEAN DEVERON
11 BRENT FUSILIER
Primary Insurance
AETNA
11 BRENT FUSILIER
Secondary Insurance BLUE CROSS
Quick-MD User Manual
Page 281 of 308
LIST LATE PROMISE TO PAY PAYMENTS
Use this feature to generate a report of all of the late PROMISE
TO
PAY payments.
PROMISE TO PAY LATE REPORT FOR :03/14/2005 Page # 1
Act#
Patient
Due Date
$Expected $Act.Pay $Cont.Amt $Cont.Bal
================================================================================
1 JANE DOE
03/01/2005
100.00
80.00
1200.00
920.00
THIS IS A PARTIAL PAYMENT
2 DAVID SARGENT
03/01/2005
500.00
0.00
2000.00
Act# - Patient’s account number.
Patient – The patient’s full name.
Due Date – Date that the payment was due.
$Expected – This is the expected amount of the patient.
$Act. Pay – Actual amount that was paid.
$Cont. Amt – This is the original Contract amount.
$Cont. Bal – This column contains the Contract balance.
Quick-MD User Manual
Page 282 of 308
2000.00
LIST PROMISE TO PAY CONTRACTS
This report will show all of the promise to pay contracts in the system.
PROMISE TO PAY CONTRACTS LISTING :03/14/2005 Page # 1
Act#
Patient
Cont.Amt
Tot.Pays
Status
Last Pay
$Cont.Bal
================================================================================
1 JANE DOE
1200.00
1200.00 ACTIVE
03/14/2005
0.00
2 DAVID SARGENT
2000.00
0.00 ACTIVE
2000.00
5 ROBERT LEUBNER
1200.27
0.00 ACTIVE
1200.27
7 BLANCHE MELTON
1200.27
0.00 ACTIVE
1200.27
8 JAYLIN MARTINEZ
850.00
0.00 ACTIVE
850.00
9 MARCIA STEWART
123.27
0.00 ACTIVE
123.27
1600.00
100.00 ACTIVE
947.32
0.00 ACTIVE
947.32
14 CLAIRE PARKER
1200.00
0.00 ACTIVE
1200.00
15 JAMES SPIKES
1200.00
0.00 ACTIVE
1200.00
16 JODY SEAUX
2400.24
0.00 ACTIVE
2400.24
12 SAVANNAH SINGLETON
13 KELSIE WARD
02/23/2005
1500.00
-------------------------------------------------------------------------------13921.37
12621.37
Note: Zero balance contracts will show up on the report if they are still active. You can set them to inactive on the promise
to pay form. (for more information see page 184)
Quick-MD User Manual
Page 283 of 308
ADVANCED FEATURES OF QUICK-MD
THE SYSTEM UTILITIES MENU
DATA FILES REBUILD
If a system ISAM error message occurs due to some type of corruption in a file, this feature allows you to rebuild that
data file by selecting the file that was made reference to in the error message. Choose the file you wish to rebuild
and Quick-MD will ask if you want to rebuild. Choose <YES>.
NOTE: Rebuilding a file also re-index’s it. Therefore, depending on the size of your database, a rebuild will take
much longer to run than a re-index.
NOTE: The majority of the time an error message comes to the screen it is coming from the Windows operating
system itself. You should always make a note of the error message, and then reboot your machine. The majority
of the time this will take care of the problem!
Quick-MD User Manual
Page 284 of 308
DATA FILES RE-INDEX
If a system INDEX error message occurs due to a corrupt index, this feature allows you to re-index that data file that
was made reference to in the error message by selecting the appropriate file. Choose the file you wish to re-index
and Quick-MD will ask if you want to re-index. Choose <YES>.
RESET LOCK FIELDS IN APPOINTMENTS
NOTE: This feature is only used in the standard scheduler!
If a system error message occurs in the appointment file this feature allows you to reset lock fields to clear error
message and allow the user to continue.
EXAMPLE: System error message will display “appointments locked by another terminal”
Quick-MD User Manual
Page 285 of 308
PURGE APPOINTMENT FILE
This feature is only used with the standard Scheduler
This feature allows all records on or before the “entered purge date” to be deleted from the appointment files.
NOTE: No other terminals can be using the appointment files while purging process is running! After purging
process has finished, it is recommended that you rebuild the appointment file.
MOVE LEDGERS TO HISTORY
This feature allows all claims in a Ledger with a zero balance that have a ledger date less than or equal to the
selected cut off date to be moved to the patient’s History Ledger. After the purging process has finished, it is
recommended that you rebuild the Ledger File. Once Patient Ledgers have been moved to History Ledger, no
reports can be generated for those claims.
NOTE: System will only move the Patient accounts you selected.
SET OPERATOR RIGHTS
Quick-MD User Manual
Page 286 of 308
Quick-MD allows for up to fifty users with different ID#’s, passwords and degrees of users rights.
Quick-MD User Manual
Page 287 of 308
Steps:
1.Select one of the numbered boxes, that number will be this operators (ID#) to log on QuickMD.
2.
3.
4.
5.
Enter NAME of the person assigned to ID number
Enter PASSWORD, this will be their private password to log on Quick Med
Click the box to put a check mark by each feature of Quick-MD that this person will be allowed to access.
If this user is going to be send claims electronic from within Quick-MD. You will need to set up the com
port that windows assigned to the modem on the computer that this user will use to send claims.
6. Set the Group Code. The group code allows you to group user together so that you can send email to all
of the users that belong to this group at the same time.
7. Select the <OK> button to save
8. The user can only access Quick-MD features that have been assigned to them.
Quick-MD User Manual
Page 288 of 308
EDIT ZIP CODE RECORD
Use this feature to make changes to existing Zip Code Records. New Zip Code
Records can be added from the patient demographics screen from the city field.
CANNED NOTES
This feature allows you to add or edit canned notes.
Steps: Part 1. Add Canned Note
To ADD CANNED NOTES: Select the button marked <ADD CANNED NOTE >
At the box marked “Code:” Enter a three digit alpha, alpha/numeric, or numeric code then hit enter.
In the fields marked 1 through 5, enter up to five lines of notes you wish this code to carry.
Select the <OK> button to save
Quick-MD User Manual
Page 289 of 308
NOTE: Canned Notes can be utilized in the Patient Ledger by highlighting the claim you
wish the note to be posted to, and hitting F3.
Part 2.
In “Patient File:” Select the LEDGER button
Select the CURRENT LEDGER
Highlight the claim to post directly under claim
Select the <F3> - Note key
To post a canned note enter the # code then the three digit code (you may type a note in here)
Select the ENTER button, then the canned note will appear in “Notation box”
Select the <OK> button to post canned note to claim. Canned notes will appear on the Patient’s Billing Statement
NOTE: To delete an existing canned note select the <DELETE> button
Steps: Part 1. Edit Canned Note
To Edit Canned Notes: Select the button marked “EDIT CANNED NOTE”
At “Browse Canned Notes: ”enter the three digit code
Select the <OK> button, then select the <ENTER> button to edit a canned note
Select the <OK> button to save changes
Quick-MD User Manual
Page 290 of 308
REASSIGN SORT CODE
This feature allows you to change existing sort codes in patient files to another predefined sort code. You would
normally use this feature to move patients, in the collection letter process, from one collection letter to the next one.
DELETE BILLING NOTE
This feature allows you to delete multiple billing notes.
Steps:
FOR DATE OF - enter the billing date you want the billing notes deleted for. Quick-MD will delete all billing notes
with the selected responsibility code for that date.
FOR COMPANY – Can be narrowed down to one company. <F1> will allow you to browse the insurance table.
TYPE OF NOTE TO DELETE - Click the circle to mark the type of billing notes you want system to delete.
Quick-MD User Manual
Page 291 of 308
Select the <OK> button to process
NOTE: This process will delete ALL billing notes for the date and responsibility selected. . If you leave
the ID# field blank it will be ALL billing notes for the date and responsibility selected, both hardcopy and
electronically! Be certain that this is the end result you are trying to accomplish!
GENERATE CONTRACT LEDGER ENTRIES
This feature is utilized when patients are set up on a payment plan for a balance owed. First, go to the patient’s
ledger and write off the amount that you are going to put under contract. It is best to do this with an adjustment code
reserved only for this purpose. Using a unique adjustment code will allow you to do reporting based on this code.
Next, set up the contract form under patient demographics. The amount you adjusted goes under contract amount
and the payment amount that you agree on goes under monthly charge field. When the “generate contract ledger
entries” function is run, the agreed upon monthly payment is posted back to the patient’s account and a report is
generated showing all entries generated on a selected entry date. This process should be run PRIOR to generating
patient statements so that the monthly amount owed is generated and appear on the patient statement. At the same
time, the date and amount of the contract ledger entry will appear in the “Contract” box within the patient file.
POST RE-OCCURING CHARGES AND PAYMENTS
This feature allows Quick-MD to post payments and/or charges to an unlimited number of patients by assigning a
sort code to patient on the demographic screen. When this utility is run it will make the ledger entries according to the
parameters set below.
Quick-MD User Manual
Page 292 of 308
SET NEXT PATIENT NUMBER
This feature allows you to select the next Patient ID number. System automatically assigns each new Patient an ID
number in numeric order. When utilizing this feature, Quick-MD will assign the next new Patient the ID number you
selected.
WARNING: No other terminals can be using Quick-MD while this feature is being utilized.
RUN DELETED RECORDS LEDGER REPORT
Use this feature to run a report of all Ledger Entries that have been deleted from the system and which operators
deleted them. The report generated contains the following fields: DATE DELETED, OPERATOR, PATIENT ID#, NAME, TYPE,
LEDGER DATE, SERVICE DATE, DESCRIPTION OF ENTRY, AMOUNT, CLAIM#, INVOICE# AND PROVIDER.
Quick-MD User Manual
Page 293 of 308
FROM DATE - Select a starting date range
TO DATE – Select an ending date range
Select <OK> to run the report.
CHECK FOR ORPHANED LEDGERS
Use this feature to run a report on ledgers that do not have a patient file attached to them. If an orphaned ledger is
found, then create a patient file with the ID# listed in the report. After the patient file is added the ledger will be
attached to it.
Quick-MD User Manual
Page 294 of 308
INTRA-OFFICE EMAIL
Intra Office Email is available to all users of Quick-MD if they are logged into Quick-MD with their own ID number and
password. Quick-MD will automatically notify the operator of an incoming email as they move around in the system, if
this feature is turned on in Properties/Miscellaneous Defaults/Auto Check Email.
The email button is available to send new emails from the front screen of Quick-MD, the front screen of the
Scheduler, and from the Electronic Medical Records/Phone Messages/New Message screen.
Quick-md User Manual
Page 295 of 308
SENDING AN EMAIL
To send an email, click the Email Icon or Button, depending on the location you are at (Front Screen, Scheduler, or
Phone Messages in EMR) then press the WRITE button at the bottom left hand corner of the window.
The operator will have the option of sending to one operator or all users of Quick-MD at once. Quick-MD tracks the
email sent and received by you and which ones that have and have not been read. All commands are across the top
and bottom of the opening window.
Quick-md User Manual
Page 296 of 308
WAITING ROOM WIZARD
Quick-MD comes with a wizard that allows patients to enter their demographics electronically.
STARTING THE WIZARD
The waiting room wizard will excepts a few command line parameters. You can enter these parameters behind the
executable to control certain aspects of the program.
-w Keeps the wizard from running full screen.
-d <milliseconds> This option controls how long the thank you screen will be displayed.
PATIENT INFORMATION
From this screen the patient can enter the following information:
• Patient Name
• First and Second Address, City, State and Zip
• Date of Birth
• Sex
• Home phone number
• Work phone number and extension
• Social Security
• Employer
• Employee Status
• Marital Status
• Provider
Quick-md User Manual
Page 297 of 308
PRIMARY INSURANCE INFORMATION
When the patient has finished entering the main information, the wizard will ask if they have a primary insurance.
If the patient answers yes the Primary Insurance Information screen will be displayed.
If the patient is the insured, the patient can click on the button labeled as “Click if the subscriber is the same as
the patient” and the wizard will bring over the information from the Patient Information screen. If the patient is not
the insured then they will need to fill out the information.
After the Primary Insurance Information is entered the wizard will ask the user if they have a secondary insurance
company.
If the patient answers yes, the wizard will display a screen identical to the Primary Insurance Information screen.
On the Secondary Insurance Information screen the patient can enter their secondary information.
Quick-md User Manual
Page 298 of 308
ALTERNATE BILLING INFORMATION
After the patient has finished with their insurance information, the system will ask them if they want the patient
statement to go to a different address.
If the patient answers yes the Alternate Billing Information screen will be displayed. From here the patient can
enter the name and address information that will appear on the patient’s statement.
Quick-md User Manual
Page 299 of 308
EMERGENCY CONTACT INFORMATION
The Emergency Contact Information screen contains the person that needs to be contacted in case of an
emergency.
At this point the Next or the Finish button will cause the wizard to ask the patient if they are finished entering their
information.
If the patient answers yes a thank you message will be displayed for a few seconds, then the wizard will return to the
Patient Information screen.
To exit the waiting room wizard press <F1> and type down in the password field.
ACCESSING THE WAITING ROOM INFORMATION
From Quick-MD the waiting room table can be accessed easily from the patient demographics screen (for more
information see page 147)
Quick-md User Manual
Page 300 of 308
SETTING UP AND USING THE HL7 INTERFACE
Quick-MD can send patients and appointments to EMR systems that except HL7 messages. It can also read
electronic super bill from a select number of EMR packages.
SETTING UP THE HL7 INTERFACE TO SEND MESSAGE
1.
2.
3.
4.
Go to properties, Miscellaneous Defaults, and third party integration.
Check the box labeled Activate Third Party Integration with Medical Records Software
Select IMED under Software to Integrate with.
Get the IP address and port number from the EMR vendor. If the EMR’s HL7 server is running on the same
machine as imedscan.exe you can use the loop back address 127.0.0.1. The port number is always going to
be dependent on the EMR company.
5. Place imedscan.exe in the startup directory of windows. You only want imedscan.exe to run on the server. It
should not be running on any client machines. If you want to run imedscan.exe as a service see the
instructions below.
The program imedscan.exe must be running on the server.
RUNNING IMED SCAN AS
A SERVICE
If no one logs into your server when it boots you may want to setup imedscan as a service. This will allow imed scan
to start at startup without a user having to login.
WARNING: Editing the registry in windows can be dangerous. If you don’t feel comfortable editing the registry or
working with regedit then do not try to setup imed scan as a service. It is always a good idea to backup the registry
before making any changes.
We will be using the programs INSTSRV.EXE and SRVANY.EXE that come with windows. If you do not have these
programs then you will need to download the Resource Kit from Microsoft. These programs only needed to be run
from the command line once. They allow you to run any program as a service.
1. Run the program to install the service
Quick-md User Manual
Page 301 of 308
C:\>"C:\Program Files\Windows Resource Kits\Tools\instsrv.exe" imedscan "c:\Program Files\Windows
Resource Kits\Tools\srvany.exe"
2.
3.
4.
5.
6.
7.
8.
Start the program regedit
Go to key HKEY_LOCAL_MACHINE\SYSTEM\CurrentControlSet\Services\imedscan
Go to the Edit menu and click on Add. This will create a new key name the key Parameters.
Double click on the new Parameters key.
Go to the Edit menu and click New String Value
Set the values name to Application set the values data to the path of imed scan (c:\qmed\imedscan.exe).
Add Another New String Value call this one AppDirectory set this values data to imed scans working
directory (c:\qmed\)
9. Close regedit
To start or restart the service you will go to the Control Panel, Administrative Tools and Double Click on Services.
At this point you should see an entry for imedscan. Highlight that entry and choose the action that you want to
perform (Start, Restart or Pause)
Note: All path setup in the register and used by the HL7 programs should point to a local directory when used as
a service. The service runs as a different user and may not have these directories mapped the same way.
IMED SCAN
When imedscan.exe is started it will immediately minimize to the task bar. You can get to the menu by right clicking
on the
icon in the task bar. If you need change the amount of time that imed scan waits between scans then
click on “Set Scan Time” from the imed scan menu. The scan time is in milliseconds and is set to 5000 (5 seconds)
by default. The main form option of the menu will bring up a screen that will let you manually run a scan. If you need
to close imed scan then choose exit from the menu.
Logging is always on for imedscan. The log file is stored in the Quick-MD data directory as imedque.log. If this file is
not found you may need to update the imedscan executable.
Quick-md User Manual
Page 302 of 308
SETTING UP THE HL7 INTERFACE TO READ ELECTRONIC SUPER BILLS
To install the electronic superbill reader you will need to install the program esupScan.exe into the qmed directory
along with the files elecsup.dat, elecsup.ix and esupfig.dat.
Like imedscan.exe esupscan.exe will need to be running at all times on your server.
You will need to find out what directory the EMR program is writing the electronic superbill files to. You will put this
directory in the Scan Directory field. After you type in the scan directory press enter for the new scan directory to be
saved.
Under the Configurations Menu you can Turn Logging on or off by clicking on the log button. If logging is on, all
message information will be saved to a log file name esup.log in the working directory. The Scan Time option will let
you change the scan time by milliseconds. Set Import System will let you choose which EMR you are expecting
electronic superbill messages from.
You can configure this program to write a log file to the Quick-MD data directory by clicking on the log item under
configurations. This will put a check next to the item. If the check is already there then the logging feature is on. You
can check the log by opening the file esup.log.
LOADING ELECTRONIC SUPERBILLS
From Quick-MD go to System Utilities and then Electronic Super Bills.
Quick-md User Manual
Page 303 of 308
This will bring up the electronic superbill browser. From this screen F2 will generate a report telling you what
information the EMR passed to Quick-MD in the electronic superbill. F10 will delete an item that you do not want.
You can load the electronic superbill into the charge entry screen by Double Clicking on the item that you want or by
highlighting the item and pressing enter. If Quick-MD encounters errors while trying to load a electronic superbill it
will generate an error report. If no errors are encountered Quick-MD will go directly to the charge entry screen and
allow you to complete the charges.
ONLINE TUTORIALS
Quick-MD comes with a collection of tutorials that explain every screen of the system. Tutorials can be accessed by
clicking a help button
, or by picking the tutorial from the list on left-hand side of the tutorial player. The tutorials
on the left-hand side of the form are grouped in logical sections that match the main menu of Quick-MD. Clicking on
the plus sign next to the section heading will expand the list and let you pick a certain tutorial.
Quick-md User Manual
Page 304 of 308
Quick-md User Manual
Page 305 of 308
HOW TO
Quick-MD has easy to access tutorials that explain how to perform common operations in the system. You can
access this list from the “How To” item on the main menu. Clicking on the “How To” item will bring up a list of
common questions. To view a tutorial, double click on the line that you are interested in.
FREQUENTLY ASKED QUESTIONS
WHAT DOES A CLAIM CONSIST OF?
A claim in this system is a single charge or group of charges along with the charge(s) associated payments,
adjustments, and notations. Quick-MD will assign a claim number when a new claim is created. Within each claim,
each individual charge will be given distinct invoice numbers. When you are posting payments, adjustments, and
notations to the ledger, you will be posting them to a claim and invoice number.
A claim will also contain billing notations put in by Quick-MD. Whenever an insurance company or the guarantor is
billed, Quick-MD will place a notation entry in the patient’s ledger saying who was billed, when they were billed, and
the amount of the bill. These billing notations also have their own invoice numbers. A primary insurance billing
notation will have an invoice number of 1000, a secondary insurance billing notation will have an invoice number of
1001, a third insurance billing notation will have an invoice number of 1002, and a patient billing notation will have an
invoice number of 1003. Do not delete these invoices. Quick-MD uses them to determine if the responsible parties
listed on the claim have been billed.
Quick-MD will consider the claim paid when there is a zero balance on the claim. All claims must reach a zero
balance at some time, whether by payment or write off, so post all payments and adjustments to the claim they are
intended to pay or adjust.
WHAT ARE RESPONSIBILITIES CODES?
Quick-MD uses four responsibility codes in determining who is responsible for the claim. (I = Primary Insurance,
S=Secondary insurance, A = Third Insurance, P = Patient) All ledger entries will contain one or more of these
responsibility codes. For example, if we enter a claim where only the patient will be responsible for the bill, only the
"P" responsibility will be placed on the ledger entries for the claim. If we enter a claim that the primary insurance
company will pay and the balance will be written off, we would enter the "I" responsibility on the ledger entries for
the claim. In short, when one of the responsibility codes is placed on a ledger entry, then Quick-MD considers that
party responsible for the balance of the claim.
Quick-md User Manual
Page 306 of 308
WHAT TYPES OF BILLING METHODS DOES QUICK-MD HAVE?
This system supports three types of billing methods. You may use any of the three methods at any time. In other
words, you may have a patient that you will use one method on and another patient that you will use another method
on. You can even mix methods within one patient's ledger.
1. Reassignment Method - This method adds or changes the responsibility codes during the process of
collecting payment on a claim. For example, we have entered a claim for a patient that has primary and
secondary insurance, and he will be responsible for what is not paid by the insurance companies. When we
first enter his claim we place only the "I" (primary) responsibilities on the charges. The primary insurance is
then billed. When the payment from the primary is posted we then add the "S" (secondary) responsibility to
the charges on this claim. The secondary insurance company will now be billed. When the payment for the
secondary insurance is posted, we then add the "P" (patient) responsibility to the charges and the patient will
now be billed for the balance on the claim. By using the reassignment method of billing, responsible parties
with the lower precedence do not receive bills until the responsible parties with the higher precedence have
paid.
2. % Method - By using this method you will add all responsible parties responsibility code to the charges when
you first enter the charges. Quick-MD will now bill all the responsible parties for the entire bill.
3. Co-percent method -This feature of the medical system allows you to bill the patient at the same time as the
insurance company for the percentage of the bill that the insurance company is not going to pay. Using this
feature will decrease the practice's receivables. Steps for implementing This feature are listed below:
a.
Set the patients co-percent amount in the patient's financial information
record. For example, if the patient's co-percent amount is 20 %, then enter the number 20 in this data
field. This MUST be done first.
b.
When entering a insurance claim that you wish to bill the patient for the copercent, place the “I” and “P” responsibilities on all of the charges for the claim.
c. Post a co-percentage billing note to the claim. This is done the same way as posting a regular note, but
this note's DESCRIPTION must start with a percent sign. You may enter anything you wish after the percent
sign. The location of the note within the claim does not matter.
EXAMPLE - % CO-PERCENTAGE BILLING
As long as this note is attached to the claim the patient will be billed for his set co-percent of this claim
until that balance is paid. If after you have received payment from the insurance company and it turns out
that the patient is going to be responsible for more than the set co-percent amount the steps to take are:
(1) Post the insurance payment to the claim.
(2) Delete the co-percent note.
Quick-MD will now ignore the co-percent and bill the patient for the entire balance of the claim.
WHAT DATE IS USED TO DETERMINE WHAT INFORMATION IS ON THE DAILY RECAP?
Quick-MD uses the ledger date for all reports and NOT the dates of service. The dates of service are used for
reference and on the 1500 form.
HOW DO I PERFORM RECAPS FOR ONLY THE WORK I DID?
Quick-MD allows users to perform summary or detailed recaps by operator. For this concept to work properly, it is
crucial that each operator has their own login into Quick-MD. It is also important that each user verify the “Operator”
name on the main screen. This insures that they are working at a terminal that logged in using their ID number.
CAN I CHANGE THE FONT SIZE ON MY REPORTS?
Yes, font size changes are performed via the Printer Settings Menu located under the Properties Menu. (for more
information see page 85)
Quick-md User Manual
Page 307 of 308
Why do my HCFA forms, Patient Statements or SuperBills not line up from top to bottom?
If your HCFA forms, Patient Statements or SuperBills are not lining up from top to bottom, or certain fields are
appearing to high or too low, you can fix this by adjusting the dithers found under Printer Settings located in the
Properties menu. (for more information see page 85)
How do I clear a file lock?
If you get a locking error, for a certain patient, then go to the file menu, then reset patient file lock. On the reset
patient file lock form enter the ID of the patient that is locked then click O.K.. If you are getting locking errors in the
appointment system then go to the properties or settings section of the appointment system and click on the button
labeled “Reset lock fields”.
EXITING QUICK-MD
1. At “Quick-MD’s Main Menu:” Select the File button
2. At “drop down menu:” Select Exit
3. At “Confirm:” Select the <YES> button to confirm the Exit of Quick -MD
Quick-md User Manual
Page 308 of 308