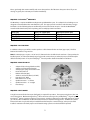
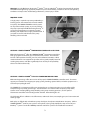
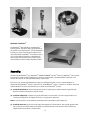
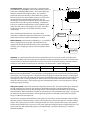
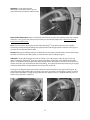
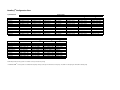
1
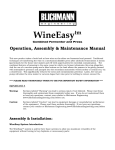
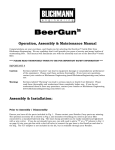
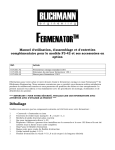
BrewEasyTM Operation, Assembly & Maintenance Manual Congratulations on your purchase, and thank you for selecting the BrewEasytm Kettle RIMStm all grain brewing system from Blichmann Engineering. We are confident that it will provide you years of service and many gallons of outstanding beer. This manual will familiarize you with the use, assembly, and the sanitation procedures for the product. PLEASE READ AND THOROUGHLY UNDERSTAND THIS MANUAL PRIOR TO USE FOR IMPORTANT SAFETY INFORMATION! About This Manual: Warning: Sections labeled “Warning” can lead to serious injury or death if not followed. Please read these thoroughly and understand them completely before use. If you do not understand them or have any questions, contact your retailer or Blichmann Engineering (www.BlichmannEngineering.com) before use. Caution: Sections labeled “Caution” can lead to equipment damage or unsatisfactory performance of the equipment. Please read these sections thoroughly. If you have any questions, contact your retailer or Blichmann Engineering (www.BlichmannEngineering.com) before use. Important: Sections labeled “Important” should specifically be followed to ensure satisfactory results with the product. About The BrewEasytm: The BrewEasytm all grain brewing system is sold in a modular format with several optional items available to enhance and customize your system. It is also sold in several pre-bundled configurations for your ordering convenience. Therefore you may not have purchased all of the items shown below in the unpacking section. Several optional and standard items will have their own separate product manual. Please review the configuration chart in the back of this manual for required and optional items you will need for your system. Please go through this section carefully and ensure that you have all of the items that you ordered. If you are missing any parts please contact your retailer immediately. REQUIRED – BoilerMakertm BREW POTS The BrewEasytm requires two Blichmann Engineeringtm BoilerMakertm pots. The adapter lids and tubing are not designed to accommodate other manufacturer’s pots. The upper pot is the mash tun and the lower pot is the boil kettle. Use the following chart to confirm that you have the correct size pots. Consult the BoilerMakertm manual included with each pot for unpacking and assembly/operation instructions. Batch Size 5 gal (19 L) 10 gal (38 L) 20 gal (76 L) Mash Tun (upper pot) 7.5 gal 15 gal 30 gal Boil Kettle (lower pot) 10 gal 20 gal 30 gal REQUIRED - FALSE BOTTOM In addition to the pot, you will also need to purchase a false bottom for the mash tun (upper pot). This false bottom also includes a large washer. Note: the AutoSpargetm requires a 13/16” to 7/8” diameter hole to be drilled in the mash tun. If you purchased a bundled system, or ordered the AutoSpargetm hole punch service when you ordered your pot, it will already be drilled in the R2 position. If not, the AutoSpargetm manual provides detailed installation instructions. REQUIRED - ADAPTER LID KIT 1 1 1 1 1 1 2 1 2 2 4 Adapter lid (5 and 10 gal batch models) Adapter ring (20 gal batch model) AutoSpargetm sparge level control valve Drain tube with nut Rubber orifice kit (6pc) Stainless steel street elbow (1/2” NPT) Hex nipple (1/2” NPT) Bulk silicone hose (½”ID) QuickConnectortm – ½” elbow QuickConnectortm – ½” straight Hose clamps REQUIRED - HEAT SOURCE A single heat source for the lower pot (boil kettle) is required for operation. The upper pot (mash tun) does not need a heat source. Blichmann Engineeringtm offers two heat source types for your BrewEasytm all grain system. Our TopTiertm burners operate on high pressure propane, or with our optional gas orifice, will operate on natural gas. We also offer our BoilCoiltm electric immersion heaters for electric brewing systems. The BoilCoiltm electric immersion heaters may be ordered pre-installed from the factory for a nominal charge, or they may be field installed. Instructions for both propane and electric heating systems are included with the product. 2 Warning!! Use only Blichmann Engineeringtm TopTiertm burners or BoilCoiltm heating elements with this product. Non-Blichmann Engineeringtm approved products may cause unsatisfactory, unstable or other unsafe operating conditions and may lead to unsatisfactory performance, serious injury or death. REQUIRED - PUMP A single pump is required to operate your BrewEasytm brewing system. We recommend and use the March 815 pump. Our TOWER of POWERtm control systems can be purchased with a pump, or you can purchase the pump separately from Blichmann Engineeringtm if you do not currently own one. Note that a pump throttling and shutoff valve is highly recommended. If you purchase our full and LTE towers the pump throttling valve is included. OPTIONAL - TOWER of POWERtm TEMPERATURE CONTROLLER & LTE STAND Blichmann Engineeringtm offers the TOWER of POWERtm temperature controller in both gas (propane and natural gas) and electric heater versions. The controller includes a full operational manual, parts list, and installation instructions. While automated control is not required for operation, it does greatly simplify control of mashing temperatures and offers significantly more accuracy and repeatability than can be achieved manually. OPTIONAL - TOWER or POWERtm LTE & FULL TOWER CONTROLLER STAND Blichmann Engineeringtm offers two versions of the popular TOWER of POWERtm controller stand. The towers support your controller and support your pump, power, plumbing, optional chiller, and other equipment on a convenient pre-packaged stand. The TOWER LTE is a compact stand for space restricted users at a lower price point. It can be collapsed for compact storage in pots 20 gal and larger. Standard features are a build in GFCI receptacle, pump switch, custom sensor mounting fitting, pump throttling valve, pump mounting provisions, and an optional Therminator wort chiller and mounting bracket available. Extended height is 32”. The Full tower offers in addition a visual flow meter, stuck mash alarm, wort sampling port, and a convenient 44” working height. Both styles are offered with and without a pump should you already own a March 809 or 815 pump. While a TOWER of POWERtm stand for your system is not required, it does greatly simplify the setup and use of your BrewEasytm system! Consult the TOWER operational manual for a parts list and installation instructions. 3 OPTIONAL - KettleKarttm The KettleKarttm adds mobility to your BrewEasytm brewing system. One of the many great features of this system is its compact nature. Use the KettleKarttm to tuck your system out of the way between brew days! Note that the KettleKarttm is modular in nature so you can bolt them together to add mobility to other components of your system as well! A parts and assembly manual is included with the product. Assembly: Assemble the BoilerMakertm pots, KettleKarttm, TOWER of POWERtm, TopTiertm burner, and BoilCoiltm and any other items you have purchased to complete your system per the instructions included with those products. This manual will cover the assembly of the BrewEasytm system itself. If you have a gas system and a KettleKarttm begin by installing the TopTiertm burner on the KettleKarttm as described in the KettleKarttm manual. If you have an electric BoilCoiltm system – install the “L” brackets on the top of the KettleKarttm to center and retain the pot as shown in the KettleKarttm manual. (1) Install the boil kettle (the lower pot) adjust the burner retaining arms to fit the outside edge of the pot. Details are shown in the TopTiertm burner manual. (2) Install the adapter lid or adapter ring on the boil kettle as shown below. The 5 and 10 gal models use a “hat shaped” adapter lid. The 20 gal model uses a “ring shaped” adapter lid. Note: the pot lid must be removed from the boil kettle prior to installation of the adapter lid. (3) Install the mash tun (upper pot) on the top of the adapter lid as shown below. Using a high quality Teflon tape on all pipe thread connections, thread the street elbow into the mash tun drain valve, and the hex nipple into the street elbow as shown below. 4 Important: Install these fittings exactly as shown or the drain tube will not fit into the assembly! Caution: Failure to use Teflon tape on stainless steel pipe threads (the street elbow and nipple) will cause thread galling (welding). Once the threads are galled they cannot be disassembled. Thread galling is NOT covered under warranty. It is NOT necessary to use pipe tape with our QuickConnectortm fittings. (4) Install the false bottom into the mash tun. Refer to the BoilerMakertm manual for installing the false bottom. (5) Install the drain tube assembly: An orifice kit is provided that will regulate the flow rate out of your mash tun to help prevent stuck mashes and to provide batch to batch consistency. Each orifice is marked with a number corresponding to the approximate flow rate in gallons per minute that will flow through the orifice as shown below. Selection of the proper orifice size will be covered in the operation portion of the manual. Slip the nut over the tube and insert the orifice into the nut as shown. Rotate the adapter lid so one of the holes aligns directly under the mash tun drain valve. Insert the drain tube into the hole and thread the nut onto the hex nipple as shown above right. Important: Do not over-tighten this fitting. Make contact then turn an additional 1/4 turn. Orifice 5 (6) Install hoses: Your BrewEasytm system includes the necessary QuickConnectortm hose fittings and a length of high quality silicone hose. Referring to the figure below, install a hex nipple onto the brew pot outlet valve with Teflon tape. Then thread an elbow QuickConnectortm fitting onto the nipple. Connect another elbow QuickConnectortm fitting on the inlet to the AutoSpargetm float valve. Teflon tape is not needed with the QuickConnectortm fittings. The elbows will keep the hoses from kinking. Place a straight QuickConnectortm fitting on the inlet to the pump and the pump throttling valve. Important: Place your pump in the desired location ensuring that it is at the lowest possible point in the system. A centrifugal pump will not prime and operate properly if it is installed above the liquid level in the brew kettle. Typically the pump is positioned on the side of the product where the AutoSpargetm is installed. Ensure that the controller and pump are located far enough from the burner or pot so that the components stay cool. Install a hose between the AutoSpargetm and the pump throttling valve as shown. Cut it to the appropriate length and secure it with the provided hose clamps. Ensure that the hose does not kink and that it is routed away from heat sources that may cause it to burn. Lastly, install a hose between the brew kettle outlet valve and the pump inlet also shown in Fig. XXX. Again, ensure that the hose does not kink or come in contact with excessive heat. It is recommended to provide a little slack in the hoses to accommodate positioning the pump. This concludes the assembly of your BrewEasytm system! 6 Operation: The BrewEasytm KettleRIMStm all grain brewing system is a unique new process and is very simple to operate once you understand the key operational principles. The BrewEasytm is a RIMS system (Recirculation Infusion Mash System). It uses a new process called KettleRIMStm or GrantRIMStm. This RIMS system requires the continuous recirculation of wort through the mash tun for the following purposes: (1) Adding heat to the mash for step mashing (2) Reducing temperature gradients within the mash bed (3) Clarifying the wort (vorlauf) Another key difference with this system is that you will start with ALL of your brewing liquor at the start of the brew day. This is a no sparge system! The elimination of the sparge process and separate vorlauf reduces the length of your brew day by about an hour! System Efficiency: The BrewEasytm system efficiency is about mid-way between a brew in a bag system and a traditional 3 tier fly sparging system. Using Blichmann Engineeringtm equipment, most fly sparge setups achieve about 78-82% mash (conversion) efficiency. Of course there are many variables (crush, water chemistry, adjuncts etc.) that effect the efficiency of any mashing system. The BrewEasytm system typically achieves about 10% lower efficiency than a fly sparging system and about 10% more than a typical brew in a bag system. With the compactness, speed, ease of use and excellent repeatability, the BrewEasytm is great system with few compromises! Tip: As with any new system it will take a few batches to dial in your efficiency and water usage requirements. Always make careful notes, and closely follow our recommendations. If you are new to all grain brewing we suggest reading John Palmer’s book “How to Brew”, published by the Brewers Association before your first batch. This manual is not intended to be a complete all grain brewing text. Important: Since all of your brewing liquor (water) is added at the start of the brew day it is important to recognize that the water will have a greater buffering power (resists a change in pH) than the concentrated mash used in a fly sparge system. All grain brewing requires basic knowledge of water chemistry to ensure that your mash pH will land in the 5.2-5.6 pH range at room temperature for proper mash chemistry. This is more important in thinner mashes. Depending on your water source and the style of beer you wish to brew, acidification of your liquor may be required. Important: We highly recommend the purchase of a digital pH meter for monitoring pH. Test strips, while inexpensive, do not provide adequate precision for brewing. Most pH meters today are automatically temperature compensated (ATC) so that readings can be taken at mash temperatures. If you are reading the meter at mash temperatures you should shoot for a mash pH between 5.1 and 5.4 pH as the pH of wort increases as it cools. This will result in a room temperature pH at the recommended range of 5.2-5.6 pH. Tip: John Palmer & Cameron Kaminski’s book “Water”, published by the Brewers Association covers this topic in great detail and is highly recommended reading for all grain brewers. 7 System Overview: The figure to the right is a schematic of the overall BrewEasytm KettleRIMStm process. Note that the system is a continuous recirculation RIMS process. The arrows indicate the direction and path of the continuous flow. The mash tun is positioned above the boil kettle so that it will drain by gravity from the mash tun into the boil kettle. A pump is used to move the wort from the boil kettle back into the mash tun. An AutoSpargetm level control is utilized to gently return the wort to the top of the mash bed to prevent channeling. In addition, it prevents an accidental overflow of the system should the mash stick or the drain tube or valve plug for any reason. The orifice installed in the drain tube sets the flow rate for the system automatically. Heat is added to the boil kettle only. On systems where automation is added the temperature of the wort is sensed at the pump outlet and heat is added automatically as needed. Sensor Orifice Selection: Included with your BrewEasytm is a set of 6 flow orifices ranging from 0.5 to 2.0 gpm. This orifice will set the approximate recirculation flow rate of the system automatically and allow you to simply open and close the valves fully to direct wort flow. Important: It is important to flow at the fastest rate that will not cause your mash to stick. Faster flow rates increase the stability of the control system and reduces the temperature gradient in the mash. It will take some experimentation to determine which orifice is best for your system. Grain crush, adjuncts, and other variables will all have some effect on how fast you can recirculate. The chart below is a good starting point. Approximate Recirculation Rate (GPM/LPM) 5 Gal 0.75 10 Gal 1.25 20 Gal 1.5 TIP: Fortunately the BoilerMakertm brew pot features a level gauge that can be used to warn you of impending stuck mashes. The level gauge acts as a manometer (pressure gauge) to indicate how hard you are drawing on the mash bed. If the level in the sight glass drops more than half of the starting level (with the pump off) you are drawing too fast and are risking a stuck mash. Either install a lower flow orifice or throttle the flow using the outlet valve of the mash tun. If you experience grain bed compaction troubles, it is nearly always the result of crushing your grain too finely. Filling Your System: Calculate the total water needed for your brew day. This should include grain absorption, boil off, and wort lost in your mash tun dead space, brew kettle dead space, and other downstream losses including shrinkage from cooling. Most brewing software such as BeerSmith and ProMash help you calculate these parameters. With a little experimentation you will be able to easily predict the water usage. Top up water can always be added to the boil kettle. If the target starting volume is exceeded you will either need to boil longer, or add extract to compensate. Close all valves and place about half of the brewing liquor in the mash tun and the remainder in the boil kettle. Adjust the position of the AutoSpargetm arm by loosening the wing nut and moving the arm so that the sliding piston is in the open position as shown in the figure below. This ensures that the valve is in the open position and the water can flow freely as you turn on your pump and begin heating the liquor to strike temperature. The levels in both pots will automatically adjust as you begin flowing. Consult your AutoSpargetm manual for detailed instructions. 8 Important: it is imperative that the AutoSpargetm level control valve is open or your pump will be air locked and will not flow! Heat to Strike Temperature: Open all valves fully and then turn on your pump. Add any water salts and acids at this time. Turn on your heat source until you reach your desired strike temperature. At this time close all valves and turn off the pump. Tip: If excessive water is spraying out the end of the AutoSpargetm level control valve, this can be quickly corrected by partially closing (throttling) the pump flow valve until the bypass flow is reduced. Some bypass is normal and is not detrimental to the wort. Caution: Adding grains while the pump is on will likely cause the pump to airlock and the mash to stick! Always turn off the heat source, turn off the pump, and close all valves prior to adding the grains. Add Grains: Gently add the grist to the mash tun stirring as you add the grains. After all grains have been added, readjust the AutoSpargetm float arm as shown in the figure to the right. The middle of the float ball is about 1-2” (25-50mm) above the grain when lifted up fully into the “off” position. The idea is to have about 1-2” of liquor above the grain bed at all times while recirculating. This reduces the chance for channeling in the grain and evenly distributes the recirculated wort over the top of the mash bed. Let the grain sit (dough-in) for about 10 min to absorb the liquor and for the air to purge out of the grain. An occasional gentle stirring will break up any clumps and release air pockets. The doughing-in process is vital for problem free recirculation. Turning on the pump before this dough-in process is complete will likely cause an airlock in the pump and a stuck mash! 9 Begin Recirculation: At this time open all valves and turn on the pump. In a minute or so the AutoSpargetm level control valve will automatically trim the flow to match the flow through the orifice. Readjust the position of the float ball if needed to achieve 1-2” of wort above the grain bed. Recirculating during the mash will clarify the wort and eliminate the vorlauf process (wort clarification) and save time. It will also reduce temperature gradients in the mash bed (stratification). In addition, you can easily add heat to make up any temperature losses in the system to maintain the desired mash temperature and ramp to other rest temperatures. Blichmann Engineeringtm offers an optional TOWER of POWERtm control system to automate this process for the ultimate in accuracy and repeatability! During the Mash: After about10-15 min all the liquor has been recirculated approximately one to two times and the wort is an even consistent temperature. At this time take a pH reading using a quality digital pH meter. Your pH should be between 5.1 and 5.4 pH when measured at mash temperatures (145-160F, 63-71C). If the sample has cooled to room temperature your reading should be in the 5.2-5.6 pH range. If your mash is not in the desired range you will need to add more calcium into your mash or add an acid (we recommend phosphoric) to acidulate the mash. Consult the two recommended books, How to Brew and Water by John Palmer and Cameron Kaminski (published by the Brewers Association) to learn how to properly adjust your mash pH. Tip: If you are manually controlling the addition of heat you will need to experiment with the burner on-time to prevent overshoot. Make sure that the thermometer in the boil kettle is actually in the wort or it will not read accurately. If it is not submerged, simply lower the float ball in the mash tun and that wort will be drained into the boil kettle. Important: Do not skip the pH measurements! If your mash is much above the recommended pH you risk astringency in your beer among other detrimental changes. Adding water salts and acid may be necessary to achieve proper pH in any all grain brewing system. Important: Stir (rake) the top 1/3 of the mash bed about every 15 minutes to break up any channels in the mash bed that may have formed. Do NOT disturb the bottom 2/3’s of the bed as this is acting as the filter in the system. Periodically raking the mash will increase your efficiency and ensure an even temperature throughout the mash bed for more repeatable results. Tip: Measure the specific gravity periodically. Since you have added all of the brewing liquor already your mash SG is the same as your pre-boil wort SG! This is a great feature of the BrewEasytm process and allows you to quickly make adjustments to your wort such as adding extract, water, or mashing a bit longer. Completion of Starch Conversion: At the completion of your mash your wort will be quite clear. Turn off the pump and close the valve on your brew kettle. Leave the valve on the mash tun fully open. Turn on your heat source to begin bringing the wort to a boil. The wort in the mash tun will drain into your brew kettle automatically. It is not necessary to slow the flow down in the mash tun. Tip: A slight increase in efficiency can be gained by reducing the flow out of the mash tun when the liquid in the level gauge reaches the height of the valve. This allows more time for the wort to permeate though the spent grains and reach the drain dip tube before it loses its siphon. Slowly move the valve handle toward the closed position until the rate of draining (as viewed in the level gauge) is about half of the full flow position. This is a completely optional step. In about 20 minutes your wort will have completely drained from the mash tun. Simply scoop out the spent grains and then remove the drain tube and the hose connected to the AutoSpargetm flow valve. Then remove the mash tun and adapter lid from the boil kettle. Your wort should now be getting close to the boiling point. Warning: Keep a close eye on the boil kettle temperature! DO NOT bring the wort to a boil with the mash tun on top of the boil kettle. Turn the heat down or off if the temperature is above 200F (93C). A boil-over will cause hot wort to flow out of the large vent holes in the adapter lid and may cause severe burns! Take a final volume and specific gravity reading of your wort and record. If you are not at the desired specific gravity you can add extract or water to compensate. 10 At this point, boil and add hops as you would any batch. After Use Cleaning, Storage, and Maintenance: Cleaning of the BrewEasytm system is very straight-forward. Clean the adapter lid with a mild detergent (nonchlorine) or Powdered Brewery Wash (PBW) after use. Rinse the drain tube with hot water or soak in a pail of PBW to remove any soils inside the tube. Soak the hoses in a PBW solution, rinse with hot tap water and soak in a non-chlorine sanitizer. Hang to dry. Note: Iodophor will leave a harmless brown stain on the hoses. StarSan, our recommended sanitizer, will not cause any staining. Please consult the individual product manuals for cleaning of the BoilerMakertm pots and the TOWER of POWERtm tower or LTE stands and pumps. Warranty: Blichmann Engineering products are warranted to be free of defects in materials and workmanship for a period of 1yr from the date of purchase (proof of purchase required). Specifically excluded from this warranty are orings, normal wear and tear, damage from abuse, misuse, failure to follow cleaning and maintenance procedures, and thread galling or breakage from over tightening or failure to use PTFE thread tape where instructed. Blichmann Engineering is not responsible for incidental or consequential damage arising from use or misuse of this product. This product is intended for home use only. No warranty or guarantee of suitability (express or implied) is given for commercial use of this product. Blichmann Engineering must be notified within 7 days of the delivery date of any hidden shipping damage. Owner is responsible for shipping damage outside of this time period. Customer is responsible to keep all original packing material for warranty returns – Blichmann Engineering, LLC is not responsible for damage from improperly packaged warrantee returns and these repair costs will be the responsibility of the customer. Resolution of warranty claims will be by repair or replacement and will be the decision solely of Blichmann Engineering. Shipping costs for warrantee returns are covered only for the contiguous United States. User is responsible for packaging costs and shipping damage if not returned in original packing. Approval for return (RMA) must be provided by Blichmann Engineering prior to any return. BrewEasytm Owners Manual – V2 Blichmann Engineering, LLC 2014 11 BrewEasy tm Configuration Chart Required Items System Batch Size Gas/Propane Systems Mash Tun Boil Kettle False Bottom Pump Adapter Lid Kit AutoSpargetm Hole Punch TopTiertm Burner 5 gal (19 L) 10 gal (38 L) 20 gal (76 L) aBoilerMaker-7.5_F(C) aBoilerMaker-15_F(C) aBoilerMaker-30_F(C) aBoilerMaker-10_F(C) aBoilerMaker-20_F(C) aBoilerMaker-30_F(C) aFalseBottom-7.5 aFalseBottom-15 aFalseBottom-30 March 809/815 March 809/815 March 809/815 aBrewEasy_ALK_5 aBrewEasy_ALK_10 aBrewEasy_ALK_20 Autosparge_punch Autosparge_punch Autosparge_punch Electric Systems Mash Tun Boil Kettle 5 gal (19 L) 5 gal (19 L) 10 gal (38 L) 20 gal (76 L) aBoilerMaker-7.5_F(C) aBoilerMaker-7.5_F(C) aBoilerMaker-15_F(C) aBoilerMaker-30_F(C) aBoilerMaker-10_F(C) aBoilerMaker-10_F(C) aBoilerMaker-20_F(C) aBoilerMaker-30_F(C) BoilCoiltm Heater Adapter Lid Kit aFalseBottom-7.5 aFalseBottom-7.5 aFalseBottom-15 aFalseBottom-30 March 809/815 March 809/815 March 809/815 March 809/815 aBrewEasy_ALK_5 aBrewEasy_ALK_5 aBrewEasy_ALK_10 aBrewEasy_ALK_20 Autosparge_punch Autosparge_punch Autosparge_punch Autosparge_punch Optional Items Gas/Propane Systems Gas Controller TOWER of POWERtm LTE *TOWER of POWERtm (FullKettleKarttm 5 gal (19 L) 10 gal (38 L) 20 gal (76 L) aTOP_Control_gas aTOP_Control_gas aTOP_Control_gas aTOP_LTE_P(NP) aTOP_LTE_P(NP) aTOP_LTE_P(NP) Electric Systems Electric Controller TOWER of POWERtm LTE TOWER of POWERtm (FullKettleKarttm 5 gal (19 L) 5 gal (19 L) 10 gal (38 L) 20 gal (76 L) aTOP_Control_elec aTOP_Control_elec aTOP_Control_elec aTOP_Control_elec aTOP_LTE_P(NP) aTOP_LTE_P(NP) aTOP_LTE_P(NP) aTOP_LTE_P(NP) aTOP_TOWER_P(NP) aKettleKart-22X22 aTOP_TOWER_P(NP) aKettleKart-22X23 aTOP_TOWER_P(NP) aKettleKart-22X24 aTOP_TOWER_P(NP) aTOP_TOWER_P(NP) aTOP_TOWER_P(NP) aTOP_TOWER_P(NP) aTopTier_Burner-FLR aTopTier_Burner-FLR aTopTier_Burner-FLR aKettleKart-22X22 aKettleKart-22X22 aKettleKart-22X22 aKettleKart-22X22 NOTE: Fully bundles turn-key systems are available. Contact your retailer for pricing! * TOWER of POWERtm control systems are available without pumps should you already own a March 809 or 815 pump. The suffix "P" is with pump, the "NP" suffix is without pump aBoilCoil-10_120V aBoilCoil-10_240V aBoilCoil-20_240V aBoilCoil-30_240V