1
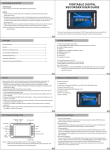
PORTABLE DIGITAL
RECORDER USER GUIDE
NOTES
Thank you for purchasing our latest product--PDR. Please read the instructions carefully
for safe usage. We recommend you to keep this instruction manual for future reference.
Please read this user manual in detail before using the product.
1ᇬWe have tried our best to make sure no mistakes or information was missing while
making this manual.
2ᇬ Manufacture warranty period is 1 year. Our Company assumes no responsibility for
any consequencesthat may arise while using and/or installing this products. We cannot be
liable for direct or indirect loss of data including, but not limited to, deleting, wrong
operation, wrong repair etc.
3ᇬShould there be revision or update of software, hardware and manual, we will not issue
any notice. Please feel free to contact original place of purchase to check for updates.
Notice:the difference of display memory and real memory is because of occupied by the
player software.
TABLE OF CONTENTS
PC Requirements………………………………………………………………………………2
NOTES…………………………………………………………………………………………….2
PRODUCT INTRODUCTION……………………………………………………………………3
BUTTONS AND CONNECTORS……………………………………………………………..3
OPERATIONAL DETAILS……………………………………………………………………..4
TROUBLESHOOTING…………………………………………………………………………..4
SPECIFICATION & ACCESSORIES…………………………………………………………5
1
PC Requirements
1. PC’s minimum system requirement
WIN98 II/ME/2000/XP, IBM compatible private Computer or notebook.
Pentium 200MHz or above.
USB port.
32MB memory (128MB for WIN2000) or above.
20MB hard disk space
CD-ROM Drive
Sound card
Available for internet
2.Connect Mp4 player to your PC
Using USB cable (it is supplied in the accessories)
connect USB port terminal from the player to USB port at PC correctly.
Notice: please power off the player BEFORE inserting USB cable. Then turn on the player.
Otherwise it will influence the player’s function. Other USB cables then provided should
not be used.
NOTES
Dear customer, thank you for choosing our product. We sincerely hope our products can
satisfy you. Please read the following instruction carefully before using.
1. Do nor use in high temperature, high humidity environment, especially in the high
temperature bathrooms .0 degrees Centigrade - 40 degrees Centigrade is the best
working temperature for Mp4;
2. Avoid putting the MP4 where there is direct sunlight.
3. Please power OFF the unit before inserting or pulling out the SD card and Video
Cable. Failure to do so will cause unpredictable damage to PDR or cause it to freeze the
system;
4. Put it in the place where the children can't reach, avoid contact with sharp object to
prevent damages
5. Please don't disassemble the MP4 without authorization . Please contact your
distributor or our company, if any query;
6. Please do not change the battery or puncture the battery. That is extremely
hazardous and may explode or cause a fire.
7.
To ensure your safety and safety for others, please do not use while driving or
operating machinery.
8.
We suggest customer copy or backup the data at all times, to prevent loss of data due
but not limited to, sudden loss of power.
2
PRODUCT INTRODUCTION
1) Video Record
2) Video play᧶support ASF᧤MPEG-4᧥᧨AVI᧤DIVXᇬXVID᧥3GP,MP4 format.
3) Built-in MIC/LINE IN/OUT᧷ 4) Support Camera IN,AV out᧷ 5) Multiple language ᧤English/Portuguese᧥set᧷ 6) Support SD/MMC card ᧷ 7) Built-in lithium batery ᧷ 8) Built-in speaker ᧷ BUTTON AND CONNECTOR
14
15
17
16
13
12
POWER
AV OUT
CAMERA
IN
1
MODE
2
MIC
ESC
3
6
MIC
5
SC E MODE
i
VOL+
L VOL-
Mn
S
VOL-
VO +
D
4
AV OUT
RESET
CAMERA
IN
11 10 9
8
1. POWER ON/OFF
2. MIC (N/A)
3. VOLUME (-) / SELECT
4. VOLUME (+) / SELECT
5. ESC
6. MODE
7. LED INDICATOR
8. FORWARD
9. PLAY/PAUSE
10. REWIND
11.LED INDICATOR
12.MICRO SD CARD SLOT
13.USB PORT.
14.CAMERA INPUT
15.SPEAKER
16. RESET
17.A/V OUTPUT
7
Note᧶
1. PLease fully charge the unit before any operation using USB connection or
the AC/DC adapter. It will take 5 hours to complete the initial charge. Blue Leds will
flash when charging and will turn off when completed.
2. The DVR has 2GB built-in flash memory. For an extra memory, insert a micro SD card
at the slot no.12 as shown on the diagram above. Setting must be changed under the memory
function in order to use the Micro SD card.
3. Press the Power Button for 3 seconds to turn the unit ON. The blue LED will blink.
If the camera is connected , the image will show up. If Not, the warning message will pop up.
Press PLAY/PAUSE button to continue with other operations.
OPERATION DETAILS
1.Power ON/OFF operation:
Press Power On button for 3secs, then enter the menu stand-by mode of PDR. And press
power on button for 3secs to power it off.
3
2.Storage media:
if inserted the external storage card,please set SD/MMC as current work area in
the“Memory”of System Setting.The system will default FLASH as current work area.
3.Battery Recharge:
Connect the USB to the PDR to start charging and the power light will turn on red. And it
will turn off when fully charged. Takes up to 5hrs to fully charge.
4.Connect PC operation:
Power on the PDR player, use USB cable to connect to the PC. Then the PDR screen will
show the connection picture. The computer will find two REMOVABLE DISCS. The first
one is flash memory, and the second is SD/MMC card memory. Attention: you cannot
open the drive without SD/MMC card inserted in the PDR unit.
VIDEO RECORDING:
1. Connect camera to Camera IN using one of the cables supplied.
2. Power on the PDR, press
or
to select Video Record menu and press
to enter the Video Record menu.
3. Press
to start recording, note that the time will be shown at bottom right corner of
the screen. Press
again to stop recording the small
will appear on top your
screen. Exit by pressing ESC and you can browse in Video. In some cases to get back to
Main menu gets couple seconds depending on your SD Card Capacity.
4
VIDEO PLAYER
1. MENU:
In the Video press MODE
for 2 secs to enter the Menu. press VOL+ (up) or VOL- (down) to
(IN) or
move down and up through the menu or
And use
(OUT) from the submenu.
to select the option. Press ESC to exit the menu.
2. DISP MODE:
This option gives you a choice between List or thumbnail for file display
3.LOOP MODE:
There is CURRENT / ALL / RANDOM LOOP play for the files.
CURRENT: will only play the current selected video continuously.
ALL: will play all files in sequence continuously.
RANDOM: will play files randomly continuously.
FILE PROTECT:
LOCK: Keep the file protected against accidental removal.
UNLOCK: leaves the file unprotected.
5
DEL FILE:
CURRENT: Delete the Selected File
ALL: Deletes all the files.
TV output:
1. Press and hold the MODE button for 3 sec. and the DISP MODE menu will display on
top left of the screen.For LCD output, select LCD output Function.
2. For TV output, select PAL or NTSC Function. Results will vary on type of TV monitor
used.
AV OUT
CAMERA
IN
PLAYBACK:
Under the VIDEO PLAYER, use VOL+ or VOL- buttons to move up or down through the
files and press
Press
to PLAY.
to pause, VOL+ or VOL- to adjust volume, and VOL+ or VOL- to move to
next or previous video.
SYSTEM SETUP:
Press
or
to move cursor to select,
Press
to ENTER ,press ESC to exit.
Language:
There are only English and Portuguese Languages available, press
6
or
button to move the cursor, and press
to select. The unit will shut down, Power back up to resume.
Default:
Make the setting to the default ,but the internal video files will remain. And the startup
picture will be the same as default set. Select the option and press
Sound:
This operation can turn the speaker ON or OFF , and also control the keytones. Use VOL+ / VOL- to
move cursor up and down, and use
or
to move left and right , Press
to select.
Memory:
There is 2 types of storage.
Flash Built in Memory: 1956MB capacity.
To use flash memory as a default drive, select WORK SPACE.
To erase and format, select FORMAT
SD Card: depends on SD card used.
To use SD card as a default drive, select WORK SPACE.
To erase and Format, select FORMAT.
7
Time setting:
Press
or
finished, press
to move cursor , press VOL+ or VOL- to change number, when
to confirm.
The Time display will not show on LCD view playback, but will be
present on PC playback.
Download the files contained in the DVR into the PC to playback
the Video with Time display.
Power Mode:
This function allows to set a time to turn the PDR to stand by mode.
to move cursor to right and left , a n d press
NEVER / 60s / 30s / 180s Press
or
VOL+ or VOL- to move up and down.
The LEDs will flash during the Standby mode. Press the PLAY/PAUSE button
to Resume the operation in the DVR.
TROUBLE SHOOTING
Troubleshooting:
1. No power᧶
If there is no power, Charge the PDR first. Leave charging 6 hrs for its first charge.
If still no power, try another source of power through USB connection for charge.
2. Auto power off after power on:
When the unit gets low battery, it automatically turns off.
The auto power off function is set through the menu, to change the settings, go to the
TIME SETTING under the system setup.
3. Have not response when press button:
Depending on the capacity of the SD card, the PDR may get slow. It can take more than
10 seconds to respond, specially when trying to see the files.
4. Saved files cannot be found:
When the SD card is inserted ,normally is set as a default drive to store files.so if you had
some files recorded on the units flash memory, remove the SD card and search.
It could be either a lost file due to improper recording or interruption.
5. PDR is not responding:
When PDR is not responding, Press “RESET” Button.
8
Product Specification:
Built-in flash memory capacity:
2GB
Signal to noise ratio
90dB
Micro SD Card
Expandable to 4GB
Earphone output rate
5mW+5mW
LCD
2.4 inch TFT
Output frequency range
60Hz-16KHz
Dimensions
83.5 x 50.2 x 12.5 mm
AV Output
3.5mm (Video / Audio)
USB port
USB 2.0(full speed)
Camera Input
3.5mm ( Video / Audio
Video Compatibility
ASF (MPEG4) / AVI (DIVX, XVID) / 3GP / MP4
Video Compression
MPEG4
Audio Play
Power Charger
AC110V/220V (input)
DC5V / 1A (output)
Accessories:
User manual
Stereo earphone
Video Player and converter CD
USB Cable
AV RCA output Cable
AV 4pin input Cable (suitable for Spy Cameras)
Optional Items:
9
MP3
/Power 3~5VDC)