1
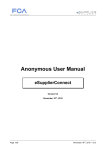
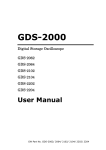
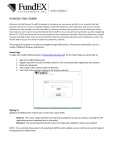
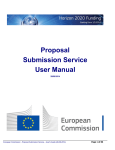
Participant Portal User’s Guide 25/10/2010 (version 2.2.1) Participant Portal User’s Guide (26-10-2010) – Release 2.2.1 Page 1 of 49 Introduction...............................................................................................................................................4 Participant Portal's main actors.............................................................................................................4 Participant Portal's main services .........................................................................................................5 System requirements for using the Participant Portal ...........................................................................5 Where can the participants get support? ..............................................................................................6 1 HOW TO ACCESS THE PARTICIPANT PORTAL? ......................................................................7 1.1 European Commission's Authentication Service........................................................................7 1.2 ECAS Registration .....................................................................................................................7 1.3 Log on to the Participant Portal..................................................................................................9 1.4 Log out from the Participant Portal...........................................................................................11 2 HOW TO USE THE PARTICIPANT PORTAL? ...........................................................................12 2.1 Roles........................................................................................................................................12 2.1.1 Role basics ....................................................................................................................... 12 2.1.2 Identify your roles.............................................................................................................. 14 2.2 The list search/filter box ...........................................................................................................15 2.3 Identify opportunities: find FP7 documentation ........................................................................15 2.4 Search for an organisation and retrieve its Participant Identification Code ..............................16 2.5 Register an organisation ..........................................................................................................18 2.5.1 2.6 Manage the organisation data..................................................................................................23 2.6.1 Status of my organisation ................................................................................................. 24 2.6.1.1 Check if your request has been validated or is in validation. .....................................24 2.6.1.2 View organisation or change (within request history).................................................25 2.6.1.3 Create a change request ...........................................................................................25 2.6.1.4 Delete change request...............................................................................................26 2.6.1.5 Update change request .............................................................................................26 2.6.2 View Projects of an Organisation ...................................................................................... 27 2.6.2.1 Roles in an organisation's project ..............................................................................28 2.6.2.2 Project details ............................................................................................................29 2.6.3 2.7 Legal Entity Appointed Representatives and account administrators ............................... 22 Roles of an Organisation .................................................................................................. 30 2.6.3.1 Add a role to an organisation .....................................................................................31 2.6.3.2 Revoke a role from an organisation ...........................................................................31 Manage projects.......................................................................................................................31 2.7.1 Access to the list of projects and project details................................................................ 31 Participant Portal User’s Guide (26-10-2010) – Release 2.2.1 Page 2 of 49 2.7.2 The project menu and project summary portlets ............................................................... 34 2.7.3 Roles of a Project.............................................................................................................. 35 2.7.3.1 First level: Coordinator Contact .................................................................................35 2.7.3.2 Second level: Participants Contacts ..........................................................................36 2.7.3.3 Third level: Named Representatives..........................................................................36 2.7.3.4 Fourth level: Task Managers and Team Members ....................................................36 2.7.3.5 Other roles: ................................................................................................................37 2.7.3.6 Display Roles.............................................................................................................37 2.7.3.7 Add a new role in your project ...................................................................................38 2.7.3.8 Revoke a role from your project.................................................................................39 2.7.3.9 Manage the Consortium ............................................................................................40 2.7.4 Access to the negotiations activities (Negotiation Facility tool -NEF)................................ 42 2.7.5 Access to the reporting activities....................................................................................... 44 2.7.5.1 Accessing the reporting functions ..............................................................................45 2.8 Manage roles ...........................................................................................................................46 2.9 Manage notifications ................................................................................................................46 3 List of roles and their rights..........................................................................................................47 4 GLOSSARY.................................................................................................................................48 Participant Portal User’s Guide (26-10-2010) – Release 2.2.1 Page 3 of 49 Introduction The Participant Portal is an Internet portal for the participants to the 7th Framework Programme (FP7) and the Competitiveness and Innovation Programme (CIP). Its ultimate aim is to become over time the participants' gateway and single entry point to interact with the Research programmes of the European Commission. It provides a consistent and coherent set of online services in order to facilitate the participants’ interactions with the Research Directorates-General of the European Commission and improve operations and data quality. It will eventually host a full range of web applications that facilitate the monitoring and the management of proposals and projects throughout their lifecycle. This document describes how to access and use the Participant Portal. Participant Portal's main actors The different types of users defined for the Participant Portal are organised by roles and described as follow: Public : Any person that goes to the PP URL Registered User: A user that has registered himself and has received credentials for logging on. A registered user can be a natural person or a member of a legal entity, called an organisation member. A member of a legal entity can have one of the following roles: Researcher: Person who directly or indirectly interacts with Framework Programme information Organisation Member : User who acts on behalf of an entity LEAR: Legal Entity Appointed Representative, possibly delegating updates of company information and other capabilities to other representatives of the organisation, called "Account Administrators" (AA) under the Participant Portal: Account Administrator (AA): the Account Administrator is appointed by the LEAR in order to provide support with the management of the organisation data. Project/Proposal Participant : Member of an organisation who participates in a project or a proposal Coordinator Contact: Coordinator of a project/proposal who is the first point of contact for the EC Participant Contact: Primary point of Contact for an organisation within a Consortium Administrative and Legal Representative (ALR) Responsible for contractual and administrative aspects of a project. Financial Representative (FR) Responsible for financial aspects of a project Proposed Signatory (PS): Represents the oversight and authority of the LEAR Participant Portal User’s Guide (26-10-2010) – Release 2.2.1 Page 4 of 49 Scientific & Technical Representative (STR): Leads the research team and is responsible for technical submissions. Team Member: Has minimal read-only rights to project resource information. The scope of these rights can be set to any combination of the following: Administrative, Legal, Financial and/or Scientific. For the majority of users the role represents a project team member. They can be designated by the Coordinator Contact, Participant Contact or a Representative. Task Manager: Extends the Team Member role with the capability to perform submit, update and delete actions. Just as for the Team Member, those rights can be constrained within one or more defined scopes amongst financial, scientific, administrative and/or legal. Like the Team Member, they can be designated by the Coordinator Contact, Participant Contact or a Representative. Depending on their role(s), users will receive different rights regarding the access to the hosted services. Participant Portal's main services The Participant Portal has been created to cover the whole lifecycle of the projects: proposals submission, evaluation, grant agreement negotiations and submission of periodic and final reports during project implementation, administrative support to the experts… Currently, the Participant Portal is the gateway to access – the Unique Registration Facility (URF), allowing organisations registration and data management – the FP7 Negotiation Facility (NEF), facilitating the negotiation process – the reporting tools (NEF, SESAM, FORCE) to submit the technical and financial reports – the FP7 documentation search functionality – the FP7 Calls database – the new Notification service System requirements for using the Participant Portal The participant portal operates on-line, without saving anything on the computer. The systems requirements are: – a computer with a 600 MHz processor and minimal 512Kb of memory; – an Internet connection, preferably 512 Kb/s or higher; – a screen with a minimal resolution of 1024 x 768; – Internet Explorer 6.0 (or above) or Firefox (3.x). Other web browsers may work but have not yet been tested. Note that for security reasons your browser may request to identify the Participant Portal website and the ECAS system as "trusted". Once added as trusted, we recommend that you restart the browser session; – Windows (2000, XP and Vista), other operating systems may work but have not yet been tested. Participant Portal User’s Guide (26-10-2010) – Release 2.2.1 Page 5 of 49 Where can the participants get support? A Frequently Asked Questions section is available on the Participant Portal. For issues related to the registration and login using the European Commission's Authentication Service (ECAS), participants can visit this website https://webgate.ec.europa.eu/ecas/help.jsp or send an e-mail to [email protected]. The participants looking for technical help can ask the eFP7 Help Desk by sending an e-mail to [email protected]. Their requests can also be supported by the contact form available on http://ec.europa.eu/research/participants/portal/appmanager/participants/portal?_nfpb=true&_pageLa bel=contactus. For questions related to the Framework and similar RDG Programmes, the participants are invited to contact the FP7 Help Desk by sending an e-mail to [email protected]. Participant Portal User’s Guide (26-10-2010) – Release 2.2.1 Page 6 of 49 1 HOW TO ACCESS THE PARTICIPANT PORTAL? Except for few services, such as the FP7 documentation, FP7 Calls or the PIC search function, access to the Portal and its underlying services requires an ECAS account. 1.1 European Commission's Authentication Service ECAS is the European Commission's Authentication Service. It provides a single sign-on across a large number of Commission information systems: once you have authenticated yourself to ECAS, you do not have to re-enter your credentials (username and password) within the same browser session. Protected information systems request ECAS to supply the current user's identity – if you have already been authenticated, it does not ask you to do so again (provided that you have not disabled the use of cookies in your browser). ECAS authentication is available only with applications that have been specifically adapted to use it. These applications request ECAS to authenticate you on their behalf and do not authenticate you directly. This means that when you use your ECAS password, it will always be on a distinctive page belonging to ECAS, even though you may have typed in the application's address, not that of ECAS. Never enter your ECAS password on any other page. Do not divulge your ECAS password to anyone - there is no reason for anyone else, including system administrators and support staff, to ask for it or know it. 1.2 ECAS Registration If you are a new user please register on the ECAS. The creation of the ECAS account is free and easy. 1. To create your ECAS account, go to the Participant Portal home page: http://ec.europa.eu/research/participants/portal. 2. Then click on the register link in the login box (Figure 1: Login Box). Figure 1: Login Box register link Participant Portal User’s Guide (26-10-2010) – Release 2.2.1 Page 7 of 49 3. The ECAS User Registration Form opens: please fill it in using your individual professional e-mail address in the relevant fields (Figure 2: ECAS User Registration Form). It allows the system to identify you and credit you with the right access and services. Please avoid using your email address as Username; this could cause issue if your email address is modified. 4. Select the privacy statement acknowledgement checkbox, copy the security code into appropriate text area and submit the form for processing. Figure 2: ECAS User Registration Form 5. The confirmation screen indicates that within a few minutes you will receive an email allowing you to complete the registration process. Note that the process must be completed within 1h30 after your original request! 6. Go to your mail box. You will see that the European Commission Authentication Service has sent you a message to initialise your password. Open it and click on the link indicated in the e-mail: you will be redirected to the Password initialisation page of ECAS (Figure 3: Password initialisation page of ECAS). Participant Portal User’s Guide (26-10-2010) – Release 2.2.1 Page 8 of 49 Figure 3: Password initialisation page of ECAS 7. On the password initialisation page create and initialise your password. 8. Click on the submit button. The ECAS password initialisation success page will appear: your ECAS password was successfully initialised. 9. You can return to the home page of the Participant Portal. It is now possible to log on. Please note that your ECAS credentials are strictly personal and confidential and should not be shared! They will allow you to access different services and data that might be critical for your organisation. 1.3 Log on to the Participant Portal 1. Go to the Participant Portal home page: http://ec.europa.eu/research/participants/portal 2. In the login box click on the login link (Figure 4: Login box login linkError! Reference source not found.) Participant Portal User’s Guide (26-10-2010) – Release 2.2.1 Page 9 of 49 Figure 4: Login box login link 3. The login page (ECAS authentication) appears (Figure 5: ECAS Login pageError! Reference source not found.): - Whenever you login, please make sure that the selected domain is “external”. Should another domain be selected, please change it by clicking on the use a different domain link. - Enter your Username (if you have created one) or your email address and your password, and click on the submit button. - You are then redirected to the secured environment of the Participant Portal. Figure 5: ECAS Login page 4. Now that you have logged on to the Participant Portal, you are identified as a user (Figure 6: Login box) Participant Portal User’s Guide (26-10-2010) – Release 2.2.1 Page 10 of 49 Figure 6: Login box Depending on your role, you will be able to access different services. 1.4 Log out from the Participant Portal 1. In the login box of the Participant Portal click on the logout link (Figure 7: Login box) 2. This will end your session in the Participant Portal and close all the applications accessed via the Participant Portal and supported by the ECAS authentication (URF, NEF, SESAM, FORCE). Figure 7: Login box Participant Portal User’s Guide (26-10-2010) – Release 2.2.1 Page 11 of 49 2 HOW TO USE THE PARTICIPANT PORTAL? 2.1 Roles 2.1.1 Role basics Every user will benefit from different rights, crediting them with access to specific information and services. Once a user has been authenticated, the list of actions that can be performed in a FP7/CIP project context depending on the user's role is displayed (see Figure 8: Home Page after login) Figure 8: Home Page after login Participant Portal User’s Guide (26-10-2010) – Release 2.2.1 Page 12 of 49 "Table 1 - Processes" describes the processes indicated in this graphical representation. The columns are: PROJECT LIFE CYCLE STAGE SERVICES related to the stage ROLES: The roles for which the services are available. The different right scopes of the Task Manager and Team Member are codified as follow: A: administrative L: legal F: financial S: scientific PROJECT LIFE CYCLE STAGE SERVICES Organisation management Search for an organisation Any Register an organisation Any Manage organisation data LEAR, Account Administrator. Identify opportunities Read FP7 related documentation Any Negotiations Browse and/or manage Negotiations Proposed Representative, Participant Contact, Coordinator Contact, Administrative and Legal Representative, Financial Representative, Task Manager (A,L,F,S), Team Member (A,L,F,S), Browse and/or manage Grants Proposed Representative, Participant Contact, Coordinator Contact, Administrative and Legal Representative, Financial Representative, Task Manager (A,L,F,S), Team Member (A,L,F,S), LEAR, account administrator Browse and/or manage Amendments Proposed Representative, Participant Contact, Coordinator Contact, Administrative and Legal Representative, Financial Representative, Task Manager (A,L,F,S), Team Member (A,L,F,S), LEAR, account administrator Browse and/or manage financial periodic and final reporting Proposed Representative, Participant Contact, Coordinator Contact, Administrative and Legal Representative, Financial Representative, Task Manager (A,L,F,S), Team Member (A,L,F,S), LEAR, account administrator Browse and/or manage deliverables and final reporting Proposed Representative, Participant Contact, Coordinator Contact, Scientific Representative, Task Manager (A,L,F,S), Team Member (A,L,F,S), LEAR, account administrator Manage roles and nominations Any role Manage notifications Any role Support Any Grant execution ROLES Horizontal processes Table 1 - Processes Participant Portal User’s Guide (26-10-2010) – Release 2.2.1 Page 13 of 49 2.1.2 Identify your roles Every user will benefit from different rights, crediting them with access to specific information and services. These rights are related to the role(s) the user plays within an organisation (as a LEAR or Account Administrator) and/or a project (as a Coordinator, Participant, Representative, Task Manager or Team Member). You can identify your role(s) by following these instructions: 1. Log on to the Participant Portal 2. Select the "My Roles" tab. 3. If you have one or more organisation role(s) (i.e. LEAR or Account Administrator), a list of each organisation for which you have these roles will be displayed in the "Organisation Roles List" section. The list consists of the Participant Identification Code (PIC), the name of the organisation and the role you are playing (Figure 9: My Roles). 4. If you have one or more project role(s) (i.e. coordinator, participant, representative, task manager o, team member, reviewer, EC Project Officer), a list of each project for which you have these roles will be displayed under the Project Roles section. The list consists of the Acronym of the project, the project identification number, the funding programme to which the project belongs, your role in the project (if you have multiple roles in the project, there will be one line per role). Figure 9: My Roles The "Nominations" column's functionality is explained in section 2.7.3 below. Select the icon in order to refresh the memory cache; it allows reloading the most recent data. Participant Portal User’s Guide (26-10-2010) – Release 2.2.1 Page 14 of 49 2.2 The list search/filter box You can use the Search box to filter out any list displayed by the participant portal. Simply start typing the word to filter on and the list will dynamically adapt itself in order to show you only the relevant lines. The filtering is done on all the fields of the table. Figure 10: The search/filter box 2.3 Identify opportunities: find FP7 documentation 1. Go to the Participant Portal home page: http://ec.europa.eu/research/participants/portal 2. Select the FP7 documentation tab 3. The Browse FP7 documentation tree appears This page gives access to all FP7 documents. Documents are grouped by category. For each category, you will see a brief description when you icon. move your mouse over the To access a document: Click on a folder and/or a list of documents. Clicking on [EN ] gives you direct access to the specific document in English Clicking on [more] directs you to more details about the document and any available translation. 4. It is also possible to search for FP7 documentation available on the Participant Portal. Select the "Search FP7 documents" tab (Figure 11: Search FP documents and Figure 12: Advanced Search FP documents) Fill in the field for at least one search criterion and click on "Search". Figure 11: Search FP documents Participant Portal User’s Guide (26-10-2010) – Release 2.2.1 Page 15 of 49 Figure 12: Advanced Search FP documents 2.4 Search for an organisation and retrieve its Participant Identification Code It is possible to check if an organisation has already registered by retrieving its PIC. However the search module provided on the Participant Portal will only retrieve the name and PIC of validated or under validation organisations. So if you have just registered your organisation, your PIC will no be displayed until the validation of your registration request has started. 1. Under the My Organisation tab, select the Search tab 2. The search organisations module appears (Figure 13 : Search Organisation) 3. There you can check whether your organisation has already registered and if so, retrieve the PIC that has already been assigned. It is obligatory to complete either the "legal name" field or the "VAT number" field with at least a three character string. The other search fields can be left blank (Figure 14: Search Results) Note: if searching for a legal name in the national language does not yield results you might try with a translation in English Participant Portal User’s Guide (26-10-2010) – Release 2.2.1 Page 16 of 49 Figure 13 : Search Organisation Note: When your search returns too many results only the first 200 are shown. You should refine your search criteria Participant Portal User’s Guide (26-10-2010) – Release 2.2.1 Page 17 of 49 Figure 14: Search Results This feature is also available when you are not logged in (but there is an additional field to be filled for the security code. As explained in section 2.2, you can use the Search box to filter out any list displayed by the participant portal. 2.5 Register an organisation In the past, participants had to provide the Commission with their organisation legal and financial information every time they submitted a proposal or negotiated a contract. This is simplified in FP7. Participants can register their organisations data ONCE. This will generate a Participant Identification Code (PIC), which defines their organisation’s details and status, to be used in the process of electronic proposal submission and negotiation. Registering an organisation will allow you to receive its Participant Identification Code (PIC). Using a PIC for your organisation has several advantages which are fully explained in this FAQ entry. Participant Portal User’s Guide (26-10-2010) – Release 2.2.1 Page 18 of 49 Use the search facility to check if an organisation has already a PIC. If you do not find a PIC for your organisation you have to first register as an ECAS user. With your ECAS password you can register your organisation. Log on to the Participant Portal, under "My Organisations" tab click on the "Register" sub-tab (see Figure 15: Register steps ). Follow the steps described below: Participant Portal User’s Guide (26-10-2010) – Release 2.2.1 Page 19 of 49 . STEP 1. Search Use the search facility to check whether your organisation is already registered or in the process of being registered (see section 2.4).. STEP 2. Self-Register your organisation in PP Register your organisation using your ECAS account details. After providing all the necessary details, press the [CONFIRM] button to submit your registration information to the Central Validation Team (CVT). If you wish to suspend the registration process at any point, the data entered may be saved as a draft by clicking the [Save Draft] button. You may then resume your registration at any time. STEP 3. Modify your Self Registration STEP 3a If you saved your data as draft it is still possibe to modify or delete your selfregistration. or STEP 3b If you have already submitted your registration and if CVT has not started the verification process that will eventually lead to the appointment of a Legal Entity Appointed Representative (LEAR), it is still possible to modify your self-registration and/or upload additional documents. or STEP 3c If CVT has already started the verification process, you can no longer modify your selfregistration data but you are still able to upload additional documents . After identification, the CVT begins a verification process that will eventually lead to the appointment of a Legal Entity Appointed Representative (LEAR). During this period, the data that you have declared about Participant Portal User’s Guide (26-10-2010) – Release 2.2.1 Page 20 of 49 your organisation can no longer be modified. You will however still be able to upload up to 10 Mb of additional supporting documents. Once uploaded, these documents cannot be withdrawn or modified, except by the validated LEAR. When your data has been validated by the CVT, you, as self registrant, will no longer be able to edit the data related to your organisation. From this point on, the organisation data may be maintained only by the LEAR. For the self-registration, you are re-directed to URF. (See Figure 16: URF – Self Registration). You can find more information in the URF user's manual. Figure 15: Register steps Participant Portal User’s Guide (26-10-2010) – Release 2.2.1 Page 21 of 49 Figure 16: URF – Self Registration 2.5.1 Legal Entity Appointed Representatives and account administrators The Legal Entity Appointed Representative (LEAR) is the person chosen by the organisation to ease the communication with the E.C. and avoid double registrations. Only the LEAR (or account administrator, see the end of the section below) may do a change request of his/her organisation's data and submit legal documents through URF. LEARs can submit requests for update for Legal Data (Name, address, registration number etc) FP7 account legal type (SME, Public private, educational etc…) and indirect cost method (ICM) Balance sheet data (if requested) And they can upload supporting documents in URF to back their requests. More information on the LEAR is available in the FAQ section of the Participant Portal: http://ec.europa.eu/research/participants/portal/appmanager/participants/portal?_nfpb=true&_pageLabel=faq #LEAR The documents to appoint a LEAR (LEAR appointment form and role and task definition) are available on ftp://ftp.cordis.europa.eu/pub/fp7/docs/appointment-lear.pdf and ftp://ftp.cordis.europa.eu/pub/fp7/docs/lear-role-tasks.pdf Participant Portal User’s Guide (26-10-2010) – Release 2.2.1 Page 22 of 49 Both documents must be signed and stamped, and then sent to the Central Validation Team (CVT) by regular letter. Note that this guide describes only the access to the URF services. URF does offer a user-friendly environment and its use is very straightforward. Nevertheless, a user manual provides a detailed description of the URF services and how to use them: https://ec.europa.eu/research/participants/urf/public/help/help.do This is how the Participant Portal supports the LEARs’ action. They can – View the information stored in the account of their legal entity and to introduce change requests. – Access the list of projects that their organisations are currently working on. – View the roles of people in their organisation on the projects. All these services are protected so you must first log on to the Participant Portal. The process to follow is described under the "Log on the Participant Portal" chapter of this guide. In order to lighten the LEAR workload (especially in bigger organisations), the participant portal provides the capability to the LEAR to nominate (and subsequently revoke) one or more account administrators. These persons will have all the rights of the LEAR (except the one of nominating/revoking account administrators themselves) and can therefore perform those tasks on his/her behalf. See section 2.6.3, Roles of an Organisation for more information. 2.6 Manage the organisation data 1. Log on to the Participant Portal 2. Once you are connected to the secured environment of the Participant Portal, select the "My Organisations" tab, and then click on "Organisations". You can also click on the "Manage Organisation Data" icon in the home page displayed after login. 3. The data of the legal entity are displayed (Figure 17: My Organisations). The section contains a synopsis of the information contained in URF. Participant Portal User’s Guide (26-10-2010) – Release 2.2.1 Page 23 of 49 Figure 17: My Organisations 4. If you are a LEAR or Account Administrator of the organisation, three links will be present at the right of the screen: Organisation's Data / View Projects / Roles. By selecting one of these 3 links you can open a new portlet 1 below the "Organisations" sub-tab. 5. If you are not a LEAR or Account Administrator but only linked to an organisation as a project member, you will only be able to see the Roles link. 2.6.1 Status of my organisation By clicking on the Organisation's Data link in the My Organisation tab (see Figure 17: My Organisations) you can: 2.6.1.1 Check if your request has been validated or is in validation. Figure 18: Status of an Organisation 1 A web portlet is a small, self-contained window within a web portal that displays useful information or offers a relevant service. Participant Portal User’s Guide (26-10-2010) – Release 2.2.1 Page 24 of 49 2.6.1.2 View organisation or change (within request history) You get redirected to URF. No extra authentication will be requested. In URF you will be able to view or modify your organisation data, or verify the status of your registration request (if it has been validated or not).See Figure 18: Status of an Organisation. 2.6.1.3 Create a change request If you need to change the data of your organisation through URF, you have to click on the Update link. See Figure 19: Status of an Organisation - Update request. You are then redirected to URF where you can create an update request of your data. Figure 19: Status of an Organisation - Update request Please note that when CVT is validating your change request, you are no longer able to modify your data. Only the View option is available. Two types of change request can be managed from this tab: normal change requests defined as "LEAR UPDATE" under the TYPE column of the "Request History" area – financial info as balance sheet cannot be created/modified. "FINANCIAL" change requests: this changed request as to be done "on demand" from NEF. The message below appears: You are requested to provide additional financial information in order to complete the negotiation of your grant for proposal #proposal_id#". For this new request type, you can only Create/Modify balance sheets and upload documents (mandatory). You can find more information in the URF user manual, available at: https://ec.europa.eu/research/participants/urf/public/help/help.do Participant Portal User’s Guide (26-10-2010) – Release 2.2.1 Page 25 of 49 2.6.1.4 Delete change request You can delete your change request as long as the CVT has not yet started the validation of your request. The Delete link is displayed in the request history part .See Figure 20: Status of an Organisation - Request not yet validated. A message asks you to confirm your deletion. 2.6.1.5 Update change request You can also modify your change request while CVT has not yet started the validation of your request. The Update link is displayed in the request history part. See Figure 20: Status of an Organisation - Request not yet validated. You are directed to URF and your data can be modified. Figure 20: Status of an Organisation - Request not yet validated Participant Portal User’s Guide (26-10-2010) – Release 2.2.1 Page 26 of 49 2.6.2 View Projects of an Organisation By clicking on the View Project link, you can have a view of all the Projects an organisation is involved in, see Figure 21: Project list of an Organisation Figure 21: Project list of an Organisation Participant Portal User’s Guide (26-10-2010) – Release 2.2.1 Page 27 of 49 As explained in section 2.2, you can use the Search box to filter out any list displayed by the participant portal. 2.6.2.1 Roles in an organisation's project Select the "Roles" icon ( ) of a project to see the roles of the people in your organisation in this project (see Figure 22: Roles of a Project) The following icon is used to refresh the memory cache; it allows reloading the most recent data. Figure 22: Roles of a Project As explained in section 2.2, you can use the Search box to filter out any list displayed by the participant portal. Participant Portal User’s Guide (26-10-2010) – Release 2.2.1 Page 28 of 49 2.6.2.2 Project details Click on the underlined Acronym of a Project (leftmost column) (see Figure 21: Project list of an Organisation) to see the details of this project (see Figure 23: Details of a project). Figure 23: Details of a project Participant Portal User’s Guide (26-10-2010) – Release 2.2.1 Page 29 of 49 2.6.3 Roles of an Organisation Figure 24: Participant User Account Management By clicking on the Roles link, in the My Organisation tab you can display all the roles of the people in your organisation. See Figure 25: Roles of the Organisation. Figure 25: Roles of the Organisation Participant Portal User’s Guide (26-10-2010) – Release 2.2.1 Page 30 of 49 As explained in section 2.2, you can use the Search box to filter out any list displayed by the participant portal. 2.6.3.1 Add a role to an organisation As LEAR, you can add an Account Administrator role. Just click on the [Add+] button. Just enter the email address of the person that will get the Account Administrator. He will receive a mail announcing him his nomination. If not already done, he will be asked to register in ECAS. See Figure 26: Add an Account Administrator role. Figure 26: Add an Account Administrator role 2.6.3.2 Revoke a role from an organisation Account Administrators can also be revoked by the LEAR. Select the check box on the left of the role to be revoked. Click on the [Revoke Selected] button and confirm the revocation. 2.7 Manage projects Note that all the services described below are protected so you must first log on to the Participant Portal. The process to follow is described under the "Log on to the Participant Portal" chapter of this guide. 2.7.1 Access to the list of projects and project details Coordinators, participants, representatives, task managers and team members can access the list of the projects they are involved in: 1. Log on to the Participant Portal 2. Once you are connected to the secured environment of the Participant Portal, select the "My Projects" tab 3. You will see a list of all the projects you are involved in. Participant Portal User’s Guide (26-10-2010) – Release 2.2.1 Page 31 of 49 Figure 27: My Projects 4. The interface will display the list (see Figure 27: My Projects), originally sorted by the Project Acronym for which you have a relevant role (for example, participant or a coordinator) The following fields will be displayed for each project listed: The Acronym of the project. (You can see the full title if you hover over the acronym). The Call identifier of the Project The programme of the Project The project ID (or project number) The "Roles" Icons (blue for managing Nominated roles, orange for Consortium management if you are Coordinator Contact, orange for Consortium management) The Phase of the project (possible values Active or Negotiation) One or more links to the available process of the projects (depending on the current one(s) the links can be: Periodic reporting, Reporting & Deliverables, Financial Reporting, Access Amendment). For an example of a link to the Negotiation Facility tool (NEF) see § 2.7.4 Access to the negotiations activities (Negotiation Facility tool -NEF) 5. If you have a vast amount of projects, you can filter them using the Search box (as explained in section 2.2). Participant Portal User’s Guide (26-10-2010) – Release 2.2.1 Page 32 of 49 If you select the acronym of a project from the list (see Figure 28: Selecting the Acronym of a project), a Project Details portlet will replace the project list. It contains a more complete set of information about the project that was selected. You can go back to the project list by using the project menu portlet described in section 2.7.2 below. Figure 28: Selecting the Acronym of a project Figure 29: Project Details Participant Portal User’s Guide (26-10-2010) – Release 2.2.1 Page 33 of 49 2.7.2 The project menu and project summary portlets Whenever specific project information is displayed in the main area of the portal, two portlets are shown on the left side of the screen: project menu and project summary (see Figure 30: Project Menu and Summary ). The "Project Summary" will display core essential information about the currently selected project (Acronym, ID, Call, Programme and Activity codes). The "Project menu" allows the following global navigation actions: Returning to the project list (by selecting the "Back to list" orange button Displaying the Project Details Managing Roles that you have nominated for the project Managing the Project Consortium (if you are a Coordinator Contact) of the project Figure 30: Project Menu and Summary Participant Portal User’s Guide (26-10-2010) – Release 2.2.1 Page 34 of 49 2.7.3 Roles of a Project The figure below shows the roles and dependencies inside a project. Figure 31: Business and portal roles in a project Below you will find an excerpt from the document: "Participant Portal Identity and Access Management (IAM) in a nutshell" 2.7.3.1 First level: Coordinator Contact At the top of the pyramid, there is the Coordinator Contact, who is the main contact person for the Commission at the coordinating beneficiary. Nomination of only one person per project is possible in this role. By default, this role is provisioned with the respective name and contact details given in the proposal (under A2. 'Contact point'). The Coordinator Contact has the right to grant and revoke the roles of the Participant Contacts. In addition, he/she has, for the coordinating beneficiary, the same rights as the Participant Contacts (see second level below). During negotiation, the Coordinator Contact and the negotiating Project Officer have to make sure that the contact details are set properly in NEF and match one of the contact person's details given in GPF A 2.4. of the coordinating beneficiary. Specific responsibility of the Coordinator Contact: Assure that the assignments of Participant Contacts are up to date and reflect the reality (including removal of obsolete access rights). Inform the Commission on time when the Coordinator Contact has to be changed. Participant Portal User’s Guide (26-10-2010) – Release 2.2.1 Page 35 of 49 2.7.3.2 Second level: Participants Contacts At the second level of the pyramid, there are the Participant Contacts, who are the main contact persons for the coordinator at the participating beneficiaries. Nomination of only one person per beneficiary and project is possible in this role. By default, these roles are provisioned with the respective names and contact details given in the proposal. These persons can be changed by the Coordinator Contact (without approval by the Commission). The Participant Contacts have the right to grant and revoke roles to Scientific, Administrative, Financial, Legall Representatives (third level) as well as Task Manager and Team Members (4th level) within their organisation. At the third level and below, several persons can be nominated in the same role, and the same person can be nominated in several roles. Specific responsibility of the Participant Contact: Assure that the assignments of third level roles within the own organisation are up to date and reflect the reality (including removal of obsolete access rights). Inform the Coordinator Contact when the Participant Contact has to be changed. 2.7.3.3 Third level: Named Representatives At the third level of the pyramid, there are the named representatives and the authorised representative in each participating organisation. Their Participant Contact can nominate them. The Named Representatives work on functions related to specific scopes (i.e. administrative and legal, financial, scientific) for negotiation, amendment handling and reporting. There can be more than one Named Representative for each scope and the same person can be nominated in more than one named representative role. Specific responsibility of the Named Representatives: perform the tasks relevant to their scope of expertise. The Participant Contact of his/her organisation also nominates the authorised representative however the LEAR must confirm it. The role will appear as "Proposed Authorised Representative" in the Participant Portal as long as the LEAR has not confirmed it. Specific responsibility of the Authorised Representative: he/she is empowered with representing signature authority for his/her organisation within the legal scope (e.g. able to commit the Participant to a course of action e.g. sign a Grant Agreement). 2.7.3.4 Fourth level: Task Managers and Team Members At the fourth level of the pyramid, there are the Task Managers and Team Members. Team Members have minimal read-only rights to project resource information. The scope of these rights can be set to any combination of the following: administrative, legal, financial and legal. Task Managers extend the Team Member role with the capacity to perform submit, update and delete actions on artefacts of the project they are assigned to and which are within their granted scope(s) (i.e. a financial report for the financial scope). The Coordinator Contact, Participant Contact or Named Representatives, can designate both of these roles. A given Named Representative can only grant part or all of the scopes that he is entitled with. E.g. the Administrative and Legal Representative can only nominate Team Members or Task Managers with the administrative and/or legal scope. Participant Portal User’s Guide (26-10-2010) – Release 2.2.1 Page 36 of 49 2.7.3.5 Other roles: The portal also supports two other roles that you might see in the project roles list: The EC Project Officer (person who is dealing with the project at the European Commission) The Reviewer (person who is in charge of reviewing the project). 2.7.3.6 Display Roles icon that is on the line of a project (see Figure 32: The project list roles icon), When you click on the blue the roles of this project are displayed (see Figure 33: Roles of a project), along with the project menu and project summary (see section 2.7.2 for a description of the project menu and project summary). Figure 32: The project list roles icon Participant Portal User’s Guide (26-10-2010) – Release 2.2.1 Page 37 of 49 Figure 33: Roles of a project 2.7.3.7 Add a new role in your project When you click on the [Add] button (Figure 33: Roles of a project), you have to enter the email address of the user you grant in the "Add role" area (Figure 34: Add roleError! Reference source not found.). This user will receive a notification (see section 2.9 Manage notifications) announcing him his nomination. If not already done, he will be asked to register in ECAS. Then, depending on your own role, you have to choose the role given (see Figure 31: Business and portal roles in a project and Table 2: List of roles and their nomination rights for more information about the nominations you can make depending on your own role). Participant Portal User’s Guide (26-10-2010) – Release 2.2.1 Page 38 of 49 Figure 34: Add role In the Error! Reference source not found.above example, an Administrative and Legal Representative is adding a Task Manager. He/she still need to decide what scope the Task Manager will be able to work in (Admin, Legal or Both). 2.7.3.8 Revoke a role from your project Depending on your role, you can also revoke some roles (roles (see Table 2: List of roles and their nomination rights). Select the check box on the left of the role to be revoked. Click on the [Revoke Selected] button and confirm the revocation. Figure 35: Confirmation of the revocation Participant Portal User’s Guide (26-10-2010) – Release 2.2.1 Page 39 of 49 2.7.3.9 Manage the Consortium As Coordinator Contact, you can add/modify Participant Contact details to your project. Figure 36: Project list of a Coordinator Contact When you click on the orange "Edit Consortium" icon of the Project list (see Figure 36: Project list of a Coordinator Contact) the Consortium Management screen is displayed: In this screen, you can see and modify the Participant Contact details for each organisation participating to the project. You can assign new Participant Contact in empty fields or modify existing one by entering their email address. Participant Portal User’s Guide (26-10-2010) – Release 2.2.1 Page 40 of 49 Figure 37: Managing the Participant Contact details Select "Save Changes", in order to save your data. Select "Return to list" from the In the confirmation message, click [OK], in order to save your data or [Cancel]. (Figure 38: Confirmation of creation-modification of a Participant Contact ) Figure 38: Confirmation of creation-modification of a Participant Contact Participant Portal User’s Guide (26-10-2010) – Release 2.2.1 Page 41 of 49 2.7.4 Access to the negotiations activities (Negotiation Facility tool -NEF) Your project has been selected for negotiation. Once the negotiations are opened by the Commission, you will receive an e-mail (see Figure 39: Invitation from NEF) inviting you to connect to the Participant Portal in order to access the negotiation sessions supported by NEF (Figure 40: Projects list - Access Negotiation) Figure 39: Invitation from NEF 1. Log on to the Participant Portal 2. Once you are connected to the secured environment of the Participant Portal, select "My Projects" tab 3. The list of the projects you are involved will be displayed. On the right side of the screen, the link Access Negotiation is displayed only once the negotiations are open by the Commission (see Figure 40: Projects list - Access Negotiation) 4. Note that for some projects, a link to Access Amendment is provided. It is displayed only once a grant agreement has been signed and amendments are requested (see Figure 41: My Projects - Links to NEF for amendments). Participant Portal User’s Guide (26-10-2010) – Release 2.2.1 Page 42 of 49 Figure 40: Projects list - Access Negotiation 5. You will be automatically redirected to the project page of NEF, with no further authentication requirements (see Figure 42: NEF). Depending on your role, you will be able to perform different tasks on NEF. In case of multiple partners projects, the participants can also access NEF in a more limited way – mainly to enter data to be submitted by the coordinator. The validation of the data you might enter in NEF is the sole responsibility of the coordinator of the project. Figure 41: My Projects - Links to NEF for amendments Participant Portal User’s Guide (26-10-2010) – Release 2.2.1 Page 43 of 49 Figure 42: NEF More information on how to use NEF can be found in the NEF user guide: ftp://ftp.cordis.europa.eu/pub/fp7/docs/nef-userguide-coordinators-participants_en.pdf Please note that the Participant Portal is the single gateway to NEF for both coordinators and other participants involved in negotiations, replacing the old way of accessing NEF – the access key mechanism. 2.7.5 Access to the reporting activities In order for a user to have access to the Reporting functionality, s/he must have the role of scientific representative or task manager with the scientific scope (either of the project coordinator or of another beneficiary in the grant) for the technical reporting Participant Portal User’s Guide (26-10-2010) – Release 2.2.1 Page 44 of 49 the role of financial representative or task manager with the financial scope (either of the project coordinator or of another beneficiary in the grant) for the financial reporting 2.7.5.1 Accessing the reporting functions 1. Log on to the Participant Portal 2. Once you are connected to the secured environment of the Participant Portal, select "My Projects" tab 3. The list of the projects you are involved will be displayed. 4. For any of your project that is in the "Active" phase, you can access both the technical reporting (deliverables) as the financial one (Form C). Once you have clicked on the link, you will be redirected to the right supporting application. Figure 43: Access to Reporting applications Participant Portal User’s Guide (26-10-2010) – Release 2.2.1 Page 45 of 49 2.8 Manage roles Please see sections "2.1 Roles", "2.6.3 Roles of an Organisation" and "2.7.3 Roles of a Project" for a complete description of Role management within the portal. 2.9 Manage notifications Notifications are messages sent by the different services exposed through the Participant Portal. Currently, notifications are sent via email but it is foreseen that other channels will be made available in the future. Examples of notifications: You will receive a notification if you are nominated in a new role. A Lear will receive a notification if someone of his organisation is nominated in a new role. A notification can be sent to all portal user in case of an exceptional situation As a user, you can decide the minimum level of Notification you want to receive (knowing that the "Very High" level cannot be ignored) as well as the frequency of reception per level ((as soon as they occur, daily or weekly)). You can change this through the "My Notifications" screen available from the main tab panel of the portal. Figure 44: Notification preferences Participant Portal User’s Guide (26-10-2010) – Release 2.2.1 Page 46 of 49 3 List of roles and their rights FULL ROLE NAME SHORT ROLE NAME Who can enrol? LEAR ACCOUNT ADMINISTRATOR REGISTRANT COORDINATOR CONTACT PARTICIPANT CONTACT ADMINISTRATIVE AND LEGAL REPRESENTATIVE FINANCIAL REPRESENTATIVE SCIENTIFIC AND TECHNICAL REPRESENTATIVE PROPOSED REPRESENTATIVE TASK MANAGER LEAR AA SYSTEM LEAR Who can revoke/notify revocation SYSTEM LEAR REG COORDINATOR SYSTEM SYSTEM SYSTEM SYSTEM PARTICIPANT CONTACT ALR COORDINATOR COORDINATOR PARTICIPANT CONTACT PARTICIPANT CONTACT PARTICIPANT CONTACT PARTICIPANT CONTACT PARTICIPANT CONTACT PARTICIPANT CONTACT TEAM MEMBER TB PARTICIPANT CONTACT COORDINATOR, PARTICIPANT CONTACT, ALR, FR, STR 2 COORDINATOR, PARTICIPANT CONTACT, ALR, FR, STR 3 PARTICIPANT CONTACT COORDINATOR, PARTICIPANT CONTACT, ALR, FR, STR COORDINATOR, PARTICIPANT CONTACT, ALR, FR, STR FR STR PSR TM Table 2: List of roles and their nomination rights 2 Note that the Named Representatives can only nominate Task Managers within their own scope of expertise (Administrative and Legal for ALR, Financial for FR and Scientific for SR. 3 Note that the Named Representatives can only nominate Team Members within their own scope of expertise (Administrative and Legal for ALR, Financial for FR and Scientific for SR. Participant Portal User’s Guide (26-10-2010) – Release 2.2.1 Page 47 of 49 4 GLOSSARY Term Definition FP7 7th Framework Programme of Research and Technological Development of the European Commission CIP Competitiveness and Innovation Programme Coordinator The participants’ coordinator in a consortium EC Officer European Commission's Project/Scientific Officer or Administrative Officer representing the European Commission during the negotiations. NEF The negotiation process is supported by the online Negotiation Facility tool (NEF), an electronic implementation of the negotiation forms used to exchange information between the participants and the European Commission. NEF provides the main channel for interactive communication between the Consortium and the EC Project Officer as all necessary administrative and financial data about the projects and the participants is collected and agreed through NEF. Negotiation Concerns one stage of the procedure applicable immediately after a favourable evaluation. The negotiation is a process during which the details about the proposal are agreed between the participants and the Commission The participants of proposals that may be selected will receive a request to provide further information Negotiation covers three areas : - scientific negotiation - financial negotiation - contractual negotiation Negotiation session PIC (Participant Identity Code) URF A period during which the coordinators are allowed to provide changes on their proposals Participant Identity Code (The unique ID of an organisation) Unique Identifier for an organisation – obtained through URF registration & used in each step of the process to indentify an organisation. The Temporary PIC received directly after URF registration and Validated PIC (CVT has validated the data & legal documents of the organisation) are the exact same number: 9 digits starting with 99…and will remain the same during the entire existence of its organisation. Unique Registration Facility: a service providing unique registration for participants in the Framework Programmes at proposal and contract stages. It encompasses a set of rules for data acquisition and validation. Participant Portal User’s Guide (26-10-2010) – Release 2.2.1 Page 48 of 49 LEAR A legal signatory of each legal entity will be asked by the Commission to appoint one person (the so-called LEAR - Legal Entity Appointed Representative) for being the correspondent towards the Commission on all issues related to the legal status of the entity. The LEAR provides the Commission with up-to-date legal and financial data (including supporting documents, where necessary) and commits to maintain the account so that it is up-to-date enabling future use for grants and other transactions between the entity and the Commission research (and other) programmes. This person is chosen by the organisation itself in order to ease the communication with the E.C. & avoid double registrations. Only the LEAR may do a Change request (of his organisation's data) through URF and submit legal documents through URF. Status of validation Indication that data provided in a form have been validated by the Commission Participant Portal The Participant Portal hosts services that facilitate the monitoring and the management of the participants' proposals and projects. It is a secure Internet site that ensures adequate authentication and confidentiality mechanisms, based on the European Commission Authentication Service (ECAS). Participant Any entity, legal or otherwise, that has some dealings with FP or CIP programmes. For example: Legal Entity as partner to a grant agreement, department or institute of such, person working in participating organisation and relevant to the programmes, expert. Participants are external to the Commission. In order to structure this participant concept into further details, a clear distinction should be made between: The "executing participant" proposing and executing an action (e.g. a department within a university or an independent expert) The "participating legal entity" endorsing the responsibility of this proposition and execution (e.g. a university or the expert as a legal natural person). "A participating legal entity is any Legal Entity that has participated, participates, or will participate in the programmes of FP and CIP, whether in Grant Agreements, contracts or proposals only" (List of Agreements PDM/URF WG, as of 14th January 2007). "Contacts" by the executing participants and participating legal entities for exchange of information (e.g. a professor within the university department, the financial officer of the university, an expert him/herself, etc.). Contacts typically play roles within participating entities and may have a specific address. It is worth noting that the "executing participant" and the "participating legal entity" can be the same entity (e.g. a private company) or that several legal entities could collectively endorse the responsibility for a single executing participant (case of a consortium). Participant Portal User’s Guide (26-10-2010) – Release 2.2.1 Page 49 of 49