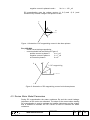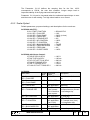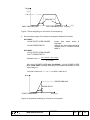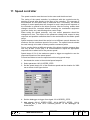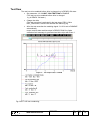
1
ACS 5000
Medium Voltage AC Drives
12 to 24 MVA
For Speed and Torque Control of
Synchronous and Induction Motors
Torque control software (TC SW)
for Asynchronous Machine Drive
Commissioning manual
LKCI5410
This document is for ABB certified service engineers use only!
Document number
ABB Switzerland Ltd.
Lang.
en
Rev. ind.
A
Page
1
1 General
All personnel who will install or do maintenance shall be familiar with the
safety instructions before opening the door of the frequency converter cubicle.
All relevant safety regulations must be followed during the installation,
commissioning and maintenance procedures. When installed and used in
accordance with instructions, it causes no risk to its associated environment.
Some of the control cards of the frequency converters are at the main circuit
potential, causing hazardous voltage levels to be present between the control
cards and the frequency converter frame. The doors of the frequency
converters must be kept locked while the frequency converter is in operation.
1.1 Commissioning
It is mandatory to follow the commissioning manuals and the user manual
safety instructions. The required measurements have to be executed
otherwise some equipment might be damaged.
1.2 Operation
The operation of the frequency converter can be entrusted to a person who is
not familiar with its basic functions. The operator should, however, be
informed of the significance of the diagnostics. In case of an alarm indication,
possibly followed by tripping, the operator should be able to decide whether
part of the system should be removed from operation or whether the system
should be restarted after resetting the alarm. (For example, repeated tripping
from overcurrent will not damage the frequency converters). In the event that it
is taken out of service, the appropriate maintenance personnel should be
called to further investigate the problem.
1.3 Maintenance work
During the warranty period, any repair work must be carried out exclusively by
ABB service personnel. After the warranty period repair work can be carried
out by ABB service personnel or by qualified personnel who have attended a
service training course.
In most cases, the diagnostic displays can be used for preliminary tracing of
the fault location and fault resetting can be done without opening the door of
the frequency converters.
The following points must be observed before any work is performed on the
frequency converters.
Document number
ABB Switzerland Ltd.
Lang.
en
Rev. ind.
A
Page
2
1.4 Warnings!
Any installation work must be done with the power off and power is not to be
reconnected unless the installation work is complete.
Dangerous residual voltages remain in capacitors when the disconnecting
device is opened. Wait 5 minutes after switching off the supply before starting
work. Always ensure that the measurement voltage between terminals UDC+
and UDC- of all DC links is close to 0 V and that the supply has been switched
off before performing any work on the equipment or making main circuit
connections.
If the main circuit of the inverter unit is live, then the motor terminals are also
live even if the motor is not running!
Opening the disconnecting device does not remove all voltages. Before
starting work, check which circuits remain live after opening of the
disconnecting device by referring to the circuit diagrams for your particular
delivery. Labels are also provided to identify the live circuits.
The protection with a door opened is minimum IP 20. Removal of any barrier
while power is connected shall be done with the utmost care and
consideration of personal safety.
NOTE also a possible uninterruptible power supply (UPS)!
Control voltages of 115/230 VAC may be present on the digital inputs or
outputs even though the inverter unit is not powered up. Before starting work,
check which circuits remain live after opening of the disconnecting device by
referring to the circuit diagrams for your particular delivery and also checking
the labeling for the live circuits included in the cubicle.
Do not make any voltage tests on any part of the unit while the unit is
connected. Disconnect motor cables before making any measurements on
motors or motor cables.
The printed circuit boards are sensitive to electrostatic discharge (ESD). When
handling the printed circuit boards, ensure that personnel is properly grounded
with wrist straps and other appropriate material for handling printed circuit
boards.
The control boards of frequency converters may be on main circuit potential.
Dangerous voltage levels may be present between the control cards and the
frame of the inverter unit, when the main circuit voltage is on. It is critical that
the use of measuring instruments, such as an oscilloscope, and their
connection to the frequency converter is done using caution and safety always
as a priority. The fault tracing instructions give special mention of cases in
which measurements may be performed on the control cards, also indicating
the measuring method to be used.
Electric arc welding may damage electronic circuits located in the drive
sections. To reduce the risk of damage while arc welding, connect the return
conductor of the welding equipment to the piece being welded on and within
0.5 meters of the arc welding equipment.
Document number
ABB Switzerland Ltd.
Lang.
en
Rev. ind.
A
Page
3
Welding of the cabinet frame is not recommended due to the possible
damage which it may cause to the electronics.
Document number
ABB Switzerland Ltd.
Lang.
en
Rev. ind.
A
Page
4
CONTENTS:
1
GENERAL ...................................................................................................................................................... 2
1.1
1.2
1.3
1.4
1.5
2
COMMISSIONING....................................................................................................................................... 2
OPERATION............................................................................................................................................... 2
MAINTENANCE WORK .............................................................................................................................. 2
WARNINGS! .............................................................................................................................................. 3
GENERAL INTRODUCTION ........................................................................................................................ 7
LOADING SOFTWARE AND FIRMWARE ............................................................................................. 8
2.1
INTRODUCTION ......................................................................................................................................... 8
2.2
PROGRAMMING AMC SOFTWARE ............................................................................................................ 9
2.2.1 Unpacking the Software Package ....................................................................................................... 9
2.2.2 Downloading the AMC Software ........................................................................................................ 9
2.3
PROGRAMMING FIRMWARE ON MAIN INTERFACE BOARD (ONLY ACS 5000) ...................................... 12
2.3.1 Using a PECINT Board .................................................................................................................... 12
2.3.2 Using an INT2 Board ........................................................................................................................ 12
2.4
PROGRAMMING FIRMWARE ON PHASE INTERFACE BOARDS .................................................................. 12
2.4.1 Using an old Phase Interface Board ................................................................................................. 12
2.4.2 Using an INT2 Board ........................................................................................................................ 12
3
DESCRIPTION OF THE ASYNCHRONOUS MOTOR DATA INITIALIZATIONS ........................ 13
3.1
ASYNCHRONOUS MOTOR DATA .............................................................................................................. 13
3.1.1 Internal frequency scaling................................................................................................................. 13
3.1.2 Default motor parameters ................................................................................................................. 14
3.1.3 Nominal rating plate data ................................................................................................................. 14
3.1.4 Motor model parameters ................................................................................................................... 15
3.1.5 Calculation of motor model parameters ........................................................................................... 15
3.2
INVERTER PARAMETERS ......................................................................................................................... 16
3.2.1 Operational parameters .................................................................................................................... 17
3.2.2 Pulse encoder .................................................................................................................................... 17
3.2.3 Other parameters .............................................................................................................................. 18
3.3
HIGH SPEED DRIVES ................................................................................................................................ 18
3.3.1 Important parameter settings for high speed drives ......................................................................... 18
3.3.2 Vector control - PI controllers .......................................................................................................... 19
3.3.3 Vector control – optimized pulse patterns ........................................................................................ 20
4
NO LOAD RUN ............................................................................................................................................ 23
4.1
OPERATION MODES................................................................................................................................. 23
4.2
CHECK DC MAGNETIZATION ................................................................................................................. 23
4.3
REVISE MOTOR MODEL PARAMETERS ................................................................................................... 24
4.4
FIRST START ........................................................................................................................................... 25
4.5
START MODES ......................................................................................................................................... 27
4.5.1 DC magnetization.............................................................................................................................. 27
4.5.2 Flying start mode .............................................................................................................................. 27
4.5.3 Scalar flystart .................................................................................................................................... 28
4.6
MOTOR MODEL TUNING WITH HIGH SPEED DRIVES................................................................................. 29
5
MOTOR MODEL AT NO LOAD .............................................................................................................. 30
5.1
MAGNETIZING CURRENT AT NO LOAD .................................................................................................... 31
5.2
SATURATION OF MAIN INDUCTANCE ...................................................................................................... 31
5.2.1 Saturation as a function of magnetizing current ............................................................................... 31
5.2.2 Saturation as a function of torque ..................................................................................................... 33
5.3
SWITCHING FREQUENCY AT NO LOAD..................................................................................................... 33
6
MOTOR MODEL AT LOADING CONDITIONS ................................................................................... 38
6.1
6.2
6.3
6.4
6.5
ROTOR TIME CONSTANT ......................................................................................................................... 38
STATOR RESISTANCE .............................................................................................................................. 38
STATOR MAIN INDUCTANCE ................................................................................................................... 39
STATOR STRAY INDUCTANCE ................................................................................................................. 39
MOTOR NOMINAL COSFII ........................................................................................................................ 39
Document number
ABB Switzerland Ltd.
Lang.
en
Rev. ind.
A
Page
5
7
SWITCHING FREQUENCY TUNING AT LOADING CONDITIONS ............................................... 40
7.1
7.2
7.3
7.4
7.5
7.6
8
AUTO RESTART ......................................................................................................................................... 51
8.1
8.2
8.3
9
ENABLING/ DISABLING ........................................................................................................................... 51
TIMER SETTINGS .................................................................................................................................... 51
OBSERVING AUTO RESTART .................................................................................................................. 51
STATIC TORQUE LIMITERS .................................................................................................................. 52
9.1
9.2
10
SWITCHING FREQUENCY AT LOADING CONDITIONS ................................................................................ 40
TUNE SWITCHING FREQUENCY BASED ON FREQUENCY AND POWER ....................................................... 43
TUNE SWITCHING FREQUENCY BASED ON CURRENT ............................................................................... 45
NEUTRAL POINT CONTROL...................................................................................................................... 45
DYNAMIC SWITCHING FREQUENCY CONTROL......................................................................................... 47
1MS SWITCHING FREQUENCY ................................................................................................................. 49
PULL-OUT TORQUE LIMITER ................................................................................................................... 52
OVERLOADABILITY (OR DERATING) ....................................................................................................... 52
DYNAMIC TORQUE LIMITERS ............................................................................................................. 55
10.1
10.2
10.3
10.4
10.5
10.6
OVERVOLTAGE LIMITER ......................................................................................................................... 55
UNDERVOLTAGE LIMITER (RIDE THROUGH) ........................................................................................... 56
FREQUENCY LIMITER .............................................................................................................................. 58
LOAD ANGLE LIMITER ........................................................................................................................... 58
BRAKING LIMITER (BCU/RBU) ............................................................................................................. 59
DAMPING THE DC-LINK VOLTAGE RIPPLE (DIODE RECTIFIER) ................................................................ 59
11
SPEED CONTROLLER .............................................................................................................................. 62
12
UPDATE TO NEWER SOFTWARE RELEASE ..................................................................................... 64
13
BACKUP OF THE SOFTWARE AND PARAMETERS ........................................................................ 65
13.1
13.2
13.3
DRIVEDEBUG: ........................................................................................................................................ 65
DRIVEWINDOW: ..................................................................................................................................... 67
PROGRAMMING OF THE SPARE BOARDS .................................................................................................. 67
APPENDIX 1: ASYNCHRONOUS MOTOR EQUIVALENT CIRCUIT ...................................................... 71
APPENDIX 2: RELATED DOCUMENT AND SW TOOL LIST ................................................................... 73
APPENDIX 3: DESCRIPTION OF THE IGCT CONDUCTING TEST FUNCTION ................................. 74
Document number
ABB Switzerland Ltd.
Lang.
en
Rev. ind.
A
Page
6
1.5 General Introduction
This document covers the basic commissioning tasks of the torque control
software (TC SW). Purpose of this document is to serve as a guideline for the
AMC-table parameter initializations and as a check of the motor control
operation. Simple basic tuning instructions are given in case of unsatisfactory
operation of the drive. It is assumed that professional person trained by ABB
does the commissioning work. Commissioning person should have adequate
knowledge about the torque control software (TC SW) and motor control in
general and should be able to use ABB standard tools (e.g. Drive Window,
Drive Debug).
Recommended DriveDebug version is 2.91 (Service pack available for
DriveDebug 2.9). DriveDebug versions before version 2.91 cannot access the
fast internal Trendlogger (Function “TrendLogWin”) because it is located in ymemory.
Document number
ABB Switzerland Ltd.
Lang.
en
Rev. ind.
A
Page
7
2 Loading software and firmware
2.1
Introduction
The drive comes from the factory with the AMC software and firmware of the
PLDs (referred to as firmware in the following) that was the latest release at
the time of testing. It may happen that between testing and commissioning
new versions of software and/or firmware were released. In this case the
procedure described in this section has to be followed.
From the actual compatibility list it can be seen which version of the firmware
has to be used together with the software (see file ACS 5000 / 6000 SW
Compatibility List.xls of software release on the database).
After first turning on the auxiliary power to the AMC board, check which
versions of software and firmware are actually loaded:
Press the button Drive on the panel: the display must show correct
drive type
Check the following parameters:
o
101.03 DEVICE NAME
the drive (see below)
must correspond to the size of
o
100.11 SW PACKAGE VER if this corresponds to the SW
version that shall be installed on the drive, the AMC software
does not need to be downloaded and the corresponding section
below can be ignored.
Only for ACS 5000:
o
6.31 INT0 VERSION
this is the version of the PLD
firmware on the main interface board (PECINT or INT2 board);
if the version is compatible to the wanted AMC software
version, the PLD does not need to be programmed and the
corresponding section below can be ignored.
o
6.32 INT1 VERSION
6.33 INT2 VERSION
6.34 INT3 VERSION
The numbers describe the version of the PLDs on the Phase
interface boards. They must be equal. If the version is
compatible to the wanted AMC software, the PLDs do not need
to be programmed and the corresponding section below may
be ignored.
It is highly recommended to use a new flash board for downloading a new
loading package. Keep the old flash as spare part in case programming of the
new SW fails. In any case make a complete backup and a parameter backup
of the loaded software before overwriting the existing software with a new
version. Use Drive Debug and Drive Windows to make the backups.
Document number
ABB Switzerland Ltd.
Lang.
en
Rev. ind.
A
Page
8
2.2
2.2.1
Programming AMC Software
Unpacking the Software Package
The software package needs about 4Mbytes of free disk space. You
need some software tool in your system to unpack the loading
package, like PKUNZIP or WINZIP.
Create a new folder (or directory) on your PC, e.g. C:\LOAD. Later this
folder is referred to as ”.\”.
Copy and unzip the file LxOy.ZIP to this folder (x may be A for
6000AD, K for 5000AD, L for 5000SD or S for 6000SD; y may be H for
AMC33 boards and I for AMC34 boards). All necessary files will be
available in this folder and the automatically created subdirectories.
Delete the zip-file if you want to save disk space.
The folder .\ must contain at least the following files:
.\CONFIG.BAT
.\7za.exe (only with Cx0t.7z)
.\Cx0t.exe or .\Cx0t.7z
.\L_ACS.BAT
.\L_MOT.BAT
.\VERSION.BAT
either .\TitlisSD.txt, .\TitlisAD.txt, .\lam.txt or .\akseli.txt.
.\AmcData\AUTOLOAD.DDF
.\AmcData\DUMMLANG.csv
.\AmcData\ENCPARAM.CSV (only in case of SD)
.\AmcData\ENCPARAM.XLS (only in case of SD)
.\AmcData\INVPARAM.csv
.\AmcData\INVPARAM.XLS
.\AmcData\MOTPARAM.CSV
.\AmcData\MOTPARAM.XLS
.\AmcExe\am34.cld
.\AmcExe\BASELIB.DDF
.\AmcExe\pa_56303.cld
.\AmcExe\Task1.ddf
with all projects except ACS 5000AD and ACS 5000SD these files are
expected in the folder:
.\AmcData\APPLPARS.CSV
.\AmcData\APPLPARS.XLS
with ACS 5000AD and ACS 5000SD also the following files are part of
the package:
.\L_HYS.BAT
.\AmcData\HYSPARAM.CSV
.\AmcData\HYSPARAM.XLS
.\
2.2.2
Downloading the AMC Software
The folder .\ contains the ACS 5000 / 6000 AMC software and all tools needed
to download to the flash memory of the AMC board.
Document number
ABB Switzerland Ltd.
Lang.
en
Rev. ind.
A
Page
9
Due to licensing issues the drivers used to download the loading package are
not included in the loading package! You need a running installation of Drive
Debug or Drive Window on your PC which offers the needed drivers.
Connect the PC to channel 3 of the AMC board.
Open a DOS window and change the directory to .\
The parameter set has to be chosen according to the installed current
measurement subprint (SCA) on the CVMI boards. The rated current of
the attached machine is not relevant for this step. The safest way to
determine the corresponding current rating is to check the marking of
the SCA subprints. The following table gives the appropriate
information:
ACS 6000:
-4’500 …+4’500A
Rated
current
(rms)
1648A
Inverter type
for
Download
11MVA
3BHB007211R0119
-4’500 … +4’500A
1648A
11MVA
XV C768 AE101
3BHB007211R0101
-3‘684 … +3‘684 A
1260A
9MVA
XV C768 AE102
3BHB007211R0102
-2'865 … +2‘865 A
980A
7MVA
XV C768 AE105
3BHB007211R0105
-2'046 … +2'046 A
700A
5MVA
XV C768 AE106
3BHB007211R0106
-1'228 … +1'228 A
420A
3MVA
Description
SCA type
SAP number
Measurement
range
Double INU
Water
Double INU
Water
Single INU
nd
Water – 2
generation
Single INU
Water
Single INU
Water
Single INU
Water
Single INU
Air
Single INU
Air
XV C768 AE111
3BHB007211R0111
Inverter type
for
Download
24MVA
XV C768 AE112
3BHB007211R0112
1400A
18MVA
XV C768 AE121
3BHB007211R0121
-2200 ... +2200A
(per INU)
-1760 ... +1760A
(per INU)
-3316 … +3316A
Rated
current
(rms)
2000A
1500A
18MVA_G2
XV C768 AE111
3BHB007211R0111
-2200 ... +2200A
1000A
12MVA
XV C768 AE112
3BHB007211R0112
-1760 ... +1760A
800A
9_5MVA
XV C768 AE113
3BHB007211R0113
-1320 ... +1320A
600A
7MVA_W
XV C768 AE116
3BHB007211R0116
-1300 ... +1300A
586A
7MVA_A
XV C768 AE115
3BHB007211R0115
-650 ... +650A
293A
3_5MVA
Description
SCA type
SAP number
Measurement
range
ACS6000
11MVA peak
ACS6000
11MVA
continuous
ACS6000
9MVA
ACS6000
7MVA
ACS6000
5MVA
ACS6000
3MVA
XV C768 AE117
3BHB007211R0117
XV C768 AE119
ACS 5000:
Table 1: SCA subprints and matching inverter types
Document number
ABB Switzerland Ltd.
Lang.
en
Rev. ind.
A
Page
10
In ACS 6000, if a 9 MVA stack is used, it is important to check the type
and select the right type of inverter for download. The following table
gives the appropriate information:
ACS 6000:
Description
Stack
type
IGCT
FW-Diode
NP-Diode
Inverter
type for
Download
9MVA
9 MVA
Stack High
Speed with
ABB-Diode
9 MVA
Stack High
Speed with
EUPECDiode
9 MVA
Stack - Low
Speed with
ABB-Diode
S-093N
3BHB013085R001
5SDF1045H002
5SDF1045H002
S-093H
3BHB013085R001
3BHB006457R0001
3BHB006457R0001
9MVA
S-093S
3BHB013085R001
3BHL000986P3003
3BHL000986P3003
09MVA
Table 2: Stack types for 9 MVA ACS 6000
Download the software and the inverter parameter set using the
command
l_acs "inverter type"
"inverter type" is the appropriate name from table 1 (or table 2 for ACS
6000 9MVA type)
Example for the 1000A unit of ACS 5000: l_acs 12MVA
At the beginning of the execution of this command you are asked to
confirm the version information (press Y or N).
For ACS 6000 (AD and SD) you are asked in a second step to select
the type of drive:
W
A
S
E
water cooled, master (default)
air cooled master (not used anywhere)
slave (ACS 6000)
no cooling type specified (only used in test environments)
In ACS 5000AD the necessary parameters are included in the file
INVPARAM.XLS/CSV.
Wait until download is finished. If there is a problem, read the *.lst file
for details.
For all products except ACS 5000AD and ACS 5000SD download the
motor parameters using
l_mot dummy
This loads a basic motor parameter set which has to be completed
according to the procedure described in the later sections of this
document.
Document number
ABB Switzerland Ltd.
Lang.
en
Rev. ind.
A
Page
11
2.3
Programming Firmware on Main Interface Board (Only ACS 5000)
2.3.1 Using a PECINT Board
To program the firmware on the PECINT board follow the procedure is
described in file
Titlis-TN041002-_PEC INT FPGA Main Modulator Programming
Manual.pdf
This file is part of the “Latest Software Release” on the database.
2.3.2 Using an INT2 Board
In newer drives the PECINT board is replaced by the INT2 board which is also
used as Phase Interface board.
The *.zip file containing the Main INT2 firmware also contains the two files
LXEMxxxx.cmd and PROG_LXEM.bat. To download to the interface board the
batch-file PROG_LXEM.bat has to be executed from a command window.
2.4
Programming Firmware on Phase Interface Boards
2.4.1 Using an old Phase Interface Board
To program the firmware on the INT boards follow the procedure described in
the file
ACS 5000 / 6000 AD&SD Phase INT EPLD Release Notes.pdf
This file is part of the “Latest Software Release” on the database.
2.4.2 Using an INT2 Board
In newer drives the PECINT board is replaced by the INT2 board which is also
used as the Main Interface board.
The *.zip file containing the Phase INT2 firmware also contains the two files
LXEFxxxx.cmd and PROG_LXEF.bat. To download to the interface boards the
batch-file PROG_LXEF.bat has to be executed from a command window for
each Phase Interface board individually..
Document number
ABB Switzerland Ltd.
Lang.
en
Rev. ind.
A
Page
12
3 Description of the asynchronous motor data
initializations
The ACS 5000 / ACS 6000 is delivered with factory default parameters.
Factory default parameters do not include asynchronous motor data. Prior to
the first start of the drive the motor data must be initialized to the AMC-table.
The data needs to correspond to the motor connected to the drive. All
parameters presented in this chapter have to be initialized.
Commissioning personnel can use the ABB standard tool (Drive Window) for
data downloading. The drive has to be in the RDY ON state (MCB open and
no voltage on the DC link) when parameters are initialized.
This chapter describes the data needed to initialize the torque control software
After motor data initializations the Control SW is ready for electrical
commissioning.
At this point is assumed that all the Application parameters are already set
correctly (Parameters below Group 100).
3.1
Asynchronous motor data
In order to control an asynchronous motor with DTC a set of motor parameters
has to be set. Parts of these parameters are available directly from a motor’s
name plate, other parameters have to be calculated, as described below
First check the parameter 111.06 Drive Type. Setting:
ACS 5000: “5000 AD”.
ACS 6000: “6000 AD”
3.1.1 Internal frequency scaling
For internal frequency scaling reasons the parameter 110.13 FREQUENCY
SCALING has to be set to a range that fits with the motor nominal frequency.
This parameter has to be set before any other parameter is changed. After
changing, upload the parameter table again and check all frequency values
(see below)!
For standard machines the default value applies “6.75-75HzDEF”.
For other machines:
The frequency scaling needs to be closely defined based on operating
frequency range of the drive e.g. for machine rated at 245Hz it should be:
110.13 FREQUENCY SCALING
27-300Hz (5)
Similarly, e.g. for machine rated at 187Hz it should be:
110.13 FREQUENCY SCALING
20.25-225Hz (4)
Attention! After defining the correct frequency scaling, please also check, if all
other frequency (speed) related parameters have been changed accordingly.
For internal frequency scaling reasons the parameter 110.13 FREQUENCY
SCALING has to be set to a range that fits with the motor nominal frequency.
Document number
ABB Switzerland Ltd.
Lang.
en
Rev. ind.
A
Page
13
This parameter has to be set before any other parameter is changed. After
changing, upload the parameter table again and check all values!
The following parameters have to be checked and corrected if they are used:
110.03 MOTOR NOM FREQ
132.07 FREQUENCY MAX
132.08 FREQUENCY MIN
186.07 FREQUENCY TRIP
186.63 W ENA ZV PROT
189.44 PWM TRUN FREQ
If “SCALAR” or “SCALAR RCM” is used as DRIVE CTRL MODE (111.01):
111.03 FREQUENCY REF
155.18 StepUpBoostFreq
155.19 StepUpMinFreq
155.54 W ENA US CTRL
155.56 W ENA IS LIM
3.1.2 Default motor parameters
ACS 6000AD:
Before the motor data are changed according to the nominal motor plate data,
the default motor data have to be loaded. This is done after loading the SW to
the AMC3 board using the following command:
l_mot dummy (only ACS 6000)
ACS 5000AD:
Nothing needs to be done.
(Accidentally downloading dummy parameters does not harm the
drive)
ACS 5000AD High speed drives:
With the following loading command predefined high speed parameter are set:
l_mot high_speed
3.1.3 Nominal rating plate data
Following rating plate data is needed for motor initialization:
Parameter
Name
Unit
110.01
Motor nominal voltage [U]
V
110.02
Motor nominal current [I]
A
110.03
Motor nominal frequency [f]
Hz
110.04
Motor nominal speed [n]
rpm
110.05
Motor nominal shaft power [P]
kW
Document number
ABB Switzerland Ltd.
Lang.
en
Rev. ind.
A
Page
14
110.06
Motor nominal power factor [cos
-
n]
Parameter number refers to the TC SW AMC-table index
ACS 5000 minimal rated currents
The rated current in parameter 110.02 must be in a certain range to guarantee
that the current scaling calculation does not saturate. For ACS 5000 the
following table shows the minimal rated currents for all supported inverter
types:
Inverter type
Max. measurable current
Minimal rated current
(190.02)
(110.02)
2200 A
1760 A
3316 A
2200 A
1760 A
1320 A
1300 A
650 A
389 A
312 A
587 A
389 A
312 A
234 A
230 A
115 A
24MVA
18MVA
18MVA_G2
12MVA
9_5MVA
7MVA_W
7MVA_A
3_5MVA
3.1.4 Motor model parameters
Following electrical parameters are needed for motor model initialization:
Parameter
Name
Unit
150.01
Stator resistance [Rs]
Ohm
150.02
Stator inductance [Ls]
mH
150.03
Machine stray inductance [ Ls]
mH
150.04
Rotor time constant [Tr]
ms
Parameter number refers to the TC SW AMC-table index.
3.1.5 Calculation of motor model parameters
Calculation of motor model parameters listed above depends on what kind of
motor data is available. The procedure is done with the help of an EXCEL file,
which is named
“AD Motor Parameter calculation.xls”
This file is delivered as part of the release structure. It contains a “Read Me”
sheet on which detailed instructions are given. For all worksheets it is crucial
to fill in the name plate parameters of the motor, i.e. rated voltage, current,
frequency, speed, mechanical power and power factor.
Document number
ABB Switzerland Ltd.
Lang.
en
Rev. ind.
A
Page
15
The preferred way of getting the correct motor parameters is to use
the values from a data sheet given by the manufacturer of the
machine. In the EXCEL file there are two worksheets supporting
this procedure (“Equivalent 1-phase”), one for the data in SI-units
and the other for the data in normalized form (per unit). The values
of the so called T-equivalent circuit are filled in and the
corresponding L-equivalent circuit parameters are calculated.
If no data sheet is available (or for comparison purposes) perform
the simple ID-Run that is related to the DC magnetization start
method. The ID-Run can only be performed after the drive is ready
to run. In a first step it is therefore necessary to set a rough
estimate of the motor parameters to be able to get the drive free of
trips. If no other data is available use the worksheet “Plate Data” of
the EXCEL file. Later perform the ID-Run as described here. The
result of the ID-Run is the stator resistance and the overall leakage
inductance of the machine (including the filter choke if existing).
They are shown in parameters 154.19 IDStart: Rs and 154.20
IDStart: sigmaLs. These values can be filled into the worksheet
“Measured Lsigma” of the mentioned EXCEL file to get the
remaining motor parameters. See the corresponding section under
“No Load Run” for details on the ID-Run.
If only motor name plate data are available, use the worksheet
“Plate Data” of the EXCEL file to get an estimate of motor
parameters. These values can also be used as a first guess which
is later refined.
Attention! Note that calculation of the motor parameters based on
the plate’s data is valid for 50/60Hz machines only.
In case of high speed drives (fundamental frequency in the range
100 ÷ 250Hz), the proposed parameters from the “Plate Data”
worksheet may differ significantly from the real motor parameters.
The simple ID-Run with DC magnetization must be performed on
the drive first to identify the correct stator winding parameters if no
data sheet is available. See the section under “No Load Run” for
details on the ID-Run.
3.2
Inverter parameters
Following electrical parameters have to be set manually:
ACS5000:
The values in brackets are default values and may be changed if necessary.
For the latest HW release of the air-cooled ACS 5000 the DC Charging Level
(parameter 17.02) should be set to at least 5450V (instead of 5300V) in order
to avoid charging faults.
Parameter
17.01
17.02
17.04
Name
MCB ClosingLevel
DC ChargingLevel
DischargeTimeout:
17.08
ModulationDischrg:
water cooled drives
air cooled drives
water cooled drives
air cooled drives
Document number
ABB Switzerland Ltd.
Value
(5200)
(5300/5450)
(200)
(300)
DISABLED
ENABLED
Lang.
en
Unit
V
V
s
s
Rev. ind.
A
Page
16
17.09
VLU Ctrl&Monitor:
water cooled drives
air cooled drives
112.04
191.18
NOM DC VOLTAGE
DISCHARGE FT LVL: water cooled drives
air cooled drives
ENABLED
DISABLED
(5000)
0
(500)
V
V
V
ACS6000:
Parameter
Name
Unit
112.04
NOM DC VOLTAGE
V
In most cases, the nominal DC voltage depends on the application:
AD with ARU supply: 4840V
AD Industry: 4410V
AD Marine: 4220V
3.2.1 Operational parameters
The following operational parameter has to be set:
Parameter
Name
21.01
StartFunction
Unit
ACS 5000:
Select between CONST DC MAGN or SCALAR FLY
(FLYING START and FLASH START are not
supported as a standard starting method)
ACS 6000:
Select between CONST DC MAGN, FLYING START
or SCALAR FLY
3.2.2 Pulse encoder
The drive can operate encoderless or with a pulse encoder depending on the
operational mode set in parameter 111.02
If parameter 111.02 ENCODERLESS DRIVE is set to TRUE no pulse encoder
is needed to run the drive. If the AMC board is booted with parameter
111.02 set to TRUE, the initialization for TACHOLESS operation is
executed.
If parameter 111.02 ENCODERLESS DRIVE is set to FALSE a pulse encoder
is needed, parameters from group 165 have to be checked and the NTAC
module has to be initialized. If the AMC board is booted with parameter
111.02 set to FALSE, the NTAC module initialization is executed.
After changing of parameter 111.02 the AMC board needs to be rebooted
in order to execute the correct initialization.
Document number
ABB Switzerland Ltd.
Lang.
en
Rev. ind.
A
Page
17
Parameter 111.07 ENCODER MODE SEL is used to select different operating
modes for the encoder. During commissioning it may be helpful to select the
mode “TEST ENCODER” which initializes the encoder correctly but does not
use the measured speed for any function inside the control. The measured
speed can thus be compared to the estimated speed to check for deviations.
Do not forget to set 111.07 back to the value “DEFAULT” which lets the
encoder be used for speed control and motor model.
Note: For high speed drives, encoders are not supported!
3.2.3 Other parameters
Check that following AMC-table parameter groups have reasonable values for
drive system in question (refer to the drive/ process requirements):
110 Drive configuration data
111 Operation mode
112 Inverter data
116 Torque selector word
120 Reference modifications
121 Speed control parameters
130 Flux control
131 Magnetizing
132 Dynamic torque limiter (usual: value of the gains at least 1000%)
133 Static torque limiter
134 SF + NP control
135 Frequency/ speed limits
136 Torque/ current limits
141 Stop
150 Motor parameters
153 Motor model tune
159 Damping Udc
165 Tacho
186 Trip levels
192 BCU/RBU/VLU
Pay special attention to the following indices:
130.03
130.05
132.07
132.08
132.09
133.06
133.07
186.07
3.3
FLUX REF IN (default value for all drives is 100% except for
ACS 5000 7MVA air cooled drives for which 102% is used)
FLUX RAMP TIME (default 0.1sec for use with UV limiter)
FREQUENCY MAX
FREQUENCY MIN
FREQ LIM GAIN
USER MAX MOT CUR
USER MAX GEN CUR
FREQUENCY TRIP
High speed drives
3.3.1 Important parameter settings for high speed drives
Set the following parameters accordingly:
134.22 NP CURR FILT
1 ms
Document number
ABB Switzerland Ltd.
(f = 50…150 Hz)
Lang.
en
Rev. ind.
A
Page
18
0.1 ms (f >150 Hz)
65 V
110 V
150 V
0.02 (for DTC 0.2)
0.02 (for DTC 0.2)
600 Hz (= disabled)
600 Hz (= disabled)
600 Hz (= disabled)
5000 A (= disabled)
134.23 NP 1ST HYST
134.24 NP 2ND HYST
134.25 NP 3RD HYST
153.08 ENLESS COR D-GAIN
153.09 ENLESS COR Q-GAIN
155.54 W ENA US CTRL
155.56 W ENA IS LIM
186.63 W ENA ZV PROT
191.08 DI/DT-MON ILIM
Make sure that the switching frequency trip limits are correctly set:
186.07 FREQUENCY TRIP
186.08 SF 1ms TRIP
186.09 SF 50ms TRIP
186.10 SF 250ms TRIP
186.11 SF 1s TRIP
110% of motor nominal frequency
Default value
Default value
TBD
TBD
For ride through the following parameters are recommended:
130.02 MIN FLUX REF
130.05 FLUX RAMP TIME
132.38 UNDERVOLT P-GAIN2
50 %
0.01 s
1000 %
For scalar flying start (SCAFLY) the suggested parameter settings are:
131.01 START FUNCTION
131.21 SFLY FLUX REF
131.23 SFLY FREQFWD
131.30 SFLY CURR THRES
SCALAR FLY
10 %
100% or defined by process
400 %
If there is an output choke between converter and motor, it must also be
included in the parameters:
152.01 FILTER INDUCTANCE
152.03 FILTER RESISTANCE
(project specs)
(project specs)
3.3.2 Vector control - PI controllers
The PI controllers parameters must be initialized prior the run. There are two
alternative operating modes of the vector control module: Stator Flux Oriented
Control (SFOC) or Rotor flux Oriented Control (RFOC), which can be selected
by the parameter switch (TRUE / FALSE):
The default selection is Stator Flux Oriented Control (SFOC). If not stated
differently for a special project, select SFOC.
If SFOC mode is selected then the following group of parameters must be set:
157.27 SFOC ENABLED
TRUE
157.01 KP-SFLUX MAX
157.02 TI-SFLUX CTRL
157.03 PI-SFCTRL MAX LIM
157.04 PI-SFCTRL MIN LIM
100% (*)
100ms (*)
1000%
-1000%
Document number
ABB Switzerland Ltd.
Lang.
en
Rev. ind.
A
Page
19
157.05 KP-SFLUX START
157.06 CUT-OFF SFLUX ACT
157.07 KP-TORQUE MAX
157.08 TI-TORQUE CTRL
157.09 PI-TCTRL MAX LIM
157.10 PI-TCTRL MIN LIM
157.11 KP-TORQUE START
157.12 CUT-OFF TORQ ACT
~ 1/3 * KP SFLUX MAX
200Hz (*)
20% (*)
10ms (*)
1000%
-1000%
~ 1/3 * KP TORQUE MAX
200Hz (*)
If RFOC mode is selected then the following group of parameters must be set:
157.27 SFOC ENABLED
FALSE
157.80 KP-RFLUX MAX
157.81 TI-RFLUX CTRL
157.82 PI-RFCTRL MAX LIM
157.83 PI-RFCTRL MIN LIM
157.84 KP-RFLUX START
157.85 CUT-OFF RFLUX ACT
157.86 KP-ISDQ MAX
157.87 TI-ISDQ CTRL
157.88 PI-ICTRL MAX LIM
157.89 PI-ICTRL MIN LIM
157.90 KP-ISDQ START
157.91 CUT-OFF ISDQ ACT
100% (*)
100ms (*)
1000%
-1000%
~ 1/3 * KP RFLUX MAX
200Hz (*)
50% (*)
10ms (*)
1000%
-1000%
~ 1/3 * KP ISDQ MAX
200Hz (*)
The suggested settings of phased locked loop (PLL) should be selected as
shown below:
157.13 KP-PLL CTRL
157.14 TI-PLL CTRL
157.15 CUT-OFF PLL ACT
157.16 CUT-OFF FX REF
157.17 CUT-OFF PLL WF
200% (*)
10ms (*)
1000Hz (*)
1000Hz
0Hz
(*) Use given default values first! If the behaviour of the drive is not
satisfying and additional tuning is needed contact the MV Supportline.
3.3.3 Vector control – optimized pulse patterns
In case of high frequency machines, it is possible to switch from PWM
modulator to the implemented pulse pattern modulator at higher operating
speeds.
At higher speeds the drive can only run with three optimized pulse patterns
(i.e. PP1… PP3) defined by number of angles used (e.g. 1x, 2x, 3x)
respectively. The areas of PP are defined by three frequency change-over
points which specify the correct modulation indexes. Hystereses are included
to prevent from using the same PP on the boundary of two areas. The actual
motor frequency multiplied with the actual PP shows approximately the
switching frequency. The SF may be slightly higher if there are additional
switching’s due to NP control.
Document number
ABB Switzerland Ltd.
Lang.
en
Rev. ind.
A
Page
20
Attention: The information regarding which pulse pattern at given operating
area must be selected is project specific. Contact support line for the project
specific settings.
Carrier:
157.18 CARR-FREQ MAX
157.19 CARR-FREQ 0Hz
157.25 CARRIER MIRRORED
1600 Hz
1600 Hz
TRUE
Pulse patterns:
157.41 FREQ-SW HYST
157.50 1st PP SELECT
157.51 FREQ SW LEV_1
157.60 2nd PP SELECT
157.61 FREQ SW LEV_2
157.70 3rd PP SELECT
157.71 FREQ SW LEV_3
1 Hz
(project specs)
(project specs)
(project specs)
(project specs)
(project specs)
(project specs)*
* If 3rd PP is not used set a frequency which the drive will never reach
to disable it.
Example of high speed drive:
1. Start Scalar flying start
2. Magnetization and start turning motor with PWM modulation
3. Switch between PWM
1st PP
Switch point: 157.51 FREQ-SW LEV_1
48 Hz
PP
157.50 1st PP SELECT
3
Hysteresis:
157.41 FREQ-SW HYST
1 Hz
Document number
ABB Switzerland Ltd.
Lang.
en
Rev. ind.
A
Page
21
4. Switch between 1st PP
2nd PP
Switch point: 157.61 FREQ SW LEV_2
PP
157.60 2nd PP SELECT
Hysteresis:
157.41 FREQ-SW HYST
5. Stop
115 Hz
2
1 Hz
Note:
The SF dip at 97 Hz (Mod Index 0.463) is normal. The dip comes from
the switching definition of PP3
PP1 is not used in the example above
Document number
ABB Switzerland Ltd.
Lang.
en
Rev. ind.
A
Page
22
4 No Load run
4.1 Operation modes
The drive may be operated with or without speed encoder. Depending on the
system configuration select:
o with an encoder
(parameter 111.02 set to FALSE)
o without an encoder
(parameter 111.02 set to TRUE)
The AMC board has to be rebooted after changing parameter 111.02.
For ACS 5000:
There are several control modes:
o DTC
o SCALAR DTC
o FACTORY TEST
o VECTOR_CONTROL
o SCALAR RCM
o SCALAR STEP-UP
(111.01 = 0)
(111.01 = 1)
(111.01 = 2)
(111.01 = 3)
(111.01 = 4)
(111.01 = 5)
For high speed machines (nominal frequency typically > 75 Hz), “VECTOR
CONTROL” needs to be selected. All other machines are operated with DTC.
4.2 Check DC Magnetization
As a first test it is proposed to check DC magnetization.
1.
Set the current trip value to about 70% of the original value for the first
start.
2.
If there is a tacho, set 111.02 to FALSE and boot the AMC board. Set
111.07 to "TEST ENCODER". This mode runs the machine in
encoderless mode but shows additionally the speed measured by tacho.
Estimated speed in 160.38, measured speed 160.37.
3.
Set the speed reference to 0 rpm.
4.
Set magnetizing mode 21.01 to CNST DC MAGN.
5.
Monitor the phase currents
1.01 PHASE U CURRENT
1.03 PHASE V CURRENT
1.05 PHASE W CURRENT
6.
Start the drive and stop it again after about DC magnetization is over.
Check the phase currents as described in the following:
For ACS 5000
- Check the currents during magnetization
- The currents should look according to Figure 1
- (i_ref is the current reference defined by parameters 131.02 DC MAGN
FLUX and 150.02 LS)
positive current in phase a
ia = i_ref
Document number
ABB Switzerland Ltd.
Lang.
en
Rev. ind.
A
Page
23
negative current in phases b and c
ib = ic = - 1/2 i_ref
DC magnetization uses the voltage vectors (+1 0 0) and
therefore only creates voltage in the positive x-axis.
(0 0 ) and
y
b
ic
ia
a,x
ib
c
Figure 1: Illustration of DC magnetizing current in the three phases
For ACS 6000
- check current during magnetizing
- currents should look according to Figure 2
positive current in phase a
ia = i_ref
negative current in phase c
ic = -i_ref
no current in phase b
ib = 0
b
y
i = DC-magnetizing
30 deg
a=x
c
Figure 2: Illustration of DC magnetizing current in the three phases
4.3 Revise Motor Model Parameters
During DC magnetization the stator resistance Rs and the overall leakage
inductance of the motor are estimated. The slope of the current when starting
DC magnetization is used to estimate the leakage inductance and the voltage
that is needed to maintain the DC current is used to estimate the stator
resistance.
Document number
ABB Switzerland Ltd.
Lang.
en
Rev. ind.
A
Page
24
The following procedure only needs to be done if the motor parameters
are not known from a data sheet. In case that a data sheet is available, the
simple ID-Run can be performed to cross-check the set parameters but the
identified parameters do not need to be used in group 150.
1.
Set the parameters 131.02 DC MAGN FLUX to 100% and 131.03 DC
MAGN TIME to 500% (must have this value otherwise estimation of stator
resistance will fail).
2.
Set the speed reference to 0rpm.
3.
Start the drive and stop it again after DC magnetization is over (torque
control state machine leaves the magnetization state). Check 170.05 TC
State = 10 = RDY_REF to be sure.
4.
Read parameters 154.19 IDStart: RS and 154.20 IDStart: sigmaLs and
write them down.
5.
Repeat steps 3 and 4 for about 5 times. Write down the estimated values.
If the values do not differ too much from each other (10%) use the
average of the results to proceed. Otherwise use the worksheet “Plate
Data” of the EXCEL file “AD Motor Parameter calculation.xls”.
6.
If between inverter and motor a filter choke is used, the resistance and
the inductance of this filter choke are included in the estimated values. For
the resistance the impact is small and can be neglected therefore. The
value of the filter inductance as set in parameter 152.01 has to be
subtracted from the estimated inductance value in 154.20 to get the value
of the leakage inductance of the motor.
7.
Transfer the average values of the estimated stator resistance and
leakage inductance into the worksheet “Measured Lsigma” of the EXCEL
file “AD Motor Parameter calculation.xls”. Complete this worksheet with
the name plate data of the motor. From this data the worksheet calculates
the parameters of the motor model.
8.
Transfer the data from the EXCEL worksheet to group 150. It is important
to use as stator resistance value (150.01 RS) only about 75% of the value
that is identified and used in the EXCEL worksheet !! This helps to
stabilize the flux estimation of the motor model at low frequencies.
4.4 First Start
Follow the procedure described below to check whether the phase order of the
motor and the direction of the speed encoder coincide (if there is a tacho).
Some torque limitations may also result in unexpected rotation.
The first start without load as described here helps to avoid uncontrolled motor
operation due to wrong settings. Follow the described procedure to ensure
proper operation.
1.
Check visually the phase order between the inverter and the motor if
possible
Document number
ABB Switzerland Ltd.
Lang.
en
Rev. ind.
A
Page
25
2.
Reduce the current trip limit to about 70% of its original value. Reduce the
frequency and speed trip levels to about 50% of their original value.
3.
If there is a tacho, set 111.02 to FALSE and boot the AMC board if the
value was changed. Set 111.07 to "TEST ENCODER". This mode runs
the machine in encoderless mode but shows additionally the speed
measured by tacho. Estimated speed in 160.38, measured speed 160.37.
4.
Check sense of rotation without speed encoder:
Set a low speed reference (as an example 20% of nominal
speed) and start the motor.
Check the sense of rotation of the motor: Does it correspond to
the customers need?
Check the speed signal 160.34: it must be close to the
reference speed
Stop the drive
5. Check sense of rotation with speed encoder (only necessary if tacho is
available)
In group 165 there are parameters and signals concerning tachometer;
check that these parameters are set according to the data sheet and that
the wiring is correct.
Compare estimated (160.38) and measured (160.37) speed at a speed of
again about 20%. If both values coincide in magnitude and sign and
correspond to the reference value, the tacho can be used for speed
feedback (set 111.07 to “DEFAULT”).
If the signs of the estimated and measured speed are not equal, check
whether the phase order of the motor cables or the sense of rotation of the
tacho needs to be adapted (111.29).
Repeat the test also in negative direction (-20%) if possible.
6.
Reference for tacholess control:
In tacholess control a low speed reference may be problematic. Therefore
use high enough speed reference on starting: lowest speed reference can
be set to a suitable value (135.04 MINIMUM SPEED or 135.02 MAXIMUM
SPEED depending on the rotation direction). Also accelerating ramp time
and speed controller should be chosen according to the starting behavior.
7.
Set the current, frequency and speed trip limits back to their original
values.
8.
Checking torque limitation chain:
o Try both rotation directions if the mechanical system allows it.
o Check the maximum and minimum speed limitations. For example if
the reference is negative the minimum speed has to be negative. The
combination of minimum (maximum) and zero speed should allow
stopping (n,zero > MIN(|n,min|, |n,max|). For example if the drive is
only used in the negative direction:
135.02 MAXIMUM SPEED -20 rpm
135.04 MINIMUM SPEED
-1000 rpm
135.07 ZEROSPEED LIMIT 50 rpm
o Check other limits given to the speed controller chain.
o Check static torque limitation chain. The output is given in 133.12
USED MAX TRQ LIM and in 133.13 USED MIN TRQ LIM.
Document number
ABB Switzerland Ltd.
Lang.
en
Rev. ind.
A
Page
26
o
9.
Check dynamic torque limitation chain. The output is given in 132.18
USED TRQ REF. It should be close to the actual torque in 1.13 or
1.22.
Checking motor model: This procedure can be used to cross-check the
used stator inductance of the motor.
o Run the uncoupled (or at least unloaded) motor at rated frequency and
rated flux which corresponds to rated. Measure the stator current
RMS value Is_RMS. Calculate the stator inductance using the
equation:
Ls = V_rated/(sqrt(3)*2* *f_rated*Is_RMS)
The resulting value should not deviate more than 10% from the value
used in parameter 150.02.
4.5 Start modes
There are several start modes available.
ACS 5000: DC magnetization or scalar flying start
ACS 6000: DC magnetization, flying start, scalar fly start, flash start
4.5.1 DC magnetization
If it is known that the machine is at standstill when starting use the DC
magnetization method. (Parameter 21.01 = CNST DC MAGN). This method is
much faster than the flying start, so if possible this method should be used.
Default parameters for the mode are:
21.01 START FUNCTION
131.02 DC MAGN FLUX
131.03 DC MAGN TIME
= CNST DC MAGN
= 100
= 300
4.5.2 Flying start mode
This mode starts directly modulating with DTC having zero torque reference.
ACS 5000:
Not available for ACS 5000.
ACS 6000:
Default parameters for the mode are:
21.01 START FUNCTION
131.11 FLY FLUX REF INIT
131.12 FLY FLUX RAMP
131.13 FLY HOLD TIME
131.14 RS OVERESTIM
= FLYING START
= 70
= 200
= 0
= 300
Before tuning of flying start, the hysteresis has to be tuned. See the
corresponding section for details.
Tuning information about the flying start parameters:
The parameter 131.11 defines the value of the initial current pulse to the
motor. It should be as big as possible, but over current has to be avoided.
Document number
ABB Switzerland Ltd.
Lang.
en
Rev. ind.
A
Page
27
The Parameter 131.12 defines the ramping time for the flux. 100%
corresponds to 150.04, the rotor time constant. Longer ramps lead to
improved stability of the flying start and avoid pull out.
Parameter 131.14 can be increased when the estimated speed drops to zero
and the motor is still rotating. Too high value leads to over current.
4.5.3 Scalar flystart
Default parameters, proposed settings, and descriptions for the mode are:
ACS 5000 with DTC:
21.01 START FUNCTION
131.21 SFLY FLUX REF
131.22 SFLY FLUX RAMP
131.23 SFLY FREQFWD
131.24 SFLY TORQUE REF
131.25 SFLY KP CONTROL
131.26 SFLY TI CONTROL
131.27 SFLY BACKWARD EN
131.28 SFLY FREQ REVERSE
131.29 SFLY FREQ MIN
131.30 SFLY CURR THRES
= SCALAR FLY
= 10%
= 300% (or less)
= 100%
= 0%
= 100%
= 20s
= FALSE
= -100%
= 2%
= 145%
ACS 5000 with Vector Control:
157.95 KP-SFLUX SFLY
157.96 TI-SFLUX SFLY
157.97 CUT-OFF FLUX SFLY
157.98 KP-TORQUE SFLY
157.99 TI-TORQUE SFLY
157.100 CUT-OFF TORQ SFLY
= 100 %
= 100 ms
= 200 Hz
= 100 %
= 10 ms
= 200 Hz
ACS 6000:
AMC-table
131.21
SFLY FLUX REF
131.22
SFLY FLUX RAMP
131.23
SFLY FREQFWD
131.24
SFLY TORQUE REF
131.25
SFLY KP CONTROL
131.26
SFLY TI CONTROL
131.27
SFLY BACKWARD EN
131.28
Default proposed
value
value
25%
10%-25%
300%
500% = 5*Tr
100%
depending on
the application
0%
2% if the drive
runs forward
-2% if the drive
runs reverse
100%
depending on
the application
20s
depending on
the application
(fan 60s)
FALSE depending on
the application
-100% depending on
Document number
ABB Switzerland Ltd.
Description
Flux init value % of rated
flux
Ramp time for flux
start frequency for
searching
This parameter helps in
low speed area to prevent
a overvoltage trip.
Correction for gain for
fly_controller
ki_fly = Ts/Ti
Ts = sample time (1ms)
Ti = integration time
Enable Backward Search
reverse frequency for
Lang.
en
Rev. ind.
A
Page
28
SFLY FREQ REVERSE
131.29
SFLY FREQ MIN
131.32
SFLY SEARCH SPEED
the application searching
1%
1%-3%
50*Tr
Depending on
the application
Minimum frequency for
searching
Search speed of flystart
4.6 Motor model tuning with high speed drives
This sections is valid for high speed drives (nominal frequency typically >
75Hz).
In general the same procedure to identify correct motor parameters applies as
for standard machines (50/60Hz). The basic tool used to get the parameters is
the EXCEL file “AD Motor Parameter calculation.xls”. Whereas with standard
machines the worksheet “Plate Data” usually gives reasonable results, this is
not the case with high-speed motors.
It is highly recommended to use the motor parameters from a data sheet of
the manufacturer if available. Entering these data into the worksheets
“Equivalent 1-phase (SI or pu)” yields the parameters that need to be set in
the AMC-table.
If no data sheet is available an initial parameter set is determined using the
worksheet “Plate Data”.
The sequence described in section 4.3 of this document shall be used to
identify the stator resistance and the leakage inductance of the motor.
Together with the worksheet “Measured Lsigma” the other parameters of the
motor model and controllers are determined.
Follow this sequence for tuning:
1. Start Motor with DC Magnetization and low speed
2. Increase motor speed and check behavior:
- Stable Torque
- Stable Flux
- Stable Current
3. Run a Ramp from 0 – Max speed and check SF:
- The switch over points are as defined in the AMC table parameters
- The actual motor frequency multiplied with the actual PP gives the
SF. If the SF is significantly higher it needs to be checked where the
additional switchings are coming from (for example NP control).
Contact the MV Supportline if the above mentioned procedure does not lead
to satisfactory results.
Document number
ABB Switzerland Ltd.
Lang.
en
Rev. ind.
A
Page
29
5 Motor model at no load
The operation of the motor model can be checked with a slow speed reversal
at no load. Monitor the magnetizing current during the speed reversal.
1. Make the speed reversal from nominal speed with slow ramp times
- Observe the used torque reference e.g. 3.02 during reversal. Set
accelerating (22.02) and decelerating times (22.03) to high values
so that the torque reference is close to zero (e.g. 60 s or longer)
- When operating below nominal speed the flux of the motor is
constant. With a long speed reversal time the motor torque is
negligible. Magnetizing current should be approximately constant
during speed reversal and the current level corresponds to the noload current (compare with the motor data sheet)
2. Save the trend of the speed reversal test.
- Record the trends of 1.17 FLUX ACT, 1.11 MOTOR RMS
CURRENT %, 1.09 MOTOR SPEED %.
Figure 3: Motor (magnetizing) current during slow ramp
Document number
ABB Switzerland Ltd.
Lang.
en
Rev. ind.
A
Page
30
3. If the magnetizing current is higher than it should be (especially at low
speeds), this could indicate that the motor parameters are not correct. In
this case increasing the stator inductance (parameter 150.02) might help.
5.1
Magnetizing current at no load
The magnetizing current should be given in the motor data sheets or in the
test report of the motor. The test report is normally more reliable than the data
sheet.
One can also estimate the magnetizing current by calculating it with the
following formula:
I0
U1
3 2
f s Ls
I0
U1
3 Xh
X 1sig
With I0 = no load current [Arms], U1 = motor terminal voltage (line-to-line)
[Vrms], fs = stator frequency [Hz], Ls = stator inductance (150.02) [H]; the noload current in Arms can be found in 1.10.
Voltage drop over stator resistance and copper and iron losses are neglected
in this formula.
Please see Appendix 1 Asynchronous motor equivalent circuit for symbol
names.
5.2
Saturation of main inductance
The saturation of the main inductance is a function of the magnetizing current
and the torque. The parameters of this function can be set in group 150.
Saturation coefficients are defined so that a value of 100% corresponds to the
factor 1.0 (at nominal flux). The main inductance used by the control is
multiplied with these saturation coefficients.
The default value of all table elements is 100%.
5.2.1 Saturation as a function of magnetizing current
The saturation of the main inductance as a function of the magnetizing current
is given by 3 points of the no-load curve of the motor:
1. point A is measured at less than nominal flux (parameters 150.24
and 150.25)
2. point N is measured at nominal flux (parameters 150.26 and 150.27)
3. point B is measured at higher than nominal flux (parameters 150.28
and 150.29)
Parameters 150.24, 150.26 and 150.28 are the current values in [%] of the
motor nominal current for three different flux levels (points A, N and B).
Parameters 150.25, 150.27 and 150.29 are the saturation coefficients
corresponding to points A, N and B.
Document number
ABB Switzerland Ltd.
Lang.
en
Rev. ind.
A
Page
31
The following example shows how the static saturation coefficients are fed into
the AMC table. The no-load curve is given by the motor manufacturer in the
form of a table.
Example for an ACS 5000:
U[V]
1210
1602
2420
3240
4820
6300
6740
7300
7900
8360
8700
Io[A]
11.0
14.5
22.0
29.0
44.0
60.0
68.0
78.0
90.0
107
124
With known nominal voltage and current: Un = 6300 V, In = 220 A
Example for an ACS 6000:
U[V]
605
801
1210
1620
2410
3150
3370
3650
3950
4180
4350
Io[A]
11.0
14.5
22.0
29.0
44.0
60.0
68.0
78.0
90.0
107
124
With known nominal voltage and current: Un = 3150 V In = 220 A
1) Calculate the percent notation of the above table and the static
saturation coefficients. The saturation coefficient for nominal voltage
is 100% (= 1). Other saturation coefficients (S) are given relative to
this one.
U[%]
I[%]
S[%]
= 100% * U[V]/Un[V]
= 100% * I[A]/In[A]
= 100% * (U[%]/I[%]) / (Un[%]/In[%])
With Un[%] = 100 %:
S[%] = (U[%]/I[%]) * In[%] in this case In[%] 27.3%
The table now looks like this:
ACS 5000:
U[%]
I[%]
S[%]
19.2
5.0
105
25.2
6.6
105
38.4
10.0
105
51.4
13.2
105
76.5
20.0
104
100
27.3
100
107
30.9
94
115.9
35.5
90
125.4
40.9
84
132.7
48.6
74
38.4
10.0
105
51.4
13.2
105
76.5
20.0
104
100
27.3
100
107
30.9
94
115.9
35.5
90
125.4
40.9
84
132.7
48.6
74
138.1
56.4
67
ACS 6000:
U[%]
I[%]
S[%]
19.2
5.0
105
25.2
6.6
105
138.1
56.4
67
2) Now this table has to be adapted to the parameters of group 150.
The following points of the no-load curve have been chosen from the
table:
Point A
150.24 = 20.0
150.25 = 104.0
Point N
150.26 = 27.3
150.27 = 100.0
Point B
150.28 = 35.5
150.29 = 90.0
3) It is recommended to have point N as close as possible to nominal
voltage. The voltage at point A should be 15-25 % below nominal
voltage and at point B 15-25 % above nominal voltage.
Document number
ABB Switzerland Ltd.
Lang.
en
Rev. ind.
A
Page
32
5.2.2 Saturation as a function of torque
The purpose of parameters 150.06 up to 150.22 is to express the main
inductance saturation as a function of motor torque. Parameter 150.06
corresponds to T = 0% (no-load) and parameter 150.22 to T = 200%, torque
steps between parameters are 12.5%.
The default value of all table elements is 100%.
5.3 Switching frequency at no load
ACS 5000
The default hysteresis bands are tuned for operation with the following
configurations:
Water-cooled ACS 5000 (any size) under any load conditions
Air-cooled 3.5MVA ACS 5000 under any load conditions
Air-cooled 7MVA ACS 5000 with square load characteristics
For the air-cooled 7MVA ACS 5000 with constant torque load characteristic,
special hysteresis bands must be loaded. This is done by typing the following
command line at the prompt in the DOS command window:
l_hys 7MVA_A_CN
ACS 5000 and ACS 6000
The switching frequency can also be checked using a similar speed reversal
test at no load. During the speed reversal the switching frequencies for
different time windows are monitored.
1. Make the speed reversal from the maximal positive speed to the
maximal negative speed with a long reversing time.
2. Save the trend from the speed reversal.
3. Take the trend of
ACS 5000:
134.06 SF 1ms MAX,
134.07 SF 50ms MAX,
134.08 SF 250ms MAX,
134.09 SF 1s MAX,
ACS 6000:
134.05 SF 1ms MAX,
134.06 SF 50ms MAX,
134.07 SF 250ms MAX,
134.08 SF 1s MAX,
1.09 MOTOR SPEED and 130.10 MODULATION INDEX.
Allowed values for different switching frequency windows are:
ACS 5000:
Document number
ABB Switzerland Ltd.
Lang.
en
Rev. ind.
A
Page
33
SF 1s MAX
250 (average)
SF 250ms MAX
75 (average)
SF 50ms MAX
20 – 25 (maximum)
SF 1ms MAX
1 - 3 (maximum)
ACS 6000:
SF 1s MAX
300 (average)
SF 250ms MAX
75 (average)
SF 50ms MAX
20 – 25 (maximum)
SF 1ms MAX
1 - 3 (maximum)
For the 11 MVA modules the tuning target is:
SF 1s MAX
230 (average)
SF 250ms MAX
67 (average)
SF 50ms MAX
20 – 25 (maximum)
SF 1ms MAX
1 - 3 (maximum)
For 9 and 11MVA modules the switching frequency has to be
decreased for high currents. This is mentioned more detailed in the
load tuning.
The switching frequency is dropping below these levels at low stator
frequencies, as can be seen from the following plots. The reason is that at low
stator frequencies the switchings are not equally distributed on all switches. In
order not to overload the active switches the average switching frequency has
to be reduced. The effect can be seen in the long time windows of 250ms and
1sec.
Document number
ABB Switzerland Ltd.
Lang.
en
Rev. ind.
A
Page
34
Figure 4: Switching frequency test at no load operation for ACS 5000
Document number
ABB Switzerland Ltd.
Lang.
en
Rev. ind.
A
Page
35
Figure 5. Switching frequency test at no load operation for ACS 6000
In case the operation is unacceptable, the following hysteresis band tuningmethod can be used:
Case 1: if supply frequency >20 Hz and SF 1s MAX > 250 (in average)
SF 1s MAX(in average)
250
250
-
Calculate error
-
Set parameter 134.27 (ACS 5000) / 134.14 (ACS 6000) HYST
BOOST MIN to a new value using eq.
HYST BOOST MIN tuned
1 HYST BOOST MIN
Document number
ABB Switzerland Ltd.
Lang.
en
Rev. ind.
A
Page
36
Case 2: if supply frequency <20 Hz and SF 50ms MAX > 25 (maximum)
- Calculate error
SF 50ms MAX(maximum) 25
25
- Set parameter 134.26 (ACS 5000) / 134.13 (ACS 6000)
BOOST 0HZ to a new value using eq.
HYST BOOST 0HZ tuned
HYST
1 HYST BOOST 0HZ
ACS 5000:
The parameter 134.26 HYST BOOST 0Hz should be 100% by default.
ACS 6000:
The parameter 134.13 HYST BOOST 0Hz can be much higher,
especially for low frequency machines. Values up to 300% are normal.
Document number
ABB Switzerland Ltd.
Lang.
en
Rev. ind.
A
Page
37
6 Motor model at loading conditions
Motor model parameters can be defined with several different approaches:
-
electrical values of equivalent circuit given on motor data sheet
-
motor rating plate data
-
test reports
-
measured values by the ACS 5000 / ACS 6000
The first approach is to use the motor parameter calculation tool (AD Motor
Parameter calculation.xls).
If a data sheet of the motor is available use the worksheets "Equivalent 1phase (SI or pu)" to get the correct settings in the AMC table. Use the sheet
“Measured Lsigma” to evaluate the simple ID-Run that is included in the DC
magnetization routine. The initial parameter set used with ID-Run can be
determined with the sheet “Plate Data”. If the ID-Run does not give stable
results with several attempts and no data sheet of the motor is available, use
the values calculated by means of the worksheet “Plate Data”
6.1
Rotor time constant
The value of the rotor time constant is dependent on the temperature value:
R
LR
RR ( TR )
The maximum rotor temperature rise can be estimated from the measured
stator winding temperatures or from the temperature rise class of the motor.
Rotor temperature rise can be higher than the stator temperature rise. The
original value can also be inaccurate. Saturation can also change the
inductance value and result in a different rotor time constant value.
The resistance of copper changes 0.4% / 1K. For example a 100 K
temperature rise results in a 29 % lower value for the rotor time constant at
loading conditions. Reduce the value of the parameter 150.04 ROTOR
TIMECONST according to the temperature rise on maximum loading
condition.
Please pay special attention to this parameter when the drive is equipped with
a tachometer.
6.2
Stator resistance
An inaccurate stator resistance value may result in an unstable control,
because flux estimation is based on integration. The stator resistance has a
big impact on this integration especially at low frequency. This is a common
problem for different kinds of control methods (for example PWM, DTC).
In practice the stator resistance value (150.01 RS) should be set to a lower
value (50%. 75%) than given by the motor parameter calculation tool (AD
Motor Parameter calculation.xls). It is preferable to set this parameter too
small than too big.
Please pay special attention to this parameter when the drive is not equipped
with a tacho.
Document number
ABB Switzerland Ltd.
Lang.
en
Rev. ind.
A
Page
38
If the drive is started with DC Start mode: Parameter 131.01 START
FUNCTION = CNST DC MAGN the stator resistance (including cable
resistance) is measured during the DC Start and displayed in Parameter
154.19 IDStart: RS. The used RS value (150.01 RS) should always be smaller
than this value.
6.3
Stator main inductance
NO-LOAD TUNING
The stator main inductance value (150.02 LS) can be tuned with help of the no
load current values. Please see chapter “Motor model at no load”.
6.4
Stator stray inductance
PULL-OUT LIMITER
Motor main and stray inductances influence the calculated pull-out torque limit.
Please refer to chapter “Pull-out torque limit” in dynamic limiters. At the
nominal operation point the calculated limit should correspond to 90% of the
motor pull-out torque.
1. If the value of the main inductance (150.02 LS) has been tuned
according to the no load measurements, it can be expected to be
reliable, especially if the value corresponds to a value calculated with
the "Equivalent 1-phase" sheet of the motor parameter calculation tool
(AD Motor Parameter calculation.xls).
2. If the drive is started in DC Start mode: Parameter 131.01 START
FUNCTION = CNST DC MAGN the stator stray inductance (including
cable inductance) is measured during the DC Start and displayed in
Parameter 154.20 IDStart: sigmaLS. Use the worksheet “Measured
Lsigma” in the parameter calculation tool to get the remaining
parameters. These data can be used to confirm data given in the data
sheet or estimated with the Excel sheet.
3. Then the estimated value of the pull-out torque limiter should be
dependent only on Stator stray inductance (150.03 SIGMALS). Try to
tune this value so that the pull-out torque limiter gives a reasonable
value. This method is rather inaccurate.
6.5
Motor nominal cosfii
The cosfii actual value of an asynchronous motor varies for different operation
points. If a high load (overload) is needed in the field weakening area a
smaller value may have to be given to the motor nominal cosfii (110.06
MOTOR NOM COSFII).
Document number
ABB Switzerland Ltd.
Lang.
en
Rev. ind.
A
Page
39
7 Switching frequency tuning at loading conditions
The checking and tuning presented in this chapter has to be done with normal
loading conditions (=normal operation of the process). Actions presented in
this chapter are only needed if drive operation is not satisfying.
7.1 Switching frequency at loading conditions
This chapter does not apply for high speed drives.
During first normal loading conditions perform the following checks:
1. Take the trend of all switching frequencies:
ACS 5000:
134.06 SF MAX 1ms, 134.07 SF MAX 50ms, 134.08 SF MAX 250ms,
134.09 SF MAX 1s, 160.07 MOTOR RMS CUR and 160.34 MOTOR
SPEED.
ACS 6000:
134.05 SF 1ms MAX, 134.06 SF 50ms MAX, 134.07 SF 250ms MAX,
134.08 SF 1s MAX, 160.07 MOTOR RMS CUR and 160.34 MOTOR
SPEED
2. Check that the switching frequencies are below the allowed average
values for different switching frequency windows and the presented
characteristics are not exceeded:
ACS 5000:
SF 1s MAX
SF 250ms MAX
SF 50ms MAX
SF 1ms MAX
250
75
20 - 25
1–3
Document number
ABB Switzerland Ltd.
Lang.
en
Rev. ind.
A
Page
40
The following maximum switching frequencies may not be exceeded for the
following drive configurations:
ACS 5000 water-cooled for all load characteristics
ACS 5000 3.5MVA air-cooled for all load characteristics
ACS 5000 7MVA air-cooled for square load characteristic
out
sw
out
sw
39
60
index
2
Figure 5: Current and Switching frequency limitations for all ACS 5000 with
square load torque and for ACS 5000W and ACS 5000A 3.5MVA with
constant load torque
Document number
ABB Switzerland Ltd.
Lang.
en
Rev. ind.
A
Page
41
For the 7MVA air-cooled ACS 5000 with constant torque load characteristic
the following levels may not be exceeded:
out
sw
out
210
sw
39
60
index
2
Figure 6: Current and Switching frequency limitations for air-cooled 7MVA
ACS 5000
In ACS 5000SD two parameters are available to tune the switching frequency:
134.75 FLUX HYST FACTOR (only acts on flux hysteresis band)
134.76 TORQ HYST FACTOR (only acts on torque hysteresis bands)
This tuning should be done under load. Results when tuning under no-load
condition may be misleading.
The switching frequency reacts rather sensitive to flux hysteresis band.
Nevertheless it must be considered that the flux hysteresis band is important for
the quality (THD) of the stator currents. If it is too big the current quality
deteriorates. Therefore it is recommended to use 134.75 very carefully.
If possible tune the switching frequency by adapting the parameter 134.76 which
only acts on the torque hysteresis (equally on all bands).
Keep in mind that these parameters are constant and therefore have an influence
in all operating points. If these two parameters need to be changed, check the
whole operating range of the drive to avoid areas where the switching frequency
exceeds the aforementioned limits.
ACS 6000 3, 5 and 7MVA units:
SF 1s MAX
300
SF 250ms MAX
75
SF 50ms MAX
20 - 25
SF 1ms MAX
1–3
For the high power modules in ACS 6000 the switching frequency target is
current dependant:
Document number
ABB Switzerland Ltd.
Lang.
en
Rev. ind.
A
Page
42
ACS 6000 9MVA units:
SF 1s MAX
250 @ 1640A
300 @ 1280A
ACS 6000 11MVA units: (for max 41°C Water temp):
SF 1s MAX
102 @ 2156A
138 @ 2010A
230 @ 1640A
SF 250ms MAX = (SF1s MAX /4) +10
For 11MVA modules the 1sec and the 250ms SF trip levels are current
dependent and will be reduced starting from 1650A rms.
The proposed values for the switching frequency are valid for “normal”
conditions. In case of extreme operation conditions (like hot cooling
water), use the calculated values of the system design group.
If the switching frequencies during load conditions of the drive stay below
these limits no further tuning is needed. In case the switching frequency
considerably exceeds the value for the 1s time window, the functions
described below have to be used.
7.2 Tune switching frequency based on frequency and power
This chapter does not apply for high speed drives.
1. Determine for which motor frequencies and powers the switching
frequency exceeds the allowed limits. This defines the frequency-power
plain (Switching frequency = f(freq,P)) where tuning is needed.
2. Set the frequency range of the boost according to the determined values.
ACS 5000:
134.32 PWR CORR FREQ MIN
134.33 PWR CORR FREQ MAX
134.34 FREQ DELTA
minimum frequency (relative to
motor nominal frequency) where
boost is activated.
maximum frequency (relative to
motor nominal freq.) where boost
is deactivated.
defines the slope of a weighting
factor (see fig.4; is ramped from
0 - 100 %.
ACS 6000:
134.19 PWR CORR FREQ MIN
134.20 PWR CORR FREQ MAX
134.21 FREQ DELTA
Document number
ABB Switzerland Ltd.
Lang.
en
Rev. ind.
A
Page
43
Weight
[%]
100 %
}
}
FREQ DELTA
[%]
PWR CORR FREQ MAX frequency
PWR CORR FREQ MIN
Figure 7: Boost weighting as a function of the frequency.
3. Set the power range of the boost according the determined values.
ACS 5000:
134.29 START CORR POWER
power limit where boost is
activated.
defines the slope when boost is
ramped from 0 – POWER CORR
MAX %.
134.30 POWER DELTA
ACS 6000:
134.16 START CORR POWER
134.17 POWER DELTA
Calculate error
SF 1s MAX SF 1s target
SF 1s target
Set 134.31 POWER CORR MAX (ACS 5000) / 134.18 POWER CORR
MAX (ACS 6000) (maximal widening of the hysteresis bands) to new
value using eq.
POWER CORR MAX tuned
1 POWER CORR MAX
Boost
POWER CORR MAX
}
POWER DELTA
START CORR POWER
Power [%]
Figure 8: Hysteresis widening as a function of the power.
Document number
ABB Switzerland Ltd.
Lang.
en
Rev. ind.
A
Page
44
7.3 Tune switching frequency based on current
This chapter does not apply for high speed drives.
This function can be used to lower the switching frequency for high inverter
currents. The function is mainly used to achieve the current dependant
switching frequency levels defined at the beginning of the chapter for the 9
and 11 MVA modules of ACS 6000.
The related parameters and default values are:
ACS5000:
134.35 INV.CURR. CORR.
134.36 CURR. CORR. VALUE
100 %
0%
ACS6000:
134.22 INV.CURR. CORR.
134.23 CURR. CORR. VALUE
100 %
50 %
The function increases the hysteresis and thus decreases the switching
frequency if the current is above the value given in INV. CURR CORR.
ATTENTION:
The parameter INV CURR CORR is related to inverter current (not motor
current). For this function the maximum inverter current is equal to
150%.
This means that with the default setting for INV.CURR. CORR = 100% the
function starts to decrease the switching frequency at 66% of maximal inverter
current.
The parameter CURR.CORR.VAUE defines how much the hysteresis is
increased at maximum inverter current. If the switching frequency does not go
down enough at higher currents the parameter CURR.CORR.VALUE can be
increased.
boost
SFmax=250
MAX CUR CORR
100%
SFmax=300
Current
CORR STRT INV CUR
150%
Figure 9: Hysteresis widening as a function of Inverter current.
7.4 Neutral point control
The neutral point (NP-) control is done differently for ACS5000 and ACS6000.
ACS5000 can be forced to switch for NP, in ACS6000 NP is only controlled if
there already is a switch due to torque or flux. That is why there are 3 levels
for NP- control in ACS5000 and only 2 levels for ACS 6000.
Document number
ABB Switzerland Ltd.
Lang.
en
Rev. ind.
A
Page
45
In any case it is recommended to run the drive with a certain margin in the
output voltage. This simplifies NP control. Set the parameter 130.04
VOLTAGE RESERVE to 5%.
Only for ACS 5000:
The NP control uses hysteresis controllers to regulate the NP voltages of the
three phases (160.15 NP VOLTAGE 1, 160.23 NP VOLTAGE 2, 160.31 NP
VOLTAGE 3). The control of the NP voltage is done independently for each
DC link. The performance of the control can be tuned via parameters:
134.23 NP 1ST HYST (deactivation level)
134.24 NP 2ND HYST (activation level)
134.25 NP 3RD HYST (forcing level)
The values are given in absolute Volts. For the air cooled ACS 5000 the levels
are bigger than for the water cooled types. Below the NP 1ST HYST the NP
control is not active. If NP rises above the value of NP 2ND HYST the control
becomes active. If NP is bigger than the value of NP 3RD HYST a switching is
forced to control NP. The inner two NP hysteresis bands are chosen to be
very small which activates NP control almost continuously. This helps to
distribute switching losses evenly on all semiconductors (loss balancing). The
switching frequency is not influenced.
Monitor the NP-voltage actual values (160.15, 160.23 and 160.31 NP
VOLTAGE1, 2 and 3) with 1ms sample time. For speeds < 50% the third level
of NP deviation should be reached only seldom. For speeds > 50% the third
level is hit regularly.
It should not be necessary to tune the NP hysteresis bandwidths. The trip level
for the NP-voltage is 660V (186.06 NP VOLTAGE TRIP). Changing this value
is prohibited.
Only for ACS 6000:
The NP control uses a hysteresis controller to regulate the NP voltages
voltage (160.15 NP VOLTAGE). The performance of the control can be tuned
via parameters:
134.11 NP 2ND HYST (deactivation level)
134.12 NP 3RD HYST (activation level)
Below the NP 2ND HYST the NP control is not active. If NP rises above the
value of NP 3RD HYST the control becomes active. The trip level for NPvoltage is 800V (186.06 NP VOLTAGE TRIP). The value is chosen to match
with the over voltage trip value. Changing the value is prohibited.
Monitor the NP-voltage actual value (160.15 NP VOLTAGE) with 1ms sample
time. If the value exceeds 500V then the control may trip to NP-voltage later
on. Change the NP-control hysteresis to keep the NP-voltage under 500V.
Too narrow NP-hysteresis (deactivation and activation level are too close to
each other) may result to switching frequency trips; especially 50 or 250 ms
SF faults. Then tune the other hysteresis boost parameters.
In low motor frequency, high power metal applications, where the NP voltage
can increase very fast, the unfiltered NP voltage can be used by setting
parameter 134.40 NP VOLT FILTER to disabled. The drawback would be a
increase of the switching frequency of around 30Hz in average.
Document number
ABB Switzerland Ltd.
Lang.
en
Rev. ind.
A
Page
46
In ACS6000 NP mainly occur if the SF or in SD in case the current is too low.
In case of NP trips check the SF and try to increase it to the values given at
the beginning of the chapter. In case of an SD motor at no load the stator
current can be very low, this can also result in problems for the NP control.
Use the “Minimum Current” function described below to increase the stator
current.
An inaccurate power feed forward term to ARU can result on unstable dc-link
(pumping or NP-voltage spikes). During tuning the power feed forward term
can be disabled with a parameter 112.07 PFF ENABLE.
Trips can also occur in case only the ARU is running (= no INU running). The
problem can be solved by activating 134.36 NP LIMITER in case there is a
VLU/RBU/BCU. The VLU will be switched on, if the NP voltage exceeds 400V
and will be switched off as soon as the NP VOLTAGE drops below 300V. This
parameter has no influence when the VLU is not enabled (e.g. slave drives).
Another way to get rid of the problem is by only starting the ARU in case an
INU starts. (Check the ARU Signal & Parameter table on how to do this).
7.5 Dynamic switching frequency control
This chapter does not apply for high speed drives.
This function dynamically widens the hysteresis bands when the switching
frequency exceeds a threshold. The idea is that the general tuning is done
without this function. At the end of the commissioning, after the basic tuning
is done, the dynamic switching frequency control should be enabled to prevent
switching frequency trips.
Enable this function only after tuning of the hysteresis bands!
Parameters related to this functionality are located in group 134 of AMC table.
DYNAMIC BOOST
widening factor of the hysteresis in % when the
boost is active.
DYN BOOST RAMPING slope, which returns the hysteresis back to normal,
after the boost is released (in %/ms).
BOOST ACTIVE CNT
counts how many times the function has become
active
DYN BOOST 50 ACT
switching frequency level at which the boost is
activated in the 50ms window (in % of actual
switching frequency trip level).
DYN BOOST 50 REL
switching frequency level at which the boost is
released in the 50ms window (in % of actual
switching frequency trip level).
DYN BOOST 250 ACT
switching frequency level at which the boost is
activated in the 250ms window (in % of actual
switching frequency trip level).
DYN BOOST 250 REL
switching frequency level at which the boost is
released in the 250ms window (in % of actual
switching frequency trip level).
For ACS 6000SD there are also following parameters:
Document number
ABB Switzerland Ltd.
Lang.
en
Rev. ind.
A
Page
47
DYN BOOST 1s ACT
switching frequency level (in % of actual switching
frequency trip level) in 1s window where boost is
activated.
DYN BOOST 1s REL
switching frequency level (in % of actual switching
frequency trip level) in 1s window where boost is
passivated.
Tuning of the 250ms dynamic switching frequency control function:
If the switching frequency in the 250ms window exceeds the value defined by
parameter DYN BOOST 250 ACT all hysteresis bands are widened. The
increase is given by the parameter DYNAMIC BOOST. This parameter is
scaled so that 100% corresponds to the factor of 1. To activate the function
values of more than 100% have to be chosen (e.g. 150% gives a scaling
factor of 1.5). When the switching frequency in the 250ms window is below the
value defined by parameter DYN BOOST 250 REL all hysteresis bands are
ramped back down to the original values. Ramping time is defined by
parameter DYN BOOST RAMPING.
The following figure shows how the function works.
134.40 DYNAMIC BOOST
134.38 DYN BOOST SF ACT
134.39 DYN BOOST SF REL
t
134.41 DYN BOOST RAMPING
Figure 10: Dynamic Boost functionality
The DYN BOOST 250 ACT value has to be set below the trip level for the
250ms window, otherwise the drive trips before the function becomes active.
The parameter should be set ca 20% below the trip value to ensure the
function becomes active before the drive trips.
The parameter DYN BOOST 250 REL is the release level. If the switching
frequency is below this value the hysteresis limits are started to be ramped
down to their nominal value. This value has to be lower than the activation
level, but slightly higher than the tuning target. Otherwise the function will stay
active all the time, and performance is deteriorated.
The amount the hysteresis is widened is given by the parameter DYNAMIC
BOOST. Normally values of 130 – 140% are sufficient to prevent any SF trips.
Tuning of the 50ms and 1 s dynamic switching frequency control function are
analog to the 250ms function.
The parameter BOOST ACTIVE CNT counts how many times the dynamic
boost was active. Check this parameter to see if and under which loading
conditions the function becomes active.
Document number
ABB Switzerland Ltd.
Lang.
en
Rev. ind.
A
Page
48
Recommended values at the end of commissioning:
DYNAMIC BOOST
= 140%
DYN BOOST RAMPING =
1
7.6 1ms Switching frequency
In case there are problems with the 1ms switching frequency first check the
cable specification to ensure the installed cables and the cable length fulfils
the requirements. Inform MV AC Supportline if there is any uncertainty.
If the cables are ok the following functions can be used to prevent 1ms SF
trips:
Filter the current. In the PEC-INT (ACS 5000) or the INT (ACS 6000) a
current filter can be activated. It uses the full sampling rate of the
current measurement (200kHz) and therefore allows to implement
filtering functions without adding significant delay to the current
measurement.
ACS 5000:
The user can choose between a second order low-pass filter and a
second order band-stop filter. The cut-off frequency respectively the
center frequency of the filters can be selected in a certain range. For
the band-stop filter also the relative bandwidth can be chosen.
Parameters (with default values):
134.45 PH CUR FILTER SEL
NO FILTER
134.46 FILTER CHAR FREQ
50 kHz
134.47 REL BANDSTO WIDTH
20 %
ACS 6000:
The filter can be activated by parameter 134.24 LONG CABLE MODE.
Start by setting the parameter to filter 1. (CABLE <125m). If
dampening is not enough, switch to the second filter setting (CABLE
<150m). (Valid from EPLD Version 2100)
Use the estimated current instead of the measured current. In the
control software an observer model estimates the stator current. The
estimated value is corrected with the measured value, such that the
estimated current value follows the true current very nicely but avoiding
the high frequency disturbance components.
For ACS 5000 this function often has to be enabled.
The parameters for this function are located in group 153. Defaults:
I EST ENABLE
= DISABLE
DAMP COEFF
= 100 %
I MEAS RATE
=5%
Document number
ABB Switzerland Ltd.
Lang.
en
Rev. ind.
A
Page
49
Monitor the influence by temporarily changing the Datalogger 1
settings. Set the CH2 monitoring signal to Parameter 154.23 Phase U
CUR EST [A].
Take several Datalogger measurements at different loading conditions
and compare the estimated current to the measured current. If they do
not match stop using the function or contact MV AC Supportline for
support. At the end restore the default settings of the Datalogger 1
(CH2 = Par. 1.03 Phase V Current).
Only for ACS 6000:
If this is not enough to prevent 1ms switching frequency trips, then
activate the 1ms switching frequency limiter. Change Parameter
134.33 SF 1ms LIMIT from 10 to 4 (starting level of the 1ms limiter).
Adjust then the blocking time 134.34 only if really necessary. Default
value is 8. If the value is too big, then the control can get unstable and
this results in high torque ripple and high current peaks.
Parameter 134.35 counts up how many time this function was active.
Recommend values:
134.33 SF 1ms LIMIT
4 pcs
134.34 SF BLOCK TIME 25u
8 pcs
Please use this function with care, because it is interfering with the
modulation.
Document number
ABB Switzerland Ltd.
Lang.
en
Rev. ind.
A
Page
50
8 Auto Restart
The Auto Restart functionality prevents long interruptions of the process in
fault cases. If this functionality is enabled, drive will restart automatically after
the faults source which requires an auto restart has disappeared.
Commissioning of the Auto Restart functionality requires profound knowledge
of the system and the environment where it is working in. It should only be
commissioned after consultation with the costumer.
An Auto Restart will stop modulation, but MCB will not open and DC link will
not discharge. The overriding control will stay in Rdy_Ref state.
8.1 Enabling/ Disabling
There are different root causes for Auto Restart (Auto Restart Classes). For
each class it is possible to enable or disable Auto Restart.
Default settings: Auto Restart for all Classes is disabled
Enabling/ disabling of different Auto Restart Classes is made via parameter
111.20 (AUTORESTART CW). Please refer to the Signal Parameter Table to
select the correct bits.
8.2 Timer Settings
Several timer settings need to be done in parameter group 111. The
properties of all timers are discussed in the Signal Parameter Table.
111.22 (AR TIMER MAX)
This specific parameter is depending on the
system (Default value: 3 s).
111.23 (AR DELAY)
Set this parameter to an adequate value to delay
the restart actions (Default value: 0.5 s).
111.24 (AR WAIT MAX)
app. 20 ms
111.26 (TIME SUCC AR)
app. 30 s
8.3 Observing Auto Restart
Find in parameter 111.21 (AUTORESTART SW) all necessary information
about the status of the functionality.
The maximum number of allowed successive Auto Restart is set in parameter
111.25 (Default value: 5).
The number of Auto Restarts is stored in the Powerfail File and is accessible
via parameter 191.21.
Document number
ABB Switzerland Ltd.
Lang.
en
Rev. ind.
A
Page
51
9 Static torque limiters
9.1
Pull-out torque limiter
This limiter is only used with AD motors
When the load exceeds so called pull-out (breakdown) torque the motor stalls.
To avoid this, the pull-out torque is calculated out of the formula below. The
calculated value with a reduction (margin) factor equal to 0.9 is used to limit
the output torque. This limit is shown in [%] of nominal torque in AMC table,
signal 133.15.
t lim it %
k gain t spull
out
100 , value shown in signal 133.15.
k gain is set in parameter 133.16 (default 90%)
If parameter 133.16 does not exist, the used gain is 90%
t spull
1
2 LS , pu
out , pu
2
S
, pu
where
cos n
150.03 mH
150.02 mH
LS , pu
130.09 %
10000
2
S , pu
cos
150.03 mH
1000
n
2
110.03 Hz 3 110.02 A
110.01 V
2
110.06
Please see also chapter “Stator stray inductance” on “On-line tuning at loading
conditions”.
9.2
Overloadability (or derating)
The thermal overloadability function is based on measured temperatures of
cabinets (thermostats), cooling water and ambient air. In case of elevated
temperatures the inverter current is derated to certain level with certain rates
according to parameter settings.
The following parameters are related to the function.
112.02 INU MAX CURRENT
133.01 INU MAX CONT CUR
133.02 WATER DERATE 1
133.03 AMBIENT DERATE
133.02 WATER DERATE 2
maximum current of inverter unit
maximum continuous current of inverter
unit
inverter current derating factor % per
degree. First slope.
inverter current derating factor % per
degree
inverter current derating factor % per
degree. Second slope.
Document number
ABB Switzerland Ltd.
Lang.
en
Rev. ind.
A
Page
52
The following signals are related to the function.
160.42 TEMP DIFF INU
160.43 TEMP DIFF AMBIENT
160.69 TEMP ALARM INU
170.09 TC AUX CW
de-ionized water temperature over
derate level
ambient temperature difference over
alarm level
de-ionized water temperature alarm
level
Bit0 = 1: cabinet temperature over alarm
level
Inverter current can be derated due to three sources:
high cabinet temperature
high cooling water temperature
high ambient air temperature
If none of these sources is active (160.42 = 0 and 160.43 = 0 and 170.09 bit0
= 0) the allowed inverter current is determined by parameter 112.02.
If the cabinet temperature is above the alarm level, the allowed inverter
current is set to the level of parameter 133.01.
If the ambient temperature is above the alarm level the inverter current is
derated. Starting from the level set by parameter 112.02, the current is
decreased with the rate specified by parameter 133.03.
If the de-ionized water temperature is above the derating level (160.42 > 0) the
inverter current is derated with slope_1 defined by parameter 133.02, starting
from the maximum current defined in parameter 112.02.
Only for ACS 6000:
If the temperature is above the alarm level (160.42 > 160.69) the derating is
carried on with slope_2 defined in parameter 133.25. This behavior is
illustrated on the following picture.
N.B.
100% torque means: Hypothetical torque on used machine when
running with maximum INU current (parameter 112.02).
Document number
ABB Switzerland Ltd.
Lang.
en
Rev. ind.
A
Page
53
Limiting the current is done by limiting the torque.
Document number
ABB Switzerland Ltd.
Lang.
en
Rev. ind.
A
Page
54
10 Dynamic torque limiters
There are several dynamic torque limiters. They are able to change (limit) the
torque reference in order to prevent trips such as overvoltage, undervoltage or
too high angular frequency. The dynamic limiters are located after the static
limiters. Except the braking limiter the dynamic torque limiters are Pcontrollers with a threshold level and a gain as parameters.
Each limiter has a parameter indicating what the maximal torque is that the
limiter allows and a parameter indicating if the limiter is active. In case any
limiter is active the torque reference coming form the speed controller is
changed. In these cases the motor speed will not follow the speed reference
any more.
10.1 Overvoltage limiter
The purpose of this limiter is to prevent the DC link voltage to exceed the
threshold value defined by parameter 132.02. In case the drive is breaking this
limiter is needed to reduce the breaking torque and prevent an overvoltage
trip. However if the overvoltage is coming from the network the limiter will also
increase the torque and thereby the motor speed. This might not be tolerable
for some applications. In these cases the limiter has to be disabled.
The limiter also has a problem if it becomes active at zero speed. In this case
it is not clear if the torque should be positive or negative, it might even happen
that the reference toggles between these two states.
The torque reference is calculated from the formula:
Tref %
Pgain %
U DCact V U DC lim V
U DCnom V
In ACS 5000 the maximum of all six half DC link voltages (multiplied by two) is
used as actual DC voltage.
In this formula:
UDC,act
actual value of DC voltage in volts, (ACS 6000: 160.09; in ACS 5000
the maximum of 160.11, 160.13, 160.19, 160.21, 160.27 and 160.29
multiplied by two is used)
UDC,lim
threshold level of DC voltage in volts defined by parameter 132.02
UDC,nom
nominal DC voltage defined by parameter 112.04
Pgain
controller gain in % defined by parameter 132.03
Example 1: If the actual voltage is 10% (% refer to the DC nominal value
defined by parameter 112.04) below the threshold level and Pgain is 1000%,
the torque is limited to minimally -100%, i.e. the drive is still allowed to brake
with nominal torque.
Example 2: If the actual voltage reaches the threshold level in parameter
132.02, the allowed torque is limited to minimally 0%, i.e. the drive is not
allowed to brake any more.
Document number
ABB Switzerland Ltd.
Lang.
en
Rev. ind.
A
Page
55
The limiter can be enabled / disabled by parameter 132.01. For ACS 5000 and
ACS 6000AD it is enabled by default.
The other default values for the control are:
ACS 5000:
132.02 OVERVOLT LIMIT
= 6300 V
132.03 OVERVOLT LIM GAIN
= 1000 %
ACS 6000:
132.02 OVERVOLT LIMIT
= 5400 V
132.03 OVERVOLT LIM GAIN
= 1000 %
The output torque of the limiter can be seen in the parameter “overvoltage
torque reference.” In AD drives this is parameter 132.10, in SD drives
parameter 132.12
The status of the limiter is displayed in parameter “overvolt limiting”. In AD
drives this is parameter 132.14 in SD drives 132.17.
10.2 Undervoltage limiter (Ride through)
In the SD machines the ride through function does not work for long
times since the EXU trips with undervoltage. There is a special EXU ridethrough function which restarts EXU after power loss without tripping
the main drive.
The purpose of the undervoltage limiter is to keep the DC-voltage from
dropping below the threshold level defined by parameter 132.36
(ACS 5000AD), 132.26 (ACS 5000 SD) or 132.05 (ACS 6000). The torque
reference is calculated from the formula:
Tref %
Pgain %
U DCact V U DC lim V
U DCnom V
In this formula:
UDC,act
actual value of DC voltage in volts (ACS 6000: 160.09; in
ACS 5000 the average of the three actual full DC voltages 160.09,
160.17 and 160.25 is used.)
UDC,lim
threshold level of DC voltage in volts (ACS 6000: 132.05;
ACS 5000AD: 132.36; ACS 5000SD: 132.26)
UDC,nom
nominal DC voltage defined by parameter 112.04
Pgain
controller gain in % (ACS 6000: 132.06; and ACS 5000SD: 132.28;
ACS 5000AD: 132.37 and 38 respectively); in ACS 5000AD the RT
controller gain depends on the sign of the voltage error:
if (UDC_act >= UDC_lim),
Pgain = 132.37
else
Pgain = 132.38
Document number
ABB Switzerland Ltd.
Lang.
en
Rev. ind.
A
Page
56
Example: If the actual voltage is 5% (% refer to the DC nominal value defined
by parameter 112.04) below the threshold level and Pgain is 100% the torque is
limited to values smaller than minus 5% of nominal torque.
The output torque of the limiter can be seen in the parameters 132.11
(ACS 6000AD), 132.13 (ACS 6000SD) or 132.30 (ACS 5000).
The status of the limiter is shown in parameters 132.15 (ACS 6000AD),
132.16 (ACS 6000SD) or 132.23 (ACS 5000).
Only for ACS 5000SD:
The voltage used as input to the limiter is shown in 132.24 and the resulting
torque limit is shown in 132.30. Experience has shown that with a gain 132.28
significantly bigger than the default value of 100% the three DC links in the
ACS 5000 converter may start to oscillate against each other keeping the
average still nicely under control. It was therefore necessary to implement a
trigger level (defined in 132.25) for the beginning of ride-through operation
which is lower than the reference value in 132.26. As long as the drive is in
ride-through mode, the torque reference coming from the speed controller is
overwritten by the torque reference that is calculated according to above
equation.
As soon as the DC link voltage passes an upper level (defined in 132.27) the
drive returns to normal operating mode.
ACS 5000AD and SD:
The duration of ride-through operation is limited to the time given in 132.33.
After this time is exceeded the drive trips. Setting this parameter to 0 disables
the supervision of ride-through time. In addition the speed is supervised.
Below the threshold given by parameter 132.32 the drive trips because it is
assumed that below that speed there is not enough energy taken from the
rotating machinery to support the DC link voltage.
The ride-through functionality is enabled by default. The default values for the
control are:
ACS 6000:
132.05 UNDERVOLT LIMIT
= 3580
132.06 UNDERVOL LIM GAIN
= 1000 %
ACS 5000AD
132.21 UNDERVOLT ENA
= TRUE
132.36 UNDERVOLT UDC REF
= 3700 V
132.37 UNDERVOLT P-GAIN1
= 1000 %
132.38 UNDERVOLT P-GAIN2
= 100 %
132.32 UNDERVOLT N MIN
= 10 %
132.33 UNDERVOLT MAX LEN
= 0 ms (0 means infinite time)
ACS 5000SD
132.21 RIDETHRU ENA
= TRUE
132.25 UDC NORM2RT
= 3800 V
Document number
ABB Switzerland Ltd.
Lang.
en
Rev. ind.
A
Page
57
132.26 UDC REF RT
= 4200 V
132.27 UDC RT2NORM
= 4400 V
132.28 GAIN UDC CTRL RT
= 100 %
132.32 N MIN RIDETHRU
= 10 %
132.33 MAX RIDETHRU LEN
= 0 ms (0 means infinite time)
10.3 Frequency limiter
The purpose of this limiter is to limit the frequency (speed). The frequency of
the motor is limited to the value defined by parameter 132.07 for positive and
by parameter 132.08 for negative direction of rotation. The torque reference is
calculated from the formula:
Tref %
Pgain %
f lim Hz f act Hz
f nom Hz
In this formula:
flim
limit level of frequency defined by parameter 132.07 or 132.08
fact
actual value of frequency signal 161.04
fnom nominal value of frequency parameter 110.03
Pgain controller gain in % defined by parameter 132.09
Example: If the actual frequency is 10% (% refer to the nominal frequency fnom)
below the limit frequency and Pgain is 1000% the torque is limited to 100%
(nominal value Tnom).
The output torque of the limiter can be seen in the parameter “frequency
torque reference.” In AD drives this is parameter 132.12, in SD drives
parameter 132.14
The status of the limiter is displayed in parameter “frequency limiting”. In AD
drives this is parameter 132.16 in SD drives 132.19.
10.4 Load Angle Limiter
This limiter is only used for SD machines.
The purpose of this limiter is to keep the load angle of the machine below a
certain limit in order to avoid pull-out of the machine. The load angle limit is set
in parameter 132.10 and the gain of the P-controller is set in 132.11. The
torque limit is calculated according to the following equation
Tref %
max Pgain %
sd _ fw
Vs
s _ nom
sd _ la lim
Vs
Vs
;0
In this formula:
Document number
ABB Switzerland Ltd.
Lang.
en
Rev. ind.
A
Page
58
sd_fw
s_lalim
s_nom
Pgain
Actual stator flux in d-axis (corrected if in field weakening)
s_nom*cos(delta_limit) D-axis stator flux if machine is at load angle
limit 132.10
Nominal stator flux
Controller gain in % calculated from parameter 132.11
The controller gain is calculated from the difference of the load angle for which
the torque is reduced from 100% to 0% (at exactly the load angle limit 132.10).
The torque limit calculated according to above equation is shown in 132.15.
Example: If the actual load angle limit is 85 deg (132.10), the delta of the load
angle is set to 5 deg (132.11) and the actual load angle is 80 deg 1000%, the
torque is limited to 100% (nominal value Tnom).
The output torque of the limiter can be seen in the parameter 132.15 “load
angle torque reference.”
The status of the limiter is displayed in parameter 132.20 “load angle limiting”.
10.5 Braking limiter (BCU/RBU)
The following only applies for ACS 6000.
This function limits the dc-link voltage rise while braking with BCU/RBU.
The following parameter values have to be defined based on the HW
dimensioning as they are used to protect the braking unit HW.
Torque is limited to a value, which corresponds to the nominal RBU/BCU
braking power value given by 192.16 RBU ON BRK POWER, unless one of
the dc-link half voltages exceeds certain level given by 192.21 LIMIT
BRAKING VOL [V].
Then the torque is limited with a ramp to a value, which corresponds 40% of
the nominal RBU/BCU braking power. Ramp time is given by the parameter
192.23 BRA LIM RAMP TIME [ms].
When all of the dc-link half voltages are under certain level given by 192.22
RECOVER BRAKING V [V] then the limitation is ramped back to a value,
which corresponds the nominal RBU/BCU braking power value given by
192.16 RBU ON BRK POWER.
The calculated value is shown on 132.13 BRAK UNIT TRQ REF [%] and the
status on 132.17 BRA UNIT LIMITING [LIMITING / NOT LIMITING].
This limiter does not limit the braking power, torque and current to acceptable
level alone. The maximum braking current has to be limited by the static
limiters chain to a certain value especially on low speeds to keep the braking
current on certain level. See chapter of static limiters!
10.6 Damping the dc-link voltage ripple (diode rectifier)
This function should be disabled for ACS 6000 drives with ARU.
This function is not a limiter, but it can also change the torque reference. The
torque reference is modified after the speed controller (or torque reference
Document number
ABB Switzerland Ltd.
Lang.
en
Rev. ind.
A
Page
59
given from FA) and before the dynamic torque limitations. The static torque
limitations are already taken into account inside the FA.
This functionality was developed for weak supply networks. In these networks
a stiff torque control may result in oscillations of the DC-link voltage. In case of
a weak supply network, the DC-link voltage oscillations typically have the
same frequency as the supply network frequency. Under certain conditions
this may lead to saturation of the line transformer and to trips. The oscillations
can be damped if the torque reference value is modified as a function of the
actual DC-link voltage.
Set the limitation 159.04 ALLOWED DAMPING to a reasonable value (for
example 5%).This parameter determines how strong the torque can be
modified due to DC oscillations. The value is given in % of the nominal torque.
Set 159.02 UDC FILT TIMECONS to 20ms and 159.03 DAMPING GAIN to
100%. The larger the time constant (159.02) is set, the bigger the resulting
delay and thus phase shift between the filtered and the original signal.
Enable the function. Monitor the behavior of the DC-link voltage. Increase the
gain by steps of 5 – 10 %. Keep in mind that the gain of this function should be
as small as possible in order to keep the noise of the resulting torque
reference small. Compare the output of this function with the torque reference
given by the FA.
The maximal value of the torque change (159.04 ALLOWED DAMPING)
should be set higher than the value needed to remove the oscillation.
Otherwise a sudden change of the torque reference could excite the oscillation
again. This risk can be checked using the TORQ STEP input (parameter
26.03). Choose a small value and keep in mind that this acts directly on the
torque reference coming from FA and that all limiters will act on the modified
torque reference.
Do not forget to clear the parameter 26.03 TORQ STEP after the tuning is
terminated.
159.01 ENA DAMPING
Enables the functionality
159.02 UDC FILT TIMECONS
T < 159.02 < 5 * T
T is the cycle time of the supply network
(20ms/50Hz)
159.03 DAMPING GAIN
Normally 100%, an increased value can be
used to achieve a stronger damping
159.04 ALLOWED DAMPING
Maximally allowed damping in % of
nominal torque. For example 5 % results in
maximal change of the torque of ±5 %.
Increase this value with steps of 1-5 %
during tuning if necessary
159.05
not in use
159.06 TORQ REF MODIFIED
Compare this value to the torque reference
value given by the FA during tuning
159.07 ENABLING SPEED[%]
Speed above which damping is enabled.
For example a value of 10 % enables the
damping function, as soon as the motor
Document number
ABB Switzerland Ltd.
Lang.
en
Rev. ind.
A
Page
60
speed is higher than 10% of the motor
nominal speed.
159.08 ENA GENERAT. MODE
Generator mode must be set to FALSE for
ACS5000 and ACS6000 single drives.
Contact supportline in case needed with an
ACS6000 multidrive.
159.09 ENA P-CONTR. MODE
This parameter changes the control
principle of the UDC damping function. If
this parameter is set to true, then a simple
P controller is used to dampen the DC-link.
Normally this parameter should be FALSE.
Document number
ABB Switzerland Ltd.
Lang.
en
Rev. ind.
A
Page
61
11 Speed controller
The speed controller must be tuned to the motor and the driven load.
The tuning of the speed controller is performed with the coupled motor by
applying a speed step directly to the input of the controller. The response of
the controller on the speed step is monitored and, if necessary, the default
settings of control parameters are changed in such a way that the response of
the controller is optimal for the driven process. After the tuning, sudden load
changes should be corrected without stressing the mechanical equipment
(gear box, belts, etc.) and affecting other control loops.
When tuning the speed controller, only one control parameter should be
changed at a time. The effects of the parameter change with respect to step
response and possible oscillations have to be monitored over the whole speed
range.
Speed response tests should be carried out at different speeds between the
minimum and the maximum speed of the motor. The speed intervals should
be small enough to be able to detect possible resonance points.
Due to varying friction at different speeds of the driven load the response time
can vary as well. In this case, it is recommended to adjust the appropriate
response time to about half of the process speed.
Speed steps of 2% of the maximum speed or bigger are applied to see the
response behaviour of the actual speed.
Proceed as follows to tune the speed controller using speed steps:
1. Accelerate the motor to the selected speed setpoint.
2. Select parameter 120.10 SPEED_STEP.
3. Set the speed step to 2% of the maximum speed and the duration for 3000
ms as shown in the figure below.
4. Set the datalogger to trigger from signal 120.10 SPEED_STEP.
5. Add signals 120.10 SPEED_STEP, 122.4 MOTOR SPEED, 122.14
TORQUE_REF_5 and 161.2 TORQUE_NOFILT to the datalogger as
shown below.
Document number
ABB Switzerland Ltd.
Lang.
en
Rev. ind.
A
Page
62
6. Start the datalogger and apply the steps. Tuning is performed by using
parameters 121.01 KPS (proportinal to the gain) and 121.05 TIS
(integration time of speed controller).
7. Reduce the integral time constant 24.08 T until an overshoot is observed in
the response.
The integral time constant is then adjusted such that there is no overshoot or
only a slight overshoot (depending on the drive application). The function of
the integral part is to remove as quickly as possible the difference caused by
the proportional control between the reference and the actual value.
If the drive is stable and allows a high proportional gain, the integral time
constant can be set to a short value to obtain an overcompensated step
response.
If the torque limit is reached during a step, a further compensation of the
response should not be attempted.
See figure below for different step responses.
Error
Step
height
A
B
C
D
E
Time
Required response time
A = undercompensated, too short intergration time and low proportional gain
B = undercompensated, too low proportional gain
C = normal
D = normal, when better dynamic performance is needed
E = overcompensated, short intergration time and high proportional gain
Document number
ABB Switzerland Ltd.
Lang.
en
Rev. ind.
A
Page
63
12 Update to newer software release
Before executing any update, please check the compatibility list.
Read the txt file included in the loading package carefully to check what has
changed compared to the previous version.
1. BACKUP OF OLD PARAMETERS
Make a backup of the used parameters as first action. In Drive Debug
save the parameter list as a text file and as a *.PAC file.
2. SAVE THE PREVIOUS FLASH AS BACKUP
Remove the previous Flash and store it in a safe place as backup in
case programming of the loading package fails.
3. DOWNLOADING THE NEW RELEASE
Download the new SW release.
After downloading the new SW release take a backup of the new
default parameters.
4. RESTORING OF PARAMETERS
After backing up the parameters with DriveDebug, downloading the
new software package and restoring the backup file, check that the
loading package version in the AMC Table Index 100.11 SW
PACKAGE VER is correct.
Otherwise you have to update the name of the software package
manually:
102.01 PARAM LOCK
OFF
100.11 SW PACKAGE VER 'LxOIxxxx'
loading package)
102.01 PARAM LOCK
(xxxx=version
of
new
ON
5. COMPARE THE NEW RESTORED PARAMETERS AND THE
BACKUP PARAMETERS
Please note that between different SW releases the parameters of the
AMC-table may be modified. Parameters may have been shifted to
different places or the meaning or scaling of the parameter may be
different. After restoring the parameters to the new release always
compare all of the names and values with the old release!
Compare the new default parameters with the old values. In case a
default value mismatches check the release documents. If no
information is given please contact the manufacturer. Check the
invparam.xls file to see the default values for the given inverter type
(updated file is included in the new loading package).
Document number
ABB Switzerland Ltd.
Lang.
en
Rev. ind.
A
Page
64
13 Backup of the software and parameters
Before leaving the site, make a backup of all the loaded software in the flash
and the used parameters: (Don’t forget the excitation units in case of a
synchronous machine drive).
Also make sure that the Dataloggers have been set back to their default
values. This can be done easily by using Parameter 106.18 and 106.19. Also
check if both Dataloggers have been started afterwards.
Use both tools, DriveDebug and DriveWindow 2.xx
13.1 DriveDebug:
Select the target drive in the target list window (double click on the required
target)
Open the Parameter table, upload the parameters:
Save the Parameters as text file.
This has to be done for all boards (INU / ARU). Don’t forget the CCB
board / DCS in case of an SD drive.
Document number
ABB Switzerland Ltd.
Lang.
en
Rev. ind.
A
Page
65
Save the Parameters as binary file:
1.
2.
Save the whole flash file content to a *.tar file (not supported for CCB)
Document number
ABB Switzerland Ltd.
Lang.
en
Rev. ind.
A
Page
66
13.2 DriveWindow:
Also make a backup with DriveWindow
1. Create a new backup package:
2. Make a backup of all connected drives if a branching board exists,
otherwise select the drives individually.
3. After finishing save the backups to a file: File, System Software, Save As…
13.3 Programming of the spare boards
The spare boards of the customer have to be programmed with the same
software version as is installed in the drives. This can be done using the
DriveWindow Restore function. The boards must be powered using an
external 24V DC power supply. It also has to be checked that the spare INT
boards (with ACS6000 also ARU and PUB) have the correct EPLD versions
loaded. Otherwise the correct EPLD’s have to be loaded and labeled.
1. Connect DriveWindow to the control board with the empty flash.
If the connection is not possible because the operating system is not
compatible with the software on the flash, execute the following steps:
a) Connect the DDCS link to the AMC34 control board CH3 and the
PC
b) Switch off the 24V power supply of the board
Document number
ABB Switzerland Ltd.
Lang.
en
Rev. ind.
A
Page
67
c) Open a DOS window and execute “ntnisa” (for NT/2000/XP
operation system)
d) In the DOS window, execute “bootint 1”
e) Switch on the 24V power supply of the board
Following messages should be displayed:
Continue restoring the empty flash:
2. Open the Backup package
3. Select System Software, Restore (Menu item is now enabled)
Document number
ABB Switzerland Ltd.
Lang.
en
Rev. ind.
A
Page
68
1. Select the restore target
2. Select the correct backup and press OK to start restoring
Document number
ABB Switzerland Ltd.
Lang.
en
Rev. ind.
A
Page
69
3. After accepting the warning message, the restoring will start
Document number
ABB Switzerland Ltd.
Lang.
en
Rev. ind.
A
Page
70
Appendix 1: Asynchronous motor equivalent circuit
Usually the datasheet of an asynchronous machine contains the parameters
of the T-equivalent circuit, which has stray reactances both on primary and on
secondary side and agrees with the physical understanding of the machine.
Nevertheless, in the motor control the L-equivalent circuit of the machine is
used, this equivalent circuit uses one parameter less and describes exactly
the same machine. The two equivalent circuits cannot be distinguished
regarding stator voltage and current behavior.
It has to be considered that the parameters of the two equivalent circuits are
not identical
T-equivalent circuit
R1T
X1sgT
X2sgT'
L-equivalent circuit
R2T'/s
R1L
XmT
XsgL
R2L'/s
XmL
T-equivalent circuit:
Parameter:
Unit:
Description:
X1sgT
[Ohm]
Stator leakage reactance
X2sgT’ [Ohm]
Rotor leakage reactance
XmT
[Ohm]
Main or magnetizing reactance
R1T
[Ohm]
Stator resistance
R2T’
[Ohm]
Rotor resistance
L-equivalent circuit:
Parameter:
Unit:
XsgL
[Ohm]
XmL
[Ohm]
R1L
[Ohm]
R2L’
[Ohm]
Description:
Overall leakage reactance
Main or magnetizing reactance
Stator resistance
Rotor resistance
Transformation from one equivalent circuit to the other:
All parameters that can be identified from the terminals are equal in both
circuits:
Stator resistance
R1
= R1T = R1L
Stator inductance
X1
= X1T = X1L = XmT+X1sgT = XmL+XsgL
Stray coefficient
= T= L
Stray inductance
Xsg
= ·X1T = X1L = XsgT = XsgL
Rotor time constant
Tr
= TrT = TrL
Document number
ABB Switzerland Ltd.
Lang.
en
Rev. ind.
A
Page
71
Based on these equalities the T-circuit parameters can be transformed into
L-circuit parameters:
R1L
L
X1L
R1T
XmT 2
T 1
XmT X1sgT XmT
X1T XmT X1sgT
XsgL
X1L
XmL
X1L
T2L
T2T
R2L'
X2sgT '
2
XsgL
XmT X2sgT '
frated R2T '
2
XmL
frated T2L
frated = rated motor frequency
The values of the L-equivalent circuit are used in the AMC table parameters
150.01 - 150.04.
Document number
ABB Switzerland Ltd.
Lang.
en
Rev. ind.
A
Page
72
Appendix 2: Related document and SW tool list
Motor data sheet from machine factory
Motor type test report
EXCEL file for parameter calculation
Users Manual
TC SW AMC table
Signal and Parameter table
FA manual
Drive window
Drive debug
Document number
ABB Switzerland Ltd.
Lang.
en
Rev. ind.
A
Page
73
Appendix 3: Description of the IGCT conducting test
function
For ACS5000 the IGCT conducting test function is available. With this function
one can test if inverter switches are conducting or not. When enabled, the test
is executed automatically after inverter has been charged. The test is based
on execution of different switch sequence combinations and DC current flow.
The inverter has to be connected to the motor to get current flow. If no current
can flow, the test results will not be correct.
After test drive stays in READY REF state, if all IGCT are conducting and is
ready to run the motor.
When the test has found non-conducting IGCT drive trips with CLASS 1 and
opens the main circuit breaker.
Inverter circuit
A21
A11
A22
A12
A23
A13
A24
A14
B21
B11
B22
B12
B23
B13
B24
B14
C21
C11
C22
C12
C23
C13
C24
C14
Fig.1 Switch notation
Document number
ABB Switzerland Ltd.
Lang.
en
Rev. ind.
A
Page
74
Test parameters and results
The test has only one parameter 131.36 used to enable the test with ENABLE.
After the test the value is set to DISABLE automatically.
131
Group name:
FLUX REF CONTROL
Description:
36
Index
IGCT CON TEST ENA
Description:
Unit:
Enabling/disabling IGCT conducting test
Type:
Min:
37
Index
Max:
Def:
Int. scaling:
TEST RESULT INU 1
Description:
Unit:
24 bits status of IGCT “0” OK , “1” not conducting
Type:
Min:
38
Index
0
0
Max:
Def:
Int. scaling:
TEST RESULT INU 2
Description:
Unit:
24 bits status of IGCT “0” OK , “1” not conducting
Type:
Min:
0
Max:
Def:
Int. scaling:
The test results are put to location 131.37 in case of single inverter and also to
location 131.38 in case of double inverters. Below the meaning of bit position
in those two locations is presented.
C24 C23 C22 C21 C14 C13 C12 C11 B24 B23 B22 B21 B14 B13 B12 B11 A24 A23 A22 A21 A14 A13 A12 A11
The test result is shown as a bit value: “0” meaning conducting
“1” meaning not conducting
Because of inverter configuration “outer” IGCTs with number 1 or 4 are
indicated precisely if not conducting, the “inner” ones 2 or 3 are shown as a
pair with “outer” 1 or 4.
Examples of results:
C24 C23 C22 C21 C14 C13 C12 C11 B24 B23 B22 B21 B14 B13 B12 B11 A24 A23 A22 A21 A14 A13 A12 A11
0
0
0
0
0
0
0
0
0
0
0
0
0
0
0
0
0
0
0
0
0
0
0
0
All IGCT are conducting
C24 C23 C22 C21 C14 C13 C12 C11 B24 B23 B22 B21 B14 B13 B12 B11 A24 A23 A22 A21 A14 A13 A12 A11
0
0
0
0
0
0
0
0
0
0
0
0
0
0
0
0
0
0
0
0
1
0
0
0
IGCT A14 is not conducting
C24 C23 C22 C21 C14 C13 C12 C11 B24 B23 B22 B21 B14 B13 B12 B11 A24 A23 A22 A21 A14 A13 A12 A11
0
0
1
1
0
0
0
0
0
0
0
0
0
0
0
0
0
0
0
0
1
0
0
0
IGCT C22 and A14 are not conducting
Document number
ABB Switzerland Ltd.
Lang.
en
Rev. ind.
A
Page
75
Test flow
The test has to be enabled before drive is charged e.g in READY ON state.
Set parameter 131.36 IGCT CON TEST ENA to ENABLE
(The test has to be enabled before drive is charged
e.g in READY ON state.)
Charge the drive
(The test execution is activated in the last step of RDY_ON to
RDY_RUN action, follow it with window like below fig.2))
After the test execution the enabling signal 131.36 is set to DISABLE
automatically
torque control state machine stays in READY RUN if no faults
otherwise fault message is generated and drive trips with Class 1.
Fig.2 IGCT A22 non conducting
Document number
ABB Switzerland Ltd.
Lang.
en
Rev. ind.
A
Page
76