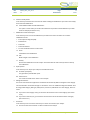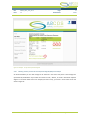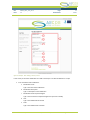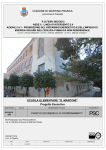
1
Tool for risk assessment
User Manual
H. Udluft (TUD), P.C. Roling (TUD), R. Curran (TUD)
The software tool described in this document embodies the ASCOS risk models and representation of
accident scenarios.
Coordinator
L. J. P. Speijker (NLR)
Work Package Manager
S. Bravo Muñoz (APS)
Grant Agreement No.
Document Identification
314299
D3.3
Status
Version
Approved
1.2
Date of Issue
Classification
16-10-2014
Public
This page is intentionally left blank
ASCOS — Aviation Safety and Certification of new Operations and Systems
Grant Agreement No. 314299
Ref:
Issue:
Page:
Classification:
ASCOS_WP3_TUD_D3.3
1.2
1
Public
Document Change Log
Version
Author(s)
Date
Affected Sections
Description of Change
1.0
1.1
H. Udluft
H. Udluft
24-03-2014
03-09-2014
All
All
1.2
L.J.P. Speijker
16-10-2014
1, Appendix B, Conclusions
and recommendations
First approved version
Updated document to match
latest version of the tool
Made consistent with D3.6.
Conclusions Section 4 added.
Appendix B, with changes for
CATS, shifted to internal note.
Review and Approval of the Document
Organisation Responsible for Review
Name of person reviewing the document
Date
APSYS Airbus Group
NLR
TR6
CAAi
JPM
TUD
IoA
Susana Bravo Muñoz
A.L.C. Roelen
B. Pauly
S. Long, T. Longhurst
J.P. Magny
R. Curran, H. Udluft
K. Piwek, A. Iwaniuk
21-03-2014
21-03-2014
21-03-2014
21-03-2014
21-03-2014
21-03-2014
21-03-2014
Organisation Responsible for Approval
Name of person approving the document
Date
APSYS Airbus Group
NLR
S. Bravo Muñoz
L.J.P. Speijker
21-03-2014
16-10-2014
ASCOS — Aviation Safety and Certification of new Operations and Systems
Grant Agreement No. 314299
Ref:
Issue:
Page:
Classification:
ASCOS_WP3_TUD_D3.3
1.2
2
Public
Document Distribution
Organisation
Names
European Commission
M. Kyriakopoulos
NLR
L. Speijker, A. Rutten, M.A. Piers, U. Dees, P. van der Geest, A.
Roelen, J.J Scholte, J.G. Verstraeten, A.D. Balk, E. van de Sluis
Thales Air Systems GmbH
G. Schichtel, J.-M. Kraus
Thales Air Systems SA
B. Pauly
Airbus Defence and Space APSYS
S. Bravo Muñoz, J.P. Heckmann, M. Feuvrier
Civil Aviation Authority UK
S. Long, A. Eaton, T. Longhurst
ISDEFE
M. Martin Sanchez, I. Etxebarria, M. Sánchez
CertiFlyer
G. Temme, M. Heiligers
Avanssa
N. Aghdassi
Ebeni
A. Simpson, J. Denness, S. Bull
Deep Blue
L. Save
JRC
W. Post, R. Menzel
JPM
J. P. Magny
TU Delft
R. Curran, H. Udluft, P.C. Roling
Institute of Aviation
K. Piwek, A. Iwaniuk
CAO
P. Michalak, R. Zielinski
EASA
K. Engelstad
FAA
J. Lapointe, T. Tessitore
SESAR JU
P. Mana
Eurocontrol
E. Perrin
CAA Netherlands
R. van de Boom
JARUS
R. van de Leijgraaf
SRC
J. Wilbrink, J. Nollet
ESASI
K. Conradi
Rockwell Collins
O. Bleeker, B. Bidenne
Dassault Aviation
B. Stoufflet, C. Champagne
ESA
T. Sgobba, M. Trujillo
EUROCAE
A. n’Diaye
TUV NORD Cert GmbH
H. Schorcht
FAST
R. den Hertog
ASCOS — Aviation Safety and Certification of new Operations and Systems
Grant Agreement No. 314299
Ref:
Issue:
ASCOS_WP3_TUD_D3.3
1.2
Page:
Classification:
ASCOS — Aviation Safety and Certification of new Operations and Systems
3
Public
Grant Agreement No. 314299
Ref:
Issue:
ASCOS_WP3_TUD_D3.3
1.2
Page:
Classification:
4
Public
Acronyms
Acronym
Definition
ESD
Event sequence diagram
FT
Fault tree
WP
Work package
ASCOS
Aviation safety and certification of new operations and systems
AoC
Area of Change
ASCOS — Aviation Safety and Certification of new Operations and Systems
Grant Agreement No. 314299
Ref:
Issue:
ASCOS_WP3_TUD_D3.3
1.2
Page:
Classification:
5
Public
This page is intentionally left blank
ASCOS — Aviation Safety and Certification of new Operations and Systems
Grant Agreement No. 314299
Ref:
Issue:
ASCOS_WP3_TUD_D3.3
1.2
Page:
Classification:
6
Public
Executive Summary
The objective of this study is the development of a software tool for risk assessment. The tool embodies the
ASCOS risk model and representation of accident scenarios, which are based on CATS. The tool allows the user
to access, explore and modify the ASCOS risk model and accident scenarios. It allows the user to utilize the
safety risk method developed to support the new proposed certification approach. The tool for risk
assessment is a web-based software tool that can be used by a safety practitioner as support in the risk
assessment process. The tool will be validated within ASCOS WP5 Validation.
The software tool has now reached a stable prototype level. It supports the following functionalities:
a)
Create safety risk picture for the current and future aviation system
b) Support safety analysis for the certification process
c)
Support analysis of future and emerging risk
d) Create precursors and safety barriers
e)
Represent safety culture and safety management
f)
Classify and filter results by EASp; AoC and stakeholder
The tool for risk assessment supports an initial proposed methodology developed in the context of an
agreement between ASCOS and the EASp Action EME1.2 [11], which seeks to develop a possible picture of the
future by establishing a foresight cell. This would help to prioritize safety improvements efforts on the basis of
foresight incorporating emerging and future risk. However, it should be noted that EASA and/or other CAA’s
have not yet tested or evaluated the current version of the tool. Follow-up activities in the ASCOS WP5 should
dedicate some efforts towards evaluating the usability of the tool in the context of the EASp Action EME1.2.
For future work, it is recommended to seek opportunities to widen the scope of the tool for risk assessment.
This could be achieved by opening up access to the tool for risk assessment to more users, and collect their
feedback on which functionalities of the tool are useful to them and from which additional functionalities they
could benefit. However, it should be noted that the ASCOS tool for risk assessment is recommended to be
used only by aviation safety experts with sufficient and relevant aviation safety expertise and knowledge.
ASCOS — Aviation Safety and Certification of new Operations and Systems
Grant Agreement No. 314299
Ref:
Issue:
ASCOS_WP3_TUD_D3.3
1.2
Page:
Classification:
7
Public
This page is intentionally left blank
ASCOS — Aviation Safety and Certification of new Operations and Systems
Grant Agreement No. 314299
Ref:
Issue:
ASCOS_WP3_TUD_D3.3
1.2
Page:
Classification:
8
Public
Table of Contents
Document Change Log
1
Review and Approval of the Document
1
Document Distribution
2
Acronyms
4
Executive Summary
6
List of Figures
11
1 Introduction
14
1.1
Background and scope
14
1.2
Objectives
14
1.3
Structure of the document
14
1.4
General structure of the screens of the tool for risk assessment
14
2 Description of the functions of the tool for risk assessment
16
2.1
Login screen
16
2.2
Welcome screen
16
2.3
Explore current risk picture
17
2.3.1 Access ESDs
19
2.3.2 Access ESD elements
20
2.3.3 Access Fault trees
21
2.3.4 Access fault tree elements
22
2.3.5 List and filter fault tree elements
24
2.3.6 Manage element categories
25
2.3.7 Manage associations to element categories
28
2.4
33
Start safety design analysis
2.4.1 Start new analysis
35
2.4.2 Share the analysis
35
2.4.3 Share analysis with new user
36
2.4.4 Access analysis
37
2.4.5 View modified model and add modifications
40
ASCOS — Aviation Safety and Certification of new Operations and Systems
Grant Agreement No. 314299
Ref:
Issue:
ASCOS_WP3_TUD_D3.3
1.2
Page:
Classification:
9
Public
2.4.6 Modify / remove / Create an event sequence diagram (ESD) in an analysis
41
2.4.7 Show ESD in an analysis
43
2.4.8 Modify / remove / Create an ESD element in an analysis
44
2.4.9 Show ESD element in an analysis
46
2.4.10 Create a fault tree in an analysis
48
2.4.11 Show fault tree in an analysis
49
2.4.12 Modify / remove / Create fault tree element in an analysis
51
2.4.13 Modify probability of top event
52
2.4.14 Show fault tree element in an analysis
55
2.5
Access supporting documents
56
2.6
Change user information
57
3 Example functionalities of the tool for risk assessment
59
3.1
Support safety based design of technologies, operations and systems
59
3.2
Handle current, emerging and future risks
59
3.3
Representation of risk for the certification process
59
3.4
Represent current risk in accident and accident avoidance scenarios
60
3.5
Identify accident scenarios linked to EASp operational issues
60
3.6
Develop a safety picture of the future
60
3.7
Anticipate future risks based on existing precursors
60
3.8
Assess necessary changes resulting from desired safety performance levels
60
3.9
Derive safety objectives and safety requirements for new technologies, operations and systems
60
3.10
Model new Event Sequence Diagrams for scenarios unique to new technologies, systems, products
or operations
61
3.11
Modify and update ESDs
61
3.12
Modify Fault Trees
61
3.13
Identify the impacts of future, emerging and current risks
61
3.14
Identify future and emerging risks resulting from precursors
61
3.15
Show and overview of all base events
61
3.16
Visualize ESDs and Fault trees
61
3.17
Represent changes to the total aviation system by modifying Event Sequence Diagrams / Fault Trees
62
ASCOS — Aviation Safety and Certification of new Operations and Systems
Grant Agreement No. 314299
Ref:
Issue:
ASCOS_WP3_TUD_D3.3
1.2
Page:
Classification:
10
Public
3.18
Calculate accident probabilities
62
3.19
Show the influence of stakeholders on parts of the model
62
3.20
Modify Elements probabilities
62
4 Conclusions and recommendations
63
References
64
Appendix A
Functional flow diagram
ASCOS — Aviation Safety and Certification of new Operations and Systems
65
Grant Agreement No. 314299
Ref:
Issue:
ASCOS_WP3_TUD_D3.3
1.2
Page:
Classification:
11
Public
List of Figures
Figure 1: General structure of the tool ................................................................................................................. 15
Figure 2: Login screen ........................................................................................................................................... 16
Figure 3: Welcome screen .................................................................................................................................... 17
Figure 4: View current risk picture - Overview screen.......................................................................................... 18
Figure 5: View current risk picture - View event sequence diagram .................................................................... 20
Figure 6: View current risk picture - ESD element ................................................................................................ 21
Figure 7: View current risk picture - Fault tree ..................................................................................................... 22
Figure 8: View current risk picture - Fault tree top event .................................................................................... 23
Figure 9: View current risk picture - Fault tree base event .................................................................................. 24
Figure 10: View current risk picture - list, search and filter fault tree elements .................................................. 25
Figure 11: Element categories - Safety-barrier - Overview................................................................................... 26
Figure 12: Element categories - Safety-barrier - Details ....................................................................................... 27
Figure 13: Associations - Safety-barrier - Overview ............................................................................................. 29
Figure 14: Associations - Safety-barrier - New - Step 1/4 ..................................................................................... 30
Figure 15: Associations - Safety-barrier - New - Step 2/4 ..................................................................................... 31
Figure 16: Associations - Safety-barrier - New - Step 3/4 ..................................................................................... 32
Figure 17: Associations - Safety-barrier - New - Step 3/4 ..................................................................................... 33
Figure 18: Analysis – overview ............................................................................................................................. 34
Figure 19: Analysis - Create new analysis ............................................................................................................. 35
Figure 20: Analysis - Share an analysis- overview................................................................................................. 36
Figure 21: Analysis - Share an analysis - Share with new user.............................................................................. 37
Figure 22: Analysis - Details of the analysis .......................................................................................................... 38
Figure 23: Analysis - List of event sequence diagrams ......................................................................................... 41
Figure 24: Analysis - ESD - Modify / remove / create ........................................................................................... 42
Figure 25: Analysis - ESD - Show ESD .................................................................................................................... 43
Figure 26: Analysis - ESD - Show empty ESD ......................................................................................................... 44
Figure 27: Analysis - ESD element - Modify / remove / create ............................................................................. 45
Figure 28: Analysis - ESD - Show ESD element...................................................................................................... 47
Figure 29: Analysis - Fault tree - Create ................................................................................................................ 48
Figure 30: Analysis - Fault tree - Show fault tree .................................................................................................. 49
Figure 31: Analysis - Fault tree - Show empty fault tree ...................................................................................... 50
Figure 32: Analysis - Fault tree element - Modify / remove / create ................................................................... 51
Figure 33: Analysis - Fault tree element - Edit top event probability - Screen 1 .................................................. 53
Figure 34: Analysis - Fault tree element - Edit top event probability - Screen 2 .................................................. 54
Figure 35: Analysis - Fault tree element - Show ................................................................................................... 55
Figure 36: Supporting documents - Index ............................................................................................................ 56
Figure 37: Show user information screen ............................................................................................................. 57
Figure 38: Edit user information screen ............................................................................................................... 58
ASCOS — Aviation Safety and Certification of new Operations and Systems
Grant Agreement No. 314299
Ref:
Issue:
ASCOS_WP3_TUD_D3.3
1.2
Page:
Classification:
12
Public
Figure 39: Functional flow diagram of the software tool ..................................................................................... 65
ASCOS — Aviation Safety and Certification of new Operations and Systems
Grant Agreement No. 314299
Ref:
Issue:
ASCOS_WP3_TUD_D3.3
1.2
Page:
Classification:
13
Public
This page is intentionally left blank
ASCOS — Aviation Safety and Certification of new Operations and Systems
Grant Agreement No. 314299
Ref:
Issue:
1
ASCOS_WP3_TUD_D3.3
1.2
Page:
Classification:
14
Public
Introduction
1.1 Background and scope
In the ASCOS project the goal is to develop aviation certification process adaptions. Within work package 3 a
total aviation safety assessment methodology is developed, for handling of current, emerging and future risks
through the use of safety based design systems and tools [1]. This document presents the results of sub work
package 3.3 ‘tool for risk assessment’.
1.2 Objectives
The objective of this study is the development of a software tool for risk assessment. The tool should embody
the ASCOS risk models and representation of accident scenarios, which are based on CATS. The tool should
allow the user to access, explore and modify the ASCOS risk models and accident scenarios. It should allow the
user to utilize the safety risk method developed to support the new proposed certification approach.
The tool for risk assessment is a web-based software tool that can be used by a safety practitioner as support
in the risk assessment process. It uses the Event Sequence Diagram (ESD) and Fault Tree logic to represent the
total aviation system risk model that was developed in the WP3.2 study [2]. The user can use the tool to
explore the risk model developed in ASCOS and to assess the impact of modifications in the Total Aviation
System in order to support the certification process. The tool is being validated within ASCOS WP5 Validation.
1.3 Structure of the document
In the first part of the user manual the various functions of the software are explained. Each function is
presented with screenshots and explanations of the different ways the user can interact with every screen.
The general structure of the tool is shown section 1.4. Section 2 describes the functions of the tool for risk
assessment. Section 3 explains the (example) functionalities of the tool for risk assessment. Section 4 gives
some conclusions. Appendix A provides the functional flow diagram for the developed tool for risk assessment.
1.4 General structure of the screens of the tool for risk assessment
The tool for risk assessment is a web-based tool. It requires a computer connected to the internet, with a web
browser such as Internet Explorer, Safari or Mozilla Firefox. The software tool has been developed – and is
maintained – by the TU Delft, based on a set of required functionalities established by NLR [6]. Initial testing
was performed by APSYS, JRC and NLR, resulting in software updates. It should be noted that the tool is still
being validated. User feedback and comments may still be processed until the end of ASCOS WP5 Validation.
The current version of the tool, which is hosted on the NLR server, can be accessed through the URL:
http://www.ascos-project.eu/risk-tool
To get access and use the tool, an account and login data can be requested from the ASCOS coordinator
([email protected]) or directly from the TU-Delft ([email protected] or [email protected]).
ASCOS — Aviation Safety and Certification of new Operations and Systems
Grant Agreement No. 314299
Ref:
Issue:
ASCOS_WP3_TUD_D3.3
1.2
Page:
Classification:
15
Public
Figure 1 shows an overview of the general structure of the screens of the tool.
Figure 1: General structure of the tool
In the navigation area you can access the various functional part of the tool, which are described in section 2
of this document.
The content area displays content and allows interacting with various part of the tool.
ASCOS — Aviation Safety and Certification of new Operations and Systems
Grant Agreement No. 314299
Ref:
Issue:
2
ASCOS_WP3_TUD_D3.3
1.2
Page:
Classification:
16
Public
Description of the functions of the tool for risk assessment
In this section the functions of the tool for risk assessment are described. The tool is a web-based application.
The functions of the tool are distributed over various screens. An overview over the structure of the screens is
represented in the functional flow diagram, which can be found in Appendix A of this document.
2.1 Login screen
The first screen you will see when you access the tool is the login screen. Figure 2 shows a screenshot of the
login screen.
Figure 2: Login screen
To login to the tool, you have to follow the following 3 steps:
1.
Enter your username in the field “name”
2.
Enter your password in the filed “password”
3.
Click on the link “Forgot Password?” to set a new password
4.
Click on the button “Login”
After this you will be redirected to the welcome screen which is described in section 2.2.
2.2 Welcome screen
The Welcome screen is the first screen you will be presented with after you login to the tool. From the login
screen you can access the functions of the tool. Figure 3 shows a screenshot of the welcome screen, which
highlights the links to the different functions of the tool.
ASCOS — Aviation Safety and Certification of new Operations and Systems
Grant Agreement No. 314299
Ref:
Issue:
ASCOS_WP3_TUD_D3.3
1.2
Page:
Classification:
17
Public
Figure 3: Welcome screen
As a user you can access the following 4 parts of the tool:
a)
View past and current risk picture (described in section 2.3)
b) Start an Analysis (Safety design / Future risk) (described in section 2.4)
c)
Access supporting documents (described in section 2.5)
d) Change user information (described in section 2.6)
2.3 Explore current risk picture
In this mode you can explore the current risk picture. Figure 4 shows the initial screen when entering the View
Current Risk Picture mode.
ASCOS — Aviation Safety and Certification of new Operations and Systems
Grant Agreement No. 314299
Ref:
Issue:
ASCOS_WP3_TUD_D3.3
1.2
Page:
Classification:
18
Public
Figure 4: View current risk picture - Overview screen
This screen is divided in 2 main sections. These sections allow you to explore the current risk picture in
different ways:
ASCOS — Aviation Safety and Certification of new Operations and Systems
Grant Agreement No. 314299
Ref:
Issue:
a.
ASCOS_WP3_TUD_D3.3
1.2
Page:
Classification:
19
Public
List and filter fault tree elements:
a.a. If you click on “List fault tree elements”, you access a screen where you explore details of all fault
tree elements in the current risk picture (see section 2.3.5).
b.
Event sequence diagrams (ESD):
In this section you see a list of all Event sequence diagrams (ESD) in the current risk picture.
b.a. If you click on the link “show”, you access a screen with details of the selected ESD (see section
2.3.1).
c.
Export options:
In this section you can export the current risk picture to EXCEL.
c.a. If you click on the link “Excel version of model (XLS)”, a download of the EXCEL version of the model
is started.
d.
Manage associations:
The tool for risk assessment supports the classification of elements by different categories. Each category
can be associated to an element through an “association”. There are 6 different categories available: Area
of change, EASP category, Risk-type, Safety-barrier, Precursors, Stakeholder. For each category, there are
2 links:
d.a. If you click on the category name, you will access the overview screen of the category. (See section
2.3.6)
d.b. If you click on this link (d.b), you access the overview screen of the associations within a category.
(See section 2.3.7)
2.3.1
Access ESDs
The screen in Figure 5 shows an event sequence diagram (ESD). The diagram is made up of ESD elements. Each
element of the ESD shows the element title, the unique identification code of the element and the probability
of the element. Each element of the ESD is linked to a fault tree and inherits the probability from the fault tree
(see section 2.3.3).
ASCOS — Aviation Safety and Certification of new Operations and Systems
Grant Agreement No. 314299
Ref:
Issue:
ASCOS_WP3_TUD_D3.3
1.2
Page:
Classification:
20
Public
Figure 5: View current risk picture - View event sequence diagram
You can access a screen with details of each ESD element (see section 2.3.2) by clicking on the ESD element
title (a).
2.3.2
Access ESD elements
The screen in Figure 6 shows an ESD element. Each ESD element is linked to a fault tree. The ESD element
inherits its probability from the top event of the linked fault tree.
If you click on the link (a) to the linked fault tree, you access a screen that shows details of the linked fault tree.
ASCOS — Aviation Safety and Certification of new Operations and Systems
Grant Agreement No. 314299
Ref:
Issue:
ASCOS_WP3_TUD_D3.3
1.2
Page:
Classification:
21
Public
Figure 6: View current risk picture - ESD element
2.3.3
Access Fault trees
If you click on the link to the linked fault tree in the detail view of an ESD element (explained in section 2.3.2),
you will see the screen in Figure 7. In this screen you see details of the fault tree, as well as the fault tree
diagram. The fault tree diagram is made up of fault tree elements. Each element of the fault tree shows the
element title, the unique identification code of the element and the element probability. For top events the
element also shows the gate variant. You can access the screen with details of each fault tree element by
clicking on the link (a).
ASCOS — Aviation Safety and Certification of new Operations and Systems
Grant Agreement No. 314299
Ref:
Issue:
ASCOS_WP3_TUD_D3.3
1.2
Page:
Classification:
22
Public
Figure 7: View current risk picture - Fault tree
2.3.4
Access fault tree elements
If you click on the link to a top event in the fault tree (explained in section 2.3.3), you will see the screen in
Figure 8. In this screen you see the details of the top event, as well as the cut-set of the top event. The
calculation of the probability of the top event is based on the probabilities of the cut-set.
ASCOS — Aviation Safety and Certification of new Operations and Systems
Grant Agreement No. 314299
Ref:
Issue:
ASCOS_WP3_TUD_D3.3
1.2
Page:
Classification:
23
Public
Figure 8: View current risk picture - Fault tree top event
If you click on the link to a base event in the fault tree (explained in section 2.3.3), you will open the screen in
Figure 9. In this screen you see the details of the base event.
ASCOS — Aviation Safety and Certification of new Operations and Systems
Grant Agreement No. 314299
Ref:
Issue:
ASCOS_WP3_TUD_D3.3
1.2
Page:
Classification:
24
Public
Figure 9: View current risk picture - Fault tree base event
2.3.5
List and filter fault tree elements
If you click on the link “List fault tree elements” in the initial screen of the explore current risk picture mode
(section 2.3), you will access the screen shown in Figure 10.
This screen is divided in 2 sections:
a)
Search and filter. In this section you can:
1.
Search the list of fault tree elements
2.
Filter fault tree elements by stakeholder
3.
Apply the search and filter to the list of fault tree elements
b) List of fault tree elements. In this list you can:
1.
Access the details of a fault tree element. If you click on the link “show” you will be
redirected to the fault tree element screen (section 2.3.4)
2.
Switch between pages of fault tree elements
ASCOS — Aviation Safety and Certification of new Operations and Systems
Grant Agreement No. 314299
Ref:
Issue:
ASCOS_WP3_TUD_D3.3
1.2
Page:
Classification:
25
Public
Figure 10: View current risk picture - list, search and filter fault tree elements
2.3.6
Manage element categories
Associations allow to group elements of the risk model together. You can create groups of elements for
specific:
•
Safety-barriers
•
Stakeholders
•
Areas of change
ASCOS — Aviation Safety and Certification of new Operations and Systems
Grant Agreement No. 314299
Ref:
Issue:
ASCOS_WP3_TUD_D3.3
1.2
•
EASP categories
•
Risk-types
•
Precursors
Page:
Classification:
26
Public
All associations are created the same way, so in the following section it is explained how to group elements of
the model together to a safety barrier.
Overview of safety barriers
If you follow the link “Safety-barriers” in the Overview screen of the “View current risk picture”-mode (see
section 2.3), you will access a screen with an overview of all the safety-barriers that are defined. The screen
will look similar to Figure 11.
Figure 11: Element categories - Safety-barrier - Overview
In this screen you see a list of all the safety barriers that are defined. Each safety-barrier you can:
a)
Show:
View details of the safety barrier and a list of associated elements.
ASCOS — Aviation Safety and Certification of new Operations and Systems
Grant Agreement No. 314299
Ref:
Issue:
ASCOS_WP3_TUD_D3.3
1.2
Page:
Classification:
27
Public
b) Edit:
Change the name and description of the safety barrier.
c)
Destroy:
Delete the safety barrier. You have to approve that you want to delete the safety-barrier.
You can create new safety barriers if you click on:
d) New Safety barrier:
Create a new safety barrier.
Details of safety-barrier
If you followed the link “show” in the safety-barrier overview (Figure 11), you will access a screen with details
of the safety barrier:
Figure 12: Element categories - Safety-barrier - Details
ASCOS — Aviation Safety and Certification of new Operations and Systems
Grant Agreement No. 314299
Ref:
Issue:
ASCOS_WP3_TUD_D3.3
1.2
Page:
Classification:
28
Public
In this screen you see the name and description of the safety-barrier. You also see a table of the elements
associated to the safety barrier. In the example in Figure 12, there are 2 elements associated to the safety
barrier. For each associated element code, title and probability are listed. The probabilities of all associated
elements are summed to give the total rate of the safety barrier.
There are two links on this screen:
a)
Edit:
Edit the safety barrier
b) Back:
Go back to the list of all safety barriers (Figure 11).
2.3.7
Manage associations to element categories
As explained in section 2.3.6, elements in the risk model can be grouped together and associated to element
categories. In this section it is explained how to manage associations between elements and element
categories.
Associations for all element categories are managed the same way. In the following section the category
“safety-barrier” is used as example.
Overview
If you follow the link “Associate elements to safety-barrier” in the Overview screen of the “View current risk
picture”-mode (see section 2.3), you will access a screen with an overview of all the associations between
safety-barriers and elements that are defined. The screen will look similar to (Figure 13).
ASCOS — Aviation Safety and Certification of new Operations and Systems
Grant Agreement No. 314299
Ref:
Issue:
ASCOS_WP3_TUD_D3.3
1.2
Page:
Classification:
29
Public
Figure 13: Associations - Safety-barrier - Overview
In this screen you see a list of all associations between elements and safety-barriers that are defined. For each
associations you can:
a)
Show:
View details of the association
b) Edit:
This will open a 4 step wizard to help you edit the association.
c)
Destroy:
This will remove the association. You will be asked to confirm that you want to remove the
association.
You can create a new association if you click on:
d) New Safety-barrier element association:
This will open a 4 step wizard to help you create a new association.
ASCOS — Aviation Safety and Certification of new Operations and Systems
Grant Agreement No. 314299
Ref:
Issue:
ASCOS_WP3_TUD_D3.3
1.2
Page:
Classification:
30
Public
Create / edit an association
This section explains how to create a new, or edit and existing association between an element of the model
and an element category. Association are created in 4 steps. All associations are created the same way. In the
following section, an ESD element is associated to a safety-barrier as an example.
1. Select the safety-barrier
Figure 14 shows step 1 of the wizard, where you select one of the safety barrier that you defined.
Figure 14: Associations - Safety-barrier - New - Step 1/4
To select the safety barrier for the association you must:
1.
Select a safety barrier from the list
2.
Click on the button “continue” to continue to step 2.
2. Select the element-type for the new association
Figure 15 shows step 2 of the wizard, where you select the type of the element that you want to associate to
the safety-barrier that you selected in step 1.
ASCOS — Aviation Safety and Certification of new Operations and Systems
Grant Agreement No. 314299
Ref:
Issue:
ASCOS_WP3_TUD_D3.3
1.2
Page:
Classification:
31
Public
Figure 15: Associations - Safety-barrier - New - Step 2/4
To select the type of the element which you want to associate to the safety-barrier you must:
1.
Select the type of the element from the list.
2.
Click on the button “continue” to continue to step 3.
3. Select the element for the new association
Figure 16 shows step 3 of the wizard, where you select the element that you want to associate to the safetybarrier that you selected in step 1.
ASCOS — Aviation Safety and Certification of new Operations and Systems
Grant Agreement No. 314299
Ref:
Issue:
ASCOS_WP3_TUD_D3.3
1.2
Page:
Classification:
32
Public
Figure 16: Associations - Safety-barrier - New - Step 3/4
To select the element that you want to associate to the safety-barrier you must:
1.
Select the element from the list.
2.
Click on the button “continue” to continue to step 4.
4. Confirm the new association
Figure 16 shows the last step (step 4) of the wizard, where you confirm the association between the element
and the safety-barrier.
ASCOS — Aviation Safety and Certification of new Operations and Systems
Grant Agreement No. 314299
Ref:
Issue:
ASCOS_WP3_TUD_D3.3
1.2
Page:
Classification:
33
Public
Figure 17: Associations - Safety-barrier - New - Step 3/4
To confirm the association:
1.
Click on the button “confirm”. You will see the screen with the overview of the associations (Figure
13).
2.4 Start safety design analysis
A key component of the tool for risk assessment is to perform safety analyses based on the current risk
picture. To perform a safety analysis you can make modifications to the current risk picture. You can both
modify existing elements of the risk picture, and add new elements. You can make modifications on all levels
of the risk picture, including event sequence diagrams (ESD), ESD elements, fault trees and fault tree elements.
If you follow the link “Analysis (Safety design / Future risk)” in the navigation area (see section 1.4), you access
the screen shown in Figure 18.
ASCOS — Aviation Safety and Certification of new Operations and Systems
Grant Agreement No. 314299
Ref:
Issue:
ASCOS_WP3_TUD_D3.3
1.2
Page:
Classification:
34
Public
Figure 18: Analysis – overview
This screen gives an overview of all your analyses in a list. Each analysis you can:
a)
Show:
Show the details of the analysis and add modifications. If you click on this link you will be redirected
to the screen shown in Figure 22 (see section 2.4.4).
b) Edit:
Edit the Analysis details such as title and description. If you click on this link you will be redirected to
the screen shown in Figure 19 (see section 2.4.1).
c)
Destroy:
Delete the analysis and all modifications of the analysis. If you click on this link, you will be asked to
confirm that you want to delete the analysis.
d) Share:
Share the analysis with other users
In this screen you can also start a new analysis, if you click on the link:
e)
New Analysis:
Start a new analysis
ASCOS — Aviation Safety and Certification of new Operations and Systems
Grant Agreement No. 314299
Ref:
Issue:
2.4.1
ASCOS_WP3_TUD_D3.3
1.2
Page:
Classification:
35
Public
Start new analysis
If you click on the link “New Analysis” in the initial screen of the analysis mode (section 2.4), you will access the
screen shown in Figure 19.
Figure 19: Analysis - Create new analysis
You can create a new analysis in 2 steps:
1) Fill in the form with the details of the new analysis you want to create:
a.
Title:
Type in the title of the analysis.
b.
Description:
Type in the description of the analysis
2) Create analysis:
Click on this button to create the analysis.
2.4.2
Share the analysis
If you follow the link “Share” of an analysis in the analyses overview screen (see section 2.4), you access the
screen that shows an overview of the users that you share the analysis with.
ASCOS — Aviation Safety and Certification of new Operations and Systems
Grant Agreement No. 314299
Ref:
Issue:
ASCOS_WP3_TUD_D3.3
1.2
Page:
Classification:
36
Public
Figure 20 shows an example where the analysis is shared with one user.
Figure 20: Analysis - Share an analysis- overview
On this screen you see a list of all the users that you share the analysis with and can follow 3 links:
a.
Edit:
Edit the access rights a user has for this analysis
b.
Destroy:
Revoke access rights of a user to this analysis
c.
Share with new user:
Share the analysis with a new user. If you click on this link, you access a new screen where you specify
the user that you want to share the analysis with. (Section 2.4.3)
2.4.3
Share analysis with new user
If you follow the link “Share with new user” in the screen showing all the users that have access to your
analysis (see section 2.4.2). You access a screen that allows you to grant access to your analysis to another user
(see figure Figure 21).
ASCOS — Aviation Safety and Certification of new Operations and Systems
Grant Agreement No. 314299
Ref:
Issue:
ASCOS_WP3_TUD_D3.3
1.2
Page:
Classification:
37
Public
Figure 21: Analysis - Share an analysis - Share with new user
To share the analysis with a new user you must the following information:
a.
User e-mail address:
Please provide the e-mail address of the user with whom you want to share the analysis. NOTE: The
user must have an account for the ASCOS tool for risk assessment (see section 1.4)
b.
Select the user right:
•
Read: The user can access your analysis and add comments. The user can not make any
modifications to the analysis. This is meant if you want a user to review the changes you made
•
Write: The user can access you analysis, make comments and make changes to your analysis. He
can add modifications of the Risk model to the analysis. This is meant for users that you want to
collaborate when generating the analysis.
c.
Create Analysis permission:
Click on this button to grant access to the analysis to the user you specified.
2.4.4
Access analysis
If you follow the link “Show” of an analysis in the analyses overview screen (see section 2.4), you access the
screen with details of the analysis.
Figure 22 shows an example of an analysis.
ASCOS — Aviation Safety and Certification of new Operations and Systems
Grant Agreement No. 314299
Ref:
Issue:
ASCOS_WP3_TUD_D3.3
1.2
Page:
Classification:
38
Public
Figure 22: Analysis - Details of the analysis
This screen is divided in 5 sections:
a.
Analysis Details:
In this section you can see and change the information of the analysis that you entered when you created
the analysis. To change the details click on the link:
a.a. Edit:
Change the information of the current analysis
ASCOS — Aviation Safety and Certification of new Operations and Systems
Grant Agreement No. 314299
Ref:
Issue:
b.
ASCOS_WP3_TUD_D3.3
1.2
Page:
Classification:
39
Public
View and modify model:
In this section you find the link to view the risk model including the modifications you make in the analysis,
and to add new modifications:
b.a. View modified model and add modifications:
This opens a screen where you see the risk model that incorporates all the modifications you make
within an analysis (see section 2.4.5)
c.
Modifications within the analysis:
In this section you see a list of all modifications you made to the event risk model. You can make
modifications to the:
•
Event sequence diagrams (ESD)
•
ESD elements
•
Fault trees
•
Fault tree elements
•
For each modification there are three links:
c.a. Show:
View details of the modification
c.b. Edit:
Make changes to the modification
c.c. Destroy:
Remove the modification from the analysis. You will be asked to confirm that you want to destroy
the modification.
d.
Export options:
In this section you can export your analysis in two different format
d.a. Printable report (PDF):
This generates a printable PDF report.
d.b. EXCEL version:
This creates an EXCEL version of the current analysis.
e.
Manage Associations:
The tool for risk assessment supports the classification of elements by different categories. Each category
can be associated to an element through an “association”. There are 6 different categories available: Area
of change, EASP category, Risk-type, Safety-barrier, Precursors, Stakeholder. For each category, there are
2 links:
e.a. If you click on the category name, you will access the overview screen of the category. (See section
2.3.6)
e.b. If you click on this link (e.b), you access the overview screen of the associations within a category.
(See section 2.3.7)
f.
Comments:
In this section you see a list of the comment you or other users made to your analysis.
f.a. Click on the link “New Comment” to add a comment to the analysis.
ASCOS — Aviation Safety and Certification of new Operations and Systems
Grant Agreement No. 314299
Ref:
Issue:
2.4.5
ASCOS_WP3_TUD_D3.3
1.2
Page:
Classification:
40
Public
View modified model and add modifications
If you follow the link to “View modified model and add modifications” on the details screen of an analysis (see
section 2.4.4), you access the screen shown in Figure 23.
In this screen you see the list of modified event sequence diagrams (ESD). Any modifications that you make in
the analysis that affect an ESD are implemented in this list.
For each ESD you can click on links to:
a)
Show:
View the ESD and make modifications to ESD elements (see section 2.4.7)
b) Edit:
Make changes to the ESD (see section 2.4.6)
c)
Delete:
Remove the ESD from the analysis (see section 2.4.6).
You can also add new ESDs. Click on the link at the bottom of the page:
d) New Event sequence diagram:
Add a new ESD to the analysis (see section 2.4.6)
ASCOS — Aviation Safety and Certification of new Operations and Systems
Grant Agreement No. 314299
Ref:
Issue:
ASCOS_WP3_TUD_D3.3
1.2
Page:
Classification:
41
Public
Figure 23: Analysis - List of event sequence diagrams
2.4.6
Modify / remove / Create an event sequence diagram (ESD) in an analysis
As mentioned before you can make changes to all elements in the current risk picture. These changes are
represented by modifications. If you follow one of links to “Edit”, “Delete”, or create a “New Event sequence
diagram” in the show model screen of an analysis (see section 2.4.5), you access a screen similar to the one
shown in Figure 24.
ASCOS — Aviation Safety and Certification of new Operations and Systems
Grant Agreement No. 314299
Ref:
Issue:
ASCOS_WP3_TUD_D3.3
1.2
Page:
Classification:
42
Public
Figure 24: Analysis - ESD - Modify / remove / create
In this screen you will add a modification of an ESD to the analysis. You add a modification in 2 steps:
1.
Enter the details of the modification.
a.
Modification name:
b.
Modification description:
Type in the name of the modification
Type in a description of the modification
c.
Modification event sequence diagram:
Type in the id of the event sequence diagram that you want to modify
d.
Title:
Type in the modified title of the ESD
e.
Code:
Type in the modified code of the ESD
ASCOS — Aviation Safety and Certification of new Operations and Systems
Grant Agreement No. 314299
Ref:
Issue:
ASCOS_WP3_TUD_D3.3
1.2
f.
Page:
Classification:
43
Public
Description:
Type in the modified description of the ESD
2.
Create event sequence diagram modification:
Click on this button to save the ESD modification in the analysis and apply it to the modified model.
2.4.7
Show ESD in an analysis
If you follow the link to “show” an event sequence diagram (ESD) in the show model screen of an analysis (see
section 2.4.5), you access a screen similar to the one shown in Figure 25.
Figure 25: Analysis - ESD - Show ESD
In this screen you see the details of the ESD, such as title, code and description, and the event sequence
diagram. The event sequence diagram is made up of ESD elements. For each ESD element you see the element
title, code and probability. You can click on 3 different links:
a)
Element title:
Click on the element title to access the screen with details of the ESD element (see section 2.4.9)
ASCOS — Aviation Safety and Certification of new Operations and Systems
Grant Agreement No. 314299
Ref:
Issue:
ASCOS_WP3_TUD_D3.3
1.2
Page:
Classification:
44
Public
b) Edit:
Modify the ESD element (see section 2.4.8)
c)
Delete:
Remove the ESD element from the analysis (see section 2.4.8)
If the ESD does not (yet) have any elements yet, you see a screen similar to Figure 26.
Figure 26: Analysis - ESD - Show empty ESD
In this screen you see details of the ESD. The event sequence diagram is still empty. You can click on the link:
a)
New ESD element:
Create a new ESD element (see section 2.4.8)
2.4.8
Modify / remove / Create an ESD element in an analysis
As mentioned before you can make changes to all elements in the current risk picture. These changes are
represented by modifications. If you follow one of links to “Edit”, “Delete”, or create a “New ESD element” in
the show ESD screen of an analysis (see section 2.4.7), you access a screen similar to the one shown in Figure
27.
ASCOS — Aviation Safety and Certification of new Operations and Systems
Grant Agreement No. 314299
Ref:
Issue:
ASCOS_WP3_TUD_D3.3
1.2
Page:
Classification:
45
Public
Figure 27: Analysis - ESD element - Modify / remove / create
In this screen you will add a modification of an ESD element to the analysis. You add a modification in 2 steps:
1.
Enter the details of the modification.
a.
Modification name:
b.
Modification description:
Type in the name of the modification
Type in a description of the modification
ASCOS — Aviation Safety and Certification of new Operations and Systems
Grant Agreement No. 314299
Ref:
Issue:
ASCOS_WP3_TUD_D3.3
1.2
c.
Page:
Classification:
46
Public
Modification event sequence diagram:
Type in the id of the event sequence diagram that you want to modify
d.
Title:
Type in the modified title of the ESD element
e.
Code:
Type in the modified code of the ESD element
f.
Description:
Type in the modified description of the ESD element
g.
Parent:
Parent element of the ESD element
h.
Final:
Select whether or not the ESD element represents a final event.
2.
Create ESD element modification:
Click on this button to save the ESD element modification in the analysis and apply it to the modified
model.
2.4.9
Show ESD element in an analysis
If you click on the title of an ESD element in the ESD screen of an analysis (see section 2.4.7), you access a
screen similar to the one shown in Figure 28
ASCOS — Aviation Safety and Certification of new Operations and Systems
Grant Agreement No. 314299
Ref:
Issue:
ASCOS_WP3_TUD_D3.3
1.2
Page:
Classification:
47
Public
Figure 28: Analysis - ESD - Show ESD element
In this screen you see the details of the ESD element:
•
Title:
The title of the ESD element
•
Probability:
The probability of the ESD element. This is inherited from the top event of the linked fault tree.
•
Event sequence diagram:
The event sequence diagram, which the ESD element belongs to
•
Parent:
•
Linked fault tree:
The parent element of the ESD element.
The title of the link fault tree.
You can click on the title to linked fault tree to access the linked fault tree:
a)
Title of the linked fault tree:
Click on tis link to access the screen of the linked fault tree (see section 2.4.11).
ASCOS — Aviation Safety and Certification of new Operations and Systems
Grant Agreement No. 314299
Ref:
Issue:
2.4.10
ASCOS_WP3_TUD_D3.3
1.2
Page:
Classification:
48
Public
Create a fault tree in an analysis
As mentioned before you can make changes to all elements in the current risk picture. These changes are
represented by modifications. If you follow the link to “Associate new fault tree” in the show ESD element
screen of an analysis (see section 2.4.9), you access a screen similar to the one shown in Figure 29.
Figure 29: Analysis - Fault tree - Create
In this screen you will add a modification to create a fault tree to the analysis. You add a modification in 2
steps:
3.
Enter the details of the modification.
a.
Modification name:
Type in the name of the modification
b.
Modification description:
Type in a description of the modification
ASCOS — Aviation Safety and Certification of new Operations and Systems
Grant Agreement No. 314299
Ref:
Issue:
ASCOS_WP3_TUD_D3.3
1.2
c.
Page:
Classification:
49
Public
Modification fault tree:
Type in the id of fault tree that you want to modify
d.
Title:
Type in the modified title of the fault tree
e.
Code:
Type in the code for the fault tree
f.
Description:
Type in the modified description of the fault tree
4.
Create fault tree modification:
Click on this button to save the fault tree modification in the analysis and apply it to the modified
model.
2.4.11
Show fault tree in an analysis
If you follow the link of the title of the linked fault tree in the show ESD element screen of an analysis (see
section 2.4.9), you access a screen similar to the one shown in Figure 30.
Figure 30: Analysis - Fault tree - Show fault tree
ASCOS — Aviation Safety and Certification of new Operations and Systems
Grant Agreement No. 314299
Ref:
Issue:
ASCOS_WP3_TUD_D3.3
1.2
Page:
Classification:
50
Public
In this screen you see the details of the fault tree, such as title, code description and the linked ESD element,
as well as the fault tree diagram. The fault tree diagram is made up of fault tree elements. For each fault tree
element you see the element title, code and probability. You can click on 3 different links:
a)
Element title:
Click on the element title to access the screen with details of the fault tree element (see section
2.4.14)
b) Edit:
Modify the fault tree element (see section 2.4.12)
c)
Delete:
Remove the fault tree element from the analysis (see section 2.4.12)
If the fault tree does not (yet) have any elements yet, you see a screen similar to 2.4.12.
Figure 31: Analysis - Fault tree - Show empty fault tree
In this screen you see details of the fault tree. The fault tree diagram is still empty. You can click on the link:
a)
New fault tree element:
Create a new fault tree element (see section 2.4.12)
ASCOS — Aviation Safety and Certification of new Operations and Systems
Grant Agreement No. 314299
Ref:
Issue:
2.4.12
ASCOS_WP3_TUD_D3.3
1.2
Page:
Classification:
51
Public
Modify / remove / Create fault tree element in an analysis
As mentioned before you can make changes to all elements in the current risk picture. These changes are
represented by modifications. If you follow one of links to “Edit”, “Delete”, or create a “New fault tree
element” in the show fault tree screen of an analysis (see section 2.4.11), you access a screen similar to the
one shown in Figure 32.
Figure 32: Analysis - Fault tree element - Modify / remove / create
In this screen you will add a modification of a fault tree element to the analysis. You add a modification in 2
steps:
ASCOS — Aviation Safety and Certification of new Operations and Systems
Grant Agreement No. 314299
Ref:
Issue:
3.
ASCOS_WP3_TUD_D3.3
1.2
Page:
Classification:
52
Public
Enter the details of the modification.
a.
Modification name:
Type in the name of the modification
b.
Modification description:
c.
Modification event sequence diagram:
Type in a description of the modification
Type in the id of the event sequence diagram that you want to modify
d.
Title:
Type in the modified title of the fault tree element
e.
Code:
Type in the modified code of the fault tree element
f.
Description:
Type in the modified description of the fault tree element
g.
Gate variant:
Select the gate variant of the fault tree element: OR / XOR / AND (only for top events)
h.
Parent:
Parent element of the ESD element
i.
Probability:
Type in the probability of the fault tree element. (Only for base events)
j.
Type:
Select the type of the fault tree element: Base event / top event
4.
Create fault tree element modification:
Click on this button to save the fault tree element modification in the analysis and apply it to the
modified model.
2.4.13
Modify probability of top event
In section 2.4.12 it was explained how you could make modifications to fault tree elements. There are two
types fault tree elements:
•
Base events
•
Top events
The probability of a top event results from combining the probability of the cut-set of the top event, according
to gate variants (AND, OR, XOR). If (in Figure 32) you input a change to the probability of a top event, you
access a screen similar to Figure 33.
ASCOS — Aviation Safety and Certification of new Operations and Systems
Grant Agreement No. 314299
Ref:
Issue:
ASCOS_WP3_TUD_D3.3
1.2
Page:
Classification:
53
Public
Figure 33: Analysis - Fault tree element - Edit top event probability - Screen 1
In this screen you have to choose one of 2 options:
1.
Set the top event probability to the desired value and ignore the cut-set of the element:
If you choose this option, the cut-set of the element is ignored, the top event is changed to a base
event and the probability is set to your desired value.
2.
Manually update the probabilities of the cut-set elements:
As mentioned before, the probability of a top event is determined by combining the probabilities of
the cut-set of the element (according to the gate variant). If you choose this option, you will access a
screen where you can modify the probabilities of all elements from the cut-set. The screen to modify
the cut-set probabilities looks similar to Figure 34.
ASCOS — Aviation Safety and Certification of new Operations and Systems
Grant Agreement No. 314299
Ref:
Issue:
ASCOS_WP3_TUD_D3.3
1.2
Page:
Classification:
54
Public
Figure 34: Analysis - Fault tree element - Edit top event probability - Screen 2
This screen is divided in 2 sections. In the first section you see the values:
•
Original value:
The probability of the top event before you made any modification
•
Desired value:
•
Current value:
The desired value of your modification
The current value of the top event taking into account the modifications you made to the cut-set
You can modify the cut-set of the top event and confirm your modifications in three steps:
1.
In this section of the screen enter the probabilities for the cut-set to match your desired value of the
top event probability
a.
2.
Enter the probability for each cut-set element that you want to change
Update changes:
Modify the probabilities of the cut-set elements to change the probability of the top event. The “
current value” (see above) of the top event will change.
ASCOS — Aviation Safety and Certification of new Operations and Systems
Grant Agreement No. 314299
Ref:
Issue:
3.
ASCOS_WP3_TUD_D3.3
1.2
Page:
Classification:
55
Public
Confirm changes:
If the “current value” probability of the top event sufficiently matches your “desired value”, you can
confirm the changes to the cut-set elements. These will be stored in your analysis and you can find
them in the analysis overview (see section 2.4.4).
2.4.14
Show fault tree element in an analysis
If you click on the title of a fault tree element in the show fault tree screen of an analysis (see section 2.4.11),
you access a screen similar to the one shown in Figure 35.
Figure 35: Analysis - Fault tree element - Show
In this screen you see the details of the fault tree element:
•
Title:
The title of the fault tree element
•
Descriptions:
A description of the fault tree element
•
Probability:
The probability of the fault tree element.
•
Type:
The type of the fault tree element
ASCOS — Aviation Safety and Certification of new Operations and Systems
Grant Agreement No. 314299
Ref:
Issue:
•
ASCOS_WP3_TUD_D3.3
1.2
Page:
Classification:
56
Public
Gate variant:
The gate variant of the fault tree element (only top events)
•
Fault tree:
The fault tree, which the fault tree element belongs to
•
Parent:
The parent element of the fault tree element
2.5 Access supporting documents
In this mode you can access supporting documents to use the tool. Figure 36 shows the initial screen when
entering the access supporting documents mode.
Figure 36: Supporting documents - Index
In this screen you see a list of all the supporting documents available. You can follow the link:
a)
Title of the document:
Open the supporting document in a new window
ASCOS — Aviation Safety and Certification of new Operations and Systems
Grant Agreement No. 314299
Ref:
Issue:
ASCOS_WP3_TUD_D3.3
1.2
Page:
Classification:
57
Public
2.6 Change user information
If you click on “change user information” in the welcome screen (section 2.2), you will see the screen shown in
Figure 37.
Figure 37: Show user information screen
In section a) you see the user information.
If you click on “edit” b), you can edit your user information. You will be presented with the screen shown in
Figure 38.
ASCOS — Aviation Safety and Certification of new Operations and Systems
Grant Agreement No. 314299
Ref:
Issue:
ASCOS_WP3_TUD_D3.3
1.2
Page:
Classification:
58
Public
Figure 38: Edit user information screen
You can update your user information in 2 steps:
1.
2.
Enter the changed user information
a.
Input your desired user name
b.
Enter your full name
c.
Enter your E-Mail address
d.
Enter your changed password (optional)
e.
Enter your changed password again for verification (optional)
Click on the button “Update User”
You will be redirected to the screen shown in Figure 37, which now shows your updated user details.
ASCOS — Aviation Safety and Certification of new Operations and Systems
Grant Agreement No. 314299
Ref:
Issue:
3
ASCOS_WP3_TUD_D3.3
1.2
Page:
Classification:
59
Public
Example functionalities of the tool for risk assessment
In this section example applications that represent functionalities of the tool for risk are presented.
3.1 Support safety based design of technologies, operations and systems
The tool for risk assessment implements the risk model and accident scenarios developed within the ASCOS
initiative. The methodology, which the tool is based upon incorporates Fault-Tree and Event Sequence
Diagram logic and covers the total aviation system.
By implementing the risk model and accident scenarios mentioned above, the tool enables the safety
practitioner to model the system wide impact of changes, and supports safety based design of technologies,
operations and systems.
The ASCOS risk model that is provided with the tool is called the “Model Master”. Within an analysis, the user
can make changes to the model master by adding modifications. The modifications within an analysis and the
model master result in the “modified model”.
Section 2.3 and 0 explain how to access the model master and carry out a safety analysis.
3.2 Handle current, emerging and future risks
The tool for risk assessment implements the risk model and accident scenarios developed within the ASCOS
initiative. This model can be used to handle current, emerging and future risk. The safety practitioner can add
modifications to the model that represent emerging and future risk. These changes propagate through the
model and have a system wide impact on other elements.
All elements within the model can be classified by the “Risk-type” (current / emerging / future risk) that they
are associated to.
3.3 Representation of risk for the certification process
Within an analysis existing elements in the model can be modified, and new elements, fault trees and event
sequence diagrams can be added.
The tool for risk assessment can provide resulting changes to probabilities of final events in event sequence
diagrams based on changes to base elements in fault trees. The tool allows the safety practitioner to perform a
“top down” analysis starting at the Top-events of Fault-trees (see section 2.4.13).
The results of the analysis can be exported to EXCEL and in a PDF summary report, which can be used to
support the certification process.
ASCOS — Aviation Safety and Certification of new Operations and Systems
Grant Agreement No. 314299
Ref:
Issue:
ASCOS_WP3_TUD_D3.3
1.2
Page:
Classification:
60
Public
3.4 Represent current risk in accident and accident avoidance scenarios
The tool for risk assessment implements the risk model and accident scenarios developed within the ASCOS
initiative. Within the Model-master of the tool, the current risk is represented in accident and accident
avoidance scenarios. Section 2.3 explains how to access and explore the current risk picture.
3.5 Identify accident scenarios linked to EASp operational issues
Within the ASCOS initiative all ESDs of the ASCOS risk model are associated to operational issues of the
European Aviation Safety plan (EASp). These associations are implemented in the tool and the tool allows
filtering of ESDs by EASp categories.
3.6 Develop a safety picture of the future
The tool for risk assessment enables the user to make an analysis to develop a safety picture of the future. The
tool provides a model-master that represents current risk. Within an analysis the user can make modifications
to the model-master and create new elements, fault trees and event sequence diagrams (see section 2.4), to
develop a safety picture of the future.
3.7 Anticipate future risks based on existing precursors
Within the ASCOS initiative, precursors of base-events in the fault-tree have been identified. The tool enables
the user to link these precursors to base-events. The base events can be filtered by precursors. For each
precursor, all associated base-events are listed.
3.8 Assess necessary changes resulting from desired safety performance levels
The tool supports analyses starting from the final element and shows all elements that contribute to the
probability of the final element. This top-down for an analysis enables the user to assess necessary changes
resulting from desired safety performance levels.
Section 2.4.13 of this manual explains how to perform a top-down analysis starting from the top-event of a
fault-tree.
3.9 Derive safety objectives and safety requirements for new technologies,
operations and systems
The tool can give input to the safety practitioner to derive requirements for new technologies, operations and
systems (including products). It allows the safety practitioner to view the current risk picture (see section 2.3),
and add or modify elements of fault trees and event sequence diagrams within an analysis (see section 2.4).
Changes to the current risk picture, are tracked within an analysis and can be output in a PDF report or EXCEL
file.
ASCOS — Aviation Safety and Certification of new Operations and Systems
Grant Agreement No. 314299
Ref:
Issue:
ASCOS_WP3_TUD_D3.3
1.2
Page:
Classification:
61
Public
3.10 Model new Event Sequence Diagrams for scenarios unique to new
technologies, systems, products or operations
The tool enables the user to model new event sequence diagrams for scenarios unique to new technologies,
systems, products or operations. Section 2.4.6 of this manual explains how to add new event sequence
diagrams to an analysis.
3.11 Modify and update ESDs
The tool for risk assessment enables the user to modify and update event sequence diagrams (ESD) and ESD
elements. Sections 2.4.6 and 2.4.8 explain how to modify ESDs within an analysis.
3.12 Modify Fault Trees
The tool for risk assessment enables the user to modify and update Fault trees and Fault tree. Sections 2.4.10
and 2.4.12 of this manual explain how to modify Fault trees within an analysis.
3.13 Identify the impacts of future, emerging and current risks
The tool for risk assessment implements the risk model and accident scenarios developed within the ASCOS
initiative. These can be used to identify the impact of future, emerging and current risk.
The tool for risk assessment enables the user to associate elements to a specific risk-type (current / future /
emerging). Elements of the model can be filtered by their risk-type. To give an overview of a specific risk type,
all elements associated to this risk type can be viewed.
3.14 Identify future and emerging risks resulting from precursors
Within the ASCOS initiative, precursors of base-events in the fault-tree have been identified. The tool enables
the user to link these precursors to base-events. The base events can be filtered by precursors. For each
precursor, all associated base-events are listed. The user can link precursors to future and emerging risks that
he modelled within an analysis.
3.15 Show and overview of all base events
The tool for risk assessment is able to list all base events. Section 2.3.5 of this manual explains how to list all
base-events. This list can be filtered by “current”, “future” and “emerging risk.
3.16 Visualize ESDs and Fault trees
The tool for risk assessment visualizes Event Sequence Diagrams and Fault trees. Sections 2.3.1 and 2.3.3 of
this manual explain how to access the visualizations of the current risk picture. Sections 2.4.7 and 2.4.10 of this
manual explain how to access the visualizations of ESDs and Fault tress within an analysis.
ASCOS — Aviation Safety and Certification of new Operations and Systems
Grant Agreement No. 314299
Ref:
Issue:
ASCOS_WP3_TUD_D3.3
1.2
Page:
Classification:
62
Public
3.17 Represent changes to the total aviation system by modifying Event Sequence
Diagrams / Fault Trees
The tool for risk assessment enables the user to represent changes to the total aviation system by modifying
ESDs and Fault trees. Modifications can be added to the current risk picture within an analysis (see section
2.4). The effects of a modification are implement immediately to the modified model within an analysis (See
section 2.4.5).
3.18 Calculate accident probabilities
The tool for risk assessment implements the risk model and accident scenarios developed within the ASCOS
initiative. The tool incorporates Fault-Tree and Event Sequence Diagram logic and covers the total aviation
system.
Accident probabilities are calculated based on the probabilities of all elements that contribute to the
probability of the accident. Accidents are represented by some of the “final events” of ESDs (see section 2.3.1).
The probability of ESD final events is calculated based on the probabilities of preceding ESD elements, which
are linked to Fault trees.
3.19 Show the influence of stakeholders on parts of the model
The tool for risk assessment enables the user to associate elements of the model to certain stakeholders. For
each stakeholder all associated elements can be listed. Elements can be filtered by stakeholder. This enables
the user to show and trace the influence of stakeholders in parts of the model.
3.20 Modify Elements probabilities
The tool for risk assessment implements the risk model and accident scenarios developed within the ASCOS
initiative. The element probabilities in the risk model can be modified. The user can start an analysis (see
section 2.4.1) and add modifications to all elements of the risk model. These modifications are incorporated in
the modified model, which can be accessed within the analysis (see section 2.4.5).
ASCOS — Aviation Safety and Certification of new Operations and Systems
Grant Agreement No. 314299
Ref:
Issue:
4
ASCOS_WP3_TUD_D3.3
1.2
Page:
Classification:
63
Public
Conclusions and recommendations
The objective of this study is the development of a software tool for risk assessment. The tool embodies the
ASCOS risk model and representation of accident scenarios, which are based on CATS. The tool allows the user
to access, explore and modify the ASCOS risk model and accident scenarios. It allows the user to utilize the
safety risk method developed to support the new proposed certification approach. The tool for risk
assessment is a web-based software tool that can be used by a safety practitioner as support in the risk
assessment process. The tool will be validated within ASCOS WP5 Validation.
The software tool has now reached a stable prototype level. It supports the following functionalities:
g)
Create safety risk picture for the current and future aviation system
h) Support safety analysis for the certification process
i)
Support analysis of future and emerging risk
j)
Create precursors and safety barriers
k)
Represent safety culture and safety management
l)
Classify and filter results by EASp; AoC and stakeholder
The tool for risk assessment supports an initial proposed methodology developed in the context of an
agreement between ASCOS and the EASp Action EME1.2, which seeks to develop a possible picture of the
future by establishing a foresight cell. This would help to prioritize safety improvements efforts on the basis of
foresight incorporating emerging and future risk. However, it should be noted that EASA and/or other CAA’s
have not yet tested or evaluated the current version of the tool. Follow-up activities in the ASCOS WP5 should
dedicate some efforts towards evaluating the usability of the tool in the context of the EASp Action EME1.2.
For future work, it is recommended to seek opportunities to widen the scope of the tool for risk assessment.
This could be achieved by opening up access to the tool for risk assessment to more users, and collect their
feedback on which functionalities of the tool are useful to them and from which additional functionalities they
could benefit. However, it should be noted that the ASCOS tool for risk assessment is recommended to be
used only by aviation safety experts with sufficient and relevant aviation safety expertise and knowledge.
ASCOS — Aviation Safety and Certification of new Operations and Systems
Grant Agreement No. 314299
Ref:
Issue:
ASCOS_WP3_TUD_D3.3
1.2
Page:
Classification:
64
Public
References
#
Authors(s), Title, Year
1
ASCOS Website; http://www.ascos-project.eu
2
ASCOS D3.2; Risk models and accident scenarios, 2013
3
http://en.wikipedia.org/wiki/MoSCoW_Method (last accessed on November 20 , 2013)
4
IIBA and Kevin Brennan, A Guide to the Business Analysis Body of Knowledge, 2009
5
http://en.wikipedia.org/wiki/Ruby_on_Rails (last accessed on November 20th, 2013)
6
S. Ruby, D. Thomas, D. H. Hansson, Agile web development with rails 4.0, 2013
7
http://www.nlr-atsi.nl/fast/CATS/CATS%20final%20report.pdf (last accessed on September 1 , 2014)
8
CATS Final Report, Dutch Ministry of Transport, March 2009
9
CATS for Ascos V0.1 NLR (Excel Table)
10
ASCOS D2.2; Total aviation system baseline risk picture, 2013
11
ASCOS D3.6; WP3 Final Report – Safety Risk Management, 2014
12
ASCOS Internal note: Changes from the original CATS, 2014.
th
st
ASCOS — Aviation Safety and Certification of new Operations and Systems
Grant Agreement No. 314299
Ref:
Issue:
ASCOS_WP3_TUD_D3.3
1.2
Appendix A
Page:
Classification:
65
Public
Functional flow diagram
Figure 39: Functional flow diagram of the software tool
ASCOS — Aviation Safety and Certification of new Operations and Systems
Grant Agreement No. 314299