1
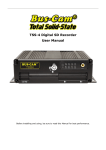
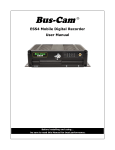
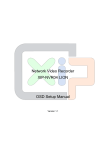
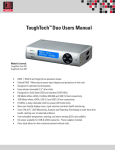
ForteRAID™ Manual
4-Drive RAID Array with FireWire 800 and 400,
USB 2.0 and eSATA
610031-2.0 ForteRAID Manual.pdf
November 21, 2011
Proprietary Notice and Disclaimer
Unless noted otherwise, this document and the information herein disclosed are proprietary to Glyph Technologies, 3736 Kellogg
Road, Cortland NY 13045 (“GLYPH”). Any person or entity to whom this document is furnished or having possession thereof, by
acceptance, assumes custody thereof and agrees that the document is given in confidence and will not be copied or reproduced
in whole or in part, nor used or revealed to any person in any manner except to meet the purposes for which it was delivered.
Additional rights and obligations regarding this document and its contents may be defined by a separate written agreement with
GLYPH, and if so, such separate written agreement shall be controlling.
The information in this document is subject to change without notice, and should not be construed as a commitment by GLYPH.
Although GLYPH will make every effort to inform users of substantive errors, GLYPH disclaims all liability for any loss or damage
resulting from the use of this manual or any software described herein, including without limitation contingent, special, or incidental liability.
© 2002-2008 Glyph Technologies. All rights reserved. Specifications are subject to change without notice. Glyph and the Glyph
logo are registered trademarks of Glyph Technologies. All other brands and product names mentioned are trademarks of their
respective holders.
1
Contacting Glyph
Please use the following contact information to contact Glyph and its distributors.
Glyph USA offers phone support Monday through Friday, 8:00 am to 5:00 PM Eastern Time.
Note: DO NOT ship any return goods to the mailing addresses below unless you have a valid RMA number.
All goods will be refused delivery unless a valid RMA number is displayed on the outside of the package.
United States of America
Glyph Technologies
3736 Kellogg Rd.
Cortland, NY 13045
USA
Phone: +1 607-275-0345
Fax: +1 607-275-9464
www.glyphtech.com
Sales Contact
[email protected]
Technical Support:
[email protected]
Unpacking Your ForteRAID
Your Glyph ForteRAID and accessories are packaged in a sturdy shipping container. Please inspect the container for evidence of shipping damage and mishandling. If the container is damaged, file a report with the
carrier or dealer immediately. Do not attempt to unpack and operate your ForteRAID until the carrier or dealer confirms the damage. If the container is in good condition, proceed with unpacking the ForteRAID. Verify
that all of the items described in the next section are present and in good condition. If any of the items you
expect to find in your container is missing or damaged, contact the dealer before proceeding any further.
In any case, do keep the shipping container and all packing materials in a safe place.
The ForteRAID package includes:
ForteRAID Enclosure
EC2 eSATA card
Glyph Manager software installer CD
9-Pin FireWire 800 Cable
6-Pin FireWire 400 Cable
USB 2.0 Cable (A to Mini-B)
1 meter eSATA cable
IEC Power Cable
2
About the ForteRAID and Drive Modes
The ForteRAID enclosure contains four hard disk drives, which function as one single volume. Through the
use of the Glyph Manager software utility, it supports six drive modes: RAID 0, 1, 3, 5, 10, and Spanning. Each
drive mode has its own advantages, depending upon the application.
RAID 0 (striping) is designed for increased speed but offers no redundancy benefits. RAID 0 spreads
data across array members in blocks, and is ideal for situations where speed and capacity are most
important. It’s a proven technology for video editing, working with huge graphics files, sound libraries, and streaming instruments that play hundreds of samples simultaneously. RAID 0 provides the
full capacity of the drives, and is the default shipping drive mode. Since data is written without any
form of parity data-checking, it allows for the fastest data transfer of all other RAID levels. However,
if one drive becomes damaged, the data on both drives can become corrupted. RAID 0 is not redundant or fault tolerant like RAID levels 1, 3, and 5, but the trade off is that it’s the fastest of all RAID
levels. MAKE SURE TO BACKUP YOUR DATA OFTEN!
RAID 1 (mirroring) uses only two of the 4 internal drives. It offers the data redundancy and real-time
backup by writing the same data to two hard drives at the same time. Should a drive failure happen,
data is still available on the remaining drive. Usable capacity is equal to capacity of 1 drive. For example, a 4TB ForteRAID will be seen as a 1TB drive. Reading and writing occurs on both drives simultaneously so that each of the drives contains exactly the same data, mirroring each other. If either of
the drives should fail the other is there to seamlessly continue to provide operation.
RAID 3 (striping with a dedicated parity drive) offers speed and data redundancy by using parity
data which is stored on a dedicated drive. Should a drive failure happen, the remaining members of
the array calculate the missing data and rebuild to a spare drive. The spare drive can be inserted after
the failure, or can be online and waiting (hot spare). For RAID 3, usable capacity is 3/4 of the entire
capacity. For RAID 3 + hot spare, usable capacity is half the entire capacity.
RAID 5 (striping with distributed parity) offers speed and data redundancy by using parity data
which is striped across all drives. Should a drive failure happen, the remaining members of the array
calculate the missing data and rebuild to a spare drive. The spare drive can be inserted after the failure, or can be online and waiting (hot spare). For RAID 5, usable capacity is 3/4 of the entire capacity.
For RAID 5 + hot spare, usable capacity is half the entire capacity.
RAID 10 (striping + mirroring) creates two pairs of mirrored drives, and stripes across them for a
very good balance of speed and redundancy. Usable capacity is equal to half of the entire capacity.
RAID 10 is perfect for situations where the data integrity is more important than the capacity, such as
audio recording and editing, photography, and sample libraries/sound libraries.
Spanning mode simply shows all four drives as one large volume and data is written sequentially
across them. When the first drive fills to the limit, data is then written to the next drive. This mode
is useful for applications requiring large volumes, but not requiring the speed of RAID 0. Spanning
provides the full capacity of the drives, with no benefits to speed or redundancy.
3
A note about spare drives
When 3 hard drives plus 1 spare drive are used, the total capacity will be only as large as two drives. When
one drive fails, the data will be rebuilt immediately by using the spare drive, rather than waiting for the
faulty drive to be replaced.
Using the ForteRAID with Pro Tools® Software
There is a current limitation with Pro Tools® and volume size. Pro Tools does not support record or playback
on volumes 2TB or larger. This is currently an open issue that we expect will be resolved in future releases of
Pro Tools. If using Pro Tools, choose a ForteRAID capacity and RAID mode that yields a volume 2TB or smaller.
Using the ForteRAID with Windows 2000 / XP
Older versions of Windows, such as 2000 and XP 32-bit, use Master Boot Record which doesn’t support volumes larger than 2TB. When the total capacity of the RAID is 2TB or higher, you must format the array using
GPT in Windows. GPT format is only supported by Windows XP 64-bit Edition, Windows 2003 Server, Windows Vista, Windows 7, and Mac OS X. GPT format will not work with XP 32-bit or older Windows operating
systems. If you want to use Windows 2000 and/or XP 32-bit, you’ll need to create a RAID that is less than 2TB.
Front panel LEDs
The ForteRAID front panel has four LEDs. From left to right they are “Power”, “Check GM” (there are two of
these which prompt you to open Glyph Manager software), and “Access”. The Power LED will display solid
blue when power is on. The Access LED will flash green when there is disk activity. The two Check GM LEDs
will display a flashing or solid yellow when error conditions exits with the drives inside the array. Those error
conditions are discussed in greater detail below. If the Check GM LED is flashing or solid, connect via FireWire
or USB, and open Glyph Manager software to diagnose the problem.
4
ForteRAID Back Panel
Ports
The fastest interface on the ForteRAID is eSATA and there is one eSATA port on the rear panel. In RAID 0
mode, the ForteRAID can sustain 120MB/sec (read speed) when connected via eSATA to the included EC2
eSATA card. (Up to 230MB/s is possible with higher performance eSATA cards, such as the Sonnet E4P card.)
FireWire 800 is the next fastest and there are two FW800 ports on the rear panel. ForteRAID can sustain
80MB/sec using FW800. If using FW800, one of these ports should be connected to your computer, and the
other should be connected to other downstream FireWire devices. It doesn’t matter which port you connect
to the computer, they are functionally identical. If your computer has a FireWire 400 port only, you can connect via the FW400 port on the ForteRAID. If your computer doesn’t have any FireWire ports you can either
purchase an eSATA or FireWire adapter card (recommended), or use the USB 2.0 port on the back of the
ForteRAID.
Smart Fan
The smart fan automatically regulates the fan speed according to the internal temperature. It will start using
low speed, and gradually increase the fan speed after the internal temperature reaches 113 degrees, then
use full speed above 140 degrees Fahrenheit.
A - B Switch
This switch is currently not used by the ForteRAID. It can be used for future functionality.
Setting up the ForteRAID
NOTE: It is advisable that the Glyph Manager software be installed prior to following the instructions below. For
information on installing Glyph Manager, see installation instructions later in this manual.
1. If you plan on using using the included EC2 eSATA card, install it in your computer’s PCIe slot. Please follow
the install directions in the EC2 manual. You can download the manual and drivers for the EC2 card on the
Glyph website, at www.glyphtech.com/support/accessories.php
2. Position the ForteRAID by placing the unit on a flat, level surface. Caution: Speakers are magnetic devices;
they can harm your data if they’re too close to your hard drives or tapes.
3. Connect the power cable. Make sure that the power is off on all of your computer equipment and the ForteRAID. Connect the power cable to the back of the ForteRAID. Plug the three-prong plug into an appropriate
power receptacle, preferably with surge and spike protection.
4. Connect the FireWire 800, FireWire 400, USB, or eSATA cable. Plug one end of the cable into your computer’s port, and the other into the back of the ForteRAID. Both FireWire 800 ports are functionally identical, so it
doesn’t matter which one you use.
5. Power up the ForteRAID and power up your computer.
6. If you’re using Mac OS X, the icon should mount on your desktop. If you’re using Windows, please follow
the formatting instructions for Windows later in this manual.
5
Understanding Glyph Manager Software
NOTE: For information on installing Glyph Manager, see installation instructions later in this manual
The Glyph ForteRAID ships with Glyph Manager software, a utility for Mac OS X and Windows. When a ForteRAID is connected to the computer either by FireWire or USB, information about the drives contained
within the ForteRAID will be displayed. Glyph Manager essentially does two things:
1. Configures the ForteRAID in one of the drive modes.
2. Constantly monitors the health of the drives and fan, and displays the health status. When a problem is detected, Glyph Manager alerts the user by animating in the Mac OS X dock or displaying an error
balloon from the Windows System Tray. Data can then be backed up before any is lost due to drive failure.
NOTE: Glyph Manager (version 4) requires special configurations to communicate with the ForteRAID over eSATA.
Below are the two conditions in which Glyph Manager will function over eSATA:
1. On Mac laptops running OS X when connected to the FirmTek SeriTek/2SM2-E ExpressCard Adapter
2. On Windows XP, Vista and Windows 7 machines with motherboards that include onboard eSATA
The Glyph Manager screen display:
When installed in MAC OS X, the left hand pane of the Glyph Manager screen displays general information
regarding all Glyph enclosures that can be monitored (GT 062, GT 062E, ForteRAID, PortaGig 62). Each will
be displayed with a status state, model and serial number. The status of all the enclosure states will be displayed in the System Status box below. The right hand pane will display information specific to whichever of
the enclosure units is highlighted.
In both Windows and Mac OS X, Glyph Manager monitors several functional parameters of your Glyph ForteRAID drive arrays including serial number, volume name, connection type, current configuration, selected
configuration, fan speed, enclosure and individual drive temperatures, array and drive health. Additionally,
in Windows, Glyph Manager monitors the Quick Removal Policy. For how to change this policy, please see
the article “Windows Write Performance” on the Glyph web site (http://www.glyphtech.com/docs/630012_
WinXP_Vista_write_performance.pdf ).
NOTE: Glyph Manager does not, however, format your ForteRAID. After configuring your ForteRAID in one of the
drive modes, you must take further steps to format your ForteRAID and prepare it for use. These steps are explained in the next sections.
6
Glyph Manager Display Details
Array Information:
Displayed are the serial number of the selected enclosure, the volume name (once the drive has been partitioned) and the connection type.
Configuration and Selected Configuration:
Normally the “Configuration” and “Selected Configuration” should match.  “Configuration” is the current disk
drive mode, as it was last set. “Selected configuration” is the new drive mode that it’s being changed to,
which is set using the “Change Configuration” utility. These would be mismatched if you are in the process of
changing from one drive mode to another. If these are mismatched, you can set them to match in one of two
ways:
1. Answer “yes” to the initialize disk question when Glyph Manager first detects the newly selected
array. This changes to the “Selected Configuration”.
2. Use Glyph Manager to change “Selected Configuration” to match “Configuration”. This keeps the current configuration.
Fan Speed:
The Glyph Manager software monitors the enclosure’s internal fan RPM, and it is normal for it to vary. It is
possible at times for the fan to turn off, so a speed of 0 is also a normal condition. The fan speed display is
used in helping to diagnose problems relating to excessive temperatures.
Temperature:
Individual drive temperatures are monitored, as well as the temperature of the “bridge” (the internal circuits).
Drive temperatures over 68 C is detrimental to continued proper operation of the drives.
Status:
Indicates array functionality. A properly functioning array condition is “Fully Operational”. Other states are:
“Initialized”, “Degraded Operation” and “Halted”. “Degraded Operation” means that a drive has failed. Due
to the redundant nature of a RAID 1, 3, 5, and 10 arrays, no data has been lost and operation can continue.
However, the failure of another drive will result in data loss. The failed drive should be replaced as soon as
possible. “Halted” means that the RAID array cannot continue operation due to drive failure and that data
has been lost. A drive failure is catastrophic when the array is configured as either Spanning or RAID 0. A
loss of a single drive will result in the loss of all data.
LED behavior relating to Glyph Manager:
Any error that results in the system state “Halted” will make the two “Check GM” LEDs turn solid yellow on the
front panel. All other errors - including RAID State Mismatch - result in blinking yellow “Check GM” LEDs. All
errors will animate the Glyph ball in the dock under OS X or generate an error balloon under Windows. If the
Check “GM LED” is flashing or solid, open Glyph Manager software to diagnose the problem.
7
Glyph Manager Display Details (continued)
Init status:
In normal operation the status should be “Success”. Possible error conditions are “Disk too small”, “Incorrect
disk count”, “Invalid RAID set”, “Multiple RAID sets”, “Disk erase fail” and “Unknown init error”. Any of these
messages indicate a problem with the RAID array.
Individual drive information:
Port Status:
Indicates the condition of the drive within the array.
“Active” means the disk is in use in the array.
“Hot standby” means that a RAID mode has been selected that includes a standby drive that will be automatically added to the array to replace a failed drive.
“Spare” and “Unused” mean that a RAID mode has been selected that does not require the drive.
“Rebuilding” indicates that the drive is in use in the array but that the data is being rebuilt. Under normal
operation this will not occur. Occasionally after an improper shutdown - for example if the unit was powered
down while data was being written to the disk - you may see a rebuild. If you see repeated rebuilds, please
contact Glyph support.
“Failed” means that the drive has been removed from the array due to failure.
“Missing” means that no drive is detected, likely due to disk failure.
Drive errors and rebuild status:
Persistent and recoverable errors: Recoverable errors are write errors that required a retry to complete.
Persistent errors indicate a disk area that cannot be read from or written to. These should normally be zero.
Non-zero numbers indicate a drive that is starting to fail.
Drive smart status:
For “Active” drives, “smart status” should normally be “Disk OK”. “Disk failing - DANGER!” and “SMART not enabled” indicate a drive problem which requires the drive be replaced.
8
Glyph Manager Operation In Mac OS X
The ForteRAID ships in RAID 0 mode, and drive mode changes are made by using the Glyph Manager software utility (not the OS X Disk Utility). OS X Disk Utility is used to format the new device after drive mode
changes are made.
READ THIS FIRST! Changing drive modes with Glyph Manager will require you to re-format the ForteRAID, and
result in erasing all of the current data on the drive. Make sure you backup all data before doing so!
To change the drive mode, follow these steps:
1. Install Glyph Manager 4 (or later) software.
2. Connect the ForteRAID via FireWire or USB, and open Glyph Manager software. If you have more than one
ForteRAID connected, choose the desired unit from the list on the left. You can identify the units by their
volume names.
NOTE: To change drive modes, ForteRAID must be connected via FireWire or USB.
9
3. Un-mount the volume(s) associated with the unit you are configuring by dragging them to the trash in the
Finder. This is very important to ensure successful drive mode change because it forces Mac OS to “forget”
the current configuration.
4. Click the Change Configuration
button.
5. Select the desired configuration
on the following screen and click
the Change button. In the example
shown, we are changing from RAID
0 to RAID 5. Note that the top selection (single drive) is not selectable
at this time.
6. The next window requires that you verify the
change request. Click OK to change the drive
configuration. NOTE: ALL DATA ON THE DRIVES
WILL BE DESTROYED.
7. The next window reports that the drive configuration has changed. After a few seconds the
system will update, and Glyph Manager will display the new drive configuration. Click OK in this
window.
7. The next window prompts you to finalize the new
configuration. Click YES to accept the configuration
change.
10
8. At this point you may see the Mac OS Disk Insertion window. Now that the drive configuration has
changed, Mac OS has re-discovered the ForteRAID
and prompts you to format the newly configured device. If you see the window below, click Eject. If you
do not see this message, simply go to step 9.
9. Power off the ForteRAID, unplug the FireWire, USB or eSATA cable, plug the cable back in, then power it
back on again. This is important to force Mac OS to “forget” any current drive information.
10. If you get the Disk Insertion dialog box, this time click Initialize which will open Disk Utility. If not, open
Disk Utility from your System Volume > Applications Folder > Utilities Folder, and format the new volume.
Mac OS X formatting instructions can be found later in this manual.
Glyph Manager Operation in Windows XP, Vista,
and Windows 7
Glyph Manager will start automatically and
will display a Glyph icon in the lower right
corner of the system tray. Right clicking on
this icon and then selecting Show will invoke
Glyph Manager to the screen.
NOTE: With Vista, Windows Defender will block
the automatic launch of Glyph Manager. Right
click on the Windows Defender icon in the
system tray to unblock Glyph Manager. With
Windows 7, it is necessary to launch Glyph
Manager manually using Start/All Programs/
Glyph Manager.
When a ForteRAID is connected to the computer, information about the drives within the
ForteRAID will be displayed.
To change the mode of the drives, click the
Change Drive Configuration button and select
the desired configuration on the following
screen.
11
Select the desired configuration on the following screen and click the Select button.
In the example shown, we are changing
from RAID 0 to RAID 5. Note that the top-left
selection (single disk) is not selectable at
this time.
Confirm the changed configuration by clicking Continue on the following screen.
Finally, click Initialize to initialize the drive array with
the new configuration.
Note: After changing drive mode, it is necessary to utilize the Windows Control Panel/Administrative Tools/
Computer Management/Disk Management to format the drives in their new configuration before they will
be usable.
The Glyph Manager menu options are as follows:
“File” contains the method to close the program.
“Tools” contains Options with four settings involving the starting and stopping of Glyph Manager.
“Help” contains About Glyph Manager information as well as help files.
Glyph Manager also tells you the Windows policy settings for your ForteRAID. If the line reads “quick removal
– BAD”, then you may experience slow write speeds to the Glyph drive. This setting only applies when using FireWire 800. The default Windows settings for FireWire-connected drives can reduce your Glyph drive
performance by as much as 90%. This problem is easily corrected, just follow the instructions in the Glyph
document 630012_WinXP_Vista_write_performance.pdf. This document is available on the support pages
of our website and also on the Glyph Manager CD.
Known Restrictions in Glyph Manager 4: Windows Vista requires Service Pack 1.
12
Changing a Failed Hard Drive Module
If one of the hard drives fails, the two “Check GM” LEDs will display flashing or solid yellow, and Glyph Manager will alert you. Open Glyph Manager software to determine which drive has failed and what the error
condition is. If a drive has failed and the RAID mode is set to RAID 1, 3, 5, or 10, the data can still be accessed,
but it is strongly suggested that you replace the faulty drive mechanism immediately to assure continued
backup and data safety.
It is very unlikely that multiple hard drives fail simultaneously, which is the reasoning behind using the redundant RAID modes. If this did happen, or if a drive fails when the RAID mode is set to RAID 0 or Spanning,
the data will be lost and the system cannot be accessed again until the drive(s) are replaced and the array
rebuilds anew.
NOTE: Glyph Tech Support is available to help you in the event of drive failure. If you need assistance with the
procedure below, please call our tech support at 1-800-335-0345.
NOTE: Spare drive modules are available from Glyph. In the event of a failed drive, you must use a replacement
drive with capacity equal to, or higher than, the existing drives in the array. When building a new RAID array, identical capacity drives are also recommended. When using drives with differing capacities, the lowest capacity drive
will determine the total capacity of the array. For example, a four-drive RAID 0 array with three 1TB drives and one
500GB drive will yield a 2TB array. 500GB on each drive would be used for the array, and the rest is wasted space.
To replace a failed drive, follow the steps below:
1. Power off and unplug the power from the ForteRAID. Position the enclosure on the edge of a desk or table,
with the front facing towards you. You will notice that there is a switch on the bottom of the enclosure. Position the enclosure so it hangs slightly off the edge of the table so you can access the switch.
2. Move the switch to the left, and with your other hand, push the inner chassis from the back until the front
panel slides out of the housing.
3. Pull the top of the front panel forward so that it un-clips from the inner chassis at the top.
4. Lift up gently to remove the front panel from the bottom pivot point. If you have to pull hard, something
is wrong. The lower lip of the front panel is probably catching the inner chassis.
13
5. To remove a drive module, turn the thumbscrew counter-clockwise and then pull it out.
6. Slide the replacement drive module into the enclosure, and fasten the locking screw in place to complete
the drive installation. The drive modules can be installed at any position in the enclosure, there is no specific
order required.
7. Plug in and power on the ForteRAID, and connect to your computer.
NOTE: Do not force the drives into place. If the drive carriers don’t slide in properly, make sure the drives are
properly installed into the trays (with the SATA connector facing out), and make sure they are lined up in the slots
correctly.
After the replacement drive has been inserted:
If a new drive module has been inserted when using RAID 1, 3, 5, or 10, the RAID array will be rebuilt automatically. If you do not see a rebuild reported in Glyph Manager, un-mount the volume and power-cycle
the ForteRAID. After power-cycle, the rebuild should begin. During the rebuild process, Glyph Manager will
estimate the remaining rebuild time. Rebuilding the RAID array may take several hours, depending on drive
capacity. You will be able to use the array during the rebuild process, but performance will be degraded.
For RAID 0 and Spanning, drive failure will result in the loss of the array. You will need to create a new partition on the volume (See Formatting instructions later in this manual).
NOTE: Do not attempt to change the RAID mode while the array is rebuilding.
NOTE: We recommend not turning the power off during the rebuild process, but if it is interrupted it will continue
rebuilding when the power is restored.
NOTE: It is not possible to add more drives to an existing RAID array (RAID expansion) or change the RAID configuration without reformatting (RAID migration). To add additional drives at a later point, turn off the power, install
the drive(s), turn the power back on and then erase the old partition and format the drives again. You will need to
back up any important data before doing this!
NOTE: Glyph only supports ForteRAID spare drive modules in the ForteRAID. Some ForteRAID models sold with
lower-capacity drives (total ForteRAID capacity less than 2TB) do not support the addition of larger drives without
a firmware update from Glyph. If you would like to increase the capacity of your ForteRAID, make sure to purchase
Glyph ForteRAID spare drive modules, and please contact Glyph tech support for details.
14
Glyph Manager Installation
Glyph Manager Installation in Mac OS X:
Insert the Glyph Manager CD, or to get the latest version of Glyph Manager, go to the support section of
www.glyphtech.com and download the version for your operating system. The Mac version of Glyph Manager 4 supports Mac OS 10.4 and above. It is a Universal Binary (supports both Intel and PowerPC Macs). You
can find your operating system version by going to the Apple Menu and clicking on “About This Mac”.
Glyph Manager can run in the background automatically under OS X by using “System Preferences/System
Accounts/Login Items/Add (+)” then selecting Glyph Manager from the Applications folder. Check the “Hide”
box to load the Glyph Manager on the Dashboard at login. The above actions are specific to the account
name selected. It is necessary to perform these same steps for each account name desired to have Glyph
Manager automatically load at login.
Note: We recommend that you set Glyph Manager to run in the background because it will alert you to any problems with your ForteRAID, and allow you to backup your data before any is lost.
Glyph Manager Installation in Windows XP, Vista, and Windows 7:
Insert the Glyph Manager CD, or to get the latest version of Glyph Manager, go to the support section of
www.glyphtech.com and download the version for your operating system. The Windows version of Glyph
Manager 4 supports Windows XP and above. Windows Vista must be patched with Service Pack 1 to allow
installation of Glyph Manager. If your installation of Vista is configured for automatic updates, Service Pack 1
is automatically downloaded. If it is not, you must download Service Pack 1 from Microsoft.
Double click the file called setup.exe and then accept the End User Licensing Agreement. Next, accept (or
change) the target install folder. The installation will create a Start Menu folder by default. Check the box
marked “Don’t create a Start Menu folder” if a Start Menu folder is not desired. The install routine will NOT
create a desktop icon by default, check the box marked “Create a desktop icon” if one is desired. Since there
are options to disable this automatic launch of Glyph Manager, it is recommended that at least one of the
above options (icon or Start Menu folder) be used to provide a manual way to launch Glyph Manager.
NOTE: Glyph Manager will start automatically when the computer is booted (except with Vista and Windows 7. With Vista, Windows Defender will block the automatic launch of Glyph Manager. Right click on the
Windows Defender icon in the system tray to unblock Glyph Manager. With Windows 7, it is necessary to
launch Glyph Manager manually using Start/All Programs/Glyph Manager.
The final step of the installation provides three options:
View readme.doc, Launch Microsoft .NET Framework Version 2.0, and Launch Glyph Manager
The readme.doc contains support contact information and should be reviewed.
Glyph Manager requires Microsoft .NET Framework Version 2.0 to be installed. It is recommended that this
option be allowed. If .NET Framework Version 2.0 is already installed, the Glyph Manager installation will not
attempt to overwrite what’s already there. If the installation does detect an existing .NET Framework Version
2.0 already installed, a “Maintenance Mode” dialog box will appear offering the choice to “Repair” or “Uninstall”. Neither of these options should be selected and the Cancel button should be clicked. Taking this action will require confirmation by clicking Yes in response to the “Are you sure…” message that follows. Lastly,
click “Finish” in the “Setup Cancelled” dialog box.
15
Formatting Instructions
Windows 2000 / XP / Vista / Windows 7 Formatting Instructions
1. Right-click My Computer and click Manage.
2. In the Computer Management window, under Storage, click Disk Management.
The Write Signature wizard pops up.
3. Use the wizard to write a signature to the new drive. If you want only one partition we suggest using a
primary partition and selecting the maximum size. In most cases you’ll want to use NTFS volumes, this is the
default for most versions of Windows. Choose FAT32 if you want to use the drives with Windows 98 or ME, or
if you want to use the drive with Windows and Mac OS.
4. Formatting will take a few minutes, after which your drive will be ready to use.
Windows 98 / 98SE Formatting Instructions
1. From your computer’s task bar, go to Start > Programs > MS-DOS Prompt.
2. At the prompt, type fdisk and press Enter. You’ll see a long message about disk support.
3. Enter Y (type Y and press Enter).
4. You are invited to make a choice. Enter 5 to change the current fixed disk drive. MS-DOS displays the connected disk drives.
5. Enter the number of the disk that has no corresponding drive letter.
6. You are invited to make a choice (same list as in Step 3). Enter 1 to create a primary DOS partition. Your
computer verifies the drive’s integrity, after which you are asked to choose whether you want to use all the
space available.
7. Enter Y to opt for using the maximum available space. Your computer again verifies the drive’s integrity.
8. When the drive’s integrity has been verified, press ESC (Escape) three times to exit fdisk.
9. At the prompt, type exit.
10. Restart your computer.
Your new drive is now ready to use.
16
Mac OS X Formatting Instructions
Since your ForteRAID comes pre-formatted for Macintosh you don’t need to format them on installation. If
you decide to reformat or partition your drive at a later date, use Disk Utility (supplied with the Mac OS X
operating system).
Caution: This procedure will destroy any data currently on the drive. Before formatting a drive, save any important
data it contains.
1. Open Disk Utility:
-Double click on your internal hard drive mounted on the desktop
-Open Applications Folder > Utilities Folder > double click on Disk Utility
2. Select your ForteRAID drive from the list on the left. The top entry represents the device and the entry underneath it represents the volume associated with that device. Click on the top device which will say something like “XXXGB Glyph Technologies”.
3. Click the “Erase” tab on the right side of the screen.
4. Choose the desired volume format from the drop-down list. Glyph recommends the default “Mac OS Extended (Journaled)”.
5. Click in the “Name” field and type the desired name for the drive. This name will identify the drive on the
desktop.
6. Click the “Install Mac OS 9 Disk Driver” button if you would like your drive to be compatible with OS 9.
7. Click the “Erase” button to erase your drive. Your new drive should automatically mount on the desktop as
a Glyph volume.
Mac OS 9 Formatting Instructions
Since Glyph drives come pre-formatted for Macintosh you don’t need to format them on installation. If you
decide to reformat or partition your drive at a later date, you can use the Erase Disk command in the Mac
OS 9 operating system. This command will erase all the data on a volume and create a new file system. Erase
disk will not allow you to re-partition a FireWire drive or create a different volume structure than what was
previously there.
Caution: This procedure will destroy any data currently on the drive. Before formatting a drive, save any important
data it contains.
1. Select the volume by clicking on it once in the Finder
2. Go to the Special menu and select Erase Disk... The Erase Disk dialog box opens to verify your decision to
erase the disk.
3. In the Name field, enter the new name for the disk or leave the name as it is.
4. In the Format drop-down menu, choose an Extended volume and click “Erase”.
17
More Information
ForteRAID Features
Removable drives in case of failure.
SATA II 3.0Gb/s drives.
RAID controller built into enclosure - no special RAID card needed.
Engineered to support professional content creation applications
Supports software-selectable drive modes: RAID 0, 1, 3, 5, and Spanning.
230MB/sec sustained transfer rate over eSATA.
Internal power supply, no wall wart, internal quiet fan.
Glyph Manager software for configuring unit, runs on Mac and PC.
Glyph Manager reports RAID array health status, RAID level, enclosure temp, drive health and temperature.
ForteRAID Specifications
Part Number
FTRD-x (x is equal to total capacity)
Interfaces
(2) 9-pin FW800 rear ports
(1) 6-pin FW400 rear port
(1) eSATA rear port
(1) USB 2.0 Hi-speed rear port
Bridging Chip
Oxford 936
Maximum Transfer Rate
eSATA: 300MB/sec (3Gb/sec)
Sustained Transfer Rate
eSATA: >230MB/sec
Dimensions
H 7” x W 5.3” x D 9.6”
ConfigurationDesktop enclosure
Weight
8.6 lb. / 3.9 kg
Internal Power Supply
Universal 100-240v 50/60 Hz
Mac OS Compatibility
Minimum PowerPC G4 Processor, 128MB RAM
eSATA interface, Mac OS X 10.3 or later
FireWire interface, Mac OS X 10.2 or later
USB 2.0 interface, Mac OS X 10.2 or later
PC Compatibility
Minimum 500MHz Intel Pentium 3 Processor, 128MB RAM
eSATA interface, Windows XP / Vista / Windows 7
FireWire interface, Windows 2000 / XP / Vista / Windows 7
USB 2.0 interface, Windows 2000 / XP / Vista / Windows 7
Warranty3 Years
1 Year Advance Replacement on removable drives (US 48 States Only)
2 Years Free Basic Data Recovery*
*While Glyph is not obligated to recover lost data, we always give it our best effort. Nonetheless, we can’t guarantee we’ll always be successful.
18
About eSATA
• eSATA is an external interface technology that grew from the internal SATA I interface.
• The ForteRAID’s eSATA port supports speeds up to 3 Gb/sec (300 MB/sec), much faster than FireWire 400 or
FireWire 800.
• Shielded eSATA cables up to 2 meters in length are available.
• eSATA cables are different than SATA I cables, they are shielded and cannot be used with internal SATA I
connectors.
• eSATA uses a “point-to-point” connection, therefore each eSATA drive needs to be connected to its own
eSATA port.
• Most computers do not have built-in eSATA, so you’ll need a PCI card to connect your drive with eSATA.
Glyph sells various eSATA cards.
About FireWire 800
• FireWire 800 supports speeds up to 800 Mb/sec, twice as fast as FireWire 400.
• If your computer does not have built-in FireWire 800, you’ll need a PCI card to achieve a true FireWire 800
connection.
• Most 800 ports are Bi-Lingual, which means they speak both FireWire 400 and FireWire 800.
• If you connect a 400 device to an 800 device, you will be running at 400 speed maximum.
• FireWire is forward-compatible and back-compatible, but the bus always runs at the speed of the slowest
link.
• Beta cables are used to connect 800 devices to 800 devices.
• Bi-Lingual cables are available to connect 400 devices to 800 devices.
• Bi-Lingual cables have a 9-pin Bi-Lingual connector at one end and a 4-pin or 6-pin FireWire 400 connector
at the other end
Frequently Asked Questions
Q: How do I know if I have the correct version of Glyph Manager?
To get the latest version of Glyph Manager, go to the support section of www.glyphtech.com and download
the version for your operating system.
Q: Do I need to have Glyph Manager installed to use the ForteRAID?
No, Glyph Manager is used for configuration and monitoring only. It is required to change drive configuration or monitor drive health. It is not necessary to install Glyph Manager, but it is recommended.
Q: Do I need any drivers to use the ForteRAID?
No drivers are required to read and write to the drive using eSATA, FireWire or USB. A driver is required to use
Glyph Manager to change configuration or monitor drive health. All necessary drivers are installed as part of
the Glyph Manager installation.
Q: Do I need RAID software?
19
RAID software is not needed because the RAID intelligence is built into ForteRAID hardware. To configure the
array, use the Glyph Manager software to switch drive modes, and format the drive. Instructions for re-initializing your drive are included in this manual.
Q: My Windows computer doesn’t show the drive in My Computer. What’s up?
The default format on the ForteRAID is for the Macintosh, and Windows doesn’t recognize it. Once you have
connected the ForteRAID to your Windows PC, you have to re-initialize it for use with Windows. For Windows XP and 2000, that’s going to be NTFS format; for Win98/SE, that will be FAT32 format. Instructions for
re-initializing your drive are included in this manual.
Q: I’m using Windows 2000 and/or XP 32-bit and my volume is bigger that 2TB. Why does my ForteRAID not
show up correctly?
Older versions of Windows, such as 2000 and XP 32-bit, use Master Boot Record which doesn’t support volumes larger than 2TB. If you want to use Windows 2000 and/or XP 32-bit, you’ll need to create a RAID that is
less than 2TB. The following models are smaller than 2TB and are compatible: 1TB and 2TB (any drive mode);
3TB and 4TB (RAID 1, RAID 3 + hot spare, RAID 5 + hot spare, RAID 10); 6TB and 8TB (RAID 1).
Q: I’m still running Mac OS 9 or Win/ME. Can I still use the ForteRAID?
Yes. You can connect the USB port on the drive to your OS 9 or Win/ME machine. You cannot run Glyph Manager to change configuration or monitor drive status, however the ForteRAID will run in the last drive mode
that it was set to.
Q: What are the differences between FireWire 800 and FireWire 400?
Speed and Protocol. FireWire 800 has a max transfer rate of 800 Mb/sec (about 100 MB/sec peak). FireWire
400 has a max transfer rate of 400 Mb/sec (about 50 MB/sec peak). The higher bus speed helps with things
like large file copies and RAID, where FireWire 400 bus speed can be a limiting factor. FireWire 800 uses IEEE1394b “Beta” protocol; FireWire 400 uses IEEE-1394a “DS” protocol.
For more information, be sure to check out the Glyph website at www.glyphtech.com. There is information
posted there concerning FireWire 800/1394B, as well as information about the rest of Glyph’s product line.
Q: How can I make my drive work across Windows and Mac platforms?
The only file system that works well between Mac OS and Windows is FAT 32, otherwise known as MS-DOS
file system. This is a native Windows file system, but Mac OS 9 and X will mount FAT 32 volumes. Mac OS 9
and 10.1.x would only work with FAT 32 partitions less than 32GB. While Mac OS 10.2.x increased that limitation to 128GB, it wasn’t until Mac OS 10.3.x that you could use FAT 32 partitions of any size. Mac OS 10.3.x
can additionally read NTFS volumes but cannot write to them. See next question for information specific to
Pro Tools software.
Q: How can I use my drive with Windows and Mac Pro Tools systems?
If you are trying to use a hard drive between Windows and Mac Pro Tools systems, FAT 32 will not work for
you because a Mac running Pro Tools can only work with HFS formatted volumes. Your best option is to install MacDrive (www.mediafour.com) on your Windows machine to mount your Mac formatted volumes.
20