1
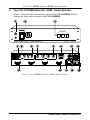
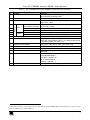
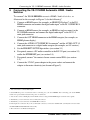
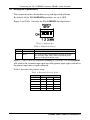
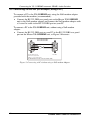
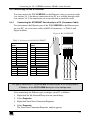
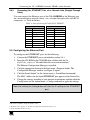
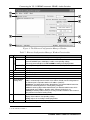
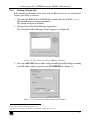
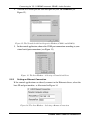
Kramer Electronics, Ltd.
USER MANUAL
Model:
VS-311HDMI
Automatic HDMI / Audio Switcher
Contents
Contents
1
2
2.1
3
3.1
3.2
3.3
4
5
5.1
Introduction
Getting Started
Quick Start
Overview
About HDMI
Recommendations for Best Performance
Terminology Used in this User Manual
Your VS-311HDMI Automatic HDMI / Audio Switcher
Connecting the VS-311HDMI Automatic HDMI / Audio Switcher
Setting the Dipswitches
1
1
1
3
4
5
5
6
8
10
5.1.1
Priority Switching Applications
11
5.2
5.3
5.4
Connecting the Contact Closure Remote Control PINs
Controlling via RS-232 (for example, using a PC)
Controlling via the ETHERNET
11
12
13
5.4.1
5.4.2
Connecting the ETHERNET Port directly to a PC (Crossover Cable)
Connecting the ETHERNET Port via a Network Hub (Straight-Through Cable)
13
15
5.5
Configuring the Ethernet Port
15
5.5.1
5.5.2
Setting a Virtual Port
Setting an Ethernet Connection
17
18
6
7
Technical Specifications
Kramer Protocol 2000
19
20
Figures
Figure 1: VS-311HDMI Automatic HDMI / Audio Switcher
Figure 2: Connecting the VS-311HDMI Automatic HDMI / Audio Switcher
Figure 3: Dipswitches
Figure 4: Connecting the Contact Closure Remote Control PINS
Figure 5: Connecting a PC without using a Null-modem Adapter
Figure 6: RJ-45 PINOUT
Figure 7: Local Area Connection Properties Window
Figure 8: Internet Protocol (TCP/IP) Properties Window
Figure 9: The Ethernet Configuration Manager Window
Figure 10: The Virtual Serial Port Manager Window
Figure 11: The Virtual Serial Port Properties Window
Figure 12: The Virtual Serial Port Properties Window (COM 3 and COM 4)
Figure 13: The Port Window – Selecting a Virtual Serial Port
Figure 14: The Port Window – Selecting a Remote Connection
6
9
10
11
12
13
14
14
16
17
17
18
18
18
i
Contents
Tables
Table 1: Terminology Used in this User Manual
Table 2: VS-311HDMI Automatic HDMI / Audio Switcher Features
Table 3: Dipswitch Settings
Table 4: Dipswitch Priority Setup
Table 5: Crossover Cable RJ-45 PINOUT
Table 6: Straight-through Cable RJ-45 PINOUT
Table 7: Ethernet Configuration Manager Window Functionality
Table 8: Technical Specifications of the VS-311HDMI
Table 9: Protocol Definitions
Table 10: Instruction Codes for Protocol 2000
ii
5
7
10
10
13
15
16
19
20
21
KRAMER: SIMPLE CREATIVE TECHNOLOGY
Introduction
1
Introduction
Welcome to Kramer Electronics (since 1981): a world of unique, creative and
affordable solutions to the infinite range of problems that confront the video, audio
and presentation professional on a daily basis. In recent years, we have redesigned
and upgraded most of our line, making the best even better! Our 500-plus different
models now appear in 8 Groups1, which are clearly defined by function.
Congratulations on purchasing your Kramer VS-311HDMI Automatic HDMI
/ Audio Switcher, which is ideal for:
Systems requiring automatic HDMI routing
Presentation and multimedia applications
Each package includes the following items:
VS-311HDMI Automatic HDMI / Audio Switcher
Power adapter and Null-modem adapter
Windows®-based Kramer control software2
Windows®-based Ethernet Configuration Manager and Virtual Serial Port
Manager
Kramer RC-IR1 Infra-Red Remote Control Transmitter3 (including the
required battery and a separate user manual4)
This user manual4
2
Getting Started
We recommend that you:
Unpack the equipment carefully and save the original box and packaging
materials for possible future shipment
Review the contents of this user manual
Use Kramer high performance high resolution HDMI cables5
2.1 Quick Start
This quick start chart summarizes the basic setup and operation steps.
1 GROUP 1: Distribution Amplifiers; GROUP 2: Video and Audio Switchers, Matrix Switchers and Controllers; GROUP 3:
Video, Audio, VGA/XGA Processors; GROUP 4: Interfaces and Sync Processors; GROUP 5: Twisted Pair Interfaces;
GROUP 6: Accessories and Rack Adapters; GROUP 7: Scan Converters and Scalers; and GROUP 8: Cables and Connectors
2 Downloadable from our Web site at http://www.kramerelectronics.com
3 Previously known as the IR-1 / IR-1-01
4 Download up-to-date Kramer user manuals from our Web site at http://www.kramerelectronics.com
5 The complete list of Kramer cables is on our Web site at http://www.kramerelectronics.com
1
Getting Started
2
KRAMER: SIMPLE CREATIVE TECHNOLOGY
Overview
3
Overview
The Kramer VS-311HDMI is a high performance 3x1 HDCP (high definition
digital content protection) compatible1 automatic switcher for HDMI signals,
digital audio (S/PDIF) signals, and stereo audio signals.
The VS-311HDMI switches any one of three HDMI HDCP compliant1
sources to a single display device, on HDMI connectors with the
corresponding:
Digital audio (S/PDIF) input signals switched to an S/PDIF output, on
RCA connectors and/or
Unbalanced stereo audio input signals on 3.5 mini-jack connectors
switched to an unbalanced stereo audio output on a 3.5 mini-jack
connector, as well as to a balanced stereo audio output on a 5-pin terminal
block connector
The VS-311HDMI can operate either in the manual mode or in the auto mode.
In the manual mode, the VS-311HDMI acts as a regular switcher, switching
the input video and audio signals to the output via the three front panel
INPUT SELECT buttons.
In the auto mode, you can switch any input to the output via the three front
panel INPUT SELECT buttons, but once the selected video signal is lost, the
machine automatically switches to the highest priority input, according to the
input priority setup2. The VS-311HDMI will switch back to the primary input
when an HDMI signal is detected on that input.
The VS-311HDMI is housed in a desktop-sized enclosure and is 12 VDC fed.
Control the VS-311HDMI using the front panel buttons, or remotely via:
RS-232 serial commands transmitted by a touch screen system, PC, or
other serial controller
The Kramer infra-red remote control transmitter
The ETHERNET
Remote control contact closure
1 HDCP is a standard, developed by Intel, to protect copyright holders (movie studios, and so on) from having their programs
copied and shared. The HDCP standard provides for the secure, encrypted transmission of digital signals over HDMI or DVI
connections between two HDCP-enabled devices. The source device (such as a DVD player or HDTV tuner) encrypts the
digital signal using the HDCP standard, and then sends that signal over the HDMI or DVI connection to the receiving device
(for example, an HDTV). The receiving device decodes the signal using HDCP and uses the signal as it is allowed
2 As described in section 5.1
3
Overview
3.1 About HDMI
High-Definition Multimedia Interface (HDMI) is an uncompressed all-digital1
audio/video interface, widely supported in the entertainment and home cinema
industry. It delivers the highest high-definition image and sound quality. Note that
Kramer Electronics Limited is an HDMI Adopter2 and an HDCP Licensee3.
In particular, HDMI:
Provides a simple4 interface between any audio/video source, such as a
set-top box, DVD player, or A/V receiver and video monitor, such as a
digital flat LCD / plasma television (DTV), over a single lengthy5 cable
Supports standard, enhanced, high-definition video, and multi-channel
digital audio6 on a single cable
Transmits all ATSC HDTV standards and supports 8-channel digital
audio, with bandwidth to spare to accommodate future enhancements and
requirements
Benefits consumers by providing superior, uncompressed digital video
quality via a single cable7, and user-friendly connector
Is backward-compatible with DVI (Digital Visual Interface)
Supports two-way communication between the video source (such as a
DVD player) and the digital television, enabling new functionality such as
automatic configuration and one-button play
HDMI has the capacity to support existing high-definition video formats
(720p, 1080i, and 1080p/60), as well as standard definition formats such as
NTSC or PAL.
1 Ensuring an all-digital rendering of video without the losses associated with analog interfaces and their unnecessary digitalto-analog conversions
2 See http://www.hdmi.org/about/adopters_founders.asp
3 See http://www.digital-cp.com/list/
4 With video and multi-channel audio combined into a single cable, the cost, complexity, and confusion of multiple cables
currently used in A/V systems is reduced
5 HDMI technology has been designed to use standard copper cable construction at up to 15m
6 HDMI supports multiple audio formats, from standard stereo to multi-channel surround-sound. HDMI has the capacity to
support Dolby 5.1 audio and high-resolution audio formats
7 HDMI provides the quality and functionality of a digital interface while also supporting uncompressed video formats in a
simple, cost-effective manner
4
KRAMER: SIMPLE CREATIVE TECHNOLOGY
Overview
3.2 Recommendations for Best Performance
To achieve the best performance:
Connect only good quality connection cables, thus avoiding interference,
deterioration in signal quality due to poor matching, and elevated noise
levels (often associated with low quality cables)
Avoid interference from neighboring electrical appliances and position
your VS-311HDMI away from moisture, excessive sunlight and dust
Caution – No operator-serviceable parts inside unit.
Warning – Use only the Kramer Electronics input power
wall adapter that is provided with this unit1.
Warning – Disconnect power and unplug unit from wall
before installing or removing device or servicing unit.
3.3 Terminology Used in this User Manual
Table 1 defines some terms that are used in this user manual.
Table 1: Terminology Used in this User Manual
Term
802.3
Definition
The standard specification for ETHERNET that is maintained by the Institute of Electrical
and Electronics Engineers (IEEE).
Dynamic Host
Allows the network administrator to distribute IP addresses from a central point and
Configuration
automatically send a new IP address when an Ethernet point is plugged into a different
Protocol (DHCP)
network location
Gateway
A network position serving as an entry to another network. On the Internet, a node or
stopping point can be either a gateway node or a host (end-point) node.
IP Address
A 32-binary digit number that identifies each sender or receiver (within a network via a
particular server or workstation) of data (HTML pages or e-mails) that is sent in packets
across the Internet. Every device connected to an IP network must have a unique IP
address. This address is used to reference the specific unit.
Local Area Network Computers sharing a common communications line or wireless link, which often share a
(LAN)
server within a defined geographic area.
Media Access
A computer's unique hardware number (or address) in a LAN or other network. On an
Control (MAC)
Ethernet LAN, the (MAC) address is identical to the Ethernet address.
Address
Transmission
The basic communication language or protocol of the Internet that breaks the message
Control
into appropriately sized packets for the network, and can be used as a communications
Protocol/Internet
protocol in an intranet or an extranet.
Protocol (TCP/IP)
1 For example: model number AD2512C, part number 2535-000251
5
Your VS-311HDMI Automatic HDMI / Audio Switcher
4
Your VS-311HDMI Automatic HDMI / Audio Switcher
Figure 1 illustrates the front and rear panels of the VS-311HDMI. Table 2
defines the front and rear panels of the VS-311HDMI.
Figure 1: VS-311HDMI Automatic HDMI / Audio Switcher
6
KRAMER: SIMPLE CREATIVE TECHNOLOGY
Your VS-311HDMI Automatic HDMI / Audio Switcher
Table 2: VS-311HDMI Automatic HDMI / Audio Switcher Features
5
6
7
8
Function
The red LED lights when receiving signals from the
Infra-red remote control transmitter
POWER Switch
Illuminated switch for turning the unit ON or OFF
INPUT SELECT Buttons
Press the INPUT button to select the input to switch to the
output (from 1 to 3)
BALANCED OUT
Connect the balanced stereo audio output to a balanced
Terminal Block Connector stereo audio acceptor
LINE
OUT 3.5mm Mini Jack Connect to an unbalanced stereo audio output
IN 3.5mm Mini Jack
Connect to the unbalanced stereo audio inputs (from 1 to 3)
OUT RCA Connector
Connect to a digital audio (S/PDIF) output
S/PDIF
IN RCA Connectors
Connect to the digital audio (S/PDIF) inputs (from 1 to 3)
9
10
RS-232 DB 9F Port
PRIORITY SETUP Dipswitches
11
12
13
14
REMOTE Terminal Block
OUT HDMI Connector
IN HDMI Connectors
ETHERNET Connector
15
FACTORY RESET Button
16
12V DC
2
3
4
Feature
IR Receiver
AUDIO
#
1
Connect to the PC or the Remote Controller
Dipswitches for setup of the machine: DIPs 1, 2 and 3 are for
setting the signal priorities; DIP 4 is for setting to the manual
or the AUTO mode (see section 5.1)
Connects to a dry contact switch (see section 5.2)
Connect to the HDMI acceptor
Connect to the HDMI sources (from 1 to 3)
Connect to the PC or other Serial Controller through computer
networking
Press the ETHERNET factory reset button to reset to the
factory default definitions1:
IP number 192.168.1.39
Mask – 255.255.255.0
Gateway – 192.168.1.1
+12V DC connector for powering the unit
1 First, disconnect the power and then connect it again while pressing the RESET button. The unit will power up and load its
memory with the factory default definitions
7
Connecting the VS-311HDMI Automatic HDMI / Audio Switcher
5
Connecting the VS-311HDMI Automatic HDMI / Audio
Switcher
To connect1 the VS-311HDMI Automatic HDMI / Audio Switcher, as
illustrated in the example in Figure 2, do the following2:
1. Connect an HDMI source (for example, an HDMI DVD player3) to the IN 1
HDMI connector and connect the digital audio input4 to the IN 1 S/PDIF RCA
connector.
2. Connect an HDMI source (for example, an HDMI set top box source) to the
IN 3 HDMI connector and connect the digital audio input5 to the IN 3 3.5
mini-jack connector.
3. Connect the OUT HDMI connector to the HDMI acceptor (for example, an
HDMI plasma display).
4. Connect the AUDIO OUT S/PDIF RCA connector6 and the AUDIO OUT 3.5
mini-jack connector to a digital audio acceptor (for example, an AV receiver).
5. Set the PRIORITY SETUP dipswitches (see section 5.1)
6. If required, connect a PC and/or controller to the RS-232 port (see section 5.3)
and/or the ETHERNET port (see section 5.4).
7. If required, connect7 the contact closure remote control PINs (see section
5.2).
8. Connect the 12V DC power adapter to the power socket and connect the
adapter to the mains electricity (not shown in Figure 2).
1 You do not need to connect all the inputs
2 Switch OFF the power on each device before connecting it to your VS-311HDMI. After connecting your VS-311HDMI,
switch on its power and then switch on the power on each device
3 You can also connect a DVD player with a DVD connector, using an DVI-HDMI adapter to transfer video signals
4 Alternatively you can connect it to the 3.5 mini-jack connector
5 Alternatively you can connect it to the S/PDIF RCA connector
6 If the inputs are connected only to the 3.5 mini-jack connectors, connect the AUDIO OUT 3.5 mini-jack connector and/or
the BALANCED OUT terminal block connector only
7 The connection is not illustrated in Figure 2
8
KRAMER: SIMPLE CREATIVE TECHNOLOGY
Connecting the VS-311HDMI Automatic HDMI / Audio Switcher
HDMI
Plasma Display
or
AV Receiver
HDMI Set Top Box
Source
HDMI
DVD Player
Figure 2: Connecting the VS-311HDMI Automatic HDMI / Audio Switcher
9
Connecting the VS-311HDMI Automatic HDMI / Audio Switcher
5.1 Setting the Dipswitches
This section describes the machine set-up and dipswitch selection.
By default, all the VS-311HDMI dipswitches are set to OFF.
Figure 3 and Table 3 describe the VS-311HDMI unit dipswitches.
Figure 3: Dipswitches
Table 3: Dipswitch Settings
DIPS
1, 2, 3
Function
Priority setup
Description
Set the inputs priority (see Table 4)
4
AUTO
OFF: manual mode, switch between channels manually;
ON: automatic mode, inputs switch automatically to the
output according to the priority setup
Inputs 1, 2 and 3 can be set in priority according to your needs. The VS-311HDMI
will switch to the secondary input upon loss of the primary input signal, and back to
the primary input when a signal is detected.
Table 4 describes the priority setup:
Table 4: Dipswitch Priority Setup
10
Priority
1, 2, 3
Dip Position
OFF
OFF
OFF
3, 2, 1
OFF
OFF
ON
2, 3, 1
OFF
ON
OFF
1, 3, 2
ON
OFF
OFF
3, 1, 2
ON
OFF
ON
2, 1, 3
ON
ON
OFF
KRAMER: SIMPLE CREATIVE TECHNOLOGY
Connecting the VS-311HDMI Automatic HDMI / Audio Switcher
5.1.1
Priority Switching Applications
In the following example, dipswitches 1, 2, and 3 are set to OFF, OFF and
OFF respectively, meaning that the highest priority input is IN 1; IN 2 is the
secondary input; and IN 3 the third. Dipswitch 4 is set ON, enabling AUTO
mode operation.
If all the inputs are connected, you can, for example, press the INPUT SELECTOR
2 button to switch IN 2 to OUT. The plasma display shows the IN 2 signal.
If the HDMI signal on IN 2 is cut off, the switcher automatically switches IN 1 to
the output, and if that fails too, IN 3 is automatically switched to the output. If, in
the meantime, the IN 2 signal is restored, IN 2 will take priority once again.
5.2 Connecting the Contact Closure Remote Control PINs
The contact closure remote control pins operate in a similar way to the input
buttons.
For example, you may override1 the presently routed input by using the
remote control contact closure. To do so2, connect the appropriate input
number3 pin on the REMOTE terminal block connector to the G (Ground) pin4,
as Figure 4 illustrates.
DO NOT Connect more than one PIN to the Ground PIN at the same time
To route IN 1 to the
output, temporarily
attach PIN 1 to
PIN G (Ground)
To route IN 2 to the
output, temporarily
attach PIN 2 to
PIN G (Ground)
To route IN 3 to the
output, temporarily
attach PIN 3 to
PIN G (Ground)
Figure 4: Connecting the Contact Closure Remote Control PINS
1 Equivalent to pressing a different input button
2 When in the manual mode (dipswitch 4 set to OFF), you can switch an input to the output using the front panel INPUT
SELECT buttons
3 Input 1, 2 or 3
4 Note that unless the connection is permanent, the VS-311HDMI will revert to an automatic switcher when the connection is
removed
11
Connecting the VS-311HDMI Automatic HDMI / Audio Switcher
5.3 Controlling via RS-232 (for example, using a PC)
To connect a PC to the VS-311HDMI unit, using the Null-modem adapter
provided with the machine (recommended):
Connect the RS-232 DB9 rear panel port on the Master VS-311HDMI
unit to the Null-modem adapter and connect the Null-modem adapter with
a 9-wire flat cable to the RS-232 DB9 port on your PC
To connect a PC to the VS-311HDMI unit, without using a Null-modem
adapter:
Connect the RS-232 DB9 port on your PC to the RS-232 DB9 rear panel
port on the Master VS-311HDMI unit, as Figure 5 illustrates
PIN 5 Connected to PIN 5 (Ground)
PIN 3 Connected to PIN 2
PIN 2 Connected to PIN 3
Female DB9 (From PC)
Male DB9
PIN 4 Connected to PIN 6
PINS 8, 7, 1 Connected together
If a Shielded cable is used, connect the shield to PIN 5
Figure 5: Connecting a PC without using a Null-modem Adapter
12
KRAMER: SIMPLE CREATIVE TECHNOLOGY
Connecting the VS-311HDMI Automatic HDMI / Audio Switcher
5.4 Controlling via the ETHERNET
You can connect the VS-311HDMI via the Ethernet, using a crossover cable
(see section 5.4.1) for direct connection to the PC or a straight through cable
(see section 5.4.2) for connection via a network hub or network router.
5.4.1
Connecting the ETHERNET Port directly to a PC (Crossover Cable)
You can connect the Ethernet port of the VS-311HDMI to the Ethernet port
on your PC, via a crossover cable with RJ-45 connectors, as Table 5 and
Figure 6 define.
Figure 6: RJ-45 PINOUT
Table 5: Crossover Cable RJ-45 PINOUT
EIA /TIA 568A
Side 1
PIN Wire Color
1
White-orange
2
Orange
3
White-green
4
Blue
5
White-blue
6
Green
7
White-brown
8
Brown
EIA /TIA 568B
Side 2
PIN
Wire Color
1
White-green
2
Green
3
White-orange
4
Blue
5
White-blue
6
Orange
7
White-brown
8
Brown
Pair 1
4 and 5
Pair 1
Pair 2
1 and 2
Pair 2
3 and 6
Pair 3
3 and 6
Pair 3
1 and 2
Pair 4
7 and 8
Pair 4
7 and 8
4 and 5
This type of connection is recommended for identification of the factory default
IP Address of the VS-311HDMI during the initial configuration
After connecting the Ethernet port, configure your PC as follows:
1. Right-click the My Network Places icon on your desktop.
2. Select Properties.
3. Right-click Local Area Connection Properties.
4. Select Properties.
The Local Area Connection Properties window appears.
13
Connecting the VS-311HDMI Automatic HDMI / Audio Switcher
5. Select the Internet Protocol (TCP/IP) and click the Properties Button (see
Figure 7).
Figure 7: Local Area Connection Properties Window
6. Select Use the following IP Address, and fill in the details as shown in
Figure 8.
7. Click OK.
Figure 8: Internet Protocol (TCP/IP) Properties Window
14
KRAMER: SIMPLE CREATIVE TECHNOLOGY
Connecting the VS-311HDMI Automatic HDMI / Audio Switcher
5.4.2
Connecting the ETHERNET Port via a Network Hub (Straight-Through
Cable)
You can connect the Ethernet port of the VS-311HDMI to the Ethernet port
on a network hub or network router, via a straight-through cable with RJ-45
connectors, as Table 6 defines:
Table 6: Straight-through Cable RJ-45 PINOUT
Side 1
PIN
1
2
3
4
5
6
7
8
Wire Color
White-orange
Orange
White-green
Blue
White-blue
Green
White-brown
Brown
Side 2
PIN
1
2
3
4
5
6
7
8
Wire Color
White-orange
Orange
White-green
Blue
White-blue
Green
White-brown
Brown
5.5 Configuring the Ethernet Port
To configure the ETHERNET port, do the following:
1. Connect the ETHERNET port as described in section 5.4.1.
2. Insert the CD-ROM in the CD-ROM drive, double click the Set
Setfc11eth_confxx.exe1 file and follow the on-screen instructions2.
The Ethernet Configuration Manager is installed.
3. Click the appropriate shortcut in the Start menu’s Programs folder. The
Configuration Manager window (see Figure 9) opens.
4. Click the Search button3 (or the Action menu’s, Search Board command).
The MAC Address for the found ETHERNET port appears in the Device List.
5. Change the settings according to your network requirements and then click the
Config button (or the Action menu’s, Config command) to apply the settings.
Note that clicking the Config button will alter the IP settings of the ETHERNET
port
1 File names are liable to change from time to time
2 The latest version appears on our Web site at http://www.kramerelectronics.com
3 To automatically search for devices
15
Connecting the VS-311HDMI Automatic HDMI / Audio Switcher
Figure 9: The Ethernet Configuration Manager Window
Table 7: Ethernet Configuration Manager Window Functionality
Feature
File
Menu bar
#
1
Function
The Exit command closes the Configuration Manager application
Set MAC1
The Search Board command seeks the VS-311HDMI device that connects to the PC
via the ETHERNET port, and displays it and its corresponding settings;
The Config command adjusts the VS-311HDMI according to the displayed data
For factory use only (click the Password command to enter the password)
About
Displays software information, including the software version
Action
2
3
4
5
6
Device List
Progress Bar
Status Bar
Version
Device Network
Settings Area
7
Action Buttons
8
Exit Button
Displays the MAC Address
Shows the progress
Shows the status
Displays the firmware version
DHCP1 Mode Check Box: When selected, configures the Ethernet port to obtain an IP
address automatically from the DHCP server. When cleared, manual configuration of
the Ethernet port is required to obtain an IP address (Static IP)
IP Address: A 32-binary digit number obtained from your Network Administrator that
identifies the Ethernet port that is currently being configured
Subnet: A 32-binary digit number obtained from your Network Administrator, which
combined with the IP Address, identifies which network your device is on
Gateway: A network position serving as an entry to another network or to the Internet
(only relevant in the Active Routing mode)
Search: seeks the devices that connect to the PC via the ETHERNET port, and
displays them and their corresponding settings
Config: adjusts the according to the displayed data
Closes the Configuration Manager application
1 See the definition in Table 1
16
KRAMER: SIMPLE CREATIVE TECHNOLOGY
Connecting the VS-311HDMI Automatic HDMI / Audio Switcher
5.5.1
Setting a Virtual Port
If the control application cannot work with an Ethernet driver, use the Kramer
Virtual port driver as follows:
1. Insert the CD-ROM in the CD-ROM drive, double click the SetKVSP_xx.exe1
file and follow the on-screen instructions2.
The virtual serial port is installed.
2. Run the Virtual Serial Port Manager Application.
The Virtual Serial Port Manager window appears (see Figure 10).
Figure 10: The Virtual Serial Port Manager Window
3. Press the Add VSP button to add a serial port and type the IP settings according
to the IP address and local port of your VS-311HDMI (see Figure 11).
Figure 11: The Virtual Serial Port Properties Window
1 File names are liable to change from time to time
2 The latest version appears on our Web site at http://www.kramerelectronics.com
17
Connecting the VS-311HDMI Automatic HDMI / Audio Switcher
4. You can set a virtual port for each local port on your VS-311HDMI (see
Figure 12).
Figure 12: The Virtual Serial Port Properties Window (COM 3 and COM 4)
5. In the control application, choose the COM-port connection according to your
virtual serial port connections (see Figure 13).
Figure 13: The Port Window – Selecting a Virtual Serial Port
5.5.2
Setting an Ethernet Connection
If the control application can directly connect to the Ethernet driver, select the
host IP and port number, as illustrated in Figure 14.
Figure 14: The Port Window – Selecting a Remote Connection
18
KRAMER: SIMPLE CREATIVE TECHNOLOGY
Technical Specifications
6
Technical Specifications
Table 8 includes the technical specifications:
1
Table 8: Technical Specifications of the VS-311HDMI
INPUTS:
OUTPUT:
DATA RATE:
POWER SOURCE:
CONTROLS:
DIMENSIONS:
WEIGHT:
ACCESSORIES:
OPTIONS:
3 HDMI connectors
3 S/PDIF digital audio on RCA connectors
3 unbalanced stereo audio +4dBm on 3.5mm mini jacks
1HDMI connector
1 S/PDIF digital audio on an RCA connector
1 unbalanced stereo audio + 4dBm on a 3.5mm mini jack, with 1 balanced
stereo audio on a 5-pin detachable terminal block
Up to 1.65Gbps
12 VDC, 270mA
Front panel buttons, infra-red remote control transmitter, RS-232, Ethernet
21.6cm x 16.1cm x 4.4cm (8.5” x 6.3” x 1.7”, W, D, H)
1.2 kg. (2.6 lbs.) approx.
Power supply
Rack adapter RK-80
1 Specifications are subject to change without notice
19
Kramer Protocol 2000
7
Kramer Protocol 20001
The VS-311HDMI is compatible with Kramer’s Protocol 2000 (version 0.46)
(below). This RS-232/RS-485 communication protocol uses four bytes of
information as defined below. For RS-232, a null-modem connection between
the machine and controller is used. The default data rate is 9600 baud, with
no parity, 8 data bits and 1 stop bit.
Table 9: Protocol Definitions
MSB
0
7
LSB
DESTINATION
D
6
INSTRUCTION
N5
5
N4
4
N3
3
N2
2
N1
1
N0
0
I5
5
I4
4
I3
3
I2
2
I1
1
I0
0
O6
6
O5
5
O4
4
O3
3
O2
2
O1
1
O0
0
OVR
6
X
5
M2
2
M1
1
M0
0
1st byte
1
7
INPUT
I6
6
2nd byte
1
7
OUTPUT
3rd byte
1
7
MACHINE NUMBER
M4
4
M3
3
4th byte
1st BYTE:
Bit 7 – Defined as 0.
D – “DESTINATION”:
0 - for sending information to the switchers (from the PC);
1 - for sending to the PC (from the switcher).
N5…N0 – “INSTRUCTION”
The function that is to be performed by the switcher(s) is defined by the INSTRUCTION (6 bits). Similarly, if a function is
performed via the machine’s keyboard, then these bits are set with the INSTRUCTION NO., which was performed. The
instruction codes are defined according to the table below (INSTRUCTION NO. is the value to be set for N5…N0).
2nd BYTE:
Bit 7 – Defined as 1.
I6…I0 – “INPUT”.
When switching (ie. instruction codes 1 and 2), the INPUT (7 bits) is set as the input number which is to be switched.
Similarly, if switching is done via the machine’s front-panel, then these bits are set with the INPUT NUMBER which was
switched. For other operations, these bits are defined according to the table.
3rd BYTE:
Bit 7 – Defined as 1.
O6…O0 – “OUTPUT”.
When switching (ie. instruction codes 1 and 2), the OUTPUT (7 bits) is set as the output number which is to be switched.
Similarly, if switching is done via the machine’s front-panel, then these bits are set with the OUTPUT NUMBER which was
switched. For other operations, these bits are defined according to the table.
4th BYTE:
Bit 7 – Defined as 1.
Bit 5 – Don’t care.
OVR – Machine number override.
M4…M0 – MACHINE NUMBER.
Used to address machines in a system via their machine numbers. When several machines are controlled from a single serial
port, they are usually configured together with each machine having an individual machine number. If the OVR bit is set, then
all machine numbers will accept (implement) the command, and the addressed machine will reply.
1 You can download our user-friendly “Software for Calculating Hex Codes for Protocol 2000” from our Web site:
http://www.kramerelectronics.com
20
KRAMER: SIMPLE CREATIVE TECHNOLOGY
Kramer Protocol 2000
For a single machine controlled via the serial port, always set M4…M0 = 1, and make sure that the machine itself is
configured as MACHINE NUMBER = 1.
Table 10: Instruction Codes for Protocol 2000
Note: All values in the table are decimal, unless otherwise stated.
INSTRUCTION
#
DESCRIPTION
0
1
RESET VIDEO
SWITCH VIDEO
2
SWITCH AUDIO
3
STORE VIDEO
STATUS
RECALL VIDEO
STATUS
REQUEST STATUS
OF A VIDEO OUTPUT
REQUEST STATUS
OF AN AUDIO
OUTPUT
VIS SOURCE
4
5
6
7
8
BREAKAWAY
SETTING
DEFINITION FOR SPECIFIC INSTRUCTION
INPUT
OUTPUT
0
Set equal to video input which is to
be switched
(0 = disconnect)
Set equal to audio input which is to
be switched
(0 = disconnect)
Set as SETUP #
Set as SETUP #
Set as SETUP #
Set as SETUP #
Set as input # when
OUTPUT byte = 6;
OR
set as output # when
OUTPUT byte = 7;
OR
set as blank period
(in steps of 25ms) when
OUTPUT byte = 32;
OR
set = 0. *****
0
1
9
VIDEO / AUDIO TYPE
SETTING
0 - for video
1 - for audio
2 - for VGA and DVI
10
REQUEST VIS
SETTING
11
REQUEST
BREAKAWAY
SETTING
REQUEST VIDEO /
AUDIO TYPE
SETTING
SET HIGHEST
MACHINE ADDRESS
REQUEST HIGHEST
MACHINE ADDRESS
12
13
14
Set as SETUP #, or
set to 126 or 127 to request if
machine has this function
Set as SETUP #, or
set to 126 or 127 to request if
machine has this function
Set as SETUP #, or
set to 126 or 127 to request if
machine has this function
0 - for video
1 - for audio
0 - for video
1 - for audio
0
Set equal to video output which is
to be switched
(0 = to all the outputs)
Set equal to audio output which
is to be switched
(0 = to all the outputs)
0 - to store
1 - to delete
0
Equal to output number whose
status is reqd
Equal to output number whose
status is reqd
0 - No VIS (immediate)
1 - Input # 1
2 - External digital sync
3 - External analog sync
4 - Dynamic sync
5 - Inter-machine sync
6 - Input # (INPUT byte)
7 - Output #(INPUT byte)
8 - User-defined sync
32 - RGBHV seamless switching
64 - Set for delayed switch
65 - Execute delayed switch
66 - Cancel delayed switch
setting
0 - audio-follow-video
1 - audio breakaway
0 - FOLLOW mode
1 - Normal mode
0 - CV
4 - SDI
1 - YC
5 - CV+YC
2 - YUV
6 - VGA scaler
3 - RGBS
7 - DVI
O0=0 – Unbalanced audio
O0=1 – Balanced audio
O1=0 – Digital audio
O1=1 – Analog audio
O4=0, O3=0, O2=0-Mono
O4=0, O3=0,O2=1-Stereo
1 - 640X480
2 - 800X600
3 - 1024X768
0 - VIS source
1 - Input # or output # of source
2 - Vertical sync freq (Hz)
0 - Request audio breakaway
setting
1 - Request “FOLLOW” setting
0 - for video
1 - for audio
2 - for VGA
Set equal to highest machine
address
0
NOTE
1
2, 15
2
2, 3, 15
2, 3, 15
4, 3
4, 3
2, 5, 17, 18
2
15
2
3, 4, 6, 7
3, 4, 6, 15
3, 4, 6
2
4
21
Kramer Protocol 2000
INSTRUCTION
#
DESCRIPTION
15
16
17
18
19
20
21
NOTE
REQUEST WHETHER
SETUP IS DEFINED /
VALID INPUT IS
DETECTED
ERROR / BUSY
SETUP #
or
Input #
0 - for checking if setup is defined 8
1 - for checking if input is valid
For invalid / valid input (i.e.
OUTPUT byte = 4 or OUTPUT byte
= 5),
This byte is set as the input #
RESERVED
RESET AUDIO
STORE AUDIO
STATUS
RECALL AUDIO
STATUS
SET VIDEO
PARAMETER
---0
Set as SETUP #
0 - error
1 - invalid instruction
2 - out of range
3 - machine busy
4 - invalid input
5 - valid input
---0
0 - to store
1 - to delete
0
Set as SETUP #
Equal to input / output number
whose video parameter is to be set
(0 = all)
Equal to input / output number
whose gain is to be set
(0 = all)
Equal to input / output number
whose video parameter is to be
increased / decreased
(0 = all)
9, 25
10
1
2, 3
2, 3
Set as parameter value
2, 11, 24
Set as parameter value
2, 11, 24
0 - increase video gain
1 - decrease video gain
2 - increase contrast
3 - decrease contrast
4 - increase brightness
5 - decrease brightness
6 - increase color
7 - decrease color
8 - increase hue
9 - decrease hue
16 - increase H-phase
17 - decrease H-phase
18 - increase V-position
19 - decrease V-position
0 - increase output
1 - decrease output
2 - increase left output
3 - decrease left output
4 - increase right output
5 - decrease right output
6 - increase input
7 - decrease input
8 - increase left input
9 - decrease left input
10 - increase right input
11 - decrease right input
0
24
6, 24
22
SET AUDIO
PARAMETER
23
INCREASE /
DECREASE VIDEO
PARAMETER
24
INCREASE /
DECREASE AUDIO
PARAMETER
Equal to input / output number
whose parameter is to be
increased / decreased
(0 = all)
25
REQUEST AUDIO
PARAMETER
Equal to input / output number
whose parameter is requested
26
REQUEST VIDEO
PARAMETER
Equal to input / output number
whose video parameter is
requested
0
6, 24
30
LOCK FRONT PANEL
0
2
31
REQUEST WHETHER
PANEL IS LOCKED
RESERVED
0 - Panel unlocked
1 - Panel locked
0
0
16
----
----
10
Memory address
Data
20
32
to
35
40
22
DEFINITION FOR SPECIFIC INSTRUCTION
INPUT
OUTPUT
DIRECT MEMORY
SAVE
24
KRAMER: SIMPLE CREATIVE TECHNOLOGY
Kramer Protocol 2000
INSTRUCTION
#
DESCRIPTION
DEFINITION FOR SPECIFIC INSTRUCTION
INPUT
OUTPUT
NOTE
42
AUDIO PARAMETER
SETTINGS FOR
INSTRUCTIONS 22,
24, 25
INPUT Bit:
I0 - 0=input; 1=output
I1 - Left
I2 - Right
0 - Gain
1 - Bass
2 - Treble
3 - Midrange
24
43
VIDEO PARAMETER
SETTINGS FOR
INSTRUCTIONS 21,
23, 26
1 – Input
2 – Output
24
56
CHANGE TO ASCII
0
57
SET AUTO-SAVE
58
59
EXECUTE LOADED
DATA
LOAD VIDEO DATA
I3 - no save
I4 - auto-save
Set as 0, or as SETUP #.
0 - video gain
1 - contrast
2 - brightness
3 - color
4 - hue
5 - H-phase
6 - V-position
1 - SVS protocol
2 - Generic protocol
0
60
LOAD AUDIO DATA
61
IDENTIFY MACHINE
62
DEFINE MACHINE
63
EXTENDED DATA
NOTES on the above table:
Set equal to video input
(0 = disconnect)
1-Take
2-Cancel
Set equal to video output
(0 = to all the outputs)
(127 = load SETUP #)
or SETUP #
Set equal to audio input
(0 = disconnect)
Set equal to audio output
(0 = to all the outputs)
(127 = load SETUP #)
1 - video machine name
2 - audio machine name
3 - video software version
4 - audio software version
5 - RS422 controller name
6 - RS422 controller version
7 - remote control name
8 - remote software version
9 - Protocol 2000 revision
1 - number of inputs
2 - number of outputs
3 - number of setups
or SETUP #
0 - Request first 4 digits
1 - Request first suffix
2 - Request second suffix
3 - Request third suffix
10 - Request first prefix
11 - Request second prefix
12 - Request third prefix
7 MSBs for INPUT data
1 - for video
2 - for audio
3 - for SDI
4 - for remote panel
5 - for RS-422 controller
7 MSBs for OUTPUT data
19
12, 2
22, 3
22, 23
22, 23
13
14
20
NOTE 1 - When the master switcher is reset, (e.g. when it is turned on), the reset code is sent to the PC. If this code is sent to
the switchers, it will reset according to the present power-down settings.
NOTE 2 - These are bi-directional definitions. That is, if the switcher receives the code, it will perform the instruction; and if
the instruction is performed (due to a keystroke operation on the front panel), then these codes are sent. For example, if the
HEX code
01
85
88
83
was sent from the PC, then the switcher (machine 3) will switch input 5 to output 8. If the user switched input 1 to output 7
via the front panel keypad, then the switcher will send HEX codes:
41
81
87
83
to the PC.
When the PC sends one of the commands in this group to the switcher, then, if the instruction is valid, the switcher replies by
sending to the PC the same four bytes that it was sent (except for the first byte, where the DESTINATION bit is set high).
NOTE 3 - SETUP # 0 is the present setting. SETUP # 1 and higher are the settings saved in the switcher'
s memory, (i.e. those
used for Store and Recall).
NOTE 4 - The reply to a "REQUEST" instruction is as follows: the same instruction and INPUT codes as were sent are
returned, and the OUTPUT is assigned the value of the requested parameter. The replies to instructions 10 and 11 are as per
the definitions in instructions 7 and 8 respectively. For example, if the present status of machine number 5 is breakaway
setting, then the reply to the HEX code
0B
80
80
85
would be HEX codes
4B
80
81
85
23
Kramer Protocol 2000
NOTE 5 – For the OUTPUT byte set as 6, the VIS source is the input selected using the OUTPUT byte. Similarly, for the
OUTPUT byte set as 7, the VIS source is the output selected using the OUTPUT byte. Note also, that on some machines the
sync source is not software selectable, but is selected using switches, jumpers, etc!
NOTE 6 – If INPUT is set to 127 for these instructions, then, if the function is defined on this machine, it replies with
OUTPUT=1. If the function is not defined, then the machine replies with OUTPUT=0, or with an error (invalid instruction
code).
If the INPUT is set to 126 for these instructions, then, if possible, the machine will return the current setting of this function,
even for the case that the function is not defined. For example, for a video switcher which always switches during the VIS of
input #1, (and its VIS setting cannot be programmed otherwise), the reply to the HEX code
0A
FE
80
81 (ie. request VIS setting, with INPUT set as 126dec)
would be HEX codes
4A
FE
81
81 (ie. VIS setting = 1, which is defined as VIS from input #1).
NOTE 7 – Setting OUTPUT to 0 will return the VIS source setting as defined in instruction #7. Setting to 1 will return the
input # or output # of the sync source (for the case where the VIS source is set as 6 or as 7 in instruction #7). Setting to 2
returns the vertical sync frequency (0 for no input sync, 50 for PAL, 60 for NTSC, 127 for error).
NOTE 8 - The reply is as in TYPE 3 above, except that here the OUTPUT is assigned with the value 0 if the setup is not
defined / no valid input is detected; or 1 if it is defined / valid input is detected.
NOTE 9 - An error code is returned to the PC if an invalid instruction code was sent to the switcher, or if a parameter
associated with the instruction is out of range (e.g. trying to save to a setup greater than the highest one, or trying to switch an
input or output greater than the highest one defined). This code is also returned to the PC if an RS-232 instruction is sent
while the machine is being programmed via the front panel. Reception of this code by the switcher is not valid.
NOTE 10 – This code is reserved for internal use.
NOTE 11 – For machines where the video and / or audio gain is programmable.
NOTE 12 - Under normal conditions, the machine'
s present status is saved each time a change is made. The "power-down"
save (auto-save) may be disabled using this code. Note that whenever the machine is turned on, the auto-save function is set.
NOTE 13 - This is a request to identify the switcher/s in the system. If the OUTPUT is set as 0, and the INPUT is set as 1, 2,
5 or 7, the machine will send its name. The reply is the decimal value of the INPUT and OUTPUT. For example, for a 2216,
the reply to the request to send the audio machine name would be (HEX codes):
7D
96
90
81 (i.e. 128dec+ 22dec for 2nd byte, and 128dec+ 16dec for 3rd byte).
If the request for identification is sent with the INPUT set as 3 or 4, the appropriate machine will send its software version
number. Again, the reply would be the decimal value of the INPUT and OUTPUT - the INPUT representing the number in
front of the decimal point, and the OUTPUT representing the number after it. For example, for version 3.5, the reply to the
request to send the version number would be (HEX codes):
7D
83
85
81 (i.e. 128dec+ 3dec for 2nd byte, 128dec+ 5dec for 3rd byte).
If the OUTPUT is set as 1, then the ASCII coding of the lettering following the machine’s name is sent. For example, for the
VS-7588YC, the reply to the request to send the first suffix would be (HEX codes):
7D
D9
C3
81 (i.e. 128dec+ ASCII for “Y”; 128dec+ ASCII for “C”).
NOTE 14 - The number of inputs and outputs refers to the specific machine which is being addressed, not to the system. For
example, if six 16X16 matrices are configured to make a 48X32 system (48 inputs, 32 outputs), the reply to the HEX code
3E
82
81
82 (ie. request the number of outputs)
would be HEX codes
7E
82
90
82
ie. 16 outputs
NOTE 15 – When the OVR bit (4th byte) is set, then the “video” commands have universal meaning. For example, instruction
1 (SWITCH VIDEO) will cause all units (including audio, data, etc.) to switch. Similarly, if a machine is in “FOLLOW”
mode, it will perform any “video” instruction.
NOTE 16 - The reply to the “REQUEST WHETHER PANEL IS LOCKED” is as in NOTE 4 above, except that here the
OUTPUT is assigned with the value 0 if the panel is unlocked, or 1 if it is locked.
NOTE 17 – For clean switching of RGBHV video, the “seamless switching” option may be used. The blanking period for the
transition of the RGB sources may be set in this case, in steps of 25 milliseconds.
For example, to set for 350ms blanking time (14 steps), send HEX codes
07
8E
A0
81
24
KRAMER: SIMPLE CREATIVE TECHNOLOGY
Kramer Protocol 2000
NOTE 18 – Delayed execution allows switching after a delay dictated by RS-232. To do this, the user sends instruction 7
with the “Set for delayed switch” option (64dec) before sending the switch command (instruction 1) or pressing via front panel.
The switch is not executed (unless timed-out) until the “Execute delayed switch” code is sent, or the “Set for delayed switch”
code is sent again. (The mode is automatically cancelled after implementation of the switch if the “execute” command is
used).
For example, to connect input 4 to output 3 after a delay, send HEX codes
07
80
C0
81
(set for delayed switch)
01
84
83
81
(switch code)
then, after the required delay, send HEX codes
07
80
C1
81
(execute delayed switch)
to implement the switch.
NOTE 19 – After this instruction is sent, the unit will respond to the ASCII command set defined by the OUTPUT byte. The
ASCII command to operate with the HEX command set must be sent in order to return to working with HEX codes.
NOTE 20 – When data (ie. the INPUT and/or OUTPUT bytes) of more than 7 bits is required, this instruction is sent before
sending the instruction needing the additional bits. The data in this intruction then becomes the Most Significant Bits of that
next instruction. For example, to set the audio gain (instruction 22) of output 3 to 681dec (2A9hex), you would first send HEX
codes
3F
80
85
81
and then send HEX codes
16
83
A9
81.
To set the audio gain of output 6 to 10013dec (271Dhex), first send HEX codes
3F
80
CE
81
followed by HEX codes
16
86
9D
81.
NOTE 21 – To store data in the non-volatile memory of the unit, eg. the EEPROM for saving SETUPS. The EEPROM
address is sent using the INPUT byte, and the data to be stored is sent using the OUTPUT byte. To use this instruction, it is
necessary to understand the memory map, and memory structure of the particular machine.
NOTE 22 – Instruction 59 and instruction 60 load data for sending to the crosspoint switcher (or for storing in a SETUP), ie.
the data is “lined-up” to be executed later. Instruction 58 executes the loaded data.
NOTE 23 – If the INPUT byte is set as 127dec, then the data stored in a SETUP is loaded. The SETUP # is in the OUTPUT
byte.
NOTE 24 – Further information needed in instructions 21, 22, 25 and 26, is sent using instruction 42 – which is sent prior to
the instruction. For example, to request the audio gain value of right input # 9, send hex codes
2A
84
80
81
and then send HEX codes
19
89
81
81.
NOTE 25 – For units which detect the validity of the video inputs, Instruction 16 will be sent whenever the unit detects a
change in the state of an input (in real-time).
For example, if input 3 is detected as invalid, the unit will send the HEX codes
10
83
84
81
If input 7 is detected as valid, then the unit will send HEX codes
10
87
85
81.
25
LIMITED WARRANTY
Kramer Electronics (hereafter Kramer) warrants this product free from defects in material and workmanship under the
following terms.
HOW LONG IS THE WARRANTY
Labor and parts are warranted for seven years from the date of the first customer purchase.
WHO IS PROTECTED?
Only the first purchase customer may enforce this warranty.
WHAT IS COVERED AND WHAT IS NOT COVERED
Except as below, this warranty covers all defects in material or workmanship in this product. The following are not covered
by the warranty:
1.
2.
3.
Any product which is not distributed by Kramer, or which is not purchased from an authorized Kramer dealer. If you are
uncertain as to whether a dealer is authorized, please contact Kramer at one of the agents listed in the Web site
www.kramerelectronics.com.
Any product, on which the serial number has been defaced, modified or removed.
Damage, deterioration or malfunction resulting from:
i)
Accident, misuse, abuse, neglect, fire, water, lightning or other acts of nature
ii)
Product modification, or failure to follow instructions supplied with the product
iii)
Repair or attempted repair by anyone not authorized by Kramer
iv)
Any shipment of the product (claims must be presented to the carrier)
v)
Removal or installation of the product
vi)
Any other cause, which does not relate to a product defect
vii)
Cartons, equipment enclosures, cables or accessories used in conjunction with the product
WHAT WE WILL PAY FOR AND WHAT WE WILL NOT PAY FOR
We will pay labor and material expenses for covered items. We will not pay for the following:
1.
2.
3.
Removal or installations charges.
Costs of initial technical adjustments (set-up), including adjustment of user controls or programming. These costs are the
responsibility of the Kramer dealer from whom the product was purchased.
Shipping charges.
HOW YOU CAN GET WARRANTY SERVICE
1.
2.
3.
To obtain service on you product, you must take or ship it prepaid to any authorized Kramer service center.
Whenever warranty service is required, the original dated invoice (or a copy) must be presented as proof of warranty coverage,
and should be included in any shipment of the product. Please also include in any mailing a contact name, company, address, and
a description of the problem(s).
For the name of the nearest Kramer authorized service center, consult your authorized dealer.
LIMITATION OF IMPLIED WARRANTIES
All implied warranties, including warranties of merchantability and fitness for a particular purpose, are limited in duration to
the length of this warranty.
EXCLUSION OF DAMAGES
The liability of Kramer for any effective products is limited to the repair or replacement of the product at our option. Kramer
shall not be liable for:
1.
2.
Damage to other property caused by defects in this product, damages based upon inconvenience, loss of use of the product, loss
of time, commercial loss; or:
Any other damages, whether incidental, consequential or otherwise. Some countries may not allow limitations on how long an
implied warranty lasts and/or do not allow the exclusion or limitation of incidental or consequential damages, so the above
limitations and exclusions may not apply to you.
This warranty gives you specific legal rights, and you may also have other rights, which vary from place to place.
NOTE: All products returned to Kramer for service must have prior approval. This may be obtained from your dealer.
This equipment has been tested to determine compliance with the requirements of:
EN-50081:
"Electromagnetic compatibility (EMC);
generic emission standard.
Part 1: Residential, commercial and light industry"
EN-50082:
"Electromagnetic compatibility (EMC) generic immunity standard.
Part 1: Residential, commercial and light industry environment".
CFR-47:
FCC Rules and Regulations:
Part 15: “Radio frequency devices
Subpart B – Unintentional radiators”
CAUTION!
Servicing the machines can only be done by an authorized Kramer technician. Any user who makes changes or modifications to
the unit without the expressed approval of the manufacturer will void user authority to operate the equipment.
Use the supplied DC power supply to feed power to the machine.
Please use recommended interconnection cables to connect the machine to other components.
26
KRAMER: SIMPLE CREATIVE TECHNOLOGY
For the latest information on our products and a list of Kramer
distributors, visit our Web site: www.kramerelectronics.com,
where updates to this user manual may be found.
We welcome your questions, comments and feedback.
Safety Warning:
Disconnect the unit from the power supply before
opening/servicing.
Caution
Kramer Electronics, Ltd.
Web site: www.kramerelectronics.com
E-mail: [email protected]
P/N: 2900-000224 REV 1