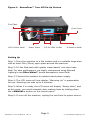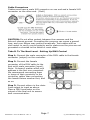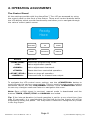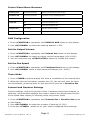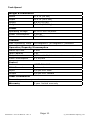
1
™
TOUR HZ
Blizzard Lighting, LLC
www.blizzardlighting.com
Waukesha, WI USA
Copyright (c) 2015
1. GETTING STARTED
What’s In The Box?
•
•
•
•
1 x AtmosFear™ Tour HZ LED Haze Machine
An Ever-So-Handy Power Cord
Warranty Card
This Lovely User Manual
Getting It Out Of The Box
Congratulations! You’ve got yourself one pro quality, road-worthy haze machine
that is ready to face the rigorous demands of life on the road! Now that you’re
the proud owner of a AtmosFear™ Tour HZ (or hopefully, HZs!), you should
carefully unpack the box and check the contents to ensure that all parts are
present and in good condition. If anything looks as if it has been damaged
in transit, notify the shipper immediately and keep the packing material for
inspection. Again, please save the carton and all packing materials. If a unit
must be returned to the factory, it is important that the fixture be returned in
the original factory box and packing.
Powering Up!
This unit must be powered directly off a switched circuit and cannot be run off
a rheostat (variable resistor) or dimmer circuit, even if the rheostat or
dimmer channel is used solely for a 0% to 100% switch.
Getting A Hold Of Us
If something is wrong, please just visit our website at www.
blizzardlighting.com and open a support ticket. We’ll be happy to help,
honest.
Blizzard Lighting
N16 W23390 Stoneridge Dr. Ste E
Waukesha, WI 53188 USA
www.blizzardlighting.com
414-395-8365
Disclaimer: The information and specifications contained in this document are
subject to change without notice. Blizzard Lighting™ assumes no responsibility
or liability for any errors or omissions that may appear in this user manual.
Blizzard Lighting™ reserves the right to update the existing document or to
create a new document to correct any errors or omissions at any time. You can
download the latest version of this document from www.blizzardlighting.com.
Author:
Date:
Last Edited:
Date:
J. Thomas
6/5/2015
J. Thomas
6/12/2015
Page 2
AtmosFear™ Tour HZ Manual - Rev. A (c) 2015 Blizzard Lighting, LLC
SAFETY INSTRUCTIONS
Attention:
To keep your AtmosFear™ Tour HZ in good working order please remember to:
•
•
•
•
Use only water-based, non-toxic haze fluid.
Keep the machine clean.
Turn the power off before adding fluid.
Turn the power off when not in use.
And also...
• ALWAYS make sure that you are connecting to the proper voltage, and that
the line voltage you are connecting to is not higher than that stated on the
decal or rear panel of the fixture.
• This product is intended for indoor use only.
• To prevent risk of fire or shock, do not expose this unit to rain or moisture.
• Make sure there are no flammable materials close to the unit while operating.
• The unit must be installed in a location with adequate ventilation, at least
20in (50cm) from adjacent surfaces. Be sure that no ventilation slots are
blocked.
• ALWAYS disconnect from the power source before servicing or replacing fuse
and be sure to replace with same fuse size and type.
• DO NOT operate at ambient temperatures higher than 104°F (40°C).
• In the event of a serious operating problem, stop using the unit immediately.
NEVER try to repair the unit by yourself. Repairs carried out by unskilled people
can lead to damage or malfunction. Please contact the nearest authorized
technical assistance center. Always use the same type spare parts.
• NEVER connect the device to a dimmer pack.
• Make sure the power cord is never crimped or damaged.
• Never disconnect the power cord by pulling or tugging on the cord.
Caution! There are no user serviceable parts inside the unit. Do not open the
housing or attempt any repairs yourself. In the unlikely event your unit may
require service, please visit our support website at: www.blizzardlighting.com/
tickets.
Page 3
AtmosFear™ Tour HZ Manual - Rev. A (c) 2015 Blizzard Lighting, LLC
2. MEET THE ATMOSFEAR™ TOUR HZ
MAIN FEATURES:
•
•
•
•
•
•
•
•
•
•
•
•
•
DMX controllable water-based haze machine
Tour-ready all-black ATA-spec flight case
1,000W heat exchanger, 8,000 cubic ft./minute continuous output
Haze output and blower speed adjustment
Timer with interval and duration settings
6-button control panel with LCD display
Optional low fluid shutdown
Manual haze output button
3/5-pin DMX connectivity
6-position moveable haze guide for directional output control
3-channel DMX control (working mode, fan speed, output volume)
Rugged and well-built (It hits the gym regularly)
PowerCON® compatible power input connector
SPECIFICATIONS:
•
•
•
•
•
•
•
•
•
Voltage: AC110-120V 50/60Hz
Fuse: 10A, 250V
Warm-up time: 6 min.
Tank Capacity: 1.9L
Power consumption: 1,000W
DMX channels: 3-channel
3/5-pin DMX input/output
Dimensions: 17.4 x 15.6 x 9.9 in. (44 x 39.5 x 25 cm)
Weight: 29.8lbs (13.5kg)
DMX Reference (3-Channel Mode)
Ch. Value
What it does
1
000 <--> 127 Fog emission off
128 <--> 255 Fog emission on
2
000 <--> 255 Fan speed (0% <--> 100%)
3
000 <--> 255 Fog volume setting (0% <--> 100%)
Page 4
AtmosFear™ Tour HZ Manual - Rev. A (c) 2015 Blizzard Lighting, LLC
Figure 1: AtmosFear™ Tour HZ Pin-Up Picture
Fluid Tank
Fuse Cover
LCD Control Panel
Power Input
3/5-Pin DMX In/Out
6-Position Guide
Setting Up
Step 1: Place the machine on a flat surface and in a suitable large area
with at least 20in (50cm) open space around the machine.
Step 2: Fill the fluid tank with quality water-based, non-toxic haze
fluid. For best performance, we highly recommend using Blizzard
Lighting’s own Blizz Whizz™ brand atmospheric haze fluid!
Step 3: Connect the machine to suitable rated power supply.
Step 4: The LCD menu will now display “Warming Up” in preparation
for use. Warming can take up to 6 minutes.
Step 5: When it is ready, the LCD menu will display “Ready Haze”, and
at this point, you could manually start making haze by holding down
the <MANUAL> button on the control panel.
Step 6: To turn off the machine, unplug the unit from its power source.
Page 5
AtmosFear™ Tour HZ Manual - Rev. A (c) 2015 Blizzard Lighting, LLC
3. SETUP
Fuse Replacement
With a phillips head screwdriver, unscrew the fuse holder out of its
housing. Remove the damaged fuse from its holder and replace with
exact same type fuse. Reattach the fuse holder, and then reconnect
power.
Connecting A Bunch of AtmosFear™ Tour HZs
You will need a serial data link to run shows using a DMX-512 controller or to run shows on two or more units set to sync in master/slave
operating mode. The combined number of channels required by all the
units on a serial data link determines the number of units the data link
can support.
Units on a serial data link must be daisy chained in one single line.
Also, connecting more than 32 units on one serial data link without the
use of a DMX optically-isolated splitter may result in deterioration of
the digital DMX signal. The maximum recommended cable-run distance is 500 meters (1640 ft). The maximum recommended number
of units on a serial data link is 32.
Data/DMX Cabling
To link units together you’ll need data cables. You should use datagrade cables that can carry a high quality signal and are less prone to
electromagnetic interference.
For instance, Belden© 9841 meets the specifications for EIA RS-485
applications. Standard microphone cables will “probably” be OK, but
note that they cannot transmit DMX data as reliably over long distances. In any event, the cable should have the following characteristics:
2-conductor twisted pair plus a shield
Maximum capacitance between conductors – 30 pF/ft.
Maximum capacitance between conductor & shield – 55 pF/ft.
Maximum resistance of 20 ohms / 1000 ft.
Nominal impedance 100 – 140 ohms
Page 6
AtmosFear™ Tour HZ Manual - Rev. A (c) 2015 Blizzard Lighting, LLC
Cable Connectors
Cables must have a male XLR connector on one end and a female XLR
connector on the other end. (Duh!)
CAUTION: Do not allow contact between the common and the
fixture’s chassis ground. Grounding the common can cause a ground
loop, and your fixture may perform erratically. Test cables with an
ohm meter to verify correct polarity and to make sure the pins are not
grounded or shorted to the shield or each other.
Take It To The Next Level: Setting Up DMX Control
Step 1: Connect the male connector of the DMX cable to the female
connector (output) on the controller.
Step 2: Connect the female
connector of the DMX cable to the
first unit’s male connector (input).
Note: It doesn’t matter which unit
address is the first one connected.
We recommend connecting them
in terms of their proximity to the
controller, rather than connecting
the lowest fixture number first, and
so on.
Step 3: Connect others in the chain
from output to input as above.
Place a DMX terminator on the
output of the final unit to ensure
best communication.
Page 7
AtmosFear™ Tour HZ Manual - Rev. A (c) 2015 Blizzard Lighting, LLC
4. OPERATING ADJUSTMENTS
The Control Panel
All the settings possible with the AtmosFear™ Tour HZ are accessed by using
the control panel on the front of the fixture. There are 6 control buttons below
the LCD display which provide functionality and allow you to navigate through
the various control panel menus.
Ready
Haze
Button
<FUNCTION>
<UP>
FUNCTION
UP
DOWN
TIMER
START/STOP
MANUAL
Function
Enters the programming mode.
Value adjustment upward.
<DOWN>
Value adjustment downward.
<TIMER>
Starts the timer controlled operation.
<START/STOP>
<MANUAL>
Starts or stops all operation.
Press and hold for manual haze output.
To navigate the LCD control menu options, use the <FUNCTION> button to
scroll through the various menu options. Then to scroll through a menu options
selectable values, use the <UP/DOWN> buttons. Press <FUNCTION> button
to save any changes made and return to navigation the menu.
Note: Once a DMX signal is received, manual mode is deactivated and the
buttons TIMER, START/STOP and MANUAL are locked.
Tip: If the interval duration in timed operation is set for a very short time (less
than 20 seconds), it is possible that fog fluid left in the fog nozzle will still be
evaporating during the pause. This may make it difficult to recognize any break
in the fog output.
Page 8
AtmosFear™ Tour HZ Manual - Rev. A (c) 2015 Blizzard Lighting, LLC
Control Panel Menu Structure
Interval Set
0s–200s (seconds)
Pause time between timed output
Duration Set
0s–200s (seconds)
Duration time of timed operation
DMX512 Add
1–512
Set the starting DMX address
Fluid Set
On
Low fluid shutdown on
Off
Low fluid shutdown off
Volume Set
1%–100%
Set the volume output
FanSpeed Set
1%–100%
Set the fan speed
DMX Configuration
1. Press <FUNCTION> repeatedly until DMX512 ADD shows on the display.
2. Use <UP/DOWN> to select the starting address 1–512.
Set the Output Volume
1. Press <FUNCTION> repeatedly until Volume Set shows on the display.
2. Use <UP/DOWN> to select an output volume percentage (1%–100%).
3. You can now press the <START/STOP> button to initiate this output.
Set the Fan Speed
1. Press <FUNCTION> repeatedly until FanSpeed Set shows on the display.
2. Use <UP/DOWN> select a total speed percentage (1%–100%).
Timer Mode
1. Press <TIMER> and the display will show a countdown of the interval time.
2. When the interval countdown reaches zero (0), the unit will start the duration countdown, producing haze for the amount of time set in Duration Set.
Interval and Duration Settings
Interval settings control the period of time in between timed haze outputs (in
seconds), while duration settings are used to control the actual period of time
of the timed haze output (in seconds) while using timer mode.
1. Press <FUNCTION> repeatedly until Interval Set or Duration Set shows
on the display.
2. Use <UP/DOWN> to select the number of seconds (0–200).
3. Press the <TIMER> button to try your newly configured timer settings.
Page 9
AtmosFear™ Tour HZ Manual - Rev. A (c) 2015 Blizzard Lighting, LLC
Keeping Your AtmosFear™ Tour HZ As Good As New
This unit is a rugged, tough piece of professional equipment, and as long as
you take care of it, it will take care of you. That said, like anything, you’ll need
to take care of it if you want it to operate as designed. You should absolutely
keep the fixture clean, especially if you are using it in an environment with a lot
of dust, haze, wild animals, wild teenagers or spilled drinks.
Cleaning Instructions:
1.) You should follow these instructions after approximately 40 hours of use.
2.) Take off the nozzle before heating the Haze machine, and clean the nozzle
with straight vinegar.
3.) To clean the tank, pour in and run a solution of 80% distilled water and 20%
white vinegar through the machine. When empty turn off the machine.
4.) Wait for it to cool down, re-install the nozzle, and you can now add more
fluid to prepare for its next use.
Returns (Gasp!)
We’ve taken a lot of precautions to make sure you never even have to worry
about sending a defective unit back, or sending a unit in for service. But,
like any complex piece of equipment designed and built by humans, once in a
while, something doesn’t go as planned. If you find yourself with a fixture that
isn’t behaving like a good little fixture should, you’ll need to obtain a Return
Authorization (RA).
Don’t worry, this is easy. Just go to our website and open a support ticket at
www.blizzardlighting.com/tickets, and we’ll issue you an RA. Then, you’ll need
to send the unit to us using a trackable, pre-paid freight method. We suggest
using USPS Priority or UPS. Make sure you carefully pack the fixture for transit,
and whenever possible, use the original box & packing for shipping.
When returning your fixture for service, be sure to include the following:
1.) Your contact information (Name, Address, Phone Number, Email address).
2.) The RA# issued to you
3.) A brief description of the problem/symptoms.
We will, at our discretion, repair or replace the fixture. Please remember
that any shipping damage which occurs in transit to us is the customer’s
responsibility, so pack it well!
Shipping Issues
Damage incurred in shipping is the responsibility of the
shipper, and must be reported to the carrier immediately upon
receipt of the items. Claims must be made within seven (7)
days of receipt.
Page 10
AtmosFear™ Tour HZ Manual - Rev. A (c) 2015 Blizzard Lighting, LLC
Tech Specs!
Weight & Dimensions
Width
17.4 in (44 cm)
Depth
15.6 in (39.5 cm)
Height
9.9 in (25 cm)
Weight
29.8 lb. (13.5 kg)
Power
Operating Voltage
AC110-120V 50/60HZ
Power Consumption
1,000W
Fuse
10A, 250V
Thermal
Max. Operating Temp. 104 degrees F (40 degrees C) ambient
Operation/Capacity/Consumption
Warm-up Time
6 min.
Tank Capacity
1.9L
Output
8,000 cubic ft./minute continuous output
Fluid Consumption
4.3 ml/min
Control
Protocol
USITT DMX-512
DMX Channels
3-channel
Input
3/5-pin XLR Male
Output
3/5-pin XLR Female
Other Information
Remember, condoms prevent minivans.
Warranty
2-year limited warranty
Page 11
AtmosFear™ Tour HZ Manual - Rev. A (c) 2015 Blizzard Lighting, LLC
Enjoy your product!
Our sincerest thanks for your purchase!
--The team @ Blizzard Lighting