1
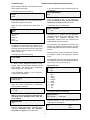
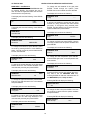
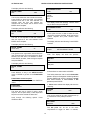
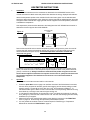
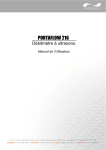
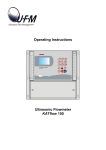
ULTRAFLO 2000
INSTALLATION & OPERATING INSTRUCTIONS
ULTRAFLO 2000 FLOW
& HEATMETER
Operating Manual
Micronics Ltd, Knaves Beech Business Centre, Davies Way,
Loudwater, High Wycombe, Bucks. ENGLAND. HP10 9QR
TEL: +44 (0)1628 810456 FAX: +44 (0)1628 531540
e-mail: [email protected]
www.micronicsltd.co.uk
1
ULTRAFLO 2000
INSTALLATION & OPERATING INSTRUCTIONS
CONTENTS
SYSTEM IDENTIFICATION
3
INTRODUCTION
4
HARDWARE
Electronics Housing
Transducers
Transducer Connections
Transducer Hardware
Transducer Mounting
Transducer Cables
Keypad
4
4
4
5
5
6
6
MAIN MENU
Power up
Quick Start
View/Edit Site Data
Set-up Sensors
Calibrate 4-20mA
Read Flow
7
8
10
11
12
12
FUNCTIONS
Display
Set-up 4-20mA
Pulses/Set Point
CutOff M/S
Set Zero Flow
Reset Total Flow
Reset Total Energy
Damping
Cal Factor
Diagnostics
Save And Exit
13
13
14
15
15
15
15
15
16
16
16
ERROR MESSAGES
E1:High Flow
E2:No Flow Sig
E3:Hot Fault
E4:Cold Fault
16
16
16
16
WARNING MESSAGES
W1:Check Data
W2:Timing Poor
W3:Signals Poor
W4:Ma (1) OVER
W5:Ma (2) OVER
W6:Pulse At Max
16
16
16
16
16
17
APPLICATION INFORMATION
Application Notes
Select a Metering Position
Mounting The Transducers
Liquid Conditions
Propagation Velocity
Maximum Flow
Application Temperature
Flow Range
Liquid Sound Sppeds
Solid Sound Speeds
17
17
18
19
19
19
19
19
20
24
SPECIFICATION
25
HEATMETER INSTRUCTIONS
26
CE MARKING Guidance Notes
27
WARRANTY
27
PRODUCT CARE AND
MAINTENANCE
28
WARNING - users should ensure or note that:
a)
The Ultraflo 2000 is not certified for use in hazardous areas.
b)
The local site safety regulations are complied with.
c)
Work is carried out in accordance with The Health & Safety at Work Act 1974.
2
ULTRAFLO 2000
INSTALLATION & OPERATING INSTRUCTIONS
FIGURE 1 - SYSTEM IDENTIFICATION
FLOW SENSORS ASSEMBLY
UP
DOWN
Figure 1
FLOW
RELAY
OR
PULSE
OUTPUT
ULTRAFLO 2000
4-20mA(1)
OUTPUT
MICRONICS
F
u
s
24VDC
IN
4-20mA(2)
OUTPUT
PT100 TEMPERATURE
SENSORS please see page 29
(if supplied)
F
u
RETURN
The following information is required by Micronics when
placing an order.
EXAMPLE
POWER VOLTAGE................................ 24v DC
PIPE OD............................................... 60
PIPE MATERIAL ................................... STEEL
APPLICATION TEMP............................ 60°C
LIQUID ................................................ WATER
TRANSDUCER CABLE LENGTH......... 50 METRES
MAX FLOW IN UNITS........................... 150L/MIN
MAX ENERGY RATE
(HEATMETER ONLY) .......................1000KW
TEMPERATURE DIFFERENTIAL
(HEATMETER ONLY)........................... 25°C
TEMPERATURE PROBE CABLE
LENGTH (HEATMETER ONLY)............ 50 METRES
Example Order Code 24-60-S-60-W-50-150L/min
3
110/240V
SUPPLY
ULTRAFLO 2000
INSTALLATION & OPERATING INSTRUCTIONS
The Ultraflo 2000 is a “Clamp-on” liquid flow
meter that uses the Transit Time method of
measurement to read flow. Using two PT100
temperature probes to measure temperature it
can also be used as a Heat/Energy meter.
Having completed the procedure for mounting the
electronics, connecting all cables and checking
the power supply, the power can now be applied.
The Ultraflo 2000 is now ready for programming.
A full programming procedure is described on
page 7.
The Ultraflo is able to measure the flow of liquid in
any pipe from 13mm to 5000mm, providing the
pipe is flooded and the correct transducers are
used. Units are supplied according to application
data provided by the customer.
Before programming the instrument, it is
necessary to attach the transducers to the pipe
wall such that they can be finally locked in the
correct position based on exact data provided by
the instrument.
The instrument displays volumetric flow rate in
3
3
3
m /hr, m /min, m /sec, g/min, USg/hr, l/min, l/sec
and linear velocity in metres and feet per second.
The total volume of flow will be displayed, up to a
maximum 12-digit number. When supplied as a
Heatmeter, kW, kCal/hr, MJ/hr, MJ/min and
MJ/sec can be displayed, as well as the
temperature differential.
TRANSDUCERS
Each instrument uses two identical transducers,
which transmit and receive the ultrasonic waves.
They are clamped to the pipe surface using the
mounting hardware supplied, as described on
pages 5, 6.
INTRODUCTION
The standard transducers are made from a Peek
material with an aluminium plate supporting the
stud, used to lock the sensor in position. A flying
armoured lead is attached between the sensor
block and the tuning circuit.
The flowmeter is supplied with electronics,
sensors and all mounting hardware. The
Heatmeter version will also be supplied with
PT100 temperature probes.
Figure 3 – 1MHz Sensors with TNC Coaxial
Connector
HARDWARE
Electronics Housing
An ABS housing with an opaque door contains
the master PCB. The housing is designed for wall
mounting using the brackets provided (see Figure
2 for mounting pattern). Drilling further fixing holes
in the Housing remove the IP67 protection rating
and CE approval.
Mounting the housing into position does not
require the removal of the electronics or the front
display panel.
Figure 2
Transducers are supplied according to the pipe
size and flow velocity, and are available to meet
an operating temperature range from –20°C up to
+200°C.
Transducer Connections
Transducers are connected to the electronics
from the tuning circuit by TNC connectors. All
other output and input connections are made
through metal glands to the clearly marked
terminals.
DO NOT PROVIDE POWER to the instrument
until the service compartment cover has been
replaced.
24V
1 2 3 4 5 6 7 8 9 10 11 12 13
+ - + - + - + + - + NC COM NO
MA1 MA2
The electronics are factory set for a particular
supply voltage. Should it be necessary to change
the settings for the power supply see page 7,
Power up.
HOT
COLD
RELAY
Coax sensor connectors
Coax cable
4
220VAC
14 15
F
U
S
E
+
24VDC
110VAC
F
U
S
E
16 17 18
L
N E
AC IN
ULTRAFLO 2000
INSTALLATION & OPERATING INSTRUCTIONS
Only one current output can be used with the flow
meter. The heatmeter option is supplied with a
separate heat integrator, please see page 29.
PT100 temperature probes should be connected
to the supplied integrator, please see page 29.
Before attempting to attach the transducers it is
imperative to ensure that the correct position has
been chosen to site the transducers and that the
pipe surface conditions are suitable. Go to page
17 and carefully follow all instructions for the
selecting and preparing the transducer mounting
site.
Transducer Hardware
Transducer alignment guide rails, chains and
couplant are supplied with all units in order to
ensure that the transducers are accurately aligned
with respect to the pipe axis.
At this point program the instrument to determine
the separation distance. When you have this
information from the instrument follow the set up
procedure below.
A single guide rail assembly is supplied for
mounting the transducers in Reflex mode and two
guide rails are provided for mounting in Diagonal
mode.
Procedure
a)
Insert the transducers into the guide rail
so the tails come out of either end.
b)
By turning the locking nut centre
clockwise, withdraw the transducers up
into the guide rail.
c)
Apply a bead of coupling grease to each
transducer. See page 19, figure 15.
d)
Attach both lengths of chain to the quick
links provided and offer the guide rail up
to the pipe wall at 45°.
e)
Wrap the chain around the pipe and
connect to the ‘J’ bolt. Complete the same
for both ends of the guide rail then tighten
the locking nuts on the ‘J’ bolt. This will
secure the complete assembly to the
pipe.
f)
By turning the centre of the locking
assembly anti-clockwise lower one block
onto the pipe. Now adjust the second
block to required separation distance and
repeat the procedure. The separation
distance is measured from the front edge
of each block and not the centre of the
locking nut.
g)
If the instrument now reads a negative
flow swapping the TNC connectors on the
instrument can change this.
h)
Now lock the transducers in position by
tightening the nut on locking assembly.
“DO NOT USE EXCESS PRESSURE”.
Note: When moving the transducers into position
ensure that they are withdrawn into the guide rail
as far as possible. This ensures that the couplant
will not be removed from the transducer face
before it is screwed down into position.
Figure 6
Figure 4 – 1MHz Reflex Mounting Assembly
Figure 5 - Diagonal Beam Mounting Hardware
Transducer Mounting
The two different methods of mounting the
transducers are shown on pages 5 & 6. When
ordering the Ultraflo 2000 specific application
information should have been given. This
information determines the correct hardware to be
supplied with each instrument.
ZERO
SEPARATION
DISTANCE
Reflex Mode
Reflex mode is a default setting on all applications
up to 215mm. Above this the instrument will
default to Diagonal mode. It is possible to change
these default settings if required (see page 11 Set
up sensors).
5
ULTRAFLO 2000
INSTALLATION & OPERATING INSTRUCTIONS
All transducers are mounted in Reflex or Diagonal
mode as described on page 5 and 6. The guide
rail assemblies are held in position using chains.
Figure 7
SEPARATION
DISTANCE ‘xxx’ mm
Ref Line (E)
Diagonal Beam Mode
Diagonal beam mounting means the two
transducer blocks are mounted on opposite sides
of the pipe as shown in figure 7. This is the default
setting for all applications above 215mm.
Chain
If you encounter a difficult application or the
maximum flow velocity is outside of the default
operating range, when working in the Reflex
mode, it is possible to reprogram the instrument to
operate in Diagonal mode (see page 11, Set up
Sensors)
Ref Line (E)
HINT: DRAWING A TRUE CIRCUMFERENCE
AROUND A PIPE
An easy way to draw a perpendicular
circumference around a large pipe is to wrap a
length of material such as chart paper around the
pipe, aligning the edges of the paper precisely at
the overlap. With the edge of the chart paper
being parallel, then either edge describes a
circumference around the pipe that is
perpendicular to the pipe axis.
Diagonal Set up Procedure
a) Using whatever means available mark a
reference line around the circumference
of the pipe (reference line D). As shown
in figure 7.
b) Locate and mark two positions exactly
180° apart around this reference line.
c) On both of these positions draw a
reference line (E) perpendicular to line
(D), parallel to the pipe axis and
approximately 1 metre long. See figure 7.
BISECTING THE CIRCUMFERENCE
Mark the chart paper exactly where it overlaps.
Then after removing the paper from the pipe, fold
the measured length in half keeping the edges
parallel. The fold line now marks a distance
exactly half way around the pipe. Put the paper
back on the pipe and use the fold line to mark the
opposite side of the pipe.
d) Take each of the guide rails and load the
transducers as described previously on
page 5. Only one transducer goes in each
guide rail.
Transducer Cables
The transducers are connected to the electronics
via 50ohm coaxial cables and TNC connectors.
The total length of the cable be up to a maximum
of 200 mteres.
d) Attach the one guide rail to the pipe using
the chain provided, such that it is parallel
to the reference line (E) and position so
that the transducer face can be aligned
with reference line (D).
Keypad
All data is entered for set up and calibration via
the front panel keypad. Figure 9 shows the
keypad layout.
e) Program the flow meter and obtain the
separation distance.
f)
Ref Line
(D)
From
the
intersection
of
the
circumference reference line (D) and the
second reference line (E) measure and
mark the separation distance XXX. Now
mount the second guide rail such that the
transducer face can be positioned on this
intersection ensuring that the guide rail is
parallel to the reference line (E). See
figure 7.
g) Screw down both of the transducers and
lock in position as previously described.
Keys
• To give a NO answer and scroll through listed
options, press SCROLL.
h) RG223 Coaxial Cable (50ohm), Different
lengths up to 200 metres available on
request.
•
6
To select options, store data and move on to
the next option, press ENTER.
ULTRAFLO 2000
•
INSTALLATION & OPERATING INSTRUCTIONS
from the FUNCTIONS menu. The Totalised Flow
data can also be reset to zero.
If data has been incorrectly entered, press Y
until the display is clear, then re-enter the
data correctly.
PROGRAMMING/MAIN MENU
Restart Key
The RESTART key can be pressed at any point in
the program and will take the instrument back to
the opening display. Press SCROLL to enter the
password 2000 and reprogram the instrument. If
the instrument has already been measuring flow
and the SCROLL key is not pressed, it
automatically returns to flow mode.
Power Up
DO NOT PROVIDE POWER TO THE
INSTRUMENT
UNTIL
THE
SERVICE
COMPARTMENT
COVER
HAS
BEEN
REPLACED.
The power supply is factory set. To change from
110/220VAC to 24VDC the left hand switch needs
to be in the down position. The right hand switch
is only used when changing from 110VAC to
220VAC.
Scroll Key
When the SCROLL key is pressed in flow mode
the display will read the following.
When power is applied to the Ultraflo 2000 it will
react in 2 distinctly different ways depending upon
whether any application data has been
programmed into the EEROM.
Signal 80%
0.00 mA
This displays the signal level of the instrument
and the current output status of the 4-20mA. Both
will be displayed if a Heatmeter is supplied.
All new meters received from the factory will have
had the EEROM memory wiped clean.
Apply power. Initial display will show
Press ENTER again and the following will be
displayed.
Micronics Ltd
ULTRAFLO 2000
ERRORS PENDING
No errors
Within 5 seconds the display will change to
This will display all Error and Warning messages
(see page 16). To program the Ultraflo 2000,
accurate application data must be keyed in via
the keypad. Data and instructions are requested
via the display and all questions must be
answered before the program will step through to
the point of measuring flow.
DIMENSION
Millimetres
Application data can now be keyed in.
If the instrument has been used then application data
will be stored in the EEROM and the following will be
displayed. If SCROLL is not pressed within 5 seconds
after the initial display, the instrument will go directly to
flow mode.
Once the unit has been programmed the data can
be reviewed and changed if necessary.
The instrument displays
following 3 ways.
Flow in selected units.
l/min
l
information
in
the
Apply power. Initial display will show
Micronics Ltd
ULTRAFLO 2000
0.00
0.00
PRESS SCROLL within 5 seconds of initial start up
Display will then show
Energy in selected units.
kW
kWh
ENTER PASSWORD
0.00
0.00
Key in password 2000 (only required if the unit has
been previously used)
Temperature differential.
H 50°C
Diff
C 10°C
40°C
The flow information can be factored to suit the
users requirements by selecting CAL FACTOR
7
ULTRAFLO 2000
INSTALLATION & OPERATING INSTRUCTIONS
ENTER PASSWORD
****
LINING THICKNESS
mm/inches
Display will show:
If the pipe has a LINING enter the thickness now and
press ENTER. If there is no LINING press ENTER to
continue.
MAIN MENU
Quick Start
WALL
M/Steel
MAIN MENU
To get into the MAIN MENU press RESTART,
SCROLL, then enter the password 2000. The MAIN
MENU has 5 options that are selectable by using the
scroll key.
The display will show the following.
There are 11 wall material options that are selectable by
using the scroll key.
Press ENTER to select.
Select the material required and press ENTER when
displayed.
MAIN MENU
Quick Start
WALL
M/Steel
View/Edit Site
Setup sensors
Calibrate 4-20mA
Read flow
S/Steel 316
S/Steel 303
Plastic
Cast Iron
Ductile Iron
Copper
Brass
Concrete
Glass
Other m/s
MAIN MENU - Quick Start
The Quick Start option enables the user to quickly read
flow.
The display will show the following.
MAIN MENU
Quick Start
If Other m/s is selected the user needs to enter the
speed of sound in metres per second of the particular
pipe material being used. Enter a figure and press
ENTER. Contact Micronics if the sound speed is not
known.
Press ENTER to select this option and enter application
data. The user now has the option of selecting
millimetres or inches.
Press SCROLL to display units and ENTER to select.
If a Lining material thickness has been selected
the following is displayed.
DIMENSION
Millimetres
LINING
Steel
Inches
The display will show the following. Enter the outside
diameter and press ENTER.
There are 6 Lining material options that are
selectable by using the scroll key. These are only
displayed if a Lining was selected previously.
PIPE OD
mm/inches
Select the material required then press ENTER to
select.
Enter the wall thickness in the selected units and press
ENTER.
WALL
mm/inches
LINING
Steel
THICKNESS
Rubber
Glass
Epoxy
Concrete
Other m/s
The display will show the following.
If Other m/s is selected the user needs to know
the speed of sound in metres per second of the
particular lining material being used. Enter a
8
ULTRAFLO 2000
INSTALLATION & OPERATING INSTRUCTIONS
figure and press ENTER. Contact Micronics if the
sound speed is not known.
If you have eneterd a SHC the following will now
be displayed.
The display will show the following.
RELATIVE DENSITY
XXX
FLUID
Water
Enter the relative density of the liquid being
measured (Heatmeter only. See the Heatmeter
instructions on page 21) and press Enter.
Press Scroll. There are 6 fluid options that are
selectable by using the scroll key.
Select the fluid required then press enter to
select.
The following will now be displayed.
Approx. max flow
* * * * l/m
FLUID
Water
Glycol 50%
Lub oil
Diesel oil
Freon
Other m/s
The data that is entered and the application
information that has been given to Micronics when
purchasing the equipment determine the
approximate maximum flow. The instrument will
always default to litres per minute.
If Other m/s is selected the user needs to know
the speed of sound in metres per second of the
particular fluid being measured. Enter a figure and
press ENTER. Contact Micronics if the sound
speed is not known.
The instrument now displays the maximum flow
rate that it is capable of with the sensors provided
and the application data that has been entered by
the user.
Pressing SCROLL at this point will allow the user
to change the units to be displayed in the flow
mode.
The display will show the following.
FLUID TEMP
°C
Press ENTER when the units have been selected.
The Heatmeter option will also display kW, Kcal/h,
MJ/h, MJ/m, kJ/m, kJ/s and Temp °C.
To enter a minus temperature press Y on the
keypad. When the temperature has been entered
press ENTER. The Ultraflo has a temperature
range between -20°C and +200°C.
Approx max flow
* * * * l/s
* * * * l/m
If the temperature entered is out of range the
following will be displayed.
* * * * Ml/d
* * * * g/m
* * * * kg/h
* * * * Usg/m
* * * * Uskg/h
* * * * m3/h
* * * * m3/m
* * * * m3/s
* * * * m/s
* * * * ft/s
Temp out of rang
Press any key
When the correct temperature is entered the
following will be displayed.
Approx. max flow
* * * * l/m
The following will now be displayed.
NOTE: If you have purchased a Heatmeter the
following will be displayed unless water has
been selected.
Attach sensors
REFLEX Sep * * * mm/inches
RELATIVE SHC
XXX
Pressing ENTER at this point will take the
instrument into reading flow.
l/m
l
Enter the specific heat capacity of the liquid being
measured (Heatmeter only. See Heatmeter
Instructions on page 21) and press Enter.
9
0.00
000.0
ULTRAFLO 2000
INSTALLATION & OPERATING INSTRUCTIONS
MAIN MENU - View/Edit Site
From the MAIN MENU select View/Edit site data
by pressing ENTER. This enables the user to
view and edit the application data that has been
entered into the unit previously.
To change the wall material of the pipe press
ENTER. Scrolls through the options, press
ENTER when a new material has been selected.
The display will show the following. Press ENTER
to select.
VIEW/EDIT SITE
Lining
l/m
l
The display will now show the following.
0.00
000.0
It will only be possible to change the pipe lining
material if a lining thickness has been entered
previously. To change the lining material press
ENTER. Use the SCROLL key to select from the
options available and press ENTER.
The display will show the following. Press ENTER
to select.
MAIN MENU
View/Edit Site
The display will now show the following.
VIEW/EDIT SITE
Fluid
The display will show the following.
VIEW/EDIT SITE
Dimension
-- --
WATER
To change the fluid type press ENTER. Use the
scroll key to select from the options available and
press ENTER.
MM/INCHES
To change the dimensions press ENTER. Select
the units by pressing SCROLL. Press ENTER to
select. This will convert all previous data entered,
into the units selected.
The display will now show the following.
VIEW/EDIT SITE
Fluid °C
20.0
The display will now show the following.
VIEW/EDIT SITE
Pipe OD
To change the fluid temperature press ENTER.
Press ENTER again when a new temperature has
been entered.
55.0
The display will now show the following.
To change the outside diameter of the pipe press
ENTER. Enter the new outside diameter in the
units selected previously and press ENTER.
VIEW/EDIT SITE
Read flow
The display will now show the following.
VIEW/EDIT
Wall thickness
Pressing SCROLL at this point will ask the user if
they wish to exit the VIEW/EDIT SITE loop.
Pressing ENTER will take the instrument back to
the MAIN MENU option, Setup sensors.
SITE
3.0
To change the pipe wall thickness press ENTER.
Enter the new wall thickness in the units selected
and press ENTER.
Pressing ENTER will display the following.
Approx max flow
* * * * l/m
The display will now show the following.
VIEW/EDIT SITE
Lining thick
To change the flow units press SCROLL and use
the scroll key to select from the options available
and press ENTER.
0.0
To change or enter a pipe lining thickness press
ENTER. Enter the new lining thickness in the
units selected previously and press ENTER.
Pressing ENTER will display the following.
Attach sensors
REFLEX Sep
The display will now show the following
VIEW/EDIT SITE
Wall
M/Steel
10
10.2
ULTRAFLO 2000
INSTALLATION & OPERATING INSTRUCTIONS
Pressing ENTER at this point will take the
instrument into reading flow.
The display will show the following.
l/m
l
SETUP SENSORS
Mode
0.00
000.0
REFLEX
MAIN MENU - Setup sensors
Press ENTER to select this option.
Sensor params
Read flow
Exit and default
MAIN MENU
Setup sensors
Select mode of operation by pressing SCROLL
then press ENTER.
This gives the user the opportunity to change the
mode of operation from Reflex to Diagonal (see
figure 5, page 5).
SETUP SENSORS
Mode
The display will show the following.
When application information is programmed into
the instrument it automatically selects the mode of
operation from that data. It is possible however to
use the same sensors in different modes.
MODE
Reflex
Pressing SCROLL will allow you to choose
between Reflex and Diagonal operation. Press
ENTER when new mode is selected.
The Setup sensors option is available for two
main reasons. Firstly, if from the data that has
been entered the instruction comes back that the
sensors should be mounted in Diagonal mode, it
may be that this is not possible in the case of a
partially buried pipe. Under these circumstances,
provided that the velocity is low enough it may be
possible to use the transducers provided in Reflex
mode (see figure 4, page 5).
The display will show the following.
SETUP SENSORS
Sensor params
The user cannot change this option. It is only
used by Micronics engineers to set sensor
parameters for a particular application and to
make sure the correct transducers are supplied
with the instrument. If this option is selected in
error the instrument will ask for a password that is
only known by Micronics engineers. Pressing
SCROLL will move the instrument onto the next
option.
The second reason for this option is that in the
case of applications where the signal strength is
not strong enough to get through a corroded pipe
in Reflex mode, the instrument may be used in
Diagonal mode. This has the effect of increasing
the signal strength and maximum flow velocity.
The display will read the following.
SETUP SENSORS
Mode
REFLEX
The display will show the following.
REFLEX
SETUP SENSORS
Read flow
To change the mode of operation press ENTER.
There are 4 options under the heading of SETUP
SENSORS and these are selectable by pressing
scroll.
If the sensor mode has been changed from the
default settings (i.e. Reflex to Diagonal or
Diagonal to Reflex) then this option will have to be
selected to make sure that the new mode of
operation is used to read flow. If this is not
selected the default settings will be used.
The display will show the following.
SETUP SENSORS
Exit and default
Press ENTER at this point to Exit and return to
the MAIN MENU. This will re-set all the default
sensor settings in the instrument that may have
been changed by the user.
11
ULTRAFLO 2000
INSTALLATION & OPERATING INSTRUCTIONS
Pressing ENTER to continue will display the
following.
Use the scroll and decimal point key to set 20mA
and keys 5 and 6 to trim. Press ENTER when
complete.
Approx max flow
* * * * l/m
The following will be displayed. Press SCROLL.
Pressing ENTER again displays the following.
MAIN MENU
Calibrate 4-20mA
Attach sensors
REFLEX Sep * * * mm/inches
The following will be displayed.
MAIN MENU
Read flow
The instrument now displays the mode of
operation and separation distance. Attach the
transducers as described on pages 5 and 6.
MAIN MENU - Read flow
Pressing SCROLL will take the instrument back to
MAIN MENU-Quick start.
Pressing ENTER will take the instrument into
reading flow.
l/m
l
0.00
000.0
Pressing ENTER displays the following.
Approx max flow
* * * * l/m
MAIN MENU - Calibrate 4-20mA
(Note: A meter is required to measure the output
current)
It is possible to change the flow units by pressing
SCROLL. When a new unit is selected press
ENTER.
The display will read the following. Press ENTER
to select.
Pressing ENTER displays the following. Press
ENTER to read flow.
MAIN MENU
Calibrate 4-20mA
Attach sensors
REFLEX Sep
The 4-20mA output is calibrated before it leaves
the factory and should not need adjusting,
although this option allows the user to adjust it if
necessary to match a specific requirement. The
DAC value is a number between 0 and 40,000,
which is a number internal to the Ultraflo.
This informs the user of the mode of operation
and the separation distance.
Pressing SCROLL takes the instrument into
SETUP SENSOR mode.
The first stage is to adjust the output current to
4mA. Use the scroll key, decimal point key or
keys 5 and 6. The scroll and decimal point key
move the DAC value in large steps of 25. Keys 5
and 6 move the value one digit at a time.
SETUP SENSORS
Mode
l/m
l
0.00
0.00
When measuring flow there are only three keys
that are active. FUNCTION, RESTART and
SCROLL. (see also page 7)
The display will show the following.
8000
The Function key when pressed in flow mode
displays a range of information that will improve
the performance of the instrument and will assist
with the setting up of the unit.
Use the scroll and decimal point key to set and
keys 5 and 6 to trim. Press ENTER when
complete.
The Restart key will at any point in the program
display the start up message. This allows the user
to restart the program from the beginning.
The display will then show the following.
CAL 20mA
DAC value:
REFLEX
Pressing ENTER will read flow.
The DAC value should be approximately 8000 for
4mA and 40,000 for 20mA. By watching the
actual current value displayed on the meter, it is
possible to set this exactly.
CAL 4mA
DAC value:
10.2
The Scroll key when pressed in flow mode will
display the signal level and the mA output.
40000
12
ULTRAFLO 2000
INSTALLATION & OPERATING INSTRUCTIONS
Pressed for a second time it will display the
ERRORS PENDING (see page 16 - Error &
Warning Messages). When pressed for a third
time it will read flow.
mA out
0.00
Output
Units
Max.
OFF
L/M
1000
FUNCTIONS
When the instrument is measuring flow, there are
certain functions that the user can access. These
functions are accessible by pressing the function
key on the keypad then entering the password
2000.
Min.
mA on error
Exit
0.00
22.0
The display will read the following. Select one of
the options by using the scroll key and press
ENTER to select.
SETUP 4-20MA
Output
FUNCTIONS
Display
Setup 4-20mA
Pulses/set point
Cutoff m/s
Set zero flow
Reset total flow
Damping
Cal factor
Diagnostics
Save and exit
The display will show the following. Press Enter to
select.
This shows the user what the output is giving at
any particular time. Press SCROLL to continue.
L/M
The display shows the following. Select the output
required and press ENTER.
0.05
5
1.000
OUTPUT
OFF
4-20mA
0-20mA
0-16mA
FUNCTIONS – Display
The display will show the following. Press ENTER
to select.
Functions
Display
OFF
It is possible to choose between switching the
output ON/OFF or selecting the output required by
pressing SCROLL and ENTER.
L/M
SETUP 4-20MA
Units
By pressing ENTER then SCROLL the user is
able to change the measuring units. When
selected press ENTER. The units displayed will
depend on whether a Flow meter or Heatmeter
has been purchased. Energy options appear the
list of flow units have been displayed. Press Enter
when you have selected what you would like
displayed. This is the same operation for both the
Heatmeter and Flowmeter.
L/M
It is possible to set the output different from that
on the display. For example the display may show
gallons/minute but the output needs to be set up
in m3/hour. When a Heatmeter is supplied the
options will include kW, kCal/hr, MJ/hr, min, sec
and temperature differential. Scroll through the
options and press ENTER to select.
FUNCTIONS - Setup 4-20mA
If a Heatmeter is supplied there will be two 420mA outputs available for use. They can be set
up separately to whatever output is required.
When using the 4-20mA to monitor temperature it
will only monitor the temperature difference and
not the individual temperatures of the flow and
return.
The display will show the following. Press ENTER
to select.
Functions
Setup 4-20mA
The display will show the following. Scroll through
each item and press ENTER to select.
SETUP 4-20MA
13
ULTRAFLO 2000
INSTALLATION & OPERATING INSTRUCTIONS
The display will show the following.
SETUP 4-20MA
Max.
PULSES/SET POINT
Units
1000
Output
l/pulse
Set point
Exit
This function allows the user to scale the 4-20mA.
Press ENTER to select and enter your required
maximum flow rate in the units selected. For
example when the flow rate reaches the
maximum set, the output will be 20mA. Press
ENTER when complete.
PULSES/SET POINT
Units
000
The display will show the following. Press ENTER
to select.
The display will show the following.
PULSES/SET POINT
Output
OFF/PULSES/SET POINT
22
This gives an error output which would inform the
user of loss of signal. This can be set to any figure
between zero and 24mA, but defaults to 22mA.
Press ENTER to select, enter the figure required
and press ENTER.
Note:
The
display
will
show
the
previous
OUTPUT
Off
Pulses
Set point
The display will show the following.
SETUP 4-20MA
Exit
selection.
Press SCROLL to select and then ENTER.
Press SCROLL to stay in the SETUP 4-20mA
menu or ENTER to go back to the FUNCTIONS
menu.
This facility allows the user to set the Pulses/Set
point or switch it off altogether. Selecting Off and
pressing ENTER will move the program to Cutoff
m/s. Press SCROLL to select Pulses or Set
point and press ENTER.
FUNCTIONS - Pulses/set point
The following will be displayed. Press ENTER to
select.
If Pulses were selected the display will show the
following.
FUNCTIONS
Pulses/set point
PULSES
l/pulse
This gives the user a choice of using a pulse
output or the set point facility. Pulse output and
set point cannot be used at the same time.
Scroll through the following
ENTER to select.
L/M
At this point the user is able to select the units
required by pressing ENTER. Scroll through the
options required and press ENTER when
selected.
The user is now required to enter the minimum
flow rate required in the units selected. Press
ENTER when complete.
SETUP 4-20MA
mA on error
OFF
The display shows the following. Use the scroll
key to select units, press ENTER.
The display will show the following.
SETUP 4-20MA
Min.
L/M
options.
1000
This can be scaled to the users requirements up
to a maximum of one pulse per second.
Or
Press
SET POINT
Set point
1000
The Set point can be set to the users
requirements to trigger an alarm or indicator,
14
ULTRAFLO 2000
INSTALLATION & OPERATING INSTRUCTIONS
when the flow has reached a minimum or
maximum level.
Follow the instructions on the display by pressing
ENTER.
The instrument defaults to 1000. This will be in
the units selected previously. It can now be
changed to the required amount by pressing
ENTER. Enter the new amount then press
ENTER.
Zero flow set
Press ENTER
The display now reads the following. Press
ENTER to return to Functions.
FUNCTIONS
Reset total flow
FUNCTIONS - Reset Total Flow
The display will now show the following.
PULSES/SET POINT
Exit
This function resets the total Flow or Energy. If a
Heatmeter was supplied it is possible to re-set the
total Energy. Press ENTER.
FUNCTIONS - Cutoff m/s
The display will now show the following.
The display will now ask the following.
FUNCTIONS
Cutoff m/s
RESET TOTAL FLOW
Are you sure?
The instrument has a preset CUTOFF of
0.05m/sec, which has been programmed into the
instrument.
Micronics
cannot
guarantee
measuring flows below this range because of
instabilities in the measuring process. It is
possible for the user to change or cancel this
figure but Micronics cannot guarantee the
performance below this. It is also possible to enter
any figure up to a velocity of 1m/sec.
Or
RESET TOTAL ENERGY
Are you sure?
Answer YES by pressing ENTER and NO by
pressing SCROLL.
FUNCTIONS - Set Zero Flow
Press ENTER to select.
If you have answered YES the following will be
displayed. Press SCROLL to continue.
FUNCTIONS
Cutoff m/s
RESET TOTAL FLOW
Total reset
On some applications the instrument is capable of
picking up noise which may show a small offset
when in flow mode. This offset should be
cancelled out which will increase the accuracy of
the instrument.
If you have answered NO the following will be
displayed. Press SCROLL to continue.
Before this function is used you have to be sure
that the flow has stopped completely. To set zero
flow before the flow has stopped will result in an
error message. This will occur when the flow is
still above 0.25m/sec. This could mean that the
flow has not totally stopped. Press SCROLL to
answer NO and ENTER to answer YES.
FUNCTIONS – Damping
The display will show the following.
FUNCTIONS
Reset total flow
FUNCTIONS
Damping
5
The following is displayed.
This option is used when flow readings are
unstable due to turbulence caused by internal
obstructions or bends etc. Damping or averaging
can be used to make the readings more stable. It
can be set to up-date the display between every 3
to 100 seconds. Press ENTER to select. Enter the
time in seconds then press ENTER.
FLOW > 0.25 m/s
Continue ?
If the flow is below 0.25 m/sec then the following
will be displayed.
Stop the flow and
press ENTER
15
ULTRAFLO 2000
INSTALLATION & OPERATING INSTRUCTIONS
FUNCTIONS - Cal Factor
The display will show the following.
FUNCTIONS
Cal factor
E2:No Flow Sig
This message appears when the two transducers
cannot send or receive signals. This could happen
for a variety of reasons. Firstly check that all
cables are connected, transducers are on the
pipe correctly and at the correct separation
distance. Check that there is couplant on the
transducers.
1.000
This facility should never have to be used if the
correct application data has been entered into the
unit when being installed.
This message may also appear when trying to
measure a partially full pipe, aerated liquid or
when the particulate content of that liquid is too
high. The condition of the pipe being measured
could also be a problem.
The calibration factor enables the instrument to be
calibrated to any existing meter or flow rate. The
transducers are always calibrated to work with the
electronics supplied. If for any reason the
transducers are damaged the new ones supplied
will not have been calibrated with the electronics.
The calibration factor could then be used to give
the same reading as other transducers.
E3:HOT Fault (only applicable for the Heatmeter)
This message appears when the temperature
probe on the feed pipe is not connected. Check
the connections under the terminal lid.
If the new reading is 4% higher than normal then
entering 0.96 will reduce the flow reading by 4%.
If the reading is 4% lower than normal, entering
1.04 would increase the reading by 4%. When the
instrument is supplied it will always default to
1.00. If it has to be changed the new cal number
will stay in the memory until changed again. Press
ENTER to select. Enter new data and press
ENTER.
E4:COLD Fault (only applicable for the
Heatmeter)
This message appears when the temperature
probe on the return pipe is not connected. Check
the connections under the terminal lid.
WARNING MESSAGES
W1:Check Data
This message occurs when the application
information has been entered incorrectly or the
transducers have been attached to the wrong pipe
size. This will cause the timing to be in error. The
site data needs to be checked and the instrument
reprogrammed.
FUNCTIONS - Diagnostics
The display will now read.
FUNCTIONS
Diagnostics
Diagnostics is not an option for the user. The
numbers displayed cannot be changed in any way
and are only of benefit to Micronics engineers
when testing the instrument or fault finding. Press
SCROLL to continue.
W2:Timing Poor
Unstable signal timing or differing up/down stream
times indicate that the liquid is aerated or pipe
surface is of poor quality.
FUNCTIONS - Save and Exit
The display now reads.
W3:Signals Poor
This warning appears when there is a signal lower
than 25%. This could be due to the application or
a poor quality pipe etc.
FUNCTIONS
Save and exit
W4:mA (1) Over
The mA (1) output is over range when the
Flow/Energy or Temperature differential is higher
than the maximum mA range.. It is possible to rescale the 4-20mA to be able to cope with the
higher range.
Press SCROLL to start at the beginning of the
FUNCTIONS menu again or ENTER to save all
the changes made and read flow.
ERROR and WARNING MESSAGES
E1:High Flow?
When the instrument is programmed the user is
informed of the maximum flow rate that the
instrument can measure. If this is exceeded the
High flow message occurs.
W5:mA (2) Over
Only one 4-20mA output is available with the
Flowmeter but both are available with the
Heatmeter. Both 4-20mA outputs are set up in the
same way when supplied.
It may be possible to get round these problems by
using another set of transducers in another mode.
This should not be necessary as the unit would
have been supplied for a particular application
with the correct transducers.
16
ULTRAFLO 2000
INSTALLATION & OPERATING INSTRUCTIONS
W6:Pulse at Max
This message occurs when the pulses have
exceeded the maximum setting. It is possible to
re-scale the pulse output to cope with the higher
flow rate.
Finally to ensure accurate flow measurement it is
imperative that the liquid is flowing uniformly
within the pipe and that the flow profile has not
been distorted by any upstream or downstream
obstructions.
APPLICATION NOTES
The ULTRAFLO 2000 is a “Transit Time”
Ultrasonic flowmeter which has been designed to
work with “Clamp On” transducers, thus enabling
liquid flowing within a closed pipe to be measured
accurately without the need for any mechanical
parts to be inserted either through the pipe wall or
protrude into the flow system.
To obtain the best results from the Ultraflo 2000 it
is absolutely necessary that the following rules for
positioning the transducers are adhered to and
that the condition of the liquid and the pipe wall
are suitable to allow transmission of the sound
along its predetermined path.
Selecting A Meter Position
As the transducers with the Ultraflo 2000 are
clamped to the outside surface of the pipe, the
meter has no way of determining exactly what is
happening to the liquid. The assumption therefore
has to be made that the liquid is flowing uniformly
along the pipe, either under fully turbulent
conditions or under laminar flow conditions.
The meter is controlled by a micro-processor
containing a wide range of data which enables the
instrument to measure flow in any pipe diameter
from 13mm bore up to 5000mm, made of any
material and over a wide range of operating
temperatures.
It is further assumed that the flow velocity profile
is uniform for 360° around the pipe axis. The
Ultraflo 2000 is normally supplied calibrated for
use on turbulent flows but by adjustment of the
CAL FACTOR the instrument can be used for
laminar flow applications.
The system operates as follows:
“X”
“Y”
Figure 11
Figure 11 shows a uniform profile as compared to
a distorted profile.
FLOW
When ultrasound is transmitted from transducer
“X” to transducer “Y” the speed at which the
sound travels through the liquid is accelerated
slightly by the velocity of the liquid. If sound is
transmitted in the opposite direction from “Y” to
“X” it is decelerated because it is travelling against
the flow of the liquid. The difference in time taken
to travel the same distance but in opposite
directions is directly proportional to the flow
velocity of the liquid.
The difference between (a) and (b) is that the
“Mean Velocity” of the flow across the pipe is
different and the Ultraflo 2000 expects a uniform
flow as in (a). The distorted flow in (b) will give
measurement errors which cannot be predicted or
compensated for.
Having measured the flow velocity and knowing
the pipe cross-sectional area, the volumetric flow
can be easily calculated. All of the calculations
required to first determine the correct siting of the
transducers and subsequently compute the actual
flow are carried out by the microprocessor.
Flow profile distortions result from upstream
disturbances such as bends, tees, valves, pumps
and other similar obstructions. To ensure a
uniform profile the transducers must be mounted
far enough away from any cause of distortion
such that it no longer has an effect.
To measure flow, it is first necessary to obtain
detailed information about each application, which
is then programmed into the processor via the
keypad. This information must be accurate
otherwise flow measurement errors will occur.
Further having calculated the precise position at
which the transducers must be clamped onto the
pipe wall, it is equally important to align and
separate the transducers accurately with respect
to one another, as failing to do so will again cause
errors in measurement.
17
ULTRAFLO 2000
INSTALLATION & OPERATING INSTRUCTIONS
It will be impossible to achieve the accuracy of
measurement specified for the Ultraflo 2000 if the
transducers are not clamped to the pipe correctly
and if the data - I.D., O.D., Temperature, Pipe
Material are not accurate.
Figure 12
CORRECT
INCORRECT
FLOW
FLOW
< 20 D
> 20 D
10
20
FLOW
5
The transducers are supplied with a guide rail, the
purpose of which is to ensure that the transducers
are aligned accurately with the pipe axis and that
the face of the sensor is tangential to the axis.
20
Apart from the correct positioning and alignment
of the transducers, of equal importance is the
condition of the pipe surface in the area under
each of the transducers.
FLOW
The minimum length of upstream straight pipe is
20 diameters and 10 diameters downstream
which ensures that accurate results will be
achieved. Flow measurements can be made on
shorter lengths of straight pipe down to 10
diameters
upstream
and
5
diameters
downstream, but when the transducers are sited
this close to any obstruction errors can be
considerable.
An uneven surface that prevents the transducers
from sitting flat on the surface of the pipe can
cause Signal Level and Zero Offset problems.
The following procedure is offered as a guide to
good practice with respect to positioning and
mounting the transducers.
It is not possible to predict the amount of error as
this depends entirely upon the type of obstruction
and the configuration of the pipework. The
message therefore is clear. Do not expect to
obtain accurate results if the transducers are
positioned closer than allowed to any obstruction
that distorts the uniformity of the flow profile.
Examples of the effects of two different pipe
configurations are shown in Figure 13.
2. Inspect the surface of the pipe to ensure it is
free from rust and unevenness. Transducers
can be mounted directly on painted surfaces
as long as the surface is smooth and that the
underlying metal surface is free from rust
particles. On bitumen or rubber coated pipes
the coating must be removed in the area
under the transducers as it is preferable that
the transducers are mounted directly on to
base metal.
Figure
3.
1. Select the site following the rules laid down on
page 17.
Transducers can be mounted on both Vertical
or Horizontal pipe runs.
Figure 14 - Horizontal pipes
‘A’
‘B’
TOP
BOTTOM
CORRECT
INCORRECT
4. Apply interface couplant to the face of the
transducers.
The amount of couplant used is extremely
important particularly on pipes of less than
100mm bore. Use the syringe supplied with the
instrument and apply couplant as shown.
On small pipes below 90mm the bead of grease
used must be approximately 20mm long and 2mm
maximum diameter. Using more grease will cause
Mounting The Transducers
18
ULTRAFLO 2000
INSTALLATION & OPERATING INSTRUCTIONS
wall signals to be generated which cause errors in
measurement.
metres/second, of the particular liquid. Micronics
can supply this information.
Figure 15
Maximum Flow
The Ultraflo 2000 is normally supplied with
hardware suitable for the specific application for
which the instrument has been purchased. It is
possible to use the instrument on a wide range of
applications as long as the transducers will cope
with the maximum velocity and temperature
required.
Application Temperature
On any application with an operating temperature
above or below ambient temperature, ensure that
the transducers reach and are maintained at the
application temperature before undertaking
calibration.
On Stainless Steel pipes the amount of couplant
applied should never exceed the amount
indicated in the examples above. For large plastic
and steel pipes the amount of couplant applied is
less critical however do not use more than is
absolutely necessary.
When applying the transducers to low
temperature pipes, do not allow the pipe surface
to ice up between the transducer and the pipe
wall.
5. Attach the guide rail assembly to the pipe so
that it is perfectly parallel to the pipe axis.
Wherever possible insulate the transducers such
that variations in ambient air temperature do not
effect the relationship between the transducer and
the liquid temperature.
6. When screwing the transducers on to the pipe
surface use only enough force to ensure that
the transducer is flat against the pipe surface
and then lock in position.
The instrument automatically compensates for
changes in application temperature over a range
of approximately +/- 20°C.
7. Clamping the transducers in exactly the
correct position is extremely important. The
Ultraflo 2000 calculates the separation
distance and the transducers must be
positioned and clamped exactly at the
distance specified.
FLOW RANGE
Figure 16
I
I
I
I
I
I
I
I
I
I
I
I
I
I
I
I
I
I
I
I
I
I
I
I
I
I
I
I
I
I
I
I
I
I
I
I
I
I
Transducer set "D" (5000mm)
I
8. Always use the couplant provided.
I
I
I
I
I
Transducer set "C" (2000mm)
Liquid Conditions
Transit Time ultrasonic meters perform best on
liquids that are totally free from entrained air and
solids. With sufficient air in the system the
Ultrasound beam can be attenuated totally and
therefore prevent the instrument from working.
Often it is possible to tell whether there is air in
the system or not.
I
I
I
I
I
I
I
I
Transducer set "D" (1000mm)
Transducer set "B" (1000mm)
I
I
I
I
Transducer set "C" (300mm)
I
I
I
I
I
I
I
I
I
I
I
Transducer
set "B"
(90mm)
Transducer set "A" (89mm)
I
I
I
I
I
Transducer set "A"
(13
)
If a flow signal cannot be obtained a simple test
to determine whether the flow is aerated involves
cutting off the flow for a period of 10 - 15 minutes.
During this time the air bubbles will rise to the top
of the pipe and the flow signal should return.
When the flow signal has returned “Switch on” the
flow and if sufficient entrained air is locked in the
system it will very quickly disperse and kill the
signal.
Propagation Velocity
To make a flow measurement using the Ultraflo
2000 on any liquid other than water it is necessary
to
know
the
propagation
velocity
in
19
I
I
I
I
I
I
I
I
I
I
I
I
m/s
0.02
0.03
0.06
0.07
0.1
0.4
1.3
2
4
6
7
8
f/s
0.06
0.09
0.19
0.22
0.32
1.31
4.26
6.56 13.12 19.68 22.96 26.24
ULTRAFLO 2000
Substance
Acetic anhydride (22)
Acetic acid, anhydride (22)
Acetic acid, nitrile
Acetic acid, ethyl ester (33)
Acetic acid, methyl ester
Acetone
Acetonitrile
Acetonylacetone
Acetylene dichloride
Acetylene tetrabromide (47)
Acetylene tetrachloride (47)
Alcohol
Alkazene-13
Alkazene-25
2-Amino-ethanol
2-Aminotolidine (46)
4-Aminotolidine (46)
Ammonia (35)
Amorphous Polyolefin
t-Amyl alcohol
Aminobenzene (41)
Aniline (41)
Argon (45)
Azine
Benzene (29,40,41)
Benzol
(29,40,41)
Bromine (21)
Bromo-benzene (46)
1-Bromo-butane (46)
Bromo-ethane (46)
Bromoform (46,47)
n-Butane (2)
2-Butanol
sec-Butylalcohol
n-Butyl bromide (46)
n-Butyl chloride (22,46)
tert Butyl chloride
Butyl oleate
2,3 Butylene glycol
Cadmium (7)
Carbinol (40,41)
Carbitol
Carbon dioxide (26)
Carbon disulphide
Carbon tetrachloride(33,35,47)
Carbon tetrafluoride (14)
Cetane (23)
Chloro-benezene
1-Chloro-butane (22,46)
Chloro-diFluoromethane (3) (Freon 22)
Chloroform (47)
1-Chloro-propane (47)
Chlorotrifluoromethane (5)
Cinnamaldehyde
Cinnamic aldehyde
Colamine
o-Cresol (46)
m-Cresol (46)
Cyanomethane
Cyclohexane (15)
Cyclohexanol
Cyclohexanone
Decane (46)
1-Decene (27)
n-Decylene (27)
Diacetyl
Diamylamine
1,2 Dibromo-ethane (47)
trans-1,2-Dibromoethene(47)
Dibutyl phthalate
Dichloro-t-butyl alcohol
2,3 Dichlorodioxane
Dichlorodifluoromethane (3) (Freon 12)
1,2 Dichloro ethane (47)
cis 1,2-Dichloro-Ethene(3,47)
trans 1,2-Dichloro-ethene(3,47)
Dichloro-fluoromethane (3) (Freon 21)
1-2-Dichlorohexafluoro cyclobutane (47)
1-3-Dichloro-isobutane
Dichloro methane (3)
1,1-Dichloro-1,2,2,2 tetra fluoroethane
Diethyl ether
Diethylene glycol, monoethyl ether
Diethylenimide oxide
1,2-bis(DiFluoramino) butane (43)
1,2bis(DiFluoramino)- 2-methylpropane (43)
INSTALLATION & OPERATING INSTRUCTIONS
Liquid Sound Speeds at 25°C
Form Index
Specific Gravity
(CH3CO)2O
1.082 (20ºC)
(CH3CO)2O
1.082 (20ºC)
C2H3N
0.783
C4H8O2
0.901
C3H6O2
0.934
C3H6O
0.791
C2H3N
0.783
C6H10O2
0.729
C2H2Cl2
1.26
C2H2Br4
2.966
C2H2Cl4
1.595
C2H6O
0.789
C15H24
0.86
C10H12Cl2
1.20
C2H7NO
1.018
C7H9N
0.999 (20ºC)
C7H9N
0.966 (45ºC)
NH3
0.771
0.98
C5H12O
0.81
C6H5NO2
1.022
C6H5NO2
1.022
Ar
1.400 (-188ºC)
C6H5N
0.982
C6H6
0.879
C6H6
0.879
Br2
2.928
C6H5Br
1.522
C4H9Br
1.276 (20ºC)
C2H5Br
1.460 (20ºC)
CHBr3
2.89 (20ºC)
C4H10
0.601 (0ºC)
C4H10O
0.81
C4H10O
0.81
C4H9Br
1.276 (20ºC)
C4H9Cl
0.887
C4H9Cl
0.84
C22H42O2
C4H10O2
1.019
Cd
CH4O
0.791 (20ºC)
C6H14O3
0.988
CO2
1.101 (-37ºC)
CS2
1.261 (22ºC)
CCl4
1.595 (20ºC)
CF4
1.75 (-150ºC)
C16H34
0.773 (20ºC)
C6H5Cl
1.106
C4H9Cl
0.887
CHClF2
1.491 (-69ºC)
CHCl3
1.489
C3H7Cl
0.892
CClF3
C9H8O
1.112
C9H8O
1.112
C2H7NO
1.018
C7H8O
1.047 (20ºC)
C7H8O
1.034 (20ºC)
C2H3N
0.783
C6H12
0.779 (20ºC)
C6H12O
0.962
C6H10O
0.948
C10H22
0.730
C10H20
0.746
C10 H20
0.746
C4H6O2
0.99
C10H23N
C2H4Br2
2.18
C2H2Br2
2.231
C8H22O4
C4H8Cl2O
C2H6Cl2O2
CCl2F2
1.516 (-40ºC)
C2H4Cl2
1.253
C2H2Cl2
1.284
C2H2Cl2
1.257
CHCl2F
1.426 (0ºC)
C4Cl2F6
1.654
C4H8Cl2
1.14
CH2Cl2
1.327
CClF2-CClF2
1.455
C4H10O
0.713
C6H14O3
0.988
C4H9NO
1.00
C4H8(NF2)2
1.216
C4H9(NF2)2
1.213
20
Sound Speed
1180
1180
1290
1085
1211
1174
1290
1399
1015
1027
1147
1207
1317
1307
1724
1618
1480
1729
962.6
1204
1639
1639
853
1415
1306
1306
889
1170
1019
900
918
1085
1240
1240
1019
1140
984
1404
1484
2237.7
1076
1458
839
1149
926
875.2
1338
1273
1140
893.9
979
1058
724
1554
1554
1724
1541
1500
1290
1248
1454
1423
1252
1235
1235
1236
1256
995
935
1408
1304
1391
774.1
1193
1061
1010
891
669
1220
1070
665.3
985
1458
1442
1000
900
Δv/ºC -m/s/ºC
2.5
2.5
4.1
4.4
4.5
4.1
3.6
3.8
4.0
3.9
3.4
3.4
6.68
4.0
4.0
4.1
4.65
4.65
3.0
3.1
5.8
3.3
3.3
4.57
4.2
3.0
1.51
2.92
7.71
2.48
6.61
3.71
3.6
4.57
4.79
3.4
5.26
3.2
3.2
3.4
4.1
5.41
3.6
4.0
4.0
4.0
4.6
3.9
3.8
3.7
4.24
3.97
3.4
3.94
3.73
4.87
3.8
ULTRAFLO 2000
Substance
1,2bis(DiFluoramino) propane (43)
2,2bis(DiFluoramino) propane (43)
2,2-Dihydroxydiethyl ether
Dihydroxyethane
1,3-Dimethyl-benzene (46)
1,2-Dimethyl-benzene(29,46)
1,4-Dimethyl-benzene (46)
2,2-Dimethyl-butane (29,33)
Dimethyl ketone
Dimethyl pentane (47)
Dimethyl phthalate
Diiodo-methane
Dioxane
Dodecane (23)
1,2-Ethanediol
Ethanenitrile
Ethanoic anhydride (22)
Ethanol
Ethanol amide
Ethoxyethane
Ethyl acetate (33)
Ethyl alcohol
Ethyl benzene (46)
Ethyl bromide (46)
Ethyliodide (46)
Ether
Ethyl ether
Ethylene bromide (47)
Ethylene chloride (47)
Ethylene glycol
50% Glycol/ 50% H2O
d-Fenochone
d-2-Fenechanone
Fluorine
Fluoro-benzene (46)
Formaldehyde, methyl ester
Formamide
Formic acid, amide
Freon R12
Furfural
Furfuryl alcohol
Fural
2-Furaldehyde
2-Furancarboxaldehyde
2-Furyl-Methanol
Gallium
Glycerin
Glycerol
Glycol
Helium (45)
Heptane (22,23)
n-Heptane (29,33)
Hexachloro-Cyclopentadiene(47)
Hexadecane (23)
Hexalin
Hexane (16,22,23)
n-Hexane (29,33)
2,5-Hexanedione
n-Hexanol
Hexahydrobenzene (15)
Hexahydrophenol
Hexamethylene (15)
Hydrogen (45)
2-Hydroxy-toluene (46)
3-Hydroxy-tolune (46)
Iodo-benzene (46)
Iodo-ethane (46)
Iodo-methane
Isobutyl acetate (22)
Isobutanol
Iso-Butane
Isopentane (36)
Isopropanol (46)
Isopropyl alcohol (46)
Kerosene
Ketohexamethylene
Lithium fluoride (42)
Mercury (45)
Mesityloxide
Methane (25,28,38,39)
Methanol (40,41)
Methyl acetate
o-Methylaniline (46)
4-Methylaniline (46)
Methyl alcohol (40,44)
Methyl benzene (16,52)
2-Methyl-butane (36)
Methyl carbinol
Substance
INSTALLATION & OPERATING INSTRUCTIONS
Form Index
C3H6(NF2)2
C3H6(NF2)2
C4H10O3
C2H6O2
C8H10
C8H10
C8H10
C6H14
C3H6O
C7H16
C8H10O4
CH2I2
C4H8O2
C12H26
C2H6O2
C2H3N
(CH3CO)2O
C2H6O
C2H7NO
C4H10O
C4H8O2
C2H6O
C8H10
C2H5Br
C2H5I
C4H10O
C4H10O
C2H4Br2
C2H4Cl2
C2H6O2
Specific Gravity
1.265
1.254
1.116
1.113
0.868 (15ºC)
0.897 (20ºC)
C10H16O
C10H16O
F
C6H5F
C2H4O2
CH3NO
CH3NO
0.947
0.947
0.545 (-143ºC)
1.024 (20ºC)
0.974
1.134 (20ºC)
1.134 (20ºC)
C5H4O2
C5H6O2
C5H4O2
C5H4O2
C5H4O2
C5H6O2
Ga
C3H8O3
C3H8O3
C2H6O2
He4
C7H16
C7H16
C5Cl6
C16H34
C6H12O
C6H14
C6H14
C6H10O2
C6H14O
C6H12
C6H12O
C6H12
H2
C7H8O
C7H8O
C6H5I
C2H5I
CH3I
C6H12O
C4H10O
1.157
1.135
1.157
1.157
1.157
1.135
6.095
1.26
1.26
1.113
0.125(-268.8ºC)
0.684 (20ºC)
0.684 (20ºC)
1.7180
0.773 (20ºC)
0.962
0.659
0.649 (20ºC)
0.729
0.819
0.779
0.962
0.779
0.071 (-256ºC)
1.047 (20ºC)
1.034 (20ºC)
1.823
1.950 (20ºC)
2.28 (20ºC)
C5H12
C3H8O
C3H8O
0.62 (20ºC)
0.785 (20ºC)
0.785 (20ºC)
0.81
0.948
0.649 (20ºC)
0.791
0.674
1.2
3.235
1.033
0.749
1.113
0.783
1.082
0.789
1.018
0.713
0.901
0.789
0.867(20ºC)
1.461 (20ºC)
1.950 (20ºC)
0.713
0.713
2.18
1.253
1.113
0.81 (20ºC)
C6H10O
LiF
Hg
C6H16O
CH4
CH4O
C3H6O2
C7H9N
C7H9N
CH4O
C7H8
C5H12
C2H6O
Form Index
21
13.594
0.85
0.162
0.791 (20ºC)
0.934
0.999 (20ºC)
0.966 (45ºC)
0.791 (20ºC)
0.867
0.62 (20ºC)
0.789
Specific Gravity
Sound Speed
960
890
1586
1658
1343
1331.5
1334
1079
1174
1063
1463
980
1376
1279
1658
1290
1180
1207
1724
985
1085
1207
1338
900
876
985
985
995
1193
1658
1578
1320
1320
403
1189
1127
1622
1622
774
1444
1450
1444
1444
1444
1450
2870 (@30ºC)
1904
1904
1658
183
1131
1180
1150
1338
1454
1112
1079
1399
1300
1248
1454
1248
1187
1541
1500
1114
876
978
1180
1212
1219.8
980
1170
1170
1324
1423
2485
1449
1310
405(-89.15ºC)
1076
1211
1618
1480
1076
1328
980
1207
Sound Speed
Δv/ºC -m/s/ºC
2.4
2.1
4.1
4.5
3.85
2.1
4.0
3.4
4.87
4.4
4.0
4.87
4.87
2.1
11.31
4.02
2.2
3.4
3.7
3.7
3.7
3.4
2.2
2.2
2.1
4.25
4.0
3.71
3.6
2.71
4.53
3.6
3.8
5.41
3.6
5.41
4.85
4.8
3.6
4.0
1.29
17.5
2.92
2.92
4.27
4.0
Δv/ºC -m/s/ºC
ULTRAFLO 2000
Methyl-chloroform (47)
Methyl-cyanide
3-Methyl cyclohexanol
Methylene chloride (3)
Methylene iodide
Methyl formate (22)
Methyl iodide
α-Methyl naphthalene
2-Methylphenol (46)
3-Methylphenol (46)
Milk, homogenized
Morpholine
Naphtha
Natural Gas (37)
Neon (45)
Nitrobenzene (46)
Nitrogen (45)
Nitromethane (43)
Nonane (23)
1-Nonene (27)
Octane (23)
n-Octane (29)
1-Octene (27)
Oil of Camphor Sassafrassy
Oil, Car (SAE 20a.30)
Oil, Castor
Oil, Diesel
Oil, Fuel AA gravity
Oil (Lubricating X200)
Oil (Olive)
Oil (Peanut)
Oil (Sperm)
Oil, 6
2,2-Oxydiethanol
Oxygen (45)
Pentachloro-ethane (47)
Pentalin (47)
Pentane (36)
n-Pentane (47)
Perchlorocyclopentadiene(47)
Perchloro-ethylene (47)
Perfluoro-1-Hepten (47)
Perfluoro-n-Hexane (47)
Phene (29,40,41)
β-Phenyl acrolein
Phenylamine (41)
Phenyl bromide (46)
Phenyl chloride
Phenyl iodide (46)
Phenyl methane (16,52)
3-Phenyl propenal
Phthalardione
Phthalic acid, anhydride
Phthalic anhydride
Pimelic ketone
Plexiglas, Lucite, Acrylic
Polyterpene Resin
Potassium bromide (42)
Potassium fluoride (42)
Potassium iodide (42)
Potassium nitrate (48)
Propane (2,13)(-45 to -130ºC)
1,2,3-Propanetriol
1-Propanol (46)
2-Propanol (46)
2-Propanone
Propene (17,18,35)
n-Propyl acetate (22)
n-Propyl alcohol
Propylchloride (47)
Propylene (17,18,35)
Pyridine
Refrigerant 11 (3,4)
Refrigerant 12 (3)
Refrigerant 14 (14)
Refrigerant 21 (3)
Refrigerant 22 (3)
Refrigerant 113 (3)
Refrigerant 114 (3)
Refrigerant 115 (3)
Refrigerant C318 (3)
Selenium (8)
Silicone (30 cp)
Sodium fluoride (42)
Sodium nitrate (48)
Sodium nitrite (48)
Solvesso 3
Spirit of wine
Substance
Sulphur (7,8,10)
INSTALLATION & OPERATING INSTRUCTIONS
C2H3Cl3
C2H3N
C7H14O
CH2Cl2
CH2I2
C2H4O2
CH3I
C11H10
C7H8O
C7H8O
1.33
0.783
0.92
1.327
3.235
0.974 (20ºC)
2.28 (20ºC)
1.090
1.047 (20ºC)
1.034 (20ºC)
C4H9NO
1.00
0.76
0.316 (-103ºC)
1.207 (-246ºC)
1.204 (20ºC)
0.808 (-199ºC)
1.135
0.718 (20ºC)
0.736 (20ºC)
0.703
0.704 (20ºC)
0.723 (20ºC)
Ne
C6H5NO2
N2
CH3NO2
C9H2O
C9H18
C8H18
C8H18
C8H16
1.74
C11H10O10
0.969
0.80
0.99
0.912
0.936
0.88
C4H10O3
O2
C2HCl5
C2HCl5
C5H12
C5H12
C5Cl6
C2Cl4
C7F14
C6F14
C6H6
C9H8O
C6H5NO2
C6H5Br
C6H5Cl
C6H5I
C7H8
C9H8O
C8H4O3
C8H4O3
C8H4O3
C6H10O
1.116
1.155 (-186ºC)
1.687
1.687
0.626 (20ºC)
0.557
1.718
1.632
1.67
1.672
0.879
1.112
1.022
1.522
1.106
1.823
0.867 (20ºC)
1.112
0.948
0.77
Kbr
KF
KI
KNO3
C3H8
C3H8O3
C3H8O
C3H8O
C3H6O
C3H6
C5H10O2
C3H8O
C3H7Cl
C3H6
C6H5N
CCl3F
CCl2F2
CF4
CHCl2F
CHClF2
CCl2F-CClF2
CClF2-CClF2
C2ClF5
C4F8
Se
NaF
NaNO3
NaNO2
C2H6O
Form Index
S
22
1.859 (352ºC)
0.585 (-45ºC)
1.26
0.78 (20ºC)
0.785 (20ºC)
0.791
0.563 (-13ºC)
1280 (2ºC)
0.78 (20ºC)
0.892
0.563 (-13ºC)
0.982
1.49
1.516 (-40ºC)
1.75 (-150ºC)
1.426 (0ºC)
1.491 (-69ºC)
1.563
1.455
1.62 (-20ºC)
0.993
0.877
1.884 (336ºC)
1.805 (292ºC)
0.877
0.789
Specific Gravity
985
1290
1400
1070
980
1127
978
1510
1541
1500
1548
1442
1225
753
595
1415
962
1300
1207
1207
1172
1212.5
1175.5
1390
870
1477
1250
1485
1530
1431
1458
1440
1509
1586
952
1082
1082
1020
1006
1150
1036
583
508
1306
1554
1639
1170
1273
1114
1328
1554
1125
1125
1125
1423
2651
1099.8
1169
1792
985
1740.1
1003
1904
1222
1170
1174
963
4.63
1222
1058
963
1415
828.3
774.1
875.24
891
893.9
783.7
665.3
656.4
574
1072
990
2082
1763.3
1876.8
1370
1207
Sound Speed
1177
3.94
4.02
3.7
3.8
4.0
4.04
4.0
4.14
3.50
4.10
3.8
3.6
3.7
5019.9
2.75
2.4
4.65
3.2
4.0
3.6
4.27
3.2
4.0
0.71
1.03
0.64
1.1
5.7
2.2
4.5
6.32
6.32
4.1
3.56
4.24
6.61
3.97
4.79
3.44
3.73
4.42
3.88
0.68
1.32
0.74
3.7
4.0
Δv/ºC -m/s/ºC
-1.13
ULTRAFLO 2000
Sulphuric acid (1)
Tellurium (7)
1,1,2,2-Tetrabromo-ethane(47)
1,1,2,2-Tetrachloro-ethane(67)
Tetrachloroethane (46)
Tetrachloro-ethene (47)
Tetrachloro-methane (33,47)
Tetradecane (46)
Tetraethylene glycol
Tetrafluoro-methane (14) (Freon 14)
Tetrahydro-1,4-isoxazine
Toluene (16,52)
o-Toluidine (46)
p-Toluidine (46)
Toluol
Tribromo-methane (46,47)
1,1,1-Trichloro-ethane (47)
Trichloro-ethene (47)
Trichloro-fluoromethane (3) (Freon 11)
Trichloro-methane (47)
1,1,2-Trichloro-1,2,2-Trifluoro-Ethane
Triethyl-amine (33)
Triethylene glycol
1,1,1-Trifluoro-2-Chloro-2-Bromo-Ethane
1,2,2-Trifluorotrichloro- ethane (Freon 113)
d-1,3,3-Trimethylnor- camphor
Trinitrotoluene (43)
Turpentine
Unisis 800
Water, distilled (49,50)
Water, heavy
Water, sea
Wood Alcohol (40,41)
Xenon (45)
m-Xylene (46)
o-Xylene (29,46)
p-Xylene (46)
Xylene hexafluoride
Zinc (7)
INSTALLATION & OPERATING INSTRUCTIONS
H2SO4
Te
C2H2Br4
C2H2Cl4
C2H2Cl4
C2Cl4
CCl4
C14H3O
C8H18O5
CF4
C4H9NO
C7H8
C7H9N
C7H9N
C7H8
CHBr3
C2H3Cl3
C2HCl3
CCl3F
CHCl3
CCl2F-CClF2
C6H15N
C6H14O4
C2HClBrF3
CCl2F-CClF2
C10H16O
C7H5(NO2)3
H2O
D²O
1.841
2.966120
1.595
1.553 (20ºC)
1.632
1.595 (20ºC)
0.763 (20ºC)
1.123
1.75 (-150ºC)
0.867 (20ºC)
0.999 (20ºC)
0.966 (45ºC)
0.866
2.89 (20ºC)
1.33
1.464
1.49
1.489
1.563
0.726
1.123
1.869
1.563
0.947
1.64
0.88
0.87
0.996
1.025
0.791 (20ºC)
CH4O
Xe
C8H10
C8H10
C8H10
C8H4F6
Zn
0.868 (15ºC)
0.897 (20ºC)
1.37
23
1257.6
991
1027
1147
1170
1036
926
1331
1586/5203.4
875.24
1442
1328
1618
1480
1308
918
985
1028
828.3
979
783.7
1123
1608
693
783.7
1320
1610
1255
1346
1498
1400
1531
1076
630
1343
1331.5
1334
879
3298
1.43
0.73
3.0
6.61
3.8
4.27
4.2
3.56
3.4
4.47
3.8
3.44
-2.4
-2.4
2.92
4.1
ULTRAFLO 2000
INSTALLATION & OPERATING INSTRUCTIONS
Solid Sound Speeds
1. Use Shear Wave for ‘A’ & ‘B’ Transducers
2. Use Long Wave for ‘C’ & ‘D’ Transducers
Material
Steel 1% Carbon (hardened)
Carbon Steel
Mild Steel
Steel 1% Carbon
302 - Stainless Steel
303 - Stainless Steel
304 - Stainless Steel
316 - Stainless Steel
347 - Stainless Steel
410 - Stainless Steel
430 - Stainless Steel
Aluminium
Aluminium (rolled)
Copper
Copper (annealed)
Copper (rolled)
CuNi (70%Cu, 30%Ni)
CuNi (90%Cu, 10%Ni)
Brass (Naval)
Gold (hard-drawn)
Inconel
Iron (electrolytic)
Iron (Armco)
Ductile Iron
Cast Iron
Monel
Nickel
Tin (rolled)
Titanium
Tungsten (annealed)
Tungsten (drawn)
Tungsten (carbide)
Zinc (rolled)
Glass (Pyrex)
Glass (heavy silicate flint)
Glass (light borate crown)
Nylon
Nylon (6-6)
Polyethylene (HD)
Polyethylene (LD)
PVC, cPVC
Acrylic
Asbestos Cement
Tar Epoxy
Rubber
Shear Wave m/s
3150
3230
3235
3220
3120
3120
3075
3175
3100
2990
3360
3100
3040
2260
2325
2270
2540
2060
2120
1200
3020
3240
3240
3000
2500
2720
2960
1670
3125
2890
2640
3980
2440
3280
2380
2840
1150
1070
540
1430
24
Long Wave m/s
5880
5890
5890
5660
5660
5310
5740
5390
6320
4660
5030
4010
4430
3240
5820
5900
5900
4550
5350
5630
3320
6100
5180
4170
5610
5260
2400
2310
1940
2400
2730
2200
2000
1900
ULTRAFLO 2000
INSTALLATION & OPERATING INSTRUCTIONS
SPECIFICATION
ELECTRONIC ENCLOSURE:
Protection Class
Material
Dimensions
Display
Keypad
Sensor Connections
All Other Connections
Temperature Range
IP67
ABS
264 x 230 x 101 mm
2 x 16 Character Super Twist LCD backlit
IP67
TNC Coax Connectors
IP65 Glands
0°C to 50°C Operating
-10°C to 60°C Storage
SUPPLY VOLTAGE:
FLOW OUTPUTS:
Flow Display
Analogue
Set Point or Pulse
HEATMETER OPTIONS:
Display
Analogue
Pulse Output
Temperature Sensors:
Switchable
110–240 VAC ± 50/60 Hz Max. 5 watts
24 Volt DC
Volumetric Flow
Flow Velocity
Flow Rate
Total Flow
Signal Level Indication
ERROR messages
4 - 20mA into 750 Ω
Resolution
Max. 1 pulse per second
m3, litres, gallons (Imperial and US)
metres/sec, feet/sec
0.2…12 m/sec to 4 Significant Figures
12 Digits
Opto isolated with user definable scaling
0.1% of full scale
User definable scaling
Energy
2 off 4-20mA
Max. 1 pulse per second
PT100
Max. temp. differential
Pipe Sizes
‘A’
‘B’
‘C’
‘D’
50 mm…89 mm
90 mm…1000 mm
300 mm…2000 mm
1000 mm…5000 mm
Frequency:
Flow Transducer Protection:
Flow Transducer Cables:
Flow Transducer Cable Length:
Flow Transducer Temp. Range:
kW, kCal/hr, MJ/hr,min,sec, kJ/hr,min,sec
Opto isolated with user definable scaling
User definable scaling
-20°C to +220°C
220°C
Flow Velocity Range
0.2 m/sec…4 m/sec (8 m/sec)
0.2 m/sec…8 m/sec (12 m/sec)
0.2 m/sec…4 m/sec (7 m/sec)
0.2 m/sec…4 m/sec (7.5 m/sec)
1MHz, 2MHz, 0.5MHz
Standard: IP65
50 Ohm Coax Cable
3 metres Standard - Optional up to 200 metres
-20°C to +200°C (‘D’ only up +80°C)
ACCURACY:
± 1…2% of reading or ± 0.02 m/sec, whichever is the greater.
Specification assumes turbulent flow profile with Reynolds numbers above 4000.
REPEATABILITY:
± 0.5% with unchanged transducer position.
PIPE MATRIALS:
Any sonic conducting medium such as Carbon Steel, Stainless Steel, Copper, UPVC, PVDF, Concrete,
Galvanised Steel, Mild Steel, Glass, Brass. Includes lined pipes – Epoxy, Rubber Steel, Plastic.
Micronics reserve the right to alter any specification without notification.
25
ULTRAFLO 2000
INSTALLATION & OPERATING INSTRUCTIONS
HEATMETER INSTRUCTIONS
1.
Installation
Connect the flow transducers to the instrument as described in the HARDWARE section of this
manual. Note that the Ultraflo must read positive flow otherwise the energy displayed will read zero.
Attach the temperature probes to the outside of the flow and return pipes. Use the stainless steel
banding to attach the temperature probe. Heat sink compound should be applied between the probe
and pipe for better heat transfer. Lagging should then be wrapped over the temperature probe itself
to stabilise the temperature.
One temperature probe should be attached to the feed pipe as the HOT SENSOR and the other is
attached to the return pipe as the COLD SENSOR.
TEMPERATURE
PROBE
Figure 17
HEAT SINK
COMPOUND
STAINLESS STEEL
BANDING
Remove the terminal lid and connect the temperature probes’ making sure the power is turned off.
Connect the HOT sensor to the terminal marked HOT (Pins 5,6,7) and the COLD sensor to the
terminal marked COLD (Pins 8,9,10). A reversed temperature connection will make the
measured energy zero.
220VAC
110/220VAC
24VDC
1 2 3 4 5 6 7 8 9 10 11 12 13
+ - + - + - + + - + NC COM NO
MA1 MA2
HOT
COLD
F
U
S
E
RELAY
14 15
+
24VDC
IN
110VAC
F
U
S
E
16 17 18
L
N
E
AC IN
The WHITE core from each temperature probe must always be connected to the negative (Pins 6
and 9). The other two cores on each temperature probe connect to either of the positive terminals
(Pins 5, 7and Pins 8,10). Always remember to earth the PT100 probes using the screen core.
The PT100 are subject to interference from power sources such as, pumps and invertors and
any electrical equipment. The interference will cause an error in the measurement of
temperature.
2.
Operation
Connect power to the instrument and wait for a few seconds.
1. Follow the Quick Start menu on page 8 to read flow. Note that if the fluid selected is not water,
the user will be prompted for the SHC (specific heat capacity) and the density relative to water
(specific gravity). For water @ 20°C the SHC is 4.2 kj/m3 and the density is 996kg/m3. To
calculate the SHC figure to enter into the unit find the SHC of the liquid being measured in kJ/kg
K and divide by 4.2 kJ/kg K. Now enter this figure into the unit.
2. To calculate the relative density, find the density in kg/m3 and divide by the density of water @
20°C (996 kg/m3). Now enter this number into the unit. The SHC and Density figures are usually
available from your supplier.
3. Select the Energy units required when setting up the display or outputs from the FUNCTION
menu on page 13. Scroll through the options and press ENTER to select.
4. It is now possible to set either of the two 4-20mA outputs for Flow/Energy or Temperature
differential as described in FUNCTIONS on page 13.
26
ULTRAFLO 2000
INSTALLATION & OPERATING INSTRUCTIONS
CE MARKING
The Ultraflo 2000 has been tested and found to conform to EN50081 - 1 Emission Standards and EN50082 1 Immunity Standards.
The tests were conducted by AQL - EMC Ltd, of 16 Cobham Road, Ferndown Industrial Estate, Wimborne,
UK BH21 7PG.
The unit was tested with all cables as supplied of a maximum length of 3m. While the operation of the unit
may not be affected by the use of longer cables, Micronics can make no statement about conformance to the
above standards when these cables are in use.
MANUFACTURERS WARRANTY
The Ultraflo 2000 Ultrasonic liquid flow meter is guaranteed by MICRONICS to be free from defects in
materials and workmanship for a period of one year from the date of shipment to the original customer,
provided that the equipment has been installed and used in the manner described in this User’s Manual.
Fuses and sensor cables are not included in this warranty.
Repair or replacement, at MICRONICS option, will be made without charge at its factory during the warranty
period.
If any problems develop, take the followings steps:
1)
Notify MICRONICS or the Distributor from whom you purchased the meter giving full details of the
problem. Be sure to include the model and serial numbers of your flow meter. You will then receive
service data and/or shipping instructions, depending on your problem.
2)
If you are instructed to send your meter back to the factory, please send it prepaid to the authorised
repair station, as indicated in the shipping instructions.
The warranty of the ULTRAFLO 2000 Ultrasonic Liquid Flow meter by MICRONICS is limited to those
stated above and MICRONICS will not be liable for anything beyond this.
27
ULTRAFLO 2000
INSTALLATION & OPERATING INSTRUCTIONS
PRODUCT CARE AND MAINTENANCE
WARNING:-USE ONLY BATTERIES, CHARGER, ACCESSORIES, CABLES APPROVED FOR THIS
PARTICULAR MODEL.
THE USE OF ANY OTHER TYPES MAY INVALIDATE ANY APPROVAL OR WARRANTY APPLYING TO
THE INSTRUMENT AND MAY BE DANGEROUS.
IF IN DOUBT,CONTACT MICRONICS SALES OR SERVICE.
•
•
•
•
•
•
•
•
•
•
•
•
•
•
•
Do not disassemble this unit unless advised by Micronics. Return the unit to the place of
purchase for further advice.
Do not drop.
Wipe the exterior of the instrument with a clean damp cloth or paper towel-the use of a
solvent may damage the paint surface. Ensure the unit is switched off and disconnected
from the mains.
Do not place the instrument electronics near to naked flames or sources of intense heat
such as an electric fire or hot pipes in excess 50°C.
Dispose of any batteries safely and in accordance with any regulations in force in the
country of operation.
Ensure all connectors are kept clean and free from grease. They may be cleaned with a
general purpose switch cleaner.
Avoid the use of excessive grease/ultrasonic couplant on the sensors. This may impair the
performance of the equipment. Read the instructions in the manual on how to apply the
couplant. Any excessive grease/couplant can be removed from the sensors and guide rails
using an absorbent paper towel and a general purpose solvent cleaner.
Regularly check all cables/parts for damage. Replacement parts are available from
Micronics.
On fixed instruments, it is recommended the ultrasonic couplant is replaced on the sensors
every 6 months especially on pipes where the application is too hot to touch. If signal level
drops below 30% this is also an indication that the sensors need re-greasing.
Ensure the person who services your instrument is qualified to do so. If in doubt, return the
instrument to Micronics with a detailed report on the nature of the problem.
Ensure that suitable protective precautions are taken when using any materials to clean the
instrument/sensors.
Calibration of the instrument and sensors is recommended to be done at least once every
12 months.
If the instrument was supplied with dust or dirt caps make sure they are re-fitted when the
instrument is not in use.
It is the users responsibility to tidy cables so they will not cause harm to other people.
When returning product to Micronics make sure it is clean. Notify Micronics if the instrument
has been in contact with any hazardous substances.
Document Number 001 - 150
Software Version: v1.18
17th April 2003
28
ULTRAFLO 2000
INSTALLATION & OPERATING INSTRUCTIONS
29