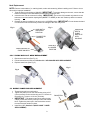
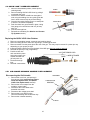
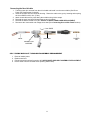
1
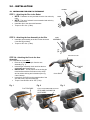
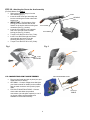
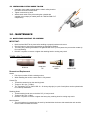
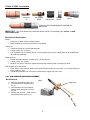
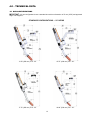
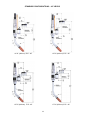
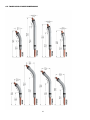
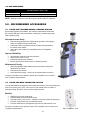
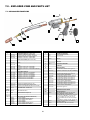
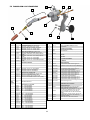
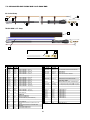
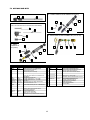
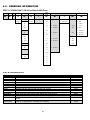
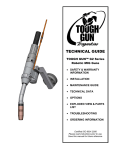
TECHNICAL GUIDE TOUGH GUN™ G2 Series Robotic MIG Guns SAFETY & WARRANTY INFORMATION INSTALLATION MAINTENANCE GUIDE TECHNICAL DATA OPTIONS EXPLODED VIEW & PARTS LIST Effective September 2010 – TROUBLESHOOTING QUICK LOAD™ Liners Standard on all TOUGH GUN™ Robotic Air-Cooled MIG Guns ORDERING INFORMATION Certified ISO 9001:2008 Please read instructions prior to use. Save this manual for future reference. TABLE OF CONTENTS THANK YOU… ....................................................................................................................................................... 2 WARRANTY ........................................................................................................................................................... 3 GENERAL SAFETY ............................................................................................................................................... 3 1.0 – COMPLETE ASSEMBLY OVERVIEW .......................................................................................................... 4 2.0 – INSTALLATION ............................................................................................................................................. 5 2.1 INSTALLING THE GUN TO THE ROBOT ................................................................................................... 5 2.2 CONNECTING GUN TO WIRE FEEDER .................................................................................................... 6 2.3 INSTALLING CLUTCH CABLE TO GUN ..................................................................................................... 7 3.0 – MAINTENANCE ............................................................................................................................................. 7 3.1 NOZZLE AND CONTACT TIP SYSTEMS ................................................................................................... 7 3.2.1 AIR-COOOLED NECK REPLACEMENT .................................................................................................. 8 3.2.2 TOUGH GUN I.C.E. NECK REPLACEMENT ........................................................................................... 9 3.3 DIRECT POWER PIN REPLACEMENT ...................................................................................................... 9 3.4 QUICK LOAD™ LINER REPLACEMENT .................................................................................................. 10 3.5.1 AIR-COOLED UNICABLE ASSEMBLY REPLACEMENT ...................................................................... 10 3.5.2 TOUGH GUN I.C.E.™ UNICABLE ASSEMBLY REPLACEMENT ......................................................... 11 3.6 WIRE BRAKE REMOVAL AND INSTALLATION ....................................................................................... 12 4.0 – TECHNICAL DATA ..................................................................................................................................... 13 4.1 GUN CONFIGURATIONS .......................................................................................................................... 13 4.2 G2 NECK DIMENSIONS ............................................................................................................................ 16 4.3 CENTER OF MASS .................................................................................................................................... 17 4.4 GUN AMPERAGES .................................................................................................................................... 18 5.0 – RECOMMENDED ACCESSORIES ............................................................................................................. 18 5.1 TOUGH GUN™ REAMER NOZZLE CLEANING STATION ..................................................................... 18 5.2 TOUGH GUN NECK INSPECTION FIXTURE .......................................................................................... 18 6.0 – TROUBLESHOOTING................................................................................................................................. 19 7.0 – EXPLODED VIEW AND PARTS LIST ........................................................................................................ 22 7.1 AIR-COOLED FRONT END ....................................................................................................................... 22 7.2 TOUGH GUN I.C.E. FRONT END ............................................................................................................. 23 7.3 AIR-COOLED AND I.C.E. BACK END ....................................................................................................... 24 7.4 OPTIONS AND KITS .................................................................................................................................. 25 8.0 – ORDERING INFORMATION ....................................................................................................................... 26 THANK YOU… …for selecting a TOUGH GUN™ G2 Series Robotic MIG Gun from Tregaskiss. Manufacturing operations demand extremely dependable robotic equipment. With this in mind, the TOUGH GUN MIG Gun was designed and engineered to be a reliable tool to support high production within a robotic cell. As the name implies, the TOUGH GUN MIG Gun is made from durable materials and components engineered to perform in a rugged welding environment. Your TOUGH GUN MIG Gun is completely assembled and ready to weld, and has undergone numerous quality checks to ensure high performance. The instructions and illustrations in this technical guide make it easy for you to maintain your TOUGH GUN MIG Gun. Please read, understand, and follow all safety procedures. Keep this Technical Guide booklet as a handy reference when ordering complete guns, parts and special options. For technical support and special applications, please call the Tregaskiss Technical Service Department at 1-855-MIGWELD (644-9353) or fax 1-877-737-2111. Our trained technicians are available between 8:00 a.m. and 5:00 p.m. EST, and will answer your application or repair questions. Tregaskiss employees build TOUGH GUN MIG Guns for the world’s welding professionals. We are always striving to improve our products and services, and would appreciate receiving your suggestions or comments. Please contact us immediately if you experience any safety or operating problems. 2 WARRANTY Product is warranted to be free from defects in material and workmanship for the period specified below after the sale by an authorized Buyer. Should there be a defect please refer to our Return Merchandise Policy. PRODUCT TOUGH GUN™ Robotic MIG Guns and Components TOUGH GUN Reamer TOUGH GARD™ Spatter Cleaner TOUGH GUN™ Robotic Peripherals (Clutch, Sprayer, Wire Cutter, Mounting Arms) Low-Stress Robotic Unicables (LSR Unicables) WARRANTY PERIOD 180 days 1 year 1 year 1 year 2 years Tregaskiss reserves the right to repair, replace or refund the purchase price of non-conforming product. Product found not defective will be returned to the Buyer after notification by Customer Service. Tregaskiss makes no other warranty of any kind, expressed or implied, including, but not limited to the warranties of merchantability or fitness for any purpose. Tregaskiss shall not be liable under any circumstances to Buyer, or to any person who shall purchase from Buyer, for damages of any kind. Including, but not limited to any, direct, indirect incidental or consequential damages or loss of production or loss of profits resulting from any cause whatsoever, including, but not limited to, any delay, act, error or omission of Tregaskiss. Genuine Tregaskiss parts must be used for safety and performance reasons or the warranty becomes invalid. Warranty shall not apply if accident, abuse, or misuse damages a product, or if a product is modified in any way except by authorized Tregaskiss personnel. GENERAL SAFETY Before installation or operation of TOUGH GUN MIG Guns, please read the safety precautions listed below: 1. Do not touch live electrical parts. The following should be checked to prevent electrical shock: a. Faulty or damaged equipment is repaired or replaced. b. Equipment is off when not in use. 2. Ensure that all safety devices, guards, shields or barriers are properly in place and connected correctly before allowing operation of the equipment. CSA Standard W117.2 CODE FOR SAFETY IN WELDING AND CUTTING obtainable from the Canadian Standards Association, Standards Sales, 178 Rexdale Boulevard, Rexdale, Ontario, Canada M9W 1R3. ANSI Standard Z49.1 CODE FOR SAFETY IN WELDING AND CUTTING obtainable from the American National Standards Institute, 1430 Broadway, New York, NY 10018. CALIFORNIA PROPOSITION 65 WARNING This product, when used for welding or cutting, produces fumes or gases which contain chemicals known to the State of California to cause birth defects and, in some cases, cancer. This product contains chemicals, including lead, known to the State of California to cause cancer, and birth defects or other reproductive harm. Wash hands after use. (California Health & Safety Code Section 25249.5 at seq.) 3 1.0 – COMPLETE ASSEMBLY OVERVIEW VELCRO WRAP TOUGH GUN I.C.E.™ SETUP UNICABLE ASSEMBLY M6 SHCS SOLID MOUNT CONNECTOR ASSEMBLY CLUTCH CABLE CLUTCH MOUNT CONNECTOR ASSEMBLY NECK LOCKING PIN ASSEMBLY NOT PROVIDED* RETAINING HEAD M6 SHCS MOUNTING ARM ASSEMBLY NECK INSULATOR CONTACT TIP NOZZLE For complete parts list, please proceed to Section 7.0 – EXPLODED VIEW AND PARTS LIST. * Check with robot manufacturer for correct fastener. 4 DISC 2.0 – INSTALLATION ROBOT 2.1 INSTALLING THE GUN TO THE ROBOT STEP 1: Attaching the Disc to the Robot NOTE: Fasteners are not provided since the size varies by DISC robot. NOTE: The use of a dowel is recommended and varies by robot manufacturer. Install the disc to the robot with fasteners. Torque to 45 in.-lbs. (5 Nm). STEP 2: Attaching the Arm Assembly to the Disc Install the arm assembly to the disc on the robot with 6 mm SHCS (provided). Torque to 45 in.-lbs. (5 Nm). ARM ASSEMBLY CLUTCH STUD STEP 3A: Attaching the Gun to the Arm Assembly (For Clutch Mount Guns ONLY) Remove the fastener and pin from the arm assembly (Fig. 1). Insert the gun assembly clutch stud into the arm on the robot until it bottoms out. IMPORTANT: The flat feature of the locking pin must interface with the flat feature on the clutch stud to achieve locking and orientation (See Fig. 2 and 3 below). Insert the 6 mm SHCS on the opposite side of the arm and screw it into the locking pin. Torque 6 mm SHCS to 60 in.-lbs. (7 Nm). Fig. 1 LOCKING PIN 6 mm SHCS Fig. 2 FLAT FEATURE Fig. 3 FLAT FEATURES ON CLUTCH STUD AND LOCKING PIN MATE HERE 5 STEP 3B: Attaching the Gun to the Arm Assembly (For Solid Mount Guns ONLY) Remove the fastener and pin from the arm assembly (Fig. 1). Insert the solid mount gun assembly stud into the mounting arm on the robot until it bottoms out. IMPORTANT: The flat feature of the locking pin must interface with the flat feature on the stud to achieve locking and orientation (See Fig. 1 below). Insert the 6 mm SHCS on the opposite side of the arm and screw it into the locking pin (See Fig. 2 below). Torque 6 mm SHCS to 60 in.-lbs. (7 Nm). Insert 5 mm SHCS through solid mount gun assembly and screw it into the mounting arm (See Fig. 2 below). Torque 5 mm SHCS to 45 in.-lbs. (5 Nm). STUD LOCKING PIN 5 mm SHCS 6 mm SHCS Fig. 1 Fig. 2 STEP 1 FLAT FEATURES STEP 2 2.2 CONNECTING GUN TO WIRE FEEDER VOLTAGE SENSE LEAD Plug gun into feeder and lock in place (see your feeder manual for details). OPTIONAL – Connect voltage sense lead (see your feeder manual for details) on the unicable with the male connector on the power jumper cable. FOR CLUTCH INSTALLATIONS – Connect clutch cable with either the provided connections (cut and splice required) or one of our jumper cables (sold separately and available for select robot models). CLUTCH CABLE 6 2.3 INSTALLING CLUTCH CABLE TO GUN Install the clutch cable supplied with the robotic safety clutch to the switch connection at the clutch. Tighten connection by hand. Attach clutch cable at five points along the unicable with supplied Velcro straps (or leather jacket for TOUGH GUN I.C.E. components). 3.0 – MAINTENANCE 3.1 NOZZLE AND CONTACT TIP SYSTEMS IMPORTANT: Neck insulator MUST be in place before welding to properly insulate neck armor. Check all parts to ensure that connections are tight before welding. The heavy duty retaining head MUST be tightened with a 5/8” (16 mm) wrench to prevent the contact tip from overheating. DO NOT use pliers to remove or tighten the retaining head or scoring may result. TOUGH LOCK Consumables NOZZLE CONTACT TIP RETAINING HEAD NECK INSULATOR Removal and Replacement Nozzle Pull slip-on nozzles off with a twisting motion. When installing the nozzle, ensure that it is fully seated. Contact Tip Thread the contact tip into the retaining head. Torque to 30 in.-lbs. (3.5 Nm). The Tregaskiss Tip Tool (Part # 450-18 – for heavy-duty tips) or a pair of weld pliers are the optimal tools for contact tip installation. Retaining Head Thread retaining head onto neck with a 5/8” (16 mm) wrench. Torque to 80 in.-lbs. (9 Nm). DO NOT use pliers to remove or tighten the heavy duty retaining head or scoring may result. Neck Insulator The neck insulator is pressed onto the neck by hand with the aluminum side towards the neck and the black insulation towards the nozzle. 7 TOUGH ACCESS Consumables NOZZLE CONTACT TIP RETAINING HEAD NECK INSULATOR COLLER DETAIL NECK TOUGH ACCESS CONSUMABLES ASSEMBLED INSTALLED IMPORTANT: TCP will be different from standard TOUGH LOCK™ Consumables (See Section 4.1 GUN CONFIGURATIONS). Removal and Replacement Nozzle Pull slip-on nozzles off with a twisting motion. When installing the nozzle, ensure that it is fully seated. Contact Tip Thread the contact tip into the retaining head. Torque to 30 in.-lbs. (3.5 Nm). The Tregaskiss Tip Tool (Part # 450-18 – for heavy-duty tips) or a pair of weld pliers are the optimal tools for contact tip installation. Retaining Head Thread retaining head onto neck with a 5/8” (16 mm) wrench. Torque to 80 in.-lbs. (9 Nm). DO NOT use pliers to remove or tighten the heavy duty retaining head or scoring may result. Neck Insulator and Coller Detail Press 59GI-2 Coller Detail by hand onto crimped aluminum portion of neck until it is 1.10 inches away from end of copper on neck. Thread Neck Insulator onto neck until it is flush with the copper end of the neck. 3.2.1 AIR-COOOLED NECK REPLACEMENT Neck Removal Fig. Fig. 1 1 1. Remove consumables (See Fig. 1). 2. Twist the hand nut clockwise (See Fig. 2). 3. Hold the hand nut in the unlocked position while pulling the neck from the gun. 4. Release the hand nut – it will return to the locked position (See Fig. 3). HAND NUT 8 Neck Replacement NOTE: Remove consumables (i.e. retaining head, nozzle and contact tip) before installing neck. Failure to do so will result in improper installation. 1. Twist the hand nut clockwise to UNLOCK. IMPORTANT: To prevent damage to the neck, ensure that the hand nut is always in the UNLOCKED position when inserting a neck. 2. Insert the neck into the connector housing. IMPORTANT: The neck is fully inserted only when the neck bottoms out and the insertion depth guide (INSERT TO HERE) on the neck meets up with the connector housing. 3. Release the hand nut allowing it to return to the LOCKED position. IMPORTANT: Do not release the hand nut unless the neck has been fully inserted or damage to the neck may result. Fig. 2 Fig. 3 HAND NUT IN UNLOCKED POSITION INSERTION DEPTH GUIDE MEETS UP WITH HOUSING CONNECTOR HOUSING HAND NUT IN LOCKED POSITION INSERTION DEPTH GUIDE ON NECK 3.2.2 TOUGH GUN I.C.E. NECK REPLACEMENT 1. Disconnect water lines (See Fig. 4). 2. Follow instructions as outlined in Section 3.2.1 AIR-COOLED NECK REPLACEMENT. 3. Replace water lines (See Fig. 5). Fig. 5 Fig. 4 3.3 DIRECT POWER PIN REPLACEMENT Thread power pin into rear housing. Tighten the power pin into the rear housing using a 3/4” (19 mm) wrench on the rear housing and a 1” wrench on the power pin. Torque to 18 ft.-lbs. (24.4 Nm). IMPORTANT: The thread-in two-piece power pin has a taper to seat and lock the power pin in the rear handle block. Tighten the power pin in the block with a wrench to ensure that pin remains in place. Install liner (See Section 3.4 QUICK LOAD™ LINER REPLACEMENT). 9 POWER PIN REAR HOUSING 3.4 QUICK LOAD™ LINER REPLACEMENT 1. Remove consumables (nozzle, contact tip and retaining head). 2. Remove existing QUICK LOAD Liner by pulling it out through the neck. 3. Insert the new QUICK LOAD Liner through the neck using the welding wire as a guide (push the liner in short bursts to help to prevent kinking). 4. Once the liner stops feeding, give it an extra push to ensure it is inserted completely. 5. Push liner back into gun and hold in place. Using liner gauge, trim conduit liner with 3/4” (20 mm) stick out. 6. Feed wire through liner. 7. Reinstall consumables (See Nozzles and Contact Tip Systems section). LINER TRIM HERE LINER GAUGE Replacing the QUICK LOAD Liner Retainer 1. Remove consumables (nozzle, contact tip and retaining head). 2. Remove existing QUICK LOAD Liner by pulling it out through the neck. 3. Remove retainer from the power pin at the rear of the gun. This may require removal of a power pin cap depending on your power pin style. 4. Install the QUICK LOAD Liner from the back of the MIG gun with liner retainer attached. 5. Reinstall the power pin cap (if applicable). 6. Push liner back into VOLTAGE SENSE LEAD neck and hold in place. Using liner gauge, trim LINER RETAINER conduit liner with 3/4” LINER (20 mm) stick out. 7. Feed wire through liner. 8. Reinstall consumables. 3.5.1 AIR-COOLED UNICABLE ASSEMBLY REPLACEMENT Disconnecting the Old Unicable UNICABLE 6 mm SHCS 1. Remove the neck, liner, and power pin from the gun (See Neck Removal, Direct Power Pin Replacement, and QUICK LOAD Liner Replacement sections). 2. Remove the Velcro straps from the unicable / control cable. 3. Disconnect the clutch cable at the threaded connection. 4. Disconnect the voltage sense lead. 5. Remove the 6 mm SHCS on the connector assembly with an M5 Allen key. 6. Remove the unicable assembly. CONNECTOR HOUSING NECK 10 Connecting the New Unicable 1. Take the power pin removed from the old unicable and install it on the new unicable (See Direct Power Pin Replacement for details). 2. Insert the unicable into the connector housing. Fasten the cable to the gun by inserting and torquing the 6 mm SHCS to 60 in.-lbs. (7 Nm). 3. Attach clutch cable at five points along the unicable using Velcro straps. 4. Reinstall the neck (see Neck Replacement section for details). 5. Reinstall the QUICK LOAD Liner (See Section 2.4 QUICK LOAD LINER REPLACEMENT). 6. Reconnect the clutch cable and voltage sense lead (See Connecting Gun to Wire Feeder section). 6 mm SHCS NECK UNICABLE POWER PIN CONNECTOR HOUSING 3.5.2 TOUGH GUN I.C.E.™ UNICABLE ASSEMBLY REPLACEMENT 1. 2. 3. 4. Remove leather jacket. Retain water lines. Follow instructions outlined in section 3.5.1 AIR-COOLED UNICABLE ASSEMBLY REPLACEMENT. Ensure water lines are included when replacing leather wrap. 11 3.6 WIRE BRAKE REMOVAL AND INSTALLATION NOTE: This product is factory set for wire equal to or smaller than 0.045”. If you are using wire 0.052” and larger, please remove and replace the Wire Guide within the neck housing and replace it with the larger size (part #598G2-116) that is supplied with the product. ITEM 1 2 3 4 PART # 599 495-18-35 495-18-116 499-9-15 598G2 598G2-116 5 1. Unthread the pushing unit (1) and remove the wire guide (4) (See Fig. 1). NOTE: Photo of gun housing is not exactly as shown. 2. Using the flat head screw driver (5), insert the wire guide (4) (flats parallel with housing key) into position within the housing (See Fig. 2). Rotate wire guide (4) to align hole with pushing unit pin (1), thread-in the pushing unit (1) (See Fig. 3). NOTE: Photo of gun housing is not exactly as shown. DESCRIPTION PUSHING PIN JUMP LINER FOR ≤ 0.045” JUMP LINER FOR ≥ 0.052” AIR LINE 15’ WIRE GUIDE FOR ≤ 0.045” WIRE GUIDE FOR ≥ 0.052” FLAT HEAD SCREW DRIVER Fig. 1 Fig. 2 Fig. 3 HOUSING KEY PUSHING UNIT PIN IMPORTANT: For the Wire Brake to work properly, make sure the pushing unit bottoms-out in the housing/connector. 12 4.0 – TECHNICAL DATA 4.1 GUN CONFIGURATIONS IMPORTANT: All gun configurations have a standard wire stick-out dimension of 15 mm (0.59”) and approach angle of 45 degrees. STANDARD CONFIGURATIONS — 22° NECKS 13.78” (350 mm) TCP - 22° 15.75” (400 mm) TCP - 22° 17.72” (450 mm) TCP - 22° 19.69” (500 mm) TCP - 22° 13 STANDARD CONFIGURATIONS — 45° NECKS 13.78” (350 mm) TCP - 45° 15.75” (400 mm) TCP - 45° 15.75” (400 mm) TCP - 45° 17.72” (450 mm) TCP - 45° 14 ALTERNATE CONFIGURATIONS 12.44” (316 mm) TCP - 22° 13.78” (350 mm) TCP - 35° 15.75” (400 mm) TCP - 35° (PREVIOUS TOUGH GUN STANDARD) TOUGH ACCESS CONFIGURATIONS 13.78” (350 mm) TCP - 22° TOUGH ACCESS Consumables 13.78” (350 mm) TCP - 35° TOUGH ACCESS Consumables 15 13.78” (350 mm) TCP - 45° TOUGH ACCESS Consumables 4.2 TOUGH GUN G2 NECK DIMENSIONS 16 4.3 CENTER OF MASS CENTER OF MASS – CLUTCH STANDARD CONFIGURATIONS 13.78” (350 mm) TCP - 22 DEGREES 13.78” (350 mm) TCP - 35 DEGREES 13.78” (350 mm) TCP - 45 DEGREES ALTERNATE CONFIGURATIONS 15.75” (400 mm) TCP - 22 DEGREES 15.75” (400 mm) TCP - 35 DEGREES 15.75” (400 mm) TCP - 45 DEGREES 12.44” (316 mm) TCP - 22 DEGREES TOUGH ACCESS CONFIGURATIONS 13.78” (350 mm) TCP - 22 DEGREES 13.78” (350 mm) TCP - 35 DEGREES 13.78” (350 mm) TCP - 45 DEGREES X INCHES (MM) -4.51 (-114.55) -3.57 (-90.68) -3.47 (-88.14) X -4.47 (-113.54) -3.51 (-89.15) -3.42 (-86.87) -4.51 (-114.55) X -4.75 (-12.65) -3.82 (-97.03) -3.75 (-95.25) Y 0 0 0 Y 0 0 0 0 Y 0 0 0 Z INCHES (MM) -4.27 (-108.46) -4.00 (-101.6) -3.45 (-87.63) Z -5.88 (-149.35) -5.63 (-143.0) -5.06 (-128.52) -3.14 (-79.76) Z -4.03 (-102.362) -3.76 (-95.50) -2.97 (-75.44) WEIGHT LBS (KG) 5.04 (2.29) 4.95 (2.25) 5.01 (2.27) WEIGHT 5.19 (2.35) 5.12 (2.32) 5.23 (2.37) 5.01 (2.27) WEIGHT 5.04 (2.29) 4.95 (2.25) 4.84 (2.20) Z INCHES (MM) -4.93 (-125.22) -4.19 (-106.43) -4.72 (-119.89) Z -6.50 (-165.1) -5.78 (-146.81) -6.11 (-155.19) -3.81 (-96.77) Z 0.71 (18.03) -3.55 (-90.17) -2.99 (-75.95) WEIGHT LBS (KG) 4.91 (2.23) 4.53 (2.05) 4.45 (2.02) WEIGHT 5.05 (2.29) 4.69 (2.13) 4.54 (2.06) 4.87 (2.21) WEIGHT 4.85 (2.2) 4.31 (1.95) 4.33 (1.97) CENTER OF MASS – SOLID MOUNT STANDARD CONFIGURATIONS 13.78” (350 mm) TCP - 22 DEGREES 13.78” (350 mm) TCP - 35 DEGREES 13.78” (350 mm) TCP - 45 DEGREES ALTERNATE CONFIGURATIONS 15.75” (400 mm) TCP - 22 DEGREES 15.75” (400 mm) TCP - 35 DEGREES 15.75” (400 mm) TCP - 45 DEGREES 12.44” (316 mm) TCP - 22 DEGREES TOUGH ACCESS CONFIGURATIONS 13.78” (350 mm) TCP - 22 DEGREES 13.78” (350 mm) TCP - 35 DEGREES 13.78” (350 mm) TCP - 45 DEGREES X INCHES (MM) -4.31 (-109.47) -3.62 (-91.95) -2.91 (-73.91) X -4.27 (-108.46) -3.55 (-90.17) -2.85 (-72.39) -4.31 (-109.47) X -7.02 (-178.31) -3.92 (-99.57) -3.83 (-97.28) 17 Y 0 0 0 Y 0 0 0 0 Y 0 0 0 4.4 GUN AMPERAGES MODEL 300 amp 500 amp 60% DUTY CYCLE - MIXED GASES OR 100% DUTY CYCLE - CO2 300 amp 500 amp NOTE: Ratings are based on tests that comply with IEC 60974-7 standards. 5.0 – RECOMMENDED ACCESSORIES 5.1 TOUGH GUN™ REAMER NOZZLE CLEANING STATION By minimizing spatter accumulation, the TOUGH GUN Reamer extends the life of robotic MIG guns and consumables, resulting in increased uptime and lower operating costs. Safe and Accurate Setup: External setup switches allow independent operation of the sprayer, clamp and spindle during manual setup. Cutter blade lifts into position but does not spin when activated by the spindle setup switch. New v-block has 4 sides for compatibility with most Tregaskiss Nozzles. Improved Reliability: All pneumatic valves are internally mounted. Seals protect points of entry. Protected external setup switches. Electric Check-Valve ensures more consistent operation. Maintenance-Friendly: Quick-Change Base Plate allows easy and accurate removal and replacement of reamer. Convenient carry handle. Quick-disconnect wiring – valves can be replaced without rewiring. For more information on this product, please visit Tregaskiss.com or contact your Tregaskiss representative. 5.2 TOUGH GUN NECK INSPECTION FIXTURE The TOUGH GUN Neck Inspection Fixture tests the tolerance of a robotic MIG gun’s neck to tool center point (TCP). If the neck is out of tolerance due to impact or prolonged usage, the fixture can be used to realign the neck. Benefits: Realigns neck to tool center point. Accommodates all standard-sized necks. Prolongs the life of your necks -- readjust a bent neck instead of replacing it. Prevents costly rework due to missed weld joints. Prevents downtime for reprogramming the robot to match a bent neck. For more information on this product, please visit Tregaskiss.com or contact your Tregaskiss representative. 18 PART NUMBER: G-59 6.0 – TROUBLESHOOTING PROBLEM CONTACT TIP WEAR CONTACT TIP BURN BACK WELD POROSITY POTENTIAL CAUSE CONTACT TIP SIZE ELECTRODE ERODING CONTACT TIP EXCEEDING DUTY CYCLE IMPROPER VOLTAGE AND/OR WIRE FEED SPEED ERRATIC WIRE FEEDING IMPROPER STICK-OUT IMPROPER ELECTRODE STICKOUT FAULTY GROUND WIRE STICK-OUT TOO LONG, GAS NOZZLE TOO FAR FROM WELD POOL BAD GUN POSITION – TOO SHARP GUN INCLINE CAUSING VENTURI EFFECT AT THE END OF NOZZLE LEADING TO ATMOSPHERIC CONTAMINATION EXCESSIVE WIDE WELD POOL FOR NOXXLE I.D. ARC VOLTAGE TOO HIGH DRAFTS, WIND, FANS, EXHAUST DUCTS, ETC. IMPURITIES IN THE BASE METAL UNSUITABLE JOINT FIT-UP SPATTER IN NOZZLE AND ON CONTACT TIP GAS FLOW RATE TOO HIGH OR TOO LOW NOZZLE DAMAGED STICK-OUT TOO LONG DAMAGED, KINKED, OR LEAKING GAS HOSE DAMAGED OR MISSING NOZZLE INSULATOR OR GAS DIFFUSER WIRE FEED TOO FAST OR SOO SLOW IN RELATION TO THE ARC VOLTAGE SPATTER ARC TOO LONG DAMAGED CONTACT TIP POSSIBLE SOLUTION REPLACE WITH PROPER SIZE. INSPECT AND/OR CHANGE DRIVE ROLLS. REPLACE WITH PROPERLY RATED GUN. SET PARAMETERS. SEE POOR WIRE FEEDABILITY. ADJUST NOZZLE/TIP RELATIONSHIP. ADJUST GUN TO BASE METAL RELATIONSHIP. REPAIR ALL CABLES AND CONNECTIONS . USE LONGER NOZZLE. CORRECT GUN ANGLE. USE LARGER BORE NOZZLE. REDUCE VOLTAGE, VERIFY PARAMETERS. PROTECT THE WORK PIECE FROM DRAFTS WITH CURTAINS OR SCREENS. DRAFTS CAN EASILY DRAW AWAY THE SHIELDING GAS FROM THE WELD POOL LEAVING IT WITHOUT SUFFICIENT GAS PROTECTIONS. REMOVE ALL CONTAMINATION FROM THE SURFACES TO BE WELDED. PAINT, MILL SCALE, RUST GREASE, AND OTHER CONTAMINATION CAN CAUSE POROSITY IN THE WELD. MINIMIZE GAPS OR PROVIDE BACKING. CLEAN THE NOZZLE AND THE CONTACT TIP REGULARLY. SPATTER ON THESE PARTS CAUSES TURBULENCE ON THE GAS FLOW, CAUSING AIR TO BECOME MIXED INTO THE SHIELDING GAS RESULTING IN POROSITY. DO NOT HIT THE NOZZLE TO REMOVE SPATTER – USE A SUITABLE SCRAPER. CONSULT YOUR WELDING ENGINEER FOR PROPER FLOW RATE. TOO LOW A GAS FLOW RATE GIVES INSUFFICIENT PROTECTION TO THE WELD POOL. TOO HIGH A GAS FLOW RATE CAUSES TURBULENCE IN THE GAS SHIELD, WHICH IN TURN CAN SUCK IN AIR RESULTING IN POROSITY. REPLACE NOZZLE. A NOZZLE WITH UNEVEN EDGES GIVES RISE TO TURBULENCE IN THE GAS FLOW. DO NOT HIT NOZZLE TO REMOVE SPATTER – USE A SUITABLE SCRAPER. GENERALLY, SET THE STICK-OUT AT ABOUT 15 TIMES THE DIAMETER OF THE WIRE BEING USED. INSPECT AND REPAIR OR REPLACE AS NECESSARY. INSPECT AND REPLACE AS NECESSARY. SET THE WIRE FEED RATE AND VOLTAGE IN ACCORDANCE WITH GOOD WELDING PRACTICES AS RECOMMENDED BY A QUALIFIED WELDING ENGINEER. ADJUST THE WIRE FEED AND VOLTAGE SO THAT THE ARC IS IN ACCORDANCE WITH GOOD WELDING PRACTICES FOR THE JOINT TO BE WELDED. THE DISTANCE FROMT EH WELDING GUN TO THE WORK-PIECE SHOULD BE ABOUT 1/2" TO 1”. IF THE ARC IS TOO LONG, THERE WILL BE SPATTER; USUALLY IN THE DIRECTION OF THE WELD. IF THE CONTACT TIP BECOMES WORN, THE FILLER WILL NOT BE IN CONSTANT CONTACT WITH THE CONTACT TIP CAUSING THE ARC TO BECOME UNSTABLE. A CONTACT TIP CONTAMINATED WITH SPATTER WILL CAUSE UNEVEN WIRE FEED RESULTING IN FURTHER SPATTER. 19 POOR WIRE FEEDABILITY OVERHEATING FAULTY POWER SOURCE INCORRECT START INCORRECT PULSE PARAMETERS UNEVEN WIRE FEED POOR GROUND CONTACT STICK-OUT TOO LONG (SHORT ARC WELDING) SLIPPING FEED ROLLS CLOGGED OR WORN LINER LINER TOO LONG OR TOO SHORT DEBRIS ON WIRE WIRE COIL BRAKE INCORRECTLY ADJUSTED POOR GROUND HAVE THE POWER SOURCE CHECKED FOR FAULTY CONDITIONS SUCH AS BROKEN WIRES OR FAULTY CONTACT. A LOT OF SPATTER OCCURS IF THE STICK-OUT IS TOO GREAT AND IF THE WELDING GUN IS HELD TOO FAR FROM THE WORKPIECE WHEN STRIKING THE ARC. TRY TO START WITH AS SHORT OF A STICK-OUT AS POSSIBLE AND WITH THE WELDING GUN AS CLOSE TO THE STARTING POINT AS POSSIBLE. IF A LARGE BALL FORMS ON THE END OF THE WELDING WIRE, REMOVE IT BY CUTTING THE WIRE WITH SHARP WIRE CUTTERS. IT IS HELPFUL IF THE WIRE IS CUT TO A POINT. ALWAYS REMOVE THE BALL END BEFORE STRIKING AN ALUMINUM ARC. CHECK WELDING GROUND CONNECTION. CONSULT THE USER MANUAL FOR YOUR POWER SUPPLY OR A QUALIFIED WELDING ENGINEER. UNEVEN WIRE FEED GIVES RISE TO HEAVY SPATTER. FIND THE CAUSE OF THE DISTURBANCE AND CORRECT THE CONDITION BEFORE PROCEEDING. INSPECT GROUND CABLE FOR LOOSE CONNECTION, FRAYING AND CUTS. CORRECT THE PROBLEM AREAS FOUND AND ATTACH THE GROUND CABLE DIRECTLY TO THE WORK-PIECE AFTER HAVING CLEANED THE CONTACT SURFACE FIRST. POOR GROUND CONTACT IS THE MOST COMMON CAUSE OF UNSTABLE MIG WELDING CONDITIONS. THE STICK-OUT SHOULD BE 15 TIMES THE DIAMETER OF THE ELECTRODE BEING USED. WITH INCREASING STICK-OUT, THE CURRENT IS REDUCED AND THE ARC VOLTAGE RISES, GIVING A LONGER UNSTABLE ARC AND INCREASED SPATTER. CHECK THAT THE FEED ROLL SIZE IS CORRECT FOR THE WIRE SIZE BEING USED. INCREASE THE DRIVE ROLL PRESSURE UNTIL THE WIRE FEED IS EVEN. DO NOT APPLY EXCESSIVE PRESSURE AS THIS CAN DAMAGE THE WIRE SURFACE AND MAY CAUSE COPPER COATING TO LOOSEN FROM STEEL WIRES OR METAL SHAVINGS TO BE FORMED (FROM SOFT WIRE LIKE ALUMINUM) WHICH WILL BE DRAWN INTO THE WIRE FEED CONDUIT AND WILL RAPIDLY CLOG THE LINER. WHEN WELDING WITH FLUX-CORED WIRES, EXCESSIVE DRIVE ROLL PRESSURE MAY OPEN THE WIRE SEAM AND ALLOW FLUX OR METAL POWERS TO ESCAPE. DUST, PARTICLES OF COPPER, DRAWING LUBRICANTS, METAL OR FLUX AND OTHER FORMS OF CONTAMINATION CAN RAPIDLY CLOG THE LINER SO THAT THE FEED IS IMPEDED. A LINER WHICH HAS BEEN IN USE FOR AN EXTENDED PERIOD OF TIME BECOMES WORN AND SATURATED WITH DUST AND MUST BE REPLACED. WHEN CHANGING WIRE, REMOVE THE CONTACT TIP FROM THE FRONT END OF THE GUN AND BLOW OUT THE LINER WITH CLEAN, DRY COMPRESSED AIR FROM THE BACK OF THE GUN. NOTE: WEAR SAFETY GOGGLES WHEN USING COMPRESSED AIR TO CLEAN LINER. ENSURE PROPER SAFETY PROCEDURES ARE FOLLOWED TO AVOID POSSIBLE SERIOUS EYE INJURY. CHECK THE LENGTH OF THE LINER AND EITHER TRIM IF TOO LONG OR REPLACE THE LINER IF TOO SHORT. PROPER FEED OF THE WELDING WIRE IS DEPENDENT UPON THE CORRECT LENGTH OF THE LINER. AN UNPROTECTED COIL OF WIRE QUICKLY COLLECTS DUST AND OTHER AIRBORNE CONTAMINATION. IF GRINDING IS BEING PERFORMED IN THE VICINITY, PARTICLES CAN BECOME ATTACHED TO THE WIRE, SEVERELY INTERFERING WITH THE WIRE FEED. REPLACE AND CLEAN WIRE AND KEEP IT PROTECTED WITH A COVER. SET THE BRAKE SO THAT THE COIL IMMEDIATELY STOPS ROTATING AS SOON AS WELDING IS INTERRUPTED. IF THE BRAKE IS APPLIED TOO HARD IT WILL CAUSE THE FEED ROLLS TO SLIP, RESULTING IN UNEVEN WIRE FEED. IF IT IS TOO LOOSE, OVERRUN OF THE WIRE WILL OCCUR, CAUSING TANGLES OF THE WIRE, IRREGULAR TENSION IN THE FEED MECHANISM, AND IRREGULAR ARC CHARACTERISTICS. INSPECT GROUND CABLE FOR LOOSE CONNECTION, FRAYING AND CUTS. CORRECT ANY PROBLEM AREAS FOUND. CLEAN CLAMPING AREA TO ENSURE GOOD CONTACT. SECURELY ATTACH GROUND CABLE TO WORK-PIECE AS CLOSE AS POSSIBLE TO THE POINT OF WELDING. ENSURE GOOD CONNECTION TO WELDING POWER SOURCE. 20 ERRATIC ARC ARCING IN THE NOZZLE LOOSE POWER CONNECTION CONSUMABLE ITEMS LOOSE OR WORN CAPACITY OF GUN BEING EXCEEDED DIRTY CONNECTION INCORRECT SETTING OF VOLTAGE AND/OR CURRENT DEFECTS IN WIRE FEED WORN CONTACT TIPS POOR CONTACT BETWEEN GROUND CABLE AND WORKPIECE LOOSE POWER CONNECTION STICK-OUT TOO LONG SPATTER BUILD-UP IS BRIDGING BETWEEN THE NOZZLE AND CONTACT TIPS OR DIFFUSERS THE NOZZLE BORE IS TOO SMALL FOR THE APPLICATION THE GUN IS NOT INSULATED FROM THE FIXTURE SWITCH MALFUNCTION 1. INCORRECT GUN INSTALLATION INCORRECT TCP AFTER CRASH2. CONTINUOUS CLUTCH ACTIVATION TCP VARIATION CHECK TO ENSURE POWER CONNECTION ON POWER SOURCE IS TIGHT, THE CONNECTION ON THE WIRE FEEDER IS TIGHT, THE CONNECTION ON THE ADAPTOR BLOCK IS TIGHT, AND THE CONNECTION OF THE GUN TO THE ADAPTOR BLOCK IS TIGHT. REMOVE NOZZLE FROM GUN AND INSPECT CONTACT TIP AND CONTACT TIP HOLDER / GAS DIFFUSER FOR WEAR AND TIGHTNESS; REPLACE OR TIGHTEN IF NECESSARY. NOTE COMPLETE WELD PARAMETER INCLUDING WELDING CURRENT IN AMPS, DUTY CYCLE, WELDING VOLTAGE, WIRE FEED SPEED, TYPE AND SIZE OF WIRE, TYPE OF GAS AND FLOW RATE OF GAS. REMOVE NECK AND INSPECT INTERFACE FOR DIRT AND BUILDUP. PERIODIC CLEANING IS NECESSARY. SET THE WIRE FEED IN RELATION TO THE ARC VOLTAGE IN SUCH A WAY THAT THE ARC BURNS EVENLY AND STABLE. IN SPRAY ARC WELDING, SET THE WIRE FEED SO THAT SHORTCIRCULATING CEASES AND SO THAT THE FILLER METAL IS TRANSFERRED IN A SPRAY ACROSS THE ARC. FIND THE CAUSE OF THE INTERFERENCE AND CORRECT THE CONDITION. WHEN THE OPENING OF THE CONTACT TIP HAS BECOME TOO BADLY WORN, THE WIRE WILL NO LONGER BE IN CONTINUOUS ELECTRICAL CONTACT, WHICH WILL RESULT IN AN UNSTABLE ARC AND AN INCREASE IN SPATTER. SECURELY ATTACH THE GROUND CABLE AS CLOSE TO THE POINT OF WELDING AS POSSIBLE ON THE WORK-PIECE. CLEAN THE SURFACES TO ENSURE GOOD CONTACT. CHECK TO ENSURE WELDING POWER CONNECTION ON THE POWER IS TIGHT, THE CONNECTION ON THE WIRE FEEDER IS TIGHT, THE CONNECTION ON THE ADAPTOR BLOCK IS TIGHT, AND THE CONNECTION OF THE GUN TO THE ADAPTOR BLOCK IS TIGHT. ADJUST THE CONTACT TIP TO WORK DISTANCE TO A MINIMUM OF 3/8” FOR SHORT ARC WELDING WITH SMALL DIAMETER WIRES. REMOVE SPATTER BUILD-UP ON A REGULAR BASIS. ADJUST WELD PROCEDURE TO REDUCE SPATTER. SWITCH TO A LARGER BORE NOZZLE. MAKE SURE THE GUN IS ON AN INSULATED MOUNT. REPLACE SWITCH. CHECK ALL JOINTS. VERIFY TCP ON CHECKING FIXTURE. 21 7.0 – EXPLODED VIEW AND PARTS LIST 7.1 AIR-COOLED FRONT END 7 8 5 11 6 4 3 9 10 2 12 1 ITEM PART # 1 401-4-62 401-54-50 401-8-62 401-44-62 401-56-62 401-6-62 401-71-62 401-81-62 401-87-62 401-91-62 DESCRIPTION ITEM STANDARD NOZZLES (SELF INSULATED) 5/8" BORE, 1/8" RECESS - SHORT TAPER TOUGH ACCESS (SD) 1/2" BORE, 1/8" RECESS 5/8" BORE, 1/8" STK. OUT - SHORT TAPER 5/8" BORE, 1/4" STK. OUT - SHORT TAPER PART # 6 59C 59S 59CW 59SW HEAVY DUTY NOZZLES (SELF INSULATED) TOUGH ACCESS (HD) 5/8" BORE, 1/8" STK. OUT 5/8" BORE, 1/8" RECESS - LONG TAPER (STRAIGHT BORE) 5/8" BORE, 1/8" RECESS - LONG TAPER (STRAIGHT BORE) 5/8" BORE, 1/8" STK. OUT - LONG TAPER 5/8" BORE, 1/8" STK. OUT - LONG TAPER 5/8" BORE, 1/8" STK. OUT - LONG TAPER (STRAIGHT BORE ) 7 8 580-3 9 10 59A22 401-42-50 401-42-50C 401-44-50 401-48-50 401-48-50C 401-48-62 401-49-50 403-14-XX 403-21-XX 403-20-XX 403-27-XX TOUGH LOCK™ CONTACT TIPS TOUGH LOCK STANDARD DUTY CONTACT TIPS TOUGH LOCK TAPERED CONTACT TIPS TOUGH LOCK HEAVY DUTY CONTACT TIPS TOUGH LOCK EXTENDED LIFE HEAVY DUTY (EXHD) 3 404-32 RETAINING HEAD - TOUGH LOCK NOT SHOWN 454-1-2 RETAINING RING ONLY 59GI 59GI-25 G2 NECK INSULATOR (QTY 100) G2 NECK INSULATOR (QTY 25) 59D01 59G22 59G22L 59G22L1 59G35 59G45L 59G45L1 59G45L2 NECKS (SUPPLIED WITH NECK INSULATOR) 22° QC-STANDARD 22° QC-STANDARD MEDIUM LENGTH 22° QC-STANDARD LONG LENGTH 35° QC-STANDARD 45° QC-STANDARD 45° QC-STANDARD MEDIUM LENGTH 45° QC-STANDARD LONG LENGTH 59D02 59A22-002 59A22-003 59A22-006 59A22-007 59A35 59A35-002 59A35-003 59A45-004 59A45-005 59A45-007 59A45-009 11 59D03 59D04 59D05 59D06 22 MOUNTING ARMS G2 MOUNTING ARM FOR 59G22 @ 350 mm G2 MOUNTING ARM FOR 59G22 @ 350 mm (ORIGINAL TOUGH GUN TCP FOR 22 DEGREES) G2 MOUNTING ARM FOR 59G22 @ 400 mm G2 MOUNTING ARM FOR 59G22 @ 350 mm TOUGH ACCESS CONSUMABLES G2 MOUNTING ARM FOR 59G22L1 @ 500 mm G2 MOUNTING ARM FOR 59G22L @ 450 mm G2 MOUNTING ARM FOR 59G35 @ 350 mm G2 MOUNTING ARM FOR 59G35 @ 400 mm G2 MOUNTING ARM FOR 59G35 @ 350 mm TOUGH ACCESS CONSUMABLES G2 MOUNTING ARM FOR 59G45L @ 350 mm G2 MOUNTING ARM FOR 59G45L @ 400 mm G2 MOUNTING ARM FOR 59G45L @ 350 mm TOUGH ACCESS CONSUMABLES G2 MOUNTING ARM FOR 59G45L1 @ 400 mm AND 59G45L2 @ 450 mm DIMENSIONS VARY BY ROBOT 12 5 LOCKING PIN ASSEMBLY 6 MM SHCS 59A22-001 4 CONNECTOR HOUSINGS CLUTCH MOUNT (SHOWN) SOLID MOUNT CLUTCH CONNECTOR HOUSING (WIRE BRAKE) SOLID MOUNT CONNECTOR HOUSING (WIRE BRAKE) M6 SHCS BOTTLENECK NOZZLES 1/2" BORE, 1/4" STK. OUT - BOTTLENECK 1/2" BORE, 1/8" RECESS - BOTTLENECK 1/2" BORE, 1/4" STK. OUT - BOTTLENECK 1/2" BORE, 1/8" STK. OUT - BOTTLENECK 1/2" BORE, 1/8" STK. OUT - BOTTLENECK 5/8" BORE, FLUSH TIP - BOTTLENECK 1/2" BORE, FLUSH TIP - BOTTLENECK 2 DESCRIPTION INSULATING DISCS MOTOMAN® K6SB, K10, SK16X, UP6, UP20, MRV6, ABB® IRB 1400M97A, IRB 2400L MOTOMAN® SK6, SK16 FANUC® 100, 100I, 120I, S-6, M710-20L, ABB® IRB 6, 1400, 1500, 2000, 2400 OTC® MRV-6, EX-V6, EX-V6L, EX-V16, DR4400 DAIHEN® DR-4000, DR-4200 MILLER® MRV-2 PANASONIC® VR-008A, VR-006A, VR-005C, VR006ALII, AW-10A, AW-8010, AW-005A&C&CL, AWOO6A, VR-006AL ABB: IRB-2400/10, IRB-2400/16, IRB-440L FANUC: ARCMATE 50iB KUKA: KR 16, KR 16 S, KR 16, KS 7.2 TOUGH GUN I.C.E. FRONT END 7 5 8 4 11 6 1 3 9 10 2 ITEM PART # 1 401-4-62 401-54-50 401-8-62 401-44-62 401-56-62 401-6-62 401-71-62 401-81-62 401-87-62 401-91-62 12 DESCRIPTION 5 BOTTLENECK NOZZLES 1/2" BORE, 1/4" STK. OUT - BOTTLENECK 1/2" BORE, 1/8" RECESS - BOTTLENECK 1/2" BORE, 1/4" STK. OUT - BOTTLENECK 1/2" BORE, 1/8" STK. OUT - BOTTLENECK 1/2" BORE, 1/8" STK. OUT - BOTTLENECK 5/8" BORE, FLUSH TIP - BOTTLENECK 1/2" BORE, FLUSH TIP - BOTTLENECK 403-14-XX 403-21-XX 403-20-XX 403-27-XX TOUGH LOCK™ CONTACT TIPS TOUGH LOCK STANDARD DUTY CONTACT TIPS TOUGH LOCK TAPERED CONTACT TIPS TOUGH LOCK HEAVY DUTY CONTACT TIPS TOUGH LOCK EXTENDED LIFE HEAVY DUTY (EXHD) 3 404-32 RETAINING HEAD - TOUGH LOCK NOT SHOWN 454-1-2 RETAINING RING ONLY 593-22-A 593-22-B 593-22-C 593-22L-A 593-22L-B 593-22L-C 593-22L1-A 593-22L1-B 593-22L1-C 593-35-A 593-35-B 593-35-C 593-45L-A 593-45L-B 593-45L-C 593-45L1-A 593-45L1-B 593-45L1-C 593-45L2-A 593-45L2-B 593-45L2-C TOUGH GUN I.C.E. (G2) NECK 22° - 1.062 OD NOZZLES 22° - 1.106 OD NOZZLES 22° - 0.938 OD NOZZLES 22L° - 1.062 OD NOZZLES 22L° - 1.106 OD NOZZLES 22L° - 0.938 OD NOZZLES 22L1° - 1.062 OD NOZZLES 22L1° - 1.106 OD NOZZLES 22L1° - 0.938 OD NOZZLES 35° - 1.062 OD NOZZLES 35° - 1.106 OD NOZZLES 35° - 0.938 OD NOZZLES 45L° - 1.062 OD NOZZLES 45L° - 1.106 OD NOZZLES 45L° - 0.938 OD NOZZLES 45L1° - 1.062 OD NOZZLES 45L1° - 1.106 OD NOZZLES 45L1° - 0.938 OD NOZZLES 45L2° - 1.062 OD NOZZLES 45L2° - 1.106 OD NOZZLES 45L2° - 0.938 OD NOZZLES PART # 593-5 6 59C 59S 59CW HEAVY DUTY NOZZLES (SELF INSULATED) TOUGH ACCESS (HD) 5/8" BORE, 1/8" STK. OUT 5/8" BORE, 1/8" RECESS - LONG TAPER (STRAIGHT BORE) 5/8" BORE, 1/8" RECESS - LONG TAPER (STRAIGHT BORE) 5/8" BORE, 1/8" STK. OUT - LONG TAPER 5/8" BORE, 1/8" STK. OUT - LONG TAPER 5/8" BORE, 1/8" STK. OUT - LONG TAPER (STRAIGHT BORE ) 401-42-50 401-42-50C 401-44-50 401-48-50 401-48-50C 401-48-62 401-49-50 2 ITEM STANDARD NOZZLES (SELF INSULATED) 5/8" BORE, 1/8" RECESS - SHORT TAPER TOUGH ACCESS (SD) 1/2" BORE, 1/8" RECESS 5/8" BORE, 1/8" STK. OUT - SHORT TAPER 5/8" BORE, 1/4" STK. OUT - SHORT TAPER 59SW 7 8 9 CONNECTOR HOUSINGS CLUTCH MOUNT (SHOWN) SOLID MOUNT CLUTCH CONNECTOR HOUSING (WIRE BRAKE) SOLID MOUNT CONNECTOR HOUSING (WIRE BRAKE) LOCKING PIN ASSEMBLY 6 MM SHCS 10 59A22 59A22-001 59A22-002 59A22-003 59A22-006 59A22-007 59A35 59A35-002 59A35-003 59A45-004 59A45-005 59A45-007 11 MOUNTING ARMS G2 MOUNTING ARM FOR 59G22 @ 350 mm G2 MOUNTING ARM FOR 59G22 @ 350 mm (ORIGINAL TOUGH GUN TCP FOR 22 DEGREES) G2 MOUNTING ARM FOR 59G22 @ 400 mm G2 MOUNTING ARM FOR 59G22 @ 350 mm TOUGH ACCESS CONSUMABLES G2 MOUNTING ARM FOR 59G22L1 @ 500 mm G2 MOUNTING ARM FOR 59G22L @ 450 mm G2 MOUNTING ARM FOR 59G35 @ 350 mm G2 MOUNTING ARM FOR 59G35 @ 400 mm G2 MOUNTING ARM FOR 59G35 @ 350 mm TOUGH ACCESS CONSUMABLES G2 MOUNTING ARM FOR 59G45L @ 350 mm G2 MOUNTING ARM FOR 59G45L @ 400 mm G2 MOUNTING ARM FOR 59G45L @ 350 mm G2 MOUNTING ARM FOR 59G45L1 @ 400 mm AND 59G45L2 @ 450 mm DIMENSIONS VARY BY ROBOT 12 59D01 59D02 59D03 59D04 59D05 59D06 23 G2 I.C.E. HOUSING CLAMP (INCLUDES FASTENER) M6 SHCS 580-3 59A45-009 4 DESCRIPTION INSULATING DISCS MOTOMAN® K6SB, K10, SK16X, UP6, UP20, MRV6, ABB® IRB 1400M97A, IRB 2400L MOTOMAN® SK6, SK16 FANUC® 100, 100I, 120I, S-6, M710-20L, ABB® IRB 6, 1400, 1500, 2000, 2400 OTC® MRV-6, EX-V6, EX-V6L, EX-V16, DR4400 DAIHEN® DR-4000, DR-4200 MILLER® MRV-2 PANASONIC® VR-008A, VR-006A, VR-005C, VR006ALII, AW-10A, AW-8010, AW-005A&C&CL, AWOO6A, VR-006AL ABB: IRB-2400/10, IRB-2400/16, IRB-440L FANUC: ARCMATE 50iB KUKA: KR 16, KR 16 S, KR 16, KS 7.3 AIR-COOLED AND TOUGH GUN I.C.E. BACK END Air-Cooled Setup 4 6 5 1 2 3 TOUGH GUN I.C.E. Setup 9 10 QUICK LOAD™ LINER PART # 1 2 300 AMP 500 AMP 59UXXX 59U503 59U503.5 59U504 59U504.5 59U505 59U505.5 59U506 59U506.5 59U507 59U507.5 59U508 59U508.5 59U509 59U509.5 59U510 59U510.5 59U511 59U511.5 59U512 59U512.5 UNICABLE ASSEMBLY (500 A & 300 A) CABLE ASSEMBLY - 3' (0.9 m) CABLE ASSEMBLY - 3.5' (1.1 m) CABLE ASSEMBLY - 4' (1.2 m) CABLE ASSEMBLY - 4.5' (1.4 m) CABLE ASSEMBLY - 5' (1.5 m) CABLE ASSEMBLY - 5.5' (1.7 m) CABLE ASSEMBLY - 6' (1.8 m) CABLE ASSEMBLY - 6.5' (2.0 m) CABLE ASSEMBLY - 7' (2.1 m) CABLE ASSEMBLY - 7.5' (2.3 m) CABLE ASSEMBLY - 8' (2.4 m) CABLE ASSEMBLY - 8.5' (2.6 m) CABLE ASSEMBLY - 9' (2.7 m) CABLE ASSEMBLY - 9.5' (2.9 m) CABLE ASSEMBLY - 10' (3.0 m) CABLE ASSEMBLY - 10.5' (3.2 m) CABLE ASSEMBLY - 11' (3.4 m) CABLE ASSEMBLY - 11.5' (3.5 m) CABLE ASSEMBLY - 12' (3.7 m) CABLE ASSEMBLY - 12.5' (3.8 m) 414-600 414-600 ADAPTOR DETAIL 214 214-12 214-1 214-7 214-30 214-39 418-14 214 214-12 214-1 214-7 214-30 214-39 418-14 418-39 418-39 417 417-60 417 417-60 3 PART # DESCRIPTION 300 AMP 59UXXX 59U303 59U303.5 59U304 59U304.5 59U305 59U305.5 59U306 59U306.5 59U307 59U307.5 59U308 59U308.5 59U309 59U309.5 59U310 59U310.5 59U311 59U311.5 59U312 59U312.5 POWER PIN TWECO #4 POWER PIN TWECO #5 POWER PIN MILLER POWER PIN (SHORT ROBOTIC) LINCOLN POWER PIN (SHORT ROBOTIC) PANASONIC POWER PIN (WITH PUSH-LOCK FITTING) OTC POWER PIN FEEDER ADAPTOR FOR OTC (USE WITH 417 OR 417-60) FEEDER ADAPTOR FOR OTC D-SERIES WIRE FEEDERS QUICK ADAPTOR BLOCK #4 QUICK ADAPTOR BLOCK #5 7 8 DESCRIPTION 500 AMP 4 AS-714-22 AS-714-22 VOLTAGE SENSE EXTENSION SUB-ASSEMBLY 5 AS-714-16 AS-714-20 AS-708-21 AS-708-22 AS-708-23 AS-714-16 AS-714-20 AS-708-21 AS-708-22 AS-708-23 JUMPER CABLE CLUTCH CABLE JUMPER CABLE FOR OTC ROBOTS JUMPER CABLE FOR PANASONIC ROBOTS JUMPER CABLE FOR MOTOMAN ROBOTS 6 AS-707-40 AS-707-40 VELCRO WRAP KIT (INCLUDES 8 WRAPS) 7 415-26 415-26 QUICK LOAD™ LINERS LINER RETAINER FOR QUICK LOAD LINER (QLL) 8 415-35-6Q 415-116-6Q 415-35-6Q 415-116-6Q QLL - .035 (0.9mm) & .045 (1.2mm) WIRE - 6' (1.8 m) QLL - .035 (0.9mm) & .045 (1.2mm) WIRE - 6' (1.8 m) 590-3-2 590-3-2.5 590-3-3 590-3-4 590-3-5 590-3-6 590-3-7 590-3-8 590-3-9 590-3-10 590-3-12 590-3-15 590-3-2 590-3-2.5 590-3-3 590-3-4 590-3-5 590-3-6 590-3-7 590-3-8 590-3-9 590-3-10 590-3-12 590-3-15 LEATHER WRAP LEATHER WRAP 2’ LEATHER WRAP 2.5’ LEATHER WRAP 3’ LEATHER WRAP 4’ LEATHER WRAP 5’ LEATHER WRAP 6’ LEATHER WRAP 7’ LEATHER WRAP 8’ LEATHER WRAP 9’ LEATHER WRAP 10’ LEATHER WRAP 12’ LEATHER WRAP 15’ 591-15 WATER LINES KIT 15’ 9 10 591-15 24 7.4 OPTIONS AND KITS D - SHORT ROBOTIC REAR HANDLE KIT (678-H) A - AIR BLAST KIT (590-A) 2 1 3 2 7 5 3 B - WIRE BRAKE OPTION (ONLY FOR GUNS ORIGINALLY EQUIPPED WITH WIRE BRAKE) 6 4 4 3 1 E - MICRO SWITCH REPLACEMENT KIT (AS-715-10) 1 2 C - EURO CONNECTOR KIT (678-E) 8 2 1 3 4 5 2 7 3 5 4 1 6 PART # A 1 2 3 300 AMP 590-A 500 AMP 590-A B 1 2 3 4 599 598G2 598G2-116 499-9-15 495-18-35 495-18-116 C 678E 1 2 3 4 5 425-20E 6 425-11 7 8 599 598G2 598G2-116 499-9-15 495-18-35 495-18-116 678E 425-20E 425-11 PART # DESCRIPTION AIR-BLAST KIT (INC. ALL ITEMS BELOW) AIR FITTING (SMC # KJS04-M5) AB INSULATING SLEEVE 4MM AIR LINE (SMC # TU0425W) WIRE BRAKE OPTION (INC. ALL ITEMS BELOW) (ONLY FOR GUNS ORIGINALLY EQUIPPED WITH WIRE BRAKE) WIRE BRAKE PUSHING UNIT G2 WIRE GUIDE FOR 0.35” - 0.045” WIRE G2 WIRE GUIDE FOR 0.052” - 1/16” WIRE AIR LINE 15’ JUMP LINER FOR 0.045” WIRE (OR SMALLER) JUMP LINER FOR 0.052” - 1/16” EURO CONNECTOR KIT (INC. ALL ITEMS BELOW) SHORT ROBOTIC REAR HANDLE SUB-ASSY ROBOTIC REAR SPRING BUSHING ROBOTIC SMALL REAR HANDLE SPRING 500A OFFSET CABLE SEAL EURO POWER PIN ASSY EURO HAND NUT ASSEMBLY SBHCS - M4 x 0.7 x 8mm LONG GROMMET- BUNA (MCMASTER-CARR #9307K11) 25 DESCRIPTION 300 AMP D 678H 1 2 3 4 5 6 7 500 AMP 678H E AS-715-10 1 2 3 4 5 AS-715-10 SHORT ROBOTIC REAR HANDLE KIT SHORT ROBOTIC REAR HANDLE SUB-ASSY ROBOTIC REAR SPRING BUSHING ROBOTIC SMALL REAR HANDLE SPRING 500A CENTERED CABLE SEAL 500A OFFSET CABLE SEAL SBHCS - M4 x 0.7 x 8mm LONG GROMMET- BUNA (MCMASTER-CARR #9307K11) REPLACEMENT MICRO SWITCH KIT WASHER - FOR MICRO SWITCH MICROMINI SWITCH ASSEMBLY INNER SLEEVE ASS’Y STATIC TENSION SPRING OUTER SLEEVE 8.0 – ORDERING INFORMATION STEP A: TOUGH GUN™ G2 Series Robotic MIG Guns Class Type Gen R A 2 Amps Neck Angle Option 1 Option 2 Cable Length 5 A C 1 A Nozzle, Tip & Wire Size B Power Pin 1 3 300 Air-Cooled C - Clutch 0 - No Options A 3’ A 401-6-62 1 403-20-XX 5 500 22 Degrees S - Solid 1 - Wire Brake B 3.5’ B 401-81-62 4 403-27-XX B M QLL D OTC/Daihen B .030” E Euro A 22 C 4’ C 401-4-62 C .035” F Fronius J 22L D 4.5’ D 401-8-62 D 1.0 mm L Lincoln K 22L1 E 5’ E 401-42-50 E .045” M Miller 35 Degrees F 5.5’ F 401-48-50 F 3/64” P Panasonic B 35 G 6’ G 401-48-62 G .052” T #4 Tweco 45 Degrees H 6.5’ H 401-44-50 J 1/16” W #5 Tweco D 45L J 7’ J 401-49-50 L 45L1 K 7.5’ K 401-71-62 R .035” 45L2 Aluminum M 8’ M 401-87-62 S 3/64” I.C.E. N 8.5’ N 401-44-62 T 1/16” 22 Degrees P 9’ P 401-91-62 E M 22 Q 9.5’ Q 401-56-62 35 Degrees R 10’ R 401-54-50 F 35 S 10.5’ 45 Degrees T 11’ H U 12’ V 13’ W 14’ Y 15’ 45L STEP B: Insulating Discs Robot Brand ABB ABB ABB COMAU FANUC FANUC KAWASAKI KUKA KUKA MILLER MOTOMAN MOTOMAN OTC/DAIHEN PANASONIC Robot Model(s) IRB1400, M97A, IRB 2400L IRB 6, IRB 1400, IRB 1500, IRB 1600, IRB 2000, IRB 2400, IRB 2400L IRB-2400/10, IRB-2400/16, IRB-440L SMART-SIX 100, 100i, 100iBe, 100iB, 120i, 120iB/10L, 120iB, S-6, M710-20L, M16iB, M-710iC/20L ARCMATE 50iB, 50iB/3L, 50iL JS6, JS6L, FS6, FS6N, FS6L KR5 ARC, KR6 ARC, KR 6 KS, KR 16 L6 ARC, KR 16 L6 KS KR 15 SL, KR 16, KR 16 S, KR 16 KS MRV-2 K5, K6, K6SB, K10, K10S, SK16X, UP20, MRV6, HP6, HP20, HP50-20 UP6, SK6, SK16, SSF2000 MRV-6, EX-V6, EX-V6L, EX-V16, DR-2000, DR-4400, DR-4000, DR-4200, AX-H3, R-4000, DR-500 AW-005 MODELS, AW006A, AW-010A, AW-8010AW, VR-005 MODELS, VR-006 MODELS, VR-008 MODELS, TW MODELS, TA MODELS 26 Insulating Disc # 59D01 59D02 59D04 59D01 59D02 59D05 59D01 59D01 59D06 59D02 59D01 59D02 59D02 59D03 STEP C: Mounting Arms STANDARD CONFIGURATIONS TCP “Z” Dim (mm) 350 400 450 500 316 Gooseneck Angle Approach Angle 59A22 59A22-002 59A22-007 59A22-006 59A22-001 Wire Stick Out (mm) 15 15 15 15 15 22 22 22 22 22 45 45 45 45 45 59G22 59G22 59G22L 59G22L1 59G22 59A35 59A35-002 15 15 350 400 35 35 45 45 59G35 59G35 59A45 59A45-004 59A45-005 59A45-009 59A45-009 TOUGH ACCESS 59A22-003 59A35-003 59A45-007 15 15 15 15 15 350 350 400 400 450 45 45 45 45 45 45 45 45 45 45 59G45 59G45L 59G45L 59G45L1 59G45L2 15 15 15 350 350 450 22 35 45 45 45 45 59G22 59G35 59G45L1 Mounting Arm INSULATING DISC MOUNTING ARM (VARIOUS) (VARIOUS) TCP “Z” DIMENSION (VARIOUS) NECK (VARIOUS) APPROACH ANGLE 45° NECK ANGLE (VARIOUS) TIP STICKOUT (15 mm) 27 Gooseneck # NOTES: TREGASKISS is an industry leader in the development and manufacture of semi-automatic and robotic MIG welding guns and robotic peripherals. TREGASKISS™, TOUGH GUN™, TOUGH LOCK™, and other names are trademarks of Tregaskiss, a division of ITW Canada Inc. M074 REV I 28 10/12