1
The powerdot class ∗
Hendri Adriaens
Christopher Ellison
v1.3 (2005/12/06)
Abstract
powerdot is a presentation class for LATEX that allows for the quick and easy development of professional presentations. It comes with many tools that enhance
presentations and aid the presenter. Examples are automatic overlays, personal
notes and a handout mode. To view a presentation, DVI, PS or PDF output can be
used. A powerful template system is available to easily develop new styles. A LYX
layout file is provided.
Contents
1 Introduction
2
2 Setting up the presentation
2.1 Document class options . .
2.2 Setup options . . . . . . . .
2
3
5
3 Making slides
3.1 The title slide . . . . . . . .
3.2 Other slides . . . . . . . . .
9
9
9
4 Overlays
4.1 The \pause command . .
4.2 List environments . . . . .
4.3 The \item command . . .
4.4 The \onslide command
4.5 Relative overlays . . . . . .
.
.
.
.
.
10
11
11
12
13
14
5 Presentation structure
5.1 Making sections . . . . . . .
5.2 Making an overview . . . .
14
14
15
6 Miscellaneous
6.1 Notes . . . . . . . . . . . . .
6.2 Empty slides . . . . . . . . .
6.3 Bibliography slide . . . . . .
6.4 Verbatim on slides . . . . .
6.5 The \twocolumn command
16
16
16
17
17
18
7 Available styles
20
9 Creating your own style
9.1 General information . . . .
9.2 Defining palettes . . . . . .
9.3 Defining templates . . . . .
9.4 Controlling setup . . . . . .
9.5 Main components . . . . .
9.6 Slide toc . . . . . . . . . . .
9.7 Miscellaneous options . . .
9.8 Template presets . . . . . .
9.9 The background . . . . . . .
9.10 Title slide, titles and sections
9.11 Testing the style . . . . . . .
26
26
27
28
28
29
31
32
33
33
34
34
10 Using LYX for presentations
10.1 How to use the layout .
10.2 Support of syntax . . . .
10.3 Compiling with LYX . . .
10.4 Extending the layout . .
35
35
36
37
37
.
.
.
.
.
.
.
.
11 Questions
38
11.1 Frequently Asked Questions 38
11.2 Mailinglist . . . . . . . . . . 39
8 Compiling your presentation
25
8.1 Dependencies . . . . . . . . 25
8.2 Creating and viewing output 25
12 Source code documentation
40
References
40
Acknowledgements
41
Version history
41
Index
42
∗ This class can be downloaded from the CTAN mirrors: /macros/latex/contrib/powerdot. See
powerdot.dtx for information on installing powerdot into your LATEX distribution and for the license of
this class.
1
1 Introduction
This class gives you the possibility to easily create professionally looking slides. The
class is designed to make the development of presentations as simple as possible so
that you can concentrate on the actual content instead of keeping yourself busy with
technical details. Of course, some knowledge of LATEX is still required though.
This class builds on and extends the prosper class [9] and the HA-prosper package
[1]. The HA-prosper package was initially intended to extend prosper and correct some
bugs and problems of that class. As developments on that package progressed, it was
found that unfortunately, not all of the problems could be overcome with the package.
That discovery was the start of a new project set up to make a new class to replace
the prosper plus HA-prosper combination. You’re currently reading the result of that
project.
The remainder of this section will be devoted to giving a feel of what the powerdot
presentation source looks like and giving an overview of this documentation.
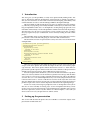
The document structure of a presentation is always the same. You can find it in the
example below.
\documentclass[<class options>]{powerdot}
\pdsetup{<presentation options>}
\begin{document}
\begin{slide}{a slide}
Contents of the slide.
\end{slide}
\section{first section}
\begin{slide}[<slide options>]{another slide}
Contents of the slide.
\end{slide}
\begin{note}{personal note}
The note.
\end{note}
\end{document}
There are several elements that define the document structure. First of all, the class
accepts some class options that control the output of the class, for instance, paper
type and style. These class options will be discussed in section 2.1. Then there are
presentation specific options which control some of the elements of the presentation
globally, for instance, the footers. These will be discussed in section 2.2.
Once the setup has been decided on, you can use the slide environment to produce
slides (see section 3) and the note environment to produce notes that go with the slides
(see section 6.1). You can use overlays to display material in steps. This is described in
section 4. The \section command provides a way to structure your presentation. This
is discussed in section 5. Section 7 will show an overview of the styles that come with
this class and the characteristics of each style. Section 8 will tell you more about how to
produce output. This section contains important information on required packages.
Section 9 is mostly interesting for people that want to develop their own style for
this class or want to modify an existing style. Section 10 explains how LYX [6] can be
used to create powerdot presentations. This documentation concludes with a section
devoted to questions (section 11), like ‘Where can I find examples?’. It also tells you
where to turn to in case your questions are still not solved.
2 Setting up the presentation
This section will describe all options that are available to control the output of the
presentation and the looks of it.
2
2.1 Document class options
option
mode
We will start with the class options that are typed in the \documentclass command
as a comma-separated list. For each option, the preset value1 will be mentioned in the
description. This is the value that will be used if you decide to not give a value to the
option or not use the option at all.
This options controls the kind of output that we want to produce. The preset value
is present.
mode=present
This mode is used when you want to create the actual presentation. It will enable
overlays and transition effects. You can read more about overlays in section 4.
mode=print
This mode can be used when printing the slides including their visual markup,
but without any overlay or transition effects.
mode=handout
This mode will produce a black and white overview of your slides that can be
used to make personal notes on, for distribution to students, a personal guide
during your talk, etcetera.
nopagebreaks
By default, the handout mode produces a document with two slides per
page. If you want to fit more slides on a page, specify this option in
the \documentclass command and powerdot will let LATEX decide on the
places to insert a page break, namely when a page is full.
option
paper
This option has three possible values. The preset value is screen.
paper=screen
This is a special format with screen optimized ratio (4/3). The actual page dimensions will be 8.25 inch by 11 inch. This paper format is not available for
print or handout mode. In these modes, powerdot will switch to a4 paper and
put a warning that it did this in the log file of your presentation.
paper=a4paper
A4 paper will be used for the presentation or handout.
paper=letterpaper
Letter size paper will be used.
option
orient
Some important information with respect to paper size, compiling and viewing presentations is available in section 8.
This controls the orientation of the presentation. The preset value is landscape.
orient=landscape
The presentation will be in landscape format. This value is not available in handout mode. In that mode, powerdot will switch to portrait orientation and will
warn you about this in the log file.
1 The value that will be used when you don’t use the option.
3
orient=portrait
This produces slides in portrait format. Notice that not all styles support portrait orientation. Please refer to section 7 for information about which styles do
support the portrait orientation.
option
display
This controls the production of slides and notes. The preset value is slides.
display=slides
This will only typeset the slides in your presentation.
display=slidesnotes
This will typeset both the slides and the notes in your presentation. See also
section 6.1 for more information about notes.
display=notes
This will typeset the notes only.
Here are some more options to control the output.
option
size
size
option
style
style
option
fleqn
fleqn
option
leqno
leqno
This is the size of the normal text font in points. Possible values are 8pt, 9pt, 10pt,
11pt, 12pt, 14pt, 17pt and 20pt and the preset value is 11pt.2
This controls the style to be loaded for the presentation. By default, the default
style will be loaded. For more styles, see section 7.
This option makes equations flushed left. It does the same as the equally named
option for the article class.
Put equation numbers at the left. Also the same as in the article class.
option
nopsheader
nopsheader
option
hlentries
hlentries
option
hlsections
hlsections
By default, powerdot will write a postscript command to the ps file to make sure
that post processors like ps2pdf know which paper to use without the need to
specify it on the command line. See also section 8. If you experience problems
with post processing or printing or you want to specify the paper size in the post
processing steps yourself, use this option.
This highlights table of contents entries when the entry matches with the
current slide and its preset value is true. See also section 5. If you don’t
want highlighting of table of contents entries (for instance in print mode), use
hlentries=false.
This highlights table of contents sections when the section matches with the current section in the presentation and is preset to false. See also section 5. Specifying this option turns highlighting of sections on. This could be useful when
you are using a style that implements a split table of contents.
2 Note that sizes other than 10pt, 11pt and 12pt are non-standard and it is assumed that you have the
extsizes bundle [11] installed, which provides these sizes.
4
option
blackslide
options
clock
blackslide
This option inserts a black slide in the presentation on page 1 and will automatically advance to page 2 when opening the presentation in a PDF viewer like
Acrobat (Reader). The option also inserts a link behind every slide or section title
that brings you to the black slide when clicked. When you click anywhere in the
black slide, you will go back to the originating slide. This option can be used to
temporarily pause a presentation, for instance, to do a proof on the black board.
clock
This displays a small digital clock on slides which you can use to check the time
left for your presentation.
Here is an example of a \documentclass command.
\documentclass[
size=12pt,
paper=screen,
mode=present,
display=slidesnotes,
style=tycja,
nopagebreaks,
blackslide,
fleqn
]{powerdot}
This example sets up a presentation in tycja style, with a black slide, normal size 12
points and flushed left equations.
\documentclass[
size=12pt,
paper=letterpaper,
mode=handout,
display=slidesnotes,
style=tycja,
nopagebreaks,
blackslide,
fleqn
]{powerdot}
Changing the paper and mode options, now produces a handout with possibly more
than two slides per page due to the nopagebreaks option.
2.2 Setup options
\pdsetup
There are several extra options that can help customizing your presentation. These
options are not available via the \documentclass command. This has a technical
reason.3 We distinguish two types of options. Options that can only be set globally
(acting for the entire presentation) using the \pdsetup command and options that
can be accessed both globally (via \pdsetup) and locally (via slide environments, see
section 3).
2.2.1 Global options
This section describes options that can only be used globally in the preamble of your
presentation via the \pdsetup command.
option
palette
palette
This specifies the palette to be used. A palette is a set of colors defined by a style.
To find out which palettes are defined by each style, see section 7.
3 The interested reader is referred to the section about the xkvltxp package in the xkeyval package documentation [2].
5
options
lf
rf
lf
rf
This determines the content of the left footer and right footers. These are preset
to empty.
option
theslide
theslide
option
thenote
thenote
option
counters
counters
This option controls how the slide number appears on the slide. This is preset
to the value \arabic{slide}~/~\pageref*{lastslide}, which could appear
like 5/22. Notice that the \arabic{slide} typesets the number of the current
slide and that \pageref*{lastslide} typesets the number of the last slide.4
This is similar to the theslide option, but typesets the slide numbers of
notes. The preset value is note~\arabic{note}~of~slide~\arabic{slide}
and \arabic{note} here typesets the number of the current note that goes with
the current slide. This could appear like note 2 of slide 7.
The counters option lists counters that you might want to protect on overlays. As material on overlays (see section 4) is processed multiple times, also
LATEX counters, like the equation counter, might be increased too often. To
avoid that your equations get different numbers on every overlay, use this option. The equation, table, figure, footnote and mpfootnote counters are
already protected for you. If you use extra counters, for instance for theorems,
list them in this option. Example:
counters={theorem,lemma}
option
list
list
This option takes a list of options that will be passed on to the enumitem package
that controls the layout of lists created by the enumerate and itemize environments. Example:
list={labelsep=1em,leftmargin=*,itemsep=0pt,topsep=5pt,parsep=0pt}
See for more information on controlling the layout of lists the enumitem package
[4].
options
enumerate
itemize
enumerate
itemize
As the list option, but only control enumerate and itemize environments respectively.
2.2.2 Global and local options
This section describes options that can be used both globally via \pdsetup and locally
via slide environments (see section 3).
option
trans
trans
This option sets the default transition effect to be used in the presentation. These
transition effects only work after compiling the presentation to PDF format. See
also section 8. The following transition effects are supported: Split, Blinds,
Box, Wipe, Dissolve, Glitter and Replace. When you are using a viewer that
4 We use the starred version of \pageref which is defined by hyperref and does not create a link to the
page that it is referring to.
6
understands PDF 1.5, you can also use Fly, Push, Cover, Uncover or Fade. It
is important to notice that most viewers are case sensitive, so, for instance, box
will not work.
The preset effect is Replace which just replaces one slide with another when
browsing the slides. Note that some PDF viewers (like Acrobat Reader 5 and
higher) only produce the transition effect in full screen mode. If you want to
use a custom transition effect that is not listed in the list above (for instance, a
wipe effect with a custom wipe direction), then that is possible. However, powerdot will put a warning in your log file that the effect that you have chosen, might
not work in the PDF viewer. Here is an example that does work.
trans=Wipe /Di 0
In Acrobat (Reader), this wipes from left to right instead of the default top to
bottom. For more information, see a PDF Reference Manual.
option
method
options
logohook
logopos
logocmd
method
This option can be used when a slide contains special material that does not
get treated in the ‘usual’ way by LATEX. Verbatim material is an example of this.
Possible values are normal (the preset value), direct and file. We will come
back to this option in detail in section 6.4.
logohook
logopos
logocmd
If logopos is specified, a logo defined by the value of the logocmd option
will be put on slides. The position can be specified relative to the width
and height of the slide. {0,0} is the lower left corner of the paper and
{\slidewidth,\slideheight} is the upper right corner. For positioning the
logo, the \rput command of pstricks [15, 16] is used. This command also allows
to specify the point of the logo that should be positioned there. This point can
be entered via the logohook option and can take the values tl, t, tr, r, Br, br,
b, bl, Bl, l, B and c. For more information about \rput, consult the pstricks
documentation. Here is an example that integrates the flower of the default style
into the husky style.
\documentclass[style=husky]{powerdot}
\pdsetup{
logohook=t,
logopos={.088\slidewidth,.99\slideheight},
logocmd={\includegraphics[height=.08\slideheight]{powerdot-default.ps}}
}
\begin{document}
...
\end{document}
The preset value for logohook is tl.
A special feature of powerdot, which can be used to make presentations come alive,
is the use of random dots. These dots will be placed anywhere on your slides and use
the colors defined by the palette that you use. Overlays will carry the same dots. This
feature uses random.tex [3]. Several options are available to control the appearance
of the random dots.
option
randomdots
randomdots
By default, random dots are turned off. If this option is set to true, random dots
will be generated. false will turn off the feature. When no value is submitted to
the option, true will be used.
7
options
dmindots
dmaxdots
dmindots
options
dminsize
dmaxsize
dminsize
options
dminwidth
dmaxwidth
dminheight
dmaxheight
dmaxdots
The number of dots per slide is also random. These options set the minimum
and maximum dots per slide. Preset values are 5 and 40, respectively.
dmaxsize
The minimum and maximum radius of the dots. Preset values are 5pt and 40pt,
respectively.
dminwidth
dmaxwidth
dminheight
dmaxheight
These options determine the area on the slide that can be used for the random
dots. These values are preset such that dots go anywhere on the slide, but you
might want to adjust these such that, for instance, dots can only appear in the
text area. The preset values are 0pt, \slidewidth, 0pt, \slideheight.
Here is an example that allows dots in a smaller rectangle on the slide.
\pdsetup{
dminwidth=.1\slidewidth,dmaxwidth=.9\slidewidth,
dminheight=.2\slideheight,dmaxheight=.8\slideheight
}
option
dbright
option
dprop
dbright
This option can be used to adjust the brightness of the dots. The number should
be an integer between -100 and 100. If the number is negative, the color will
be adjusted towards black, with -100 giving black. If the number is positive, the
color will be adjusted towards white, with 100 giving white. With a light background, you may want to choose bright to be positive. With a dark background,
you may want to set it negative. The preset value is 60, meaning a mixture of 40%
of the original color and 60% white.
dprop
This option is used for passing extra parameters to the \psdot command, which
creates the random dots. You could, for instance, change the style of the dots or
the line width. See for more information about \psdot the pstricks documentation [15, 16]. powerdot defines two extra dot styles that can be used for the random dots. These styles are ocircle (open circle) and osquare (open square).
Here are two examples for the use of random dots.
\pdsetup{
randomdots,dminwidth=.2\slidewidth
}
This turns on random dots and doesn’t use the left 20% of the slide for placing random
dots.
\pdsetup{
randomdots,dprop={dotstyle=ocircle,linewidth=.5pt},
dminsize=500pt,dmaxsize=600pt,dmindots=2,dmaxdots=5
}
This example puts at most 5 big circles on slides. These circles do not fit on the slides
and you will only see parts of them in the shape of curves.
2.2.3 \pdsetup example
Here is an example of a \pdsetup command that one could use to set up the presentation.
8
\pdsetup{
lf=My first presentation,
rf=For some conference,
trans=Wipe,
theslide=\arabic{slide},
randomdots,dmaxdots=80
}
This sets the left and right footers and will initialize the transition effect to Wipe. Further, slide numbers will not include the number of the last slide, but only the number
of the current slide. Finally, slides will be covered with at most 80 random dots.
A small note is necessary with respect to the appearance of footers. The slide number (controlled by the theslide option) will be added to a footer. Most styles add it
too the right footer. If both the footer and the slide number are non empty, ~--~ will be
inserted in between them to separate them. Styles might modify this default behavior
however.
3 Making slides
3.1 The title slide
\title
\author
\and
\date
\maketitle
The title slide is created by the \maketitle command.
\maketitle[〈options〉]
Its use is the same as in the standard LATEX document classes. The optional argument
〈options〉 can contain any option from section 2.2.2. Specifying such an option in the
\maketitle command will only have an effect on the title slide and not on other slides.
See an example below.
\documentclass{powerdot}
\title{Title}
\author{You \and me}
\date{August 21, 2005}
\begin{document}
\maketitle
...
\end{document}
The author, title and date declarations provide the text to be used when making a
title page. The design of the title page is specific to the style in use. Notice the use of
\and for separating multiple authors. See a LATEX manual [12] for more information on
commands such as \title and \author.
3.2 Other slides
slide
The centerpiece of every presentation is the slide. In powerdot, the content of each
slide is placed in a slide environment.
\begin{slide}[〈options〉]{〈slide title〉}
〈body〉
\end{slide}
In section 4 we’ll see how to give some life to the slides, but for now, let’s look at a
simple example.
\begin{slide}{First slide}
Hello World.
\end{slide}
9
The slide environment has one required argument, namely the slide title. When a slide
is created, the slide title is used to create an entry in the table of contents and in the
list of bookmarks. The table of contents is a listing of the slides and section titles in the
presentation that appears on each slide.
The table of contents is clickable (when the presentation is compiled into PDF)
and serves as a nice way to jump from location to location within the presentation.
The bookmark list is only present when compilation is taken all the way to the PDF file
format. It also serves as a table of contents, but this list does not appear on any of the
slides, but in a separate window in a PDF viewer. In the example above, the entries in
both table contents and the list of bookmarks would be titled First slide.
The 〈options〉 for the slide environment can contain any option listed in section 2.2.2. Additionally, the following options can be used.
option
toc
toc
option
bm
bm
When specified, the value is used for the entry in the table of contents; otherwise,
the slide title is used. If toc= is specified, then no entry is created.
When specified, the value is used for the bookmark entry; otherwise, the slide
title is used. If bm= is specified, then no entry is created.
These optional arguments are especially useful when the title of a slide is extremely
long or when the title contains LATEX commands that do not render correctly in the
bookmarks.5 When specifying entries, be sure to hide special characters ‘,’ and ‘=’
between curly brackets ‘{’ and ‘}’. Let’s look at an example that uses these optional
arguments.
\begin{slide}[toc=,bm={LaTeX, i*i=-1}]{\color{red}\LaTeX, $i^2=-1$}
My slide contents.
\end{slide}
In this example, the slide title will appear as LATEX, i 2 = −1. This text will not render
correctly in a bookmark entry. An attempt is made to correct this, but often, the correction does not produce an equivalent text. This particular title would be rendered in the
bookmark list as redLaTeX, i2=-1. On the other hand, the manually specified bookmark entry is rendered as: LaTeX, i*i=-1. Notice, no entry is created in the table of
contents, because of the use of toc=.
In addition to the slide environment, each individual style can define its own environments. Many styles have a wideslide environment. The idea is that one might
have information that does not fit nicely on a slide with a table of contents listed, as
this consumes some space. In such cases, it is preferable to use a slide that does not list
the table of contents. The wideslide environment provides this functionality and has
more space for the actual slide content. See section 7 for information on the various
environments provided by the styles.
4 Overlays
It is often the case that you don’t want all the information on the slide to appear at
once. Rather, the information should appear one item at a time. In powerdot, this is
achieved with overlays. Each slide can be comprised of many overlays, and the overlays
are displayed one at a time.
5 The bookmarking procedure uses \pdfstringdef from the hyperref package, and it can process accented characters such as \"i.
10
4.1 The \pause command
\pause
The easiest way to display information sequentially is to use the \pause command.
\pause[〈number〉]
Below is a simple example:
\begin{slide}{Simple overlay}
power\pause dot
\end{slide}
The slide’s information is displayed and continues until the \pause command is encountered. No further output within the same slide is displayed until the click of the
mouse or the touch of the keyboard. Then, the content will continue to display until
all the information is displayed or until another \pause command is encountered. In
this example, power is displayed on the first overlay, and powerdot is the displayed
on the second overlay. The \pause command is often used within the itemize and
enumerate environments. For example,
\begin{slide}{Multiple pauses}
power\pause dot \pause
\begin{itemize}
\item Let me pause\ldots \pause
\item \ldots while I talk \pause and chew bubble gum. \pause
\item Perhaps you’ll be persuaded.
\item Perhaps not.
\end{itemize}
\end{slide}
Since \pause was used before the itemize environment, no item will appear until
the third overlay. Then, each item will be displayed one at a time, each on their own
overlay. More information on using lists will follow in the next section.
The optional argument of the \pause command specifies the number of overlays
to pause. An example usage is:
\begin{slide}{Pause longer}
\begin{itemize}
\item A \pause
\item B \pause[2]
\item C
\end{itemize}
\end{slide}
In the example above, item C will appear on the fourth overlay. The usefulness of this
option will become more apparent in the next section; so we will revisit a similar example at that time.
4.2 List environments
The list environments, itemize and enumerate, have special treatments in powerdot.
They have an optional argument that will be taken care off by the enumitem package
(see [4]). powerdot supplies an extra key for this optional argument. In the examples
that follow, features will be described using the itemize environment but they also
apply to the enumerate environment.
Here is the typical usage of the itemize environment:
\begin{slide}{Basic itemize}
\begin{itemize}
\item A \pause
\item B \pause
\item C
\end{itemize}
\end{slide}
11
option
type
The display is simple, each item appears one at a time with each overlay.
Suppose we wanted every item to show, but we only wanted one item to appear
‘active’ at once. This can be accomplished via the type option for the itemize environment. The preset value is 0.
\begin{slide}{Type 1 itemize}
\begin{itemize}[type=1]
\item A \pause
\item B \pause
\item C
\end{itemize}
\end{slide}
Now, every item will be displayed in the inactive color (which is defined by the style
that you use), and the item’s font color will become the active one on the overlay that
it would normally appear on. The default behavior is given by type=0.
Lists can also be nested to create complicated structures. When a list is nested, it
inherits the setting of the type option from the ‘parent’ list, but that can be overruled
by specifying the type option in the optional argument of the nested list. We present
here one example, but many more can be created by nesting lists of different types in
different ways.
\begin{slide}{Nested lists}
\begin{itemize}
\item A\pause
\begin{itemize}[type=1]
\item B\pause
\end{itemize}
\item C
\end{itemize}
\end{slide}
This displays A and B on the first overlay, but B is inactive. On overlay 2, B will become
active and on overlay 3, C will become visible.
4.3 The \item command
\item
The \item command has an extra optional argument in powerdot which allows for
creating overlays in a more flexible way then \pause provides.
\item[〈label〉]<〈overlays〉>
This optional argument should contain an overlay specification stating on which overlays you want the item to appear. This specification is a comma separated list where
each item can used the notation as in table 1. The 〈label〉 argument is the standard
Syntax
x
-x
xx-y
Meaning
Only overlay x
All overlays up to and including x
All overlays from x, including x
All overlays from x to y, including x and y
Table 1: \item and \onslide notation
optional argument for \item in LATEX. A LATEX manual [12] can tell you more about this
argument.
Here is an example.
\begin{slide}{Active itemize}
\begin{itemize}[type=1]
\item<1> A
\item<2> B
12
\item<3> C
\end{itemize}
\end{slide}
Here we have said that A should only be active on overlay 1, B should only be active on
overlay 2, and C should only be active on overlay 3. Again, when the item is not active,
it appears in the inactive color because of type=1.
If type=0 is specified and if each item is given an overlay option, then each item will
appear only when it is active. When the item is not active, then it will not show on the
slide at all. More examples demonstrating the syntax for 〈overlays〉 will be discussed in
the next section.
4.4 The \onslide command
\onslide
Overlays can also be achieved using the \onslide command.
\onslide{〈overlays〉}{〈text〉}
This command takes an 〈overlays〉 specification as first argument and the 〈text〉 to apply it to as second argument. The 〈overlays〉 on which the text will appear are specified
as a comma separated list with syntax as in table 1. We start off with a simple example.
\begin{slide}{Simple onslide}
\onslide{1,2}{power}\onslide{2}{dot}
\end{slide}
\onslide+
We have instructed power to appear on overlays one and two, and dot to appear only
on overlay two. As you might guess, this example has the same output as our first
\pause example. Yet, it is clearly the case that our syntax is more complicated. However, this slight “complication” also allows for much more flexibility.
Consider the above example with the following modifications:
\begin{slide}{Simple onslide+}
\texttt{onslide }: \onslide{1}{power}\onslide{2}{dot}\\
\texttt{onslide+}: \onslide+{1}{power}\onslide+{2}{dot}
\end{slide}
\onslide*
The \onslide+ command displays its content in a different manner altogether. Now,
dot appears on every overlay, but it is in inactive color and matches the normal font
color only on overlay two. This is comparable to the type=1 behavior for lists (see
section 4.2).
When executing this example, we will also notice that the \onslide command
does hide material, but still reserves the right amount of space for it: on overlay 2,
the dots appear right above each other. The next command does not reserve space.
Instead of hiding and reserving space (\onslide) or putting 〈text〉 in the inactive
color (\onslide+) when the overlay doesn’t match 〈overlays〉, this command just eats
the material altogether. To understand the differences, consider the following example:
\begin{slide}{Simple onslide*}
\texttt{onslide }: \onslide{1}{power}\onslide{2}{dot}\\
\texttt{onslide+}: \onslide+{1}{power}\onslide+{2}{dot}\\
\texttt{onslide*}: \onslide*{1}{power}\onslide*{2}{dot}
\end{slide}
The output of the first two lines, we are already familiar with. The third line displays
power on overlay 1 and dot on overlay 2, but no space for power is reserved on overlay
2. Hence dot will start on the cursor position that power started on overlay 1 and it is
not aligned below the other two dots.
13
We finish with an example of the syntax that is possible with \item and \onslide.
Remember that these commands take a comma separated list for the 〈overlays〉 specification and that each element can used the syntax as explained in table 1. The various
variations are demonstrated in the example below.
\begin{slide}{Lists}
\onslide{10}{on overlay 10 only}\par
\onslide{-5}{on every overlay before and including overlay 5}\par
\onslide{5-}{on every overlay after and including overlay 5}\par
\onslide{2-5}{on overlays 2 through 5, inclusive}\par
\onslide{-3,5-7,9-}{on every overlay except overlays 4 and 8}
\end{slide}
4.5 Relative overlays
Sometimes it is a pain to keep track of when an item should appear or become active.
You might, for example, just care that some text appears on the overlay after some
other item. This functionality is provided through the use of relative overlays which
should not be used outside list environments that use \item. Let’s consider a simple,
illuminating example.
\begin{slide}{Relative overlays}
\begin{itemize}
\item A \pause
\item B \onslide{+1}{(visible 1 overlay after B)}\pause
\item C \onslide{+2-}{(appears 2 overlays after C, visible until the end)}
\pause
\item D \onslide{+1-6}{(appears 1 overlay after D, visible until overlay 6)}
\pause
\item E \pause
\item F \pause
\item G \onslide{+1-+3}{(appears 1 overlay after G for 3 overlays)}\pause
\item H \pause
\item I \pause
\item J \pause
\item K
\End{itemize}
\end{slide}
As you can see, we still use \onslide. The only change is with the syntax of the
list of overlays. Now, we can specify a ‘+’ symbol in the list. In its simplest usage,
\onslide{+1} will make text display one overlay after the overlay it would normally
appear on. You can still use the syntax in table 1. These are demonstrated in the above
example. Notice, \onslide{+1-6} means that the text will appear one overlay after
the overlay it would normally appear on and that the text should remain shown until
overlay seven. To make text appear for a range of relative overlays, see the final demonstration in the above example.
5 Presentation structure
5.1 Making sections
\section
This section describes the \section command which provides a way to structure a
presentation.
\section[〈options〉]{〈section title〉}
This command will produce a slide with 〈section title〉 on it and will also use this text
to create sections in the table of contents and in the bookmarks list. There are several
〈options〉 to control its output.
14
option
tocsection
This option controls the creation of a section in the table of contents. The preset
value is true.
tocsection=true
This does create a section in the table of contents. This means that all following
slides, until the next section, will be nested under this section.
tocsection=false
This does not create a section in the table of contents and hence the section will
be listed as an ordinary slide.
tocsection=hidden
This does create a section in the table of contents, but this is only visible when
you view a slide that is part of this section. This could be used to append a section to the presentation which you can discuss if there is some extra time.
option
slide
This option controls whether the \section command creates a slide. The preset
value is true.
slide=true
A slide is created.
slide=false
No slide will be created. If also tocsection is false, the \section command
doesn’t do anything. If it does create a table of contents section (tocsection=
true or hidden), its link will point to the first slide in the section as the section
itself doesn’t have a slide.
option
template
This option can be used to make the section slide with another template. By default, a normal slide environment is used to create the section slide, but if a style offers other templates that could be used for this purpose (for instance, the wideslide
environment), then you can use this option to select that template. See section 7 for
an overview of the available templates with every style.
Finally, all options available to normal slides are available to slides created by
\section as well (see section 3). However, when the section does make a tocsection,
toc= or bm= won’t remove the table of contents entry or the bookmark respectively.
5.2 Making an overview
\tableofcontents
This command creates an overview of your presentation and can only be used on a
slide.
\tableofcontents[〈options〉]
option
type
There are several 〈options〉 to control the output of this command.
This option controls whether certain material (depending on the input in the
content option below) will be hidden or displayed in the inactive color. The preset
value is 0. Compare with the type option for list environments (section 4.2).
type=0
When material is not of the requested type as specified in the content option, it
will be hidden.
type=1
As type=0, but instead of hiding material, it will be typeset in the inactive color.
15
option
content
The content option controls which elements will be included in the overview. The
preset value is all. The description below assumes that type=0 was chosen, but the
alternative text for type=1 can easily be deduced.
content=all
This will display a full overview of your presentation including all sections and
slides, except the slides in hidden sections (see section 5.1).
content=sections
This displays only the sections in the presentation.
content=currentsection
This displays the current section only.
content=future
This displays all content starting from the current slide.
content=futuresections
This displays all sections, starting from the current section.
We finish this section with a small example that will demonstrate how you can
make a presentation that contains an overall overview of sections in the presentation,
giving a general idea of the content, and per section a detailed overview of the slides in
that section.
\begin{slide}[toc=,bm=]{Overview}
\tableofcontents[content=sections]
\end{slide}
\section{First section}
\begin{slide}[toc=,bm=]{Overview of the first section}
\tableofcontents[content=currentsection,type=1]
\end{slide}
\begin{slide}{Some slide}
\end{slide}
\section{Second section}
...
6 Miscellaneous
6.1 Notes
note
The note environment can be used to make personal notes that accompany a slide.
You can control displaying notes using the display option (see section 2.1). Here is
an example.
\begin{slide}{Chewing gum}
...
\end{slide}
\begin{note}{Reminder for chewing gum}
Don’t forget to mention that chewing gum is sticky.
\end{note}
6.2 Empty slides
emptyslide
The emptyslide environment creates a totally empty slide. The text box on the slide
can be used for special things like displaying photos. This allows for creating a dia
show. Example:
16
\begin{emptyslide}{}
\centering
\vspace{\stretch{1}}
\includegraphics[height=0.8\slideheight]{me_chewing_gum.eps}
\vspace{\stretch{1}}
\end{emptyslide}
The \includegraphics command is defined by the graphicx package [5]. The
\stretch command is used to vertically center the picture. Both commands are described in your favorite LATEX manual, for instance [12]. Note that you can use the
lengths \slideheight and \slidewidth to scale pictures to fit nicely on the slide.
6.3 Bibliography slide
thebibliography
powerdot redefines the standard article thebibliography environment to suppress
the creation of a section heading and running headers. All other properties are maintained. You can do either of the next two (depending whether you are using BiBTEX or
not):
\begin{slide}{Slide}
\cite{someone}
\end{slide}
\begin{slide}{References}
\begin{thebibliography}{1}
\bibitem{someone} Article of someone.
\end{thebibliography}
\end{slide}
\begin{slide}{Slide}
\cite{someone}
\end{slide}
\begin{slide}{References}
\bibliographystyle{plain}
\bibliography{YourBib}
\end{slide}
In case you have a big reference list that you want to spread over multiple slides,
have a look at the packages natbib and bibentry [8]. Using both packages allows you to
do:
\begin{slide}{References (1)}
\bibliographystyle{plain}
\nobibliography{YourBib}
\bibentry{someone1}
\bibentry{someone2}
\end{slide}
\begin{slide}{References (2)}
\bibentry{someone3}
\end{slide}
Have a look at your favorite LATEX manual for more information about citations and
bibliographies.
6.4 Verbatim on slides
option
verbatim
powerdot has three different methods of processing slides, from which two have mainly
been developed to make the inclusion of verbatim content6 on slides easier. These
methods can be accessed by the method key which is available in slide environments
and the \pdsetup command (see section 2.2.2).
method=normal
This is the preset method for processing slides. It is fast and allows for overlays,
but it does not allow for verbatim.7
6 And other content that needs catcode changes when processing.
7 Except when it has been saved in a box outside the slide.
17
method=direct
This method is also fast, but does not allow for overlays. Overlays will silently be
disabled. However, it does allow for verbatim content on slides.
method=file
This method uses a temporary file to export the slide body to and read it back
in. This method does allow for verbatim content and overlays, but could be slow
when many slides use this method because the filesystem is used.
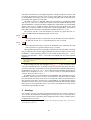
Below is an example demonstrating the use of all three different methods of slide
processing.
\documentclass{powerdot}
\usepackage{listings}
\lstnewenvironment{code}{%
\lstset{frame=single,escapeinside=‘’,
backgroundcolor=\color{yellow!20},
basicstyle=\footnotesize\ttfamily}
}{}
\begin{document}
\begin{slide}{Slide 1}
Normal \pause content.
\end{slide}
\begin{slide}[method=direct]{Slide 2}
Steps 1 and 2:
\begin{code}
compute a;‘\pause’
compute b;
\end{code}
\end{slide}
\begin{slide}[method=file]{Slide 3}
Steps 1 and 2:
\begin{code}
compute a;‘\pause’
compute b;
\end{code}
\end{slide}
\end{document}
The first slide shows the default behavior for normal content. It produces two overlays.
The second slide does not produce overlays, despite the use of the \pause command.
This command has been disabled by choosing the direct method to process the verbatim content. The third slide has the same body as the second slide, but now does
create two overlays, because the method using a temporary file has been chosen. Notice that we used \pause inside the listing, but that it can also be used outside the
listing.
6.5 The \twocolumn command
\twocolumn
The \twocolumn macro allows to split content into two columns.
\twocolumn[〈options〉]{〈left〉}{〈right〉}
This typesets 〈left〉 and 〈right〉 in two columns. The dimensions of those columns can
be controlled by 〈options〉. Below are the available options.
option
lineheight
option
lineprop
lineheight
If lineheight is specified, a line of the specified height will be created using
\psline in between the two columns. Example: lineheight=6cm.
lineprop
Any pstricks declaration to specify the line properties. Example:
18
lineprop={linestyle=dotted,linewidth=3pt}
options
lfrheight
lfrprop
lfrheight
options
rfrheight
rfrprop
options
lcolwidth
rcolwidth
option
frsep
rfrheight
The first creates a frame of the specified height around the left column. The
second is as lineprop, but for the left frame.
lcolwidth
rcolwidth
Width of the left and right columns. Both are preset to: 0.47\linewidth.
frsep
Space between text and the frames. Preset: 1.5mm.
colsep
option
topsep
topsep
option
indent
rfrprop
As lfrheight and lfrprop, but for the right frame.
option
colsep
option
bottomsep
lfrprop
Space between the two columns. Preset: 0.06\linewidth.
The extra space (additional to \baselineskip) between text above the columns
and the text within the columns. Preset: 0cm.
bottomsep
Idem for the bottom of the columns. Preset: 0cm.
indent
Horizontal indent left to the left column. Preset: 0cm.
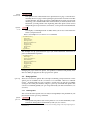
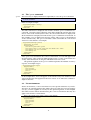
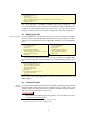
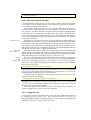
The dimensions described above are represented graphically in figure 1. Important
to notice is that the \twocolumn macro uses the current cursor position as the reference point to position the first line of text of the left column (see also figure 1). This
means that optional frames can extend to the text on the previous line. Use for instance topsep=0.3cm in that case to add extra space between the two lines of text.
The preset value of topsep is based on the situation that there is no text on top of the
two columns. In that case, it is best to locate the first line of text of the left column at
the same spot as text that is not created by \twocolumn on other slides. The setting
topsep=0cm does exactly this. However, with a combination of topsep and indent
you can change this behavior and position the first line of text of the left column anywhere you want.
The \twocolumn macro computes the height of the construction to position text
below the construction correctly. The computation is done by taking the maximum
height of lfrheight, rfrheight, lineheight (if specified) and the left and right column content. Hence when frames nor a line is requested, bottomsep is the vertical
space between the lowest line of text in the columns and the text below the columns
(additional to \baselineskip). Here is an example.
\begin{slide}{Two columns}
Here are two columns.
\twocolumn[
lfrprop={linestyle=dotted,linewidth=3pt},
lfrheight=4cm,rfrheight=5cm,lineheight=3cm,topsep=0.3cm
]{left}{right}
Those were two columns.
\end{slide}
19
Top
9
6
5
5
Left column text
Right column text
3
1
2
5
5
5
7
4
8
Bottom
1
2
3
4
Meaning of the labels
5 frsep
6 topsep
7 indent
8 bottomsep
9 Reference point
lcolwidth
rcolwidth
colsep
lfrheight, rfrheight,
lineheight
Figure 1: Two-column dimensions.
Note that the use of the xkeyval commands \savevalue and \usevalue could be
handy here, for instance for copying the properties of the left frame to the right frame.
This avoids typing them twice and avoids making errors resulting in different frames.
See an example below.
\twocolumn[
\savevalue{lfrheight}=3cm,
\savevalue{lfrprop}={
linestyle=dotted,framearc=.2,linewidth=3pt},
rfrheight=\usevalue{lfrheight},
rfrprop=\usevalue{lfrprop}
]{left}{right}
See the xkeyval documentation [2] for more information about \savevalue and
\usevalue.
7 Available styles
powerdot comes with a number of styles which are listed in the overview below. The
characteristics of each style are described shortly and a sample of a title slide and a
normal slide is provided for each style. Styles support the wideslide environment,
have a table of contents on the left part of the paper in landscape orientation and on
20
the bottom part in portrait orientation and support portrait orientation unless states
otherwise.
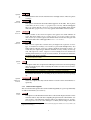
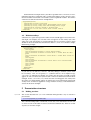
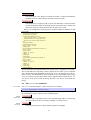
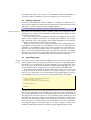
default
This style provides six different palettes. A flower in the top left corner decorates
the slides for all palettes. The default palette is blue which has as main colors
light blue and white. You can see an example of that palette below. Other available palettes are red, green, yellow, brown and purple.
Example slide
Here is the binomium formula.
n
X
(a + b)n =
Example of the default style
k=0
!
n n−k k
a
b
k
(1)
We will prove formula (1) on the blackboard.
Hendri Adriaens
Christopher Ellison
■
Here
◆
December 4, 2005
is
a
■
◆
◆
■
left footer
right footer – 1 / 2
list
with
■
seven
items.
left footer
right footer – 2 / 2
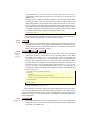
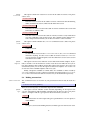
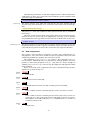
simple
This is a simple style in black and white. This style could be useful if you want to
print your slides.
Example slide
Here is the binomium formula.
Example of the simple style
Hendri Adriaens
(a + b)n =
Christopher Ellison
n X
n
k
an−k bk
(1)
k=0
We will prove formula (1) on the blackboard.
December 4, 2005
Here
–
is
a
⊲
■
–
left footer
right footer – 1 / 2
list
with
⊲
seven
items.
left footer
right footer – 2 / 2
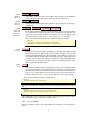
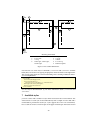
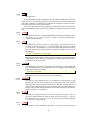
tycja
This style is set in shades of yellow and dark blue. The table of contents on slides
is on the right side of the paper in landscape orientation and on the bottom part
in portrait.
Example slide
Here is the binomium formula.
(a + b)n =
Example of the tycja style
Hendri Adriaens
!
n n−k k
a
b
k
(1)
We will prove formula (1) on the blackboard.
Christopher Ellison
■
December 4, 2005
Here
◆
is
■
a
◆
■
◆
■
left footer
n
X
k=0
right footer – 1 / 2
left footer
list
with
seven
items.
right footer – 2 / 2
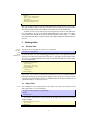
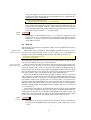
ikeda
This style uses dark shades of red and blue and a light text color. It has nice
patterns on the slide for decoration.
21
Example slide
Here is the binomium formula.
n
X
(a + b)n =
Example of the ikeda style
!
n n−k k
a
b
k
k=0
(1)
We will prove formula (1) on the blackboard.
Hendri Adriaens
Christopher Ellison
■
Here
▲
December 4, 2005
is
■
a
▲
■
▲
■
list
with
seven
items.
left footer
right footer – 2 / 2
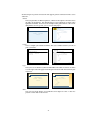
fyma
This style was originally created by Laurent Jacques for prosper. Based on that
style, he created a version for HA-prosper with extended features. With his kind
permission, this style has been converted by Shun’ichi J. Amano for powerdot.
The style has an elegant design with a light blue and white gradient background
in the default blue palette. Other available palettes are green, gray, brown and
orange. It has special templates for sections on slides and sections on wide
slides. Below is a sample of the blue palette.
Example slide
Here is the binomium formula.
(a + b)n =
Example of the fyma style
Hendri Adriaens
n
X
!
n n−k k
a
b
k
k=0
(1)
We will prove formula (1) on the blackboard.
Christopher Ellison
• Here
December 4, 2005
◦ is
•
a
◦
•
list
with
◦ seven
• items.
left footer
right footer – 1 / 2
left footer
right footer – 2 / 2
ciment
This style was originally created by Mathieu Goutelle for prosper and HA-prosper.
With his kind permission, this style has been converted for powerdot. The style
has a background that is hatched with light gray horizontal lines. Titles and table
of contents highlighting are done with dark red.
Example slide
Here is the binomium formula.
(a + b)n =
n
X
k=0
Example of the ciment style
!
n n−k k
a
b
k
(1)
We will prove formula (1) on the blackboard.
Hendri Adriaens
Christopher Ellison
■
Here
◆
December 4, 2005
is
■
a
◆
■
◆
■
left footer
right footer – 1 / 2
list
with
seven
items.
left footer
right footer – 2 / 2
elcolors
This is a style using light shades of the elementary colors red, blue and yellow.
Example slide
Here is the binomium formula.
(a + b)n =
Example of the elcolors style
n
X
k=0
!
n n−k k
a
b
k
(1)
We will prove formula (1) on the blackboard.
Hendri Adriaens
Christopher Ellison
■
Here
◆
December 4, 2005
is
■
a
◆
■
◆
■
left footer
right footer – 1 / 2
left footer
22
list
with
seven
items.
right footer – 2 / 2
aggie
This style was created by Jack Stalnaker for HA-prosper and he has converted this
style for powerdot. The style uses dark red and light brown colors.
Example slide
Here is the binomium formula.
(a + b)n =
n
X
k=0
Example of the aggie style
Hendri Adriaens
!
n n−k k
a
b
k
(1)
We will prove formula (1) on the blackboard.
●
Christopher Ellison
Here
✦
is
December 4, 2005
a
■
list
◆
with
■
✦
●
left footer
right footer – 1 / 2
seven
items.
left footer
right footer – 2 / 2
husky
This style is created by Jack Stalnaker and has a background of light gray sun
beams combined with dark red highlights.
Example slide
Here is the binomium formula.
Example of the husky style
(a + b)n =
n
X
k=0
Hendri Adriaens
Christopher Ellison
(1)
We will prove formula (1) on the blackboard.
●
December 4, 2005
Here
✦
is
a
■
list
◆
with
■
✦
●
left footer
!
n n−k k
a
b
k
right footer – 1 / 2
seven
items.
left footer
right footer – 2 / 2
sailor
This style is contributed by Mael Hilléreau and supplies five different palettes:
Sea (the default), River, Wine, Chocolate and Cocktail. Below is a sample of
the palette Sea.
Example slide
Here is the binomium formula.
Example of the sailor style
(a + b)n =
n X
n
k
an−k bk
(1)
k=0
We will prove formula (1) on the blackboard.
Hendri Adriaens
Here
is
Christopher Ellison
a
December 4, 2005
with
seven
left footer
list
right footer – 1 / 2
items.
left footer
right footer – 2 / 2
upen
This style has a nice dark blue background and text in yellow. It is contributed by
Piskala Upendran.
Example slide
Here is the binomium formula.
Example of the upen style
(a + b)n =
n
X
k=0
Hendri Adriaens
Christopher Ellison
(1)
We will prove formula (1) on the blackboard.
■
December 4, 2005
Here
—
is
▲
a
◦
▲
—
■
left footer
!
n n−k k
a
b
k
right footer – 1 / 2
left footer
list
with
seven
items.
right footer – 2 / 2
bframe
The bframe style has blue frames on the slide in which text is positioned. The
23
style is contributed by Piskala Upendran.
Example slide
Here is the binomium formula.
(a + b)n =
Example of the bframe style
Hendri Adriaens
!
n n−k k
a
b
k
(1)
We will prove formula (1) on the blackboard.
Christopher Ellison
■
December 4, 2005
Here
◆
is
■
a
◆
■
◆
■
left footer
n
X
k=0
right footer – 1 / 2
list
with
seven
items.
left footer
right footer – 2 / 2
horatio
The horatio style has been contributed by Michael Lundholm and is a more conservative blue style.
Example slide
Here is the binomium formula.
(a + b)n =
Example of the horatio style
Hendri Adriaens
!
n n−k k
a
b
k
(1)
We will prove formula (1) on the blackboard.
Christopher Ellison
✔
December 4, 2005
Here
✘
is
✓
a
✗
✓
✘
✔
left footer
n
X
k=0
right footer – 1 / 2
list
with
seven
items.
left footer
right footer – 2 / 2
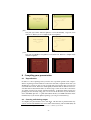
paintings
This is a simple style without a table of contents on slides. It has been contributed by Thomas Koepsell and provides 10 different palettes. The colors used
in the palettes are drawn from famous paintings.8 If you are interested, open
the style file to read which paintings have been used. The available palettes are:
Syndics (the default), Skater, GoldenGate, Lamentation, HolyWood, Europa,
Moitessier, MayThird, PearlEarring and Charon (all case sensitive). Below
is a sample of the Syndics palette.
Example slide
Here is the binomium formula.
(a + b)n =
n
X
k=0
Example of the paintings style
(1)
We will prove formula (1) on the blackboard.
•
Hendri Adriaens
!
n n−k k
a
b
k
Christopher Ellison
Here
•
is
• a
December 4, 2005
•
list
• with
•
•
seven
items.
left footer
right footer
klope
The klope style implements a horizontal table of contents that only lists the sections. The style is available in the following palettes: Spring, PastelFlower,
BlueWater and BlackWhite. The Spring palette is the default and you can see
a sample of that below.
8 The style defines a color pdcolor7 which is not used in the style but comes from the same painting and
complements the other colors. It can be used, for example, to highlight text against the main background
color.
24
Example slide
Here is the binomium formula.
Example of the klope style
(a + b)n =
n
X
k=0
Hendri Adriaens
Christopher Ellison
!
n n−k k
a
b
k
(1)
We will prove formula (1) on the blackboard.
■
December 4, 2005
Here
◆
is
■
a
◆
■
◆
■
list
with
seven
items.
left footer
right footer – 2 / 2
jefka
The jefka style comes with four palettes: brown (the default), seagreen, blue
and white. Below you see a sample of the brown palette.
Example slide
Here is the binomium formula.
(a + b)n =
Example of the jefka style
n
X
k=0
!
n n−k k
a
b
k
(1)
We will prove formula (1) on the blackboard.
Hendri Adriaens
Christopher Ellison
■
Here
◆
December 4, 2005
is
■
a
◆
■
◆
■
list
with
seven
items.
right footer – 2 / 2
pazik
This style is available in two palettes: red and brown. Below is a sample of the
default red palette.
Example slide
Here is the binomium formula.
(a + b)n =
Example of the pazik style
n X
n
k
an−k bk
(1)
k=0
We will prove formula (1) on the blackboard.
Hendri Adriaens
Christopher Ellison
■
Here
◆
December 4, 2005
is
■
a
◆
■
◆
■
list
with
seven
items.
left footer
right footer – 2 / 2
8 Compiling your presentation
8.1 Dependencies
In table 2 is a list of packages that powerdot uses to perform specific tasks. Dependencies of packages in this table are not listed. In the table, ‘required’ means that you
should have a version at least as new as listed and ‘tested’ means that powerdot was
tested with this version, but that it could equally well work with an older or newer version than the one listed in the table. So, when trying to solve an error, first concentrate
on solving version issues for the ‘required’ packages. To find out which version of a
package you are currently using, put \listfiles on the first line of your document,
run it with LATEX, open the .log file and read the file list (see a LATEX manual for more
information). If you need to update a package, you can get it from CTAN [7].
8.2 Creating and viewing output
To compile your presentation, run it with LATEX. The DVI that is produced this way
can be viewed with MiKTEX’s DVI viewer YAP.9 Unfortunately, xdvi and kdvi (kile) do
9 Unless you are using pstricks-add which distorts the coordinate system in DVI.
25
Package/file
xkeyval [2]
pstricks.sty [15, 16]
xcolor [10]
enumitem [4]
article class
geometry [14]
hyperref [13]
graphicx [5]
verbatim
Version
2.5c
0.2l
1.11
1.0
1.4f
3.2
6.74m
1.0f
1.5q
Date
2005/07/10
2004/05/12
2004/05/09
2004/07/19
2004/02/16
2002/07/08
2003/11/30
1999/02/16
2003/08/22
Required/tested
required
required
required
required
tested
tested
tested
tested
tested
Table 2: Dependencies
not support all PostScript specials and hence these will display the presentation incorrectly. If your DVI viewer does support this, make sure that your DVI display settings
match that of the presentation. In case you are using the screen paper, you should set
the DVI display setting to using the letter paper format. If your DVI viewer allows for
custom paper formats, use 8.25 inch by 11 inch.
Note that certain things that are produced with PostScript or PDF techniques will
not work in a DVI viewer. Examples are hiding of material via postscript layers (as is
done, for instance, by \pause, see section 4) and hyperlinks, for instance in the table
of contents.
If you want to produce a postscript document, run dvips over the DVI without any
particular command line options related to orientation or paper size. powerdot will
write information to the DVI file that helps dvips and ps2pdf (ghostscript) to create a
proper document. If you have some reason that this does not work for you and you
want to specify the paper and orientation yourself, you should use the nopsheader
option that is described in section 2. The PostScript document could, for instance, be
used to put multiple slides on a page using the psnup utility.
To create a PDF document for your presentation, run ps2pdf over the PS file created
with dvips. Also here, you can leave out any command line arguments related to paper
size or orientation. If this is problematic for you somehow, use the nopsheader option
as before and specify the paper and orientation at each intermediate step yourself.
9 Creating your own style
9.1 General information
Writing or customizing powerdot styles is simple. If you want to modify a style or
build a new one, locate the style that you want to use as basis in your TEX tree (styles
are named as powerdot-<style_name>.sty), copy that and rename it as to avoid license10 or naming conflicts. You might want to install the new style in your local TEX
tree to be able to access it from any place on your hard drive. See your LATEX distribution
for more information.
Once that has been taken care of, we can start creating the style. We strongly recommend to study a style file (for example, powerdot-default.sty) while reading the
remainder of this section as it provides good examples for the content of this section.
A style has several components. We describe these components below.
Identification and packages
This identifies the package in the log of a presentation and loads all required
packages. The default style contains something like:
10 The LAT X Public Project License requires renaming files when modifying them, see
E
latex-project.org/lppl.
26
http://www.
\NeedsTeXFormat{LaTeX2e}[1995/12/01]
\ProvidesPackage{powerdot-default}[2005/10/09 v1.2 default style (HA)]
\RequirePackage{pifont}
See for more information about these commands a LATEX manual, for instance
[12].
Palette or color definitions
This section contains the definitions of palettes or colors that you want to use in
the style. powerdot uses xcolor (via pstricks). Hence, for more information about
colors, see the xcolor documentation. We will discuss palettes in more detail in
section 9.2.
Template definitions
We will come back to this in sections 9.3 to 9.9.
Custom declarations
These can include anything that you want to be part of the style. The default
style, for instance, includes definitions for the labels in list environments like
itemize and some initializations for lists in general (done with \pdsetup, see
section 2.2). This part could also include some customizations as described in
section 9.10.
Font initializations
This initializes font definitions (which can be done by loading a package like
helvet).
9.2 Defining palettes
\pddefinepalettes
We will be defining templates formally in section 9.3. For now, it’s enough to have the
general idea that a template controls the design of a slide. Palettes are sets of colors that
color a template or design. A palette does not change the overall design of a template.
The following command can be used to define palettes for your style.
\pddefinepalettes{〈name1〉}{〈cmds1〉}. . .
This macro takes any even number of mandatory arguments with a minimum of two.
For every 〈name〉, a set of 〈commands〉 can be given which define the palette with
name 〈name〉. These commands can define colors with names pdcolor1, pdcolor2,
etcetera. These colors can be used when designing the template (see section 9.3).
pdcolor1 will always be used as text color.
The user can access these palettes via the palette key for the \pdsetup command
(see section 2.2). If the user does not specify a palette, the first palette defined when
compiling the presentation, will be used. Here is an example for defining 2 palettes.
\pddefinepalettes{reds}{
\definecolor{pdcolor1}{rgb}{1,0,0}
\definecolor{pdcolor2}{rgb}{1,.1,0}
\definecolor{pdcolor3}{rgb}{1,.2,0}
}{greens}{
\definecolor{pdcolor1}{rgb}{0,1,0}
\definecolor{pdcolor2}{rgb}{.1,1,0}
\definecolor{pdcolor3}{rgb}{.2,1,0}
}
In this example, the reds palette is the default one. For more information about
\definecolor, see the documentation of the xcolor package [10].
Notice that it is not necessary to use the names pdcolor2, pdcolor3 etcetera as
color names. But if these colors are defined, powerdot will use them, for instance, in
27
the random dots feature (see section 2.2.2). The flexibility adds extra possibilities in
setting up templates and palettes. See for an example of its use, the klope style.
9.3 Defining templates
We start off with a definition of what a template is. A template is a collection of settings for slide components together with custom definitions, which controls the visual
appearance of a slide. A style can contain multiple templates.
\pddefinetemplate[〈basis〉]{〈name〉}{〈options〉}{〈commands〉}
\pddefinetemplate
This defines the environment 〈name〉 to produce a slide with characteristics determined by 〈basis〉, 〈options〉 and 〈commands〉. We will discuss these elements in more
detail in the coming sections.
If you want to create several templates that differ only slightly from each other,
define a 〈basis〉 template, and then use it to define other templates. All 〈options〉
and 〈commands〉 for the new template 〈name〉 will be appended to the existing list
of 〈options〉 and 〈commands〉 from the 〈basis〉 template.
Make sure you choose a proper name for the template, and avoid redefining existing templates or environments. powerdot defines blackslide, note and emptyslide
internally, so you shouldn’t use these names unless you know what you’re doing. Furthermore, each style needs to define at least the templates slide and titleslide.
The titleslide environment will be used to create the title slide and slide will (by
default) also be used to create section slides. Titles and sections are a bit special in the
way they use the 〈options〉 and will be discussed in more detail in section 9.10.
9.4 Controlling setup
option
ifsetup
The 〈options〉 (keys) are described in the following sections. You can control how these
options apply to the various setups by using the ifsetup key. Any key appearing before the first ifsetup declaration in 〈options〉 will apply to every possible setup. Once
the ifsetup key is used, then all subsequent key declarations will apply only to the
setups declared in the ifsetup key. The ifsetup key can be used multiple times.
By possible setups, we mean the allowed values of the mode, paper, orient, and
display keys that are described in section 2.1. If a value (or values!) for any of these
four keys is not specified in a ifsetup declaration, then all subsequent key declarations will apply to any layout of that type. Consider the following as an example.
1
2
3
4
5
6
7
8
9
...
textpos={.2\slidewidth,.3\slideheight},%
ifsetup={portrait,screen},%
textpos={.3\slidewidth,.2\slideheight}%
...
ifsetup=landscape,%
...
ifsetup,
...
Assuming there was no ifsetup declaration before the first textpos declaration, this
first textpos will apply to every possible setup. However, for the screen format in
portrait orientation, the next textpos declaration will be used. In fact, all declarations
that appear until we switch to the next ifsetup (which specifies all paper sorts and
only landscape orientation) will be used in the portrait screen layout. All keys after
the next ifsetup declaration will be used in landscape orientation, with any paper,
mode and display. If, after declaring some specializations, you want to switch back
to settings that apply to all possible setups, set ifsetup to empty as is done in the
example. All subsequent declarations will then again be applied under any setup.
28
The following command is a stand-alone implementation of the mechanism described above. It allows you to control the setup outside the 〈options〉 argument of the
\pddefinetemplate command.
\pdifsetup{〈desired〉}{〈true〉}{〈false〉}
\pdifsetup
This macro executes 〈true〉 when the setup that the user chose matches with the
〈desired〉 setup, 〈false〉 in all other cases. For instance, if the user has chosen landscape,
then
\pdifsetup{landscape}{yes}{no}
will typeset yes. If the user would have chosen portrait instead, then no would have
been typeset.
This macro can be used to check setup requests from the user and, for instance,
generate an error if a certain setup is not supported by your style. powerdot provides
one predefined error message which can be used in one of the first lines of your style.
\pd@noportrait
\pd@noportrait
This macro generates an error when the user requests portrait orientation. Notice that
the handout mode only works in portrait orientation. This macro takes that into account and doesn’t generate an error in the case that the user requested a handout.
9.5 Main components
The 〈options〉 control several key components of a slide. Every component has several properties. A key that can be used in the 〈options〉 argument is the name of the
component postfixed by its property that you want to control.
The components title, text, toc, stoc and ntoc have properties hook, pos,
width and font. Additionally, the text component has a height property. The components lf and rf have properties hook, pos, temp and font. Hence, examples of
valid keys are titlefont, tocpos and lftemp. All components and properties will be
discussed below.
Here is an overview of the components that can be controlled from the 〈options〉
argument in \pddefinetemplate.
option
title-
title-
option
text-
text-
option
toc-
toc-
option
stoc-
stoc-
option
ntoc-
ntoc-
option
lf-
lf-
The slide title.
The main text box on the slide.
The (full) table of contents on a slide containing sections and slides.
This is a table of contents containing only the sections. See also ntoc below.
This is a table of contents containing only the entries for the active section. Together with stoc, this can be used to create a split table of contents. In a particular template, one would usually have a toc, a combination of stoc and ntoc or
no table of contents at all.
The left footer.
29
option
rf-
rfThe right footer.
Notice that all positioning of components described above will be done with \rput
from pstricks [15, 16] internally. See the pstricks documentation for more information
about this command. It should also be noted that all components (except lf and rf)
put their content in a minipage environment.
Now we list all properties of the components listed above and describe what they
mean. Remember that keys are formed by combining a component name and a property.
option
-hook
-hook
option
-pos
-pos
This option defines the \rput hook that will be used when positioning the item.
This can be tl, t, tr, r, Br, br, b, bl, Bl, l, B and c. See the pstricks documentation for more information.
This defines the position of the hook on the paper. The lower left corner of
the paper is given by the point {0,0} and the upper right corner by the point
{\slidewidth,\slideheight}. So if you want to position the main text box at
20% from the left edge and 30% from the top edge of the paper, you have to do
the following.
textpos={.2\slidewidth,.7\slideheight}
If the position of any component has not been specified, this component will not
be placed on the slide. This gives an opportunity to design slides without footers
or table of contents, for instance.
option
-width
-width
The width of the component. All component positioned by powerdot will be put
in a surrounding minipage environment. The width property determines the
width of the minipage. Example:
textwidth=.7\slidewidth
This property does not exist for the lf and rf components.
option
-height
-height
This option is only available for the text component. In other words, for this
property, there is only one key, namely textheight. This can be used to specify
the height of the minipage used for the main text. This does not imply that users
are restricted to this length or that powerdot does automatic slide breaking. This
height is only used for vertical alignments of material, for instance by footnotes.
The preset value is \slideheight.
option
-font
-font
option
-temp
-temp
This will be inserted just before the text that is about to be typeset. This can
be used to declare deviations from the main text font and color. It can be a
font declaration, like \large\bfseries, but can also contain other things like
\color{red} or \raggedright.
This property is only available for the footers (lf and rf) and can be used to
30
change the template of the footers. This means that you can, for instance, add
content to the footer, besides the content specified by the user. The default declaration by powerdot is the following.
rftemp=\pd@@rf\ifx\pd@@rf\@empty
\else\ifx\theslide\@empty\else~--~\fi\fi\theslide
Here \pd@@rf will contain the content of the right footer defined by the user
via the \pdsetup command. Similarly, \pd@@lf contains the content of the left
footer. The above declaration checks whether the footer and \theslide are both
non-empty and if so, it inserts ~--~ to separate both.
option
-orient
-orient
This property is only available for the toc, stoc and ntoc components. This
property can be h or v and determines the orientation of the table of contents.
The preset is v. See also section 9.6 for more information about the construction
of the table of contents.
9.6 Slide toc
\pd@tocslide
\pd@tocsection
The small table of contents that is placed on slides can be controlled by four macros
and several options.
These macros take one argument. When building the table of contents, powerdot
first passes the content through \pd@tocslide or \pd@tocsection, depending on
the type of entry that it is building at that moment. You could, for instance, do
\def\pd@tocslide#1{$\bullet$\ #1}
\def\pd@tocsection#1{#1}
\pd@tocdisplay
\pd@tochighlight
option
tocfrsep
which will prefix all normal entries (not the sections) with a bullet. By default, these
two macros are defined to just pass on their argument.
These two macros also take one argument. After processing an entry with the command \pd@tocslide or \pd@tocsection, powerdot continues building the entry by
passing it through \pd@tocdisplay, when the entry needs to be displayed only, or
\pd@tochighlight, when the entry needs to be highlighted. These macros are a little
more involved and take care of putting the content in the proper font and color in a
minipage. Further, \pd@tochighlight also puts a box around the item.
Notice, that by default, both the separate table of contents entries as well as the
table of contents as a whole are typeset in minipage environments by these macros, in
case the table of contents is vertical. The -width properties then determines the width
of the table of contents and, together with tocsecindent and tocslideindent (see
below) the width of the individual entries. If it is horizontal, only the separate entries
will be in minipages and the table of contents itself not and the -width properties
determine only the width of the individual entries (together with tocsecindent and
tocslideindent).
Several aspects of the process of generating the table of contents can be controlled
via the keys that are available in the \pddefinetemplate command that will be described below. If these keys do not provide enough handles to do what you want, you
might need to have a look at the two macros in the source and decide to rewrite them
in your style as to fit your needs. An example can be found in the fyma style.
tocfrsep
This length is the distance between the box around the content created by the
minipage and the highlight frame box created by \pd@tochighlight. Preset:
0.5mm.
31
option
tocsecsep
tocsecsep
The distance inserted before a section (unless it is the first element in the table
of contents). Preset: 2ex. Notice that if the orientation of the table of contents is
set to vertical, this length creates a vertical skip, otherwise, it creates a horizontal
skip.
option
tocslidesep
tocslidesep
option
tocsecindent
tocsecindent
option
tocslideindent
option
tocsecm
option
toctcolor
The distance inserted before other entries (unless it is the first element in the
table of contents). Preset: 0ex. Like tocsecsep, the effect of this length depends
on the orientation of the table of contents.
The horizontal space left to a section entry. Preset: 0pt.
tocslideindent
The horizontal space left to a slide entry. The horizontal skip will not be inserted
left to slide entries that appear before the first section. Preset: 0pt.
tocsecm
This is inserted just before typesetting a section. This can be used to mark a
section, for instance with a line as in the default style. Preset: empty.
toctcolor
This is the text color used for non-highlighted elements in the table of contents.
Preset: black.
option
tochltcolor
tochltcolor
option
tochlcolor
tochlcolor
This is the text color used for highlighted elements in the table of contents. Preset: white.
This is the color used for the frame behind highlighted elements. Preset: black.
9.7 Miscellaneous options
There are some options that fall outside of the scope of the previous sections. These
will be discussed here.
option
iacolor
iacolor
The iacolor option can be used to specify the color that is used for inactive things, produced for instance by \onslide, \pause (see section 4) and
\tableofcontents (see section 5.2). As xcolor is used by powerdot, one can
use special notation here, like
iacolor=black!20
The preset value for this key is lightgray.
The following options control the digital clock (see section 2.1). The clock is a form
text field with dynamic content, driven by a javascript via hyperref text fields. Some
options for the clock work similarly as for, for instance, the title component, but there
are also special options.
32
options
clockhook
clockpos
options
clockwidth
clockheight
option
clockcharsize
clockhook
clockpos
These work in the same way as the -hook and -pos properties discussed in section 9.5. The preset value of clockhook is tr.
clockwidth
clockheight
These control the width and height of the text field containing the clock. Preset
values come from hyperref and are 3cm and \baselineskip, respectively.
clockcharsize
The size of characters of the clock. Preset: 14pt.
option
clockalign
clockalign
option
clockcolor
clockcolor
The alignment of the clock in the text field. 0 is left-aligned, 1 is centered and 2
is right aligned. Preset is 2.
This determines the text color of the clock. The value should be a named color.
The preset value is black.
9.8 Template presets
Below, we have copied the preset setting for the keys described above. These will be
used if you didn’t supply other input for these keys in a particular template. If the
preset value meets your needs, you don’t have to specify it again in your style.
titlehook=Bl,titlepos=,titlewidth=\slidewidth,
titlefont=\raggedright,texthook=tl,textpos=,
textwidth=\slidewidth,textfont=\raggedright,
textheight=\slideheight,
tochook=tl,tocpos=,tocwidth=.2\slidewidth,
tocfont=\tiny\raggedright,
stochook=tl,stocpos=,stocwidth=.2\slidewidth,
stocfont=\tiny\raggedright,
ntochook=tl,ntocpos=,ntocwidth=.2\slidewidth,
ntocfont=\tiny\raggedright,
tocorient=v,stocorient=v,ntocorient=v,
tocfrsep=.5mm,tocsecsep=2ex,tocslidesep=0ex,
tocsecm=,toctcolor=black,tochlcolor=black,tochltcolor=white,
tocsecindent=0pt,tocslideindent=0pt,
lfhook=Bl,lfpos=,lffont=\scriptsize,lftemp=\pd@@lf,
rfhook=Br,rfpos=,rffont=\scriptsize,rftemp=\pd@@rf\ifx\pd@@rf\@empty
\else\ifx\theslide\@empty\else~--~\fi\fi\theslide,
iacolor=lightgray,
clockhook=tr,clockpos=,clockwidth=3cm,clockheight=\baselineskip,
clockcharsize=14pt,clockalign=2,clockcolor=black
9.9 The background
This leaves only one argument of the \pddefinetemplate macro undiscussed. This
is the 〈commands〉 argument. This argument can contain any code that you want to
execute after setting the options and before building the slide components like the slide
title, main text, and footers. This argument is designed to contain declarations that will
build the background of a template using, for instance, pstricks, but it can also hold
other commands you might need for building your template.
Important to notice is that these commands may not create TEX material as that
might destroy the construction of the slide. So, if you want to place the word ‘Hello’
in the bottom left corner of the slide, don’t type ‘Hello’, but make its width, height and
depth equal to zero, for instance by using pstricks’ \rput.
33
\rput[bl](0,0){Hello}
9.10 Title slide, titles and sections
\pd@slidetitle
\pd@title
\pd@sectiontitle
options
sectemp
widesectemp
As mentioned before, the style that you write needs to define at least the templates
slide and titleslide. The latter treats some of the keys in a special way. Besides, a
section slide is also done in a special way.
The title slide (made with \maketitle) puts the title with author(s) and date in
the main text box. This means that you have to supply a position for the main text
box (textpos). It will use the main text font for the text (together with declarations
in the textfont key) for the author(s) and the date. But it will use the declarations
in titlefont for the title of the presentation. This is done so that title and author(s)
form a coherent block and to make sure that long titles can push down the author(s)
instead of overwriting it.
The \pd@slidetitle macro is used to typeset the slide title on slides. This macro
is comparable to for instance \pd@tocslide. The macro takes one argument which
is the slide title in the right font and formatting. By default, this macro just passes on
the content for typesetting, but you could redefine this macro so do something with its
input prior to typesetting it. An example is in the fyma style which underlines the title
after putting it in a minipage to support multi line titles.
These macros are similar to \pd@slidetitle and typeset the title on the title slide
and the title on section slides respectively. By default, these also pass there argument
(which is the presentation title or section title), but these can be redefined to do something with the input prior to typesetting it, just as \pd@slidetitle.
The \section command uses (by default) the slide environment and puts the
section title in the title box with font titlefont. If you want to change the default use
of the slide environment for sections to, for instance, the sectionslide environment or any other especially designed section template, change the section template
preset in your style, using
\setkeys[pd]{section}{sectemp=sectionslide}
This means that if the user asks for template=slide in the \section command, the
sectionslide environment will be used silently. To avoid surprises, sectionslide
should preferably be based on the slide environment.
A similar option is available in case the user asks for template=wideslide. One
could for instance do the following.
\setkeys[pd]{section}{widesectemp=sectionwideslide}
Whenever the user requests a wideslide to be used for a \section, instead, the
sectionwideslide environment will be used. Other input to the template key by
the user does not get a special treatment.
Notice that these keys are available in the section family of keys and that you
cannot use them in the \pddefinetemplate command.
9.11 Testing the style
powerdot has a test file that should test most of the style. This test file can be produced
by running LATEX over powerdot.dtx. This generates powerdot-styletest.tex
which will help you with the testing job. Feel free to contact us when you would like to
contribute your style to powerdot. See also section 11.
34
10 Using LYX for presentations
LYX [6] is a WYSIWYM (What You See Is What You Mean) document processor based
on LATEX. It supports standard LATEX classes but needs special files, called layout files, in
order to support non-standard classes such as powerdot.
To start using LYX for powerdot presentations, copy the layout file powerdot.layout
to the LYX layout directory. You can find this file in the doc tree of your LATEX installation: texmf/doc/latex/powerdot. If you can’t find it there, download it from CTAN:
/macros/latex/contrib/powerdot. Once that is done, reconfigure LYX (Edit ⊲
Reconfigure and restart LYX afterwards). Now you can use the powerdot document
class as any other supported class. Go to Layout ⊲ Document and select powerdot
presentation as document class. For more information, see the LYX documentation,
which is accessible from the Help menu.
10.1 How to use the layout
The powerdot LYX layout provides some environments11 which can be used in LYX.
Some of these environments (for instance Title or Itemize) are natural to use since
they exist also in the standard document classes such as article. For more information
on these standard environments, see the LYX documentation.
This section will explain how to use the powerdot specific environments Slide,
WideSlide, EmptySlide and Note. These environments correspond to the powerdot
environments slide, emptyslide, wideslide and note.
We start with a simple example. The following LATEX code
\begin{slide}{Slide title}
Slide content.
\end{slide}
can be obtained using the following LYX environments. The right column represents
the text typed into the LYX window and the left column represents the environment
applied to this text).
Slide
Standard
EndSlide
Slide title
Slide content.
Some remarks concerning this example.
• You can use the environment menu (under the menu bar, top-left corner) to change
the environment applied to text.
• The slide title should be typed on the line of the Slide environment.
• EndSlide finishes the slide and its line is left blank.
In the LYX window, the Slide environment (that is, the slide title) is displayed in
magenta, the WideSlide style in green, the EmptySlide style in cyan and the Note
style in red and hence these are easily identifiable.
Here is another example.
\begin{slide}{First slide title}
The first slide.
\end{slide}
\begin{note}{First note title}
The first note, concerning slide 1.
\end{note}
\begin{slide}{Second slide title}
The second slide.
\end{slide}
11 Don’t confuse these with LAT X environments.
E
35
This can be done in LYX in the following way.
Slide
Standard
Note
Standard
Slide
Standard
EndSlide
First slide title
The first slide.
First note title
The first note, concerning slide 1.
Second slide title
The second slide.
This example demonstrates that it is often sufficient to insert the EndSlide style after
the last slide or note only. Only when you want certain material not to be part of a slide,
you need to finish the preceding slide manually using the EndSlide style. Example:
Slide
First slide title
Standard
The first slide.
EndSlide
[ERT box with some material]
Slide
Second slide title
...
Options can be passed to slide environments by using Insert ⊲ Short title in
front of the slide title. The following example uses the direct method (see section 6.4)
in the short title argument (delimited by square brackets) to allow for a lstlisting
environment (defined by the listings package) within the slide content.
Slide
[method=direct]Example of LaTeX source code
Standard
Here’s the \HelloWorld command:
[ERT box:
\lstset{language=[LaTeX]TeX}
\begin{lstlisting}
\newcommand{\HelloWorld}{Hello World!}
\end{lstlisting}
]
EndSlide
Note that you are not obliged to use a verbatim environment to type the \HelloWord
text into the LYX window because LYX directly supports standard verbatim.12 Consequently, the use of the slide processing methods direct and file is not necessary
when you need standard verbatim, but it is necessary when doing more advanced
things, like in the example above.
10.2 Support of syntax
This section lists options, commands and environments that are supported through
the LYX interface directly, without using an ERT box (TEX-mode).
All class options (see section 2.1) are supported via the Layout ⊲ Document dialog
(Layout pane). Options for the \pdsetup command (see section 2) should be specified in the Preamble pane of the Layout ⊲ Document dialog.
Table 3 lists the powerdot commands that are supported in LYX. Table 4 lists the
powerdot environments that, besides the earlier discussed slide, wideslide, note
and emptyslide environments, are supported in LYX. Table 5 lists commands that
can only be done by using an ERT box (via Insert ⊲ TeX). Note that you may use the
clipboard in order to repeat often used commands like \pause. Finally, table 6 lists
additional commands and environments that are supported by the layout.
12 L X translates special characters into their corresponding LAT X command. For instance, the backslash
Y
E
character is translated into \textbackslash. Resulting, the font is not the same as in true verbatim and
you might want to change that via the Layout ⊲ Character dialog.
36
Command
\title
\author
\date
\maketitle
\section
\tableofcontents
Method in LYX
Use Title environment.
Use Author environment.
Use Date environment.
Managed directly by LYX.
Use the Section environment. Options to this command (see section 5.1) can be specified using Insert ⊲
Short title in front of the section title.
Use Insert ⊲ Lists & TOC ⊲ Table of contents.
You will need an ERT box if you want to use the optional
argument, see below.
Table 3: Supported powerdot commands in LYX
Environment
itemize
enumerate
thebibliography
Method in LYX
Use Itemize and ItemizeType1 environments. The
latter will create a list with type=1 (see section 4.2).
Use Enumerate and EnumerateType1 environments.
Use Bibliography environment.
Table 4: Supported powerdot environments in LYX
10.3 Compiling with LYX
First of all, make sure that you have also read section 8. Then, in order to get a proper
PostScript or PDF file, you have to set your LYX document properties depending on
which paper and orientation you want. When your LYX document is open, go to the
Layout ⊲ Document dialog. In the Layout pane, put the nopsheader, orient and
paper keys as class options (see section 2.1 for a description). Then, go to the Paper
pane and select corresponding paper size and orientation (you may choose letter
paper in the case you set paper=screen in the class options). Finally, go to the View
(or File ⊲ Export) menu and select your output (PostScript or PDF).
10.4 Extending the layout
If you have created a custom style (see section 9) which defines custom templates, you
may want to extend the layout file13 so that these templates are also supported in LYX.
The explanation below assumes that you have defined a template called sunnyslide.
To support this new template in LYX, you have to use the following command.
\pddefinelyxtemplate〈cs〉{〈template〉}
\pddefinelyxtemplate
This will define the control sequence 〈cs〉 such that it will create a slide with template
〈template〉 (which has been defined using \pddefinetemplate. This new control sequence can be used in the layout file as follows.
# SunnySlide environment definition
Style SunnySlide
CopyStyle
Slide
LatexName
lyxend\lyxsunnyslide
Font
Color
Yellow
EndFont
Preamble
\pddefinelyxtemplate\lyxsunnyslide{sunnyslide}
EndPreamble
End
13 The LPPL dictates to rename a file if you modify it as to avoid confusion.
37
Command
Method in LYX
Within Author environment.
\and
\pause
\item
\onslide
\twocolumn
\tableofcontents
An ERT box is only required for the optional argument,
not mandatory for overlays specifications.
And the versions \onslide+ and \onslide*.
Only when using the optional argument.
Table 5: powerdot commands needing an ERT box in LYX
Env./Command
quote
quotation
verse
\caption
Method in LYX
Use Quote environment.
Use Quotation environment.
Use Verse environment.
Use Caption environment within standard float environments.
Table 6: Additional environments for LYX
Note that you must begin the LatexName field with lyxend. The definition of the LYX
template has been inserted in between Preamble and EndPreamble which assures
that the new LYX environment will work in every presentation. After modifying the
layout file, don’t forget to restart LYX. See for more information about creating LYX environments, the documentation of LYX in the Help menu.
11 Questions
11.1 Frequently Asked Questions
This section is devoted to Frequently Asked Questions. Please read it carefully; your
problem might be solved by this section.
Q1 Does powerdot have example files? Where can I find them?
A1 powerdot comes with several examples that should be in the doc tree of your LATEX installation. More precisely: texmf/doc/latex/powerdot. If you can’t find them there,
download them from CTAN:/macros/latex/contrib/powerdot [7].
Q2 I’m getting errors or unexpected output when compiling the simplest example!
A2 Did you read section 8?
Q3 I made a typo in the slide code, ran the file, got an error, corrected the typo and reran,
but now get an error that doesn’t go away.
A3 Remove the .bm and .toc files and try again.
Q4 \pause does not work in the align14 environment.
A4 align does several tricky things, which make it impossible to use \pause. Use
\onslide instead. See section 4.4.
Q5 My pstricks nodes appear on all overlays. Also: color doesn’t seem to work with
\onslide.
A5 Some PostScript tricks like nodes and color do not work with \onslide. Use \onslide*
instead. See an example below.
14 There are several environments doing similar things as align. Another example is the split environment, but more (often from the amsmath package) can cause similar trouble for \pause.
38
\documentclass{powerdot}
\usepackage{pst-node}
\begin{document}
\begin{slide}{Color}
\onslide*{2}{\cnode(0,-5pt){2pt}{A}}
This is {\onslide*{2-}{\color{red}} red} text.
\onslide*{2}{\cnode(0,-5pt){2pt}{B}}
\onslide{2}{\ncline{A}{B}}
\end{slide}
\end{document}
Q6 Do I need to edit style files to change a style a bit?
A6 No, you do not need to edit any style file. You can change any part of a certain style
using the \pddefinetemplate and \pddefinepalettes commands. Here is an example that removes the right footer from the default style, moves the left footer to the
center and adds another palette.
\documentclass{powerdot}
\pddefinetemplate[slide]{slide}{
lfhook=Bc,lfpos={.5\slidewidth,.04\slideheight},
rfpos
}{}
\pddefinepalettes{mypalette}{
\definecolor{pdcolor1}{rgb}{.27,.31,.44}
\definecolor{pdcolor2}{rgb}{.85,.85,.92}
\definecolor{pdcolor3}{rgb}{.8,.75,.98}
}
\pdsetup{
lf=My presentation,
palette=mypalette
}
\begin{document}
\begin{slide}{Title}
\end{slide}
\end{document}
See section 9 for more information about these two commands.
Q7 Can I contribute to this project?
A7 Certainly. If you find bugs15 or typos, please send a message to the mailinglist (see
section 11.2). If you have developed your own style that is distinct from existing styles
and would like to see it included in powerdot, please inform us by private e-mail and
we will consider your contribution. Notice that included contributions will fall under
the overall powerdot license and copyright notice, but that your name will be included
in the documentation when you make a contribution. This is done to guarantee that
we can adapt files if maintenance is needed.
If your question has not been answered at this point, advance to the next section
to read where to find more answers.
11.2 Mailinglist
powerdot has a mailinglist from freelists.org and has its website here:
http://www.freelists.org/list/powerdot
There is a link to ‘List Archive’. Please search this archive before posting a question.
Your problem might already have been solved in the past.
15 Make sure that you confirm that the bug is really caused by powerdot and not by another package that
you use.
39
If that is not the case, use the box on the page to type your e-mail address, choose
the action ‘Subscribe’ and click ‘Go!’. Then follow the instructions that arrive to you
by e-mail. At a certain moment, you can login for the first time using an authorization code sent to you by e-mail. After logging in, you can create a password for future
sessions using the ‘Main Menu’ button. The other buttons provide you some info and
options for your account.
When you are all set, you can write to the list by sending an e-mail to
powerdot[at]freelists[dot]org
When writing to the list, please keep in mind the following very important issues.
1.
2.
3.
4.
We are volunteers!
Keep your questions related to powerdot.
Always supply a minimal example demonstrating your problem.
Don’t send big files over the list.
We hope you will enjoy this service.
12 Source code documentation
In case you want regenerate the package files from the source or want to have a
look at the source code description, locate powerdot.dtx, search in the file for
\OnlyDescription and remove that and do
latex powerdot.dtx
latex powerdot.dtx
bibtex powerdot
makeindex -s gglo.ist -o powerdot.gls powerdot.glo
makeindex -s gind.ist -o powerdot.ind powerdot.idx
latex powerdot.dtx
latex powerdot.dtx
References
[1] Hendri Adriaens.
HA-prosper.
HA-prosper package.
CTAN:/macros/latex/contrib/
[2] Hendri Adriaens. xkeyval package. CTAN:/macros/latex/contrib/xkeyval.
[3] Donald Arseneau. random.tex. CTAN:/macros/generic/misc.
[4] Javier Bezos. enumitem package. CTAN:/macros/latex/contrib/enumitem.
[5] David Carlisle. graphics bundle. CTAN:/macros/latex/required/graphics.
[6] LYX crew. LYX website. http://www.lyx.org.
[7] CTAN crew. The Comprehensive TeX Archive Network. http://www.ctan.org.
[8] Patrick W. Daly. natbib package. CTAN:/macros/latex/contrib/natbib.
[9] Frédéric Goualard and Peter Møller Neergaard. prosper class. CTAN:/macros/
latex/contrib/prosper.
[10] Uwe Kern. xcolor package. CTAN:/macros/latex/contrib/xcolor.
[11] James Kilfiger and Wolfgang May.
contrib/extsizes.
extsizes bundle.
40
CTAN:/macros/latex/
[12] Frank Mittelbach and Michel Goossens. The LATEX Companion. Tools and Techniques for Computer Typesetting. Addison-Wesley, Boston, Massachusetts, 2 edition, 2004. With Johannes Braams, David Carlisle, and Chris Rowley.
[13] Sebastian Rahtz and Heiko Overdiek. hyperref package. CTAN:/macros/latex/
contrib/hyperref.
[14] Hideo Umeki. geometry package. CTAN:/macros/latex/contrib/geometry.
[15] Herbert Voß. PSTricks website. http://pstricks.tug.org.
[16] Timothy Van Zandt et al.
/graphics/pstricks.
PSTricks package, v1.07, 2005/05/06.
CTAN:
Acknowledgements
The authors are grateful to Mael Hilléreau for contributing the LYX layout file and description. Further, we like to thank all style contributors (see section 7). Moreover, we
wish to thank everyone who contributed to this package in any other way.
Ramon van den Akker, Pavel Čížek, Darren Dale, Hans Marius Eikseth, Morten
Høgholm, András Horváth, Laurent Jacques, Akira Kakuto, Uwe Kern, Kyanh,
Theo Stewart, Don P. Story and Herbert Voß.
We hope not to have forgotten anyone.
Version history
For more information on bug fixes, typeset the source code documentation (see section 12).
v1.0
General: Initial release . . . . . . . . . . . . . . . . . . . . . . . . . . . . . . . . . . . . .
v1.1
General: blackslide options adds hyperlink to slide and section titles
Added elcolors, aggie, husky and sailor styles . . . . . . . . . . . . . . . . . .
Added tocsecindent and tocslideindent options . . . . . . . . . . .
Added graphical examples of styles to documentation . . . . . . . . . . .
Added LYX layout, description and example . . . . . . . . . . . . . . . . . . .
Changed size=10 to size=10pt . . . . . . . . . . . . . . . . . . . . . . . . . . .
Extended FAQ . . . . . . . . . . . . . . . . . . . . . . . . . . . . . . . . . . . . . . . . . .
Fixed some small bugs . . . . . . . . . . . . . . . . . . . . . . . . . . . . . . . . . . .
Improved tycja, ciment and fyma styles . . . . . . . . . . . . . . . . . . . . . .
Improved section title handling . . . . . . . . . . . . . . . . . . . . . . . . . . . .
v1.2
General: Added upen and bframe styles . . . . . . . . . . . . . . . . . . . . . . . .
Simplified coding of most styles . . . . . . . . . . . . . . . . . . . . . . . . . . . .
Solved some small bugs . . . . . . . . . . . . . . . . . . . . . . . . . . . . . . . . . .
Speeded up compilations . . . . . . . . . . . . . . . . . . . . . . . . . . . . . . . . .
v1.3
General: Added horatio, paintings, klope, jefka and pazik styles . . . . . .
Added clock feature . . . . . . . . . . . . . . . . . . . . . . . . . . . . . . . . . . . . .
Added examples and example file . . . . . . . . . . . . . . . . . . . . . . . . . . .
Added logo feature . . . . . . . . . . . . . . . . . . . . . . . . . . . . . . . . . . . . . .
Added optional argument to \maketitle . . . . . . . . . . . . . . . . . . . .
Added palettes feature . . . . . . . . . . . . . . . . . . . . . . . . . . . . . . . . . . .
Added palettes to default, fyma and sailor styles . . . . . . . . . . . . . . . .
Added possibility to create horizontal table of contents . . . . . . . . . .
41
(2005/09/04)
.............. 1
(2005/09/19)
.............. 1
.............. 1
.............. 1
.............. 1
.............. 1
.............. 1
.............. 1
.............. 1
.............. 1
.............. 1
(2005/10/09)
.............. 1
.............. 1
.............. 1
.............. 1
(2005/12/06)
.............. 1
.............. 1
.............. 1
.............. 1
.............. 1
.............. 1
.............. 1
.............. 1
Added random dots feature . . . . . . . . . . . . . . . . . . . . . . . . . . . . . . .
Added two slide processing methods to do verbatim on slides easily
Cleaned up options . . . . . . . . . . . . . . . . . . . . . . . . . . . . . . . . . . . . .
Improved figure and table handling . . . . . . . . . . . . . . . . . . . . . . .
Revised docs . . . . . . . . . . . . . . . . . . . . . . . . . . . . . . . . . . . . . . . . . . .
Solved some small bugs . . . . . . . . . . . . . . . . . . . . . . . . . . . . . . . . . .
Updated all styles . . . . . . . . . . . . . . . . . . . . . . . . . . . . . . . . . . . . . . .
Updated LYX example and information . . . . . . . . . . . . . . . . . . . . . . .
.
.
.
.
.
.
.
.
.
.
.
.
.
.
.
.
.
.
.
.
.
.
.
.
.
.
.
.
.
.
.
.
.
.
.
.
.
.
.
.
.
.
.
.
.
.
.
.
.
.
.
.
.
.
.
.
.
.
.
.
.
.
.
.
.
.
.
.
.
.
.
.
.
.
.
.
.
.
.
.
.
.
.
.
.
.
.
.
.
.
.
.
.
.
.
.
.
.
.
.
.
.
.
.
.
.
.
.
.
.
.
.
1
1
1
1
1
1
1
1
Index
Numbers written in italic refer to the page where the corresponding entry is described;
numbers underlined refer to the code line of the definition; numbers in roman refer to
the code lines where the entry is used.
dprop (option) . . . . . . . . . . . . . . . . . . . . . 8
Symbols
-font (option) . . . . . . . . . . . . . . . . . . . .
-height (option) . . . . . . . . . . . . . . . . . .
-hook (option) . . . . . . . . . . . . . . . . . . . .
-orient (option) . . . . . . . . . . . . . . . . . .
-pos (option) . . . . . . . . . . . . . . . . . . . . .
-temp (option) . . . . . . . . . . . . . . . . . . . .
-width (option) . . . . . . . . . . . . . . . . . . .
30
30
30
31
30
30
30
E
emptyslide (environment) . . . . . . . . . . 16
enumerate (option) . . . . . . . . . . . . . . . . . 6
F
fleqn (option) . . . . . . . . . . . . . . . . . . . . . 4
frsep (option) . . . . . . . . . . . . . . . . . . . . 19
A
H
\and . . . . . . . . . . . . . . . . . . . . . . . . . . . . . 9
\author . . . . . . . . . . . . . . . . . . . . . . . . . . 9
hlentries (option) . . . . . . . . . . . . . . . . . 4
hlsections (option) . . . . . . . . . . . . . . . . 4
B
I
blackslide (option) . . . . . . . . . . . . . . . . 5
bm (option) . . . . . . . . . . . . . . . . . . . . . . . 10
bottomsep (option) . . . . . . . . . . . . . . . . 19
iacolor (option) . . . . . . . . . . . . . . . . . . 32
ifsetup (option) . . . . . . . . . . . . . . . . . . 28
inactive color . . .
indent (option) .
\item . . . . . . . . .
itemize (option)
C
clock (option) . . . . . . . . . . . . . . . . . . . . . 5
clockalign (option) . . . . . . . . . . . . . . . 33
clockcharsize (option) . . . . . . . . . . . . 33
clockcolor (option) . . . . . . . . . . . . . . . 33
clockheight (option) . . . . . . . . . . . . . . 33
clockhook (option) . . . . . . . . . . . . . . . . 33
clockpos (option) . . . . . . . . . . . . . . . . . 33
clockwidth (option) . . . . . . . . . . . . . . . 33
colsep (option) . . . . . . . . . . . . . . . . . . . 19
content (option) . . . . . . . . . . . . . . . . . . 16
counters (option) . . . . . . . . . . . . . . . . . . 6
.
.
.
.
.
.
.
.
.
.
.
.
.
.
.
.
.
.
.
.
.
.
.
.
.
.
.
.
.
.
.
.
.
.
.
.
.
.
.
.
.
.
.
.
12, 13, 15
. . . . . . 19
. . . . . . 12
....... 6
L
lcolwidth (option) . . . . . . . . . . . . . . . . 19
leqno (option) . . . . . . . . . . . . . . . . . . . . . 4
lf (option) . . . . . . . . . . . . . . . . . . . . . . . . 6
lf- (option) . . . . . . . . . . . . . . . . . . . . . . 29
lfrheight (option) . . . . . . . . . . . . . . . . 19
lfrprop (option) . . . . . . . . . . . . . . . . . . 19
lineheight (option) . . . . . . . . . . . . . . . 18
lineprop (option) . . . . . . . . . . . . . . . . . 18
list (option) . . . . . . . . . . . . . . . . . . . . . . 6
logocmd (option) . . . . . . . . . . . . . . . . . . . 7
logohook (option) . . . . . . . . . . . . . . . . . . 7
logopos (option) . . . . . . . . . . . . . . . . . . . 7
D
\date . . . . . . . . . . . . . . . . . . . . . . . . . . . .
dbright (option) . . . . . . . . . . . . . . . . . . .
display (option) . . . . . . . . . . . . . . . . . . .
dmaxdots (option) . . . . . . . . . . . . . . . . . .
dmaxheight (option) . . . . . . . . . . . . . . . .
dmaxsize (option) . . . . . . . . . . . . . . . . . .
dmaxwidth (option) . . . . . . . . . . . . . . . . .
dmindots (option) . . . . . . . . . . . . . . . . . .
dminheight (option) . . . . . . . . . . . . . . . .
dminsize (option) . . . . . . . . . . . . . . . . . .
dminwidth (option) . . . . . . . . . . . . . . . . .
.
.
.
.
9
8
4
8
8
8
8
8
8
8
8
M
\maketitle . . . . . . . . . . . . . . . . . . . . . . . 9
method (option) . . . . . . . . . . . . . . . . . . . . 7
mode (option) . . . . . . . . . . . . . . . . . . . . . . 3
N
nopsheader (option) . . . . . . . . . . . . . . . . 4
note (environment) . . . . . . . . . . . . . . . . 16
ntoc- (option) . . . . . . . . . . . . . . . . . . . . 29
42
slide (option) . . . . . . . . . . . . . . . . . . . . 15
stoc- (option) . . . . . . . . . . . . . . . . . . . . 29
style (option) . . . . . . . . . . . . . . . . . . . . . 4
O
\onslide . . . . . . . . . . . . . . . . . . . . . . . . 13
\onslide* . . . . . . . . . . . . . . . . . . . . . . . 13
\onslide+ . . . . . . . . . . . . . . . . . . . . . . . 13
orient (option) . . . . . . . . . . . . . . . . . . . . 3
T
\tableofcontents . . . . . . . . . . . . . . . . 15
template (option) . . . . . . . . . . . . . . . . . 15
text- (option) . . . . . . . . . . . . . . . . . . . . 29
thebibliography (environment) . . . . . 17
thenote (option) . . . . . . . . . . . . . . . . . . . 6
theslide (option) . . . . . . . . . . . . . . . . . . 6
\title . . . . . . . . . . . . . . . . . . . . . . . . . . . 9
title- (option) . . . . . . . . . . . . . . . . . . . 29
toc (option) . . . . . . . . . . . . . . . . . . . . . . 10
toc- (option) . . . . . . . . . . . . . . . . . . . . . 29
tocfrsep (option) . . . . . . . . . . . . . . . . . 31
tochlcolor (option) . . . . . . . . . . . . . . . 32
tochltcolor (option) . . . . . . . . . . . . . . 32
tocsecindent (option) . . . . . . . . . . . . . 32
tocsecm (option) . . . . . . . . . . . . . . . . . . 32
tocsecsep (option) . . . . . . . . . . . . . . . . 32
tocsection (option) . . . . . . . . . . . . . . . 15
tocslideindent (option) . . . . . . . . . . . 32
tocslidesep (option) . . . . . . . . . . . . . . 32
toctcolor (option) . . . . . . . . . . . . . . . . 32
topsep (option) . . . . . . . . . . . . . . . . . . . 19
trans (option) . . . . . . . . . . . . . . . . . . . . . 6
\twocolumn . . . . . . . . . . . . . . . . . . . . . . 18
type (option) . . . . . . . . . . . . . . . . . . 12, 15
P
palette (option) . . . . . . . . . . . . . . . . . . . 5
paper (option) . . . . . . . . . . . . . . . . . . . . . 3
\pause . . . . . . . . . . . . . . . . . . . . . . . . . . 11
\pd@noportrait . . . . . . . . . . . . . . . . . . 29
\pd@sectiontitle . . . . . . . . . . . . . . . . 34
\pd@slidetitle . . . . . . . . . . . . . . . . . . 34
\pd@title . . . . . . . . . . . . . . . . . . . . . . . 34
\pd@tocdisplay . . . . . . . . . . . . . . . . . . 31
\pd@tochighlight . . . . . . . . . . . . . . . . 31
\pd@tocsection . . . . . . . . . . . . . . . . . . 31
\pd@tocslide . . . . . . . . . . . . . . . . . . . . 31
\pddefinelyxtemplate . . . . . . . . . . . . 37
\pddefinepalettes . . . . . . . . . . . . . . . 27
\pddefinetemplate . . . . . . . . . . . . . . . 28
\pdifsetup . . . . . . . . . . . . . . . . . . . . . . 29
\pdsetup . . . . . . . . . . . . . . . . . . . . . . . . . 5
R
randomdots (option) . . . . . . . . . . . . . . . . 7
rcolwidth (option) . . . . . . . . . . . . . . . . 19
rf (option) . . . . . . . . . . . . . . . . . . . . . . . . 6
rf- (option) . . . . . . . . . . . . . . . . . . . . . . 30
rfrheight (option) . . . . . . . . . . . . . . . . 19
rfrprop (option) . . . . . . . . . . . . . . . . . . 19
U
\usevalue . . . . . . . . . . . . . . . . . . . . . . . 20
S
\savevalue . . . . . . . . . . . . . . . . . . . . . . 20
sectemp (option) . . . . . . . . . . . . . . . . . . 34
\section . . . . . . . . . . . . . . . . . . . . . . . . 14
size (option) . . . . . . . . . . . . . . . . . . . . . . 4
slide (environment) . . . . . . . . . . . . . . . . 9
V
verbatim (option) . . . . . . . . . . . . . . . . . 17
W
widesectemp (option) . . . . . . . . . . . . . . 34
43