1
JUnit Test Generator
15/04/10
User Manual
User Manual
JUnit Test Generator
I.T. Carlow
Software Engineering
Bachelor Degree (With Honours)
Sergio Alcocer Vázquez
C00132732
1/17
JUnit Test Generator
15/04/10
User Manual
Table of Contents
1. Introduction.......................................................................................................................................3
1.1. What's JUnit?.............................................................................................................................3
1.2. Why is JUnit or reusing tests useful?.........................................................................................3
2. Application Features and Code Constraints.......................................................................................4
3. User Manual usage............................................................................................................................5
4. Menu..................................................................................................................................................6
5. How To ….........................................................................................................................................8
5.1. … Create an Skeleton with the application................................................................................8
5.1.1. … Set File's package..........................................................................................................8
5.1.2. … Add an Import...............................................................................................................9
5.1.3. … Add a constructor..........................................................................................................9
5.1.4. … Add a method..............................................................................................................10
5.1.5. … Create the skeleton once finished................................................................................10
5.2. … Open a Java File..................................................................................................................11
5.3. … Load or Save the progress of the Test Class........................................................................11
5.4. … Add a new Object...............................................................................................................12
5.5. … Add a new Instruction.........................................................................................................13
5.6. … Edit an Instruction...............................................................................................................14
5.7. … Delete an Instruction...........................................................................................................14
5.8. … Generate the Test File.........................................................................................................15
5.9. … Add a new type to the Randomizer.....................................................................................15
Appendix 1..........................................................................................................................................16
Appendix 2..........................................................................................................................................17
2/17
JUnit Test Generator
15/04/10
User Manual
1. Introduction
JUnit Test Generator is an application that allows the user (usually a software
developer) to generate JUnit Tests in a semi-automatic way, in an early stage of the
project.
It also stores the information of the tests cases (instructions associated to each
method) to allow the user modify them (edit, delete and create instructions)
With the application you can even create a simple skeleton for your application
from scratch.
1.1. What's JUnit?
JUnit is a framework to create Unit Tests for Java language, that
allows testing the correct functionality of any class.
1.2. Why is JUnit or reusing tests useful?
JUnit tests single classes, what reduces the search space,
helping you find the error much faster. Otherwise you would realise
that there is a problem when joining all together, and you will have to
scan each single class to check if the error is there or not.
Storing JUnit Tests lets you modify the class. You can add new
methods and then use the application to add more tests to those new
methods without having to start over. It also lets you modify the
implementation of a method and then, reapply the test to check if you
have broken something down.
3/17
JUnit Test Generator
15/04/10
User Manual
2. Application Features and Code Constraints
The application has two working modes.
The first is the skeleton generator.
Through the application's GUI, you would be able to define the name
of the class, the package of the class, the imports that it needs, the constructors
and methods, with their parameters.
Once you have add all the methods and constructors, imports, and
package that you want, the application allows you to dump that information
into a Java file.
The second is the JUnit Test Generator it-self.
Through the application's GUI, you would be able to load a Java File.
Once loaded you can start creating Objects to use on the test's
instructions, create Instructions, or you can Load a previously saved state.
When you finish, or just before closing the application, you can save
your progress or/and generate the test file.
The Java Code had this constraints:
–
Cannot use extends or implements
–
Cannot use abstract, final, etc. modifiers, only public or private
–
Cannot throw exceptions.
–
Cannot declare more than one element in the same line (e.g.
“private String name, password”, you should split it in two
instructions)
4/17
JUnit Test Generator
15/04/10
User Manual
3. User Manual usage
In the next section (Menu section), there is a list of all the options that can be
available on the application, a small description of what they do, and when they will
be visible to the user.
The last section just before the Appendices, is a How-To in which is detailed
all the operations that can be performed in the program, step by step.
If you follow it, after finishing the section 5.1 and all its sub-steps and substates, you should end up with a skeleton of your class, ready to be filled up with
code.
In section 5.2 you should open the file you want to create the tests for, then
you can either open the just-generated file (through section 5.1.5) or any simple Java
file.
Once it gets loaded, the methods prototypes would be listed on the left
column. Now is when you need to create instructions and associate them with a
method. To do that, you first need to create at least one object (you can check the
steps out in this manual).
During this process, you can either load or save the state.
WARNING: Loading a state, removes all previous information.
Once you have finish, just generate the Test file. To do so, follow the How-To
(section 5.8)
Note: This application uses a library called Randomizer, which is filled and
compiled by YOU. This library is the one that allows the auto-generation of the inputs
on the creation of the objects. (Check section 5.9)
5/17
JUnit Test Generator
15/04/10
User Manual
4. Menu
•
File
◦ Open:
Allows to open a Java file to start adding TestCases, and objects.
{Only visible before choosing either the option Open or New}
◦ New
Allows to create a Java skeleton file with the methods desired.
{Only visible before choosing either the option Open or New}
◦ Generate Test
Takes all the information of the tests and generates a JUnit Java file.
{Only visible once a file has been opened}
◦ Export Skeleton
Generates a Java file (skeleton) with the methods, imports and
package given.
{Only visible once the option New has been chosen}
◦ Add Import
Adds an Import to the import list of the Skeleton to be created.
{Only visible once the option New has been chosen}
◦ Set Package
Sets the package of the Java file to be created.
{Only visible once the option New has been chosen}
•
State
{Only visible once a Java file has been opened}
◦ Load
Loads all the test information previously stored from a file.
◦ Save
Stores all the test information for future runs.
6/17
JUnit Test Generator
•
Object
15/04/10
User Manual
{Only visible once a Java file has been opened
and a Constructor has been selected}
•
◦ Create
Creates an object to be used in the tests.
Instruction
{Only visible once a Java file has been opened
and a method has been selected}
◦ Create
Allows to create an instruction as an assert or a custom code one.
◦ Edit Selected
Allows to edit the selected instruction.
{Only visible when an instruction has been selected}
◦ Delete Selected
Deletes the selected instruction.
{Only visible when an instruction has been selected}
7/17
JUnit Test Generator
15/04/10
User Manual
5. How To …
5.1. … Create an Skeleton with the application
1st Run the application
2nd Click on File → New
3rd Choose a folder an a name for the file to create. (User.java for example)
4th Follow 2.1.X. instructions.
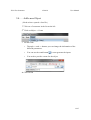
5.1.1. … Set File's package
1st Click on File → Set Package
2nd Write the package and click OK
8/17
JUnit Test Generator
15/04/10
User Manual
5.1.2. … Add an Import
1st Click on File → Add Import
2nd Write the package and class to import and click OK
5.1.3. … Add a constructor
1st Click on Method and Constructors → New Constructor
2nd Write the access (public or private) on the first Field
3rd Write the type of the nth parameter on the last Field and click on >>
4th Repeat step 3 until you finish, then click on Save
9/17
JUnit Test Generator
15/04/10
User Manual
5.1.4. … Add a method
1st Click on Method and Constructor → New Method
2nd Write the access (public or private) on the first Field
3rd Write the returned type on the second Field
4th Write the name of the method on the third Field
5th Write the type of the nth parameter on the last Field and click on >>
6th Repeat step 5 until you finish, then click on Save
5.1.5. … Create the skeleton once finished
1st Click on File → Export Skeleton
2nd The file would be created in the folder specified at the beginning.
It is possible to see the example in the Appendix 1.
10/17
JUnit Test Generator
15/04/10
User Manual
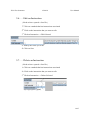
5.2. … Open a Java File
1st Run the application
2nd Click on File → Open
3rd Browse the file that you want to create the Test for
5.3. … Load or Save the progress of the Test Class
{ Needs to have opened a Java file}
1st Click on State → Load or State → Save
2nd Choose the file to read / write
11/17
JUnit Test Generator
15/04/10
User Manual
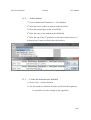
5.4. … Add a new Object
{ Needs to have opened a Java file}
1st Click on a Constructor in the list on the left
2nd Click on Object → Create
3rd Fill the fields.
•
Through << and >> buttons you can change the information of the
different parameters.
•
You can use the wand button
•
You need to provide a name for the object
to auto-generate the inputs
4th Click on OK
12/17
JUnit Test Generator
15/04/10
User Manual
5.5. … Add a new Instruction
{ Needs to have opened a Java file}
1st Click on a public method
2nd Click on Instruction → Create
3rd Here you can choose between the asserts or a custom code:
•
Asserts: Choose the object to use from the options, fill the parameters
and, in case you need it, add some extra code at the end.
•
Custom Code: just write your code in the field next to “Custom Code”
option
4th Click on Save (any of them)
13/17
JUnit Test Generator
15/04/10
User Manual
5.6. … Edit an Instruction
{ Needs to have opened a Java file}
1st Click on a method that has instructions associated
2nd Click on the instruction that you want to edit
3rd Click on Instruction → Edit Selected
4th Modify the fields you want
5th Click on Save
5.7. … Delete an Instruction
{ Needs to have opened a Java file}
1st Click on a method that has instructions associated
2nd Click on the instruction that you want to edit
3rd Click on Instruction → Delete Selected
14/17
JUnit Test Generator
15/04/10
User Manual
5.8. … Generate the Test File
{ Needs to have opened a Java file}
1st Click on File → Generate Test
2nd Browse where you want it to be created and Save
5.9. … Add a new type to the Randomizer
With the application is given a library Randomizer.jar and its Source Code.
This library is the one used to generate automatically the types of the fields. If your
code is using a type that is not in the Randomizer and you use the wand button while
creating an Object, it would give a warning message. If you want those types to be
generated, you should create those methods and compile Randomizer. The methods
should be public, and return some Java built-in type that, by calling toString(), it
returns how it should created.
For example, if we want to add to the Randomizer the User, we should create
the function getUser() as shown in Appendix 2
Once the code is ready, build the jar file and copy it to *_lib folder.
15/17
JUnit Test Generator
15/04/10
User Manual
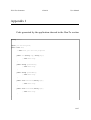
Appendix 1
Code generated by the application showed in the HowTo section
package hotel;
import java.util.ArrayList;
public class User{
// TODO Write your own class properties
public User(String arg0, String arg1){
// TODO Write body
}
public String getPassword(){
// TODO Write body
}
public String getUserName(){
// TODO Write body
}
public void setPassword(String arg0){
// TODO Write body
}
public viod setUserName(String arg0){
// TODO Write body
}
}
16/17
JUnit Test Generator
15/04/10
User Manual
Appendix 2
Example of code to add to the Randomizer class to generate
Objects of type User randomly.
public Object getUser(){
String letters = new String("abcdefghijklmnopqrstuvwxyzABCDEFGHIJKLMNOPQRSTUVWXYZ");
String username = new String();
String password = new String();
for (int i = 0; i<10; i++){
username += letters.charAt((int)(Math.random()*letters.length()));
password += letters.charAt((int)(Math.random()*letters.length()));
}
return new String("new User(\"" + username + "\", \"" + password + "\")");
}
17/17