1
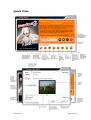
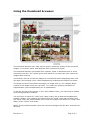
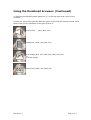
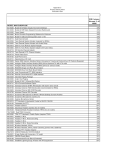
INSTALLATION AND USER MANUAL
ENGLISH/U.S
Revision 1.0
Page 1 of 1
Contents:
Contents: .................................................................................... 2
Introduction ................................................................................. 3
Quick View ................................................................................... 4
Installation: CDROM ...................................................................... 5
Installation: Internet Download....................................................... 5
Recovering your Images: ............................................................... 6
Important Notes about recovery: .................................................... 7
Using the thumbnail browser: ......................................................... 8
Advanced Options: ...................................................................... 10
Trouble Shooting: ....................................................................... 13
Contact Details: .......................................................................... 15
Revision 1.0
Page 2 of 2
Introduction
About ImageRecall 3.0
Thank you for purchasing ImageRecall 3.0, this is our third revision of our popular
recovery software and is by far the best recovery solution at this date to arrive in the
market.
We have taken version 2 and completely re-written it from the ground up, it now uses
a faster language and a professionally designed user interface.
The software itself now recovers more files, faster than any other recovery solution
and is a wise investment for anybody taking digital photography seriously.
ImageRecall knows a lot about digital media cards, its history ranges back to 1996
when digital media cards were only used in expensive non-commercial equipment
where we technically supported these industrial customers. With the advent of mp3
players and digital cameras the media cards applications became more widespread so
it was natural for us to open our technical services up to these new markets.
Our experience is unrivalled, and this experience is integrated into our recovery
software.
If you have purchased this software you are not only entitled to the excellent service it
will provide throughout its time on your computer, you are also entitled to free
specialised technical support on +44 (0)2380 240444 or [email protected] and
use of our recovery lab service that provides further ways of recovering your lost files.
Thank you
The ImageRecall Team.
Revision 1.0
Page 3 of 3
Quick View
Revision 1.0
Page 4 of 4
Installation: CDROM
Follow these quick and easy steps to get your CD copy of
ImageRecall 3 up and running in seconds.
1)
2)
3)
4)
5)
6)
Insert the ImageRecall 3 CD into your CDROM drive.
The CD should auto play, if it does jump to 6)
Choose the appropriate language.
Now follow the onscreen instructions for installation.
Once complete remove the CD from the drive and store in a safe place for
backup purposes.
If your CD does not auto play, double-click “My Computer” from your desktop
and right click the icon for ImageRecall 3 in your CDROM drive. Now choose
from the menu “Explore”. Navigate to the install directory and double-click
the ImageRecall3.exe file. (go to 3).
Installation: Internet Download
Follow these quick and easy steps to get your download of
ImageRecall 3 up and running in seconds.
1)
Locate the downloaded file, we recommend this is downloaded to the
desktop for easy access.
Double-click the imagerecall3.exe file, this will now launch the installation.
Choose the appropriate language.
Now follow the onscreen instructions to complete the installation.
2)
3)
4)
Registration (Internet Download Only)
To Register the software and enable the advanced tools and full
recovery do the following:1)
2)
3)
4)
5)
6)
Revision 1.0
Press the question mark button on the interface
Press the purchase new version and follow the onscreen instructions
presented to you by the secure online payment system from Worldpay.
Once payment has been processed an e.mail will be sent to you, this
e.mail will contain your name and a registration key.
Click the register full version button and enter your name and the key
exactly as they are typed in the e.mail it is case sensitive so follow the
name and key exactly.
We recommend copying and pasting the name and key, this eliminates
any errors.
Now save the key somewhere safe in case you need to re-format your
machine due to virus infection in the future.
Page 5 of 5
Recovering your Images:
ImageRecall 3 is designed specifically to be easy to use with no
expert knowledge required to get the results your need.
Follow these simple steps to get your photos.
1) Insert the media into the reader, or plug in the camera with the cable, ensure
the card is in the camera and turn it on.
2) Double-Click “My Computer” and find the drive letter that corresponds to the
camera or media (if you do not see one go to the troubleshooting section).
3) Close “my computer” (ensure you remembered that drive letter!).
4) Double-click the ImageRecall 3 Icon on the desktop.
5) Select the drive letter that you remembered in the drop down box.
6) Press the “magnifying glass” button, the card is now being scanned in “Turbo
Mode” this is the quickest of the scans.
7) The preview screen allows you to see the images being recovered this can be
turned off by pressing the button to the left of the screen titled “Preview”.
8) Keep your eyes on the “Bad Sectors” number if this changes from 0 to 1 and
increments then the recovery process will slow down (see Bad Sectors in
troubleshooting).
9) Wait for the progress bar to reach 100% and you will then be given the option
to go into deep scan mode.
10) If you look in the top right hand corner at “Files Found” and feel that
ImageRecall 3 has found all the files in “Turbo Scan” mode then you do not
need to go onto the deep scan so press “No”. if you feel more can be found
press “yes” for the deep scan mode.
11) Once the recovery is complete you will be given the option to view the
thumbnails using our inbuilt viewer, see ”page 6” for the functionality and
operation of the thumbnail browser.
Revision 1.0
Page 6 of 6
Important Notes about recovery:
By default all files are recovered to the C Drive at :“My Documents\My Recovered Files\Turbo Scan”
or
“My Documents\My Recovered Files\Deep Scan”
for the relevant scan modes - however; this can be changed by going into
advanced tools and clicking on the “Set Output Directory” button.
Set Output Directory
Turbo Scan mode and Deep Scan Mode are very different ways of recovering files,
Turbo scan is very successful with deleted cards and files but not effective if a
format has taken place. Deep scan on the other hand is very effective after an
accidental format.
Revision 1.0
Page 7 of 7
Using the thumbnail browser:
The thumbnail browser is an easy way to quickly review the quality of the recovered
images. It currently works with Jpeg and other common file types.
The thumbnail browser is accessed from 2 places, either in advanced tools or more
commonly from the “Yes” option given when asked if you want view your recovered
images after recovery.
The browser will first render the images into thumbnails before displaying them, this
can take a few seconds, once it has completed the rendering the images are shown.
The larger box at the top shows the image you single-click on, it’s a slightly larger
version of the image known as a preview. It is useful for checking corruption or
fragmentation (see troubleshooting for an explanation).
To see the full size of the picture in your own default viewer, you need only to doubleclick the appropriate thumbnail.
You will notice a switch for “turbo” and “deep” scans, this is because ImageRecall 3
creates 2 folders, one contains the images from the “turbo” scan and the other from
the “deep” scan, this switch allows you to view the images from either the “deep” scan
folder or the “Turbo” scan folder.
NOTE: The thumbnail browser views the recovered images from the last “recovered to”
directory.
Revision 1.0
Page 8 of 8
Using the thumbnail browser: (Continued)
To close the thumbnail browser press the “X” in the top right hand corner of the
interface.
There are 4 Icons that represent different types of files that the browser cannot show,
these icons give an indication of the type of file it is:-
Sound Files
(MP3, WAV, Etc)
Data Files (DOC, XLS, PDF, Etc)
Raw Image (Nef, X3F, CRW, RAF, ORF, CR2, Etc)
or
Corrupt Image
Movie Files (MPG, AVI, MOV, Etc)
Revision 1.0
Page 9 of 9
Advanced Options:
Setting the output directory
This is a very useful function that allows you to change where the recovered files are
placed once they are copied from the card.
You may find that ImageRecall 3 refuses to allow you to set the output directory to the
same location as the media that needs to be recovered, this is a safety mechanism
that protects your unrecovered data and ensures a better recovery count.
How to:1.
Click the “Set output directory” button, this is the first button on the left under
advanced tools.
2.
Press the “+” next to “My Computer” – this now shows you a list of drives
available on your PC, choose the appropriate drive where you wish to place the
files.
3.
To create a new directory, go to the drive or folder where you want to create
the new folder, then press the “New Folder” button. This will create a new
folder, to rename the folder click on the new folder that has been created this
will now allow you to rename the folder.
4.
Press “OK” to exit and all recovered files will be placed within that folder under
2 folders called “Turbo Scan” and “Deep Scan”.
File type selection
This is a very useful function that allows you to choose what types of files you wish to
recover, it helps when you need to filter out lots of junk that you really do not need.
The changes made in this tool are only applicable to the deep scan mode, the turbo
scan mode will still attempt to recover everything so cancel this mode whilst it is
running and choose “yes” to the deep scan mode that appears next.
You can select individual file types such as Jpeg or BMP, or you can select a category
of files such as Images, Movies, Data or Sound files.
Once you have made your selection click “Apply”.
Please note these settings are applied permanently, even when you restart the
software so remember to change them back if you need to.
Revision 1.0
Page 10 of 10
Advanced Options:(Continued)
Checking for updates
To check for available updates for ImageRecall 3 just press this button.
Ensure your computer is online, and allow any firewalls to give it permission to check
the ImageRecall 3 internet server.
Deleting the output directory
This function allows you to delete all the files in the recovered directory at the touch of
a button, it will delete the last files it recovered.
Before pressing this button ensure you have either copied your recovered files to
another location or made a backup to CD using our built-in CD writing wizard.
Secure Erase
This function permanently and securely erases all presence of data from your media by
writing “0” to every location.
You cannot run this on your main C drive or a CD-ROM drive.
The length of time of a secure erase depends on the capacity and speed of the media.
Once a secure erase has been run on your media, you will not be able to recover
anything from it.
Revision 1.0
Page 11 of 11
Advanced Options (Continued)
CD Writing Wizard
Our CD writing wizard is easy and fast, it adapts to whatever type of CD or DVD writer
you may have and can backup your files to CD-R.
The CD writing wizard will automatically backup the last recovery to a CD, if the files
are to large to fit on 1 CD then it will automatically ask for another blank CD until the
recovery has been backed up.
How to:1.
2.
3.
4.
5.
6.
Click the CD Writing Wizard (last button on the right)
Press the eject button on your CD writer and insert a blank CD.
Enter a name for the volume in the box labelled “CD Volume name”.
Press the “Burn” button
Allow around 1 minute for ImageRecall 3 to cache the data and it will then
start to write the data to the CD you will notice this as the buffer indicators
start to change.
Once complete the CD will be ejected and you can close the CD writer
wizard by pressing the “X” in the top right hand corner of the interface.
Card Backup and Restore Tools
The backup function is for those people in a rush. It allows you to backup or take a
snapshot of the map or content of the media. You can then re-format the card and reuse it for another shoot. At anytime in the future when you feel you have the time to
do the original recovery simply use the restore function to place the backup or map
back onto the original card. You are then in a position to start the recovery.
We do not recommend this is used on large hard drives.
Revision 1.0
Page 12 of 12
Trouble Shooting:
My camera is installed and turned on but I cannot see a drive
letter to recover from?
ImageRecall 3.0 requires a mass storage enabled camera or card reader to read and
access the card, some cameras although they have a USB lead use a twain system. If
the camera is using a twain system (typically some Canon cameras) then you will need
a card reader from your local camera store.
To test if your camera is twain, go into “My Computer” whilst the camera is on, and
installed with a card and see if there is a drive letter for the camera, if there is not you
are using a twain camera.
What are bad sectors, they are appearing on the card?
Bad sectors are areas of memory that are not responding to the ImageRecall 3 scans,
these are not recoverable and we recommend that after recovery you do not use the
card in the camera again.
I scanned the correct drive but nothing was recovered?
There are known formats on cameras that are not recoverable, we can give you the
following information on what we have experienced as from September 2004:-
List of camera with unrecoverable formats
Manufacturer
Fuji
Konica
Kyocera
Kyocera
Minolta
Olympus
Polaroid
Sony
Sony
Model
All
KD Series
M400R
FineCam S3R
G500
All
PDC3030
Cybershot
FD100
Card
Smartmedia/XD
MemoryStick
SD Card
SD Card
MemoryStick
Smartmedia/XD
Smartmedia
MemoryStick
Floppy Disk
Function
Format/Delete All
Format
Format
Format
Format
Format/Delete All
Format/Delete All
Format
Format
I have lost photos on my C drive and want to scan that but too
much data is being recovered?
This is quite a serious problem, ImageRecall is very thorough it will recover all image
formats from the Windows installed drive and with a lot of internet usage ImageRecall
can pull as many as 20,000 images back before you even glimpse the ones you are
after. The bigger the drive the bigger the problem, the only way to ensure you do not
recover too many files is to choose the filetype you are after. Simply start the scan,
press cancel and agree to continue with the Deep scan. This was it will recover only
the filetypes you have selected.
Revision 1.0
Page 13 of 13
My recovered images have bits missing, or other parts of photos
tangled in them?
This is known as fragmentation, if you do not regularly format, or checkdisk the media
data becomes jumbled, this is more apparent of users who only delete photos from the
card rather then formatting.
This means that when an image is written to the card, the FAT file system has to split
the image up so it can fit it into available memory locations, if the card becomes
corrupt and the FAT file system is lost then there is nothing to give ImageRecall the
locations of where the pieces of files were saved, there is nothing that can be done if
this is the case.
To prevent it happening again always remember the golden rule “always format before
an important shoot” and this will never happen again.
I can see the thumbnail in Windows Explorer but when I double
click on it there is no viewable image?
This is due to the same problem explained in fragmentation, at the start of every exif
jpeg file is a small thumbnail, the rest of the file contains the main image.
ImageRecall finds the start of the file and scans it in but it when it comes to the end its
not complete because the file is fragmented this why you can see the thumbnail but
none or only part of the main image.
I cannot see my images in the browser?
If you cannot see your images in the browser then either the images you are
recovering are a proprietary RAW format so you will need to use the correct software
to view the files or the image is corrupt due to fragmentation as outlined at the top of
this page.
My Software is not correctly updating?
Please ensure your firewall is allowing ImageRecall 3 to access the internet and that
you have an internet connection and are currently connected.
Revision 1.0
Page 14 of 14
Contact Details:
www.imagerecall.com
Technical Support
+44 (0) 02380 240444
[email protected]
Sales
+44 (0) 2380 240440
See our list of distributors on the internet site at www.imagerecall.com for the up to date
distributor in your respective country.
ImageRecall
1st Floor Penarth House
Otterbourne
Winchester
Hampshire
SO21 2EZ
United Kingdom
+44 (0) 2380 240440 – Telephone
+44 (0) 2380 268691 – Fax
Special Thanks to:Matthias Wandel
Gerry McGuire
For their combined work on Dexif, a function that extracts exif data from a jpeg file.
Anders Melander
For his work on TGIFImage, a function that handles GIF images correctly.
Copyright 2004 ImageRecall – a member of the Media Innovations Group
Revision 1.0
Page 15 of 15