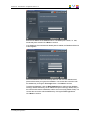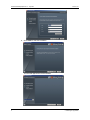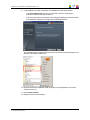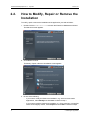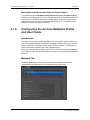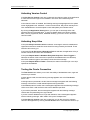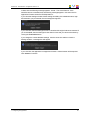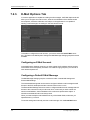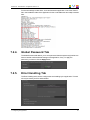
1
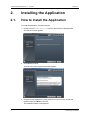
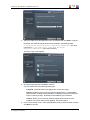
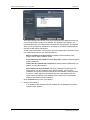
USER MANUAL
Configurator
Version 1.0 - July 2013
IP2Archive - User Manual - Configurator Version 1.0
Copyright
EVS Broadcast Equipment S.A.– Copyright © 2003-2013. All rights reserved.
Disclaimer
The information in this manual is furnished for informational use only and subject to
change without notice. While every effort has been made to ensure that the information
contained in this user manual is accurate, up-to-date and reliable, EVS Broadcast
Equipment cannot be held responsible for inaccuracies or errors that may appear in this
publication.
Improvement Requests
Your comments will help us improve the quality of the user documentation. Do not
hesitate to send improvement requests, or report any error or inaccuracy on this user
manual by e-mail to [email protected].
Regional Contacts
The address and phone number of the EVS headquarters are usually mentioned in the
Help > About menu in the user interface.
You will find the full list of addresses and phone numbers of local offices either at the end
of this user manual (for manuals on hardware products) or at the following page on the
EVS website: http://www.evs.com/contacts.
User Manuals on EVS Website
The latest version of the user manual, if any, and other user manuals on EVS products
can be found on the EVS download center, on the following webpage:
http://www.evs.com/downloadcenter.
I
EVS Broadcast Equipment S.A. - July 2013
II
Issue 1.0.D
IP2Archive - User Manual - Configurator Version 1.0
1.
About the Application
Configurator is an application which allows a system administrator to configure the
IP2Archive applications. It also allows to create users for the IP2Archive system and
manage their user rights.
1. About the Application
1
EVS Broadcast Equipment S.A. - July 2013
Issue 1.0.D
2.
Installing the Application
2.1.
How to Install the Application
To install the application, proceed as follows:
1. Double-click the IP2Archive.exe to launch the IP2Archive Setup Wizard.
The Welcome screen appears.
2. Click Next to continue.
The End-User License Agreement screen appears.
3. Read the license agreement on using IP2Archive in your country. Accept the
agreement and click Next to continue.
The Installation Folder screen appears.
2
2. Installing the Application
IP2Archive - User Manual - Configurator Version 1.0
4. Select the folder where the application has to be installed and click Next to continue.
By default, the IP2Archive applications will be installed in the following folder:
C:\Program Files\EVS Broadcast Equipment\IP2Archive\(for 32-bit
machines) or C:\Program Files (x86)\EVS Broadcast
Equipment\IP2Archive\ (for 64-bit machines).
The Setup Type screen appears.
5. Choose a setup type and click Next to continue.
You can choose one of the following setup types:
◦
Complete: Installs all IP2Archive applications. Continue to step 7.
◦
Typical: Installs the most common IP2Archive applications, i.e. the database
client software, the Deep Archive Manager, Configurator and the EVS Software
Player. Continue to step 7. By default, this installation type is selected.
◦
Custom: Allows you to select the IP2Archive applications that have to be
installed. The Custom Setup screen appears. Continue to step 6.
6. In the Custom Setup screen, select the applications that you want to install, and then
click Next to continue.
2. Installing the Application
3
EVS Broadcast Equipment S.A. - July 2013
Issue 1.0.D
The Custom Setup screen shows a tree view of the IP2Archive applications that you
can install. By default, Deep Archive Manager, the database client software, the
EVS Software Player, the IP2Archive documentation and Configurator are selected.
When you click a feature or subfeature, a description of the feature will be displayed
and also the disk space requirements.
To add or remove a feature, click the arrow next to the feature name, and then choose
one of the following options from the drop-down list:
◦
Will be installed on local hard drive: Installs the selected feature in the
location shown under Installation Folder.
◦
Entire feature will be installed on local hard disk: Installs the selected feature
and all subfeatures.
◦
Feature will be installed when required:The feature will be installed when you
perform an action that requires it.
◦
Entire feature will be unavailable: For a new installation of IP2Archive, this
option passes over the installation of the selected feature. For an existing
installation, this option removes the feature from the installation. After you select
this option, a red X appears on the feature tree next to the feature name.This
option cannot be selected for the database client software, the EVS Software
Player and the IP2Archive documentation.
Click the Reset button to undo your selection.
7. Do one of the following:
◦
4
If no database client software has been installed yet, the Database Connection
Creation screen appears.
2. Installing the Application
IP2Archive - User Manual - Configurator Version 1.0
Enter the IP address of the database server. The default port number, i.e. 1521,
has already been entered. Click Next to continue.
◦
If the database client software has already been installed, the Database Selection
screen appears.
Select the database name from the drop-down list and enter the username and
password necessary to log onto the database. You can test the connection with
the database by clicking the Test Login button. Click Next to continue.
To add a new database, click the New Database button and enter the database
name (by default IP2A.EVS), the IP address and port number (by default 1521) of
the machine that hosts the database, and the service name (by default TOM). You
can test the connection with the database by clicking the Test Login button.
Click Next to continue.
2. Installing the Application
5
EVS Broadcast Equipment S.A. - July 2013
Issue 1.0.D
8. Click Install to start the installation.
The selected applications will be installed.
6
2. Installing the Application
IP2Archive - User Manual - Configurator Version 1.0
9. If the installation has been completed, click Finish to exit the Setup Wizard.
◦
If the View Readme File check box is selected, a text file containing the
IP2Archive release notes will be opened.
◦
If the second check box is selected, the Configurator application will be launched.
This application will allow to configure the installed applications.
The installed IP2Archive applications and a link to the IP2Archive documentation will
appear in the Windows Start menu.
10. Open the IP2Archive installation folder, and right-click the application you want to
create a shortcut to.
11. Click Create Shortcut.
12. Drag the shortcut to the Desktop.
2. Installing the Application
7
EVS Broadcast Equipment S.A. - July 2013
2.2.
Issue 1.0.D
How to Modify, Repair or Remove the
Installation
To modify, repair or remove the installation of the application, proceed as follows:
1. Double-click the IP2Archive.exe to launch the IP2Archive Maintenance Wizard.
The Welcome screen appears.
2. Click Next to continue.
The Modify, Repair or Remove Installation screen appears.
3. Do one of the following:
8
◦
If you want to modify the IP2Archive installation, e.g. add or remove certain
applications, select Modify and click Next. Continue to step 4.
◦
If you want to repair the IP2Archive installation, e.g. fixing missing or corrupt files,
shortcuts and registry entries, select Repair and click Next. Continue to step 6.
2. Installing the Application
IP2Archive - User Manual - Configurator Version 1.0
◦
If you want to remove the IP2Archive installation, select Remove and click Next.
Continue to step 7.
4. In the Custom Setup screen, select the applications that you want to (de)install.
The Custom Setup screen shows a tree view of the IP2Archive applications that you
can install and deinstall. By default, Deep Archive Manager, the database client
software, the EVS Software Player, the IP2Archive documentation and Configurator
are selected. When you click a feature or subfeature, a description of the feature will
be displayed and also the disk space requirements.
To add or remove a feature, click the arrow next to the feature name, and then choose
one of the following options from the drop-down list:
◦
Will be installed on local hard drive: Installs the selected feature in the
location shown under Installation Folder.
◦
Entire feature will be installed on local hard disk: Installs the selected feature
and all subfeatures.
◦
Feature will be installed when required:The feature will be installed when you
perform an action that requires it.
◦
Entire feature will be unavailable: For a new installation of IP2Archive, this
option passes over the installation of the selected feature. For an existing
installation, this option removes the feature from the installation. After you select
this option, a red X appears on the feature tree next to the feature name.This
option cannot be selected for the database client software, the EVS Software
Player and the IP2Archive documentation.
Click the Reset button to undo your selection. Click Next to continue.
5. Click Install to start the installation.
2. Installing the Application
9
EVS Broadcast Equipment S.A. - July 2013
Issue 1.0.D
Any features that you have added in the Custom Setup screen will be installed. Any
features that you have removed will be uninstalled. The installed features that you
haven't modified will be skipped. Continue to step 8.
6. Click Repair to repair the installation of EVS IP2Archive. Continue to step 8.
7. Click Remove to remove IP2Archive from your computer.
10
2. Installing the Application
IP2Archive - User Manual - Configurator Version 1.0
8. Click Finish to exit the Setup Wizard.
2. Installing the Application
11
EVS Broadcast Equipment S.A. - July 2013
3.
Starting the Application
3.1.
After Installation
Issue 1.0.D
Double-click the Configurator icon
on your desktop to start the application. You can
also start the application by double-clicking the executable file (.exe) in the installation
folder.
The splash screen appears.
The application logs into the database. Then, the Settings window appears allowing you to
configure the application.
See section "Settings Window" on page 60.
3.2.
After Configuration
Double-click the Configurator icon
on your desktop to start the application. You can
also start the application by double-clicking the executable file (.exe) in the installation
folder.
The splash screen appears. The application logs into the database.
Then, a Login dialog box appears.
12
3. Starting the Application
IP2Archive - User Manual - Configurator Version 1.0
To be able to log into the application, you need to belong to a user group that has a role
which allows to use the application.
Enter your username and password and click Login. The main window of the application
opens.
You get an error notification if:
•
you have entered a wrong username or password.
•
you have omitted your username.
•
you have insufficient user rights.
•
your user account has expired.
3. Starting the Application
13
EVS Broadcast Equipment S.A. - July 2013
3.3.
Issue 1.0.D
Main Window Overview
General Description
The main window allows you to view and switch between the various setup panes of
Configurator.
Illustration
The main window contains the areas highlighted on the screenshot below:
Area Description
The table below describes the various parts of the main window:
Part
14
Name
Description
1.
Menu Bar
The menu bar contains three menus: File, Settings
and Help.
2.
Selected Setup Pane
This area displays the selected setup pane. Each
setup pane allows you to configure specific settings.
3.
Navigation bar
The Navigation bar allows you to navigate between
the eight Setup panes. They can be accessed by
clicking the corresponding icon.
3. Starting the Application
IP2Archive - User Manual - Configurator Version 1.0
Menu Bar
The menu bar contains three menus: File, Settings and Help.
The File menu contains only one command: Exit. It is used to exit the application. Click
the File menu or use the keyboard shortcut keys ALT + F or F10 + F to open it. Click Exit
or use the keyboard shortcut key X to exit the application.
The Settings menu doesn’t contain any commands. It immediately gives access to the
application settings. Click the Settings menu or use the keyboard shortcut keys ALT + S
or F10 + S to access the settings.
The Help menu contains the following commands: About and Help. With the About
command the application splash screen can be opened. The splash screen displays the
application software version, the name of the database the application is logged on to and
the login name used. With the Help command you can open the application help file. Click
the Help menu or use the keyboard shortcut keys ALT + H or F10 + H to open it. Click
About or use the keyboard shortcut key A to open the splash screen. Click Help or use
the keyboard shortcut key H to open the application help file.
Setup Categories
The settings are grouped according to three setup categories:
Setup Category
Description
Connections
Settings related to the connection between IP2Archive and
IPDirector, and between IP2Archive and the HSM system.
Settings
Settings related to specific IP2Archive applications.
Rights
Settings related to user rights.
Setup Panes
The following table briefly describes each Setup pane:
Setup Pane
Description
IPDirector
This pane allows you to configure the connection between
IPDirector and particular IP2Archive applications. See section
"Configuring the Connection with IPDirector" on page 17.
HSM
This pane allows you to configure the connection between
IP2Archive and the hierarchical storage management system
(HSM). See section "Configuring the HSM Connection" on page
24.
General
This pane allows you to configure settings specific to the Deep
Archive Manager. See section "Configuring Deep Archive
Manager" on page 33.
Application
Monitor
This pane allows you to configure the Application Monitor. See
section "Configuring Deep Archive Manager" on page 33.
3. Starting the Application
15
EVS Broadcast Equipment S.A. - July 2013
16
Issue 1.0.D
Setup Pane
Description
Relations
This pane allows you to create and manage users and contacts for
the IP2Archive system, and to assign user rights and resources to
them. See section "Managing Relations" on page 44.
Roles
This pane gives an overview of the user rights (=roles). It allows
you to add a description to each user right. See section "Managing
User Rights" on page 53.
Groups
This pane gives an overview of the existing user groups. It allows
you to create new user groups and delete existing ones. See
section "Managing User Rights" on page 53.
3. Starting the Application
IP2Archive - User Manual - Configurator Version 1.0
4.
Configuring Connections
4.1.
Configuring the Connection with
IPDirector
4.1.1.
Introduction
The connection between IPDirector and IP2Archive can be configured in the IPDirector
setup pane.
It allows you to:
4.1.2.
•
create a connection with an IPDirector in your setup
•
configure the connection between the SOAP API of the IPDirector of your choice and
the IP2Archive applications
•
configure the connection between the local SOAP notification server of IP2Archive
Communicator and IPDirector
•
specify the archive and process bins in IPDirector IP2Archive Communicator has to
monitor
•
specify the archive metadata userfields in IPDirector IP2Archive Communicator and
Deep Archive Sync have to update.
Creating an IPDirector Connection
If your setup has more than one IPDirector, Configurator allows you to create and
configure a connection between IP2Archive and each of these IPDirectors. The creation
is done in the IPDirector Name area.
4. Configuring Connections
17
EVS Broadcast Equipment S.A. - July 2013
Issue 1.0.D
To create a connection with a particular IPDirector, click the New button. Enter a name for
the IPDirector you want to connect with and click the OK button. The name will appear in
the IPDirector Name field. You can now start configuring the connection.
To switch between the connection settings of two IPDirectors, select the name of the
desired IPDirector from the IPDirector Name drop-down list.
To delete a particular connection, select the name of the desired IPDirector from the
IPDirector Name drop-down list and click the Delete button. Click OK to confirm your
action. Note that if you delete a connection, all corresponding settings will be lost.
4.1.3.
Configuring the Connection with the
IPDirector API
The API tab allows you to configure the connection between the IPDirector SOAP API
and the IP2Archive Applications (Deep Archive Manager, Deep Archive Sync, IP2Archive
Communicator, Deep Archive Controller).
In the IPDirector API Settings group box you have to enter the data these applications
need to be able to communicate with the IPDirector API.
The following data has to be entered:
18
•
API Host: The IP address or hostname of the server that hosts the IPDirector API.
•
Login: The login necessary to log into the IPDirector API.
•
Password: The password necessary to log into the IPDirector API.
•
WSDL: The path to the IPDirector API .wsdl file. This path is is automatically entered
based on the IP address of the server that hosts the IPDirector API.
4. Configuring Connections
IP2Archive - User Manual - Configurator Version 1.0
A Test button is provided allowing you to test the connection with the IPDirector API. If all
data is correct, the message ‘Connected’ will appear. Otherwise, the message
‘Connection Failed’ will appear.
In the Cmnd. Timeout field you can set the number of seconds to wait while IPDirector
attempts to execute a command, before canceling the attempt and generate an error. By
default, a time interval of 10 seconds is set.
By default, the API maintains a session for 1 hour. After a period of no activity, the
session expires automatically. In the Token Keep Alive field you can set a time interval
after which the session timeout is reset to prevent the session from timing out. By default,
this is after 10 minutes.
If you select the option Extended Log Enabled, additional information will be inserted in
the application logs. For example, the API messages and parameters sent by the SOAP
API client (= the application). By default, this option is not selected.
If you select the option Trace Enabled,even more detailed information will be inserted in
the application logs,namely the entire SOAP messages sent between the
SOAP API client (= the application) and the SOAP API server (= IPDirector API). By
default, this option is not selected.
4.1.4.
Configuring the Local SOAP Notification
Server
The API tab also allows you to configure the connection between IPDirector and the local
SOAP notification server that forms part of the IP2Archive Communicator.
The IP2Archive Communicator receives notifications from IPDirector through a local
SOAP notification server, for example, when a new clip has been created in IPDirector,
the archive status of a clip has changed, or when a clip has been moved to a particular
archive bin.
In the IPDirector API Notification Settings group box you have to enter the data which is
necessary for IPDirector to send notifications to the SOAP notification server.
The following data has to be entered:
•
Server Local Host: The IP address or hostname of the server on which IP2Archive
Communicator runs.
•
WSDL: The path to the IPDirector Communicator API .wsdl file. This path is
automatically entered based on the IP address of the server on which IP2Archive
Communicator runs.
•
Server Local Port: The port on which the local SOAP notification server listens for
notifications of IPDirector. By default, this is 30677, and it should only be altered if
there are issue with firewalls or port conflicts.
4. Configuring Connections
19
EVS Broadcast Equipment S.A. - July 2013
Issue 1.0.D
If you select the option Trace Enabled,more detailed information will be inserted in the
application logs, namely the entire SOAP messages sent between the SOAP API client
(=IPDirector API) and the SOAP API server (= the application). By default, this option is
not selected.
4.1.5.
Configuring the IP2Archive Archive and
Restore Process Bins
Introduction
When installing and configuring IP2Archive, an Archive and Restore bin hierarchy is
created in the Database Explorer of IPDirector. This bin hierarchy allows users to easily
request the archiving and restoring of certain clips by dragging them to a specific bin
within this hierarchy. It also allows them to keep track of the archive and restore process
of each clip. Depending on their archive or restore status, clips will be moved from one bin
in the hierarchy to another. Each bin represents a particular stage in the archive or restore
process.
These bins have to be monitored by the IP2Archive Communicator and the Deep Archive
Sync application. The IP2Archive Communicator will check for archive and restore
requests and pass this on to IP2Archive. Both applications will check the archive and
restore status of the clips and move them to another bin if the status changes.
20
4. Configuring Connections
IP2Archive - User Manual - Configurator Version 1.0
Bins Tab
The Bins tab allows you to specify which bins should be scanned by IP2Archive and Deep
Archive Sync.
Note
Before you start configuring this tab, make sure you have already configured the
connection with the IPDirector API. See section "Configuring the Connection
with the IPDirector API" on page 1. Otherwise, an error message will appear if
you open the Bins tab. Also, the drop-down lists where you have to select the
bins will be empty.
Linking Archive and Restore Process Bins
In the Archive Process Bins group box the names of the archive process bins that have to
be scanned are displayed. For each bin, you have to select the name of the corresponding
bin in IPDirector from a drop-down list. Note that if you haven't configured the connection
with the IPDirector API yet, the drop-down list will be empty.
You have to do the same for the restore process bins in the Restore Process Bins group
box.
Set Request Bin Scan Frequency
The Request Bin Active Scan Delay field allows you to set how frequently (in seconds)
IP2Archive Communicator has to scan the Request Archive and the Request Restore bin.
By default, this is every 10 seconds. If you set this to 0, no scanning will be performed.
4. Configuring Connections
21
EVS Broadcast Equipment S.A. - July 2013
Issue 1.0.D
Moving Externally Requested Clips on Status Change
If you enable the option Add External Requested Clips to Bins on Status Change,
IP2Archive Communicator will not only move the clips that were requested in IPDirector
to be archived or restored to another bin on status change, but also the clips that were
requested to be archived or to be restored outside IPDirector, i.e. in the Deep Archive
Manager. By default, this option is selected.
4.1.6.
Configuring the Archive Metadata Profile
and User Fields
Introduction
To be able to monitor the progress and status of the archive and restore process of the
clips in the Database Explorer of IPDirector, metadata is added to the clips by means of
specific userfields. For example, Archive Status, Archive Progress, Archive Date, etc.
These userfields are linked to one or more metadata profiles.
IP2Archive Communicator and Deep Archive Sync will check the IP2Archive database
for the status of these clips and then update the content of the corresponding userfields in
IPDirector.
Metadata Tab
The Metadata tab allows you to specify the IPDirector metadata profile and the
corresponding userfields that have to be updated by both applications.
22
4. Configuring Connections
IP2Archive - User Manual - Configurator Version 1.0
Note
Before you start configuring this tab, make sure you have already configured the
connection with the IPDirector API. See section "Configuring the Connection
with the IPDirector API" on page 1. Otherwise, an error message will appear if
you open the Metadata tab. Also, the drop-down lists where you have to select
the userfields and the metadata profile will be empty.
Selecting the Archive Metadata Profile
The Archive Metadata Profile group box displays a grid with the names of the available
metadata profiles retrieved from IPDirector. If you haven't configured the connection with
the IPDirector API yet, this list will be empty.
Select the Default check box of the IP2Archive metadata profile. If a clip has no metadata
profile assigned to it yet in IPDirector, the IP2Archive Communicator will assign the
metadata profile you have marked as being the default profile. To avoid that the userfields
linked to the other metadata profiles appear in the drop-down lists of the Archive Metadata
Userfields group box, select the corresponding Ignore check box.
Selecting the Archive Metadata Userfields
In the Archive Metadata Userfields group box the names of the userfields that have to be
updated are displayed. For each userfield, you have to select the name of the
corresponding userfield in IPDirector from a drop-down list.Once you have selected a user
field, the type of user field (text, combo box, date) will be displayed next to it. If you
haven't configured the connection with the IPDirector API yet, this list will be empty.
4. Configuring Connections
23
EVS Broadcast Equipment S.A. - July 2013
Issue 1.0.D
4.2.
Configuring the HSM Connection
4.2.1.
Introduction
The HSM setup pane allows you to configure the connection between IP2Archive and the
hierarchical storage management system.
The connection with the following HSM systems can be configured:
4.2.2.
•
Front Porch Digital DIVArchive
•
XenData Digital Archive
•
SGL FlashNet
•
Atempo Digital Archive
Selecting the Type of HSM
To be able to configure the connection between IP2Archive and the Hierarchical Storage
Management System (HSM) in your setup, you first have to select the type of HSM from
the HSM field. Once selected, the corresponding settings will appear.
24
4. Configuring Connections
IP2Archive - User Manual - Configurator Version 1.0
4.2.3.
Configuring the DIVA Connection
Entering the Connection Data
In the Connection group box you have to enter the data Tape Storage Controller needs to
connect with Front Porch Digital's DIVArchive.
The following data has to be entered:
•
Manager: The name of the DIVArchive Manager. The DIVArchive Manager is the
main component in a DIVArchive system. All archive operations are controlled and
handled by the DIVArchive Manager.
•
Address: The IP address of the management station running the DIVArchive
Manager software component.
•
Port: The listening port number of the DIVArchive Manager management station. By
default, this is 9000.
A Test button allows you to test the connection with DIVArchive. If the connection is ok,
the message ‘Success’ will appear.
Otherwise, an error message will appear.
Click the Save button to save your settings. Click the Undo button to undo the
information you have just entered or modified.
Setting the Maximum Number of Archive and
Restore Requests
The Storages area allows you to the set maximum number of archive and restore requests
that will be simultaneously sent to the DIVArchive by Tape Storage Controller.
By default, 2 archive and 2 restore requests will be sent at the same time.
4. Configuring Connections
25
EVS Broadcast Equipment S.A. - July 2013
Issue 1.0.D
You also have to enter the name of the default tape group. A group is a logical association
of tapes in the LTO tape library, for example Movies, Arts, Commercials. The name of the
default group has to match the name as configured in the Sets and Groups tab of the
Configuration Utility of DIVArchive.
Click the Save button to save your settings. Click the Undo button to undo the
information you have just entered or modified.
Entering LTO Tape IDs
Introduction
The Tape Storage tab contains vital information about the LTO tapes in the tape library.
You have to add the ID of the LTO tapes that are available in the tape library. This is
necessary because the Tape Storage Controller application that communicates with the
DIVArchive system cannot obtain this list from the DIVArchive database through the
DIVArchive API. You can add single tape IDs by clicking the Add button, but you can
also import a list containing multiple tape IDs by clicking the Import Batch button.
Each tape has a unique ID. This ID can be the ID assigned to the tape by the tape
manufacturer, e.g. T0001, but can also be a custom ID assigned in agreement with the
customer. This custom ID will consist of maximum six characters, e.g. EVS001. The list
containing the tape IDs is a simple text file. The IDs have to be entered in the text file
below each other as exemplified in the image below.
26
4. Configuring Connections
IP2Archive - User Manual - Configurator Version 1.0
How to Add a Single Tape ID
To add a single tape ID, proceed as follows:
1. Click the Add button.
◦
If tape set ID 0 is selected, a warning message appears. This is because normally
no tapes are assigned to tape set 0.
Click No to abort the operation and select a different tape set ID first.
◦
If tape set ID 0 is not selected, or if you click Yes, the Add Tapes dialog box
appears.
2. Select the Single Tape radio button.
3. Enter the tape ID.
4. Click Add to add the tape ID to the list of tape IDs or Cancel to cancel the operation.
How to Add a Tape Range
To add a range of tapes, proceed as follows:
1. Click the Add button.
◦
If tape set ID 0 is selected, a warning message appears. This is because normally
no tapes are assigned to tape set 0.
Click No to abort the operation and select a different tape set ID first.
◦
4. Configuring Connections
If tape set ID 0 is not selected, or if you click Yes, the Add Tapes dialog box
appears.
27
EVS Broadcast Equipment S.A. - July 2013
Issue 1.0.D
2. Select the Tape Range radio button.
3. In the Prefix field, enter the default prefix that should be added to each tape ID
belonging to the tape range, e.g. ‘T’.
A preview is given of the new tape IDs.
4. In the Start field, select or type the start number of the first tape ID.
5. In the End field, select the end number of the last tape ID.
6. In the Length field, specify the length, i.e. the number of characters, of the tape ID.
7. Click the Add button to add the tape IDs or Cancel to cancel the operation.
28
4. Configuring Connections
IP2Archive - User Manual - Configurator Version 1.0
4.2.4.
Configuring the XenData Connection
Entering the Connection Data
In the XenData Configuration group box you can configure the connection between the
File Transfer Daemon and the API of the XenData hierarchical storage management
system Digital Archive.
You have to enter the following information:
•
XenData Root Folder: The root location of the XenData hard disk.
•
XenData Subfolder: The path of a folder on this XenData hard disk where the files to
be archived will be stored.
•
Maximum Number of Transfers: The maximum number of file transfers that can be
simultaneously performed by the File Transfer Daemon.
The XenData root folder path is necessary to be able to make connection with the
XenData API.
The XenData root folder and XenData subfolder path combined represent the location on
the XenData hard disk where the files to be archived to LTO will be transferred to by the
File Transfer Daemon.
Click the Save button to save your settings. Click the Undo button to undo the
information you have just entered or modified.
Setting the Maximum Number of Archive and
Restore Requests
The Storages area allows you to the set maximum number of archive and restore requests
that will be sent simultaneously to XenData by the File Transfer Daemon.
By default, 2 archive and 2 restore requests will be sent at the same time.
Click the Save button to save your settings. Click the Undo button to undo the
information you have just entered or modified.
4. Configuring Connections
29
EVS Broadcast Equipment S.A. - July 2013
4.2.5.
Issue 1.0.D
Configuring the FlashNet Connection
Entering the Connection Data
The FlashNet Connection group box allows you to configure the connection between the
Tape Storage Controller and SGL's hierarchical storage management system FlashNet.
The following connection data has to be entered:
•
Host : The IP address or machine name of the FlashNet server.
•
Port: The listening port number of the FlashNet server. The default port number is
8199.
•
Application Host: The IP address or machine name of the server that hosts Tape
Storage Controller.
In the Reply Timeout field you have to enter how many seconds Tape Storage Controller
will wait for the FlashNet server to respond after making connection before giving an error
. By default, this is set to 60 seconds.
If you select the Logging Enabled check box, extra logs related to FlashNet will be
added to the application log files. By default, this option is selected.
If you select the Trace Enabledcheck box, the XML communication between Tape
Storage Controller and FlashNet is added to the log files. By default, this option is not
selected.
The Test button can be used to test the connection with the FlashNet server.
Click the Save button to save your settings. Click the Undo button to undo the
information you have just entered or modified.
Setting the Maximum Number of Archive and
Restore Requests
The Storages area allows you to the set maximum number of archive and restore requests
that will be simultaneously sent to FlashNet by Tape Storage Controller.
By default, 2 archive and 2 restore requests will be sent at the same time.
30
4. Configuring Connections
IP2Archive - User Manual - Configurator Version 1.0
You also have to enter the name of the default tape group. A group is a logical association
of tapes in the LTO tape library, for example Movies, Arts, Commercials. The name of the
default group has to match the name as configured in the Media Group Management
window of FlashNet.
Click the Save button to save your settings. Click the Undo button to undo the
information you have just entered or modified.
4.2.6.
Configuring the ADA Connection
Entering the Connection Data
The ADA group box allows you to configure the connection between the Tape Storage
Controller and the Atempo Digital Archive (ADA) system.
Entering the Connection Data
In the Connection group box you have to enter the following connection data:
•
User: The name of the user as defined in Atempo Digital Archive.
•
Domain: The Windows domain name.
•
Password: The password necessary to log into Atempo Digital Archive.
•
Server Name: The name of the Atempo Digital Archive Server to which Tape Storage
Controller will connect. You have to use the machine name.
•
Port: The number of the port the Atempo Digital Archive Server will listen for requests.
By default, this is port 80.
•
Database: The database instance used for Atempo Digital Archive. It is called ADA
by default.
Specifying the ADA Archive
In the ADA Archive group box you have to enter the following data:
•
Archive: The name of the project archive created in Atempo Digital Archive. A project
archive is shared and can be accessed by several users defined by the Administrator.
•
Path: The folder of the project archive which mirrors the location of the data on the
source platform. This folder has a path of the structure: <source_machine>\<source_
machine_OS>\root_path_on_source>.
4. Configuring Connections
31
EVS Broadcast Equipment S.A. - July 2013
Issue 1.0.D
Specifying the Host Platform
A host platform is an archiving platform where the source data to be archived is located. In
the Host Platform group box you have to enter the network name of the machine hosting
the data. This name can be derived from the UNC path of the storage or this can be a fixed
name. The first option is used when there are multiple storages, the second option is used
when there is only one storage.
Enabling Logging
If you select the option Enable Logging, an extensive log will be kept of the
communication between Tape Storage Controller and the Atempo Digital Archive Server.
Click the Test button to test this option.
Enabling Retrieval of LTO Tape ID
If you select the option Retrieve Tape ID After Archiving Has Finished, Tape Storage
Controller will retrieve from the ADA database the ID of the LTO tape which contain the
archived files.
Click the Save button to save your settings. Click the Undo button to undo the
information you have just entered or modified.
Setting the Maximum Number of Archive and
Restore Requests
The Storages area allows you to the set maximum number of archive and restore requests
that will be sent simultaneously to ADA by Tape Storage Controller.
By default, 2 archive and 2 restore requests will be sent at the same time.
Click the Save button to save your settings. Click the Undo button to undo the
information you have just entered or modified.
32
4. Configuring Connections
IP2Archive - User Manual - Configurator Version 1.0
5.
Configuring Settings
5.1.
Configuring Deep Archive Manager
5.1.1.
Introduction
The General setup pane allows you to configure certain features of the Deep Archive
Manager.
The following features can be configured
5.1.2.
•
the automatic archiving, restoring and purging of clips and the automatic removal of
the high-resolution video file from the IPDirector nearline
•
the deriving of the content type of the clips that enter Deep Archive Manager
•
the language of the user interface.
Configuration Tab
Introduction
The Configuration tab allows you to configure the Deep Archive Manager. You can specify
by means of filters which types of clips:
•
have to be automatically archived
•
have to be automatically refused
•
have to be automatically purged.
5. Configuring Settings
33
EVS Broadcast Equipment S.A. - July 2013
Issue 1.0.D
You can also specify for which types of clips, once archived, the high-resolution video file
has to be automatically removed from the IPDirector nearline.
Filter Criteria
The following filter criteria are available:
•
VarID: VarID of the clip. By default, the wildcard character * is entered.
•
Filepath: path of the folder where the high-resolution video files are stored. By default,
the wildcard character * is entered.
•
Clipname: name of the clip. By default, the wildcard character * is entered.
•
Video formats: video format of the media assets that are linked to the clip. Multiple
video formats can be selected. By default, the option None selected is selected.
•
Origin: source via which the clip was entered in the deep archive system. Multiple
origins can be selected. By default, the option None selected is selected.
•
Content Types: categorization of the content of a clip. Multiple content types can be
selected. By default, the option None selected is selected.
Regular Expressions
In the VarID, Filepath and Clipname field you can enter regular expressions that Deep
Archive Manager will use to recognize certain strings of text, such as particular
characters, words, or patterns of characters, in the VarID, filepath or clipname of clips.
Priority of Filters
The filters are displayed in order of priority. Deep Archive Manager will start from the top of
the list. It will search for clips that match the criteria of the first filter and execute the
request. If there are no more clips that match the criteria, it will search for clips that match
the criteria of the second filter, etc.
You can change the order of priority by means of
34
and
.
5. Configuring Settings
IP2Archive - User Manual - Configurator Version 1.0
Adding an Archive Filter
Depending on your user rights, you will be able to add an archive filter or not. If you don't
have the necessary rights, the Archive icon will not be visible.
To add an archive filter, proceed as follows:
1. Click the Archive icon to open the Archive pane.
2. Enter and/or select the desired filter criteria.
3. Click the Add button.
A new archive filter is added to the archive filter list. By default, New archive filter is
entered as name for the filter.
4. (Optional) Enter a new name for the filter.
5. (Optional) Select the Auto Archive check box. If selected, clips that correspond to
the selected filter criteria will be automatically archived by Deep Archive Manager.
6. (Optional) Edit the other filter data.
7. Click the Save button to save the archive filter in the database. If you don't save your
filter and leave the pane, a message will appear asking you to save your changes.
8. Click Save.
Adding a Refuse Archive Filter
Depending on your user rights, you will be able to add a refuse archive filter or not. If you
don't have the necessary rights, the Refuse Archive icon will not be visible.
To add a refuse archive filter, proceed as follows:
1. Click the Refuse Archive icon to open the Refuse Archive pane.
2. Enter and/or select the desired filter criteria.
3. Click the Add button.
A new refuse archive filter is added to the refuse archive filter list. By default, New
Refuse archive filter is entered as name for the filter. The Auto Refuse check box is
automatically selected.
4. (Optional) Enter a new name for the filter.
5. In the Retention period field, enter the time (in hours) after which Deep Archive
Manager will automatically refuse the clips and move them from the Archive
Candidates tab to the Refused tab. The retention period starts from the moment when
the clip is dropped in the Request Archive bin in IPDirector (displayed in the Deep
Archive Manager as Creation date).
6. (Optional) Edit the other filter data.
7. Click the Save button to save the refuse archive filter in the database. If you don't
save your filter and leave the pane, a message will appear asking you to save your
changes.
5. Configuring Settings
35
EVS Broadcast Equipment S.A. - July 2013
Issue 1.0.D
8. Click Save.
Adding a Remove Hires Filter
Depending on your user rights, you will be able to add an remove hires filter or not. If you
don't have the necessary rights, the Remove Hires icon will not be visible.
To add a remove hires filter, proceed as follows:
1. Click the Remove Hires icon to open the Remove Hires pane.
2. Enter and/or select the desired filter criteria.
3. Click the Add button.
A new remove hires filter is added to the remove hires filter list. By default, New
Remove hires filter is entered as name for the filter.
4. (Optional) Enter a new name for the filter.
5. (Optional) Select the Auto remove check box. If selected, the hires file of clips that
correspond to the selected filter criteria will be automatically removed by Deep
Archive Manager after a certain period of time from the nearline storage.
6. In the Retention period field, enter the time (in days) after which Deep Archive
Manager will automatically remove the hires file of the clips. The retention period
starts from the moment when the clip is dropped in the Request Archive bin in
IPDirector (displayed in the Deep Archive Manager as Creation date).
7. (Optional) Edit the other filter data.
8. Click the Save button to save the remove hires filter in the database. If you don't save
your filter and leave the pane, a message will appear asking you to save your
changes.
9. Click Save.
Adding a Purge Filter
Depending on your user rights, you will be able to add an purge filter or not. If you don't
have the necessary rights, the Purge icon will not be visible.
To add a purge filter, proceed as follows:
1. Click the Purge icon to open the Purge pane.
2. Enter and/or select the desired filter criteria.
3. Click the Add button.
36
5. Configuring Settings
IP2Archive - User Manual - Configurator Version 1.0
A new purge filter is added to the purge filter list. By default, New Purge Filter is
entered as name for the filter.
4. (Optional) Enter a new name for the filter.
5. (Optional) Select the Auto Purge check box. If selected, the high-resolution file of the
clips that correspond to the selected filter criteria will be automatically purged from
LTO after a certain period of time.
6. In the Retention period field, enter the time (in days) after which Deep Archive
Manager will automatically request the purge of the high-resolution file from LTO and
the removal of the high-resolution and low-resolution file from the nearline storage. The
retention period starts from the moment when the clip is dropped in the Request
Archive bin in IPDirector (displayed in the Deep Archive Manager as Creation date).
7. (Optional) Edit the other filter data.
8. Click the Save button to save the purge filter in the database. If you don't save your
filter and leave the pane, a message will appear asking you to save your changes.
9. Click Save.
Editing Filters
To edit one or more filters, proceed as follows:
1. Select each time the filter you want to edit.
2. Change the necessary data.
3. Do one of the following:
◦
Click the Post button or select another filter to save the changes in the memory of
Deep Archive Manager. The changes are not yet saved in the database.
◦
Click the Cancel button to undo the changes you made to the selected filter.
◦
Click the Undo button to undo all the changed filters.
◦
Click the Save button to save all the changed filters in the database.
Deleting a Filter
To delete a filter, proceed as follows:
1. Select the filter from the list and click the Delete button
.
A confirmation dialog box appears.
2. Click OK to continue. The filter is removed from the list.
3. Click the Save button to save the change to the database.
5. Configuring Settings
37
EVS Broadcast Equipment S.A. - July 2013
5.1.3.
Issue 1.0.D
Content Types Tab
The Content Types tab is used to specify the possible content types of the clips that enter
the deep archive system. The Content Types tab consists of two sub-tabs:
•
Regular Expressions
•
Content Types
Regular Expressions Sub-tab
The Regular Expressions sub-tab is used to manage regular expressions. These regular
expressions are used by Deep Archive Manager to derive the content type of a clip from
its video file name. The regular expressions are displayed in order of priority. The regular
expressions at the top of the list will be processed first.
Possible Regular Expression
The table below gives an overview of the regular expressions that can be used:
38
Metacharacter
Syntax
Operator
Name
.
Any Character - Dot
Matches any character.
+
One or More -Plus Quantifier
Matches one or more occurrences of the preceding
subexpression.
?
Zero or One -Question Mark
Quantifier
Matches zero or one occurrence of the preceding
subexpression.
Description
5. Configuring Settings
IP2Archive - User Manual - Configurator Version 1.0
Metacharacter
Syntax
Operator
Name
Description
*
Zero or More -Star Quantifier
Matches zero or more occurrences of the
preceding subexpression.
{m}
Interval--Exact
Count
Matches exactly m occurrences of the preceding
subexpression.
{m,}
Interval--At
Least Count
Matches at least m occurrences of the preceding
subexpression.
{m,n}
Interval-Between Count
Matches at least m, but not more than n
occurrences of the preceding subexpression.
[ ... ]
Matching
Character List
Matches any character in list ...
[^ ... ]
Non-Matching
Character List
Matches any character not in list ...
|
Or
'a|b' matches character 'a' or 'b'.
( ... )
Subexpression
or Grouping
Treat expression ... as a unit. The subexpression
can be a string of literals or a complex expression
containing operators.
\n
Backreference
Matches the nth preceding subexpression, where n
is an integer from 1 to 9.
\
Escape
Character
Treat the subsequent metacharacter in the
expression as a literal.
^
Beginning of
Line Anchor
Match the subsequent expression only when it
occurs at the beginning of a line.
$
End of Line
Anchor
Match the preceding expression only when it
occurs at the end of a line.
How to Add a New Regular Expression
To add a new content type, proceed as follows:
1. In the Regular Expressions sub-tab, click:
◦
◦
to add a record for a new regular expression below the existing regular
expressions.
to insert a regular expression between two existing regular expressions.
2. Enter the regular expression string in the Reg. Exp. field. For example, ‘^T.*$’.
3. Select the desired content type from the Content Type field. For example, ‘Teaser’.
4. Enter a comment in the Comments field. For example, ‘The letter T, followed by any
number of characters’.
5. Activate the regular expression by selecting the corresponding check box.
6. Click
to validate the new regular expression. This button only becomes available
once you have added a new regular expression.
Deep Archive Manager adds the new regular expression to the IP2Archive database.
5. Configuring Settings
39
EVS Broadcast Equipment S.A. - July 2013
Issue 1.0.D
7. Click Save to add the new regular expression definitively to the database or Undo to
return to the state before you added a new regular expression. These buttons only
become available once you have validated the changes.
In the example, Deep Archive Manager will now categorize all archive candidates
whose video file name starts with the letter T followed by any number of characters as
belonging to the content type Teaser.
How to Test a Regular Expression
To test a regular expression, e.g. ‘^T.*$’, type part of the video file name of a clip, e.g. T_
Lonely_In_Paris, in the Test field and then click the Preview button. A popup will appear
indicating the content type the clip belongs to. If the entered video file name string doesn’t
match any regular expression, a warning message will appear.
How to Edit a Regular Expression
To edit a regular expression, just select it in the Regular Expressions list and perform the
necessary changes. Click
to validate the changes. Click Save to save the changes
you made, or Undo to undo them. These buttons only become available once you have
validated the changes.
How to Deactivate a Regular Expression
To deactivate a regular expression, clear the corresponding Active check box. The regular
expression will remain visible in the list of regular expressions, but will no longer apply to
the video file names as they appear in Deep Archive Manager.
How to Delete a Regular Expression
To delete a regular expression, proceed as follows:
1. In the Regular Expressions sub-tab, select the regular expression you want to delete.
2. Click
.
A dialog box appears asking you to confirm the action.
3. Click OK to continue.
The record of the regular expression is removed from the Regular Expressions list.
4. Click Save to definitively delete the regular expression or Undo to return to the state
before you deleted the regular expression.
How to Change the Priority of a Regular Expression
To change the priority of a regular expression, select it in the Regular Expressions list
and then click
or
to move the regular expression one position up or down the list.
Click Save to save the new order or Undo to undo it.
40
5. Configuring Settings
IP2Archive - User Manual - Configurator Version 1.0
Content Types Sub-tab
The Content Types sub-tab is used to manage the possible content types. New content
types can be added and existing content types can be edited or deleted. A retention period
for each content type can also be specified.
How to Add a New Content Type
To add a new content type, proceed as follows:
1. In the Content Types sub-tab, click
.
In the Content Types list a new, empty record is added below the existing content
type records.
2. Enter a name and description for the new content type.
3. Enter a retention period.
Deep Archive Manager will propose a date to remove the hi-res video file of a
particular clip. It will take the archive date of the clip and add the number of days
entered in the Retention Period field. This proposal date will be displayed in the
Remove Hires Proposal field of the Archived tab.
4. Click
to validate the new content type. This button only becomes available once
you have added a new content type.
Deep Archive Manager adds the new content type to the IP2Archive database.
5. Click Save to add the new content type definitively to the database or Undo to return
to the state before you added a new content type. These buttons only become
available once you have validated the changes.
How to Edit a Content Type
To edit a content type, just select it in the Content Type list and perform the necessary
changes. Click
to validate the changes. Click Save to save the changes you made, or
Undo to undo them. These buttons only become available once you have validated the
changes.
How to Delete a Content Type
To delete a content type, proceed as follows:
5. Configuring Settings
41
EVS Broadcast Equipment S.A. - July 2013
Issue 1.0.D
1. In the Content Types sub-tab, select the content type you want to delete.
2. Click
.
A dialog box appears asking you to confirm the action.
3. Click OK to continue.
The record of the content type is removed from the Content Types list.
4. Click Save to definitively delete the content type or Undo to return to the state before
you deleted the content type.
Warning
You cannot delete content types that are used in one or more regular
expressions. An error message will appear.
Delete these regular expressions first.
5.1.4.
Language Tab
The Language tab allows the system administrator to change the language of the user
interface of the Deep Archive Manager. The default language is set to English. In the
settings of the Deep Archive Manager the user can still select another language though.
42
5. Configuring Settings
IP2Archive - User Manual - Configurator Version 1.0
5.2.
Configuring Application Monitor
Introduction
The Application Monitor is an automated application that is used to monitor the status of
the automatic IP2Archive applications and their tasks. It will notify the system
administrator when one of these applications is down or when one or more of its automatic
tasks went into error.
The Application Monitor setup pane allows you to specify which automatic applications
Application Monitor has to monitor.
Specifying the Automatic Applications to Monitor
The Application Monitor tab lists the automatic IP2Archive applications that are installed
in your IP2Archive setup. It allows you to specify which applications should be monitored
by Application Monitor. Note that the applications displayed in the screenshot above
might differ from the applications in your specific setup.
If you select the Visible check box of a particular application, the application will appear in
the Applications pane of the main window of the Application Monitor. Application Monitor
will then monitor the status of this application.
To view the tasks of an application, click
5. Configuring Settings
. To hide the tasks again, click
.
43
EVS Broadcast Equipment S.A. - July 2013
Issue 1.0.D
6.
Managing Relations and User
Rights
6.1.
Managing Relations
6.1.1.
Introduction
Configurator allows you to create relations for the IP2Archive system: contacts and
users.
Contacts are relations that have no access to the IP2Archive system. They are defined
by the department and the company they work for.
Users are contacts that have access to and can perform actions in the IP2Archive
system. They too are defined by the department and company they work for. Moreover,
they are member of a user group and they can perform certain tasks in the IP2Archive
system, for example archive and restore certain clips.
6.1.2.
Relations Pane
The Relations pane opens when you click the Relations icon in the
Navigation bar.
This pane allows you to search for, create and delete contacts and users. It also enables
you to export the information of all users.
44
6. Managing Relations and User Rights
IP2Archive - User Manual - Configurator Version 1.0
6.1.3.
Creating Relations
Workflow
When creating contacts and users, you always have to proceed in the following order:
1. Create a company.
2. Create a department for a company.
3. Create a contact.
4. Turn the contact into a user.
Creating a Company
To create a new company, proceed as follows:
1. Open the Relations pane.
2. In the Company Data area, click the New button
.
3. In the Company Name field, enter the name of the new company.
4. Click the Save button to save the new company.
Creating a Department
Each company can consist of one or more departments. To create a new department for a
company, proceed as follows:
1. Open the Relations pane.
2. In the Companies area, search and select the company you want to create a new
department for, or create a new company first.
3. Open the Departments tab.
The names of the existing departments are displayed under the Company field.
6. Managing Relations and User Rights
45
EVS Broadcast Equipment S.A. - July 2013
4. Click the New Department button
Issue 1.0.D
.
5. In the Department field, enter the name of the new department. This field is
mandatory.
6. In the Address field, enter the address of the department.
7. In the Other field, enter the contact information and select a currency.
8. Click the Save button.
46
6. Managing Relations and User Rights
IP2Archive - User Manual - Configurator Version 1.0
Creating a Contact
Each department can have one or more contacts. To create a new contact for a
department, proceed as follows:
1. Open the Relations pane.
2. In the Companies area, search the company you want to create a contact for, or
create a new company first.
3. Open the Departments tab and check if a department has already been created for the
company. If not, create one first.
4. Open the Contacts tab.
5. Click the New Contact button
.
6. In the Department list, select the department for which you want to create a contact.
The Department field is mandatory.
7. In the Contact field, enter the contact details. The trigram of a contact is the threeletter abbreviation of the name of that contact.
The Last Name field is mandatory.
8. Open the Address tab.
6. Managing Relations and User Rights
47
EVS Broadcast Equipment S.A. - July 2013
Issue 1.0.D
9. Enter the address of the new contact manually if it differs from the department
address, otherwise click the Copy from Department button
.
Creating a User
Besides contacts, a department can also have one or more users.
To turn a contact into a user, select the User check box in the Contact tab.
Enter a user name (mandatory).
To enter a password, click the Set Password button. A dialog box will appear in which
you can enter the password. Repeat the password and click OK.
The user will need this information to log into the IP2Archive system.
The access of a user to the MAD system can be limited in time by defining an expiration
date. To do this, tick the Expires check box and select a date from the date picker. As of
this date the user will no longer be able to log into the MAD system to perform actions.
48
6. Managing Relations and User Rights
IP2Archive - User Manual - Configurator Version 1.0
6.1.4.
Searching Relations
Searching a Company
To search a company, proceed as follows:
1. In the Relations pane, open the Search Company tab.
2. In the Company field, enter the name of the company.
3. Press ENTER or click the Search button to start the search.
The company name appears in the Company list.
If you want to get an overview of all companies, leave the Company field empty.
Searching a Contact
To search a contact, proceed as follows:
1. In the Relations pane, open the Search Contact tab.
2. In the Company field, enter the name of the company the contact works for.
3. In the Contact field, enter the name of the contact.
If you want an overview of all contacts, leave the Contact field empty.
4. Press ENTER or click the Search button to start the search.
The name of the contact appears in the Company list. The name of the company and
department the contact works for are also displayed.
6. Managing Relations and User Rights
49
EVS Broadcast Equipment S.A. - July 2013
50
Issue 1.0.D
6. Managing Relations and User Rights
IP2Archive - User Manual - Configurator Version 1.0
6.1.5.
Deleting Relations
Deleting a Company
To delete a company, proceed as follows:
1. In the Relations pane, open the Search Company tab.
2. Search for the company you want to delete.
3. Select the company and click the Delete button
.
Warning
If you delete a company, all data related to that company (departments, users)
will be lost.
Deleting a Department
To delete a department, proceed as follows:
1. In the Relations pane, open the Search Company tab.
2. Search for the company the department belongs to.
3. Select the company.
4. Open the Departments tab.
5. Select the department you want to delete and click the Delete Department button
.
Warning
If you delete a department, all data related to that department will be lost.
Deleting a Contact
To delete a department, proceed as follows:
1. In the Relations pane, open the Search Company tab.
2. Search for the company the contact works for.
3. Select the company.
4. Open the Contacts tab.
5. Select the contact you want to delete and click the Delete Contact button
.
6. Managing Relations and User Rights
51
EVS Broadcast Equipment S.A. - July 2013
6.1.6.
Issue 1.0.D
Exporting User Information
Configurator allows you to export the information (e.g. name, email, trigram, rights, etc.)
of all users to Excel.
To do this, proceed as follows:
1. Open the Relations pane.
2. Click the Report button
.
The Save As dialog box opens.
3. Name the Excel file and save it on the desired location.
A message box appears asking you if you want to open the newly created Excel file.
4. Click Yes to open it, or No to close the message box without opening the Excel file.
52
6. Managing Relations and User Rights
IP2Archive - User Manual - Configurator Version 1.0
6.2.
Managing User Rights
6.2.1.
User Rights Structure
Overview
The structure of the user rights in IP2Archive is User / Group / Role.
User Groups
All users in the IP2Archive system are put into groups. Each user is member of one or
more user groups. All groups have at least one role assigned.
Roles for Groups
A role is a user right. It allows a user to perform certain actions in the IP2Archive system.
Roles are not assigned to users, but to groups. There are various types of roles.
6. Managing Relations and User Rights
53
EVS Broadcast Equipment S.A. - July 2013
6.2.2.
Issue 1.0.D
Managing Roles
Roles Pane
The Roles pane opens when you click the Roles icon in the Navigation
bar.
This pane gives an overview of the existing, predefined roles. It allows you to select a role
and add a description to it.
Overview Roles
The following roles have been configured in Configurator:
54
User Right
Meaning
Start Deep Archive
Manager
The user can start the Deep Archive Manager.
Archive
The user has archive rights in the Deep Archive Manager.
Restore
The user has restore rights in the Deep Archive Manager.
Remove Hires
The user has remove rights in the Deep Archive Manager.
Purge
The user has purge rights in the Deep Archive Manager.
6. Managing Relations and User Rights
IP2Archive - User Manual - Configurator Version 1.0
User Right
Meaning
Partial Restore
The user has partial restore rights in the Deep Archive
Manager.
Start Deep Archive
Sync
The user can start Deep Archive Sync.
Synchronize
IPDirector
The user has rights to synchronize IPDirector.
Synchronize
IPDirector Lores
The user has rights to synchronize with IPDirector to restore
low-resolution files.
Synchronize with
DIVA
The user has rights to synchronize with DIVA.
6. Managing Relations and User Rights
55
EVS Broadcast Equipment S.A. - July 2013
Issue 1.0.D
Adding a Description to a Role
You cannot create new roles. They are predefined. You can only add a (new) description.
To add a description to a role, proceed as follows:
1. Open the Roles pane.
2. From the Roles list, select a role, for example 'Deep Archive - Restore'.
3. In the Role area below, enter a description in the Description field.
4. Click the Save button to save the description.
The new description appears in the Roles list.
56
6. Managing Relations and User Rights
IP2Archive - User Manual - Configurator Version 1.0
6.2.3.
Managing Groups
Groups Pane
The Groups pane opens when you click the Groups icon in the Navigation
bar.
This pane gives an overview of the existing groups. It allows you to create new and delete
existing groups. It also allows you to add roles to and remove from a group.
6. Managing Relations and User Rights
57
EVS Broadcast Equipment S.A. - July 2013
Issue 1.0.D
Creating a Group
To create a new group, proceed as follows:
1. Open the Groups pane.
2. Click the New button
to create a new group.
3. In the General Info area, enter a name for the new group and also add a description.
4. In the Roles pane, select the roles you want to add to the group. To select a
consecutive group of roles, click the first item, press and hold down the SHIFT key,
and then click the last item. To select non-consecutive roles, press and hold down the
CTRL key, and then click each item you want to select.
5. Click the Add button
.
The selected roles are added to the new group.
6. Click the Save button to save the new group.
The new group appears in the Groups list.
58
6. Managing Relations and User Rights
IP2Archive - User Manual - Configurator Version 1.0
Deleting a Group
Warning
If you delete a group, the users belonging to that group will lose their user rights.
To delete a group, proceed as follows:
1. Open the Groups pane.
2. From the Groups list, select a group.
3. Click the Delete button
.
A message asks you to confirm your action.
4. Click Yes to continue or No to cancel the operation. If validated, the group disappears
from the list.
Adding a User to a Group
Each user of the IP2Archive system belongs to at least one user group. To add a user to a
user group, proceed as follows:
1. Open the Relations pane.
2. Search for the user you want to add to a user group.
3. Open the Contacts tab and then the Groups tab.
4. Select a group from the list, for example ‘Deep Archive Manager’.
5. Click
to add the selected group to the user.
6. Click Save.
The user will now have the user rights that are inherent to this user group.
6. Managing Relations and User Rights
59
EVS Broadcast Equipment S.A. - July 2013
Issue 1.0.D
7.
Configuring the Application
7.1.
Settings Window
Opening the Settings Window
The Settings window allows you to configure your application. The first time the
application is launched after it has been installed, the Settings window opens
automatically.
The Settings window can also be accessed through the Settings menu in the main
window.
Overview Setup Categories
The settings can be divided into three setup categories. In the Settings window, a tab is
provided for each setup category. The table below briefly describes each setup category:
Setup Category
Description
User Settings
These settings can be configured by each individual user.
Global Settings
These settings can only be configured by the system
administrator and by an eventual superuser.
System Settings
These settings configure the general functioning of the
application. They can only be configured by the system
administrator.
Currently, only the System Settings tab contains settings. The User Settings and Global
Settings tab are still empty. They do not contain any settings.
60
7. Configuring the Application
IP2Archive - User Manual - Configurator Version 1.0
Edit Mode
To be able to edit the Global and/or System settings, you first have to enter a password.
To put the Settings window into Edit Mode, proceed as follows:
1. Click the Enter Into Edit Mode button
.
A dialog box appears.
2. Enter the administrator password and then click OK.
The Settings window enters into Edit Mode.
7. Configuring the Application
61
EVS Broadcast Equipment S.A. - July 2013
Issue 1.0.D
7.2.
System Settings
7.2.1.
Overview System Settings Subcategories
The System settings are divided into the following subcategories:
•
Directories
•
MAD Options
•
Oracle Connection
•
E-Mail Options
•
Global Password
•
Error Handling
For each subcategory a tab is provided. The Directories and MAD Options tab do not
contain any settings.
62
7. Configuring the Application
IP2Archive - User Manual - Configurator Version 1.0
7.2.2.
Oracle Connection Tab
The Oracle Connection tab allows you to configure the connection with the Oracle
database.
Entering the Database Name
In this field you have to enter the name of the database the application has to connect to.
If the Use This Database Name check box is selected, the name of the database will
automatically appear in the Oracle login dialog box at start-up.
Entering the Login Name
In this field you have to enter a login name. If the Use This Login Name check box is
selected, the login name will automatically appear in the Oracle login dialog box at startup.
Entering a Password
In this field you have to enter a password. If the Use Auto Login check box is selected,
the application automatically logs into the selected database at start-up. The Oracle login
dialog box does not appear.
7. Configuring the Application
63
EVS Broadcast Equipment S.A. - July 2013
Issue 1.0.D
Activating Version Control
If the Use Version Control check box is selected, the software version of the application
is checked each time it logs into the database. This check box should always be
selected!!
If the software version is outdated, the following warning message appears in the splash
screen highlighted in red: ‘Obsolete – A newer version exists. May not be used anymore.’
Click the OK button to close the splash screen and update your software version.
By clicking the Application History button, you can open a chronological list of all
software versions of the application. To get more details about each version (creation
date, name of programmer, status, additional remarks), you have to click + next to the
version number.
Activating Keep Alive
If the option Keep Connection Alive is selected, a message is sent to the database at
regular time intervals to avoid idle connections from being closed by the firewall. These
intervals can be set by you.
If the option Try to Reconnect if Keep Alive Fails is selected, the application will try a
number of times to reconnect with the database.
If the option Report Status in Database Everytime Keep Alive Timer Triggers is
selected, the status of the connection is reported in the database each time the Keep
Alive Timer sends a trigger to send a Keep Connection Alive message.
If the option Report Status of Tasks is selected, the status of the tasks (ok or not ok) is
reported to the database.
Testing the Oracle Connection
The Test Oracle button allows you to check the validity of the database name, login and
username you entered.
If these data are valid, then the following message appears next to the Test Oracle
button: ‘OK’.
If the login name or password is invalid, then a message box appears with the following
message: ‘ORA-01017: invalid username/password; logon denied’.
If the database name is invalid, then a message box appears with the following message:
‘ORA-12154:TNS: could not resolve the connect identifier specified’.
If you omit the password, then a message box appears with the following message:
‘ORA-01005: null password given; logon denied’.
If you don’t enter a database name, login and username, then a message box appears
with the following message: ‘ORA-12560: TNS: protocol adapter error’.
If the Use Version Control check box is selected, you can also check the software
version of the application by clicking the Test Oracle button. If the software version is up-
64
7. Configuring the Application
IP2Archive - User Manual - Configurator Version 1.0
to-date, then the following message appears: ‘Actual – The Actual Version’. If the
software version is outdated, then the following message appears: ‘Unknown Version
Application! Please contact the EDP department.’
If you close the Settings window without testing the validity of the database name, login
and username you just entered, then a message box appears.
If you click Yes, then the Settings window is closed and the original values are restored. If
you click Cancel, then the Settings window doesn’t close and you can test the values by
clicking the Test Oracle button.
If you change the current database settings, test the connection and then close the
Settings window, a message box will appear.
If you click Yes, the application is stopped and closed. A manual restart will be required.
Click Cancel to continue.
7. Configuring the Application
65
EVS Broadcast Equipment S.A. - July 2013
7.2.3.
Issue 1.0.D
E-Mail Options Tab
In case the application is capable of sending e-mail messages, the E-Mail Options tab will
allow you to configure an e-mail account, enter the e-mail address of the default sender
and recipients, and enter a default e-mail subject. If the application is not capable of
sending e-mail messages, the settings in this tab cannot be used.
To be able to configure the e-mail account, you have to select the Send E-Mail check
box. The fields in the Mail System Settings and Mail Message Settings group box become
available.
Configuring an E-Mail Account
In the Mail System Settings group box you have to enter the IP address and port number
of the SMTP server and specify a timeout. In the SMTP Login group box you can enter a
user name and password.
Configuring a Default E-Mail Message
The Mail Message Settings group box contains two tabs: Internal Mail Settings and
External Mail Settings.
The Internal Mail Settings tab can be used to configure a default e-mail message that will
be sent to the EVS developers and the customer when an error occurs.
The External Mail Settings tab can be used to configure a default e-mail message that will
be sent to the customer to notify him about an error. In each tab you have to enter the
sender’s email address, the email address of the various recipients and a subject. It
should be noted that this tab is not always used.
When you insert multiple e-mail addresses in any of the header fields, make sure you
separate them by a comma.
To test the settings and manually send an e-mail message, click the Send Mail button.
66
7. Configuring the Application
IP2Archive - User Manual - Configurator Version 1.0
For the new settings to take effect, close and restart the application. Check the TOM.ini
file in the installation folder of the application for the e-mail addresses and subject entered
here.
7.2.4.
Global Password Tab
The Global Password tab allows you to set a password that the superuser(s) has/have to
enter to be able to edit the Global settings of the application, if any. To apply the
password, you have to click the Apply button.
7.2.5.
Error Handling Tab
The Error Handling tab is used to configure the error handling by the application. This tab
will only be used by the EVS administrator.
7. Configuring the Application
67
EVS Broadcast Equipment S.A. - July 2013
Issue 1.0.D
Handling Unhandled Errors
If the Save the Screen Dump check box is selected, a screenshot is taken of an
unhandled error message and stored in the database and in a folder on the computer
where the application is installed. In the Not Logged Error(s) panel, errors can be typed for
which no log was created. By default, this check box is selected.
Handling Handled Errors
If the Save the Unforced Error Log’s check box is selected, the log of the error is saved
in the database and in a folder on the computer where the application is installed. By
default, this check box is selected.
If the Save the Screendump check box is selected, a screenshot is taken of the error
message and stored in the database and saved in the same folder as where the error log is
kept. By default, this check box is selected.
68
7. Configuring the Application
Corporate
+32 4 361 7000
North & Latin America
+1 973 575 7811
EVS Headquarters
Liège Science Park
16, rue Bois St Jean
B-4102 Seraing
Belgium
To learn more about EVS go to www.evs.com
Asia & Pacific
+852 2914 2501
Other regional offices
www.evs.com/contact
EVS Broadcast Equipment is continuously adapting and improving its products in accordance with the ever changing
requirements of the Broadcast Industry.
The data contained herein is therefore subject to change without prior notice. Companies and product names are
trademarks or registered trademarks of their respective companies.