1
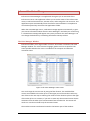
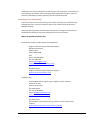
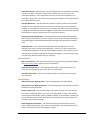
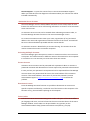
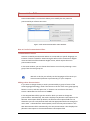
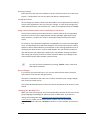
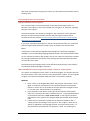
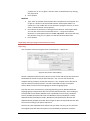
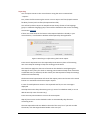
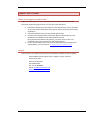
Infovox iVox – User Manual version 4.0 Published the 11th of December 2013 Copyright © 2006-2013 Acapela Group. All rights reserved http://www.acapela-group.com Table of Contents INTRODUCTION .......................................................................................................... 1. WHAT IS INFOVOX IVOX?.................................................................................................. 1. HOW TO USE INFOVOX IVOX ............................................................................................. 1. TRIAL LICENSE AND PURCHASE INFORMATION ........................................................................ 2. SYSTEM REQUIREMENTS ................................................................................................... 2. LIMITATIONS OF INFOVOX IVOX .......................................................................................... 2. INSTALLATION/UNINSTALLATION ................................................................................ 3. HOW TO INSTALL INFOVOX IVOX......................................................................................... 3. HOW TO UNINSTALL INFOVOX IVOX .................................................................................... 3. INFOVOX IVOX VOICE MANAGER................................................................................. 4. THE VOICE MANAGER WINDOW ......................................................................................... 4. INSTALLING VOICES ......................................................................................................... 5. ACTIVATING VOICES......................................................................................................... 5. MENUS AND FUNCTIONS................................................................................................... 8. ACTIVATION SERVER ACCOUNT......................................................................................... 10. VOICE CREDITS ............................................................................................................. 10. PRONUNCIATION EDITOR .......................................................................................... 11. HOW TO USE THE PRONUNCIATION EDITOR ......................................................................... 11. FINE-TUNING THE NEW PRONUNCIATION ............................................................................ 14. IMPORTING AND EXPORTING PRONUNCIATION LEXICONS........................................................ 15. SUPPORT AND CONTACT ........................................................................................... 17. WHERE TO GET SUPPORT FOR INFOVOX IVOX ...................................................................... 17. CONTACT .................................................................................................................... 17. TROUBLESHOOTING AND FAQ ................................................................................... 18. INFOVOX IVOX FAQ ...................................................................................................... 18. PRONUNCIATION EDITOR FAQ ......................................................................................... 18. iii Introduction What is Infovox iVox? Infovox iVox is the voice that enables your computer to speak. Infovox iVox is a high-quality multilingual text-to-speech converter that can be used to add vocal output to any application compatible with Apple Speech Manager. Infovox iVox is the ideal partner for the Universal Access accessibility suite built-in on Mac OS X, including the widely popular screen reader VoiceOver. However, there are some limitations in Infovox iVox affecting the way VoiceOver works with Infovox iVox. See the section Limitation of Infovox iVox to find more information about it. Many other third-party applications, for instance Preview, TextEdit, Acrobat Reader, Proloquo, GhostReader and VisioVoice, will also benefit from the high-quality voices provided with Infovox iVox. All you need to do is install Infovox iVox and then select your favorite voice. Infovox iVox voices are available in a wide variety of languages, including English. New languages are added continuously. Once installed, the voices can be employed by any standard Mac application. Infovox iVox can be purchased with either one or more voices. For each language there are several voices included, both male and female. Please check the specifications per language to view the exact list of voices included. How to Use Infovox iVox Infovox iVox contains two applications: Voice Manager and Pronunciation Editor. The Voice Manager application is used to install, activate, and to inspect the voices. While using the voices, the Voice Manager application does not need to be running. Pronunciation Editor is an application used for changing the standard pronunciation of the words. You can select one of the Infovox iVox voices as your default system voice in the Text to Speech tab of the System Preferences' Speech (Dictation & Speech from Mac OS X 10.8) pane. The Infovox iVox voices can also be used with Apple's screen reader VoiceOver, for people with low vision. Open the VoiceOver utility through the Seeing (VoiceOver from Mac OS X 10.8) tab of the System Preferences' Universal Access (Accessibility from Mac OS X 10.8) pane. Finally, some applications provide direct access to the voices through a voice menu or a voice dialog inside the application. 1 Acapela Group developed Infovox iVox in collaboration with AssistiveWare. AssistiveWare provides the worldwide distribution of Infovox iVox. Trial License and Purchase Information You may use this software for a 30-day full trial period. If you wish to continue using Infovox iVox beyond the 30-day trial, you have to purchase a license, see the section Activating a Voice Permanently. Once you have purchased the software, you will receive a permanent activation code that removes the time limit for the voices you have purchased. System Requirements Infovox iVox requires an Intel Macintosh running Mac OS X 10.6 or higher. The activation of Infovox iVox voices requires an active Internet connection. Minimum recommended hardware configuration: Intel: all Mac Intel hardware configurations Limitations of Infovox iVox Pitch Infovox iVox includes Acapela High Quality Voices (HQ). The voices are based on a technology that makes them sound natural. However, there is a limitation to these HQ voices as it is not possible to modify the pitch. This affects certain settings of VoiceOver. For instance, when entering uppercase letters, VoiceOver heightens the pitch as the letters are pronounced. This feature will not work when the HQ voices are used. The problem can be solved by having VoiceOver utility signal uppercase letters by playing a tone or speaking cap instead of changing the pitch. Discontinuous Speech Flow In certain situations, for instance during very heavy hard drive usage or when your computer processor is very busy, you may experience the Infovox iVox voices speaking with a discontinuous speech flow similar to a stuttering or hesitation effect. This is a known problem that is due to hardware limitations. 2 Installation/Uninstallation How to Install Infovox iVox Infovox iVox is distributed on Disk Image (a file with extension .dmg), or on a DVD. In order to install Infovox iVox, mount the disk image or the DVD and run the Infovox iVox installer by double-clicking the file Infovox iVox v3.2.pkg. The following dialog box will be launched: Figure 1 The Infovox iVox installer screen. The installer will guide you through the installation. Installing Infovox iVox is the first step of the installing procedure. Once you have completed the installation of Infovox iVox on your computer, you will need to proceed with the installation of the voices. See the Infovox iVox Voice manager chapter for the instructions on how to install and activate the Infovox iVox voices. How to Uninstall Infovox iVox In order to uninstall Infovox iVox, you need to have administrator privileges. You start the uninstaller from the Infovox iVox Voice Manager. Open the Voice Manager from the Applications folder. Go to the menu Tools and select the menu item Uninstall Infovox iVox.... It is also possible to uninstall single voices. See the Infovox iVox Voice manager chapter for more information. 3 Infovox iVox Voice Manager Infovox iVox Voice Manager is an application that gives you an overview of the Infovox iVox voices. This application allows you to see the status of the Infovox iVox voices, install and remove them, activate voices, and manage the user accounts. This application opens automatically when the Infovox iVox installation is completed. It can also be opened any time from the Applications folder. When the Voice Manager starts, a welcome message appears automatically. It gives you concise information about what the Voice Manager is and what you can do using it. The welcome message will appear every time you launch the Voice Manager. You can change this behavior by unchecking the Show at startup tick box. The Voice Manager Window Infovox iVox offers you a large number of voices. All of them are listed in the Voice Manager window. For each voice the language, gender and cost is specified. The status specifies whether the voice is installed on the computer and indicates activation status. Figure 2 The Voice Manager main screen. You can change the current view by using the filter feature. The available filter criteria are available in the Filter by list in the upper part of the window. Select any one of them. The next step is selecting the value from the Show list place to the right of the Filter by list. For instance, if you wish to view only the activated voices choose Activation from the Filter by list and Activated from the Show list. This action will result in a view that includes only the activated voices. The window contains two buttons located in the bottom part of the window: 4 Redeem Activation Code – Clicking it opens the window where you can enter your activation code. There are three account options available. Select the option that fits your situation. You can use an account already available on your computer, you can create a new account and you can activate an existing account that is not yet available on your computer (i.e. you created your Infovox iVox account on another computer). After entering the activation code click the Redeem button. Manage Accounts – Clicking it opens a sheet giving you an overview of the Infovox iVox accounts activated on the computer. The Account Activated On section of the window specifies the computers where the selected account is used. To the right of this section the details of your account are displayed. Use the Buy more link if you need more credits. The bottom section lists the assets connected to the selected account. The Redeem Activation Code button opens the window were you can enter the activation code. Clicking the Add Account button gives the option to add an account either by creating a new one or adding an existing account. Installing Voices In order to install a voice select the voice you wish to install in the voice list of the Voice Manager and choose the proper command from the Action list in the right most column of the window. Select Install… if you have the installation file available on your computer or on a DVD. This command opens a window that you use to locate the installation file. If the installation file is not available locally on your computer use the Download and Install… command. In order to run this command access to the Internet is required. This command will download and install the voice. It opens a window that allows you to see the download progress. You can run several Download and Install sessions in parallel. When the download is completed you can activate the voice from this window either as a demo or as a permanent license. Tip: The commands available in the Action list are also available from the Voice Actions menu. Activating Voices In order to work an installed voice needs to be activated, either as demo or permanently. The voices must be installed before they can be activated. Demo Period If you only want to try a voice you can use a trial license that allows you to use a voice for 30 days. Select then Start Demo Period… from the Action list. This option is also available in the progress window that you get after selecting the Download and Install… command. The corresponding button will appear when the installation is 5 completed. You can start the demo period any time, not necessarily in connection to the installation procedure. After starting the demo period the Activation status of the voices will change to Demo specifying also the number days left. Activating a Voice Permanently Infovox iVox voices are activated using voice credits. The price per voice differs per language and voice, and can be found in the Cost in Credits column of the Voice Manager window. Please consult http://www.assistiveware.com/infovox_ivox.php or contact one of the distributors below for the latest information on how to purchase. Where to purchase Infovox iVox North America (USA, Canada, Mexico and Caribbean): Origin Instruments Corporation (full support) 854 Greenview Drive Grand Prairie Texas 75050-2438 USA phone: 972-606-8740 fax: 972-606-8741 email: [email protected] http://orin.com/access/infovox_ivox/ Purchase online: Origin Instruments Corporation (full support) http://orin.com/ec/infovox_ivox Anywhere else: AssistiveWare (email support only in English, French or Dutch) Laurierstraat 183 1016 PL Amsterdam The Netherlands fax: +31-20-6128266 email: [email protected] http://www.assistiveware.com Purchase online AssistiveWare, email support only in English, French or Dutch (full support). http://www.assistiveware.com/infovox_ivox.php 6 When activating using voice credits a voice is licensed for activation on two or more computers (seats). The first purchase is always for two computers, subsequent purchases for one additional computer. Voice licenses are stored in the activation account that is used when activating the voice. The total number of seats (licenses for a specific voice) determines the number of computers a voice can be activated on at any time. It is possible to deactivate a voice on a computer and to re-activate it on another computer. However, it is not possible to 'un-license' a voice and regain your credits. Example: Max has three computers: an iMac, a MacBook and a MacBook Pro. He wants to use Tracy (an American voice) on all three computers and Bruno (a French voice) on his two MacBooks. On the AssistiveWare website, http://www.assistiveware.com/infovox_ivox.php, he purchased 20 voice credits for which he received an activation code. Max starts the Voice Manager on his iMac. He clicks Redeem activation code in the main window and copies the activation code to the dialog box. Since he does not have an Activation Server Account, he creates a new account by entering his name and e-mail address. After clicking Redeem an account is created in his name and the 20 credits are loaded on that account. An email is sent to his email address with his account details. Max selects the Tracy voice and chooses Download and Install… from the Voice Actions menu. The Tracy voice is downloaded and automatically installed by the software. After the installation, Max chooses Activate and uses 4 credits to license Tracy for use on 2 computers. He repeats the process for Bruno. The total number of credits left on his account is now 12. He now moves to his MacBook. On this computer he starts the Voice Manager. But this time he chooses Manage accounts and Add account. In the dialog box he goes to Use existing Account and copies the account id from the confirmation email in the Account ID field. On return to the Voices he chooses Install All Licensed Voices, this downloads, installs and activates the Tracy and Bruno voices, as these are already licensed. On his third computer Max activates his account and goes to the Voices list. In the costs column the Tracy voice now shows 2. He installs the voice and activates Tracy on his MacBook Pro for 2 credits. His credit total is now 10. 7 Menus and Functions There are a number of functions that are standard for most of the Mac application. As they are not Infovox iVox specific they are not described here. However, Infovox iVox contains additional functions that require further information. The Infovox iVox Voice Manager Menu Check for Updates – This version of Infovox iVox has an automatic check for updates. If a new version of the software is available you will be notified about it. The check will be done regularly. You can also at any time check the update availability manually using this command. This command opens the Software Update Window. If there is an update available you will get information about what is new in the next version. Use the buttons located in the bottom of the window in order to perform an action of your choice. The button captions explain the options that you have. You can decide to skip this version, ask to be reminded later or install the available update. If you decide to install the update click the Install Update and follow the instructions. Preferences – This command opens the Preferences window. The first setting concerns the automatic launch of the Welcome message. Uncheck the Show at startup tick box if you don’t want the Welcome Screen to be launched automatically every time you start the Voice Manager. You can also choose settings that affect the automatic software update. Uncheck the Check for Updates tick box if you don’t want Infovox iVox to perform automatic update check. You can also see how often the check is performed now and set the update check frequency to a different value. Use the Check Now button if you wish to run an update check manually. The File Menu Open License File – This command can be used for activating a voice if there is no access to the Internet. This solution is not recommended as it requires manual processing. Install Voice Package – You use this command if you have a voice package saved on your computer and you want to install it. It can be on your hard disk or a DVD. This command opens the window where you can locate your installation file. The Voice Action Menu This menu contains commands that you can also find in the Action column of the Voice Manager window. Get Info – It opens a window displaying the info of the voice selected in the voice list of the Voice Manager. "cmd + I" is a keyboard shortcut for this command. Play Sample – This command plays a short speech sample of the voice selected in the voice list of the Voice Manager. You can also execute this command by pressing the space button. 8 Start Demo Period – Executing this command will give you the possibility to evaluate a voice for 30 days. It will start a demo period so that you can try a voice. The command applies to a voice selected in the voice list of the Voice Manager. This command is greyed out if the voice has not yet been installed or if the selected voice has already been activated. Activate/Deactivate – Use the Activate command in order to launch the activation procedure. This command can be executed if the selected voice has already been installed. It is greyed out if the voice has not yet been installed. If the voice is already installed and activated this command toggles to Deactivate. You need to deactivate a voice before moving your license from one computer to another. Download and Install/Reinstall – The Download and Install command downloads and installs the selected voice on your computer. If the voice is already installed this command toggles to Download and Reinstall. Running it will reinstall the selected voice. Install/Uninstall – The Install command launches the installation of the voice selected in the voice list of the Voice Manager. In order to run this command the corresponding installation file needs to be available locally on your computer. If the selected voice is already installed this command will toggle to Uninstall and running it removes the selected voice from your computer. The Tools Menu Edit Pronunciations – This command launches the Infovox iVox Pronunciation Editor, see Pronunciation Editor chapter for more information. Install All Licensed Voices – This command downloads, installs and activates all voices that are licensed on an account, but not yet installed. Uninstall Infovox iVox – Run this command in order to remove Infovox iVox from your computer. The Help Menu Infovox iVox Voice Manager Help – This command opens the Help window. Infovox iVox Voice Manager Manual – This command opens the printable version of the Infovox iVox User Manual. Recover Account ID – Use this command if you need to recover your user account ID. It opens a dialog box where you enter your email address. There is also a Reset account password checkbox, which is ticked by default. If the checkbox is ticked your account password will be reset. Otherwise the account ID recovery procedure will not affect your password settings. Show Diagnostic Information – The window that this command opens contains technical information about your Infovox iVox installation. This information can be used in communication with AssistiveWare support. 9 Contact Support – It opens the contact form to contact AssistiveWare support. When you send this form the diagnostic information about your Infovox iVox will be included automatically. Activation Server Account The Voice Manager uses the AssistiveWare activation server to keep track of voice licenses for Infovox iVox voices. All licensing information is stored in a free activation server user account. An activation server account can be created when redeeming activation codes, or from the Manage Accounts function in the main Voice Manager screen. To create an activation account enter your name, organization (if any) and email address. The name and organization will be the licensee of the voices. An email will be sent to the email address provided with the account details. An activation account is identified by an account id string. This account id can be used to activate the account on another computer. Activating Multiple Accounts The Voice Manager gives the option to create or activate more than one account on a computer. This allows licenses in different names to be activated on one computer. In normal use it is not necessary to create more than one account. Protect Account Activation server accounts can be protected with a password. When an account is protected activation and deactivation of voices require the password to be executed. In case you lose your password a new password can be requested from the Manage Accounts sheet. The password will be sent to the email address of the activation account. If this email address is incorrect or if you lost the password, contact AssistiveWare support ([email protected]) to resolve the problem. Deactivate Account From the Manage Accounts function it is possible to deactivate an account on a specific computer and thereby, revoke the use of the license on that computer. This function can e.g. be used when replacing an old computer. Voice Credits Infovox iVox voices are activated using voice credits. The price of the voices differs per language and voice, and can be found in the Cost in Credits column of the Voice Manager window. Voice credits can be purchased in any quantity on the AssistiveWare website http://www.assistiveware.com/infovox_ivox.php. 10 Pronunciation Editor Pronunciation Editor is a tool which allows you to modify the way a word is pronounced by an Infovox iVox voice. Figure 3 The Pronunciation Editor main window. How to Use the Pronunciation Editor Pronunciation Lexicons Lexicons created by Pronunciation Editor are connected to a specific language. For instance a lexicon created for American English will work for the American English voices and will not affect the British English voices, which require their own pronunciation lexicon. In the main window, you can choose what lexicon to work on by selecting a voice group from the Voice group list. Remark: In this list you will only see the languages of the voices you have activated (as demo or permanently) on your computer. Adding a New Pronunciation If you want to change the way a word is pronounced by a group of voices of the same language/technology, check if the lexicon in the list of the voice group pop-up button is correct, and then press the "+" button. You can also use the menu LexiconNew Word or the shortcut "cmd-N". In the Original Word field, type the word for which you want to change the pronunciation. Automatically, the word is displayed as phonetic transcription in the Phonetic Transcription field. By default, the Phonetic transcription fields are not shown but you can easily disclose them with the appropriate disclosure triangle (or menu View Show Phonetic Transcriptions). Enter the new pronunciation in the New Pronunciation field. Automatically, this new pronunciation is also displayed as phonetic transcription in the second Phonetic Transcription field. 11 If you begin the new pronunciation with a '#' character, you have the possibility to enter the phonetic transcription of the new pronunciation. Otherwise, without a leading "#" character, the Pronunciation Editor application will consider the new pronunciation as a regular text. If you specify your pronunciation in this way you can use orthography, misspelling or rephrasing. Such transcriptions will be referred to as rephrasing. Using space or punctuation in rephrasings is not recommended. If you specify your pronunciation using more than one word it’s recommended to store it as a phonetic transcription. This improves the speech quality. Storing the pronunciation as phonetic transcriptions is the default action. However, if you need to store the pronunciation that you specify as a rephrasing (i.e. you don’t use phonetic symbols) uncheck Transcribe this phonetically. Unchecking it will store your transcriptions exactly as you specify them in the New Pronunciation box. Press the Update button to validate your new entry. Read Fine-tuning the new pronunciation section for more information about phonetic transcriptions. Update an Existing Entry If you want to modify an existing entry of your pronunciation lexicon, select it in the list of lexicon entries. The original word and its phonetic transcription are shown in the Original Word field and the first Phonetic Transcription field. The existing new pronunciation is shown in the New Pronunciation field. If the existing pronunciation is a literal transcription, the phonetic transcription is also shown in the second Phonetic Transcription field, and modify the New Pronunciation field. Make your modifications in the New Pronunciation field. Automatically, this new pronunciation is also shown as phonetic transcription in the second Phonetic Transcription field. If the pronunciation is expressed as a phonetic transcription it must be preceded by the "#" character. Press the Update button to validate your new entry. Listening to Original Word and New Pronunciation You have the possibility to hear how the original word is pronounced by pressing the play button to the right of the Original Word field. You can also use the menu entry Lexicon Play Original Word or the keyboard shortcut "cmd-@". You can also hear how the new transcription that you have typed in the New Pronunciation field is pronounced by pressing the play button to the right side of the field. You can also use the menu entry Lexicon Play New Pronunciation or the keyboard shortcut "cmd-&". 12 Deleting an Entry Select the entry that you want to delete in the list of lexicon entries. Go to the menu Lexicon Delete Word. You can also press the delete or backspace key. Saving the Lexicon All the changes you make in the Pronunciation Editor are not permanent and will not work in other applications until you save your changes. To save all the changes and make them permanent, use the menu File Save or the keyboard shortcut "cmd-S". Using a Saved Pronunciation Lexicon with Infovox iVox Voices Once you have saved a pronunciation lexicon, it will be used by the corresponding Infovox iVox voices in all the Apple Speech Synthesis Manager applications using them. However, it requires the voices to be initialized after the lexicon has been saved. For instance, if you opened an application using Heather, an Infovox iVox US English voice, and afterwards you made some changes in the pronunciation lexicon used by Heather it will not affect Heather's pronunciation in that running application even if the lexicon has been saved. In order to make Heather use your lexicon you have to quit and relaunch your application. Suppose you used Heather through VoiceOver after saving your lexicon you have to restart VoiceOver before your changes in the pronunciation lexicon affect Heather's pronunciation. Tip: You can restart VoiceOver by pressing "cmd-F5" twice. It will close and reopen VoiceOver. Revert Changes If you haven't yet saved the lexicon, you can use undo and redo actions from the menu Edit to revert the last changes you did. Use Revert to Saved from the menu File in order to discard all your changes and get back to the last saved version. The command Delete All Words in the menu Lexicon will delete all the entries in your lexicon. Changing the Working Voice When you select a voice group, the Pronunciation Editor will use the first voice in the group (language/technology) for which you have a valid license. If you want to change the working voice (see Listening to the original word and the new pronunciation), select it in the menu LexiconVoices. You can also use the associated keyboard shortcut "cmd+alt+x" where x is a voice number, for instance 1, 2, 3. 13 Next time you open that voice group’s lexicon, the last selected voice will be used as working voice. Fine-tuning the New Pronunciation Why Use Phonetic Transcription? You can enter either a literal transcription in the New Pronunciation field, or a phonetic transcription (in this case, proceed your string by a "#" character, signaling phonetic transcription). Literal transcriptions are simpler for a beginner, but sometimes are less effective because you cannot always predict how the new literal pronunciation will be synthesized. See also section The new pronunciation sounds good in Pronunciation Editor but not in Infovox iVox. If you enter a phonetic transcription in the New Pronunciation field, you can be sure that the original word will be processed exactly as played in the Pronunciation Editor. A description of the phonetic alphabet with examples of a particular language is available in the corresponding Language Manual (found in the Documentation folder on your Infovox iVox DVD or disk image). You can see a basic list of phonetic symbols by pressing the Phoneme List button or by selecting the command Show Phoneme List from the menu View. The following section explains how to work efficiently with phonetic transcriptions, even without good knowledge in linguistics. Minor Modification of the Original Word with a Phonetic Transcription Let's take as an example the word "hello" in American English. You wish this word to be pronounced as "hillo" and you want to use the phonetic symbols. You can type #h i1 l @U1 in the New Pronunciation field, but there are two easier methods. Method 1 1. Enter "hello" in the Original Word field. The phonetic transcription "# h E l @U1" is shown for information in the associated Phonetic Transcription field if it is shown (if it is not visible click on the disclosure triangle to show it, or menu View - Show Phonetic Transcriptions). 2. Press the down arrow button to the right of this Phonetic Transcription field. You can also use the menu command Lexicon Copy Word Phonetics or the keyboard shortcut "Cmd – Down arrow". It will copy the phonetic information "# h E l @U1"of the Original Word into the New Pronunciation field. 3. Look at the list of phonetic symbols for the phonetic symbol for the ”i” sound you want and change "# h E l @U1" to "# h i1 l @U1". Note the /1/, which, as explained in the language manual, is used for lexical accent, i.e. the prominence (or emphasis) of a syllable in a word. Try removing the 14 /1/after the i in "# h i1 l @U1" and then listen to the difference by clicking the play button. 4. Press Update. Method 2 1. Type "hillo" in the New Pronunciation field. The phonetic transcription "# h i1 l @U1" is shown in the associated Phonetic Transcription field if it is shown (if it is not visible click on the disclosure triangle to show it, or menu View Show Phonetic Transcriptions). 2. Press the up arrow button to the right of this Phonetic Transcription field. You can also use the menu command Lexicon Copy Pronunciation Phonetics or the keyboard shortcut "Cmd – Up arrow". This action will copy the phonetic string "# h i1 l @U1" into the New Pronunciation field. 3. Press Update. Importing and Exporting Pronunciation Lexicons Exporting You can export a lexicon using the menu command File Export As.... Figure 4 The lexicon export dialog. Choose a filename and the location where to save the file and choose the file format. The default file format is text file (file extension: .txt). You can also choose the Acapela Lexicon file binary format (file extension: .dic). Acapela Lexicon file format may be useful for backup purposes. You will not be able to export an Acapela Lexicon binary format from one language to another language group. Text files are more convenient for importing/exporting entries between different language groups. Exported text files can be easily edited manually. The encoding of the exported format will be Windows Latin 1 (CP1252) for most voices, Windows Latin 2 (CP1250) for Polish and Czech and Windows Latin 5 (CP1254) for Turkish, Windows Arabic (CP1256) for Arabic, Windows Cyrillic (CP1251) for Russian and Windows Greek (CP1253) for Greek. Don't forget to open the exported text files with the correct encoding if you plan to edit them. The format is tab separated which means that you have one entry per line and that the original word and new transcription are separated by a tabulation character. 15 Importing You can import entries in the current lexicon using the menu command File Import... First, select the file containing the entries. You can import .dic files (Acapela Lexicon file binary format) and .txt files (tab separated text file). You will not be able to import an Acapela Lexicon binary format of one language group to a different language group. The text files should have the correct encoding, see section Exporting. If there are some words in the lexicon to be imported which are already in your current lexicon, a confirmation window will be opened by the application: Figure 5 Resolving a conflict during the lexicon import. Press Use the imported to use the imported pronunciation in place of the existing one. Press Keep the existing to keep the existing pronunciation. The check box Apply this choice to all words can be checked to avoid getting this message for every entry for which an existing pronunciation already exists. Next time a redundant entry is detected, the last choice (Use the imported or Keep the existing) will be used automatically. The button Cancel importation will cancel the import process and revert to the saved lexicon as it was before the lexicon import request. In case of invalid phonetic entries in the imported text file, an error message is displayed. Use Skip this word to keep the existing entry (in case of a redundant word) or to not add the word (in case of a new entry). Press Use new pronunciation to correct the transcription. Skip all future errors can be checked in order to automatically skip all entries containing errors. The new imported words are added in the end of the entry list. If you wish reorder the entries, click the Original Word header in the entry list. 16 Support and Contact Where to Get Support for Infovox iVox Apply the following steps if you need help in order to solve problems that you encounter while using Infovox iVox or if you have some questions 1. Consult the Infovox iVox Help function. This help function can be accessed at any time via the Help menu when Infovox iVox is the active (front-most) application. 2. Consult the dealer where you purchased Infovox iVox. 3. Contact your local distributor. The latest address information for local distributors is available on the AssistiveWare web site http://www.assistiveware.com/infovox_ivox.php. There is also a list provided in the section Activating a Voice Permanently. 4. If none of the above helps or if you purchased Infovox iVox directly from AssistiveWare, send an email to [email protected]. Contact Infovox iVox is an Acapela Group product distributed worldwide by AssistiveWare. AssistiveWare (email support only in English, French or Dutch) Laurierstraat 183 1016 PL Amsterdam The Netherlands fax: +31-20-6128266 email: [email protected] http://www.assistiveware.com 17 Troubleshooting and FAQ Infovox iVox FAQ Troubleshooting after Upgrading Mac OS X It can happen that a Mac OS X upgrade makes Infovox iVox losing its voices. In order to solve this problem run the Infovox iVox installer and update the application. If you still have problems contact support: <[email protected]> Pronunciation Editor FAQ The New Pronunciation Sounds Good in Pronunciation Editor but Not in Infovox iVox Sometimes a literal transcription may sound good in Pronunciation Editor when you press play but sounds bad in applications using Infovox iVox. This behavior comes from a limitation of the Infovox iVox preprocessor: A word replaced by a literal transcription will not be analyzed as much as another words (e.g. grammatical analysis, system lexicon, etc ...) Let's take an example: You wish to change F1 into Formula One with US English Ryan. Enter F1 as an original word and Formula One as a new pronunciation. The Pronunciation Editor will tell you that Formula One will be synthesized as "# f O1 r m j @ l @ w V n". If you then listen to how the word F1 is pronounced in an application using an HQ American English voice, you will hear "# f O1 r m j @ l @ @ n". This kind of strange behavior is not frequent. But if you have a problem similar to this example, use a phonetic string instead of a literal string. So, in our example, specify the pronunciation of the word F1 by entering the phonetic transcription "# f O1 r m j @ l @ w V n". You can do it using the menu command LexiconCopy Pronunciation Phonetics, see section Fine-tuning the new pronunciation. Apple Speech Service Doesn't Use the Saved Lexicon Apple Speech Service is a daemon application that keeps the same instance of the voice. And thus, the modified lexicon is not reloaded, even if you close the application in which you were using the Speech Service. To force a reload, open the Speech Panel, choose another voice and go back to your working voice. This will force the Speech Service to reload the voice and the lexicon. The Specified Pronunciation is Not Used Sometimes words entered in a pronunciation lexicon are not pronounced according to the specified pronunciation. It happens when this particular word is between quotes in the text. This is a known issue of Infovox iVox voices. 18 For instance, you specified in the lexicon that the word hello is pronounced as hi but the sentence hello "hello" will be read as hi hello and not as you may expect hi hi. A workaround may be to add a space between the quotes and the word, i.e. " hello " instead of "hello". What are These Numbers after Some Phonemes? They are accents and present in some languages. By adding or removing the accents, you can fine tune the pronunciation. Please read the relevant language manual (found in the Documentation folder on your Infovox iVox DVD or disk image) for more information. If I Export a Lexicon as a Text File, All Accented or Special Characters Have a Bad Encoding The export encoding of the main languages is Windows Latin 1 (CP1252) and not Mac OS Roman. It allows you to exchange lexicon with Windows users, but you need to open the file in Windows Latin 1 instead of Mac OS Roman in order to edit them. For Polish and Czech you should use Windows Latin 2 (CP1250) instead of Mac OS Central European Roman encoding. For Turkish, use Windows Latin 5 (CP1254) instead of Mac OS Turkish. For Icelandic use Windows Latin 1 (CP1252) instead of Mac OS Icelandic. For Russian use Windows Cyrillic (CP1251) instead of Mac OS Cyrillic. For Greek use Windows Greek (CP1253) instead of Mac OS Greek. For Arabic use Windows Arabic (CP1256) instead of Mac OS Arabic. 19