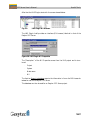
1
Manual
Gesytec
Gesellschaft für Systemtechnik
und Datenverarbeitung mbH
Pascalstr. 6
52076 Aachen, Germany
Phone + (49) 24 08 / 9 44-0
Fax + (49) 24 08 / 94 4-100
email: [email protected]
www.gesytec.com
Doc. ID EOS/Doku/UserDoc/EOS_Manual-E.doc, V01.00
Date: 04/25/2002
OPC Server
User’s Manual
This Manual …
… provides any required information for installation, configuration and operation of
the Easylon ® OPC Server for LONWORKS ®.
It exclusively treats the handling of the Easylon OPC Server Software. It neither describes the LONWORKS technology by Echelon ® nor the OPC interface definition.
More specific information concerning these subjects can be found in the respective
documentation of Echelon (www.echelon.com) and the OPC Foundation
(www.opcfoundation.org).
The first part of this manual provides general product information. The installation,
starting and configuration of the Easylon OPC Server are described in chapter 2,
“Installation and Operation”. Chapter 3, “Easylon OPC Server Demos” contains a description of the client demos, which are delivered with the installation package while
chapter 4, “Writing OPC Clients” gives an overview on the implemented Naming
Items.
Chapter 5 contains a description of Useful Tools. After a lot of “Tips and Tricks” in
chapter 6 this manual closes with an explanation how to get a full license of the
Easylon OPC Server and a version history and chapters 7 and 8.
This manual refers to program version 2.2 and following of the Easylon OPC Server
where new diagnostic functions are implemented.
For the complete specification of the OPC automation interface as well as for the
OPC custom interface, we refer to the OPC Foundation web site, where you can
download the OPC interface definition document: http://www.opcfoundation.org
This documentation is subject to modification at any time without prior notice. Gesytec does not take
over any responsibility for mistakes or inaccuracies in this documentation and eventually occurring
consequences.
In no case Gesytec as well as its representatives and staff are liable for eventual defaults, damages
caused indirectly or during use, occurring due to the use or non-usability of the software or the
accompanying documentation.
Easylon is a registered trademark of Gesytec GmbH.
Echelon, LON, LONMARK, LONWORKS and Neuron are registered trademarks of Echelon
Corporation. Other names may be registered trade marks of the respective companies.
3
OPC Server
User’s Manual
Contents
1 Introduction ........................................................................................................................6
1.1
What is OPC? ...........................................................................................................6
1.2
Why use the Easylon OPC Server ? ............................................................................8
1.2.1 Use Process Data in Business Applications .................................................................8
1.2.2 Why connect LONWORKS Networks through OPC? ..................................................9
1.3
OPC Data Model.....................................................................................................10
1.4
Accessing the LonWorks network with the Easylon OPC Server...............................12
1.5
Accessing OPC Items...............................................................................................14
2 Installation and Operation................................................................................................15
2.1
2.2
2.2.1
2.2.2
2.2.3
Easylon OPC Server Structure..................................................................................16
Installation ..............................................................................................................18
Supported Hardware................................................................................................18
Migration to Version 2.2..........................................................................................19
Installation Procedure ..............................................................................................19
2.3
2.3.1
2.3.2
2.3.3
Starting ...................................................................................................................21
Easylon OPC Server Actions ....................................................................................21
Automatic Startup and Shutdown by OPC clients ....................................................22
Automatic startup by Windows ...............................................................................22
2.4
2.4.1
2.4.2
2.4.3
2.4.4
2.4.5
2.5
2.5.1
2.5.2
2.5.3
2.6
2.7
2.7.1
2.7.2
2.7.3
2.7.4
2.7.5
Configuration ..........................................................................................................23
Opening a Different Configuration File....................................................................23
Device Properties (Changing Configuration Options) ...............................................23
The Options Dialog .................................................................................................25
Saving the Configuration File...................................................................................27
Back Compatibility..................................................................................................27
NV Browser ............................................................................................................29
Defining Tag Properties...........................................................................................30
Change Value... .......................................................................................................30
Multiple Setting.......................................................................................................31
Binding Network Variables and the XIF Editor .......................................................32
Diagnosis.................................................................................................................34
Group/Item Diagnosis .............................................................................................34
Protocol...................................................................................................................35
Network Interface Status .........................................................................................36
All Nodes Status......................................................................................................37
Options ...................................................................................................................37
4
OPC Server
User’s Manual
3 Easylon OPC Server Demos ..............................................................................................41
3.1
3.2
3.3
Requirements ..........................................................................................................41
Visual Basic Demo...................................................................................................43
Visual Basic for Applications Demo .........................................................................45
4 Writing OPC Clients .........................................................................................................47
4.1
Naming Items .........................................................................................................48
4.2
VBA for Excel..........................................................................................................49
4.3
Some OPC Clients for Test ......................................................................................53
5 Useful Tools ......................................................................................................................54
5.1
5.2
Determine Domains ................................................................................................54
LNS-PlugIn .............................................................................................................55
6 Tips and Tricks .................................................................................................................57
6.1
6.2
6.3
6.4
6.5
General Questions ...................................................................................................57
Installation ..............................................................................................................60
Network Interface ...................................................................................................60
Runtime errors.........................................................................................................62
Upload Problems .....................................................................................................63
7 Licensing of the Easylon OPC Server Trial Version.........................................................64
8 Version History..................................................................................................................65
9 List of Figures....................................................................................................................68
10 List of Tables .....................................................................................................................69
11 Index ................................................................................................................................70
5
OPC Server User’s Manual
1
Introduction
Introduction
This chapter gives an introduction to basic OPC concepts and the Easylon OPC
Server.
The use of microprocessors has proliferated in manufacturing plants, and they often
do not work together. Application software should readily communicate with digital
plant-floor devices as well as other applications, but this is not often the case. Making
these systems work together is the most pressing need of process manufacturers.
1.1
What is OPC?
Based on Microsoft’s OLE (now ActiveX), COM1 and DCOM2 technologies, OPC
consists of a standard set of interfaces, properties and methods for use in processcontrol and manufacturing-automation applications. The ActiveX/COM technologies
define how individual software components can interact and share data. Based on
Microsoft’s NT technology, OPC provides a common interface for communicating
with diverse process-control devices, regardless of the controlling software or devices
in the process.
Fig. 1.1:
From proprietary solutions to a plug-and-play standard
1 Component Object Model
2 Distributed Component Object Model
6
OPC Server User’s Manual
Introduction
From the OLE for Process Control Standard3:
OLE for Process Control (OPC) is designed to be a method to allow business applications access to plant floor data in a consistent manner.
OPC originally is the product of a taskforce that had the objective of developing
a standard interface for the process control industry to enable development of servers
and clients by multiple vendors that shall inter-operate seamlessly together.
The first objective of OPC is not to connect (components in) process control systems
to each other, but to create an interface between various existing process control systems and Windows PC’s running business management applications, accessing
process data and allowing some degree of influence on the process control system.
To do these things effectively, manufacturers need to access data from the plant floor
and integrate it into their existing business systems. Manufacturers must be able to
utilize off the shelf tools (SCADA Packages, Databases, spreadsheets, etc.) to
assemble a system to meet their needs. The key is an open and effective communication
enabler concentrating on data access, and not the types of data.
Of course, exchanging data between business applications and process control systems is not new. But it used to be done with proprietary drivers or with DDE links.
OPC is defining a standard interface, allowing a much wider range of business applications to connect to a much wider range of process control systems. Since OPC is
based on the existing OLE/COM interface that is used by most Windows applications, an OPC server opens a process control system to many business applications at
the same time.
3 Current version of the OPC standard is 2.0
7
OPC Server User’s Manual
1.2
Why use the Easylon OPC Server ?
1.2.1
Use Process Data in Business Applications
Fig. 1.2:
Introduction
Use Process Data in Business Applications
The fact that OPC was initiated by Microsoft makes it important enough to keep
track of. But there are more reasons why an Easylon OPC Server can be of advantage
for you:
A standard interface to process control systems
The OPC interface was designed to allow any business application with an OLE interface access to process control systems without any interfacing work involved. This
means that the only addition needed is on the part of the process control system
manufacturers: as soon as they provide an OPC server for their process control system, virtually every business application can connect up and use the process data.
Combine data from various devices or fieldbus systems
Since the OPC interface builds on DCOM, the source of process data can be anywhere on the intranet. As long as your business application knows the address of an
OPC server, it can connect and use the available process data. More than one OPC
server can be combined in the same business application.
8
OPC Server User’s Manual
1.2.2
Introduction
Why connect LONWORKS Networks through OPC?
Fig. 1.3:
Gateway between the control network and the OPC clients
Include data from the control network in standard business applications
Business applications use the OLE interface to connect to data sources. Since the OPC
interface is defined at OLE level, any business application can use LonWorks networks data, simply by connecting to the Easylon OPC Server. For those who write
their own applications in C++, there is the COM level OPC interface. If you want to
include NV values in an Excel spreadsheet, visualize your control network with
InTouch, or use NV's in other business applications, the Easylon OPC Server is the
solution to your problem.
9
OPC Server User’s Manual
1.3
Introduction
OPC Data Model
For understanding some features of an OPC server, the OPC data model is introduced here. It is based on the OPC Data Access Automation Specification 2, which
may be downloaded from the homepage of the OPC Foundation
(www.opcfoundation.org).
The automation specification is more dedicated for usage with Visual Basic, however
it gives a good overview.
OPC Server
OPCGroups
(collection)
OPCBrowser
OPC Group
OPCItems
(collection)
OPCItems
The OPC server offers two objects. An OPC client is able to read information regarding all data points available on the OPC server. The server can present this information hierarchically, for instance it can sort the data points by physical devices.
By using the OPC Browser the client can determine addressing information for the
data points. Of course the client must know, how to specify the data to be read. The
OPC Browser will give an access path and item ID for each data point.
For accessing data the client uses the OPC Groups collection. All data has to be organized by groups. So a client must define a group object. A group consists of OPC
items which are a representation of the data points. The OPC item is managing two
values. First the client may have direct access to the value in a device which is monitored by the OPC server. So accessing the “device value” will effect a physical access
to the device. Of course this can considerably increase network traffic. So the OPC
item additionally implements a data cache with a certain cache timeout. Reading the
data from the cache will not effect new traffic, as long as the last direct device reading
has been within the cache timeout. Using the caching method reduces bandwidth in
communication with the devices and should therefore be preferred.
10
OPC Server User’s Manual
Introduction
An OPC client does have several options to access the data from the server.
•
The first and preferred method is using a subscribe mechanism. A group object is
defined by the client and filled with OPC items. The OPC server sends data
change events to the client, if an item has changed. Communication bandwidth
between server and client is controlled by a timeout mechanism. Prohibiting the
server from sending update information too frequently. Furthermore the client is
able to define a hysteresis. Especially for analog values like temperatures it is possible to reduce bandwidth. Of course, by using this method the client is not able
to write any values.
•
The second method uses an asynchronous mechanism. The client starts a transaction, which will be either a read or write. The OPC server decides at its own,
when the transaction will be performed. After finishing the transaction the OPC
server will send an appropriate event to the client. In case of a read request it
contains the data. The asynchronous methods can be used either for the item
cache or for direct access. Because of the undetermined execution time the user
has to be careful in using the asynchronous mechanism.
•
Fast access is possible with the third method, the synchronous access for read and
write. A synchronous access will be directly executed. If it has to be performed on
the device value and not on the item cache it will be immediately performed. So
reading or writing a value with synchronous access on the Easylon OPC Server
will send directly messages on the LonWorks network. Obviously this method
should be used deliberately, because of bandwidth issues.
11
OPC Server User’s Manual
1.4
Introduction
Accessing the LonWorks network with the Easylon OPC Server
The Easylon OPC Server gives access to the values of network variables (NVs) and to
the Neuron state of a LonWorks node. It implements three methods for accessing the
values.
Polling
Polling is the most simple method. The Easylon OPC Server sends a request
an will receive a response containing the requested value. This may be either
the value of a network variable or the node’s state. For controlling the network load, the user may define for each NV a cache timeout. The server is
able to manage 30 polls per second.
Watcher
Using Gesytec LonWorks interfaces with the Easylon Watcher will reduce
bandwidth. The Watcher interface is monitoring the whole network traffic.
When the value of a network variable is transmitted on the network, the
Easylon OPC server is able to assign the transferred value to the sending and
receiving network variable. NV polling will be suppressed if the monitored
update is recognized within the cache timeout. If the cache timeout is exceeded the Easylon OPC Server will poll. So, to suppress polling, the user should
define a sufficient timeout. However, the timeout should be set with respect
to the update demand. Worst case: a device failure will not be recognized.
The Watcher method does not work for node status information. Furthermore the watcher is able to monitor just values, which are really on the network. If the LonWorks network is structured by routers, the benefits of the
Watcher technology are limited to the segment the Easylon OPC Server is
attached to.
Binding mode
In some cases polling will be disastrous to bandwidth. Especially if thousands
of values have to be monitored another method is required. The Easylon OPC
Server is able to work as a usual LonWorks node with its own input an output NVs. The amount of NVs is defined by using the XIF editor. Input NVs
are useful to monitor network variables very fast. The user has to define the
bindings from the respective network nodes to the Easylon OPC Server input
NV. Output NVs are be used to send a simultaneous update to many nodes
by using a group binding, e.g. for set points in a sunblind control.
12
OPC Server User’s Manual
Introduction
Comparing the methods
The following table compares the advantages/disadvantages of the three methods
Binding
no
Listening
yes
Polling
no
for output NVs only
no
yes
no
additional bindings required
yes
no
no
additional network load
no
no
yes
works across routers
yes
only if router forwards
NV updates
yes
special hardware required
Table 1.1:
Network data accessing
13
OPC Server User’s Manual
1.5
Introduction
Accessing OPC Items
Of course the OPC client has to know, how to access the network variables (NVs).
The Easylon OPC Server offers two methods. First, each NV is assigned an address.
This address is a combination from domain, subnet ID, node ID, NV index and NV
name. For example:
00.3.5.12 nviSetting
This address specifies the NV “nviSetting” which is the 12th NV of the node with
node ID 5 in subnet 3 and domain “00”. Because this is a very technical addressing,
the user may like to work with a more convenient method and define a name of his
liking, an alias name. This is the second NV addressing method offered by the Easylon OPC Server. By using the LNS PlugIn this alias will be assigned automatically if
the LNS naming structure is used.
Accessing Sub-fields of SNVTs
Important
If the NV is of a SNVT type with an underlying structure, a client may refer to a
sub-field of this structure by appending two underbars and the sub-field name.
Example:
if MyStates refers to a NV of type SNVT_state, MyStates__bit0 would refer only to
the first bit.
Note
Addressing sub-fields can not be used with user-defined NV types!
14
OPC Server User’s Manual
2
Installation and Operation
Installation and Operation
This chapter describes all aspects of installing and using the Easylon OPC Server.
Subjects covered are
Installation
How to install the Easylon OPC Server software, including the DCOM software that is needed to run the server under Windows 95.
Starting the Easylon OPC Server
Describes how the Easylon OPC Server is started, either manually or automatically (when an OPC client tries to access the Easylon OPC Server).
Configuration
This chapter describes the Easylon OPC Server configuration options, for to
connecting to the LonWorks network and uploading NV information.
The NV Browser
How to use the NV browser to check the connected LonWorks network,
monitor NV values and set properties of NVs. Properties include aliases to be
used in OPC client applications and variable types.
How the Easylon OPC Server accesses data
Describes the different methods of “Binding”, “Watcher” or “Polling”.
Diagnosis
From Version 2.2 onwards the Easylon OPC Server contains functions for
extensive troubleshooting.
15
OPC Server User’s Manual
2.1
Installation and Operation
Easylon OPC Server Structure
VBA clients
OPC clients
ElonOPC
Auto.dll
interface
Easylon OPC Server Components
User interface and
NV Browser
OPC COM
interface
Elonopc.exe
TDB file
Windows
registry
MS Access
network data
base
SNVT
ioFMT.ocx
ELONOCX
Physlon.dll
LON API
network
interface driver
network interface
LON
Fig. 2.1:
Structure of the Easylon OPC Server
16
OPC Server User’s Manual
Installation and Operation
The OPC clients use their standard VBA (or C++) code to connect to the Easylon
OPC Server and access groups and items. When they have opened a connection, the
desired items are subscribed, The Easylon OPC Server checks access authentication
data and retrieves the current values for the desired items. As soon as NV values
change, the new values are passed to the OPC client, for as long as the NVs are subscribed.
The Easylon OPC Server consists of the ElonOPC program, implementing the OPC
interface, and the ElonOCX automation server, implementing the interface to the
network interface driver. The Easylon OPC Server also handles the database in which
the available process data are described (names, addresses and access authentication
data). The built-in NV browser permits browsing through the uploaded network
node information, setting aliases for NVs and monitoring their values.
The Easylon OPC Server wraps process data from the LonWorks network into OPC
objects. The OPC standard is based on the OLE/COM automation interface and can
be used by most Windows applications without the need for customization. Everyone, who can write macros in VBA (Visual Basic for Applications), can include process data from the LON in his spreadsheets or database applications.
17
OPC Server User’s Manual
2.2
Installation and Operation
Installation
To install the Easylon OPC Server on your PC, follow the steps described below.
Note that the Easylon OPC Server should be installed on a PC with an interface to
the LonWorks network, otherwise it is only possible to run in simulate mode.
If you are already using an older version of the Easylon OPC Server it is strongly recommended to uninstall the old version by using the Windows-Uninstall-Tool.
When upgrading from a version prior to release 2.20 please read the instructions for
Migration to Version 2.2 in chapter 2.2.2.
2.2.1
Supported Hardware
To connect the Easylon OPC Server to the LonWorks network, you need a network
interface devices. The following ones have been tested with the Easylon OPC Server:
Device
Driver version
Easylon PC Interface
1.22 and later
Easylon PC/104 Interface
Easylon PCI Interface
1.00 and later
Easylon USB Interface
1.10 and later (no Windows NT4 support)
SLTA-2
no driver needed
SLTA-10
no driver needed
PCLTA/PCNSS
1.08
PCLTA-10
1.02
PCC-10
1.02
PC-NSS
NOT SUPPORTED !
Table 2.1: Supported network interface devices Windows NT 4.0, 2000, XP
Device
Driver version
Easylon PC Interface,
1.20 and later
Easylon PC/104 Interface
Easylon PCI Interface
1.00 and later
Easylon USB Interface
1.10 and later
SLTA-2
no driver needed
SLTA-10
no driver needed
PCLTA-10
1.23
PCC-10
1.23
PC-NSS
NOT SUPPORTED !
Table 2.2: Supported network interface devices Windoes 95 / 98 / ME
18
OPC Server User’s Manual
2.2.2
Installation and Operation
Migration to Version 2.2
With version4 2.2 of the Easylon OPC Server some changes in formatting network
variables and naming items in the OPC browser interface have become necessary.
Formatting NVs is now equal to Echelon’s tools. The OPC browser namespace is
different from older versions because of the new LNS PlugIn. Some application may
have problems with these changes. It is possible to return to the previous SNVT
formatting and OPC browser namespace by using the downward compatibility
settings from the control menu.
The OPC server will update old databases on opening, some fields are added. The
user may now decide for each OPC item whether it is polled or not. Some clients do
define for each LonWorks node a group with all NVs of this single node. In this case
a couple of NVs will be polled unnecessarily. The user may change this behavior to
the old method using the control menu.
2.2.3
Installation Procedure
Note:
If you want to run the Easylon OPC Server, Windows NT 4.0, Windows 2000 or XP
(Professional) are recommended. Running the server in simulation mode (without a
network connected) should work fine with Windows 95 (provided DCOM is
installed).
1. Install the DCOM libraries (for Windows 95 only)
These libraries are the basis for the OPC automation interface, and need to be installed before the Easylon OPC Server software is installed. If you already have
DCOM installed on your Windows 95 machine, or if you do not user Windows 95
you can skip this first step. To install DCOM, run the following program (it is
recommended to close all other applications prior to installation):
Run <your CD>:\Easylon OPC Server\Dcom95\Dcom95.exe
Note:
After installing, you must reboot the machine before you can proceed with the next
installation step. Otherwise, the Easylon OPC Server cannot be properly registered
and will not run.
2. Install the Easylon OPC Server software
The setup program allows you to determine where the Easylon OPC Server is installed, and guides you through the necessary steps. To install, run the following
program (it is recommended to close all applications prior to installation):
Run <your CD>:\ Easylon OPC Server\Setup\Setup.exe
After installing the Easylon OPC Server and rebooting your computer, you will
find the following program group:
4 A version history is given in Chapter 8
19
OPC Server User’s Manual
Fig. 2.2:
Installation and Operation
Programm group after installation
3. Update the Common Controls Library (for Windows 95 only)
If the Xif editor refuses to start after installation, you must update the Common
Controls Library. Run the following program (it is recommended to close all applications before installing):
Run <your CD>:\Easylon OPC Server\DCOM95\40Comupd.exe
4. Run the Visual Basic demo
To check if the installation was successful, you can now start the Visual Basic demo,
which will automatically start the Easylon OPC Server.
The Visual Basic demo is available in the VBdemo subdirectory that was created in
the directory where you installed the Easylon OPC Server to.
Example: C:\Easylon\EOS2\VBDemo
The server will run in "Simulate" mode. This means it will use the demo database
and simulate data changes to the available NVs. Refer to chapter 3.2 Visual Basic
demo for instructions on how to control the program and browse the NV database.
5. Configure the Easylon OPC Server for your network
To access your LonWorks network, you must configure the Easylon OPC Server,
and tell it which interface to use. Set the Startup Mode to “Auto” and define a
new database name. When the server is started, it will scan and upload the
LonWorks network, the information is stored into a new generated database with
the given name.
For information about the configuration file, check the „Configuration“ chapter
2.4 of this manual. It also explains how to set the network interface to your
LonWorks control network.
20
OPC Server User’s Manual
2.3
Installation and Operation
Starting
The Easylon OPC Server can be started manually or automatically. If you have installed the Easylon OPC Server and checked the installation by running the Visual
Basic demo, you will already have seen how the server starts automatically. Manual
starting is done according to usual Windows procedures by either double-clicking the
program file in its directory, or by using one of the shortcuts that were placed in the
Easylon OPC Server program group.
Anyway, starting the server will show you the following picture:
Fig. 2.3:
2.3.1
Startup picture of the OPC Server
Easylon OPC Server Actions
1. Open the configuration file.
The last configuration file used is read. This file contains information about the
network database, LonWorks network interface and further options to be used.
Check the Configuration chapter (2.4) for details.
2. Check the command line options.
If no option is given, the program opens its user interface (which is in fact the NV
Browser), and waits for a start command before proceeding with the next steps. If
the option "/run" is given, the program does not wait, but immediately continues
with the next step, using the configuration which was most recently saved.
3. Read the Network database
When the start command is given (or the “/run” command line option was used),
the network database is read. This database contains the NVs (organized in domains, subnets and nodes) and the method in which these NVs are represented as
OPC items (addresses, data types, aliases). See chapter 2.5 on the NV Browser for
details.
21
OPC Server User’s Manual
Installation and Operation
4. Open the physical LonWorks network connection
The Easylon OPC Server can run in "Simulate" mode (cf. Configuration for details). In this case, no attempt is made to open a LonWorks connection. NVs
from the given database are made available to OPC clients, and their values are
simulated (including randomized changes to these values).
If an error occurs when opening an interface to the LonWorks network, a dialog box
will be shown indicating the type of error.
You can check the Tips and Tricks chapter in this document for hints on how to
overcome the problem.
5. Scan and upload nodes from the network
Depending on the configuration options, the Easylon OPC Server now scans the
LonWorks network and uploads either all nodes (discarding the previously scanned
information) or just the nodes that were not known in the network database before.
6. Wait for connections from OPC clients
At this point, the Easylon OPC Server is running and waiting for OPC clients to
contact the server, add groups, and subscribe items.
7. Serve OPC requests
The Easylon OPC Server now replies to any request arriving through one of the
connections to OPC clients, until the program is terminated.
2.3.2
Automatic Startup and Shutdown by OPC clients
If an OPC client tries to open the Easylon OPC Server, it will browse the Windows
registry to find the program. If the server is already running, a connection is made to
it. If the program is not running, it will be started automatically, with the “/run”
command line option.
The Easylon OPC Server will be operative until the last OPC client has disconnected
(removing the last remaining group). If the program was started automatically by an
OPC client, it will then terminate automatically, even if the last remaining OPC client was not the one that caused the server to start.
2.3.3
Automatic startup by Windows
You can copy the “Easylon OPC Server (run)” shortcut to the Autostart directory of
your Windows PC to cause the server to start automatically when the PC is booted.
The server will use the last opened configuration file and start its OPC services
immediately.
22
OPC Server User’s Manual
2.4
Installation and Operation
Configuration
The Easylon OPC Server makes LonWorks network data available to OPC clients. By
the Configuration settings the Easylon OPC is told where the LonWorks network can
be found, and how to handle the database that contains the network description.
Configuration information is stored in a separate file with extension TDB. Normally,
you will edit the Configuration options while the Easylon OPC Server is not running
yet. To start the program without immediately starting the Easylon OPC server, you
can use the shortcut "Easylon OPC Server (Config)" in the Easylon\OPC Server
program group. This starts the server without a configuration file.
2.4.1
Opening a Different Configuration File
If you want to open a different configuration file (or if you started the server with the
Config shortcut), choose the “Open” command from the “File” menu. If the server
was already started and at least one OPC client is connected, this action is refused (a
dialog box will tell you why). Otherwise, the server is stopped and the new configuration file is read in.
2.4.2
Device Properties (Changing Configuration Options)
Choose the “Properties” command from the “Edit” menu. This opens the dialog box
shown below. Clicking OK will cause the Easylon OPC Server to use the new properties, without storing them in a configuration file for future use. For this purpose you
have to use the “Save” or “Save As” commands from the “File” menu.
The command is even available if the Easylon OPC Server is running. However, in
that case, the changes will not affect the program, not even if you save the configuration file. They will be used when you start the Easylon OPC Server for the next
time.
23
OPC Server User’s Manual
Fig. 2.4:
Installation and Operation
The Edit Properties dialog box
The value shown under “LON Access” and “Startup” are entries which can be set in
the “Options” dialog described below.
Name
This is the name used for the network as it is shown in the NV Browser. You
are free to choose any name.
LON access
see: Options dialog
Startup
see: Options dialog
Host adapter address
The entries define the primary and secondary domain of the LonWorks network interface. Note that you need to define a valid domain, since no nodes
will be found if the network is scanned with a domain name not matching the
domain to which the network interface is connected. The domain is entered as
hexadecimal string. If you enter the empty string the default domain will be
scanned.
Valid domains have a length of 0, 2, 6 or 12 digits, e.g. 01 or 818283848586
Also, you need to set the subnet and node number of your network interface
node. Do not set these to 0, since the interface will not work properly with
that. If you choose the same subnet/ node number as one of the nodes in the
24
OPC Server User’s Manual
Installation and Operation
domain to be scanned, that node may not be visible and other errors may
occur.
License key
A license key is needed to keep the Easylon OPC Server running for more
than 30 minutes. The key can be purchased from Gesytec and is coded with
the Neuron ID of your network interface (host adapter). This implies that you
can use the key with any PC, but only with one network interface device. For
detailed information refer to chapter 6.
Watcher
This entry allows you to set the timeouts for NV cache entries, if you use the
Easylon Watcher adapter of the Gesytec network interface cards, as well as if
you use binding of NVs to the OPC server. The Easylon OPC Server will poll
a NV for its current value, if a client requests the value and the cached value
has become “stale”.
“Update Database”
This command will overwrite all timeouts with the value specified here.
2.4.3
The Options Dialog
Choose the “Options” command from the “Control” menu. Base configuration options are specified here.
Fig. 2.5:
The Options menu
The parameters in this dialog are those which cannot be changed once the OPC
server is connected to the LonWorks network (started); at that time this dialog can't
be accessed any more.
LON interface
The Easylon OPC server checks the Windows registry to build a list of available interfaces, and offers a list box, from which you can select the LonWorks
network interface to be used. Supported devices are listed in chapter 2.2.1
Supported Hardware.
25
OPC Server User’s Manual
Installation and Operation
Startup mode
This option tells the Easylon OPC Server which database to open, and in
which mode it shall run. The database contains a model description of the
connected LonWorks network, and node/NV information (if the database was
filled in a previous run of the Easylon OPC Server). An empty database, containing the logical organization of a LonWorks network but no nodes, is delivered as part of the Easylon OPC Server software and installed in the Easylon OPC program directory as empty97.mdb.
The available startup modes are described below:
Auto
Upload the network information only if the database is
empty.
Simulate
Use the database but do not access the network; simulate NV
value changes. The user may change values by an appropriate
dialog.
UploadAll
Uploads all nodes from the network and overwrites the information in the current database
UploadNew
Keep the information in the database; scan the network and
upload unknown nodes
Database
This text field allows you to specify the name of the database to be used for
this configuration. It is advisable to specify the database by giving its full path
- this can easily be done with the help of the browse button (depicted with
“...”).
You may specify a non existing database. In this case the OPC server will display a warning when connecting to the net and create a new empty database.
Use power line timings
If you check the “use power line timings” box, the timeout for transactions is
set to the maximum value possible, which may be necessary for networks
which use the power line transceiver. The disadvantage of this is, that all
failed transactions will take longer to timeout.
Use NV self documentation as NV name
Depending on the application for a LonWorks node, the NV self documentation may give a better description of the purpose of a NV than the NV name
itself. By checking this box you tell the OPC server to use the self documentation instead of the NV name as the description displayed for a NV. This option is only evaluated during the scan of a network.
26
OPC Server User’s Manual
Installation and Operation
Debug trace
If you check the “Debug Trace” box, the OPC server logs all communication
with the LonWorks network to a file "DbgTrace.log" located in the OPC executable directory. Gesytec can use this log file to analyze any problems you
encounter in network communicating. This option should normally not be
enabled, since the log file tends to grow very quickly.
Hide main window if started from client
Although it is quite useful to look at the OPC servers user interface while developing or configuring you client, this may be rather confusing for an end
user – additionally it may give him the (bad) idea to terminate the OPC
server while the client is still running. If this option is checked, the OPC
server will hide its main window if it was started by a client (in contrast to
being started on its own).
2.4.4
Saving the Configuration File
After you have edited the Properties you can save the configuration information in
the current file or choose a new name to save the information in. If you choose a new
name, this will be the active file after saving. Note that the last saved file will be the
one that is loaded in the next run of the Easylon OPC Server.
2.4.5
Back Compatibility
Fig. 2.6:
2.4.5.1
Back Compatibility
Back Type Compatibility
To enable / disable the Back Type Compatibility please choose the “Control” menu.
In older versions (up to 2.08) some SNVTs has been formatted in a different manner.
Existing applications may have problems with the newer formatting which is now
following the LonMark guidelines. As an example the SNVT type Switch can be represented in two ways:
27
OPC Server User’s Manual
Installation and Operation
Example:
100 1
C801
2.4.5.2
Strin
g
Hex
new Back Type Compatibility disabled
old
Back Type Compatibility enabled
Back Name Compatibility
The second setting of back type compatibility defines the node names for OPC namespace browsing. For existing client projects which store the namespace, back type
compatibility must be enabled.
With enabled Back Type Comptability, the name of a node consists of domain key,
subnet ID, program ID, node ID and location
Fig. 2.7:
Back Name Compatibility enabled
The new naming just uses the node ID and the location name. In case of ducplicate
node Ids, the OPC Server will add an enumeration. Normally duplicate node IDs will
not occur, because a LonWorks network management toll will prevent this.
Fig. 2.8:
Back Name Compatibility disabled
28
OPC Server User’s Manual
2.5
Installation and Operation
NV Browser
After the Easylon OPC Server has been started, you can browse through the uploaded
network information, using the program window, as shown in the example below. In
Simulate Mode you will get simulated data.
Fig. 2.9:
The NV Browser
To the left you have a tree view of the uploaded network, containing domains, subnets and nodes. Opening the network, a domain or a subnet is done according to
Windows conventions by clicking the
or
symbols.
When you select a node in the tree view, its NVs are listed in the table view to the
right. The address is the logical address of the NV in the LonWorks network. In
front of the address, an "O" or "I" indicate Output or Input NVs.
The columns for Value and Timestamp are activated when the “Monitor” option in
the “View” menu is switched on: the current values are then shown, as they are retrieved from the network (respectively simulated if the Easylon OPC Server runs in
Simulate mode).
By choosing “Monitor NV’s” from the “Control” menu you will find a check-box in
front of the address field.
In Simulation mode the user may change the simulated value. By clicking with the
right mouse button on an item, a small pop up menu is displayed, in which a Change
Value option may be selected.
The OPC Server status bar shows how many clients are currently connected, and how
many NVs are subscribed by those clients.
29
OPC Server User’s Manual
2.5.1
Installation and Operation
Defining Tag Properties
A Tag maybe either a network variable or the node’s status. To define Tag
properties, select the NV in the table view and choose the “Properties” command
from the “Edit” menu. Instead, you can also click the right mouse button on the
item. A pop-up menu shows the commands, “Properties…”, “Change value …” and
“Multiple Setting” which in the first case opens the Tag Properties dialog box. This
allows you to define the type for the NV and set the description.
Fig. 2.10:
Tag Properties
This description is visible through the OPC interface, so the OPC clients can use
either the logical NV “Address” or the “Description” to access the NV.
The type of the NV can be set to any of the following:
UByte
UWord
UDWord
Word
DWord
Float
String
Native
- 8 bit unsigned
- 16 bit unsigned
- 32 bit unsigned
- 16 bit
- 32 bit
- 32 bit
- character string
- takes the type sent by the OPC Server
The default type is Native.
Cache Timeout is given in milliseconds and specifies the interval after which a cached
value for this NV will become “stale”. The OPC Server will poll this NV when a
clients requests a stale value. “Always use Cache” will always suppress polling of this
NV.
2.5.2
Change Value...
Using the command “Change Value...” allows to set the value of a tag manually
when the Easylon OPC Server is running in simulation mode. The use may check the
operation of his OPC Client by setting different values. By changing a value
manually, the Easylon OPC Server will stop automatic generating values.
30
OPC Server User’s Manual
Installation and Operation
By using this command, the Easylon OPC Server will open an nv editor dialog.
2.5.3
Multiple Setting
To define NV properties for more the one NV, select a NV in the table view and
click the right mouse button. By choosing “Multiple Setting” a pop-up menu shows
the following check box:
Fig. 2.11:
Multiple Setting
In the upper part of this box you are able to choose the properties witch will be set .
In the for-field a selections are possible for all tags, all NV types or all NV names. In
the lower part you may choose to which nodes these changes shall be applied once
you click the OK button.
31
OPC Server User’s Manual
2.6
Installation and Operation
Binding Network Variables and the XIF Editor
In order to bind a NV to the OPC Server, you first have to define the network interface of the server. This is done with the help of the XifEditor.exe utility, which allows
you to:
–
specify which NVs of which types are offered in the network image of the
Easylon OPC Server
–
load this virtual image into a project file
–
dave the interface definition in form of a .xif file
The Xif editor provides an online help, which should enable you to perform the following tasks:
1. Create a new project (all data is stored in form of the final .xif file)
2. Fill in the header or the XIF. You may use the XIF of the LonWorks interface,
which will be used by the Easylon OPC Server. You will find the XIF of an
Easylon LonWorks Interface on the installation CD-ROM, If you do have an
Echelon interface you will find it in the directory LonWorks\templates.
You must define the header, otherwise the network management tool will fail to
import the XIF.
3. Add all the input NVs you need.
Fig. 2.12:
The Xif -Editor
32
OPC Server User’s Manual
Note:
Installation and Operation
Message Tags are for future extensions, explicit messages are not supported at the moment by the OPC Server
4. Export the definitions to the OPC Server in form of an existing database (.mdb).
Fig. 2.13:
Export to database
You can then take the .xif-file to your favorite network installation tool, and bind any
output NV in the network to any of the input NVs of the OPC Server (as long as
their type is compatible). In order to bind an NV to the OPC Server, the server will
probably have to run (depending on your installation tool).
On starting the Easylon OPC server its own input variables will be undefined, because they have not been updated by the sending nodes. The Easylon OPC Server
will poll the sending nodes on startup to have valid values. By using the LNS PlugIn
after changing bindings to the OPC Server additional addressing information is
written to the OPC server’s database. The Easylon OPC Server does not use “bound”
poll’s, because this is limited to 15 destination addresses.
33
OPC Server User’s Manual
2.7
Installation and Operation
Diagnosis
Apart from a log file which was difficult to understand the Easylon OPC Server
hardly offered any diagnostic facilities until release 2.2. Especially for the users on-site
it was difficult to find out, what had caused a problem. For this reason, the Easylon
OPC Server form Release 2.2 onwards provides the Diagnosis features shown below.
Fig. 2.14:
2.7.1
Diagnosis extensions
Group/Item Diagnosis
In order to allow an extensive diagnosis on OPC-level a form is implemented displaying the qualities of the OPC items as well as of the OPC groups.
Fig. 2.15:
Group/Item Diagnosis
On the left a list of the clients connected to the OPC Server is shown. For each client
its groups are listed. (in above example only G1).
By selecting a group, specific information for this group is shown in the upper part of
the right side of the window. In the lower part specific information is given for the
OPC items belonging to this group:
–
OPC item ID
–
OPC canonical data type
34
OPC Server User’s Manual
Installation and Operation
–
OPC requested data type
–
OPC client Handle
–
OPC value
–
OPC timestamp
–
OPC quality
–
OPC number of reads, writes, polls and updates
By clicking into this window with the right mouse button you can directly access the
Options/Diagnostic settings.
2.7.2
Protocol
An additional diagnosis feature is given by the “Protocol” where several events on
OPC- as well on LON-level can be shown and stored.
Example:
Fig. 2.16:
Extract of Protocol window
Which kind of information will be stored, is adjustable in the Options/Diagnosis Settings described at the end of this chapter.
By pressing the right mouse button in the protocol window a selection box appears.
35
OPC Server User’s Manual
Installation and Operation
These functions need no explanation except for “Export” which allows to save
the information as a file.
Fig. 2.17:
2.7.3
Functions of the Protocol Window
Network Interface Status
Fig. 2.18:
Status of node “Network Interface”
A simple but helpful diagnose exists in representing the node state of the network
interface in form of a list. Values are updated in 1 second intervals. With the “Clear
status” button it is possible to set the values back.
In particular the values for xmit_errors and transaction_timeout will give a first overview of the network. For example quickly increasing xmit_errors indicate a poor
transmission quality.
36
OPC Server User’s Manual
2.7.4
Installation and Operation
All Nodes Status
Fig. 2.19:
Status of “All Nodes”
This diagnosis feature displays a table with the node states of all connected LONnodes. The table can be sorted by:
–
Node name
–
Program ID
–
Location
–
Value of the different error counters
As shown in Fig. 2.19, it is possible to set the update interval for the display (1000ms
in above Figure).
By pressing the “Clear All” button, values of all nodes will be set back by using a
domain broadcast message.
2.7.5
Options
By selecting “Options” from the “Diagnosis” menu you access the “Diagnostic Settings”. These settings are the instructions for the Easylon OPC Server to list selected
events. All adjustments which are made here are stored in the Windows registry. This
is useful in case of starting the Easylon OPC Server automatically by a client.
37
OPC Server User’s Manual
2.7.5.1
Installation and Operation
OPC Protocol
Fig. 2.20:
OPC Protocol Settings
The above check box switches select the entries made into the “Protocol” with respect
to OPC events . You can choose Management or Datachange or both or none at all.
2.7.5.2
LON Protocol
Fig. 2.21:
LON Protocol Settings
The above check box switches select the entries made into the “Protocol” with respect
to LON Protocol entries.
38
OPC Server User’s Manual
2.7.5.3
Installation and Operation
OPC Items Table
Fig. 2.22:
OPC Items Table settings
The above check box switches are all related to OPC-Diagnosis. The selected columns are shown in the Group/Item Diagnosis (Fig. 2.15).
2.7.5.4
Protocol Window
Fig. 2.23:
Protocol Window settings
Here the adjustment for the Protocol window is made. If the Protocol window exceeds the maximal count of lines the removed lines can be stored as a .txt-file.
39
OPC Server User’s Manual
2.7.5.5
Installation and Operation
Archive
Fig. 2.24:
Archive Settings
This limits the size of the .txt-file: If the disk space required exceeds the value specified here, no more entries are made.
40
OPC Server User’s Manual
3
Easylon OPC Server Demos
Easylon OPC Server Demos
Two demonstrations of the Easylon OPC Server have been installed together with the
program: one for Visual Basic (VB-Demo) and the other for Visual Basic for Applications (VBA Demo)
3.1
Requirements
During the Easylon OPC Server setup a demo database is copied to the installation
directory. It is displayed as first entry of the list of recently used files in the file menu
of the EOS. The demo database consists of three nodes with network variables of
most commonly used types. This database is configured to run in the “simulation
mode”, so that the user can test with values of all SNVT types and can change the
values.
Changing a value for an input network variable (NV) is done by clicking with the
right mouse button to an OPC item in monitoring mode. A small context menu is
shown, the second entry of which is “change value”. Following this entry will display
a dialog box to change the value of the item:
41
OPC Server User’s Manual
Easylon OPC Server Demos
After changing the item’s value it becomes static, meaning that he usual automatic
updates of the simulation mode are turned off., So it is possible to test an user
interface.
The Visual Basic demos are available in the VBdemo subdirectories that were placed
in the directory where you installed the Easylon OPC Server.
Example:
C:\Easylon\EOS2\VBDemo and
C:\Easylon\EOS2\VBADemo
To run the demos described in this chapter, you must have the Easylon OPC Server
installed on your PC.
The demos are using the demo database, so they do not need a LonWorks network
connection. If you have installed the Easylon OPC Server, it will automatically be
started by the demo programs and the demo database will be found.
42
OPC Server User’s Manual
3.2
Easylon OPC Server Demos
Visual Basic Demo
The Visual Basic example is a simple application, which shows a couple of NVs from
the LonWorks network. The data are requested from the Easylon OPC Server, which
is automatically started when you run the demo program named VBDemo.exe.
How to run the Visual Basic demo
1. Make sure you have installed the Easylon OPC Server
2. Start the Visual Basic demo. You can simply double-click the VBdemo.exe program in the ... \VBDemo subdirectory. The following picture will be shown:
Fig. 3.1:
Startup of VBDemo
3. Click the “Connect” button to start the Easylon OPC Server
4. Enter one or more NV names. To find NV addresses that are valid in the demo
database, use the NV browser of the Easylon OPC Server. Press “Start” to get the
simulated NV values.
5. If you want to change NV names, press “Stop” first, change the names, and press
“Start” again. The connection to the Easylon OPC Server is kept open until you
quit the demo.
6. If you have a LonWorks network connected to your PC, you can use the Visual
Basic demo to access NVs from your network. Read the chapter 2.4 on configuration of the Easylon OPC Server to see how you can tell the program to scan
43
OPC Server User’s Manual
Easylon OPC Server Demos
your network and upload the NV information to the database. After making
changes, you need to exit the Easylon OPC Server (save the changes to a new
TDB file), and restart the Visual Basic demo.
Take a look at the code
If you have installed the Easylon OPC Server on your PC, the VBdemo files are also
copied to the Easylon\EOS2\VBDemo directory (or wherever you have installed it to).
This directory contains the source code of this Visual Basic demo, including the
Visual Basic Project file for Visual Studio.
44
OPC Server User’s Manual
3.3
Easylon OPC Server Demos
Visual Basic for Applications Demo
Excel uses Visual Basic for Applications (VBA) to write macros.
Since this programming system supports the OLE automation interface which is part
of OPC, it is quite easy to connect elements in your Excel spreadsheet to the Easylon
OPC server. To run the example that is discussed below, the Easylon OPC Server
must be installed and, of course, you will need Microsoft Excel.
For this example we use a demo database, which does not require a connection to an
actual LonWorks network. Instead of polling the requested NVs for changes in their
values, these values are simulated. The difference with a real network producing the
values is realized in the DLL that forms the lower level of the Easylon OPC server
software, and does not affect the behavior of the rest of the software.
How to run the Visual Basic demo
1. Make sure you have installed the Easylon OPC Server
2. Start the VBA demo. You can simply double-click the OPCDemo.xls-sheet in the
Easylon\EOS2\VBADemo directory. When starting the Excel program you have
to activate the macros. The following picture will be shown:
Fig. 3.2:
Startup of VBA Demo
45
OPC Server User’s Manual
Easylon OPC Server Demos
3. Click the “Connect” button to start the Easylon OPC Server. In row 8 you can see
the text: “connected to server”
4. To find NV addresses that are valid in the demo database, use the NV browser in
the Easylon OPC Server. The Itemnames of the Excel-Sheet have to be the same as
the Description of the NV.
5. Press Start to get simulated NV values.
6. By selecting the sheet named Archive you will see a graph (with simulated
changing values) as follows:
Fig. 3.3:
Graph of VBA Demo
What the code looks like
The VBA code is written in a single module, which is associated to the Excel worksheet into which the data for the chart are written. To see the complete code, load the
demo in Excel and open the VBA Macro Editor (in the Tools menu, Macro item,
submenu Visual Basic Editor – or press Alt+F11). Then press F7 to see the code. To
see an explanation of the source code, refer to chapter 4.2VBA for Excel.
46
OPC Server User’s Manual
4
Writing OPC Clients
Writing OPC Clients
To make use of the Easylon OPC Server, you will need to write OPC clients which
request data from the OPC Server and use them in their visualizations and/or calculations. This section of the Easylon OPC Server documentation gives an introduction
into writing OPC clients using Visual Basic and VBA for Excel.
Note:
This documentation is only supplied as an example, so that you can see how the interface of a client to the OPC server works.
If you want to write OPC clients for the OPC custom interface, please check the official OPC Standard document for reference. This document can be retrieved from the
OPC Foundation web site http://www.opcfoundation.org.
The current release of the Easylon OPC server (V2.2) supports as well the OPC Standard document version 1.0a as version 2.02.
In this section of the user documentation, the following information is available:
•
Naming Items
•
VBA for Excel
The „Naming Items“ section explains which names a client can use to identify NVs of
interest to the OPC Server, and how to address subfields of structured NVs.
The „VBA for Excel“ section gives a step-by-step procedure to write an OPC client in
Excel, using the DataCallBack feature of the OPC interface to automatically update
the spreadsheet when OPC item values change. Although some of the code is specific
for Excel, the structure of the client program is the same in other Microsoft Office
applications (or any other application that supports VBA).
47
OPC Server User’s Manual
4.1
Writing OPC Clients
Naming Items
The are two ways by which the client can specify an item in which it is interested:
Address
This specifies an NV by giving the domain, subnet/node ID and the
NV index to the OPC Server
Description
This is an alias name for a NV which can be chosen freely to describe
NVs of interest in any convenient way.
Note that the NV name itself would not be sufficient, as NV names are not unique in
a LonWorks network (several nodes of the same type will have the same NV names
for instance).
Fig. 4.1:
Address an Description of an NV
You will find the address of a NV as well as its description in both the NV browser of
the Easylon OPC Server and in the properties dialog opening on that NV.
48
OPC Server User’s Manual
4.2
Writing OPC Clients
VBA for Excel
To write an OPC client for Excel, you must have the Easylon OPC Server software installed on your PC before starting Excel. This is necessary to make the OPC objects
available to the Visual Basic Editor. Installing the Easylon OPC Server software
automatically registers the OPC libraries containing the interface definitions.
The program structure of an OPC client written in VBA is as follows:
–
Declarations
–
Starting the Easylon OPC Server
–
Adding a Group
–
Adding Items to an OPC Group
–
Using the DataCallBack feature
–
Stopping the DataCallBack mechanism
–
Releasing items and/or groups
–
Stopping the server connection
The explanations below are related to VBA Demo (OPCDemo2.xls) of chapter 3.3.
Declarations
'Sample OPC client in VBA for MS-Excel
Const ITEMSMAX = 3
' we need an OPCServer
Private gOpcServer As OPCServer
' this is the groups collection
Private gOPCGroups As OPCGroups
' we need an OPCGroup receiving events
Public WithEvents gOPCGroup As OPCGroup
' An own index
The objects and variables defined here are needed to
establish a connection to the Easylon OPC Server. The ITEMSMAX constant indicates how many NVs can be subscribed at the same time. The gIndex variable is used
to identify the DataCallBack connection to the Easylon OPC Server.
Private gIndex As Long
Starting the Easylon OPC Server
'Connect to the OPC Server
Private Sub CmdConnect_Click()
On Error GoTo Err_Connect_Click
ShowStatus "Connecting to Server"
' Create server object
Set gOpcServer = New OPCServer
49
OPC Server User’s Manual
Writing OPC Clients
' connect to the Easylon OPC Server by using it's name
gOpcServer.Connect ("Gesytec.ElonOPC2")
'attach to the groups collection
Set gOPCGroups = gOpcServer.OPCGroups
ShowStatus "connected to server"
Exit Sub
Err_Connect_Click:
ShowStatus Err.Description
MsgBox "Error connecting: " & Err.Description
End Sub
First, the Easylon OPC Server object is created. If the server was not started yet, this
is done now. If there was already an Easylon OPC Server active, the new gOpcServer
object refers to the active server. The identifier "Gesytec.ElonOPC2" should be used
as indicated. This is the name that is entered in the Windows registry.
Adding a Group
' Add a Group
Private Function AddGroup() As Boolean
' Add a group with name G1
Set gOPCGroup = gOPCGroups.Add("G1")
If gOPCGroup Is Nothing Then
MsgBox "Error AddGroup"
AddGroup = False
Exit Function
End If
' use an update rate of 500 ms
gOPCGroup.updateRate = 500
End Function
Before the OPC client can subscribe items, a group needs to be created, using the
AddGroup method. The group is used as a container object for items belonging to an
OPC client. A client can add more than one group and connect to more than one
OPC server.
Adding items to an OPC group
' add the items to the Group
Private Sub AddItems()
' Add items
' the ItemIDs to acces the Items
Dim itemIDs(ITEMSMAX) As String
' our own handles
Dim ClientHandles(ITEMSMAX) As Long
' access patch to the items (unused in this sample)
50
OPC Server User’s Manual
Writing OPC Clients
Dim accessPaths(ITEMSMAX) As String
' the handles, assigned by the OPC server
Dim serverhandles() As Long
' some errors
Dim errors() As Long
' the datatypes for our items
Dim dataTypes(ITEMSMAX) As Integer
Dim count As Long
count = 0
Dim i As Integer
For i = 0 To ITEMSMAX - 1
If Worksheets("General").Cells(i + 1, 1).Value <> "" Then
count = count + 1
' read the ItemIDs out of the worksheet
itemIDs(count) = Worksheets("General").Cells(i + 2,
1).Value
ClientHandles(count) = i
' no access patch
accessPaths(count) = ""
' use string as datatype for all
dataTypes(count) = 8
End If
Next i
'- - - - - - - - - - - - - - - - - - - - - - - - - - - - ' add the items
gOPCGroup.OPCItems.AddItems count, itemIDs, ClientHandles, _
serverhandles, errors, _
dataTypes, accessPaths
' start the subscription
gOPCGroup.IsSubscribed = True
ShowStatus Format(count) & " items defined"
End Sub
Items are the OPC representation of process variables (NVs in the case of LonWorks).
To identify each item, a number of variables need to be defined for each of them:
each item has a name, an access path, a data type and an active flag.
The arrays are initialized (the code for one item is shown below - reading the item
name from a cell in the Excel worksheet). After all parameters are set, the AddItems
method is used to subscribe the items.
Using the DataCallback feature
The DataCallback is used by implementing an appropriate event handler for the
group object.
51
OPC Server User’s Manual
Writing OPC Clients
' handle the datachange event
Private Sub gOPCGroup_DataChange( _
ByVal TransactionID As Long, _
ByVal NumItems As Long, _
ClientHandles() As Long, _
ItemValues() As Variant, _
Qualities() As Long, _
TimeStamps() As Date)
On Error GoTo err_setValue
ShowStatus ""
Dim i As Long
For i = 1 To NumItems
' put the values to the worksheet
Worksheets("General").Cells(i + 1, 2).Value =
ItemValues(i)
Next
' handle the little archive
Worksheets("Archiv").Cells(gIndex, 1).Value = ItemValues(1)
Worksheets("Archiv").Cells(gIndex, 2).Value = TimeStamps(1)
gIndex = gIndex + 1
If gIndex > 10 Then gIndex = 1
Exit Sub
err_setValue:
ShowStatus "Error during callback"
End Sub
The datachange event receives some collections, containing the data, the status and a
timestamp for each data. Now the procedure is able to set the received values to the
cells of the worksheet.
Stopping the DataCallback mechanism
Before releasing items from the group, you need to tell the Easylon OPC Server to
stop using the callback mechanism. This is done by releasing the group itself.
Releasing items and/or groups
Private Sub RemoveGroup()
If gOpcServer Is Nothing Then Exit Sub
'remove the group
If Not gOPCGroup Is Nothing Then
gOPCGroup.IsSubscribed = False
Set gOPCGroup = Nothing
End If
52
OPC Server User’s Manual
Writing OPC Clients
' Remove groups
gOpcServer.OPCGroups.RemoveAll
End Sub
By removing a group, all the items in that group are removed as well. In this example, all added groups (the ones that were added by this OPC client) are removed.
Stopping the server connection
Set gOpcServer = Nothing
If the Easylon OPC Server was started by the OPC client, and no other clients have
connected since then, releasing the connection to the server will cause it to finish.
4.3
Some OPC Clients for Test
There are some clients available for free. A couple of them may be found via the
Links-section of the OPC Foundation web site (www.opcfoundation.org). Gesytec
tested KepWare’s opcquickclient, Iconcics OPC Spy and Axeda’s OPC inspector.
53
OPC Server User’s Manual
5
Useful Tools
5.1
Determine Domains
Useful Tools
A common problem of customers is that they don't know the domain(s) in which the
nodes within their network are installed. These domains have to be entered in the
configuration dialog of the Easylon OPC Server in order that it can find the nodes.
After installing the Easylon OPC Server there is a short cut named Determine domains in the program group. After starting this tool and choosing the network interface you will get the following picture:
Fig. 5.1:
Determine domains: waiting …
By pressing the service pin you will get the node-information in the order (domain/subnet/node) as follows:
Fig. 5.2:
Determine domains: receiving …
54
OPC Server User’s Manual
5.2
Useful Tools
LNS-PlugIn
As of release 2.2 the Easylon OPC Server comes with a LNS PlugIn named
OPCPLUGIN.EXE. After installing the Easylon OPC Server the PlugIn can be
started from the directory into which you installed the Easylon OPC Server Its icon
is:
Like other LNS PlugIns it has to be registered on the PC by the first start of the program.
Fig. 5.3:
Registration of the LNS PlugIn
After that it will be registered for the LNS-Tool when this one is started.
When choosing System PlugIns in the LonMaker menu you have to select Create
Easylon OPC server database.
Fig. 5.4:
LNS system PlugIns
The LNS PlugIn reads the network configuration from the LNS database.
55
OPC Server User’s Manual
Useful Tools
After that the LNS PlugIn starts with the screen showed below.
Fig. 5.5:
LNS PlugIn NV browser
The LNS PlugIn itself provides an interface (NV browser) identical to that of the
Easylon OPC Server.
Figure 38: LNS PlugIn NV Properties
The “Description” of the NV Properties comes from the LNS project and is structured:
–
Project
–
System
–
Node name
–
NV
The function Export to database exports the information in form of a MS-Access-database for use of the Easylon OPC Server.
This database can then be used for an Easylon OPC Server project.
56
OPC Server User’s Manual
6
Tips and Tricks
Tips and Tricks
This chapter will help you in case of some frequently met problems. Additionally you
may consult the Frequently asked Questions database at the Gesytec web site
www.gesytec.de.
This problems are sorted by the following categories:
6.1
–
General Questions
–
Installation
–
Network Interface
–
Runtime errors
–
Upload Problems
General Questions
Can the OPC Server run as a service?
Properly speaking the Easylon OPC Server is not an application in itself - running it
as a service therefore doesn't make much sense. A client of the OPC Server on the
other hand may very well be a service; such a client service can use the OPC Server as
well as any other client.
Starting with version 2.00, the OPC Server can be configured not to show its main
window if started by a client (within the Control/Options... dialog). This is advisable
especially if the client is started as a service, as otherwise the user might shut down
the OPC Server by mistake.
Does binding of NVs vs. using the Easylon Watcher technology matter for performance?
The limiting factor for the performance of the OPC server is always the LonWorks
network and the interface to it. A network interface can handle a couple of ten network variable (NV) updates per second. whereas the Easylon Watcher will pass on
any NV update sent over the network - which can be two hundred or more. Additionally, no acknowledges have to be sent back from the OPC server, which saves
bandwidth on the network. In networks with a high traffic load you get a definite
performance advantage with our Watcher technology.
Please note that NV's have to be bound even if the Watcher interface is used, because
otherwise the node will not send its NV's and must be polled.
57
OPC Server User’s Manual
Tips and Tricks
Are there examples for using OPC with Delphi ?
We can offer support ourselves only for MS Visual Basic and MS VisualC++.
There is a source code example for a client written in Borland Delphi freely available
on the internet: http://dspace.dial.pipex.com/opc/tooltech.shtml
Additionally, as there are lots of people interested in this, you may take a look into
the news group borland.public.delphi.oleautomation and/or post your questions
there.
Does the server support explicit messages ?
No. Since explicit messages are application specific and not standardized in any way,
they can be neither read nor written.
Does the OPC Server support LonMaker/LNS?
The Easylon OPC Server has been designed in a way that keeps it completely independent from the installation scenario used and thus independent from any given
database. Instead, the OPC Server scans the actual network and creates its own database. This has several advantages. One advantage is that you can use it with networks
that have been installed with ANY tool or even with no tool at all (self-installation).
Another advantage is that you always are up-to-date with the nodes in the network
even if the database is not on site or nodes are missing or new nodes have been
installed that are not in the current database.
You can assign a separate symbolic name to a node's network variable and use this
name as the OPC tag. You only need to assign these names to those network variables that you want to subscribe to from you OPC client. And the Easylon OPC
server uses an open MS Access database so that it is easy to import/export data.
So the answer is YES: you can use the Easylon OPC Server with LonMaker for Windows. And with the LNS PlugIn available from Easylon OPC Server Release 2.2 onwards you can as well import the information from the LNS database.
The server displays NV self documentation in place of NV names ?
The Easylon OPC Server used to display the NV self documention instead of the NV
name if that was present - otherwise the NV name was be displayed. From release
2.00 onwards you can configure this behavior (Dialog Control/Options...).
Note:
This setting is only evaluated during a scan of a network, changing it
at a later time will not be effective for nodes which have already been
scanned.
58
OPC Server User’s Manual
Tips and Tricks
What are the restrictions of the demo or trial version ?
The demo version of the Easylon OPC Server has the same (full) functionality as the
licensed version. The only difference is that the demo version shuts down after running for 30 minutes and has to be restarted manually.
Does the server support “user-defined” variables?
User defined variables are treated as byte arrays by the Easylon OPC Server and can
thus be read and written by applications. The Easylon OPC Server does not read in
formatting information from resource files.
Which installation tools can be used in conjunction with the OPC Server ?
The Easylon OPC Server uploads all information which it needs from the LonWorks
network itself. Since it does not read data from the database of the installation tool, it
will not restrict you in your choice of an installation tool at all.
Can the OPC server be used with clients running on UNIX systems?
In a network a client talks communicates with the OPC server using Microsoft’s
DCOM mechanism. We cannot support UNIX clients ourselves, but at least for
Linux there is a freely available DCOM interface from Software AG:
http://www.softwareag.com/entirex/download/free_download.htm
Does Intouch run with Easylon OPC server?
Wonderware’s Factory Suite supports OPC, and yes, the Easylon OPC Server does
support Intouch. We suggest not to use Intouch versions prior to 7.1.0.31 and you
definitely need Wonderware's OPC Link version 7.208 which can be received
through Wonderware’s support channel.
Does the OPC server support explicit messages ?
No. Since explicit messages are application specific and not standardized in any way,
they can be neither read nor written.
59
OPC Server User’s Manual
6.2
Tips and Tricks
Installation
Why does setup.exe refuse to start under Windows NT ?
We have observed this problem after the installation of an Echelon driver.
Setup.exe is a 16-bit application, which needs a valid “files” entry in your configuration. Look into the config.nt file in the <systemroot>\system32 directory. If you
find at the end a line like
files=50device=....
then split it into two lines
files=50
device=...
What is to be done if an “error opening Physlon” message is displayed during the OPC server
start?
Please make sure that your network interface device is installed correctly.
You can test the installation of an Easylon Interface card with the help of the
"CheckLPC" utility delivered with the driver installation.
Most Echelon interfaces can be tested from Echelons control panel application.
6.3
Network Interface
What has to be observed when using Echelon’s SLTA-2
If you have problems connecting to the LonWorks network using Echelon’s SLTA-2,
please check the following:
1)
2)
The OPC Server has its own 32bit driver for the SLTA-2 or SLTA-10. It is
not possible to use the 16 bit LDVSLTA.SYS.
The SLTA-2 needs to be configured internally in the following way:
S3 Jumper settings : ( 0 = left, 1 = right )
CFG3
CFG2
CFG1
CFG0
Table 6.1:
3)
0
0
0
0
ALERT/ACK
Local Host
Network enabled
3-Wire
SLTA-2 jumper setting
AB
BAUD2
BAUD1
BAUD0
0
1
0
0
Autobaud disabled
19200 Baud
19200 Baud
19200 Baud
You have to choose the correct COM Port in the “Options” dialog of the
Easylon OPC Server.
60
OPC Server User’s Manual
Tips and Tricks
What has to be observed when using Echelon’s SLTA-10
You can use the SLTA-10 in its SLTA-2 compatible MIP Mode as a LonWorks network interface for the Easylon OPC Server.
1)
The OPC Server has its own 32bit driver for the SLTA-2 or SLTA-10. It is
not necessary to install any Echelon drivers.
2)
The SLTA-10 needs to be configured in the following way:
Configuration switches: ( 0 = down, 1 = up )
1. CFG3
2. CFG2
3. CFG1
4. NSI
Table 6.2:
0
0
0
0
ALERT/ACK
Local Host
Network enabled
MIP Mode Firmware
SLTA-10 jumper setting
5. AB
6. BAUD2
7. BAUD1
8. BAUD0
0
1
0
0
Autobaud disabled
19200 Baud
19200 Baud
19200 Baud
Be sure to reset the SLTA-10 after any changes to the configuration settings by cycling the power.
3)
You have to choose the correct COM Port in the Options dialog of the Easylon OPC Server.
4)
Whereas the SLTA-2 could be alternatively configured as a DTE or DCE device, the SLTA-10 only supports operation as a DCE device. Please read the
instructions within Echelons SLTA-10 User's Guide about how to attach the
SLTA-10 to a PC carefully.
The OPC Server does not offer to select the Easylon Interface card
The wording in the Easylon PC Interface control panel application is misleading.
There is a check box with the text “also use as NSI”, which reads as if this should be
checked only if you have the NSI variant of the Easylon card, and plan to use the card
for instance with Echelons LNS software. In fact, the box only controls the generation
of the required registry entries defined by Echelon for NSI compatible devices.
Fix:
As the OPC server uses these registry entries to locate installed network interfaces on a system, this box has to be checked even if you
use the MIP variant of our interface card.
Why doesn't the OPC server let me choose my network interface?
The OPC server can only talk to network interfaces which have a 32-bit driver; 16bit drivers are not supported. You can find a list of supported network devices in
chapter 2.2.1 Supported Hardware.
61
OPC Server User’s Manual
Tips and Tricks
If you are using an Easylon Interface card, and it is not recognized by the OPC server,
then please check the “also use as NSI” box in its control panel application.
For some of the Echelon drivers, the required entries in the registry are not generated
during installation of the driver, but rather when the network interface has been initialized with the help of Echelon's control panel application.
Why doesn't the OPC server recognize the SLTA
If you get error number 0xe0130003 when connecting to the SLTA, please note that
the SLTA has to be jumpered for a fixed baud rate of 19 200 Bd; please verify that
the jumper settings are as indicated in Table 6.1 and Table 6.2.
Which interface should be used for the SLTA-10 ?
The preferred way is to tell the OPC server to use “SLTA on COMn”, where n is 1 or
2. In this situation the OPC server talks directly to the SLTA-10 via the serial line,
and no driver has to be installed.
If you have installed the Echelon driver, you can also choose the LON1 entry - but
for this to work the SLTALinkManager has to run. As there are no advantages to this
method, we usually recommend against it.
6.4
Runtime errors
When started by a client the OPC server doesn't find its database.
You have to consider two things:
The OPC server opens the database (when started by a client or in “run” mode),
which was used the last time when a connection to a network was made.
Simply opening another database in “config” mode is not sufficient - use Control/Start to connect to the network so that the database can be found, Please specify
the complete path to it (this can easily be done by browsing to the database in the
“Options” dialog)
Closing the OPC server when a client is still connected leads to a crash.
We know about this problem, but the Easylon OPC Server is not supposed to be
closed by a user while a client is still running - so from our point of view this error is a
result of a severe user mistake, and we see no point in rewarding the user by catching
this erroneous behavior (the user is asked for confirmation before the OPC server
closes down !).
62
OPC Server User’s Manual
Tips and Tricks
If you a bothered by the possibility that a user closes down the OPC server by mistake, you can configure the OPC server to completely hide its window when it is
started by a client (Dialog Control/Options...).
Error 0xE0130003 with SLTA-2/-10 when connecting to the network
This error occurs if the baud rate of the SLTA-2 has not been jumpered to 19200
Baud. Verify that the jumper settings are as indicated in Table 6.1 and Table 6.2.
6.5
Upload Problems
Why doesn't the OPC server find my nodes when scanning the network ?
In order to find a node, the OPC server must have been told the domain in which this
node is configured.
Domains are specified for the OPC server in the properties dialog (Menu Edit/
Properties...). Please note the first domain should always be specified, the second one
is optional. A domain will only be used by the OPC server when at the same time the
corresponding subnet and node IDs are set to values different from 0. If there are
more then two domains in your network, you can switch a domain entry after scanning. The OPC server will still be able to talk to nodes that it knows even if it hasn’t
a corresponding domain entry anymore.
The domain is set correctly, but the OPC server still does not see my node(s).
There are several possible reasons for this:
1.) You may be wrong in your assumption about the domain of your nodes. Because
this is so common, we deliver a little utility called SP2Dom.exe, which allows you
to verify in which domain(s) your node is configured.
Start it, choose your network interface, and then press the service pin of your
node - the domain(s) of the node will then be displayed.
Note:
If both domains are marked as “unused”, the OPC server can’t find
this node - it will have to be configured with the help of an installation tool first.
2.) If you are using powerline topology, it is important that you activate “use powerline timings” in the configuration dialog (Menu Control/Options...)
3.) If it is only a single node that is not found, then this node may have identical
subnet/node IDs then the ones configured for the OPC server. Make sure that the
subnet/node ID configuration of the OPC server is unique in the network.
4.) OPC Server versions before 2.00:
If the network interface device is in flush-cancel mode when the OPC server is
started, then the scan will not succeed. Please reconfigure the network interface
device in this case with the help for example of nodeutil.exe.
This has been automated within the OPC server starting with version 2.00.
63
OPC Server User’s Manual
7
Licensing of the Easylon OPC Server Trial Version
Licensing of the Easylon OPC Server
Trial Version
The Easylon OPC Server is available in a trial version offering the same functionality
as the licensed version. The only difference is that the trial versions shuts down after
running for 30 minutes and has to be restarted manually.
The following message will then be displayed:
Fig. 7.1:
Trial version stops
In this state all values are marked as “bad”.
If you want to purchase a full-version of the Easylon OPC Server, please follow the
steps below:
1. Start the Easylon OPC Server in Config-mode.
2. Choose the “Properties” command from the “Edit” menu. You will find the Neuron ID of your host adapter.
3. Send an email to [email protected] with a purchase order for the Easylon OPC
Server. Include the Neuron ID in this email. You may as well send your purchase
order by fax or mail.
4. For new customers Gesytec insists on payment in advance. For convenience we
prefer credit card payment.
5. After your payment has been made, you will get the license key back from
Gesytec. The key is coded with the Neuron ID of your host adapter.
6. Choose the “Properties” command from the “Edit” menu. Fill in the license key.
The expression “Trial version” will disappear in the status bar and the Easylon
OPC Server has changed to a fully registered version.
64
OPC Server User’s Manual
8
Version History
Version History
Version 2.20 (02/04/25)
New features and improvements
• New: Diagnosis for OPC and LonWorks
• New: Status of network interface
• New: Node diagnosis
• New: Polling bound network variables with new LNS PlugIn to have valid
values on startup for input NVs of the server
• New: user may set values in simulation mode
• New: multiple settings option for setting OPC item properties
•
•
•
•
•
•
•
•
•
•
•
Improvement: Echelon compliant SNVT formatting (including backward
compatibility for existing projects)
Improvement: Monitoring flag, especially for usage with bCON client from
ICONAG
Improvement: Better performance for subscribing identical groups
Improvement: Better performance of LNS PlugIn
Improvement: Better documentation
Improvement: visible trial mode in status line
Improvement: user may change values in simulation mode
Improvement: handling more SNVTs
Fix: No resource leakage (memory and threads) for overlapping async’ reads
of identical items
Fix: Some rare memory leakage (just one time noticed)
Fix: data type has not been stored for host NVs
Version 2.12
• Some improvements on SNVT formatting (SNVT_switch) and LNS PlugIn
• Fix: data type for items has not been stored
Version 2.11
• New: Added LNS PlugIn for exporting OPC server database from LNS based
network management tools
• Fix: Easylon OPC Server does not change address of the LonWorks network
interface
Version 2.10
Fixed several bugs regarding XIF editor and binding mode:
• Fix: Correct handling of program ID and self documentation
• Fix: Correct XIF format for importing to LNS
• Fix: No more gaps in the NV index after deleting network variables
65
OPC Server User’s Manual
•
Version History
Fix: Correct handling for length of user defined network variables
Version 2.09
• Fix: error on polling host based nodes with more than 254 network variables
Version 2.08 (11/15/2000)
• fix: due to an incorrect registry entry the Watcher sometimes did not work
• fix: the Watcher dropped sometimes an NV update erroneously
• fix: Host-NVs now work in output direction too
• fix: subfields of structured NVs can now be addressed by name
• SNVT formatting understands now more formats, and works almost always
in both directions (read/write)
• performance in reporting back to a client has been improved
Version 2.05 (02/02/2000)
• fix: a memory leak in some environments
• fix: subscribing to subfield values sometimes led to lost update events
• fix: erroneous reporting of QUALITY_BAD when communication to an
other node was broken
• fix: the database can now be put into any directory
• fix: unnecessary registry reads have been eliminated
Version 2.03 (10/28/99)
• the project to be opened automatically is now system-global instead of userdependent
- this makes it easier for clients which are started as a service
• the OPC_DS_DEVICE parameter is honored for synchronous reads
• project databases produced with version 1.1x are upgraded automatically
• flat namespace browsing is supported in addition to hierarchical namespace
browsing
• setup of the OPC Data Access Automation Interface has been integrated into
the server setup
• in demo mode the OPC server now runs for 30 minutes with full functionality and has then to be restarted by hand
• all interfaces are now registered correctly
• a couple of minor problems have been fixed
Version 2.00 Beta 2 (07/30/99)
• the server now conforms to the OPC Interface Standard Version 2.02 as well
as 1.0a
• support for bindings of Output NVs of the OPC Server
• debug support has been improved to allow remote analysis of network
interface problems by Gesytec
• performance has been increased in case of defective nodes in the net
• support for replacement of nodes in the LON network
• a couple of minor problems have been fixed
66
OPC Server User’s Manual
Version History
Version 1.11 (7/07/99)
• fixed a bug, which led to some nodes not appearing in the database after
being scanned
Version 1.10 (12/07/98)
• NVs can now be bound to input NVs of the OPC Server
• caching of NV values with selectable timeouts
• support for Gesytec's "Watcher" technology (listen to all telegrams on the
net, cache NV values)
• access to subfields of structured NVs
• better feedback while scanning
• access the node state as a data item
• ability to stop the server in order to scan a new domain
• numerous smaller improvements
Version 1.00 (06/19/98)
Initial release
67
OPC Server User’s Manual
9
Fig. 1.1:
Fig. 1.2:
Fig. 1.3:
Fig. 2.1:
Fig. 2.2:
Fig. 2.3:
Fig. 2.4:
Fig. 2.5:
Fig. 2.6:
Fig. 2.7:
Fig. 2.8:
Fig. 2.9:
Fig. 2.10:
Fig. 2.11:
Fig. 2.12:
Fig. 2.13:
Fig. 2.14:
Fig. 2.15:
Fig. 2.16:
Fig. 2.17:
Fig. 2.18:
Fig. 2.19:
Fig. 2.20:
Fig. 2.21:
Fig. 2.22:
Fig. 2.23:
Fig. 2.24:
Fig. 3.1:
Fig. 3.2:
Fig. 3.3:
Fig. 4.1:
Fig. 5.1:
Fig. 5.2:
Fig. 5.3:
Fig. 5.4:
Fig. 5.5:
Fig. 7.1:
List of Figures
List of Figures
From proprietary solutions to a plug-and-play standard .............................................6
Use Process Data in Business Applications .................................................................8
Gateway between the control network and the OPC clients .......................................9
Structure of the Easylon OPC Server ........................................................................16
Programm group after installation ...........................................................................20
Startup picture of the OPC Server............................................................................21
The Edit Properties dialog box .................................................................................24
The Options menu...................................................................................................25
Back Compatibility..................................................................................................27
Back Name Compatibility enabled...........................................................................28
Back Name Compatibility disabled ..........................................................................28
The NV Browser .....................................................................................................29
Tag Properties .........................................................................................................30
Multiple Setting.......................................................................................................31
The Xif -Editor........................................................................................................32
Export to database ...................................................................................................33
Diagnosis extensions ................................................................................................34
Group/Item Diagnosis .............................................................................................34
Extract of Protocol window......................................................................................35
Functions of the Protocol Window...........................................................................36
Status of node “Network Interface”..........................................................................36
Status of “All Nodes”...............................................................................................37
OPC Protocol Settings .............................................................................................38
LON Protocol Settings.............................................................................................38
OPC Items Table settings ........................................................................................39
Protocol Window settings........................................................................................39
Archive Settings.......................................................................................................40
Startup of VBDemo.................................................................................................43
Startup of VBA Demo .............................................................................................45
Graph of VBA Demo...............................................................................................46
Address an Description of an NV.............................................................................48
Determine domains: waiting … ...............................................................................54
Determine domains: receiving ….............................................................................54
Registration of the LNS PlugIn ................................................................................55
LNS system PlugIns.................................................................................................55
LNS PlugIn NV browser..........................................................................................56
Trial version stops....................................................................................................64
68
OPC Server User’s Manual
10
Table 1.1:
Table 2.1:
Table 2.2:
Table 6.1:
Table 6.2:
List of Tables
List of Tables
Network data accessing ...........................................................................................13
Supported network interface devices Windows NT 4.0, 2000, XP............................18
Supported network interface devices Windoes 95 / 98 / ME .....................................18
SLTA-2 jumper setting ............................................................................................60
SLTA-10 jumper setting ..........................................................................................61
69
OPC Server User’s Manual
11
Index
Index
automatic startup .......................................22
back compatibility ......................................27
back name compatibility.............................28
back type compatibility...............................27
binding mode .............................................12
cache timeout .............................................30
change value...............................................30
command line options.................................21
configuration ..............................................23
data access methods ....................................12
DCOM ...................................................6, 19
debug trace.................................................27
demo database ................................41, 43, 46
determine domains .....................................54
device properties .........................................23
diagnosis.....................................................34
all nodes status ........................................37
network interface.....................................36
options settings........................................37
protocol ...................................................35
Diagnosis
Group/Item .............................................34
diagnosis settings
archive.....................................................40
LON protocol..........................................38
OPC items table ......................................39
OPC protocol ..........................................38
protocol window......................................39
domains......................................................54
empty97.mdb.............................................26
FAQ
installation...............................................60
installation..................................................18
introduction..................................................6
itemname ...................................................46
license.........................................................64
license key ............................................25, 64
LNS-PlugIn ................................................55
LON interface ............................................25
LonMaker...................................................55
multiple setting ..........................................31
naming items..........................................3, 48
network interface............................18, 24, 60
NV browser..........................................17, 29
OPC clients ....................................22, 30, 47
OPC Foundation ..........................................3
OPC standard...............................................3
polling........................................................12
Polling .......................................................13
registration.................................................64
runtime errors.............................................62
setup ..........................................................19
simulate mode ..........................20, 26, 29, 43
SLTA-10 ........................................18, 61, 62
SLTA-2 ..........................................18, 60, 63
starting.......................................................21
startup .................................................43, 45
startup mode ........................................20, 26
sub-fields....................................................14
supported hardware ....................................18
tag properties .............................................30
Tag properties ............................................31
tips and tricks.............................................57
uninstall .....................................................18
VBA...................................17, 45, 46, 47, 49
version history ............................................65
Watcher .........................................12, 25, 57
Windows
2000 .......................................................18
95 ...........................................................18
98 ...........................................................18
ME..........................................................18
NT..........................................................18
XP ..........................................................18
Xif editor..............................................20, 32
70