1
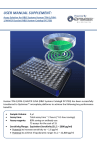
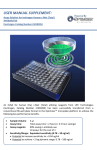
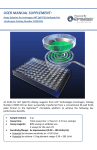
USER MANUAL SUPPLEMENT: Assay Solution for Invitrogen Mouse IL-6 Antibody Pair (Invitrogen Catalog Number CMC0063) An ELISA for mouse IL-6 using reagents from LIFE Technologies (Invitrogen, Catalog Number CMC0063) has been successfully transferred from a conventional 96-well ELISA format to the Optimiser™ microplate platform to achieve the following key performance benefits. Sample Volume: Assay time: Assay reagents: 5 µl Total assay time ≈ 2 hours (≈ 2.5 hour savings) 60%-80% saving on antibody use 25-50 assays for the cost of 10 Sensitivity/Range: 2x improvement (15.6 – 1000 pg/ml) Potential to increase sensitivity to ≈ 0.8 pg/ml Potential to achieve > 2-log dynamic range: 15.6 ~ 3800 pg/ml Intended Use: This User Manual Supplement is intended to be used in conjunction with Invitrogen’s Technical Data Sheet for the Mouse IL-6 Antibody Pair (Catalog Number CMC0063) employed in this Optimiser™-based ELISA procedure. Please refer to the vendor’s instructions for material storage, preparation, and concentration information. The procedure described in this User Manual Supplement is intended as a starting reference for the investigator using the vendor’s assay reagents with the Optimiser™ microplate system. Siloam has optimized this procedure using OptiBlock™ as blocking solution, as reagent diluent, and as the media to reconstitute the protein standard. Siloam has not evaluated this procedure for its applicability for analysis of tissue culture supernatants, serum, or plasma samples. Use of this assay for the analysis of tissue culture supernatant, serum, plasma, or other sample types may require further optimization of some assay parameters by the investigator (for example, standard curve and sample diluents) to achieve desired results. It is expected that investigators following this assay procedure are familiar with the Optimiser™ microplate system. If you have not used the Optimiser™ microplate before, please order the Evaluation kit (Catalog# OPV-IL6) which provides a comprehensive overview to the Optimiser™ microplate system. The Evaluation Kit guides the user through correct pipetting procedures for Optimiser™ microplates and contains all necessary materials and instructions for completing an illustrative human IL-6 assay. Investigators are strongly urged to familiarize themselves with the Optimiser™ microplate system before completing the procedure described in this document. Please contact Siloam’s tech support ([email protected]) for any questions regarding this procedure. FOR RESEARCH USE ONLY Not for Use in Diagnostic Procedures MATERIALS: Assay Reagents: 1 Material Function Vendor Catalogue Number Storage Anti-Mouse IL-6 Anti-Mouse IL-6 Biotin Recombinant Mouse IL-6 2 Streptavidin-HRP Capture Ab Detection Ab Standard Streptavidin-HRP Invitrogen CMC0063 Per TDS Optimiser™ Materials: Material 3 Optimiser™ plate (with holder) OptiMax™ buffer reagent pack (with substrate) Streptavidin-HRP for Optimiser™ Other Material & Equipment: Materials Polypropylene centrifuge tubes, 1.5 – 2 mL, snap-cap Pipet tips KimWipes Test tube rack Reagent reservoirs (v-bottom) 96-well polypropylene v-bottom plate Product Number OPH-10 OMR-10-J OMR-HRP Storage Room temp 0 2–8 C 0 2–8 C Equipment Fluorescence plate reader Vortex mixer Single channel pipettor(s) Multichannel pipettor 1 Refer to the respective Technical Data Sheets (TDS) for storage, concentration and other relevant information. 2 DO NOT use SAv-HRP from assay reagent vendor. Use of OMR-HRP is strongly recommended. 3 Optimiser™ plates and corresponding OptiMax™ buffer reagents are also available in 2-plate and 50-plate configuration. Page 3 of 13 REAGENT PREPARATION: 1. 2. 3. 4. Working concentrations of all materials should be prepared before beginning the procedure. Capture antibody working solution: a. Refer to the vendor’s TDS for the protein concentration of the stock capture antibody solution. b. Prepare the capture antibody working solution by diluting the stock capture antibody to 5 µg/mL in OptiBind™-J. Lyophilized Standard: a. Reconstitute the lyophilized protein standard with OptiBlock™. Refer to the vendor’s TDS for further directions, the concentration of the reconstituted standard, and storage conditions. Standard Curve: a. Prepare standard 1 by diluting the reconstituted standard to 1000 pg/mL in OptiBlock™ (OB). b. Dispense 200 µL of standard 1 to well A1 of the polypropylene 96-well v-bottom plate. c. Dispense 100 µL of OptiBlock™ to each of the 7 wells immediately below well A1. d. Prepare serial two-fold dilutions of the standard by successive 100 µL transfers through well G1. Change pipet tips after each transfer and mix the well contents 8-10 times by gently aspirating and dispensing the well contents. Do not transfer standard to well H1. Well H1 will serve as the assay blank (0 pg/mL). 1 A B C D E F G H 5. 6. 7. 200 µL Std 1 A 100 µL OB 100 µL OB 100 µL OB 100 µL OB 100 µL OB 100 µL OB 100 µL OB A B C D E F G H 1 Std 1 Std 2 Std 3 Std 4 Std 5 Std 6 Std 7 Blank Detection antibody: a. Refer to the vendor’s TDS for the protein concentration of the stock detection antibody solution. b. Prepare the detection antibody working solution by diluting the stock detection antibody material to 0.2 µg/mL in OptiBlock™. Horseradish-Peroxidase-Labeled Streptavidin (SAv-HRP): a. Refer to the vendor’s TDS or vial label for the dilution factor required to prepare the SAvHRP working solution. b. Prepare the SAv-HRP working solution by diluting the stock material appropriately in OptiBlock™. OptiGlow™ working solution: a. Prepare the OptiGlow™ substrate working solution by combining OptiGlow™- A, OptiGlow™- B, and OptiGlow™- C in proportions of 50:50:1 parts, respectively. b. Note: Prepare the working substrate solution no more than 30 minutes before reading the plate. Page 4 of 13 Use of OptiBlock™: This method was developed using Siloam Biosciences’ OptiBlock™ not only as blocking agent following the coating of the microfluidic reaction chamber with capture antibody but also as diluent for the standards, detection antibody, and SAv-HRP. The intent in developing this method was to demonstrate the ease of transitioning Invitrogen’s Mouse IL-6 Antibody Pair from their intended use in conventional ELISAs to an Optimiser™-based ELISA format. Use of this method for the analysis of tissue culture supernatant, serum, plasma, or other sample types may require further optimization of some assay parameters by the investigator to achieve desired results; for example, standard curve and sample diluents. Siloam Biosciences has developed OptiMax™ Standard Diluent for use in the analysis of cell culture supernatants. This product has been incorporated in Siloam Biosciences’ commercially available OptiMax™ ELISA Kits. Page 5 of 13 DISPENSING MATERIALS TO THE OPTIMISER™ PLATE: 1. Optimiser™ assembly: Assemble the Optimiser™ plate, pad, and holder as illustrated. a. Position the holder on the lab bench with the Optimiser™ logo facing the user. b. The absorbent pad must be positioned with the plasticcovered surface facing the holder. c. Position the pad and plate on the holder surface and push down firmly until the plate snaps into position. 2. Reverse pipetting: Introduction of bubbles to the Optimiser™ wells will compromise method performance by occluding the microchannel. To avoid introducing bubbles, always use the reverse pipetting technique when delivering materials to an Optimiser™ well. a. Beginning with the pipettor’s operating button in the ready position, depress the operating button to the second stop (See figure in step c below). b. Immerse the pipet tip in the liquid to be transferred. Aspirate the liquid by releasing the operating button returning it to the ready position. c. Dispense the liquid to the Optimiser™ well by depressing the operating button to the first stop. Ensure that the pipet tip is touching the well surface as the liquid is dispensed. Ready Position First Stop Pipetting Step 1 2 3 4 Second Stop 3. Transferring reagents, standards, and samples to the Optimiser™ plate: Due to the short incubation times, it is critical that antibodies, standards, samples, SAv-HRP, and substrate are transferred from their source to the Optimiser™ wells quickly (< 1 minute) but accurately. To accomplish this: a. First, dispense the materials to a polypropylene 96-well v-bottom plate. b. Then, using a multichannel pipettor, transfer the materials from the polypropylene vbottom plate to the Optimiser™ wells as illustrated in the figure on the next page. Optimiser Washes: Optimiser™-based ELISAs use a unique “flush” step rather than the traditional, and laborious, “wash” step used in conventional ELISAs. To flush, the user simply dispenses OptiWash™ into the Optimiser™ well. The wash buffer “flushes” the used reagent/sample from the microchannel into an absorbent pad beneath the plate. The Optimiser™ “flush” is equally effective as the traditional washes. Page 6 of 13 1 2 3 A Std 1 B Std 2 C Std 3 D Std 4 E Std 5 F Std 6 G Std 7 H Blank Samp 1 Samp 2 Samp 3 Samp 4 Samp 5 Samp 6 Samp 7 Samp 8 Samp 9 Samp 10 Samp 11 Samp 12 Samp 13 Samp 14 Samp 15 Samp 16 4 5 6 7 8 9 10 11 12 ↑ Polypropylene v-bottom plate containing diluted standards, samples, and blank. ← 5 µL of standard, sample, and blank are transferred from individual wells of polypropylene v-bottom plate to duplicate cells of the Optimiser™ plate. 1 2 3 4 5 6 A Std 1; Sample #1 Sample #9 B Std 2; Sample #2 Sample #10 C Std 3; Sample #3 Sample #11 D E Std 4; Sample #4 Sample #12 Std 5; Sample #5 Sample #13 F Std 6; Sample # 6 Sample #14 G Std 7; Sample #7 Sample #15 H Blank (0 pg/mL) Sample #8 Sample #16 7 8 9 10 11 Shaded cells not used in this assay ↑ Optimiser™ plate to which standards, samples, and blank will be dispensed Page 7 of 13 12 PROCEDURE: a 1. (___) Assemble the Optimiser™ plate, pad, and holder as described earlier. 2. (___) Dispense 5 µL of the working capture antibody solution to the appropriate number of wells in the Optimiser™ plate. Incubate 10 minutes at room temperature (RT). 3. (___) Following the incubation, dispense 5 µL OptiWash™ to each well. Incubate 10 minutes at RT. 4. (___) Following the wash step, dispense 5 µL OptiBlock™ to each well. Incubate 10 minutes at RT. 5. (___) Following the block step, dispense 5 µL standard or sample to each well. Incubate 20 minutes at RT. 6. (___) Following the sample incubation, dispense 5 µL OptiWash™ to each well. Incubate 10 minutes at RT. 7. (___) Following the wash step, dispense 5 µL of the detection antibody working solution to each well. Incubate 10 minutes at RT. 8. (___) Following the detection antibody step, dispense 5 µL OptiWash™ to each well. Incubate 10 minutes at RT. 9. (___) Following the wash step, dispense 5 µL of the SAv-HRP working solution to each well. Incubate 10 minutes at RT. 10. (___) Following the SAv-HRP incubation, dispense 30 µL OptiWash™ to each well. Incubate 10 minutes at RT. 11. (___) Immediately following step 10, dispense 30 µL OptiWash™ to each well (for a second 30 µL wash). Incubate 10 minutes at RT. 12. (___) Dispense 10 µL OptiGlow™ working solution to each well. Incubate 15 minutes at RT. a. (___) Observe the plate periodically during this incubation. When the substrate solution has drained from all wells, first remove the plate from the holder and then remove the pad from the plate. b. (___) Wipe the bottom of the plate thoroughly with a KimWipe™ or similar laboratory tissue. 13. (___) Read the plate using an excitation wavelength of 528/20 nm and an emission wavelength of 590/35 nm. a (___) This space is provided as a simple way of documenting the completion of each step. Page 8 of 13 Page 9 of 13 Calculations: 1. Calculate the mean background signal (RFU). 2. Subtract the mean background signal from the individual standard and sample values. 3. Calculate the mean background-adjusted signal for each standard and sample. 4. Prepare a standard curve by plotting the concentration of the standard on the xaxis and the background- adjusted signal on the y-axis using a 4-parameter curve fit. 5. Interpolate the sample concentrations from the standard curve. Calculate the final concentration after applying the sample dilution factor if applicable. Typical Data: The standard curve illustrated below was generated using the method, reagents, and equipment specified in this procedure. 7000 Optimiser™-Based ELISA for Mouse IL-6 Bkg-Adjusted RFU 6000 5000 4000 3000 2000 1000 0 0 200 400 600 Mouse IL-6 (pg/mL) Page 10 of 13 800 1000 Page 11 of 13 Additional technical assistance is available under the Technical Support tab on the Siloam Biosciences web site (http://www.siloambio.com/). Material Safety Data Sheets (MSDS) Using Optimiser™ Immunoassay Microplate Video Optimiser™ User’s Guide Reader Settings Quick Reference Guide Frequently Asked Questions Application Notes Two additional videos appear under the Technology tab of the web site. Optimiser™ Principles of Operation Running an Assay with Optimiser™ DOC ID: ETS-1-MS-0012-A1 QuantaRed™ substrate is supplied by Thermo Fisher Scientific Inc. Page 12 of 13 Better Immunoassays Through Innovative Microfluidics SILOAM BIOSCIENCES, INC 413 Northland Blvd. Cincinnati, OH 45240 USA Tel: +1 (513) 429-2976 Fax: +1 (513) 429-2976 http://www.siloambio.com