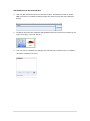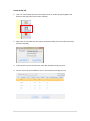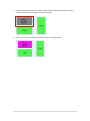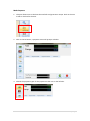
1
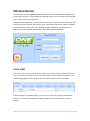
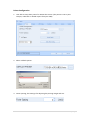
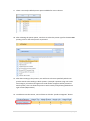
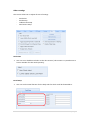
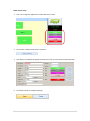
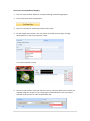
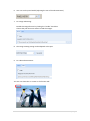
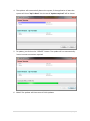
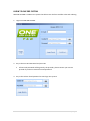
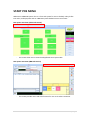
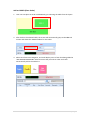
ONE F&B POS User Manual A brief hand guide for ONE ERP POS SYSTEM MYIT SOLUTION Latest update on: 03/09/12 TABLE OF CONTENTS CHAPTER 1 - SETTINGS Database Setup ....................................................................................................................3 Printer Configuration ...........................................................................................................5 Cash Drawer Configuration ..................................................................................................9 LED Display Settings ...........................................................................................................10 Customer Settings .............................................................................................................12 Other settings (Stock Alert, Email) ....................................................................................13 i) Table Screen Setup ..............................................................................................14 ii) Dual Screen Setup ................................................................................................15 Update System ..................................................................................................................17 Login ..................................................................................................................................19 CHAPTER 2 – START USING POS SYSTEM POS System Overview ........................................................................................................20 Add Order...........................................................................................................................21 Add Condiment ..................................................................................................................22 Create Order Bill ................................................................................................................23 Make Payment ...................................................................................................................25 Search Bill...........................................................................................................................28 View Daily Sales ................................................................................................................29 View Daily Sales (Cash in/Cash out) ..................................................................................31 Add New Customer Record................................................................................................33 Form UI Settings i) Right Action Button ..............................................................................................36 ii) More Button .........................................................................................................37 iii) Grid Button ...........................................................................................................38 iv) Header ..................................................................................................................39 v) Menu Settings ......................................................................................................40 Combine bills......................................................................................................................41 Transfer Table ....................................................................................................................42 1|P a g e POS Get Started ONE ERP Point of sales SYSTEM (POS) transform a PC into a powerful POS cash register for retails sales, services, or rental businesses. ONE ERP system can be customize and operated with or without bar code equipment. During the basic transaction, product codes are entered or scanned into the transaction and the screen instantly displays the quantity, price, and product description. When completed, the transaction is totaled, sales tax is applied, change is computed, the cash drawer is opened, a receipt is printed, and inventory and sales records are updated. QUICK START This section sets up the system and starts explaining the POS reference design and how to use it. The reference design consists of the POS system and the database installed in a PC. The following pages describe the general steps and descriptions for this procedure. Before we login into the POS system, user can set up some of the settings like database, printers, cash drawers, LED Display, Customer, Others (dual screen), license and auto updates. 2|P a g e Database Setup 1. User has to make sure that the database can works perfectly before start to use the system, it is essential that database is active to run. 2. At server section (PC name), user can browse by clicking the for available server. button. It will search 3. The server search result: 3|P a g e 4. User will need to key in the username and password. *The username and password will be provided by your local agent. 5. Choose database from the appropriate and press ok. button. It will show a list of database and select the 6. Press the “TEST CONNECTION” to start test. (This part is to make sure the database is running perfectly). 4|P a g e Printer Configuration 1. User able to setup their printer for POS at this section. (the printer is use to print receipts, order bills or related reports from your POS) 2. Select a default printer. 3. Footer spacing; this setting is for adjusting the printing margin and size. 5|P a g e 4. A4 paper: this section is to allow A4 printing. To enable A4 printing user has to select the checkbox. 5. A4 paper margin can be adjusted by using the margin settings. For multiple printer settings 6. User is able to add multiple printers in this section. (E.g. A restaurant that divided their job into different section/department will need have different order bill/receipt for each section. Example: A customer place and order from cashier, cashier created an order bill and the order bill can be printed simultaneously to A (kitchen) and along to B (drinks bar). 7. Choose which type of printing user wish to print/send. 8. For simultaneous printing, user will have to adjust the printer settings. Click on the button to proceed. 6|P a g e 9. There is currently 6 default printer point available for user to choose. 10. After selecting the printer points, user have to select the printer type for the KITCHEN1 printing. Click on the select printer to proceed. 11. After done setting up the printers, user will have to choose specifically which item product needs to be sending to which printers. (example: Japanese unagi rice under food category to kitchen1 and green tea under drinks categories will be printed to Drink1 printer, this is to allow the printer to work smartly and job being divided into right sections/department) 12. To add item into the section, user will have to click the “product categories” button. 7|P a g e 13. Click the ADD button to start browse for the product categories. 14. Margin of the receipt can be adjusted using the column below. 15. Click SAVE button to complete the printer settings. 8|P a g e Cash Drawer Configuration 1. This section is to configure the settings for cash drawer. 2. Kick out drawer command: The command for kick out drawer is default on value. 3. To select connection type for the Cash drawer, user can either let the drawer to kick out when a receipt is printed or it can be kick out by default without using a printer. Choose the connection type from the radio button. 4. “Kick out from printer” mainly connecting using a printer and the drawer will kick out when the printers print receipts. The “Serial Port” type is allowing user to directly connect the cash drawer to their POS machine. 5. When settings is done, click on the “TEST CONNECTION” button, if cash drawer responded by kicking out, it means it works as intended. 9|P a g e LED Display settings (Pole Display) 1. This section is to show how to add in a LED (pole display). 2. If user wishes to display the LED Display, select the “Connect LED Display” checkbox. NOTE: For “SUREDISPLAY” please key in 9600 in the Baud Rate. *each pole display might have different baudrate, please kindly check from vendor or see the pole display user manual if the LED pole display is not working. 3. Click on the TEST CONNECTION button. It will display a message if the display is successfully connected. 10 | P a g e 4. Go to the TEXT SETTING section to customize the pole display text: Select from the drop down list, user can choose from Company name, Item Code, Description, or Barcode. 5. User can also set a “thank you” or “greeting” message at the 2nd row. The second row will be shown when a payment has been made. 6. User can choose which item to be display with the display settings. 11 | P a g e Customer settings (member) 1. This section allow user to set the format of the customer information. 2. User can easily set the format by clicking the button listed below. 3. The detail is added accordingly with the format. 4. The customer name will be show according to this format on the POS system menu. 12 | P a g e Others settings This section allow user to adjust all sorts of settings. - Stock Alert Email Setup Table Screen Setup Dual Screen Setup Stock Alert 1. User can set or disable stock alert on the alert section. (This section is to provide user to have a reminder for their stock quantity). Email Setup 1. User can set the email function for the daily sales for which it will be forwarded to. 13 | P a g e Table screen setup 1. User can change the appearance of the POS menu screen 2. Click on the “Table Screen Setup” to button. 3. User able to customize the appearance like text, font or colors for their desired needs. 4. Click Save button to complete settings. 14 | P a g e Dual screen setup (additional display) 1. User can setup another display for customer viewing or advertising purpose. 2. Click on the Dual screen setup button. 3. There is a function for advertising in dual screen mode. 4. On the header Panel section. User can choose to enable a banner type of image advertisement on top of the customer screen. 2nd Screen (customer screen) 5. There is an Ads rotator at the left side of the screen. This part allows user to either put multiple image for rotates or runs a video types of advertisement. User can choose whether to put pictures or video as the default ADS. 15 | P a g e 6. User can set the panel width (adjusting the size of the advertisement). 7. For image advertising: Enable this image function by clicking the “Visible” check box. Choose the path that user wishes to load the images. 8. The image rotating timing can be adjusted at this part. 9. For video advertisement: 10. User can show the 2nd screen as a full screen ads: 16 | P a g e Update System 1. Click on the system update tab button. 2. The SYSTEM UPDATE setting screen will be shown as below. a b a) Automatically update when ONE ERP is launch. b) Check for update manually. 3. Select the “Check Update” button; the updater screen will appear for updates. 17 | P a g e 4. The updater will automatically detect the system; if the application is latest the system will show “Up-To-Date” else the word “Update required” will be shown. 5. To update, just click on the “UPDATE” button. The update will run automatically. *note: internet connection required. 6. DONE: The updater will close once it finish updates. 18 | P a g e LOGIN TO ONE ERP SYSTEM ONE ERP SYSTEM is a POS menu system that allows user do front task like sales and ordering. 1. Login into ONE ERP SYSTEM. 2. Key in the user ID & Password and press OK All user ID & password will be given by the provider, please contact your service provider if you do not have the ID and password. 3. Key in the cashier id and password to start login into system. 19 | P a g e START POS MENU Welcome to F&B POS System. This is a front end system for user to do daily sales job like item sales, make payment and etc. F&B POS system divided into 2 main screens: POS system overview (Table Tab section) - This screen allow user to view the Shop/Retail store layout table. POS system overview (F&B Tab section) - This screen provide menu and sales function for user to do sales transaction. 20 | P a g e Add an ORDER (Place Order) 1. User can start place an order at F&B POS by just selecting the table from the layout. 2. After click on the selected table, the screen will automatically jump to the F&B tab section and shows the TABLE numbers for this order. 3. Select item from item categories, and it will display sorts of item that being added in *ERP MASTER INVENTORY. Select the item that you wish to order and it will automatically add to the Order list. 21 | P a g e Add Condiment to the selected item. 1. User can add condiments based on customer request. Condiments can be set at ERP F&B->Transaction->condiment settings. Select the order from list and click condiment button. 2. The button will show the condiment being added previously and let user to add (e.g. less sugar, more spicy, extra rice and etc.) 3. User can also set condiment by typing in the text field. (this is when there is no default condiment available to choose) 22 | P a g e Create Order bill. 1. User can create Order bill once the customer order is confirm by pressing F5 or the button at the right side of the screen as below: 2. When click on the order bill, the system will automatically prints the order bill receipt (Printers required). 3. It will show the option of where the order bill should be sending to print. 4. An item list menu will available for user to choose before sending to print. 23 | P a g e 5. Complete placing an order for customer, table will be show follow by status (occupy) and the amount of total if item is successfully placed. 6. User can mark as serve when the customer order is already served. 24 | P a g e Make Payment 1. This part allows user to calculate the total bills and generate a receipt. Click on the icon at side or click F4 for shortcut. 2. Click on the F4 button, a payment screen will prompt as below: 3. Choose the payment types for this payment at the icon on the left side. 25 | P a g e 4. After selecting a payment type, a calculator will appear for user to key in the amount of the payment receives. 5. Key in the amount and click enter button it will automatically calculate the balance. 6. Click ok to complete payment and it will automatically print and generate a receipt. NOTE: if user key in the amount wrongly, user can click the “DELETE” button to delete the amount. 26 | P a g e Set default payment types: 1. Click on the setting button on the bottom of the screen. 2. A setting screen will be prompt for user to select their default payment type. 3. Tick and apply the default payment mode on the check box. 4. Select the payment types from the drop down list: 5. After save the default payment mode, on the next payment it will automatically jump to the payment screen (based on the default payment selection). 27 | P a g e Search Bill 1. User can track and search all the bill record by clicking the Search bill icon (F3). 2. User can select the date to filter the search. 3. Choose the receipt type for the searching. 4. Result will be list down as below: 28 | P a g e View Daily Sales 1. User can view the total daily sales report. Click on the more button drop down list to view more options. 2. Click on the daily sales button and it will prompt a report screen as below: 29 | P a g e 3. Select the date for the daily sales report from the pos date and print the sales report. 4. The daily sales details will be shown as below: 30 | P a g e View Daily Sales (Cash in/Cash out) 1. User able to cash in or cash out the amount from the cash drawer on the daily sales section. 2. The details will display the result of how much cash has in drawer: 3. To cash in (add) more cash into the cash drawer. 4. Successfully cash in to cash drawer. 31 | P a g e 5. To cash out (withdraw) the cash from the drawer: 6. Successfully cash out all cash from the drawer. 32 | P a g e Add a new customer (member) 1. From the more drop down button, select the +New Customer. 2. A window will be available for user to create new customer record. 3. All customer personal details like First name, last name, phone, customer type and etc. can be stored. 33 | P a g e 4. User can add a special delivery address user can click on the tab button as below: 5. For a different customer type, each customer can be classified in a different price list. Example there is a member price for Platinum, Gold, or silver member with all purchase in different prices. This function allow user to have more control in multi-level pricing for customers. 6. User can add remarks and note for each customer at the remark tab and note tab. 7. When complete key in all details, click ADD button to create a new customer record. 8. Record successfully been added. 34 | P a g e 9. User can select customer from the top corner of the system menu. 10. Click on the customer button, a list of existing customer will appear for user to choose from. 11. Selected customer will appear at the system menu. 35 | P a g e Form UI Settings (Adjust the System Screen/fonts size) Click the shortcut key of [CTRL + K] on the system screen and it will launch a Form UI setting screen. 1. Right Action Button TAB - User can change the button size, font settings or even hide away the icons. 36 | P a g e 2. More Button TAB - User can change the button name, or hide the button inside the more drop down list. - Item can be hidden by tick or un-tick the “Visible” button. 37 | P a g e 3. Grid Button TAB - User can adjust the grid function button in this setting. - Item can be hidden by tick or un-tick the “Visible” button. 38 | P a g e 4. Header - User can modify or adjust all buttons at the header by changing the name or even change position. - Select the part that wished to modify. - After select the button, the options will be available at the right side of the screen. Name or even size and position of the button can be adjusted. User can choose to hide the button by un-tick the visible button. 39 | P a g e 5. Menu Settings - User can adjust the item menu, and adjust all width and fonts for the entire button. - tick on the apply menu settings and press save to apply. 40 | P a g e Combine Bills 1. This part allows user to combine bills(e.g. both table joins together) 2. Click on the COMBINE BILL button, and it will display the current occupied tables and bills. 3. Select from the combine check box and it will auto sums up the total. See example: 4. Press combine button to combine the selected bills. 5. Success combine, and the payment can be made for this combine bills. 41 | P a g e Transfer Table 1. This part allow user to transfer table (e.g. from table A shift to table B.) 2. Click on the transfer table button and click on the empty table to start transfer. 3. A list will appear allow user to choose to transfer. 4. Transfer Table successful. 42 | P a g e