1
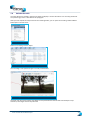
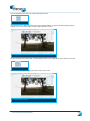
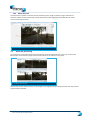
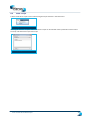
User manual Horus Movie Player 1 REVISION HISTORY DATE VERSION AUTHOR October 2013 1.0 Bijwoordbeeld tekst en techniek User manual Horus Movie Player 2 1 WORKING WITH THE INSPECTION AND SURVEY SUITE 5 1.1 Introduction Inspection and Survey Suite 5 1.2 System requirements 5 2 INSTALLING THE SOFTWARE 6 3 DESCRIPTION OF THE MOVIE MAKER 7 3.1 Opening a recorder file 7 3.2 Screen elements 7 3.3 Toolbar buttons 8 3.3.1 File buttons 8 3.3.2 Player control buttons 8 3.3.3 View buttons 8 3.3.4 Export buttons 8 3.4 Recording properties screen 9 3.5 Main screen 9 3.5.1 Rotate / move field of view (spherical view) 9 3.5.2 Spherical view 9 3.5.3 Multiview grid 10 3.5.4 Single camera stream 10 3.5.5 View the selected main camera stream 10 3.5.6 Switching to GPS map 11 3.5.7 Selecting a frame from the map 11 3.6 3.7 4 Playback functions 12 3.6.1 12 Reset default playback speed Exporting images 12 3.7.1 Taking a snapshot 12 3.7.2 Saving a Equirectangular image (panorama) 13 EDITING A RECORDING 14 4.1 Frame offset correction 14 4.2 Screen elements 15 4.2.1 Frame counter and camera streams 15 4.2.2 Go to a frame 15 Edit marking buttons 15 4.3.1 Editing a scene 15 4.3.2 Export an edited recording 16 4.3 4.4 Playback settings 16 User manual Horus Movie Player 3 5 6 7 CREATING A GUIDED TOUR 9 5.1.1 Setting keyframes 17 5.1.2 Deleting a keyframe 18 5.1.3 Browsing keyframes 18 5.1.4 Camera settings on keyframe 18 EXPORTING A VIDEO FILE 19 6.1.1 Setting video file properties 19 6.1.2 Set the file type and framerate 20 6.1.3 Set the directory and filename 20 CREATING A SETUP FILE 21 7.1 Software requirements 21 7.2 Open a recording to stitch 21 7.3 Create Hugin Stitch PTO 22 7.3.1 22 7.4 8 17 Specify the initial Hugin settings Editing the stitch in Hugin 23 7.4.1 24 Position the horizon 7.5 Create a setup from the .pto file 26 7.6 Position the stitch 27 7.6.1 Adjust the Yaw 29 7.6.2 Adjust the Roll 29 7.6.3 Adjust the Pitch 30 7.7 Check the positioning 30 7.8 Set the camera height 31 7.9 Save the camera setup 31 7.10 Position the setup on 3D GIS data 32 7.10.1 Correct the lever arms 34 MOVIE MAKER OPTIONS 35 8.1 Repair damaged camera streams 35 8.2 Insert a script 36 INDEX 37 User manual Horus Movie Player 4 1 Working with the Inspection and Survey Suite 1.1 Introduction Inspection and Survey Suite The Horus Inventory and Survey Suite consist of three programs: the Movie Recorder, the Movie Maker and the Movie Player. The Movie Recorder’s main function is to record all the data from the camera’s and additional sensors. The Movie Recorder has a simple playback function, it is merely used to check the images that have just been recorded. The Horus Movie Maker is used to edit the recordings, it is used to select the useful recordings and allow you to cut out sections that aren’t needed. The Horus Movie Player is used for the actual inspection and survey duties. This manual describes the Horus Movie Maker software. This program is used to edit the recorded camera streams so the recordings are tailored for the Inventory and Survey with the Movie Player software. This manual is written in the assumption that the reader has basic knowledge of video inspections and basic computer knowledge. 1.2 System requirements We recommend that you run the Horus Movie Maker on a machine running on Windows 7 x86 / x64, Open GL 2.1 or higher and an Intel Core i3 processer or faster. User manual Horus Movie Player 5 2 Installing the software You can start the installation of the Horus Movie Maker by double-clicking on the installation package icon: Fig. 1- Installation package icon This will start the setup wizard, select Next to start the installation procedure: Fig. 2- Start screen of the installation wizard Before installation can commence, you must have read and accepted the software license agreement. After accepting the terms in the agreement, check the box and press Next to proceed: Fig. 3- License agreement After that, you must select the location where the Horus Movie Player should be installed. Click Next after you have selected the desired installation location: Fig. 4- Selection of the installation location The installation wizard needs a final approval before it can install the Horus Movie Player. Click Install to start the installation. The progress of the installation is shown by a progress bar. After the installation is finished, select Finish. User manual Horus Movie Player 6 3 Description of the Movie Maker 3.1 Opening a recorder file To open a recording file, use the Open recording button in the toolbar: Fig. 5- Open recording button You can select the directory with the recordings you want to open in the Select a recording directory window. Click Select folder to open the directory in Movie Maker: Fig. 6- Select a the folder with the recording you want to edit The recording in the specified folder will then be opened in Movie Maker. 3.2 Screen elements Fig. 7- Overview of screen elements The Movie Maker screen consists of four main elements: 1 Recording properties 2 Toolbar 3 Main screen 4 Edit screen User manual Horus Movie Player 7 3.3 Toolbar buttons The buttons in the toolbar are used for the most commonly used functions. It can be divided into four sections: the File, Player, View and Export functions. 3.3.1 File buttons From left to right: Open recording Fig. 8- File buttons Add recording(s) Save recording Close recording 3.3.2 Player control buttons From left to right: Go to first frame Fig. 9- Player control buttons Ten frames back Previous frame Play / Pause Next frame Ten frames forward Go to last frame 3.3.3 View buttons From left to right: Spherical view Fig. 10- View buttons Multiview grid Select a main camera from the multiview grid View a single camera GPS map 3.3.4 Export buttons From left to right: Export selection Fig. 11- Export buttons Snapshot Export Equirectangular image User manual Horus Movie Player 8 3.4 Recording properties screen Left of the main screen the recording properties are shown: Fig. 12- Recording properties The Info tab shows the most relevant data about the recording, like start and end time, total amount of frames and the directory. The Image tab provides information about the images from the camera streams. The Color tab provides information on the color system of the recording. 3.5 Main screen The main screen shows the images from the camera streams and helps you to pinpoint the exact in- and outpoints for editing. The rendering of the images can be chosen with the View buttons in the toolbar (see 3.3.3). 3.5.1 Rotate / move field of view (spherical view) To ‘look around’ in the spherical view in the main screen, place the mouse pointer in the main screen and left click to grab the image and rotate it. 3.5.2 Spherical view The spherical view is the default mode for the Movie Player. In this mode all images are stitched together to form a seamless spherical view. The spherical view is selected with the Spherical view button in the toolbar: Fig. 13- Spherical view button Fig. 14- Spherical view User manual Horus Movie Player 9 3.5.3 Multiview grid In the multiview mode, the main screen shows the camera stream from all cameras. This mode is selected with the Multiview button: Fig. 15- Multiview button Fig. 16- Multiview 3.5.4 Single camera stream With the Main camera stream button you can select the stream from a single camera for the main screen. Click the button to get an overview of all camera streams (like the multiview mode, see 3.5.2). After that, select one of the camera streams you want to enlarge: Fig. 17- The stream from a single camera is enlarged 3.5.5 View the selected main camera stream The selected main camera stream can be enlarged to fit the main screen with the View main camera stream button: Fig. 18- View main camera stream button User manual Horus Movie Player 10 3.5.6 Switching to GPS map The GPS map button will activate the map in the main screen: Fig. 19- GPS map button Fig. 20- Map showing the recording positions The recording positions for each frame are shown as red dots on the map, together they form the travel path of the recording session. The larger dots represent every hundredth frame. When the mouse pointer is placed on a dot, the number of the frame on that recording position will appear: Fig. 21- Number of a frame on that recording position 3.5.7 Selecting a frame from the map By clicking on a recording position on the map you can view the frame that was filmed on that position. Select the regular viewing mode (see 3.5) to actually view the frame. User manual Horus Movie Player 11 3.6 Playback functions Since the Movie Maker is mainly used to edit recordings, it is important to be able to quickly browse through the recording. To speed up the viewing process, the playback speed can be raised. In the fast playback mode, the player skips a set amount of frames. The frame interval during playback can be set with the Play with interval mode in the Play menu: Fig. 22- Setting the playback speed You can set the frame interval in the field right of the Play with interval selection. 3.6.1 Reset default playback speed To reset the playback speed to the default setting, select Play every frame in the Play menu (see image above). 3.7 Exporting images With the export buttons you can export the edited movie, take a snapshot from one recording position or save the frameset as an Equirectangular image. The export function of an edited recording is described in section 4.3.2 of this manual. 3.7.1 Taking a snapshot With the snapshot button you can take a snapshot from the viewpoint in the main screen. When pressing the camera button, the Movie Maker takes a snapshot from all cameras. After the snapshot is made, the Movie Maker will ask for a file name and a directory to store the snapshot. The default name for a snapshot is a combination of the GPS coordinates and the recording time and date: Fig. 23- Snapshot button Fig. 24- Specify the directory to save the snapshot User manual Horus Movie Player 12 3.7.2 Saving a Equirectangular image (panorama) The Movie Maker can export the frameset from a recording position as a panorama (also called Equirectangular image). Click the Equirectangular image button: Fig. 25- Equirectangular image button Movie Maker will instantly generate a panorama from the current recording position in the main screen: Fig. 26- Equirectangular image in the main screen With the Save Equirectangular screen you can set the image properties: Fig. 27- Set the properties for the panorama The filename and directory are set via the Choose button. Click Save to save the panorama. User manual Horus Movie Player 13 4 Editing a recording When a recording is opened in Movie Maker, the buttons in the edit screen are activated and the timeline of the recording becomes visible. The Edit screen consists of the following elements: Fig. 28- Screen elements of the Edit screen 1 Frame counter and camera streams 2 Marking buttons 3 Stream alignment 4 Playback buttons 5 Guided tour buttons 6 Timeline with slider 4.1 Frame offset correction The frame alignment buttons are used to ‘align’ multiple recording streams that have different time coordinates and which are not in sync. By selecting a stream you can move the entire stream back and forwards to synchronize it with the time of the main camera stream: Fig. 29- Frame offset correction With the Reset offset button (on the right) you can reset the stream to its original setting. User manual Horus Movie Player 14 4.2 Screen elements 4.2.1 Frame counter and camera streams On the left side of the edit screen the main information on the camera streams and frames is shown: Fig. 30- Frame counter and camera streams The frame counter (1) shows the number of the frame on a specific point on the timeline (2). Above the timeline slider the recording time is shown. All the recorder camera streams (3) that were recorder are shown under the frame counter. 4.2.2 Go to a frame To go to a specific frame number, you can type in the number in the frame counter (1) or move the sliders (2) in the timeline. Movie Maker will immediately jump to that frame. 4.3 Edit marking buttons The marking buttons are used to edit the recording. The In button marks the beginning of a scene, the Out button marks the endpoint of a scene. With the Delete button you can delete any faulty marks: Fig. 31- Marking buttons 4.3.1 Editing a scene Editing a scene means that you determine the start and the end of a frame set that form the scene. This is done with the In and Out marking buttons. You start by selecting the camera stream you want to edit. Normally the combined streams of the immersive view cameras are used, but it is also possible to edit the images from extra (HD) cameras. Next, you select the first frame of the scene. For this you can use the frame selection buttons in the main toolbar (see 3.3.2) or in the toolbar of the edit screen (see 0 ). When the first frame of a scene is selected, place the In mark by clicking the In button. The In mark appears on the timeline: Fig. 32- In mark on the timeline User manual Horus Movie Player 15 Next, select the last frame of the scene and select the Out button to mark the end of the scene. The scene is marked on the timeline: Fig. 33- A selected scene After you have selected the first scene you can add the following scenes, there is no restriction to the number of scenes: Fig. 34- Several selected scenes on the timeline The markers can also be moved by left-clicking and sliding them to the desired position (frame). 4.3.2 Export an edited recording After you have selected the scenes you want to use in the Movie Player, click the Save recording button in the main toolbar: Fig. 35- Save recording button Movie will then ask for a directory to store the edited recording, select the directory and select OK: Fig. 36- Select the directory. Movie Maker generates the filename 4.4 Playback settings With the Playback mode selection button you can toggle between the playback or edit mode. The audio mute button is used to switch the audio on or off during playback: Fig. 37- Playback mode buttons User manual Horus Movie Player 16 5 Creating a guided tour You can create a so called ‘Guided Tour’ with the Movie Maker. In a guided tour you can set the camera angle and zoom within a specified frame. When the guided tour is played back, the camera will pan and zoom to the specified settings. A guided tour uses ‘keyframes’ in which the camera angle and zoom ratio is set. This chapter describes how to make a guided tour with the Movie Maker. To start creating a guided tour, select the Add tour function in the Guided tour menu: Fig. 38- Add tour function Movie Maker will create a guided tour track in the timeline: Fig. 39- Guided tour track When the Guided tour track is selected, when selected, the track is shaded dark blue (as in the image above). The guided tour buttons are then activated: From left to right Add keyframe Fig. 40- Active buttons Delete keyframe Create tour Previous keyframe Next keyframe Remove all keyframe Only change camera on keyframes 5.1.1 Setting keyframes To set a keyframe, activate the spherical view (see 3.5.2) and select the frame with the desired recording location. Set the viewing angle and zoom in the main screen. Click Set keyframe to mark the keyframe. Fig. 41- Set keyframe button The keyframe markers are displayed as vertical lines in the Guided tour track: Fig. 42- Keyframe markers User manual Horus Movie Player 17 5.1.2 Deleting a keyframe To delete a single keyframe, click the Remove keyframe button (red pin). To delete all keyframes, click the Delete all keyframe (recycle bin) button: Fig. 43- Delete keyframe buttons 5.1.3 Browsing keyframes With the Previous and Next keyframe buttons you can browse through the keyframes. By clicking either one of these buttons, Movie Maker will jump to the previous or next keyframe. The frame number and recording time are shown in the edit screen, the main screen shows the keyframe. 5.1.4 Camera settings on keyframe With the Only change camera on keyframe button the virtual camera can be set to only change on the keyframes. On other frames, the camera will resume the normal viewing mode (in spherical view, see 3.5.2): Fig. 44- Change camera on keyframe button When this function is activated, a thin blue square appears on the edges of the button. User manual Horus Movie Player 18 6 Exporting a video file A guided tour, or any other edited recording, can be exported as a video with the Export selection button: Fig. 45- Export selection button Click the Export selection button to start the file export. Movie Maker will open a screen in which you can set the properties, filename and export directory: 1 Camera stream source 2 Frame information with in- and out points 3 File settings 4 Directory and filename Fig. 46-Settings for the file export Before you export the edited recording as a video file, check if the correct camera stream (1) is selected for export. In the frame column (2) detailed information on the number of frames and the in- and out point is displayed. If the information in (1) and (2) are correct, you can proceed by setting the file properties in field (3). 6.1.1 Setting video file properties First select the export method. The Movie Maker can export the movie file to a standard tailored to client standards. To do so, click the pull down arrow in the Method field and select the export method. Otherwise, the Default setting is advised. To generate an equirectangular image, check the Equirectangle box. The image size can be specified with the Width and Height fields: Fig. 47- Set the image size Note: These fields are left blank in the Default export method! User manual Horus Movie Player 19 6.1.2 Set the file type and framerate Next, select the type of file and the file quality. The Export to type field has five options which have their own quality settings: BMP No quality setting JPEG Percentage PNG No quality setting AVI Kbit per second and Framerate HRS No quality setting Fig. 48- File type and quality settings 6.1.3 Set the directory and filename With the Choose button you can specify the directory the file has to be saved, and set the filename. Click Export to export the file. User manual Horus Movie Player 20 7 Creating a setup file Before a recording can be viewed or edited in the Movie Maker, there has to be a setup file for the camera streams. This setup file determines how the view in Movie Maker is built. The recording consists of multiple camera streams which need to be stitched together to create an immersive view. For recordings that are used for measuring and annotation jobs it is especially important that the setup is precisely calibrated. The setup.hsf (Horus setup File) is normally stored in the recording directory: Fig. 49- Setup.hsf file in the recording directory For a fixed camera setup the setup.hrs file has to be created only once. When the camera setup is altered, the setup.hrs file has to be recreated to ensure an optimal view and accuracy. 7.1 Software requirements The following software is required for making a camera stitch: 7.2 Horus Movie Maker Hugin version 2012.0.0.a6e4184ad538 (or higher) Open a recording to stitch The default setup.hsf file from Horus is a non calibrated and offset version. However, this file is needed to create a new stitch. Copy this file and paste it to the recording folder in which the recording you want to use is stored. To start, open the recording you want to stitch. Select Open in the File menu: Fig. 50- Open recording User manual Horus Movie Player 21 7.3 Create Hugin Stitch PTO Select Create Hugin stitch in the Edit menu: Fig. 51- Hugin Stitch option Note: To create a good stitch it is important that all camera views have sufficient stitch objects (reference points). Select a recording position that shows as much horizon as possible (unobstructed view), preferably 180 degrees of horizon per camera. 7.3.1 Specify the initial Hugin settings To make a new Hugin stitch, start by setting the horizontal field of view a single camera in the upper field. The field of view is specified in degrees. Next, specify the type of camera lens using the pull down menu. To proceed, click Start: Fig. 52- Hugin stitch settings The progress of the stitching process is visualized with a progress bar: Fig. 53- Stitching in progress User manual Horus Movie Player 22 When the stitching is complete, the new stitch will immediately be loaded in the spherical view: Fig. 54- The result of the Hugin stitch Check if all images are stitched correctly, if not, select another camera position (preferably with more reference points) and repeat the stitching process. If the stitch is successful, the stitch can be opened in Hugin for further editing. 7.4 Editing the stitch in Hugin Start Hugin and open the created stitch with the Open project function: Fig. 55- Open project Hugin The editing process in Hugin is described in this paragraph. User manual Horus Movie Player 23 7.4.1 Position the horizon Click the Fast preview panorama button to view and position the created stitch: Fig. 56- Fast preview button Select the Move / Drag tab to horizontally and vertically position the stitch: Fig. 57- Move / Drag tab for positioning the stitch By clicking and moving the stitch can be positioned. The crosshair is the reference for the horizontal and vertical alignment. The horizon of the image should touch the horizontal line on the 12 and 6 o’clock position seen from the recording position: Fig. 58- Horizon aligned User manual Horus Movie Player 24 Next, align the vertical line with the 12 o’clock (straight forward) viewpoint: Fig. 59- Straight forward viewpoint aligned Close the Fast panorama preview screen when the images are horizontally and vertically aligned and save the PTO file. Select Save in the File menu: Fig. 60- Save the PTO file The file is saved to the recording directory: Fig. 61- Saved PTO file The created stitch file is named project.pto. This .pto file is needed to create the setup.hrs file. User manual Horus Movie Player 25 7.5 Create a setup from the .pto file Select the Create View option in the File menu of the Movie Maker: Fig. 62- Create view option Movie Maker will open a dialogue box. Select the create project.pto file with the File button: Fig. 63- Select the project.pto file Next, click the Save button. Movie Maker will now save a .hrs file named new.hrs. Change the filename to setup.hrs and save the file: Fig. 64- Change the filename to setup.hrs Click the Done button to close the dialogue box: Fig. 65- Click Done to close The setup.hrs file that you have just created has to be copied and pasted to the recording folder. User manual Horus Movie Player 26 7.6 Position the stitch The setup file that is created in the previous steps will display a correct stitch but it isn’t correctly positioned. The positioning process is described in this paragraph. After you have copied the setup.hrs file to the recording folder, you can open the recording in Movie Maker. Select Open in the File menu: Fig. 66- Open a recording Select the recording and click Open: Fig. 67- Open the recording The recording is now opened using the recently created stitch: Fig. 68- Recording with new stitch opened in Movie Maker The stitch may be correct, but the view doesn’t correspond with the field of view indicated by the map. Therefore, the images have to be positioned. User manual Horus Movie Player 27 Click the Alignment axis button to activate the alignment axis: Fig. 69- Alignment axis button The alignment axis is displayed in the main screen of Movie Maker. This grid is used for alignment of the images. The horizon of the images must be aligned with the red line: Fig. 70- Alignment axis is activated To start correction the field of view, click the Settings button in the right upper corner of the main screen: Fig. 71- Settings button A set of sliders will appear in the right corner of the main screen: Fig. 72- Settings sliders activated User manual Horus Movie Player 28 7.6.1 Adjust the Yaw With the Yaw slider the viewpoint (left – right position) can be moved 180 degrees to the left or right. In this example the yaw is set to -85.95 to adjust the view in the main screen to the field of view on the map: Fig. 73- Yaw adjusted to align view with the field of view on the map 7.6.2 Adjust the Roll With the Roll slider you can adjust the roll (leveling of the horizon of the image). In this example the roll is set to -8.29 to level the image with the horizon (red line) of the alignment axis: Fig. 74- Roll adjusted to align the horizon User manual Horus Movie Player 29 7.6.3 Adjust the Pitch The Pitch slider is used to correct the vertical positioning of the image so that the image is leveled in all directions. When the view horizontally rotated, the horizon of the image will stay leveled with the virtual horizon of the alignment axis: Fig. 75- Pitch adjusted 7.7 Check the positioning The next step is to check the positioning and alignment. Select the Spherical view in the main screen of the Movie Player and rotate the image. The horizon should be on the red line in every view: Fig. 76- Checking the positioning If the virtual horizon and the horizon on the images aren’t aligned in every viewing direction, then the previous steps should be repeated. User manual Horus Movie Player 30 7.8 Set the camera height When the recording is used for measuring it is important that the camera height is set. The camera height is measured by a physical measurement. Measure from ground level to the heart of the camera. The default camera height is 2,40 meter. Set the measured camera height with the cam h slider in the settings panel: Fig. 77- The camera height is adjusted with the ‘cam h’ slider 7.9 Save the camera setup When all the image and camera settings are correct, the setup file can be saved. This is done via the Immersive View Builder module. Click the Immersive view builder button in the Movie Player toolbar: Fig. 78- Immersive view builder button The Immersive View Builder screen will appear in the left bottom corner: Fig. 79- Immersive view builder screen To save the camera setup, open the Camera options tab and click Save. The new setup.hsf file is saved in the recording directory (the original setup file is renamed setup.hsf.original): Fig. 80- Setup.hsf file in the recording folder Always make a backup of the new setup.hsf file. This file can be copied to all recordings made with the same camera setup. Tip: The Horus Recorder Builder can be used to set a file writer to write this setup to all recordings made with the same camera setup. User manual Horus Movie Player 31 7.10 Position the setup on 3D GIS data To further increase the accuracy, the positioning of the camera must be calibrated to the GIS data. To do so, open a recording that is already correctly stitched. Open the Immersive View Builder and the Layer Manager module: Fig. 81- Immersive View Builder and Layer Manager activated Open the 3D (GIS) data in the Layer Manager. To open an existing layer, click the Import layer button. The Movie Player will open the Import Layer screen: Fig. 82- Import layer screen To import an existing layer, specify the type of data you want to import in the pull down menu (1): Fig. 83- Select the type of file you want to import User manual Horus Movie Player 32 Click the URL button (2) and specify the directory of the data you want to import. After that, click the Connect button (3). The layer will now be loaded in the Import layer screen: Fig. 84- Select the type of file you want to import After the layer is opened, minimize the Layer Edit screen to obtain a larger main screen. The spatial data from the layer is visualized in the main screen, the lines must correspond with the images in the main screen: Fig. 85- Spatial data from the layer is visualized in the main screen To adjust the image to the spatial data, click the Settings button: Fig. 86- Settings button User manual Horus Movie Player 33 7.10.1 Correct the lever arms If there is no reference for the GPS position of the camera, then the GIS data can be placed on the correct position with the Lever arms slider: Lev. Arm X Adjusts the X-axis (forward – backward) Lev. Arm Y Adjusts the Y-axis (Left – Right) Lev. Arm Z Adjusts the Z-axis (Up – Down) Fig. 87- Lever arm sliders When the spatial data is aligned with the images, the settings must be saved using the Save option in the Immersive View Builder: Fig. 88- Immersive view builder screen User manual Horus Movie Player 34 8 Movie Maker options 8.1 Repair damaged camera streams Movie Maker can repair damaged camera streams provided that the data is not excessively damaged. An irregularity in the camera streams appears as a vertical line in the camera tracks: Fig. 89- Irregularities in the camera streams To start the repair function, select Repair streams in the Tools menu: Fig. 90- Repair streams option Movie Maker will open a screen in which you can select the streams that need to be repaired: Fig. 91- Select damaged streams Use the checkboxes to select the streams and select Start to repair the streams. A Progress screen will appear. Fig. 92- Repair in progress User manual Horus Movie Player 35 8.2 Insert a script Custom made Horus scripts can be inserted using the Scripts function in the Tools menu: Fig. 93- Scripts function Selecting this function will open a form in which the script can be selected. Use the pull down arrow to select the script and select GO to import the script: Fig. 94- Script import form User manual Horus Movie Player 36 9 Index 3D data ................................................................. 32 Audio mute........................................................... 16 Camera height ...................................................... 31 Camera position GPS position ..................................................... 34 Camera setup save .................................................................. 31 Camera streams ................................................... 15 Creating a guided tour ......................................... 17 Creating setup file ................................................ 21 Edit mode ............................................................. 16 Editing a recording ............................................... 14 Editing a scene ..................................................... 15 Export an edited recording .................................. 16 Export as video ..................................................... 19 Export buttons ....................................................... 8 Export video directory .......................................................... 20 filename ........................................................... 20 Exporting images .................................................. 12 Field of view correction ........................................................ 28 File buttons ............................................................ 8 Frame counter ...................................................... 15 Frame offset correction ....................................... 14 Go to a frame ....................................................... 15 GPS alignment ...................................................... 32 GPS map ............................................................... 11 Horizontal alignment............................................ 30 Hugin settings....................................................... 22 Image positioning check ................................................................ 30 Installation ............................................................. 6 Installation directory .............................................. 6 Introductive Security Suite ..................................... 5 Keyframe camera settings................................................ 18 delete ............................................................... 18 Keyframes browsing .......................................................... 18 Lever arms correction ........................................................ 34 Main screen ............................................................ 9 move view .......................................................... 9 Map select a frame .................................................. 11 Marking buttons................................................... 15 Movie Maker options ........................................... 35 Multiview ............................................................. 10 User manual Horus Movie Player Opening a recorder file .......................................... 7 Panorama directory .......................................................... 13 filename ........................................................... 13 Pitch ..................................................................... 30 Playback functions ............................................... 12 default speed ................................................... 12 speed ............................................................... 12 Playback mode ..................................................... 16 Playback settings .................................................. 16 Player control buttons ........................................... 8 Position on 3D data .............................................. 32 Positioning ........................................................... 30 stitch ................................................................ 27 PTO file ................................................................. 26 Recording properties screen .................................. 9 Repair damaged camera streams ........................ 35 Roll ....................................................................... 29 Screen elements................................................7, 15 Script insert ................................................................ 36 Set keyframes....................................................... 17 Setup file .............................................................. 31 create from .pto file ......................................... 26 Single camera ....................................................... 10 Snapshot .............................................................. 12 software license agreement................................... 6 Software requirements ........................................ 21 stitching images ............................................... 21 Spatial data alignment ......................................................... 33 Spherical view ........................................................ 9 Stitch Create Hugin Stitch PTO .................................. 22 edit Hugin stitch ............................................... 23 horizon ............................................................. 24 Hugin settings .................................................. 22 positioning ....................................................... 27 select recording ............................................... 21 Synchronize multiple streams .............................. 14 Toolbar buttons...................................................... 8 Video export file type ............................................................ 20 framerate ......................................................... 20 Video file properties ............................................ 19 View buttons .......................................................... 8 View main camera stream ................................... 10 Yaw ....................................................................... 29 37