1
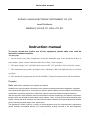
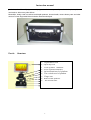
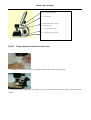
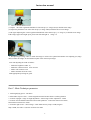
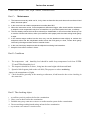
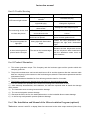
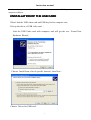
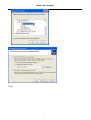
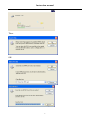
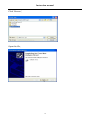
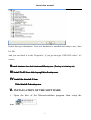
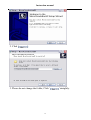
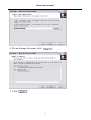
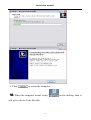
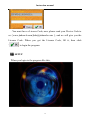
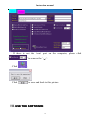
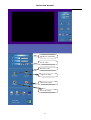
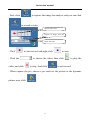
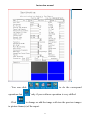
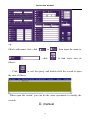
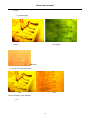
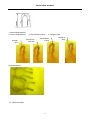
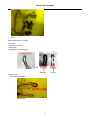
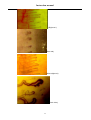
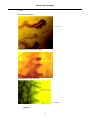
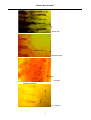
Instruction manual
User Manual
Portable color microcirculation detector
Instruction manual
XUZHOU JIAHUA ELECTRONIC INSTRUMENT CO.,LTD
Local Distributor:
MEMDA İÇ VE DIŞ TİC. DAN. LTD. ŞTİ.
Instruction manual
To ensure normal use, before use of this equipment, please make sure read the
instruction manual carefully.
*Security tips
1
Do not remove any other components except the detachable part in the instruction.If there is
some matters ,please contact with After-Sale Service Dep. of our company
2
The input voltage is AC 100-240V then convert to DC 12V ,and above 2.0A of electric current
3
This instrument can produce the higher source luminance, don't look light directly, to avoid the
eyes’hurt.
4
The instruction is appropriate for the JH-1004(JH-C) detection instrument for microcirculation
Purpose
Note: USB fuction ,software and computer are optional
Portable color microcirculation microscope is an advanced medical photoelectric apparatus, equipped
with a special LED light source, used mainly on human nailfold capillary microcirculation of microscopic
examination of dynamic perspective, USB Video Capture cards and notebook computers with the
real-time dynamic clear indication of the microcirculation vascular morphology, flow pattern, loop weeks
images, which can be right microcirculation image capture, video, surveying microvessel diameter, pipe
length, velocity and other indicators and may microcirculation indicators for expert analysis and medical
points, beautifully printed copies of the report alone.
The apparatus is widely used for a variety of clinical diseases (such as cardiovascular, hypertension,
stroke, diabetes, rheumatoid arthritis, etc.) microcirculation change occurred in the early diagnosis,
1
Instruction manual
prediction, the effect of judgment and prognosis of other aspects. Operation is simple, rapid, and
noninvasive, without any side effects.
Meanwhile, widely used in medicine and health products, human health, census beauty care and other
areas of human fingernails Microcirculation Detection Analysis.
PartA : Structure
High definition LCD
(2) Import chip.CCD
(3
Crude regulation handwheel
(4) Vernier regulation handwheel
(1)
(5)
(6)
(7)
The
horizontal travel of platform
The vertical travel of platform
Finger seat
Double mobile platforms.
The main basement
(9)
(8)
2
Instruction manual
(10) LCD Angle adjustment
(11
LCD bracket
(12) facula adjustment of images
(turn left and right)
(13) Power interface.(12V)
(14)
Video line interface (AV)
PartB: Diagrammatical method of detection
1 , According to the left image,do the developing solutionde spread to the ring fingernail.
2 , Please put the ring fingernail on the finger seat ,put the fingernail under the light exactly . keep relax,and do
balance
3
Instruction manual
3 , How to find the blood vessels.
(1) Adjust the crude regulation handwheel of microscope (ex. image 3&4),to find the clear image
(2) Adjust the platform travel of the microscope (ex image 5&6),to find the blood vessel image
(3) Do again adjusting the vernier regulation handwheel of the microscope ,( ex. image 4), to find the clear image.
If the image appear the bright spots, please turn left and right as image. 12.
4, Do adjusting(ex,image 3&4 ) to make the images to achieve the optimal articulation. Do adjusting (ex,image
5&6) to make the images to show different parts of the microscope images
Note: Do adjusting the LCD as follows:
- Make the brightness under 15,
- Make the contrast control from 70 to 85
- Make color contrast to 60
- Make saturation from 70 to 80)
With appropriately feeling for good .
Part C: Main Technique parameter
1. total magnifying power : 240 times
2. Achromatic objective lens : 7 times magnification and 25mm effective working distance
3. Coaxial conjugate : range of rough adjustment : 35mm range of fine adjustment : 35mm
4. Coaxial vertical and horizontal movement of the platform : vertical movement area 35mm ,
horizontal movement area 35mm .
5. electronic light source : rated voltage : 220V 50Hz mercury lamp: 125W, tungsten
lamp :250W, fuse tube: 5A ,Power of blower fan:18W
4
Instruction manual
6. Fiber bundle: diameter : 6mm , length : 1000mm , transmittance 70%.
Part C : Maintenance
1. The instrument must lay aside cool in, is dry, does not have the dust, and does not have the acid and
alkali, the steam place.
2. In the room in the air relative temperature is smaller than 80%.
3. When the instrument moves, if two temperature differences bigger, after should wait the instrument
to adapt the room temperature only then to install the use, prevented optics lens haze, is mildewy.
4. The lens already verified, did not have voluntarily to disassemble. In the mirror surface dust may use
to catch a chill the ball to blow, either (or scratches mirror paper) with the clean writing brush gently
to wipe.
5. In the camera target surface has the dust, may use the absorbent cotton slightly to moisten the
anhydrous ether and the dehydrated alcohol mixes the fluid gently to clean, cleans when gently
revolves by the target surface center to outside cleans
6. In the use should pay attention avoid the objective lens being hard scratches.
7. Keep the instrument surface is clean.
Part E: Conditions
1
The temperature
and
humidity level should be stable. keep temperature level from 22
2
, and 70% of humidity level.
The inspector should be sit down , bring into the same height with heart and hand .
3
Spread a little fragrant pitch on the nail fold.( The purpose to reduce scattering
24
,improve the transmittance of light)
4 Check should be generally in the morning or afternoon, it had better do the review checking in
the same time .
Part F: The checking object
1
Avoid Heavy activity an hour before the examination.
2
3
4
Have a rest an hour before the examination
Prohibit taking drugs which have influence of cardiovascular system before examination.
Do not smoking,washing hands,eating an hour before examination
5 Pay attention to the influence of female menses
5
Instruction manual
Part G :Trouble Shooting
Breakdown phenomenon
LED source light is down
Reason
Trouble Shooting
The power line plug has not
inserted
Reinserts the plug
Light bulb aging
Change the Light bulb
The video frequency line
short-circuits
The monitoring device does
not have the picture
The picture appears the
light spot
In the monitoring device
picture has the sunspot
Change the video frequency line
The 12V voltage-stabilized
source short-circuits
Change the 12V voltage-stabilized
source
The monitoring device contrast
knob has not opened
Clockwise turns on the monitoring
device contrast gradient knob
Wrong light bulb illumination
angle
Rotates the LED photosource box,
changes the light bulb illumination
angle
The dust on the camera target
surface
Moistens the little dehydrated alcohol
and the anhydrous ether intermixture
with the absorbent cotton turns on
lathe scratches
Part H:Product Warranties
1. This written guarantee scope: This Company and the business agent sell the product which this
company produces.
2. The product maintenance card records each item to fill in and the signature after the customer mails
back our company by the customer or the business agent, takes the instrument replacement and the
maintenance basis.
3. The free maintenance deadline for from delivers goods the date for 18 months.
4. The following reason surely damage does not belong to the maintenance scope:
1.) Has not installed and operates this instrument according to the instruction for use;
2.) After arbitrarily disassembles, the installment, the reduction expands other to attach the damage
which causes.
3.) The instrument outer covering bursts and the damage.
4.) The unusual migration creates damage
5.) Because the flood, the fire, the earthquake and so on the irresistible factor creates damage
6.) In the far way transportation process produces damage
Part I:The Installation and Manual of the Microcirculation Program (optional)
Note:when connect it with PC or laptop,Video line connected to the video output terminal (Video Out).
6
Instruction manual
the other end plugs into the USB Video Capture card video input terminal,USB Capture Card received a
computer's USB port.
、INSTALLATION
、INSTALLATION OF THE USB CARD
1.Don’t link the USB video card and USB key before computer run
2.Set up the driver of USB video card
Link the USB Video card with computer, and will get the cue: ‘Found New
Hardware Wizard’,
Choose ‘Install from a list of specific location’ ,then Next
Choose ‘Driver for USB card’:
7
Instruction manual
Next:
8
Instruction manual
Then:
OK.
9
Instruction manual
Click ‘Browse’,
Open this file,
10
Instruction manual
Finish, then get information ‘Your new hardware is installed and ready to use’, then
It’s OK.
And you can check it in the ‘Properties’, if you get the sign ‘USB 2820 video’, it’s
correct.
、Install database from disk:\
disk:\interbase\
interbase\IB:\
IB:\setup、exe、 (The key is in the key、txt“
、Install DivX5 from disk:\
disk:\mpeg4\
mpeg4\divx5divx5-setup、exe、
、Install the directx9、0 from
Disk:\
Disk:\diretx9、0\
diretx9、0\dxsetup、exe、
、 INSTALLATION OF THE SOFTWARE
1
Open the disc of the Microcirculation program, then setup the
icon‘
’,
11
Instruction manual
2. Click ‘
’,
3. Please do not change the folder, Click ‘
12
’ straightly.
Instruction manual
4. Do not change the name, click ‘
5. Click ‘
’,
’,
13
Instruction manual
6. Click ‘
’ to restart the computer.
. When the computer restart, setup ‘
will give a device Code like this
14
’on the desktop, then it
Instruction manual
. You must have a License Code, now, please send your Device Code to
us
www.jiahuaele.com/[email protected] , and we will give you the
License Code. When you get the License Code, fill it, then click
‘
’ to login the program.
. SETUP
When you login to the program like this,
15
Instruction manual
. Click this picture,
. The first time, set the program first, click ‘
16
’,
Instruction manual
Input the password ‘0’, then click ‘
’,
You can reset the RecTime, if you want to record for longer time.
And set the PlayVideo to ‘OSDefault’ if there is not player in the
computer.
. Click ‘
’,
. Input the password ‘136’, then click ‘
17
’
Instruction manual
. If there is not the ‘com’ port on the computer, please click
’ to remove the ‘
‘
. Click ‘
Click ‘
’.
’,
’ to save and back to this picture.
、USE THE SOFTWARE
18
Instruction manual
. Click ‘
’ to create a new case of illness,
. Input the ‘name’, ‘sex’, ‘age’, then click ‘
19
’,
Instruction manual
Modify the information
Set the video
Record a video
Capture an image
Analyze the image
Freeze the image
20
Instruction manual
. First, click ‘
‘
’ to capture the image for analyze, and you can click
’ to record a video,
Start or stop record
Capture an image from the
Delete the video
. Click ‘
’ to start record, and right-click ‘
. Click the ‘
video, and click ‘
’ to stop.
’ to choose the video, then click ‘
’ to stop. And click ‘
’ to play the
’ to exit record.
. When capture the pic, choose a pic and tow the picture to the dynamic
picture area, click ‘
’,
21
Instruction manual
. Choose or fill every Option, and click ‘
’ and ‘
’ to do the
similar step.
. If analyze the item of the FLOW, you must analyze upon the live video.
. Click ‘
. Click ‘
’ to exit the analyzing.
’
22
Instruction manual
’ to do the correspond
. You can click ‘
operations but ‘
. Click ‘
’ only if your software operation is very skilled.
’ to change or add the image with tow the preview images
to picture frame(s) of the report.
23
Instruction manual
. You can also click ‘
. When finish the work, click ‘
. Click ‘
’ to choose another report.
’ to back to the main windows.
’ to create a new case of illness.
. QUERY
. Click ‘
’,
. Click ‘
’
24
Instruction manual
e.g.
Check with name: first, click ‘
‘
’ to ‘
’, then input the name to
’, click ‘
’ to find tom’s case of
illness.
. Click ‘
’ to exit the query, and double-click the record to open
the case of illness.
When open the record, you can do the same operations to modify the
records.
D. manual
25
Instruction manual
1 Form
1
Distinctness:
clear
(not clear)
(Blurred)
2 No.of microvascu lar loops:
five
nine
No.of microvascu input number
3
26
Instruction manual
1- Anterial limb diameter
2- Venous limb diameter
Anterial
limb
3- Top diameter of loop
Venous limb
diameter
4- Length of loop
Top diameter
of loop
(4)Crossed loops:
5 Abnormal loops:
27
Length of
loop
Instruction manual
2
Flow:
Blood flow Velocity: Thread:
Gnanular:
Gnanular to and fro:
Vasomotion
Aggregation of erythrocytes
(mild)
moderate
(4)Leucocyte
White microthrombus:
Blood color :
28
severe
Instruction manual
Slight red
(Dark red)
(More slight red)
(Dark violet)
29
Instruction manual
3
Peri.:
Perivasular diapedesis
(1) Microvascular loop hemorrhage:
(2)Subpapillary venous plexus:
3
(4)papilla
30
lines
Instruction manual
(Wave like)
(Mid wave like)
(smooth)
(5)Sweat gland duct:
2 n/ 1finger
31
Instruction manual
After sale service
(1) From the date of delivery of the equipment, we will provide one year free maintenance; we also
guarantee life-long maintenance after the 12 months free warranty (but not include carriage). After 12
months user will payment accessory fee and carriage, we will maintenance for long long time.
(2)The company will not comply free warranty obligations under following circumstances:
1) Exceed the warranty period;
2) The device is damaged on purpose;
3) The device is damaged due to force majeure (such as abnormal voltage electricity, fire, lightning,
earthquakes, ect.);
4) Fail to operate under the instructions;
5) Reassemble and repair without the manufacture’s permission;
(3) The company guarantees to be responsible for the device maintenance even after the free warranty
period. The clients only have to pay the materials costs and maintenance fee. If the users want to repair
by themselves, the company will assist the user by providing the device’s circuit diagram and parts of an
apparatus.
32