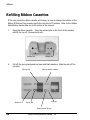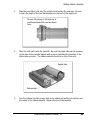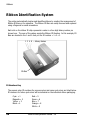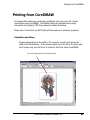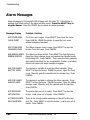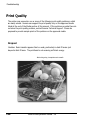
1
Warranty I nformation Dur a Chr om e One- Y ea r Lim ited W a r r a nty W a r r a nty R egis tr a tion V a lida te y our w a r r a nty by com pleting a nd m a iling the enclos ed W a r r a nty Ca r d a long w ith a copy of y our or igina l pur cha s e invoice. I f you have any questions, please contact Summa, I nc. directly at 1-800-527-7778. Or Fa x the infor m a tion to 2 0 6 - 5 2 7 - 1 0 4 6 . L im ited W a r r a nty on H a r dw a r e - This warranty applies only to DuraChrome hardware. Summa, I nc. warrants its DuraChrome Printing System against defects in parts and material for a period of one (1) year from the date of purchase. Workmanship, labor, or on-site (US only) repair charges are warranted for a period of ninety (90) days from date of purchase. This warranty is made only to the original purchaser/owner (the “Purchaser”) and only if the purchase is made from an authorized DuraChrome Summa, I nc. dealer. The purchaser must complete and return the enclosed warranty registration card and copy of the purchase invoice within thirty (30) days of the date of purchase. Completion and return of the warranty registration and invoice copy are conditions precedent to the effectiveness of this warranty. This warranty applies only to equipment purchased in the United States and Canada. For equipment purchased outside of the United States and Canada contact your local dealer or distributor. This warranty is void if the product has been damaged by accident, abuse, misuse, negligence, use of non-Summa supplies or misapplication, or has been modified or repaired by others without the written permission of Summa, I nc. THE WARRANTI ES AND REPRESENTATI ONS SET FORTH ABOVE ARE EXCLUSI VE AND I N LI EU OF ALL OTHERS, EXPRESS OR I MPLI ED, I N FACT OR I N LAW. No Summa, I nc. dealer, agent or employee is authorized to make any modification, extension, or addition to this warranty. Summa, I nc. reserves the right to make changes to the product without notice. I N NO EVENT WI LL SUMMA, I NC. BE LI ABLE FOR DI RECT, I NDI RECT, SPECI AL, I NCI DENTAL, OR CONSEQUENTI AL DAMAGES RESULTI NG FROM ANY BREACH OF WARRANTY OR UNDER ANY LEGAL THEORY, EVEN I F ADVI SED OF THE POSSI BI LI TY OF SUCH DAMAGES. Some states and countries do not allow the exclusion or limitation of implied warranties of liability for incidental or consequential damages, so the limitation or exclusion may not apply to you. This warranty gives you specific legal rights, and you may also have other rights which vary from state to state or country to country. NOTWI THSTANDI NG THE ABOVE LI MI TATI ONS AND WARRANTI ES, SUMMA, I NC.’S LI ABI LI TY HEREUNDER FOR DAMAGES I NCURRED BY THE PURCHASER OR OTHERS SHALL NOT EXCEED THE AMOUNT PAI D BY PURCHASER FOR THE PARTI CULAR PRODUCT I NVOLVED. DuraChrome Operation Manual - 3e 1 Warranty Information No action arising out of any claimed breach of this warranty or transactions under this warranty may be brought more than one (1) year after the cause of action has occurred, or more than two (2) years after the date of the Summa, Inc. sales document for the product, whichever occurs first. Ink, Media and Outdoor Durability of Transferred Resin Ink onto Vinyl Media. If you discover physical defects in the ribbons or media distributed with the DuraChrome hardware, Summa, Inc. will replace the defective material at no charge, provided you return the item to be replaced with proof of purchase to your authorized Summa, Inc. dealer within 30 days after purchase date. Customers must first obtain an RMA (Return Material Authorization) number from their dealer prior to returning any defective material. In some countries the replacement period and procedures may be different. Check with your authorized Summa, Inc. dealer for additional information. Resin Ink or Vinyl Media durability, in the context of this warranty, can be in any form. Even though Summa, Inc. has satisfactorily tested the fade resistance, scratch resistance, cracking, shrinking, adhesion and overall outdoor durability for up to 3 to 5 years, Summa, Inc. MAKES NO WARRANTY OR REPRESENTATION, EITHER EXPRESSED OR IMPLIED, WITH RESPECT TO THE OUTDOOR DURABILITY, ITS QUALITY, PERFORMANCE, MERCHANTABILITY, OR FITNESS FOR A PARTICULAR PURPOSE. AS A RESULT, THIS RESIN AND VINYL MEDIA IS SOLD AS IS, AND YOU, THE PURCHASER, ARE ASSUMING THE ENTIRE RISK AS TO ITS QUALITY, PERFORMANCE AND OUTDOOR DURABILITY. THE WARRANTY AND REMEDIES SET FORTH ABOVE ARE EXCLUSIVE AND IN LIEU OF ALL OTHERS, ORAL OR WRITTEN, EXPRESS OR IMPLIED. No Summa, Inc. dealer, agent, or employee is authorized to make any modification, extension or addition to this warranty. Summa, Inc. reserves the right to make changes to the Ink or Media without notice. IN NO EVENT WILL Summa, Inc. BE LIABLE FOR DIRECT, INDIRECT, SPECIAL, INCIDENTAL, OR CONSEQUENTIAL DAMAGES RESULTING FROM ANY DEFECT IN THE PERFORMANCE OR DURABILITY OF INK OR MEDIA, even if advised of the possibility of such damages. In particular, Summa, Inc. shall have no liability for any other Ink or Media manufactured by other companies. Some states or countries do not allow the exclusion or limitation of implied warranties or liability for incidental or consequential damages, so the above limitation or exclusion may not apply to you. This warranty gives you specific legal rights, and you may also have other rights which vary from state to state or country to country. Before you begin... Please complete the warranty registration card inside the envelop enclosed with this manual. Mail the card and a photocopy of the original dealers invoice to Summa, Inc. today. Failure to do so can delay response to any warranty service inquiries. 2 DuraChrome Operation Manual - 3e Contents Basics .................................................................................................5 Printer Anatomy ...............................................................................6 The Keypad ....................................................................................11 Alarm Buzzer ...................................................................................13 Internal Hard Disk ...........................................................................14 Installation .......................................................................................15 Unpacking and Repacking ...............................................................16 Ideal Operating Environment ..........................................................23 Connecting to a Computer ...............................................................23 Turning the Power On/Off ...............................................................24 Quick Start Guide ............................................................................25 General Settings ..............................................................................29 Display Language ............................................................................30 Display Units of Measurement ..........................................................31 Parallel Port Type ............................................................................32 SCSI Device Number .......................................................................32 Disk Queuing .................................................................................33 Alarm Buzzer ..................................................................................34 Nesting ..........................................................................................35 About the Diagnostic Submenu .......................................................36 Media ................................................................................................37 Loading Media ................................................................................38 Specifying Media Width ....................................................................45 Specifying Media Length ..................................................................46 Adjusting Media Feed ......................................................................47 Adjusting Print Density ....................................................................49 Approved Media .............................................................................50 Ribbons ............................................................................................51 DuraChrome Operation Manual - 3e 3 Contents Loading Ribbon Cassettes ................................................................52 Monitoring Ribbon Supply ................................................................53 Refilling Ribbon Cassettes ................................................................54 Ribbon Identification System ............................................................56 ColorControl RIP Software ..............................................................57 Introduction ...................................................................................58 Starting ColorControl ......................................................................61 Printing from CorelDRAW ................................................................65 Printing from Adobe Photoshop .......................................................69 Viewing Ripped Files .......................................................................73 Ripping and Printing ........................................................................74 Printing .............................................................................................81 Pausing and Cancelling Prints ...........................................................82 Storing Files in the Queue and Library ...............................................83 Deleting Files from the Queue and Library .........................................85 Reprinting Files in the Queue ...........................................................86 Reprinting Files in the Library ...........................................................87 Changing the Order of Files in the Queue ..........................................88 Maintenance .....................................................................................89 Cleaning the Printer ........................................................................90 Cleaning the Printhead ....................................................................90 Cleaning the Pinch Rollers and Media Drive Rollers ............................92 Changing Printheads .......................................................................93 Troubleshooting ...............................................................................103 Alarm Messages ...........................................................................104 Error Messages ...............................................................................106 Print Quality .................................................................................110 Menu Maps .......................................................................................115 Index ................................................................................................120 4 DuraChrome Operation Manual - 3e Basics Section headings... Printer Anatomy The Keypad Alarm Buzzer Internal Hard Disk DuraChrome Operation Manual - 3e 5 Basics Printer Anatomy The following figures show the major parts and mechanisms of the printer. Become familiar with the printers anatomy before beginning any of the procedures in this manual. Please note that the Media Supply Bar and the Ribbon Changer Cover are located on the backside of the printer. The operator will need to access the backside to replace media and ribbon cassettes. The top cover can be opened by removing the two pairs of screws at either end. The cover lifts up like an automobile hood. Prop it open using the stay-bars secured to the underside of the cover. The front cover can be opened also. Pause the printer before opening the cover to avoid activating the COVER OPEN alarm message. Press the SELECT key to stop the buzzer. Keep both the Top Cover and Front Cover closed during printing. The covers keep dust and debris from coming into contact with the media, which will adversely affect print quality. Top Cover Front Cover Keypad PUSH PUSH Power Switch HDD 6 Media Take-up Roll DuraChrome Operation Manual - 3e Printer Anatomy Ribbon Changer Cover Media Supply Roll Data Interface Ports, Power Plug Centronics Parallel Port Power Plug SCSI input / output DuraChrome Operation Manual - 3e 7 Basics Removing the Front Cover The front cover can be removed. Cleaning procedures for the pinch rollers and printhead are much easier to do with the front cover removed and the top cover opened. 8 1. Turn the printer OFF. 2. Loosen the two screws securing the cover hinge beside the control panel. Remove the ground wire. 3. While holding the front cover, slide the hinge pin toward the center of the printer. 4. Pull the front cover away from the printer and slide the right-hand pin out of the hinge. DuraChrome Operation Manual - 3e Printer Anatomy Opening the Top Cover The top cover opens with two hinges located at the rear of the printer. The cover can be propped open much like an automobile hood using two stay-bars located on the underside of the cover. 1. Remove the two pairs of screws at either end of the top cover. 2. Lift the top cover and prop it open using the stay-bars secured on the underside of the cover. DuraChrome Operation Manual - 3e 9 Basics Internal Components B A Media pressure plate / shaft Platen 10 Pinch rollers Encoder Pinch Roller DuraChrome Operation Manual - 3e The Keypad The Keypad The functions of each key and LED are described below. DURACHROME READY POWER SELECT ALARM HDD CANCEL PRINTS PAUSE RELEASE FEED SETUP MEDIA RIBBON Cancel Cancels the alarm and error codes displayed on the LCD. Select Selects submenus and appropriate settings within a current submenu. SELECT also stops the alarm buzzer. The Arrow keys change a menu or submenu and the parameters of the current screen. Both keys will scroll backward and forward when selecting a parameter. Pause Pauses printer operation. Setup Displays the Setup Menu. The printer must be paused first. Prints Displays the Prints Menu. Media Displays the Media Menu. The printer must be paused first. DuraChrome Operation Manual - 3e 11 Basics Ribbon Displays the Ribbon Menu. The printer must be paused first. Release Releases media from the pinch rollers. The printer must be paused first. Feed Feeds media into the printer, in the forward direction. The printer must be paused first. Power LED Illuminates when power is ON. Alarm LED Indicates a printer alarm or error. HDD LED Indicates access to the internal hard drive. Pause LED Illuminates when the printer is paused. The Pause LED will blink until the current printhead pass is complete, then will glow steadily. Ribbon LED Illuminates when one or more ribbon cassettes are empty. Open the ribbon changer cover and replace the cassette(s) below the flashing LED. 12 DuraChrome Operation Manual - 3e Alarm Buzzer Alarm Buzzer The Alarm Buzzer indicates an operational error. The LCD will display an alarm message. Refer to the Troubleshooting section of this manual for a list of Alarm Messages and what to do to resolve them. To stop the buzzer, press the SELECT key. The Alarm Message will still be displayed on the LCD. Again, refer to the Troubleshooting section. To disable the buzzer, enter the General Settings submenu and turn the Alarm OFF. Refer to the General Settings section of this manual. Two most common alarms: A03 COVER OPEN CLOSE FRONT Solution: The front cover is open. This error often occurs when the printer is turned on and the cover has been left ajar. Press the SELECT key to stop the buzzer. Close the cover, then press the CANCEL key to clear the error. The front cover prevents dust from accumulating on the media, which will adversely affect print quality. A26 RIBBON ALARM CASSETTE EMPTY X Solution: One of the ribbon cassettes is empty. Press the SELECT key to stop the buzzer. Open the ribbon changer cover and refill the cassette beside the flashing LED. Then, reload the cassette into the printer and press the CANCEL key. The print job will resume where it was interrupted. DuraChrome Operation Manual - 3e 13 Basics Internal Hard Disk The 4.3 GB internal hard disk allows the operator store print jobs for later reprinting, which can save time spent re-ripping the files. Print jobs can be saved temporarily and permanently, as described in the Printing section of this manual. The printer can function without the HDD installed if, for example, the HDD has proved to be defective in some way. However, the operator must: 1.) disable the Disk Queuing function as described in the Setup section of this manual, and 2.) Delete all the characters in the Job Name box in ColorControls Print dialog box, as described in the ColorControl section of this manual. Both of these functions require a hard disk. To remove a defective HDD, remove the two thumb screws securing the HDD in the printer. Pull the bracket out slowly. Then, disconnect the data ribbon cable and the power cable. If the printer is still under warranty, Summa will replace a defective HDD at no charge. Otherwise, a new HDD can be purchased from Summa. Thumb screws Data Ribbon Cable Power Cable 14 DuraChrome Operation Manual - 3e Bracket Installation Section headings... Unpacking and Repacking Ideal Operating Environment Connecting to a Computer Turning the Power On/Off DuraChrome Operation Manual - 3e 15 Installation Unpacking and Repacking The printers shipping container and hardware must be saved in the event the printer will need to be moved. Do not transport the printer any distance without completely repacking it in its original shipping container. Disassemble the shipping container • Before unpacking, be sure there is at least 4 meters of space beside the side panel labeled as FRONT. The printer will be rolled down a ramp on this end of the container. • Remove the top panel first. Use a 10mm wrench (a socket wrench is recommended) to remove the bolts securing the panel. • Then, remove the four side panels using the 10mm wrench. Top panel Front panel 16 DuraChrome Operation Manual - 3e Unpacking and Repacking • The printer is secured to the base of the container by four 19mm bolts. Remove the bolts using a pair of 19mm wrenches. • Remove the ramp legs from beneath the printer as shown here. DuraChrome Operation Manual - 3e 17 Installation • Install the ramp legs as shown here. Two people are required to safely and slowly roll the printer down the ramp. Be sure the wheels of the printer are aligned with the ramp legs. Remove internal packing materials Remove the plastic wrapping, then remove the adhesive tape securing the front cover and cassette changer cover. 18 DuraChrome Operation Manual - 3e Unpacking and Repacking Remove adhesive tape from top and front covers. Remove adhesive tape from ribbon changer cover. DuraChrome Operation Manual - 3e 19 Installation Open the top cover as described in the Anatomy section of this manual. Then, remove the front cover. Loosen the two screws at the left-hand hinge and allow the pin to recess, out of the hinge bracket. Then, pull the other end out of the right-hand hinge. Loosen two screws. Remove the adhesive tape and packing material from the following locations. Then, replace the front cover and close the top cover. Remove adhesive tape. 20 DuraChrome Operation Manual - 3e Unpacking and Repacking Remove adhesive tape form platen, pinch rollers, and center encoder pinch roller. Remove adhesive tape from carriage, traverse beam, and underside of the carriage. DuraChrome Operation Manual - 3e 21 Installation NOTE: Please save the packaging materials and the shipping container. Replace the front cover and close the top cover. These covers keep dust out of the printer that can adversely affect print quality. Repack the printer To repack the printer, follow these instructions in reverse order. Be sure the carriage is fully secured. Failure to repack the printer correctly can cause severe damage in transport. 22 DuraChrome Operation Manual - 3e Ideal Operating Environment Ideal Operating Environment Environmental conditions can significantly affect the printers performance. High humidity, high temperatures, direct sunlight and airborne dust can adversely affect print quality. The printer should be located away from windows and doors, preferably in an interior room of a building. Install the printer at an operating site only under the following conditions: § § § § § § § Surface must be level, without vibration. Floor structure must support approximately 550 lbs. (250 Kg). Operating temperature should be stable between 60 and 80 degrees Fahrenheit (10-30 degrees Centigrade). Operating humidity should be stable between 30% and 80%. Area should not be prone to static electricity. Be sure to allow enough space surrounding the printer for the changing of media and ribbons, at least 24 inches (500 mm) on either side, and 40 inches (1000mm) behind and in front of the printer. The printer uses a universal power system that can operate with AC voltage from 100 volts (-10%) to 240 volts (+6%), or any line frequency from 50 to 60 Hz. Connecting to a Computer The DuraChrome currently supports only one type of data interface: EPP Centronics parallel for computers using the Microsoft Windows operating system. Set the parallel port to EPP in the computers BIOS setup program. Most computers are preset to ECP. The printer is equipped with SCSI input and output ports for use with Macintosh computers, however no software exists for transferring print files to the printer from a Macintosh operating system. The printer will automatically switch to the interface that is receiving data. Both SCSI and EPP can be used, although when one interface is busy, the other interface will wait until the previous data transfer is complete. CAUTION... Turn the printer and computer OFF before connecting the interface cable. To protect both devices, follow the power on/off sequence for the computer. Refer to the computers operating instructions. DuraChrome Operation Manual - 3e 23 Installation Turning the Power On/Off Locate the power cord included with the printer. Plug one end into the power connector on the back of the printer. Plug the other end into a grounded power outlet, preferably into a surge protection device plugged into such an outlet. CAUTION... Be sure the power switch is turned off before connecting the power cord. The printer is to be used only with a properly grounded power outlet. POWER ON Flip the power switch located on the front of the printer to turn the power ON. The power LED on the keypad will illuminate. The printer will check the number and color of any ribbon cassettes loaded. Then, the printer will perform an initialization procedure to prepare for printing. The following message will appear on the LCD. INITIALIZING (PLEASE WAIT) After the printer completes the initialization procedure, the following message will appear on the LCD. The printer is ready to receive data and begin printing. DURACHROME READY POWER OFF The printer does not require any special shutdown procedure. Nevertheless, when the hard disk (HDD) LED on the keypad is illuminated, delay shutdown to avoid data loss or damage. When the printer is turned off, all the prints in the Prints Queue are erased, including the TEMP files stored in the Prints Library. CAUTION... Always wait at least 20 seconds after turning the power off to restart the printer. Failure to do so can cause damage to the printer. 24 DuraChrome Operation Manual - 3e Quick Start Guide Section headings... Prepare the Printer Install ColorControl Software Consult the Application Notes Send a Print File DuraChrome Operation Manual - 3e 25 Quick Start Guide Prepare the Printer Unpack the printer and install it as described in the Installation section of this manual. 1. Connect the power cord and plug it into a grounded power outlet. Then, connect the data interface cable to the host computer. Refer to the instructions in the previous section of this manual. Turn the printer ON. CAUTION... Turn the printer and computer OFF before connecting the interface cable. To protect both devices, be sure to follow the power on/ off sequence for the computer. Refer to the computers operating instructions. 2. Load a roll of media into the printer as described on pages 38-44 of this manual. NOTE... Be sure to position the encoder pinch roller in the center of the media width, according to the graduations marked inside the printer. The encoder measures the distance the media moves through the printer. 3. Use the keypad to enter the correct media width as described on page 45 of this manual. 4. Load the ribbon cassettes into the printer as described on pages 52-55 of this manual. 5. Adjust the Media Feed value according to the results of the Media Feed Test print, as described on pages 47 and 48. Install ColorControl Software ColorControl is a RIP (raster image processor) designed to be used with the DuraChrome. Refer to the ColorControl RIP Software section in this manual, pages 58-64, for installation instructions. 26 DuraChrome Operation Manual - 3e Quick Start Guide Consult the Application Notes The ColorControl RIP Software section contains important information about using the software and optimizing settings within two popular graphics applications, CorelDRAW and Photoshop, for use with DuraChrome. Be sure to consult this section, pages 6572, before sending any print files to the DuraChrome. Settings within graphics applications significantly affect the printers operation and performance. Send a Print File Using any vector or bitmap graphics application (CorelDRAW, Photoshop, etc.) and export or save the print file as an EPS (Encapsulated Postscript) file. Then, use ColorControl to print the image. Refer to the ColorControl RIP Software section, pages 74-80, for instructions. DuraChrome Operation Manual - 3e 27 28 DuraChrome Operation Manual - 3e General Settings Section headings... Display Language Display Units of Measurement Parallel Port Type SCSI Device Number Disk Queuing Buzzer Alarm Nesting About the Diagnostic Submenu DuraChrome Operation Manual - 3e 29 General Settings General Settings General Settings are found within the Setup Menu. The printer must be paused before the operator can access the Setup Menu. Press the PAUSE key, then the SETUP key. Within the Setup Menu, the operator can make basic adjustments to the way the printer operates, including: • • • • • • • Changing the Display Language Changing the Display Units of Measurement Specifying the type of Parallel Port used for data transfer Specifying the SCSI device number Enabling the Disk Queuing function Enabling the Buzzer Alarm Enabling the Nesting function NOTE...The Setup Menu comprises the General Settings submenu and the Diagnostics submenu. The procedures in this section are performed within the General Settings submenu. The Diagnostics submenu is used only under special circumstances. Refer to the note at the end of this section. Display Language The language the LCD messaging system uses can be set to English or Japanese. The default language is English. 1. Press the PAUSE key to pause the printer. 2. Press the SETUP key to enter the Setup Menu. Use the arrow keys to scroll to the General Settings submenu. SETUP GENERAL SETTINGS 3. Press the SELECT key. Use the arrow keys to scroll to the Display Language screen. The current setting is displayed. DISPLAY LANGUAGE ENGLISH 30 DuraChrome Operation Manual - 3e Display Units of Measurement 4. Press the SELECT key again. The current setting will blink off and on. Use the arrow keys to change the language between Japanese and English. Note: while the new display language is still blinking, the operator can revert to the previous language by pressing the CANCEL key. 5. Press the SELECT key one last time to store the setting. Display Units of Measurement The units of measurement the printer uses can be set to either centimeters (CM) or inches. The default setting is centimeters. 1. Press the PAUSE key to pause the printer. 2. Press the SETUP key to enter the Setup Menu. Use the arrow keys to scroll to the General Settings submenu. SETUP GENERAL SETTINGS 3. Press the SELECT key. Use the arrow keys to scroll to the Display Units screen. The current setting is displayed. DISPLAY UNITS CM 4. Press the SELECT key again. The current setting will blink off and on. Use the arrow keys to change the units of measurement between metric and English. Note: while the new display units is still blinking, the operator can revert to the previous setting by pressing CANCEL. 5. Press the SELECT key one last time to store the setting. DuraChrome Operation Manual - 3e 31 General Settings Parallel Port Type If the host computer operates on a Windows platform, the type of parallel port used for data transfer must be specified. As of October 1999, the DuraChrome only supports EPP parallel ports. The host computers parallel port must be set to EPP within the computers CMOS. Refer to the computers user manual for instructions. 1. Press the PAUSE key to pause the printer. 2. Press the SETUP key to enter the Setup Menu. Use the arrow keys to scroll to the General Settings submenu. SETUP GENERAL SETTINGS 3. Press the SELECT key. Use the arrow keys to scroll to the Parallel Port screen. The current setting is displayed. PARALLEL PORT EPP - NORMAL 4. Press the SELECT key again. The current setting will blink off and on. Use the arrow keys to change the type of parallel port. Note: while the new port type is still blinking, the operator can revert to the previous port type by pressing the CANCEL key. 5. Press the SELECT key one last time to store the setting. SCSI Device Number If the host computer operates on a Macintosh platform, the printer must be specified as any device numbered 1-5. The default SCSI device number is 5. 1. 32 Press the PAUSE key to pause the printer. DuraChrome Operation Manual - 3e Disk Queuing 2. Press the SETUP key to enter the Setup Menu. Use the arrow keys to scroll to the General Settings submenu. SETUP GENERAL SETTINGS 3. Press the SELECT key. Use the arrow keys to scroll to the SCSI ID screen. The current setting is displayed. SCSI ID 5 4. Press the SELECT key again. The current setting will blink off and on. Use the arrow keys to change the device number from 1-5. 5. Press the SELECT key one last time to store the setting. Disk Queuing The printer can temporarily save print files on its internal hard drive. When Disk Queuing is enabled, any prints sent from the computer are first written to the printers hard disk, then they are printed. So long as the printers power remains ON, the operator can access and reprint any of those print files (refer to the Printing section). Once the power has been turned off, however, those print files are erased. When Disk Queuing is enabled, the printer will take a longer time to print a single print file because the file must first be written to the hard disk. When reprinting capabilities are not needed, its more efficient to leave the Disk Queuing function turned OFF. The default setting is ON. 1. Press the PAUSE key to pause the printer. 2. Press the SETUP key to enter the Setup Menu. Use the arrow keys to scroll to the General Settings submenu. SETUP GENERAL SETTINGS DuraChrome Operation Manual - 3e 33 General Settings 3. Press the SELECT key. Use the arrow keys to scroll to the Disk Queuing screen. The current setting is displayed. DISK QUEUING OFF 4. Press the SELECT key again. The current setting will blink off and on. Use the arrow keys to turn Disk Queuing OFF or ON. Note: while the new setting is still blinking, the operator can revert to the previous setting by pressing the CANCEL key. 5. Press the SELECT key one last time to store the setting. Alarm Buzzer The printer uses an audible alarm buzzer to alert the operator. The buzzer can be turned ON and OFF. The default setting is ON. 1. Press the PAUSE button to pause the printer. 2. Press the SETUP key to enter the Setup Menu. Use the arrow keys to scroll to the General Settings submenu. SETUP GENERAL SETTINGS 3. Press the SELECT key. Use the arrow keys to scroll to the Buzzer screen. The current setting is displayed. BUZZER ON 34 4. Press the SELECT key again. Use the arrow keys to turn the Buzzer ON and OFF. Note: while the new setting is still blinking, the operator can revert to the previous setting by pressing the CANCEL key. 5. Press the SELECT key one last time to store the setting. DuraChrome Operation Manual - 3e Nesting Nesting The Nesting function allows the operator to conserve media by placing two smaller prints side by side across the width of the media. The printer places a one centimeter (~ 3/8) margin between nested prints. The Disk Queuing function must also be enabled for Nesting to work because the print files must be stored in the queue first, before printing begins. Nesting will not work if the two print files have different process color printing orders. All images to be nested together must utilize the same combination of ribbons in the same printing order. 1. Press the PAUSE button to pause the printer. 2. Press the SETUP key to enter the Setup Menu. Use the arrow keys to scroll to the General Settings submenu. SETUP GENERAL SETTINGS 3. Press the SELECT key. Use the arrow keys to scroll to the Nesting screen. The current setting is displayed. NESTING OFF 4. Press the SELECT key again. Use the arrow keys to turn Nesting ON and OFF. Note: while the new setting is still blinking, the operator can revert to the previous setting by pressing the CANCEL key. 5. Press the SELECT key one last time to store the setting. When Nesting is enabled, the printer will store the first print file in the Queue and will then wait for the second print file to be sent before it begins printing. If the combined width of the two print files, plus a standard one centimeter gap between the two images exceeds the maximum allowable printing width for the media size, the printer will revert to normal operation, printing the images one after another. Be sure to check image sizes before nesting them together. DuraChrome Operation Manual - 3e 35 General Settings About the Diagnostic Submenu The other submenu within the Setup Menu is the Diagnostic submenu. The operator will not need to access this submenu unless they are instructed to do so by a certified DuraChrome service technician. The Diagnostic submenu comprises a number of test prints and other operations designed to diagnose problems with the printer. 36 DuraChrome Operation Manual - 3e Media Section headings... Loading Media Specifying the Media Width Specifying the Media Length Adjusting the Media Feed Adjusting the Print Density Approved Media DuraChrome Operation Manual - 3e 37 Media Loading Media The operator must be able to reach the back side of the printer to load new media. The procedures that follow use the terms left-hand and right-hand as if the operator were facing the back side of the printer. In addition to physically loading the media into the printer, the operator must also: • • • Position the Center Encoder Pinch Roller in the center of the Media Width Specify the Media Width within the Media Menu Adjust the Media Feed These operations are described later in this section of the Manual. Loading Media onto the Supply Bar 1. Loosen the lock screws on the left-hand flange and remove it from the supply bar. Also, loosen the core expansion dial on the right-hand end of the supply bar. Core expansion dial Left flange Lock screws 2. 38 Insert the supply bar through one end of the media. Be sure the media unrolls from the bottom of the roll as shown in photo on the next page. DuraChrome Operation Manual - 3e Loading Media NOTE... Avoid touching the media with bare hands. Natural body oils on the media can inhibit complete resin transfer. Also, hands washed with soap can leave chloride ions on the media that can, over time, damage the printhead surface. Always wear media handling gloves. 3. Reinstall the left-hand flange and tighten the lock screws. Then, tighten the core expansion dial on the right-hand end of the bar. Loading the Media Supply Bar into the Printer 1. Place the right-hand end (gear end) of the media supply bar on the right-hand bracket. Fit the collar of the bar into the guide plate, as shown in the figure below. DuraChrome Operation Manual - 3e 39 Media 2. Place the left-hand end of the bar on the left-hand bracket. Always load the right-hand end (gear end) of the supply bar first. 3. Loosen the lock screws on the left-hand flange. Press the flange into the end of the media rolls core. Then, retighten the lock screws. 4. Finally, tighten the lock screws located on top of the left and right-hand brackets. Pull the screws forward, then tighten them. Lock screw 40 DuraChrome Operation Manual - 3e Loading Media Loading the Take-up Bar into the Printer These instructions assume the operator is facing the front of the printer. 1. Place the left-hand end (gear end) of the take-up bar on the left-hand bracket. Fit the collar of the bar into the guide plate, as shown below. 2. Place the right-hand end of the take-up bar on the right-hand bracket. Always place the left-hand end (gear end) of the take-up bar first. 3. Tighten the lock screws on the top of the right and left-hand brackets. Pull the screws forward then tighten them to secure the take-up bar in the printer. DuraChrome Operation Manual - 3e 41 Media Feeding Media into the Printer 1. Position the encoder pinch roller appropriately for the media width. The encoder is a narrow rubber roller located just in front of the platen. Loosen the two thumb screws to move the encoder. The encoder must be positioned in the center of the media, according to the marked graduations inside the printer. Center encoder pinch roller 2. Press the media release key on the keypad or the media release switch located on the back side of the printer. Pinch rollers A and B, the media pressure shaft and the media pressure plate are all released. 3. Insert the media from behind the printer. The operator can press the media release key to temporarily secure the media once it has passed between the platen and pinch roller B. 42 DuraChrome Operation Manual - 3e Loading Media 4. Pull the media from the front of the printer until the front edge passes under the media pressure plate, pinch roller A, and the media pressure shaft. B A Media pressure plate / shaft Pinch rollers 5. Pull the media evenly from left to right until the front edge reaches to the takeup core. Use the Media Alignment rules on the front and back of the printer to ensure the media is aligned straight. The edge of the media should be aligned with the same numbered line on the front as on the back. 6. Use adhesive tape to secure the media to the take-up bar. Attach it in three places: the middle and either end, as shown here. DuraChrome Operation Manual - 3e 43 Media Media take-up activation lever 7. Roll the media around the take-up bar several times. 8. Press the media release key on the keypad to engage pinch rollers A and B, the media pressure shaft and the media pressure plate. 9. Place the right-hand flange plate against the right edge of the media. Completely tighten the lock screws. 10. To activate the media take-up motor, pull the media take-up activation lever out so that the media will touch it as it feeds out of the printer. The lever will sense the weight of the media and will then activate the media take-up motor. 11. Tighten the lock screws on the top of the right and left-hand brackets. Pull the screws forward then tighten them to secure the take-up bar in the printer. Lock screw 44 DuraChrome Operation Manual - 3e Specifying Media Width Specifying Media Width The Media Width must be properly specified within the Media Menu. The printer must be paused before the operator can access the Media Menu. Press the PAUSE key, then press the MEDIA key. The printer can handle media widths from 300mm to 1270mm (approx. 12-53 inches). The default setting is 1270mm (approx. 53 inches). 1. Press the PAUSE key to pause the printer. Press the MEDIA key to enter the Media Menu. 2. Use the arrow keys to scroll to the Media Width screen. MEDIA WIDTH 920 cm 3. Press the SELECT key. The current setting will blink off and on. Use the arrow keys to change the media width. Note: while the new setting is still blinking, the operator can revert to the previous media width by pressing the CANCEL key. 4. Press the SELECT key again to store the setting. DuraChrome Operation Manual - 3e 45 Media Specifying Media Length The Media Length does not need to be specified. Nevertheless, if the printer is informed of how much media is loaded on the supply bar, it can warn the operator if a print will not fit on the remaining amount of media. The length can be set anywhere between 1-100 meters. The default setting is 50 meters. 1. Press the PAUSE key to pause the printer. Press the MEDIA key to enter the Media Menu. 2. Use the arrow keys to scroll to the Media Length screen. MEDIA LENGTH 50 m 46 3. Press the SELECT key. The current setting will blink off and on. Use the arrow keys to change the media length. Note: while the new setting is still blinking, the operator can revert to the previous media length by pressing the CANCEL key. 4. Press the SELECT key again to store the setting. DuraChrome Operation Manual - 3e Adjusting Media Feed Adjusting Media Feed Media Feed refers to the distance the media is fed after each set printhead passes. The operator must adjust the Media Feed every time new media is loaded. The amount of the adjustment is determined by inspecting the Feed Value Test Print. The Media Width must be set before printing a Feed Value Test Print. Incorrect Media Width settings will skew test results. Also, the test pattern will continue printing beyond the edge of the media if the Media Width is set too narrow, which could damage the platen and the printhead. 1. Press the PAUSE key to pause the printer. Press the Media key to enter the Media Menu. 2. Use the arrow keys to scroll to the Feed Value Test Print screen. FEED VALUE TEST PRINT 3. Press the SELECT key. The LCD will ask the operator to check the media width. Be sure the Media Width setting in the Media Menu is correct. Then, press the PAUSE key to confirm. 4. The test print pattern will look similar to this: 5. Take note of where the two dashed lines intersect. They should intersect in the ZERO column. If the two lines intersect at +6, for example, increase the Media Feed Value by 6. If the two lines intersect at -18, for example, decrease the Media Feed Value by 18. DuraChrome Operation Manual - 3e 47 Media 6. Press the PAUSE key to pause the printer. Press the MEDIA key to enter the Media Menu. 7. Use the arrow keys to scroll to the Media Feed screen. MEDIA FEED VALUE+ x 8. Press the SELECT key. The current setting will blink off and on. Use the arrow keys to change the Media Feed value. Note: while the new setting is still blinking, the operator can revert to the previous setting by pressing the CANCEL key. 9. Press the SELECT key again to store the setting. NOTE... Results from the Feed Value Test print are not entirely exact. While the test provides a very good starting point for Media Feed adjustment, the final adjustments should be determined by examining sample images. Refer to the Troubleshooting section in this Manual. If the printhead passes appear to overlap one another, increase the Media Feed value by 3 points or so, then try again. If the printhead passes appear to fall short of meeting one another, decrease the Media Feed value by 3 points or so, then try again. 48 DuraChrome Operation Manual - 3e Adjusting Print Density Adjusting Print Density Print Density refers to the level of energy being sent to the printhead. Print Density values range from 1-10. The default setting is 6. The operator should not make any adjustments to the Print Density unless instructed to do so by the Troubleshooting section of this manual. 1. Press the PAUSE key to pause the printer. 2. Press the MEDIA key to enter the Media Menu. Use the arrow keys to scroll to the Print Density screen. PRINT DENSITY VALUE+ 6 3. Press the SELECT key. The current setting will blink off and on. Use the arrow keys to change the setting from 1-10. Note: while the new setting is still blinking, the operator can revert to the previous setting by pressing the CANCEL key. 4. Press the SELECT key again to store the setting. DuraChrome Operation Manual - 3e 49 Media Approved Media Summa has thoroughly tested and approved the following media for use in the printer. Part Number DC-404 DC-406 DC-408 DC-410 DC-411 Media 3M Cast White Vinyl 3M Cast Clear Vinyl 3M Window Graphics Film 3M Translucent White Vinyl 3M Scotchlite Reflective Vinyl Summa cannot guarantee print quality on other media. Using Unapproved Media The printer can physically accept most rolled vinyl films, but print quality results are not guaranteed. Depending upon the medias physical characteristics, the Print Density setting may require adjustment. Problems such as ribbon distortions, ribbon breakages and dropout can occur unpredictably. Please proceed with caution when using unapproved media. 50 DuraChrome Operation Manual - 3e Ribbons Section headings... Loading Ribbons Monitoring Ribbon Supply Refilling Ribbon Cassettes Ribbon Identification System DuraChrome Operation Manual - 3e 51 Ribbons Loading and Removing Ribbons Ribbon cassettes can be loaded or removed at any time, even during a print. An empty cassette will trigger an alarm. Open the changer cover and replace the cassette under the flashing LED. Load and remove ribbon cassettes from behind the printer. Open the ribbon changer cover and lift the spring-tensioned gate. Cassettes can be placed in any open location. Lift the gate Let the gate close again, then pull the cassette back against it. 52 DuraChrome Operation Manual - 3e Monitoring Ribbon Supply Monitoring Ribbon Supply The Ribbon Status submenu shows the location of each ribbon and the amount of ribbon remaining in each cassette. To view the Ribbon Status submenu: 1. Press the PAUSE key to pause the printer. Press the RIBBON key to enter the Ribbon Menu. 2. Use the arrow keys to scroll to the Ribbon Status screen. The number of cassettes in the printer appears on the second line of the LCD. RIBBON STATUS CASSETTE: 4 3. Press the SELECT key. In this example, four ribbons are loaded into the first four ribbon storage locations. Storage Locations 1 2 3 4 4 3 2 1 Ribbon ID Numbers 5 6 7 8 Amount of Ribbon Remaining (outlined box means ribbon is full) Ribbon ID Numbers Each ribbon color is assigned a number. The printer reads these numbers by locating the Ribbon ID Bars on each cassette. Refer to Ribbon Identification System later in this section of the manual. DuraChrome Operation Manual - 3e 53 Ribbons Refilling Ribbon Cassettes If the color inside the ribbon cassette will change, be sure to change the location of the Ribbon ID Bars so they properly signify the new colors ID number. Refer to the Ribbon Identification System later on in this section of the manual. 1. Open the ribbon cassette. Press the release tabs on the front of the cassette and lift the top off. Remove both rolls. Release Tab 2. Release Tab Pull off the spring-tensioned end caps and black washers. Slide the rolls off the cylinders. Take-up Roll Ribbon Core Take-up Washer (smaller) End Cap Supply Roll Supply Washer (larger) 54 DuraChrome Operation Manual - 3e Refilling Ribbon Cassettes 3. Slide the new ribbon rolls onto the cylinders and replace the end caps. Be sure to place the larger of the two black washers on the end of the supply roll. Be sure the spring on the end cap is positioned toward the core as shown here. 4. Place the rolls back inside the cassette. Be sure the empty take-up roll is placed on the side of the cassette labeled with an arrow indicating the direction of the ribbon take-up motor. The ribbon material should lie on top of the rolls. Supply side Take-up side 5. Turn the cylinders to take up any slack in the ribbon and pull the ink section over the center of the ribbon cassette. Replace the top of the cassette. DuraChrome Operation Manual - 3e 55 Ribbons Ribbon Identification System The printer automatically locates and identifies ribbons by reading the arrangement of Ribbon ID Bars on the cassettes. The Ribbon ID Bars are easily removed and replaced using a fingernail or small screwdriver. Each slot on the ribbon ID chip represents a value in a four-digit binary number, as shown here. The sum of the values equals the Ribbon ID Number. In this example, ID Bars are located in the 1 and 2 slots, so the ID number = 1+2 =3. 1 2 4 8 ... Binary Values ID Bars ID Numbers Key The process color ID numbers for process colors and some spot colors are listed below. ID numbers for future spot colors will be indicated on the individual ribbon packaging. Cyan = 1 Magenta = 2 Yellow = 3 Black = 4 56 Red = 5 Green = 6 Blue = 7 Orange = 8 White = 9 DuraChrome Operation Manual - 3e ColorControl RIP Software Section headings... Introduction Starting ColorControl Printing from CorelDRAW Printing from Adobe Photoshop Viewing Ripped Files Ripping and Printing DuraChrome Operation Manual - 3e 57 ColorControl RIP Software Introduction ColorControl provides a Raster Image Processor to enable the operator to output vector and raster images to the DuraChrome. Functions are minimal, making the software easy to use. They include: Print to DuraChrome: A high-speed image rasterizer that processes only PostScript files (EPS, PS, PDF, or EPSF) using a PostScript level 3 interpreter. The native raster print engine sends files individually or in batch. Print options include automated image tiling, spot color support, and Summas exclusive VisionPrint technology for creating see-through window graphics. View Ripped Files: Allows the operator to view images before printing them. A Zoom feature is included. All aspects of file size, rotation and color depth assigned in the design software are retained by ColorControl's RIP. A basic knowledge of the design software is all that's required to print to the DuraChrome. System Requirements Operating System: Hard Disk Space: Memory: Windows 95/98/NT 12 MB 64MB RAM Hardware Lock 58 1. Install the hardware lock included in the back of this manual. The lock attaches to the host computers parallel port. The parallel cable then attaches to the other side of the lock. 2. Set the computers parallel port to EPP in the computers BIOS setup program. Refer to the Installation section earlier in this manual. The hardware lock will fail if the port is set to ECP, as most computers parallel ports are. DuraChrome Operation Manual - 3e Introduction Installing ColorControl 1. Insert the ColorControl CD into the computers CD-ROM drive. 2. The Autorun file should launch the installation routine automatically. If the installation routine does not begin automatically, launch the routine manually from the Run... command line in the Windows Start menu. Type: D:setup (where D is the CD-ROM drive). 3. The InstallShield Wizard will escort the user through the installation routine. Accept all default options throughout the installation unless the software is to be installed in a different directory than Programs/Summa CC. Uninstalling ColorControl Use the Add/Remove Programs function in the Windows Control Panel. The program and its related components will be removed from the computer. Add Printer to Windows DuraChrome must be added to Windows as a printer for it to appear in ColorControls print options window. 1. Enter the Windows Start menu and select Settings, then Printers. 2. Double-click on the Add Printer icon. The following screen is the Add Printer Wizard. Click on Next. 3. In the next screen, select Local Printer and click Next. 4. The Wizard will ask for the manufacturer of the printer. Select Generic from the list of manufacturers and click Next. 5. Choose LPT1 from the list of available ports and click Next. 6. Type DuraChrome in the Printer Name field in the next screen. Then, click Next. 7. Select NO in the print test page? option and click Next. The DuraChrome has been added to the Windows Print Manager. DuraChrome Operation Manual - 3e 59 ColorControl RIP Software Installing Spot Color Palette Information ColorControl supports the use of up to eight spot colors at a time. Spot colors are assigned ribbon ID numbers, as the process colors are, and can be printed in any sequence. However, the design software must contain the DuraChromes unique spot color palette information. Currently Summa supports spot colors only for use with CorelDRAW, versions 7 to current. To install the Spot Color Palette Files: 1. Insert the ColorControl CD in the host computers floppy drive. When the Welcoming installation screen appears, click on Cancel. In the subsequent dialog box, click Exit Setup. 2. Browse the contents of the CD as you would a floppy diskette. Open the Summa ColorControl folder, then open the Spot Color Palettes folder. 3. Double-click on the Pallete_Installer application, which will automatically copy the color palette into CorelDRAWs custom palettes. Quit the CorelDRAW application before executing this installation. The DuraChrome spot colors will then be available in CorelDRAWs custom color palette. 60 DuraChrome Operation Manual - 3e Starting ColorControl Starting ColorControl The hardware key must be installed, and the printer must be connected and turned ON before starting ColorControl. The software is ready to use once the printer has been added to Windows. Nevertheless, the operator might wish to adjust certain preferences. Enter the View Menu in the application window and select Preferences. On the lefthand side of the Preferences dialog box, there are four categories for adjustment: ColorControl, Processes, RIP, and DuraChrome. ColorControl Preferences Temp directory: where ColorControl writes temporary files during processing. For best performance, choose a directory on a local drive with a large amount of free space. License key: where the ColorControl license number should be entered. If this box is blank upon starting ColorControl for the first time, the operator might have to install the HASP drivers by clicking on the HASP Drivers button. The software will then recognize the hardware keys identification number. DuraChrome Operation Manual - 3e 61 ColorControl RIP Software Processes Preferences Units: sets the units of measurement for resolution, default page size, and the rulers within the preview window. Drag n Drop RIP: specifies the RIP process to use. RIP Preferences Lib directory: where ColorControls library files reside. Library files include fonts and other resources ColorControl uses when Ripping files. The default is: C:\Program Files\Summa CC\lib\psrip. If during the installation the program files were stored elsewhere, change this setting appropriately. If this setting is incorrect, the following message will appear. Error occurred before errordict setup. Check your init files. Error calling PSripDLL.startup Fatal Error 62 DuraChrome Operation Manual - 3e Starting ColorControl RIP memory(MB): the amount of RAM ColorControl uses while processing files. The default minimum is 16 MB. For best results, set this value as high as possible, up to two-thirds of the computers available RAM. Postscript RIP: selects either Level 2 or Level 3 compatibility. Default Page Size: provides the default page size if the imported PostScript file does not contain page size information. DuraChrome Preferences Destination printer: select the interface port, most commonly LPT1, but also LPT2. DuraChrome Operation Manual - 3e 63 ColorControl RIP Software RIP Output Directory: specify the directory where ripped files will be stored. 64 DuraChrome Operation Manual - 3e Printing from CorelDRAW Printing from CorelDRAW For images that contain any combination of bitmaps, text and vector fills, Summa recommends using CorelDRAW. CorelDRAW retains all imbedded screen angle information when placing TIFF files produced in Adobe Photoshop. Please note, ColorControl can RIP PostScript files produced in all design programs. Orientation and Sizing Images displayed across the width of the computer monitor print across the width of the DuraChrome. If the desired output size of the file is 50 inches wide by 80 inches long, size the file to 50 inches by 80 inches within CorelDRAW. Top of the image comes out of the printer first. DuraChrome Operation Manual - 3e 65 ColorControl RIP Software Printing Gradient Fills To print smooth gradient fills created in CorelDRAW, select the gradient object and convert the gradient to a bitmap in the Bitmaps menu. Select RGB Color, and 100-150 dpi resolution. Select Anti-aliasing and Color Profile. Select Transparent background if the gradient object is layered on top of other objects. Then, enter the Bitmaps menu again and select Noise > Add Noise. In the Add Noise dialog box, set the Level between 10-25% and set the Density to 100%. Select Uniform Noise Type and Intensity Color Mode. 66 DuraChrome Operation Manual - 3e Printing from CorelDRAW Exporting a PostScript File To export an image from CorelDRAW, select Export from the File menu at the top of the application window. In the subsequent dialog box, choose Encapsulated PostScript (EPS), then enter a file name and select the folder (or directory) where the file will be stored. Click the Export button to export the file. The EPS Export dialog box will appear. Enter the following settings in the General Tab: • • • • • • Do not include a TIFF header. Select Use printer color profile and Composite printer profile. Export text as curves. Send bitmaps as CMYK. Select Auto increase fountain steps to help eliminate banding in graduated fills of vector objects. Increase the number of steps to 2000. Select Always overprint black if black text or vector objects are layered on top of other color elements. DuraChrome Operation Manual - 3e 67 ColorControl RIP Software Enter the following settings in the Advanced Tab: • • • • 68 Select PostScript Level 1 compatibility. Do not use any bitmap compression. Select Always overprint black and Preserve document overprint settings if black text or vector objects are layered on top of other color elements. Select the objects bounding box, unless a specific page size is needed. DuraChrome Operation Manual - 3e Printing from Adobe Photoshop Printing from Adobe Photoshop To create and size bitmap files for printing with ColorControl, Summa recommends using Adobe Photoshop, which is widely considered the global standard for photo editing software. ColorControl uses Photoshops default screen angles. All bitmap elements placed into programs like CorelDRAW should be edited, rotated and sized in Photoshop, then imported into the illustration program. Setting Resolution, then Print Size To set the correct resolution, select Image Size from Photoshops Image Menu. Set the image width and height to the desired output size. Then, click on the Auto button to display the Auto Resolution dialog box. Set the lines/inch to 50 or 75 and the Quality to Best. Click OK. DuraChrome Operation Manual - 3e 69 ColorControl RIP Software When the Auto Resolution box disappears, the Pixels/Inch setting will be automatically set in the Image Size dialog box. Screen Angles Photoshop automatically sets the optimal screen angles for output to the DuraChrome. When using other bitmap editing programs, set the angles as follows: Cyan Magenta Yellow Black 105 degrees 165 degrees 90 degrees 45 degrees Color Depth RGB mode is best for photographic images. RGB has a wider color gamut than CMYK and retains better image quality when scaling or distorting photographic images. Nevertheless, if the image contains text or other elements with solid fills, Summa recommends CMYK mode. Changing the mode is accomplished by entering Photoshops Image Menu and selecting Mode. 70 DuraChrome Operation Manual - 3e Printing from Adobe Photoshop Orientation and Sizing Images displayed across the width of the computer monitor print across the width of the printer. If the desired output size is 50 inches wide by 80 inches long, set the image size in Photoshop to 50 inches wide by 80 inches high. ColorControl does not scale the image once its been exported. Size the image within the bitmap editing program before exporting. Top of the image comes out of the printer first. Printing Gradient Fills To print smooth gradient fills, apply a Noise filter to the gradient. Enter the Filter menu and select Noise > Add Noise. In the Add Noise dialog box, set the Amount between 5-15. Select Uniform rather than Gaussian Distribution. This method has proved to help eliminate banding in gradient fills. DuraChrome Operation Manual - 3e 71 ColorControl RIP Software Saving as a PostScript File Save the print file as an Encapsulated PostScript (EPS) file in the Save dialog box. In the subsequent EPS Options dialog box, select Binary encoding and Include Halftone Screen. Please note that Photoshop will not allow the file to be saved as an EPS file if there are multiple layers or multiple channels beyond the RGB or CMYK channels. If the file will then be placed into CorelDRAW or a similar design program, save it as a TIFF file. EPS files are not displayed well in CorelDRAWs design environment. In the subsequent TIFF Options dialog box, select IBM PC byte order. Summa recommends not using LZW compression unless memory is severely restricted. Compression degrades print quality and is more likely to cause PostScript errors. 72 DuraChrome Operation Manual - 3e Viewing Ripped Files Viewing Ripped Files Once a file is ripped, it can be viewed prior to printing. Select View Ripped File from the File Menu, or click on the open file icon just below the File Menu. Select the particular file in the subsequent dialog box. The image will display on the screen, along with the viewing tools described here. Crop: marquis-select portions of the image to display size attributes. Pan: move the image within the viewing window. Zoom: marquis-select an area of the image to magnify. Dropper: sample color values from selected areas in the image. DuraChrome Operation Manual - 3e 73 ColorControl RIP Software Ripping and Printing ColorControl uses a PostScript interpreter for processing PostScript, PDF and EPSF files. The RIP is compatible with PostScript level 3 functions. ColorControls RIP supports three operating modes: Single-resolution for generating a single output raster; Dual-resolution for generating separate output rasters for images and text or line-art elements; and PS2PS for optimizing Postscript files for later ripping. Dual Res is recommended for most DuraChrome print projects. To begin, enter the File Menu and select Print to DuraChrome. In the subsequent dialog box, browse to the particular EPS/PDF/EPSF file and click on the Open button. The Print dialog box will appear. The Print dialog comprises five tabs: General; Color; Screening; Layout; and DuraChrome. General Tab RIP and Print / RIP only: select which operation to perform. Save / Delete File after RIPing: select whether to save the ripped file. The default setting is Save. 74 DuraChrome Operation Manual - 3e Ripping and Printing Save / Delete File after printing: select whether to save the printed file. The default setting is Save. Force Black Overprint: overprints all black elements, which helps to prevent small black text from knocking out the background color. Mirror: reverses the image, which is useful for some backlit and window graphic applications. Negative: creates a negative image, which is useful for screen-printing applications. Number of Copies: specify the number of copies to print. Color Tab Colorspace: select 4-color (CMYK), 3-color (CMY), or monochrome (grayscale). For images containing black text or vector fills, select 4-color. Use 3-color for photographic images. For images using spot colors, select 4-color or 3-color. Type: CMYK will all default to Process. If spot colors were assigned in the design software, they will appear as Spot. The spot colors can be changed to As Process if the spot color ribbons are not available. Cassette Number: refers to the ribbon ID number indicated on the top of each cassette. Be sure these numbers are accurate. Default settings are : Cyan#1, Magenta#2, Yellow#3, Black#4, Red#5, Green#6, Blue#7, Orange#8, White #9. Double-click on the numbers, or Unknown to display a drop-down menu of alternate numbers. DuraChrome Operation Manual - 3e 75 ColorControl RIP Software Print Order: specify the order in which the color planes will be printed. Normally, process color prints will print YMCK, which is the default setting. Double-click on the numbers, or Unknown to display a drop-down menu of alternate numbers. Screening Tab Dithering: select PostScript, Stochastic, or Error-diffusion dithering patterns from the drop-down list. Select PostScript, which uses conventional halftone screening. Screening: Use printers default screens (the default setting) or specify the Frequency, Angle and Dot shape for each ink color. Summa recommends using the same dot shape for all inks. 76 DuraChrome Operation Manual - 3e Ripping and Printing Layout Tab Output Size: scale the EPS file to any size or specify a page size. Enable Constrain to constrain the proportions of the image during re-sizing. Tiling: If the image is to be tiled, specify the tile size and the amount of overlap between each tile. Select Autotile to use to the maximum print width. ColorControl will print each tile as a separate file. DuraChrome Operation Manual - 3e 77 ColorControl RIP Software DuraChrome Tab Horizontal Offset: specify the printing point of origin, the distance away from the left-hand edge of the media. Job Name (optional): specify the name the printer will call the file in the printers queue. Use Compression: compresses raw printer data to reduce the time it takes to transfer data. Summa recommends enabling this function to accelerate data transfer speed. Use DuraChrome UCR/GCR: undercolor removal and gray component replacement, a color separation process that determines the amount of blank ink used to replace CMY in areas where those three inks overlap. The default setting is enabled when specifying a 4-color process in the Color Tab. Masking: provides a variety of methods for creating see-through window graphics. Select the masking pattern circle, square, horizontal line, or vertical line. Summa recommends the horizontal line pattern for best results because it is most compatible with the direction of the printhead passes. 78 DuraChrome Operation Manual - 3e Ripping and Printing Also, select the masking pattern size and the number of cassettes that will create the mask. For most applications, a 2-cassette mask is ideal, which consists of a double layer of black, then a layer of white. The masking cassettes also need identification number ascribed to them. Be sure the ribbon ID bars on the masking cassettes are accurately positioned. DuraChrome Operation Manual - 3e 79 80 DuraChrome Operation Manual - 3e Printing Section headings... Pausing and Cancelling Prints Storing Prints in the Queue Storing Prints in the Library Deleting Files from the Queue and Library Reprinting Files from the Queue Reprinting Files from the Library Changing the Order of Files in the Queue DuraChrome Operation Manual - 3e 81 Printing Pausing and Cancelling Prints Prints can be paused or cancelled at any time. Pausing Prints While the LCD reads PRINTING, press the PAUSE key. The printer carriage will complete the current pass, then the printer will pause. Press the PAUSE key again to resume printing. Cancelling Prints While the LCD reads PRINTING, press the PAUSE and CANCEL keys at the same time. The LCD will ask for confirmation. Press the SELECT key to confirm. Press the CANCEL key to cancel. The carriage will complete the current pass, then the printer will stop. To advance the media, and to remove the cancelled print, press the PAUSE key, then the FEED key to advance the media. 82 DuraChrome Operation Manual - 3e Storing Print Files in the Queue Storing Print Files in the Queue Once the Disk Queuing function is turned on, any print files sent to the printer will be stored in the Queue as TEMP files. Once the power has been turned off, however, those print files are erased. When Disk Queuing is enabled, the printer will take a longer time to print a single print file because the file must first be written to the hard disk. When reprinting capabilities are not needed, its more efficient to leave the Disk Queuing function turned OFF. The default setting is OFF. TEMP files remain accessible (for reprinting) in the Queue until they are done printing. Then, they are accessible in the Library. 1. Press the PAUSE key to pause the printer. 2. Press the SETUP key to enter the Setup Menu. Use the arrow keys to scroll to the General Settings submenu. SETUP GENERAL SETTINGS 3. Press the SELECT key. Use the arrow keys to scroll to the Disk Queuing screen. The current setting is displayed. DISK QUEUING OFF 4. Press the SELECT key again. The current setting will blink off and on. Use the arrow keys to turn Disk Queuing OFF or ON. Note: while the new setting is still blinking, the operator can revert to the previous setting by pressing the CANCEL key. 5. Press the SELECT key one last time to store the setting. DuraChrome Operation Manual - 3e 83 Printing Storing Print Files in the Library Print files can be stored permanently on the printers internal hard disk as DEMO files. These files remain stored on the hard disk even after the power has been turned OFF. Disk Queuing must be turned ON to store files in the Library. Once the file has been sent to the DuraChrome and printing is complete, access the Prints Library. 1. Press the PRINTS key. Use the arrow keys to scroll to the LIBRARY screen. PRINTS LIBRARY 2. Press SELECT. Use the arrow keys to scroll to the desired file. Press SELECT again. FILENAME DIMENSION 3. TEMP The REPRINT screen will flash off and on. FILENAME REPRINT 4. Press the Up or Down arrow key to switch to the SAVE AS DEMO screen. FILENAME SAVE AS DEMO 5. 84 Press SELECT. The LCD will ask for confirmation. SELECT confirms. CANCEL cancels. DuraChrome Operation Manual - 3e Deleting Files from the Queue and Library Deleting Files from the Queue and Library Files stored in the Queue as TEMP files are deleted once the power is turned OFF. Files stored permanently in the Library as DEMO files can be deleted by accessing the Prints Library. 1. Press the PRINTS key. Press the UP arrow to scroll to the Library. PRINTS LIBRARY 2. Press SELECT. Use the arrow keys to scroll to the print to be deleted. FILENAME DIMENSION 3. DEMO Press SELECT. The REPRINT screen will appear. FILENAME REPRINT 4. Use the arrow keys to scroll to the TOGGLE DEMO-TEMP screen. The display will continue to flash off and on. TOGGLE DEMO-TEMP FILENAME DEMO 5. Press SELECT to toggle between DEMO and TEMP. Press PAUSE when the desired attribute is displayed. Remember, TEMP files are deleted once the power has been cycled. DuraChrome Operation Manual - 3e 85 Printing Reprinting Files from the Queue Print files remain in the Queue only while the file is being printed. Then, those files are temporarily stored in the Library as TEMP files. 1. While the file is printing, press the PRINTS key to enter the Prints Menu. 2. Use the arrow keys to scroll to the Prints Queue submenu. Press the SELECT key to enter the submenu. FILE NAME COPY: 1 3. 0 OF 1 Use the arrow keys to scroll through all the print files stored in the Prints Queue. Once the desired print file is displayed, press the SELECT key. The LCD will prompt the operator to enter the number of copies to reprint. FILE NAME CHANGE COPY? 4. 86 2 Press the SELECT key again. The display will blink off and on. Use the arrow keys to change the number of copies. Press the SELECT key to enter the number and begin printing. Press the CANCEL key to revert to the previous setting. DuraChrome Operation Manual - 3e Reprinting Files from the Library Reprinting Files from the Library 1. Press the PRINTS key to enter the Prints Menu. Use the arrow keys to scroll to the Prints Library submenu. PRINTS LIBRARY 2. Press the SELECT key to enter the Library. Use the arrow keys to scroll through all the TEMP and DEMO files stored in the Library. FILE NAME 50” x 38” 3. DEMO Once the desired print file is displayed, press the SELECT key. The LCD will flash this message: FILE NAME REPRINT? 4. Press the SELECT key again. The LCD will prompt the operator to enter the number of copies to reprint. Use the arrow key to change the number of copies to be reprinted. Press the SELECT key to enter the number. FILE NAME CHANGE COPY? 5. 1 The LCD will ask for confirmation. SELECT confirms. CANCEL cancels. FILE NAME ARE YOU SURE? DuraChrome Operation Manual - 3e 87 Printing Changing the Order of Files in the Queue When more than one file is stored in the Queue, the printer will print them in the order they were received. The operator can change this order, however, by using the Move to #1 function within the Prints Menu. 1. Press the PRINTS key to enter the Prints Menu. Use the arrow keys to scroll to the Prints Queue screen. PRINTS QUEUE 2. Press the SELECT key. Use the arrow keys again to scroll through the print files waiting in the Queue. At the desired print file screen, press the SELECT key again. FILE NAME COPY 2 QUEUED 3. Use the arrow keys to scroll to the MOVE to #1 screen. Press the SELECT key. The print file is now the next file in line to be printed. FILE NAME MOVE TO #1 88 DuraChrome Operation Manual - 3e Maintenance Section headings... Cleaning the Printer Cleaning the Printhead Cleaning the Pinch Rollers Cleaning the Media Drive Rollers Changing the Printhead DuraChrome Operation Manual - 3e 89 Maintenance Cleaning The printers body panels should be dusted regularly using a soft cloth. Use a soft cloth moistened with water and a mild detergent to remove any stains on the body panels. CAUTION... Do not use aerosol cleaners, abrasive cleaners, or any strong solvents to clean any part of the printer. Unplug the printers power cord before cleaning it with dampened cloths. Do not let any fluids drip into the printers enclosure. Printhead The printhead accumulates dust, debris and resin residue, which can all degrade print quality. The printer will automatically self-clean the printhead upon initialization and after each successive hour of operation. The self-cleaning procedure involves brushing the printhead surface against the cleaning pad at the far right-hand end of the platen. The self-cleaning procedure can also be initiated manually: 1. Press PAUSE. Then, press the RIBBONS key. 2. Press SELECT. Use the arrow keys to switch to the HEAD CLEANING screen. Press SELECT twice to begin the self-cleaning procedure. HEAD CLEANING NOTE... If the blue cleaning pad at the far right-hand end of the platen begins to show signs of wear, it can be turned around and turned over to provide a fresh surface for cleaning. Cleaning pads normally last several years before wearing out. Contact Summa directly to order a new pad. While this procedure removes much of the residue and debris, the printhead will sometimes require manual cleaning, particularly after a ribbon breakage, where large pieces of ribbon material might be caught underneath the carriage. 90 DuraChrome Operation Manual - 3e Cleaning the Printhead Use a lint free cloth, or gauze, moistened with isopropyl alcohol. Open the front cover and reach under the carriage as shown here. The carriage should not be holding a ribbon cassette. Gently wipe the printhead, the head plate, and the head roller. Take note of the location of these three parts in the figure on the next page. The parts are not readily visible from outside of the printer. Avoid touching any other internal parts of the printer with a moistened cloth. Carriage Head Plate Printhead Head Roller DuraChrome Operation Manual - 3e 91 Maintenance Pinch Rollers and Media Drive Rollers Dust and debris will accumulate on the pinch rollers and media drive rollers. Regularly wipe the rollers with a dry, soft cloth to prevent the dust and debris from being transferred to the media. Pinch rollers Media drive rollers 92 DuraChrome Operation Manual - 3e Changing the Printhead Changing the Printhead The thermal printhead in the printer may require replacement, due to accidental damage or excessive wear. The procedure comprises the following steps: • • • • • • Remove the carriage Exchange printheads Install the carriage Enter configuration data into the printer Enter new parameter settings into the printer Align the carriage The following tools are necessary to complete the procedure: • • • Phillips head screwdriver Hex wrench, 4mm Utility knife Remove the Carriage 1. Turn the power OFF. Remove the four screws securing the top cover. Lift the top cover and prop it open. 2. Remove the front cover. Two pairs of screws secure the cover at either end. Loosen either pair and allow the pin to recess, out of the pivot hole. Then, pull the cover out. 3. Remove the two screws securing the carriage cover. Remove the carriage cover. 4. There are two cable clusters running from the carriage drive mechanism to the carriage itself. Undo the cable clasp to release the cables. Then, reach inside the carriage and disconnect the data ribbon cable and the power cable cluster. Take note of where these cables connect. The cables must be reconnected the to the new carriage in the same way. Caution: do not pull on the wires, grasp the plastic connectors and pull gently. DuraChrome Operation Manual - 3e 93 Maintenance Disconnect the power cable cluster. Do not pull on the wires. Grasp the plastic connector and pull gently. Disconnect the data ribbon cable. Do not pull on the cable. Grasp the plastic connector and pull gently. 94 DuraChrome Operation Manual - 3e Changing the Printhead 5. Remove the four hex screws on the top of the carriage. Use the 4mm hex wrench to remove the four hex screws. Two of the screws are located at the rear of the carriage, behind the carriage support beam. Carriage traverse beam 6. Hex screw Slide the carriage cap to the left, separating it from the carriage. Then, lift the carriage out of the printer. Carriage cap slid to the left. DuraChrome Operation Manual - 3e 95 Maintenance Exchange the Printheads 1. Rest the carriage on its side. Reach through the top of the carriage and manually turn the gear inside to lower the printhead, out of the carriage. Manually turn the gear to lower printhead. 2. Now set the carriage upside down. 3. Remove the two hex screws securing the printhead to the slide plate. Two hex screws 4. 96 Slide Plate On the underside of the printhead, there is a data ribbon cable, a power cable cluster, and a 3-wire ribbon end sensor cable. Disconnect the data ribbon cable and the power cable cluster. Do not pull on the wires. Grasp the plastic connectors and pull gently. DuraChrome Operation Manual - 3e Changing the Printhead 5. Reach inside the carriage, to the carriage circuit board and disconnect the 3-wire ribbon end sensor cable from the circuit board at J79. 6. Inspect the new printhead and the accompanying floppy diskette. Be sure the serial number on the surface of the printhead matches the number printed on the floppy diskette and the number printed on the carriage information label. Affix the new information label to the carriage where the previous one was. 7. Reconnect the data ribbon cable first. Be sure the small ridge on the top side of the connector is facing upward. Be sure the cable is installed evenly into position. Improperly connected data ribbon cables can cause damage to the printhead. 8. Reconnect the 6-wire power cable cluster. Be sure all six pins are properly and fully installed. Improperly connected power cable clusters can cause damage to the printhead. 9. Feed the 3-wire ribbon end sensor cable inside the carriage, along side the data ribbon cable. Reconnect the cable to the circuit board at J79. Route the ribbon end sensor cable beneath the housing Housing 10. Mount the printhead to the slide plate and replace the hex screws. DuraChrome Operation Manual - 3e 97 Maintenance 12. Raise the printhead within the carriage by manually turning the head gear. IMPORTANT! Do not adjust any other screws on the carriage unit or the printhead unit. These are calibrated in the factory. Install the New Carriage 1. Place the new carriage in the printer, resting it on the two pinch rollers. Replace the four hex screws at the corners of the carriage cap. 2. Reconnect the data ribbon cable and the power cable cluster. Secure both cables with the cable clasp. 3. Place the Alignment Label over the union of the top plate and the carriage. Then, cut through the center of the label, in the seam of the two components. This label will be used later on in the procedure to align the carriage. Cutting the label in half establishes a specific starting point, with the ZERO line matched up. Cable clasp 98 DuraChrome Operation Manual - 3e Alignment Label cut through center line. Changing the Printhead Enter Configuration Data into the Printer 1. Turn the printer OFF. Connect the computer via the parallel port. 2. Insert the printhead configuration floppy disk into the computers floppy drive. 3. Holding down the SELECT and SETUP keys, turn the printer ON. Once Initializing appears on the LCD, release the keys. The LCD will then read: REWRITE FLASH / ENTER SETUP KEY. Press the SETUP key. 4. The LCD will read: REWRITE FLASH / TRANSFER DATA. 5. At the PC, double-click on the My Computer icon, then the floppy drive icon. There should be three files on the disk. Double-click on the SETUP.bat file. 6. An MS-DOS window open automatically. Follow the onscreen instructions. The SETUP batch file will send the other two files to the printer. After the first file (head profile data) is sent, the printer LCD will read REWRITE PRT TBL1 / ENTER SELECT KEY. Press SELECT. 7. The MS-DOS window and the printer LCD will instruct the operator to turn the printer OFF. 8. Leave the MS-DOS window open. At the printer, hold down the SELECT and SETUP keys and turn the power on. The LCD will read: REWRITE FLASH / ENTER SETUP KEY. 9. Press SETUP. Return to the computer and follow the onscreen instructions to send the second file. The printer LCD will instruct the operator to press SELECT to initiate the file writing. Once the file is transferred, restart the printer. Enter New Parameter Settings into the Printer 1. Turn the printer ON. Press PAUSE. Then, press CANCEL and SETUP at the same time. The LCD will read: SERVICE MODE TEST PRINTS DuraChrome Operation Manual - 3e 99 Maintenance 2. Use the arrow keys to scroll to the Adjustment submenu. SERVICE MODE ADJUSTMENT 3. Press SELECT. Use the arrow keys to scroll to the following screens. At each screen, press SELECT. The display will begin flashing. Use the arrow keys to change the displayed value to values indicated on the printhead configuration data diskette. Once the correct value is displayed, press SELECT again and the display will stop flashing. HEAD RESISTANCE VALUE XXXX SENSITIVITY VALUE RES XX TEMP ADJUSTb RES VALUE XX Align the Carriage 1. Turn the printer ON. Wait for initialization to complete. Press the Prints key. Use the arrow keys to scroll to the LIBRARY screen. Press SELECT. PRINTS LIBRARY 2. Use the arrow keys to scroll to the TOOLAL48 print file. If media less than 48 wide is loaded in the printer, select TOOLAL36. Do not use media narrower than 36 to align the carriage. At the appropriate print file, press SELECT. TOOLAL48 REPRINT? 100 DuraChrome Operation Manual - 3e Changing the Printhead 3. Press SELECT again. The LCD will prompt the user to enter the number of copies to print. Print only one copy. Press SELECT again. The LCD will ask for confirmation. Press SELECT one final time to begin the print. 4. The print will appear similar to one pictured below. 5. Inspect the ZERO line of the print. The ZERO line should be the straightest, most continuous line in the print. If it is not, the carriage is out of alignment. Determine which direction the carriage needs to be rotated to make the ZERO line perfectly straight. 6. Loosen the two phillips head screws securing the front latch on the carriage. Then, loosen the four hex screws securing the carriage cap to the carriage, as shown on the next page. DuraChrome Operation Manual - 3e 101 Maintenance Loosen four Hex screws, two in front, and two behind the traverse beam. Also, loosen the two phillips head screws on the front latch. 7. Alignment Label Inspect the carriage alignment label. The ZERO line is the straightest and most consistent. Now, inspect the alignment test print. Determine which line is straightest. If the (-2) line is straightest, for example, the carriage will need to be rotated clockwise until the corresponding (2) line on the alignment label lines up straight. 102 8. Secure the two phillips head screws, then secure the four hex screws. 9. Reprint the TOOLAL48 test print to confirm results. Repeat steps 3-9 until results are satisfactory. DuraChrome Operation Manual - 3e Troubleshooting Section headings... Alarm Messages Error Messages Print Quality DuraChrome Operation Manual - 3e 103 Troubleshooting Alarm Messages Alarm messages on the keypads LCD all begin with the letter A. If the Buzzer is enabled (see Setup section), the alarm will also sound. Press the SELECT key to stop the Buzzer. Press the CANCEL key to cancel any alarm message. Message Display Problem, Solution A03 COVER OPEN CLOSE FRONT The front cover is open. Press SELECT, then close the cover. Press CANCEL. PAUSE the printer to open the front cover without activating the alarm. A04 COVER OPEN CHANGER COVER The ribbon changer cover is open. Press SELECT to stop the buzzer. Close the cover. Press CANCEL. A06 RIBBON ALARM RIBBON MISFEED The ribbon has been misfed. Press SELECT to stop the buzzer. Open the ribbon changer cover and replace the cassette beside the blinking LED. Press CANCEL. Then, open the faulty cassette and inspect the ribbon for any irregularities. Broken or wrinkled ribbons will cause this alarm message to appear. A08 CASS ALARM EJECT BY HAND The carriage is not able to store the ribbon cassette. Press SELECT to stop the buzzer. PAUSE the printer. Open the front cover. Manually push the cassette into the storage tray. Press CANCEL. A09 CASS ALARM LOAD BY HAND The carriage is not able to retrieve the ribbon cassette. Press SELECT to stop the buzzer. PAUSE the printer. Open the ribbon changer cover. Manually push the cassette onto the carriage. Press CANCEL. A13 MEDIA END SET NEW ROLL The printer has run out of media. Press SELECT to stop the buzzer. Load a new roll of media. Press CANCEL. A17 MEDIA ALARM ROLL SHORTAGE There is not enough media remaining on the roll for the next print file. Press SELECT to stop the buzzer. Load a new roll of media. Press CANCEL. 104 DuraChrome Operation Manual - 3e Alarm Messages A18 MEDIA ALARM MEDIA DRIFTING A22 CHANGER FULL PLEASE REMOVE 1 The media is not feeding into the printer correctly. Press SELECT to stop the buzzer. Check to see whether the media is loaded properly. Reload the media if necessary. Press the CANCEL key. There are already eight ribbon cassettes in the printer. One of them is on the carriage. Press SELECT to stop the buzzer. Remove one or more cassettes, then reload. Press CANCEL. A26 RIBBON ALARM CASSETTE EMPTY One of the ribbon cassettes is empty. Press SELECT to stop the buzzer. Remove the cassette beside the flashing LED. Refill the ribbon and reload it into the printer. Refer to the Ribbons section of this manual. Press CANCEL. A33 COMAND ALM COPY: QUEUE OFF When printing multiple copies of a file stored in the printer, the Disk Queuing function must be turned ON. DuraChrome needs data stored on the local disk. Press SELECT then CANCEL. A34 COMAND ALARM PAGE > MEDIA SIZE The Media Width setting is narrower than the page size received from the computer. Press SELECT to stop the buzzer. Change the Media Width setting accordingly. Press CANCEL, cycle the printers power, then re-send the print file. A35 PRINT ALARM There is not enough disk space remaining to process the ribbon DISK SPACE LOW offsetting procedure. Press SELECT to stop the buzzer, then CANCEL to clear the error. Delete files to free up disk space. A36 RIBBON ALARM A previous ribbon alarm was not properly cleared. Press SELECT CHECK CASSETTE to stop the buzzer. CANCEL to clear the error. A37 COMAND ALARM QUEUE: QUEUE OFF Disk Queuing has been turned off while the software is attempting to spool the print file. Press SELECT to stop the buzzer. Press CANCEL to clear the ERROR. Turn Disk Queuing ON. A38 COMAND ALARM INVALID FILENAME An invalid character was used in the file name. Change the file name. Valid characters are all uppercase letters and the following: ! @ # $ %. Do not use commas or periods. Press SELECT to stop the buzzer. Press CANCEL to clear the error. DuraChrome Operation Manual - 3e 105 Troubleshooting Error Messages Error messages on the keypads LCD all begin with the letter E. Press the CANCEL key to cancel any error message, then cycle power on the printer to clear the error. Solutions given here are for most cases. If the error persists, make note of the message and contact the dealer for technical support. Message Display Problem, Solution E01 PCB ERR LC ROM LC ROM checksum error. Press CANCEL. Cycle power on the printer. E02 PCB ERR LC RAM LC RAM write and verify test error. Press CANCEL. Cycle power on the printer. E03 FLASH ERR SIGNATURE Flash ROM signature code read error. Press CANCEL. Cycle power on the printer. E04 FLASH ERR ERASE xxxxh Flash ROM erase error. Press CANCEL. Cycle power on the printer. E05 FLASH ERR WRITE xxxxh Flash ROM write error. Press CANCEL. Cycle power on the printer. E06 PCB ERR LC INVALID INT Invalid logical control CPU interrupt occurred. Press CANCEL. Cycle power on the printer. E07 PCB ERR LC EEPROM Logical control CPU EEPROM write error. Press CANCEL. Cycle power on the printer. E08 PCB ERR LC WATCHDOG TIMR Logical control CPU watchdog timer interrupt occurred. Press CANCEL. Cycle power. E09 LEVEL ERR VOLTAGE 12 OR 24 Printhead voltage is out of range. Press CANCEL. Cycle power. E10 SENSOR ERR CARRIAGE FEED Carriage overrun was detected. Press CANCEL. Cycle power. 106 DuraChrome Operation Manual - 3e Error Messages E11 POSITION ERR CARRIAGE FEED Internal position error detected. Press CANCEL. Cycle power. E12 DRIVE ERR CARRIAGE FEED The Encoder Pinch Roller is not engaging the media. Press CANCEL. Cycle power. Place the encoder in the center of the media. Refer to the Media Section. E13 LOCK ERR CARRIAGE FEED Carriage is locked. Press CANCEL. Cycle power. E14 PCB ERR MC I/O Protocol error between LC and MC. Press CANCEL. Cycle power. E15 PCB ERR MC TIMEOUT MC timeout occurred. Press CANCEL. Cycle power. E16 PCB ERR MC ROM MC ROM checksum error. Press CANCEL. Cycle power. E17 PCB ERR MC RAM MC RAM writes and verifies error. Press CANCEL. Cycle power. E18 PCB ERR MC ADC MC A/D converter error. Press CANCEL. Cycle power. E19 PCB ERR MC LCD MC LCD access error. Press CANCEL. Cycle power. E20 PCB ERR MC WATCHDOG TIMR MC watchdog timer interrupt occurred. Press CANCEL. Cycle power. E22 PCB ERR MC INVALID INT Invalid MC interrupt occurred. Press CANCEL. Cycle power. E22 POSITION ERR MEDIA FEED Media feed error. Press CANCEL. Cycle power. E23 SENSOR ERR HEAD UP/DOWN Irregular head load/unload status. Press CANCEL. Cycle power. E24 SENSOR ERR PINCH ROLLER Irregular status of pinch roller sensor. Press CANCEL. Cycle power. DuraChrome Operation Manual - 3e 107 Troubleshooting E25 SENSOR ERR MEDIA PRESSURE Irregular status of media pressure sensor. Press CANCEL. Cycle power. E26 PCB ERR PRINT BUFFER Write/verify error from print buffer. Press CANCEL. Cycle power. E27 PCB ERR IMAGE BUFFER Write/verify error from image buffer. Press CANCEL. Cycle power. E28 PCB ERR DATA TRANSFER Data transfer error. Press CANCEL. Cycle power. E29 INTRFACE ERR COMMAND HANDLER Command received is not supported. Press CANCEL. Cycle power. If error persists, remove the internal HDD, turn Disk Queuing off, and on the next print job, do not send a Job Name within the ColorControl print dialog box. E30 PCB ERR SCSI IC INITIAL SCSI IC initialize error. Press CANCEL. Cycle power. E31 PCB ERR SCSI IC SCSI IC status is unknown. Press CANCEL. Cycle power. E32 PCB ERR SCSI IC TIMEOUT SCSI IC has timed out. Press CANCEL. Cycle power. E33 PCB ERR SCSI IC TRANSFER Older version PCB. The xxh is the PCB version. Press CANCEL. Cycle power. E34 PCB ERR MC STATUS xxh HDD initializing has failed. The xxxxh is the HDD error code. Press CANCEL. Cycle power. E35 PCB ERR VERSION xxh Older version PCB. The xxh is the PCB version. Press CANCEL. Cycle power. E36 HDD ERR INITIALIZE xxxxh HDD initializing has failed. The xxxxh is the HDD error code. Press CANCEL. Cycle power. E37 HDD ERR FORMAT xxxxh HDD formatting has failed. The xxxxh is the HDD error code. Press CANCEL. Cycle power. 108 DuraChrome Operation Manual - 3e Error Messages E38 HDD ERR FAT xxxxh File Allocation Table (FAT) was destroyed. The xxxxh is the HDD error code. Press CANCEL. Cycle power. E39 FILE ERR OPEN xxxxh File open error. ColorControl truncates file names. If two files are thusly given the same name, this error message will occur. Change one of the file names. The xxxxh is the HDD error code. Press CANCEL. Cycle power. E40 FILE ERR CLOSE xxxxh File close error. The xxxxh is the HDD error code. Press CANCEL. Cycle power. E41 FILE ERR DELETE xxxxh File delete error. The xxxxh is the HDD error code. Press CANCEL. Cycle power. E42 FILE ERR WRITE xxxxh File write error. The xxxxh is the HDD error code. Press CANCEL. Cycle power. E43 FILE ERROR READ xxxxh File read error. The xxxxh is the HDD error code. Press CANCEL. Cycle power. E44 HDD ERROR HARD DISK FULL Insufficient disk space or HDD not present. Press CANCEL. Cycle power. E46 CONECT ERROR Carriage cable could be disconnected, or connected improperly. Printhead could be expired or shorted. If print quality has also CARRIAGE CABLE begun to degrade, the printhead is most likely expired and needs to be replaced. Press CANCEL. Cycle power. DuraChrome Operation Manual - 3e 109 Troubleshooting Print Quality The printer may encounter one or more of the following print quality problems, which are easily solved. Summa can support the print quality only on the approved media listed at the end of the Media section of this manual. If the solutions provided here do not solve the print quality problem, contact Summa Technical Support. Please be prepared to provide sample prints of the problem on the approved media. Dropout Problem: Resin transfer appears faint or weak, particularly in dark fill areas just beyond a faint fill area. The printhead is not receiving sufficient energy. Notice the grainy, incomplete resin transfer 110 DuraChrome Operation Manual - 3e Print Quality Solution: Be sure the Print Density setting is not set too low. The default setting is 6. Try to increase the Print Density setting by a single point, then check results. Refer to Adjusting Print Density in the Media section of this manual. If wrinkling occurs (refer to next page), lower Print Density back to 6 and contact Summa Technical Support. Wrinkles, Distortions in Ribbons Problem: The printhead is receiving too much energy. Ribbon material is melting and distorting, causing wrinkles in the print. Notice the scratch-like irregularities. Solution: Be sure the Print Density setting is not set too high. The default setting is 6. Try to decrease the Print Density setting by a single point, then check results. Refer to Adjusting the Print Density in the Media section of this manual. If dropout occurs (refer to previous page), raise the Print Density back to 6 and contact Summa Technical Support. DuraChrome Operation Manual - 3e 111 Troubleshooting Apparent Seams between Printhead Passes Problem: The Media Feed value is inaccurate. The Media Feed value must be reset each time media is loaded, particularly when the media width changes. Solution: Print the Media Feed test print and adjust the Media Feed value accordingly, as described in the Media section of this manual. Be sure the media is loaded properly and straight, as described in the Media section of this manual. Also, check to see that the center encoder pinch roller is secured and positioned properly. Please note that the seams between printhead passes will always be visible close-up. In some images that contain large solid fills the seams will be more apparent. In highly detailed photographs, the seams are less noticeable. For large-format graphics, please use the 20/20 rule for judging the printers print quality. Inspect the image from 20 feet away and imagine it moving past at 20 miles per hour. Notice the gaps between printhead passesexcessive Media Feed 112 DuraChrome Operation Manual - 3e Print Quality Horizontal Lines in Prints Horizontal lines running through the prints are most often caused by dust or debris on the printhead or media. Clean the printhead as described in the Maintenance section of this manual. If the printer has recently broken a ribbon, some debris may be stuck to the printhead surface. It may be necessary to remove the carriage, as described in Changing the Printhead in the Maintenance section, and inspect the printhead surface for debris. Use a piece of gauze moistened with isopropyl alcohol. Also, keep the operating environment as clean as possible. Close all printer covers. Store media in a dust-free environment. Always wear media handling gloves when loading the media. DuraChrome Operation Manual - 3e 113 114 DuraChrome Operation Manual - 3e Menu Maps Section headings... The Setup Menu The Media Menu The Ribbons Menu The Prints Menu DuraChrome Operation Manual - 3e 115 Menu Maps The Setup Menu DURACHROME PAUSED SETUP DIAGNOSTICS SETUP GENERAL SETTINGS see sidebar note... DISPLAY LANGUAGE ENGLISH DISPLAY UNIT CENTIMETER PARALLEL PORT EPP SCSI ID 5 DISK QUEUING OFF BUZZER ON 116 DuraChrome Operation Manual - 3e NOTE... The Setup Menu comprises the General Settings submenu and the Diagnostics submenu. The Diagnostics submenu is only used under special circumstances. Refer to About the Diagnostics Submenu at the end of the General Settings section of this manual. Media Menu The Media Menu DURACHROME PAUSED MEDIA FEED VALUE 00 PRINT DENSITY VALUE 6 MEDIA LENGTH 50m MEDIA WIDTH 127 cm FEED VALUE TEST PRINT DuraChrome Operation Manual - 3e 117 Menu Maps The Ribbons Menu DURACHROME PAUSED HEAD CLEANING RIBBON STATUS CASSETTE: 4 Storage Locations 1 2 3 4 4 3 2 1 Ribbon ID Numbers 5 6 7 8 Amount of Ribbon Remaining The Prints Menu DURACHROME READY PRINTS LIBRARY 118 PRINTS QUEUE DuraChrome Operation Manual - 3e Prints Menu PRINTS QUEUE FILE NAME #1 COPY: 1 FILE NAME CHANGE COPY? 0 OF 1 FILE NAME XX COPY: 3 QUEUED FILE NAME MOVE TO #1 FILE NAME DELETE PRINTS LIBRARY FILE NAME #1 35 X 40 cm DEMO FILE NAME XX 20 X 30 cm TEMP FILE NAME REPRINT? FILE NAME SAVE AS DEMO FILE NAME CHANGE COPY? DuraChrome Operation Manual - 3e 2 119 Index Index F A FEED key - 10 flanges - 36, 38 front cover - 6, 11 Adobe Photoshop - 67 alarm buzzer - 11, 32 alarm LED - 10 alarm messages - 11, 102 anatomy - 6 approved media - 48 Arrow keys - 9 G general settings - 27 H B basics - 5 C Cancel key - 9 cancelling prints - 80 changing the printhead - 91 cleaning - 88 ColorControl RIP Software - 55 connecting to a computer - 21 CorelDRAW - 63 D data interface ports - 7, 21 deleting prints from HDD - 83 Diagnostic submenu - 34 Disk Queuing - 31 Display Language - 28 Display Units - 29 E ECP - 21 encoder pinch roller - 8 environmental conditions - 21 error messages - 104 120 HDD - 6, 12 HDD LED - 10 humidity - 21 hardware lock - 56 K keypad - 9 L LCD - 9 language - 28 Library - 84, 85 loading media - 36 loading ribbons - 50 M media feed - 45 media feed test print - 45 Media key- 9 media length - 44 media supply bar - 7 media take-up bar - 6 media width - 43 menus - 113 DuraChrome Operation Manual - 3e Index N S nesting - 33 O operating environment - 21 P SCSI input/output - 21, 30 Select key - 9 Setup key - 9 spot colors - 58 spot color palettes - 58 T panelling images - 76 parallel port - 21, 30 Pause key - 9 pausing prints - 80 pinch rollers - 8 platen - 8 power on/off - 22 pressure plate - 8, 41 pressure shaft - 8 print density - 47 print quality - 108 printhead - 91 printing - 79 Prints key - 9 Prints Library - 84, 85 Prints Queue - 31 TEMP files - 31 temperature - 21 top cover - 6 troubleshooting - 101 U units - 29 W wrinkling in ribbon material -109 Q Queue - 31 Quick Start Guide - 23 R refilling ribbon cassettes - 52 ribbon changer cover - 7 ribbon ID numbers - 54 ribbon ID system - 54 ribbon supply - 51 Ribbon key - 10 ripping and printing - 72 DuraChrome Operation Manual - 3e 121 NOTES... 122 DuraChrome Operation Manual - 3e NOTES... DuraChrome Operation Manual - 3e 123 NOTES... 124 DuraChrome Operation Manual - 3e