1
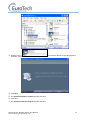
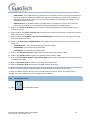
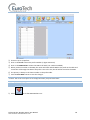
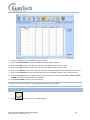
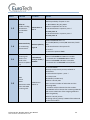
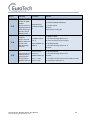
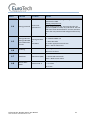
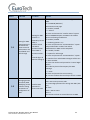
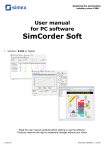
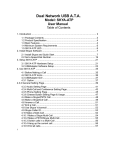
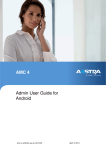
WINNER One Number Follow-Me Router User Manual Version 4.9 CONTENTS 1. OVERVIEW .......................................................................................................................... 4 1.1. Packing List ............................................................................................................... 4 1.2. Safety Guidelines ...................................................................................................... 5 2. QUICK START GUIDE ............................................................................................................ 6 2.1. General User Information ......................................................................................... 6 2.1.1. Placement of the Device ........................................................................................... 6 2.1.2. Interference to Medical and Personal Electronic Devices ........................................ 6 2.1.3. Antenna Considerations ........................................................................................... 6 3. INSTALLATION AND SETUP ................................................................................................... 7 3.1. STAGE 1 - Identifying Potential Sources of Interference .......................................... 7 3.2. STAGE 2 - Assessing the Subscriber Site ................................................................... 7 3.3. STAGE 3 - Installing the system ................................................................................ 8 3.4. STAGE 4 - Abstract .................................................................................................... 8 3.5. STAGE 5 - Programming ............................................................................................ 9 4. PROGRAMMING THE GSM ................................................................................................. 10 4.1. Software Installation............................................................................................... 10 4.2. Programming with the PC Software ....................................................................... 12 4.2.1. Connecting .............................................................................................................. 12 4.2.2. The FXO Port Configuration .................................................................................... 14 4.2.3. The FXS Port Configuration..................................................................................... 15 4.2.4. The GSM Port Configuration................................................................................... 16 4.2.5. The Prefixes Table ................................................................................................... 17 4.2.6. The Number List...................................................................................................... 18 4.2.7. The Control via SMS Setting ................................................................................... 19 4.2.8. The Gateway Setting ............................................................................................... 20 4.3. Programming the Unit with DTMF ......................................................................... 21 4.3.1. General Setting Parameters.................................................................................... 21 4.3.2. Browsing Between Main Menus ............................................................................. 22 4.4. List of Menus and their Functions .......................................................................... 23 4.4.1. Functions ................................................................................................................ 23 4.4.2. Menu Synopsis ........................................................................................................ 24 5. CONFIGURING THE ROUTER ............................................................................................... 33 5.1. Basic Configuration without PBX ............................................................................ 33 5.2. Options of Operation .............................................................................................. 33 5.3. Readdressing Incoming Calls from PSTN to GSM ................................................... 33 5.4. Configuration without PBX ..................................................................................... 34 5.4.1. Incoming PSTN Calls................................................................................................ 34 5.4.2. Incoming Calls from GSM ....................................................................................... 34 5.5. Call-Back to Incoming Calls from GSM.................................................................... 34 Follow-Me One Number Router User Manual www.eurotech-communication.com 2 5.6. 5.6.1. 5.6.2. 5.6.3. 5.6.4. Configuration with PBX ........................................................................................... 35 Configuration .......................................................................................................... 35 Incoming Calls from PBX Extension Line to GSM .................................................... 35 Incoming Calls from GSM to the Unit ..................................................................... 35 Outgoing Calls from Landline.................................................................................. 35 6. APPENDIX A....................................................................................................................... 36 6.1. Controlling the Router via SMS............................................................................... 36 6.1.1. Adding a New Cellular Number to the List ............................................................. 36 6.1.2. Erasing a Cellular Number from the List ................................................................. 36 6.1.3. Changing the Parameters for “Follow-Me” ............................................................ 36 6.1.4. Operating the Callback via SMS .............................................................................. 36 7. GENERAL TECHNICAL INFORMATION .................................................................................. 38 7.1.1. DTMF Dialing........................................................................................................... 38 7.1.2. Normal dialing tone ................................................................................................ 39 7.1.3. Congestion / Busy Tone .......................................................................................... 39 7.2. Enviromental Characteristics .................................................................................. 39 7.3. Labels ...................................................................................................................... 39 Follow-Me One Number Router User Manual www.eurotech-communication.com 3 1. OVERVIEW This user’s manual will help you installing your WINNER PSTN–GSM gateway unit, and it will provide you with basic guidelines to handle any problems that might arise. In general, the WINNER PSTN-GSM gateway provides a flexible and cost efficient connection between your LANDLINE Network and the GSM mobile networks. In essence, the device acts as a router that is programmed to choose the Least Cost Route when you make a call from your PSTN line to a cellular phone. The GSM gateway connects you to an extension and bypasses the telephone company thus significantly reducing overhead costs of telephone calls. Connect to your PBX or landline phone or even to a specific phone extension and you will save money on all calls by bypassing the telephone network and obtaining direct access to the GSM networks. Together, the embedded Wavecom Module and SIM cards which act as 'Smart' user ID cards that encrypt voice and data transmissions and store data about the specific user and personal phone settings, make the GSM gateway a cell phone in itself. The WINNER gateways are therefore an essential tool for cutting overhead costs of telephone bills as they allow direct access to the GSM networks and cut costs of airtime and interconnections. The WINNER PSTN-GSM gateways are intended for middle to large enterprises but can as well be installed on regular phone lines in your home or home office. There are certain features that may be relevant to the product you have selected and some that are not. However, all are discussed in the following manual. The WINNER One-Number FOLLOW-ME PSTN Router unit, when used with the appropriate telephone equipment (antenna, adapter, SIM cards, telephone PSTN line or LANDLINE-PBX) will function as an ordinary PSTN line and support the following features: Cost-saving routing of incoming calls GSM and PSTN interconnection via internal LCR 'Follow Me' call forwarder to your personal mobile Caller ID, LCD, RTC FXO/FXS interface Polarity Reverse Outstanding voice performance and echo cancellation ‘CallBack' 1.1. PACKING LIST When you receive your WINNER device please inspect the package to verify that you have the following: 1) One PSTN Router Unit. 2) 110/220V Electric Power converter to 12V with cables supplied. 3) GSM Antenna – To be installed to the PSTN Router Gateway. 4) Com Cable – To connect to the PC. 5) Two Screws – To mount the router on the wall. Follow-Me One Number Router User Manual www.eurotech-communication.com 4 6) CD – Containing the PC Management Software and User Manual. 1.2. SAFETY GUIDELINES For a safe and efficient operation of your WINNER gateway unit, please observe the following guidelines: Please read the installation instructions and safety guidelines in this user's manual carefully before installing the unit. Do not handle the equipment before disconnecting it from the electrical outlet Do not use any cleaning agents or detergents on any exterior or interior surfaces If you intend to clean the device, disconnect it from electrical outlet and use only a damp cloth. Do not position device in a damp place; do not expose to water. Do not expose to extreme temperatures: optimal operating temperatures are between -5° C to + 50°C Position equipment in a stable environment; any sudden fall or sharp movement may damage the device. Do not cover or stick any foreign objects in devices' openings or ventilation holes. Do not operate your device while any person is within 0.02m of the antenna. A person or object within 0.02m of the antenna could impair call quality and may cause the phone to operate at a higher power level than necessary Warning: Potentially Explosive Atmospheres. Do not operate the WINNER near blasting caps, or in a blasting area. Avoid the possibility of triggering an explosion Do not operate your device’s transmitter in a hazardous atmosphere: an explosion or fire may result. The telephone interface is not designed for outdoor application: The RJ-11 cable must not be run to an outdoor telephone; this minimizes equipment exposure to coupling or direct lightning surges. Follow-Me One Number Router User Manual www.eurotech-communication.com 5 2. 2.1. QUICK START GUIDE GENERAL USER INFORMATION 2.1.1. PLACEMENT OF THE DEVICE The WINNER GSM gateway unit is designed for installation on a vertical surface but may be mounted also on a wall. If you wish to mount the device on a wall follow these steps: 1) Remove the black metallic strip used for hanging the unit on the wall by sliding it out from the back of the WINNER unit. 2) Place the metallic strip on the wall to indicate the location of the screws. 3) Hold the strip to the wall and drill holes for the screws 4) Place the unit onto the wall by sliding the metallic strip back into its place. 2.1.2. INTERFERENCE TO MEDICAL AND PERSONAL ELECTRONIC DEVICES Most electronic equipment are shielded from RF energy. Nevertheless, RF energy from the WINNER transmitter may affect inadequately shielded electronic equipment. We therefore advise you to consult the manufacturer(s) of your medical and personal electronic device(s), (e.g. a pacemaker or hearing aid) to determine if they are adequately shielded from external RF energy. Do not install a WINNER gateway unit in a health care facility, if regulations posted in the area restrict the use of cellular phones. Hospitals and health care facilities may be using equipment that is sensitive to external RF energy. 2.1.3. ANTENNA CONSIDERATIONS Use only the supplied or approved antenna. An unauthorized antenna, modifications or attachments could affect call quality. Follow-Me One Number Router User Manual www.eurotech-communication.com 6 3. INSTALLATION AND SETUP The installation procedure consists of the following steps: STAGE 1: Identifying potential sources of interference STAGE 2: Assessing the subscriber site STAGE 3: Installing the system STAGE 4: Abstract STAGE 5: Programming the unit according to User Manual 3.1. STAGE 1 - IDENTIFYING POTENTIAL SOURCES OF INTERFERENCE The electronic circuitry of some telephones may be insufficiently shielded to operate properly with the WINNER gateway units. When making or receiving a phone call, if you hear a “humming” sound or noise in the earpiece of the telephone connected to the WINNER, or if any other party hears the hum or noise, move the telephone away from the WINNER. If moving it farther away has no effect, try using a different telephone. The WINNER is a two-way radio and as such, some occasional interference is unavoidable. For best results, choose an electrical outlet away from obstructions. Do not place the WINNER near items which may increase static, such as: Electrical appliances Lamps Microwaves TVs Fax Machines 4 Feet (1.2 meters) Computers 4 Feet (1.2 meters) Refrigerator Vacuum cleaner Light dimmers Fluorescent bulbs Motors Fans 3.2. STAGE 2 - ASSESSING THE SUBSCRIBER SITE The WINNER GSM gateway must be installed indoors: Basement installation is not recommended, it can be done, but you must use an external antenna. The device needs to be installed in a place in which the temperatures may not exceed the specified operating temperature range (see safety guidelines above). You should make sure that there is sufficient air movement. Installation in higher locations is preferred i.e. near windows and outer walls. Follow-Me One Number Router User Manual www.eurotech-communication.com 7 3.3. STAGE 3 - INSTALLING THE SYSTEM 1) Inspect the package, you should see: a unit gateway, an antenna, an adapter, a User Manual. Please note: the WINNER unit comes without the SIM card(s). 2) Connect the antenna at a distance greater than 1 meter from the unit. Location of the antenna is important in order to get best performances, thus once you turn the power on, make sure you have best reception and clear conversation with the unit. 3) Insert SIM card into the unit: In case of single channel unit, insert the SIM card in the designated slot (on the right side panel) adjacent to the antenna connection you will see a thin metallic black colored drawer. Use a small pointed object such as the point of a ballpoint pen into the little hole on the right side of that drawer/slot to open the drawer, then insert the SIM into that drawer (SIM face up) and close the drawer firmly. 4) Connect the gateway unit to a PBX telephone network or telephone line with a RJ-11 cable on the left side panel nearest to the LEDs. 5) Connect an ordinary analog telephone to the RJ-11 connector nearest to the power (pin 3 and 4 are used for Tip and Ring). 6) On the left side panel you will find the POWER socket. Connect the adapter (provided with unit) to the electrical outlet and then to the electrical socket. Note: The power input is 90 –260 VAC and the output is 12 VDC 1.2 Amp. 7) Wait 90 seconds for the unit to startup. 3.4. STAGE 4 - ABSTRACT The Eurotech Communication one-number 'Follow Me' PSTN to GSM router with the Call-Back/CallThrough feature availability is a clever device that attaches to your home or office telephone PSTN or line or PBX and forwards all incoming calls to your personal cell phone. 'Follow Me' enables you to accept phone calls from your office or home line on your mobile anywhere, anytime. Incoming telephone calls will be automatically forwarded to your mobile phone via the embedded LCR that utilizes a SIM card of the same GSM network to forward the call to your mobile phone. This device is more beneficial than similar services available from telephone companies as the inner SIM card enables you to remain in the same GSM network and thus cut costs of interconnections and high airtime charges by taking advantage of the lower tariffs of same GSM network calls. The Call-Back/Call-Through features enables you to enter up to 32 approved numbers that has the capability and the approval to enter into your organization’s PBX (i.e. the call will be made through your PBX which will provide a dial tone immediately for Call-Through or the unit will call you back, thus giving you a dial line Call-Back). These features will reduce the billing costs to your company up to 50% and more. This allows you to decide which employee (telephone number) will be entered and defined as Call-Back or Call-Through. The ROUTER device readdresses calls from the landline network to the GSM network and vice-versa. The readdressing of the calls to the appropriate GSM network is set according to the prefixes that were updated to SIM 1 and SIM 2. All other prefixes NOT updated in SIM 1 and 2 will be readdressed to the PSTN (landline). Follow-Me One Number Router User Manual www.eurotech-communication.com 8 Incoming call from PSTN can be redirected to the GSM network. User can set the number of rings from a local line after which the call can be re-directed to the GSM subscriber that was pre-set. If an incoming local call is answered PRIOR to the presetting of the required rings necessary to the deployment of the FOLLOWME feature, it is possible to connect this incoming local call to the GSM network in the following ways: Press ## and the incoming local call will be redirected to the GSM Number that was pre set in the Follow-Me mode. Press # and then the GSM number, followed by #, the call will be redirected to the above GSM number via the preset SIM. 3.5. STAGE 5 - PROGRAMMING Start the installation procedure of the Follow Me Call Back Router following the set-up and Installation as follows: 1) Entering programming mode Via PC or DTMF. 2) SIM Settings – regarding with usage limits and other optional modes 3) Follow-me settings – to let the system call you while you are away from your office as if you where in your office 4) Call Back Settings – to let waiting lines make the call when line is available again. Follow-Me One Number Router User Manual www.eurotech-communication.com 9 4. PROGRAMMING THE GSM General Rule Outgoing calls to GSM will be directed through either SIM 1 or 2 according to the prefixes. Incoming calls from GSM to PSTN will come from SIM 1 only. Incoming GSM call can be automatically directed to a landline subscriber First contact is made between the GSM network and the gateway and a ring tone is heard followed by dialing to a local subscriber. Another call to a local subscriber is possible without the need to disconnect the connection between the unit and the GSM (using the "Repeat Call" feature). Caller ID The unit will display on its LCD screen the number of the subscriber making the incoming call. It is possible to configure the redirection of the number to a local line. There are several options for controlling the call disconnection. User can set the dialing mode from the gateway to the PSTN as TONE or PULSE. The user can set the PAUSE prior to the dialing of GSM to PSTN. Programming is done via analogue telephone set to TONE (DTMF) All set parameters will be saved once the handset is returned to its place. Modifying the unit's parameters is possible only with a password which can also be changed. User can upgrade the programming of the unit by connecting a PC to the DATA port. A table of authorized numbers for the Call-Back and Call-Through can be updated via SMS messages. Call Through Call Through with List Connection between the cellular phone and the gateway can allow for a dial tone of the PBX/PSTN if the cellular number has been included in the table of authorization. Call Through without a List Connection between the cellular phone and the gateway can allow for a dial tone of the PBX/PSTN without the need to have the cellular number included in the authorization table. Call Back Connection between the cellular phone and the gateway can allow the gateway to identify the number as an authorized number and it then sends a busy signal to the cellular caller. The call is then disconnected and the gateway immediately returns a call to the cellular caller and provides the caller with a dial tone. If the cellular number is not authorized then the call will be redirected to the PSTN or local line. It is possible to program the Call Back feature via PSTN or GSM. 4.1. SOFTWARE INSTALLATION 1) Insert the Winner Router 4.9 Installation CD into to CD drive of the PC. 2) In Windows Explorer, navigate to the installation CD drive. Follow-Me One Number Router User Manual www.eurotech-communication.com 10 3) Double click on Software. The Installation Window will open. to install the Winner 4.9 PC Management 4) Click Next. 5) The Choose Destination Location window will open. 6) Click Next. 7) The Ready to Install the Program window will open. Follow-Me One Number Router User Manual www.eurotech-communication.com 11 8) Click install. The software installs itself. Wait until a completion message will appear. 4.2. PROGRAMMING WITH THE PC SOFTWARE 4.2.1. CONNECTING After installing the PC software, launch it and define the type of connection between the PC and the Router as described below. 1) Launch the software by pressing on your PC desktop, or by pressing: Start > Programs > Eurotech-Communication > Winner Router v4.9 build14. The software window will open. Follow-Me One Number Router User Manual www.eurotech-communication.com 12 2) Connect the com port cable from the router to the PC Com port. 3) Press in the toolbar. The Select Connection window will open. 4) Select the Com Port to which the Router is connected to, the connection frequency should be 115200, the Connection mode should be via Com port and the default Password is 0000. 5) Press OK to connect. 6) At the bottom of the window you will see the connection status. If connected you see the status connected and the led image will be green. Follow-Me One Number Router User Manual www.eurotech-communication.com 13 7) Version is the firmware version of the router. 8) At the box near it select the skin of the software (the look of the windows). 9) The Restart Gateway button will restart the program in the router. 10) The Refresh button will read again the data from the router. 11) In the About button you will see the software version and how to contact us. 12) After a change in the settings push the Save Data button in that window. 4.2.2. THE FXO PORT CONFIGURATION 1) Press to configure the FXO port. 2) Select in the Access Mode box how to route the incoming calls from the FXO. Directly to FXS: All the calls will be routed to the FXS. Directly to GSM: All the calls will be routed to the GSM. Follow Me: All the calls will ring the FXS the Number of Rings before Follow Me then route to the GSM Follow Me Number. In the Directly to GSM Mode: Test the Number for "Access to GSM": If enabled, when a call comes from the FXO and receive a GSM dial tone, the router will check the dialed number if it is on the Numbers List and authorized to call the GSM (has 1 in the GSM column). Follow-Me One Number Router User Manual www.eurotech-communication.com 14 The dialed number could be between the Minimum Digits and the Maximum Digits. If a number is below the Minimum Digits the router will wait the Waiting Timer before returning normal operation. Select GSM Network via Prefixes: If enable the calls will be routed according to the Prefixes Table. 3) Select the Dialing Mode to be Pulse Dialing or Tone Dialing. 4) Select the Dial Pause between the last digit dialed and sending the number. 5) Enter the Country Code and the National Direct Dialing code, when you want the router to automatically replace the Country Code with the National Direct Dialing, in calls from the GSM to the FXO. Enter the Pause after NDD timer, between the NDD and the number. 6) Select in the Condense of Busy Tone the ON time of your Landline network busy tone signal. 7) Select in the Condense of Reorder Tone the ON time of your landline network reorder tone signal. 8) Enter in the Number Unobtainable Tone the time of constant tone the router will see as busy tone only when needed. 9) The CID Type shows you the CID format the router recognizes (not changeable at this version). 4.2.3. THE FXS PORT CONFIGURATION 1) Press to configure the FXS port. 2) Select enable in the Unlisted GSM Number to readdress the incoming GSM calls, which are not on the list, to the FXS port. If disabled the calls will be rejected. 3) Select enable in the CID Generation to FXS for the router to send the caller number to the FXS port. 4) Select in the CID Generation to Type the format of the CID in which the number will be sent. Follow-Me One Number Router User Manual www.eurotech-communication.com 15 5) Enter in the Dial Pause the time in units of 0.1 seconds between the last digit dialed and sending the number. 6) Select in the Reverse Polarity Type the way the router will do the Answer Supervision at the end of the call. The options are : Disable – No answer supervision. Battery Reverse – Reversing the power of the line in the time of the call. Double Reverse – Reversing the power of the line again at the end of the call. Break Line – No power in the line at the end of the call. 7) Select in the Answer Supervision Timer the time to do the Double Reverse and Break Line in 0.1 seconds units. 8) Select in the Ring Signal the timing of the ring pulses to the FXS or customize your own. 4.2.4. THE GSM PORT CONFIGURATION 1) Press to configure the GSM connection setting. 2) Select in the Access Mode box how to route the incoming calls from the GSM. Directly to FXS: All the calls will be routed to the FXS. Directly to FXO: All the calls will be routed to the FXO. Enter the desired PSTN number when you hear the PSTN dial tone. Select Enable in Repeating "Access Mode" box. At the end of PSTN call dial # to get a new PSTN dial tone. Enter in the Auto Dialing to FXO the PSTN number to dial automatically (16 digits). Follow-Me One Number Router User Manual www.eurotech-communication.com 16 GSM Callback: If the GSM number is granted access to callback in the list, the router will disconnect the call and call the number from SIM1 and will give him PSTN dial tone. Select in the Callback via GSM/FXO from where the router will call you back the GSM or the PSTN. When a callback is from the PSTN it will go to the FXS. GSM Conference: If the GSM number is granted access to conference in the list, the router will disconnect the call and call the number from SIM1 and will give him a GSM dial tone. 3) Select in the Access via Number List, if the access to the FXO and FXS will be automatically or by the accesses in the list. 4) Select Enable in the Private Incoming call to enable access for private calls (with no caller ID) to the FXS (when the access is by the List). 5) Select Enable in the 'Ringback' Tone from the GSM Network to hear the voice of the rings to the GSM from the GSM network itself. 6) Select in the Presentation of GSM Number if and when the SIM number will be shown to the recipient of the call: CLIR by Network – The network decide if to show the number. CLIR Disabled – The number will not be shown. CLIR Enabled – The number will always shown. 7) Select in the Microphone Level the gain to the microphone volume (-6db to +6db). 8) Select in the Speaker Level the gain to the speaker volume (-6db to +6db). 9) Enter in the Pin Code for SIM1 and Pin Code for SIM1 the pin codes of the SIMs when Pin Code Request is enabled at the SIMs. 10) Select in Voice Rate Type the codec for incoming and outgoing calls. 11) Select in Frequency Band the frequency the GSM network works with. ⇒ Note: If Voice Rate Type or Frequency Band ware changed you need to restart the router. ⇒ Note: The Network Status shows you the Cell and Network selection setting. This setting can be changed only via the DTMF menu (see Programming with DTMF). 4.2.5. THE PREFIXES TABLE 1) Press to set the SIMs Prefixes. Follow-Me One Number Router User Manual www.eurotech-communication.com 17 2) There are up to 32 prefixes. 3) Enter in the Prefix column the prefix number (7 digits maximum). 4) Enter in the SIM Number column the SIM to call with (1 or 2 when available). 5) When you dial a number in the PBX, the router will check which SIM has the prefix in the table and routes the call through that SIM. If the prefix is not in the list, the call will be routed to the PSTN. 6) The priority is always to the lower number in the prefix table. 7) Push the Save Data button to save the changes. ⇒ Note: The cursor must point to an empty box when you press Save Data. 4.2.6. THE NUMBER LIST 1) Press to set the GSM Numbers List. Follow-Me One Number Router User Manual www.eurotech-communication.com 18 2) There are listings of up to 64 GSM numbers in the list. 3) Enter in the GSM number column the GSM number (16 digits maximum). 4) Enter in the FXO column 1, to allow the calls from that GSM number access to FXO. 5) Enter in the FXS column 1, to allow the calls from that GSM number access to FXS. 6) Enter in the Callback column 1 to allow the calls from that GSM number to be called back by the router. 7) Enter in the Conference column 1 to allow the calls from that GSM number to do a conference call. 8) Enter in the GSM column 1 to allow the calls from the FXO access to that GSM number (test for 'access to GSM' in the FXO setting needs to be enabled). 9) Push the Save Data button to save the changes. ⇒ Note: The cursor must point to an empty box when you press Save Data. 4.2.7. THE CONTROL VIA SMS SETTING 1) Press to set the control via SMS settings. Follow-Me One Number Router User Manual www.eurotech-communication.com 19 2) Select Enable in the Control setup via SMS to allow the control of the router by SMS. 3) Select Enable in the Receiving SMS control from specific number to allow only SMS from the Specific GSM Number to control the router. 4) Select Enable in the Sending Confirmation SMS when you want the router to send back SMS that's confirming the arrival of the control SMS. 5) Select Enable in the Callback via SMS to enable the operation of the callback by SMS command. 6) Select Enable in the Callback Number and FXO via SMS to enable the operation of the direct callback to the FXO number by SMS command. 7) Enter in the Specific GSM Number the GSM number that’s allowed to control the router via SMS if enabled (see clause 3). 8) Enter in the Service GSM Number the service number that's always allowed the control of the router via SMS. 9) See appendix A to see the list of instructions how to control the router via SMS. 4.2.8. THE GATEWAY SETTING 1) Press to set the Gateway settings. Follow-Me One Number Router User Manual www.eurotech-communication.com 20 2) Select Data Mode in the Work Mode Box to enable sending and receiving data from the module. 3) Select in the Dial Tone box the frequency of dial tone. Select in the Level Box the volume level of the dial tone. 4) Select in the Busy Tone box the frequency of busy tone. Select in the Level Box the volume level of the busy tone. 5) Select in the Reorder Tone box the frequency of reorder tone. Select in the Level Box the volume level of the reorder tone. 6) Select in the Ringback Tone box the frequency of ringback tone. Select in the Level Box the volume level of the ringback tone. 7) Select in the Cadence Busy Tone the ON/OFF timing of the busy tone in units of 10ms. 8) Select in the Cadence Reorder Tone the ON/OFF timing of the reorder tone in units of 10ms. 9) Select in the Cadence Ringback Tone the ON/OFF timing of the ringback tone in units of 10ms. 4.3. PROGRAMMING THE UNIT WITH DTMF 4.3.1. GENERAL SETTING PARAMETERS Connecting the unit for programming mode: Connect an analogue phone with dial tone only to the local line port of the unit. Connect power source to the unit. Entering programming mode. Follow-Me One Number Router User Manual www.eurotech-communication.com 21 → Pick up the handset PROCEDURE # 1 2 3 ACTION LCD READ Enter the programming mode Router- v.4.9 –R4 If SIM is in place: GSM --- LINE If no SIM is in place: NOT GSM --- NOT LINE Pick up handset DIAL: LOCAL LINE A dial tone Press # # ENTER PASSWORD Two beeps ENTER PASSWORD 0000 and # INVALID PASSWORD Quiet Busy signal 4 Enter password In case wrong password is inserted 5 press # MENU # 1.0 LOCAL NETWORK Completion of Programming Mode: Return handset to its place SAVING PARAMETERS: ROUTER – V4.9X-R4 GSM – LINE or NOT GSM – NOT LINE 6 HEAR OVER HEADSET 4.3.2. BROWSING BETWEEN MAIN MENUS PROCEDURE # ACTION LCD READ HEAR OVER HANDSET 1A Pick up handset MENU #1.0 LOCAL NETWORK No sound 1B Press # to enter local network MENU #2.0 PREFIX FOR GSM 2 beeping tones 2A Press * for access to GSM NETWORK menu MENU #2.0 GSM NETWORK 2 beeping tones 2B Dial # and enter GSM NETWORK MENU #2.1 ACCESS TO PSTN 2 beeping tones 3A Dial # to enter LANDLINE NETWORK MENU #3.0 LANDLINE NETWORK 2 beeping tones 3B Dial # to enter LANDLINE NETWORK menu MENU #3.1 ACCESS TO GSM 2 beeping tones 4A Dial * for Gateway MENU #4.0 GATEWAY 2 beeping tones Follow-Me One Number Router User Manual www.eurotech-communication.com 22 PROCEDURE # ACTION LCD READ HEAR OVER HANDSET 4B Dial # and enter Gateway menu MENU #4.1, SETTING PASSWORD 2 beeping tones 5A Dial * to access SMS menu MENU #5.0, SMS PARAMETERS 5A Dial # and enter SMS ⇒ Dial * to return to beginning of menu 4.4. Control by list by over SMS LIST OF MENUS AND THEIR FUNCTIONS To browse between menus, press * To enter into a menu, press # To browse in a particular menu, press * To enter into a function in a menu, press # To exit menu press Short Flash 4.4.1. FUNCTIONS Menu #1.0 1.1 1.2 1.3 1.4 Prefix for GSM Dial Pause Generation CLI Reverse Polarity Menu #2.0 2.1 2.2 2.3 2.4 2.5 2.6 2.7 2.8 2.9 LANDLINE network FXO Access Mode Follow Me Dialing Mode PSTN/Ext.L Tones Menu #4.0 4.1 4.2 4.3 4.4 4.5 GSM network Unlisted Call GSM Access Mode Repeat Call Call Back Access Via list GSM number list Ring Back Tone CLIR Net/Cell Select Menu #3.0 3.1 3.2 3.3 3.4 Local network Gateway Gain Control Voice Rate GSM Band Setting Password Setting Pin Code Follow-Me One Number Router User Manual www.eurotech-communication.com 23 4.6 4.7 4.8 Updating Module ID (MID) Work Mode Menu #5.0 5.1 5.2 Control Follow-Me Call Back by SMS SMS Control Changing private password/PSW 4.4.2. MENU SYNOPSIS MENU # FUNCTION 1.1 Prefix for GSM prefix configuration per SIM 1.2 Dial Pause Delay in Dialing Operation until the actual dialing occurs LCD READ ACTION #XX for SIM: Y Prefix: ZZZ XX: Number of record Y: Number of SIM ZZZ: Prefix To select XX: For Browsing Down: digits 1or 2 or 3 For Browsing Up: digits 7 or 8 or 9 Updating record: press * Updating Y (number of SIM): SIM 1 = 1 SIM2 = 2 SAVE = # Erase = 3456789* Updating ZZZ (prefixes): Enter digits from 0-9 to set the desired prefix Erase = * Save = # Dial Pause in X seconds X is greater than or equal to 0.5 seconds and smaller than or equal to 5 seconds. Update the value of X to 0.5 seconds via * 0-9 digits; increase the value of X in leaps of 0.5 seconds save Via # Follow-Me One Number Router User Manual www.eurotech-communication.com 24 MENU # 1.3 FUNCTION Caller ID Enables sending CALLER ID to local landline phone LCD READ Generation: X CLI: Y ACTION X = off or on Defines possibility of option or not Y= BELLCORE or BT_ON_HOOK Defines completion time of CLI. To browse between X options: press *. To save press : # To browse between Y options: press *. To save press: # 1.4 Reverse Polarity For monitoring disconnection Reveres polarity Type X ENTER PASSWORD and **** X = Disable/Battery reverse/DBL. REV.POL./ Break Line To browse between the options for X = Press * To select the options: Flash 2.1 Unlisted Call Incoming call which is not listed in the Access List (Menu 2.5) Unlisted Call Accept: Enable / Disable Unlisted call Disable and Menu 2.5 Enable: →unlisted calls are denied access to PSTN. Unlisted call Enable and Menu 2.5 Enable →unlisted calls are directed to local phone. GSM Access Mode: X X = Access Mode. Directly to FXS, Directly to FXO, Call Back or Conference. To select desired option = press * To save press #. AUTODIAL (numbers 0-9) When X= Directly FXO User can enter number of subscriber and the incoming GSM →Number will be redirected to that number. If AUTODIAL will not be set then incoming GSM call will receive a dial tone of the outgoing PSTN line from the gateway When X= Directly to FXS Incoming calls to gateway's GSM will be redirected to the local landline. 2.2 GSM Access Mode Determines what to do with GSM incoming calls. Follow-Me One Number Router User Manual www.eurotech-communication.com 25 MENU # FUNCTION LCD READ ACTION 2.3 Repeat Call to PSTN from GSM Enables disconnection of ongoing PSTN call while accessing a Dial tone for an additional call. Repeat Call to PSTN from GSM: X X = Enable (ON)/Disable(OFF) * = Select option # = Save Continued on next page 2.4 Call Back Call the unit Via GSM or PSTN and the unit calls back providing dial tone. Call-Back will be via: X Edit Call-Back via SMS: X X= GSM or PSTN * = browse through options of X # = Save and move to next screen. X= Enable/Disable * = browse through options of X # = Save 2.5 Access Via List Authorization List Allowing Access to dial tone for Call Through or Call Back options Access via list Via list: X GSM number list: Key: * - Add Key: # - Edit X= Enable/Disable * = browse through options of X # = Save * = To add a number and criterion (PBX or PSTN) # = Proceed to menu # 2.6 Follow-Me One Number Router User Manual www.eurotech-communication.com 26 MENU # FUNCTION LCD READ ACTION 2.6 Browsing the current list and viewing records = # Editing the records in the table is as follow X #Y/FXO – O FXS – S Call-Back – Cb Conference – Cn GSM - G X = the number of the subscriber needing authorization Y = the number of the record in the table Z = Enable/disable PSTN R= Enable/disable Call Back Browsing the authorized records: Upwards: 7 or 8 or 9 Downwards: 1 or 2 or 3 * = updating the displayed record X = 0-9. Refers to the subscriber's number requiring authorization. * = Erase the X value. # = Save the X and proceed to O. * = YES/NO to enable O # = Save O and Proceed to S. * = YES / NO to S # = Save S and Proceed to Cb. Continued on next page * = YES / NO to Cb # = Save Cb and Proceed to Cn. * = YES / NO to Cn # = Save Cn and Proceed to G. * = YES / NO to G. # = Save G and proceed to next record in the table. Flash = Exit to main menu. 2.7 Ring Back Tone Ring back tone from GSM: X X = Enable/Disable ring back tone from the GSM network. Follow-Me One Number Router User Manual www.eurotech-communication.com 27 MENU # 2.8 2.9 FUNCTION CLIR and Private Sets whether the outgoing call that the unit is making to the GSM will be identified NET/CELL SELECT. Allows you to select specific cell or network LCD READ ACTION My number: X Private call to local line: X X = set by Network /Enable number / Disable Number If * = Set by Network: the identification will be set by the provider alone in line with the provider's parameters if * = Enable Number: The call will be identified only if the provider configured the SIM as identifiable If * = Disable Number: The gateway's number is not identifiable although the provider has configured the SIM as so # = Save selection and return to main menu. X = ENABLE / DISABLE: unidentifiable call to receive a dial tone when the authorization table is in DISABLE mode Network select: X Manual select: Y #C Network: A Period/Sec: B Cell select from network: Z Cell select: R X=Mode of selection. Press * to Change from : Auto select, Periodic Select, or Manual Select. Continued on next page Next: Press #. Y = the network code. #C = number of period (1 to 4). A = the network code. B = number of seconds for this period. Next: Press #. Z = the cell code. R=Mode of selection. Press * to Change from: Auto select, Periodic Select, or Manual Select. If R = Manual: press * to browse from the cells. If R = Periodic: Prd = seconds for period. Rx = only cells with level above Rx will be selected. Press # to save. Follow-Me One Number Router User Manual www.eurotech-communication.com 28 MENU # 3.1 3.2 FUNCTION FXO Access Mode. Determines what to do with PSTN incoming calls. Follow Me Redirecting incoming PSTN local call to GSM LCD READ ACTION FXO access mode: X GSM selection by prefixes: Y To test number list: Z X = Access Mode: Directly to FXS, Directly to GSM, or Follow Me. * = to select, # = to save. Y=YES/No. Either the GSM calls are routed by prefixes or all go by SIM #1. Z=YES/No. If Z=YES, if the GSM number is with the Minimum number of digits or maximum number of digits and in the list with GSM =Y, then he will make the call. Ring number: Y “Follow me number”: Z Y = 0-9 ( SELECTING NUMBER OF RINGS) # = Save number of rings and proceed to "Follow Me" Number Z = The number that will be designated as Follow Me. * = Resetting the above number. # = Save and proceed to main menu. Continued on next page NOTE: If Z is not designated and we are in Follow me mode, an incoming PSTN call will receive a dial tone for a GSM call. Follow-Me One Number Router User Manual www.eurotech-communication.com 29 MENU # LCD READ ACTION 3.3 Dialing Mode Set the dialing parameters to enable correct Dialing Min. dialing digits: Mn Max. dialing digits: Mx Dialing pause: Dp Time waiting of dialing: T PSTN/Ext line dialing: X Country code: Y Mn = In test mode minimum Number of digits to be dialed. Mx =In test mode maximum Number of digits to be dialed. Dp = The length of time between the end of DTMF dialing and the sending of it. T = Enter waiting time when less then minimum digits. X = Tone / Pulse * = Select appropriate X # = Save and proceed to selection of country code. * = Reset Y # = Save and proceed to NDD. NDD( National Direct Dialing) = T T= prefix for the region * = Reset T # = Save and move to PAUSE. Pause After Dialing: NDD (1 sec * ): z Z = Delay time between 0 and 9 after completion of NDD dial * = reset Z # = Save and proceed to main menu. 3.4 PSTN/Ext.L Tones The tone cadences setting. Busy tone ON/OFF: X Reorder tone ON/OFF = Y X=the cadence time in milliseconds that the router will recognized as busy. Y=the cadence time in milliseconds that the router will recognized as reorder tone. 4.1 Gain Control Determines the strength level of Speaker and Microphone Speaker -6/+6 Microphone -6/+6 Browse No. Down = press Numbers 1,2,3 Continued on next page Browse No. UP = press Numbers 7,8,9 Save by #. 4.2 Voice Rate Type Out coding: X In coding: Y X=The outgoing voice coding type. Y=The incoming voice coding type. Frequency Band: X X=The frequency that the router will work in. * = to select: from: 850; 900; 1800; 1900; Dual:850/1900; Dual:900/1800; Dual: 900/1900. # = to save. 4.3 FUNCTION GSM Band Follow-Me One Number Router User Manual www.eurotech-communication.com 30 MENU # FUNCTION LCD READ ACTION Enter new password: X X= Password to enter programming mode Default password is: 0000 Setting new password: After entering menu 4.2, user must key the old password (0000 is initially set) and then #. The LCR will read "Enter New Password" and user will then enter the new password with 4 digits and then key #. Setting PIN SIM: X PIN SIM: Y X = 1 = SIM 1 - SIM 2 =2 Y= SIM PIN CODE: 0-9 * =Erase Pin Code # = Select appropriate X and save. Flash = Exit to main menu. 4.4 Setting password 4.5 Setting PIN Code Setting PIN CODE of the SIM inside the unit. 4.6 Updating Updating - Restricted to Eurotech. No access to client. 4.7 Module ID Module ID (MID) # = Restricted to Eurotech. * = Restricted to Eurotech. Flash = Back to main menu 4.8 Router Work Mode Work mode: X X= Voice mode/Data mode. * = to select # to save Follow-Me One Number Router User Manual www.eurotech-communication.com 31 MENU # 5.1 5.2 FUNCTION Setting for SMS Determining the parameters to allow control of authorization list of Call-Back and Call-Through Changing Private Password /PSW Modifying access code for setting parameters to configuration of SMS. LCD READ ACTION Setting for SMS Confirm: X Control by list via SMS: Y Confirm action via SMS: Z Private number from SMS: R Private number: T Control digit: W Service setting: Q Code for entry to modification of configuration for SMS X = 12345678 (DEFAULT) Continued on next page Y = Enable / Disable * = Select Y # = Save and Proceed to "Confirm Action" option. Allows FEEDBACK option via SMS to the cellular phone confirming modification Z = Enable / Disable * = Selecting options or Z # = Save and proceed to "Private Number " option Unique Subscriber number from which modifications in SMS can be completed. R = Disable / Enable * = Option for selecting R # = Save and proceed to "Private Number " option T = Number from which SMS messages will be sent *= Erase number # = Save the number and proceed to "Control Digit" option W= Code key that will accompany the SMS message. * = Erase # = Save and proceed to service setting Q = service number that can always control via SMS. Confirmation password: Y Enter new code Y = 12345678 (Default) User must enter previous code. X = new 8 digit password for setting new SMS .(See 5.1) # = Save Flash = Exit to menu see 1.5 instructions on how to control the unit Via SMS Follow-Me One Number Router User Manual www.eurotech-communication.com 32 5. CONFIGURING THE ROUTER Ways of connecting the router to the landline and GSM networks, PBX Ways of operating in different configurations Router to PSTN/GSM 5.1. BASIC CONFIGURATION WITHOUT PBX 1) Landline parameter Menu 3.1 - GSM Access Mode → Directly to FXS Menu 3.3 - Tone Mode - Tone/Pulse according to country 2) Local line parameter Menu 1.1 - Setting prefixes → SIM 1, SIM 2 Menu 1.2 - Dial Pause – Default 5 seconds (can be changed) Menu 1.3 - CLI - Enable Menu 1.4 - Reverse Polarity – Disable 3) GSM Parameter Menu 2.2 - PSTN Access Mode → Directly to FXS. 5.2. OPTIONS OF OPERATION Option 1: Outgoing to PSTN: Dial number of PSTN from local line, 5 seconds dial pause Connects to PSTN, enter the number to PSTN Option 2: Dial number GSM Network A or B: 5 sec dial pause - A or B Select SIM 1 or SIM 2 depending on prefix table → GSM network In case of incoming PSTN calls the call will be transferred to the local line. If the CLI is enabled the local phone will display the incoming number. 5.3. READDRESSING INCOMING CALLS FROM PSTN TO GSM Incoming call to the local line from PSTN: Dial # XXXX (readdressed number) → Pause Dial. The call will be sent to the GSM network where subscriber A or B will answer. Incoming call to the local line from PSTN: Dial # XXXX # (readdressed number). The call will be sent to the GSM network where subscriber A or B will answer In case of a Follow-Me number, enter ## and the call will be sent from PSTN to GSM If Follow-Me mode is ON and the number of rings to local line is set between 1 and 9, the unit will generate the number of rings in the local line which will be forwarded automatically to the GSM network If the number of rings is set to "0" it will forward the call to the GSM network without any rings in the local line Follow-Me One Number Router User Manual www.eurotech-communication.com 33 5.4. CONFIGURATION WITHOUT PBX Landline Parameter: Follow-Me – OFF GSM Access Mode – Directly to FXO GSM Parameter: FXO Access Mode – Directly to GSM Local Line: Same parameters as in configuration 3.1. Outgoing calls from local line to PSTN work the same way as in configuration 3.1. 5.4.1. INCOMING PSTN CALLS Unit will work as a router All calls from PSTN will be diverted to GSM network A or B Incoming calls from PSTN: Unit will answer → subscriber will hear a dial tone → subscriber will dial GSM number → Dial Pause → outgoing call goes to GSM network A or B. ⇒ If the subscriber dials the wrong number he can correct this only if done before the end of the dial pause. Subscriber must press key # and enter the new number. 5.4.2. INCOMING CALLS FROM GSM All calls will be diverted from GSM to PSTN. The GSM subscriber dials to the unit → unit answers → subscriber receives dial tone → subscriber dials a PSTN number→ Dial Pause → outgoing call to PSTN activated. Option 1: When session to PSTN from GSM is ended the GSM subscriber will still be connected to the unit. He can press * # and will receive again a dial tone allowing him to make another outgoing call to PSTN. ⇒ The gap between * and # mustn’t be longer than 5 seconds Option 2: Access to PSTN from GSM via list of subscriber numbers → menu 2.5: ENABLE → when the incoming GSM call is listed, the unit will divert it to PSTN 5.5. CALL-BACK TO INCOMING CALLS FROM GSM Menu 2.1: Disable Menu 2.2: GSM Access Mode – Call Back Menu 2.4: Call Back → call-back option is PSTN or GSM Call-Back will work only with a list of authorized numbers If the callback is via the GSM incoming calls, the incoming calls will be disconnected. If the unit has connected already cellular A with PSTN and cellular B is calling, the unit will disconnect cellular B and will call back B once A has ended the session. Follow-Me One Number Router User Manual www.eurotech-communication.com 34 5.6. CONFIGURATION WITH PBX 5.6.1. CONFIGURATION Landline Parameter: Menu 3.1: FXO Access Mode: Directly to GSM Menu 3.2: OFF Menu 3.3: Dialing Mode GSM Parameter: GSM Access Mode: Directly to PSTN Menu 2.1: Auto Dial (0-9) Local Line Parameter: Menu 1.1: Prefix 1 – SIM 1, Prefix 2 – SIM 2 Menu 1.2: Dial Pause, greater or equal to 0.5 seconds and less or equal to 5 seconds Menu 1.3: CLI – Enable Menu 1.4: Reverse Polarity – Enable 5.6.2. INCOMING CALLS FROM PBX EXTENSION LINE TO GSM Extension will dial into the Router that is connected to the PBX and will receive a dial tone allowing the dial of a GSM number. 5.6.3. INCOMING CALLS FROM GSM TO THE UNIT Once auto dial number is set, all incoming GSM calls will be diverted to that extension number. ⇒ If auto dial is not set the GSM call will be diverted to a local line. 5.6.4. OUTGOING CALLS FROM LANDLINE See configuration 3.1: PSTN numbers will be diverted to PBX and will out go through PSTN GSM prefixes will be diverted to GSM network Configuration 4.4: PBX is connected to CO (Central Office) Port Follow-Me One Number Router User Manual www.eurotech-communication.com 35 6. APPENDIX A 6.1. CONTROLLING THE ROUTER VIA SMS To send a SMS command you must enable the parameter Control Setup via SMS in the PC software or SMS CONTROL in menu #5.1. 6.1.1. ADDING A NEW CELLULAR NUMBER TO THE LIST Send this SMS to the SIM1 number: 12345678.Add.nnnnnnnnnnnnnnn.P.S.C.N.G. Where: 12345678 = the Control Code. nnnnnnnnnnnnnnn = the GSM Number. P = Yes/No for this number to access the PSTN (in the message appears Y or N). S = Yes/No for this number to access the FXS (in the message appears Y or N). C = Yes/No for this number to do CALLBACK (in the message appears Y or N). P = Yes/No for this number to do CONFERENCE (in the message appears Y or N). G = Yes/No for this number to access the GSM (in the message appears Y or N). 6.1.2. ERASING A CELLULAR NUMBER FROM THE LIST Send this SMS to the SIM1 number: 12345678.Clr.nnnnnnnnnnnnnn. Where: nnnnnnnnnnnnnn = a GSM Number from the list that we want to erase. 6.1.3. CHANGING THE PARAMETERS FOR “FOLLOW-ME” Send this SMS to the SIM1 number: 12345678.Flm.nnnnnnnnnnnnn.F.m. Where: nnnnnnn = number for FOLLOW-ME F = Yes/No, to enable the FOLLOW-ME (in the message appears Y or N). M = the number of rings until auto readdressing. 6.1.4. OPERATING THE CALLBACK VIA SMS 1) Calling the GSM Callback Number via SMS Enable the parameter Callback via SMS in the PC Software or SMS: CALLBACK in menu #2.4. Send this SMS to the SIM1 number: Cbnnnnnnnnnnnnnn Where: nnnnnnnnnnnnnn = the GSM Number to Call-Back (must be enabled for callback in the List). 2) Calling the GSM Call-Back Number and Connecting him to PSTN Number via SMS Follow-Me One Number Router User Manual www.eurotech-communication.com 36 Enable the parameter Callback via SMS in the PC Software or SMS: SENDING CALL of menu #2.4. Send this SMS to the SIM1 number: Scnnnnnnnnnnnnnn.mmmmmmmmmm Where: ⇒ nnnnnnnnnnnnnn = the number to call via the FXO. mmmmmmmmmm = the GSM Number to call back from the list. If 'The GSM Number to Call Back' is not present then the callback will be made to the number which sent this SMS. → In this case 'NDD' and 'Country Code" parameters must be set in menu #3.3. Follow-Me One Number Router User Manual www.eurotech-communication.com 37 7. GENERAL TECHNICAL INFORMATION Electrical Power supply: 12 VDC +/- 5% 1,2A 720 mA average in GSM 900 at Tx power max 2W 920 mA average in GSM/GRPS 900 at Tx power max 2W 100 mA in idle mode Physical Absolute maximum dimension: 165 x 127 x 30mm Weight: 600g Casing: Complete shielding-stainless steel Mounting: 2 screw holes Operating temperature range: -5°C to + 55°C Optimal storage temperature: -35°C to +85°C Analog Telephone/LANDLINE-PBX interface TIP/Ring Voltage: –48V Line current: 25ma Ringing Voltage: 140 Vpp Load 3REN Crest Factor: 1.25 Frequency: 20 Hz Cadency: 2s/4s Answer supervision - reverse polarity DTMF compliancy Dial Tone: 400 Hz Busy Tone: 400 Hz, cadency 500ms/500ms GSM Circuit Data Features Data circuit asynchronous, transparent and nontransparent up to 14,400 b/s Automatic fax group 3 (Class 1 & 2) Alternate speech and fax MNP2, V.42bis 7.1.1. DTMF DIALING Detection level: -25dBm to +3dBm On time: 50msec Off time: 12 characters Ringing Signal Feeding type: Distortion: Balanced signal Less than 5% Follow-Me One Number Router User Manual www.eurotech-communication.com 38 Ring drive capability 3 type A Minimum ring Voltage: 40 Vrms – crest factor 1.2 Frequency: (20 Hz ) 7.1.2. NORMAL DIALING TONE Frequency: 400Hz Level: 2dB Cadence: continuous 7.1.3. CONGESTION / BUSY TONE Frequency: 400Hz Level: 2dB Cadence: 500ms 20% signal 500ms 20% pause 7.2. ENVIROMENTAL CHARACTERISTICS The WINNER complies to the following requirements: Temperature - we claim -5° to 70° (Israeli Standard Institute Approval is in process). Humidity - 5% to 95% Safety - Israeli Standard Institute Approval Transportation - Transport conditions are according to EuroTech Standards. Storage Condition - Storage conditions are according to class 1.1, ETS 300 019 –1-1 (-20°C +80°C), 25°C to +65°C 7.3. LABELS The label contains this information: Line 1: The Module Type and the Antenna Type Line 2: The Router Type Line 3: The Bootloader Program Line 4: The Serial Number Line 5: The Firmware Program Follow-Me One Number Router User Manual www.eurotech-communication.com 39