1
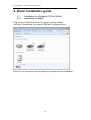
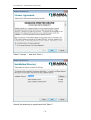
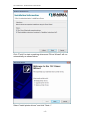
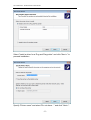
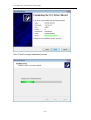
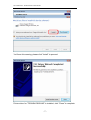
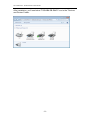
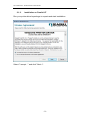
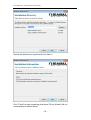
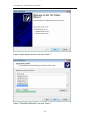
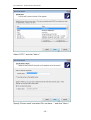
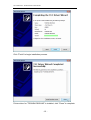
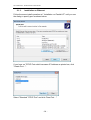
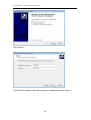
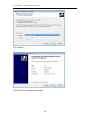
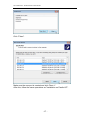
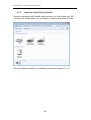
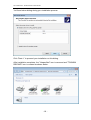
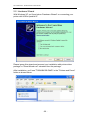
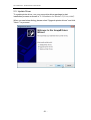
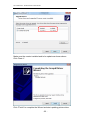
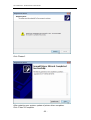
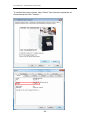
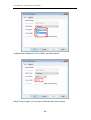
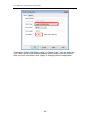
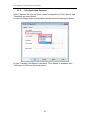
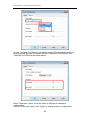
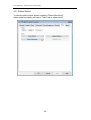
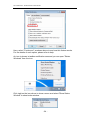
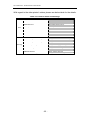
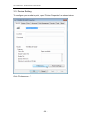
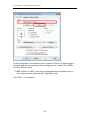
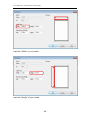
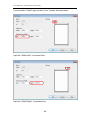
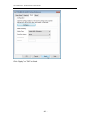
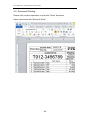
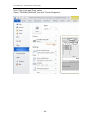
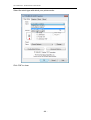
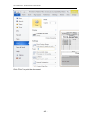
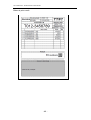
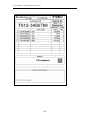
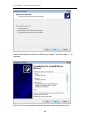
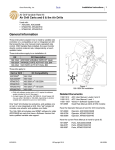
TOSHIBA 2ST Label Printer
DB-EA4D
Printer Driver Manual
First Edition:
April 27, 2012
This document describes the precautions for using the 2ST Label Printer Windows Printer
Driver.
This document assumes that the reader is familiar with the following:
General characteristics of Windows and Windows printer driver
General characteristics of 2ST Label Printer
Notes:
All rights reserved. It is prohibited to use or duplicate a part or whole of this document
without the permission of TOSHIBA TEC SINGAPORE PTE LTD.
This document is subject to change without prior notice.
Microsoft, Windows, Windows NT, Windows 2000, Windows XP and Windows 7 are
registered trademarks of Microsoft Corporation in the United States and/or other
countries.
The official name of Windows is the “Microsoft Windows Operating System”.
*
Table of Content
1. System Requirement .................................................................. 1
2. Driver Installation guide ............................................................ 2
2.1.
2.2.
2.3.
Installation for Windows 7(32-bit, 64-bit).......................................................... 2
Hardware Wizard .............................................................................................. 20
Update Driver.................................................................................................... 21
3. Printer Properties and Settings ................................................ 25
3.1.
3.2.
3.3.
3.4.
Printer Configuration ........................................................................................ 25
Printer Status..................................................................................................... 33
Device Setting................................................................................................... 36
Document Printing ............................................................................................ 42
4. Un-installation of Printer Driver.............................................. 48
2ST Label Printer - Windows Driver User’s Manual
1. System Requirement
OS:
Language:
Printer I/F:
Windows XP Professional (English) / 7(32bit, 64bit)(English)
English
USB (Printer Class)
LAN (TCP/IP)
Parallel (Option)
-1-
2ST Label Printer - Windows Driver User’s Manual
2. Driver Installation guide
2.1.
Installation for Windows 7(32-bit, 64-bit)
2.1.1.
Installation on USB I/F
Plug printer on USB I/F and turn it on, before running installer.
You'll see "Unspecified" icon named "DB-EA4D" as shown below.
After this, run your printer driver's package to unpack and start installation.
-2-
2ST Label Printer - Windows Driver User’s Manual
Select "I accept…" and click "Next >".
Specify the directory to unpack and click "Next >".
-3-
2ST Label Printer - Windows Driver User’s Manual
Click "Finish" to start unpacking drivers and "Driver Wizard" will run
automatically as shown below.
Select "Install printer drivers" and click "Next >".
-4-
2ST Label Printer - Windows Driver User’s Manual
Select "Install a driver for a Plug and Play printer” and click "Next >" to
proceed installation.
Specify "Printer name" and select "Do not share…" and click "Next >".
-5-
2ST Label Printer - Windows Driver User’s Manual
Click "Finish" to begin installation process.
-6-
2ST Label Printer - Windows Driver User’s Manual
You'll see this warning, please click "Install" to proceed.
Printer driver for "TOSHIBA DB-EA4D" is installed, click "Close" to complete.
-7-
2ST Label Printer - Windows Driver User’s Manual
After installation, you'll see below "TOSHIBA DB-EA4D" icon in the "Devices
and Printers" folder.
-8-
2ST Label Printer - Windows Driver User’s Manual
2.1.2.
Installation on Parallel I/F
Run your printer driver's package to unpack and start installation.
Select "I accept…" and click "Next >".
-9-
2ST Label Printer - Windows Driver User’s Manual
Specify the directory to unpack and click "Next >".
Click "Finish" to start unpacking drivers and "Driver Wizard" will run
automatically as shown below.
- 10 -
2ST Label Printer - Windows Driver User’s Manual
Select "Install printer drivers" and click "Next >".
Select "TOSHIBA DB-EA4D" and click "Next >".
- 11 -
2ST Label Printer - Windows Driver User’s Manual
Select "LPT1:" and click "Next >".
Specify "Printer name" and select "Do not share…" and click "Next >".
- 12 -
2ST Label Printer - Windows Driver User’s Manual
Click "Finish" to begin installation process.
Printer driver for "TOSHIBA DB-EA4D" is installed, click "Close" to complete.
- 13 -
2ST Label Printer - Windows Driver User’s Manual
2.1.3.
Installation on Ethernet
Follow the same install operation as " Installation on Parallel I/F" until you see
the dialog to specify port as shown below.
If you have no TCP/IP Port which has same IP Address as printer has, click
"Create Port…".
Select "Standard TCP/IP Port" and click "New Port…".
- 14 -
2ST Label Printer - Windows Driver User’s Manual
Click "Next >".
Specify the IP address with which printer is configured and click "Next >".
- 15 -
2ST Label Printer - Windows Driver User’s Manual
Click "Next >".
Click "Finish" to complete the wizard.
- 16 -
2ST Label Printer - Windows Driver User’s Manual
Click "Close".
Make sure the new port is created and click "Next >".
After this, follow the same operations as "Installation on Parallel I/F".
- 17 -
2ST Label Printer - Windows Driver User’s Manual
2.1.4.
Install by Plug-N-Play by Parallel
Connect your printer with Parallel cable and turn it on, then restart your PC.
You'll see the "Unspecified" icon is created in "Devices and Printers" folder.
After this, please proceed your installation process as shown in "2.1.2".
- 18 -
2ST Label Printer - Windows Driver User’s Manual
You'll see below dialog during your installation process.
Click "Next >" to proceed your installation on this dialog.
After installation completes, the "Unspecified" icon is removed and "TOSHIBA
DB-EA4D" icon is created as shown below.
- 19 -
2ST Label Printer - Windows Driver User’s Manual
2.2. Hardware Wizard
With Windows XP, you'll see below "Hardware Wizard" on connecting your
printer with USB or parallel I/F.
Please ignore this wizard and proceed your installation with printer driver
package or "DriverWizard.exe" extracted from the package.
After installation, you'll see "TOSHIBA DB-EA4D" in the "Printers and Faxes"
folder as shown below.
- 20 -
2ST Label Printer - Windows Driver User’s Manual
2.3. Update Driver
To update printer driver, run your new printer driver package to start
installation process as shown in "2.1 Installation for Windows 7(32-bit, 64-bit)".
When you see below dialog, please select "Upgrade printer drivers" and click
"Next >" to proceed.
- 21 -
2ST Label Printer - Windows Driver User’s Manual
Make sure the version installed and to be update as shown above.
Click "Next >".
Click "Finish" to complete the Wizard and start updating printer driver.
- 22 -
2ST Label Printer - Windows Driver User’s Manual
Click "Restart".
After restarting your system, update of printer driver completes.
Click "Close" to complete.
- 23 -
2ST Label Printer - Windows Driver User’s Manual
To confirm the printer version, open "About" tab of printer's properties as
shown below and click "Version…”
- 24 -
2ST Label Printer - Windows Driver User’s Manual
3. Printer Properties and Settings
3.1. Printer Configuration
Below table shows the printer configurations available from "Printer
Properties".
Table 3-1 Available Printer Configuration
Category
Configuration
Media Type
Sub Item
-
Media
Form Width
Form Length
Cut Offset*1
Use
variable print speed
Print Speed
Max Print Speed*2
Options
Print Speed
Front Head
Darkness
Back Head
*1 Available only if "Labels With Black Marks" is selected.
*2 Available only if "variable print speed" is enabled.
Available options or range
Continuous /
Labels With Gaps /
Labels With Black Marks /
Labels With Perforation /
Cut Sheet
58mm / 80mm / 4in / 5.1in
2.76in - 21.84in
-0.25in - 2.9in
Enable / Disable
3.00 in/sec / 4.00 in/sec / 5.00 in/sec / 6.00 in/sec
3.00 in/sec / 4.00 in/sec / 5.00 in/sec / 6.00 in/sec
0 - 15
0 - 15
In order to configure printer's option, click right button and select "Printer
properties" on the "TOSHIBA DB-EA4D" icon to open printer's properties.
- 25 -
2ST Label Printer - Windows Driver User’s Manual
"Printer Properties" will open as shown below.
Click "Preferences…".
- 26 -
2ST Label Printer - Windows Driver User’s Manual
"Printing Preferences" will open as shown below.
Click "Configure…"
Below window will be shown during communicating with printer.
- 27 -
2ST Label Printer - Windows Driver User’s Manual
3.1.1.
Media Settings
"Printer Configuration" will open and you'll see current "Media Settings" as
shown below.
In order to change its configurations, please follow the operations below.
5 options are available for "Media Type" as shown above.
- 28 -
2ST Label Printer - Windows Driver User’s Manual
4 options are available for "Form Width" as shown above.
About "Form Length", you can input in the text box shown above.
- 29 -
2ST Label Printer - Windows Driver User’s Manual
If you select "Labels With Black marks" for "Media Type", you can define the
"Cut Offset" which is the distance between black mark and the cut position.
After you finish your setup, click "Apply" to change printer's configuration.
- 30 -
2ST Label Printer - Windows Driver User’s Manual
3.1.2.
Print Speed and Darkness
Select "Options" tab and you'll see current configuration of "Print Speed" and
"Darkness" as shown below.
In order to change those configurations, please follow the operations below.
In case "Variable Print Speed" is disabled, "Print Speed" is available from
3.00in/sec to 6.00in/sec as shown above.
- 31 -
2ST Label Printer - Windows Driver User’s Manual
In case "Variable Print Speed" is enabled, printer will automatically adjust its
printing speed. But you can specify printer's "Maximum Print Speed" from
3.00in/sec to 6.00in/sec as shown above.
About "Darkness" option, move the slider to left/right to change its
configuration.
After you finish your setup, click "Apply" to change printer's configuration.
- 32 -
2ST Label Printer - Windows Driver User’s Manual
3.2. Printer Status
To check printer's status, please configure "Status Monitoring".
Open printer's property and select "Tools" tab as show below.
- 33 -
2ST Label Printer - Windows Driver User’s Manual
Here, select "Continuous" as shown above to see how this feature works.
For the details of each option, please refer to help.
An icon is shown in taskbar notification area and you can open "Status
Windows" from the icon.
Click right on the icon above to show a menu and select "Show Status
Window" to show below window.
- 34 -
2ST Label Printer - Windows Driver User’s Manual
With regard to the other printer's status, please see below table for the details.
Table 3-2 Printer's status and message
Error
Warning
Printer's Status
Paper Jam Error
Cutter Jam Error
Head Temperature Error
Black Mark Error
Paper Empty
Cover open
Unable To Load Paper Error
CAM Motor Jam Error
Label Error
Perforation Error
EEPROM Error
Thermal Head Error
Label Page Over Warning
Perforation Page Over Warning
Cut Sheet Page Over Warning
Black Mark Page Over Warning
Document Length Page Over Warning
24V Anomaly Warning
Head Temperature High Warning
Non CG Warning
Sensor Adjustment Fail Warning
EEPROM Warning
Thermal Head Warning
- 35 -
Message shown on Windows
Paper Jam
Cutter Error
Head Temperature High
Black Mark Detection Error
Out of paper
Cover Open
Out of paper, Paper Load Error
CAM Motor Jam Error
Gap Detection Error
Perforation Detection Error
Memory Read/Write Error
Head Error
Ready, Data Exceeds Label Length
Ready, Data Exceeds Perforation Gap
Ready, Data Exceeds Cut Sheet Length
Ready, Data Exceeds Black Mark
Ready, Data Exceeds Document Length
Ready, Power Supply Warning
Ready, Print Head Overheated Warning
Ready, Non CG Warning.
Ready, Sensor Adjustment Warning
Ready, Memory Warning
Ready, Print Head Warning
2ST Label Printer - Windows Driver User’s Manual
3.3. Device Setting
To configure your media to print, open "Printer Properties" as shown below.
Click "Preferences…".
- 36 -
2ST Label Printer - Windows Driver User’s Manual
In this configuration, the media to print is called as "Stock" as shown above,
and we'll give you the example how to configure your "media" with "USER
(4.00in x 4.00in)" stock.
* "USER (4.00in x 4.00in)" is the only configurable stock by default but you
can create any new stock on this "Page Setup" tab.
Click "Edit…" to configure.
- 37 -
2ST Label Printer - Windows Driver User’s Manual
Input the "Width" of your media.
Input the "Height" of your media.
- 38 -
2ST Label Printer - Windows Driver User’s Manual
If your media is "Label" type and has "Liner", please set below sizes.
Input the "Width(Left)" of exposed liner.
Input the "Width(Right)" of exposed liner.
- 39 -
2ST Label Printer - Windows Driver User’s Manual
Note) If your printer works with perforation paper (with hole), please see
below how to configure.
Switch to "Stock" tab on "Printing Preferences".
Select "Labels With Perforation".
- 40 -
2ST Label Printer - Windows Driver User’s Manual
Click "Apply" or "OK" to finish.
- 41 -
2ST Label Printer - Windows Driver User’s Manual
3.4. Document Printing
Please refer to below operations to print with "Word" document.
Open a document with "Microsoft Word".
- 42 -
2ST Label Printer - Windows Driver User’s Manual
Point "File" menu and "Print" option.
Select "TOSHIBA DB-EA4D" and click "Printer Properties".
- 43 -
2ST Label Printer - Windows Driver User’s Manual
Select the stock type with which your printer works.
Click "OK" to close.
- 44 -
2ST Label Printer - Windows Driver User’s Manual
Click "Print" to print the document.
- 45 -
2ST Label Printer - Windows Driver User’s Manual
Below is print result.
- 46 -
2ST Label Printer - Windows Driver User’s Manual
- 47 -
2ST Label Printer - Windows Driver User’s Manual
4. Un-installation of Printer Driver
To uninstall printer driver, run your new printer driver package to start
installation process as shown in "2.1 Installation for Windows 7(32-bit, 64-bit)".
When you see below dialog, please select "Remove printer drivers" and click
"Next >" to proceed.
- 48 -
2ST Label Printer - Windows Driver User’s Manual
Select "Automatically remove all Drivers by Seagull" and click "Next > " to
proceed.
Click "Finish" to complete the Wizard and start removing printer driver.
- 49 -
2ST Label Printer - Windows Driver User’s Manual
Click "Restart".
After restarting your system, removal of printer driver completes.
Click "Close" to complete.
- 50 -